

Page 1
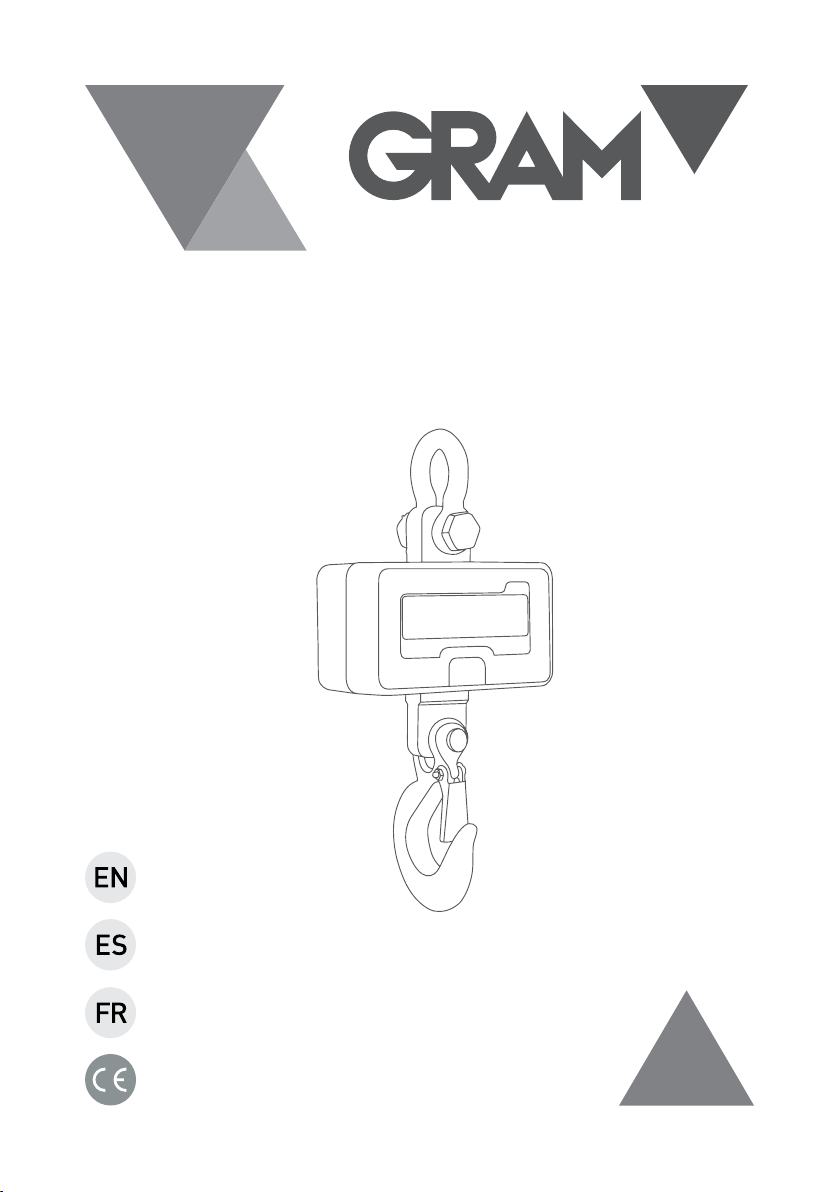
SERIES / SERIE / SÉRIE
C3
300 / 500 / 1T
OPERATION MANUAL
MANUAL DE UTILIZACION
MANUEL D´UTILISATION
Page 2

INDEX English
Safety recommendations 5
Function keys on remote control 6
Use of crane scale 7
Turn ON 7
Turn OFF
Tare / Zero
Display brightness
Hold function
Weighing accumulation function
ON / OFF Save power
Calibration 9
Calibration using the remote controller 9
Calibration using keys of crane scale
Parameters setting 10
Parameters setting using the remote controller 10
Parameters setting using keys of crane scale
Guarantee 12
7
7
7
8
8
8
9
11
2
Page 3

ÍNDICE Español
Requisitos para una óptima instalación 13
Función de las teclas del control remoto 14
Utilización del gancho 15
Encender el gancho 15
Apagar el gancho
Tara y puesta a cero
Brillo del display
Función Hold
Función de acumulación de pesadas
Ahorro de energía
Calibración 17
Calibración utilizando las teclas del mando a distancia 17
Calibración utilizando las teclas del gancho
Configuración de parámetros 18
Configuración de parámetros utilizando las teclas del mando a distancia 18
Configuración de parámetros utilizando las teclas del gancho
Garantía 21
15
15
15
16
16
16
17
19
3
Page 4

SOMMAIRE Français
Conditions requises pour une installation optimale 22
Función de las teclas del control remoto 23
Utilisation du crochet 24
Allumer le crochet 24
Eteindre le crochet peseur
Tare et retour au zéro
Luminosité de l’ecran
Fonction Hold
Fonction d’accumulation de pesées
ON / OFF Save power
25
Etalonnage 26
Calibration avec la commande a distance 26
Calibration avec les touches du crochet
Configuration des parametres 27
Configuration des parametres avec la commande a distance 27
Configuration des parametrs avec les touches du crochet
Garantie 29
24
24
24
25
25
26
28
4
Page 5
ENGLISH
SAFETY RECOMMENDATIONS
Before using the crane scale, please, read this manual carefully and
follow the instructions.
• DON´T overload the crane scale, this could seriously damage the
loadcell (repair not covered by the warranty).
• DON´T leave any weight on the hook for a long time, this reduces the
accuracy of the equipment and shorts the life of the loadcell.
• Before using the scale, check rings, hooks and other parts, cotter pin,
if the screw is loose and deformation loose every 3 months.
• Charge the battery when the display shows the low power indicator.
• DON’T use the crane scale in rain or storms.
• After used, hook should vertical suspended or the loadcell could be
damaged.
• DON´T try to repair the crane scale. Please contact with your
Distributor.
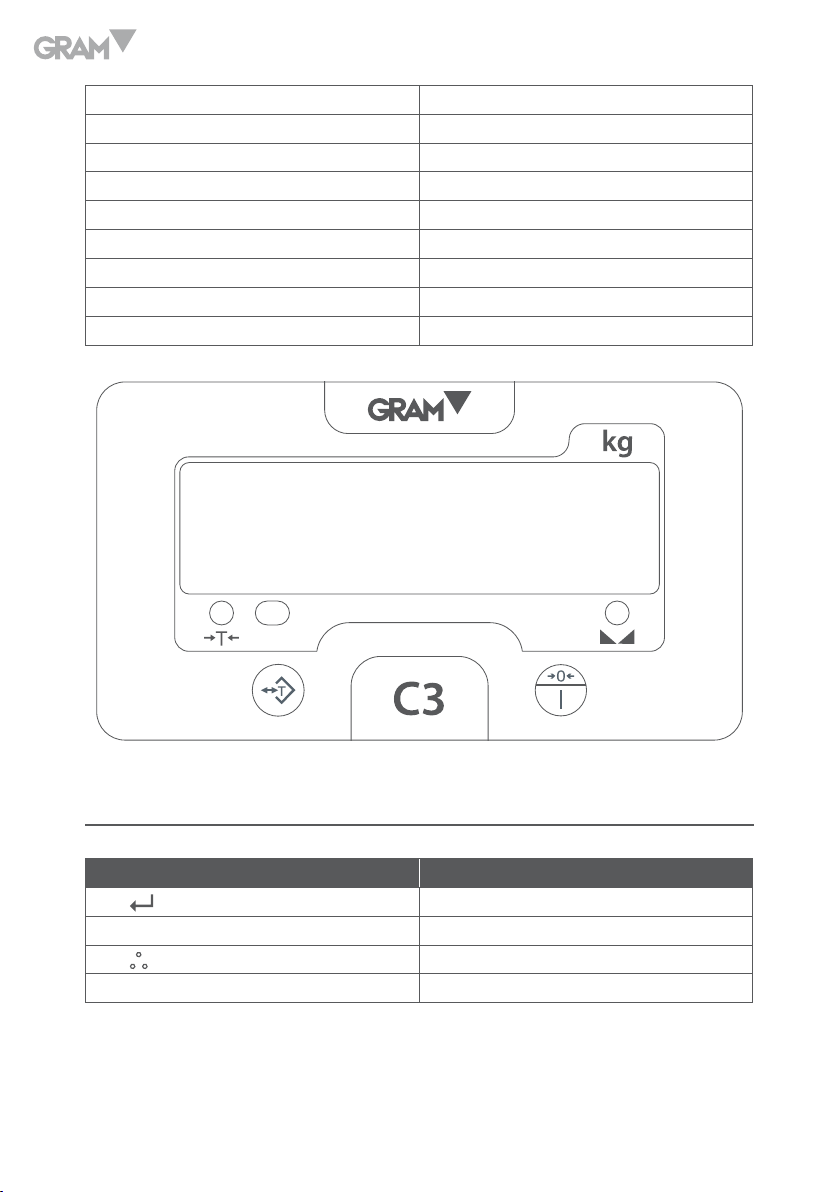
Model Capacity Division (e)
C3-300 300kg 50kg
C3-500 500kg 100g
C3-1T 1.000kg 200g
5
Page 6
Accuracy Class III
Tare range 100% Max. capacity
Time of stability 10´s
Overload alarm Max +9e
Max. overload 125% Max. capacity
Power Fwll seal rechargeable battery 6V/4AH
Display Super light LED
Temperature 0ºC – 40C
Remote control range
≤ 20m
FUNCTION KEYS ON REMOTE CONTROL
Key Function
A – Confirm
B – T/0 Tare / zero
C - Accumulation
D - H Hold
6
Page 7
USE OF CRANE SCALE
Turn ON
Press the key on the crane, the scale begin the self test, at the same
time, auto-zero initialization, then the display will show power status “Pbt85”
(85% power) and finally the crane scale enters to weighing mode.
Turn OFF
Press the
display will show “PA80” (80% power), 1.5 seconds later, the display will
show “off” and scale power off.
key for 3 seconds or D and B together on remote control, the
Tare / Zero
To obtain the net weight of a product. Place a container and press the
key or B on remote control, the display shows zero value, put the product into
the container, the display will show the net weight of the product.
Display brightness
1. With the crane scale disconnected, press the key
press also the key .
2. The display will show: “Dsp X”.
3. Available options:
X=0 Low brightness.
X=1 High brightness.
X=2 Automatical brightness (when weight changes, the high
the same time
7
Page 8

brightness is activated, after 20 seconds of stability, the low
brightness is activated).
4. Press
5. Press the
key to select the desired mode.
key to return to normal weighing mode.
Hold function
1. Press the key D on remote control, the display´s reading will remain
locked for 30 seconds.
2. Press again the key D on remote control, the Hold function will be turn
off, the balance will return to normal weighing mode.
Weighing accumulation function
When the weight is stable, press the C key on the remote control to accumulate
the display values and view the accumulation times “n32”, 2 seconds later,
back to normal weighing mode.
To cancel accumulation function, press the B key on remote control and
returns to normal weighing mode.
ON / OFF Save power
Press the A key on remote control for 2 seconds, the display will power off,
only shows “-“ to save power.
Press the A key on remote control for 2 seconds, back to normal weighing
mode.
8
Page 9

CALIBRATION
Calibration using the remote controller
1. Power on the crane scale and keep pressed the D key until display shows
“CAL SP”.
2. The display will show “CAL 00”, press A key once to display “CAL00”.
3. Do not hang on the hook any goods at this time.
4. Display will show “LOAD”, press the A key until view “-------“ and then
later on display “LOAD”.
5. Press the D key to input the calibration weight value (long press D key to
increase the number of digit, click to the left shift).
6. Lifting weights, until steady 4 to 5 seconds.
7. Press the A key to show “--------“, 2 seconds after the display of the
hanging weight values, calibration is finished, put weight down, turn it off.
Calibration using keys of crane scale
1. When power on and self detecting, keep pressed
shows “CAL SP”.
2. Press the
3. Do not hang on the hook any goods at this moment.
4. Press the
the display will read “LOAD”.
key once the display shows “CAL00”.
key once the display shows “--------“, after few seconds,
key until display
9
Page 10

5. Press the
(keeping pressed the
key to input the weighing value of the calibration weight
key means adding number, single clicking
means left shift).
6. Hang the calibration weight and wait for 4 – 5 seconds until the stable
sign light on.
7. Press the
key once the display shows “-----------“, few seconds
after, the display will show the weight calibration value. Calibration is
over by now. Put down the weights and power off the scale.
PARAMETERS SETTING
Parameters setting using the remote controller
1. Post holding down the D key and so display “CAL SP”.
2. Press the D key to display “SET”.
3. Press the A key on remote control to display “dx” (division parameter).
4. Use the D key to change the division value.
5. When finished, press the A key to view the capacity of the crane scale.
6. Press the D key to change the capacity value.
7. Press the A key to show “FLT 00” (filter parameter 0 – 4).
8. Press the D key to change the filter value.
9. Press the A key to show “rng 1” (zero tracking parameter).
10. Press the D key to change the zero tracking value.
10
Page 11

11. Press the A key to show “AUPF0” (time of auto-off).
12. Press the D key to change the time of auto-off (parameter 0=never off).
13. Press the A key to back to normal weighing mode.
Parameters setting using keys of crane scale
1. When power on and self detecting, keep pressing
shows “CAL SP”.
2. Press the
3. Press the
the
4. Press the
5. Press the
6. Press the
7. Press the
8. Press the
9. Press the
10. Press the
key once the display shows “SET”.
key once the display shows “d x”, (x means division), press
key to set the value.
key to show the capacity of the crane scale.
key to modify the capacity value.
key to show “FLT 00” (filter parameter 0 – 4).
key to set the filter parameter.
key to show “rng 1” (zero tracking parameter).
key to set the zero tracking value.
key to show “AUPF0” (time of auto-off parameter).
key until display
11. Press the
12. Press the
key to set the auto-off time (0=never off).
key to back to normal weighing mode.
11
Page 12

GUARANTEE
This crane scale is guaranteed for one year from the delivery date. The
guarantee covers any fabrication defect of the material.
During this period, GRAM PRECISION, SL, covers manpower and spare parts
costs necessary for the reparation of the crane scale.
This guarantee does not cover the failures caused by an inappropriate use
or overload.
The guarantee does not cover the freight cost (transport) necessary to
repair the scale.
12
Page 13

ESPAÑOL
REQUISITOS PARA UNA ÓPTIMA INSTALACIÓN
Para obtener el máximo rendimiento y los mejores resultados, recomendamos
utilizar e instalar el gancho de acuerdo con los siguientes requisitos:
• No sobrecargar el gancho pesador, esto podría dañar la célula de carga
y anular la garantía.
• No deje objetos colgados durante mucho tiempo, esto podría disminuir
la precisión del gancho y reducir la duración de la célula de carga.
• Antes de su utilización revisar la cadena y el gancho. Revisar regularmente
los clips, pins y tornillos.
• Revisar con frecuencia la carga de la batería. Cuando el gancho se queda
sin energía, cargar la batería con el alimentador/cargador suministrado.
• No utilizar el gancho pesador en el caso de tormentas ó lluvia.
• No someterlo a atmósferas con gases corrosivos.
• Instalar el gancho en un lugar seco y bien ventilado, no situarlo
directamente sobre el suelo.
• No intentar reparar el gancho, contactar con su proveedor.
Modelo Capacidad División (e)
C3-300 300kg 50kg
C3-500 500kg 100g
C3-1T 1.000kg 200g
13
Page 14

Clase Clase III
Rango de Tara 100% Capacidad maxima
Tiempo de estabilización 10´s
Aviso de sobrecarga Max +9e
Máximo valor de sobrecarga 125% Capacidad maxima
Alimentación Batería recargable 6V/4AH
Display LED
Temperatura 0ºC – 40ºC
Rango del control remoto
≤ 20m
FUNCIÓN DE LAS TECLAS DEL CONTROL REMOTO
Key Function
A – Confirmar
B – T/0 Tara / Cero
C - Acumulación
D - H Función Hold
14
Page 15

UTILIZACIÓN DEL GANCHO
Encender el gancho
Pulsar la tecla , la balanza realizará un auto-chequeo, al mismo tiempo
la inicialización del cero, el display mostrará el voltaje “Pbt85” (85%) y
finalmente el gancho entrará en el modo de pesaje.
Apagar el gancho
Pulsar la tecla
control remoto, el display mostrará “Pbt80” (80% de voltaje), 1,5 segundos
después, el display mostrará “off” y la balanza se apagará.
del gancho durante 1.5 segundo o las teclas D y B del
Tara y puesta a cero
Cuando la lectura del display está estable, pulsar la tecla
o la tecla B del control remoto para poner a cero la lectura del display o
sustraer el peso de un recipiente.
del gancho
Brillo del display
1. Con el gancho apagado, pulsar las teclas
2. El display mostrará: “Dsp X”.
3. Opciones disponibles:
X=0 Brillo bajo.
X=1 Brillo alto.
X=2 Brillo automático (cuando el peso varia, se activa automáticamente
el brillo alto, transcurridos 20 segundos de estabilidad, se activa
y
al mismo tiempo.
15
Page 16

automáticamente el brillo bajo).
4. Pulsar la tecla
5. Pulsar la tecla
para seleccionar el modo deseado.
para volver al modo normal de pesaje.
Función Hold
1. Pulsar la tecla D del control remoto, la lectura del display quedará fijada
durante 30 segundos.
2. Pulsar de nuevo la tecla D del control remoto, la función Hold se desactiva
y entra al modo normal de pesaje.
Función de acumulación de pesadas
Cuando la lectura del display esté estable, pulsar la tecla C del control
remoto para acumular las pesadas efectuadas y visualizar el número de
acumulaciones (“n32” ejemplo) , transcurridos 2 segundos la balanza vuelve
al modo normal de pesaje.
Para cancelar la función de acumulación de pesadas, pulsar la tecla B del
control remoto para volver al modo normal de pesaje.
Ahorro de energía
Pulsar la tecla A del control remoto durante 2 segundos, el display se
apagará y visualizará solo “-“ para economizar energía.
Pulsar la tecla A del control remoto durante 2 segundos para volver al modo
normal de pesaje.
16
Page 17

CALIBRACIÓN
Calibración utilizando las teclas del mando a distancia
1. Conectar el gancho y durante el auto-chequeo pulsar la tecla D hasta
visualizar “CAL SP”.
2. El display mostrará “CAL 00”, pulsar la tecla A para visualizar “CAL00”.
3. No colgar ningún objeto en este momento.
4. El dispay mostrará “LOAD”, pulsar la tecla A hasta visualizar “-------“ y
seguidamente “LOAD”.
5. Pulsar la tecla D para introducer el valor de la pesa de calibración
(mantener pulsada la tecla D para incrementar el valor del dígito y
realizar un solo click en la tecla D para mover el dígito hacia la izquierda).
6. Colgar la pesa de calibración del gancho y esperar de 4 a 5 segundos
para que la lectura se estabilice.
7. Pulsar la tecla A, el display mostrará “--------“, transcurridos 2 segundos
el display mostrará el valor de la pesa de calibración, la calibración ha
finalizado, retirar la pesa de calibración y apagar el gancho.
Calibración utilizando las teclas del gancho
1. Pulsar la tecla
mantener pulsada la tecla
2. Pulsar la tecla
3. No colgar ningún objeto al gancho en este momento.
para encender el gancho, durante el auto-chequeo
hasta visualizar el mensaje “CAL SP”.
hasta visualizar “CAL00”.
17
Page 18

4. Pulsar la tecla
hasta que el display muestre “--------“, transcurridos
unos segundos el display visualizará “LOAD”.
5. Pulsar la tecla
(mantener pulsada la tecla
para introducer el valor de la pesa de calibración
para incrementar el valor del dígito, un
único click para desplazarse a la izquierda).
6. Colgar la pesa de calibración al gancho y esperar durante 4 – 5 segundos
hasta que el indicador de estabilidad de illumine.
7. Pulsar nuevamente la tecla
, el display mostrará “-----------“ y
unos segundos después el valor de la pesa de calibración. La calibración
se ha realizado, retirar la pesa de calibración y apagar el gancho.
CONFIGURACIÓN DE PARÁMETROS
Configuración de parámetros utilizando las teclas del mando a distancia
1. Encender el gancho y mantener pulsada la tecla D hasta visualizar “CAL
SP”.
2. Pulsar la tecla D para visualizar “SET”.
3. Pulsar la tecla A el display mostrará “dx” (parámetro de la división).
4. Utilizar la tecla D para cambiar el valor de la división.
5. Pulsar la tecla A el display mostrará la capacidad del gancho.
6. Pulsar la tecla D para cambiar el valor de la capacidad.
7. Pulsar la tecla A para visualizar “FLT 00” (parámetro del filtro 0 – 4).
8. Pulsar la tecla D para cambiar el nivel del filtro.
18
Page 19

9. Pulsar la tecla A el display mostrará “rng 1” (parámetro del seguimiento
del cero).
10. Pulsar la tecla D para cambiar el valor del seguimiento del cero.
11. Pulsar la tecla A el display mostrará “AUPF0” (tiempo de auto-
desconexión).
12. Pulsar la tecla D para cambiar el tiempo de autodesconexión (parámetro
0=nunca apagado, 1=15 minutos, 2=30minutos).
13. Pulsar la tecla A para volver al modo normal de pesaje.
Configuración de parámetros utilizando las teclas del gancho
1. Encender el gancho y durante el autochequeo, mantener pulsada la
tecla
hasta visualizar el mensaje “CAL SP”.
2. Pulsar la tecla
3. Pulsar la tecla
4. Pulsar la tecla
5. Pulsar la tecla
6. Pulsar la tecla
7. Pulsar la tecla
0 – 4).
8. Pulsar la tecla
9. Pulsar la tecla
seguimiento del cero).
hasta visualizar “SET”.
el display mostrará “d x”, (parámetro de la división).
para modificar el valor de la división.
el display mostrará la capacidad del gancho.
para modificar el valor de la capacidad.
el display visualizará “FLT 00” (Parámetro del filtro
para modificar el nivel del filtro.
el display mostrará “rng 1” (parámetro del
19
Page 20

10. Pulsar la tecla
para modificar el valor del seguimiento de cero.
11. Pulsar la tecla
el display mostrará “AUPF0” (tiempo de auto-
desconexión).
12. Pulsar la tecla
para seleccionar el tiempo de autodesconexión (0=
nunca, 1=15 minutos, 2=30 minutos).
13. Pulsar la tecla
para volver al modo normal de pesaje.
20
Page 21

GARANTÍA
Esta balanza está garantizada contra todo defecto de fabricación y de
material, por un periodo de 1 año a partir de la fecha de entrega.
Durante este periodo, GRAM PRECISION, SL, se hará cargo de la reparación
de la balanza.
Esta garantía no incluye los daños ocasionados por uso indebido o
sobrecargas.
La garantía no cubre los gastos de envío (portes) necesarios para la
reparación de la balanza.
21
Page 22

FRANÇAIS
CONDITIONS REQUISES POUR UNE INSTALLATION OPTIMALE
Pour une utilisation optimale et de meilleurs résultats, nous recommandons
d’utiliser et installer le crochet en suivant les instructions suivantes:
• Ne pas surcharger le crochet peseur, cela pourrait endommager le
capteur de pesée et annuler la garantie.
• Ne pas laisser d’objets pendre pendant une trop longue durée. Cela
pourrait diminuer la précision du crochet peseur et réduire la durée du
capteur de pesée.
• Avant chaque utilisation, il est important de vérifier l’état de la chaine et
du crochet. Vérifier régulièrement les clips, boulons et vis.
• Vérifier fréquemment la batterie. Lorsque le crochet est sans batterie,
recharger la batterie en utilisant le chargeur fourni.
• Ne pas utiliser le crochet peseur en cas d’orage ou de pluie.
• Ne pas exposer le crochet peseur à des atmosphères avec des gaz
corrosifs.
• Installer le crochet dans un endroit sec et bien aéré, ne pas placer
directement sur le sol.
• Ne pas tenter de réparer le crochet, contacter votre fournisseur.
Modèle Capacité Division (e)
C3-300 300kg 50kg
C3-500 500kg 100g
C3-1T 1.000kg 200g
22
Page 23

Classe Classe III
Rang de Tare 100% Capacité maximale
Temps de stabilisation 10´s
Indication de surcharge Max +9e
Valeur Max de surcharge 125% Capacité maximale
Alimentation Batterie rechargeable 6V/4AH
Display LED
Temperature 0ºC – 40ºC
Distance pour contrôle de la commande
≤ 20m
FUNCIÓN DE LAS TECLAS DEL CONTROL REMOTO
Touches Fonction
A – Pour valider / Confirm
B – T/0 Tare / zéro
C - Accumulation
D - H Hold / en cours de traitement
23
Page 24

UTILISATION DU CROCHET
Allumer le crochet
Appuyer sur la touche , la balance réalisera une auto-vérification,
en même temps que l’initialisation du zéro. Ensuite, l’écran affichera le
voltage “Pbt85” (85%) et enfin le crochet peseur entrera dans le mode de
pesage.
Eteindre le crochet peseur
Appuyer sur la touche
de la commande, l’écran affichera “Pbt80” (80% de voltage), 1.5 secondes
après, l’écran affichera “off” et la balance s’éteindra.
pendant 1.5 secondes ou sur les touches D et B
Tare et retour au zéro
Quand la lecture de l’écran est stable, appuyer sur la touche
ou la touche B de la commande pour que la lecture de l’écran retourne à
Zéro ou soustraire le poids d’un récipient.
du crochet
Luminosité de l’ecran
1. Lorsque le crochet peseur est éteint, appuyer en même temps sur les
touches
2. L’écran affichera le message suivant: “Dsp X”.
3. Options disponibles:
X=0 Luminosité faible.
X=1 Luminosité haute.
et .
24
Page 25

X=2 Luminosité automatique (lorsque le poids varie, la luminosité
haute s’activera automatiquement, au-delà de 20 secondes de
stabilité, la luminosité faible s‘activera automatiquement).
4. Appuyer sur la touche
5. Appuyer sur la touche
pour sélectionner le mode souhaité.
pour retourner au mode de pesée normal.
Fonction Hold
1. Appuyer sur la touche D de la commande à distance, la lecture de
l’écran restera fixe pendant 30 secondes.
2. Appuyer à nouveau sur la touche D de la commande à distance, la
fonction Hold de désactivera et permettra l’accès au mode de pesée
normal.
Fonction d’accumulation de pesées
Lorsque la lecture de l’écran est stable, appuyer sur la touche C de la
commande à distance pour accumuler les pesées effectuées et visualiser
le nombre de pesée accumulées, (“n32“ exemple). Au-delà de deux
secondes, la balance retournera au mode de pesée normal.
Pour annuler la fonction d’accumulation de pesées et retourner au mode
normal de pesée, appuyer sur la touche B de la commande à distance.
ON / OFF Save power
Appuyer sur la touche A de la commande à distance pendant 2 secondes,
l’écran s’éteindra et affichera seulement “-“ pour économiser de l’énergie.
25
Page 26

Appuyer sur la touche A de la commande pendant 2 secondes, et vous
reviendrez au mode de pesée normal.
ETALONNAGE
Calibration avec la commande a distance
1. Allumer le crochet peseur et appuyer sur la touche D jusqu’à ce que le
message “CAL SP” apparaisse.
2. Lorsque l’écran affichera “CAL 00”, appuyer sur la touche A.
3. Ne surtout pas accrocher d’objet sur le crochet.
4. Lorsque l’écran affichera “LOAD”, appuyer sur la touche A, l’écran
affichera “-------“ et tout de suite après “LOAD”.
5. Appuyer sur la touche D pour introduire la valeur du poids de (maintenir
la touche D appuyée pour augmenter la valeur du numéro).
6. Placer le poids de la calibration et attendre que la valeur du poids se
stabilise pendant 4 à 5 secondes.
7. Appuyer sur la touche A, l’écran affichera “--------“. Ensuite, au-delà de
2 secondes l’écran affichera la valeur du poids de calibration.
8. Enlever le poids et éteindre la balance.
Calibration avec les touches du crochet
1. Appuyer sur la touché
test, maintenir appuye la touche
SP” apparaisse.
26
pour allumer le crochet, au cours du auto-
jusqu´à ce que le message “CAL
Page 27

2. Appuyer sur la touche
jusqu´à ´écran affiche “CAL00”.
3. Ne surtout pas accrocher d’objet sur le crochet.
4. Appuyer sur la touche
jusqu´à ce que le message “--------“
apparaisse et tout de suite après “ LOAD”.
5. Appuyer sur la touche
calibration (maintenir appuyée la touche
pour introduire la valeur du poids de
pour augmenter la valeur
du numéro).
6. Placer le poids de la calibration et attendre que la valeur du poids se
stabilise pendant 4– 5 secondes.
7. Appuyer sur la touche
, l´écran affichera “-----------“ ensuite, au-
delà de 2 secondes l´écran affichera la valeur du poids e calibration.
8. Enlever le poids et éteindre la balance.
CONFIGURATION DES PARAMETRES
Configuration des parametres avec la commande a distance
1. Maintenir la touche D appuyée jusqu’à ce que le message “CAL SP”
apparaisse.
2. Appuyer sur la touche D jusqu’à ce que le message “SET” apparaisse.
3. Appuyer sur la touche A jusqu’à ce que le message “dx” apparaisse.
4. Utiliser la touche D pour changer la valeur de la division.
5. Appuyer sur la touche A pour confirmer.
27
Page 28

6. Appuyer sur la touche A , l’écran affichera le message “FLT 00”.
7. Appuyer sur la touche A, l’écran affichera le message “rng 1” (1
correspond aux paramètres du suivi du Zéro).
8. Appuyer sur la touche A l’écran affichera le message “AUPF0”.
9. Appuyer sur la touche A pour revenir au mode de pesée normal.
Configuration des parametrs avec les touches du crochet
1. Allumer le crochet en appuyant la touche , au cours du autotest,
maintenir appuyée la touche
apparaisse.
jusqu´à le message “CAL SP”
2. Appuyer sur la touche
3. Appuyer sur la touche
appuyer sur la touche
confirmer avec la touche .
4. Appuyer sur la touche
5. Appuyer sur la touche
6. Appuyer sur la touche
7. Appuyer sur la touche
minutes, 2=30 minutes).
8. Appuyer sur la touche
28
jusqu´à l´écran affiche “SET”.
jusqu´à l´écran affiche “d x”, (x= division),
pour changer la valeur de la division et
, l´écran affichera la capacité du crochet.
l´écran affichera “FLT 00”.
l´écran affichera “rng 1”.
l´écran affichera “AUPF 0” ( 0=jamais, 1=15
pour revenir au mode de pesée normal.
Page 29

GARANTIE
Cette balance est garantie contre tout défaut de fabrication et de matériel
pendant 1 an à partir de la date de livraison.
Pendant cette période, GRAM PRECISION, SL, se chargera de la réparation
de la balance.
Cette garantie n’incluse pas les dommages occasionnés par une utilisation
non appropriée ou par des surcharges.
La garantie ne couvre pas les coûts d’envoi (transport) nécessaires pour la
réparation de la balance.
29
Page 30

001/08072016
Gram Precision S.L.
Travesía Industrial, 11 · 08907 Hospitalet de Llobregat · Barcelona (Spain)
Tel. +34 902 206 000 · +34 93 300 33 32
Fax +34 93 300 66 98
comercial
@gram.es
www.gram.es
 Loading...