

Gram Blast Chillers and Freezers, KPS 20, KPS 40, KPS 60, KPS 90 Operating Instructions Manual
...Page 1

Type
Part No.
S/N
Operating Instructions
GRAM PROCESS · KPS Blast Chillers and FreezersGRAM PROCESS · KPS Blast Chillers and Freezer
s
WHAT YOU NEED TO KNOW ABOUT YOUR NEW GRAM PRODUCT
Page 2

Thank you for choosing a Gram product
This manual is divided into two major sections, a compulsory and a complementary
section.
The compulsory section deals with details that you must know of in order to use
the product. The complementary section gives advice about utilising our many
extended functions. It should be stressed that no cabinet is completely
maintenance-free, however the most typical issues can be prevented with correct
use and maintenance.
Easy to operate, total control
The Gram KPS cabinets are blast chillers and freezers that fulfi ll all HACCP
requirements for a cook-chill kitchen. The entire range of KPS cabinets utilise the
same controller with short cut keys to make it easy to run your desired cycle. You
can also customise your own blast chill or blast freeze programmes to enhance
operational fl exibility.
If you do experience operational diffi culties a diagnostic error code will be shown on
the display. The cause and remedy will be described within this manual.
All KPS cabinets utilise HFC-free insulation.
Support
If you do not fi nd the information you
need in this manual, our service department
is ready to help you. Often issues can be
readily solved over the telephone.
Contact information for the
service department: – see backpage.
Gram products observe the RoHS Directive
1 July 2006 the EU-wide enforcement 2002/95/EF took effect. It concerns the RoHS directive (Restriction
of Hazardous Substances Directive). The RoHS directive took effect on 1 July 2006, and is required to be
enforced and become law in each member state of the EU. This directive restricts the use of six hazardous
materials in the manufacture of various types of electronic and electrical equipment. The law commands
manufacturers that earlier used these substances in their components to fi nd alternatives.
The six banned substances are: lead, mercury, cadmium, hexavalent chromium, poly-brominated biphenyls
(PBB) or polybrominated diphenyl ethers (PBDE). As a proof that Gram Commercial and our subsuppliers
live up to the law our company has a RoHS declaration.
The CE mark
- certifi es that a product has met EU consumer safety, health or environmental requirements.
Attention
Please fi ll Type /
Part No. / S/N (Serial no.)
from the name plate of your
cabinet into the three white
boxes on the frontpage.
See the paragraph “Service” for
information about where the
name plate is placed on
your cabinet.
Page 3

Contents
Compulsory Part
Getting Started
4
Installation and preparation
6
Installation 6
Connecting the cabinet 7
Starting up 8
Language, date and time 8
Pre-cooling 9
Short cut keys 10
Maintenance
11
Cleaning 11
Defrosting water 11
Service 12
Quick Guide
(attachment to cover)
Further Information
Complementary
Working cycles
14
Programming of user’s cycles 14
Settings: Blast chill/freeze cycles,
temperature controlled,
time controlled
14
Memorise user’s programmes 16
IFR cycle 17
Use of recommended programmes 18
Use of own programmes 19
Pre-cooling 19
Storing cycles 20
Error codes
22
Overview 22
Supplementary
24
Sterilisation programme 24
Printing of data 24
Alarms 25
Key lock 26
Service parameters 26
Inputs/Outputs 27
Disposal
28
Page 3
Page 4
Getting started
The following models are comprised
in this manual:
KPS 20, 40, 60, 90, 120 and 180.
The models in this manual are all
termed as “cabinets” although KPS
120 and 180 are rooms that you can
walk into.
Some functions or properties can
deviate from cabinet to cabinet.
Differences will be mentioned.
General use of the cabinet.
The KPS cabinet is not a storage
cabinet. Therefore the cabinet does
not defrost automatically. Use the
appropriate short cut key to run
a defrosting cycle, see paragraph
“Short cut keys” or the Quick Guide.
After end of the blast chill or freezing
cycle the system will automatically
switch to the storage mode (+2°C
at the end of the positive blast chill
phase and -22°C at the end of the
freezing phase). When the cabinet
runs a storage cycle the display
shows “cons”.
To achieve an effective cooling cycle it
is advisable to run a pre-cooling cycle
prior to selecting any blast chill or
freeze cycle.
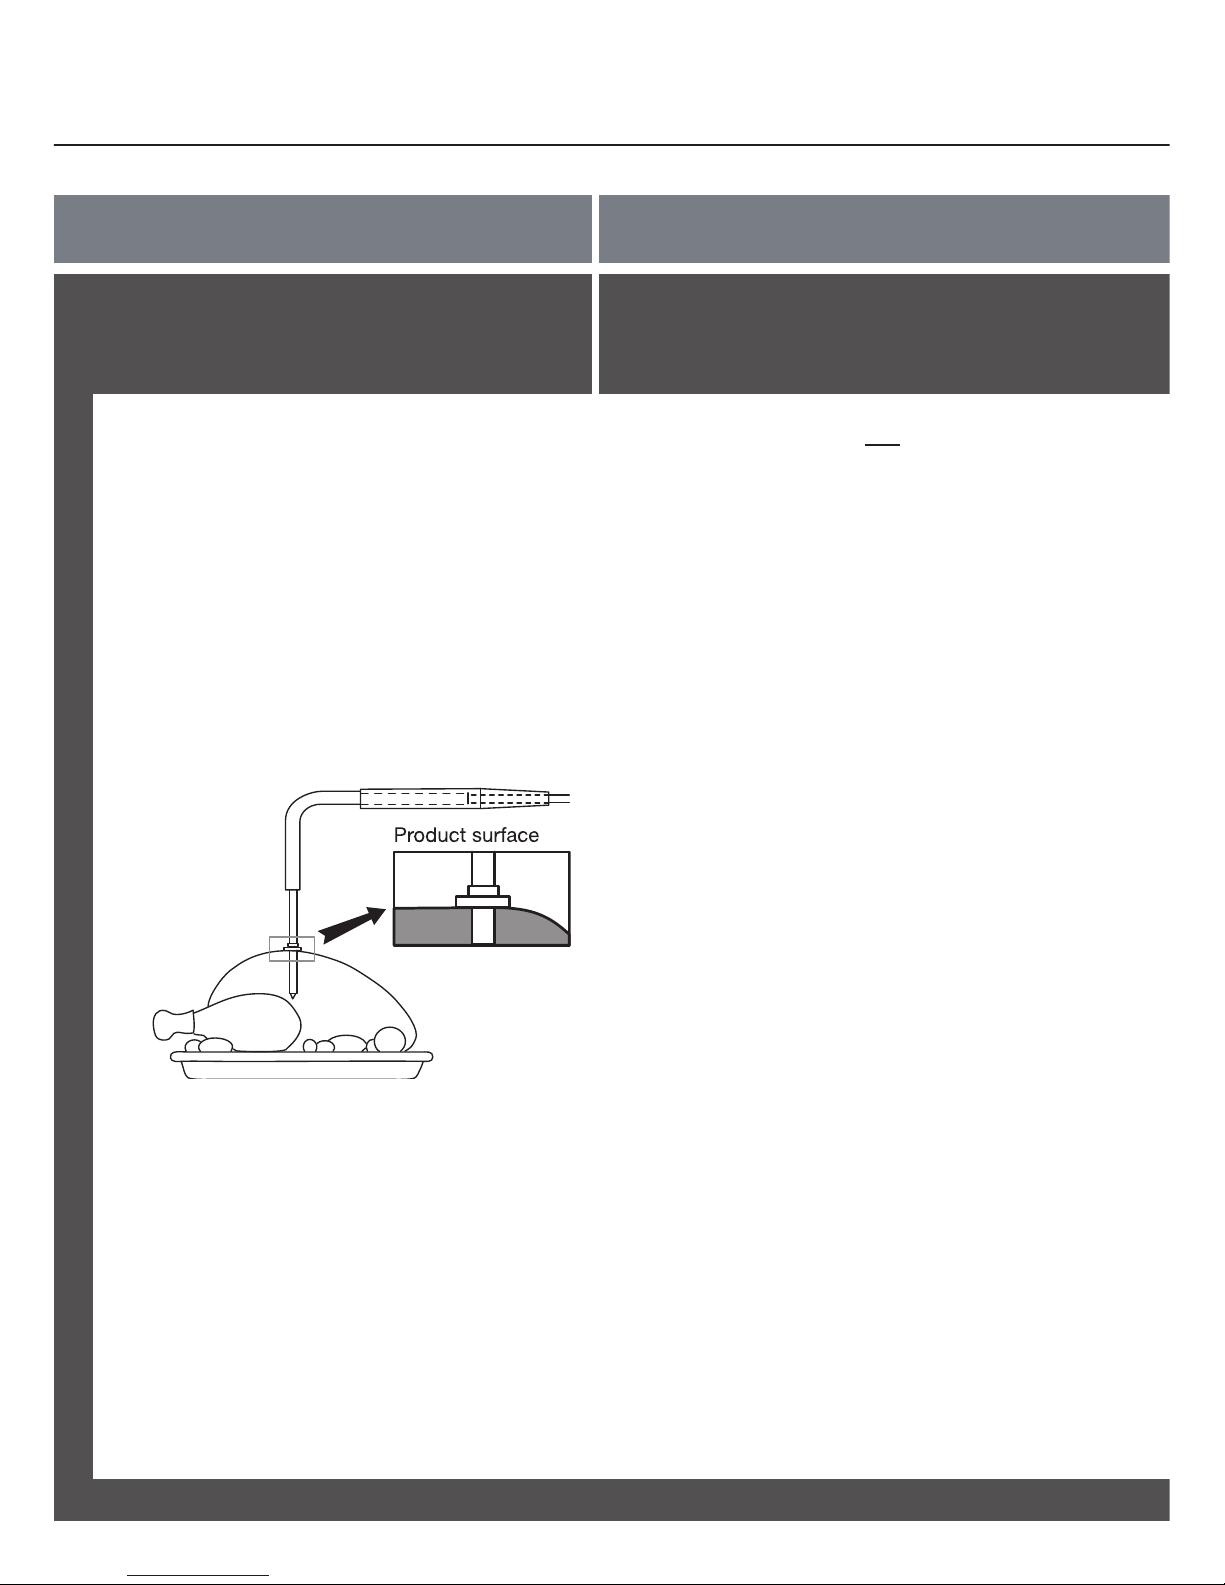
It is important to insert the probe
correctly. When running an IFR cycle
the probe is inserted until the “disc”
of the probe reaches the surface of
the foodstuff. Concerning other cycles
using the probe the needle is inserted
until the point reaches the center of
the foodstuff. See fi gure 1.
>
>
>
>
>
>
>
COMPULSORY PART
Figure 1:
Page 4
Page 5
Composition of this manual.
This manual is divided into the
following two parts:
Compulsory part (page 4 - 13)
Complementary part (page 14 - 27)
The compulsory part deals with
basic functions. Knowledge of these
is required for correct use of the
cabinet.
The complementary part deals
with extra functions, including use
of recommended programmes
and storage and use of user’s
programmes.
In addition the manual has a Quick
Guide which offers an overview of the
most common functions and how to
use them.
Use of display images.
This manual will refer to display text
using images as in the example
below:
Date: ---- 10/02/09
Time: ---- 14:22:46
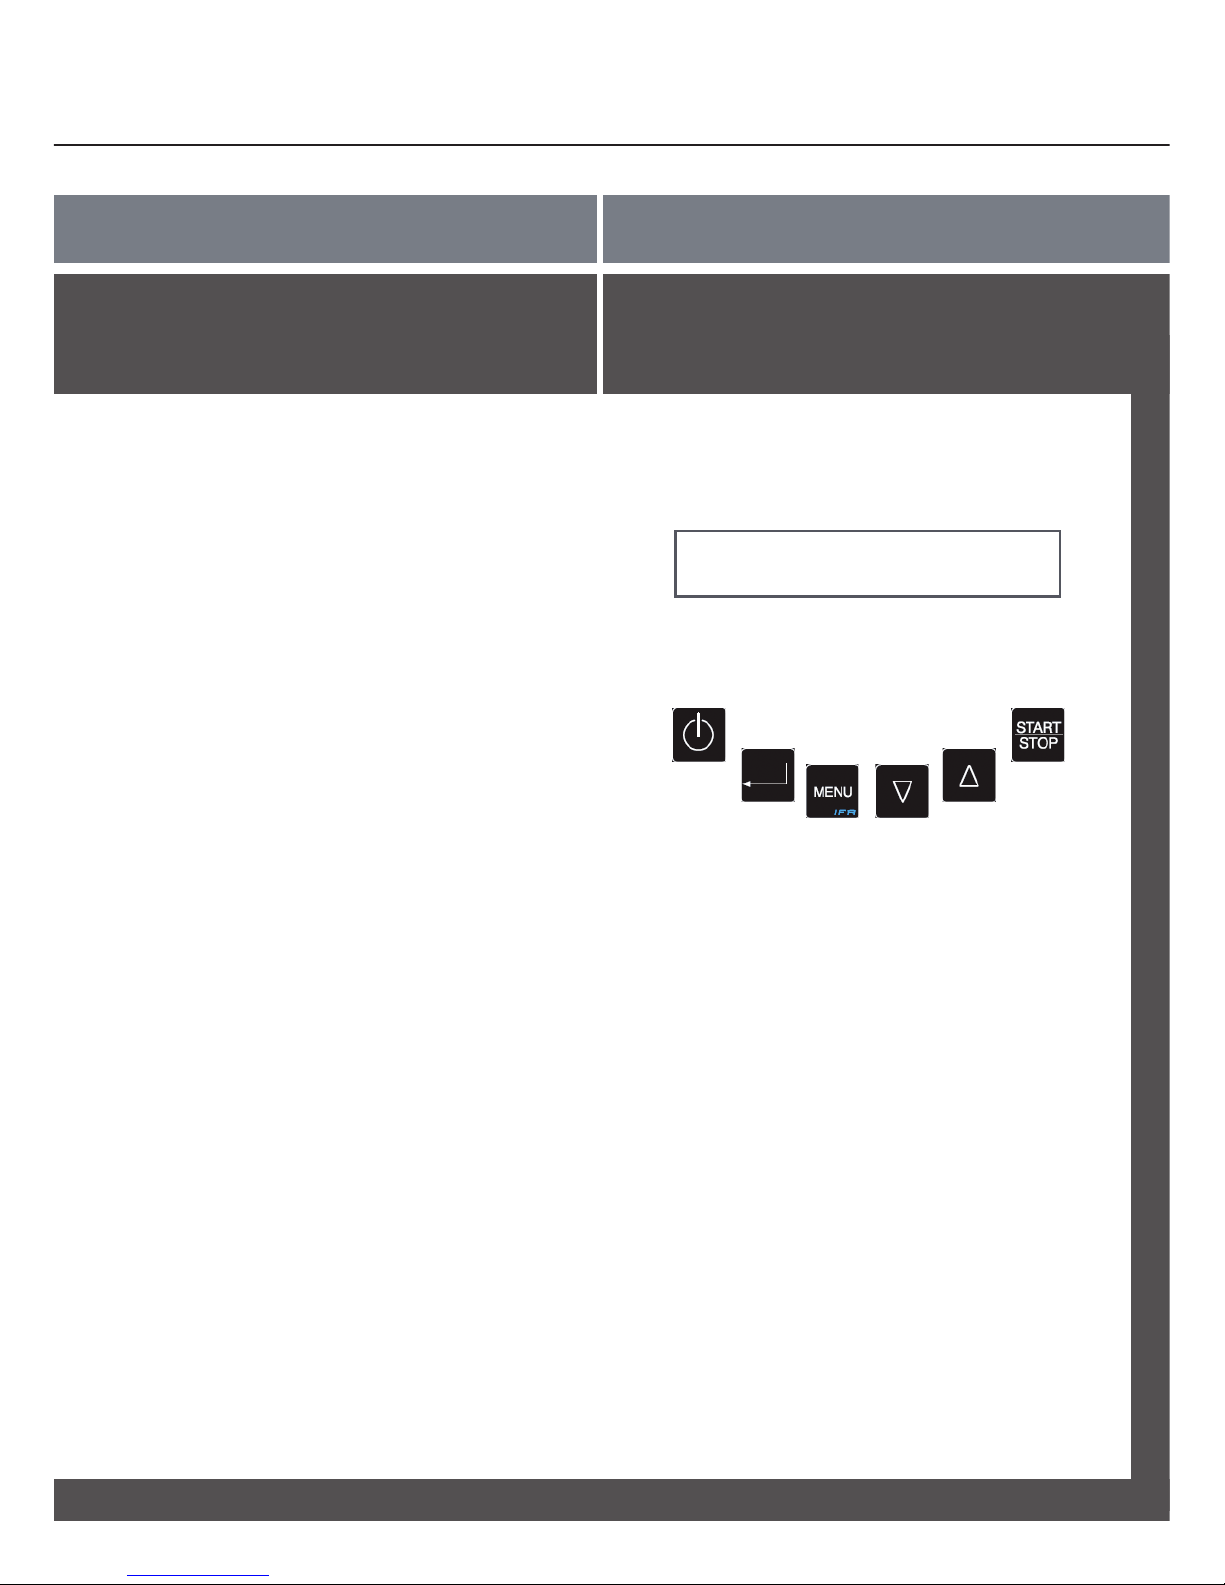
The control panel is equipped with a
display and keys which are positioned
under the display:
Check the Quick Guide for an
explanation of the 5 short cut keys
and for further information regarding
correct use of these keys.
>
>
>
>
>
>
>
COMPULSORY PART
Example
Page 5
Page 6
Correct installation of the cabinet
before usage.
To ensure reliable operation make
sure the following is observed:
The cabinet must be located in a dry
and ventilated room.
The cabinet is designed to operate in
ambient temperatures of up to +30°C.
Avoid location in direct sunlight or
near any heat sources, i.e. an oven.
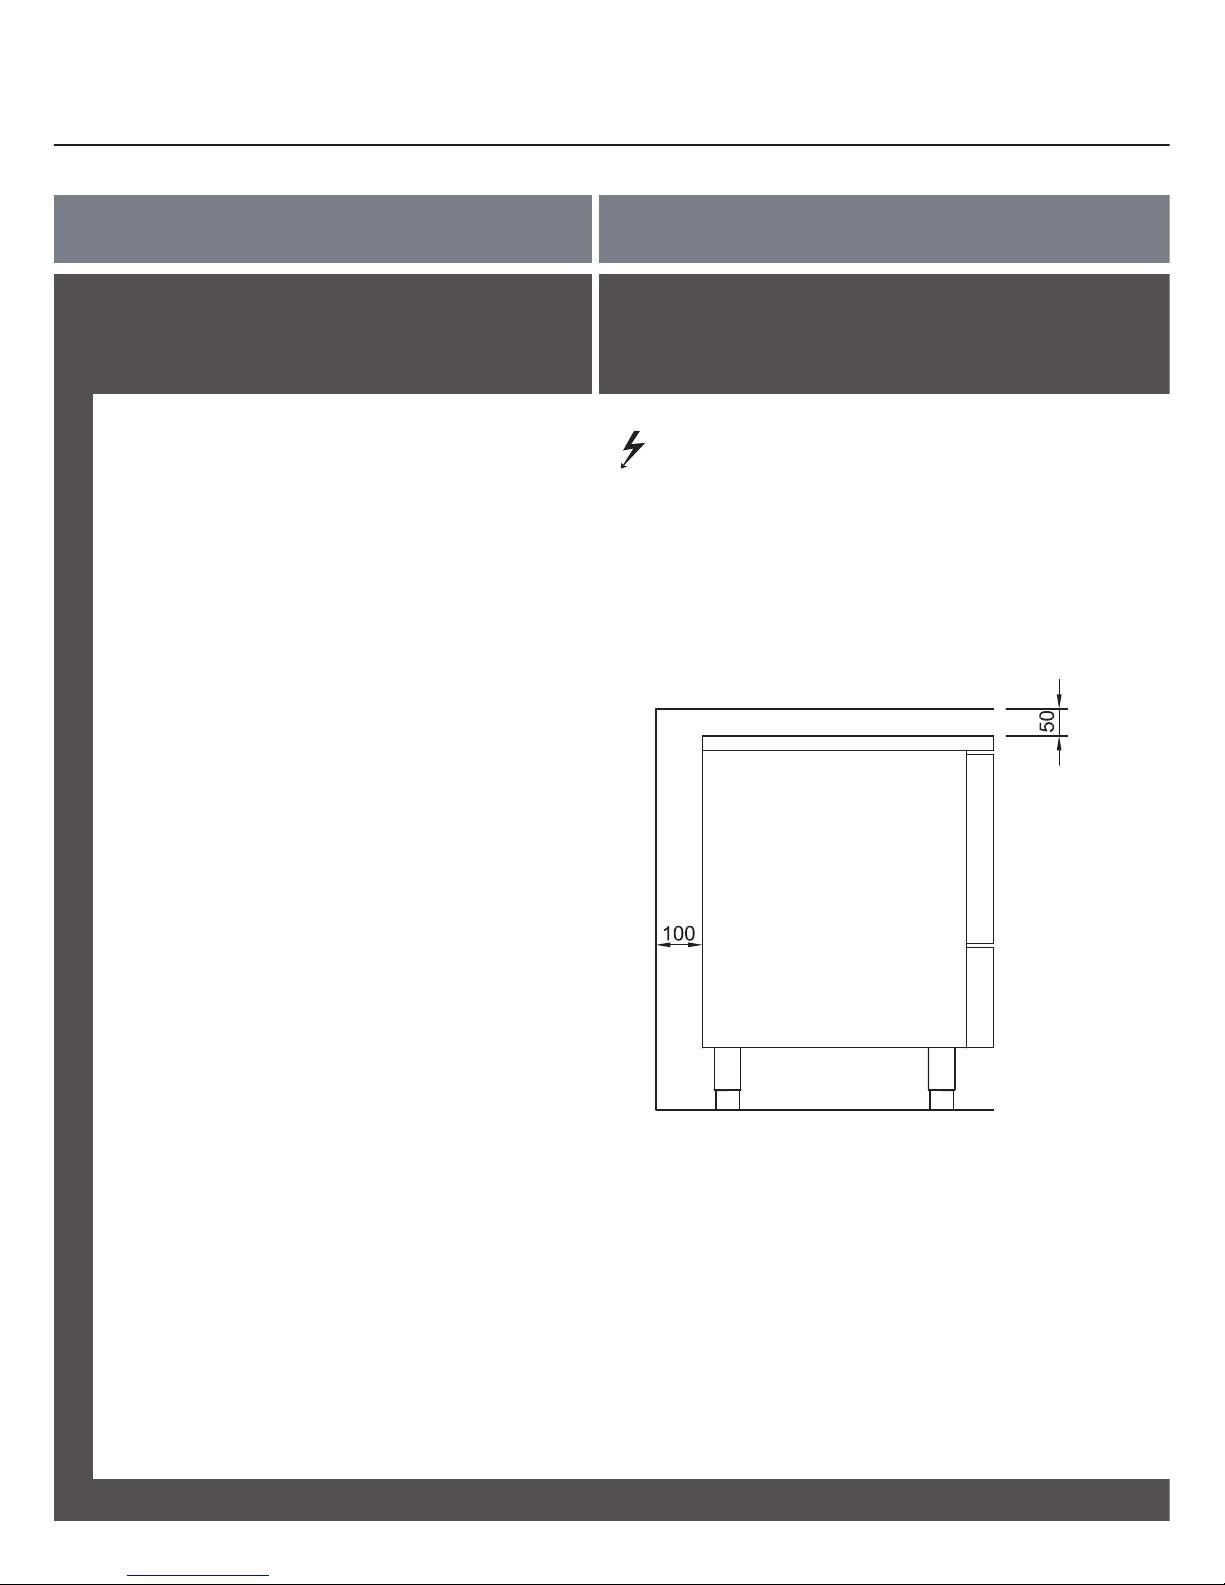
The cabinet can be placed directly
against a wall. However, the KPS
20 and 40 must be located with a
distance of minimum 100 mm to the
wall behind the cabinet and at least
50 mm space above the cabinet is
required.
For versions with legs, use the screws
on the legs to make sure that the
cabinet stands level and upright.
Before usage, clean the cabinet
with a mild soapy solution and dry
thoroughly.
If the cabinet has been transported
in horizontal position it must stand
upright at least 2 hours before it
is started to allow the oil from the
compressor to run back.
This only concerns the KPS 20 and
40 as well as KPS 60 cabinets with
built-in compressors.
Installation and preparation
Installation continued.
The cabinet must not be located in a chloride/
acid-containing environment (swimming-bath
etc.) due to risk of corrosion.
The KPS 20, 40 and 90 are delivered with height
adjustable legs and with doors with removable
sealing strips. The KPS 40 is also delivered with
reversible door.
!
COMPULSORY PART
KPS 20/40
Page 6
Installation
>
>
>
>
>
>
>
Page 7
Read the text below thoroughly before
electrical connection.
The KPS 40, 60, 90, 120 and 180
must be connected by an authorized
electrician.
The KPS 20 can be connected by the
user himself.
When the cabinet has been connected,
press to turn on the cabinet.
If there is a power failure the controller
will remember the settings. When
the power returns the cabinet will
continue in the programme settings
prior to the power failure.
Connecting the cabinet - continued.
Do not use the cabinet before all shieldings
have been mounted to prevent access to live or
rotating machine parts.
Do not use the cabinet, if the wire has been
damaged. In this case the cabinet must be
examined by a service electrician from Gram
Commercial or an authorised refrigeration
company with knowledge of Gram’s products.
The cabinet must not be used outdoor. All
earthing requirements stipulated by the local
electricity authorities must be observed. The
cabinet plug and wall socket should then
give correct earthing. If necessary, contact an
electrician.
!
COMPULSORY PART
As regards the KPS 60, 90, 120 and 180 defrost
water must be led to an external drain.
See page 11.
The KPS 20 and 40 are equipped with a water
tray which at point of delivery is placed inside the
cabinet. The user must place the tray under the
cabinet when the cabinet is installed. The tray
must be emptied when needed. Alternatively,
these cabinets can be connected to an external
drain.
Page 7
Connecting the cabinet
>
>
>
>
Page 8
It is easy to start using the cabinet.
For easy reference the Quick Guide
displays an illustration of the control
panel.
Connect the cabinet to the main power
and if necessary also to a drain.
See the paragraph “Connection”.
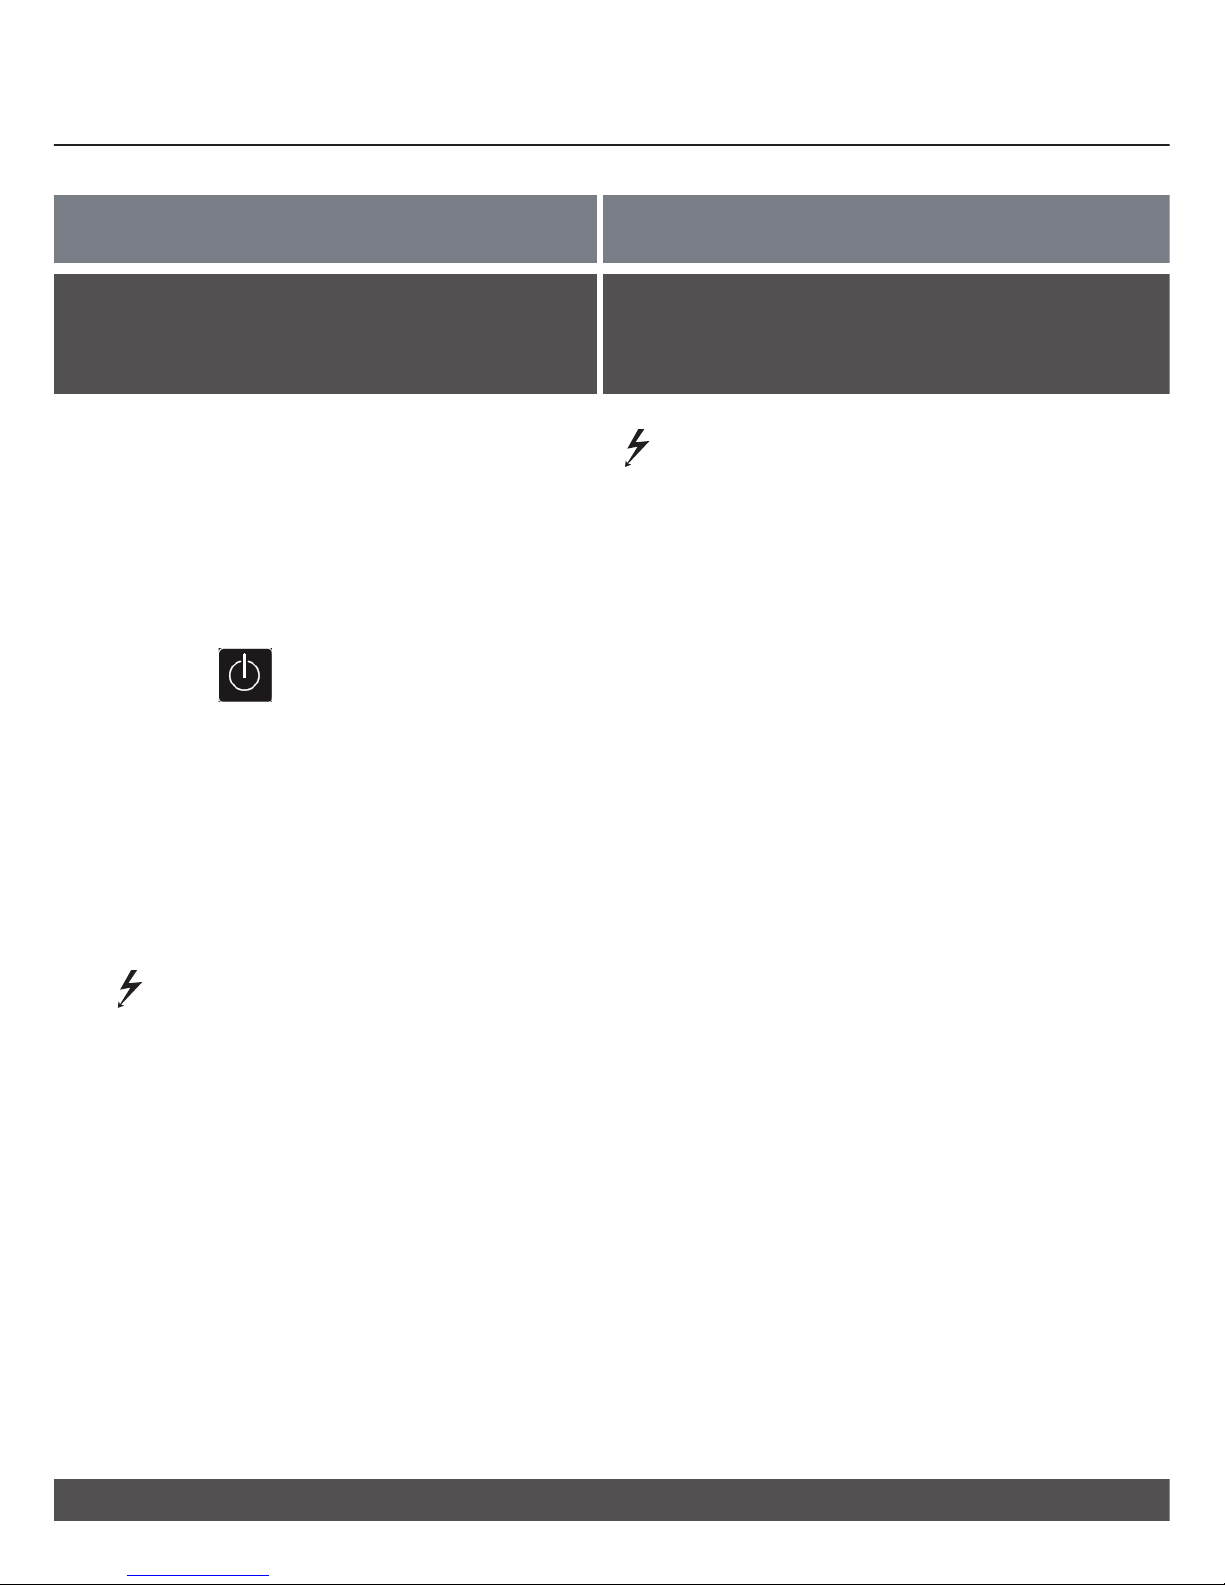
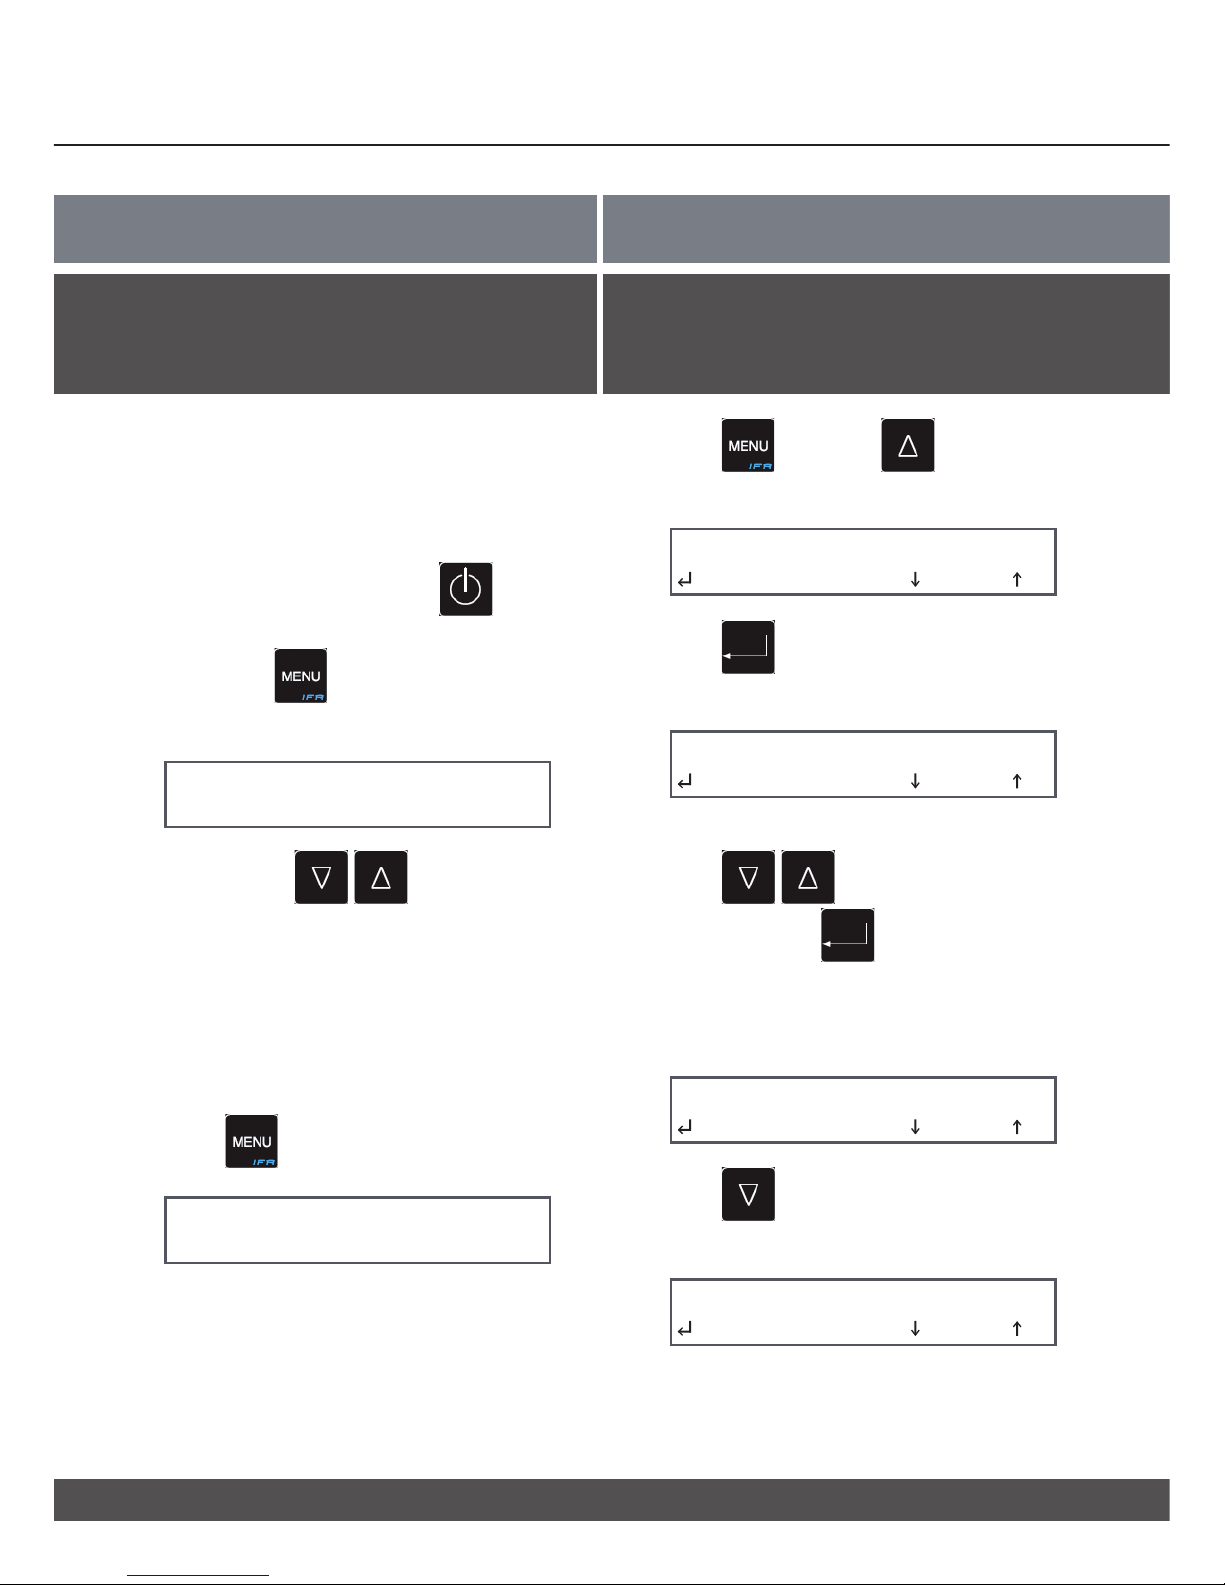
If the display does not turn on when
power is connected, press to
turn on the cabinet.
Then press twice to display:
Room xx °C
Menu
Use the keys to select the
desired menu.
Note: xx °C = Current temperature
Starting-up
>
>
>
>
COMPULSORY PART
>
>
>
>
>
The default language is English.
Therefore, the display language is
English unless this is changed. Date
and time are set afterwards.
Press and then until the
display shows:
Language
Esc
Press to access the menu. The
display shows:
English
Esc
Press to select language
and then press to confi rm
choice of language.
The display now shows:
Language
Esc
Press once and the display
shows:
Clock Setting
Esc
Language, date and time
Language, date and time
It is recommended to set language, date and time
initially. See next paragraph.
Main menu
The main menu can be reached at any time
pressing
twice. The display shows
Room xx °C
Menu
For easy reference it is helpful to unfold the
Quick Guide when reading the manual this will
help you to see the illustration of the control
panel and main functions. Guide when reading
the manual for easy reference to the illustration of
the control panel and main functions.
!
Page 8
Page 9
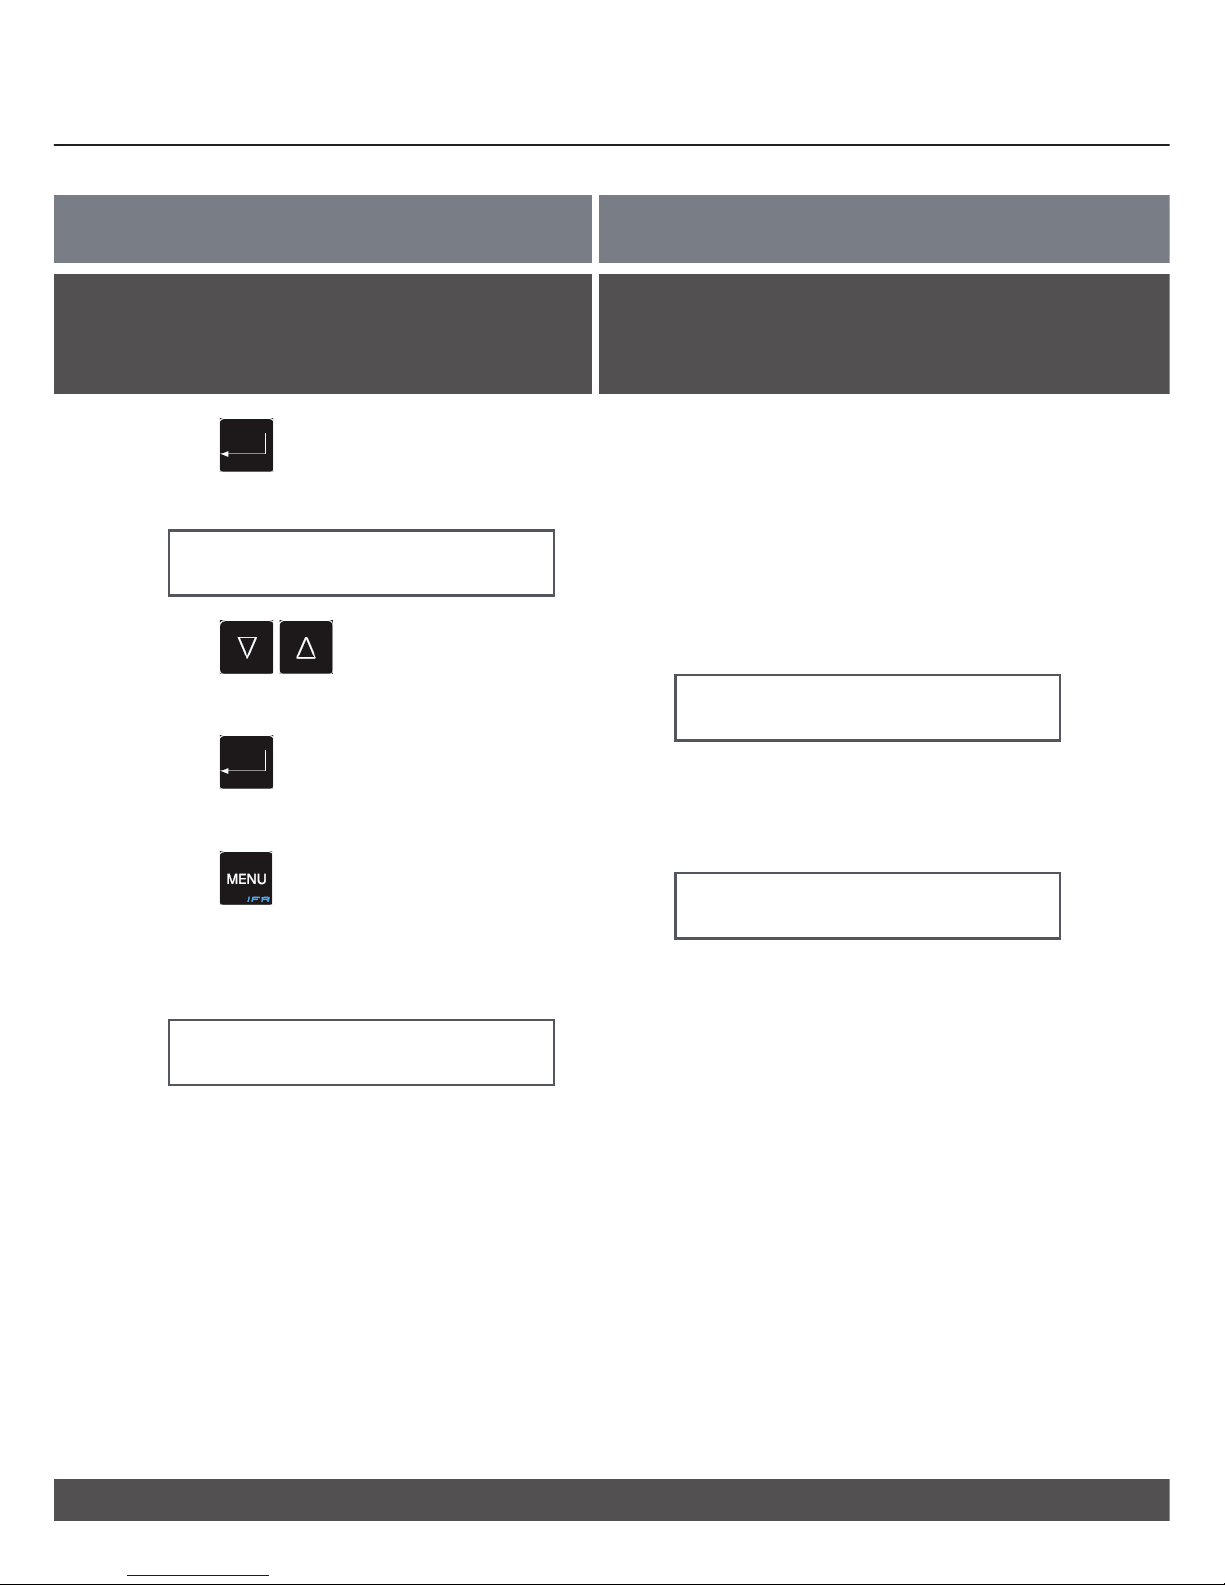
Language, date and time - continued.
Press to enter the menu. The
display shows:
Date: ---- 10/02/09
Time: ---- 14:22:46
Press to change the
fl ashing digits.
Press to save the settings and to
move on to the next digits.
Press twice to return to the main
menu.
The main menu display now shows:
Room xx °C
Menu
Pre-cooling
>
>
>
>
To enable an effective chill/freeze cycle
it is advisable to run a pre-cooling
cycle of the cabinet prior to selecting
any cycle. For advice on how to run a
pre-cool cycle, see Quick Guide.
After end of the pre-cooling cycle the
display shows:
Room -25 °C
Insert product
When the food stuff is placed inside
the cabinet and the door is closed,
the display shows:
Room xx °C
Menu
Now the desired programme must be
run. See Quick Guide.
!
COMPULSORY PART
Example
Unfold the Quick Guide for further information.
The short cut keys can only be activated from the
main menu, see main menu display opposite.
!
Page 9
Page 10

Short cut keys
COMPULSORY PART
>
>
>
>
>
5 keys also serve as short cuts. To
activate a short cut, press the key for
5 seconds.
.
Activates a defrosting cycle. If
defrosting is not necessary the
cycle will not be activated.
Activates an IFR cycle. IFR
automatically adapts the
cycle to the characteristics of
the food item. Using the IFR
facility, surface frosting cycle
will be minimised. See page
17 under “IFR” for further
information.
Activates a blast freezing
cycle (Quick negative chill
key).
Activates a blast chill cycle
(Quick soft positive chill key).
Activates a pre-cooling cycle.
Also when pressed once it will
repeat the last ran cycle.
Unfold the Quick Guide for further information.
The short cut keys can only be activated from the
main menu:
Room xx °C
Menu
!
Page 10
Page 11

If cleaning is insuffi cient, the cabinet
may not work effi ciently or it may
cause malfunctions.
Before cleaning isolate the cabinet
from the electrical supply.
The cabinet should be cleaned
internally with a mild soap solution at
suitable intervals.
For the external maintenance use
stainless steel polish.
The compressor compartment and in
particular the condenser (cabinet with
built-in compressor) must be kept free
from dust and dirt. This is best done
with a vacuum cleaner and a stiff brush.
For information of cleaning of the
defrost water tray see the opposite
paragraph “Defrosting water”.
Defrosting:
A KPS cabinet does not defrost
automatically. Typically it is not
necessary to defrost. However, if it
turns out to be necessary please see
the Quick Guide for guidance.
Cleaning
>
>
>
>
>
>
>
>
Defrosting water
As a KPS cabinet does not
re-evaporate defrosting water
the following should be noticed:
The KPS 60, 90, 120 and 180 must be
led to an external drain.
The KPS 20 and 40: A defrost water
tray is placed under the cabinet to
collect defrost water. The tray must
be emptied daily or when needed.
Alternatively, these cabinets can also
be connected to an external drain.
Cleansing agents containing chlorine or
compounds of chlorine as well as other corrosive
means, must not be used, as they might cause
corrosion to the stainless panels of the cabinet
and the evaporator system.
Do not fl ush water directly on the cabinet
or inside the cabinet as this may cause
short-circuits in the electrical system. It is
recommended to keep record of the cleaning
of the condensator in the cleaning plan. This is
relevant to KPS 20 as well as KPS 40 and 60 with
built-in compressor.
!
COMPULSORY PART
Maintenance
Page 11
Page 12

Name plate
KPS 20
Name plate
KPS 40
The refrigeration system and the
hermetically sealed compressor need
no inspection, only cleaning.
If refrigeration fails, fi rst investigate
whether the unit has been
unintentionally disconnected or
switched off at the socket, or whether
a fuse has blown.
If it is not possible to fi nd the cause of
the refrigeration failure, please contact
Gram’s technical department.
KPS 20 and 40: When contacting
us please tell us the name and serial
number (S/N) of the cabinet. This
information is stated on the name
plate, see illustrations opposite.
Service
>
>
>
When removing covers to gain access to
electrical parts either remove the lead from the
wall socket, or switch it off at the wall socket.
It is not suffi cient only to switch off with
at the cabinet only.
COMPULSORY PART
Service - continued.
Page 12
Page 13

KPS 60
Climate class
Volt Hz
Watt
Watt Heating element
Refrigerant gr
Type
Part no.
Serie no.
prod. no.
Made in Denmark
KPS 90
>
COMPULSORY PART
KPS 120 and
180
Notice: KPS 120 and 180:
The name plate is placed at the front of the blast chiller/freezer and
can only be read, when the panel for the controller box is opened.
This must only be performed by authorised personnel.
Service - continued.
KPS 60, 90, 120 and 180: As there is
no direct access to the name plate,
when contacting our technical service
department please inform us of the
model type and how old the cabinet is.
Service - continued.
Page 13
Page 14

>
>
1
2
3
Working cycles
How to do your own user
programmes.
If you want to do your own user cycle,
select one of the following three types
of cycles:
Soft positive cycle: Minimum room
temperature of -5°C and a miminim
core temperature of +3°C.
Negative cycle: Minimum room
temperature of -25°C and a minimum
core temperature of -18°C.
Hard positive cycle: 60% of the
time at a minimum room temperature
of -25°C. The remaining time at a
minimum room temperature of -5°C.
The core temperature is set to be +3°C.
Suitable for thick cuts of meat.
The settings are displayed in the
diagram on this and the next page:
Programming of user’s cycles
COMPLEMENTARY USE
To repeat the latest cycle, press
.
Return to previous menu:
It is possible to return to the previous menu.
Use the
-key until you reach the start menu, see diagram.
Regarding “core” at level 2:
This cycle is with the core probe and continues until the core
temperature has reached +3°C when running a soft or hard
positive cycle, and -18°C when running a negative cycle.
Regarding time at level 2 and 3:
This cycle is time controlled and continues until the set time expires.
!
Page 14
How to do your own user
programmes - continued.
Press and the display shows:
Program
Esc
Press until the display shows:
Manual
Esc
Press to access settings on
LEVEL 1 and adapt the cycle to your
needs.
LEVEL 1
STARTING MENU
Manual
Esc
Plus Soft
Ok Esc No
Minus
Ok Esc No
Plus Hard
Ok Esc No
Page 15

How to do your own user
programmes - continued.
Press to scroll the cycle types at
LEVEL 1.
Press to confi rm your choice.
Press to scroll between core and
time controlled cycle.
Press to confi rm your choice.
4
5
6
7
COMPLEMENTARY USE
*: Min. room temperature
*: Min. room temperature
Page 15
How to do your own user
programmes - continued.
Use or to set time or
minimum room temperature.
Confi rm your choice with .
Press or to set the desired
fan speed. Press to confi rm
your choice. If you want to save the
programme, do this before running
the programme, see next page.
Press to start the cycle.
Soft Core
Ok Esc No
Soft Core -5°C*
)
Esc
LEVEL 2
Soft Time
Ok Esc No
LEVEL 3
Soft Time 90’
Esc
LEVEL 4
Speed 100%
Esc
Speed 100%
Esc
Neg Time
Ok Esc No
Neg Time 240’
Esc
Speed 100%
Esc
Neg Core
Ok Esc No
Neg Core -25°C*
)
Esc
Speed 100%
Esc
Hard Time
Ok Esc No
Hard Time 90’
Esc
Speed 100%
Esc
Hard Core
Ok Esc No
Hard Core -5°C
Esc
Speed 100%
Esc
8
9
10
Page 16

COMPLEMENTARY USE
Page 16 16
User’s programmes can be
memorised.
After programming a user’s cycle (see
page 14-15) it can be memorised. Do
as follows:
Keep pressed for 5 seconds and
the display will show the fi rst available
position.
Available positions are showed with
------ in the display. Example:
Program 02
- - - - - -
Press and to select a
desired position.
If the position is not available
programme data is shown in the
bottom line of the display.
Press to confi rm the chosen
position. Leave the menu and the
display shows:
A - - - - Esc
Memorise user’s programmes
>
>
>
>
>
>
>
>
>
Type in the name of the programme,
which is to be memorised using
to scroll through the letters
and numbers.
Press to confi rm and move on to
the next character.
Press to save the name. The
display shows (example):
Name
Esc
Press to immediately activate
the selected cycle.
Please, note that memorised programmes can
be overwritten.
!
Page 17

COMPLEMENTARY USE
Page 17
IFR automatically adapts the cycle to
the food item’s characteristics. IFR
minimises frost on the food surface.
Insert the probe correctly into the
foodstuff (see illustration page 4)
and activate an IFR cycle. The
temperatures are then monitored in
3 places; the core, the product
surface and the air temperature
around the surface of the food.
In this way surface frost that can be
damaging to the foodstuff can be
minimised.
The function is usable only when blast
chilling (not blast freezing) and where
the probe can be used correctly.
Press and the display will now
show:
Program
Esc
Press and the display now
shows:
IFR
Esc
Press to start the IFR cycle.
IFR cycle
>
>
>
>
>
>
From the main menu it is also possible
immediately to start an IFR cycle.
Simply press
for 5 secs. and the cycle will
start immediately. See Quick Guide.
!
Page 18

COMPLEMENTARY USE
Page 18
UDVIDET BRUGUDVIDET BRUGUDVIDET BRUGUDVIDET BRUG
It is possible to choose between
recommended programmes, which
are pre-set programmes, which
cannot be changed.
Press to select the desired preset programme. The display shows:
IFR
Esc
Press until the display
shows:
Recommended
Esc
Press and the display shows:
MEAT
Esc
Use of recommended programmes
>
>
>
>
>
Use of recommended programmes continued.
Press to select the desired
programme, 21 - 29.
Press to start the selected cycle.
Programmes
Prog Name Time/core Hard Storage temperature Time
21 MEAT Core (probe) Yes +2°C 120 min.
22 DAIRY Time No +2°C 90 min.
23 PIE Time No +2°C 90 min.
24 STEW Time No +2°C 90 min.
25 FISH Time Yes +2°C 90 min.
26 POULTRY Time Yes +2°C 90 min.
27 VEGETABLES Time No +2°C 90 min.
28 FREEZING TEMP Core (probe) Yes -22°C 240 min.
29 FREEZING TIME Time Yes -22°C 240 min.
Page 19

COMPLEMENTARY USE
!
Pre-cooling can also be activated by means of
short cut key from the main menu, see Quick
Guide.
Page 19
UDVIDET BRUG
UDVIDET BRUGUDVIDET BRUGUDVIDET BRUGUDVIDET BRUG
It is possible to memorize your
own programmes and use them
afterwards.
Press to use your own
programmes. The display shows:
Program
Esc
Press and the display shows:
IFR
Esc
Press until the display shows:
User
Esc
Press to confi rm the choice.
Use to scroll between the
user programmes.
Press to activate the selected
programme.
Use of own programmes Pre-cooling
>
>
>
>
>
>
>
>
>
>
It is recommended to pre-cool the
cabinet, prior to any cooling or
freezing prozess.
Press to select the desired
menu.
Use until the display
shows:
Program
Esc
Press to confi rm your choice.
The display shows:
IFR
Esc
Use until the display
shows:
Cooling
Esc
Press to activate pre-cooling.
Page 20

The cabinet can run a storing cycle for
a short period.
To set the storing temperature follow
the instructions below:
Press to select the desired
menu.
Use and until the display
shows:
Store
Esc
Press to confi rm your choice.
To set a positive storing temperature
press , until the display shows:
Plus
Ok No
Storing cycles
>
>
>
>
>
>
>
>
COMPLEMENTARY USE
Page 20
Storing cycles - continued.
To set a negative storing temperature,
press , until display shows:
Minus
Ok No
Press to confi rm your choice.
The display now shows:
Set Point
Esc
Press and to change
setpoint for the room temperature.
Press to confi rm your choice.
Page 21

Storing cycles - continued.
The display shows:
Speed
Esc
Use and to change fan
speed.
Press to confi rm your choice.
The display shows:
Store
Esc
Press to start the storing cycle.
>
>
>
>
!
We recommend that you do not use the product
range for storing cycles, as the cabinets are not
equipped with an automatic defrosting function.
Page 21
Page 22

Error code Cause How to correct the fault
ALL High Press
High pressure switch activated. • The blast chiller is located too close to the wall
behind (see installation).
• Ask Grams Service department for skilled
assistance.
ALL Room Sensor
Room probe defect. • Qualifi ed technician required.
Replacement of room sensor.
ALL Evap Sensor
Evaporator probe defect. • The problem may be a frosted evaporator.
• Ask Gram Service department for skilled
assistance.
ALL Cond Sensor
Condensator probe defect.
(this only concerns cabinets with
built-in compressors)
• Qualifi ed technician required
• Replacement of the condensator probe.
ALL Probe
Needle probe defect. • Qualifi ed technician required.
• Replacement of the needle probe.
ALL Insert Probe
Needle probe not correctly inserted
in the food stuff although a needle
probe cycle is running. The cycle
will automatically change to a timecontrolled cycle.
• Insert needle or ignore the error code.
• IMPORTANT: If the needle is not used at Quick-
guide programmes, it must be heated before restart of the programme to avoid that the process
starts in storing cycle (cons.)
High T Room
The room temperature is / has been
higher than the set point, plus 10°C
(in storing programme)
Example:
The set point is set to +2°C. The
upper alarm threshold will in this
case be +12°C.
• Qualifi ed technician required.
Page 22
If the cabinet has a defect or
operating troubles occur, the display
will typically show an error code.
In the table below you can get
information about the error and how
to correct it.
Overview
Error codes
>
COMPLEMENTARY USE
Page 23

Error code Cause How to correct the fault
Low T Room
The room temperature is / has
been below the set point, less 10°C
(storing cycle).
Example:
The set point has been set to +2°C.
The lower alarm threshold will then
be -8°C.
• Qualifi ed technician required.
ALL BlackOut
The power supply has been
disconnected.
• When power is restored, you can see under
ALARM how long this blackout has lasted, and
what the maximum temperature has been
ALL Door Open
Room door is open.
Door micro faulty.
• Close the door.
• If the error code is still shown in the display after
the door has been closed, a qualifi ed technician is
required.
Page 23
Overview error codes - continued.
COMPLEMENTARY USE
!
See contact information to Gram’s Service
department on the back of this user manual.
Page 24

Supplementary
This function is only possible if the
cabinet is equipped with sterilisation
equipment - UV lamp (optional
equipment).
Press to select the sterilisation
programme and use and
until the display shows:
Sterilization
Esc
Press and the display shows:
Start?
Ok No
Press to start. The display
shows:
Room xx °C
Sterilization
Press to stop the process.
Sterilisation programme Printing of data
>
>
>
>
>
>
>
This function is only possible if the
cabinet is equipped with a thermo
printer (optional equipment).
Press to use the thermo printer
and use and , until the
display shows:
Print
Esc
Press and the display shows:
Print Data?
Ok No
Press to print the memorised
data. Subsequently, the data will be
printed during the following cycles.
COMPLEMENTARY USE
If the door is opened, the process is interrupted
UV lamp is not within Gram’s product
programme.
!
Press and select “Ok”, and all memorised
cycles will be printed..
!
Page 24
Page 25

The control memorises all alarms.
To gain access to the mode for
displaying alarms press and use
and to display:
Alarm
Esc
Then press to see the latest
alarms. If no alarms are memorized
the display shows:
No Data
Esc
If alarms are memorised, the display
shows (example):
A05 Room Sensor
S 14:21 10/02/09
Press to get further information
about the alarm. Alarm stop “E” is
shown with this example:
A05 Room Sensor
E 16:30 10/02/09
Alarms
>
>
>
>
>
>
>
Alarms - continued.
If the alarm is still in progress the
display shows: “Present”. Example:
A05 Room Sensor
I Gang 16:30 10/02/09
Press again for further
information of how to solve an error.
Example:
A05 Room Sensor
Call Service
Use the keys and to
display all the memorised alarms.
Press several times to return to
the main menu.
COMPLEMENTARY USE
Alarm information:
A_ _ = Alarm number, i.e. A05 is the 5th and
the latest alarm and in the example it concerns a
room sensor error.
Room Sensor = Error type, in this example a
room sensor error.
S = Alarm start.
E = Alarm stop.
Present = Alarm is still in progress.
See page 22 for an overview of error codes,
cause and how to remedy.
!
Page 25
Page 26

The keys can be locked and in this way
secured against unauthorized use of the
blast chiller/freezer.
Go to the main menu (please, see the
Quick Guide for guidance).
Press and at the same time,
and a signal is given.
Then press and at the same
time for 5 seconds, until an “S” is shown
in the upper right corner. The keys are
now locked.
To unlock the keys press and
for 5 seconds. The “S” will disappear from
the display.
Key lock Service parameters
>
>
>
Service parameters show the basic
settings in concert with Gram.
The service parameter area of the
controller is reserved for the service
technician. Therefore the area is
protected with a password. Changes
in the parameters will directly
infl uence the operation and functions
of the cabinet.
The service parameters display looks
as follows:
Service
Esc
COMPLEMENTARY USE
Page 26
Page 27

COMPLEMENTARY USE
In this menu the input and output
values can be read, i.e. the present
sensor temperature and the relay
state.
Press and use and to
display:
Inputs/Outputs
Esc
Press to check the values shown
in the table below.
Inputs/Outputs
>
>
>
>
Inputs/Outputs - continued.
Use the keys and to scroll
the data.
Press several times to exit.
Display Description
Room -6°C
Probe 15°C
Room and needle temperature values
Food
6°C
External -3°C
“Internal” temperature on the surface of the foodstuff.
“External” temperature around the foodstuff.
Evap. -10°C
Cond. 21°C
Evaporator and condenser temperature values. If the
cabinet has a remote compressor, “Cond.” setting will
be “Disab”.
C D FE FC L R A
1 0 0 1 1 0 0
1 = Relay activated
0 = Relay de-activated
C = Compressor
D = Defrost
FE = Evaporator fan
FC = Condenser fan
L = Sterilisation equipment
R = Frame/Floor heating
A = Alarm
DI1 DI2 FAN
0 1 80
Digital inputs state and fan speed of the evaporator
DI1 = Inputs door switch
DI2 = Inputs high pressure safety
Fan = Evaporator fan speed
This menu is suitable for fault analysis.
!
Page 27
Page 28

The below only concerns the United
Kingdom.
Disposal of an old cabinet is only
available when we are delivering a
new one at the same time. Cabinets
must be fully defrosted and emptied
prior to collection.
Gram recognises that our products for
the catering market are considered as
WEEE when they become obsolete
(excl. Coldrooms). To ensure that
Gram’s responsibilities are handled
correctly and environmentally friendly,
we are signed up the largest Business
to Business compliance scheme in
the UK – B2B Compliance
http://www.b2bcompliance.org.uk/”
B2B Compliance will on our
behalf deal with all areas of our
responsibilities when collecting and
disposing of equipment which fall
under the UK WEEE regulations.
B2B Compliance can be contacted on
telephone number 01691 676124”.
>
>
>
Disposal
COMPLEMENTARY USE
Page 28
Page 29

Page 29
Page 30

Technical and spares department
Technical spare parts support and advice are available Monday to Friday 9am - 5pm.
Please fi nd contact numbers below:
Main Offi ce: 01322 616900
Technical Support: 01322 616915
Spares: 01322 616910
Main Fax: 01322 616901
Spares Fax: 01322 616911
Page 31

Press ... for at least 5 seconds to activate a defrosting cycle.
This function is only effective if the evaporator is colder than +8°C.
Press ... for at least 5 seconds to activate an IFR chill cycle.
Press ... for at least 5 seconds to activate a blast freeze cycle.*
This does not apply for KPS 20 CH and KPS 40 CH and CF.
Press ... for at least 5 seconds to activate a blast chill cycle.
*
Press ... for at least 5 seconds to activate a pre-cooling cycle. At the end of
the pre-cooling cycle (–25°C internal temperature) insert product and close
door. The desired programme must now be selected.
Control panel with buttons and display
Short cut to
defrosting.
Main menu display.
Activate the short
cut keys from
this menu.
Short cut to
Blast Chilling.
Short cut to
pre-cooling.
Short cut to IFR. Also allows
access to the main menu.
Short cut to
Blast Freezing.
Quick Guide
See page 10 for more information about use of the short cut keys...
Access to main menu: Press several times until the main menu is displayed.
At the end of every cycle the cabinet will give an acoustic signal and automatically
switch to storage mode. The default storage temperature is +2°C for blast chilling and
–22°C for blast freezing.
*
Using the Probe: When using the temperature probe and short cut buttons for chill or freeze the cycle will be controlled
by the core temperature. If the probe is not used: A) The chill/freeze cycle will automatically be controlled by time or
B) If the probe is colder than the desired temperature the cabinet will start a storing cycle (display shows -Store).
To remedy this press START/STOP to interrupt the cycle. Then heat the probe using warm water. The chill/freezer cycle is
now ready for use. The desired cycle is then activated.
Parameters for blast chilling without use of probe: –5°C room temperature, 100% fan speed and 90 minutes duration.
Parameters for blast freezing without use of probe: –25°C room temperature, 100% fan speed and 240 minutes duration.
Page 32

Better food without the stress
With fl exible blast chilling and freezing solutions cook-chill can introduce signifi cant
savings. Working time, food weight loss and wastage can be greatly reduced.
Production can be increased without hiring extra staff or enlarging your kitchen facility.
Using these processes can radically reduce stress levels at peak service periods and
cut anti-social working hours due to easy to operate controls and monitoring systems.
The KPS family
The KPS cabinet range from Gram have been designed to fully meet all the legal
chilling time requirements of any cook-chill operation.
Capacities of the blast chillers (C-models) range from 20 to 180 kg in 90 min., blast
freezers (S-models) from 12 to 180 kg in 240 min. Depending on the model the
cabinets are available with a built-in compressor or prepared for remote compressor.
Some models offer both options.
The KPS cabinets are not suitable for continuous refrigerated storage as they are not
equipped with an automatic defrosting system.
Blast chill +70°/+3°C
Only fast, controlled reduction of the core temperature of a cooked food item makes
it possible to preserve both natural goodness and prevent the accelerated growth of
harmful bacteria at temperatures between +60°C and +10°C.
Gram blast chillers bring food items through this high risk temperature range as fast
as possible. The core temperature will reach +3°C in 90 minutes, helping to preserve
natural vitamins and maintain the appearance and taste of the food.
Blast freezing +70°/–18°C
If the food item is to be stored for a longer period of time it must be shock frozen
to a minimum of –18°C. Using commercial blast freezers from Gram a core
temperature of –18°C is reached within HACCP requirements of 4 hours. Blast
freezing will preserve the quality of the food item and all unprocessed raw
materials, semi-processed or cooked food can be frozen to achieve the optimum
product when defrosted or regenerated.
Page 33

United Kingdom
Gram (UK) Ltd.
2 The Technology Centre
London Road
Swanley
GB-Kent BR8 7AG
Main Office: 01322 616900
Technical Support: 01322 616915
Spares: 01322 616910
Main Fax: 01322 616901
Spares Fax: 01322 616911
e-mail: info@gramuk.co.uk
Denmark
Head Office:
Gram Commercial A/S
Aage Grams Vej 1
DK-6500 Vojens
Tel. +45 73 20 12 20
Fax: +45 73 20 12 01
e-mail: info@gram-commercial.com
www.gram-commercial.com
Facts about us
Gram Commercial A/S develops and produces refrigerators
and freezers for commercial kitchens. With our head office
in Vojens, Denmark, we are part of the Japanese owned
Hoshizaki Group, a global supplier of equipment for professional
kitchens. With an extensive sales and service network around
the world, we provide expert local service to our customers
wherever you are.
765041403
 Loading...