

Page 1

BIOBASIC
USER MANUAL
Models: 210, 310 & 410
Page 2

2 | BIOBASIC MANUAL
Before You proceed
Manufactured by Gram Commercial A/S
Aage Grams Vej 1
DK-6500 Vojens
Denmark
+45 7320 1300
www.gram-biobasic.com
Item number 765041746 Rev.: 180518
Language: English
Your feedback is much appreciated, feel free to email us at:
info@gram-bioline.com
This user manual is intended for the BIOBASIC product series.
We recommend that you read this user manual through thoroughly
before using the cabinet. Gram Commercial A/S does not guarantee
safety if the appliance is used for anything other than its intended
use. Contents of the manual can be subject to change without notice.
No part of this manual may be published or reproduced in any form
without expressed written consent of Gram Commercial A/S. Gram
Commercial A/S guarantees the appliance under certain warranty
conditions. Gram Commercial A/S is in no way responsible for any loss
or damage of content.
Page 3

BIOBASIC MANUAL
|
3
Contents
Before You proceed .................................................................................. 2
Contents .................................................................................................... 3
Intended use ............................................................................................. 4
Temperature setpoint range and ambient requirements ................................... 4
Symbols used ............................................................................................ 5
Installation ................................................................................................ 6
Initial setup steps ...................................................................................................6
Adjusting the base .................................................................................................. 7
Anti tilt bracket .......................................................................................................8
Wall mounting .........................................................................................................9
Surroundings ........................................................................................................10
Product inspection ...............................................................................................10
Voltage free contact .............................................................................................11
Connecting to electricity .....................................................................................12
Start up .................................................................................................... 14
The digital display controls .................................................................................. 15
General introduction to the controller interface ...............................................16
Alarm settings ....................................................................................................... 17
Buttons and useful shortcuts ..............................................................................17
Operation parameters .........................................................................................18
Error codes ............................................................................................................ 19
Sensor oset ......................................................................................................... 20
Ordinary use............................................................................................ 22
Regular maintenance ............................................................................ 23
Cleaning .................................................................................................................23
Door gaskets ......................................................................................................... 24
General info ............................................................................................. 25
Reversing of door .................................................................................... 26
IMPORTANT ............................................................................................. 27
Disposal ................................................................................................... 28
Declaration of Conformity ..................................................................... 29
Wiring diagrams ...................................................................................... 30
Piping diagram ........................................................................................ 32
Notes........................................................................................................ 33
Page 4
4 | BIOBASIC MANUAL
Intended use
The BIOBASIC range of refrigerators (RR) and freezers (RF),
are designed and manufactured to provide general purpose
storage solutions for laboratory items.
The BIOBASIC range complies with EN/IEC 60079-15,
covering electrical apparatus in Category 3, Zone 2 locations
where gas atmospheres may be present.
Temperature setpoint range and
ambient requirements
model + temperature
setpoint range
Minimum ambient
operating temperature
Maximum ambient
operating temperature
BIOBASIC 210, 310, 410
RR with solid door: +2/+15 ºC +10 ºC +35 ºC
RR with glass door: +2/+15 ºC +10 ºC +32 ºC
RF: -25/-5 ºC +10 ºC +35 ºC
Enabling placement of BIOBASIC refrigerators and freezers, in
Zone 2 areas categorised according to EN/IEC 60079-15.
Page 5
BIOBASIC MANUAL
|
5
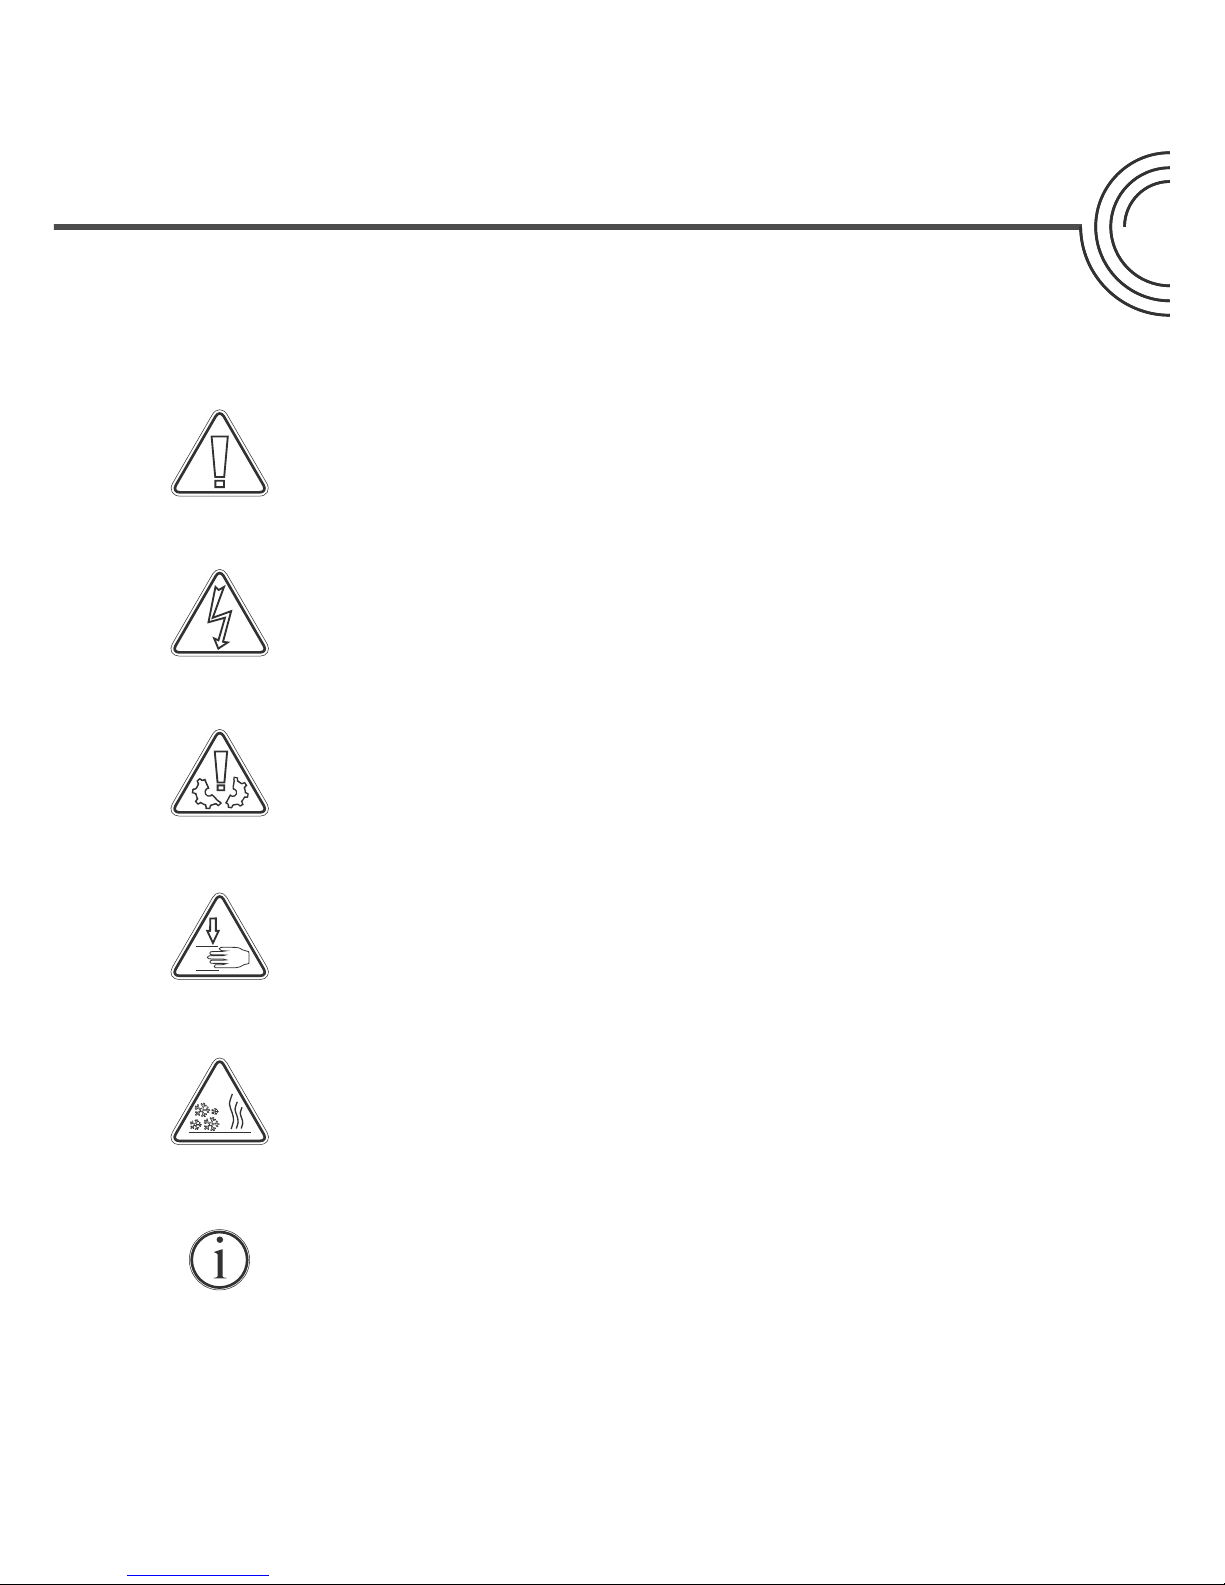
Symbols used
Hazard
Risk of electric shock
Risk of material damage
Risk of personal injury
Risk of burning / freezing
Info
Page 6

6 | BIOBASIC MANUAL
Installation
Due to safety and operating reasons, the cabinet must not be used
outdoors. The cabinet should be installed in a dry and suciently
ventilated area. To ensure ecient operation, the cabinet should not be
installed in direct sunlight or close to heat sources.
Avoid placement of the cabinet in a chloric/acidic environment due to
risk of corrosion.
Clean the cabinet with a mild soap solution prior to use.
If the cabinet has been laying down (e.g. during transport.).
The cabinet must stand up-right for 24 hours prior to being turned on.
Initial setup steps
Certain cabinets are shipped
with a protective lm that
should be removed prior to
putting the cabinet into service.
Page 7
BIOBASIC MANUAL
|
7
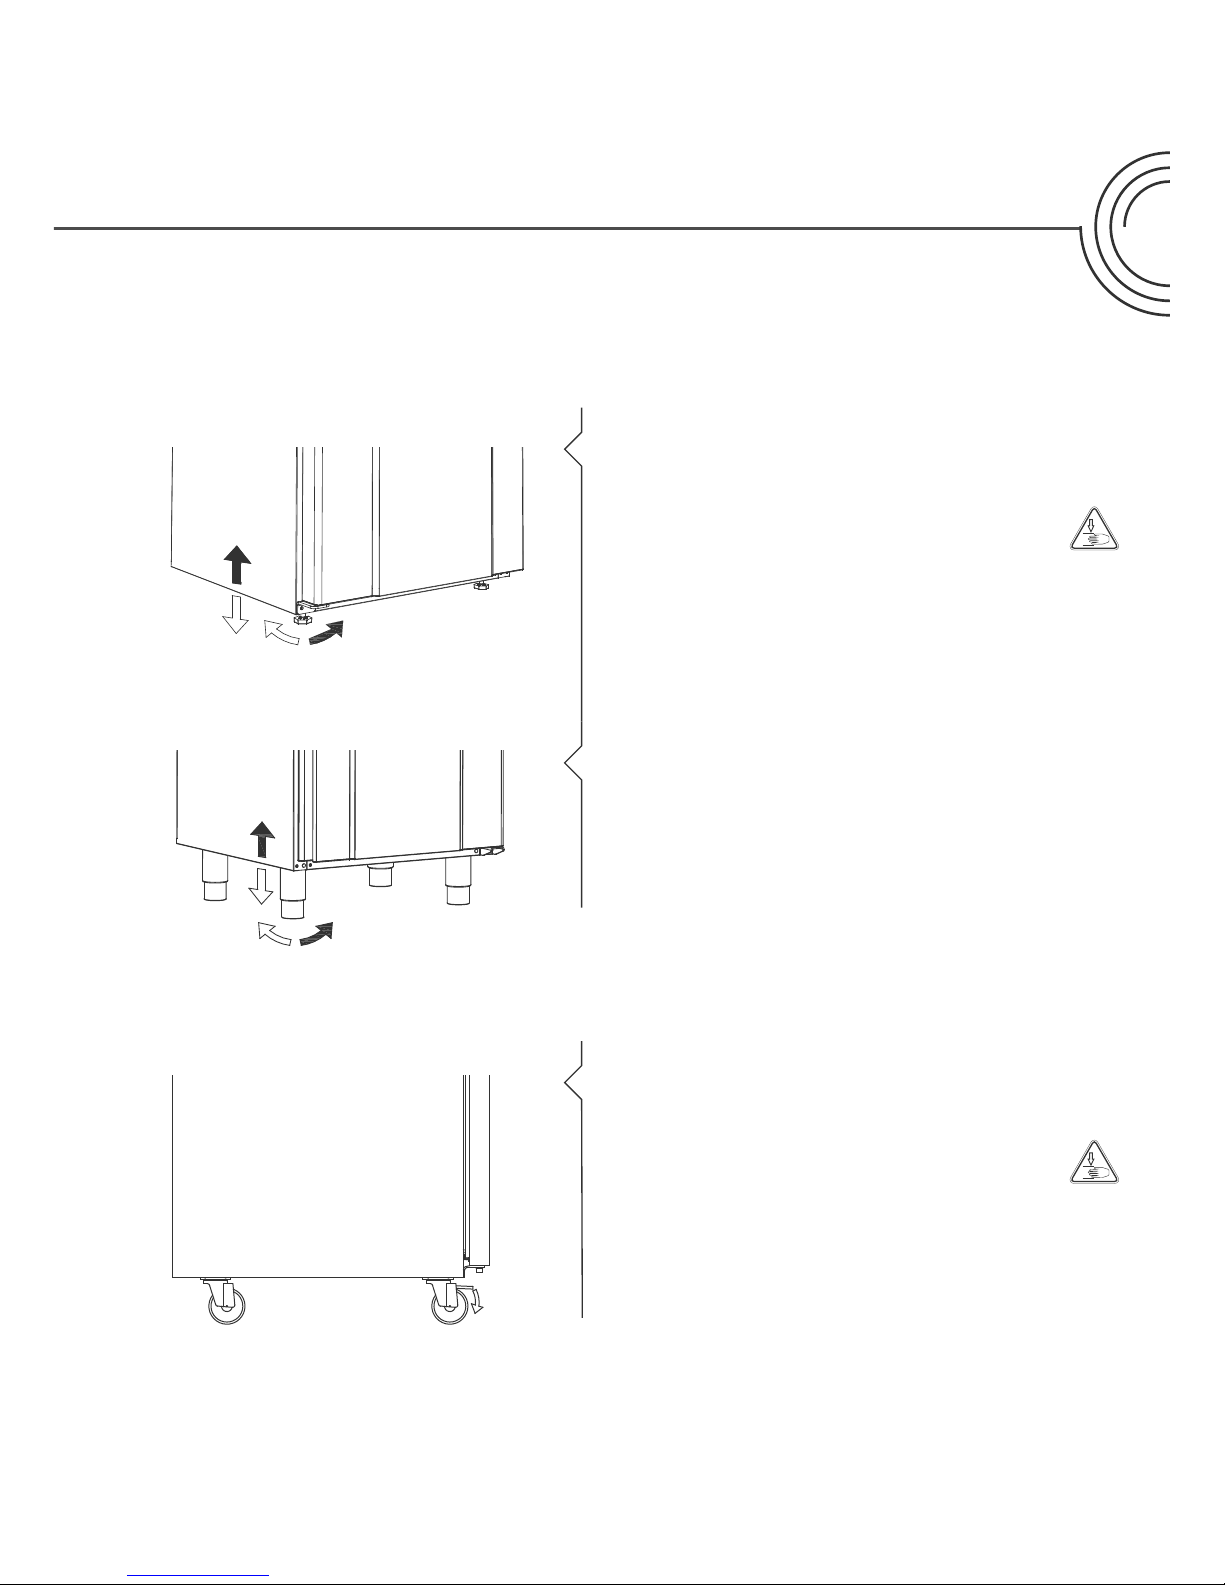
Cabinets equipped with legs
should be levelled as shown in the
illustrations to the left.
For cabinets equipped with
castors, the oor must be level
to ensure stable positioning and
safe use. When the cabinet is
positioned, the 2 front castors
should be locked.
Adjusting the base
Page 8
8 | BIOBASIC MANUAL
Installation
Cabinets with drawers and/or glass door must be secured to a stable
vertical surface, ensuring that the cabinet can not tip over when the
drawers are drawn to the outermost position, or the door is open.
Brackets for securing the cabinet are included from the factory.
Find the instructions for the tilt bracket below.
The anti-tilt brackets must be tted when installing the cabinet,
ensuring that the users, surroundings and stored items are not
damaged.
Anti tilt bracket
Page 9
BIOBASIC MANUAL
|
9
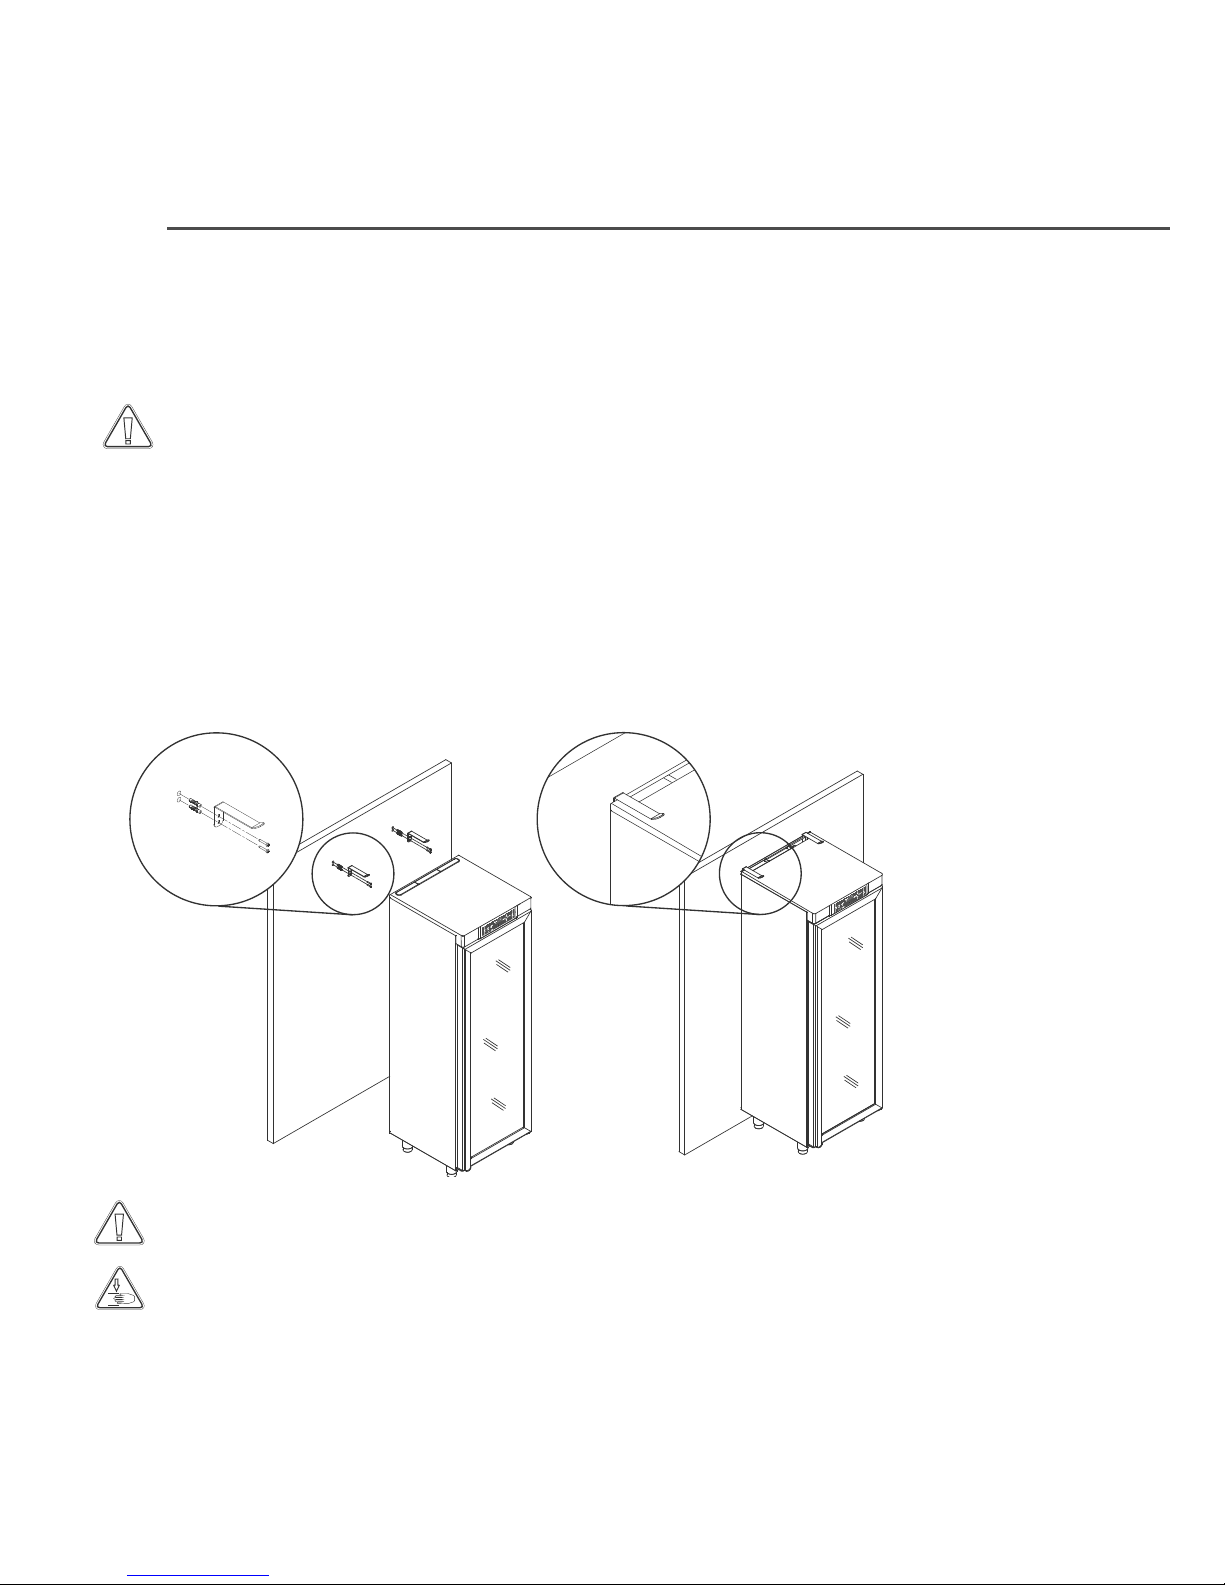
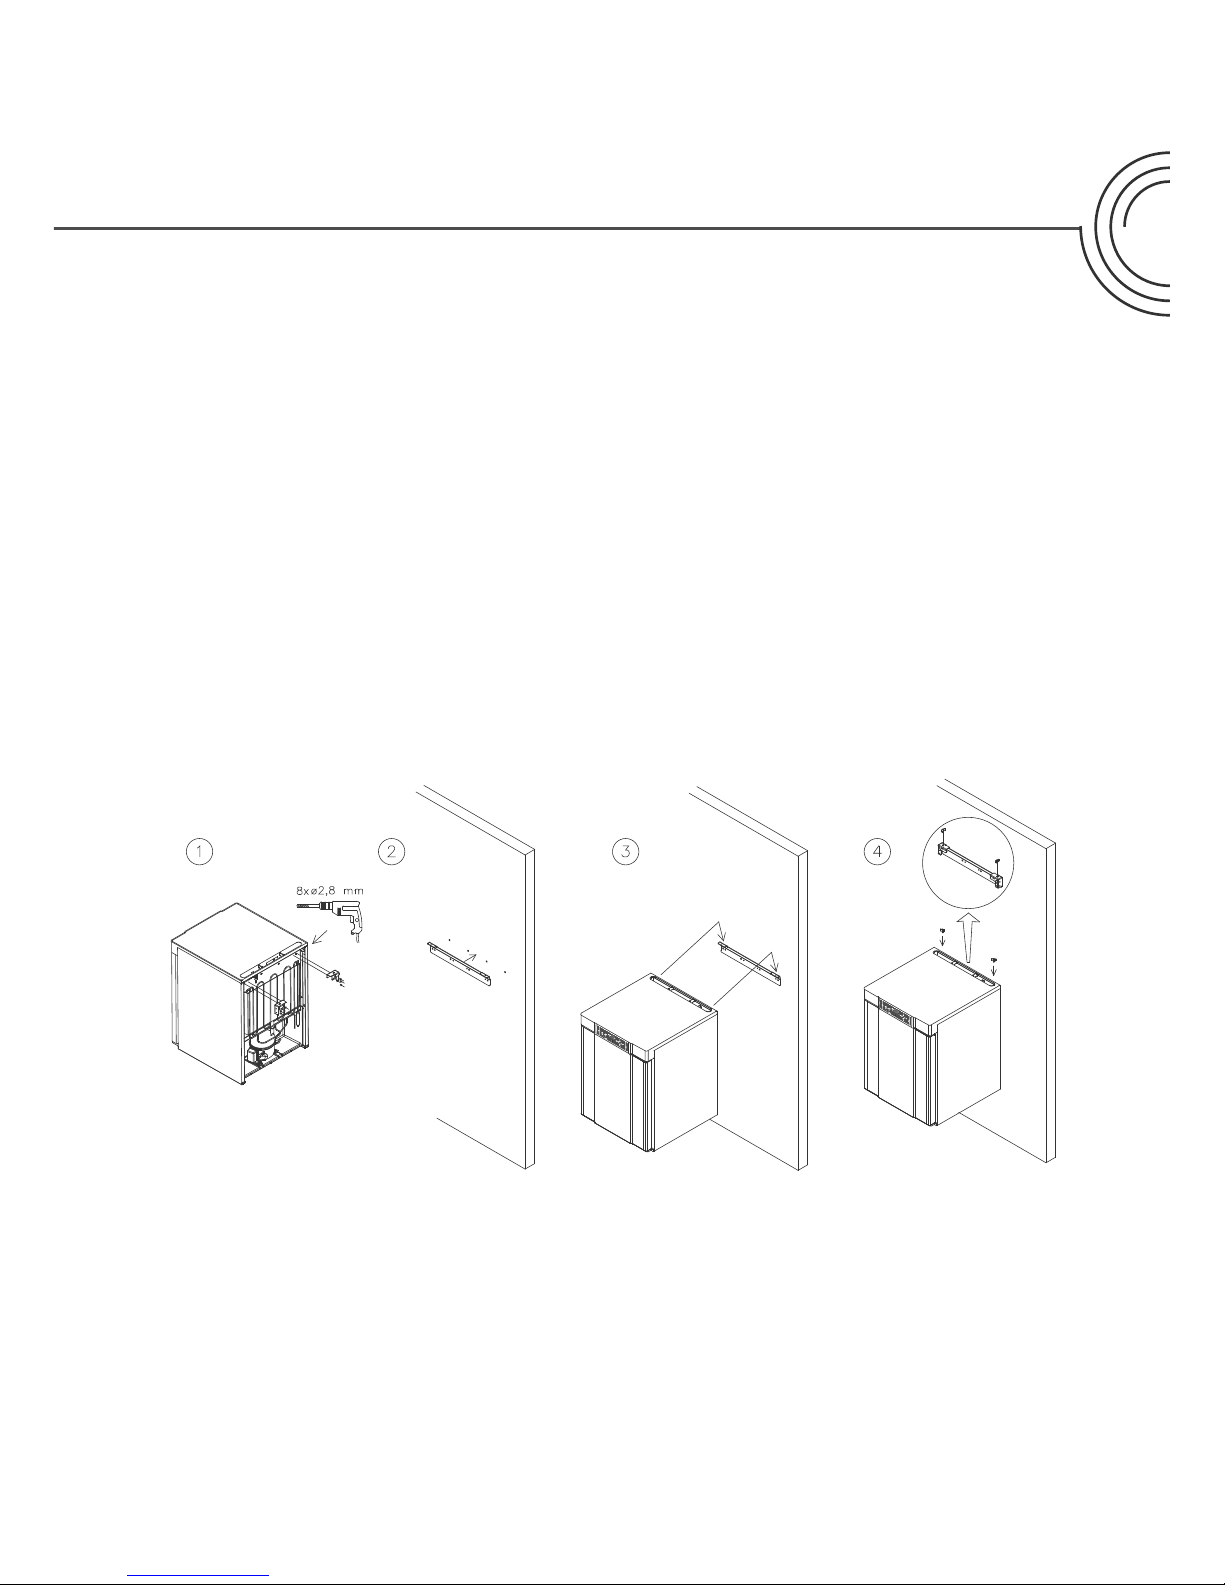
Wall mounting
Wall mounting brackets can be supplied if specied. Allowing the
cabinet to be lifted from the oor. Find instructions on wall mounting
of a BIOBASIC 210 below, the same procedure applies for mounting 310
and 410.
Page 10
10 | BIOBASIC MANUAL
Installation
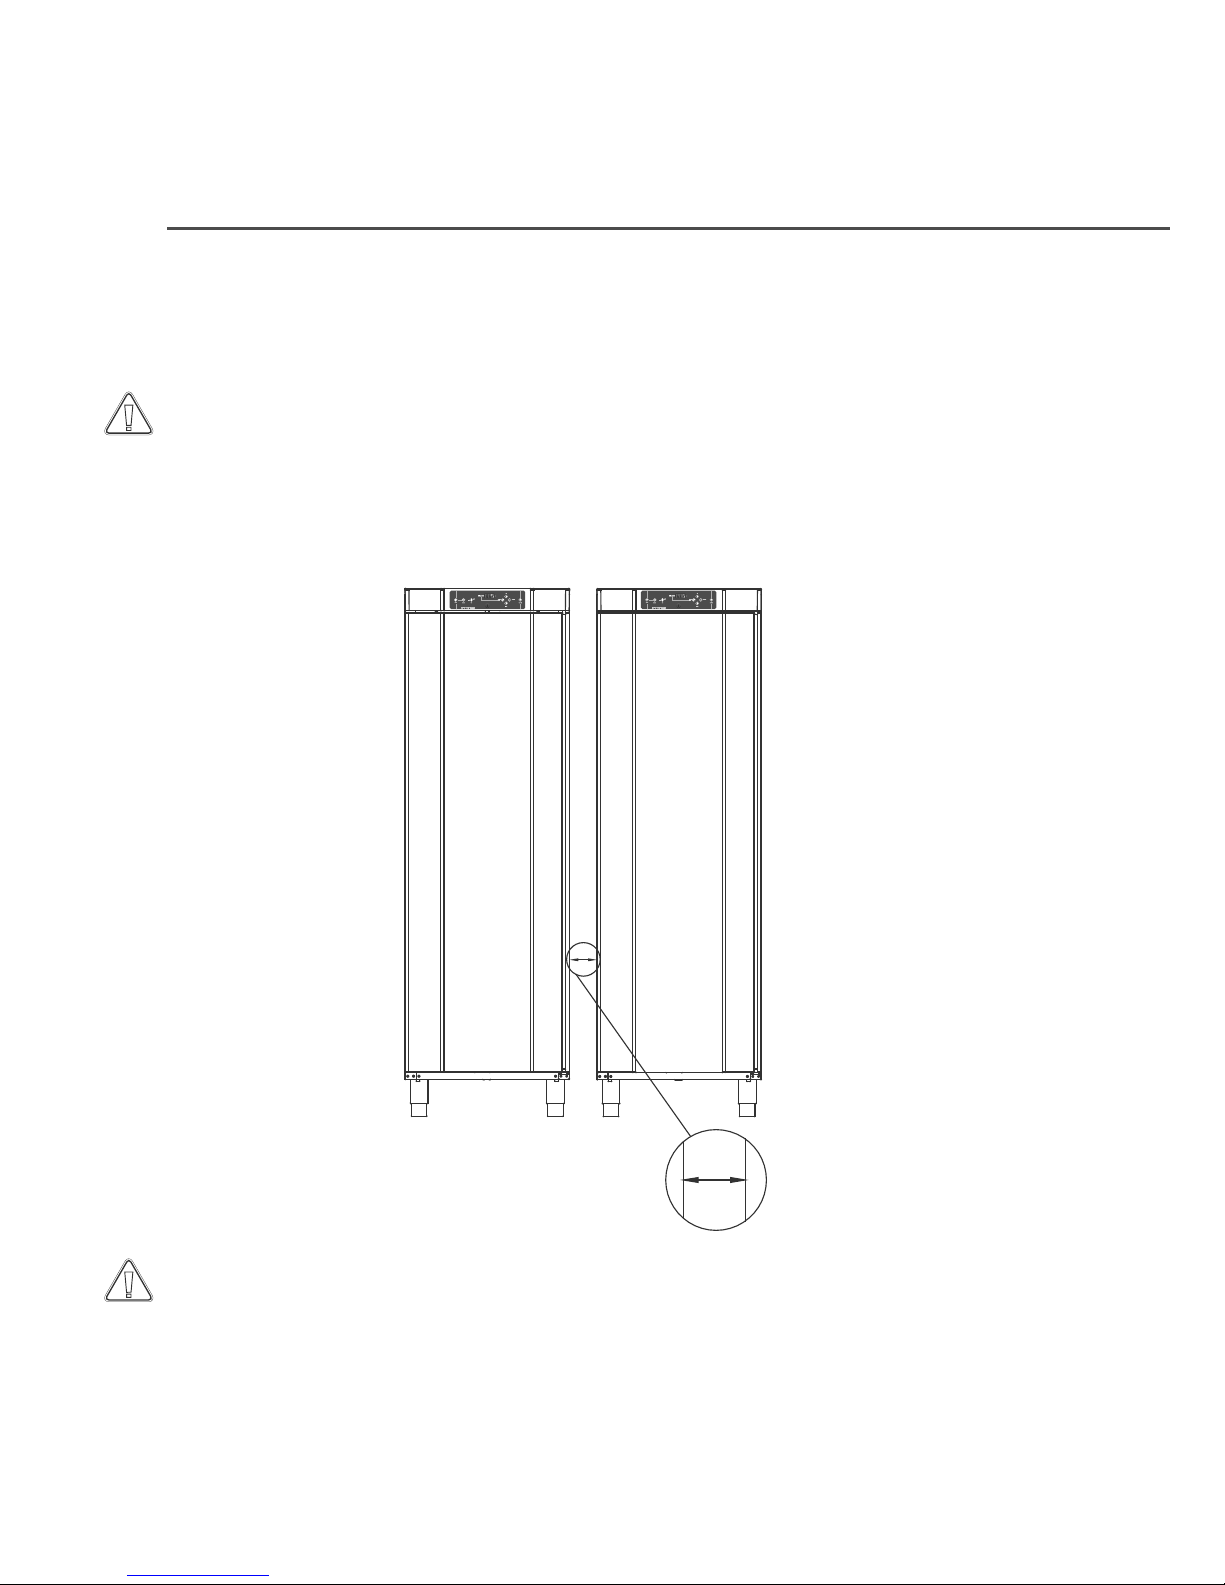
There must be at least a 30mm gap between cabinets and/or walls.
A visual inspection of the cabinet must be conducted prior to putting
the cabinet into service. Check the cabinets structural integrity, that
door frames and doors don’t have deformities, gaskets seal properly
and the doors sit ush up against the door frame.
Surroundings
Product inspection
Min. 30mm
Page 11
NC
Common
NO
Common
NC
Common
NO
Common
NC
Common
NO
Common
+
+
NC
NO
NC
BIOBASIC MANUAL
|
11
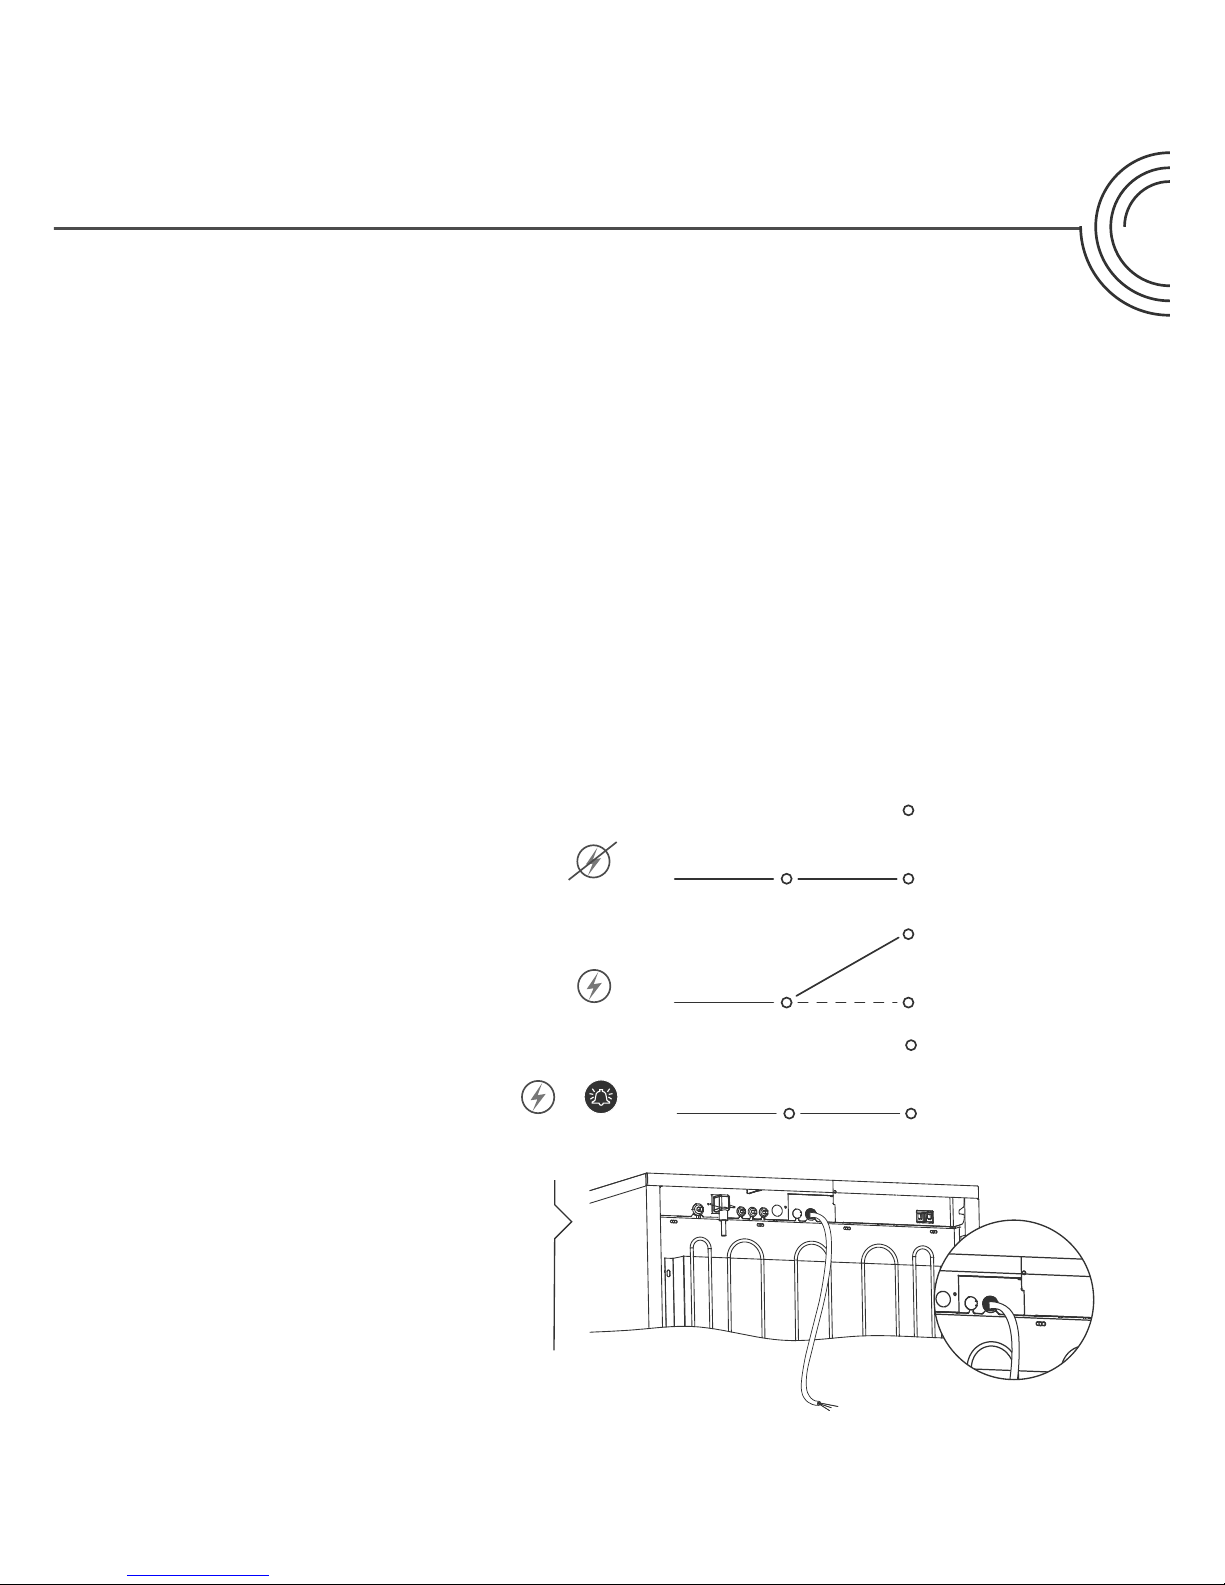
The illustration below shows the three connectors for the relay (e.g..
in connecting to CTS or other external monitoring systems). The three
connections, are respectively Common, NO (Normally Open) and NC
(Normally Closed).
The moment voltage is applied, the controller draws the relay, this
makes it possible for the controller to respond to both high and low
temperature alarms, door alarms and power failures. Find instructions
on setting the alarms in the controller settings section.
Voltage free contact
Normally closed
circuit (NC)
Connection of the voltage-free contact should be done by a qualied installer.
Location of the voltage
free contact
Page 12

12 | BIOBASIC MANUAL
Installation
When setting up in an ordinary scenario that is not subject to
regulations for EN 60079-15 zone 2:
The appliance may be connected in accordance with applicable local
heavy current regulations.
Note that there are special regulations for products that are in
accordance with EN 60079-15 zone 2.
The appliance has been manufactured in accordance with EN 6007915: Electrical apparatus for explosive gas atmospheres - Part 15: Type
of protection “n”. Zone 2 is the applicable zone. If the appliance is to be
installed in a zone 2 environment, specialist personnel should perform
the installation, or be consulted beforehand, in order to ensure that
the appliance is installed in compliance with the guidelines currently
contained in the standard.
The cabinet is intended for connection to alternating current. The
connection values for voltage (V) and frequency (Hz) are given on the
type/number-plate.
The power cord from the mains is plugged in
the terminal box on the back of the cabinet.
The plug is then xated in place by the
hanger that is built into the terminal box.
Please note that the hanger should be tted
tightly around the plug, as shown.
Connecting to electricity
Page 13

BIOBASIC MANUAL
|
13
The appliance must be connected to the external power supply using a
suitable device which mechanically prevents the plug and socket from
being separated unintentionally. The connection must be labelled:
”DO NOT SEPARATE WHEN ENERGIZED” .
Fuses and similar must never be removed or replaced while the
appliance is connected to a power source. The electrical terminal box
must never be opened while the appliance is connected to a power
source. The compressor starting equipment must never be dismantled
while the appliance is connected to a power source. The LED lighting
must never be dismantled while the appliance is connected to a power
source. Whenever electrical components are dismantled or replaced,
the appliance must be moved to an area in which there is no risk of
ignition caused by the electrical components or gases contained in the
appliance. Never use the cabinet if the plug is damaged. The cabinet
should be examined by a Gram Commercial A/S authorised service
technician in such cases.
In both cases:
Use a three-wire plug, if the power outlet is intended for a three-wire
plug, the lead in green / yellow insulation should be connected to the
ground terminal. Power must be connected via a wall socket. The wall
socket should be easily accessible. All earthing requirements stipulated
by the local electricity authorities must be observed. The cabinet plug
and wall socket should then give correct earthing. If in doubt, contact
your local supplier or authorized electrician.
In case of technical diculties or breakdowns, always
contact authorized service personnel. Never dismantle the
terminal box or any other electrical component.
Page 14

14 | BIOBASIC MANUAL
Start up
BIOBASIC +5º
MENU/
BACK
ALARM SET
MUTE
2ºC
15 ºC
7 1112
13
6
8
14
1
On/O
2
Select or conrm a menu
parameter
3
Navigate upwards in a given
menu / raise a given value
4
Navigate downwards in a
given menu / lower a given
value
5
Parameter settings menu / go
a menu-step back
6
Setpoint temperature setting
7
Temperature alarm settings
8
Acknowledge alarm, mute for
5 minutes
Page 15

BIOBASIC MANUAL
|
15
The digital display controls
ON/OFF
MENU/
BACK
UP
DOWN
SELECT
10 9 5 3 2
1
15 4
9
Key pad lock engaged
10
Display
11
Temperature- and/or door-
alarm registered
12
Parameter settings menu is
open
13
Defrost in progress
14
Visual distinction between
refrigerator or freezer
15
Door lock
Page 16

16 | BIOBASIC MANUAL
Start up
Turn On/O:
Press shortly to turn the cabinet on and press for 6 seconds to turn
the cabinet o.
Initiation procedure:
Readout of the software version and variant will occur shortly after
turning the cabinet on. The cabinet will then automatically start a
defrost-cycle, and terminate it again after a system check.
The cabinet is ready when the temperature is displayed.
The cabinet will always commence operation when initially connected
to a power supply. For instance after a power outage or when plugging
the cabinet in for the rst time.
Setpoint temperature adjustments:
Temperature adjustments are done by pressing for 3 seconds,
prompting the set point temperature. Adjust the set point temperature
by either pressing or . Conrm the settings by pressing .
Servicing:
Make sure the appliance is switched o at the socket before service is
performed on the cabinet. It is not sucient to switch o the cabinet on
the On/O button, as current will persist in some electrical parts of
the cabinet.
If fuses or similar are to be replaced, the appliance must be moved to a
no-risk area for safe replacement.
General introduction to the controller interface
Page 17

BIOBASIC MANUAL
|
17
Press
for 3 seconds to enter the alarm settings
Alarm settings
Unit
HL [° C]
High temperature alarm limit.
Code for activated alarm [A2]
LL [° C]
Low temperature alarm limit.
Code for activated alarm [A3]
Hd [Min.] Delay of high temperature alarm
Ld [Min.] Delay of low temperature alarm
dA On/o
Door alarm.
Code for activated alarm [ A1]. [1=on / 0=o]
dAd [Min.] Delay of door alarm
bU On/o
Acoustic signal for alarm codes
[ A1], [ A2] and [ A3]. [1=on / 0=o]
Alarm settings
Buttons and useful shortcuts
Buttons: Press for: Function:
- Acknowledge alarm, mute for 5 minutes
> 3 seconds Access the alarm settings
> 5 seconds Access the parameter settings
> 3 seconds Adjust/show setpoint temperature value
+
> 3 seconds Manually start or stop a defrost
+
> 6 seconds Activating / deactivating the keypad lock
-
Show highest registered temperature spike (since
the last reset of alarm and temperature history)
-
Show lowest registered temperature spike (since
the last reset of alarm and temperature history)
+
> 3 seconds Clear and reset alarm and temperature history
+ +
+
> 6 seconds Restores factory settings
+
Page 18

18 | BIOBASIC MANUAL
Operation parameters
Operation parameters
Unit
CA
[° K]
Oset of A-sensor. Reference sensor
for refrigeration and alarm system
d1
Number of defrosts per 24 hours (4
is factory setting)
d2
[° C]
Termination temperature in the
evaporator during a defrost
Li
On/o
*Only for glass door models* -
Turn light on or o
tEr
Relay test / Component test
tC [° C] Test compressor relay
tF [Min.] Test evaporator fan
td [Min.]
Test defrost element relay (RF
models)
tA [Min.]
Test alarm relay (will trip voltage
free)
tdP On/o Test display
Sensor read-out P-A
[° C] Test output of A-sensor
P-B
[° C] Test output of B-sensor
Please note - changing operation parameters without the expressed
consent from Gram Commercial A/S can have unintended implications
on performance and potentially void warranty.
Press for 5 seconds to enter operation parameters.
Page 19

BIOBASIC MANUAL
|
19
Error codes
Display code Explanation
- 0 - Door is open
A1 Door alarm “dAd” has been activated
A2 High temperature alarm “HL” is or has been activated
A3 Low temperature alarm “LL” is or has been activated
F1 Error on the main cabinet sensor. The refrigeration system will use an
emergency program to make the cabinet run. Temperature stability will be
aected. Service is required
F2 Error on the evaporator sensor. Service is required
Please nd instructions for connecting the “voltage-free contact” in the
“Installation” section.
In order to assure the safety of the stored items, the alarms
should be supported by external alarms. This can be done by
utilizing the possibility of the voltage-free contact.
Page 20

20 | BIOBASIC MANUAL
Sensor oset is used in cases where there are deviations in the
cabinet’s actual operation compared to control measurements by
independent temperature measuring systems.
The A-sensor is used to manage the cabinets refrigeration system, and
is also the reference sensor for the display and alarms.
The A-sensor is oset if the actual temperature in the cabinet does not
match the setpoint, despite taking the hysteresis into consideration.
Oset of A sensor is named “CA”.
Osetting the A-sensor
Press and hold for more than 5 seconds
Press to select “CA”
Press + to oset the A-sensor
Press to conrm the set value
The A-sensor is now oset, proceed to other parameters by pressing
, and then navigate by using or
Leave the user menu by pressing several times until
the cabinet temperature is shown in the display.
Sensor oset
Page 21

BIOBASIC MANUAL
|
21
Practical example of osetting:
Example 1 - The temperature in the cabinet is operating colder than
the actual setpoint.
With a setpoint of +4°C, the actual temperature inside the cabinet is
between +2 and +4°C. The desired temperature range is between +3
and +5°C. This means that “CA”, in this case, should be -1,0K, so that the
refrigeration system stops 1,0K before and starts 1,0K later than the
setpoint normally otherwise would dictate.
Example 2 - The temperature in the cabinet is operating warmer than
the actual setpoint.
With a setpoint of +4°C, the actual temperature inside the cabinet is
between +4 and +6°C. The desired temperature range is between +3
and +5°C. This means that “CA”, in this case, should be 1,0K, so that the
refrigeration system stops 1,0K later and starts 1,0K earlier than the
setpoint normally otherwise would dictate.
Page 22

100mm
20mm
22 | BIOBASIC MANUAL
Ordinary use
The cabinet is not suited for storing items that emit vapours, as they
might corrode the cabinet and its components.
All the items stored in the cabinet that are not sealed, or wrapped,
should be covered to reduce the risk of corrosion of the cabinet and its
components.
Items placed on the bottom of the cabinet will cause the air circulation
to be impeded, reducing the cabinets performance.
Items should be evenly distributed in the cabinet, with minimum layerthickness / maximum surface. And at the same time, the air should be
able to circulate freely between the items.
Keep the marked areas in the cabinet
(shown on this page) clear of all items,
ensuring adequate air circulation, and
therein cooling.
Do not place items beneath the lowest
shelf bracket.
Page 23

BIOBASIC MANUAL
|
23
Regular maintenance
Always disconnect the cabinet before cleaning.
The cabinet should be cleaned internally with a mild soap solution
(Max. 85°C) at suitable intervals and checked thoroughly before it is put
into operation again.
It is recommended that the re-evaporation tray is cleaned at least once
a year. This shall only be done while the cabinet is turned o.
Be careful not to damage the defrost water tube and heating element
(located in the tray) when cleaning.
Cleaning agents containing chlorine or compounds of chlorine as
well as other corrosive agents, may not be used, as they might cause
corrosion to the stainless panels of the cabinet and the evaporator
system.
Cleaning
The compressor compartment and in
particular the condenser must be kept free
from dust and dirt. This is best done with a
vacuum cleaner and a brush. Do not ush
compressor compartment or evaporator
with water as this may cause short-circuits
in the electrical system.
Page 24

24 | BIOBASIC MANUAL
Door gaskets
Door gaskets are an important part of a cabinet, door gaskets
with impaired functionality reduces a cabinets seal with the door.
Impaired seals can lead to increased humidity in the storage chamber,
iced evaporator (and thus reduced cooling capacity), and in some
cases, decreased lifetime expectancy of the cabinet. It is therefore
very important to be aware of the door gaskets condition. Regular
inspections are recommended.
The door gasket should be
cleaned regularly with a mild
soap solution.
If a gasket is to be replaced,
please contact your local Gram
BioLine distributor.
Page 25

BIOBASIC MANUAL
|
25
General info
Is the cabinet being used for purposes other than its intended use, or
use of the cabinet is not in accordance with guidelines specied in the
user manual, the user bears full responsibility for any consequences
thereof.
Defective parts must be replaced with original parts from Gram
Commercial A/S. Gram Commercial A/S can only guarantee functional
and safety requirements on the cabinets, if above-mentioned is
adhered to.
The cabinets refrigeration components should at least be checked once
a year by a Gram Commercial A/S technician or a similar professional.
Quote the serial number (SN) of
a cabinet when referring to it.
This information can be found
on the type/number-plate
located on the inside of the
storage chamber.
Page 26

26 | BIOBASIC MANUAL
Reversing of door
1. Switch o the power at the mains socket.
2. Dismantle the two screws that hold the control panel at front
and back, pull the panel a little forward, and then tilt it upwards.
3. Dismantle the hinge at pos. A, and lift o the door.
4. Dismantle the hinge at pos. B, and mount it at pos. F.
5. Turn the door 180°, and x it at the hinge pos. F.
6. Mount the hinge from pos. A in pos. D, and move bracket from
pos. C to pos. E.
7. Fasten the control panel again. Apply power to the cabinet.
Applicable to cabinets without self close device and glass door
C A
B
D
E
F
Left hinged Right hinged
Page 27

BIOBASIC MANUAL
|
27
IMPORTANT
There may occur sharp edges on the cabinet housing, compressor
room, and interior furnishings. Show due diligence when handling the
cabinet, neglect of these precautions can lead to injuries.
Danger of wedging in the frame slot between the door and the cabinet,
show due diligence when opening and closing the cabinet door.
Negligence of these precautions can lead to injuries.
Danger of wedging in the drawer column between the drawers and
interior of the cabinet, show due diligence when using the drawers.
Negligence of these precautions can lead to injuries.
Unlocked castors can lead to unexpected movements of the cabinet.
Lock the castors after installation. Negligence of these precautions can
lead to injuries.
The re-evaporation tray, re-evaporation tray heating element, pressure
pipes and compressors develops considerable heat during operation.
Assure that these components are suciently tempered before
touching. Negligence of these precautions can lead to injuries.
The evaporator develops considerable cold during operation.
Assure that the evaporator is suciently tempered before touching.
Negligence of this precaution may lead to injuries.
The fan may cause injury during operation, avoiding touching the
fans while the cabinet is connected to the mains. Negligence of these
precautions can lead to injuries.
Do not use electrical appliances inside the cabinet.
Notice
Page 28

28 | BIOBASIC MANUAL
Electrical and electronic equipment (EEE) contains materials,
components and substances that can be dangerous and harmful to
human health and the environment if the waste (WEEE) is not disposed
of properly.
Products that are labelled with a “crossed-out wheelie bin ‘is electric
and electronic equipment. The crossed out wheelie bin symbolizes
that waste of this type can not be disposed of with unsorted municipal
waste, but must be collected separately.
Contact you local BioLine distributor when the cabinet needs to be
disposed of.
For additional information, see our website:
www.gram-biobasic.com
Disposal
Page 29

Rev. 002 - 17.05.2018
BIOBASIC MANUAL
|
29
Declaration of Conformity
English EC Declaration of Conformity
W e, Gram Co mmercial A/S declare under sole responsibility that the following products:
Nam e: GRAM BIOBASIC
Model: 210, 310 & 410
Refrigerant: R134a & R600a
To which this declaration relates, is in c ompliance with all the applicabl e essential requirements, and ot her provisions of t he European
Council Directive.
Directive of the European Parliament and of the Council:
- ATE X Directive 2014/34/EU
- Pressure Equipment Directive 2014/68/EU
- Directive for Machinery 2006/42/EU
- Low Voltage Directive 2014/35/EU
- EMC Directive 2014/30/EU
- RoHS 2011/65/EU
Product c ompliance has been demonstrated on the basis of:
Harmonized Standards:
Text:
DS/EN 61010-1: 2010
Safety requirements for electr ical equipment for measurement, control, and
laboratory use - Part 1: G eneral requirements .
DS/EN 61326-1: 2013
Electric al equipment for meas urement, control an d laboratory use. EMC
requirements. General requirements.
DS/EN 60079-0: 2012
Electric al apparatus for explosive atmospheres.
DS/EN 60079-11: 2012
Explosive atmospheres - Part 11: Equipment protection by intrinsic safety "i".
DS/EN 60079-15: 2010
Explosive atmospheres - par t 15: T ype og pr otection “n” .
DS/EN 60079-25: 2010
Explosive atmospheres - part 25: Intrinsically safe systems.
DS/EN 60704-1: 2010
Household and similar electrical appli ances - T est cod e for the det erminat ion of
airborne acoustical noise - Part 1: Gen eral requirements.
DS/EN ISO 3744: 2010
Acoustics - Determination of sound power levels of noise s ources using sound
pressure - Engineering method in an essentially free field over a reflecting plane.
DS/EN ISO 9001: 2008
Quality management systems.
DS/EN 50581: 2012
Technical documentation for the assesment of electrical and eletronic products with
respect to the restriction of hazardous substances.
Gram Commercial A/S
Aage Grams Vej 1
DK-6500 Vojens
Telephone: + 45 73 20 13 00
Vojens, 17.05.2018
John B. S. Petersen
Approval Manager
Page 30

30 | BIOBASIC MANUAL
Wiring diagrams
Page 31

BIOBASIC MANUAL
|
31
Page 32

32 | BIOBASIC MANUAL
Piping diagram
Page 33

BIOBASIC MANUAL
|
33
Notes
Page 34

34 | BIOBASIC MANUAL
Notes
Page 35

BIOBASIC MANUAL
|
35
Page 36

Gram Commercial A/S
Aage Grams Vej 1
DK-6500 Vojens
Tel. +45 7320 1300
Info@gram-bioline.com
Item number 765041746 Rev.: 180518
Language: English
 Loading...