

Page 1
SERIES / SERIE / SÉRIE
AM
3000 / 6000 / 15K / 30K
OPERATION MANUAL
MANUAL DE UTILIZACION
MANUEL D´UTILISATION
Page 2
2
INDEX English
Requirements for an optimal installation 5
Components included 5
Unpacking 6
Installation 6
Display description 7
Keyboard description 7
Calibration 8
Reset to Zero 9
Tare function 9
Weight unit selection 10
Auto-Turn off 11
Backlight 11
Maintenance 12
Battery charge 13
Technical characteristics 13
Troubleshooting guide 14
Guarantee 15
Page 3

3
ÍNDICE Español
Requisitos para una óptima instalación 16
Componentes incluidos 16
Desembalaje 17
Puesta en marcha 17
Descripción del display 18
Descripción del teclado 19
Calibración 19
Puesta a cero 21
Utilización de la tara 21
Cambio de unidad 22
Autodesconexión 22
Iluminación automática del display 23
Consejos para el mantenimiento 24
Carga de la batería 25
Características técnicas 25
Guía de averías 26
Garantía 27
Page 4
4
SOMMAIRE Français
Conditions requises pour une installation optimale 28
Composants inclus 28
Deballage 29
Mise en marche 29
Description de l’ecran 30
Description du clavier 31
Calibrage de modeles non verifies 31
Mise a zero 33
Utilisation de la tare 33
Changement d’unite 34
Mise en veille automatique 34
Eclairage automatique de l’ecran 35
Conseils pour l’entretien 36
Recharge de la batterie 37
Caracteristiques techniques 37
Problemes / Solutions 38
Garantie 39
Page 5

5
ENGLISH
REQUIREMENTS FOR AN OPTIMAL INSTALLATION
To obtain the maximum performance and the best results, we recommend
installing the balance according to the following requirements:
• Install it on a firm and stable surface.
• Place it on a stable base free of vibrations.
• Don´t expose it to direct sunlight.
• Don´t submit it to atmospheres with corrosive gases.
• Keep it in an environment free of dust and dirt.
• Work at temperatures between 0º and 40º C.
• Use the balance in environments with humidity lower than 95% HR.
• Keep the balance away equipments that produce magnetic oracoustic
interferences.
• Calibrate it in its definitive location and check it regularly with the
optional calibration weight. If necessary, recalibrate it.
COMPONENTS INCLUDED
Unpack the balance carefully. Inside the carton you will find the following
components:
• This user manual (please read it before using the balance).
• A AC/Adaptor 9V / 500 mA or 700mA.
Page 6
6
• A balance Series AM.
• A transparent dust cover.
• A weighing pan.
VERY IMPORTANT: Keep the original package. It could be useful in the future
in transporting the balance.
UNPACKING
1. Remove the weighing pan from the package.
2. Remove the balance and place it on a flat, firm and stable surface.
3. Install the weighing pan, so that the four platter screws fit in the top
holes of the balance.
INSTALLATION
1. Level the balance by turning the four adjustable feet, the bubble level
located on rear side of the balance must remain in the centre of circle.
2. Connect the balance to the supplied AC/Adaptor 220 V 50.
3. Keep the balance connected for 8 hours to fully charge the rechargeable
battery (This action is only necessary for the first installation or if the
balance was stored for several months).
4. Press the ON-CERO key. The balance performs with a self-test, after a
few seconds the display will show zero value.
5. To obtain maximum accuracy, it is necessary to maintain the balance
Page 7
7
connected for about 10 minutes before using it. However, the balance
can be used immediately with good results.
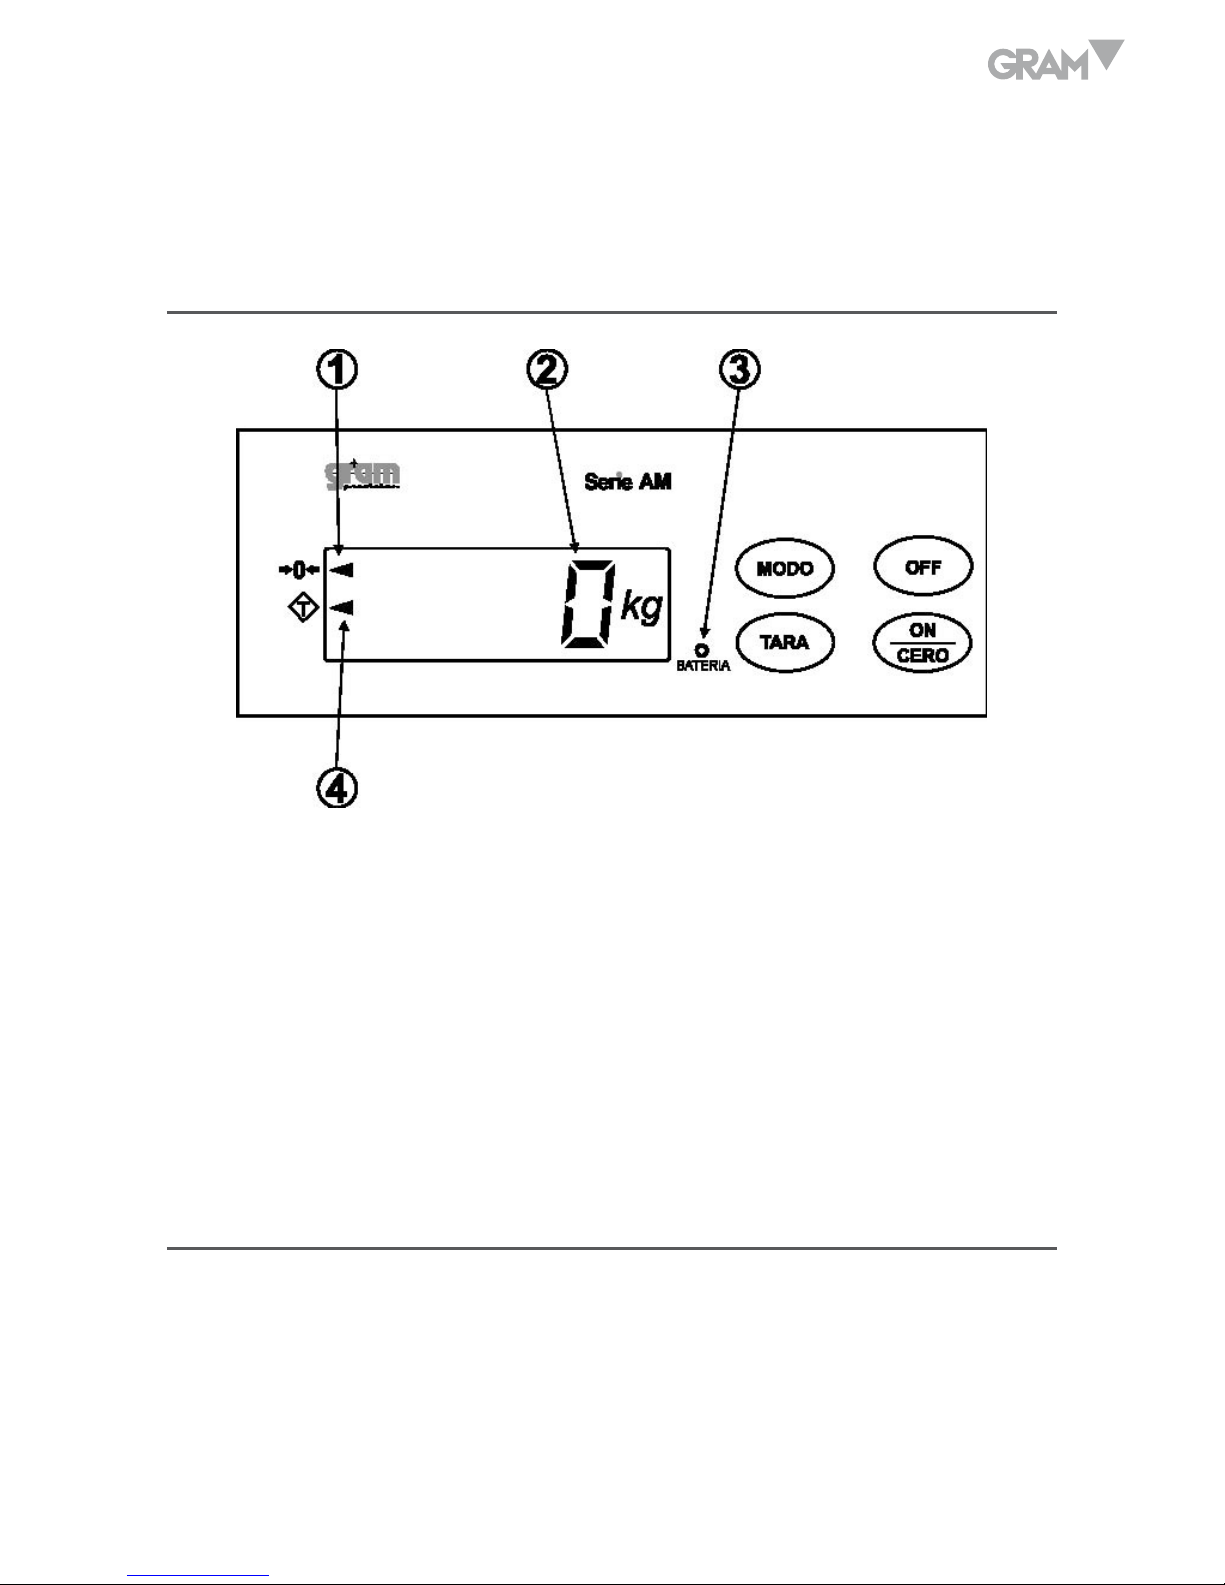
DISPLAY DESCRIPTION
1. Indicates that the balance is in zero point, if the function tare is not
in use.
2. Shows the weight of item located on the weighing platter.
3. Indicates that battery is low. In this moment, connect the balance
to the AC/Adaptor to charge the battery.
4. Indicates that the Tara function is activated. The weight showed on
display is the net weight.
KEYBOARD DESCRIPTION
ON-CERO
Press this key to turn on the balance and to zero the display´s reading.
Page 8

8
OFF
Press this key to turn off the balance.
MODO
Press this key to activate or deactivate the backlight.
TARA
Press this key to tare the weight of a container.
CALIBRATION
When the balance is initially installed, you should calibrate it using an
appropriate calibration weight.
Each model is calibrated with two calibration weight values, see the following
table:
MODELO 1 Kg 2 Kg 5 Kg 10 Kg 20 Kg
AM - 3000
AM - 6000
AM - 15K
AM - 30K
Procedure
1. When the balance is turned-off press the MODO key, and, without
releasing it, press the ON-CERO key. First, release the ON-CERO key and
then the MODO key.
2. The calibration procedure will start automatically. The display will show
Page 9
9
the message “CAL?”.
3. Press the MODO key, the display will show “YES” and after a while it will
show “LOAD XX OR XX” (XX is the weight calibration value).
4. Carefully place the appropriate weight calibration in the centre of
weighing pan.
5. The balance will accept automatically the weight value.
6. When the message “Done” appears on the display, it means that calibration
has been completed successfully.
7. The balance will show the calibration weight value.
8. If you wish to cancel calibration procedure, press the TARA key.
RESET TO ZERO
When it happens that the balance is on with no object on the weighing pan
but the display is not showing zero (0) and the zero indicator is not lighting,
press the ON-CERO key to correct the reading.
The balance has an internal zero correction (auto zero), this system is
disconnected when the balance is tared or has an object on the platter.
TARE FUNCTION
This function allows obtaining the net weight of a product placed in a
container.
1. With display showing zero “0”, place the container on the weighing pan.
Page 10

10
2. Press the TARA key.
3. The display will show “0”.
4. Put the product inside the container, the display will show its weight (net
weight).
5. To return to normal weighing mode, remove the container and press the
TARA key.
WEIGHT UNIT SELECTION
To select the desired weight unit:
1. When the balance is turned-off press the TARA key and without releasing
it, press the ON-CERO, first release the ON-CERO key and then the TARA
key, the display will show the message “F1”.
2. Press the TARA key twice.
3. Keep pressing the MODO key until the symbols “g” or “lb” appear on the
right side of the display, then release the key.
4. By pressing the MODO key, the indication will alter between “g” and “lb”.
5. If the selected unit is “g”, the balance only weighs in gram.
6. If the selected unit is “lb”, you can change the weight unit to gram, to
pounds and to pound / ounces, by pressing the MODO key.
7. To save the selection, press the ON-CERO key.
(Default value: g)
Page 11
11
AUTO-TURN OFF
This function allows prolonging the battery life when the balance is not used.
The balance will turn-off automatically after a few minutes of not using it.
1. When the balance is turned-off, press the ON-CERO and without
releasing it, press the TARA key.
2. The display will show “F1”.
3. Press the TARA key three times, until the “F4” appears.
4. Press the MODO key. The display will show “0 OFF” (auto-turn off
disabled) or “4 OFF” (auto-turn off activated).
5. Press the MODO key to choose the desired option.
6. Press the ON-CERO to confirm.
BACKLIGHT
The backlight feature is very useful in environments with little light.
Press the MODO key to change the weight unit and to activate or deactivate
the backlight.
The backlight will turn on only when the balance is in use, when the balance
does not detect any object on the weighing pan, the backlight will turn off. In
this way, the battery life is extended.
Page 12

12
MAINTENANCE
This balance is a precision instrument, designed and manufactured by using
high technology. Please, use the balance according to following requirements:
1. Never disassemble or open the balance housing.
2. The balance must be used in environments free of vibrations.
3. Do not expose the balance to direct sunlight.
4. Avoid the entrance of liquids inside the balance. Clean periodically the
base with a wet cloth with mild soap. To clean the weighing pan, remove
it and clean it separately.
5. Keep the instrument away from heat sources (store, electric hobs, etc. ).
6. Install the balance in a cool, clean and dry place.
7. Do not drop objects on the weighing pan.
8. When the balance is not used, the weighing pan must remain empty, with
on object on it.
9. Do not exceed the maximum capacity of the balance.
10. Use the AC/Adaptor provided with the balance. If you use other AC/
Adaptor it can damage the internal circuits and this causes the loss of
warranty rights.
11. When the balance is not used for a long time, unplug it and disconnect the
charger. Protect it from dust and keep it in a dry place with a temperature
between 0 and 40º C.
Page 13

13
BATTERY CHARGE
When the battery indicator appears on the display, it means that battery is
low. Proceed to charge it immediately.
To do it, connect the provided AC / Adaptor to the mains (220V).
The battery can work independently for about 150 hours. If you use the
backlight function the autonomy time is reduced. Replace the battery when
the autonomy time is shorter than 24 hours.
TECHNICAL CHARACTERISTICS
Model AM-3000 AM-6000 AM-15K AM-30K
Capacity 3000 g 6000 g 15.000 g 30.000 g
Readability 1 g 2 g 5 g 10 g
Tara range 999 g 1.998 g 4.995 g 9.990 g
Zero range
(at the beginning)
± 300 g ± 600 g ± 1.500 g ± 3.000 g
Zero range ± 60 g ± 120 g ± 300 g ± 600 g
Weighing minimum 20 g 40 g 100 g 200 g
Platter size 245 x 300 mm
Balance size 285 x 336 x 134 mm
Power Rechargeable battery / AC / Adaptor 220 V -9V/800 mA
Weight
4,3 kg
Page 14

14
TROUBLESHOOTING GUIDE
Sympton Cause / Solution
The balance does not turn on
Discharged battery / Charge it using the AC/
Adaptor
Plug the AC/Adaptor.
Connect the power connector to the balance.
The balance turn on but
the zero indicators doesn’t
appear
The weighing pan is not installed correctly.
There is a possible object on the weighing pan.
Remove all items from the pan and connect again
the balance.
The balance doesn’t weigh in
whole capacity
Tare indicator activated. Disconnect the balance,
remove all items from the pan and connect the
balance again.
An object is located between the weighing pan and
the balance. Remove this object.
There are air currents, turbulences or
electromagnetic interferences. Place the balance
away from these disturbances.
The balance doesn’t operate
correctly
You are using an incorrect weight unit. Check in
display that weight unit is the correct, otherwise,
press the MODE key to select it.
The balance is not placed on a flat surface or is
not levelled. Adjust the adjustable feet until the
level bubble remains in the centre of the circle.
There are air currents, turbulences or
electromagnetic interferences. Place the balance
away from this disturbances.
The balance needs to be calibrated. Calibrate it or
contact with your Distributor.
The balance goes OFF by
itself
Auto-power off function activated. Deactivate this
function.
The battery indicator is on. Recharge the battery
with the AC / Adaptor.
The display is full of zeros
The object located on the weighing pan exceeds
the maximum capacity of the balance. Remove the
object from weighing pan and try again.
Page 15

15
GUARANTEE
This balance is guaranteed for one year from the delivery date. The guarantee
covers any fabrication defect of the material.
During this period, GRAM PRECISION, SL, covers the manpower and the
spare parts necessary to repair the scale.
This guarantee does not cover the failures caused by an inappropriate use
or overload.
The guarantee does not cover the freight cost (transport) necessary to
repair the balance.
Page 16

16
ESPAÑOL
REQUISITOS PARA UNA ÓPTIMA INSTALACIÓN
Para obtener el máximo rendimiento y los mejores resultados, recomendamos
instalar la balanza de acuerdo con los siguientes requisitos:
• Instalarla en una superficie plana.
• Apoyarla en una base estable y exenta de vibraciones.
• No exponerla a la luz solar directa.
• No someterla a atmósferas con gases corrosivos.
• Mantenerla en ambientes libres de polvo o suciedad.
• Trabajar a temperaturas entre 0º y 40º C.
• Utilizarla en ambientes con una humedad inferior a un 95% HR.
• Mantenerla lejos de equipos que produzcan cualquier interferencia
magnética o acústica.
• Calibrarla en su emplazamiento definitivo, y comprobarla periódicamente
con una pesa de calibración (equipamiento opcional); y si fuera necesario,
calibrarla (excepto unidades con Certificación CE OIML).
COMPONENTES INCLUIDOS
Desembalar la balanza con cuidado. En el interior de la caja encontrará los
siguientes componentes:
• Este manual de instrucciones (léalo atentamente antes de utilizar la balanza).
Page 17

17
• El alimentador/cargador de batería de 9V / 500 mA ó 700mA.
• La balanza Serie AM.
• El blister transparente de protección (sobre la balanza).
• El plato de pesada con la parte superior de acero inoxidable.
Importante: No deshacerse del embalaje. Puede ser útil en el futuro si fuera
necesario transportar la balanza.
DESEMBALAJE
1. Retirar el plato del embalaje.
2. Retirar el resto del embalaje que cubre la balanza.
3. Sacar la balanza de la protección y colocarla en su emplazamiento definitivo
que debe ser una superficie plana, lo más estable y rígida posible.
4. Colocar el plato sobre la misma, de forma que encajen los cuatro
cilindros del plato en los orificios superiores de la balanza.
PUESTA EN MARCHA
1. Nivelar la balanza, girando sus cuatro pies regulables, hasta que la
burbuja del nivel situada en la parte posterior de la balanza se encuentre
en el centro del círculo interior de la burbuja. Hacerlo de forma que
todos los pies regulables se apoyen sobre la mesa o superficie de apoyo.
2. Conectar el alimentador / cargador a una toma de 220 V 50 Hz y después
el cable al conector de la balanza, situado en su parte inferior (si la batería
está cargada, puede utilizarse con batería, sin conectar el alimentador).
Page 18

18
3. Mantener el alimentador conectado al menos 8 horas, para cargar
completamente la batería. (Esto solo es necesario efectuarlo cuando
se instala por primera vez, y siempre que la balanza permanezca sin
utilizarse durante varios meses).
4. Pulsar la tecla ON-CERO. La balanza realizará un auto-test, después de
unos segundos aparecerá el cero en el display.
5. Para obtener la máxima precisión es necesario mantener la balanza
conectada durante unos 10 minutos como mínimo, antes de utilizarla.
No obstante, la balanza se puede utilizar inmediatamente, con buenos
resultados.
DESCRIPCIÓN DEL DISPLAY
1. Indica que la balanza se encuentra en el punto cero, siempre que
no se esté utilizando ninguna tara.
2. El display indica el peso de la muestra colocada sobre el plato.
3. Indica que la batería se está agotando y deberemos cargarla
conectando el alimentador a una toma de 220 V en la entrada
inferior de la balanza.
Page 19

19
4. Indica que se está utilizando la tara y que el display está dando la
lectura de la muestra que estamos pesando, descontando la tara.
DESCRIPCIÓN DEL TECLADO
ON-CERO
Al pulsarla con la balanza apagada, la pone en marcha. Si la pulsamos con
la balanza en marcha, corregiremos la puesta a cero.
OFF
Al pulsar esta tecla con la balanza en marcha, la desconectare-mos.
MODO
Al pulsarla conecta la iluminación del display o la desconecta.
TARA
Pulsar esta tecla para restar el peso de un recipiente o conte-nedor.
CALIBRACIÓN
Cuando se instala inicialmente la balanza, es recomendable calibrarla
utilizando una pesa de calibración adecuada.
Cada modelo se calibra con dos valores de pesa de calibración, de acuerdo
con la siguiente tabla:
Page 20

20
MODELO 1 Kg 2 Kg 5 Kg 10 Kg 20 Kg
AM - 3000
AM - 6000
AM - 15K
AM - 30K
Antes de proceder a la calibración, situar la balanza bien nivelada en
un lugar libre de corrientes de aire, vibraciones y de cualquier agente
perturbador. Mantenga la balanza conectada durante 30 minutos o más.
Estas recomendaciones son muy importantes para realizar una buena
calibración.
1. Con la balanza desconectada, con la plataforma limpia y sin ningún
objeto en su superficie, pulsar la tecla MODO y sin dejar de pulsarla,
pulsar también la tecla ON-CERO. Soltar la tecla ON-CERO y luego la de
MODO.
2. El procedimiento de calibración empieza automáticamente. Aparecerá
en el display el mensaje “CAL?”. Pulsar la tecla MODO otra vez, y el
display mostrará “YES”, y después de unos instantes, “LOAD XX OR
XX”, donde “XX” será la pesa de calibración necesaria, dependiendo del
modelo (ver tabla anterior).
3. Colocar cuidadosamente la pesa de calibración adecuada sobre el centro
del plato. La balanza aceptará el valor de la pesa automáticamente.
Cuando aparezca el mensaje “Done” la operación habrá finalizado y la
balanza se pondrá en marcha indicando en el display el valor de la pesa
de calibración.
4. Si se desea abortar la calibración, pulsar la tecla TARA y la balanza se
pondrá en marcha sin realizar la calibración.
Page 21

21
PUESTA A CERO
En caso de que durante la utilización de la balanza, con el plato vacío, el
display no indique la lectura cero (0) ni se ilumine el indicador de “cero”,
pulsar la tecla ON-CERO para su corrección.
La balanza dispone de un sistema interno de corrección del cero (autocero)
pero este sistema se desconecta cuando la balanza está tarada o tiene un peso
sobre el plato. Siempre que la balanza esté descargada (con la plataforma
vacía) y queramos realizar una pesada, comprobar que el indicador “cero”
esté encendido, y si no lo está, pulsar la tecla ON-CERO para encenderlo.
UTILIZACIÓN DE LA TARA
Esta función posibilita pesar el producto que se introduce en un reci-piente
descontando el peso del mismo.
1. Con el display de la balanza marcando cero “0”, situar el recipiente
sobre el plato.
2. Pulsar la tecla TARA para realizar el tarado del recipiente. El display
visualizará “0”.
3. Introducir la muestra dentro del recipiente y su peso será visualizado en
el display.
4. Se puede realizar la tara repetidas veces, pulsando la tecla TARA,
después de añadir otras muestras.
5. Para volver la balanza a su posición inicial, sacar el recipiente de
la balanza, y pulsar la tecla TARA, con lo que la balanza volverá a su
posición de reposo “0”.
Page 22

22
CAMBIO DE UNIDAD
Esta balanza dispone de varias unidades de pesada (g, Libras y Libras/
onzas). Por defecto, está activado el pesaje sólo en g.
Para activar las demás unidades, con la balanza desconectada, pulsar la tecla
TARA y mientras la mantenemos pulsada, pulsar también la tecla ON-CERO.
Soltar la tecla ON-CERO y luego la de TARA y el display mostrará “F1”.
Pulsar la tecla TARA dos veces. El display mostrará “F3”.
Pulsar y mantener pulsada la tecla MODO hasta que aparezca por la derecha
del display la indicación “g” o “lb”. Soltar la tecla MODO.
Al pulsar la tecla MODO otra vez, la indicación alternará entre “g” y “lb”.
Si seleccionamos “g”, la balanza sólo pesará en g, si seleccionamos “lb”,
podremos cambiar la unidad de pesada de gramos a libras o libras/ onzas,
en el momento del pesaje.
Para memorizar la selección, pulsar la tecla ON-CERO y la balanza se pondrá
en marcha.
Si hemos seleccionado “lb”, al pulsar ahora la tecla MODO, el display
cambiará a la unidad “libras” y “libras/onzas” y al volver a pulsar la tecla
MODO, volverá a “gramos”.
AUTODESCONEXIÓN
Esta función permite alargar la vida de la batería cuando no se utiliza la
balanza. Para ello, desconecta la balanza automáticamente cuando han
pasado unos minutos sin utilizarla.
La función de auto-desconexión se puede cancelar. Para ello, realizar las
Page 23

23
siguientes operaciones:
1. Con la balanza apagada pulsar la tecla ON-CERO mientras se mantiene
pulsada la tecla TARA.
2. El display mostrará el mensaje “F1”. Pulsar la tecla TARA tres veces,
hasta que aparezca en el display “F4”.
3. Pulsar la tecla MODO. El display mostrará “0 OFF” (la balanza no se
desconectará) ó “4 OFF” (la balanza se desconectará pasados unos
minutos sin utilizarla).
4. Pulsar la tecla MODO para elegir la modalidad deseada.
5. Pulsar la tecla ON-CERO para memorizar la selección deseada.
ILUMINACIÓN AUTOMÁTICA DEL DISPLAY
La iluminación del display es muy útil en ambientes con poca iluminación
ambiental.
Para activarla pulsar la tecla MODO y el display se iluminará (si no está
activada la función de cambio de unidad). Si está activada esta función, pulsar
varias veces esta tecla, hasta que la balanza indique la unidad deseada
(flecha inferior para gramos), y la iluminación se conecte.
El display se encenderá sólo cuando la balanza se esté utilizando; cuando no
detecte nada sobre el plato, se apagará , encendiéndose otra vez cuando se
deposite un objeto sobre él. De esta forma, se alarga la vida de la batería, y
el tiempo de recarga.
Para anular la iluminación pulsar la tecla MODO y la iluminación se
desactivará.
Page 24

24
CONSEJOS PARA EL MANTENIMIENTO
Esta balanza es un instrumento de precisión, diseñado y fabricado con la más
alta tecnología, para pesadas de precisión. Rogamos que utilice la balanza
de acuerdo con las siguientes recomendaciones:
1. No desmontar ni abrir nunca la carcasa de la balanza.
2. Este instrumento no debe ser utilizado en entornos con vibraciones, ni
debe ser expuesto a la radiación solar directa.
3. Evitar que entren productos líquidos en el interior de la balanza. Limpiar
periódicamente la base con un paño humedecido con agua y jabón suave.
Para limpiar el plato, debe desmontarse antes de la balanza y limpiarlo
por separado; no hacerlo nunca con el plato sobre la balanza, porque la
presión ejercida al limpiar puede dañar el sistema de pesada.
4. Mantener el instrumento alejado de fuentes de calor (estufas, placas
eléctricas. etc.).
5. Mantener la balanza en un lugar fresco, limpio y seco.
6. No dejar caer objetos sobre el plato de la balanza, ni depositarlos sobre
él, cuando la balanza no se use.
7. No sobrepasar en ningún caso la capacidad máxima de la balanza.
8. Utilizar única y exclusivamente el alimentador/cargador estándar
suministrado con la balanza. Si se utiliza otro alimentador, pueden
dañarse los circuitos internos de la balanza, y esto ocasiona pérdida de
la garantía.
9. Cuando no se utilice la balanza durante un periodo prolongado de tiempo,
desconectar el alimentador de la red y de la balanza. Proteger la balanza
del polvo y mantenerla en lugar seco y a temperaturas entre 0 y 40 ºC.
Page 25

25
CARGA DE LA BATERÍA
Cuando se encienda en el display el indicador de batería agotada, se deberá
proceder a la carga de la misma inmediatamente.
Para ello, conectar el alimentador / cargador a la red (220 V), y después a la
toma situada en la parte inferior de la balanza.
No dejar el conector fijado a la balanza, y desconectado de la red, porque se
descargaría completamente la batería.
Con la batería nueva, la autonomía es de una 150 horas de servicio,
aproximadamente. Si se utiliza la iluminación del display, la autonomía se
reduce. Cambiar la batería cuando la autonomía sea muy baja (menos de
24 horas).
CARACTERÍSTICAS TÉCNICAS
Modelo AM-3000 AM-6000 AM-15K AM-30K
Capacidad 3000 g 6000 g 15.000 g 30.000 g
Escalón de verificación 1 g 2 g 5 g 10 g
Rango de tara 999 g 1.998 g 4.995 g 9.990 g
Rango de cero (al inicio) ± 300 g ± 600 g ± 1.500 g ± 3.000 g
Rango de cero ± 60 g ± 120 g ± 300 g ± 600 g
Mínima pesada 20 g 40 g 100 g 200 g
Dimensiones plato 245 x 300 mm
Dimensiones balanza 285 x 336 x 134 mm
Alimentación Batería recargable / Alimentador 220 V -9V/700 mA
Peso
4,3 kg
Page 26

26
GUÍA DE AVERÍAS
Síntoma Causa / Solución
La balanza no se
enciende
Batería descargada. Cargarla con el alimentador/cargador
standard.
Conectar el Alimentador correctamente a la red.
Insertar el conector de alimentación a la balanza.
La balanza se
enciende, pero el
cero no aparece en el
indicador
Plato mal encajado. Retirarlo, y volver a colocarlo
correctamente.
Plato lleno. Retirar todos los objetos del plato, dejarlo vacío
y volver a conectar la balanza.
La balanza no pesa
toda su capacidad
Indicador de tara encendido. Desconectar la balanza,
retirar todos los objetos del plato y volver a conectarla.
Algún objeto está entre la balanza y el plato, o no deja que
el plato se desplace libremente. Sacar el objeto.
Existen corrientes de aire, turbulencias o interferencias
electromagnéticas. Situar la balanza lejos de estas
perturbaciones.
La balanza no pesa
correctamente
Se está utilizando una unidad de pesada errónea.
Comprobar en el display que la unidad de pesada sea
la correcta. De no ser así, pulsar la tecla MODO hasta
seleccionarla.
La balanza no está situada en una superficie plana., o no
está nivelada. Ajustar los pies regulables, hasta que la
burbuja del nivel se sitúe en el centro del círculo.
Existen corrientes de aire, turbulencias o interferencias
electromagnéticas. Situar la balanza lejos de estas
perturbaciones.
Balanza mal calibrada o descalibrada. Calibrarla, o
contactar con su distribuidor para que la calibre.
La balanza se apaga
sola
Está activada la función de auto-desconexión. Desactivarla.
Se enciende el indicador de batería baja. La batería está
descargada.
Cargarla, conectando el alimentador.
La pantalla está llena
de ceros
El peso depositado sobre la plataforma excede la
capacidad de la balanza. Retirar los objetos del plato, y
volver a comprobarlo.
Page 27

27
GARANTÍA
Esta balanza está garantizada contra todo defecto de fabricación y de
material, por un periodo de 1 año a partir de la fecha de entrega.
Durante este periodo, GRAM PRECISION, SL, se hará cargo de la reparación
de la balanza.
Esta garantía no incluye los daños ocasionados por uso indebido o
sobrecargas.
La garantía no cubre los gastos de envío (portes) necesarios para la
reparación de la balanza.
Page 28

28
FRANÇAIS
CONDITIONS REQUISES POUR UNE INSTALLATION OPTIMALE
Pour obtenir un rendement optimal et les meilleurs résultats, nous vous
recommandons d’installer la balance selon les conditions suivantes:
• L’installer sur une surface plate.
• La poser sur une base stable et exempt de vibrations.
• Ne pas l’exposer directement aux rayons de soleil.
• Ne pas la soumettre à des environnements contenant des gaz corrosifs.
• La conserver dans un environnement dépourvu de poussière et résidus.
• Travailler avec une température comprise entre 0° et 40° C.
• L’utiliser dans un environnement contenant une humidité inférieure à
95% HR.
• La maintenir loin des appareils qui produisent des interférences
magnétiques ou acoustiques.
• La calibrer sur son emplacement définitif, et vérifier périodiquement
avec le poids de calibrage (équipement optionnel) ; et si nécessaire, la
calibrer. (sauf pour les unités avec la Certification CE OIML).
COMPOSANTS INCLUS
Déballer la balanceavec précaution. Dans la boite,vous devez trouver:
1. Ce manuel d’instructions (à lire attentivement avant d’utiliser la balance).
Page 29

29
2. Le chargeur de la batterie de 9V / 500 mA ou 700mA.
3. La balance de précision.
4. Le film transparent de protection (sur la balance).
5. Le plateau de la pesée avec la partie supérieure en acier inoxydable
(protégé par un plastique).
Important: Conserver l’emballage. Il pourra être utile si vous désirez
transporter la balance.
DEBALLAGE
1. Retirer le plateau de l’emballage.
2. Retirer le reste de l’emballage qui couvre la balance.
3. Sortir la balance de la protection et la mettre dans son emplacement
définitif qui devra être une surface plate, la plus stable et rigide possible.
4. Placer le plateau sur celle-ci, de façon à ce que les quatre cylindres du
plateau s’emboîtent dans les orifices supérieurs de la balance.
MISE EN MARCHE
1. Niveler la balance, en tournant les quatre pieds réglables, jusqu’à ce la
bulle de niveau située dans la partie postérieure de la balance se place
dans le centre du cercle intérieur de la bulle. Le faire de façon à ce que
tous les pieds réglables s’appuient sur la table ou la surface d’appui.
2. Brancher le chargeur à une prise de 220 V 50 Hz et ensuite le câble
à la prise de la balance, situé dans sa partie inférieure (si la batterie
Page 30

30
est chargée, vous pouvez l’utiliser avec la batterie, sans brancher le
chargeur).
3. Maintenir le chargeur branché au moins pendant 8 heures, pour charger
complètement la batterie. (Ceci est à faire seulement lors de sa première
installation et toutes les fois où la balance ne sera pas utilisée pendant
plusieurs mois).
4. Appuyer sur la touche ON-CERO. La balance effectuera un auto-test,
ensuite, après quelques secondes, le zéro apparaîtra à l’écran.
Pour obtenir la précision maximale, il est nécessaire de maintenir la balance
chargée pendant une dizaine de minutes au moins, avant de l’utiliser. Malgré
tout, la balance peut être utilisée immédiatement, avec de bons résultats.
DESCRIPTION DE L’ECRAN
1. Indique que la balance est sur le point zéro, en n’utilisant aucune
tare.
2. L’écran indique le poids de la marchandise posée sur le plateau.
3. Indique que la batterie s’épuise et qu’il faut la recharger en
Page 31

31
branchant le chargeur à une prise de 220 V dans l’entrée inférieure
de la balance.
4. Indique que la fonction tare est utilisée et que l’écran affiche le
poids de la marchandise qui est pesée, en soustrayant la tare.
DESCRIPTION DU CLAVIER
ON-CERO
Appuyer sur cette touche lorsque la balance est éteinte pour la mettre en
marche. Si vous appuyez sur cette touche lorsque la balance est en marche,
vous corrigerez la mise à zéro.
OFF
Appuyer sur cette touche pour l’éteindre lorsque la balance est en marche.
MODO
Appuyer sur cette touche pour activer l’éclairage de l’écran ou pour le
désactiver.
TARA
Appuyer sur cette touche pour soustraire le poids d’un récipient.
CALIBRAGE DE MODELES NON VERIFIES
Lorsque vous installez la balance au début, il est recommandé de la calibrer
en utilisant un poids de calibrage adéquat.
Chaque modèle se calibre en utilisant deux valeurs de poids de calibrage, en
accord avec le tableau suivant:
Page 32

32
MODÈLE 1 Kg 2 Kg 5 Kg 10 Kg 20 Kg
AM - 3000
AM - 6000
AM - 15K
AM - 30K
Avant de procéder au calibrage, placer la balance bien nivelée dans un
endroit sans courant d’air, vibration ou n’importe quel agent perturbateur.
Maintenir la balance branchée pendant 30 minutes ou plus.
Ces recommandations sont très importantes pour faire un bon calibrage.
1. Avec la balance débranchée, avec le plateau propre et sans aucun objet
sur sa surface, appuyer sur la touche MODO et sans la relâcher, appuyer
en même temps sur la touche ON-CERO. Lâcher la touche ON-CERO et
ensuite la touche MODO.
2. Le processus de calibrage commence automatiquement. Il apparaîtra
sur l’écran le message “CAL ?”. Appuyer sur la touche MODO encore
une fois, et l’écran affichera “YES”, et après quelques instants, “LOAD
XX OR XX”, où “XX” sera le chiffre de la pesée du calibrage nécessaire,
dépendant du modèle (voir tableau ci-dessus).
3. Placer attentivement le poids du calibrage adéquat au centre du plateau.
La balance acceptera la valeur de la pesée automatiquement, et se
mettra en marche en indiquant sur l’écran la valeur du poids du calibrage.
Lorsque “DONE” apparaîtra à l’écran, l’opération sera terminée.
4. Si vous voulez arrêter le processus de calibrage, appuyer sur la touche
TARA et la balance se mettra en marche sans faire de calibrage.
Page 33

33
MISE A ZERO
Dans le cas où lors de l’utilisation de la balance, avec le plateau vide, l’écran
n’affiche pas le zéro (0) ou que l’indicateur de zéro ne s’éclaire pas, appuyer
sur la touche ON-CERO pour le corriger.
La balance dispose d’un système interne de correction du zéro (auto zéro)
mais ce système se désactive lorsque la balance est sur la fonction tare ou
qu’il y a un poids sur le plateau. Il faut que la balance soit toujours vide (avec
le plateau vide) et si vous voulez faire une pesée, vérifiez que l’indicateur
“CERO” soit allumé, et s’il ne l’est pas, appuyer sur la touche ON-CERO pour
l’allumer.
UTILISATION DE LA TARE
Cette fonction permet de peser le produit qu’il y a dans un récipient en
retirant le poids du récipient en lui-même.
1. Avec l’écran de la balance affichant zéro « 0 », placer le récipient sur le
plateau.
2. Appuyer sur la touche TARA pour faire la tare du récipient. L’écran
affichera “0”.
3. Introduire la marchandise dans le récipient et son poids apparaîtra à
l’écran.
4. Il est possible de faire des tares à répétitions, en appuyant sur la touche
TARA, après, ajouter d’autres marchandises.
5. Pour faire revenir la balance à sa position initiale, retirer le récipient de
la balance et appuyer sur la touche TARA, ainsi, la balance retournera à
sa position de veille “0”.
Page 34

34
CHANGEMENT D’UNITE
Cette balance dispose de plusieurs unités de pesée (g, Livres et Livres/once).
La pesée est activée par défaut en g.
Pour activer les autres unités, avec la balance en veille, appuyer sur la touche
TARA et tandis que vous la maintenez appuyée, appuyez en même temps sur
la touche ON-CERO ensuite, la touche TARA et l’écran affichera “F1”.
Appuyer sur la touche TARA deux fois. L’écran affichera “F3”.
Appuyer et maintenir appuyer la touche MODO jusqu’à ce qu’apparaisse à
droite de l’écran l’indication “g” ou “lb”. Lâcher la touche MODO.
En appuyant encore une fois sur la touche MODO, l’indication oscillera entre
“g” et “lb”.
Si vous sélectionnez “g”, la balance passera en gramme, si vous sélectionnez
“lb”, vous pourrez changer l’unité de pesée de grammes en livres ou livres
onces au moment de la pesée.
Pour enregistrer la sélection, appuyer sur la touche ON-CERO, la balance se
mettra ainsi en marche.
Si vous avez sélectionné “lb”, en appuyant maintenant sur la touche MODO,
l’écran basculera en “livres” et “livres onces” et en ré appuyant sur la
touche MODO, il se rechangera en “gramme”.
MISE EN VEILLE AUTOMATIQUE
Cette fonction permet de rallonger la durée de vie de la batterie lorsque la
balance n’est pas utilisée. Pour cela, la balance s’éteint automatiquement
lorsqu’elle n’aura pas été utilisée pendant quelques minutes.
Page 35

35
La fonction de mise en veille automatique peut être annulée. Pour cela,
suivre les opérations suivantes:
1. Avec la balance éteinte, appuyer sur la touche ON-CERO tout en
maintenant la touche TARA appuyée.
2. L’écran affichera le message “F1”. Appuyer sur la touche TARA trois
fois, jusqu’à ce qu’apparaisse à l’écran “F4”.
3. Appuyer sur la touche MODO. L’écran affichera “0 OFF” (la balance ne
s’éteindra pas) ou “4 OFF” (la balance s’éteindra après quelques minutes
de non utilisation).
4. Appuyer sur la touche MODO pour choisir la modalité désirée.
5. Appuyer sur la touche ON-CERO pour enregistrer la sélection désirée.
ECLAIRAGE AUTOMATIQUE DE L’ECRAN
L’éclairage de l’écran est très utile lorsque l’environnement est peu éclairé.
Pour l’activer, appuyer sur la touche MODO et l’écran s’éclairera (si ce n’est
pas le cas, c’est que la fonction de changement d’unité est activée). Si cette
fonction est activée, appuyer plusieurs fois sur cette touche, jusqu’à ce que
la balance affiche l’unité désirée (flèche inférieure pour les grammes) et que
l’éclairage soit en marche.
Pour annuler l’éclairage, appuyer sur la touche MODO et l’éclairage se
désactivera.
Page 36

36
CONSEILS POUR L’ENTRETIEN
Cette balance est un appareil de précision, conçue et fabriquée avec la plus
grande technologie pour les pesées de précision. Nous vous prions de bien
vouloir suivre les recommandations suivantes:
1. Ne jamais démonter ni ouvrir la balance.
2. Cet appareil ne doit pas être utilisé près de vibrations, ni être exposé aux
radiations solaires directes.
3. Eviter l’intrusion de produits liquides à l’intérieur de la balance. Nettoyer
périodiquement la base avec un chiffon humidifié avec de l’eau et d’un
savon doux. Pour laver le plateau, il faut d’abord démonter la balance et la
nettoyer séparément ; ne jamais la nettoyer avec le plateau car la pression
exercée par le nettoyage peut endommager le système de pesée.
4. Maintenir l’appareil éloigné des sources de chaleur (prises, plaques
électriques…).
5. Maintenir la balance dans un endroit sec, aéré et propre.
6. Ne pas laisser tomber des objets sur le plateau de la balance, ni les
poser dessus lorsque la balance n’est pas utilisée.
7. Ne jamais dépasser en aucun cas la capacité maximale de la balance.
8. Utiliser uniquement et exclusivement le chargeur standard fourni avec la
balance. Si un autre chargeur est utilisé, cela risque d’endommager les
circuits internes de la balance, ce qui occasionnera la perte de la garantie.
9. Lorsque vous n’utilisez pas la balance pendant une longue période,
débrancher le chargeur du réseau de la balance. Protéger la balance
de la poussière et la conserver en un lieu sec et à température entre 0
et 40 °C.
Page 37

37
RECHARGE DE LA BATTERIE
Lorsqu’il apparaît à l’écran le signal de batterie épuisée, il faudra la recharger
immédiatement.
Pour cela, brancher le chargeur au réseau (220V), ensuite à la prise située
dans la partie inférieure de la balance.
Ne pas laisser le chargeur branché à la balance et débranché du réseau car
cela déchargerait complètement la batterie.
Avec la nouvelle batterie, l’autonomie est de 150 heures de service,
approximativement. Si l’éclairage de l’écran est utilisé, l’autonomie diminue.
Changer la batterie dès que l’autonomie est très faible (moins de 24 heures).
CARACTERISTIQUES TECHNIQUES
Modèle AM-3000 AM-6000 AM-15K AM-30K
Capacité 3000 g 6000 g 15.000 g 30.000 g
Echelle de vérification 1 g 2 g 5 g 10 g
Rang de tare 999 g 1.998 g 4.995 g 9.990 g
Rang de zéro ± 300 g ± 600 g ± 1.500 g ± 3.000 g
Rang de zéro ± 60 g ± 120 g ± 300 g ± 600 g
Pesée minimale 20 g 40 g 100 g 200 g
Dimension plateau 245 x 300 mm
Dimensions balance 285 x 336 x 134 mm
Alimentation Batería recargable / Alimentador 220 V -9V/700 mA
Poids
4,3 kg
Page 38

38
PROBLEMES / SOLUTIONS
Problèmes Solutions
La balance ne
s’allume pas
Batterie déchargée. La recharger avec la batterie standard.
Brancher le chargeur correctement au réseau.
Insérer le chargeur de l’alimentation à la balance.
La balance s’allume
mais le zéro
n’apparaît pas sur
l’indicateur
Plateau mal encastré. Le retirer et le replacer
correctement.
Plateau plein. Retirer tous les objets du plateau, le laisser
vide et rebrancher la balance.
La balance ne pèse
pas toute la capacité
L’indicateur de tare est allumé. Débrancher la balance,
retirer tous les objets du plateau et la rebrancher.
Un objet est entre la balance et le plateau, ou empêche le
plateau de bouger librement. Retirer l’objet.
Il y a des courants d’air, turbulences ou interférences
électromagnétiques. Placer la balance loin de ces
perturbations.
La balance ne pèse
pas correctement
Une unité de pesage erronée est utilisée. Vérifier sur
l’écran que l’unité de pesée est correcte. Si ce n’est pas le
cas, appuyer sur la touche « MODO » jusqu’à sélectionner
la bonne unité.
La balance n’est pas posée sur une surface plate ou n’est
pas nivelée. Ajuster les pieds réglables jusqu’à ce que la
bulle à niveau se situe au centre du cercle.
Il y a des courants d’air, turbulences ou interférences
électromagnétiques. Placer la balance loin de ces
perturbations.
La balance est mal calibrée ou plus calibrée. La calibrer,
ou contacter son distributeur pour qu’il la calibre.
La balance s’éteint
toute seule
La fonction de mise en veille automatique est activée. La
désactiver.
Le signal de faible batterie est allumé. La batterie est
déchargée. La recharger en la branchant au chargeur.
L’écran est rempli de
zéro
Le poids posé sur le plateau excède la capacité de la
balance. Retirer les objets du plateau et réessayer.
Page 39

39
GARANTIE
Cette balance est garantie contre les défauts de fabrication ou de pièce,
pendant une année, à partir de la date de livraison.
Durant cette période, GRAM PRECISON, SL, se chargera de la réparation de
la balance.
Cette garantie n’inclut pas les dommages causés par une utilisation
impropre, surcharge, ou par faute de ne pas avoir suivi les recommandations
écrites dans ce manuel (particulièrement de l’aparté CONSEILS POUR
L’ENTRETIEN).
La garantie ne couvre pas les frais d’envoi (transport) nécessaires pour la
réparation de la balance.
Page 40

Gram Precision S.L.
Travesía Industrial, 11 · 08907 Hospitalet de Llobregat · Barcelona (Spain)
Tel. +34 902 206 000 · +34 93 300 33 32
Fax +34 93 300 66 98
comercial
@gram.es
www.gram.es
001/08072016
 Loading...