

Page 1
SERIES
AHV
AH-300V / AH-600V / AH-1200V
AH-1500V / AH-3000V
OPERATION MANUAL
Page 2

2
INDEX English
Precautions before using the balance 4
Name and type of the instrument 5
Keys and display description 5
Keys function 6
Display 7
Function 7
Power-Up 8
Weighing mode 8
Display range 8
Zero-Setting 8
Semi-automatic zero-setting 8
Zero-tracking 8
Initial zero-setting 9
Tare 9
Semi-automatic tare 9
Units selection 10
Overload alarm 10
Counting mode 10
Percentage weighing mode 11
Calibration procedure 12
Parameters setting 13
Ratio span calibration 15
Weight span calibration 16
Weight loading 17
Parameters set-up 18
Auto-shut off time 18
Transmitting mode 19
Label format 21
Page 3

3
Baud rate 21
Data bits 22
Unit weight re-computing in counting mode 23
Blacklight type 23
Recovery of the default values from memory 24
Specification of output interface 24
Error messages 26
Technical data 26
Guarantee 27
Page 4

4
ENGLISH
PRECAUTIONS BEFORE USING THE BALANCE
For safe and dependable operation of this balance, please comply with the
following safety precautions:
• Verify that the input voltage printed on the AC Adapter and the plug type
matches the local AC power supply.
• Make sure that the power cord does not pose a potential obstacle or
tripping hazard.
• Disconnect the scale from the power supply when cleaning the scale.
• Do not operate the scale in hazardous or unstable environments.
• Do not immerse the scale in water or other liquids.
• Do not drop loads on the platform.
• Use only approved accessories and peripherals, as available.
• Operate the scale only under ambient conditions specified in these
instructions.
• Service should be performed by authorized personnel only.
• It must not be bumped against by other items or overloaded with
excessively heavy weights (The load must not exceed the maximum
capacity of the balance).
• Give a warm-up for 30 mins before using the scale.
Page 5
5
NAME AND TYPE OF THE INSTRUMENT
The AH-V model weighing balance is a self-indicating weighing scale of
Class II with single weighing range, an external AC mains adapter, and an
internal rechargeable battery.
The balance consists of analogue to digital conversion, microprocessor
control, power supply, keyboard, and a weight display contained within a
single enclosure.
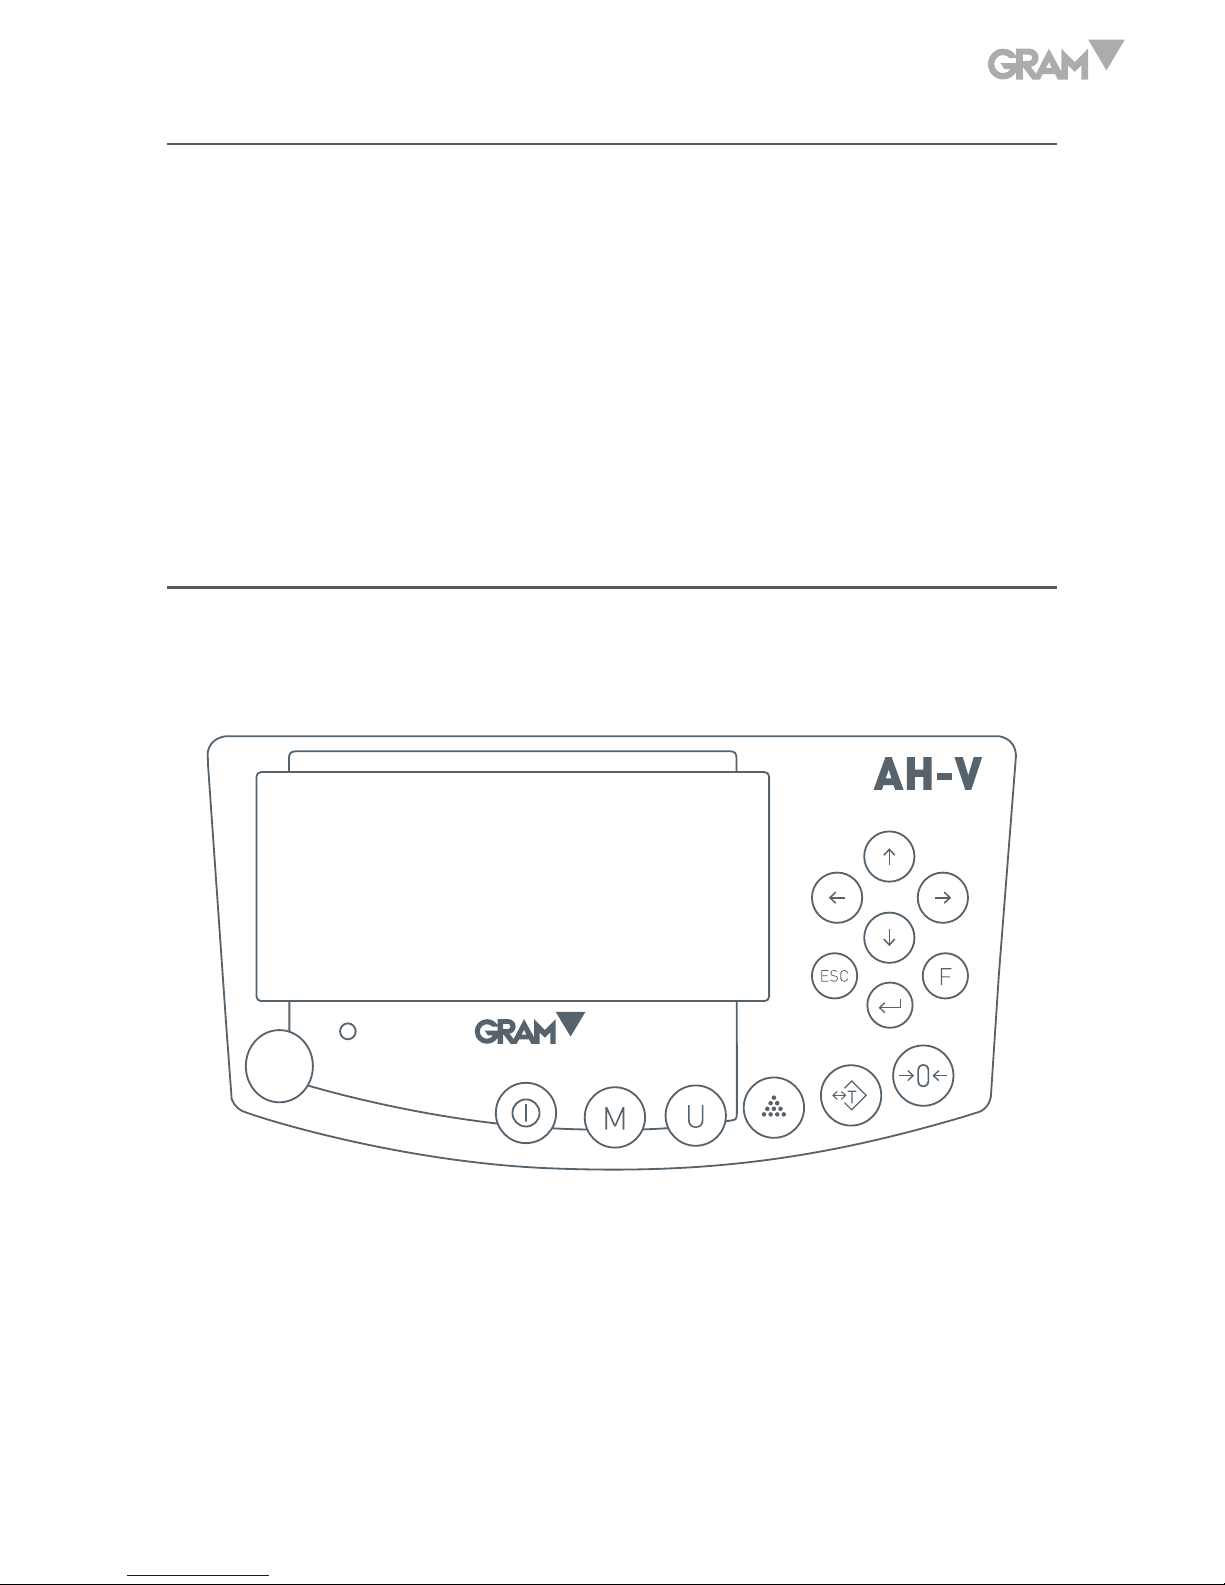
KEYS AND DISPLAY DESCRIPTION
The balance is equipped with 13 keys membrane keypad to control the
functions and also the ON/OFF of the balance.
Page 6

6
Keys function
F
ON/OFF switch.
Function key to choose weighing, parts counting and percentage
weighing.
Units selection (8 units are available).
To take samples in parts counting mode or percentage weighing mode.
To subtract the container’s weight.
To return the display to “0”.
Confirmation key and print key.
To enter into setup mode (User Programming Setting).
To return to last menu or exit Setup Mode; extend one more digit for
the current display for 5 seconds.
Move to left.
Move to right.
Page up (Increase value).
Page down (Decrease value).
Page 7
7
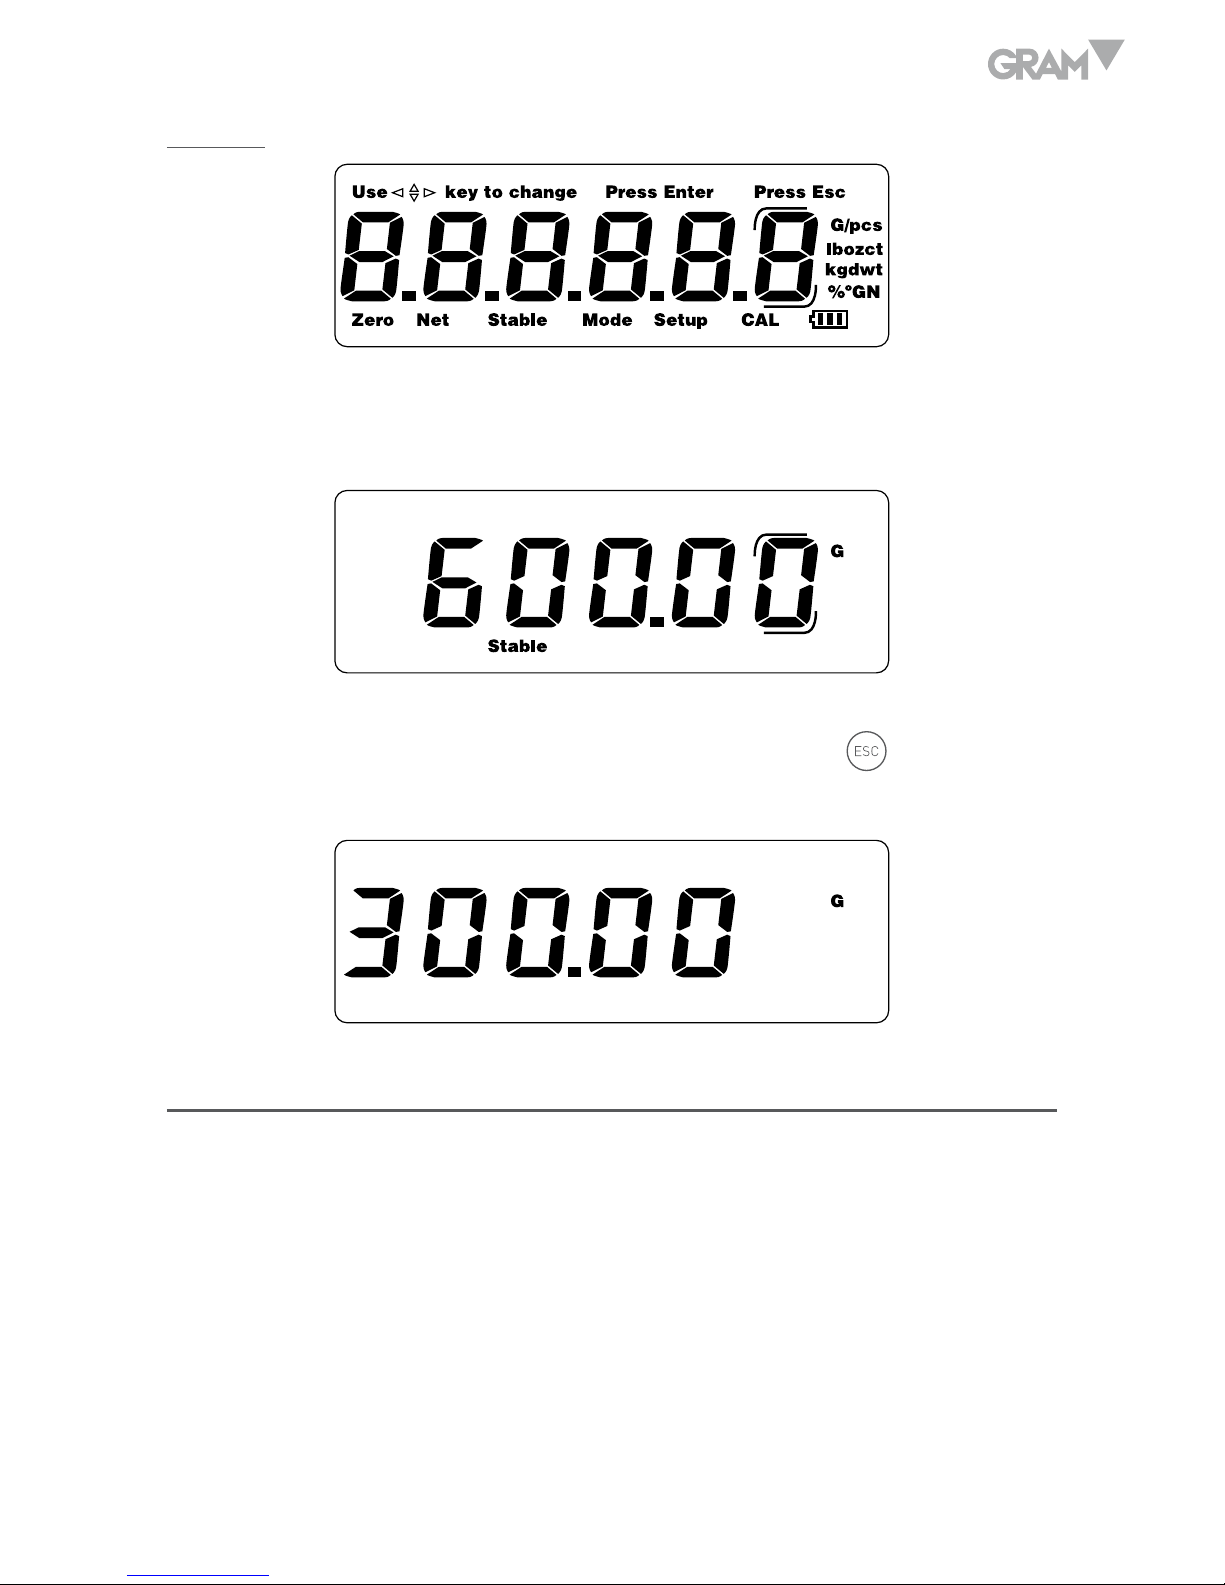
Display
When the Capacity of the balance is 600.0g, the last digit will be the auxiliary
display digit (a symbol indicating the digit):
When the Capacity of the balance is 150.00g, 300.00, 1500.0 and 3000.0g, the
last digit will be blank in normal weighing mode only if the
key is pressed
to extend the display.
FUNCTION
The balance can be available for operation from mains at 110~240V (50/60Hz)
with an external AC/DC adapter with 12V output voltage and an optional
internal 6V rechargeable battery.
Page 8

8
POWER-UP
When power up the balance, the display will first show the software version
(Ver. 1.01) for 2 seconds and then perform a self display test. Then it will
show the Calibration counting times for about 1 second. After that it will
automatically establish the current weight as a new zero reference point.
WEIGHING MODE
Display range
The display can show weight from –Max (Tare weight) to Max+9e (Gross
weight).
Zero-Setting
Zero-setting range: ±2% of Max
Zero-setting is only available when the load receptor is not in motion (The
display is stable).
Semi-automatic zero-setting
When there is a minor weight displayed (without load on the pan), press
key to return to the display to zero, then the Zero symbol appears which
indicates that the display now is at the zero point.
Zero-tracking
The instrument is equipped with a zero-tracking feature which operates at a
Page 9

9
speed of ±0.25e/s and only when the indicator is at gross zero and there is no
motion in the weight display.
Initial zero-setting
Initial zero-setting range: ±10% of Max
When the initial zero-setting range is below -10% of Max, the display shows
“-------” and the buzzer sounds. To return the display to normal mode,
please adding more weights until the initial zero-setting range is between
±10% of Max.
When the initial zero-setting range is beyond +10% of Max, the display shows
“-------” and the buzzer sounds. To return the display to normal mode, please
take off weights until the initial zero-setting range is between ±10% of Max.
Tare
The instrument is provided with a semi-automatic subtractive tare.
Semi-automatic tare
Press
key to subtract the current displayed weight value as the tare
weight value (Consecutive tare operations are permitted). The NET symbol
appears and the display will show a net weight of the object to be weighted.
Page 10

10
To clear the tare value, please remove the container on the pan, then the
display will show a minus tare weight value and press
key again.
Note:
1. When performing the tare operation(s), make sure the instrument is in stable.
2. If consecutive tare operations have been performed, to clear the tare value,
please remove all the containers on the pan first and then press
key.
3. Tare range is the full capacity of balance for all models.
Units selection
Press the key to choose the weighing units and the display will be
changed to the new value with the units shown. There are up to 8 units of
weight that can be enabled.
Overload alarm
When the weight on the pan exceeds the Max. capacity, the display will show
“--OL--” at the same time the buzzer sound. Please take off the weight at
once. Otherwise the load cell will be easy to be damaged.
Counting mode
In normal weighing mode, press the
key to enter into parts counting
mode. The display shows as below:
Page 11

11
Press
key or
key to choose the sample size (10, 20, 50 and 100
pcs).
After a desired sample size has been chosen, put the samples as the chosen
sample size on the pan and press the
key. Then the “Mode” symbol
starts flashing and the “C” disappears.
Then the sampling procedure is finished. And the balance can be used for
parts counting.
Note: If the unit weight is two small (less than 0.2 scale division), the display
will show “- -or- -pcs”.
Percentage weighing mode
In normal weighing mode, press
key twice to enter into percentage
weighing mode.
Page 12

12
Press
key or
key to switch between 100.0% or 100.00%.
Put the sample considered to be 100% on the pan, and then press the
key
to perform sampling process. Then the “Mode” symbol starts flashing and
several seconds later, the “Mode” symbol and “P” disappears.
Then the sampling procedure is finished. Take away the sample and put
other objects on, the display will show a percentage (the objects’ weight to
the 100% sample weight).
• The sample weight considered to be 100% should be larger than 0.2d,
or the display will show “- -or- -%”, which indicates that larger sample
weight should be put on.
Note:
1. Press the
key after the sampling procedure (parts counting or
percentage weighing) is finished, it will return to normal weighing mode.
Then press the
key, the balance will return to parts counting or
percentage weighing mode again; and the sampling data can also be used.
2. The sampling data will be cleared automatically when after switching
between counting mode and percentage weighing mode.
CALIBRATION PROCEDURE
IMPORTANT: This action involves breaking the seal of the verification
certificate.
Page 13

13
Turn on the balance and press calibration button under the balance to enter
calibration mode (break verification seal). When the salf-test procedure
finished, the display will show as below:
Press
key to move to “SET”for parameters setting or “CAL.R” for
ratio span calibration, or “CAL.W” for weight span calibration. Then press
to enter.
Or justa press key to enter into Weights loading procedure when it
displays “CAL”.
Parameters setting
1. Unit selection
The display will show as below:
Use keys to choose the available units:
Page 14

14
1: g, ct
2: g, ct, GN
3: g, ct, ozt, oz, dwt, GN, t (Default)
4: Press
key to choose the units manually from g, ct, ozt, oz, dwt, GN
and t.
Use keys to choose the unit, use
key to set the unit to be
on or off.
Press
key to confirm the choice or press
key to exit.
Note: The unit g and ct is default to be on (can not set to be off).
2. LFT mode (Legal for trade)
The display will show as below:
Use keys to set the LFT mode to be on or off.
LFT on: The auxiliary display function or extended display function are
Page 15

15
unavailable.
LFT off: The mode with auxiliary display function or extended display function.
(Default).
Press
key to confirm the choice and move to next setting; or press
key to exit.
2. Capacity
The display will show as below:
Use keys to choose the capacity from Cap 0.3 (300g), Cap 0.6 (600g),
Cap 1.2 (1200g), Cap 1.5 (1500g), Cap 3.0 (3000g) or Cap 6.0 (6000g).
Press
key to confirm the capacity and enter into Weights loading
procedure.
Ratio span calibration
When the display shows “CAL”, press
key to move to “CAL.R” for ratio
span calibration.
When the display shows “CAL.R”, press
key to enter into the ratio span
calibration and the display show as below:
Page 16

16
Press
key to display the ratio inputting status.
Use
key to move the digit; use keys to change the figure for
the current digit.
The ratio can only be a value between 0.80000 ~ 1.20000 ( = Mass weight
value/Actual display weight value).
Press
key to confirm and exit to normal weighing mode.
Weight span calibration
Press
keys to move to “CAL.W” when ti display “CAL.R”.
When the display shows “CAL.W”, press
key to enter into the weight span
calibration and the display show as below:
Press
key to display capacity value.
Page 17

17
Use
key to move the digit; use keys to change the figure for
the current digit.
Put the Weights which is exactly equal to the displayed value and press
key to confirm.
The value flickers and the exit to normal weighing mode when it finishes.
Weight loading
The display show as below:
Touch the pan lightly, the displaying value flickers; when the display is stable,
the Zero point is confirmed. And the display will show a value which flicker,
when it is stable, the display will show a value which should be put on for the
second time.
Put on the Weights which equals the value displayed, and the value will
Page 18

18
flicker, when it is stable, the display wil show a value which should be put on
for the second time.
Put on the Weights which equals the value displayed, and the value will
flicker, when it is stable, the display will show a value which should be put
on for the third time.
Put on the Weights which equals the value displayed, and the value will
flicker, when it is stable, the loading procedure is finished. Take off the
Weights, and the scale can be used.
PARAMETERS SET-UP
In normal weighing mode, press
F
key to enter into parameters set-up
mode. The “Setup” message appears.
Auto-shut off time
Page 19

19
Press
key to move to parameter “Unit” (To choose available units) or press
key to move to parameter “A.OFF” (To choose auto-shut off time).
Press
key to enter into the parameter.
Press ,
keys to choose from 2m, 5m, 8m or No (auto. shut off is
unavailable). (Default: No).
Press
key to confirm your choice and press
key to return to
parameters menu. To move to next setting press the key. To return to
normal weighing mode press the
key.
Transmitting mode
Press
key to move to parameter “A.OFF” (auto-shut off time) or press
the
key to move to parameter “trn” (transmitting mode).
Press the
key to enter into the parameter.
Page 20

20
Press ,
keys to choose the transmitting mode from tr.M.LP, tr.disp,
tr.SEr, tr.A.PC, tr.M.PC, tr.A.dt, tr.M.dt, tr.A.LP . (Default: tr.M.LP).
tr.M.LP: When the display is stable, the data can be printed by pressing a key
(For LP-50 printer).
tr.disp: Only the displaying data will be transmitted (for Extra Display).
tr.SEr: The data will be transmitted continuously.
tr.A.PC: When the display is stable, it will be transmitted to PC automatically.
tr.M.PC: When the display is stable, it can be transmitted to PC by pressing
a key.
tr.A.dt: When the display is stable, the data can be printed automatically. (For
DT printer).
tr.M.dt: When the display is stable, the data can be printed by pressing a key.
(For DT printer).
tr.A.LP: When the display is stable, the data will be printed automatically.
(For PR printer).
Press
key to confirm your choice and press
key to return to
parameters menu. Press the
key to move to next setting. To return to
normal weighing mode press the
key.
Note: For some balance, they can be connected with PR Printer. So two more
choices will be added here:
KBl: The data will be transmitted ony by pressing the key (For PR only).
Stbl: The data will be transmitted when the display is stable (For PR only).
Page 21

21
Label format (For PR Printer)
Press
key to move to “To choose transmitting mode” or press
key
to move to “To choose baud rate”.
Press
key to exit to normal weighing mode; press
key to enter into
choosing label format.
Press ,
key to choose the Label format from Form 0 ~ Form 9.
(Default: Form 0)
Press
key to confirm your choice and press
key to exit; then press
key to move to next setting.
Baud rate
Page 22

22
Press
key to move to parameter “trn” (transmitting mode) or press the
key to move to parameter “rAtE” (to choose baud rate).
Press
key to enter into the parameter.
Press ,
keys to choose the baud rate from 1200, 2400, 4800 and 9600.
(Default: 9600).
Press
key to confirm your choice and press
key to return to parameters
menu. To move to next setting press the key. To return to normal weighing
mode press the
key.
Data bits
Press
key to move to parameter “rAtE” (to choose baud rate) or press
the
to move to parameter “dAta b” (To choose data bits).
Press
key to enter into the parameter.
Page 23

23
Press ,
keys to choose the data bits from bit. N8 or bit. E7. (Default: bit. N8).
Press the
key to confirm and then the
key to return to parameters
menu. Press the
to move to next setting or press again the
to back
to normal weighing mode.
Unit weight re-computing in counting mode
Press
key to move to parameter “Zero1” (To choose zero display range)
or press the
to move to “A.C Y” (to choose unit weight in counting mode).
Press ,
key to choose it from y or n (yes or no). (Default: y).
Press
key to confirm your choice and then press
key to move to next
setting; press
key to exit.
Blacklight type
Page 24

24
Press
key to move to parameter “A.C Y” or press the
key to move to
parameter “Bl.1” (to choose backlight type). Press ,
keys to choose
the backlight type from 1, 2 and 3. (Default: 1)
1. The backlight will be on automatically when a load exceeds 10e on
the pan or pressing a key.
2. The backlight will always be on.
3. The backlight will always be off.
Press
key to confirm your choice and then press
key to move to next
setting; press
key to exit.
Recovery of the default values from memory
In normal weighing mode, hold down the
F
key for 3 seconds. Then the
balance will be recovered with a default calibration values.
SPECIFICATION OF OUTPUT INTERFACE
Mode: EIA-RS-232 C’s UART signal, or USB signal
Format:
Baud rate: 1200-9600 BPS
Data bits: 8 bits/ 7 bits
Parity bit: none/Even
Stop bit: 1 bit
Code: ASCII
RS232 connector is a 9-pin D-subminiature socket.
Input Pin 2
Output Pin 3
Signal Ground Pin 5
Page 25

25
Data Format:
H1 H1 , H2 H2 , D D D D D D D D U U U U CR CR
Head 1 Head 2 Data Unit CR LF
HEAD 1 (2 BYTES) HEAD 2 (2 BYTES)
OL – Over Load
ST – Stable NT – Net Weight
US – Unstable GS – Gross Weight
DATA (8 BYTES)
2D (HEX) = “-“ (LESS)
20 (HEX) = ” “ (SPACE)
2E (HEX) = ”.” (DECIMAL POINT)
UNIT (4 BYTES)
g-20 ( HEX ) ; 20 ( HEX ) ; 20 ( HEX ) ; 67 ( HEX )
lb-20 ( HEX ) ; 20 ( HEX ) ; 6c ( HEX ) ; 62 ( HEX )
Ti.T-74 ( HEX ) ; 6C ( HEX ) ; 2E ( HEX ) ; 54 ( HEX )
Page 26

26
ERROR MESSAGES
When the balance powered up or during the operation, the display may show
some Error messages as below: E1, E2, E5 and OL.
The messages may also be shown if the pan is not installed correctly or the
operation environment is not suitable.
TECHNICAL DATA
Model AHV
Construction Stainless steel pan, plastic housing
Weighing Units
g, ct
Application Modes
Weighing, Simple Counting and Percent
Weighing
Display(s)
20 mm high, 6-digit, 7-segment LCD, blue
color LED backlight
Keyboard 13 keys embossed membrane keyboard
Zero Range 4% (± 2%) of Full Scale Capacity
Tare Range Full Capacity by subtraction
Stabilization Time
≤ 2 seconds
Operating Temp. 5 ºC - 40 ºC
Humidity Range
≤ 90% relative humidity, non-condensing
Power
AC/DC Adapter 12V/1000mA or 6V/1.2Ah
Internal rechargeable lead acid battery.
Battery Life
20 hours continuous use with 8 hour recharge
time.
Safe Overload Capacity 120 % of capacity
Pan Size
Φ 116 mm (Round) / 124 * 144 mm (Square)
Scale Dimension W*H*D 200 * 76 * 250 mm
Page 27

27
GUARANTEE
This balance is guaranteed for one year from the delivery date. The guarantee
covers any fabrication defect of the material.
During this period, GRAM PRECISION, SL, covers the manpower and the
spare parts costs necessary for the reparation of the scale.
This guarantee does not cover the failures caused by an inappropriate use
or overload.
The guarantee does not cover the freight cost (transport) necessary to
repair the balance.
Page 28

Gram Precision S.L.
Travesía Industrial, 11 · 08907 Hospitalet de Llobregat · Barcelona (Spain)
Tel. +34 902 208 000 · +34 93 300 33 32
Fax +34 93 300 66 98
comercial
@gram.es
www.gram-group.com
006/12062018
 Loading...