

Page 1
SERIES / SERIE / SÉRIE
AC
500 / 5000
OPERATION MANUAL
MANUAL DE UTILIZACION
MANUEL D´UTILISATION
Page 2
2
INDEX English
Requirements for an optimum installation 5
Components included 5
Optional AC/Adaptor 5
Replacing the batteries 6
Weighing 6
Reset to zero 7
Tare function 7
Calibration 7
Unit weights 8
Auto power-off 8
Guarantee 9
CE Conformity Declaration 21
Page 3
3
ÍNDICE Español
Requisitos para una óptima instalación 10
Componentes incluidos 10
Funcionamiento con alimentador (opcional) 10
Cambio de las pilas 11
Puesta en marcha 11
Puesta a cero 12
Utilización de la tara 12
Calibración 12
Peso en otras unidades 13
Autodesconexión 13
Garantía 14
Declaración CE de Conformidad 21
Page 4

4
SOMMAIRE Français
Précautions 15
Avant l’utilisation de la balance 15
Alimentation (En option) 15
Changement des piles 16
Mise en marche de la balance 16
Mise a zero 17
Fonction de tare 17
Etalonnage 17
Unités de pesées 18
Fonction d’auto-deconnexion 19
Garantie 20
Déclaration CE de Conformité 21
Page 5

5
ENGLISH
REQUIREMENTS FOR AN OPTIMUM INSTALLATION
To obtain maximum performance and best results, we recommend installing
the scale according to the following requirements:
• Don´t expose the scale to direct sunlight.
• Don´t submit it to atmospheres with corrosive gases.
• Work at temperatures between 15º and 40º C.
• Use the scale in environments with humidity lower than 85% HR.
COMPONENTS INCLUDED
• This operation manual (please read it carefully before using the scale).
• The scale.
• Four batteries 1.5 V type R-6.
Very important: Keep the original package; it could be useful in a future to
transport the scale.
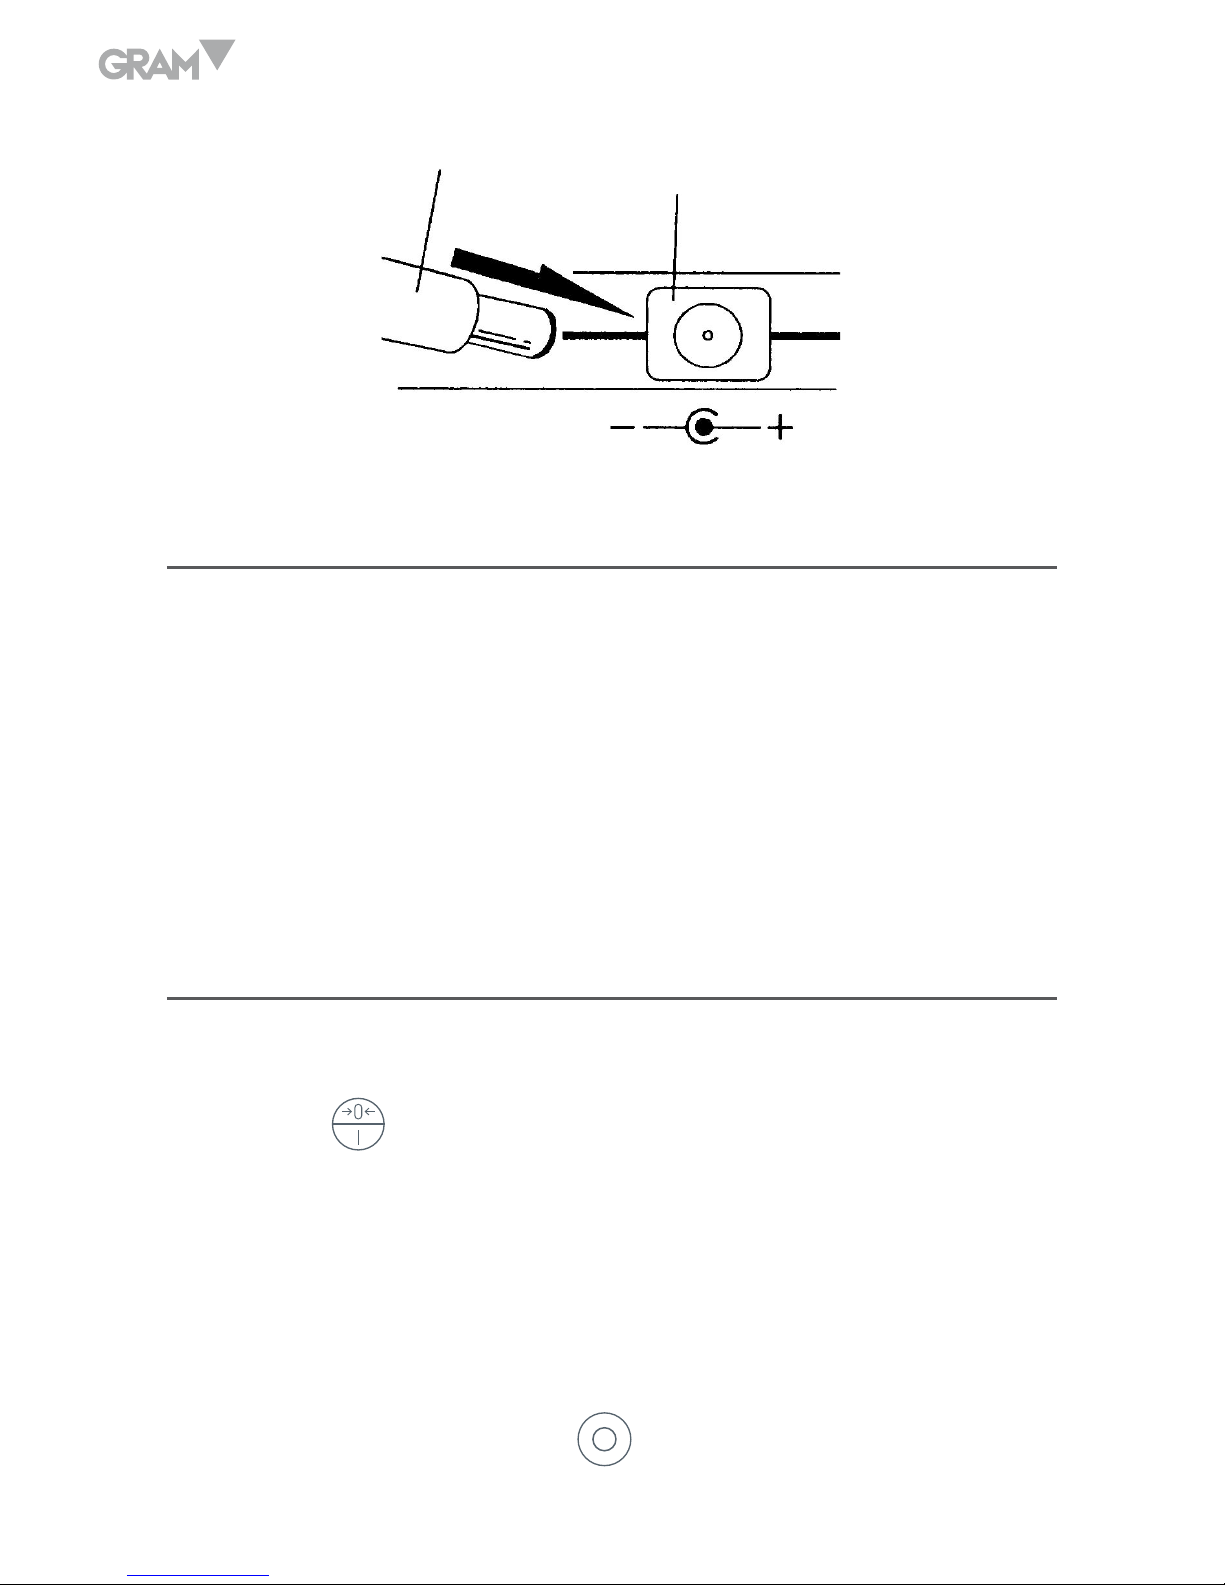
OPTIONAL AC/ADAPTOR
This scale can be used with an optional AC/Adaptor from 4,5 to 6V-DC.
Connect the adaptor connector to the left rear side of the scale and then
connect it to 220 V.
Page 6
6
REPLACING THE BATTERIES
Replace the batteries when the display shows the message “LLLL”.
1. Open the rear batteries compartment; be careful not to press the pan
with your fingers.
2. Remove the used batteries, put the new ones type R-6 of 1.5 V and close
the compartment.
WEIGHING
1. Place the scale on a flat and stable surface; keep it always in horizontal position.
2. Press the
key. The scale performs with a self-test showing “88888”
for a few seconds, then the display will show (0.0 g / 0 g). At this moment
the scale is ready to use.
3. Put the object on the pan to weight it. The display will show the weight of
the object. If the weight of object exceeds the maximum capacity of the
scale, the display shows the message “EEEEE”.
4. To turn off the scale, press the
key.
Connector
Base Scale
Page 7
7
RESET TO ZERO
If the pan is empty however the display doesn´t indicate zero; press the
key for correction. The display will show zero value.
TARE FUNCTION
This function allows obtaining the net weight of the product.
With display showing “0.0 g / 0 g”, place a container on the pan.
Press the
key. After few seconds, the display will come back to zero and
the indicator of Tara will appear. Place the product into container, the display
will show the product´s weight (net weight).
To return to normal weighing mode, remove the container from the pan and
press the
key, the display will come back to stand-by position “0.0 g / 0 g”.
CALIBRATION
The calibration must be effected in an environment free of vibrations and
drafts. You must have a proper calibration weight, with an error less than
0.1 g (we recommend using calibration weights Class M2 OIML R-111 or
superior).
The model AC-500 is calibrated with a weight of 500 g and the model AC-5000
with a weight of 5.000 g.
To calibrate the scale, please follow the following steps:
1. When the scale is Off, press
key to start the scale.
2. During initialisation, while the display shows “8888”, press
key four
Page 8

8
times, at the fourth time hold the key until the display shows an internal
code “XXXX”.
3. Press again
key and the display will show “CAL”, then it will show
5000 or 500 (depending on the model).
4. Place a calibration weight of either 500g or 5000g on the weighing pan.
5. Once the display shows “PASS”, the scale will be calibrated and ready to use.
UNIT WEIGHTS
To weight in OZ units, press the key. To change it to grams unit, press
again the
key.
AUTO POWER-OFF
This scale has an auto-power system to prolong the batteries life. Activating
this function, the scale will auto-turn off after two minutes without being
used.
The scale is turn off automatically even with an object on the platter, in this
case, please remove the object before to turn on.
Page 9

9
GUARANTEE
This scale is guaranteed for one year from the delivery date. Te guarantee
covers any fabrication defect of the material.
During this period GRAM PRECISION, SL, covers the manpower and the
spare parts for the reparation of the scale.
This guarantee does not cover the failures caused by an inappropriate use
or overcharge.
The guarantee does not cover the freight cost (transport) necessary to
repair the scale.
Page 10

10
ESPAÑOL
REQUISITOS PARA UNA ÓPTIMA INSTALACIÓN
Para obtener el máximo rendimiento y los mejores resultados, recomendamos
instalar la balanza de acuerdo con los siguientes requisitos:
• No exponerla a la luz solar directa.
• No someterla a atmósferas con gases corrosivos.
• Trabajar a temperaturas entre 15º y 40º C.
• Utilizarla en ambientes con una humedad inferior a un 85% HR.
COMPONENTES INCLUIDOS
Desembalar la balanza con cuidado. En el interior de la caja encontrará los
siguientes componentes:
• Este manual de instrucciones (léalo antes de utilizar la balanza).
• La balanza.
• Las cuatro baterías de 1.5 V tipo R-6.
Importante: No deshacerse del embalaje. Puede ser útil en el futuro si fuera
necesario transportar la balanza.
FUNCIONAMIENTO CON ALIMENTADOR (OPCIONAL)
Se puede utilizar un alimentador opcional de 4,5 a 6V-DC para utilizar la
balanza sin depender de las pilas.
Page 11

11
Conectar el conector a la parte trasera izquierda de la balanza y después a
la red de 220 V.
CAMBIO DE LAS PILAS
Cambiar las pilas cuando el display indique “LLLL”.
1. Abrir el compartimiento posterior apretando la pestaña, sin presionar el
plato con los dedos.
2. Colocar las cuatro pilas tipo R-6 de 1.5 V dentro del compartimiento, en
las posiciones marcadas en el interior del mismo y volver a cerrar la
tapa, hasta notar un suave “click”.
PUESTA EN MARCHA
1. Situar la balanza en una superficie plana y estable, manteniéndola siem-
pre en posición horizontal.
2. Pulsar la tecla
. La balanza realiza un autochequeo mostrando
“88888” durante unos segundos, seguido de puesta a cero. (0.0 g / 0 g).
En este momen to la balanza está preparada para su utilización.
3. Depositar el objeto a pesar sobre el plato de la balanza. En el display
Conector
Base de la balanza
Page 12

12
aparecerá el peso del objeto. Si el peso sobrepasa la capacidad máxima,
el display mostrará la indicación “EEEEE”.
4. Para apagar la balanza pulsar la tecla
.
PUESTA A CERO
En caso de que durante la utilización de la balanza, con el plato vacío, el display
no indique la lectura cero (0.0 g/ 0 g), pulsar la tecla para su correc ción.
UTILIZACIÓN DE LA TARA
Esta función posibilita pesar el producto que se introduce en un recipiente,
descontando el peso del mismo. Con el display de la balanza marcando cero
“0.0 g / 0 g”, situar el recipiente sobre el plato.
Pulsar la tecla
. Después de unos instantes, el display se pondrá a cero
y se encenderá el indicador de tara del display. Ahora la balanza está tarada
(a cero), y se puede pesar en el interior del recipiente.
Se puede realizar la tara repetidas veces, pulsando la tecla
después de
añadir otros ingredientes o muestras. Para volver la balanza a su posición
ini cial, sacar el recipiente del plato, y pulsar la tecla , con lo que el
display volverá a la posición de reposo “0.0 g / 0 g”.
CALIBRACIÓN
La calibración de la balanza debe realizarse en un lugar libre de vibra ciones
y corrientes de aire, en completo reposo. Debe disponerse de una pesa de
calibración adecuada, con un error inferior a 0.1 g (recomenda mos una pesa
de clase M2 OIML R-111 o superior).
Page 13

13
El modelo AC-500 se calibra con una pesa de 500 g y el modelo AC- 5000 con
una pesa de 5.000 g
Para realizar la calibración, seguir los siguientes pasos:
1. Con la balanza apagada, pulsar la tecla
para poner en marcha la balanza.
2. Durante el inicio, mientras el display indica “8888”, pulsar la tecla
cuatro veces seguidas, manteniendola pulsada la última vez, hasta que
el display indique un código interno “XXXXX”.
3. Pulsar la tecla
otra vez, el display indicará “CAL”. A continuación
mostrará 5000 (o 500, dependiendo del modelo).
4. Colocar sobre el plato una masa con el valor visualizado, y a continuación
pulsar la tecla
.
5. El display visualizará el mensaje “PASS” y la balanza queda calibrada y
preparada para su uso.
PESO EN OTRAS UNIDADES
OZ. Para pesar en esta unidad, pulsar la tecla (con la balanza pesando
en gramos como unidad) y el display indicará esta unidad. Volviendo a pulsar
la tecla se selecciona la unidad gramos.
AUTODESCONEXIÓN
Este modelo dispone de un sistema de autodesconexión, para alargar la vida de
las baterías. Se desconecta una vez transcurridos unos dos minutos sin utilizarse.
La balanza se desconecta incluso con un objeto sobre su plato; este caso, para
volver a conectarla, debe retirarse el objeto previamente.
Page 14

14
GARANTÍA
Esta balanza está garantizada contra todo defecto de fabricación y de
material, por un periodo de 1 año a partir de la fecha de entrega.
Durante este periodo, GRAM PRECISION, SL, se hará cargo de la reparación
de la balanza.
Esta garantía no incluye los daños ocasionados por uso indebido o
sobrecargas.
La garantía no cubre los gastos de envío (portes) necesarios para la
reparación de la balanza.
Page 15

15
FRANÇAIS
PRÉCAUTIONS
• Ne pas exposer la balance directement à la lumière solaire.
• Ne pas soumettre la balance à un environnement qui contient des gaz
corrosifs.
• Travailler avec une température comprise entre 15° et 40°.
• Utiliser la balance dans un environnement avec une humidité inférieure
à 85% HR.
AVANT L’UTILISATION DE LA BALANCE
Ouvrir l’emballage et vérifier les produits. Pour tout défaut, dommages causés
par le transport, pièces manquantes constatées, informer immédiatement le
fournisseur. Le colis doit contenir:
• Une balance.
• Un manuel d’utilisation.
• Quatre batteries de 1,5 V type R-6.
ALIMENTATION (EN OPTION)
GRAM offre également l’option d’utiliser la balance AC avec une alimentation
secteur.
Brancher le connecteur à la partie derrière la balance et puis au réseau
électrique de 220V.
Page 16

16
CHANGEMENT DES PILES
Changer les piles quand l’écran indique: “LLLLL”.
1. Ouvrir le compartiment postérieur en appuyant sur le rebord, sans faire
pression sur le plateau.
2. Poser les quatre piles dans le compartiment, en suivant les positions
marquées dans l’intérieur et fermer la tape jusqu’à entendre un click.
MISE EN MARCHE DE LA BALANCE
1. Placer la balance sur une surface plane, ferme et sans vibration.
2. Pour allumer la balance, appuyer sur la touche
. La balance
s’allumera et réalisera une auto-vérification en affichant sur l’écran le
message “88888” pendant quelques secondes. La balance AC sera prête
pour utilisation lorsque l’écran affichera “0”.
3. Déposer l’objet à peser sur le plateau de la balance. L’écran affichera
le poids. Si le poids de l’objet pesé dépasse la capacité maximale de la
balance AC, l’écran affichera “EEEEE”.
Connecteur
Base de la balance
Page 17

17
4. Pour éteindre la balance, appuyer sur la touche .
MISE A ZERO
Si la balance AC est en marche avec le plateau vide et que l’écran affiche
aucune lecture du “0” ou “0.0g”, il faudra appuyer sur la touche
pour
corriger l’erreur.
FONCTION DE TARE
Placer un récipient sur le plateau et lorsque le poids est stable, appuyer sur
la touche
pour effectuer la Tare. L’écran affichera “0”.
Introduire le produit dans le récipient. Le poids affiché à l’écran sera le poids net.
Enlever les poids du plateau. L’écran affichera le poids taré qui correspond
au poids du récipient. (La valeur de la tare sera négative).
Pour annuler la tare et remettre l’écran à 0, enlever les poids du plateau et
appuyer sur la touche
.
Il est possible de réaliser cette opération à plusieurs reprises en appuyant
sur la touche
après avoir ajouté d’autres échantillons.
ETALONNAGE
L’étalonnage de la balance doit se réaliser dans un endroit dépourvu de
vibrations et de courants d’air, dans un repos complet. Il doit disposer
d’un poids adéquat, avec une marge d’erreur inférieure à 0.1g (nous
recommandons un poids M2 OIML R – 111 ou supérieur).
Page 18

18
Note: Un poids d’étalonnage est disponible en option pour cette balance (le
solliciter auprès de votre distributeur).
Le modèle AC-500 se calibre avec un poids de 500 g, et le modèle AC-5000
avec 5.000 g.
1. Lorsque la balance est éteinte, appuyer sur la touche
pour la mettre
en marche.
2. Pendant la mise en marche de la balance et lorsque l’écran affiche
“8888”, appuyer sur la touche
4 fois de suite et maintenir appuyée
la touche jusqu’à ce que l’écran affiche un code interne “XXXXX”.
Note: Appuyer 4 fois et rester appuyer lors de la 4ème pulsation. Ne pas
appuyer 5 fois sur la balance.
3. Appuyer à nouveau sur
une nouvelle fois et l’écran affichera “CAL”.
Ensuite, l’écran affichera 5000 (ou 500, en fonction du modèle).
4. Placer le poids sur le plateau et vérifier le poids sur l’écran. Ensuite,
appuyer sur la touche
.
5. L’écran affichera le message “PASS” et la balance sera calibrée et prête
pour utilisation.
UNITÉS DE PESÉES
La balance AC peut effectuer des pesées en g et en OZ.
Pour changer d’unité de pesée, appuyer sur la touche
.
Si la balance pèse en gramme, l’écran affichera “0”.
Si la balance pèse en once, l’écran affichera “0.0”.
Page 19

19
Un curseur s’affichera sur l’écran devant le symbole “g” ou “oz” pour
confirmer l’unité de pesée sélectionnée.
FONCTION D’AUTO-DECONNEXION
La balance AC dispose d’un système d´auto-déconnexion, de manière à
prolonger la vie de la batterie. Elle se déconnecte lorsque la balance n´est
pas utilisée pendant 4 minutes.
La balance peut se déconnecter même avec un objet déposé sur le plateau.
Dans ce cas, pour la reconnecter, il faut d’abord retirer l’objet et allumer à
nouveau la balance.
Page 20

20
GARANTIE
Cette balance est garantie contre les défauts de fabrication ou de pièce,
pendant une année, à partir de la date de livraison.
Durant cette période, GRAM PRECISON, SL, se chargera de la réparation de
la balance.
Cette garantie n’inclut pas les dommages causés par une utilisation
impropre, surcharge, ou par faute de ne pas avoir suivi les recommandations
écrites dans ce manuel (particulièrement de l’aparté CONSEILS POUR
L’ENTRETIEN).
La garantie ne couvre pas les frais d’envoi (transport) nécessaires pour la
réparation de la balance.
Page 21

21
NOTES
Page 22

22
NOTES
Page 23

23
NOTES
Page 24

Gram Precision S.L.
Travesía Industrial, 11 · 08907 Hospitalet de Llobregat · Barcelona (Spain)
Tel. +34 902 206 000 · +34 93 300 33 32
Fax +34 93 300 66 98
comercial
@gram.es
www.gram.es
001/08072016
 Loading...