

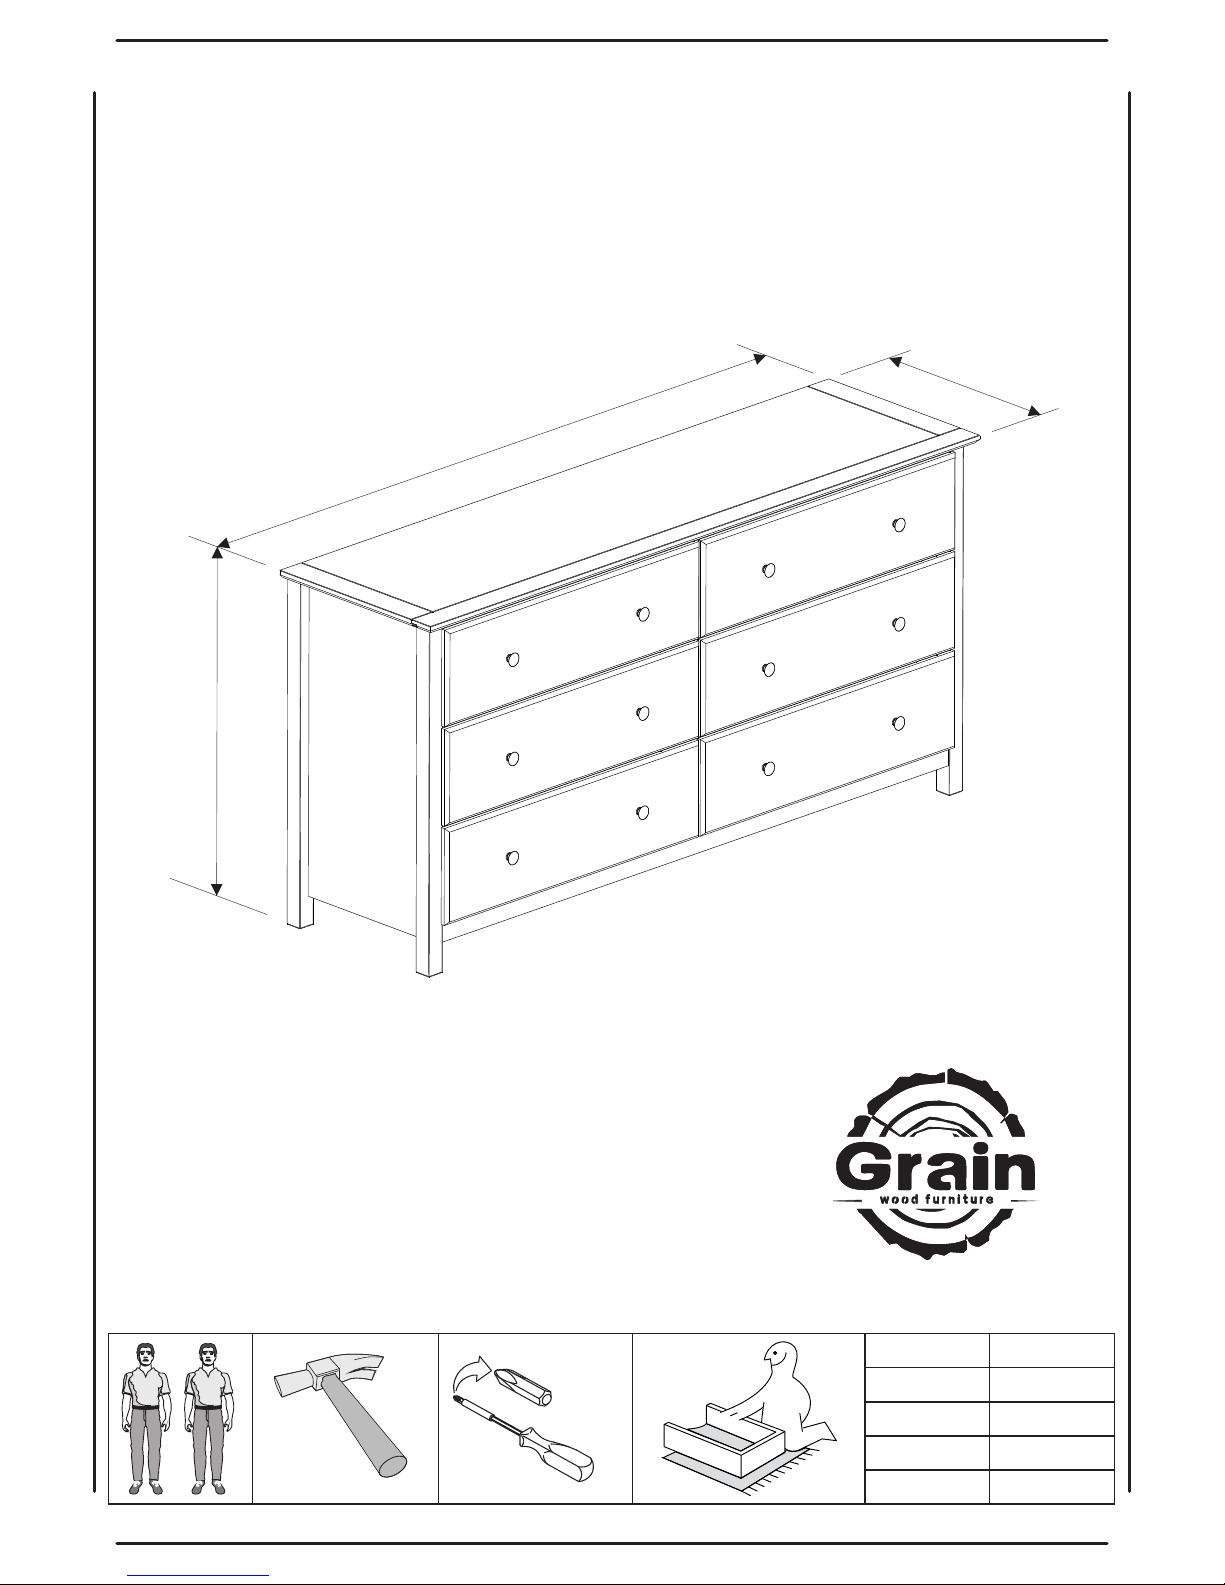
18”
63 3/4”
32”
Assembly Instructions
6 Drawer Dresser
Shaker Collection
page 1/12
MADE IN BRAZIL
PH#2
Walnut
SH0504
Expresso
SH0502
Cherry
SH0501
Finish
Model #
REV - 7/2017
Every effort has been made to ensure your Wood Furniture is
of the finest quality. If you have any questions or need
any replacement parts, please do not hesitate to contact
us at www.grainwoodfurniture.com .
Thank you for purchasing our furniture, it’s an honor to be
in your home!
www.grainwoodfurniture.com

Enjoy your Real Wood Furniture!
page 2/12
Here are some tips on assembling your flat-pack furniture in order to minimize your
assembly time and frustrations:
-Do Not throw away packaging material until assembly is complete.
-Assemble the item on a soft surface, such as cardboard or old blanket, to protect
finish from possible dents of scratches.
-Choose a spacious, open area near where the piece will be located. It is easier to
move parts than to relocate the furniture after it is fully assembled, depending on
its size and weight.
-Organize everything and count it twice. lf you organize the items by parts, you'll
find it much easier to grab each piece as you build.
- Real Wood furniture may present imperfections such as wood knots, minor
splits or cracks that are part of the natural aspect of the material. In few cases,
also can be caused by variations of air moisture and temperature.
Whenever stability of the piece of furniture is not compromised we recommend
customers to perform cosmetic touch-ups by wax crayon fillers sold at all major
hardware stores.
-It is best to use any tools the kit provides, such as a hex key, because they may
be specially sized for that piece of furniture. We do not recommend the use of
power drill, it can damage your furniture if not used correctly.
-Read the entire list of instructions, arranging your parts in order of use as you go.
-Finally, Enlist a help from friends and family since proper assembly of most items
require 2 people.
Wood Furniture Care:
- Clean with a cloth dampened with water or furniture polish following the pattern
of the grain.
- Do NOT use solvents such as alcohol for cleaning.
- Avoid placing under direct sun light, to prevent UV damage.
- Avoid positioning very close to heaters or AC vents.
- Hot pads should always be used when placing warm serving dishes on your furniture.
- Very hot items such as a sauce pan or baking dish should never be placed on a
tabletop, even with a hot pad.
- Place mats will help to protect the finish from dishes and silverware, and coasters
will help protect your furniture from moisture.
page 3/12
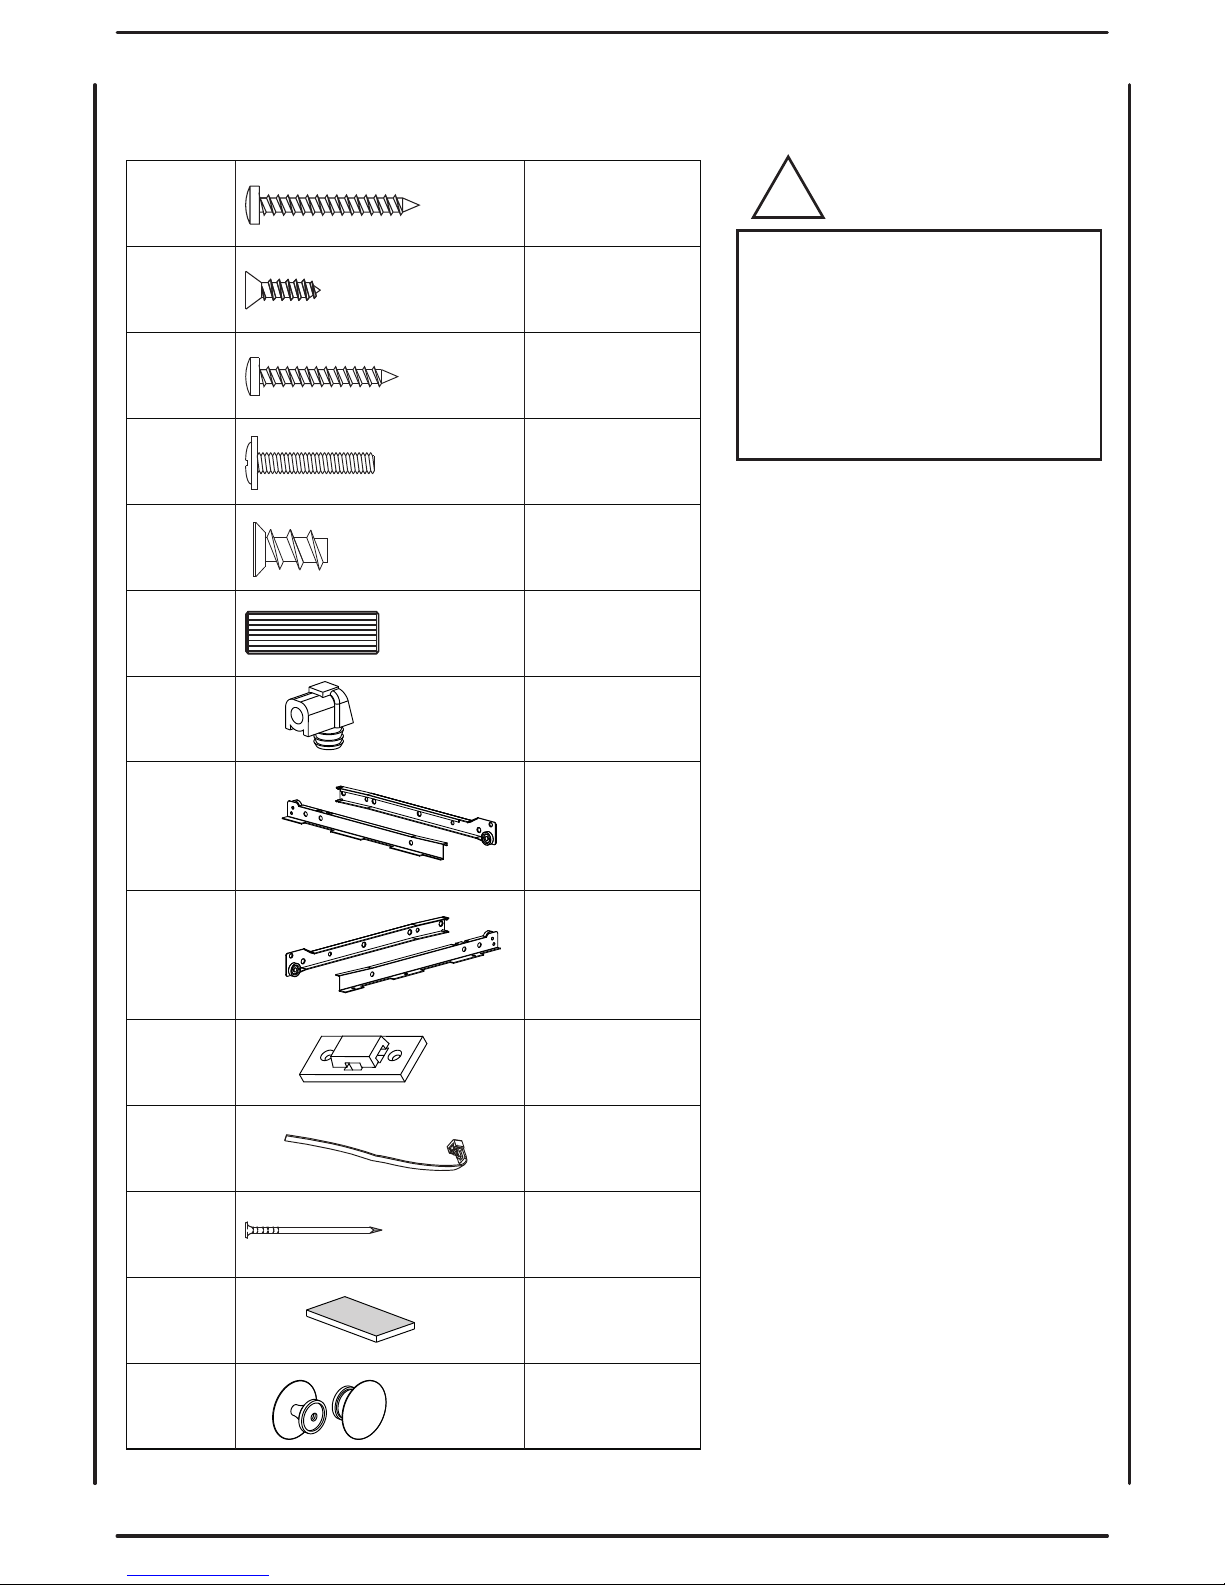
Before starting assembly
please verify if the hardware
set is complete.
For missing hardware please
contact us at
www.grainwoodfurniture.com
ATTENTION
!
A1
4,0x30
81 + 2
A4
3,5x14
21 + 1
C2
8,0x25
76 + 2
G1
10x10
30
E13
330mm - 13"
06
E14
330mm - 13"
06
H4
12
Pz04
A25
M4x25
12 + 1
HARDWARE LIST
D21
01
F9
01
F8
02
A18
4,0x25
01
G11
06
B31
6,0x10
48 + 2
page 4/12
6x
01
02
03
08
09
10
11
12
13
14
04
04
05
06
06
07
07
15
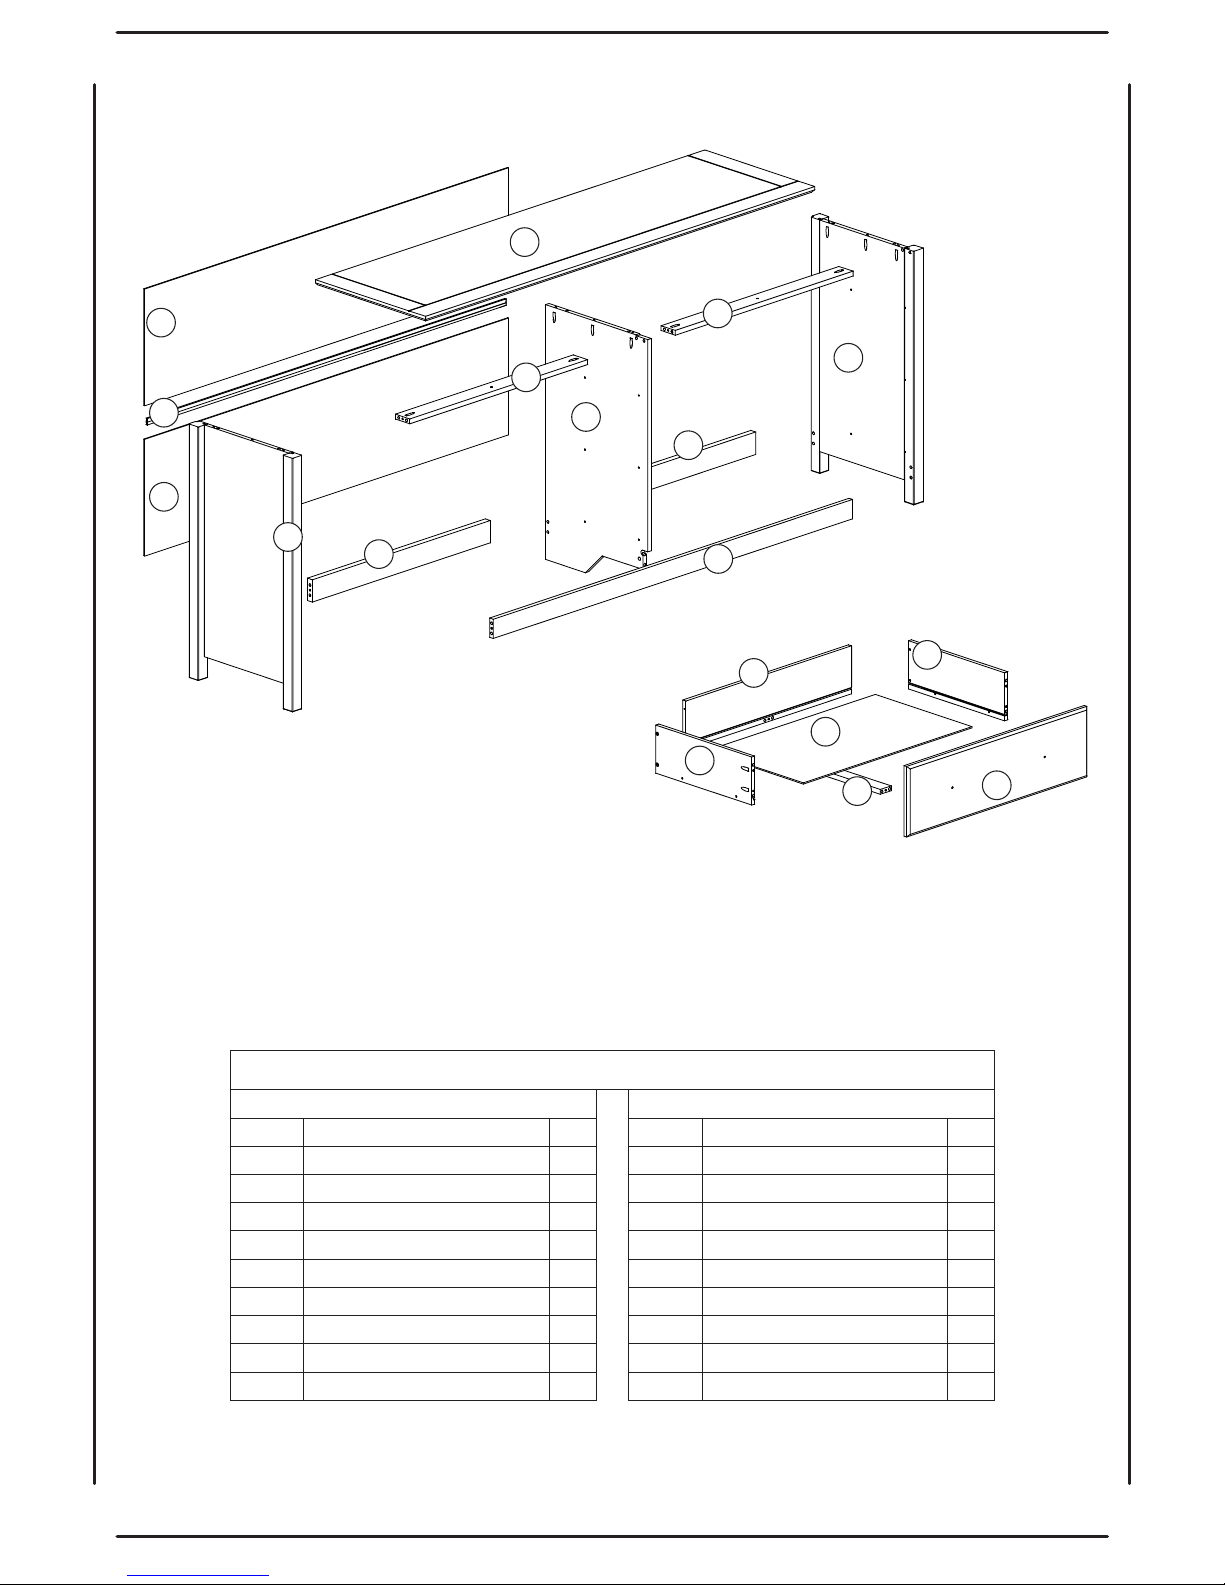
01 1
Top
03 1
02
Right side
1
04 2
Left side
Upper crosspiece
06
09
10
13
14
2
6
6
6
1
1
Rear crosspiece
Drawer right side
Drawer Left side
Drawer bottom support
Division
Part # Description qty
Parts list
Box 1 Box 2
Part # Description qty
Hardware
07 2
Back panel
08 6
Drawer front
05 1
Lower crosspiece
11 6
Drawer bottom
12 6
Drawer back
15 1
Profile “H”
1
Hardware

01)
page 5/12
C2
8,0x25
76
D21
01
02)
C2
C2
6x
03
02
14
05
09
6x
10
6x
13
2x
04
2x
06
C2
C2
C2
C2
C2
C2
C2
C2
C2
D21
C2
C2
C2
C2
C2
C2
C2
C2
C2
C2
C2
C2
C2
C2
C2
C2
C2
C2
D21
03
E14
B31
B31
B31
E14
E14
E13
E13
E13
180º
14
14
02
B31
B31
B31
B31
B31
B31
B31
B31
B31
E14
B31
B31
B31
E14
E14
B31
B31
B31
E13
E13
E13
B31
B31
B31
B31
B31
B31
B31
E13
B31
330mm - 13"
06
B31
6,0x10
24
E13
330mm - 13"
06
E14

03)
04)
page 6/12
A1
4,0x30
04
A1
14
06
04
02
A1
A1
A1
A1
06
03
04
05
A1
4,0x30
06
A1
A1
A1
A1
A1
A1
A1

05)
06)
page 7/12
A1
A1
A1
A1
A1
A1
A1
A1
A1
A1
01
A18
A1
4,0x30
11
A18
01
4,0x25
A18
05
G1
G1
07
G1
G1
G1
G1
G1
G1
10x10
06
07

07)
08)
page 8/12
15
07
07
07
G1
G1
G1
G1
G1
G1
G1
A4
A4
A4
A4
A4
A4
G1
G1
G1
G1
G1
G1
G1
G1
G1
G1
10x10
G1
24
G11
06
3,5x14
A4
07
A4
A4

09)
page 9/12
10)
3,5x14
A4
12
A4
A4
A4
A4
A4
A4
A4
A4
A4
A4
A4
A4
A1
4,0x30
60
A1
A1
A1
A1
08
10
09
6x
A1
A1
A1
A1
A1
12
13
11
6x
A4

page 10/12
11)
12)
330mm - 13"
330mm - 13"
E13
06
E14
06
B31
6,0x10
24
FLIP THE ASSEMBLED DRAWER
UPSIDE DOWN TO INSTALL GLIDES
6x
E13
B31
E14
B31
B31
B31
E14
B31
H4
12
A25
M4x25
12
H4
A25
6x
H4
A25

page 11/12
13)

14)
page 12/12
WALLBOARD
WALLBOARD
Set in furniture
A4
A4
F8
F8
F9
not included
F9
01
F8
02
3,5x14
A4
02
 Loading...