

Graham-Field Health Products Lumex FR587WD Series, Lumex FR587WDH Series Assembly And Operating Instructions Manual
Series FR587WD Deluxe Clinical Care Recliner,
Extra Wide with Drop Arm
Series FR587WDH Deluxe Clinical Care Recliner,
Extra Wide with Drop Arm, with Heat and Massage
Assembly and Operating Instructions
IMPORTANT: READ THIS MANUAL BEFORE OPERATING YOUR LUMEX
FR587WD / FR587WDH DELUXE EXTRA-WIDE CLINICAL CARE RECLINER.
SAVE THIS MANUAL FOR FUTURE USE.
THE MOST CURRENT VERSION OF THIS MANUAL CAN BE FOUND ONLINE
AT www.grahameld.com.
FR587WD-INS-LAB-RevB18

CONTENTS
INTRODUCTION ....................................................................................................................................................... 3
INTENDED USE .................................................................................................................................................3
IMPORTANT SAFETY PRECAUTIONS—PLEASE READ BEFORE USE ....................................................... 3
WARNINGS ..................................................................................................................................................3
ASSEMBLY ...............................................................................................................................................................5
UNPACKING.......................................................................................................................................................5
PRODUCT DESCRIPTION ................................................................................................................................. 5
UPHOLSTERED BACK ASSEMBLY...........................................................................................................5
OPERATION .............................................................................................................................................................8
TENTE® CASTERS.............................................................................................................................................8
LOCKING CASTERS ................................................................................................................................... 8
DIRECTIONAL (SWIVEL) CASTER ............................................................................................................8
SIDE TABLE OPERATION .................................................................................................................................9
RAISE TABLE .............................................................................................................................................. 9
LOWER TABLE ...........................................................................................................................................9
SIDE PANEL OPERATION .................................................................................................................................9
REMOVE SIDE PANEL ................................................................................................................................ 9
INSTALL SIDE PANEL ................................................................................................................................9
RECLINER OPERATION..................................................................................................................................10
FIRST POSITION (UPRIGHT POSITION) .................................................................................................10
SECOND POSITION (FIRST RECLINE POSITION) .................................................................................10
THIRD POSITION (SECOND RECLINE POSITION) .................................................................................10
TRENDELENBURG POSITION (ALSO KNOWN AS SHOCK POSITION) .............................................. 11
DROP ARM OPERATION.................................................................................................................................12
LOWER DROP ARM ................................................................................................................................. 12
RAISE DROP ARM ................................................................................................................................... 12
GAS SPRING TROUBLESHOOTING GUIDE .................................................................................................13
ADJUSTING CABLE TENSION ................................................................................................................13
HEAT AND MASSAGE FEATURE .........................................................................................................................14
INSTALLATION AND OPERATING GUIDE ..................................................................................................... 14
DESCRIPTION ........................................................................................................................................... 14
CONNECTION ...........................................................................................................................................14
MAIN COMPONENTS ................................................................................................................................14
HEAT AND MASSAGE UNIT SETUP INSTRUCTIONS ............................................................................15
HEAT AND MASSAGE UNIT OPERATION INSTRUCTIONS ................................................................... 16
HEAT AND MASSAGE UNIT TROUBLESHOOTING GUIDE ................................................................... 17
CARE AND MAINTENANCE .................................................................................................................................. 19
EVERY THREE MONTHS ................................................................................................................................19
UPHOLSTERY MAINTENANCE AND STAIN REMOVAL ...............................................................................19
PERMABLOK3® CARE AND CLEANING GUIDE — ADVANCED VINYL PROTECTION ....................... 19
CDC RECOMMENDATIONS ............................................................................................................................ 20
CE CERTIFICATION (SERIES FR587WD ONLY) .................................................................................................. 22
TECHNICAL SPECIFICATIONS ............................................................................................................................. 22
LIMITED WARRANTY ............................................................................................................................................23
FR587WD-INS-LAB-RevB18
2

INTRODUCTION
This manual contains assembly, operation, and maintenance instructions for the Lumex
Clinical Care Recliners Series FR587WD and FR587WDH. Read the entire manual carefully
before using your recliner, and refer to it during use if you have questions. If you have
further questions, call Graham-Field / Lumex Technical Support at 1.770.368.4700.
INTENDED USE
Lumex Clinical Care Recliners are intended to make the care, treatment and recovery of
patients easier and more comfortable. Lumex Clinical Care Recliners are used in a wide
range of healthcare applications including Dialysis, Oncology, Drug Delivery, Same Day
Surgery and Post-Operative Recovery. Lumex Clinical Care Recliners are ideal for use in
hospitals, clinics and rehabilitation centers.
Lumex Series FR587WD and FR587WDH support patient weights up to 450 lb (204 kg) when
evenly distributed.
IMPORTANT SAFETY PRECAUTIONS—PLEASE READ BEFORE USE
The safety statements presented in this chapter refer to the basic safety information that
the FR587WD / FR587WDH user must pay attention to and abide by. There are additional
safety statements in other chapters or sections, which may be the same as or similar to the
following, or specic to the operations. Please note the following special statements, used
throughout this manual, and their signicance:
WARNING: Indicates a potential hazard situation or unsafe practice that, if not
avoided, could result in death or serious personal injury.
CAUTION: Indicates a potential hazard or unsafe practice that, if not avoided, could
result in minor or moderate personal injury.
s NOTICE: Indicates a potential hazard or unsafe practice that, if not avoided, could
result in product or property damage.
Info: Provides application recommendations or other useful information to
ensure that you get the most from your product.
WARNINGS
WARNING: Read this entire manual before assembly or operation.
WARNING: Periodically inspect all parts and replace as needed.
WARNING:Donotusenearanopename,asthechaircouldbeacombustion
source,resultinginre,propertydamage,andseverephysicalinjury.
WARNING: Service and repair of the Lumex FR587WD / FR587WDH Deluxe Clinical
Care Recliner, Extra Wide with Drop Arm, must be performed by a Graham-Field
authorized distributor. GF Health Products, Inc. is not responsible for any
consequence resulting from any unauthorized service or repair.
WARNING: The electronics and / or actuator contain no serviceable components.
If service is required, the unit must be returned to the factory for repair. DO NOT
attempt to open the electronics or actuator or obtain local service; this will void
the warranty and may result in damage to the unit. Consult your Graham-Field
authorized distributor for further information.
FR587WD-INS-LAB-RevB18
3

WARNING: This product has a maximum weight capacity of 450 lb (204 kg), EVENLY
DISTRIBUTED.
WARNING: Casters must be locked at all times, except during transport.
WARNING:Unauthorizedmodicationofyourreclinerortheuseofnon-Lumex
replacement parts may change the structure of the recliner and could create a
hazardous condition, which may result in serious injury and will void the warranty.
WARNING: This product can expose you to chemicals including
Di(2-ethylhexyl)phthalate (DEHP) which is known to the State of California to cause
cancer and birth defects or other reproductive harm. For more information go to
www.p65warnings.ca.gov/furniture.
WARNING:GFHealthProducts,Inc.specicallydisclaimsresponsibilityforany
bodily injury or property damage which may occur during any use which does not
comply with federal, state or local laws or ordinances.
FR587WD-INS-LAB-RevB18
4
ASSEMBLY
(total of 3 on recliner; black locking tab)
UNPACKING
1. Check for obvious damage to the carton or its contents. If damage is evident, notify the
carrier and your Graham-Field authorized distributor.
2. Remove all packaging materials from recliner base.
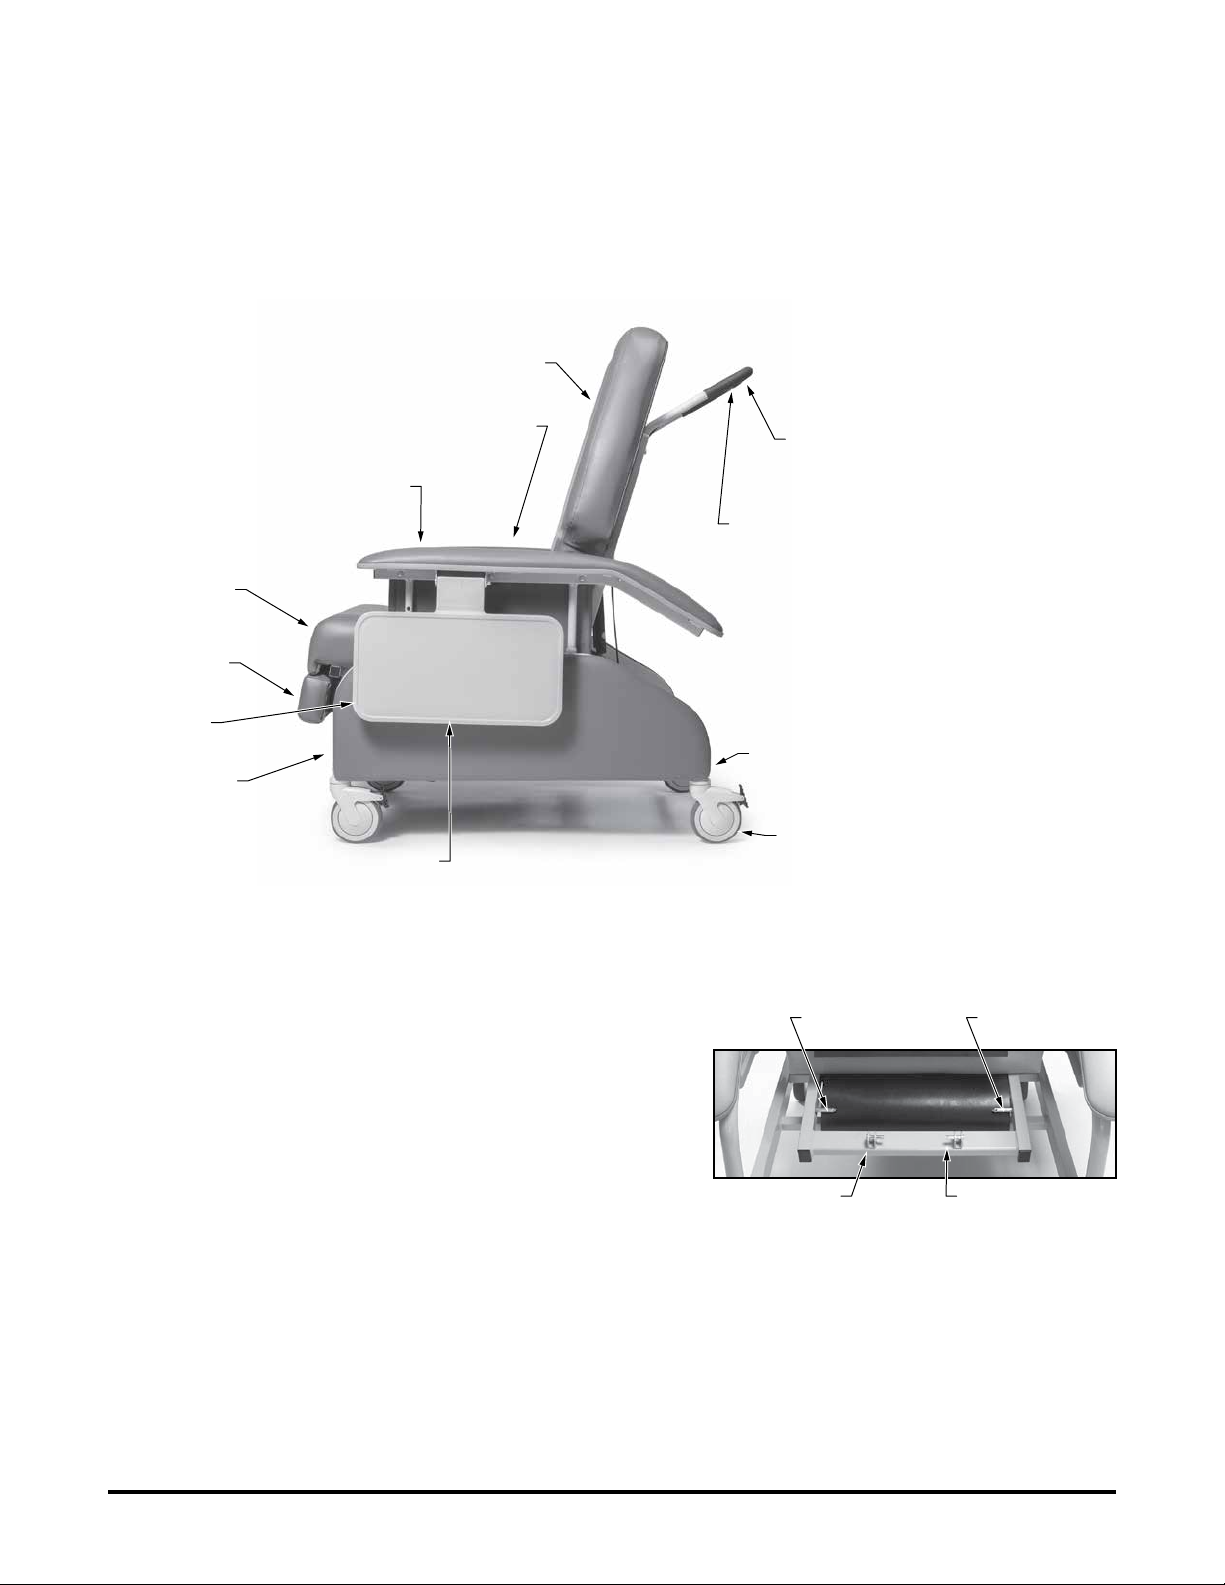
PRODUCT DESCRIPTION
upholstered back
upholstered seat
upholstered armrest
upholstered
legrest / skirt
upholstered
footrest
fold-down
side table
frame
removable side panel
Series FR587WD Deluxe Clinical Care Recliner,
Extra Wide with Drop Arm
Upholstered Back Assembly
1. After removing all components from the
carton, engage all four locks on the casters
before beginning assembly.
padded
push handle
gas spring
actuating lever
rear directional (swivel) locking caster
(right rear leg only; green locking tab)
total locking caster
3
/8” diameter
clevis pin
large cotter pin
2. See the location of three clevis pins, two ring
cotter pins and two large cotter pins at right.
Info: The center clevis pins are 5/16" in
diameter. The outside clevis pins are 3/8" in
diameter.
FR587WD-INS-LAB-RevB18
5
back brace with
U-brackets
Back Assembly
5
/16” diameter
clevis pin
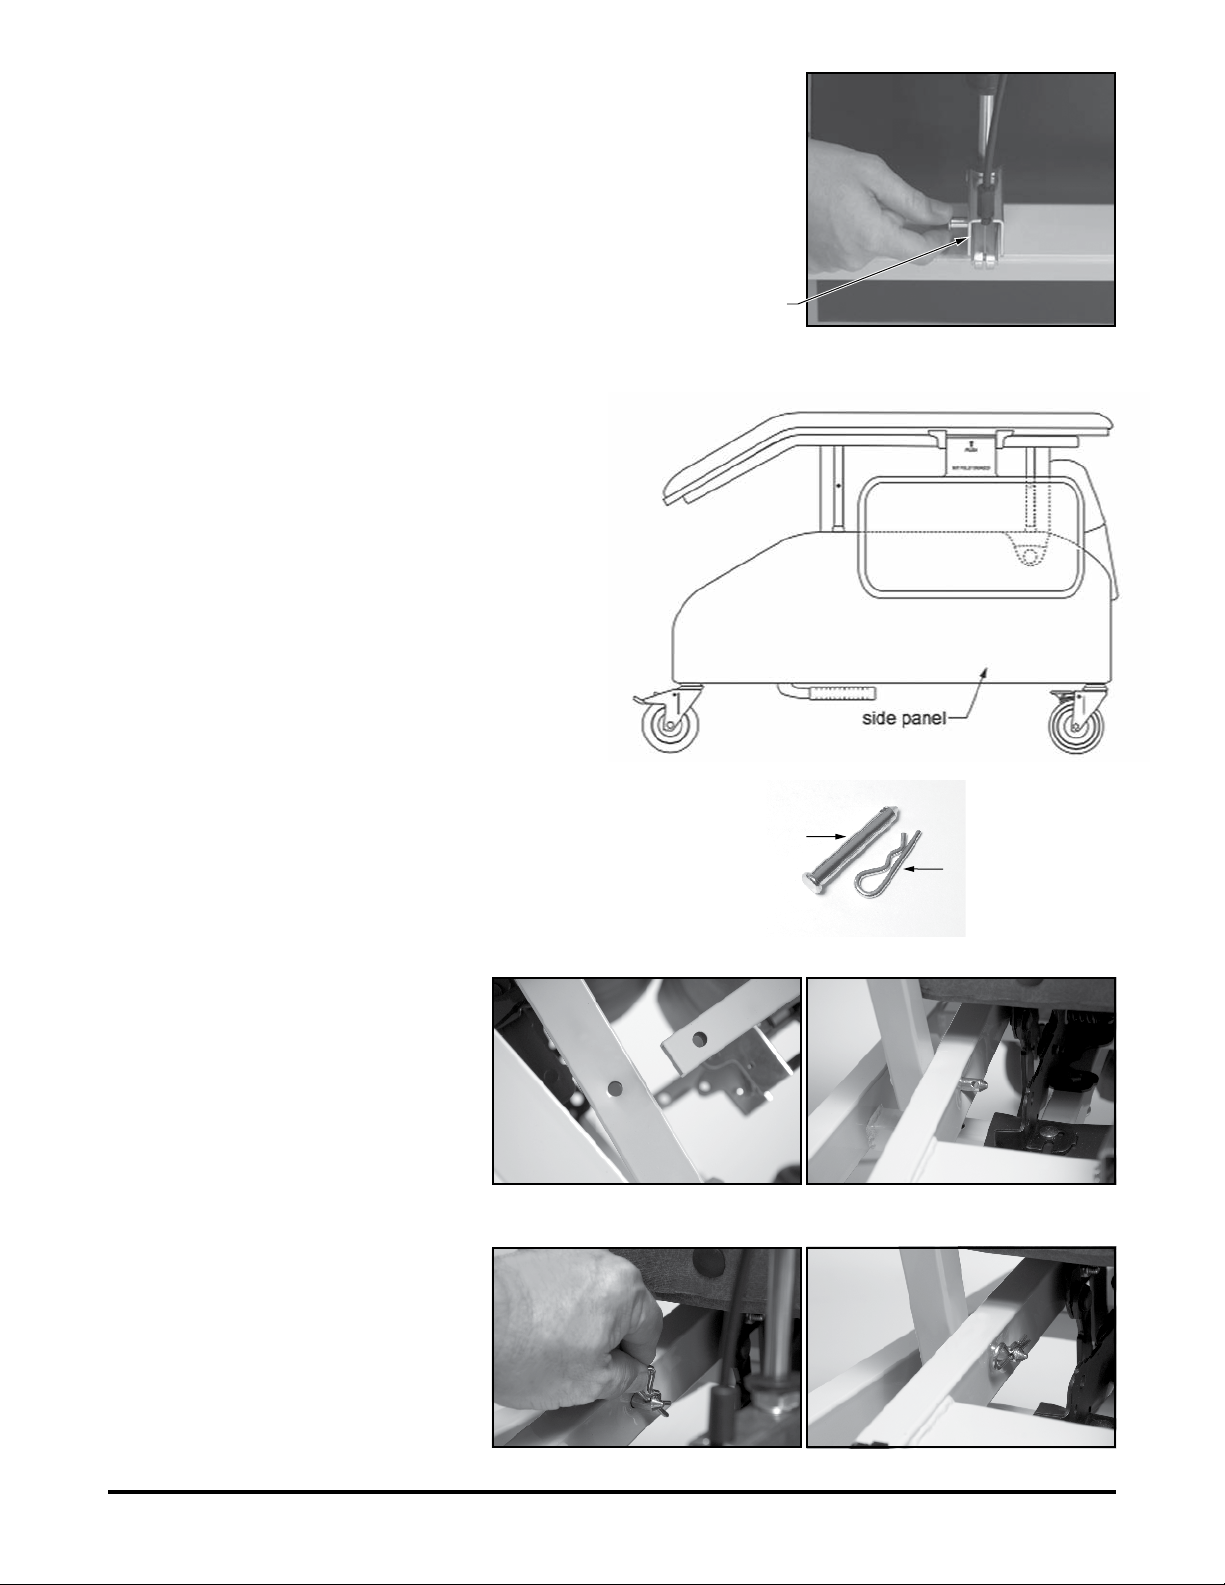
3. Remove cardboard shipping
retainers and tape from around
gas spring cylinders. Rotate the
hinge section on the gas spring
so that it is perpendicular to the
upholstered back, as shown at
right.
4. Remove side panel: grasp
upholstered side panel from
both sides. Pull sharply out
from recliner until locking
clips release side panel from
frame.
gas spring hinge
Rotate HInge
5. Lift the upholstered back
from the sides and place it
horizontally with the
upright back tubes resting
on the recliner frame.
6. Align the holes on the
upright back tubes of the
upholstered back with the
holes on the seat frame.
Place the 3/8" diameter
clevis pins through the
mounting holes in the frame
and back as shown at right.
7. Secure the two clevis pins
by placing a large cotter
pin through the hole in the
clevis pin (one for each
side) as shown at right.
Remove Side Panel
clevis pin
cotter pin
Clevis Pin and Cotter Pin
Align Holes Place Clevis Pins
FR587WD-INS-LAB-RevB18
Place Cotter Pin Cotter Pin
6
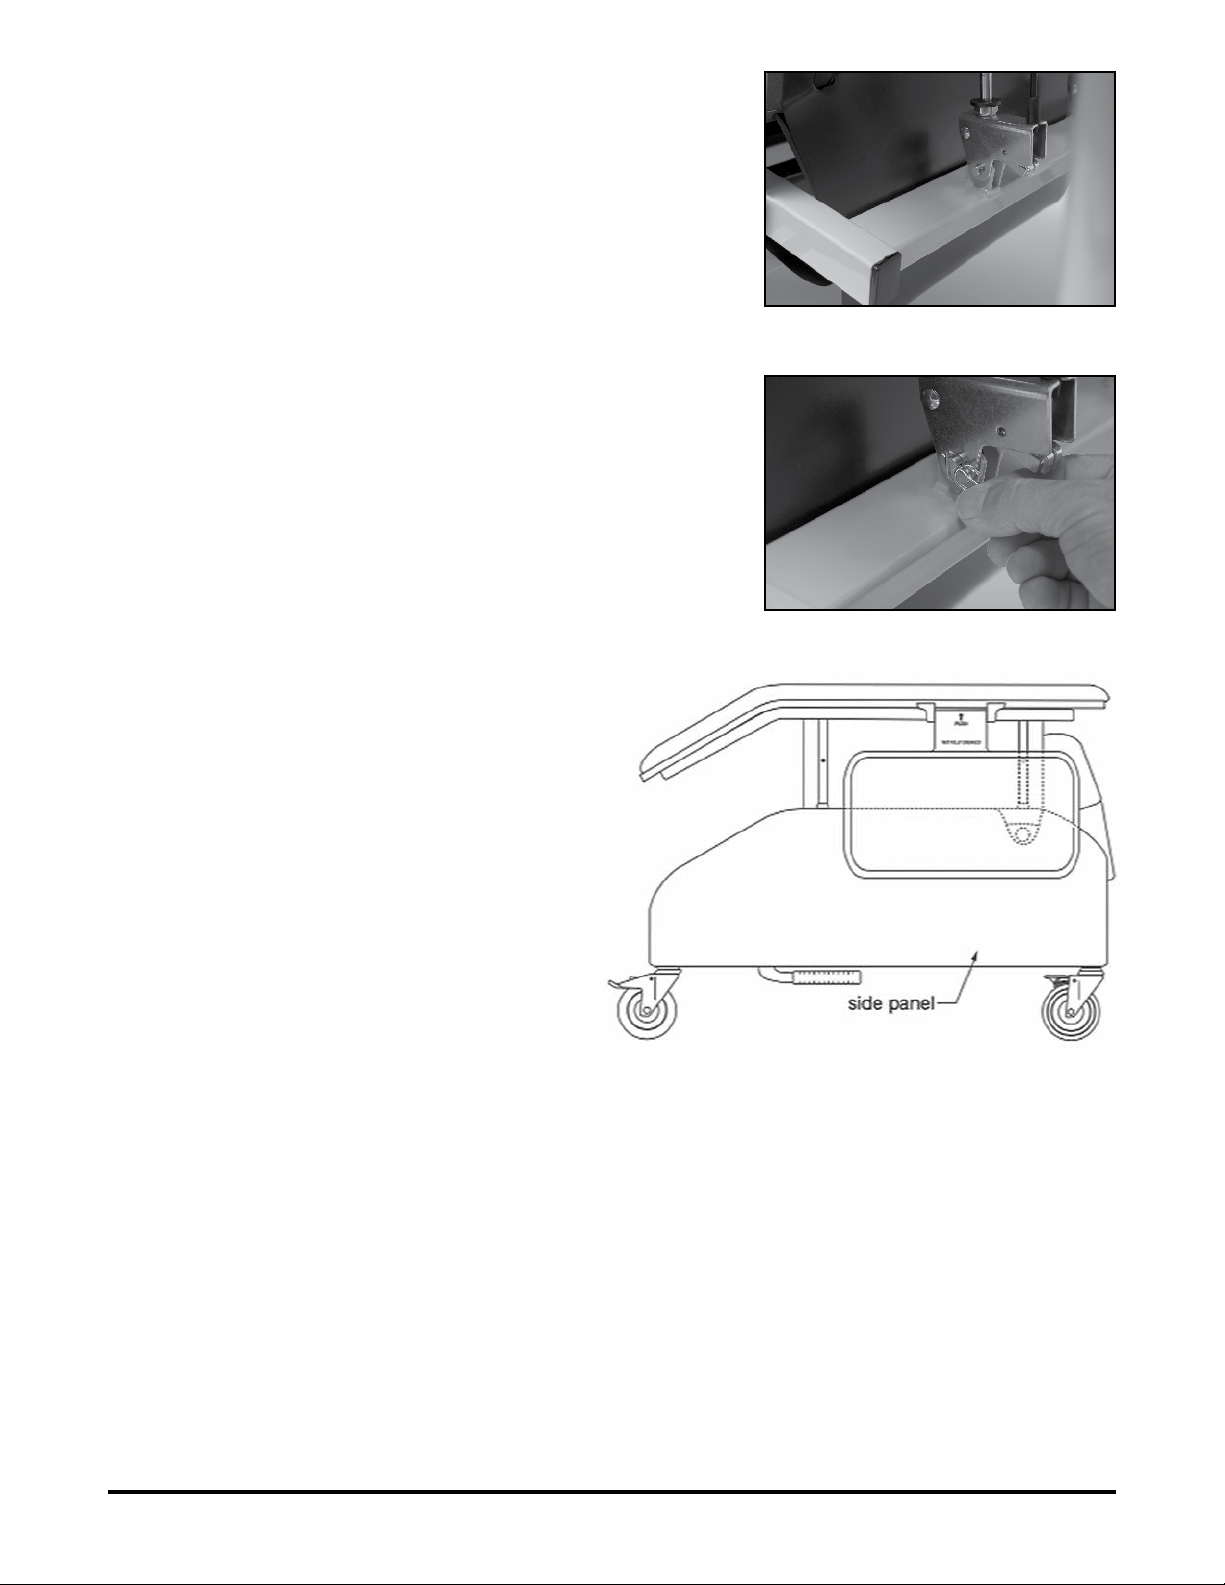
8. Raise the upholstered back to vertical position.
Tuck the plastic skirt at rear of upholstered
back behind seat frame crossbrace. Align the
hinges at the bottom of the gas springs with
the holes in the U-brackets on the seat frame
crossbrace. While holding the back in position
with one hand, secure both gas spring hinges
to the U-brackets by placing two 5/16"diameter
clevis pins through the U-brackets and hinges
with the other hand.
9. Secure the clevis pins by placing the ring cotter
pins through the hole in the clevis pins as
shown at right.
Place Clevis Pins
Place Cotter Pins
10. Re-install side panel: insert side panel
into recliner frame by lining up side
panel clips with frame tubes. Push
side panel rmly into frame until
side panel clips lock into place.
Replace Side Panel
FR587WD-INS-LAB-RevB18
7
OPERATION
TENTE® CASTERS
WARNING: Casters must be locked at all times, except during transport.
All Lumex Clinical Care Recliners now feature
green actuator tabblack actuator tab
the latest design, all-plastic casters from TENTE.
Specically designed for use in healthcare
environments, the new casters are easier to clean,
easier to move, and tolerate a wide array of cleaners
and chemicals. Each caster is made from highgrade synthetic materials and features a double-ball
bearing swivel head. The wheel center is made of
polypropylene and the tire tread of TENTEprene
(thermoplastic rubber). The gray non-marking tires
feature precision ball bearings.
Locking casters
total
locking caster
directional (swivel)
locking caster
(right rear caster)
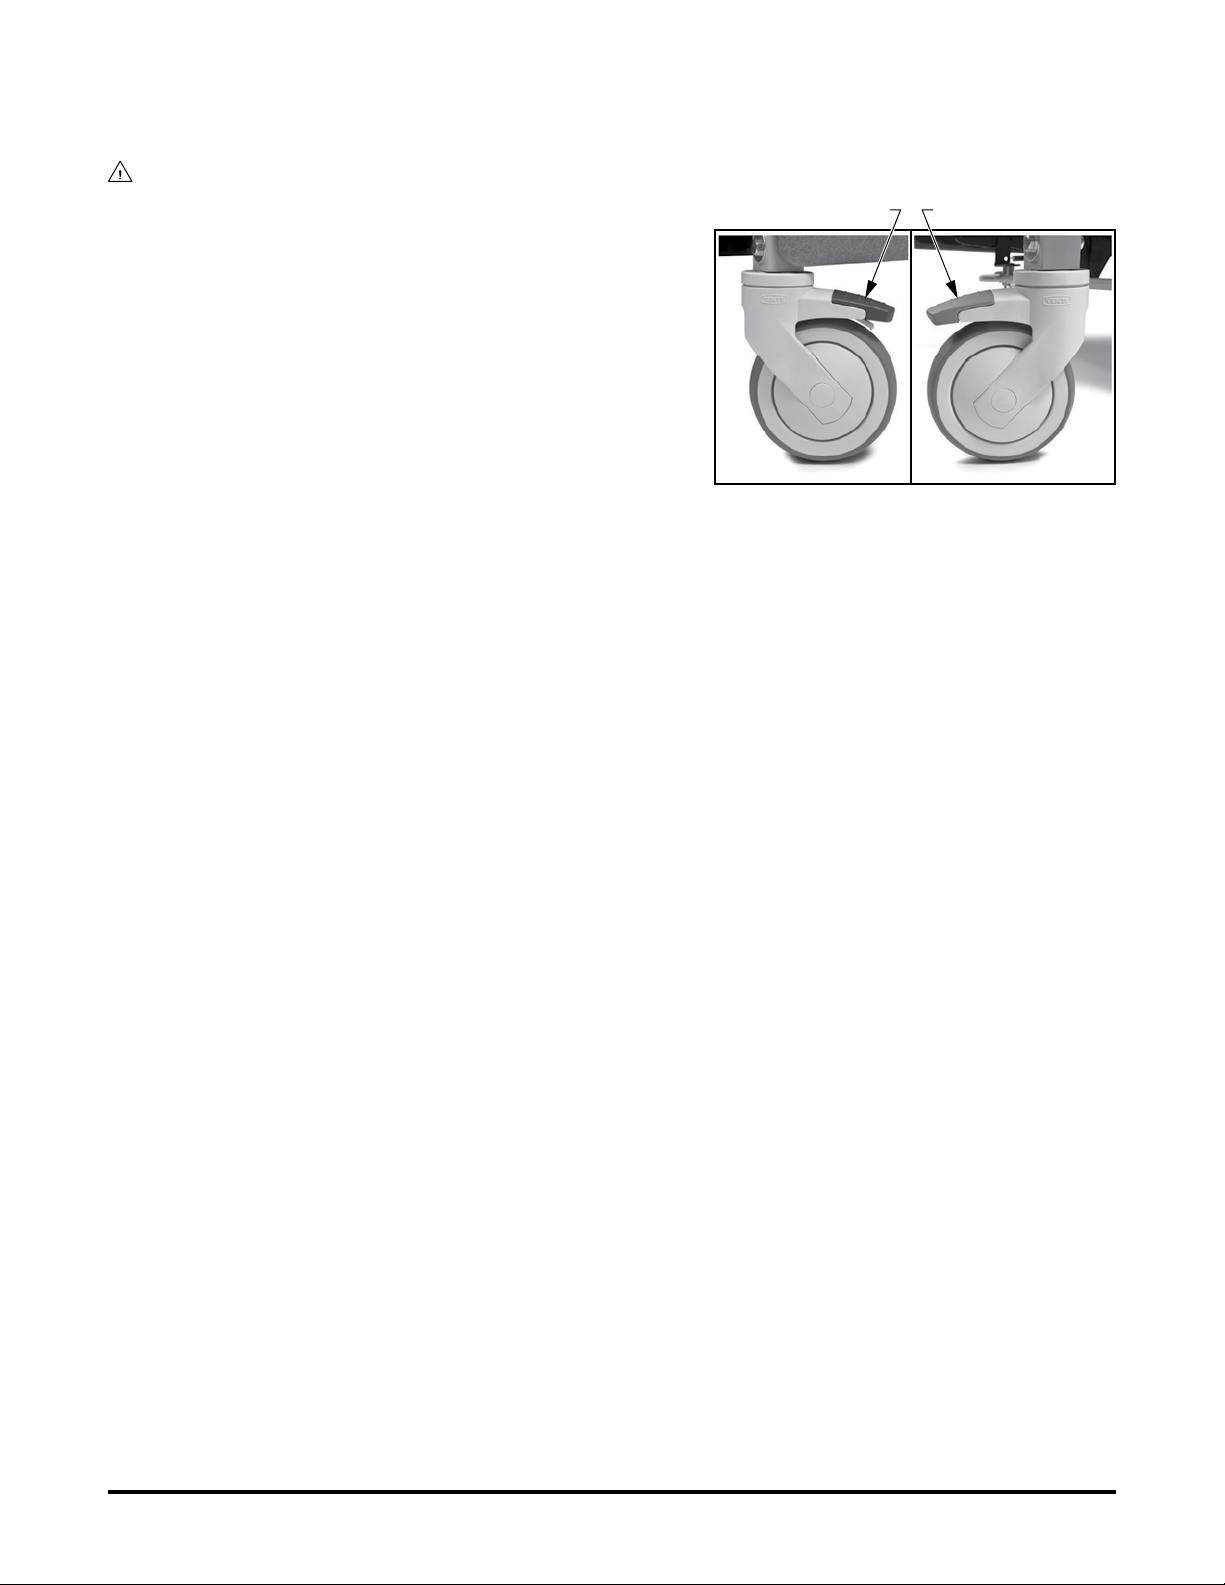
Each Lumex Clinical Care Recliner features three total locking casters, identied by black
actuator tabs, that lock both the wheel and the swivel. To activate the total lock, simply
press down on the BLACK actuator tab until it locks. To release the total lock, press on the
raised portion of the actuator tab until the lever is back in the normal operating position.
Directional (swivel) caster
The fourth caster, located on the right rear position of the recliner, is a directional (swivel)
locking caster only. Identied by a green actuator tab, the directional lock caster will lock
in one of two 180-degree positions relative to the frame (forward and backward) and allows
the recliner to track straight when pushed. To activate the directional lock, simply press
down on the GREEN actuator tab until it locks — you may need to move the recliner slightly
until the caster locks in a straight line with the recliner frame. To release the directional
lock, press on the raised portion of the actuator tab until the lever is back in the normal
operating position.
FR587WD-INS-LAB-RevB18
8
 Loading...