

Page 1

Item 707A,
707AX, 707AC
Digital Blood Pressure
Monitor
with Manual Ination &
Automatic Deation
User Manual
Read this manual before operating the Labtron Digital Blood
Pressure Monitor. Save this manual for future reference.
707A-INS-LAB-RevD11
Page 2

CONTENTS
SAFETY GUIDELINES - PLEASE READ BEFORE USE ................................................................. 3
INTENDED USE ................................................................................................................................. 3
FEATURES ........................................................................................................................................ 4
BATTERY INSTALLATION / REPLACEMENT .................................................................................. 5
BLOOD PRESSURE .......................................................................................................................... 5
PREPARING TO MEASURE BLOOD PRESSURE ................................................................... 6
MEASURING BLOOD PRESSURE ........................................................................................... 9
MAINTENANCE ............................................................................................................................... 13
TROUBLESHOOTING ..................................................................................................................... 14
ERROR INDICATORS .............................................................................................................. 14
GENERAL TROUBLESHOOTING ........................................................................................... 15
SPECIFICATIONS ............................................................................................................................ 16
WARRANTY ..................................................................................................................................... 18
BLOOD PRESSURE MEASUREMENT LOG .................................................................................. 19
Graham-Field and Labtron are registered trademarks of GF Health Products, Inc.
Packaging, warranties, products, and specications are subject to change without notice.
GF Health Products, Inc. is not responsible for typographical errors.
Labtron Digital Blood Pressure Monitor 2
Page 3

SAFETY GUIDELINES - PLEASE READ BEFORE USE
Important! Read and understand these instructions before using the
Labtron Digital Blood Pressure Monitor. If you do not understand
any part of these instructions, contact your medical professional or
Graham-Field dealer for direction in the use of this product.
WARNING: If components are damaged or missing, contact your
Graham-Field dealer immediately. DO NOT use substitute parts.
WARNING:
damage or injury caused by improper installation or use of this product.
INTENDED USE
GF Health Products, Inc. assumes no responsibility for any
The Labtron Digital Blood Pressure Monitor is intended to measure
arterial blood pressure. This device is intended for use by adults,
and not for use by children except under the supervision of an
adult. This device is not intended to replace regular medical
examinations. Review your procedure for using this monitor with
your physician, who is the only person qualied to interpret blood
pressure monitor results.
Labtron Digital Blood Pressure Monitor 3
Page 4
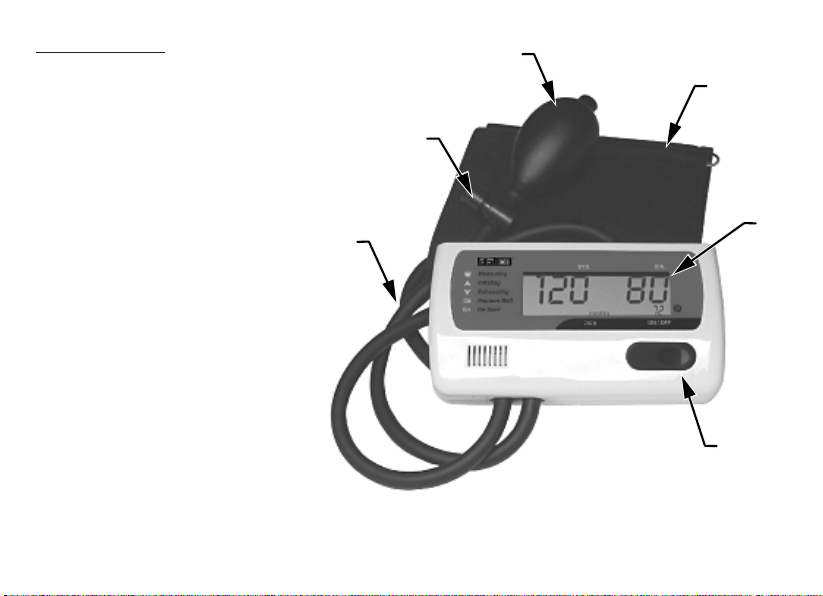
FEATURES
Digital Blood Pressure Monitor
Main features of
the Digital Blood
Pressure Monitor,
referred to in this
exhaust valve
button
bulb
cuff
manual, are shown
in the picture at
right.
Labtron Digital Blood Pressure Monitor 4
cuff
hose
LCD
ON/OFF
button
Page 5

BATTERY INSTALLATION / REPLACEMENT
1. Slide the battery cover off in the direction of
the arrow.
O P E N
2. Install or replace the four AAA batteries,
oriented as shown by battery compartment
diagram, into the battery compartment.
3. Replace the battery cover. Ensure that the
battery cover is securely fastened.
Info: Ensure that the batteries are correctly
installed. Incorrect installation will prevent the
device from operating.
BLOOD PRESSURE
Blood Pressure is a measure of the blood’s pressure in the
circulatory system, which changes constantly during the course
of the cardiac cycle. Blood pressure readings report two values.
The higher reading (systolic pressure) shows the highest pressure
Labtron Digital Blood Pressure Monitor 5
Page 6

in the arteries occurring when the heart contracts. The lower
reading (diastolic pressure) shows the lowest pressure in the
arteries, which occurs right before the heart contracts. Blood
pressure readings are written with the highest value rst, then the
lowest value. Readings of 120/80 are considered to be normal, with
high blood pressure being dened as a systolic pressure which is
140mmHg or more at rest and a diastolic pressure which is 90mmHg
or more at rest. Only a patient’s physician is qualied to determine
whether the readings obtained are normal for that person.
Preparing to measure blood pressure
1. Blood pressure uctuates continuously throughout the day. To
consistently track your blood pressure, try to take your blood
pressure at the same time each day.
2. Relax and remain still for 5 to 10 minutes before a blood pressure
measurement, and between blood pressure measurements.
3. Refrain from eating, smoking, and drinking, especially alcoholic
Labtron Digital Blood Pressure Monitor 6
Page 7

beverages, before a measurement.
4. Remove any clothing on the upper arm to place the
cuff directly on the skin. Constriction of the upper
arm by clothing or a rolled-up sleeve, as shown at
right, may cause an inaccurate reading; remove any
excessive
constriction
constricting garments.
5. Sit down in a chair with back support
and place both feet on the oor.
6. Extend the arm from which the blood
pressure will be taken to the front or
side. Rest your hand, palm-up, on a
table as shown at right.
Info: Place the cuff at the same level as your heart to obtain accurate
measurements. Your heart is located slightly to the right of your left
armpit.
Labtron Digital Blood Pressure Monitor 7
Page 8

7. Attach the cuff: Hold the area of the cuff where
the hose exits the cuff rmly against the inside
of the bare upper arm directly over the brachial
artery, and the bottom of the cuff approximately
one inch (2-3cm) above the elbow, as shown in the
third picture at right. Never place the cuff over
clothing. Pull the opposite end of the cuff snugly
around the arm and secure with the hook and loop
fastener. The cuff should be snug, but not too tight.
If one or two ngers can t between the cuff and
the arm, the cuff is properly secured. If you are
1 inch
unable to t the cuff as described above, a smaller
or larger cuff should be used.
Labtron Digital Blood Pressure Monitor 8
Page 9

Measuring blood pressure
Symbol key: LCD symbols you may see during measurement
Deating
Inating
Measurement error
Measuring
Low battery
1. Ensure that cuff is properly placed and that you are positioned as
described in previous paragraphs.
2. Press the ON/OFF button. All LCD symbols will appear
momentarily. If a downward arrow symbol displays, press
the exhaust valve button (see earlier labeled picture) located
between the ination bulb and the tube to release the residual
pressure from the cuff.
Labtron Digital Blood Pressure Monitor 9
Page 10

Info:
The low battery symbol will also appear at this time while the
monitor checks the power level. This does not indicate that the batteries
are low unless the low battery symbol remains on continuously.
3. After "0" displays, pressurize the cuff by squeezing the bulb until
the pressure value displayed is 50mmHg above your usual systolic
pressure. If you do not know your usual systolic pressure, squeeze
the bulb just until 200mmHg displays.
4. The cuff will automatically deate after you stop pressurizing the
cuff. If an upward arrow symbol displays, you must inate the
cuff to a higher pressure than you did the rst time. If an upward
arrow does not display, the monitor is taking your measurement.
Remain calm and still to avoid causing any measurement error.
5. The systolic pressure, diastolic pressure,
Systolic
Diastolic
and pulse will display in the format shown
at right. The device will completely deate
when measurement is nished. To accelerate
deflation, press the exhaust valv
Labtron Digital Blood Pressure Monitor 10
e button.
Page 11

Info: To stop measurement in progress for whatever reason, press the
exhaust valve button to release the pressure and turn off the device.
Info: If during measurement the power drops to an insufficient level,
the device will end the measurement and display the low battery
symbol. Replace the batteries and repeat the measurement.
Info: If the device cannot detect your pulse, it will end the
measurement. Wait several minutes, ensure that you and the cuff are
positioned properly, and try again.
6. The device will automatically shut off three minutes after
completing a reading, or you may turn it off manually by pressing
the ON/OFF button.
Labtron Digital Blood Pressure Monitor 11
Page 12

7. If performing measurement for the rst time, repeat the
measurement two or more times to ensure that you and cuff are
positioned correctly and that results are accurate and consistent.
Record your results; there is a log provided, with examples, at
the end of this manual for this purpose. Always check with your
physician to ensure that readings are performed correctly. If you
have concerns or questions about your results, always contact
your physician. Only your physician is qualified to analyze
blood pressure.
Labtron Digital Blood Pressure Monitor 12
Page 13

MAINTENANCE
s NOTICE: To prevent product damage, please follow these
recommended care and maintenance instructions:
Do not drop or pull excessively on monitor components or subject them to strong impact.
Do not use monitor close to any device with a strong electrical eld such as television,
microwave oven, X-Ray equipment, etc.
Never inate cuff above 300mmHg. Never inate cuff unless it is positioned on an arm.
Do not expose the monitor components to direct sunlight, high temperature, or high humidity.
Do not put any part of monitor in contact with sharp objects which could pierce the material
and cause damage.
Do not dismantle or disassemble monitor components.
Cleaning Wipe off all components with a clean, dry cloth. Do not use solvents or other
petroleum-based cleaners. Do not press cuff with a hot iron.
Storage Always deate the cuff completely before storage.
Remove the batteries when the device is to be stored for extended periods of
time. Info: Removing the batteries will erase all readings in memory.
Labtron Digital Blood Pressure Monitor 13
Page 14

TROUBLESHOOTING
Error indicators
Indication Cuff pressure reaches 330mmHg
Cause Twisted bladder inside cuff
Correction Ensure that bladder lies at within cuff
Indication "Err" displays, cuff pressure releases, then "0 pressure" displays
Cause Excessive arm movement or talking during measurement
Correction Turn monitor OFF then ON and measure again while remaining still
Indication Could not obtain pulse rate
Cause Cuff was too loosely applied, extremely weak pulse, or arrhythmia
Correction Reapply cuff and measure again; if problem persists after cuff is
correctly positioned, seek medical attention immediately
Batteries are exhausted. Replace with four new AAA alkaline batteries
Labtron Digital Blood Pressure Monitor 14
Page 15

General troubleshooting
Problem Recommended Action
Nothing appears
in LCD
Ensure that batteries are correctly oriented in battery holder (polarity
matches battery case placement indicators)
No measurement
occurs
Blood pressure
measurements are
too high or
too low
Blood pressure
measurements
vary
Labtron Digital Blood Pressure Monitor 15
Ensure that cuff is positioned correctly
Go over measurement procedure; measure again
Ensure that user and cuff are positioned as instructed
Rest your arm on a table so that the cuff is level with your heart during
measurement
Remain seated and still during entire measurement period
Refrain from hand and body movements during measurement
Your blood pressure can uctuate considerably throughout the day. All
of the following factors can inuence your blood pressure:
• Emotional state
• Daily activities / exercise
• Smoking
• Drinking alcoholic beverages
• Eating
• Taking certain medications
Page 16

SPECIFICATIONS *
Digital Blood Pressure
Monitor Model
Measurement method Oscillometric
Display Digital LCD
Measurement range Pressure 20-280mmHg, Pulse 40-180bpm
Measurement accuracy Pressure ±3mmHg, Pulse ±5%
Ination system Manual ination with air pumping bulb
Deation system Automatic deation
Power 1.5V (AAA) alkaline batteries X 4
Automatic power-off Approximately 3 minutes after measurement
707A, adult-size cuff, ts 7.5 in. - 12.2 in. (19-31cm) arm
707A X, large adult-size cuff, ts 11.8 in. - 17.7 in. (30-45cm) arm
707A C, small adult-size cuff, ts 5.1 in. - 7.9 in. (13-29cm) arm
Reference method for
clinical trials
Weight Approximately .75 lb (340g) without batteries
Labtron Digital Blood Pressure Monitor 16
Auscultatory measurement
Page 17

Specications, continued *
Environmental
conditions
Operation 50°F ~ 104°F (10°C ~ 40°C), 10% ~ 85% RH
Storage &
14°F ~ 140°F (-10°C ~ 60°C), 10% ~ 95% RH
transport
Standard cited EN 1060-1 Noninvasive blood pressure measuring equipment
general requirements
EN 1060-3 Noninvasive blood pressure measuring equipment
supplementary requirements for electromechanical
blood pressure measuring systems
EN 60601-1 Safety requirements for medical electrical equipment
EN 606011-2
Electromagnetic compatibility and safety for medical
electrical equipment
EN 14971 Risk analysis for medical devices
* Specications are subject to change without notice
Labtron Digital Blood Pressure Monitor 17
Page 18

WARRANTY
GF Health Products, Inc. ("Graham-Field") warrants the Labtron
Digital Blood Pressure Monitor Model 707A/707A X/707A C for a
period of one year for defects in workmanship and materials. If a
product is deemed to be under warranty, GF Health Products, Inc.
shall provide, at its option, (1) replacement of any defective part or
product or (2) a credit of the original selling price made to GF Health
Products, Inc.’s initial customer. The warranty does not include any
labor charges incurred in replacement part(s) installation or any
associated freight or shipping charges to GF Health Products, Inc.
The warranties contained herein contain all the representations
and warranties with respect to the subject matter of this
document, and supersede all prior negotiations, agreements and
understandings with respect thereto. The recipient of this document
hereby acknowledges and represents that it has not relied on any
representation, assertion, guarantee, warranty, collateral contract or
other assurance, except those set out in this document.
Labtron Digital Blood Pressure Monitor 18
Page 19

BLOOD PRESSURE MEASUREMENT LOG
Date
Time
mmHg
1/1 1/1 1/1
7:00 13:30 20:00
240
220
200
180
160
Pulse
Body
Condition
140
120
100
128
80
60
134
84
70 73 69
123
90
76
Labtron Digital Blood Pressure Monitor 19
Page 20

USA Corporate Headquarters:
GF Health Products, Inc.
2935 Northeast Parkway
Atlanta, Georgia 30360
telephone: 770-368-4700
fax: 770-368-2386
www.grahamfield.com
707A-INS-LAB-RevD11
© 2011, GF Health Products, Inc.
 Loading...