

Graham Architectural Products Series 2400, Series 6500, Series 1100, Series 0800, Series 0400 Homeowner's Manual

1551 Mt. Rose Avenue
York, PA 17403-2909
HOMEOWNER’S WINDOW
MAINTENANCE & OPERATION
MANUAL
FOR:
ACOUSTICAL ALUMINUM WINDOWS
Copyright © 2004

Graham Architectural Products
Homeowner’s Manual
Acoustical Aluminum Windows
TABLE OF CONTENTS
Cleaning Aluminum, Glass, and Screens 1-2
Vent and Sash Operation 2-3
Water Drainage 4
Condensation and Humidity 4-5
Series 2400 Double-Hung Window 6-8
Series 0400 Horizontal Sliding Window 9-11
Series 6500 Casement/Projected Window 12-15
Series 1100 Fixed Window 16-17
Series 0800 Sliding glass door 18-21
Appendix 1 22-23
Appendix 2 24
1

Graham Architectural Products
Homeowner’s Manual
Acoustical Aluminum Windows
Congratulations . . . and thank you for your selection of Graham Architectural Products windows,
which have become an integral part of your new home or replacement window project. All our
products are manufactured to the highest possible standards. All Graham windows and patio doors
are engineered and randomly selected for testing by certified third party laboratories to assure that
our products perform as designed day in and day out. Like any highly-engineered product,
periodic maintenance is required to assure a lifetime of low maintenance performance.
There are several elements the homeowner should pay attention to when cleaning and maintaining their
Graham window or door. These elements are:
• The cleanliness of the aluminum, glass, and screen
• The operability of vents and sashes
• Effectiveness of the water drainage system
• Understanding of condensation and humidity
Cleanliness of the Aluminum, Glass, and Screen
In order to extend the life of your window, it is very important to keep it clean. Many kinds of debris and
dirt build-up can harm your window and decrease its durability. The aluminum should be cleaned on a
regular basis to prevent a build-up, which could be difficult to remove later. Although this sounds like a
difficult task, it really is quite easy to clean the aluminum surface with little effort. In most cases, a heavy
rain is sufficient to clean the exterior side of the window.
Normal Maintenance for Aluminum Painted Surfaces
The painted surface provided will not normally show an appreciable amount of dirt collection. Very often,
rainfall may be sufficient to keep the exterior surface clean. In most geographic locations dirt or soil will
not have a detrimental effect on the coating, but cleaning may be desirable for appearance sake. Graham
recommends following AAMA publication No. 610.1-1979 “Voluntary Guide Specification for Cleaning
and Maintenance of Painted Aluminum Extrusions and Curtain Wall Panels” for maintaining the
aluminum finish. A copy of that document can be found in Appendix 1 of this manual.
Normal Maintenance for Glass
Clean the glass using standard glass cleaner such as Windex®. Do not use abrasive cleaners, as it will
scratch the glass. Decals and dried debris can be removed with a new single edged razor blade, wetting
the glass first with glass cleaner.
Normal Maintenance of the Screen
To clean the screens, simply hose them off with water. For built-up dirt, you can use a mild soap and
sponge, then rinse thoroughly. Do not use abrasive cleaners. Damaged screen mesh can be replaced by the
owner or by most local hardware shops. Do not use aerosol cleaning agents on screens, as certain
propellants in the cleaners can cause damage to the molded corner parts.
2

Graham Architectural Products
Homeowner’s Manual
Acoustical Aluminum Windows
Vent and Sash Operation
General
The windows which have been installed into your home are referred to as “dual windows.” This means
that there are two sets of sash or vents (interior and exterior) separated by a wide air space. This wide air
space between the panes of glass results in better noise reduction. The interior sash/vent must be operated
or removed for cleaning the exterior sash/vent.
Hung Windows
Hung windows are windows with the operating sash moving in a vertical direction. These windows are
balanced using block and tackle devices; one on each side of the operating sash. To operate the sash,
make sure the locking device is in the unlocked position, grasp the pull handle, and slide the sash away
from the locking frame member (upward for the bottom sash and downward for the top sash). More
detail is given in the 2400 window section of this manual.
Horizontal Sliding Windows
Horizontal sliding windows are windows where the sash move in a horizontal direction. To operate the
sash, make sure the locking device is in the unlocked position, grasp the pull handle, and slide the sash
away from the locking frame member. Ensure that there is no debris in sill tracks, as this will impede
smooth operation. More detail is given in the 0400 window section of this manual.
Casement/Projected Windows
Casement window:
A window unit in which the vent cranks outward, to the right or left.
Projected window:
Window unit that the vent swings either inward or outward, from the top or the bottom.
All moving hinge and locking hardware should be kept clean and lubricated at least annually with a
greaseless type lubricant. More detail is given in the 6500 window section of this manual.
Fixed Windows
Fixed windows are those windows that have non-operating sash or fixed glazing. More detail is given in
the 1100 window section of this manual.
Sliding Glass Doors
Sliding glass doors are doors comprised of one or more operating panels that move in a horizontal
direction. To operate the panel, make sure the locking device is in the unlocked position, grasp the pull
handle, and slide the panel away from the locking frame member. More detail is given in the 0800 door
section of this manual.
3
Graham Architectural Products
Homeowner’s Manual
Acoustical Aluminum Windows
Water Drainage System
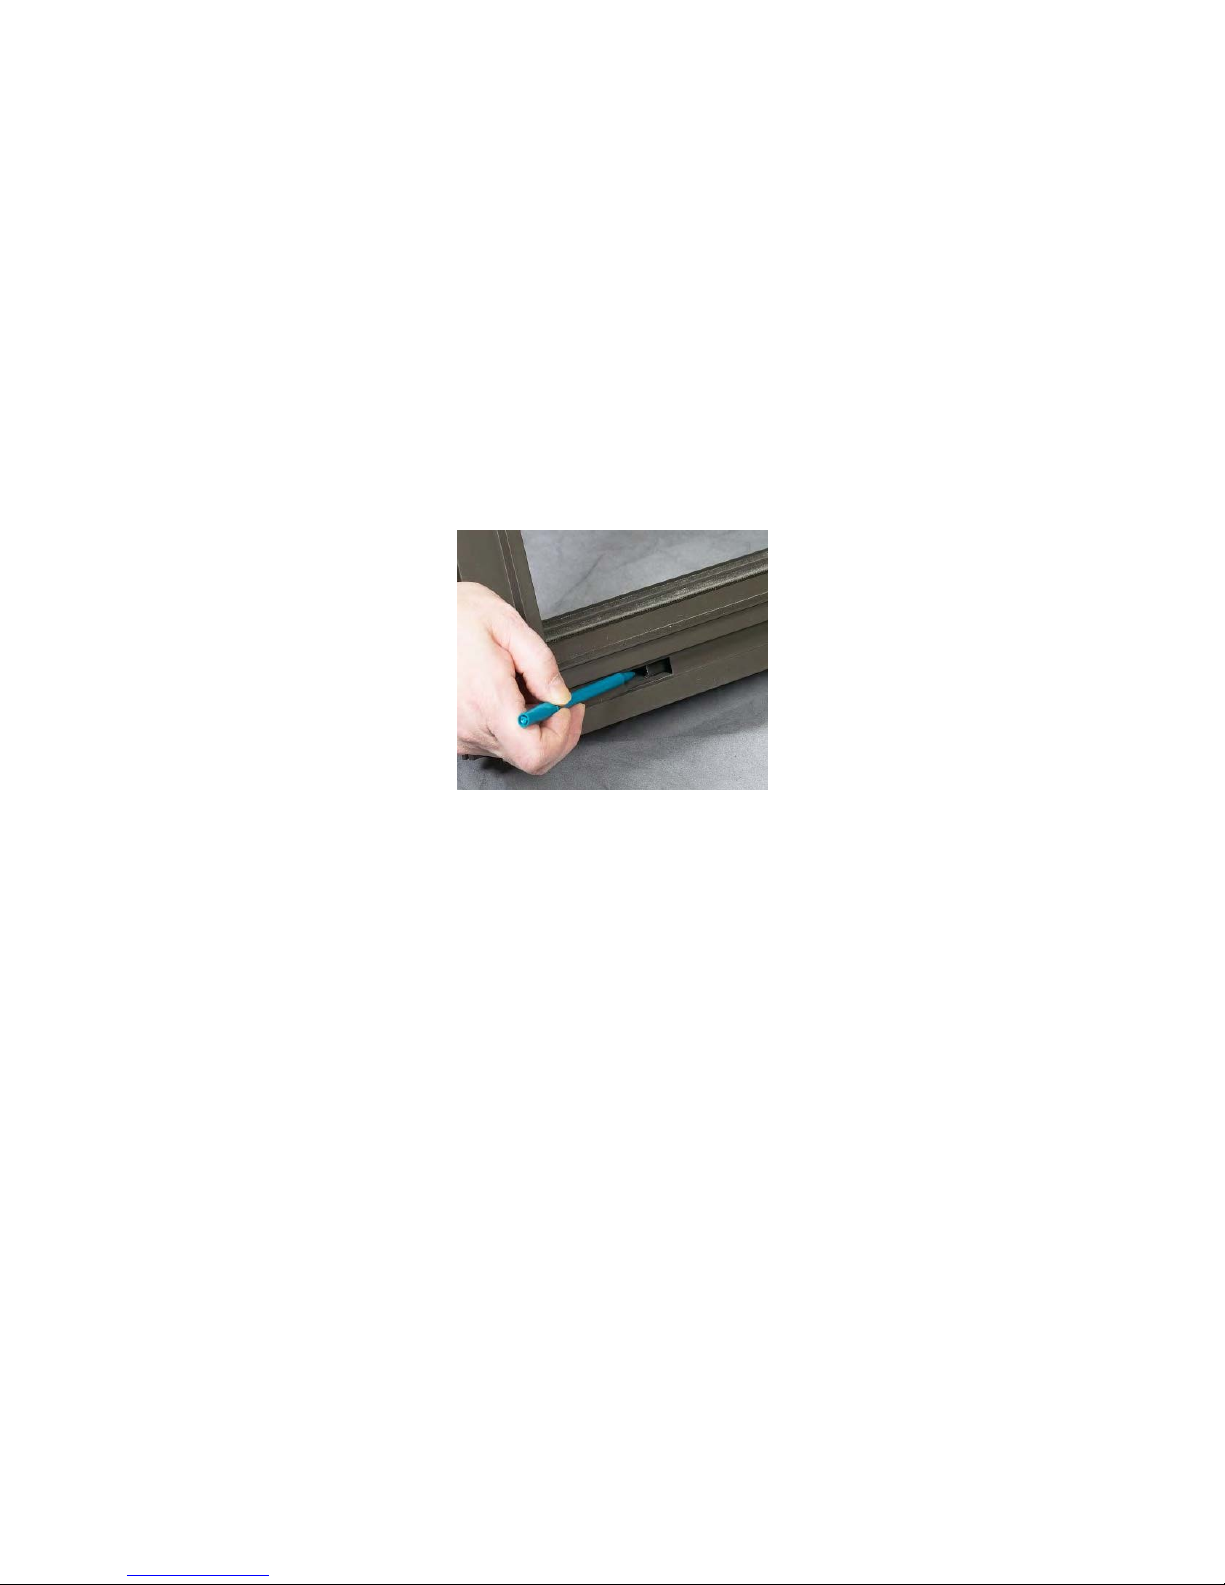
Your Graham windows incorporate a low-point, high-pressure weep system. This system uses small holes
in the window sill, which will route water to the exterior face of the window or door through very small
openings (weep holes). It is customary for water to accumulate in the sill area when raining. There is no
cause for alarm, as this water will weep to the exterior. At times, the small passages get plugged with
excess dirt and debris. This is evidenced by water standing in the sill long after the rain has stopped or
overflowing the sill during a rain period. In most cases, a piece of wire or a pipe cleaner inserted into the
weep holes will clear the debris (Photo 1). In severe cases, the snap-in sill track may be removed to
expose possible clogged openings in the sill frame. Highly-effective weep systems have been engineered
into all Graham window products to allow for water drainage. Please keep weep holes clean and clear so
that water drains to the outside, as designed. To ensure proper operation, keep the sill of your windows
free of dust, and periodically clean your weep holes with a small soft bottle brush or pipe cleaner.
Keep Weep Holes Clear of Debris
Photo 1
Understanding Condensation & Humidity
Condensation on exterior surfaces of windows and doors occurs because of the improved U-values of the
windows produced today. On clear nights with still, humid air, condensation occurs when moisture-laden
air comes in contact with a glass surface that is below the dew point temperature. “Dew point” is the
temperature at which the air will no longer hold its moisture vapor. Cold air holds less moisture than
warm air. In high-performance windows with low-E glass and argon gas-filled, the outside glass surface
will actually be colder than a similar “regular” window without these features. This is because the highperformance window is doing its job— reducing heat flow to the outside and preventing the warming of
the exterior surface above dew point. This is not a window defect. Like dew forming on grass and car
hoods, it is a natural phenomenon. Condensation on interior surfaces of windows and doors occurs
because of a combination of high humidity and insufficient air exchange inside the home. In many
windows built using older technologies, there were gaps in the windows where a significant draft could be
felt and where air would flow. This exchange of air, in many cases, was sufficient enough to prevent
condensation from forming. The high-performance windows of today are designed to be as air tight as
possible to reduce heat loss. By doing this, it reduces air flow, and in humid conditions, will allow for
condensation to form on windows. Again, this is not a window defect.
4

Graham Architectural Products
Homeowner’s Manual
Acoustical Aluminum Windows
Table I. Maximum Humidity Levels for No Window Condensation
(Interior Glass Surface 1)
Glass Surface Temperatures and Relative Humidity with Inside Temperature at 70°F
Outdoor
Temp.
40°F 47°F 44% 55°F 59% 59°F 68% 61°F 73%
20°F 32°F 24% 45°F 41% 52°F 53% 56°F 61%
0°F 17°F 12% 35°F 27% 45°F 41% 50°F 49%
-20°F 2°F 6% 24°F 17% 38°F 32% 44°F 39%
-40°F -14°F 2% 14°F 10% 31°F 23% 38°F 31%
1
There are many different types of window framing materials. These values are for the window glazed area only.
15 mph wind No wind 15 mph wind No wind
Indoor Glass
Temp.
Single Glazed Window Double Glazed Window
Indoor R.H.
Indoor
Glass Temp.
Indoor R.H.
Indoor
Glass Temp.
Indoor R.H.
Indoor
Glass Temp.
Indoor R.H.
Recommended maximum humidity levels to prevent condensation on all parts of the window are listed
below taking into account various window framing materials and glazing types. These are the
recommended humidity levels, and may not be applicable for every household. Differences in glass types
(lowE vs. clear) will allow for variances in humidity levels.
Outdoor Temp. Maximum Indoor Humidity with 70ºF Room Temperature
+10ºF to +35ºF not over 35%
0ºF to +10ºF not over 30%
-10ºF to 0ºF not over 25%
-20ºF to -10ºF not over 20%
-20ºF or below not over 15%
Other factors that influence condensation are:
Window Size- Larger windows may have a higher tendency to show condensation.
.
Window Location- Windows protected from the wind will have a higher tendency to show condensation.
Screens- Windows protected by exterior screens may have a different condensation behavior than the
same windows without screens under the same conditions.
Air Circulation- Good air circulation, such as exposure to wind, reduces the occurrence of condensation.
Building projections, foliage, and other wind breaks may contribute to condensation.
Interior Shades- Opening interior shades or blinds may reduce condensation by allowing more heat to
transfer to the outside or allow interior room airflow to come in contact with the window.
Minor differences in conditions can cause condensation to form on one window and not on another, even
when they are side-by-side. Finally, condensation on windows can be a seasonal, night-time event. When
outside temperatures are warm, the glass temperature will usually be above the dew point. The same is
true during cold, winter weather. Condensation will most often occur during transition months.
5

Interior
Top
Sash
Interior
Bottom
Sash
Graham Architectural Products
Homeowner’s Manual
Acoustical Aluminum Windows
MAINTENANCE INSTRUCTIONS
SERIES 2400
DOUBLE HUNG WINDOW
Exterior
Top Sash
Exterior
Bottom
Sash
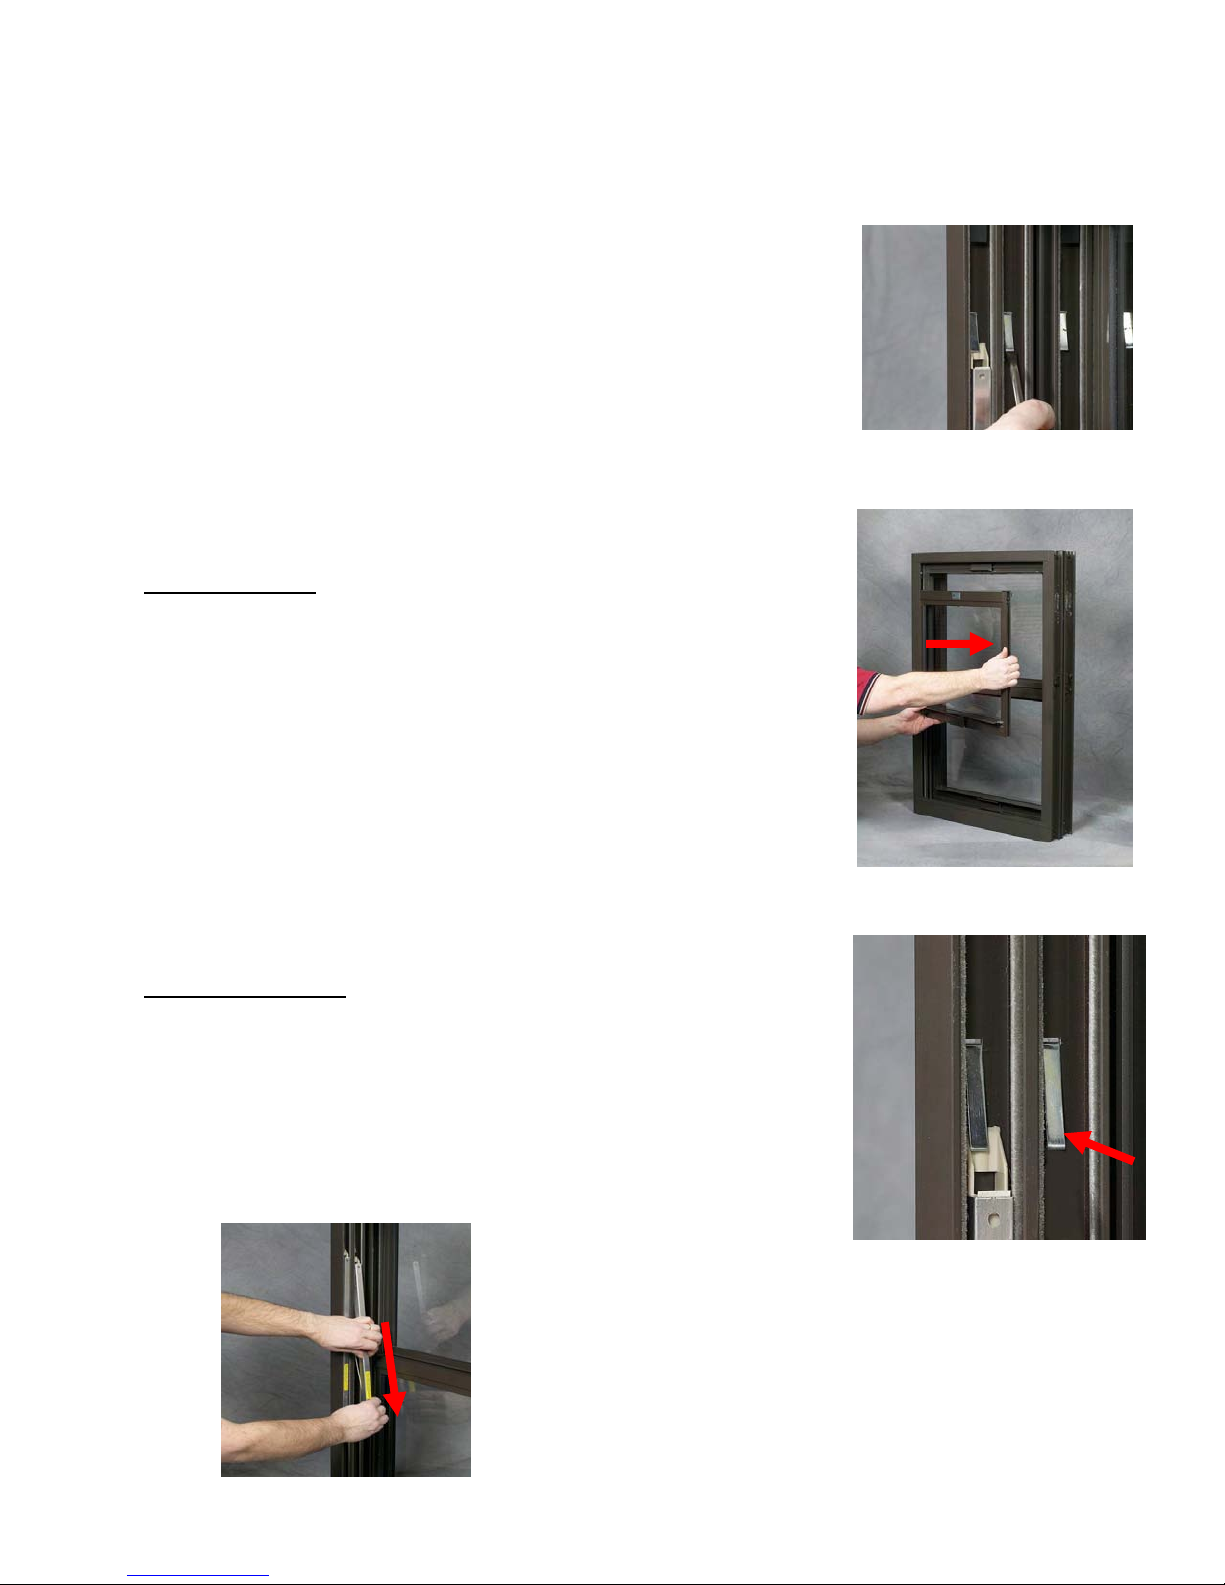
Sash Removal
A. Interior Bottom sash
1. Activate balance release clips which are located in the jamb tracks about
six inches from the top of the window (Photo 2). Clips are activated by
pulling the lower edge away from the jamb.
2. Unlock and raise sash until balances engage the release clips. Continue
to raise sash another two (2) inches to free the sash from the balances
(Photos 3 & 4).
3. While holding sash by the top and bottom rail, shift sash towards either
jamb. When sash is completely over to one side, pull the other side
inward and the sash will come free from the frame. Continue to pull the
sash into the room while supporting its weight (Photos 5 & 6).
Activate Balance Release Clip
Photo 2
Unlock And Raise Bottom Sash
Photo 3
Raise Sash Until Balances
Engage Balance Clips
Photo 4
Shift Sash To One Side
6
Photo 5
Photo 6
Pull Sash Out Of Jamb
And Inward To Remove From Fram
e
Graham Architectural Products
p
Homeowner’s Manual
Acoustical Aluminum Windows
SERIES 2400
DOUBLE HUNG WINDOW
B. Interior Top Sash
1. After the bottom sash is removed, lower the top sash until the balance
release clips are exposed. Activate the balance release clips and
remove the sash as described above in steps two and three (Photo 7).
C. Exterior Sash
1. The exterior sash are removed in the same manner as the interior set
of sash. Follow the steps above for interior sash removal to remove
the exterior sash also.
Sash Replacement
1. Insert sash completely into one jamb pocket while holding sash so that
bottom rail is two (2) inches above the lower end of the sash balance
(Photo 8). (Top sash must be installed prior to installing the lower
sash).
2. Align sash with the other jamb and shift sash into a centered position
between the jambs.
3. Carefully lower the sash onto the balances. The balances should
support the weight of the sash.
4. Lower the sash to clear the balance release clips. De-activate the clip
by pushing in the bottom of each clip so it is flush with the jamb
(Photo 9).
5. If balance does not lower with sash (stays up while sash goes down)
stop process. Remove sash and start over at step 1.
Balance Replacement
1. Remove sash, as described above, to expose the balances located in
each jamb.
2. Firmly grip balance housing and pull down to release the balance
from the clip
(Photo 10). Continue to hold balance firmly while slowly allowing
balance to move upward until the hook attaching the balance to the
jamb is exposed.
Activate Top Sash Balance Clip
Photo 7
Photo 8
Slide Sash Into Jamb Pocket
Photo 9
De-activate Balance Release
Photo 10
And Pull Balance
Gras
7
 Loading...