


LUXXOR
®
VIDEO
MICROSCOPE
User Guide
2
Luxxor® Video Microscope – Set Up
Slide Stop
Slide Brake
Vertical Slide
Column
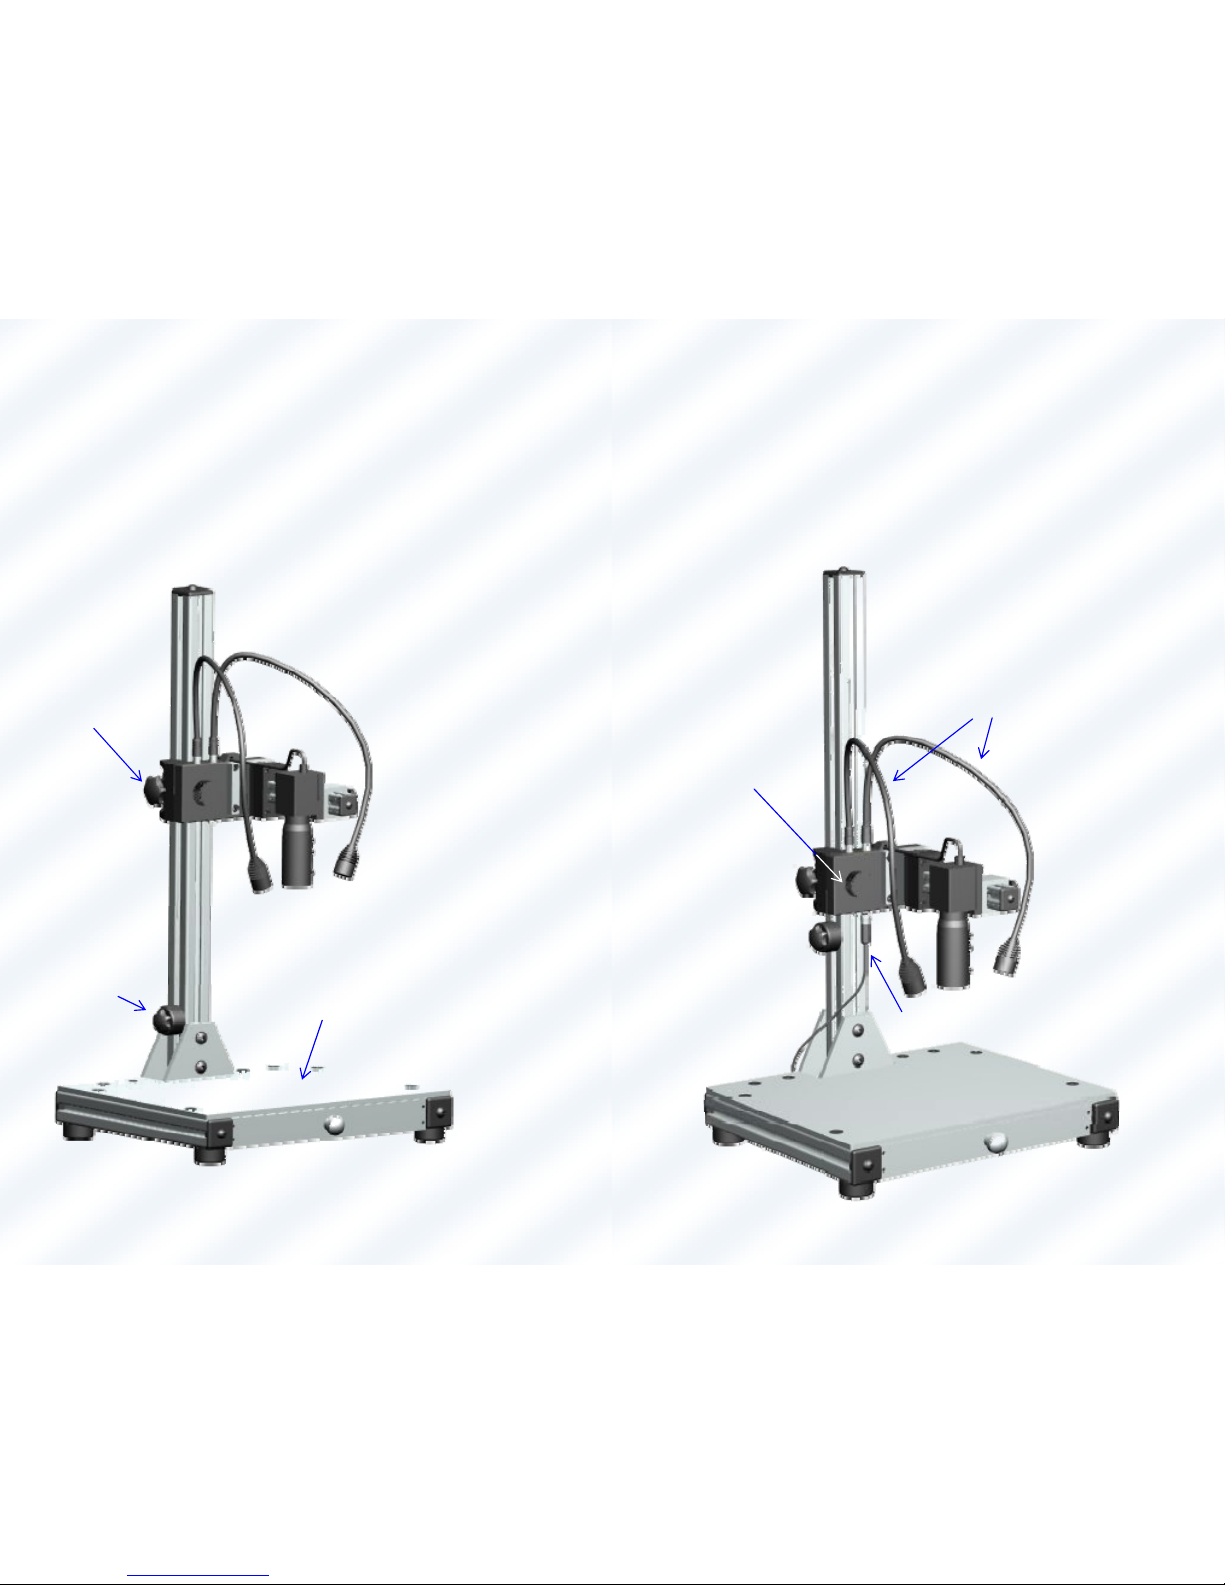
When removed from its
packaging, the Luxxor
Video Microscope will be
configured as shown, with
the Vertical Slide and
Slide Stop at their fully
lowered positions on the
column.
3
Luxxor® Video Microscope – Set Up
The Slide Stop may be
positioned along the
Column by loosening its
knob and re-tightening
when at the desired
location. Use this to
set a limit for the
Vertical Slide to avoid
the Camera or an
attached borescope
colliding with the Table
or a workpiece under
inspection.
The Vertical Slide may be raised to the desired position on the
Column by loosening the knob on the Slide Brake and lifting the
Vertical Slide. Be sure to tighten the Slide Brake knob before
letting go of the Vertical Slide.
Slide Stop
Slide Brake Knob
Table
4
Luxxor® Video Microscope – Set Up
Power Connecto
r
Plug the Powe
r
Connector at the end of
the power supply cable into the jack on
the bottom of the Vertical Slide.
Tighten its locking ring to secure it in
place. Then plug the power supply into
a 110 VAC outlet. The Illumination
Control may then be used to turn on the
LED lights and vary their intensity.
Make sure that both the light stalks are
seated firmly in their sockets.
LED Light Stalks
Illumination Control
5
Luxxor® Video Microscope – Set Up
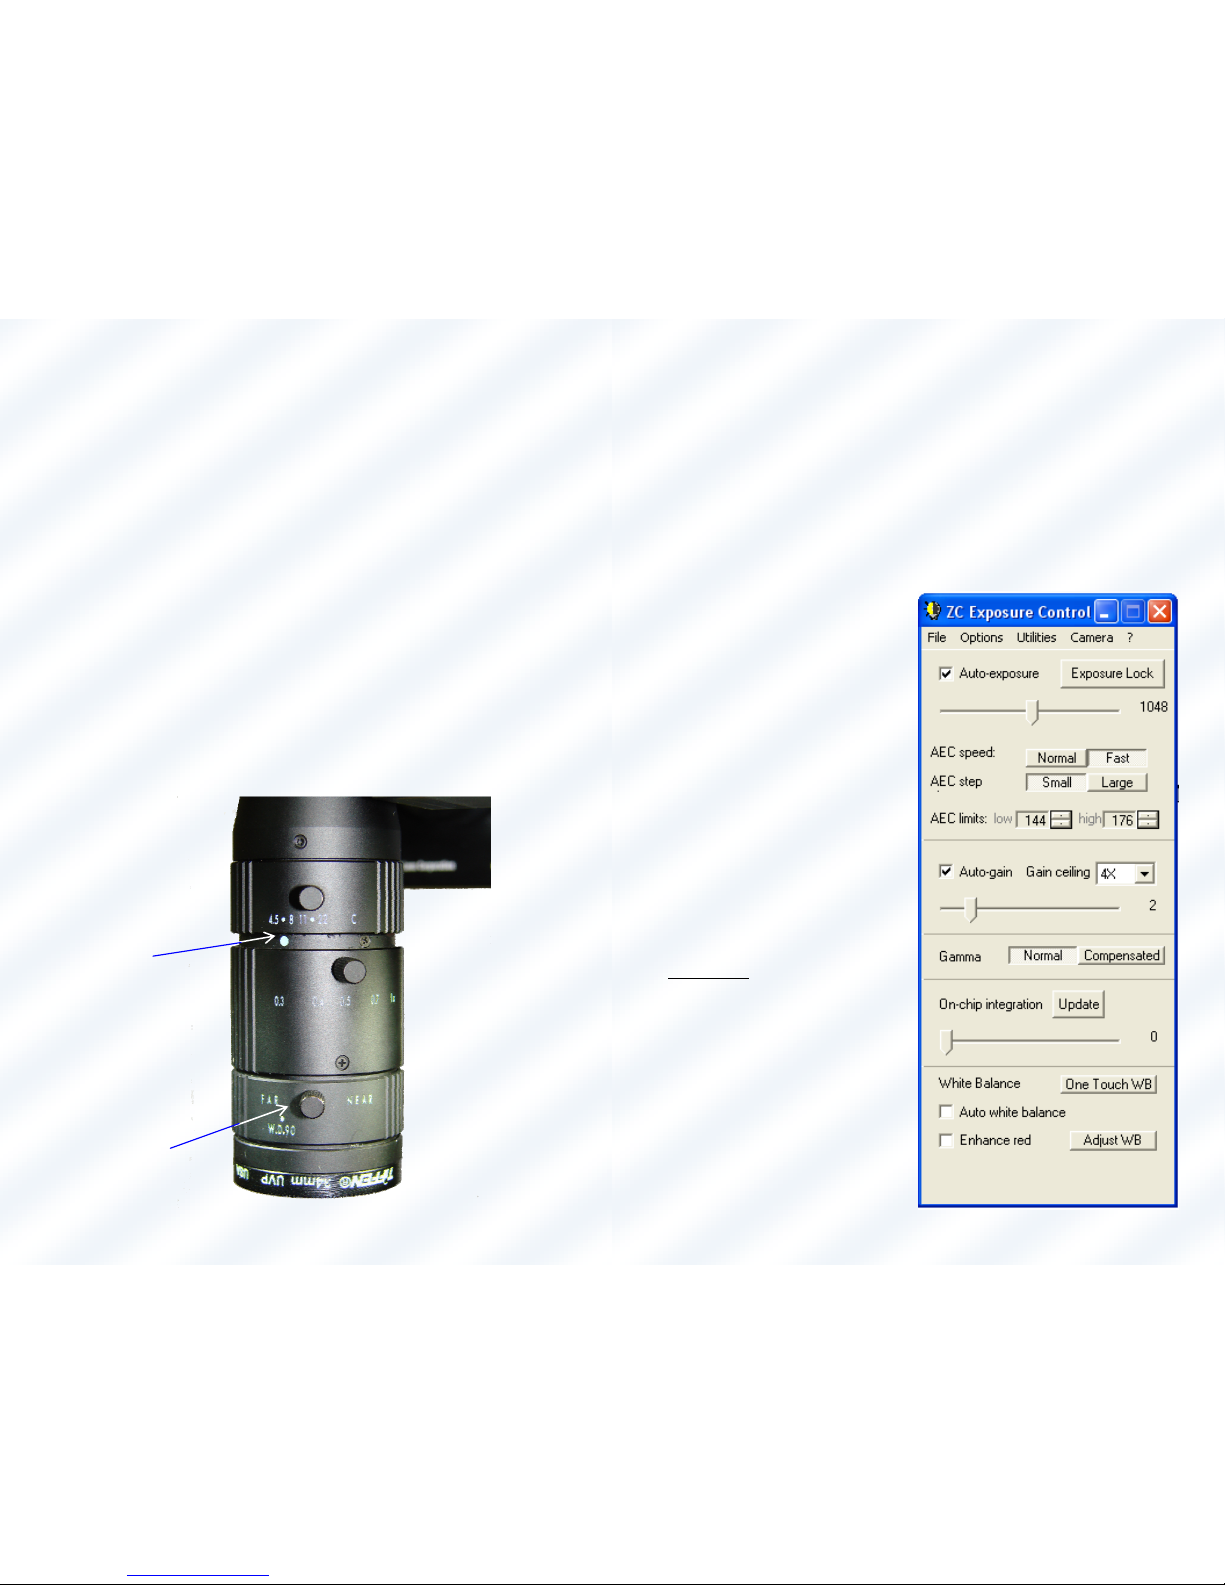
Remove the lens cap from the camera lens. Notice that the
lens has three control rings, each having a locking knob. The
locking knobs should be loosened to allow the control rings to
turn. They can be tightened if you want the rings to stay in a
certain position. The ring settings are read relative to the white
dot index mark.
The upper ring controls the lens aperture. Opening the
aperture (lower numbers) provides a brighter image with less
depth of field.
The middle ring controls the zoom.
The lower ring controls the lens working distance. Set on Far,
objects will be in focus about 4 inches from the lens. Set on
Near, objects about 3 inches away are in focus.
For initial set-up, it is recommended to set the aperture wide
open (4.5), the zoom at minimum (0.3) and the focus at Far.
Aperture Ring
Zoom Ring
Workin
g
Distance Ring
Index Mark
Lockin
g
Knob
6
Luxxor® Video Microscope – Set Up
Install Software and Drivers
Follow the instructions in the camera manual to install the
camera driver and image capture software. The camera requires
a computer running Windows 2000 or XP with a full speed USB
2.0 port. USB ports on a PCMCIA card may not be fast enough.
Most modern built-in USB ports will work.
Initial Settings
With the camera and
software installed, open the
Video Toolbox program.
Notice that a second window
titled ZC Exposure Control
also appears. For the initial
set-up the ZC Exposure
Control window should be set
as follows:
The “Auto-exposure” box is
checked.
The “Auto-gain” box is
checked.
“Gain ceiling” is set to 4X.
The “Auto white balance”
and “Enhance red” boxes are
unchecked
.
Set White Balance
Place a piece of white paper
under the camera lens so that
it fills the field of view. It
does not need to be in focus.
7
Luxxor® Video Microscope – Set Up
Set White Balance (cont’d)
Check the “Auto white balance” box and wait a few seconds if
necessary until the image turns white. Then uncheck the box.
White balance should remain valid until the lighting is changed,
such as when the LED lights are turned on or off. If the image
color later seems wrong, repeat this procedure.
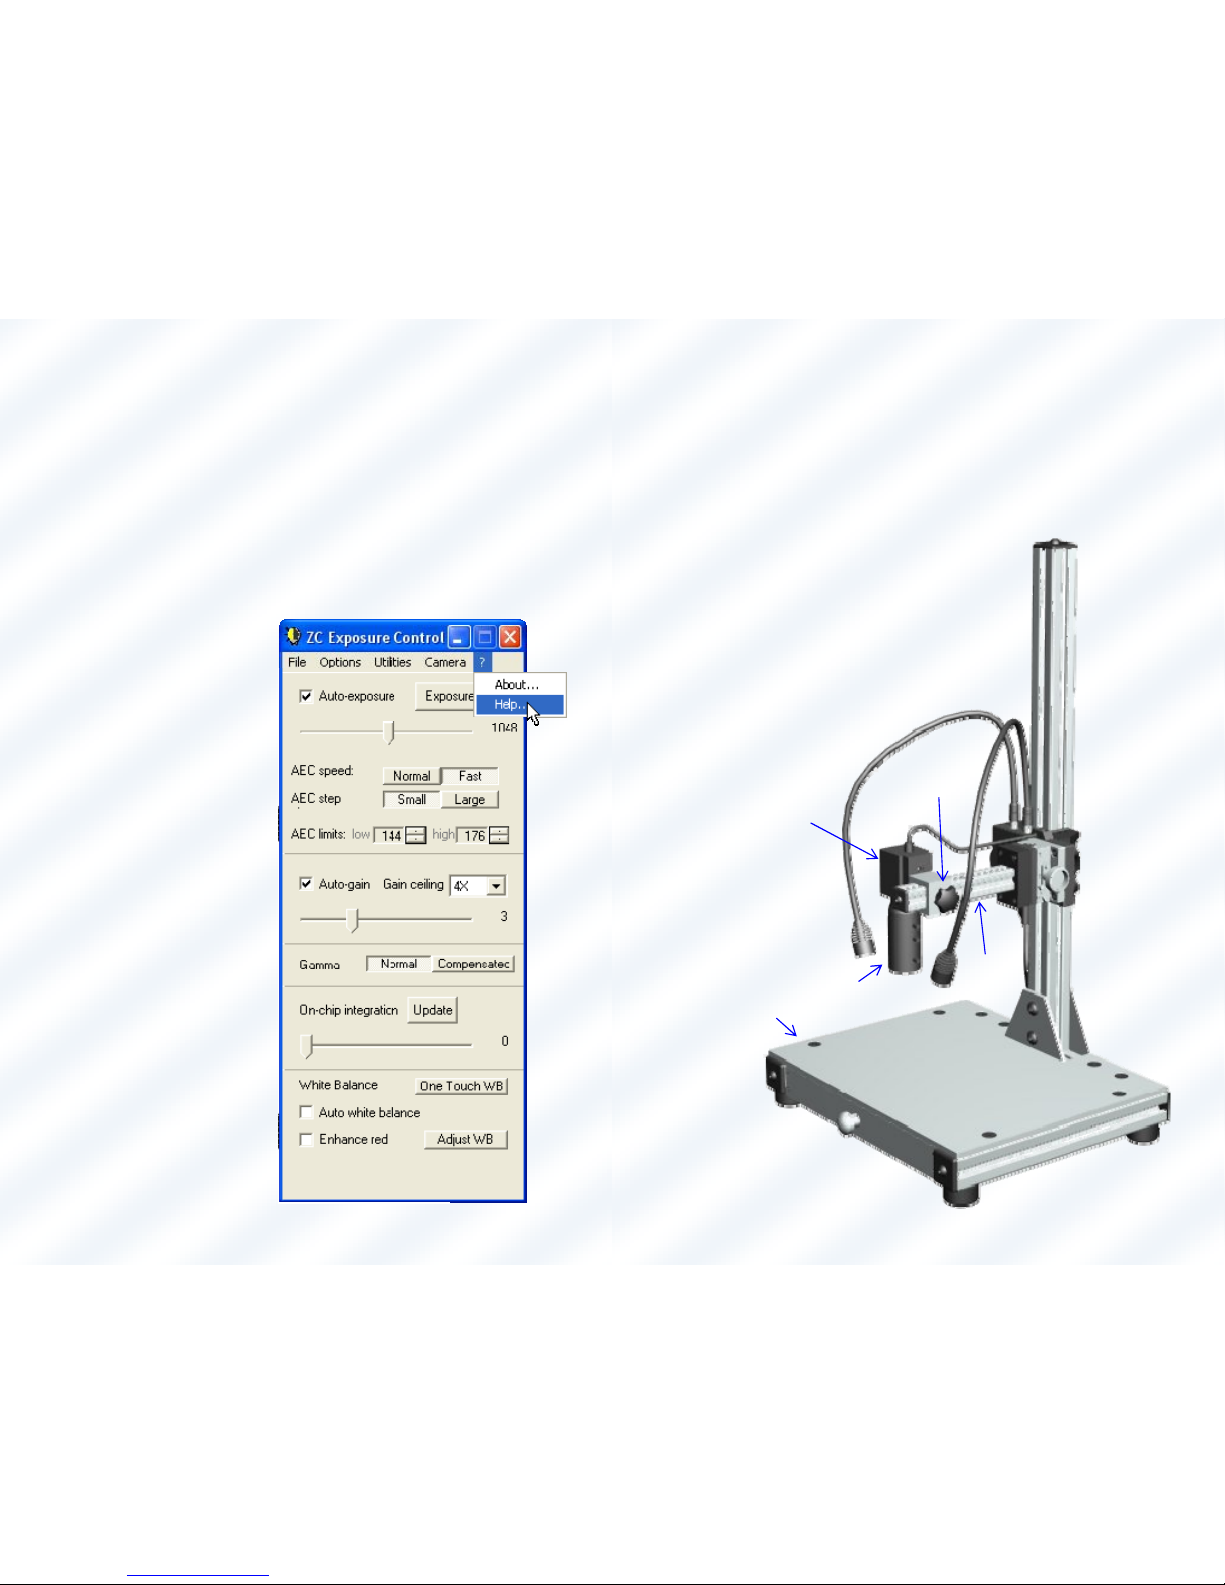
These settings should be
good for starting out.
More detailed information
about the use of ZC
Exposure Control can be
found in the Help menu of
the ZC Exposure Control
window.
8
Luxxor® Video Microscope – Operation
Place the workpiece to be viewed on the Table under the
camera Lens. The Camera may be slid along the Boom to align it
with the part. To do this, Loosen the Camera Slide Brake, move
the Camera and tighten the brake again when the desired
position is reached. Move the Vertical Slide
up or down as needed to get the image
nearly in focus on your video display. Then
be sure to tighten the brake on the Vertical
Slide.
Camera
Lens
Camera
Slide Brake
Boom
Table
9
Luxxor® Video Microscope – Operation
Fine focus is achieved with the Focus Knob located on the side of
the Vertical Slide, at the base of the Boom. BE SURE TO
RELEASE THE BRAKE LEVER BEFORE TURNING THE FOCUS KNOB.
The brake lever flips UP to release. Push the lever DOWN to lock
the focus mechanism in place if desired.
Flip Brake Lever UP
Before Turning Focus Knob
Focus Knob
10
Luxxor® Video Microscope – Operation
Once a focused image of the workpiece is obtained with
the lens set to initial settings, further image modifications
may be made by adjusting the control rings on the Camera
Lens.
The top ring controls the aperture of the lens, thus
affecting the brightness, resolution, and depth of field.
The aperture set wide open, at f/4.5 yields a brighter, higher
resolution image with a very small depth of field. Closing
the aperture to f/22 yields a darker, slightly lower resolution
image, with a relatively large depth of field.
It is recommended to start with the lens at f/4.5 and obtain
a well-focused image. Then decrease the aperture (increase
the f-number) and observe the increase in the depth of field
until it is satisfactory. As the aperture closes and the image
gets darker, it may become necessary to provide more light
by turning on the LED lights or increasing their intensity with
the Illumination Control. The user must find the best
compromise between brightness and depth of field in a given
situation.
The middle ring controls the zoom (magnification).
The zoom range goes from 0.3X to 1X from the part to the
CCD Imager inside the camera. This corresponds to 15X to
51X when the focus setting is on “Far” and the image is
viewed on a 19” computer monitor with software Zoom set
to 1X. (Changing the monitor size or resolution changes the
magnification). The magnification can be increased by
setting the focus ring at the bottom of the lens to the “Near”
setting. Then the effective magnification range on a 19”
monitor is 25X to 83X.

11
Luxxor® Video Microscope – Operation
The bottom ring controls the working distance from the
lens to the object under inspection. Set at Far, the working
distance will be about 4 inches. At Near, working distance
will be about 3 inches. This mechanism should not
be used
for general focusing as it also changes the magnification. If
the magnification changes, any measurement calibration that
has been set will be invalid and have to be re-done. Set the
position of the ring to Far to get 15X to 51X magnification, or
to Near to get 25 X to 83X. once you choose a setting,
tighten the Locking Knob so that it does not accidentally
move.
For focusing, ALWAYS move the Vertical Slide up and down
the Column for coarse focus and use the silver Focus Knob on
the right side of the Vertical Slide for fine focus.
12
Luxxor® Video Microscope – Image Capture
Setting Up Image Capture
In order to set up Video Toolbox for capturing images, do
the following:
1/ Click the camera button at
the far left of the Video Toolbox
menu bar. This selects Still Photo
mode. The film icon selects movie
mode, the clock icon selects time-lapse movie mode and the
computer icon stores still images to a file and then opens
them in the image editing program of your choice.
2/ Click the Settings button in the Video
Toolbox menu bar. A new window will open.

13
Luxxor® Video Microscope – Image Capture
Setting Up Image Capture (cont’d)
3/ Click “Capture File” on the left.
4/ Choose the directory you want to save the images in.
5/ Enter the root file name you want. Video Toolbox
will append index numbers to the root file name.
6/ Choose the file type you want images saved as. The
choices are bitmap, jpeg and tiff.
7/ Click the Done button at the bottom of the window.
Now the image displayed on the
monitor can be captured by clicking
on the Capture button at the right
of the Video Toolbox menu bar. It
will be automatically saved to the
directory you chose.
14
Luxxor® Video Microscope – Measurement
Calibration
To calibrate the microscope for measuring:
1/ Place the workpiece to be measured under the lens. Focus
on the area of interest and set the zoom and working distance
rings on the lens to provide the desired view.
2/ LOCK DOWN THE ZOOM & WORKING DISTANCE RINGS.
If the magnification changes due to moving either of these rings,
the calibration is no longer valid and the microscope must be recalibrated.
3/ Click the Settings button in the Video Toolbox
menu bar. Click “Measurement” on the left. Select
“Crosshair Cursors”, then click the Done button.

15
Luxxor® Video Microscope – Measurement
Calibration (cont’d)
4/ Remove the workpiece from the Table and place the
Calibration Reticle supplied with the Video Microscope under the
lens, with a white piece of paper under it.
5/ Focus on the Calibration Reticle without
disturbing the zoom or working distance rings on
the lens. Use only the Vertical Slide for coarse
focus and the silver Focus Knob for fine focus.
6/ Click on the Zoom button on the Video
Toolbox menu bar. Make sure 1X, 2X, 3X or 4X is
chosen, but NOT “Fit to Window”. 1X is the
recommended setting.
7/ Click on the Measure button on the Video
Toolbox menu bar. This will display the
measurement cursors on the image, as well as the
measurement readout at the upper-left of the
image.
16
Luxxor® Video Microscope – Measurement
Calibration (cont’d)
8/ Decide whether to calibrate in inches or millimeters. Then
choose the appropriate scale on the Calibration Reticle. Move
the cursors so that their respective vertical lines are aligned
with convenient marks on the scale as widely separated as
possible.
Note that in order to drag an individual cursor, it must be
grabbed at the intersection of its two axes. If grabbed
elsewhere, both cursors will be dragged together.
Shown here is the yellow cursor’s vertical line aligned with ‘0’
on the inch scale and the reds cursor’s vertical line aligned with
.250 in.

17
Luxxor® Video Microscope – Measurement
Calibration (cont’d)
9/ With the measurement cursors aligned on
the Calibration Reticle, click in the
calibration bar at the bottom of the Video
Toolbox window.
Select Calibrate from the menu that
appears.
(Note that cursor and text colors may be
changed by choosing Set Colors from this
menu.)
18
Luxxor® Video Microscope – Measurement
Calibration (cont’d)
9/ Select ‘Calibrate by X and Y’ in the lower-left of the window
that appears.
Enter “in” or “inches” in the ‘Set units’ box, (or mm if
appropriate). Then enter the scale reading (.250 in this case) in
the ‘x=’ box. Then select ‘OK’.

19
Luxxor® Video Microscope – Measurement
Calibration (cont’d)
Now rotate the Calibration Reticle so that the desired scale is
oriented vertically as shown here. Repeat the above procedure,
this time aligning the cursors’ horizontal lines with widely
separated marks on the reticle.
Go to the Calibrate menu as
above and enter the scale
reading in the ‘y=’ box.
Then click ‘OK’.
20
Luxxor® Video Microscope – Measurement
Measurement
The microscope is now calibrated and ready to measure.
Replace the workpiece on the Table, refocus the image using the
coarse and fine focus only. Do not change the magnification.
Use the crosshair cursors to measure any visible feature. Here
the drill bit measures .044 inches in diameter.
Changing the focus with the Vertical Slide and Focus Knob for
different areas of interest or different parts is OK as long as the
magnification remains the same.
Other cursors may be selected by clicking the Settings button on
the toolbar, selecting ‘Measurement’ at the left and choosing an
alternate cursor style from the list. Calibration should remain
valid after changing cursors.
If the Zoom ring or Working Distance ring is moved, calibration
must be re-done.

21
Luxxor® Video Microscope
More help can be found in the Video Toolbox Help
files. Click the Help button on the toolbar.
Then choose Open Help File
from the window that
appears.
Choose a
help
topic.
22
Lens
VC-35
Luxxor® Video Microscope – Borescope Mounting
To mount a Hawkeye® or most other
brands of borescope to the Camera,
first raise the Vertical slide high
enough to provide clearance for the
borescope and part and tighten the
brake. Then position and lock down
the Slide Stop to prevent the Vertical
Slide from descending too far. Next,
unscrew the Lens from the camera. Be
sure the knurled ring stays attached to
the Camera. If it comes loose, rethread it onto the Camera.
Now thread the VC-35 onto
the Camera.

23
Luxxor® Video Microscope – Borescope Mounting
With the VC-35 mounted, pull the
bell of the VC-35 upward while
inserting the eyecup of the
borescope fully into the VC-35.
Then release the bell of the VC-35 to
lock the borescope in place.
The mounted borescope will look
similar to this.
24
Light Stub Adapter
Luxxor® Video Microscope – Borescope Mounting
Light may be
provided through
the Hawkeye
®
borescope (and
many others) from
one of the LED Light
Stalks by first slipping
the Light Stub
Adapter over the
head of the LED Light
Stalk, then sliding the
adapter onto the
light stub of the
borescope.

25
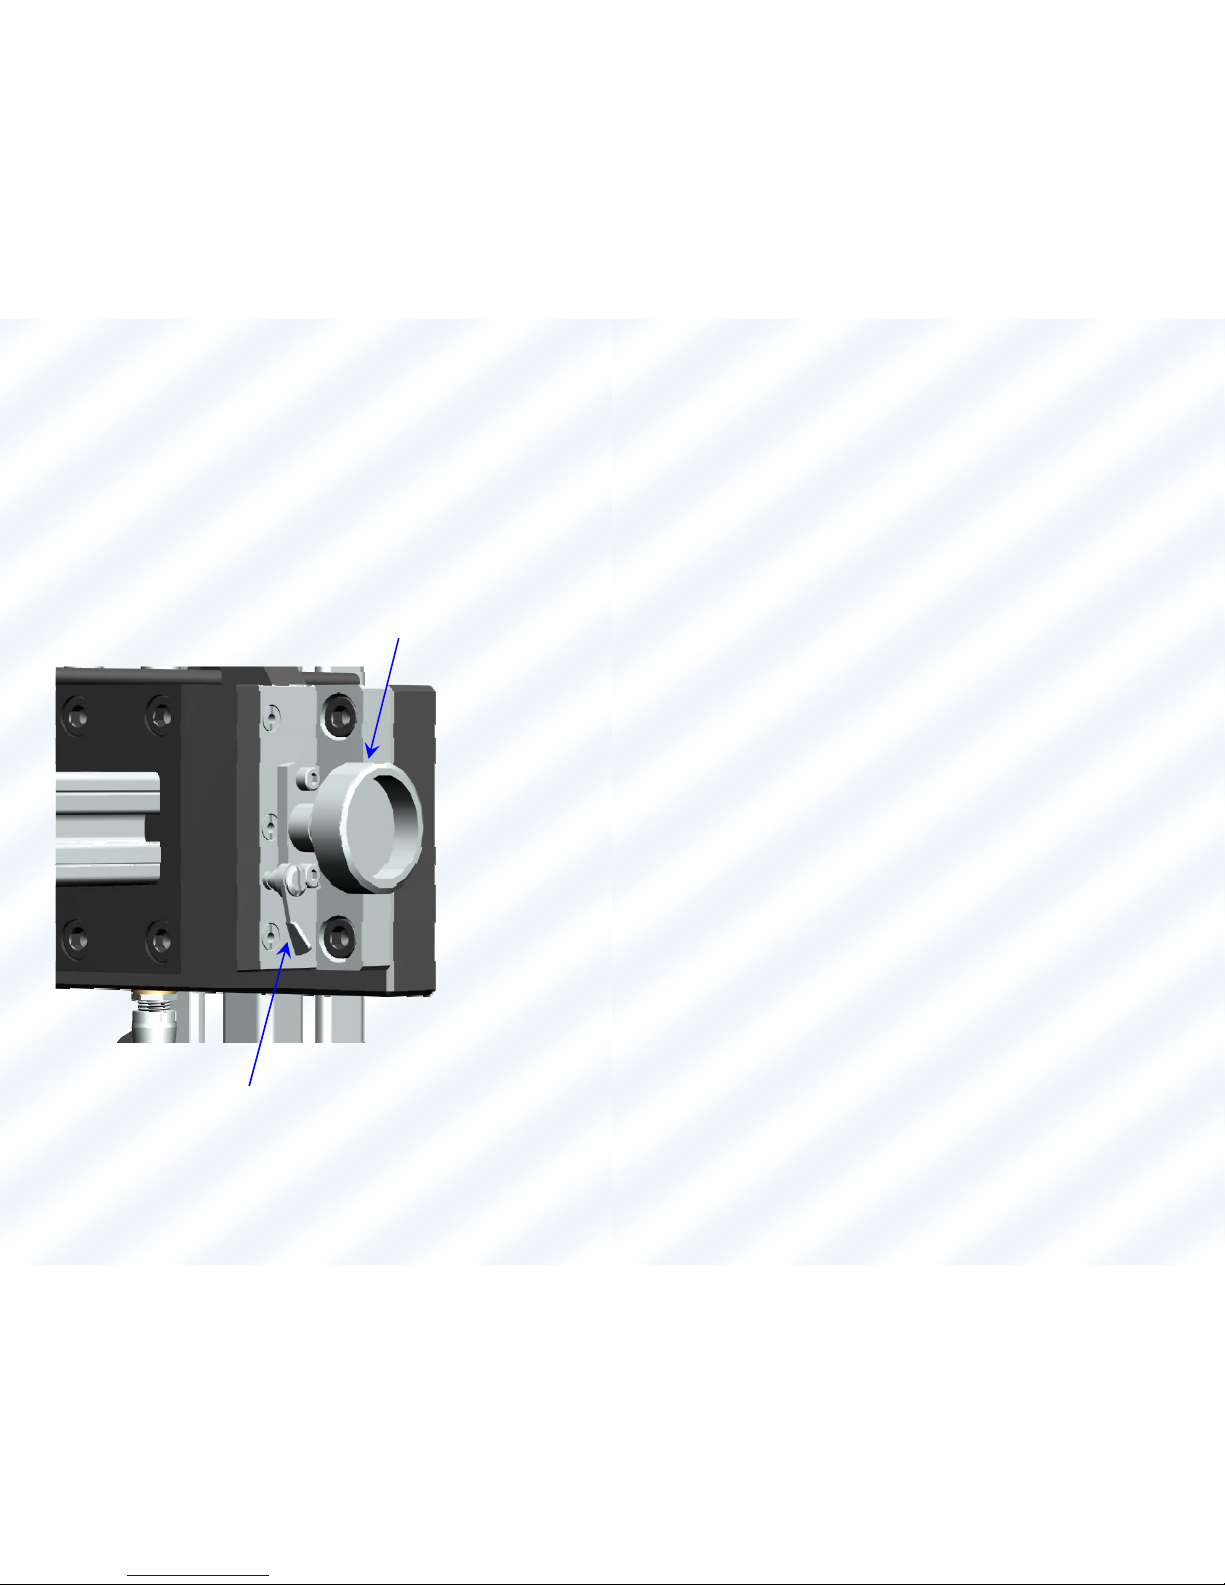
Adjustment
Screws (2)
Luxxor® Video Microscope – Maintenance
The amount of friction between the
Vertical Slide and the Column can be
adjusted. The adjustment screws on the
Vertical Slide are easily accessible on the side
of the slides opposite the Slide Brake knob, as
shown here. Adjust these in very small
increments as they are
quite sensitive. First,
while holding the
Vertical slide by hand, or
letting it rest against the
Slide Stop, loosen the
slide brake. Then, using a
1/8-inch hex key, turn both
screws equally only about 5 or 10 degrees at
a time. Turn the screws clockwise to increase
friction. If the slide locks up, back them out a
little. The friction should be set to allow the
Vertical Slide to move up and down the column
smoothly by hand, but not fall when the brake is
loosened.
26
Camera Mounting Screw
Adjustment
Screw
Luxxor® Video Microscope – Maintenance
The friction between the Camera Slide and the Boom may also
be adjusted. To access the friction adjustment screw on the
Camera Slide, it is first necessary to remove the Camera
from its mounting block.
Remove the Camera Mounting
Screw and set the Camera aside.
Loosen the slide’s brake and use a
3/32-inch hex key to make
adjustments. Again, clockwise
tightens and increases friction.
Adjust in 5 or 10 degree
increments until the desired
resistance to motion is felt in the
slide. Tighten the brake and
replace the Camera on its
mounting block.

27
Luxxor® Video Microscope – Specifications
Working Distance – Adjustable from 72 to 96mm.
Resolution and Field of View
Minimum Zoom
Maximum Zoom
Working
Distance
Field of View
(H x V)(in.)
Resolution
(in./pixel)
Field of View
(H x V)(in.)
Resolution
(in./pixel)
FAR
(96mm)
0.97 x 0.75 0.00083 0.29 x 0.23 0.00024
NEAR
(72mm)
0.59 x 0.47 0.00050 0.18 x 0.14 0.00014
28
207 Tremont Street, Rochester, New York 14608
800.536.0790
Fax: 585.235.6645
www.gradientlens.com info@gradientlens.com
 Loading...