


©2015 Graco PD254062J 9/15
www.gracobaby.com
OWNER'S MANUAL
MANUEL D'UTILISATION
MANUAL DEL PROPIETARIO
OWNER'S MANUAL
MANUAL DEL USUARIO
Soothing System
Glider
™

2
Failure to follow these warnings and the assembly
instructions could result in serious injury or death.
• PLEASE SAVE OWNER’S
MANUAL FOR FUTURE USE.
• THIS PRODUCT REQUIRES
ADULT ASSEMBLY. Follow
assembly instructions
carefully. If you experience
any difficulties, please contact
the Customer Service
Department.
• TO PREVENT SERIOUS
INJURY OR DEATH FROM
INFANTS FALLING OR
BEING STRANGLED IN
STRAPS:
• Always secure infant in the
restraint system provided.
After fastening buckles, adjust
belts to get a snug fit around
your infant.
• Never leave infant
unattended in swing.
• Never carry swing with
infant in it.
• Never use on elevated
surface.
• Child's movement can slide
swing. Always place swing
on floor.
• Discontinue use of swing
when infant attempts to
climb out or reaches 30
pounds (13.6 kg).
• Some newborns cannot sit in
a reclined or upright position
and have special needs.
Check with your doctor
about when to start using
this swing. Do not use with
an infant that weighs less
than 5.5 pounds (2.5 kg).
Use only in most reclined
seat position until infant can
hold head up unassisted.
• Keep swing seat fully
reclined until child is at
least 4 months old AND
can hold up head without
help. Young infants have
limited head and neck
control. If seat is too
upright, infant’s head can
drop forward, compress the
airway, and result in DEATH.
• STRANGULATION HAZARD:
• Children have STRANGLED
in loose or partially buckled
harness straps. Fully
restrain the child at all
times.
• DO NOT place swing in any
location where there are
cords, such as window blind
cords, drapes, phone cords,
etc.
• Strings can cause
strangulation. DO NOT
place items with a string
around your child’s neck,
such as hood strings or
pacifier cords.

3
• DISCONTINUE USING
YOUR SWING/BOUNCER/
CARRIER should it become
damaged or broken.
• NEVER USE as a car seat.
• DO NOT allow child to sit or
stand on the cover.
• Head support for use only
with this product.
• DO NOT place product near
water and moisture. Do not
use the product near possible
wet areas, such as a bathtub,
shower, wash basin, sink,
laundry tub, swimming pool,
wet basement, etc.
• DO NOT use the swing
without the seat cover.
• DO NOT use the AC adapter
if it has been exposed to
liquids, has been dropped, or
is damaged.
• Protect the power cord. Place
it so it is not walked on or
pinched by furniture or other
items.
• DO NOT use with an
extension cord.
• Use only power cord
provided.
• NEVER use this product as a
means to transport an infant
in a motor vehicle.
• Maximum recommended
height is 30 inches (76.2cm)
and 18 pounds (8.2 kg).
• The toybar is not a carry
handle. Never use toy bar to
lift or carry bouncer.
• DO NOT suspend strings
over the swing or attach
strings to toys.
• BOUNCER/CARRIER MODE:
READ ALL INSTRUCTIONS
BEFORE ASSEMBLY AND
USE OF THIS PRODUCT.
PLEASE SAVE OWNER’S
MANUAL FOR FUTURE USE.
FALL HAZARD:
To prevent serious injury or
death from falling :
•Use product ONLY on floor.
Child's movement can slide
product. Never place product
near edges of counter tops,
tables or other elevated
surfaces.
• Always use restraint system.
Adjust to fit snugly
STRANGULATION HAZARD:
• Child can strangle in loose
restraint straps. NEVER leave
child in product when straps
are loose or undone.
SUFFOCATION HAZARD:
• Babies have suffocated when
product tipped over on soft
surfaces. NEVER place product
on beds, sofas, cushions or
other soft surfaces.
• Never leave child unattended.
• ALWAYS use restraint system.
Adjust to fit snugly.
• Never use for a child able to sit
up unassisted.

4
• POR FAVOR, GUARDE EL
MANUAL DEL USUARIO
PARA USO FUTURO.
• ESTE PRODUCTO
REQUIERE QUE LO ARME
UN ADULTO. Siga
detenidamente las
instrucciones del
armado. Si experimenta
alguna dificultad, por favor,
comuníquese con el
Departamento de Servicio al
Cliente.
• PARA PREVENIR SERIAS
LESIONES O LA MUERTE
DEL BEBÉ DEBIDO A
CAÍDAS O
ESTRANGULACIÓN CON
LAS CORREAS:
• Asegure siempre al bebé
con el sistema de
seguridad provisto. Luego
de sujetar las hebillas,
ajuste los cinturones
para lograr un calce
apretado alrededor de su
bebé.
• Nunca deje al bebé sin
atender en el columpio.
• Nunca transporte el
columpio con el bebé
sentado.
• Nunca lo use sobre una
superficie elevada.
• El movimiento del niño
puede mover el columpio.
Siempre ponga el columpio
sobre el piso.
• Deje de usar el columpio
cuando el bebé trate de
subirse o pese 30 libras
(13.6 kg).
• Algunos recién nacidos no
se pueden sentar en la
posición vertical o
reclinada y tienen
necesidades especiales.
Consulte a su médico
sobre cuándo comenzar a
usar este columpio. No lo
use con un bebé que pese
menos de 5.5 libras (2.5
kg). Úselo solamente en la
posición más reclinada del
asiento hasta que el bebé
pueda sostener la cabeza
sin ayuda.
• Mantenga el asiento del
columpio totalmente
reclinado hasta que el niño
tenga por lo menos 4
meses Y pueda mantener
erguida la cabeza sin
ayuda. Los bebés
pequeños tienen control
limitaddo de la cabeza y el
cuello. Si el asiento está
demasiado vertical, la
cabeza del bebé puede
inclinarse hacia adelante,
comprimir la entrada de
aire y resultar en la
MUERTE.
Si no se cumplen estas advertencias y se siguen las
instrucciones de armado, podría resultar en lesiones
graves o la muerte.
5
• PELIGRO DE
ESTRANGULACIÓN:
• Los niños se han
ESTRANGULADO en las
correas del arnés sueltas o
parcialmente abrochadas.
Debe de contener
completamente al niño por
todo el tiempo.
• NO coloque el columpio en
ningún lugar donde haya
cordones, tales como
cordones de cortinas,
persianas, teléfonos, etc.
• Los cordones pueden causar
estrangulación. NO coloque
artículos con un cordón
alrededor del cuello de su
bebé, tal como cordones de
capuchas o cordones de
chupetes.
MODO SALTADOR/
TRANSPORTADOR:
LEA TODAS LAS
INSTRUCCIONES ANTES DE
ARMAR Y USAR ESTE
PRODUCTO.
POR FAVOR, GUARDE EL
MANUAL DEL USUARIO
PARA USO FUTURO.
PELIGRO DE CAÍDA:
Para prevenir una lesión seria
o la muerte por una caída:
• Use el producto
SOLAMENTE en el piso. Los
movimientos del niño pueden
mover el producto. Nunca
ponga el transportador en los
bordes de mesadas, mesas u
otras superficies altas.
• Use siempre el sistema de
seguridad.
• La barra de juguetes no es una
manija para el transporte. Nunca
use la barra de juguetes para
levantar o transportar el saltador.
PELIGRO DE
ESTRANGULAMIENTO:
• El niño puede estrangularse con
las correas de seguridad sueltas.
NUNCA deje al niño en el
producto cuando las correas
estén sueltas o sin atar.
PELIGRO DE ASFIXIA:
• Bebés se han asfixiado cuando el
producto fue puesto en una
superficie blanda y se tumbó.
NUNCA ponga el producto sobre
una cama, sofá, cojines u otras
superficies blandas.
• Nunca deje a un niño sin
atender.
• Use siempre el sistema de
seguridad. Ajuste el cinturón lo
necesario para que esté apretado
alrededor de su niño.
• Nunca debe usarlo un niño que
puede sentarse sin ayuda.
• NUNCA use este producto como
manera de transportar al bebé en
un vehículo.
• La altura máxima recomendada
es 30 pulgadas (76,2 cm) y
18 libras (8.2 kg).
• NO suspenda los cordones sobre
el columpio ni ponga cordones a
los juguetes.

6
• DEJE DE USAR EL COLUMPIO o
SALTADOR o
TRANSPORTADOR si resulta
dañado o roto.
• NUNCA LO USE como asiento
para automóvil.
• NO deje que el niño se siente o
se ponga de pie sobre la funda.
• El soporte para la cabeza deben
usarse solamente con este
producto.
• NO ponga el producto cerca del
agua y la humedad. No use el
producto cerca de lugares
posiblemente húmedos, tales
como una bañera, ducha,
lavadero, fregadero, palangana
para lavar la ropa, piscina, sotano
húmedo, etc.
• NO USE el columpio sin la funda
del asiento.
• NO use el adaptador de
corriente alternada si ha estado
en contacto con líquidos, se ha
caído o setá dañado.
• Proteja el cordón eléctrico.
Póngalo de manera que nadie lo
pise ni quede apretado entre
muebles u otros artículos.
• NO lo use con un cordón de
extensión.
• Use solamente el cordón
eléctrico provisto.

7
Parts list • Lista de las piezas
ALL MODELS • TOUS MODÈLES • TODOS LOS MODELOS
ON CERTAIN MODELS • SUR CERTAINS MODÈLES • EN CIERTOS MODELOS
Toy style may vary
Los estilos de los juguetes pueden variar
2X
2X
2X
2X
This model may
not include some
features shown
below. Check
that you have all
the parts for this
model BEFORE
assembling your
product. If any
parts are missing,
call Customer
Service.
Tools required:
Philips
Screwdriver
Wrench
(included)
Este modelo podría no
incluir algunas de las
características que se
indican a continuación.
Verifique que tenga
todas las piezas de este
modelo ANTES de armar
el producto. Si falta
alguna pieza, llame al
Departamento de
Servicio al Cliente.
Herramienta
requerida:
destornillador Philips
Llave (incluida)
Six sided hole
Oval shaped hole
Agujeros de seis
costados
Agujeros ovalados

8
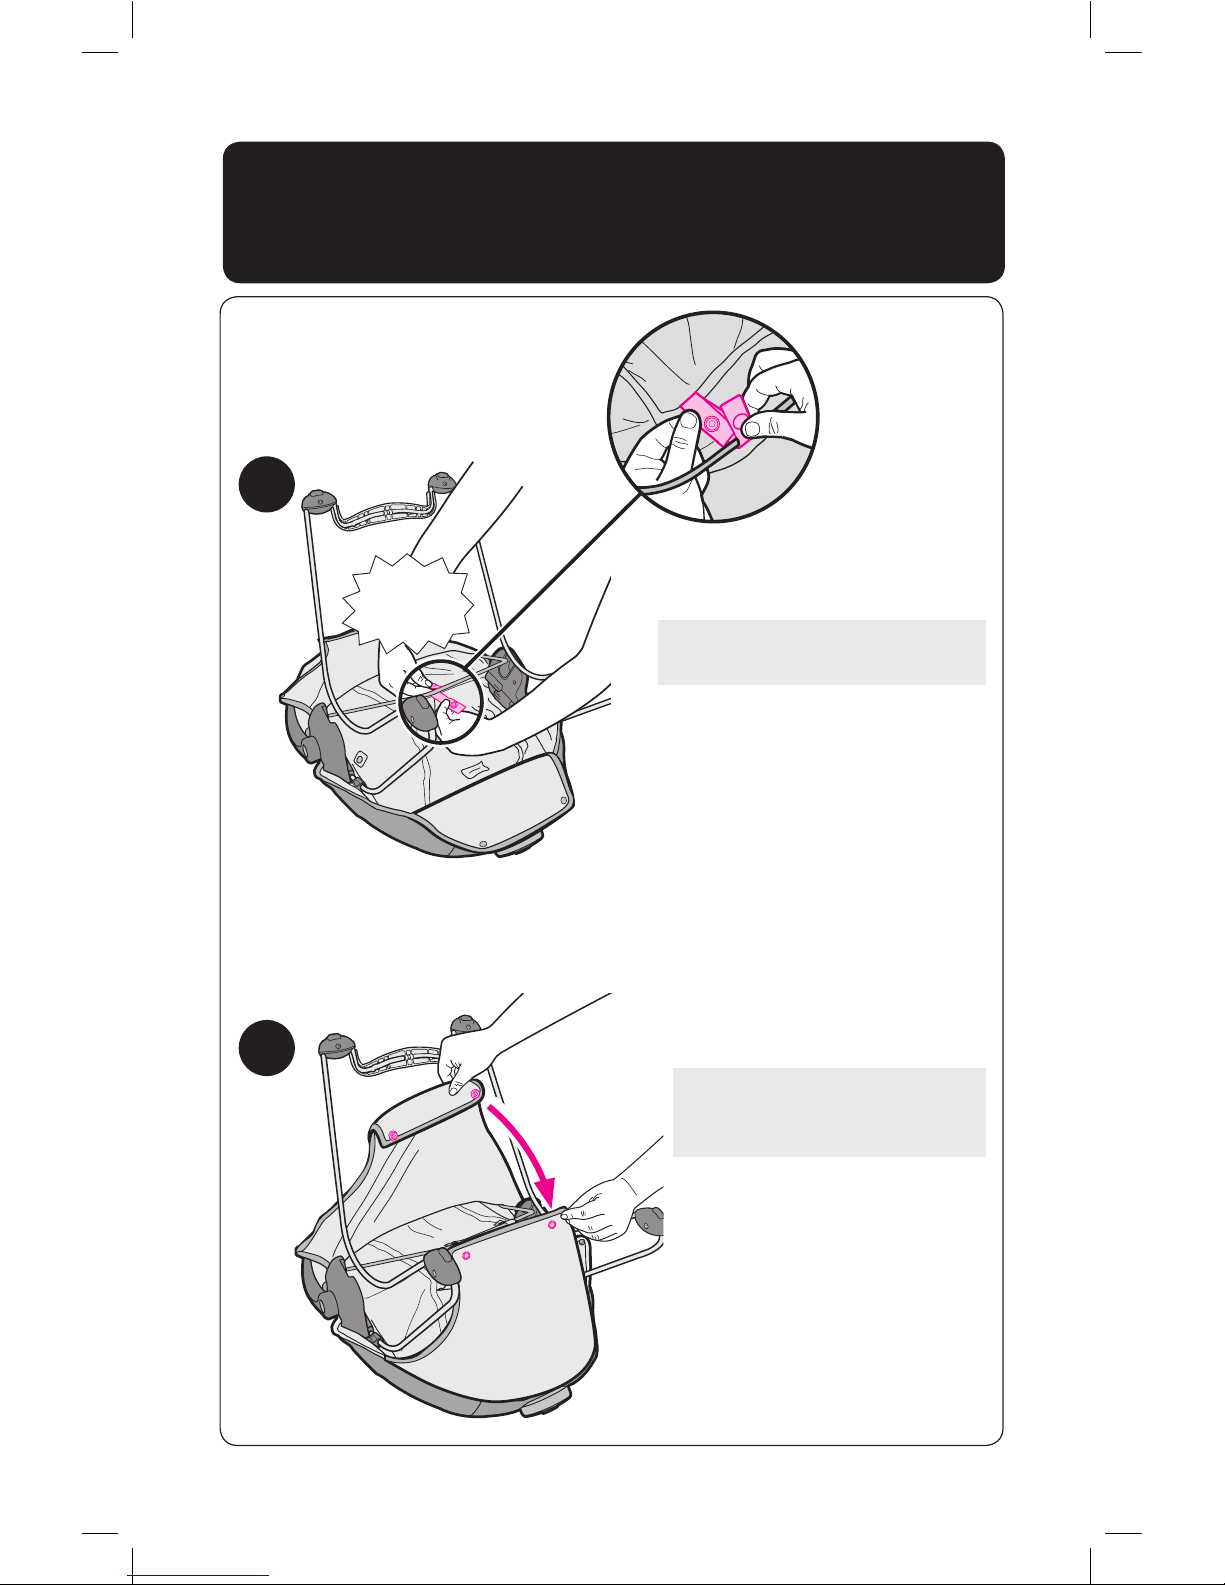
1
2
Remove bottom of seat pad
and attach vibration unit onto
center of curved seat tube
with 2 screws. Replace seat
pad.
Saque el fondo de la
almohadilla del asiento y
conecte la unidad vibratoria
en el centro del tubo curvo
del asiento con 2 tornillos.
Vuelva a colocar la
almohadilla del asiento.
2X
Assembly • Montaje
9
SNAP!
¡CLIC!
SNAP!
¡CLIC!
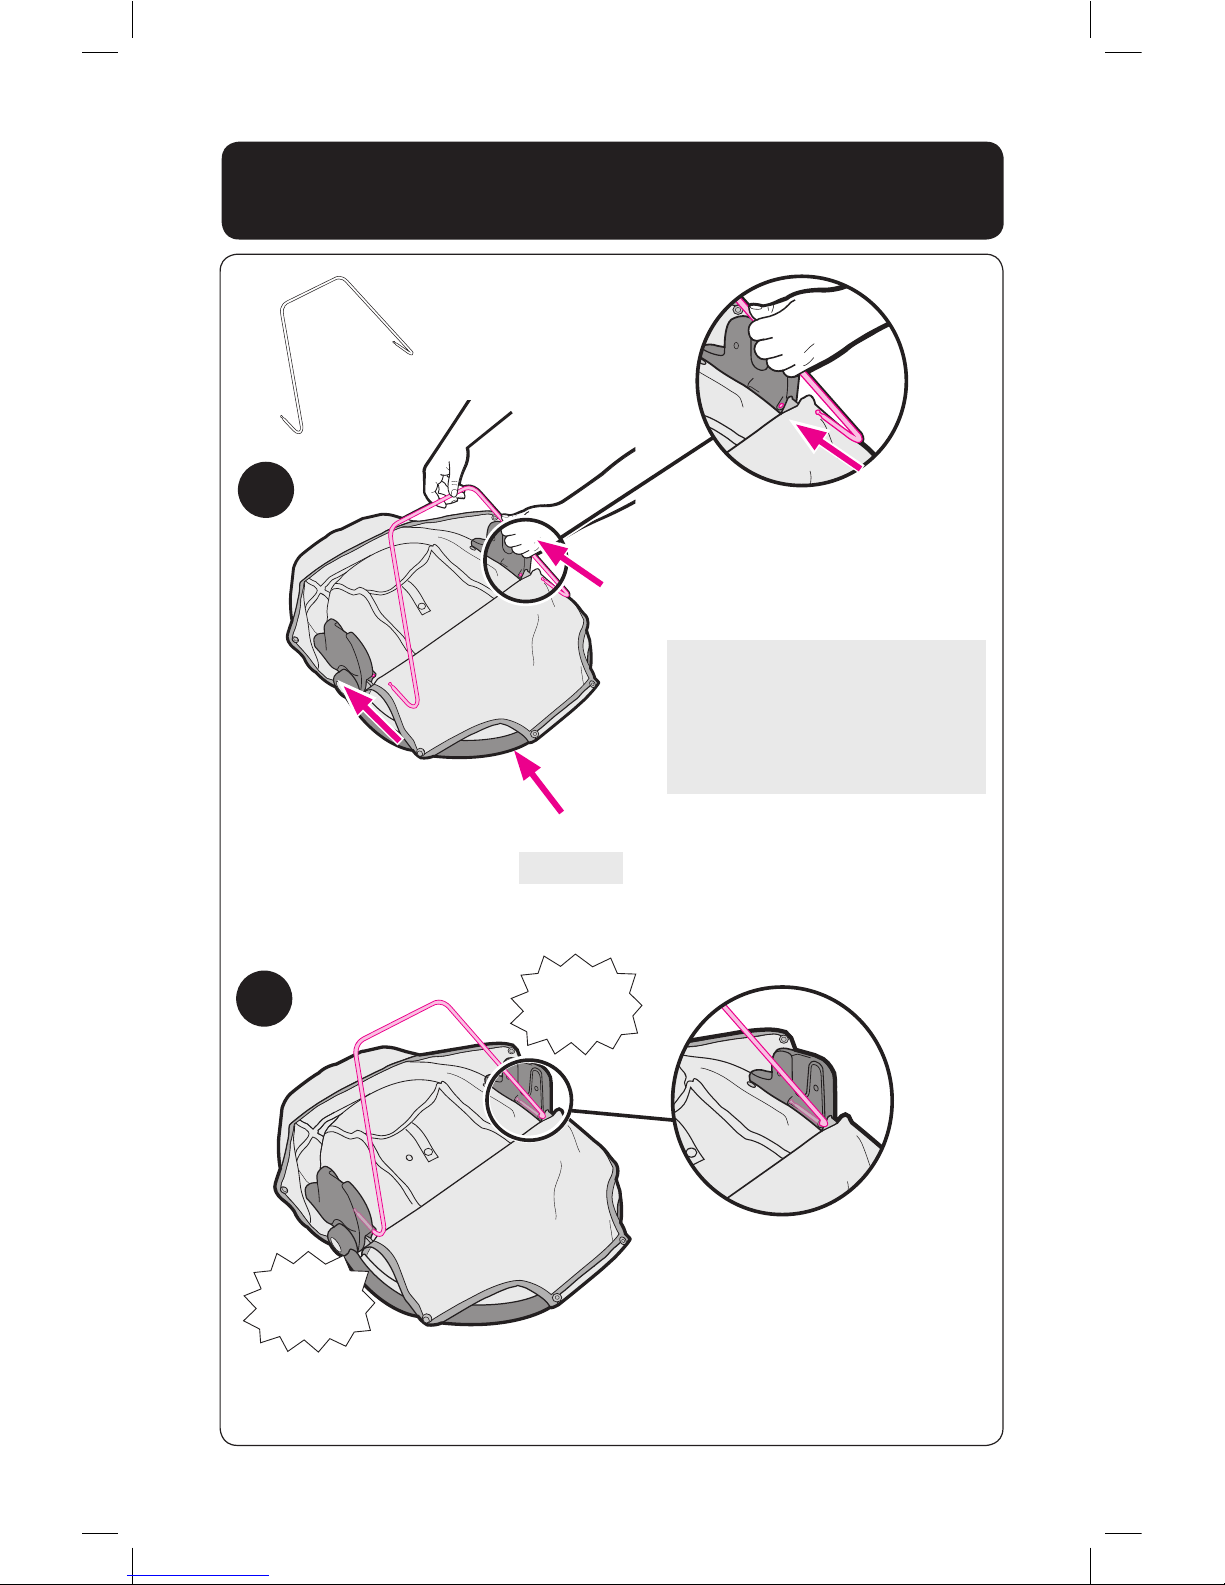
Turn seat over with handle
facing towards you. Insert
seat wire into brackets on
rear of seat as shown.
Dé vuelta el asiento con la
manija mirando hacia usted.
Ponga el alambre del asiento
en los soportes de atrás del
asiento como se indica.
Assembly • Montaje
Handle
Manija
1
2
10
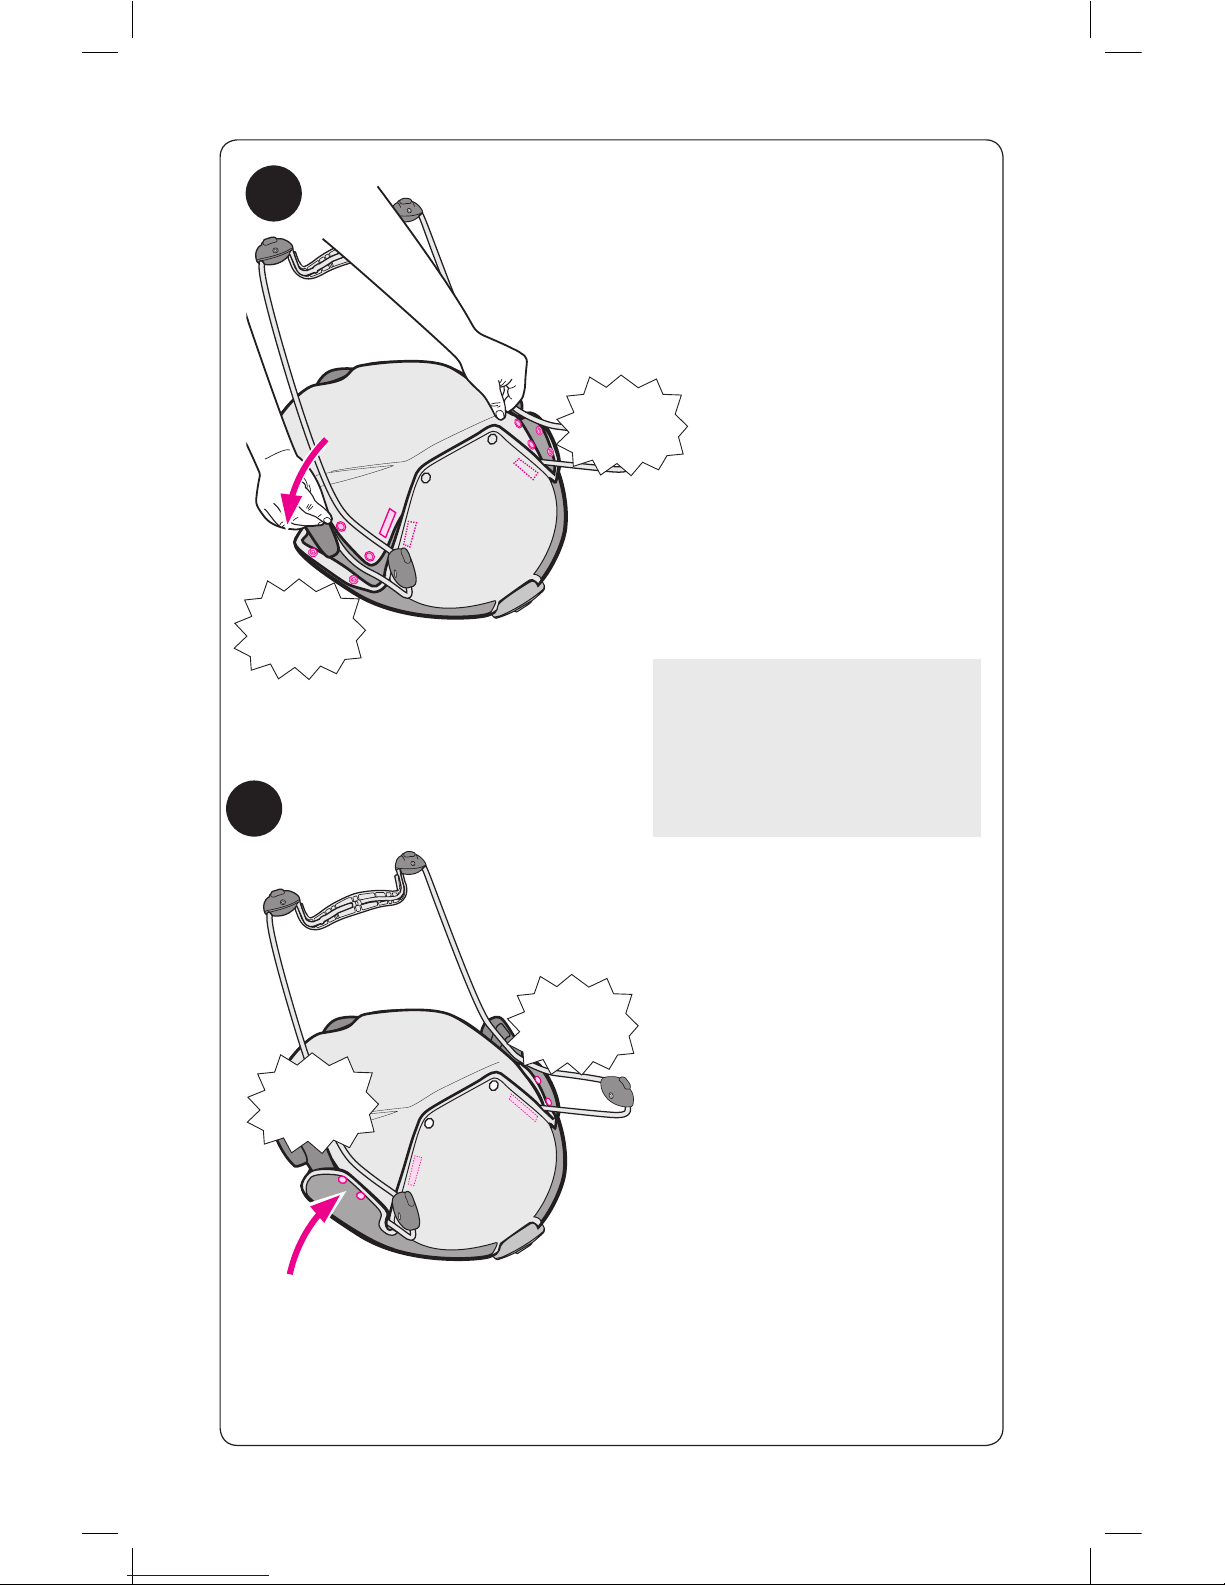
1
2
SNAP!
¡CLIC!
SNAP!
¡CLIC!
Attaching Legs • Instalación de las patas
Rotate seat with vibration unit
facing towards you. Insert leg
tube into hole in leg bracket.
Repeat on other side.
Gire el asiento con la unidad de
vibración mirando hacia usted.
Ponga el tubo de la pata en el
agujero del soporte de la pata.
Repita el procedimiento del otro
lado.
Vibración
Vibration

11
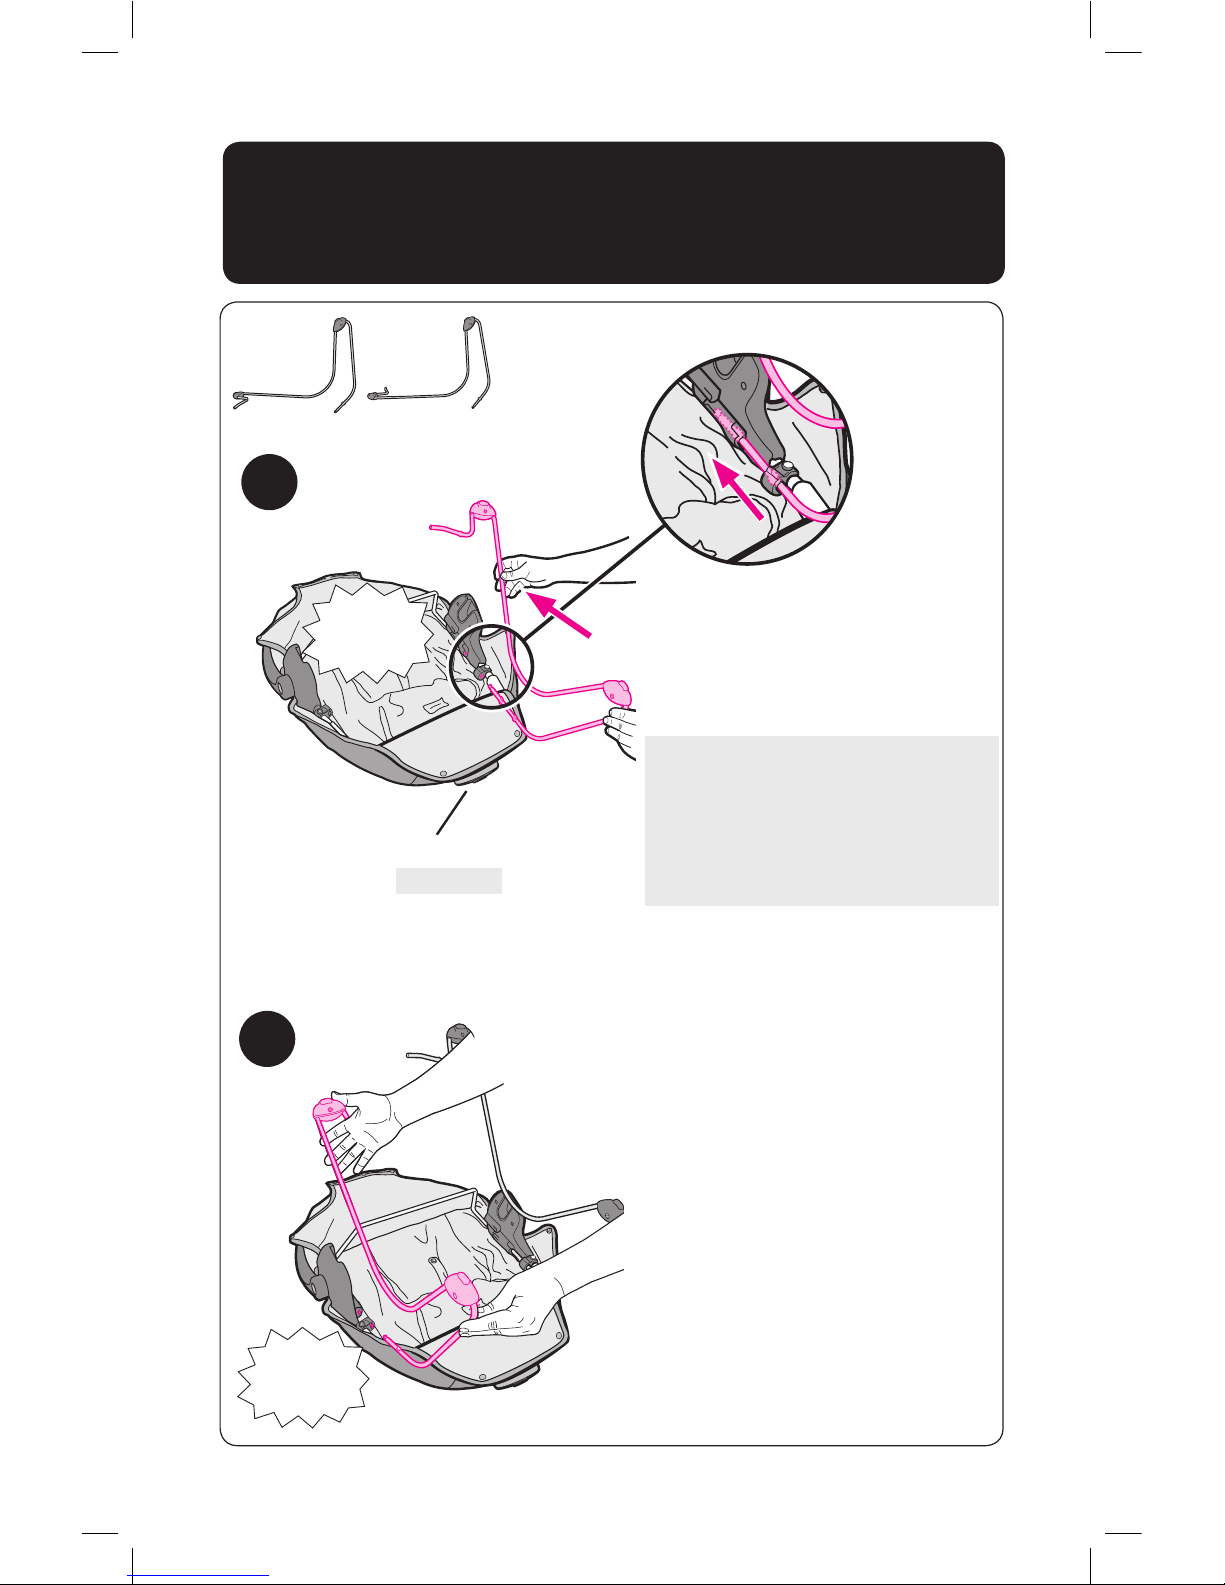
Insert leg wire into leg
brace as shown until it
snaps into place.
Inserte el alambre de la
pata en el soporte de la
pata como se indica hasta
que se trabe en su lugar.
Snap the other side of the
brace on to the other leg
wire.
Trabe el otro lado del
soporte en el alambre de
la otra pata.
3
4
SNAP!
¡CLIC!
SNAP!
¡CLIC!
12
2
1
Pull snaps over the wire and
fasten together.
Pase las trabas sobre el
alambre y trábelas.
SNAP!
¡CLIC!
Attaching Seat Pad
• Instalación de la almohadilla del asiento
Fasten bottom snaps to seat
pad as shown.
Sujete los broches inferiores
para asegurar la almohadilla
del asiento como se indica.
13
3
SNAP!
¡CLIC!
SNAP!
¡CLIC!
Fasten side snaps and hook
and loop tape to seat pad as
shown. Repeat on other side
of seat.
Sujete los broches laterales y
la cinta de gancho y bucle
para asegurar la almohadilla
del asiento como se indica.
Repita el procedimiento del
otro lado del asiento.
4
SNAP!
¡CLIC!
SNAP!
¡CLIC!
14
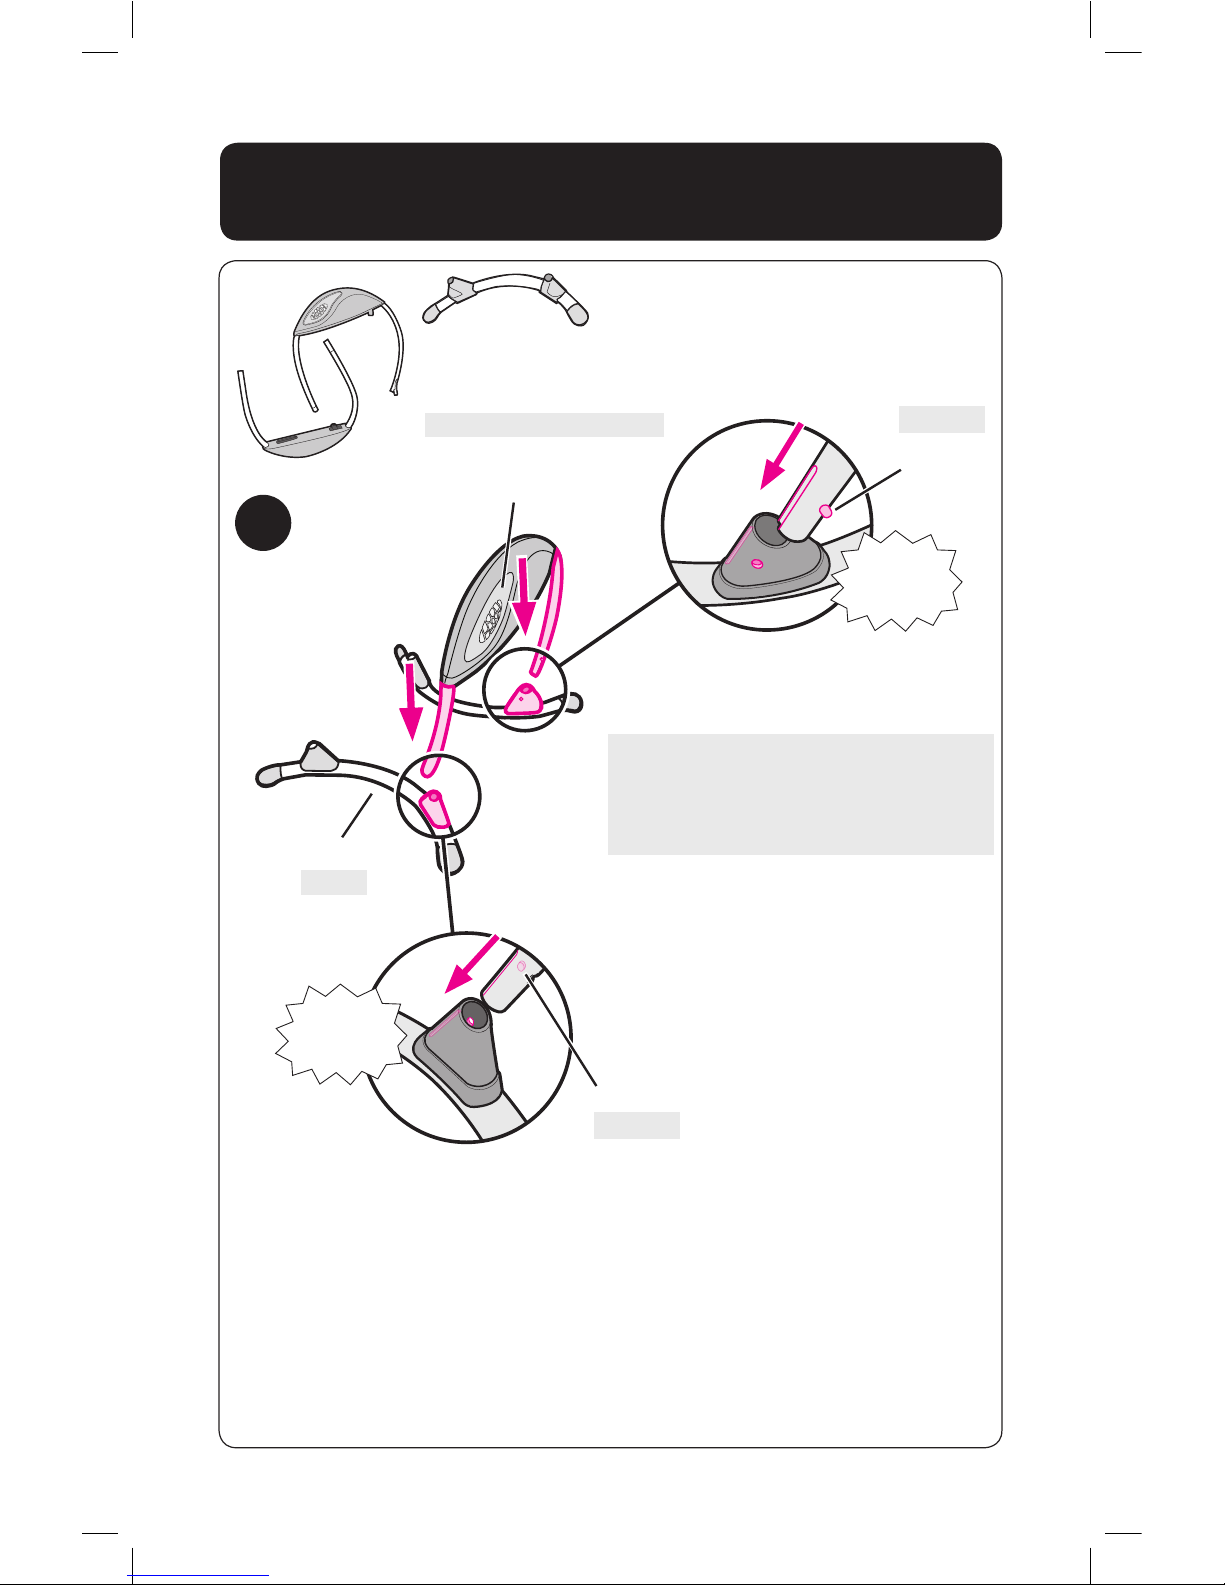
1
Frame Assembly • Montaje el armazón
Lay feet on floor. Insert battery
housing leg tubes into both feet as
shown.
2X
Feet
Battery housing
Pies
Armazón de las pilas
Ponga las pies en el piso. Ponga
los tubos de la pata con el
armazón de las pilas en ambos pies
como se indica.
SNAP!
¡CLIC!
SNAP!
¡CLIC!
Button
Button
Botón
Botón
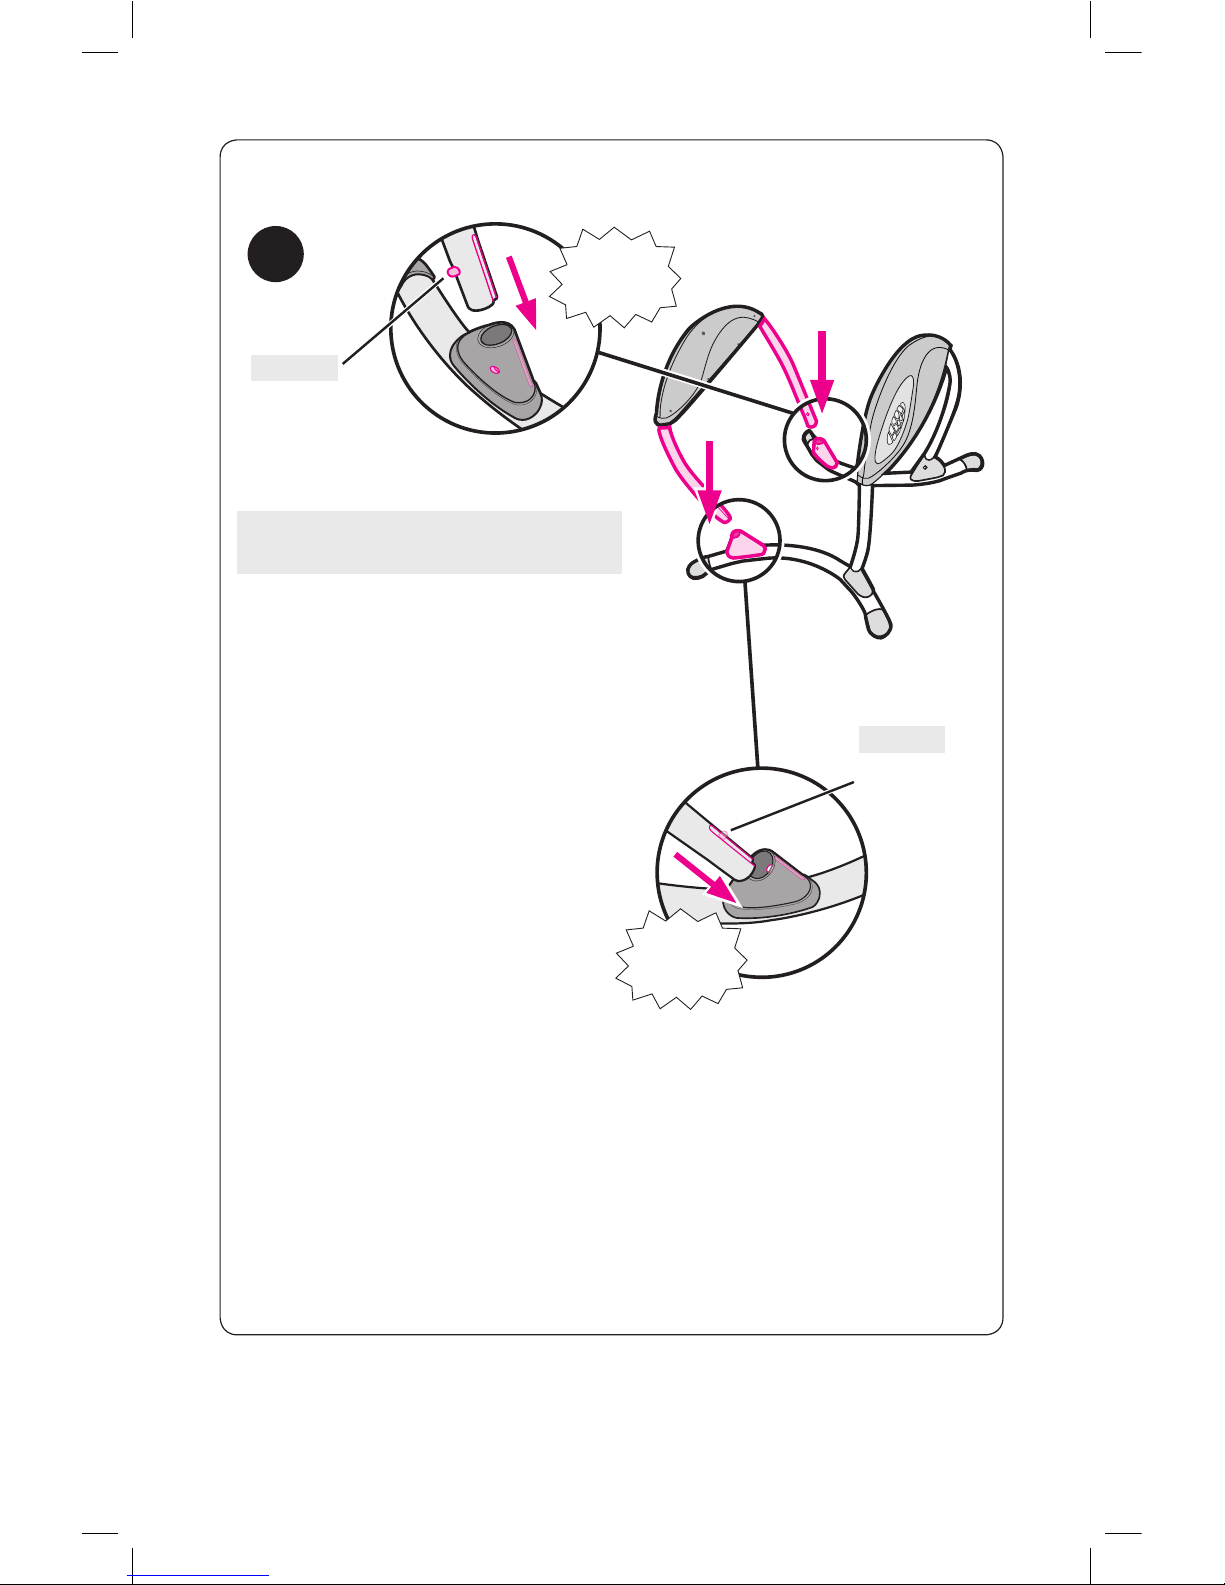
15
Insert the other leg tubes into both
feet as shown.
2
Ponga los otros tubos de la pata
en ambos pies como se indica.
SNAP!
¡CLIC!
SNAP!
¡CLIC!
Button
Button
Botón
Botón

16
1
Insert the single hinge swing arm
into the housing with buttons
lining up with the hole in the
housing as shown.
Hole
Ponga el brazo del columpio con
bisagra simple en el armazón con
los botones en línea con el
agujero del armazón como se
indica.
Attaching Swing Arms
• Instalación de los brazos del columpio
SNAP!
¡CLIC!
Double hinge
Single hinge
Bisagra doble
Bisagra simple
Button
Botón
Agujero