

Page 1
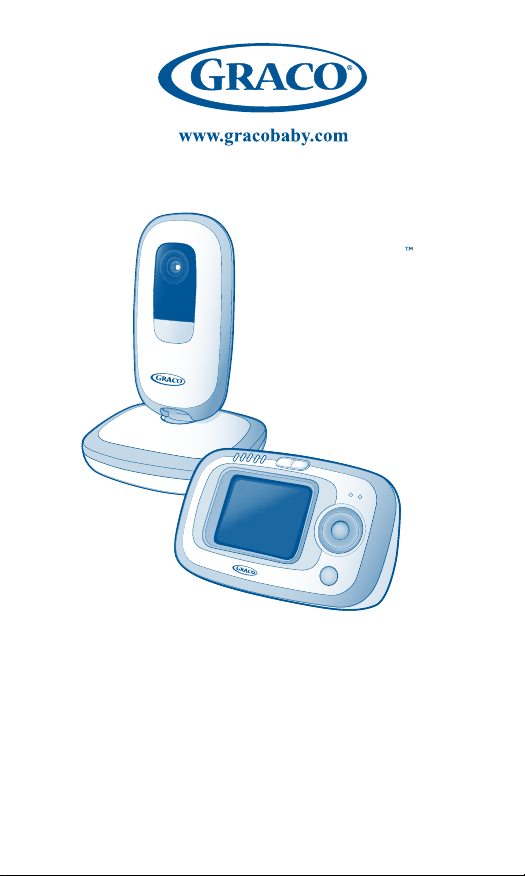
True Focus
Model 2V00
OWNER’S MANUAL
Keep Instructions For Future Reference
©2011 Graco PD148039C 4/11
Page 2

Warnings to Parents and Other Users
Failure to follow these warnings and the assembly
instructions could result in serious injury or death.
This device is designed to aid in the monitoring of
your child. When using the monitor, you must still
provide the supervision necessary for the continued
safety of your child. This product is not designed or
intended for use as a medical monitor. Always be sure
that both the transmitter and receiver are working
properly and are within range of each other.
• STRANGULATION HAZARD. Keep the adapter
cords out of the reach of children. Do not use with
extension cords.
• DO NOT place the Nursery Unit or its cord within
your child’s reach. Do not put the Nursery Unit inside a
crib or playard.
• Use ONLY with 110-120 volt AC electrical outlets.
• Protect the AC adapter cords. Place them so they are
not walked on or pinched by furniture or other items.
• Allow for proper ventilation when units are in use.
Do not cover the Nursery Unit or Parent Units with any
object such as a blanket. Do not place it in a drawer or in
any location which would mufe the sound or interfere
with the normal ow of air.
• DO NOT immerse any part of the Nursery Unit or
Parent Units in water. Clean only with a dry cloth.
2
Page 3

• DO NOT place unit near water and moisture. Do not
use the Nursery Unit outdoors. Do not use the Nursery
Unit near possible wet areas, such as a bathtub, shower,
wash basin, sink, laundry tub, swimming pool, wet
basement, etc.
• Keep Nursery Unit away from heat sources, such as
replaces, radiators, stoves, and TVs or other appliances.
Heat can damage the case or electrical parts.
• Do not use the Nursery Unit if :
• The adapter cords or plugs have been damaged.
• The unit has been exposed to liquids.
• Unit has been dropped or is damaged.
• DO NOT OPEN THE NURSERY UNIT, PARENT
UNIT, OR ADAPTERS. No user-serviceable parts
inside. Risk of electrical shock, re or death.
• The antenna used for this nursery unit must be installed
to provide a separation distance of at least 20 cm (7.9”)
from all persons and must not be co-located or operating
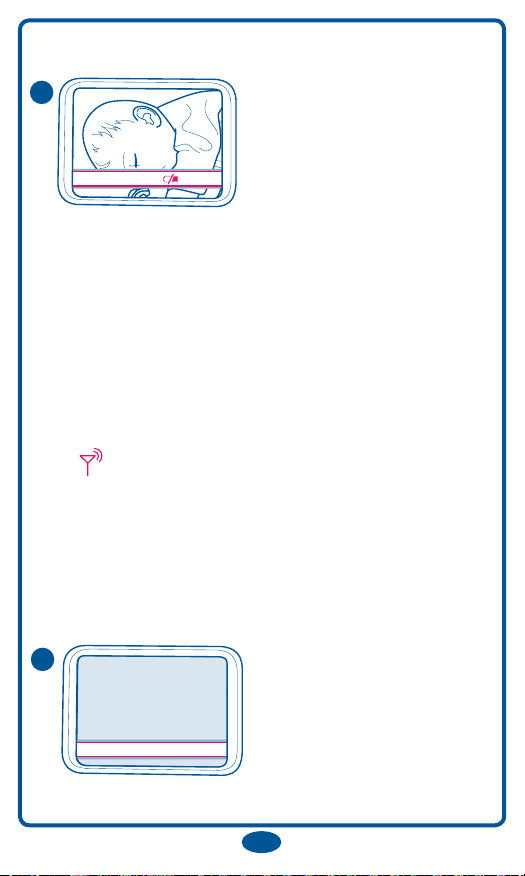
in conjunction with any other antenna or transmitter.
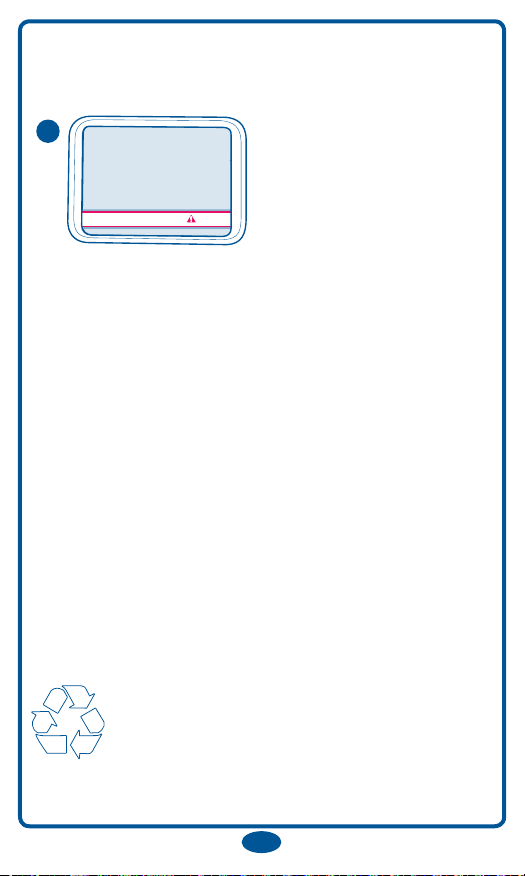
•While the parent unit may be portable, the antenna(s)
used for this transmitter should not be co-located with
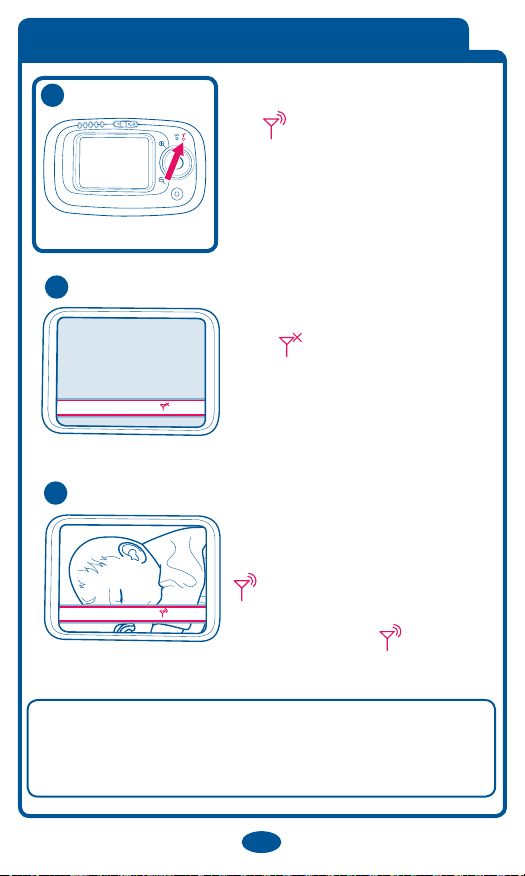
any other antenna or transmitter.
FCC Statement :
WARNING Modications not authorized by the
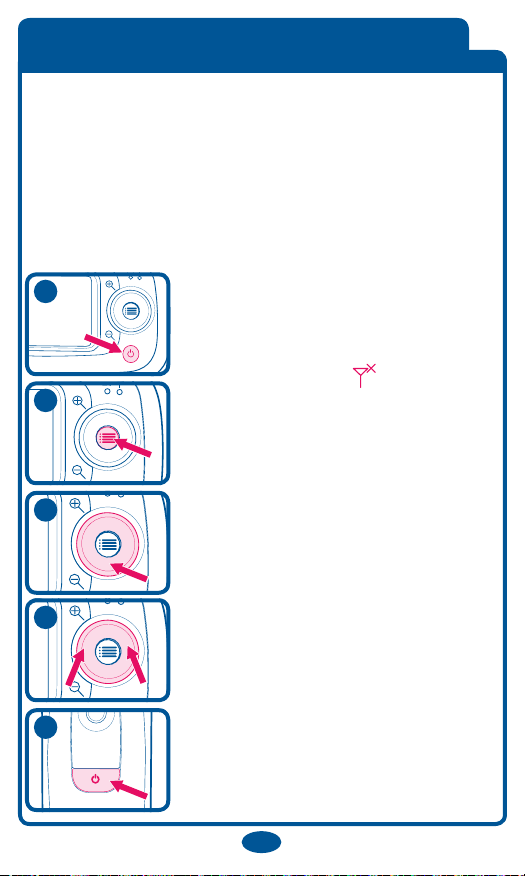
manufacturer may void users authority to operate this
device.
NOTE : This equipment has been tested and found to
comply with the limits for a Class B digital device,
pursuant to Part 15 of the FCC Rules.
3
Page 4

These limits are designed to provide reasonable
protection against harmful interference in a residential
installation. This equipment generates, uses and can
radiate radio frequency energy and, if not installed and
used in accordance with the instructions, may cause
harmful interference to radio communications.
However, there is no guarantee that interference will not
occur in a particular installation. If this equipment does
cause harmful interference to radio or television
reception, which can be determined by turning the
equipment off and on, the user is encouraged to try to
correct the interference by one or more of the following
measures:
• Reorient or relocate the receiving antenna.
• Increase the separation between the equipment and
receiver.
• Connect the equipment into an outlet on a circuit
different from that to which the receiver is
connected.
• Consult the dealer or an experienced radio/TV
technician for help.
This device complies with part 15 of the FCC Rules.
Operation is subject to the following two conditions :
(1) This device may not cause harmful interference,
and
(2) This device must accept any interference received,
including interference that may cause undesired
operation.
• Look for the FCC ID on the back of the Nursery Unit
and inside the battery compartment on the Parent Unit.
4
Page 5
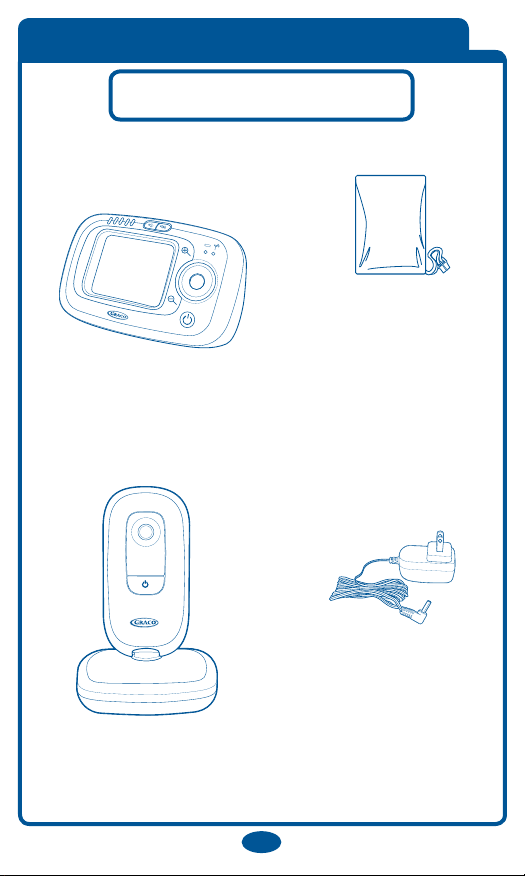
Parts List
Parent Unit
(PD170841)
Adult assembly required.
Tool required : Phillips screwdriver
(1) Parent Unit
Battery
Nursery Unit
(PD170766)
(2) AC Adapter
5
Page 6
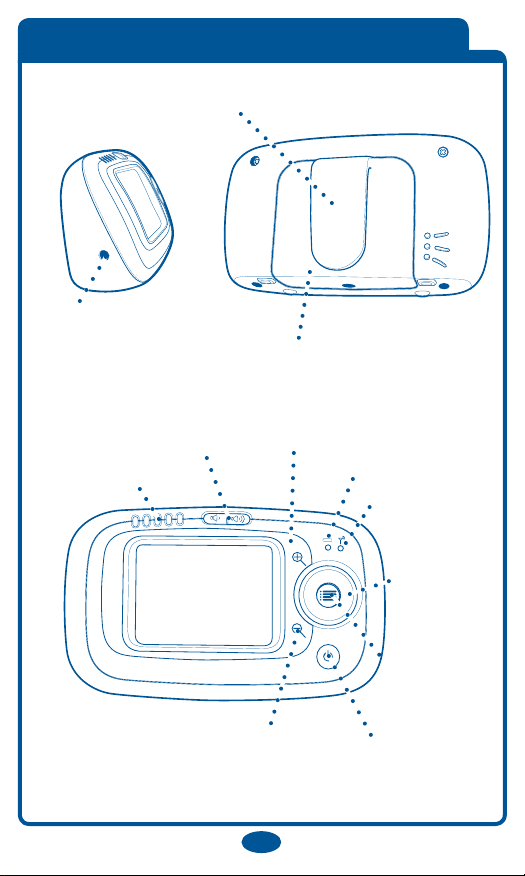
Parent Unit
DC Adapter
Jack
Belt Clip
Battery Compartment
Volume Up/Down
SoundLights
6
Zoom
In
Battery Status
Indicator
Signal Strength
Indicator
Navigation
buttons
Menu
Power Zoom Out
Page 7
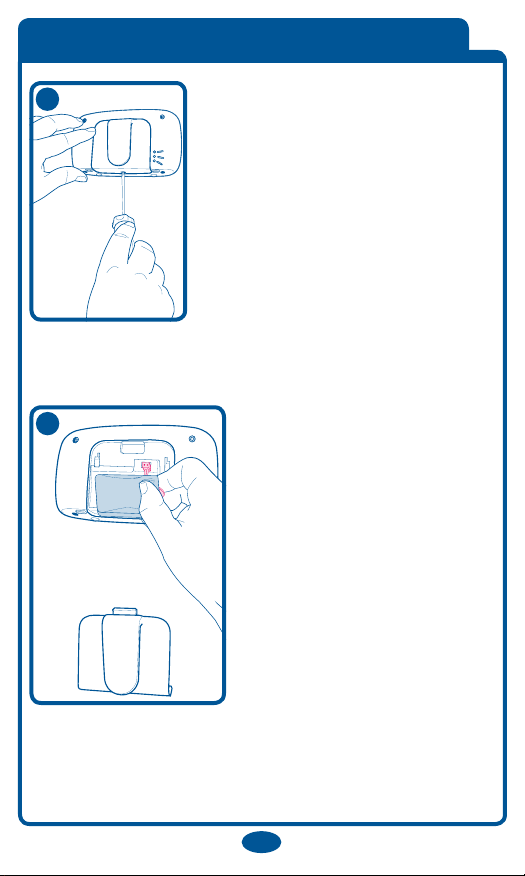
Installing Batteries
1
The battery must be plugged
into the Parent Unit before
the unit will be ready for
use.
Use a Phillips head
screwdriver to remove the
battery door.
NOTE : Screw should be
loosened but stay attached to
battery door.
2
Remove the battery pack
from the packaging and plug
into the back of the unit.
Place the battery pack into
the recess and press the wire
into the slot on the side.
7
Page 8
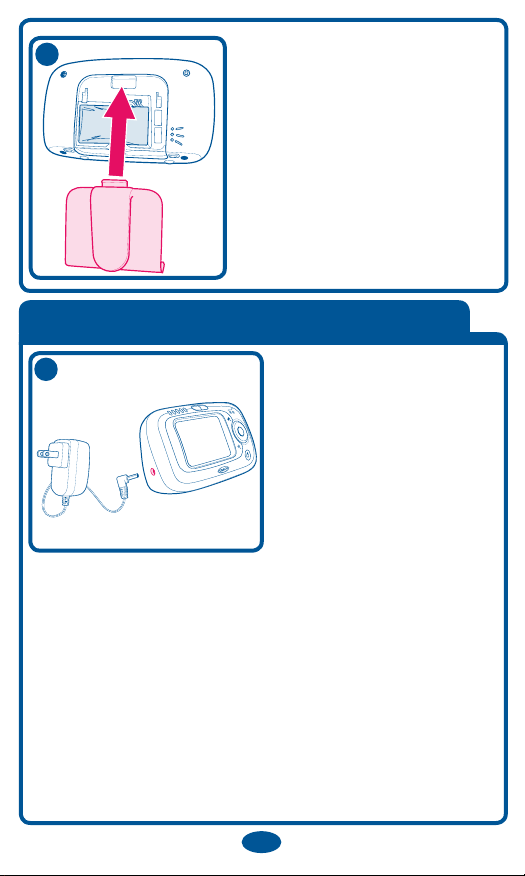
3
Replace the battery door and
tighten the screw.
Using AC Adapters
4
• The Parent Unit(s) uses a rechargeable battery pack
or standard 120 volt AC household current. To use
AC adapters, plug the connector on the cord into the
DC adapter jack on the side of the Parent Unit. Then
plug adapter into a standard wall outlet.
• Use ONLY the Graco adapters included with the
unit. Do not use these adapters with other equipment
under any circumstances.
• If units do not work, check that AC adapters are
plugged into working outlets.
8
Page 9
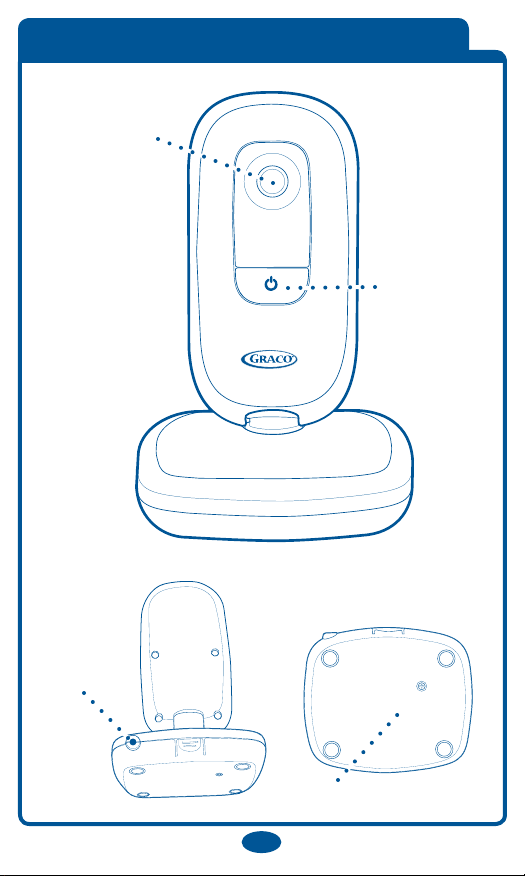
Nursery Unit
Camera
Power
DC Adapter
Jack
Battery Compartment
9
Page 10
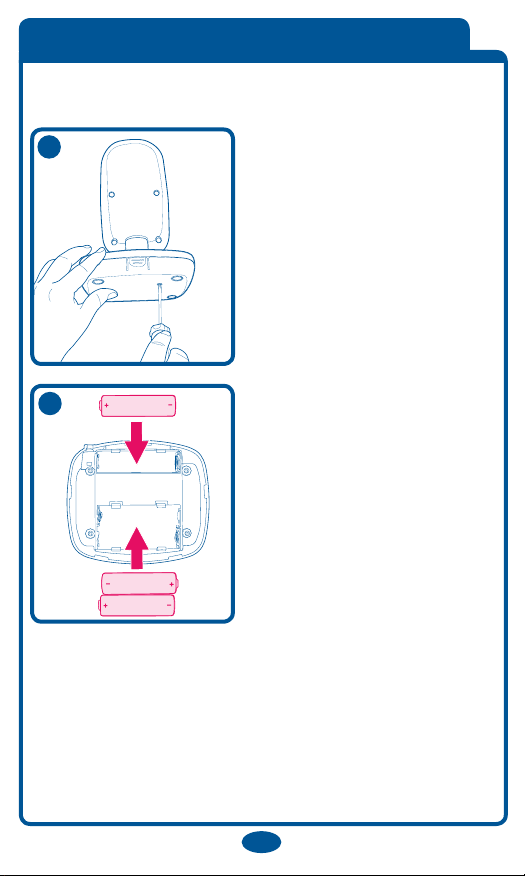
Battery Installation
5
Use a Phillips head
screwdriver to remove the
battery door.
NOTE : Screw should be
loosened but stay attached
to battery door.
6
Insert 3-AA (1.5V-LR6)
batteries.
Make sure they are
inserted correctly.
• Batteries will power the Nursery Unit in the event of
a power outage. Only audio (no video) is operational
when running on battery power.
• Batteries should be replaced periodically.
10
Page 11
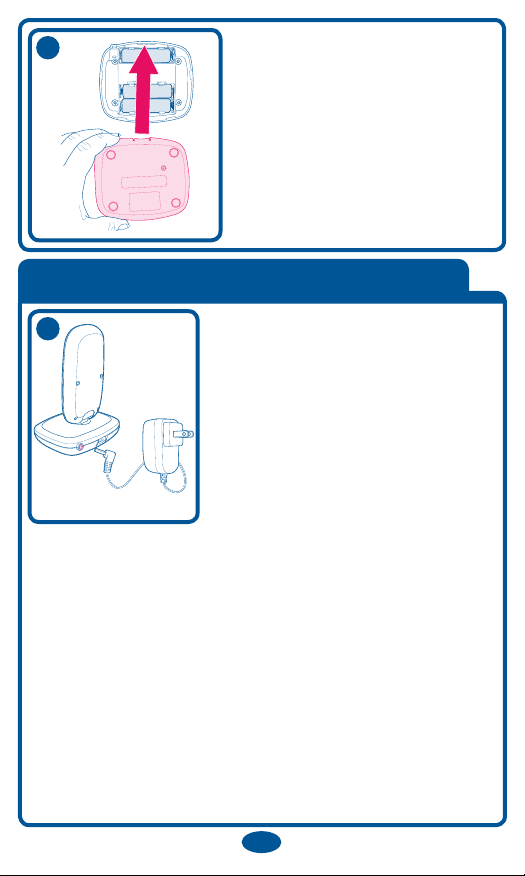
7
Using AC Adapters
Replace the battery door and
tighten the screw.
8
• The Nursery Unit uses 3-AA
(1.5V-LR6) batteries or standard
120 volt AC household current.
• To use AC adapters, plug the
connector on the cord into the DC
adapter jack on the back of the
Nursery Unit. Then plug adapter
into a standard wall outlet.
• Use ONLY the Graco adapters included with the unit.
Do not use these adapters with other equipment under
any circumstances.
• If units do not work, check that AC adapters are
plugged into working outlets.
• When electricity is off (from a power failure, etc.), the
Nursery Unit will operate on 3-AA (1.5V-LR6) batteries
in audio mode only.
11
Page 12
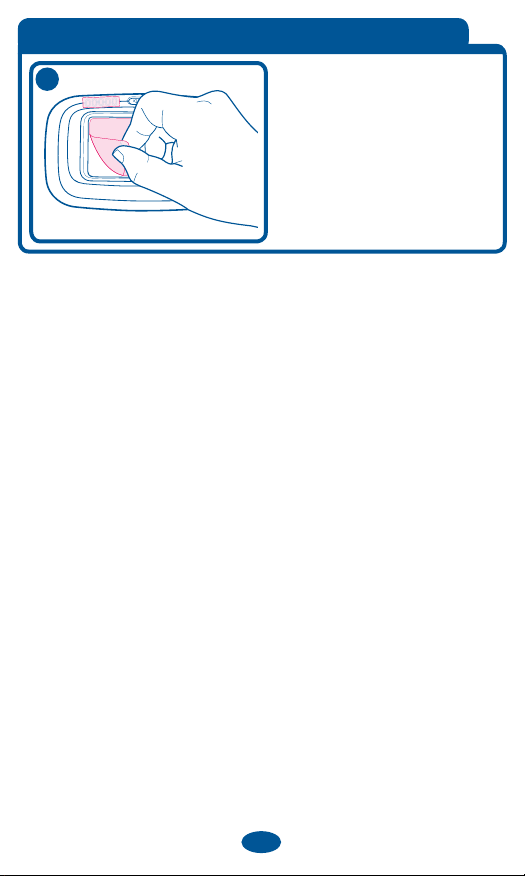
Static Cling Labels
9
Remove and discard static
cling labels.
12
Page 13
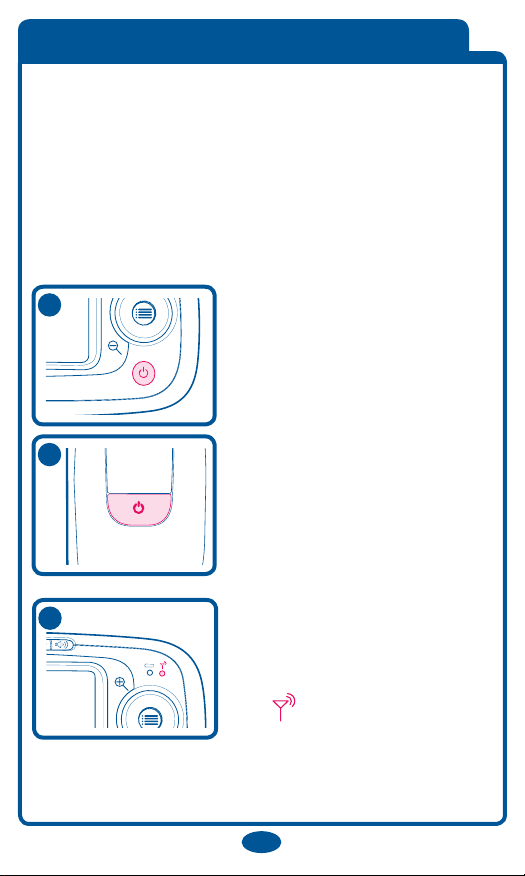
Setting Up the Baby Monitor
NOTE : It is very important that the steps below be
followed for first time power-up.
• Place the Nursery Unit within 3 meters (10 feet) of your
baby. Plug an AC adapter into the jack on the back of the
Nursery Unit. Plug it into a working 120 volt AC outlet.
• Point the Nursery Unit toward your baby.
10
Place the Parent Unit within five
1.5 meters (5 feet) of the
Nursery Unit and turn on the
Parent Unit using the On/Off
button on right side of the LCD
screen. Press and hold the
button for 3 seconds to turn on.
11
Depress the power button on the
Nursery Unit for 3 sec. to turn
camera on.
12
Within a few seconds, the
Parent Unit will lock on to the
Nursery Unit.
A second later, the connection
light will turn on. Your
monitor is now ready for use.
13
Page 14
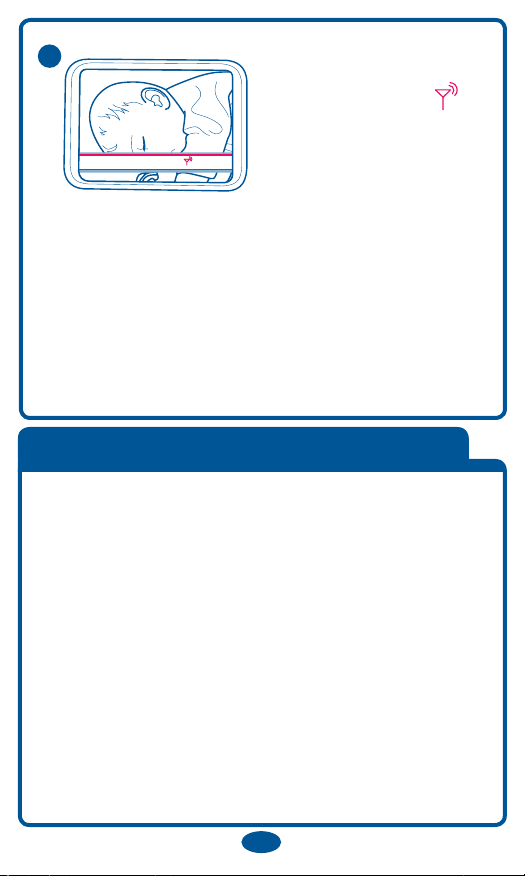
Cam. 1 : Détectée
Cam. 1 : Perte de signal
Cam 1: Detected
Cam 1: Lost Signal
Cam 1: Detectada
13
When a new Nursery
Unit is detected, the
“Cam 1 : Detected
”
message displays on the
screen of the Parent Unit.
The video feed does not
change.
The message fades away
after 3 seconds.
Testing the System
It is VERY IMPORTANT to test the system when first
set up, and at regular times thereafter. Test the units
if you suspect they may have been damaged or have not
been used for a long time.
1. If two adults are present, have one take the Parent
Units to different locations, trying various volume
settings, while the other speaks into the Nursery Unit.
2. If only one adult is available, place a ticking clock,
radio, or other sound-producing device near the Nursery
Unit to test it.
3. When testing, keep the level of your child’s sounds in
mind, and adjust the volume accordingly.
4. If there is sound interference, try moving the Nursery
Unit to a different location.
14
Page 15
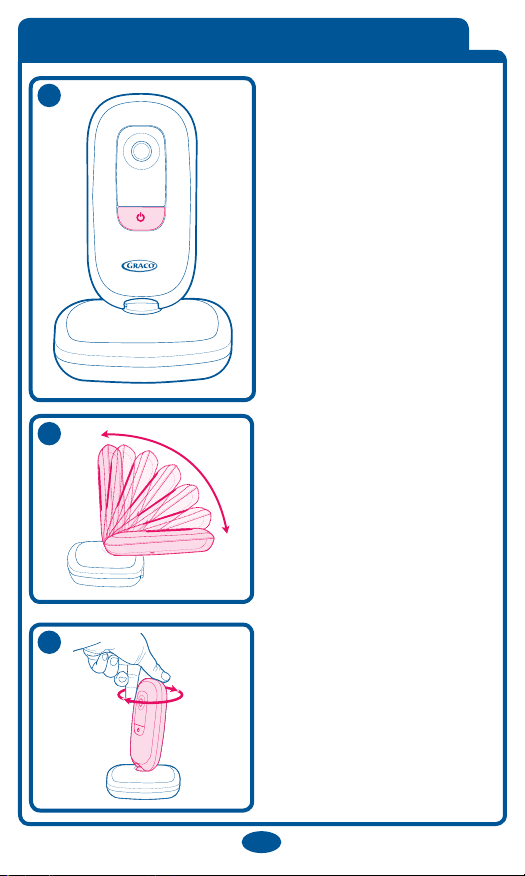
Nursery Unit Power On/Off
14
Depress the power button
on the Nursery Unit for 3
sec. to turn camera on.
15
To change camera angle,
swivel the Nursery Unit in
the desired direction.
16
1515
15
Page 16
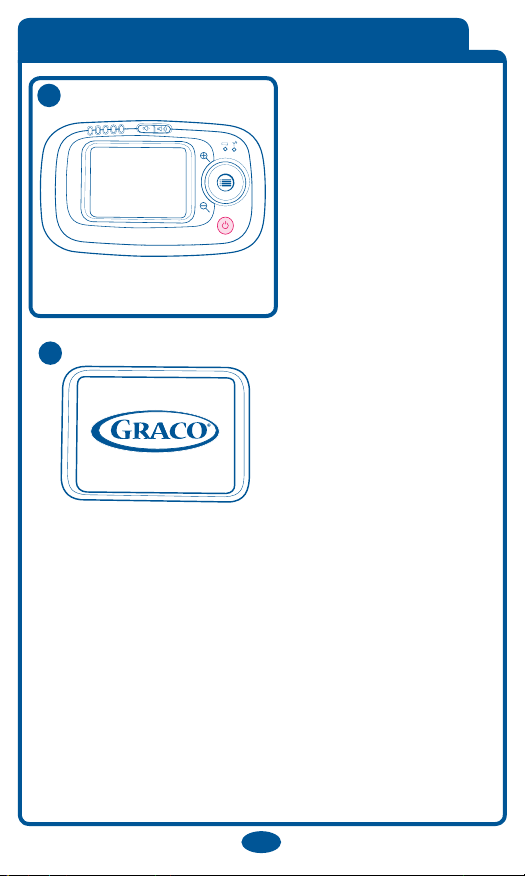
Parent Unit Power On/Off
17
Press and hold ON/OFF
button for 3 seconds.
Unit will cycle through
intro and begin searching
for the Nursery Unit.
18
Make sure Nursery Unit
is turned on. The Parent
Unit will display the
Graco logo on the status
screen until the Nursery
Unit is found. The live
video feed will then be
shown.
The connection LED
will turn from red to
green.
16
Page 17
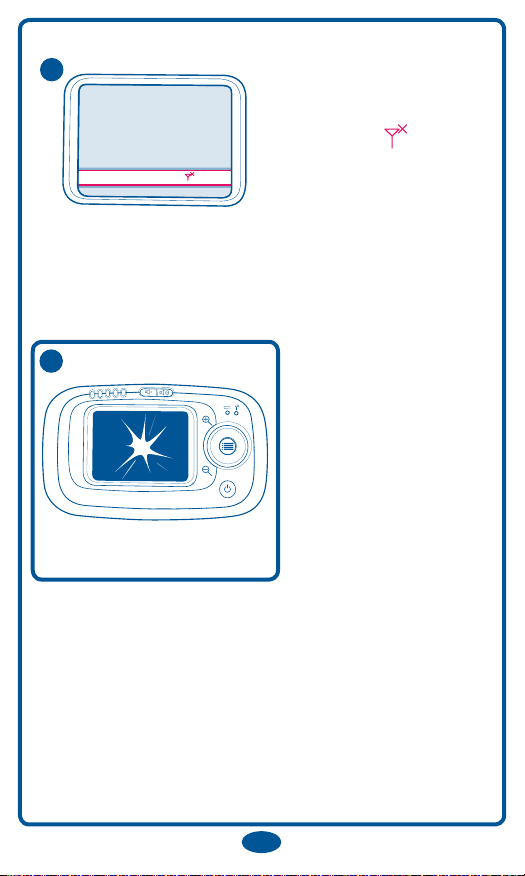
Cam. 1 : Perte de signal
Cam 1: Lost Signal
19
If the Nursery Unit is not
turned on the Parent Unit
will display “Cam 1:
Lost Signal
” prompt
and beep once every
minute until Nursery
Unit is turned on.
20
Press and hold ON/OFF
button for 3 seconds to
turn unit off.
17
Page 18
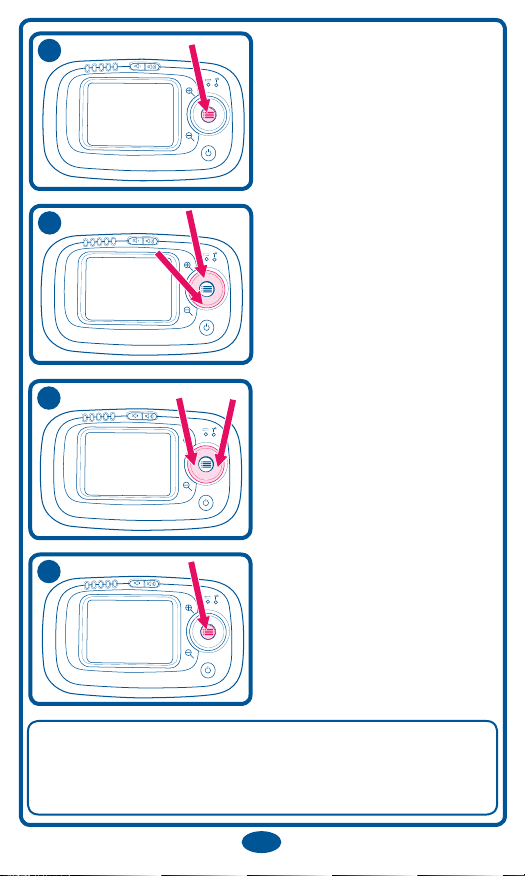
21
To set up preferences or
change status, press the
“MENU” button.
22
To cycle through the
different choices, press up
or down.
23
To cycle through items in
the sub-menu press left or
right.
24
After choosing one of the
options, press the “MENU”
button to make the
selection.
NOTE : Once you make a selection (MENU), the unit
will automatically advance you to the next option/screen
or return you to the live video feed (if applicable).
18
Page 19
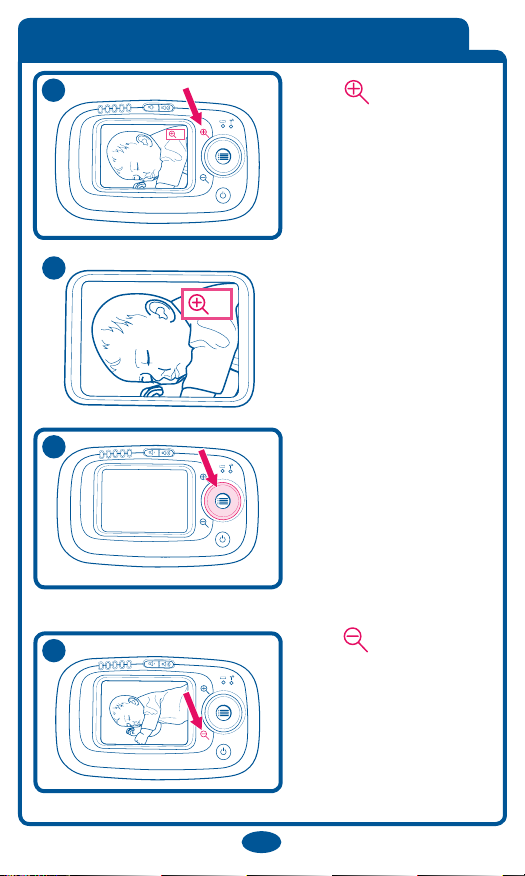
Zoom and Pan
2x
2x
25
Press button to
Zoom In on baby.
2x
Zooms in on the center of
the video feed one level.
The zoom levels are 1x
and 2x.
26
The zoom indicator
appears on the screen to
indicate the current zoom
level.
27
When zoomed in, you
can pan by pressing up,
down, left and right
buttons.
NOTE: Pan will not
work in zoom out or
regular viewing mode.
28
Press button to
Zoom Out on baby.
Zooms out on the center
of the video feed one
level.
The zoom levels are 1x
and 2x.
19
Page 20
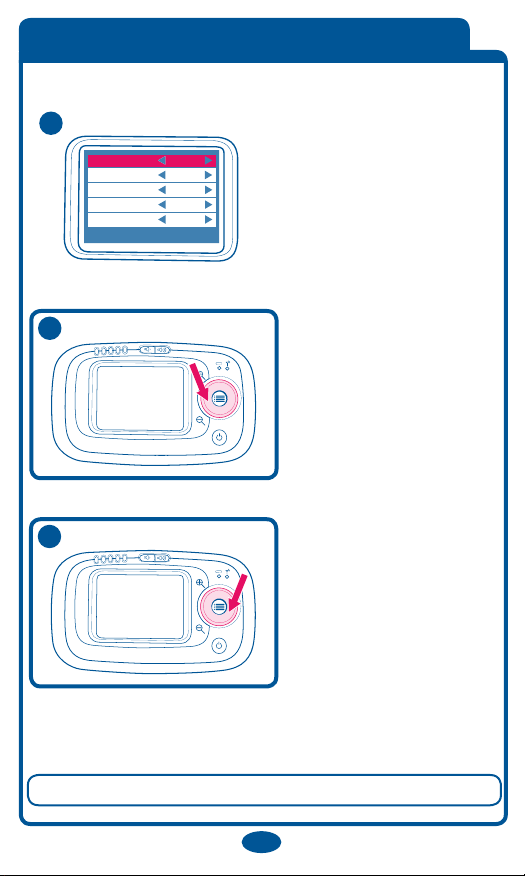
Brightness
Contrast
Screen Timeout
Brightness 50%
50%
Off
Camera
Cam 1
Language
English
Press Menu to Exit
29
The brightness for the
LCD ranges from 0%
to 100%, in 10%
increments.
The default value is 50%.
30
Decreases the
brightness level by 10%.
If the brightness level
is 0%, then it wraps to
100%.
31
Increases the
brightness level by 10%.
If the brightness level is
100%, then it wraps to
0%.
To return to live Video feed (if available) press : MENU.
20
Page 21
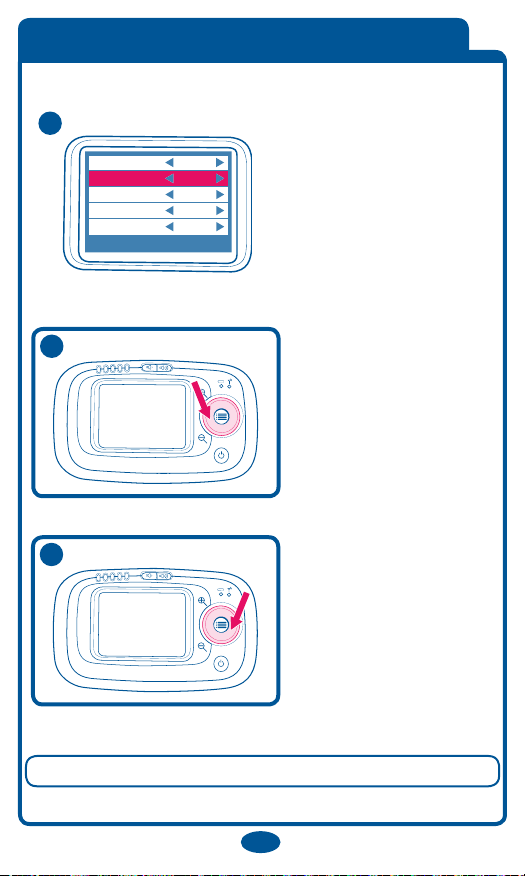
Contrast
Contrast
Screen Timeout
Brightness 50%
50%
Off
Camera
Cam 1
Language
English
Press Menu to Exit
32
The contrast for the LCD
ranges from 0% to 100%,
in 10% increments.
The default value is 50%.
33
Decreases the contrast
level by 10%. If the
contrast level is 0%, then
it wraps to 100%.
34
Increases the contrast
level by 10%. If the
contrast level is 100%,
then it wraps to 0%.
To return to live Video feed (if available) press : MENU.
21
Page 22
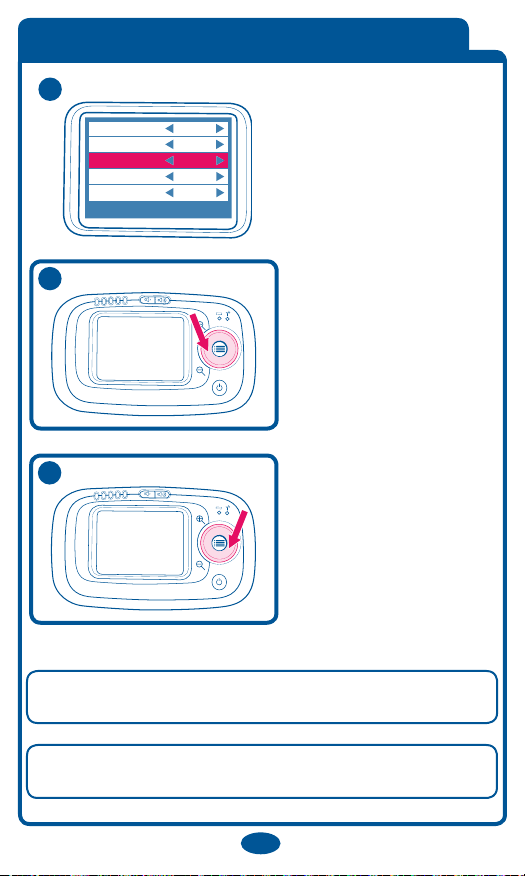
Screen Timeout
Contrast
Screen Timeout
Brightness 50%
50%
Off
Camera
Cam 1
Language
English
Press Menu to Exit
35
The Screen Timeout
settings for the LCD are
Off, 15 sec, 30 sec, and
60 sec.
The default value is OFF.
36
Decreases the Screen
Timeout. If the Screen
Timeout is Off, then it
wraps to 60 sec.
37
Increases the Screen
Timeout. If the Screen
Timeout is 60 sec, then it
wraps to Off.
To return to live Video feed (if available) press any
button except the power button.
NOTE : Setting the Screen Timeout to 15, 30 or 60
seconds will signicantly increase your battery life.
22
Page 23
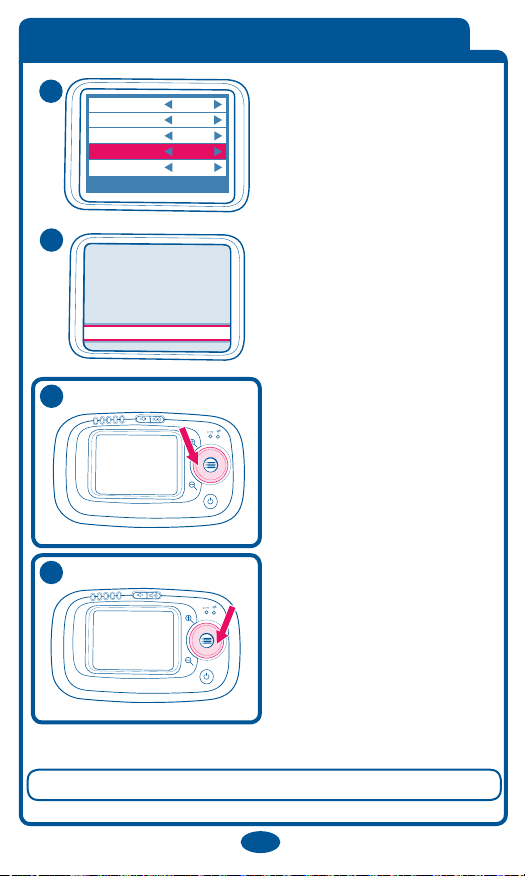
Search for New Camera
Camera
Contrast
Screen Timeout
Brightness 50%
50%
Off
Camera
Cam 1
Press Menu to Exit
Language
English
38
39
The video feed settings are
Cam 1 and + camera.
Cameras found will appear
in settings. To add another
camera, use left/right scroll
to choose (+ camera).
40
Moves back to the
previous Nursery Unit video
feed. If the rst Nursery
Unit video feed is reached,
then it wraps to the last
Nursery Unit video feed.
41
Advances to the next
Nursery Unit video feed.
If the last Nursery Unit
video feed is reached, then
it wraps back to the rst
Nursery Unit video feed.
To return to live Video feed (if available) press : MENU.
23
Page 24
Contrast
Screen Timeout
Brightness 50%
50%
Off
Camera
Cam 1
Press Menu to Exit
Language
English
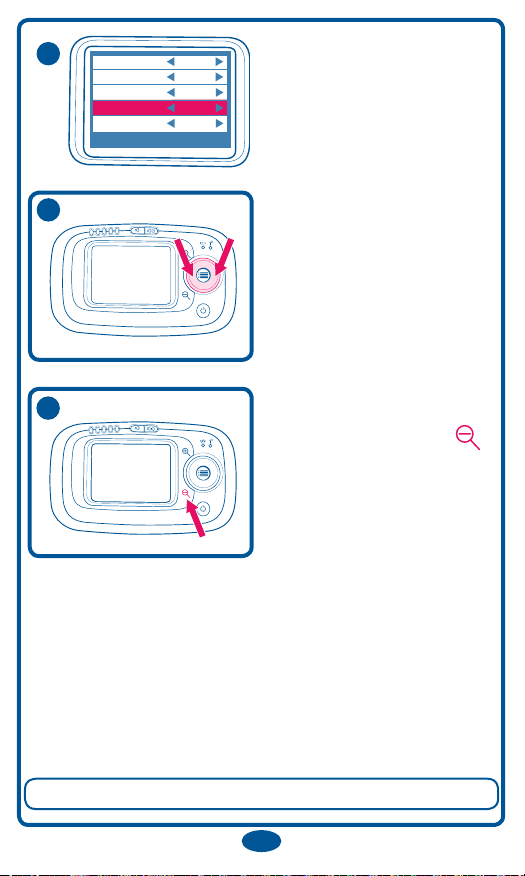
42
To remove one of the
cameras from the system,
scroll down to “Camera”
eld.
43
Use left/right scroll to
choose Camera you wish to
remove from system.
44
Press Zoom Out button .
To return to live Video feed (if available) press : MENU.
24
Page 25
Language
Contrast
Screen Timeout
Brightness 50%
50%
Off
Camera
Cam 1
Language
English
Press Menu to Exit
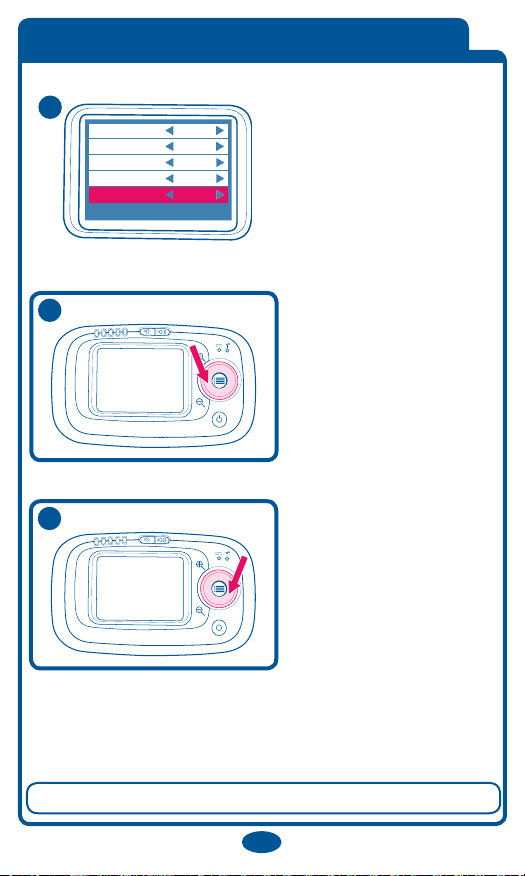
45
The language settings are
English, French,
and Spanish. The default
setting is English.
46
Moves back to the
previous language. If the
rst language is reached,
then it wraps to the last
language.
47
Advances to the next
language. If the last
language is reached, then
it wraps back to the rst
language.
To return to live Video feed (if available) press : MENU.
25
Page 26
Volume Up/Down
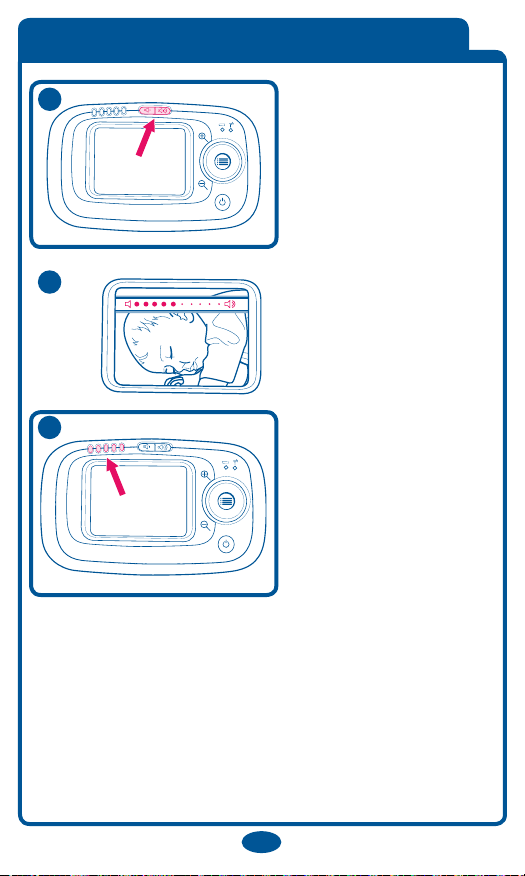
48
Adjust the volume
on the Parent Unit by
pressing the Volume
Up/Down buttons.
49
This indicator
disappears after a
2 second timeout.
The unit will beep
50
louder or softer
depending on the
volume level.
The SoundLights on
the Parent Unit will
illuminate as your child
(or other objects) make
noise near the
Nursery Unit. Please
note that the SoundLights and volume control on the
Parent Unit are independent of each other. With the
volume turned all the way down, the SoundLights will
still illuminate as your child (or other objects) make
noise near the Nursery Unit.
26
Page 27
Battery Information
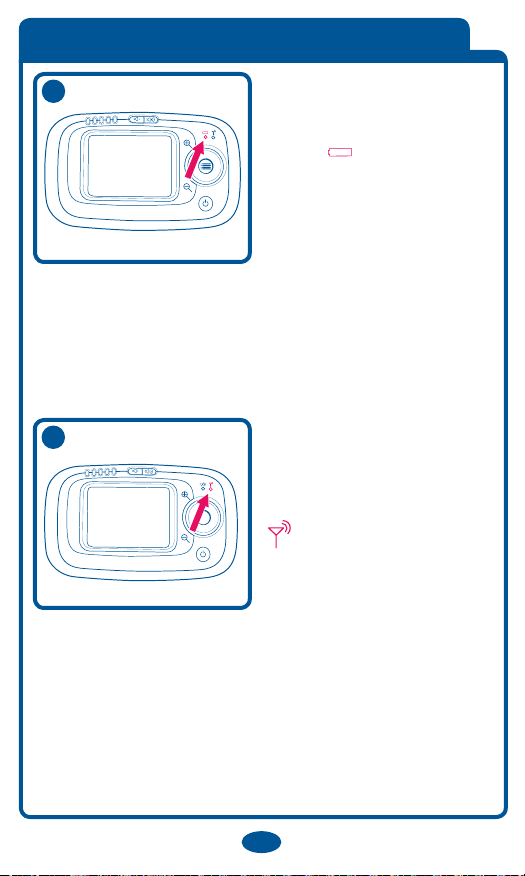
51
Parent Unit Battery Level
When the battery is low
in the Parent Unit, the low
battery light blinks red
on and off. The Parent Unit
beeps once every minute.
When battery is charging,
LED blinks green on and
off.
If battery is fully charged,
LED is solid green.
52
If operated too long on a
low battery, you may also
experience a poor signal
and the connection light
will blink red on and
off and the Parent Unit
beeps once every minute.
You may either turn off
the unit or plug in the AC
adapter to recharge the
batteries.
27
Page 28
Low Battery
Cam 1: Low Battery
Nursery Unit AC Power
Disconnected
Audio Only
The Battery Icon shows how much power is left in the
batteries :
53
• When the battery is low in
the Parent Unit a “Low
Battery” message shows on
the screen. The video feed
does not change. The
message fades away after 3 seconds. The Parent Unit
will beep once every minute when this occurs.
• The Battery Level Light will illuminate green when
the batteries are OK, blink red on and off when the
batteries are low.
Nursery Unit Backup Batteries
• When the batteries are low in the Nursery Unit, you
may also experience a poor signal and the connection
light
on the Parent Unit blink green on and off
and the Parent Unit beeps once every minute.
• You may either turn off the unit, plug in the AC
adapter or replace the batteries.
• Three
AA (1.5V-LR6) batteries can be optionally
installed in the Nursery Unit in case AC power is lost.
• When a Nursery Unit
54
loses power and is running
on battery backup, the
“Cam 1: Low Battery”
message will display.
The Parent Unit will beep
28
once.
Page 29
• When the Nursery Unit is on battery power, only
Cam 1: Low Battery
the audio will be transmitted. This helps to extend the
battery life.
55
• When batteries in
Nursery Unit are low the
“Cam 1: Low Battery”
message will display on
the Parent Unit.
• Do not mix old and new batteries.
• Do not mix alkaline, standard (carbon zinc), or
rechargeable (ni-cadmium, etc) batteries.
• Please remove a dead battery promptly.
A dead battery left in the unit may leak, damaging
your unit.
• Do not attempt to recharge a non-rechargeable
battery.
• A rechargeable battery CANNOT be recharged by
plugging the AC adapter into the Nursery Unit.
• Remove the batteries from the unit if it is no longer
being used or will be stored for an extended period of
time.
• Batteries should be disposed of
properly by recycling.
29
Page 30
Cam. 1 : Perte de signal
Cam 1: Lost Signal
Cam 1: Pérdida de la señal
Cam. 1 : Détectée
Cam. 1 : Perte de signal
Cam 1: Detected
Cam 1: Lost Signal
Cam 1: Detectada
Cam 1: Pérdida de la señal
Signal Strength Indicator
56
the signal from the Nursery Unit,
the
connection light blink
red on and off and the Parent
Unit beeps once every minute.
• If the Parent Unit begins to lose
57
Additionally, the “Cam 1 : Lost
Signal
” message will come up
on the screen.
• Immediately move the Parent
58
Unit closer to the Nursery Unit to
regain connection.
• Once connection has been
re-gained, the connection light
will be solid green and the
audible beep will stop. Also, the
“Cam 1 : Detected
message will come up on the
”
screen.
Note : It is not uncommon for the Parent Unit to
occasionally lose and regain connection with the
Nursery Unit in environments that have a signicant
amount of obstructions.
30
Page 31

Trouble Shooting
Most problems have a simple solution.
First, check that :
• Power is turned ON for both units
• Both units are plugged in (or batteries are fresh in
Nursery Unit and fully charged in Parent Unit)
• Electrical outlet works
• Volume is turned up on Parent Unit
• Parent Unit is in range of the Nursery Unit
Parent Unit Only Works With AC Adapter
• Check that the battery is plugged in.
• Check that battery is charged.
No Sound or No Video
• Batteries dead or weak — replace or use AC
adapter.
• AC adapter not properly connected — check the
connections.
• Nursery Unit covered or blocked — remove the
obstruction.
31
Page 32

Weak Sound, Static or Poor Video.
• Nursery Unit too far from baby — move closer.
• Parent Unit too far from Nursery Unit — move them
closer.
• Large objects blocking the signal —
try repositioning Nursery Unit.
• Volume setting too low — turn it up.
• Interference from other electrical equipment
— eliminate cause of static (TVs, mixers, computers,
fans, fluorescent lights, light dimmers, etc.)
• Significant amount of obstructions between Parent
Unit and Nursery Unit such as walls, ceilings and
buildings. Try moving the Nursery Unit to another
part of the room.
Shrill Sound (Feedback)
• Nursery Unit and Parent Unit too close together
— move them farther apart.
• Volume set too high — lower the volume.
32
Page 33
Pairing the Parent Unit and Nursery Unit or
Adding another Nursery Unit
To ensure privacy, your Parent Unit is paired with
your Nursery Unit at the factory. You can pair the
Parent Unit with up to 4 Nursery Units.
If your Parent Unit won’t lock onto your Nursery
Unit, or you purchased a new Parent Unit or Nursery
Unit, follow the procedure below to pair the Parent
Unit and Nursery Unit.
59
• If the Parent Unit is not on, turn it
on now.
• The Parent Unit will display
“Cam 1 : No Signal ”
60
• Go to the Main Menu
• Go to the Camera option using
61
down button.
62
• When on Camera press left or right
buttons to choose (+camera).
Press the “Menu” button.
63
• Place the Nursery Unit in the same
room, as the Parent Unit.
• Turn on the Nursery Unit using the
On/Off Button.
33
Page 34
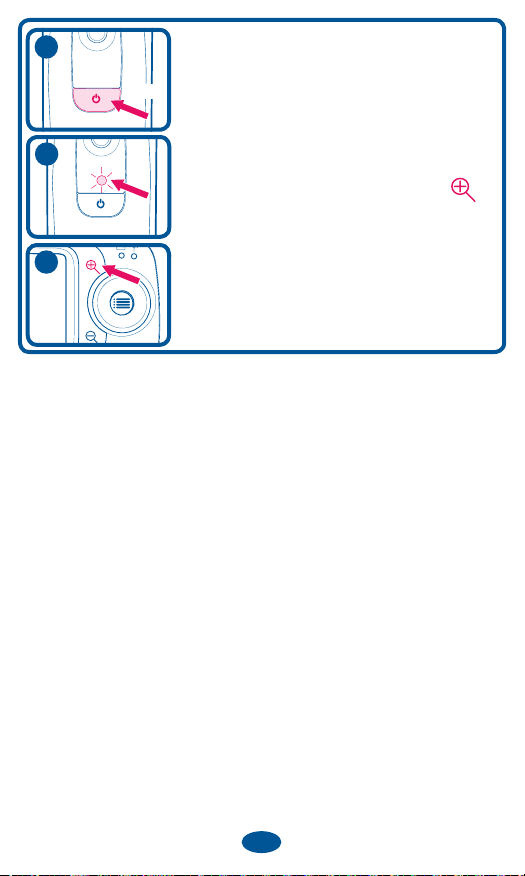
• Press On/Off Button on Nursery
64
Unit 2 times quickly.
2X
65
• While the indicator light is flashing
on the Nursery Unit, press the
button on the Parent Unit.
66
• The Parent Unit will begin
monitoring normally.
34
Page 35
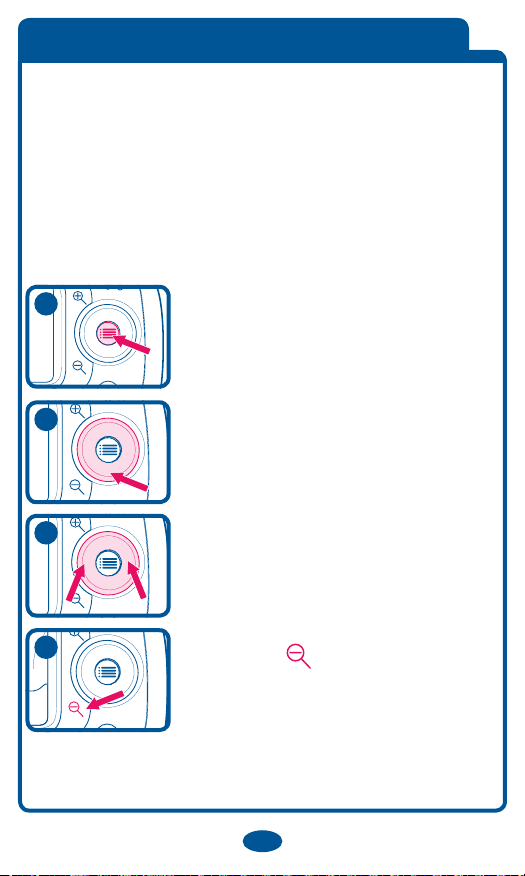
Erase the Pairing from the Parent Unit
Nothing happened when I turned on the Nursery
Unit. What do I do?
• With the Parent Unit on, turn the Nursery Unit off,
and then on again.
• If there is still a problem, follow the procedure
below then repeat Pairing the Parent Unit and Nursery
Unit.
• Go to the Main Menu
67
68
• Go to the Camera option using
down button
• When on Camera press left or right
69
buttons to choose camera you wish
to erase.
70
• Zoom Out button and a line
will appear through the camera
indicating it is removed.
• The Parent Unit is ready to pair
with the Nursery Unit.
35
Page 36

Replacement Parts
Warranty Information (Canada)
To purchase parts or accessories or for warranty
information in Canada,
contact Elfe at :
1-800-667-8184
(Montréal : 514-344-3533 /
Fax: 514-344-9296).
or/ou
www.elfe.net
36
 Loading...