

Page 1

Ear Thermometer
OWNER'S MANUAL
KEEP INSTRUCTIONS FOR FUTURE REFERENCE.
©2008 Graco PD104815A 9/08
1
Page 2

Failure to follow these warnings and the
assembly instructions could result in
serious injury or death.
• This product not to be used as a toy.
• WARNING: This product is not a toy.
• DO NOT immerse any part of the
Ear Thermomete, in water.
Clean only with a dry cloth.
• DO NOT place unit near water and
moisture. Do not use the
Ear Thermometer outdoors. Do not use the
Ear Thermometer near possible wet areas,
such as a bathtub, shower, wash
basin, sink, laundry tub, swimming pool,
wet basement, etc.
• Keep Ear Thermometer away from
heat sources, such as replaces,
radiators, stoves, and TVs or other
appliances. Heat can damage the case or
electrical parts.
2
Page 3

• DO NOT use the
Ear Thermometer Unit if:
• The unit has been exposed to liquids.
• Unit has been dropped or is damaged.
• DO NOT OPEN THE
EAR THERMOMETER.
No user-serviceable parts inside. Risk of
electrical shock, re or death.
• Do not drop the instrument! Protect it
from severe impact and shock.
3
Page 4

FOR SAFE BATTERY USE:
Keep the batteries out of children’s reach.
Any battery may leak battery acid if mixed
with a different battery type, if inserted
incorrectly (put in backwards) or if all
batteries are not replaced or recharged at
the same time. Do not mix old and new
batteries. Do not mix alkaline, standard
(carbon-zinc) or rechargeable
(nickel-cadmium) batteries.
Any battery may leak battery acid or
explode if disposed of in fire or an attempt
is made to charge a battery not intended
to be recharged. Never recharge a cell of
one type in a recharger made for a cell of
another type.
4
Page 5

Discard leaky batteries immediately. Leaky
batteries can cause skin burns or other
personal injury. When discarding batteries,
be sure to dispose of them in the proper
manner, according to your state and local
regulations.
Remove batteries before storing product
for a prolong period of time. Batteries left
in the unit may leak and cause damage.
Recommended type batteries—
disposables, size 3-volt CR 2032 Lithium
battery. NEVER mix battery types. Change
batteries when product ceases to operate
satisfactorily.
Always remove batteries if the product is
not going to be used for a month or more.
Batteries left in the unit may leak and cause
damage. Recommended type batteriesdisposables, size 3-volt CR 2032 Lithium
battery. NEVER mix battery types. Change
batteries when product ceases to operate
satisfactorily.
5
Page 6

WARNING
Modications not authorized by the
manufacturer may void users authority
to operate this device.
NOTE: This equipment has been tested
and found to comply with the limits for a
Class B digital device,
pursuant to Part 15 of the FCC Rules.
These limits are designed to provide
reasonable protection against harmful
interference in a residential installation.
This equipment generates, uses and
can radiate radio frequency energy and,
if not installed and used in
accordance with the instructions, may
cause harmful interference to radio
communications. However, there is no
guarantee that interference will not
occur in a particular installation. If this
equipment does cause harmful
interference to radio or
television reception, which can be
determined by turning the equipment off
and on, the user is encouraged to try to
correct the interference by one or more
of the following measures:
• Reorient or relocate the receiving
antenna.
6
Page 7

• Increase the separation between the
equipment and receiver.
• Connect the equipment into an outlet
on a circuit different from that to which
the receiver is connected.
• Consult the dealer or an experienced
radio/ TV technician for help.
This device complies with part 15 of the
FCC Rules. Operation is subject to the
following two conditions:
(1) This device may not cause harmful
interference, and
(2) This device must accept any
interference received, including
interference that may cause undesired
operation.
7
Page 8

Probe
Power & scan
button
Memory button
LCD display
Battery cover
Overview
Bag
Accessories (On certain models)
Storage case
8
Page 9

Symbol Key
Degrees of temperature
Temperature is being scanned
Smiling face indicating temperature
lower than 100.4°F (38°C)
Frowning face indicating temperature of 100.4°F (38°C) or higher
Fahrenheit
Celsius
Low battery warning
Replace battery
Memory symbol
Temperature is below 93.2°F (34°C)
Temperature is above 109.4°F (43°C)
Ambient temperature is outside
thermometer’s range 60.8°-104°F
(16°-40°C)
9
Page 10

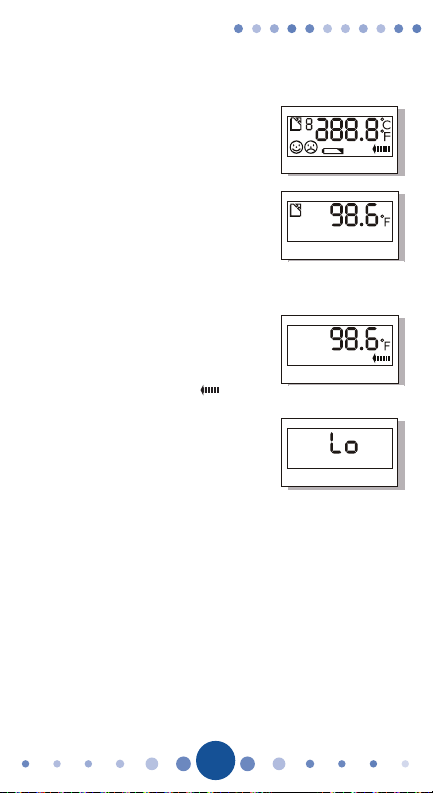
Battery Installation
NOTE: The word “Lo” by itself does not mean that
the battery is low and needs to be charged.
It means that the temperature being measured is
out of the thermometer’s range (see Fig. 8).
Replace the battery when the
low battery symbol appears
(see Fig. 1). If only the symbol
appears, you may still use the
thermometer but you will need
to replace the battery soon. If
the symbol appears with the
word “Lo” (see Fig. 2), you must
replace the battery to use the
thermometer.
1. Slide the battery
compartment lid off.
2. Carefully push back
on the battery release
non-metal tool. Battery will
pop up (see Fig. 4).
3. Remove old battery
from compartment and
discard immediately.
4. Insert one 3-volt CR
2032 lithium battery with
the positive side (+) facing up.
using a
Figure 1
Figure 2
Figure 3
Figure 4
5. Replace the battery
compartment lid by sliding
it forward.
10
Page 11

Instructions for use
Please do not use this ear thermometer when the
ear canal is wet.
1. Press and release the Power/
Scan button. The system will
start it’s self-testing cycle
(see Fig. 5).
2. Once the self-testing is
completed (approximately 1
second), the thermometer
will beep and the display will
show the last temperature
recorded. This indicates the
thermometer is ready to take a
temperature (see Fig. 6).
3. Press the Power/Scan button
again. The symbol will
appear beneath the last
reading (see Fig. 7). The word
“Lo” may also appear
indicating the temperature is
lower
than 93.2°F (34°C) (see
Fig. 8). NOTE: The word “Lo”
by itself does not mean that
the battery is low and needs
to be charged unless the low
battery
icon appears with it
(see Fig. 2).
It means that the
temperature being measured
is out of the thermometer’s
range.
4. Insert the probe into the ear canal. The probe
must be inserted well into the ear to allow the
probe tip to continuously scan the ear canal.
This will ensure an accurate temperature
measurement (see. Fig. 9).
11
Figure 5
Figure 6
Figure 7
Figure 8
Figure 9
Page 12

5. After one second you will hear
a beep indicating the reading
is complete. Remove the
thermometer from the ear to
get the temperature reading.
6. A smiling face will appear
indicating a temperature
reading lower than 100.4°F
(38°C). A frowning face
accompanied by one long and
two short beeps will indicate a
temperature of 100.4°F (38°C)
or higher (see Figs. 10 & 11).
7. You do not need to manually
shut off the thermometer. It will
automatically shut off after one
minute of non-use.
8. To change the reading from
Celsius to Fahrenheit, press
the Power/Scan button without
releasing it, then press the
blue M button on the
underside of the thermometer.
First release the M button and
then the Power/Scan button.
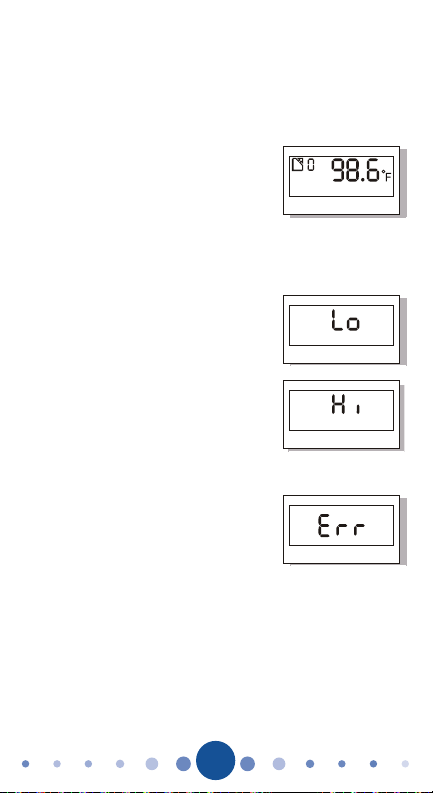
9. The Ear Thermometer stores
and recalls the last
10 temperature readings. To
recall the prior readings simply
press the blue M button on
the underside of the thermometer. The memory symbol, the
number of the reading, and
the temperature reading will
appear on the display
(see Fig. 12).
12
Figure 10
Figure 11
Page 13

10. If you want to immediately
take another reading, please
wait at least 10 seconds.
11. The temperature may vary
between both ears so try to
take it from the same ear
each time.
12. The thermometer has a
temperature range of
93.2°-109.4°F (34°-43°C).
If the temperature being
measured is below the range,
the word “Lo” will appear. The
word “Hi” will appear when
the temperature measured is
above 109.4°F (43°C) (see
Figs. 13 &14)
13. If the ambient temperature
is outside the thermometer’s
range (60.8°-104°F/16°40°C), the word “Err” will
appear (see Fig. 15).
Figure 12
Figure 13
Figure 14
Figure 15
13
Page 14

Care and maintanance
1. The ear thermometer is a delicate electronic
device. Although the probe can be cleaned
with isopropyl alcohol, the body of the
thermometer should never be submerged in
water or any other liquid.
2. Clean the probe with a cotton swab moistened
with isopropyl alcohol after every measurement
and before each use.
thermometer with a soft dry cloth. Never use an
abrasive.
3. Avoid touching the probe with your fingers.
4.
Do not expose the thermometer to direct
sunlight.
5. Keep out of the reach of children when not in
use. The optimal storage temperature range is
4°-122°F (-20°-50°C).
6. Use the ear thermometer to take temperature
from the ear canal only. Do not use it to take
rectal, oral, or underarm temperatures.
7. Do not disassemble the thermometer.
8. Only use a 3-volt CR-2032 lithium battery.
Clean the body of the
14
Page 15

Troubleshooting
1. Consistent low temperature readings.
a. The probe is not positioned properly in the
ear canal. The tip of the probe must be snug
and fully seated against the opening of the
ear canal. Failure to properly position the
probe may lead to a low temperature reading.
b. The probe lens is dirty. Clean the lens with a
soft cloth moistened with water or
alcohol.
2. The word “Lo” or “Hi” appears. Temperature is
out of the range of thermometer.
a. The probe is not positioned properly in the
ear canal. The tip of the probe must be snug
and fully seated against the opening of the
ear canal. Please properly position the ear
thermometer in the ear canal and then
repeat the measurement.
3. Thermometer will not take a reading.
a. Check to see if the low battery icon appears
with the word “Lo”. If it does, the battery
needs to be replaced. See Battery
Installation section of the manual.
b. Check to see if the low battery icon appears
by itself. If it does, the battery may need to
be replaced. See the Battery Installation
section of the manual.
isopropyl
15
Page 16
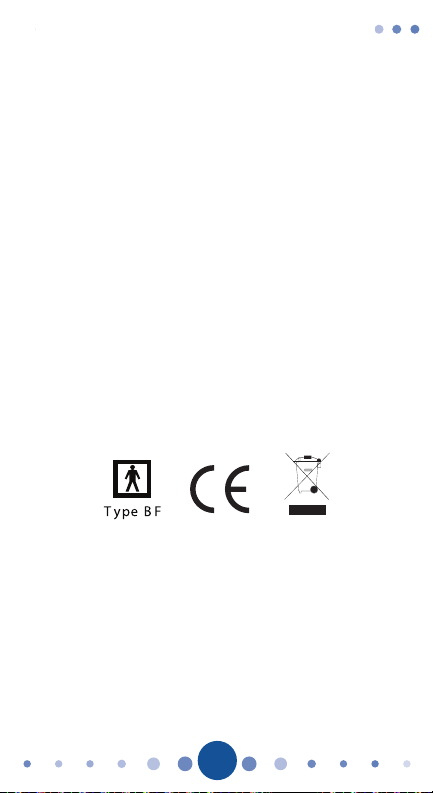
Applied standards and approvals
This product conforms to the provisions of the EC
directive MDD(93/42/EEC).
The following standards apply to design and/or
manufacturing of the products:
• ASTM E1965-98: Standard Specication for
infrared thermometers for intermittent
determination of patient temperature.
• IEC/EN980:1997: Graphical symbol for use in
the labeling of medical devices.
• IEC/EN60601-1: Medical electrical equipment
– Part 1: General requirement for safety.
•
IEC/EN60601-1-2: Medical electrical equipment
– Part 2: Collateral standard: Electromagnetic
compatibility – Requirements and tests.
• ISO 14971 Risk Management
16
Page 17

Notes
17
Page 18

Notes
18
Page 19

Notes
19
Page 20

Replacement Parts
Warranty Information (USA)
To purchase parts or accessories or for
warranty information in the United States,
please contact us at the following:
www.elfe.net
ou
1-800-667-8184
Montreal (514-344-3533)
Fax: 514-344-9296
Product Registration (USA)
To register your Graco product from
within the U.S.A. visit us online at
www.gracobaby.com/productregistration.
We currently do not accept product
registrations from those living outside the
United States of America.
20
Page 21

Thermomètre auriculaire
MANUEL D'UTILISATEUR
GARDEZ CES INSTRUCTIONS POUR USAGE FUTUR.
©2008 Graco PD104815A 9/08
1
Page 22

Ne pas se conformer à toutes les mises
en garde et directives de montage peut
causer des blessures graves
ou même la mort.
• Ce produit ne doit pas servir de jouet.
• MISE EN GARDE : Ce produit n’est pas
un jouet.
• N’IMMERGER AUCUNE partie du
thermomètre auriculaire
(thermomètre auriculaire) dans l’eau.
Nettoyer uniquement avec un chiffon sec.
• NE PAS exposer l’appareil à
l’eau ou à l’humidité. Ne pas utiliser le
thermomètre auriculaire à l’extérieur. Ne
pas utiliser le thermomètre auriculaire
à proximité d’endroits qui peuvent être
mouillés, comme une baignoire, une
douche, une cuvette, un évier, un bac à
lessive, une piscine, un sous-sol humide,
etc.
• Tenir le thermomètre auriculaire
éloigné des sources de chaleur, comme
les foyers, les radiateurs, les cuisinières,
les téléviseurs et autres appareils
ménagers. La chaleur peut endommager
le boîtier ou les composants électriques.
2
Page 23

• NE PAS utiliser le thermomètre
auriculaire si :
• L’appareil a été exposé à des liquides.
• L’appareil a été échappé ou est
endommagé.
• NE PAS OUVRIR LE
THERMOMÈTRE AURICULAIRE.
Ne renferme aucune pièce que
l’utilisateur peut réparer lui-même.
Danger d’électrocution, d’incendie ou de
décès.
• Ne pas échapper cet instrument!
Protéger contre tout impact ou choc
grave.
3
Page 24

UTILISATION SÉCURITAIRE DES PILES :
Conserver les piles hors de la portée des
enfants. Toutes les piles peuvent produire
des fuites d’acide si on mélange différents
types de piles, si on les insère
incorrectement (à l’envers) ou si les piles ne
sont pas toutes remplacées ou rechargées
en même temps. Ne pas utiliser ensemble
des piles neuves et usagées. Ne pas
mélanger des piles alcalines et régulières
(carbone-zinc) ou rechargeables
(nickel-cadmium).
Toutes les piles peuvent produire des fuites
d’acide ou exploser si on les jette au feu
ou si on tente de recharger une pile non
rechargeable. Ne jamais recharger de piles
d’un type dans un chargeur conçu pour un
autre type.
4
Page 25

Jeter immédiatement toute pile qui fuit.
Les piles qui fuient peuvent causer des
brûlures cutanées et d’autres blessures.
Les piles doivent être mises aux rebuts
selon la méthode approuvée, dans le
respect des lois et règlements provinciaux
ou locaux.
Retirer les piles avant de remiser ce
produit pour une période prolongée. Les
piles laissées dans l’appareil peuvent fuir
et causer des dommages.
Type de piles recommandées : au lithium
jetables, format 3 volts, CR 2032.
NE JAMAIS utiliser ensemble des piles
de types différents. Remplacer les piles
lorsque l’appareil ne fonctionne plus de
manière satisfaisante.
Toujours retirer les piles si ce produit ne
doit pas être utilisé pendant un mois ou
plus. Les piles laissées dans l’appareil
peuvent fuir et causer des dommages.
Type de piles recommandées :
au lithium jetables, format 3 volts, CR
2032. NE JAMAIS utiliser ensemble des
piles de types différents. Remplacer les
piles lorsque l’appareil ne fonctionne plus
de manière satisfaisante.
5
Page 26

MISE EN GARDE
Toute modication non autorisée par
le fabricant peut annuler le droit de
l’utilisateur à faire fonctionner cet
appareil.
REMARQUE: Cet appareil a été testé et
prouvé conforme aux normes d’un
appareil numérique de catégorie B,
conformément au chapitre 15 du
règlement de la CFC.
Ces limites sont conçues an de fournir
une protection raisonnable contre les
interférences nuisibles dans une
installation résidentielle. Cet appareil
produit, utilise et émet de l’énergie
des fréquences radio. S’il n’est pas
installé et utilisé conformément à ces
consignes, il peut occasionner des
interférences nuisibles aux
communications radio. Cependant, il n’y
a aucune garantie qu’il ne se produira
pas d’interférences dans une installation
en particulier. Si cet appareil cause des
interférences qui nuisent à la réception
d’un appareil de radio ou de
télévision, ce qu’on peut vérier en
allumant et éteignant l’appareil,
l’utilisateur est invité à tenter de
remédier à la situation par l’une ou
6
Page 27

plusieurs des mesures suivantes :
• Réorienter ou déplacer l’antenne
réceptrice.
• Augmenter la distance entre l’appareil
et le récepteur.
• Brancher l’appareil dans un circuit
différent de celui du récepteur.
• Consulter le détaillant ou un technicien
en radio/télévision expérimenté.
Cet appareil est conforme au chapitre
15 du règlement de la CFC. Son
fonctionnement est assujetti aux deux
conditions suivantes :
(1) Cet appareil ne risque pas de causer
des interférences nuisibles.
(2) Cet appareil doit accepter toutes
les interférences reçues, incluant les
interférences qui peuvent causer un
fonctionnement inadéquat.
7
Page 28

Sonde
Bouton
d'alimentation
et de balayage
Bouton
mémoire
Dispositif
d’affichage ACL
Couvercle du
compartiment à
piles
Aperçu
Sac
Accessoires (sur certains modèles)
Boîtier de
rangement
8
Page 29

Légende
Degrés de température
La température est en cours
de lecture
Le visage souriant indique que la température est inférieure à 38 °C (100,4 °F)
Le visage mécontent indique que la tem-
pérature est égale ou supérieure à 38 °C
(100,4 °F)<
Fahrenheit
Celsius
Avertissement en cas de piles faibles
Remplacer les piles.
Symbole de mémoire
La température est inférieure à
34 °C (93,2 °F).
La température est supérieure à 43 °C
(109,4 °F).
La température ambiante est en dehors
de la plage du thermomètre qui est de
16 à 40 °C (60,8 à 104 °F)
9
Page 30

Installation des piles
REMARQUE : REMARQUE : Le mot « Lo »
apparaissant seul ne signie pas que la pile est
faible ou qu’elle doive être chargée.
Il signie que la température prise est en dehors
de la plage du thermomètre (consulter la gure 8).
Remplacer la pile lorsque le
symbole de pile faible apparaît
(consulter la gure 1). Si le
symbole apparaît seul, on peut
encore utiliser le thermomètre;
on doit toutefois prévoir remplacer la pile sous peu. Si le
symbole apparaît avec le mot «
Lo » (consulter la gure 2), on se doit
de remplacer la pile an
d’utiliser le thermomètre.
1. Glisser le couvercle du
compartiment à piles.
2. Appuyer légèrement sur le dispositif
libérant la pile à l’aide d’un outil non
métallique. La pile sortira de son
compartiment (consulter la gure 4).
3. Retirer la pile usée du
compartiment et jeter
immédiatement.
4. Insérer une pile au lithium
CR2032 de 3 volts en plaçant la
borne positive (+) vers le haut.
Figure 1
Figure 2
Figure 3
Figure 4
5. Replacer le couvercle du
compartiment à piles
en le glissant vers l’avant.
10
Page 31
Mode d’emploi
Prière de ne pas utiliser ce thermomètre
auriculaire lorsque le conduit auditif est humide.
1. Appuyer et relâcher le bouton d’alimentation
et de lecture. Le dispositif
amorcera de lui-même le cycle
d’autovérication (consulter la
gure 5).
2. Une fois le test automatique
terminé, soit après 1 seconde, le
thermomètre émettra un signal
sonore et l’écran afchera la
dernière température enregistrée.
Le thermomètre est alors prêt à
lire une température (consulter la
gure 6).
3. Appuyer à nouveau sur le
bouton d’alimentation et de
balayage. Le symbole
apparaîtra sous la dernière
lecture (consulter la gure 7). Le
mot « Lo » peut également
apparaître indiquant que la
température est inférieure à 34
°C (93,2 °F) REMARQUE : Le
mot « Lo » seul ne signie pas
que la pile est faible et qu’elle doit
être chargée à moins que l’icône
indiquant que la pile est faible
n’apparaisse en même temps
(consulter la gure 2).
Il signie que la température prise est en
dehors de la plage du thermomètre.
Figure 5
Figure 6
Figure 7
Figure 8
11
Page 32

4. Insérer la sonde dans le conduit auditif. La
sonde doit bien pénétrer dans l’oreille pour
permettre à la sonde de continuellement balayer le
conduit auditif. Cela garantit une lecture précise de
la température (consulter la gure
9).
5. On entendra le signal sonore
indiquant que la lecture est
terminée une seconde plus tard.
Retirer le thermomètre de l’oreille
Figure 9
pour obtenir la lecture de la
température.
6. Un visage souriant apparaîtra
indiquant une lecture de
Figure 10
température inférieure à 38 °C
(100,4 °F). Un visage mécontent
suivi d’un long et de deux courts
signaux sonores indiquera une
Figure 11
température de 38 °C (100,4 °F) et
plus (consulter les gures 10 et 11).
7. Il n’est pas nécessaire d’éteindre
manuellement le thermomètre. Il
s’arrêtera automatiquement après
une minute d’inactivité.
8. Pour changer la lecture de la
température de Celsius à
Fahrenheit, appuyer sur le bouton
d’alimentation et de balayage sans
le relâcher, appuyer ensuite sur le
bouton bleu M sur le revers du
thermomètre. Relâcher d’abord
le bouton M, puis le bouton
d’alimentation et de balayage.
12
Page 33
9. Le thermomètre auriculaire enregistre et
mémorise les 10 dernières lectures de
température. Pour revoir les lectures antérieures,
simplement appuyer sur le bouton bleu M sur le
revers du thermomètre. Le symbole de mémoire,
le numéro de la lecture et la
lecture de la température
apparaîtront sur l’écran (consulter
la gure 12).
Figure 12
10. Attendre au moins
10 secondes, si l’on souhaite
immédiatement prendre une
nouvelle lecture.
11. La température peut varier
d’une oreille à l’autre, toujours
essayer de la prendre dans la
Figure 13
même oreille.
12. La plage de température du
thermomètre est de 34 à 43 °C
( 93,2 à 109,4 °F). Si la tem-
Figure 14
pérature prise est inférieure à la
plage, le mot « Lo » apparaîtra.
Le mot « Hi » apparaît lorsque la
température prise est supérieure
à 43 °C (109,4 °F) (consulter les
gures 13 et14).
Figure 15
13. Si la température ambiante
est à l’extérieur de la plage du thermomètre (16
à 40 °C/60,8 à 104 °F), le mot « Err » apparaîtra
(consulter la gure 15).
13
Page 34

Soins et entretien
1. Le thermomètre auriculaire est un appareil
électronique délicat. Bien que la sonde puisse être
nettoyée avec de l’alcool isopopylique, le corps du
thermomètre ne doit jamais être submergé dans
l’eau ou tout autre liquide.
2. Nettoyer la sonde à l’aide d’un cure-oreille
humecté à l’alcool isopropylique après chaque lecture et avant chaque utilisation. Nettoyer le corps
du thermomètre à l’aide d’un chiffon doux et sec.
Ne jamais utiliser d’abrasif.
3. Éviter de toucher la sonde avec les doigts.
4. Ne jamais exposer le thermomètre à la lumière
directe.
5. Conserver hors de la portée des enfants,
lorsqu’inutilisé. La température d’entreposage
optimale se situe entre -20 et 50 °C (entre 4 et
122 °F). NOTE : the conversion in the original is
not right.
6. Utiliser uniquement le thermomètre auriculaire
pour prendre la température dans le conduit
auditif. Ne pas l’utiliser pour prendre les températures rectales, orales ou à l’aisselle.
7. Ne pas démonter le thermomètre.
8. Utiliser uniquement une pile au lithium de 3
volts CR-2032.
14
Page 35

Dépannage
1. Lectures continues de faible température.
a. La sonde n’est pas bien placée dans le conduit
auditif. Le bout de la sonde doit être ajusté et
complètement appuyé contre l’ouverture du
conduit auditif. Le fait de placer la sonde de
manière inadéquate pourrait entraîner une lecture
de faible température.
b. La lentille de la sonde est sale. Nettoyer la
lentille à l’aide d’un chiffon humecté avec de l’eau
ou de l’alcool isopropylique.
2. Les mots « Lo » ou « Hi » apparaissent.
La température est en dehors de la plage du
thermomètre.
a. La sonde n’est pas bien placée dans le
conduit auditif. Le bout de la sonde doit être
ajusté et complètement appuyé contre l’ouverture
du conduit auditif. Veiller à placer le thermomètre
auriculaire adéquatement dans le conduit auditif
et de reprendre la lecture.
3. Le thermomètre ne prend plus la lecture.
a. Vérifier si l’icône de pile faible apparaît avec le
mot « Lo ». Si c’est le cas, la pile doit être
remplacée. Consulter la rubrique du présent
manuel traitant de l’installation de la pile
b. S’assurer que seule l’icône de pile faible apparaît. Si c’est le cas, la pile doit être remplacée.
Consulter la rubrique traitant de l’installation de la
pile du présent manuel.
15
Page 36

Normes appliquées et approbations
Ce produit est conforme aux dispositions de la
directive 93/42/CEE du Conseil, du 14 juin 1993,
relative aux dispositifs médicaux.
Les normes suivantes s’appliquent à la conception
et/ou à la fabrication des produits.
• ASTM E1965-98 : Caractéristique standard des
thermomètres infrarouges pour la détermination
intermittente de la température de patients.
• IEC/EN980:1997 : Symbole graphique pour
l’utilisation dans l’étiquetage d’appareils
médicaux.
• IEC/EN60601-1 : Appareil médical électrique,
partie 1 : Exigence générale pour la sécurité.
• IEC/EN60601-1-2 : Appareil médical électrique,
partie 2 : Norme de garantie : Compatibilité
électromagnétique, exigences et tests.
• ISO 14971 : Gestion des risques.
16
Page 37

Notes
17
Page 38

Notes
18
Page 39

Notes
19
Page 40

Pièces de rechange •
Renseignements sur la
garantie (au Canada)
Pour commander des pièces ou obtenir
des renseignements au sujet la garantie
au Canada, communiquez avec Elfe at:
www.elfe.net
ou
1-800-667-8184
Montreal (514-344-3533)
Fax: 514-344-9296
Inscription de votre produit
(au Canada)
Pour inscrire votre produit Graco aux
États-Unis, visitez notre site
www.gracobaby.com/productregistration.
Pour le moment nous n’acceptons pas
d’inscriptions de produits des résidents
hors des États-Unis.
20
 Loading...