

Page 1

L
CH
OWNER’S MANUAL
Keep instructions for future use.
ultra clear™ vibe
Baby Monitor
©2008 Graco PD108433A 10/08
Page 2

WARNING
Failure to follow these
warnings and the assembly
instructions could result in
serious injury or death.
This device is designed only to
monitor the sounds of your child.
It will not alert you to your child’s
silent activities.
When using the monitor, you
must still provide the
supervision necessary for the
continued safety of your child.
This product is not designed or
intended for use as a medical
monitor. Always be sure that
both the transmitter and
receiver are working properly
and are within range of each
other.
• STRANGULATION HAZARD.
Keep the adapter cords out of
the reach of children. Do not use
with extension cords.
• DO NOT place the Nursery
Unit or its cord within your child’s
reach. Do not put the Nursery
Unit inside a crib or play yard.
• Use ONLY with 110-120 volt
AC electrical outlets.
• Protect the AC adapter cords.
Place them so they are not
walked on or pinched by
furniture or other items.
• Allow for proper ventilation
when units are in use. Do not
cover the Nursery Unit or Parent
units with any object such
as a blanket. Do not place it in a
drawer or in any location which
would mufe the sound or
interfere with the normal ow
of air.
• DO NOT immerse any part of
the Nursery Unit or Parent units
in water. Clean only with a dry
cloth.
2
Page 3

• DO NOT place unit near water
and moisture. Do not use the
Nursery Unit outdoors. Do not
use the Nursery Unit near
possible wet areas, such as a
bathtub, shower, wash basin,
sink, laundry tub, swimming
pool, wet basement, etc.
• Keep Nursery Unit away from
heat sources, such as replaces,
radiators, stoves, and TVs or
other appliances. Heat can
damage the case or electrical
parts.
• DO NOT use the Nursery Unit
if:
• The adapter cords or plugs
have been damaged.
• The unit has been exposed
to liquids.
• Unit has been dropped or is
damaged.
• DO NOT OPEN THE
NURSERY UNIT, PARENT
UNITS, OR ADAPTERS.
No user-serviceable parts inside.
Risk of electrical shock, re or
death.
• The antenna used for this
transmitter must be installed to
provide a separation distance of
at least 20 cm (7.9”) from all
persons and must not be
co-located or operating in
conjunction with any other
antenna or transmitter.
3
Page 4

WARNING
The Manufacturer is
not responsible for any
radio or TV interference caused
by unauthorized modications to
this equipment. Such modications
could void the user’s authority to
operate the equipment.
NOTE: This equipment has been
tested and found to comply with the
limits for a Class B digital device,
pursuant to Part 15 of the FCC
Rules. These limits are designed
to provide reasonable protection
against harmful interference in a
residential installation. This
equipment generates, uses and can
radiate radio frequency energy and,
if not installed and used in
accordance with the instructions,
may cause harmful interference to
radio communications. However,
there is no guarantee that interference will not occur in a particular
installation. If this equipment does
cause harmful interference to radio
or television reception, which can
be determined by turning the
equipment off and on, the user is
encouraged to try to correct the
interference by one or more of the
following measures:
• Reorient or relocate the receiving
antenna.
• Increase the separation between
the equipment and receiver.
• Connect the equipment into an
outlet on a circuit different from that
to which the receiver is connected.
• Consult the dealer or an
experienced radio/TV technician
for help.
This device complies with part 15 of
the FCC Rules. Operation is
subject to the following two conditions: (1) This device may
not cause harmful interference, and
(2) this device must
accept any interference
received, including interference that
may cause undesired operation.
4
Page 5
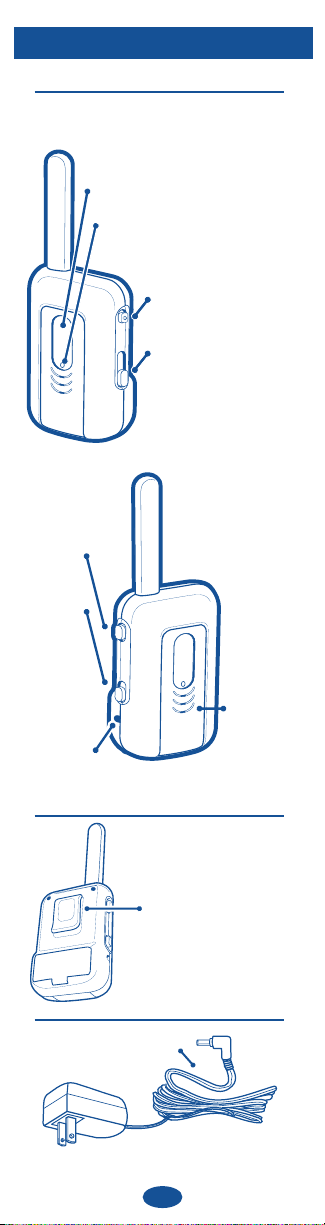
Product Features
VOL
Volume
Adjust
Power Light
Power
Sound Lights
Speaker
Channel
Vibe
CH
VIBE
AC Adapter
Jack
AC Adapter
Belt Clip
Parent Unit
(X2)
PD103056A
5
(X2)
Page 6
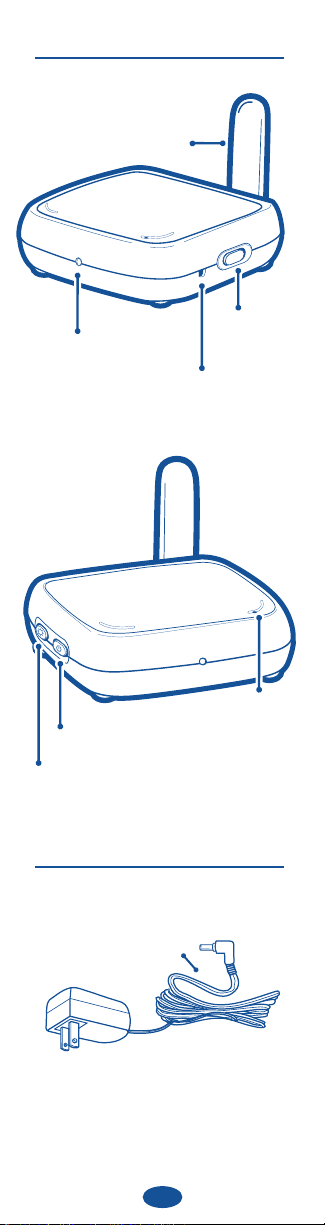
VOL
CH
Volume
Adjust
Power Light
Power
Channel
Antenna
AC Adapter Jack
Power
Light
Sound Lights
Night Light
ON/OFF
Speaker
CH
VIBE
Microphone
Nursery Unit
AC Adapter
PD103078A
6
Page 7
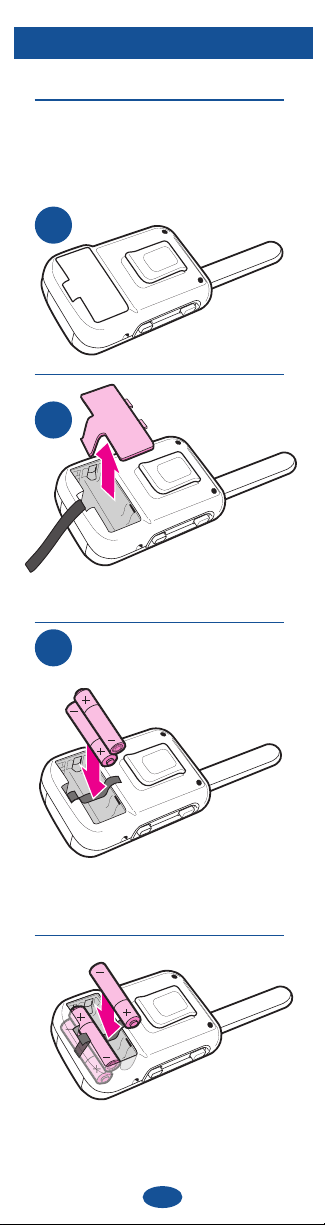
Battery Installation
Parent Unit
• The batteries must be installed into the
Parent Units before the units will be ready for
use. Remove the battery door cover on the
Parent Units with a key or at blade screw
driver.
1
2
Remove the battery door.
Requires 3 -AA (LR06-1.5V) batteries
3
(not included).
Place 2-AA (LR06-1.5V) batteries into the
lower battery compartment. Note the proper
orientation of the batteries.
Place 1-AA (LR06-1.5V) battery into the
top battery compartment. Note the proper
orientation of the battery.
7
Page 8
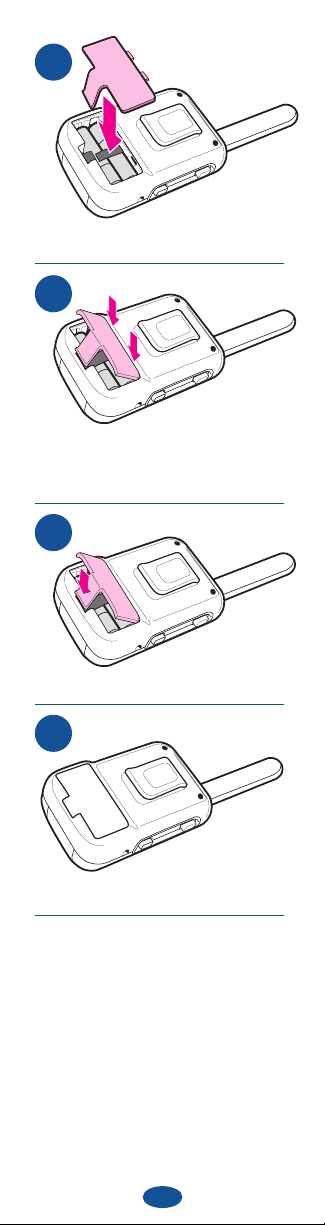
4
Place the battery door back on the unit.
5
Insert the 2 battery door tabs into the slots on
the back of the Parent Units as shown.
6
Push battery door tab into slot as shown.
7
Make sure battery door is completely closed.
• Please remove a dead battery promptly.
A dead battery left in the unit may leak,
damaging your unit.
• Do not attempt to recharge a
non-rechargeable battery.
• A rechargeable battery CANNOT be
recharged by plugging the AC adapter into the
Nursery Unit.
• Remove the batteries from the unit if it is
no longer being used or will be stored for an
extended period of time.
8
Page 9
CH
CH
VIBE
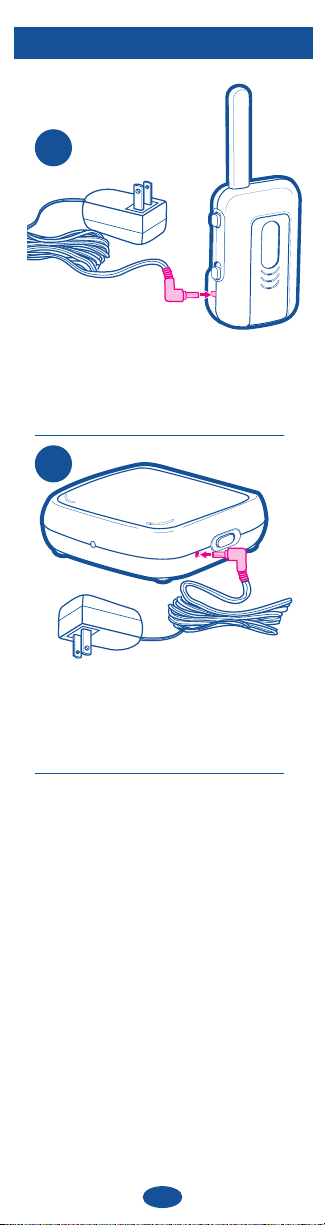
Using AC Adapters
1
• To use AC adapters, plug the connector on the
cord into the AC adapter jack on the side of the
Parent Unit, then plug adapter into a standard
wall outlet.
2
• To use AC adapters, plug the connector on
the cord into the AC adapter jack on side of the
Nursery Unit, then plug adapter into a standard
wall outlet.
• Use ONLY the Graco adapters included with
the unit. Do not use these adapters with other
equipment under any circumstances.
• If units do not work, check that AC adapters
are plugged into working outlets.
• The Nursery Unit uses a standard 120 volt AC
household current.
• The Parent Unit will operate on
3-AA (LR06-1.5V) batteries.
If the LED does not light at all, then replace the
batteries.
9
Page 10
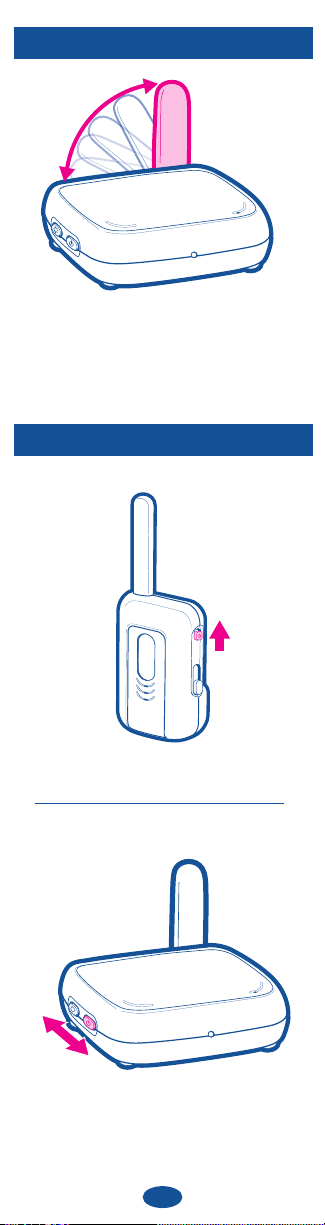
Using Antenna
VOL
For best connection rotate the antenna UP
when using the Nursery Unit. MAKE sure to
lower the antenna whenever the product is not
in use for long periods of time or for storage.
To Power Units ON/OFF
Push the power button UP as shown
to turn unit ON, push DOWN to turn OFF.
Push the power button as shown
to turn Unit ON/OFF.
10
Page 11
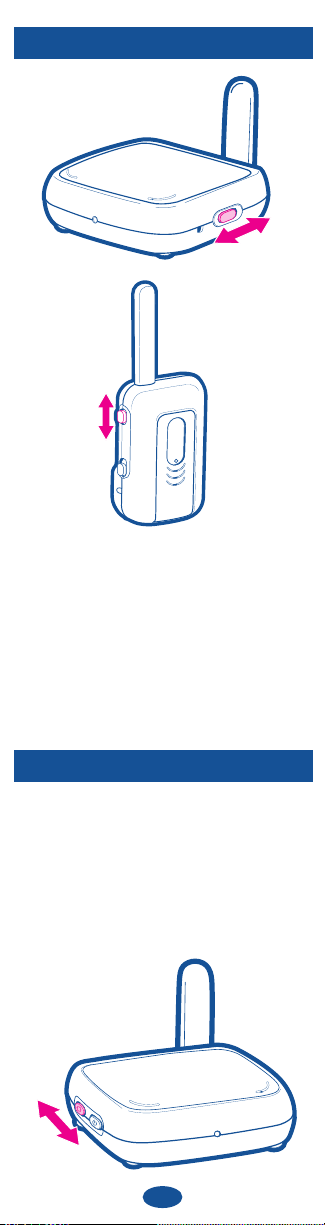
Selecting Channels
CH
CH
VIBE
• In case you are experiencing some
interference, the channel on the Nursery Unit
can be changed by switching the channel
button on the side of the unit. The Parent Units
and Nursery Unit must be set to the same
channel, either channel “A” or “B” (“X” or “Y”).
Night Light
• Some models have a night light on the
Nursery Unit that will illuminate when the button
on the side of the unit is activated.
Push the power button as shown
to turn night light ON/OFF.
11
Page 12
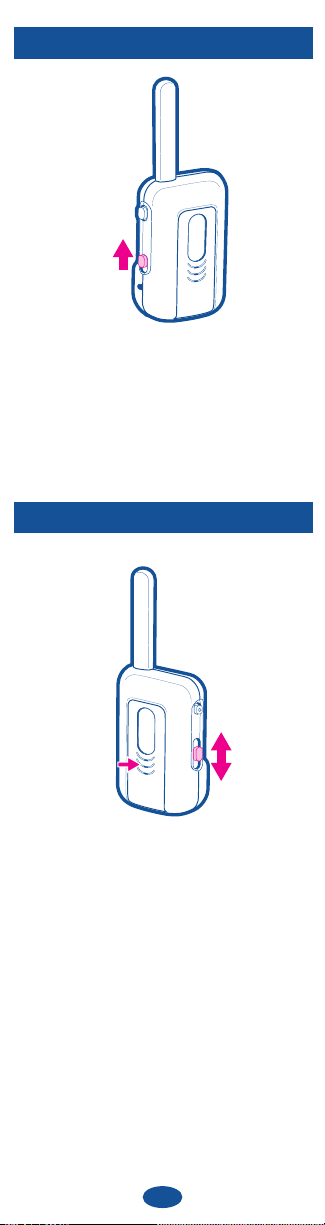
Vibration
CH
VIBE
VOL
To activate the Vibe function push button UP to
the ON position as shown. Push button DOWN
to turn OFF.
Volume
To adjust the volume push button UP/DOWN.
• The Sound Lights on the Parent Units will
illuminate as your child (or other objects) make
noise near the Nursery Unit. Please note that
the Sound Lights and volume control on the
Parent Units are independent of each other.
With the volume turned all the way down, the
Sound Lights will still illuminate as your child
(or other objects) make noise near the Nursery
Unit.
12
Page 13

Setting Up
the Baby Monitor
1. For optimum operation, it is best to use new
batteries in the Parent Unit.
2. Place the Nursery Unit within 10 feet
(3 meters) of your baby. Plug an AC adapter
into the jack on the side of the Nursery Unit.
Plug adapter into a working 120 volt AC outlet.
3. Aim the Nursery Unit toward your baby.
Check that there are no walls or large objects
that could block sound transmission.
4. Set both the Nursery Unit and the Parent
Unit to the same channel, “A” or “B” (“X” or “Y”).
5. Turn on the Nursery Unit using the on/
off switch on the side. The green power light
should come on.
6. Place the Parent Unit within ve (5) feet (1.5
meters) of the Nursery Unit and turn on the
Parent Unit using the ON/OFF switch on the
side of the unit. The green power light should
come on.
7. Repeat same set-up procedure for second
Parent Unit.
8. Your monitor is now ready for use.
Testing the System
It is VERY IMPORTANT to test the system
when rst set up, and at regular times
thereafter. Test the units if you suspect they
may have been damaged or have not been
used for a long time.
1. If two adults are present, have one take the
Parent Units to different locations, trying
various volume settings, while the
other speaks into the Nursery Unit.
2. If only one adult is available, place a ticking
clock, radio, or other sound-producing device
near the Nursery Unit to test it.
3. When testing, keep the level of your child’s
sounds in mind, and adjust the volume
accordingly.
4. If there is sound interference, switch the
Nursery Unit and the Parent Units to the other
channel setting.
13
Page 14

Troubleshooting
DO NOT ATTEMPT to modify the unit. Any
modications to the transmitter and/or
receiver can void the operator’s authority to
operate the equipment.
Most problems have a simple solution. First,
check that:
• Power is turned ON for both units
• Both units are plugged in (or fresh batteries
are in Parent Unit.
• Electrical outlet works
• Volume is turned up on Parent Unit
• Parent Unit is in range of the Nursery Unit
• Both Units are on the same channel.
No Sound
• Battery dead or weak — replace or use AC
adapter.
• AC adapter not properly connected — check
the connections.
• Nursery Unit covered or blocked — remove
the obstruction.
Weak Sound
• Nursery Unit too far from baby — move closer.
• Large objects blocking the signal — try
repositioning Nursery Unit.
• Volume setting too low — turn it up.
Static
• Interference from other electrical equipment
— eliminate cause of static (TVs, mixers,
computers, fans, uorescent lights,
light dimmers, etc.)
• Parent Unit too far from Nursery Unit — move
them closer.
• Signicant amount of obstructions between
Parent Unit and Nursery Unit such as walls,
ceilings & buildings.
Try moving the Nursery Unit to another part of
the room.
• Change channel on Nursery Unit.
Shrill Sound (Feedback)
• Nursery Unit and Parent Unit too close
together — move them farther apart.
• Volume set too high — lower the volume.
14
Page 15

Notes
15
Page 16

Replacement Parts
Warranty Information
(USA)
To purchase parts or accessories or
for warranty information in the United States,
please contact us at the following:
Graco Children’s Products
150 Oaklands Blvd.
Exton, PA 19341
www.gracobaby.com
or
1-800-345-4109
Product Registration
(USA)
To register your Graco product from
within the U.S.A. visit us online at
www.gracobaby.com
/productregistration
We currently do not accept product
registrations from those living outside
the United States of America.
16
 Loading...