

Page 1
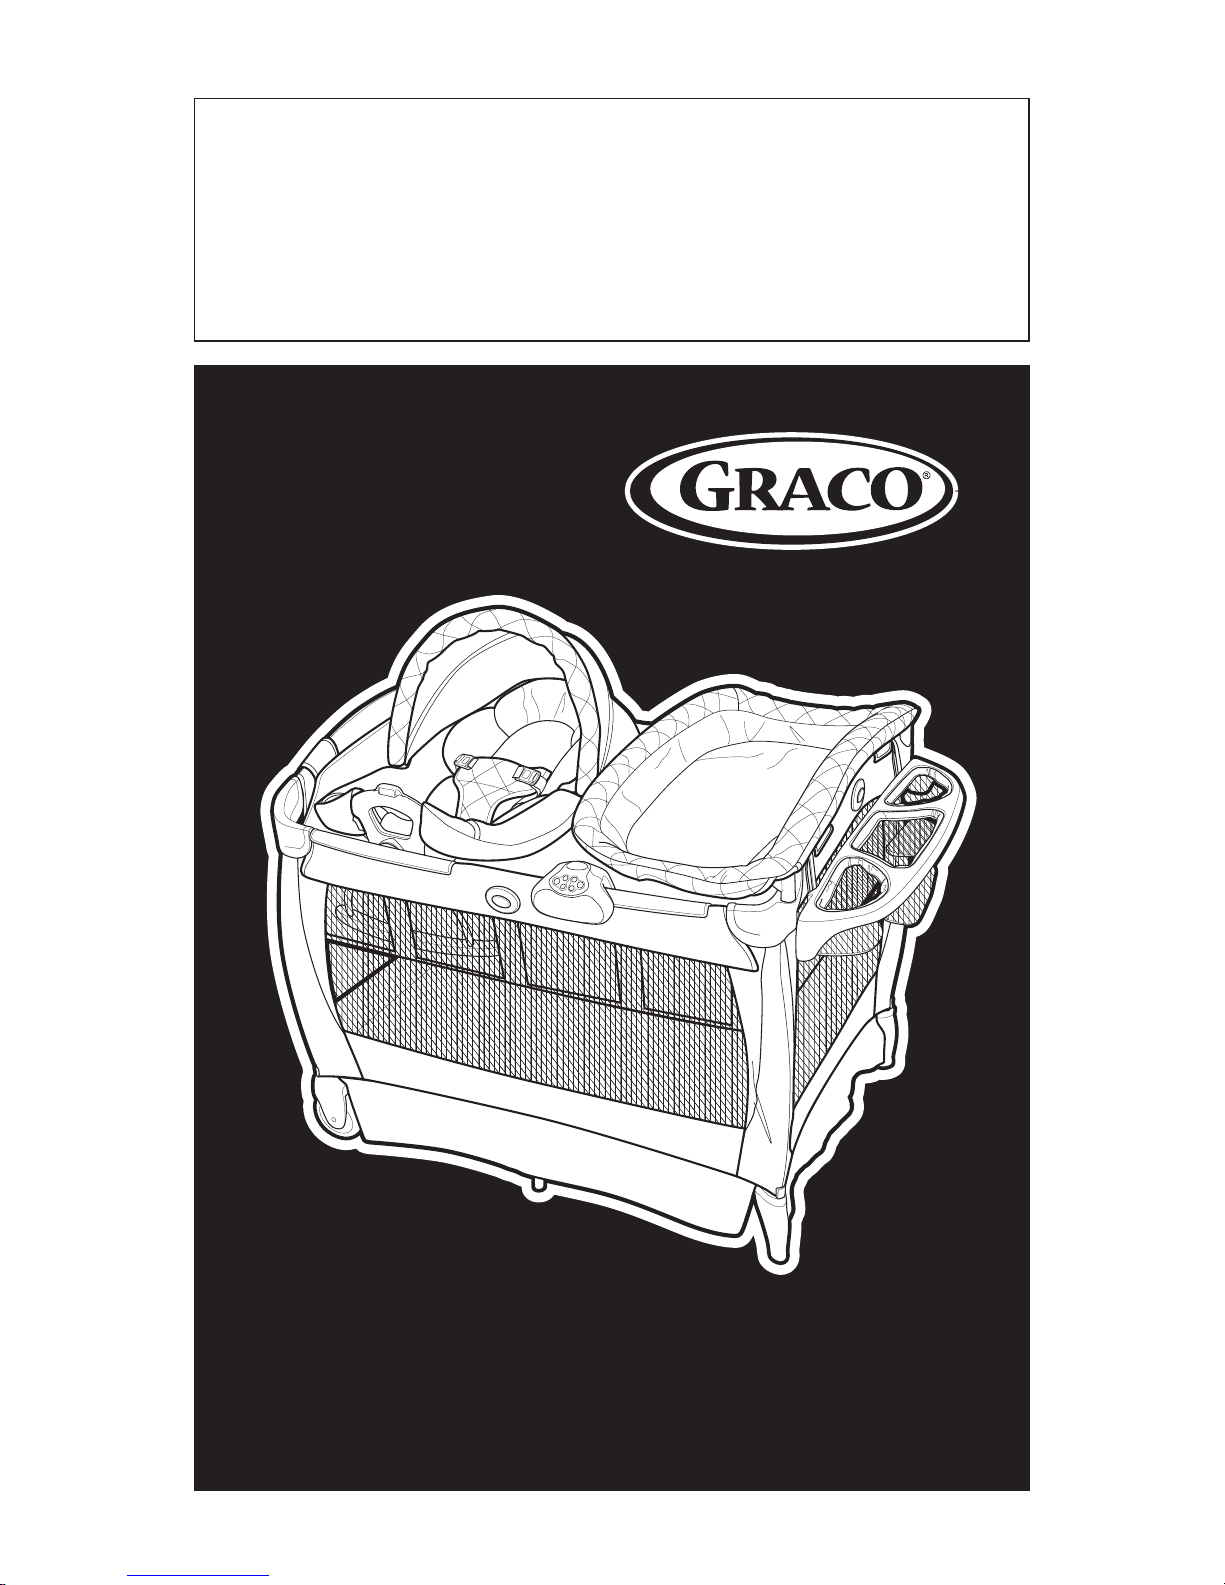
OWNER'S MANUAL
Read all instructions BEFORE assembly and USE of product.
KEEP INSTRUCTIONS FOR FUTURE USE.
Page 2

Failure to follow these warnings and the
instructions could
result in serious injury or death.
Setting Up the Playard
• THIS PRODUCT REQUIRES ADULT ASSEMBLY.
• Keep fingers clear of top corners during setup. Be sure playard
is completely set up before use. Check that the four top rails are
completely latched, the center of the floor is pushed down, the
mattress/pad is flat, the straps are securely fastened to the bottom of
the unit and the four corners are tucked under the stiffeners. Always
follow the instructions in the owner’s manual to set up the playard.
Using the Playard
• The playard is for playing or sleeping. When used for playing, never
leave child unattended and always keep child in view. When used for
sleeping, you must still provide the supervision necessary for the
continued safety of your child.
• Always keep the playard away from hazards in the area that may
injure your child.
• When child is able to pull to standing position, remove large toys
and other objects that could serve as steps for climbing out.
• Stop using this product when your child reaches 35 inches (89 cm) in
height, weighs more than 30 pounds (14 kg), or is able to climb out.
• Do not modify playard or add any attachments that are not
listed in the owner’s manual, including an add-on bassinet.
• Child can become entrapped and die when improvised netting or
covers are placed on top of a playard. Never add such items to
confine child in playard.
• NEVER leave child in product with side lowered. Be sure side is in
raised and locked position whenever child is in product.
• If refinishing, use a nontoxic finish specified for children’s products.
Page 3

Avoiding Suffocation Hazards
• Unlike cribs that have rigid sides, the playard has flexible sides.
As a result, the playard mattress/pad is specially designed to prevent
suffocation. The playard mattress/pad has a solid base, a certain
length and width, and is less than one inch thick in order to meet
safety standards. Using a thicker or a different sized mattress/pad may
allow a child’s head to get between mattress/pad and the side of the
playard causing suffocation.
• Infants can suffocate
• In gaps between a mattress too small or too thick and
products sides
• On soft bedding.
NEVER add a mattress, pillow, comforter or padding. Use ONLY
mattress pad provided by Graco.
• To reduce the risk of SIDS, pediatricians recommend healthy
infants be placed on their backs to sleep, unless otherwise advised
by your physician.
• Never use plastic shipping bags or other plastic film as mattress covers
not sold and intended for that purpose. They can cause suffocation.
• NEVER use a water mattress with the playard.
Avoiding Strangulation Hazards
• Strings and cords can cause strangulation. Keep strings and cords
away from child.
• NEVER place the playard near a window where cords from
blinds or drapes can strangle a child.
• NEVER hang strings on or over the playard.
• NEVER place items with a string around a child’s neck, such as hood
strings, pacifier cords, etc.
• NEVER attach strings to toys.
This product is not intended for commercial use.
Page 4
Parts list
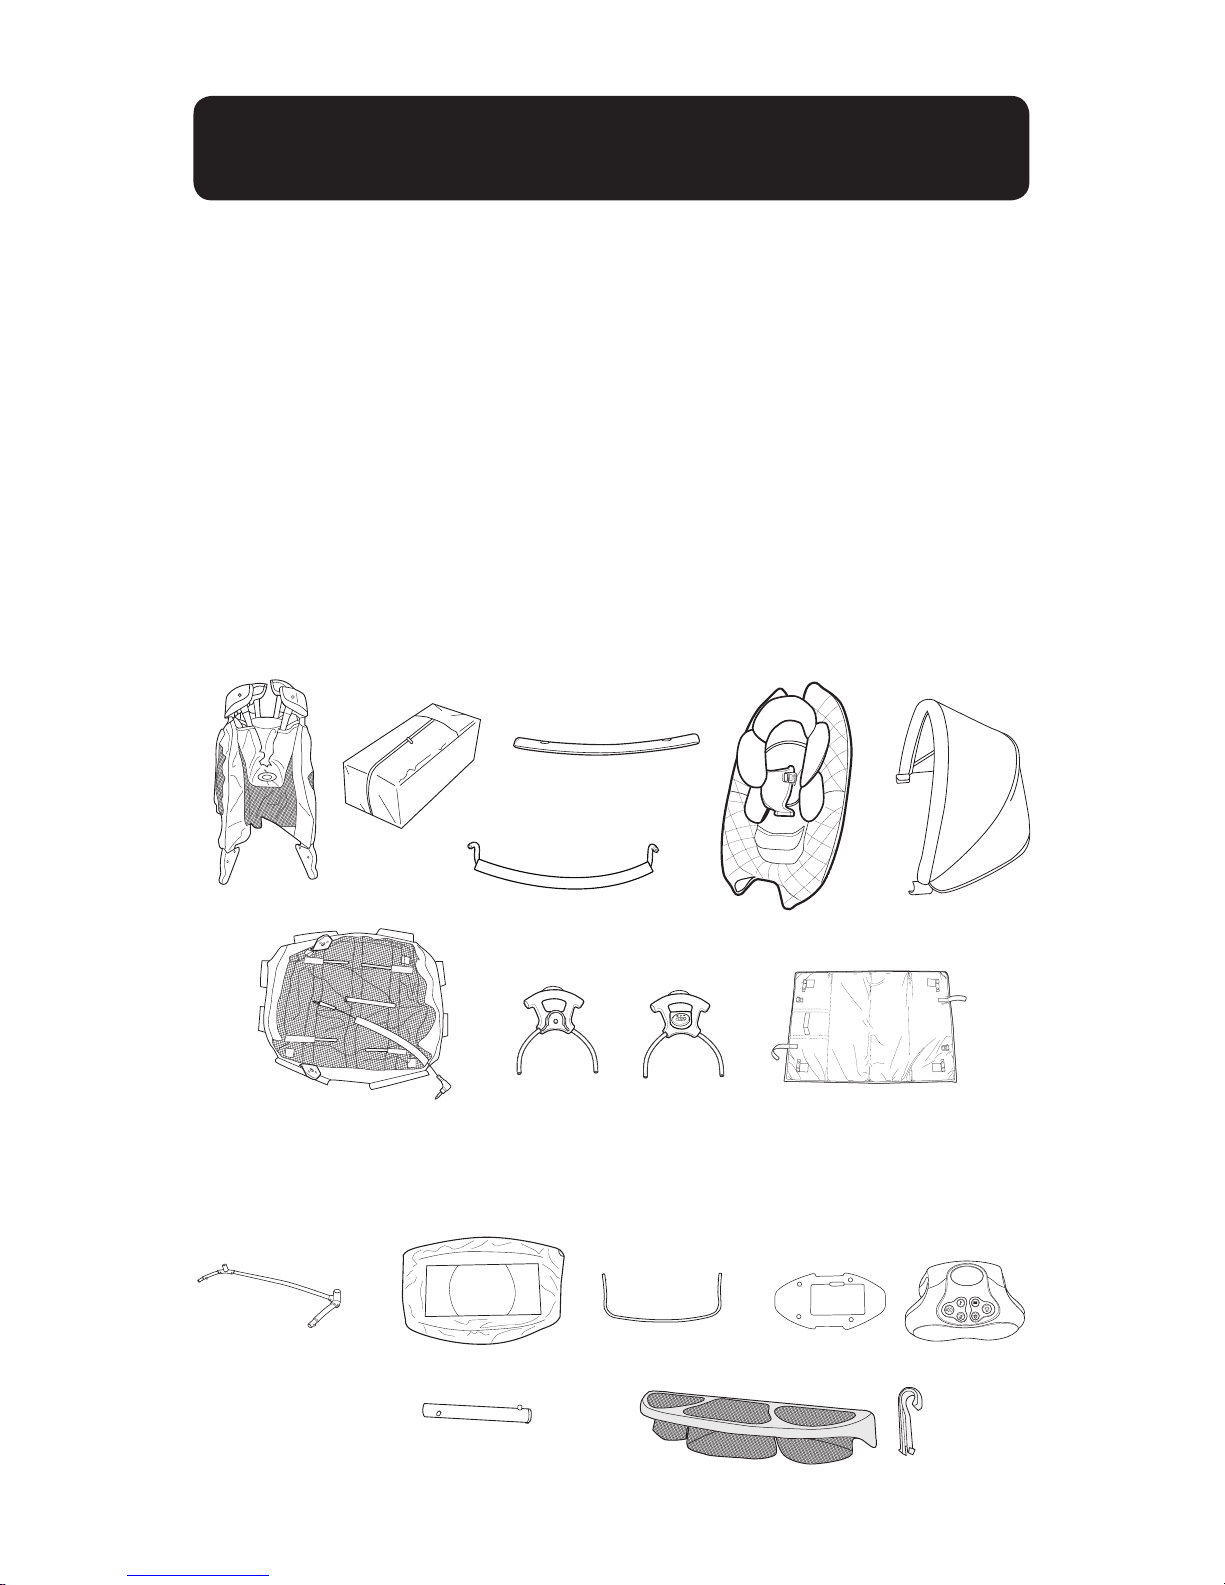
ALL MODELS
This
model may not include some features shown below. Check
that you have all the parts for this model BEFORE assembling your
product. If any parts are missing, call Customer Service.
Tools required:
Phillips
Screwdriver
2X
2X
2X
2X
FEATURES ON CERTAIN MODELS
Page 5
Setup
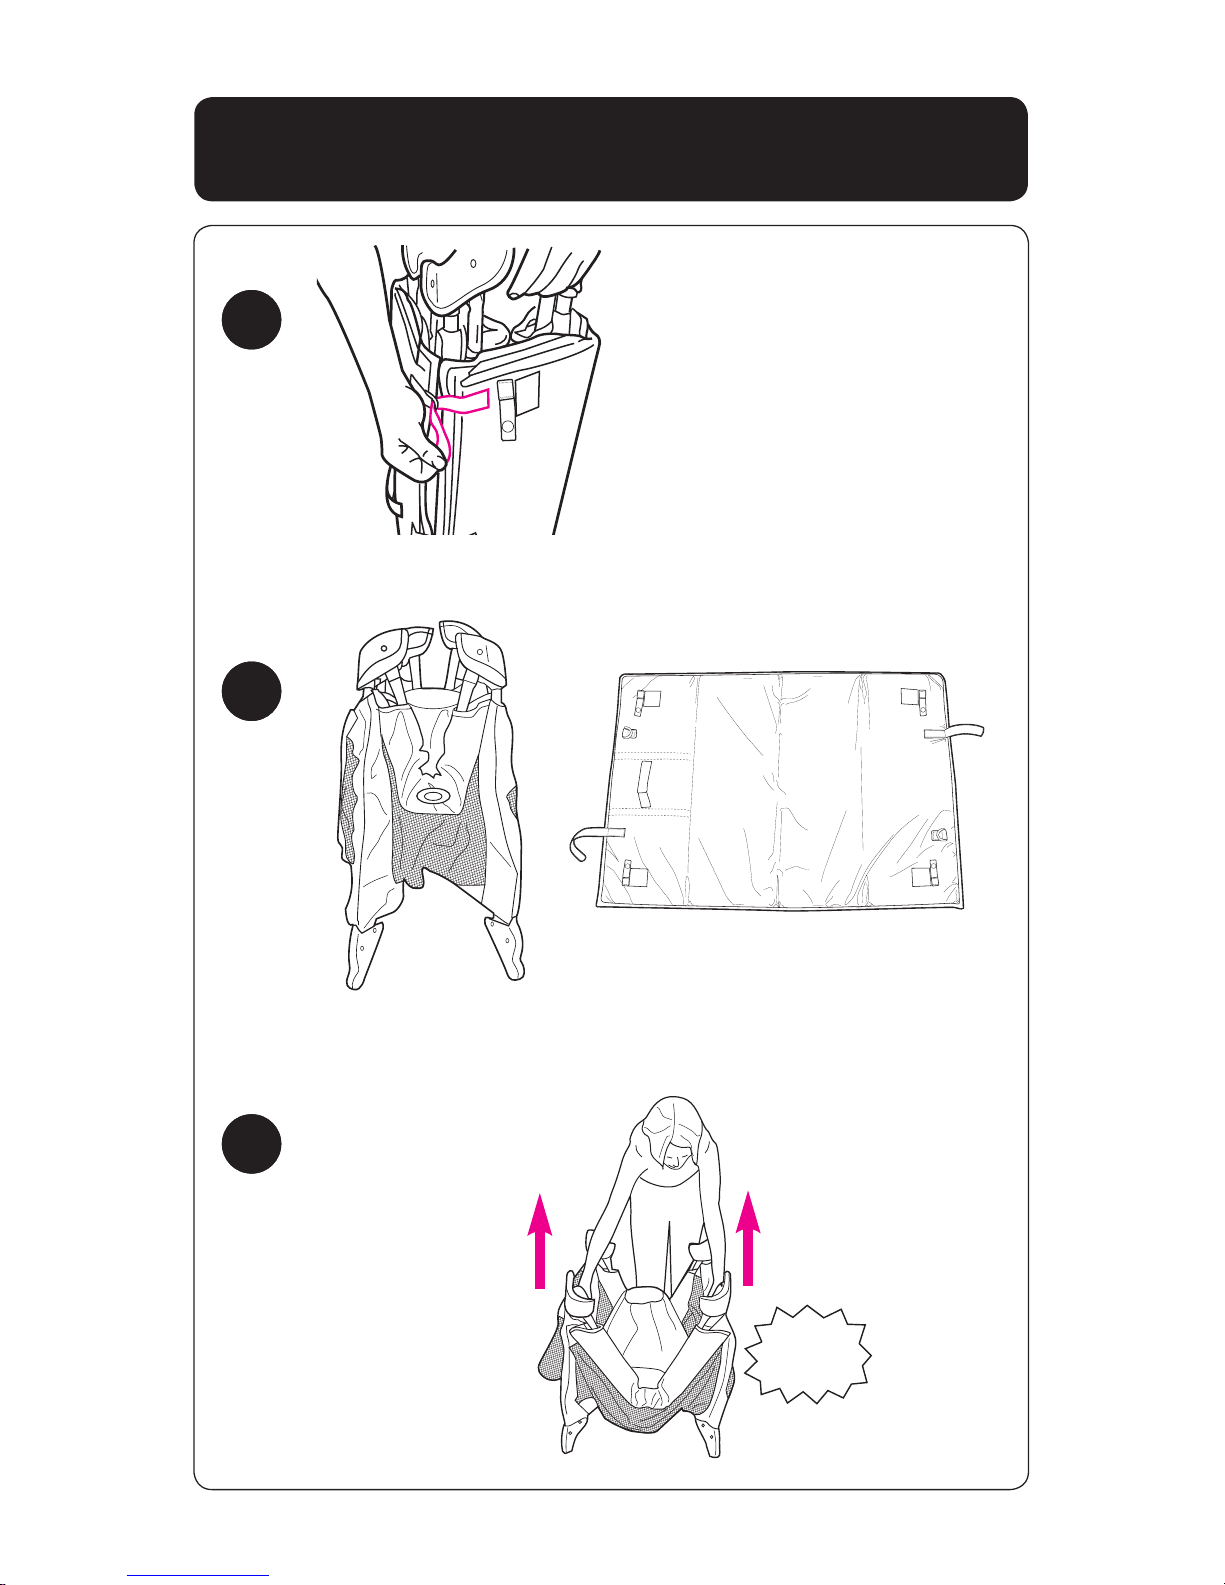
DO NOT push center
down yet.
SNAP!
1
2
3
Page 6
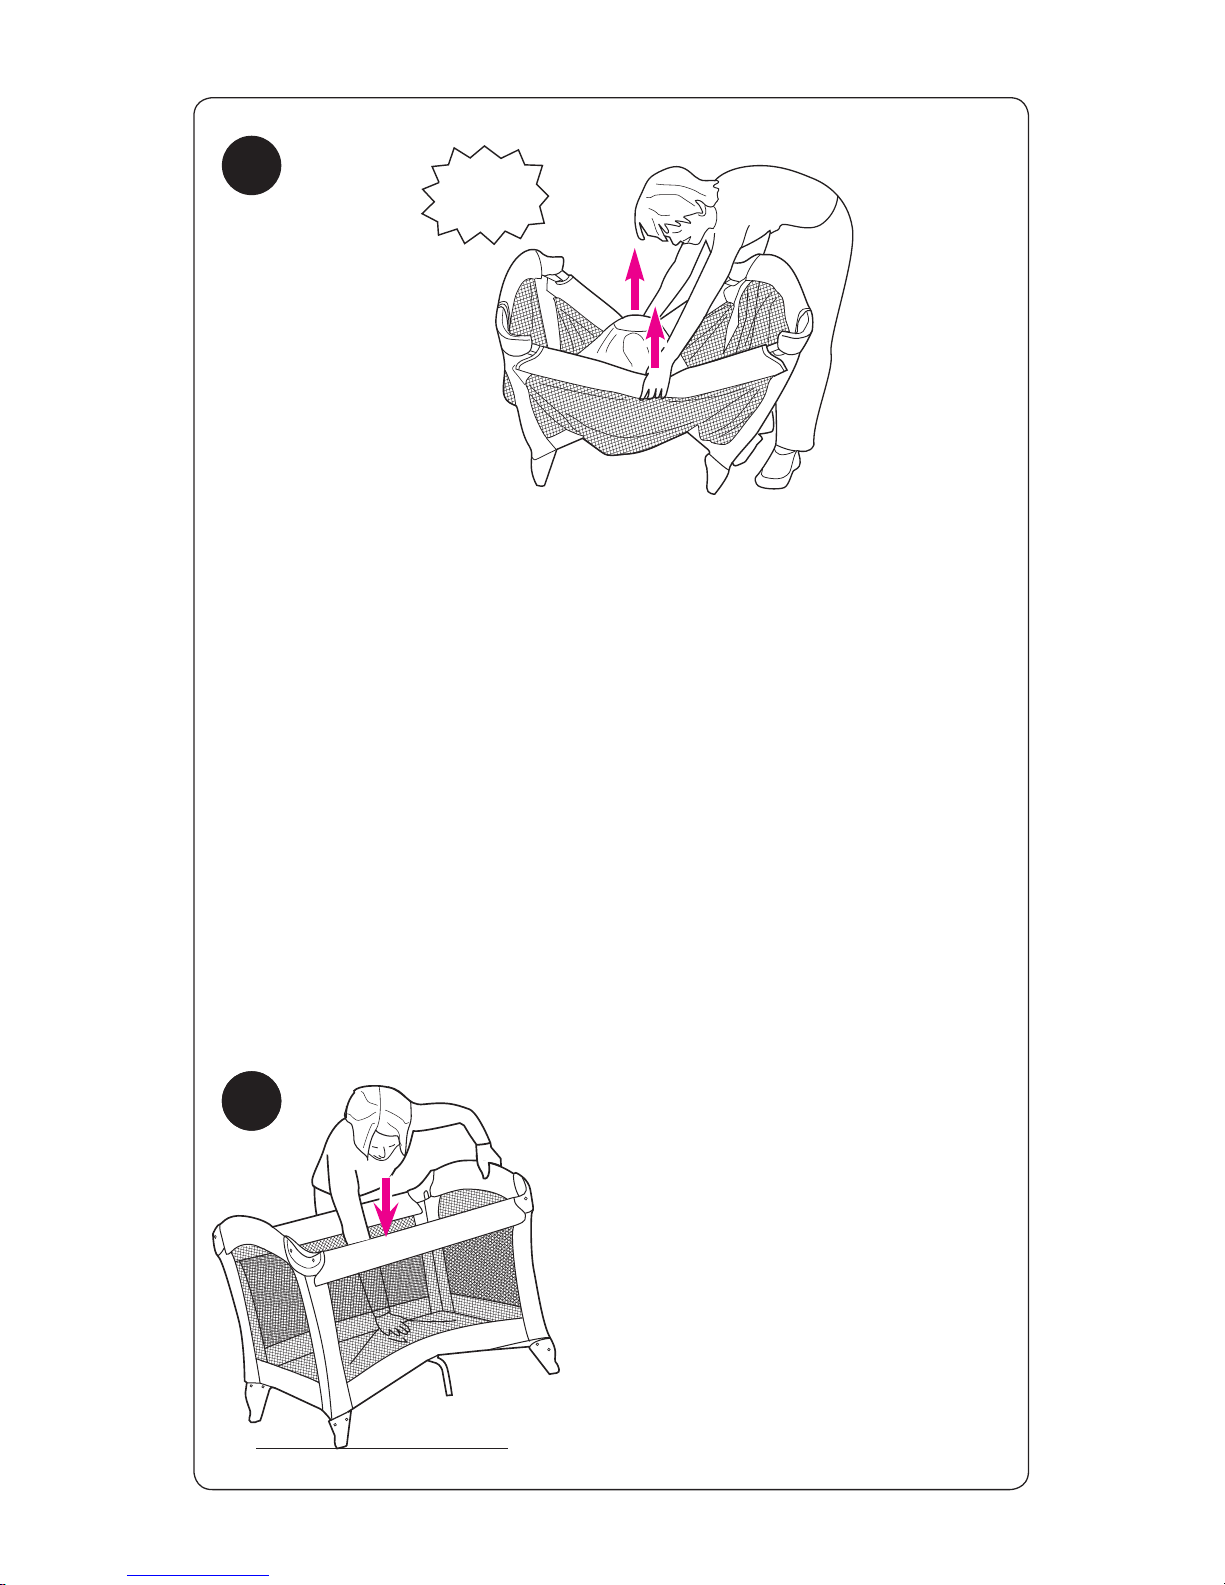
• When setting up, lock rails BEFORE lowering center.
Be sure top rails have become rigid. If not, pull up again until they
are rigid. If top rails do not latch, lift the center of the floor higher.
Hold one end of the unit up and
push the center of the floor down.
4
5
SNAP!
Page 7
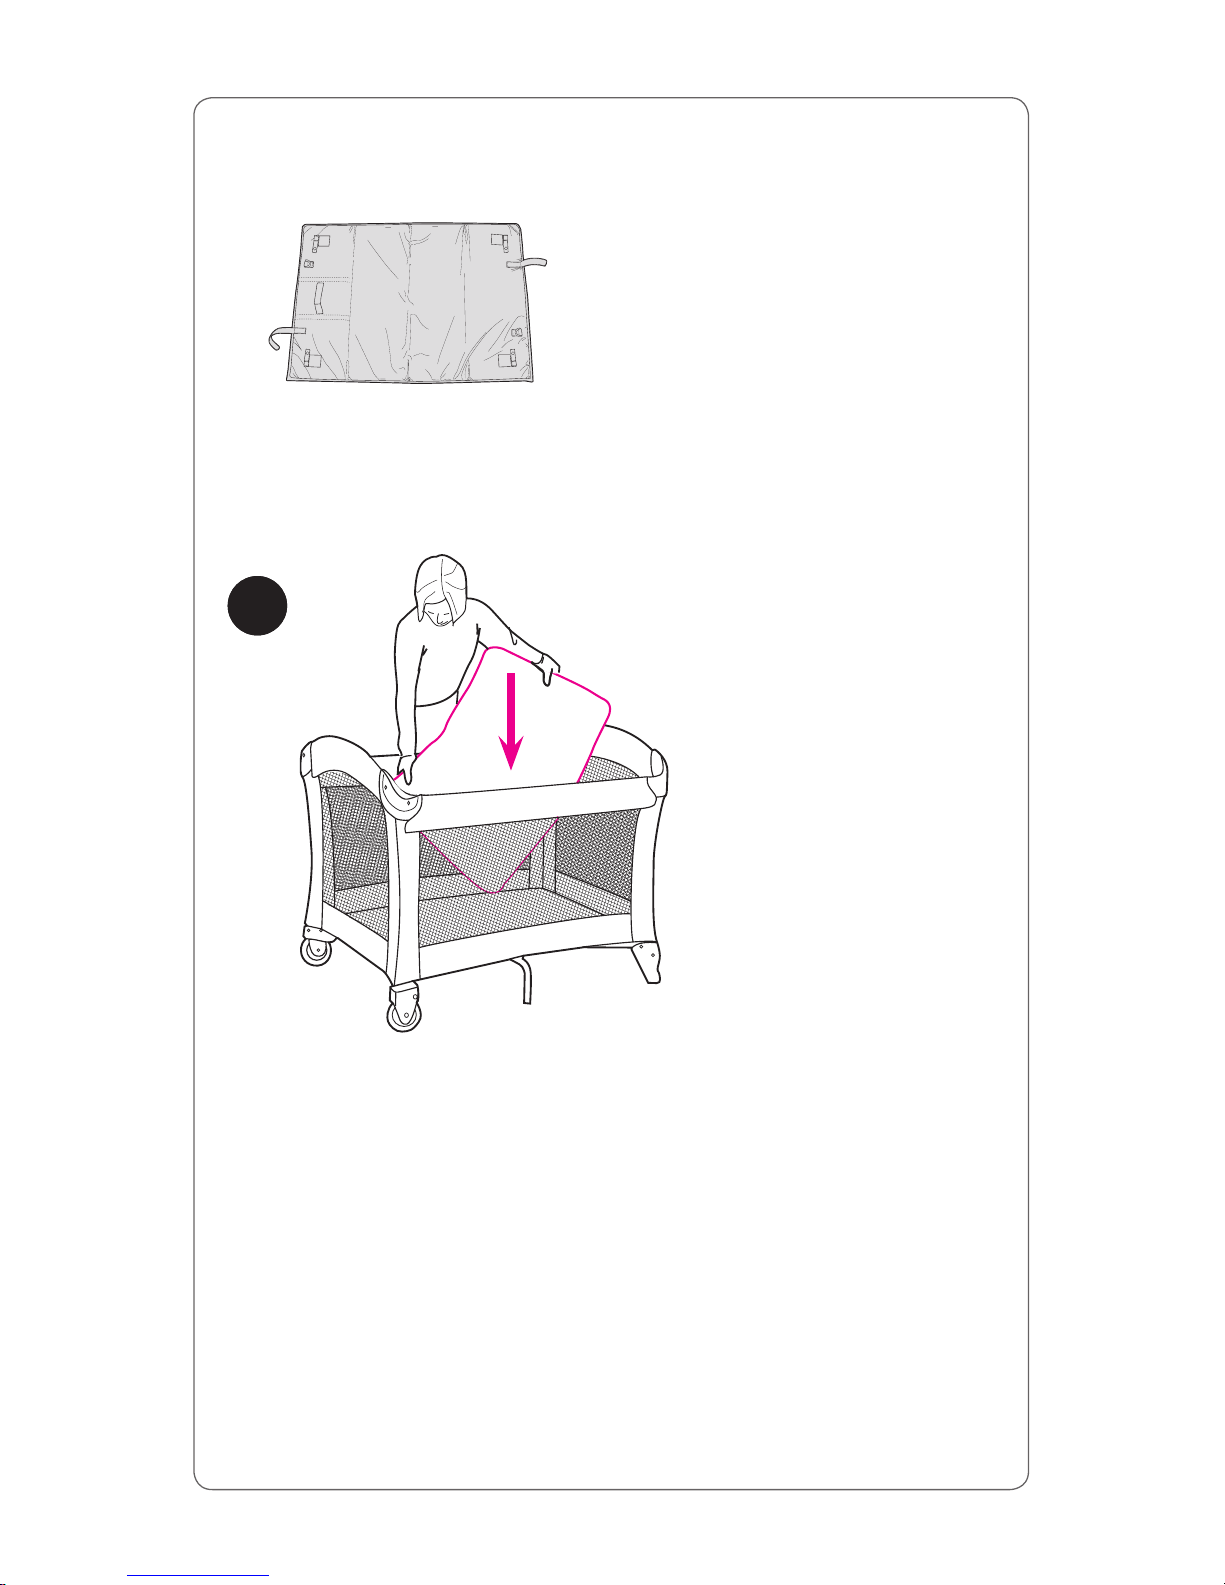
Always use mattress/pad
soft side up.
6
Page 8
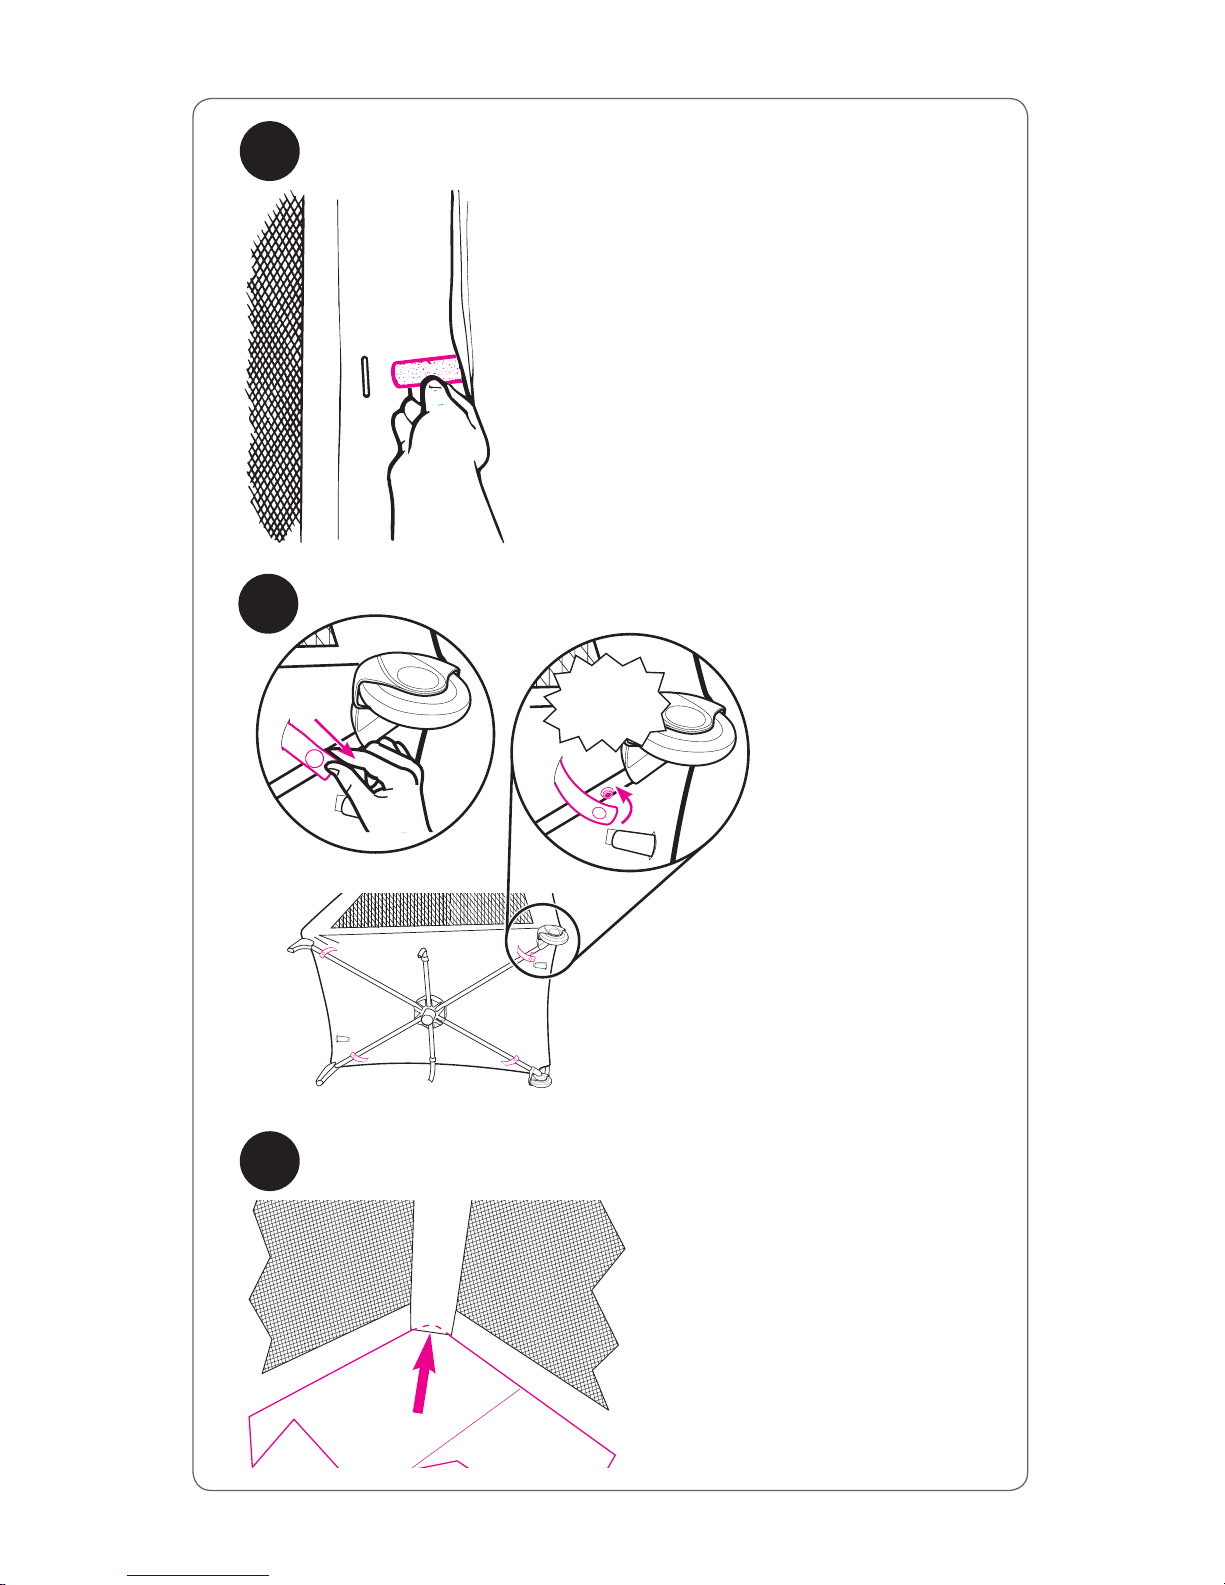
7
8
Put two tabs under mattress/pad
through button holes and fasten
securely on bottom of unit.
Tuck four corners of mattress/
pad under corner stiffeners.
7a
Pull strap through
bottom of playard
and wrap around
tube and refasten
snap. Repeat on
other corners.
SNAP!
Page 9
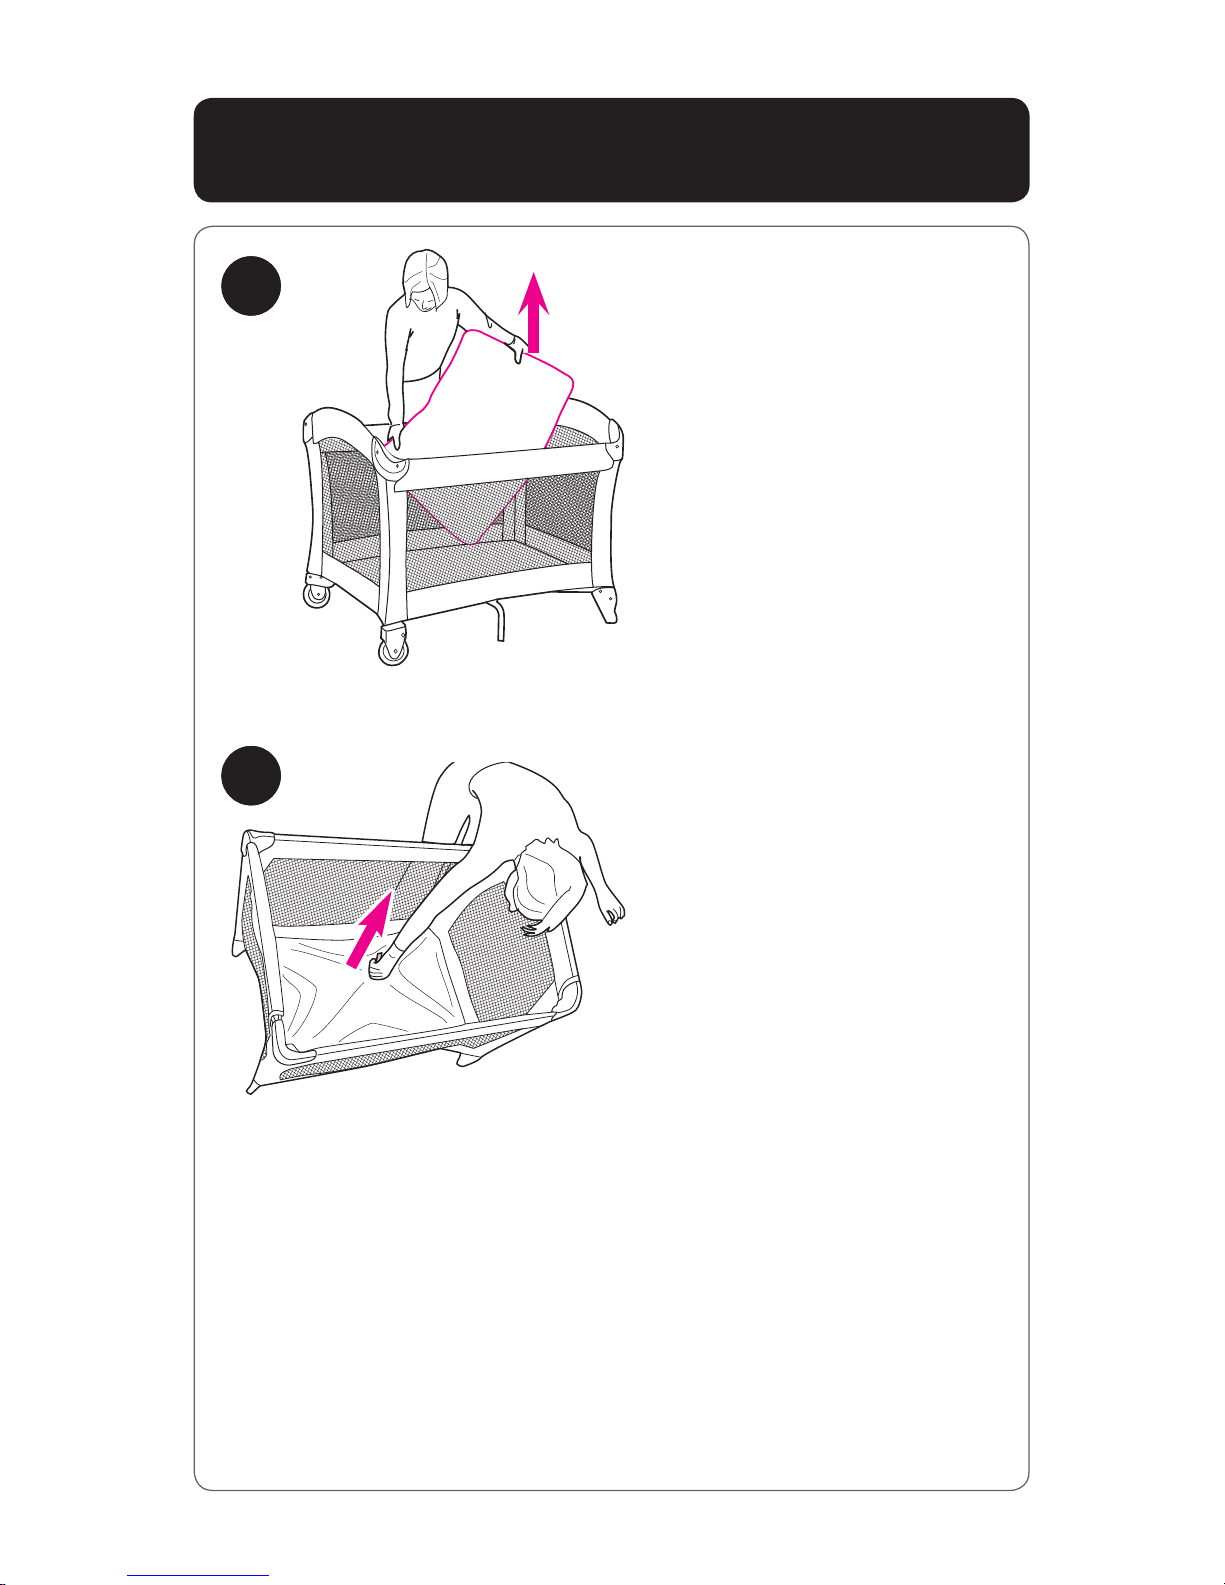
To Fold
Release straps.
DO NOT unlock top rails yet.
Center of floor must be
halfway up before top rails
will unlock.
9
10
Page 10
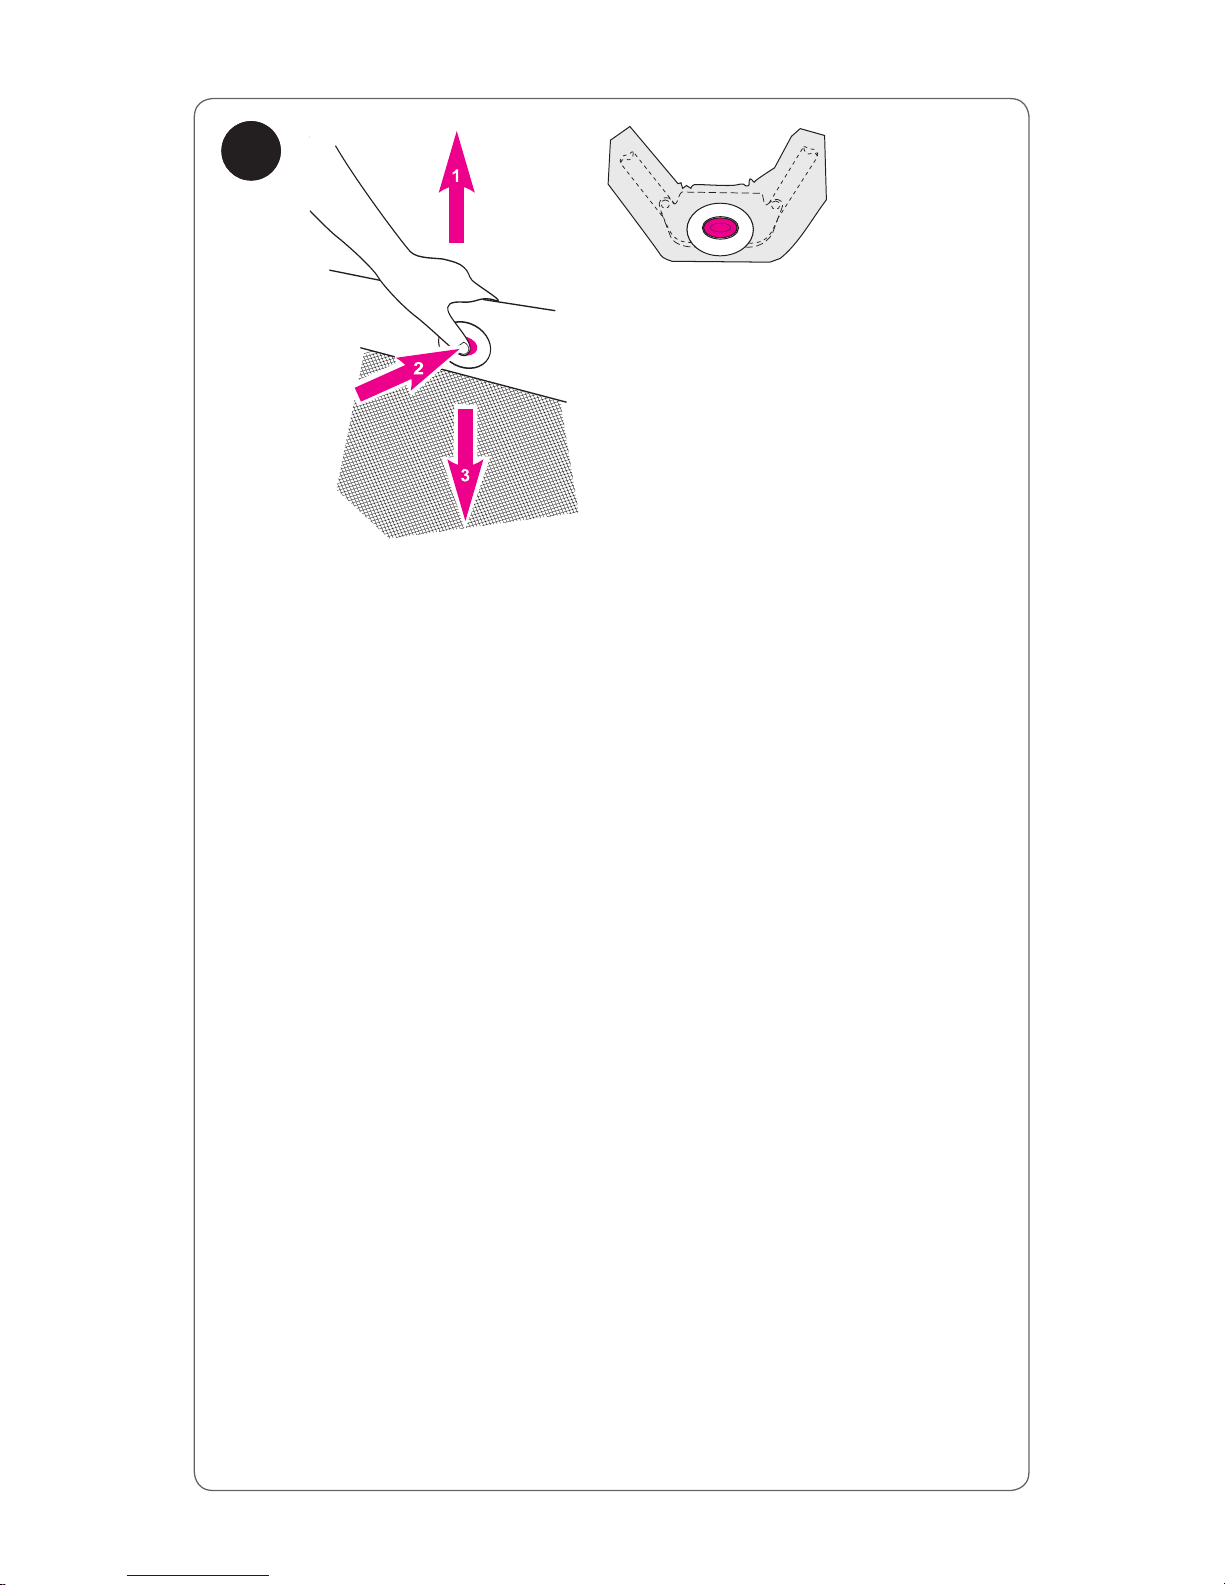
Center of floor must be up.
1. Lift up slightly on the top rail.
2. Push in on the button located
on the side of the top rail to
release the two tubes.
3. Push down.
• If top rails do not unlatch, DO
NOT FORCE. Lift the center of
the floor higher.
• Both tubes must be released
for the top rail to fold.
11
Page 11
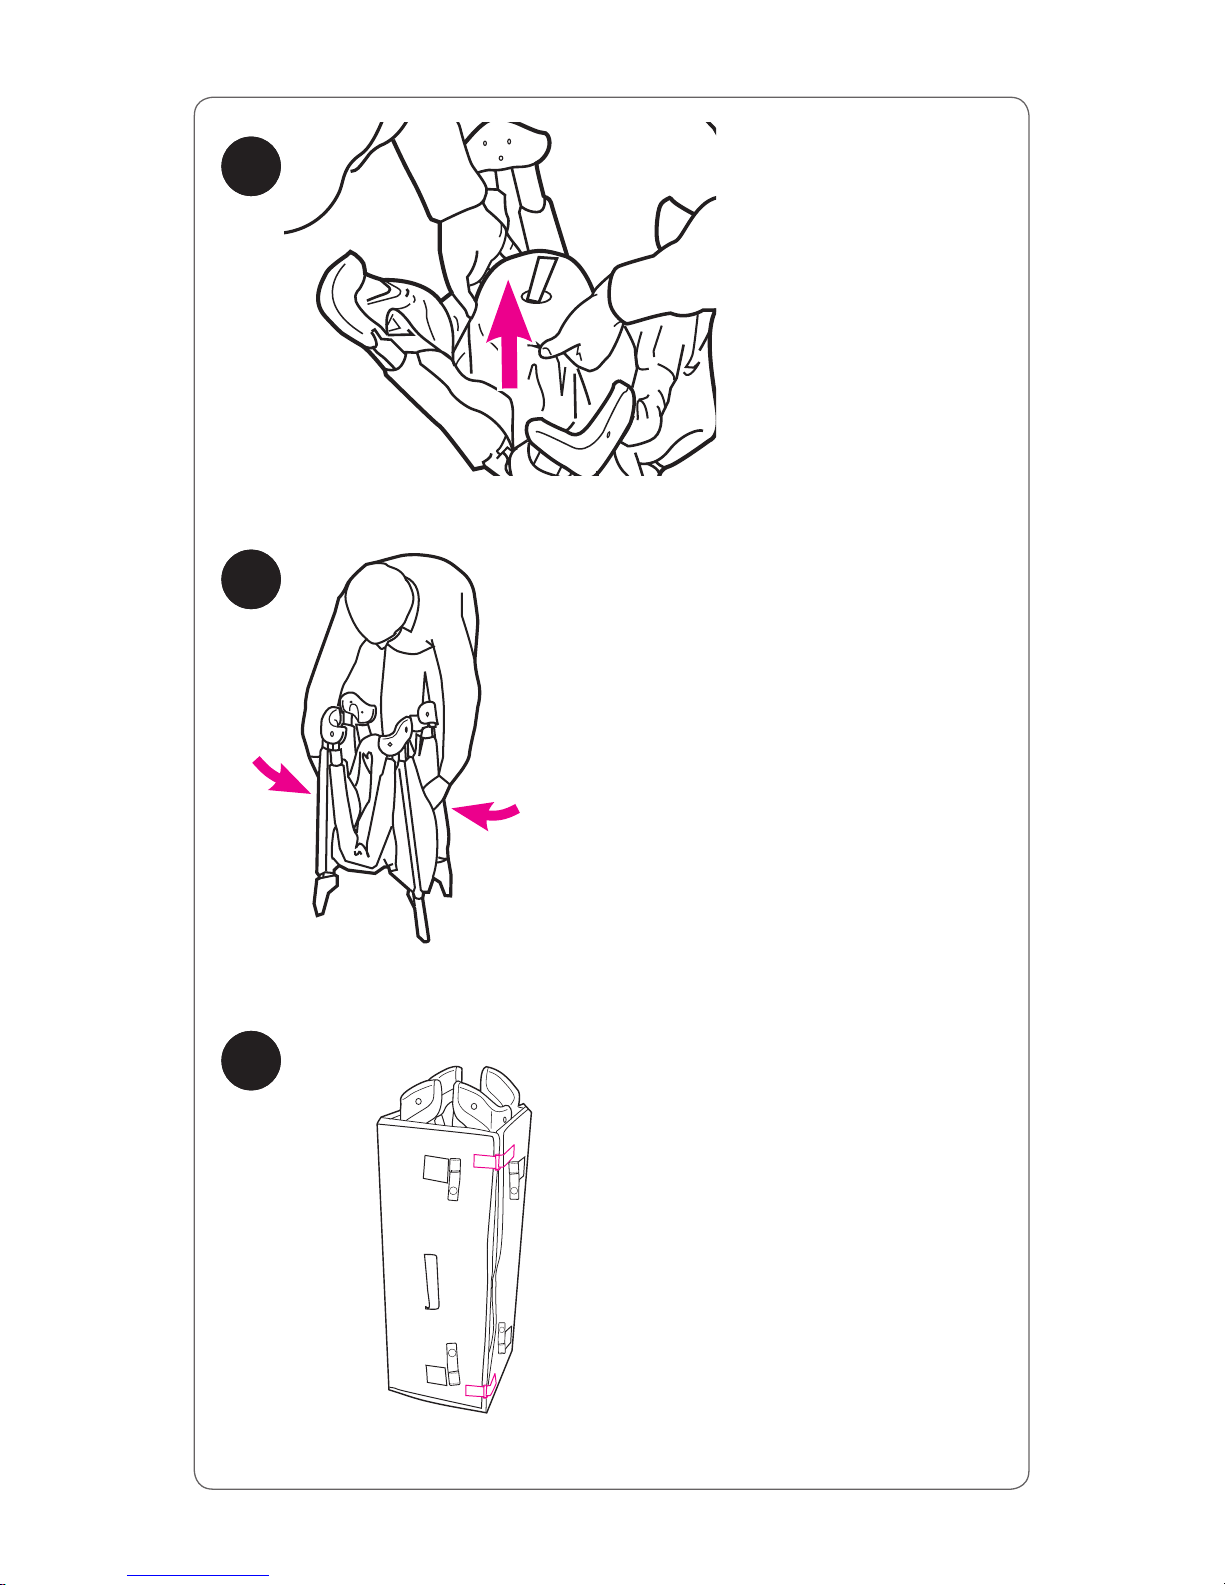
Do not force. If unit will not fold, look
for a partially latched top rail. Squeeze
the latch button to release the rail.
12
13
14
Page 12
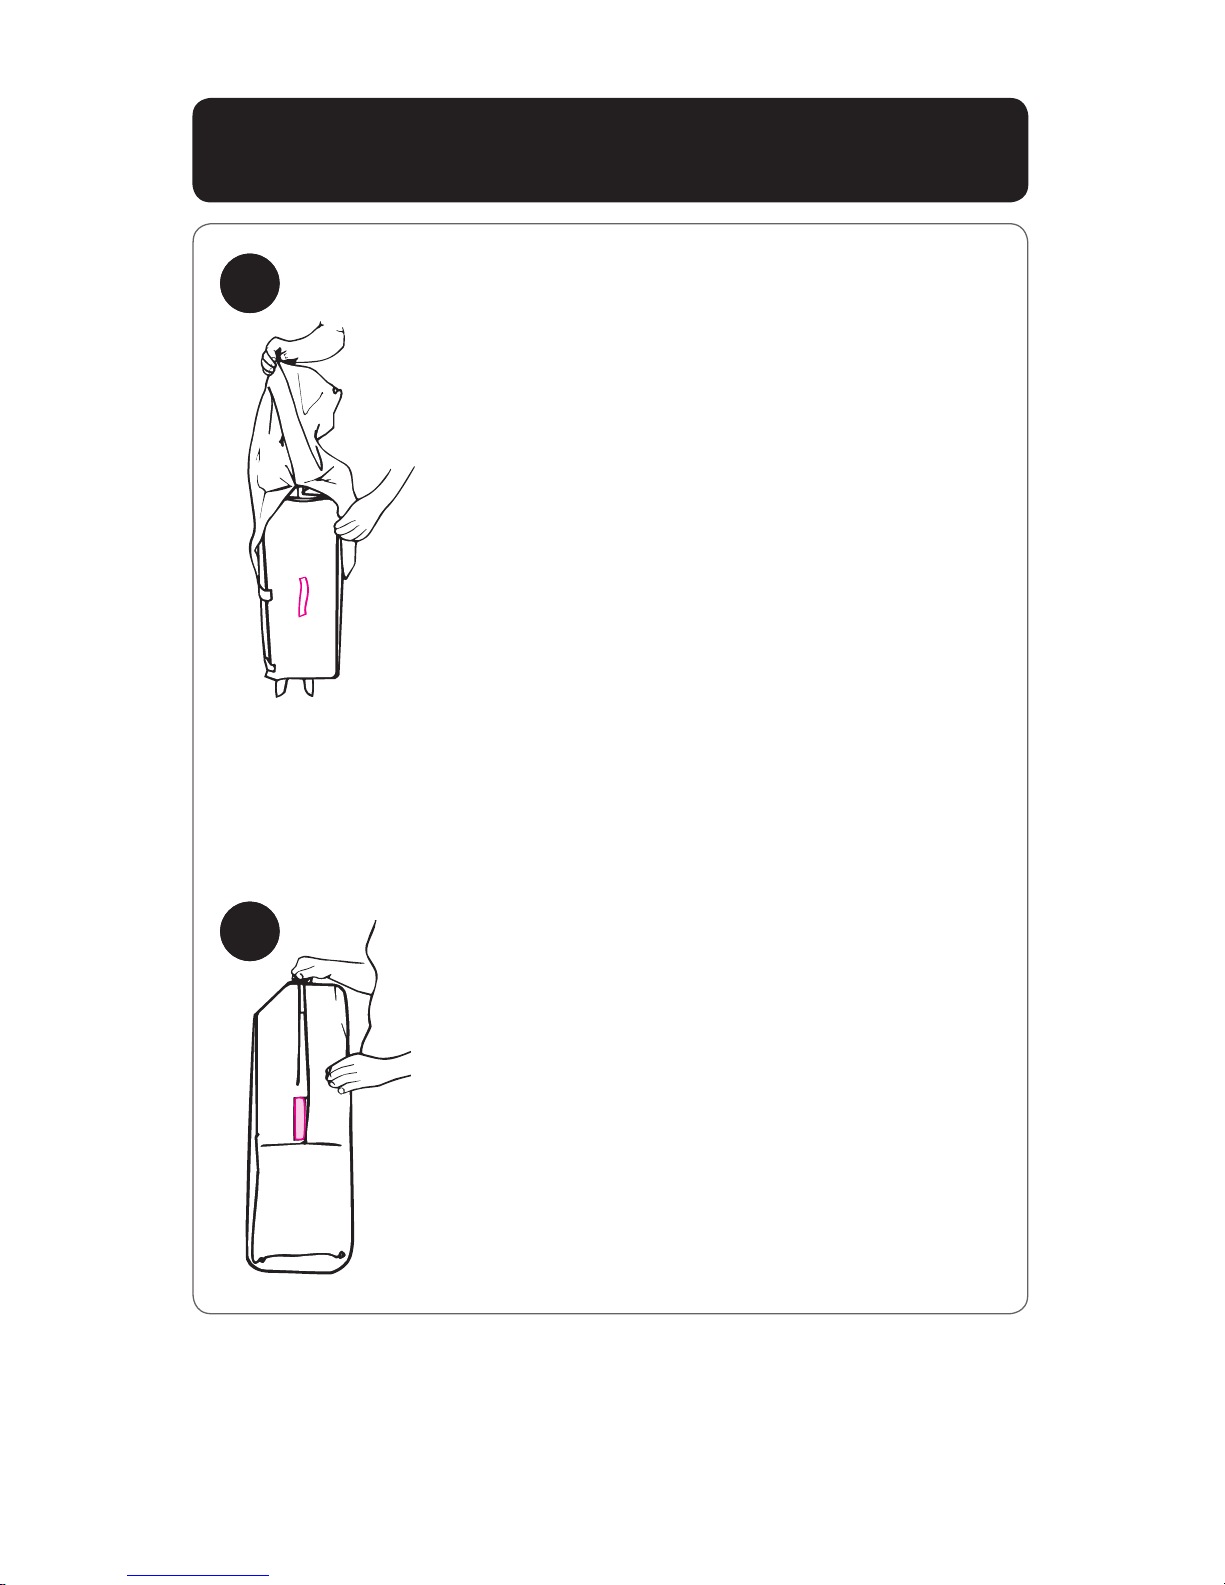
To Cover
Cover unit with handle out.
Zip together.
15
16
Page 13
Accessories (On certain models)
Bassinet
WARNING
SUFFOCATION HAZARD Infants have suffocated:
• In gaps between extra padding and side of the bassinet, and
• On soft bedding.
Use ONLY mattress/pad provided by Graco. NEVER add a pillow,
comforter or another mattress for padding.
• FALL HAZARD: To help prevent falls, do not use this product when
the infant begins to push up on hands and knees or weighs over
15 lbs (6.8 kg), whichever comes first.
• Use bassinet with only one child at a time.
• Never place a child under the bassinet.
• The bassinet must be fully assembled and installed, including four
metal tubes, eight clips and mattress/pad, before using. Do not
modify bassinet or add any attachments that are not listed in the
owner’s manual.
• DO NOT store the bassinet in the playard while in use.
• To help prevent heat build-up inside the playard and to avoid
overheating your child, when using the bassinet DO NOT use an
outdoor canopy.
• To reduce the risk of SIDS, pediatricians recommend healthy
infants be placed on their backs to sleep, unless otherwise advised
by your physician.
• If a sheet is used with the pad use only the one provided by Graco
or one specifically designed to fit the dimensions of the bassinet.
• Never place child in bassinet while seat is attached.
This model may not include some
features shown.
Page 14
Page 15
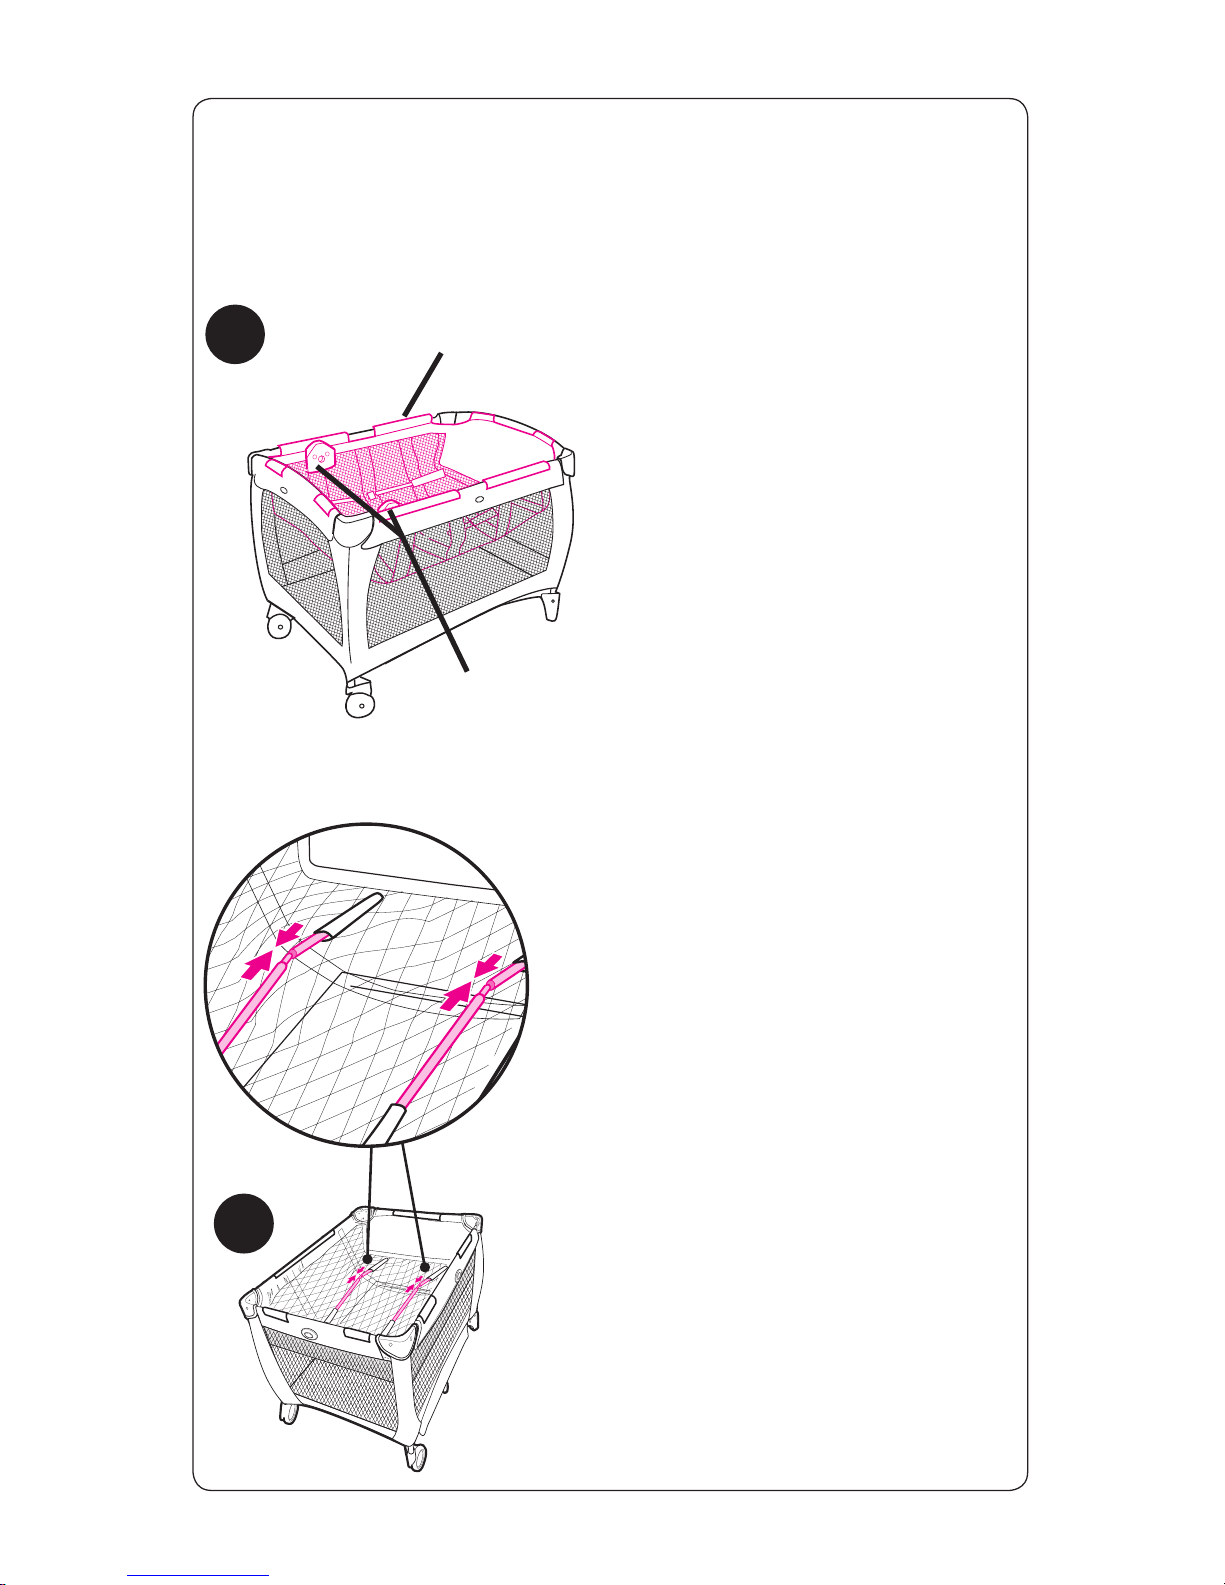
You will need to remove the
mattress/pad from the bottom
of the playard to use inside your
bassinet.
18
NOTE: Bassinet mounts should
always be attached on the end
with the wheels as shown.
Insert tapered end of bar into end of
other bar with hole in it. Repeat with
other set of bars.
CHECK: Tubes MUST be assembled
before placing mattress/pad in bassinet.
17
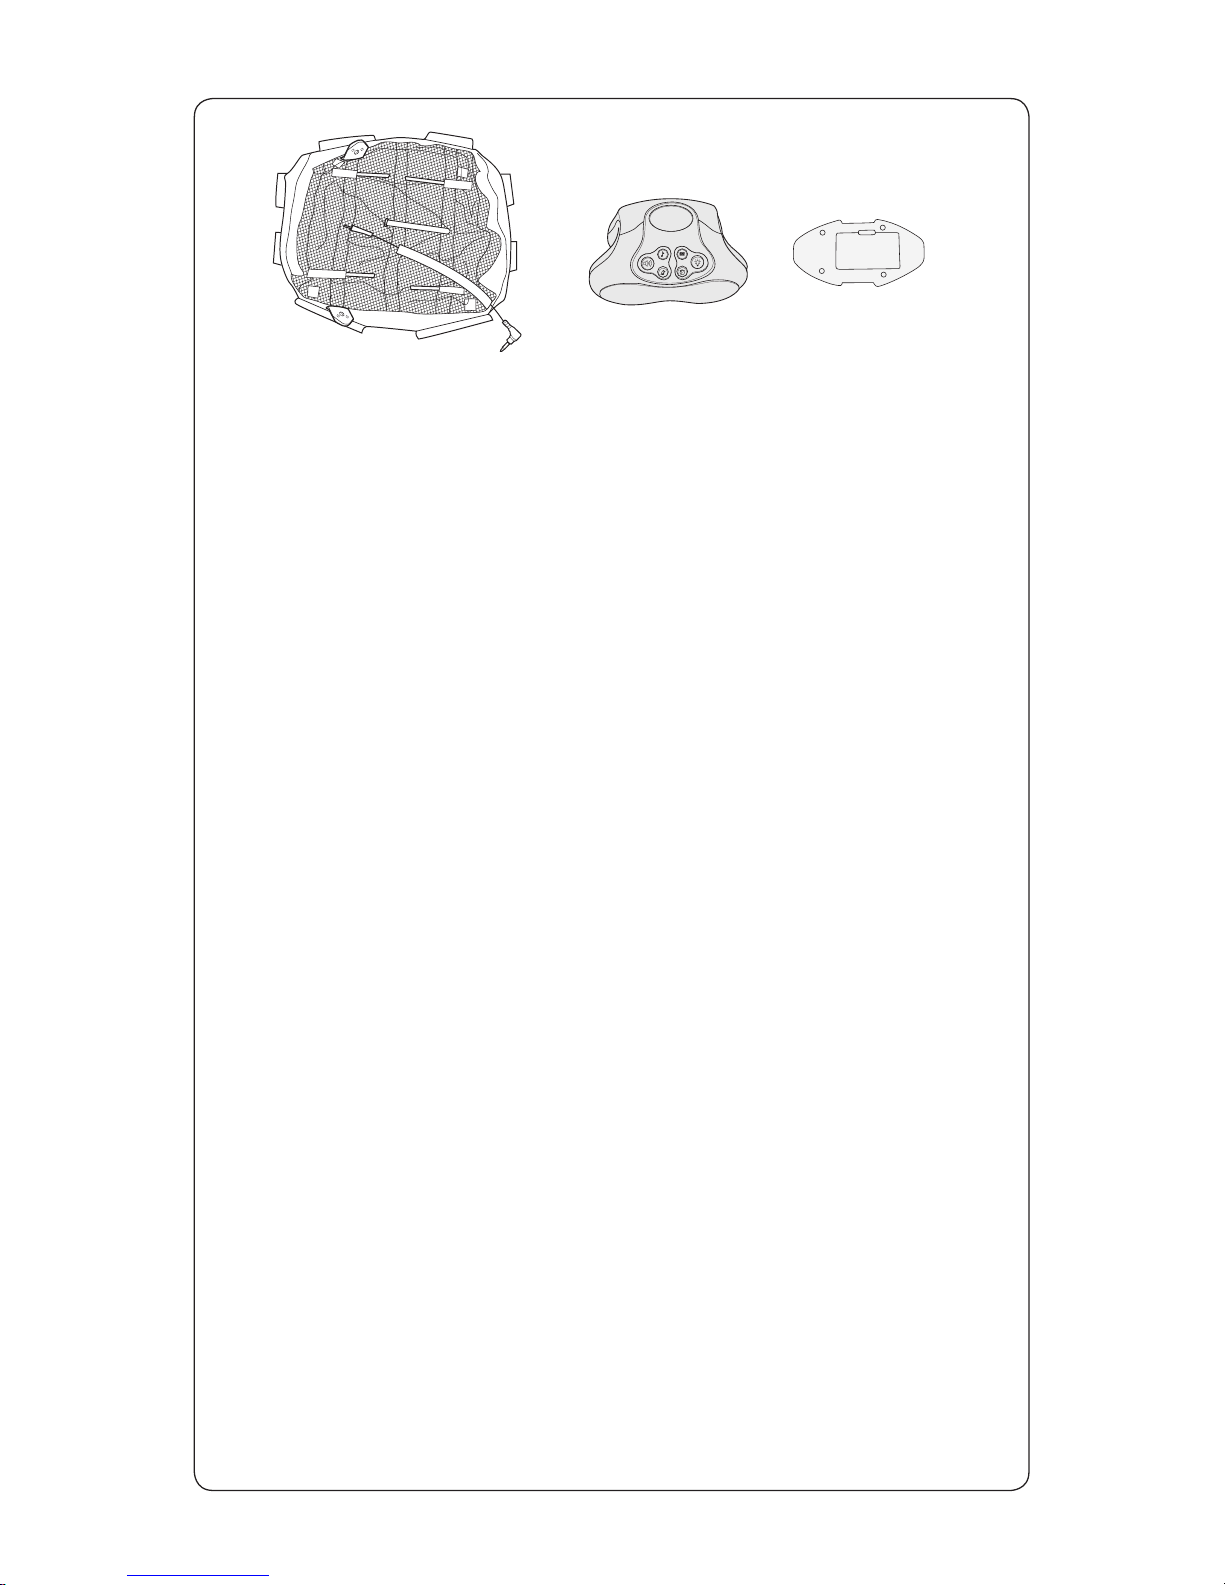
Mounts
8 Clips
Page 16
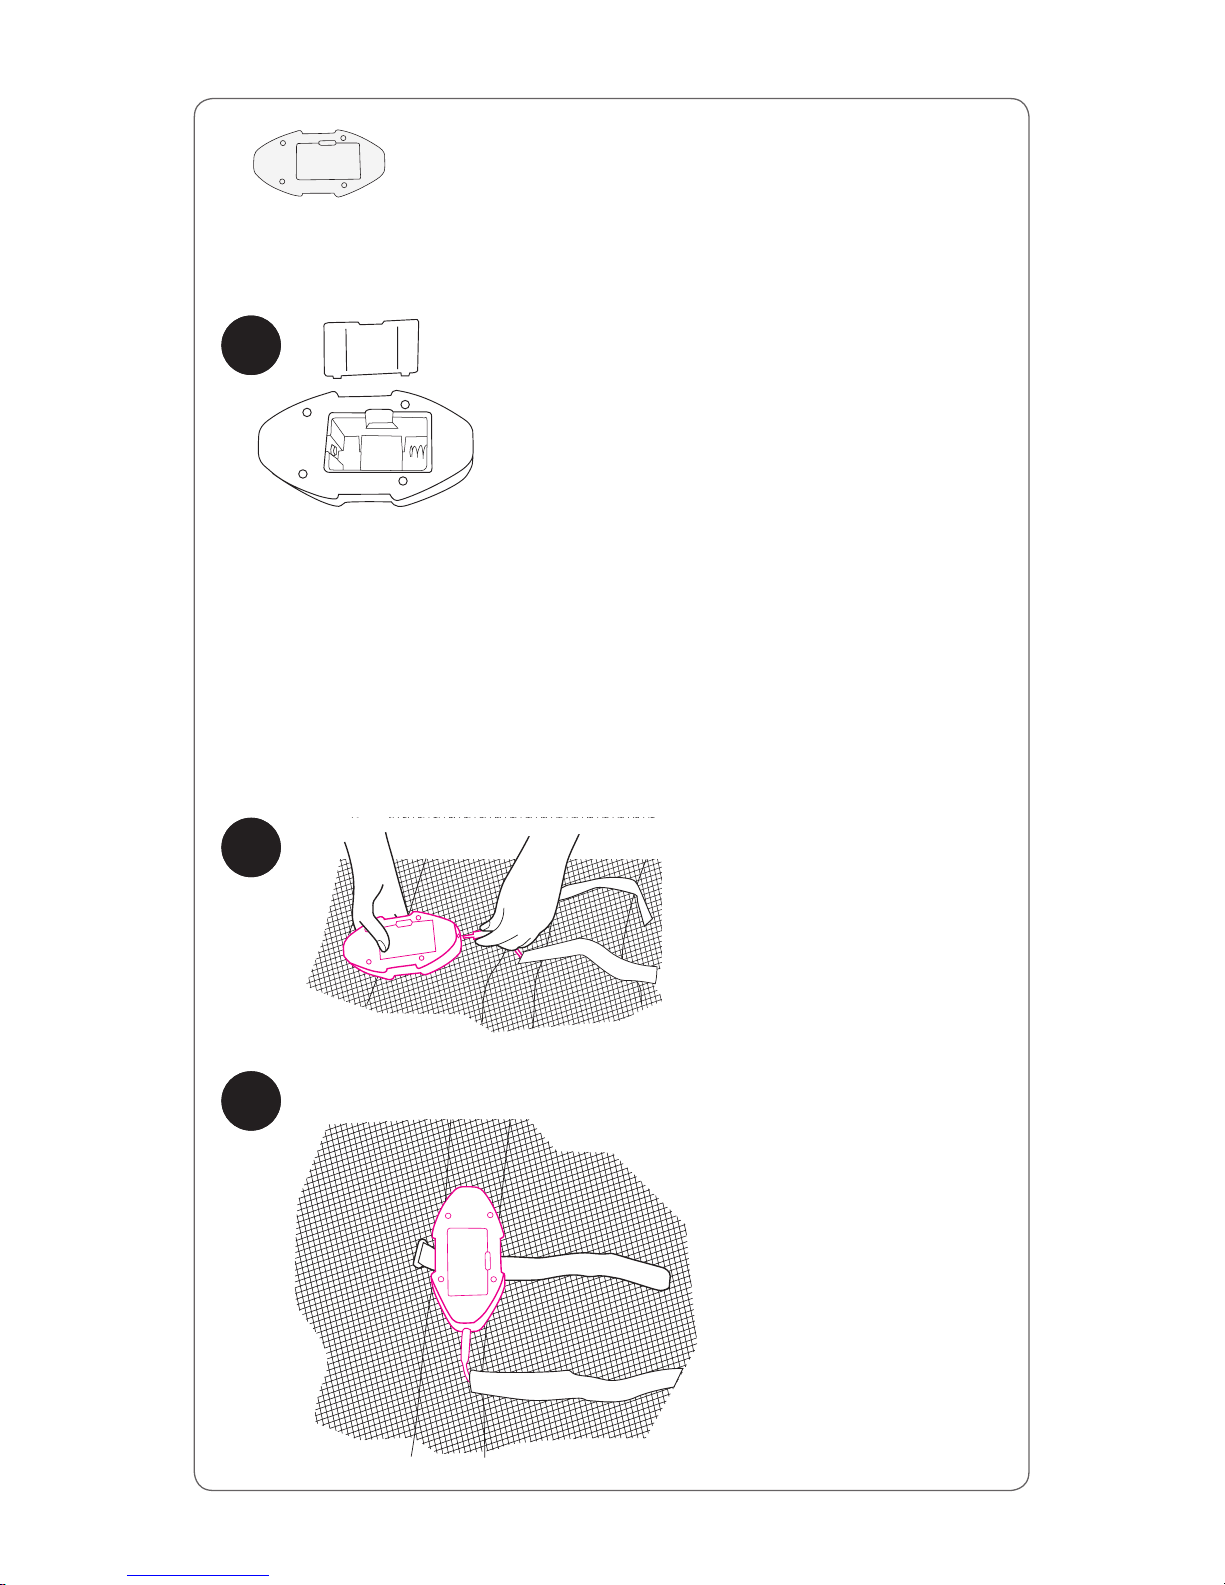
Open the battery compartment lid by
inserting a screwdriver in the slot. Insert one
D (LR20) cell battery (not included).
Replace lid.
Cord in bottom of bassinet.
21
20
19
Page 17
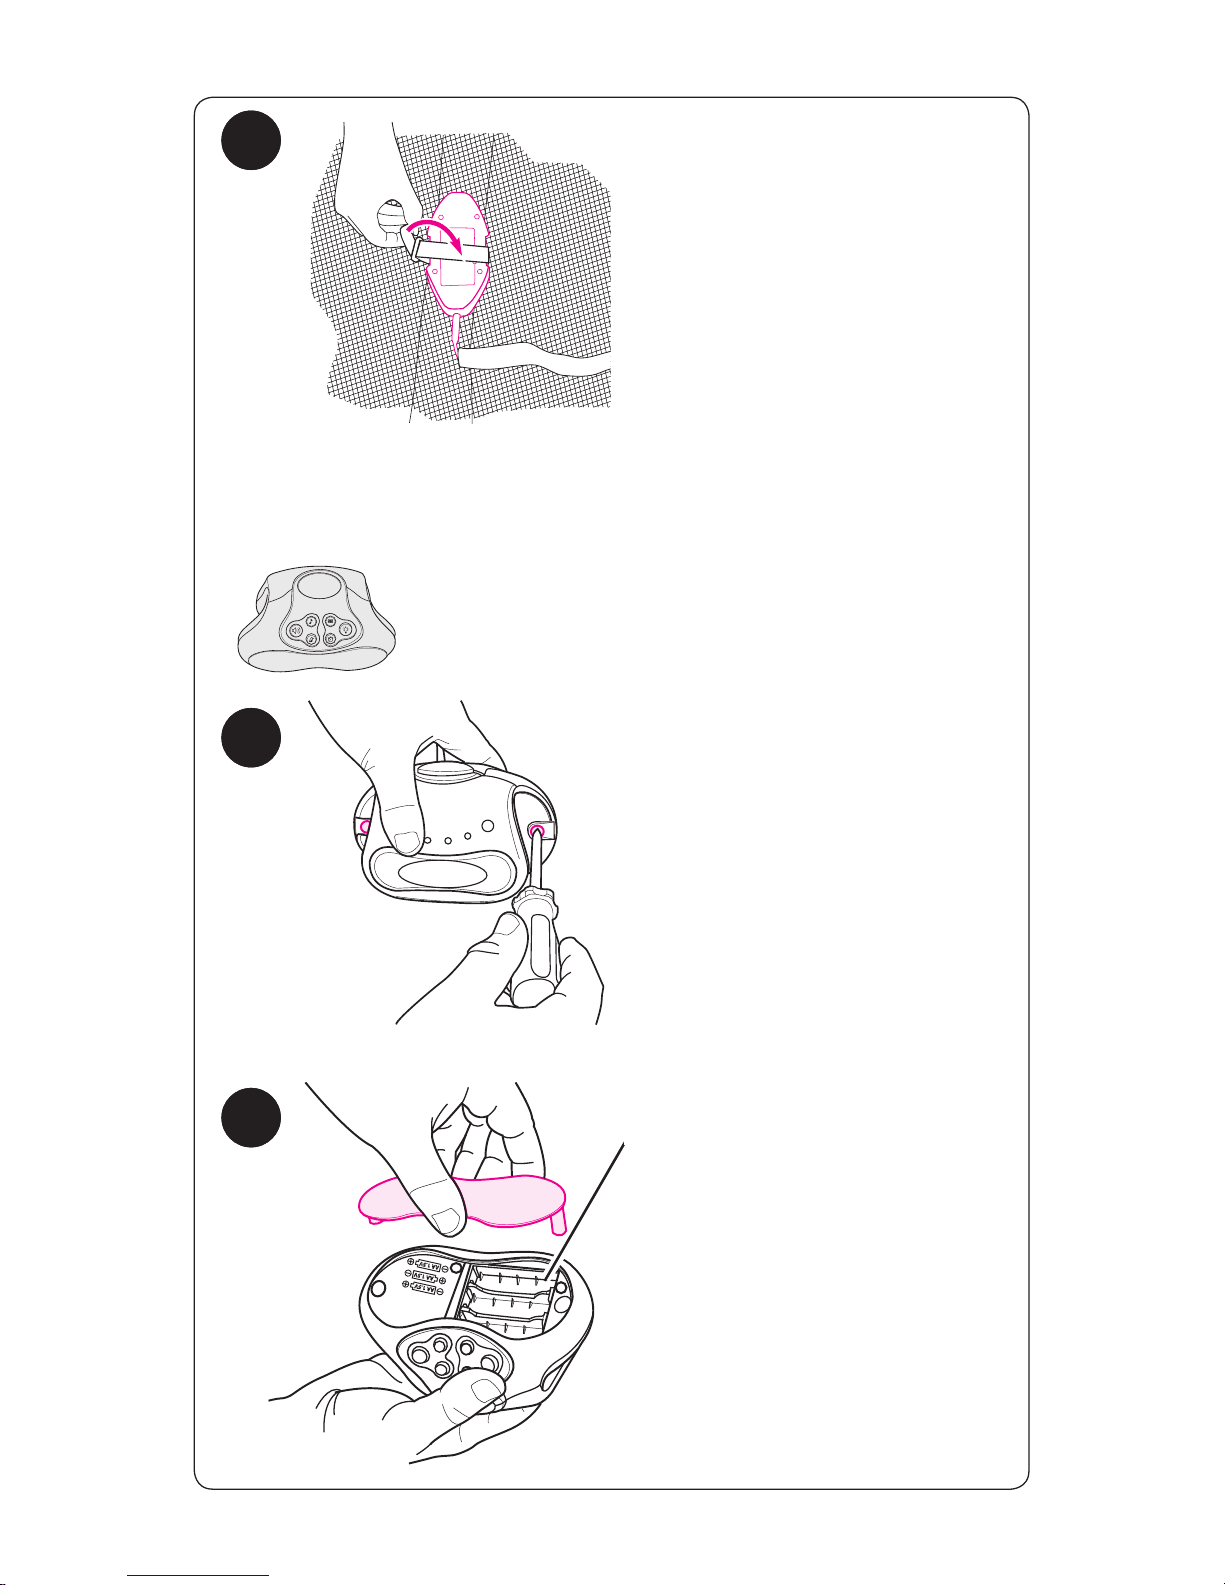
Vibration must be fastened tight
and centered on the webbing
strap to work properly.
Remove 2 screws from back of
electronics module.
Remove battery door and insert
3-AA (LR06) batteries (not
included). Replace door and
screws.
24
23
22
Page 18
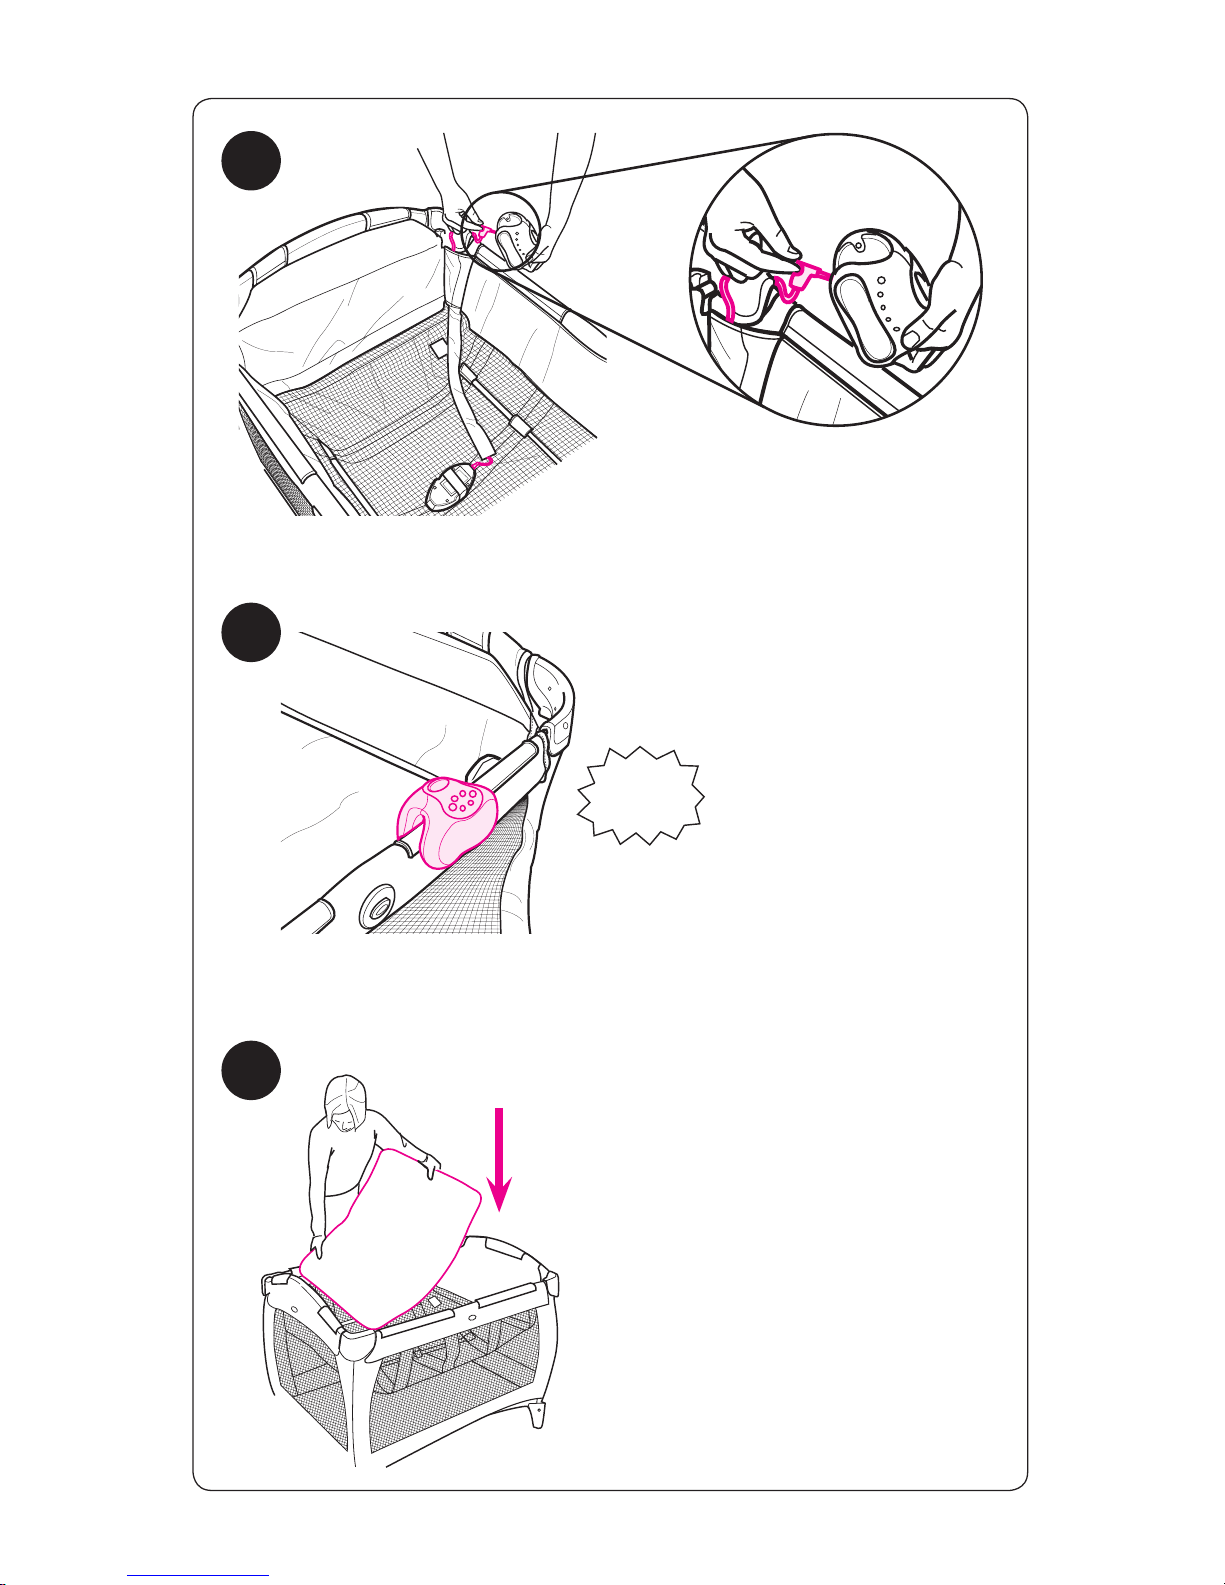
27
26
25
SNAP!
Page 19
Keep the batteries out of children’s reach.
Any battery may leak battery acid if mixed with a different battery
type, if inserted incorrectly (put in backwards) or if all batteries are
not replaced or recharged at the same time. Do not mix old and new
batteries. Do not mix alkaline, standard (carbon-zinc) or rechargeable
(nickel-cadmium) batteries.
Any battery may leak battery acid or explode if disposed of in
fire or an attempt is made to charge a battery not intended to be
recharged. Never recharge a cell of one type in a recharger made for
a cell of another type.
Discard leaky batteries immediately. Leaky batteries can cause
skin burns or other personal injury. When discarding batteries, be sure
to dispose of them in the proper manner, according to your state and
local regulations.
Always remove batteries if the product is not going to be used
for a month or more. Batteries left in the unit may leak and cause
damage.
Recommended type batteries—alkaline disposables. NEVER mix
battery types. Change batteries when product ceases to operate
satisfactorily.
TROUBLESHOOTING: If your device is not functioning
properly, check for the following problems:
1. No batteries in electronics module.
2. Batteries dead.
3. Batteries in backwards—check “+” and “-”.
4. Corrosion on battery terminals. Rotate batteries in place
against terminals, or clean with sandpaper or steel wool if
corrosion is severe.
5. Batteries too weak.
For Safe Battery Use
Page 20
The vibration unit may ONLY
be used with the bassinet or
seat.
WARNING
You must remove the module
from the unit when your child
can pull up to a standing
position.
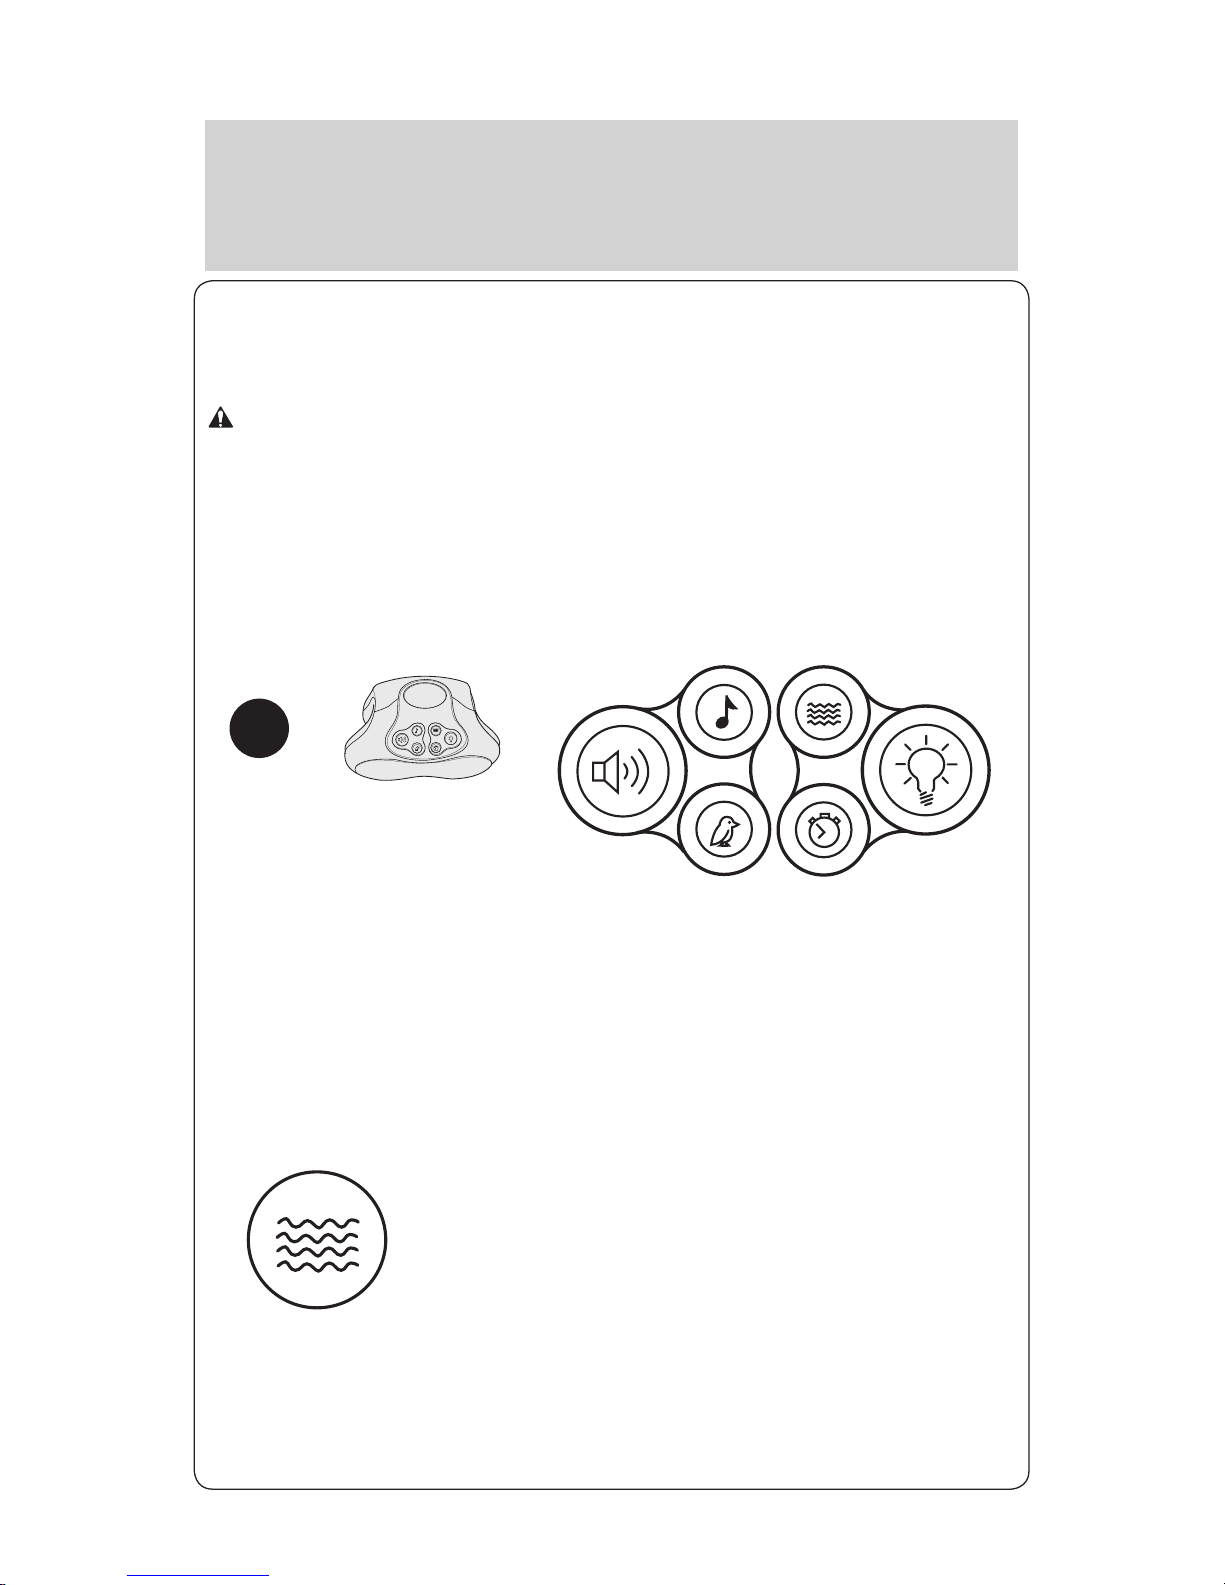
TO TURN OFF ANY FUNCTION— Press and hold the button for
2 seconds.
Using Electronics Module
VIBRATION— Press once for high, twice for low,
three times to turn off. Automatically shuts off in
25 minutes.
28
Page 21
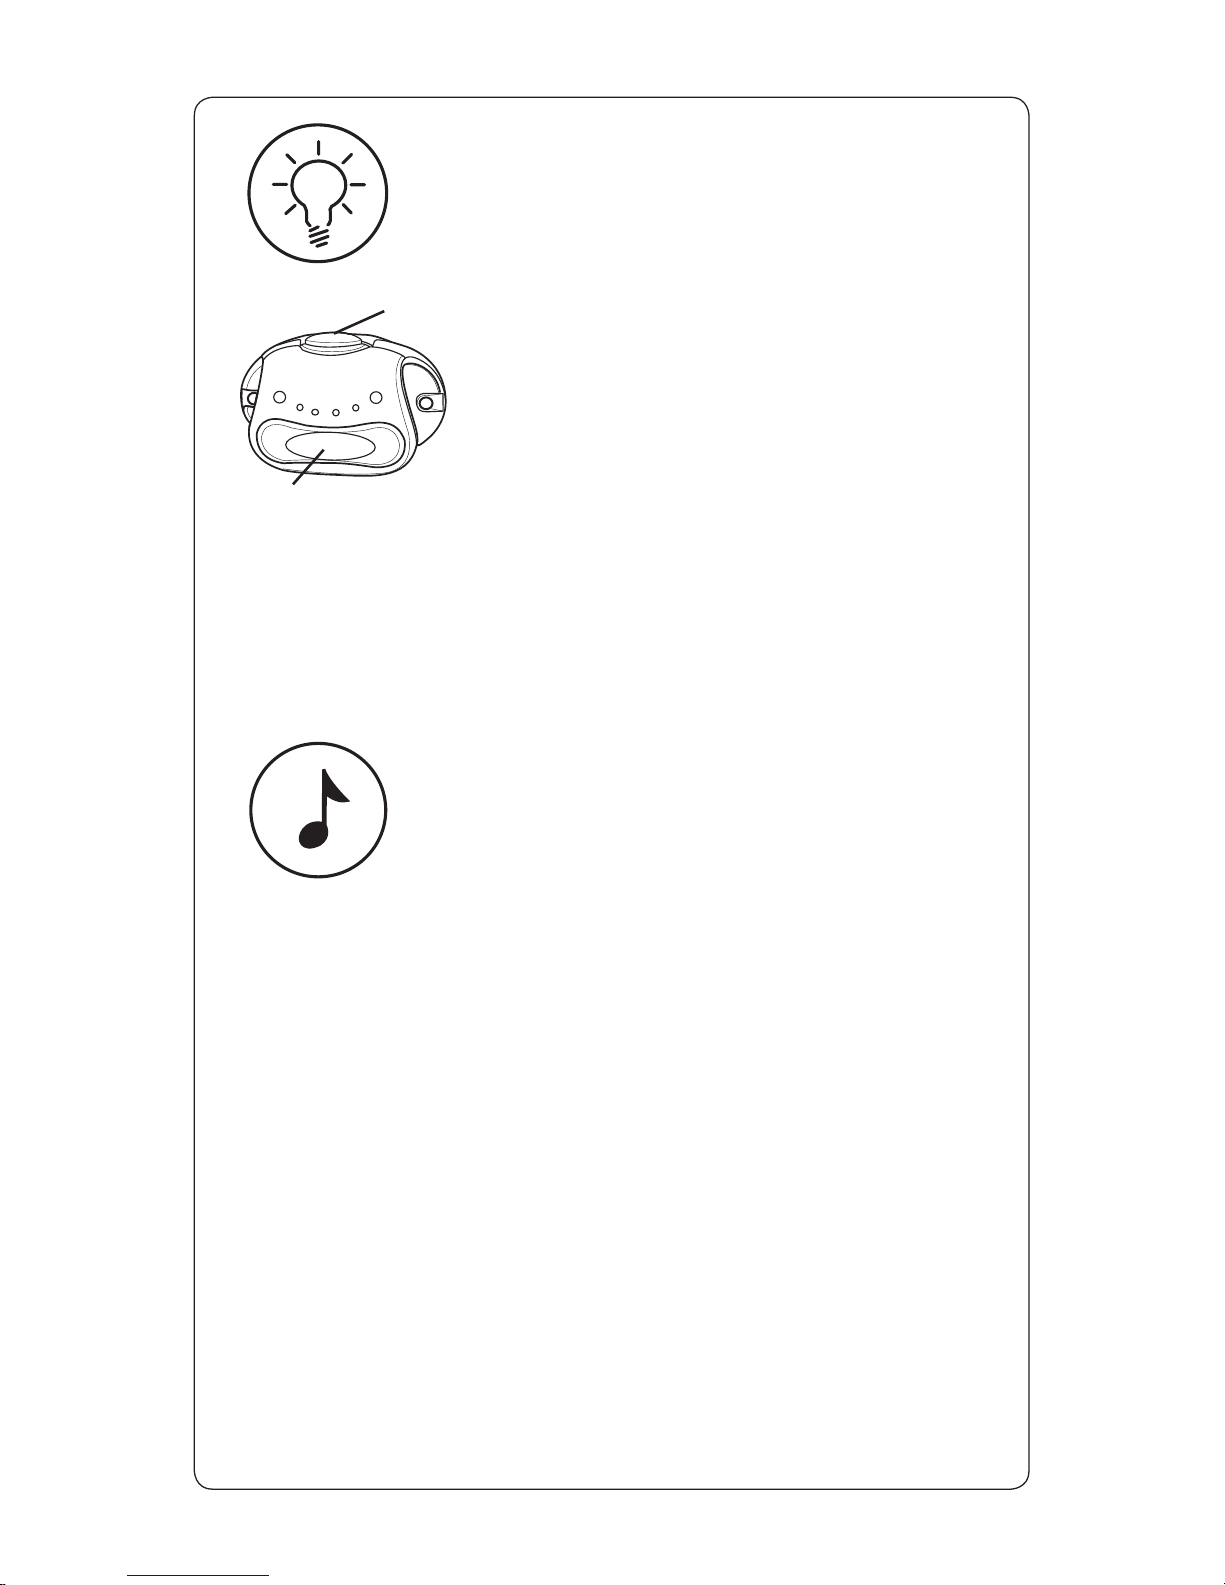
LIGHTS— Press once to turn top light (A) on,
press twice to turn both lights on, press three
times to turn bottom light (B) on, and four
times to turn lights off.
(A)
(B)
MUSIC— Each press will start the next music
function in sequence, after the 5th song is
selected, the next press will turn music off.
Page 22

NATURE SOUNDS— Each press will change to the
next nature sound. After the 5th sound is selected,
the next press will turn sound off.
TIMER— Press once to set timer to 5 minutes,
Press twice for 10 minutes, Press 3 times for
15 minutes.
VOLUME— With each press of the volume button,
the volume will increase by one preset level. Once
at the highest level, the next press will stop the
music.
Page 23
WARNING
FALL HAZARD- To prevent death or serious injury,
• Always stay within arm’s reach of your child when using the
changing table. Never leave child unattended.
• The changing table is designed for use only with this Graco
playard. Do not use on the floor, bed, counter or other
surfaces. Before each use make sure the changing table is properly
secured to the playard by pushing down firmly in the middle
of the changing table.
• Do not use changing table as a sleeping or play area.
• Weight limit for the changing table is 25 lbs (11 kg). Do not use the
changing table as extra storage. Always remove the changing table
when your child is in the playard.
• Use only the pad provided by Graco.
• Do not use changing table if it is damaged or broken.
• Strangulation Hazard: Child can lift changing table and get neck
trapped between changing table and playard frame. Always
remove the changing table when your child is in the playard.
• Never use changing table on the same side as seat.
Changing Table
Page 24
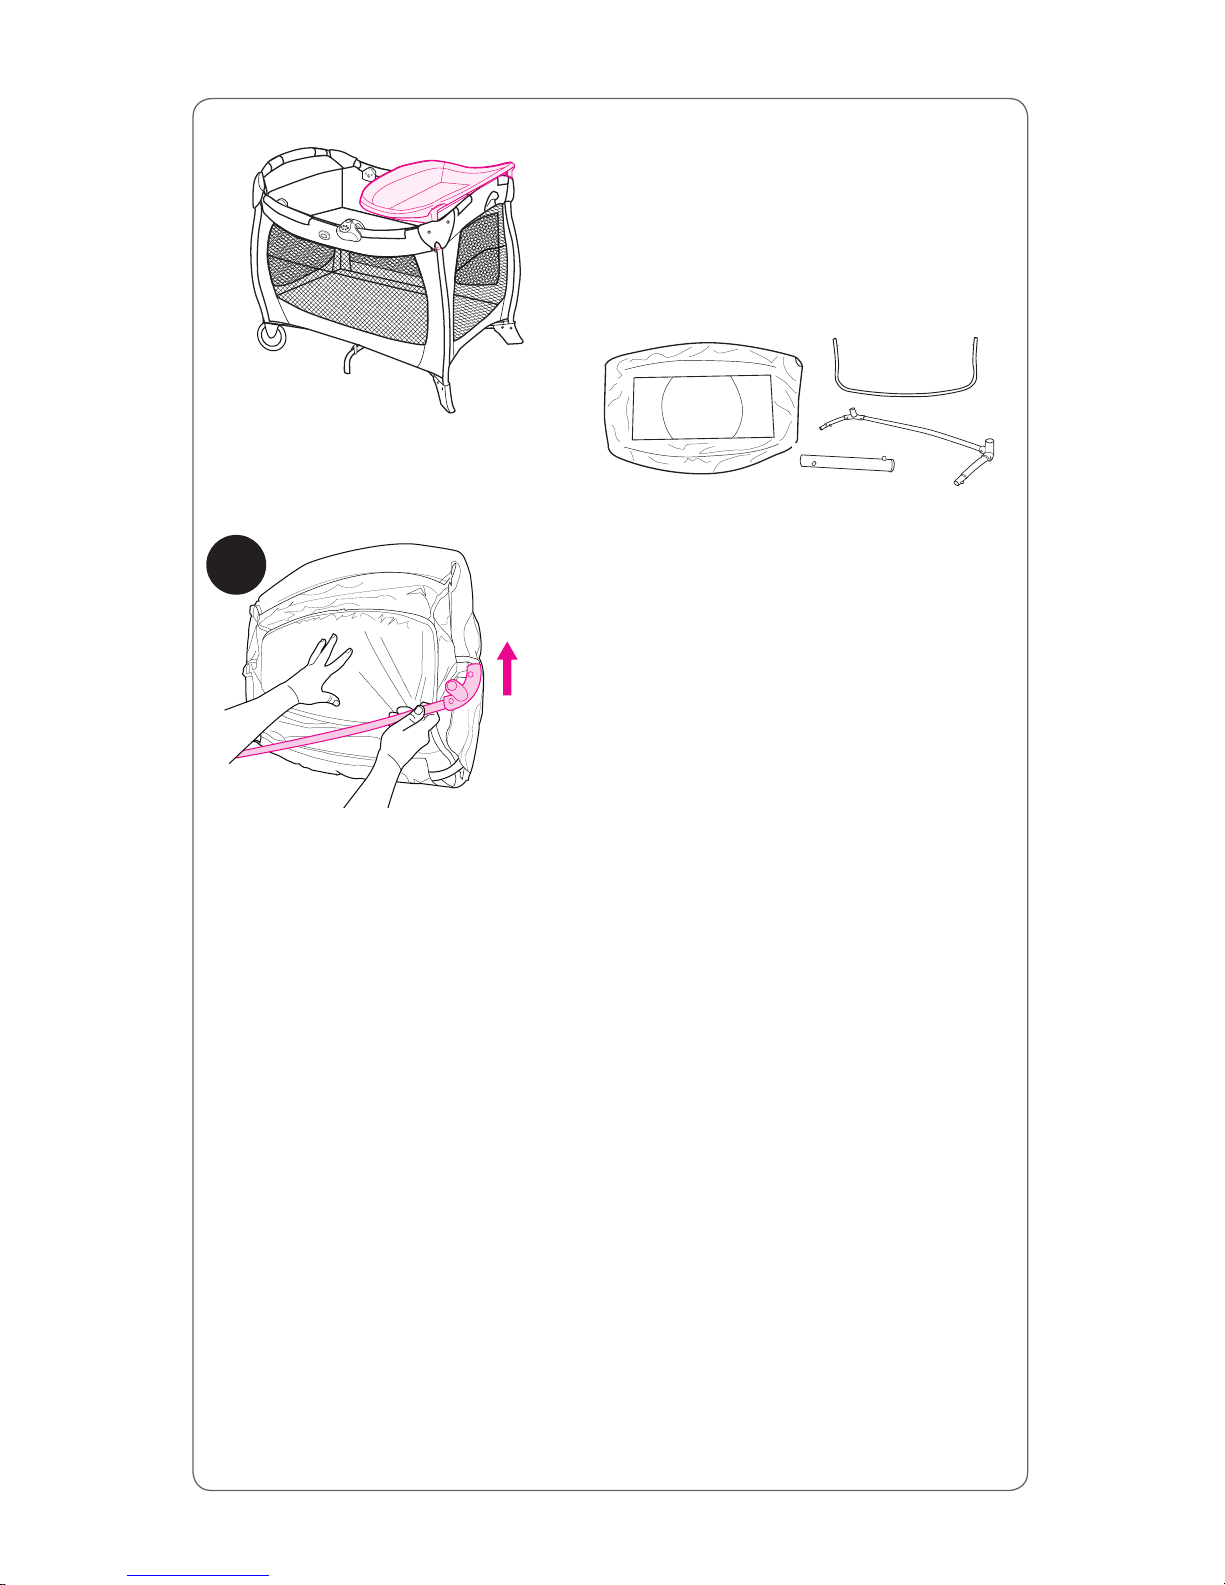
Slide tube through fabric as
shown. Repeat with other tube.
29
2X
Page 25
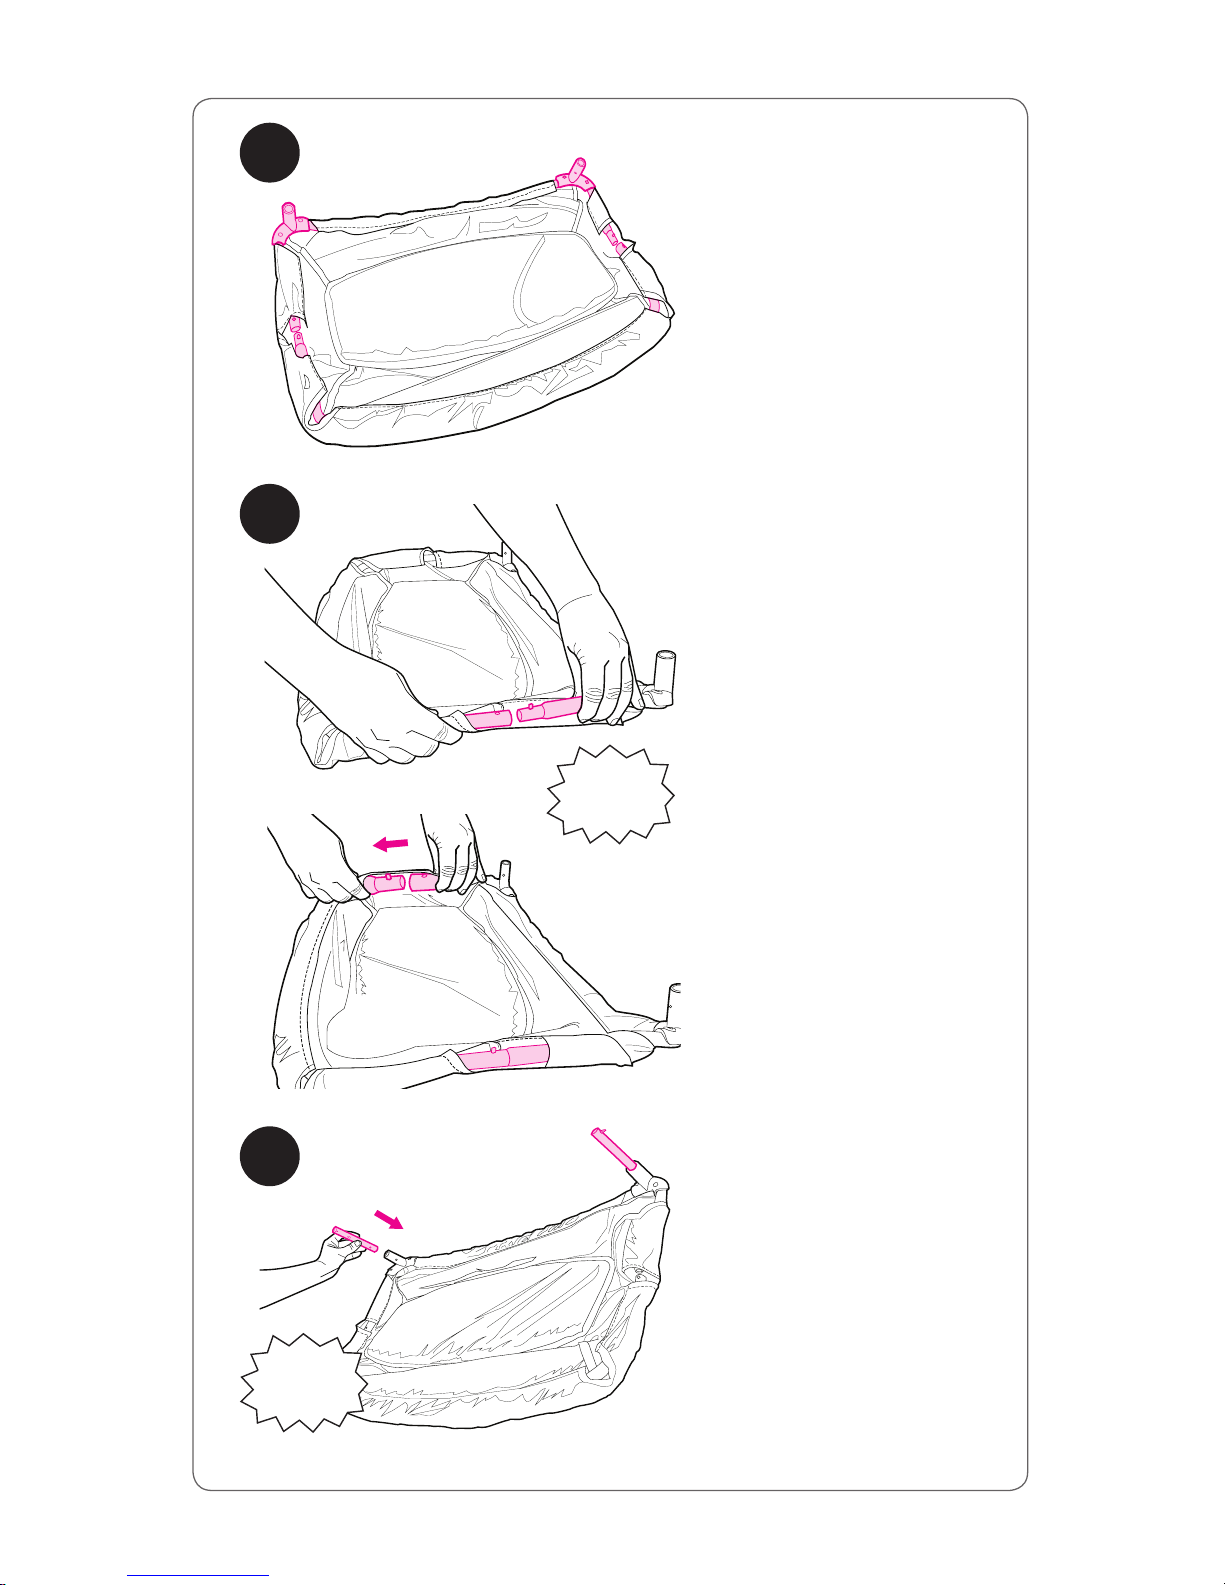
Tubes should appear
exactly as shown.
Snap leg tubes together
as shown.
Attach short tubes into
changing table mounts.
30
31
32
SNAP!
SNAP!
Page 26
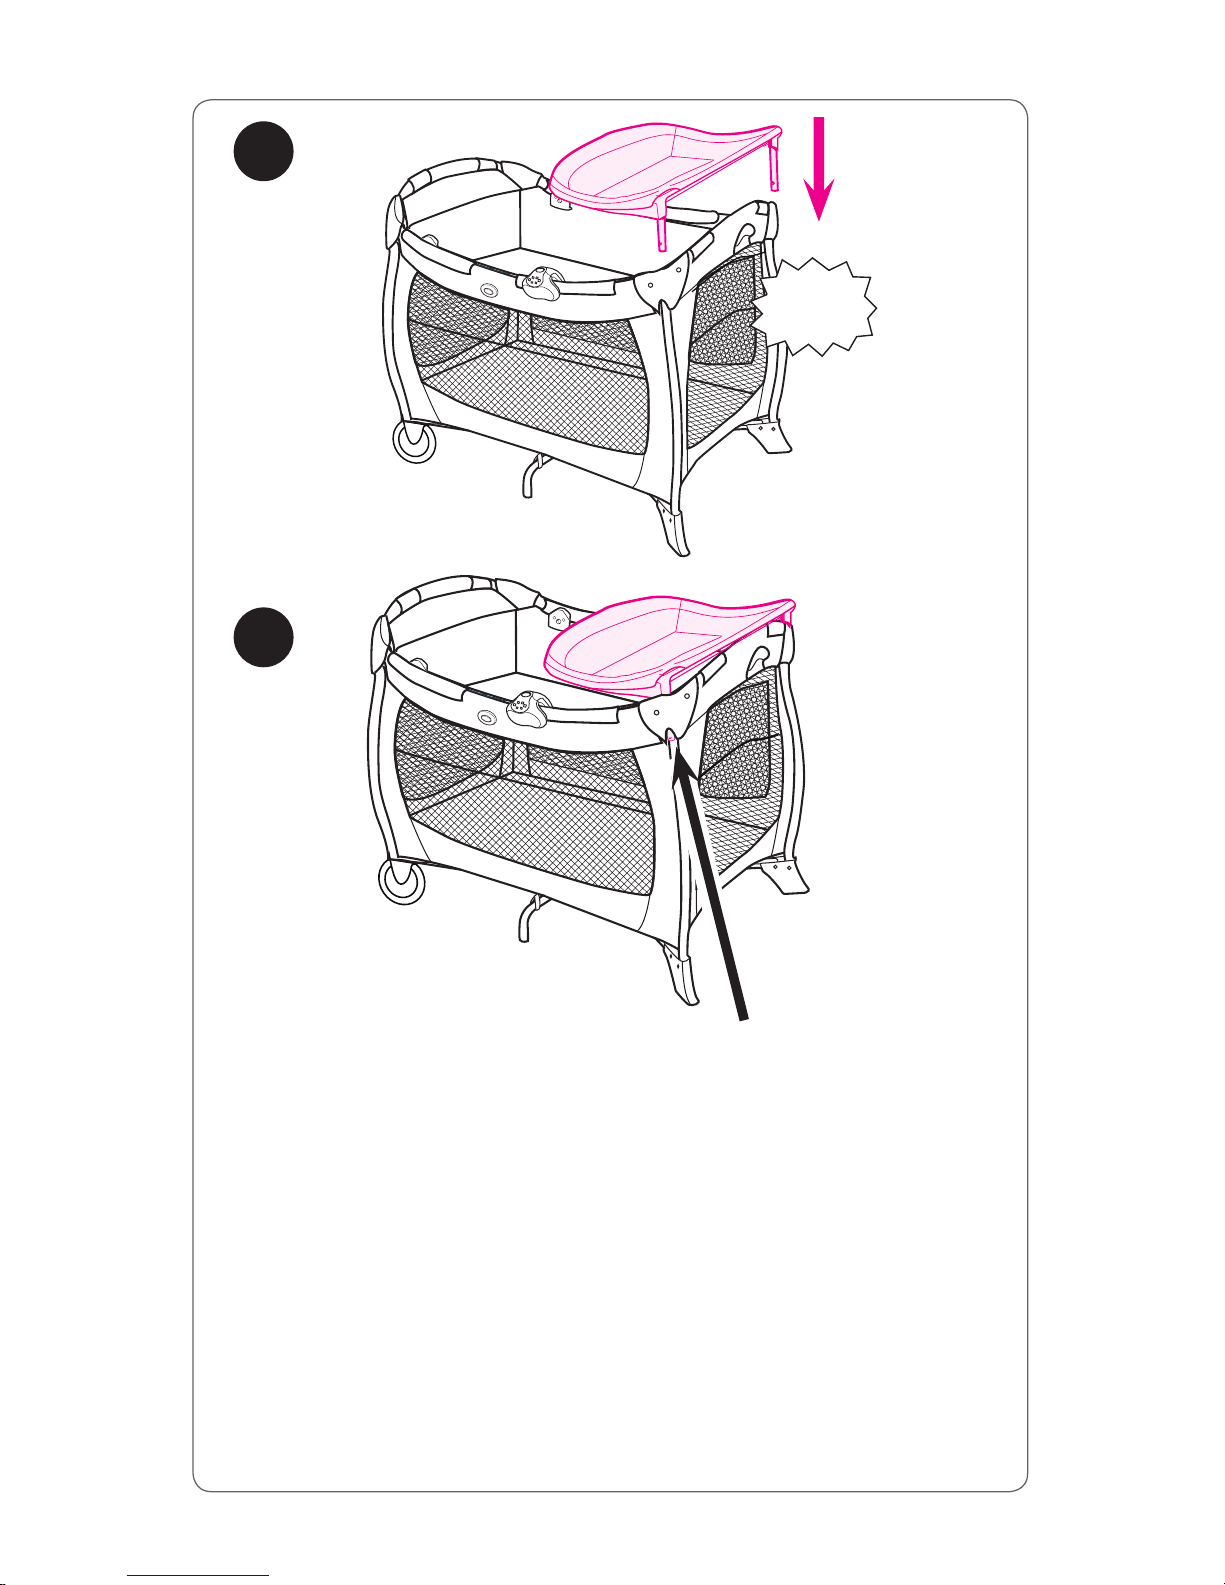
To remove, push in button while
pulling up on corner of changing
table. Repeat for other side.
34
33
SNAP!
Page 27

Seat
WARNING
Prevent serious injury or death: follow these warnings and the
instructions.
FALL HAZARD:
• To prevent falls, do not use this product when the infant
rolls over, weighs over 15lb (6.8kg) or reaches 3 months,
whichever comes first.
• This product is not intended for unsupervised or
prolonged periods of sleep.
• Never use for a child able to sit up unassisted.
• NEVER leave child unattended.
• Always use restraint system. Adjust belt as needed to get
a snug fit around your child.
• Child’s activity may move rocker. Use only on floor.
Never use on any elevated surface.
• NEVER attach seat on the same side as the changing table.
• NEVER use this product as a means to transport an infant
in a motor vehicle.
SUFFOCATION HAZARD: Infants can suffocate
• Never use on a soft surface (bed, crib, sofa, cushion), as
seat may tip over and cause suffocation.
• NEVER place baby face down in seat.
• Use seat with only one child at a time.
• NEVER place a child under the seat.
• The seat must be fully assembled before using. Do not
modify seat or add any attachments that are not listed in
the owner’s manual.
• Always check to make sure seat is securely attached to
bassinet.
• NEVER place child in bassinet while seat is attached.
• To avoid suffocation, never use seat inside bassinet unless
it’s attached to the mounts on the bassinet. Never place
seat in the bottom of playard.
Page 28
STRANGULATION HAZARD:
• Children have STRANGLED in loose or partially buckled
harness straps. Fully restrain the child at all times.
• Do not use this product if it is damaged or broken.
• Strings and cords can cause strangulation. Keep strings
and cords away from child.
• NEVER place the seat near a window where cords from
blinds or drapes can strangle a child.
• NEVER hang strings on or over the seat.
• NEVER place items with a string around a child’s neck,
such as hood strings, pacifier cords, etc.
• NEVER attach strings to toys.
• Make sure canopy is securely attached when in use.
• Canopy for indoor use only.
• DO NOT store the seat in the playard while in use.
• To reduce the risk of SIDS, pediatricians recommend healthy
infants be placed on their backs to sleep, unless otherwise
advised by your physician.
• Never place any objects in seat while child is in it.
• Never use this seat on any other product.
• To prevent serious injury or death, DO NOT REMOVE FOAM.
• Do not use this rocker if it is damaged or broken.
Page 29
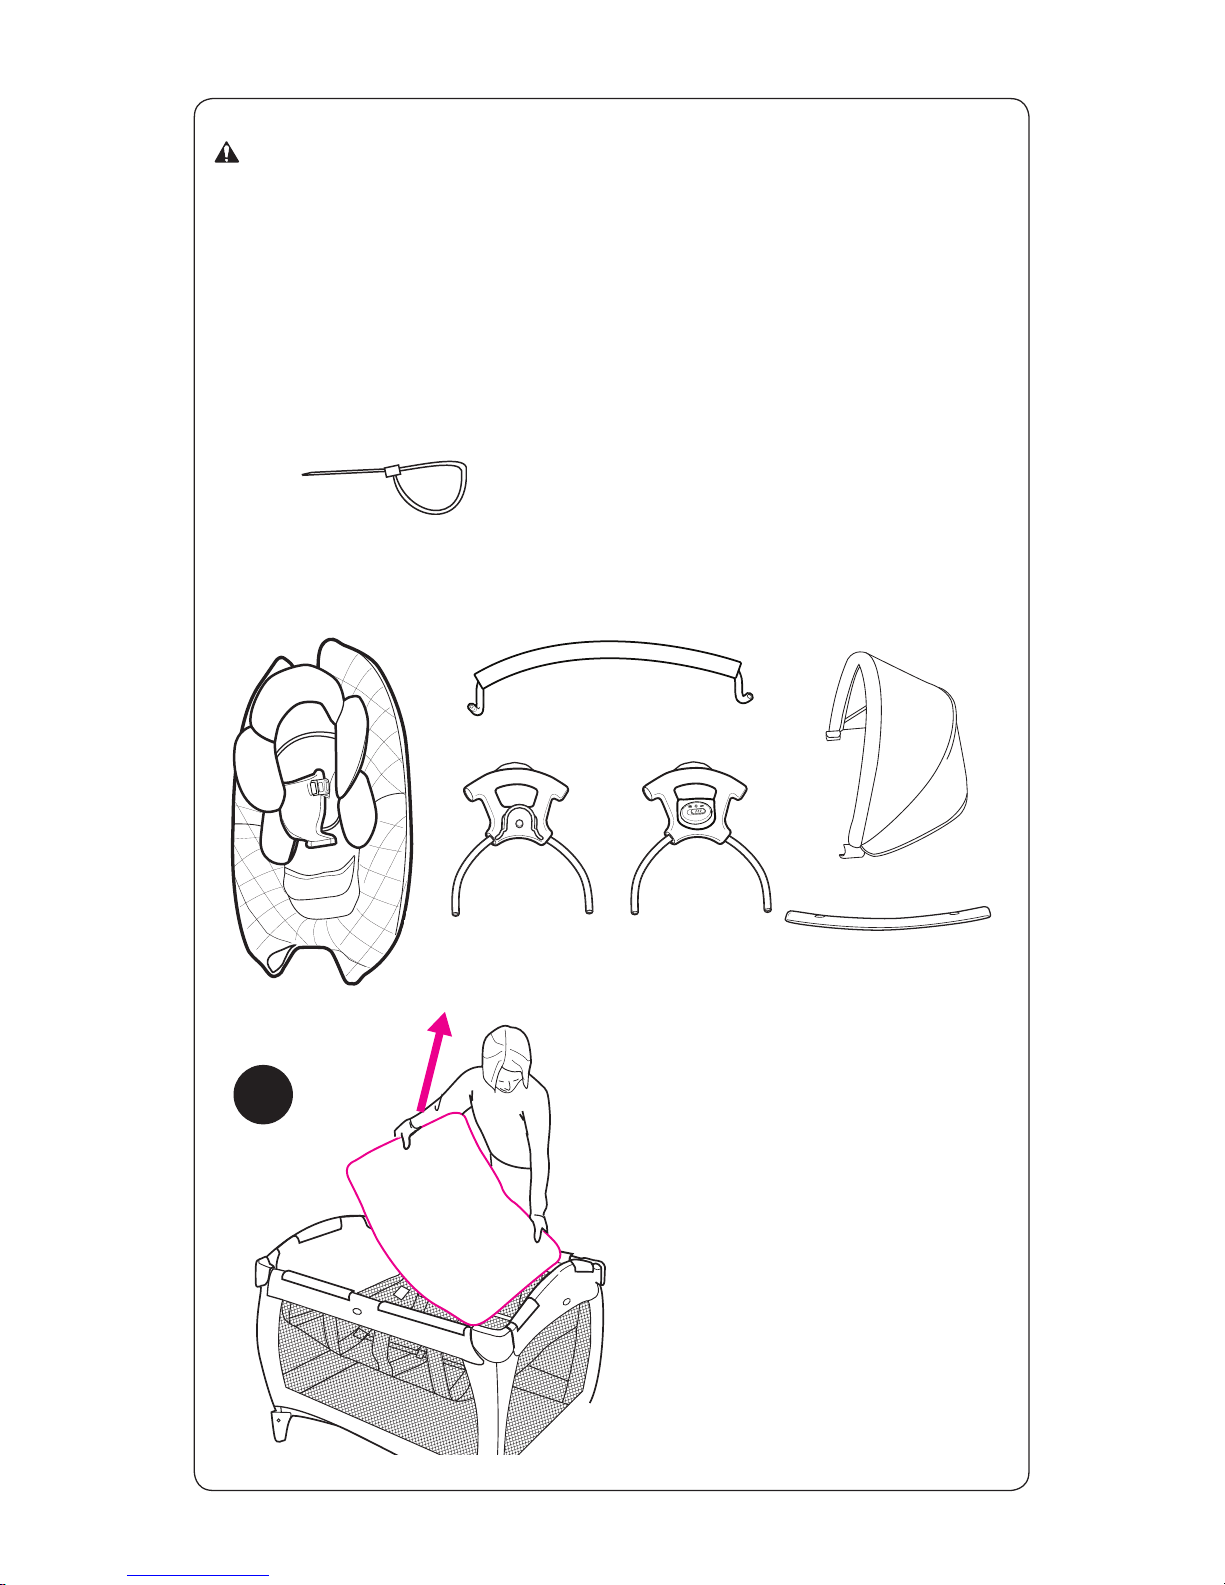
2X
2X
WARNING
•
To prevent serious injury
or death, DO NOT REMOVE
FOAM.
• Remove and IMMEDIATELY
discard the zip tie.
Ziptie
Remove mattress pad from
bassinet.
35
Page 30
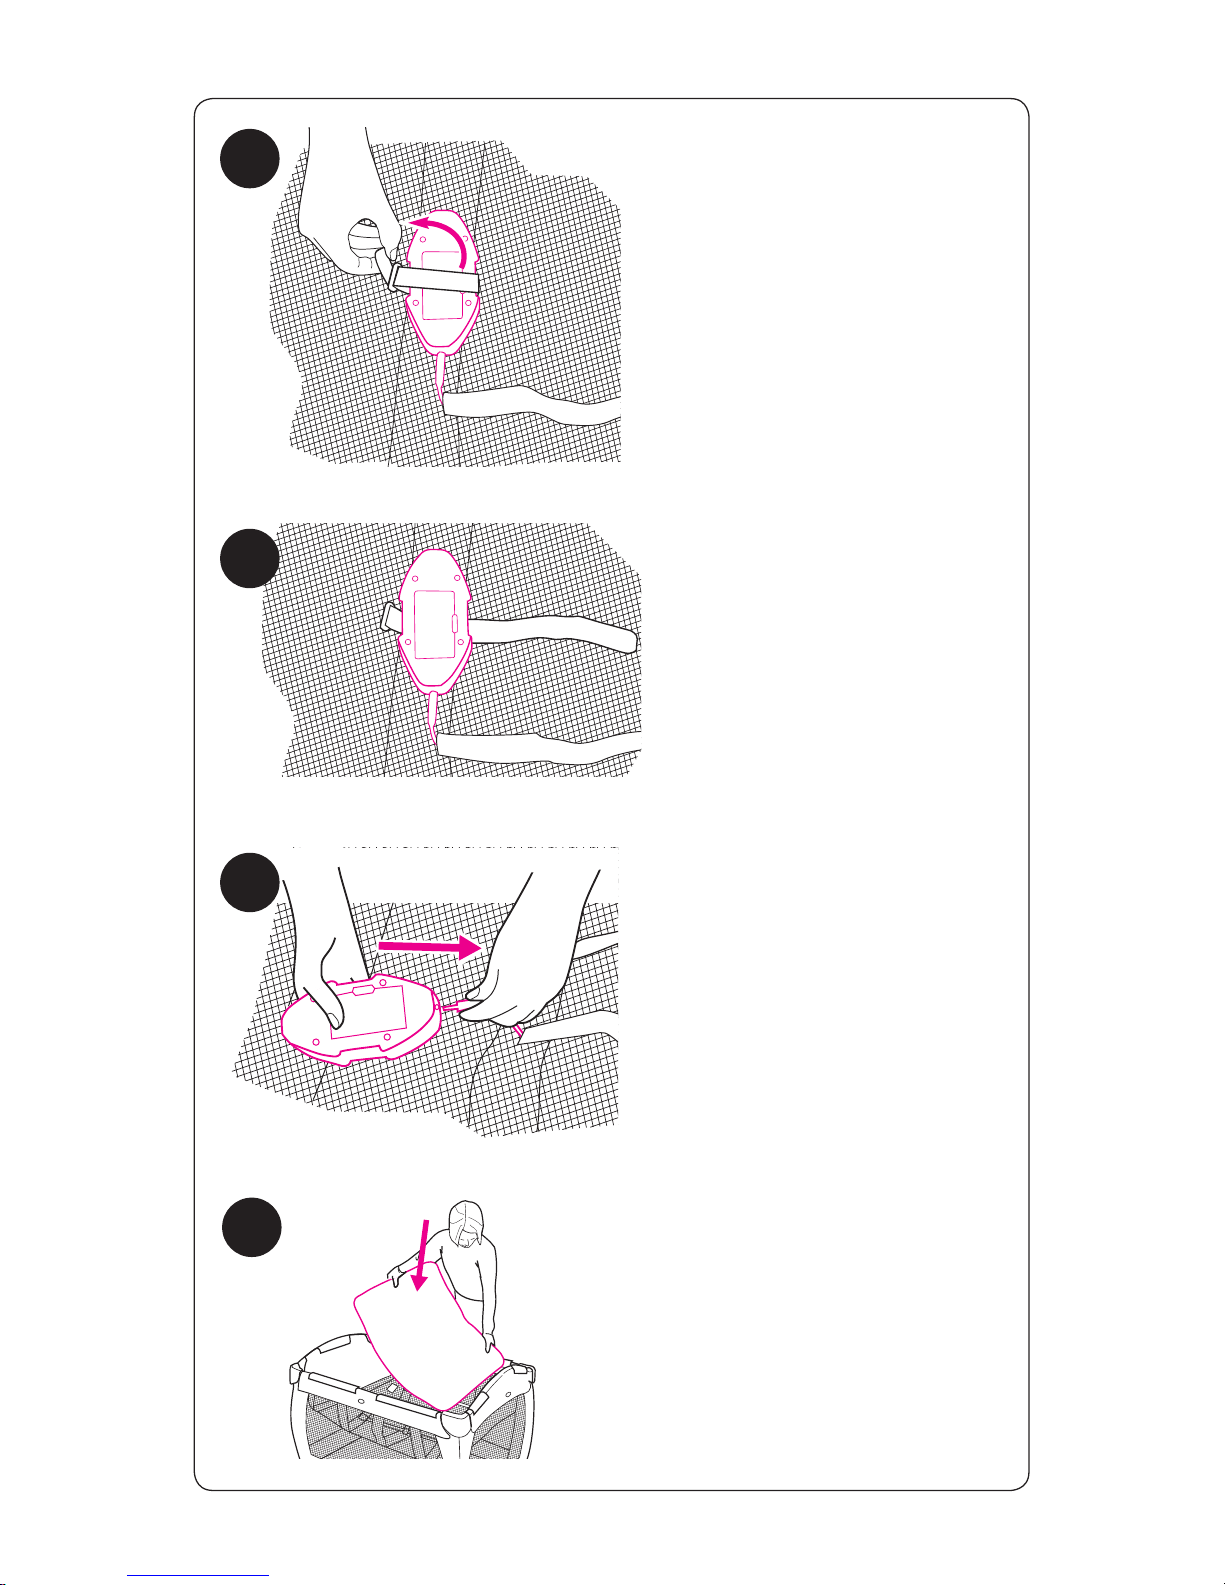
Unfasten the webbing strap
holding the vibration unit in
the playard.
Unplug the vibration unit
and remove from bassinet.
36
37
38
Insert mattress pad into bassinet.
39
Page 31
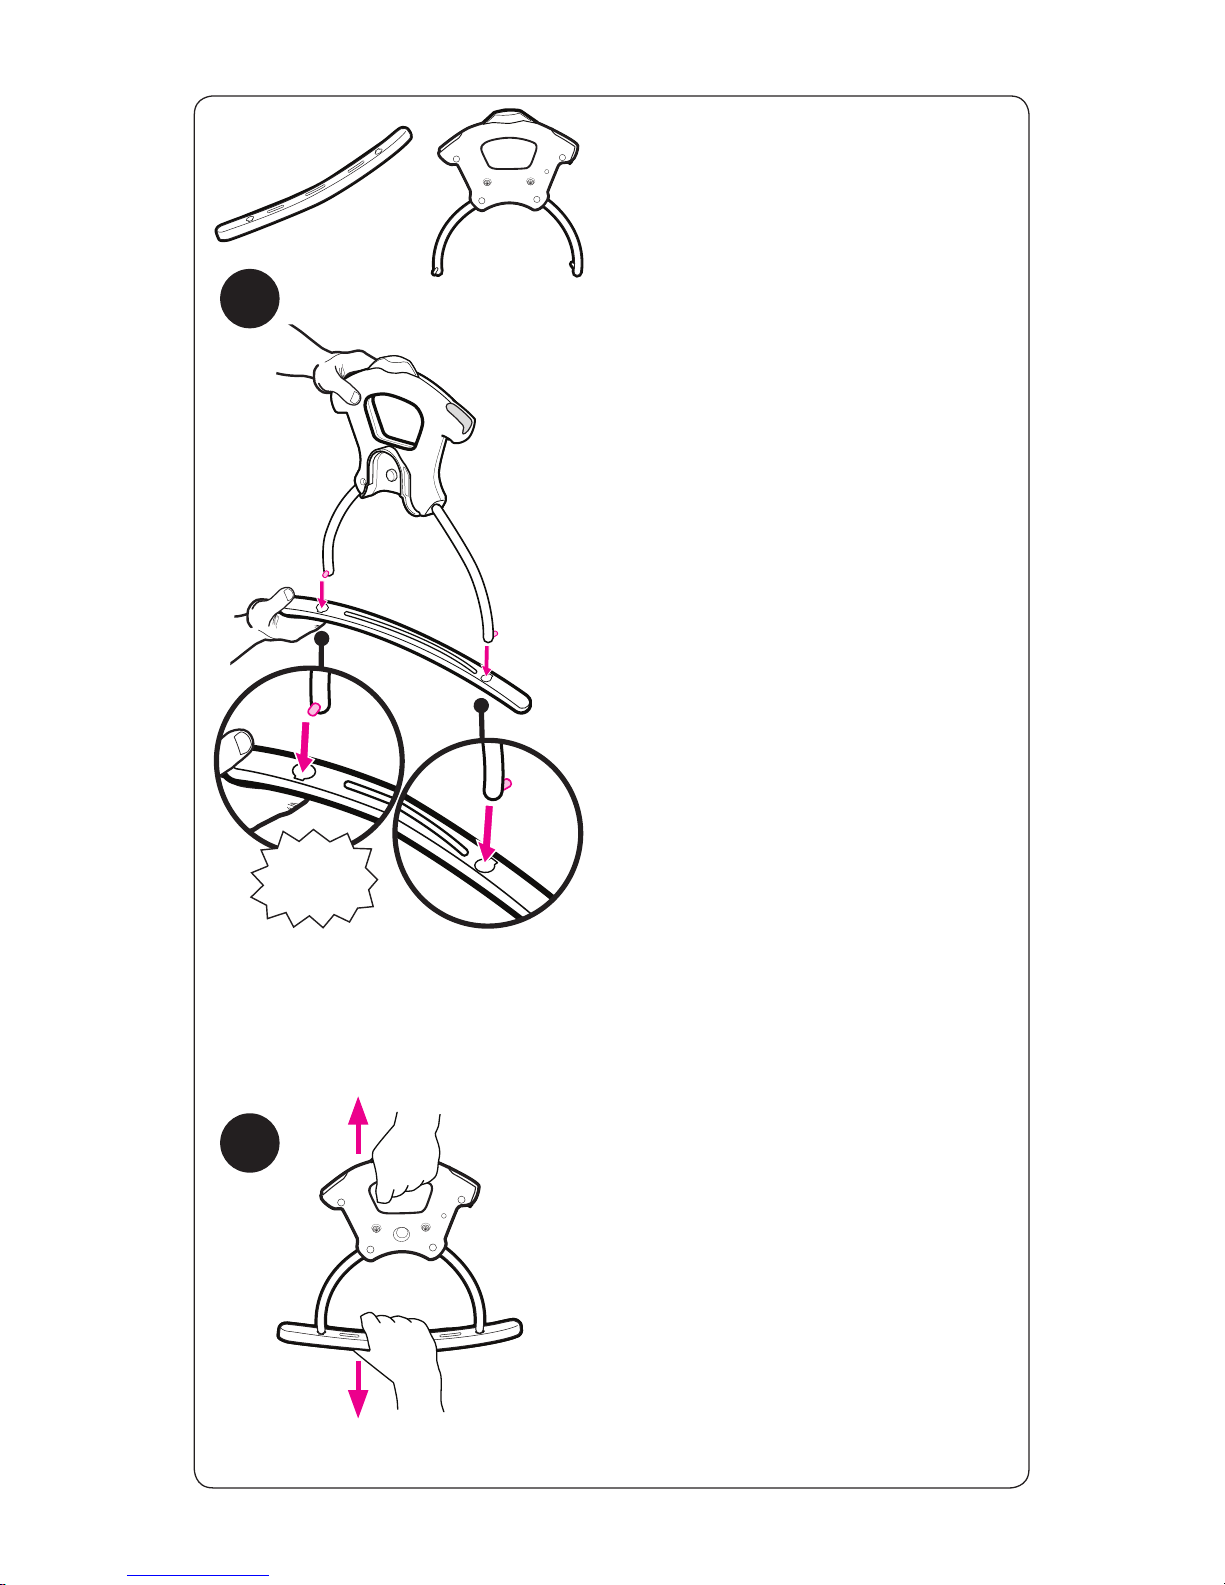
Select the handle without the
electronic switch.
Insert the handle tubes into the
rocker as shown. You will have to
push the buttons while inserting.
Tug on parts to make sure they are
securely attached.
40
41
SNAP!
Page 32
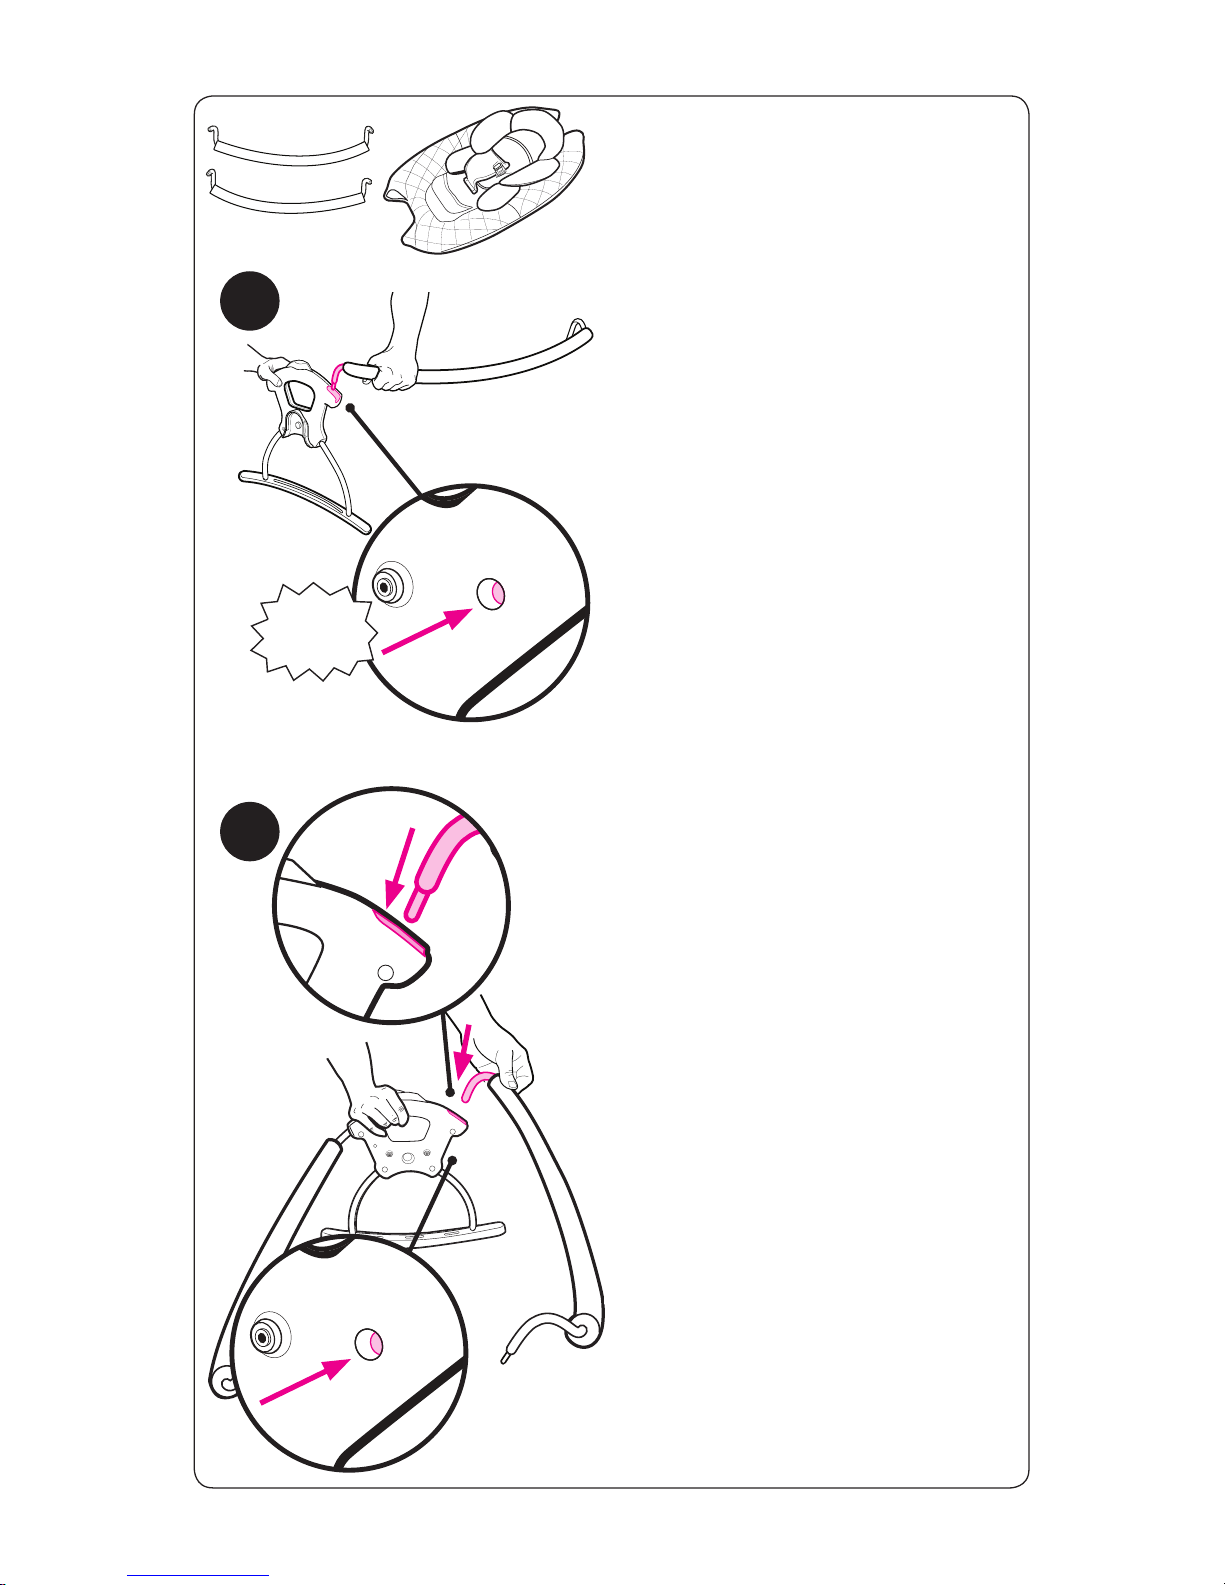
Attach one of the seat tubes to the
handle as shown. The U-shape on
the handle should be facing out.
Make sure the button is snapped
into place as shown.
42
A
ttach the other seat tube to the
handle as shown. Make sure the
button is snapped into place as
shown.
43
SNAP!
Page 33
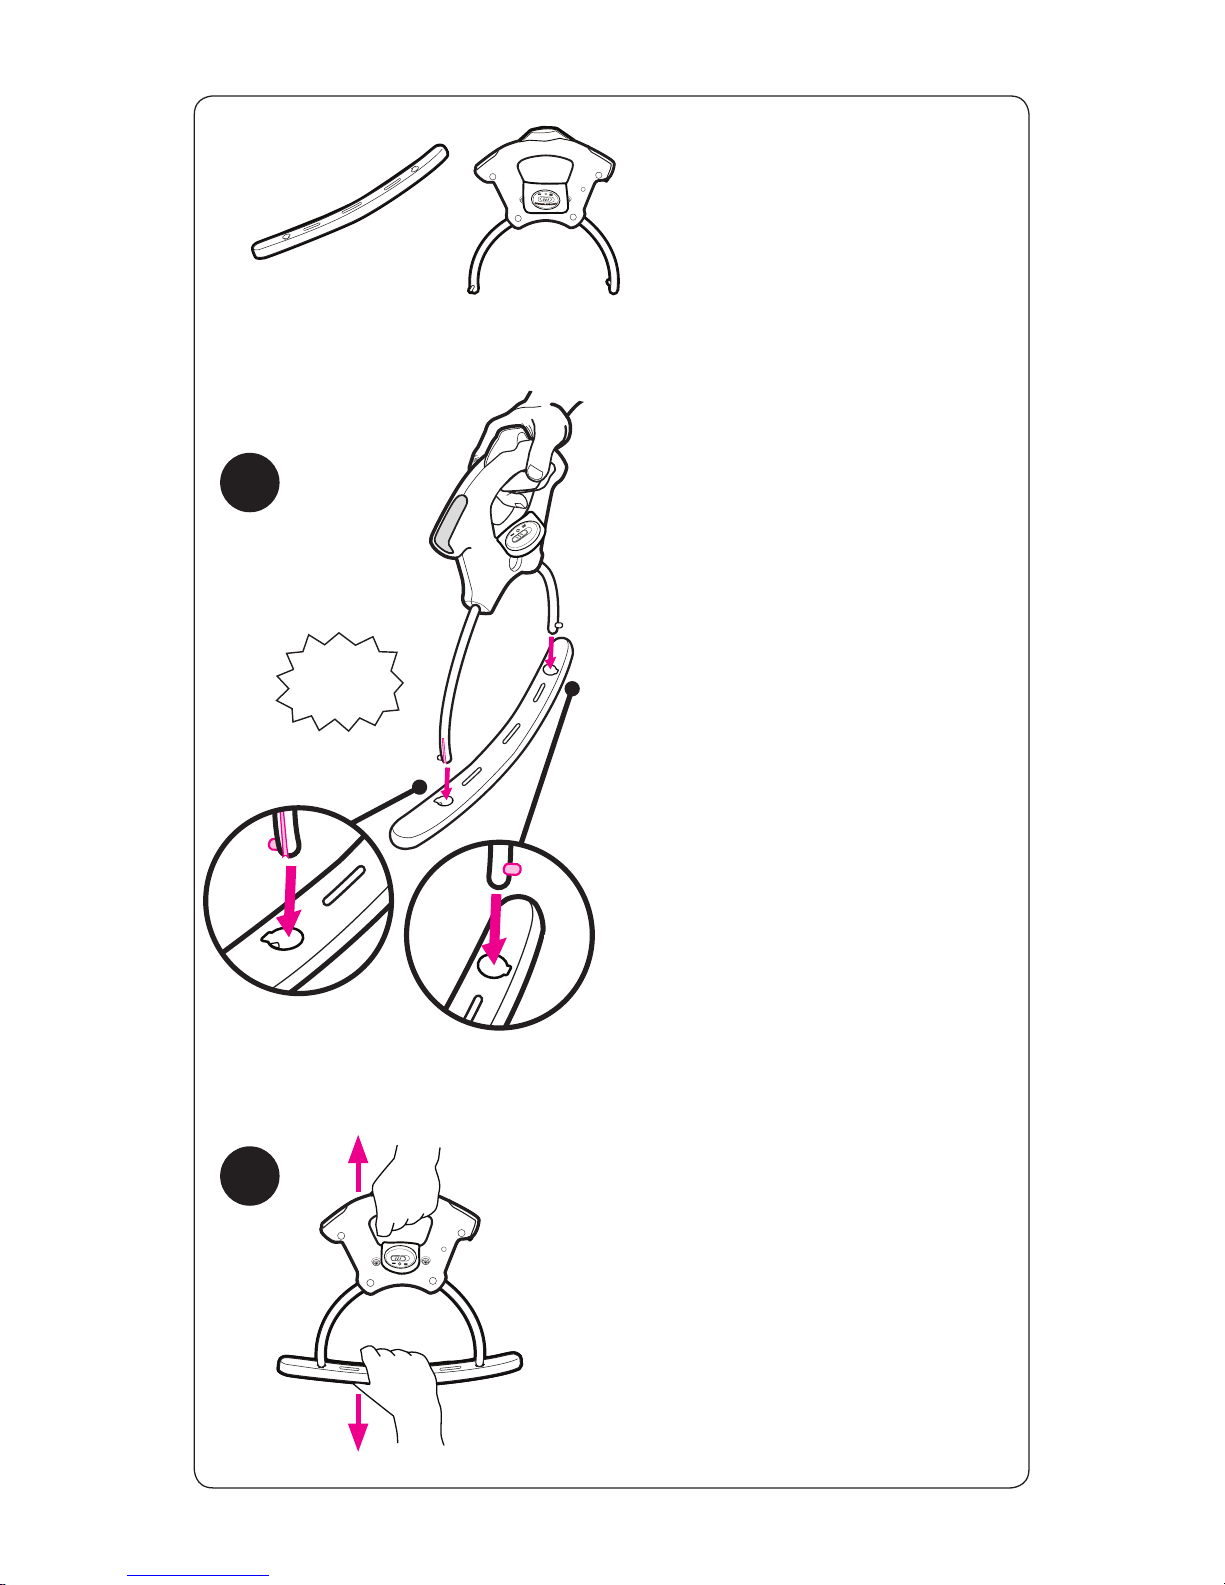
Select the handle with the electronic
switch.
Insert the handle tubes into the
rocker as shown. You will have to
push the buttons while inserting.
Tug on parts to make sure they are
securely attached.
44
45
SNAP!
Page 34
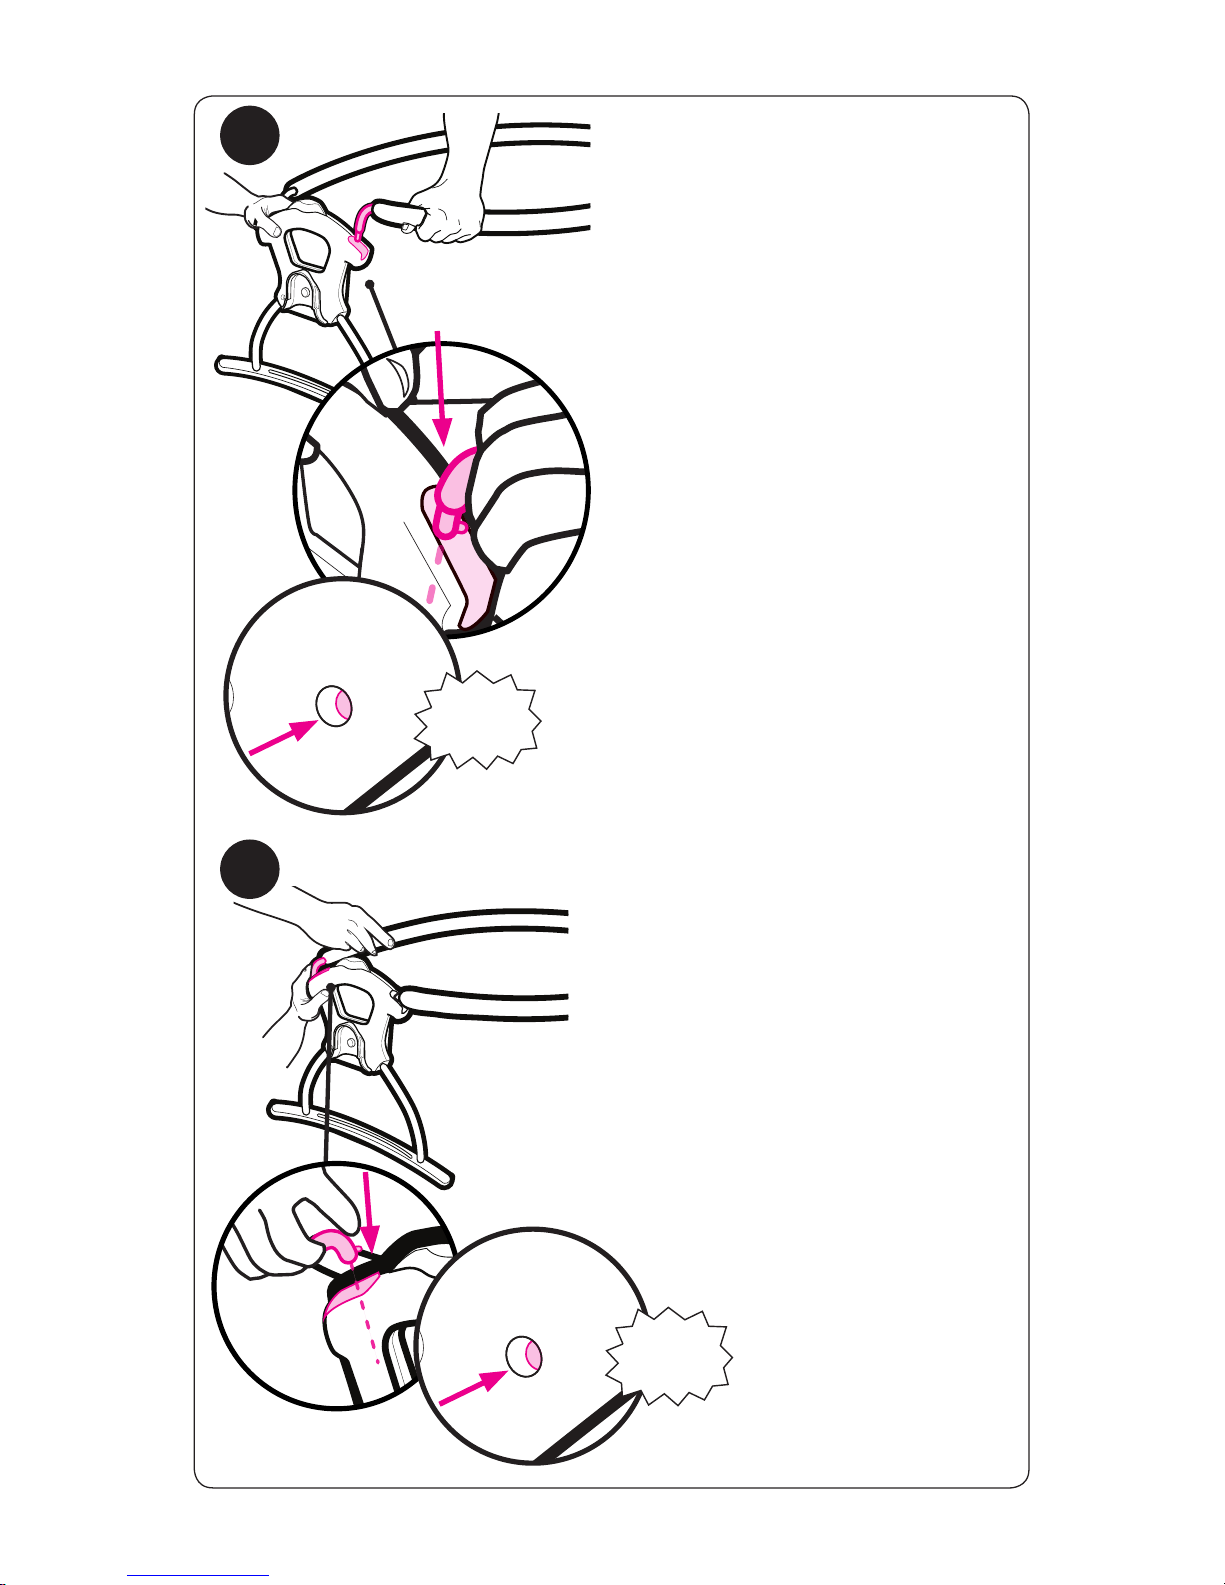
Attach one of the seat tubes to the
handle as shown. The U-shape on
the handle should be facing out.
Make sure the button is snapped
into place as shown.
46
47
Attach the other seat tube as
shown. Check that the button is in
place.
SNAP!
SNAP!
Page 35
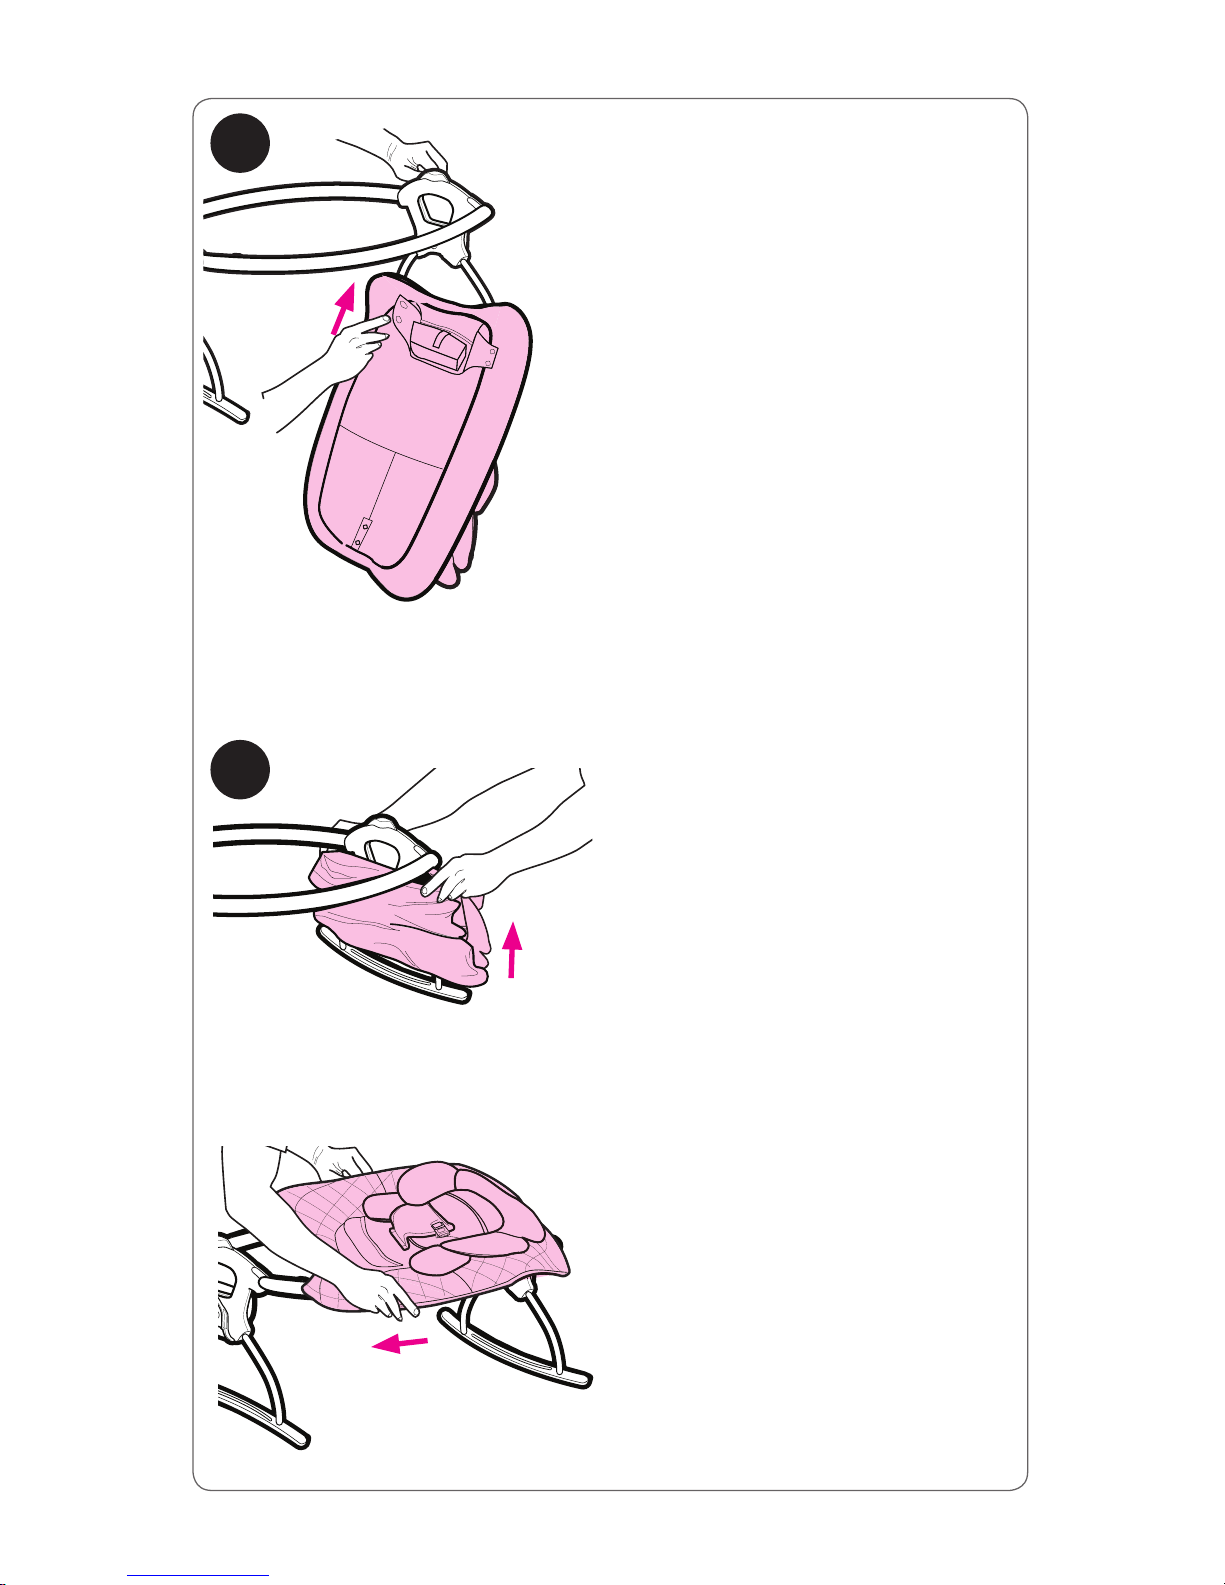
Slide the foot end of the seat cover
over the rocker that does not have
the electronic switch.
Pull seat cover up over the handle
and the seat tubes as shown.
48
49
Page 36
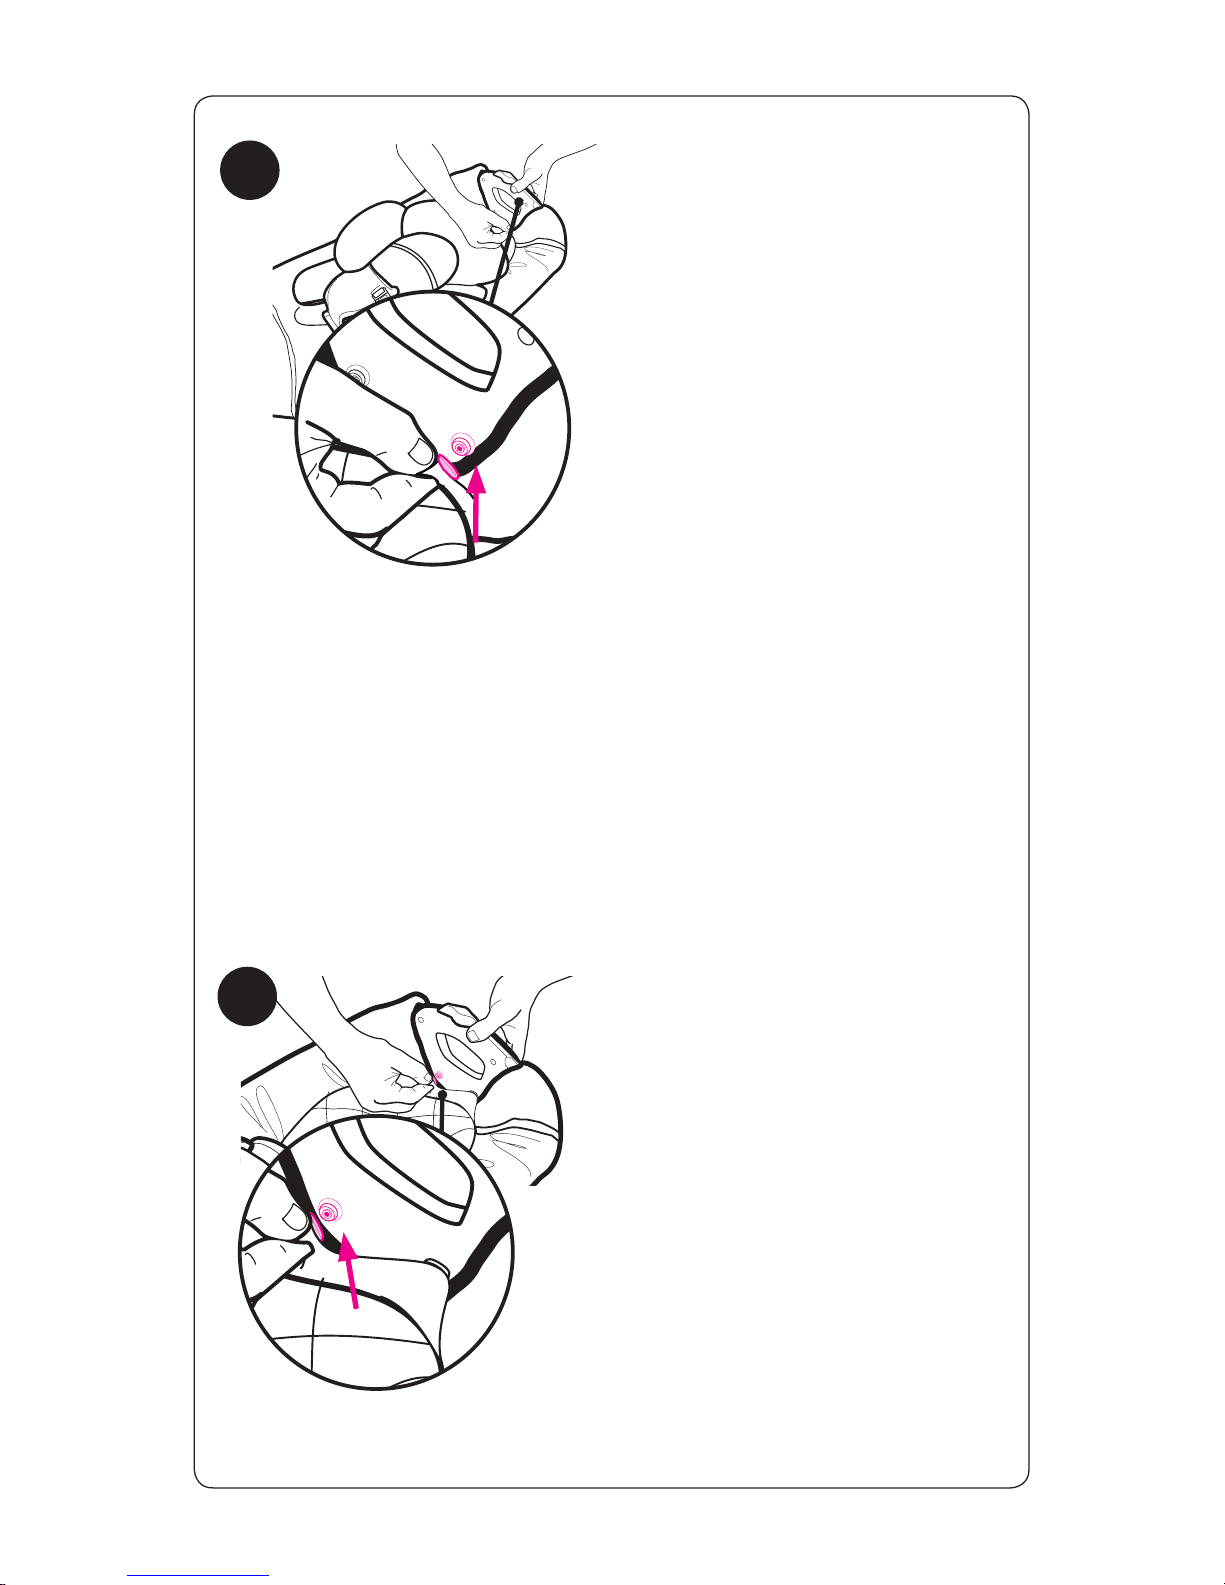
50
F
asten snap as shown.
F
asten snap as shown.
51
Page 37
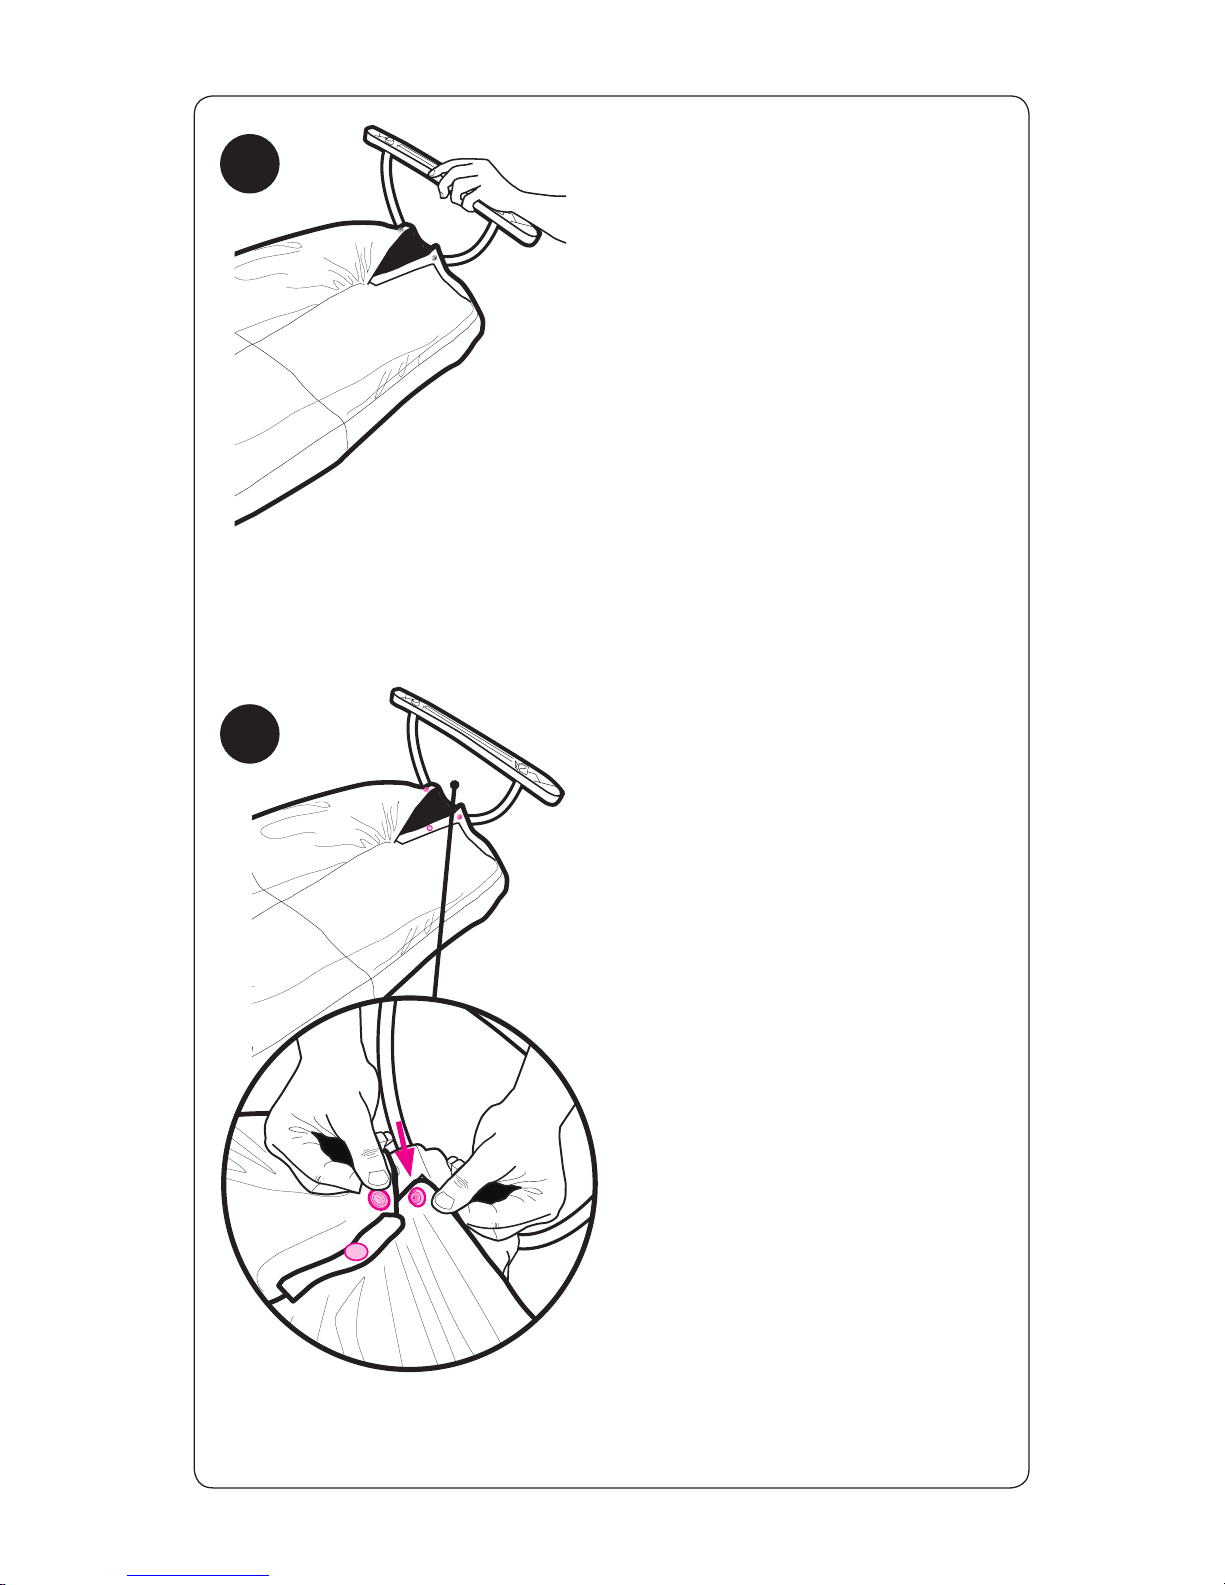
Fasten 2 snaps as shown.
Flip seat upside down.
52
53
Page 38
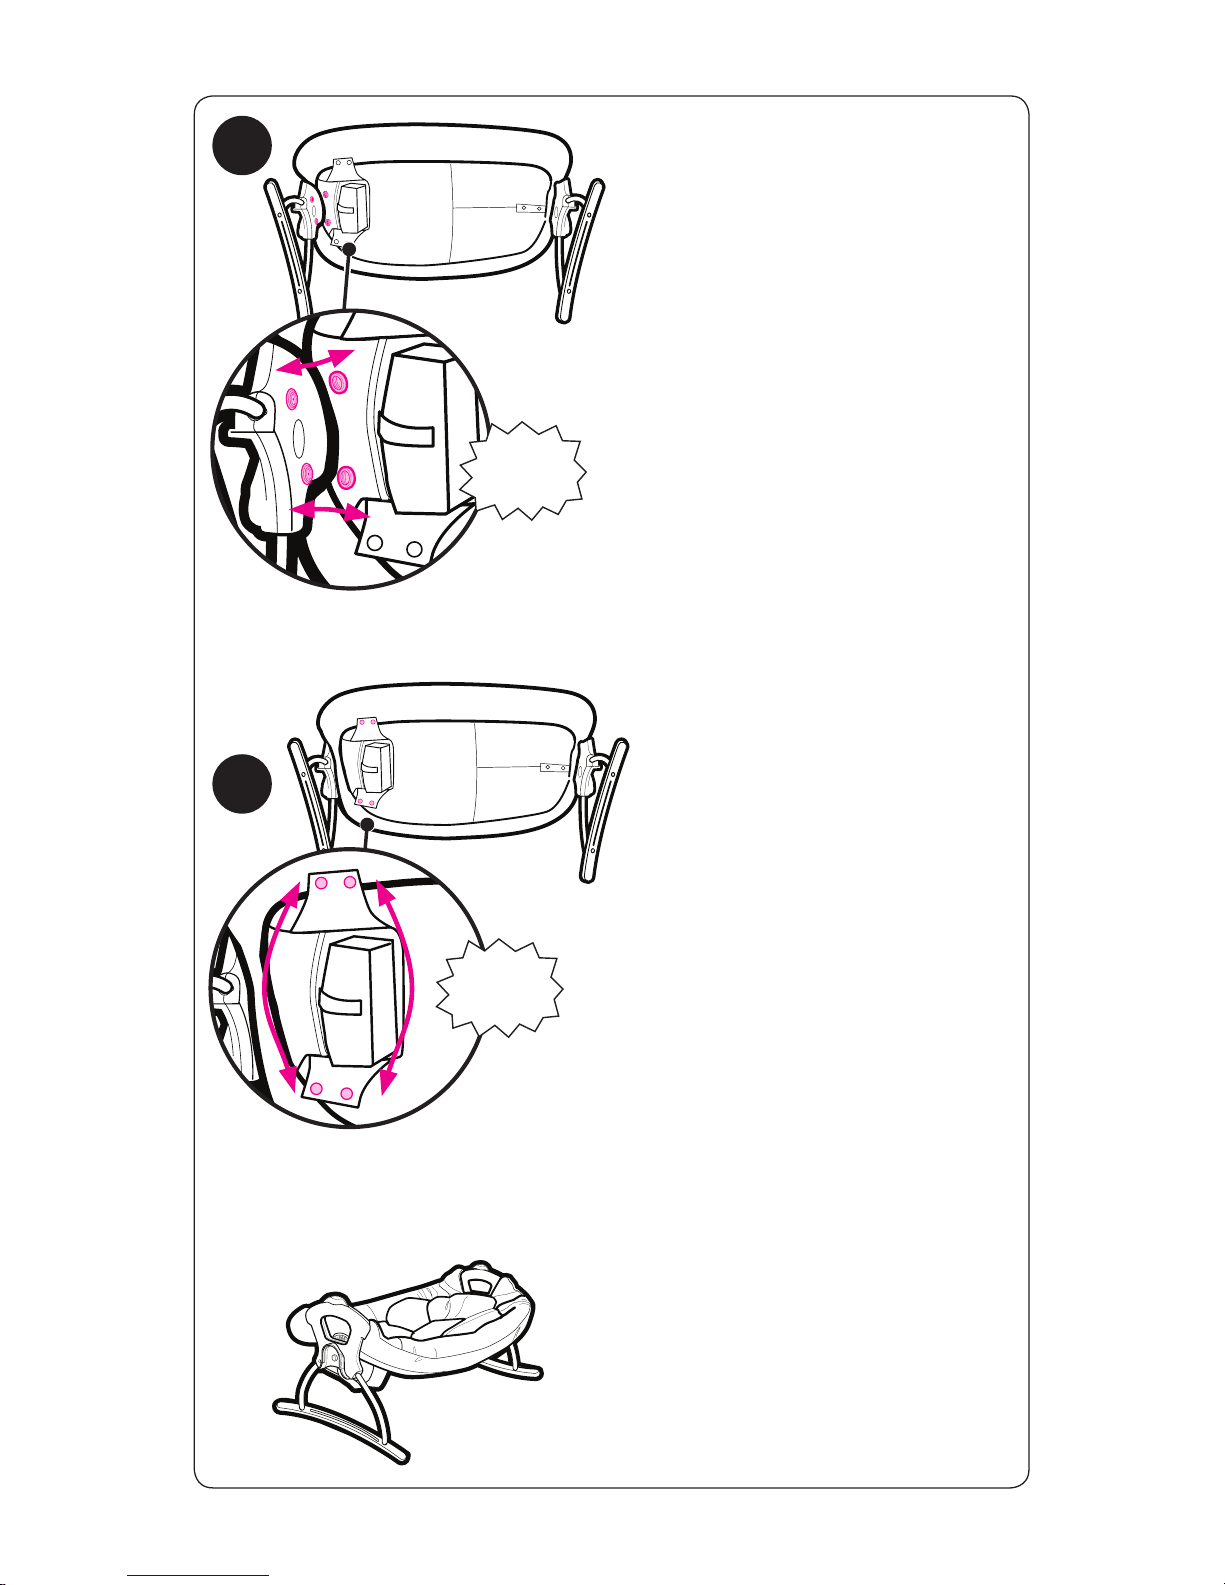
54
55
Fasten the snaps to the seat
handle as shown.
Fasten the snaps on the flaps
together as shown.
SNAP!
SNAP!
Page 39
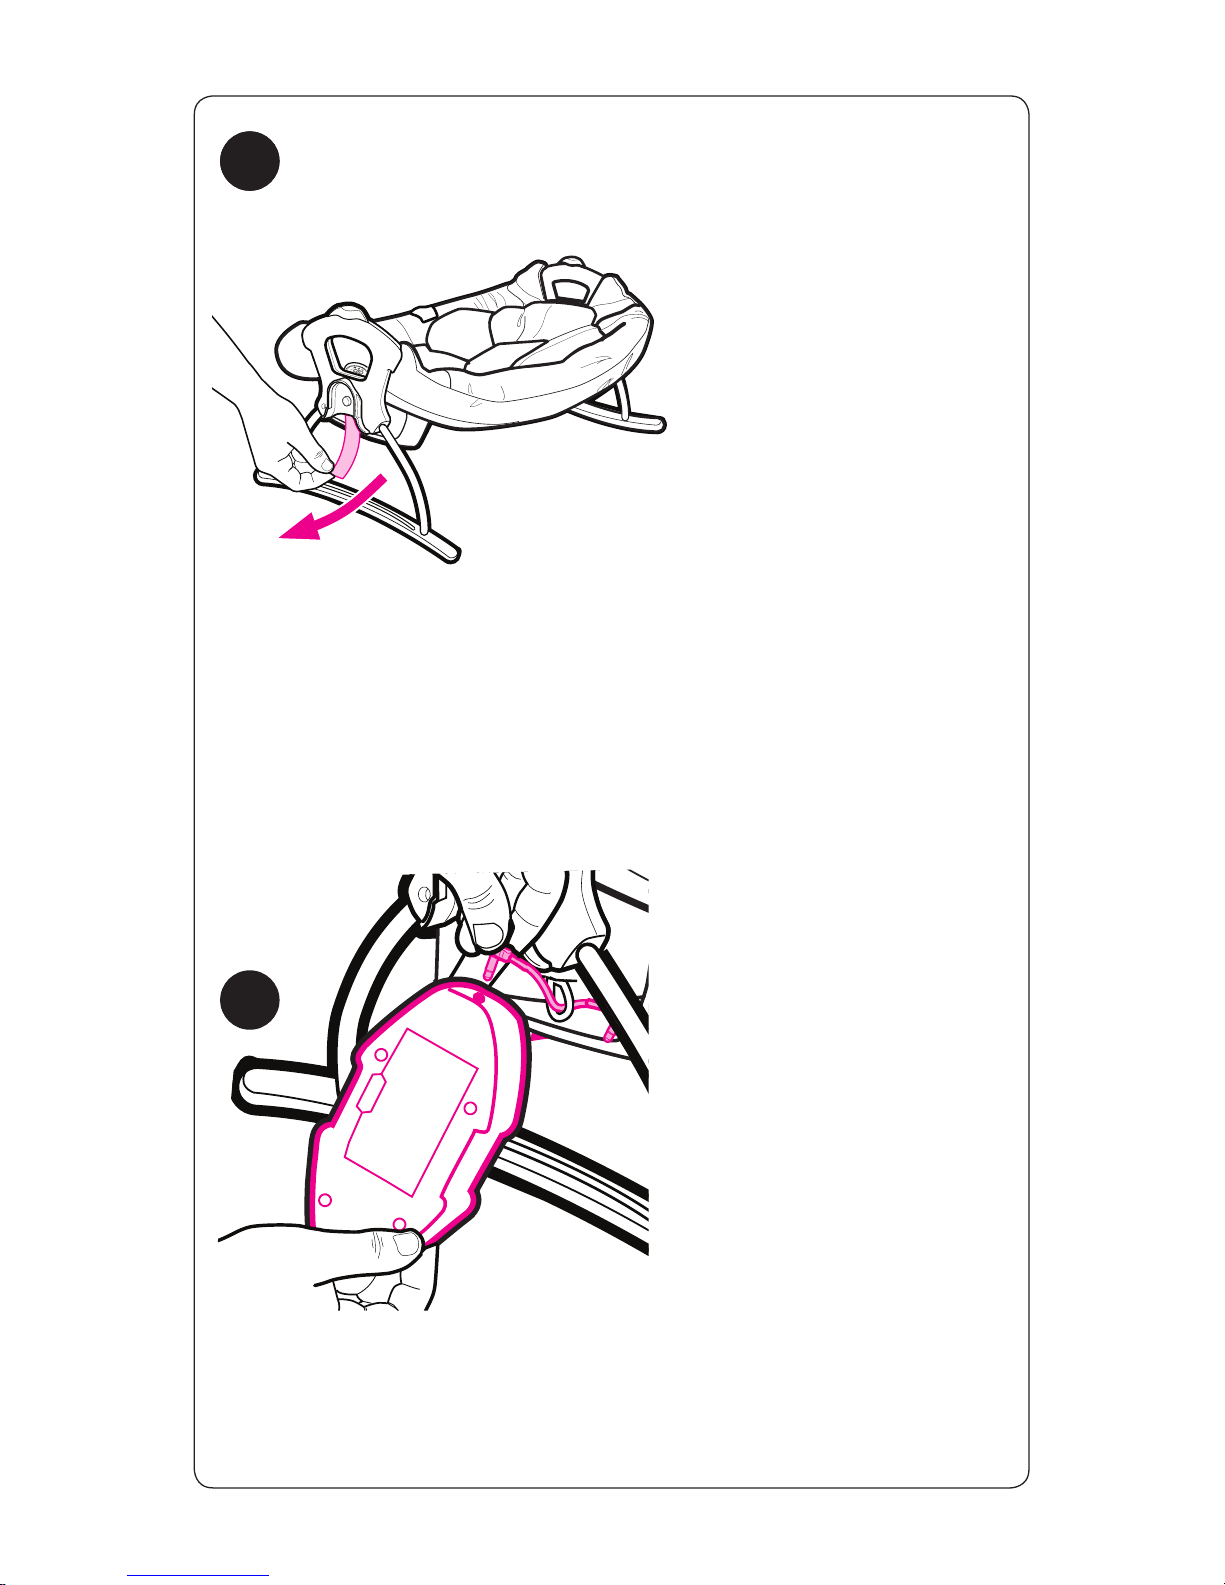
Open pocket by pull
ing on
the hook and loop tape as
shown.
4256
Plug-in one end of the short
cord into the side of the
vibration unit as shown.
57
Page 40
58
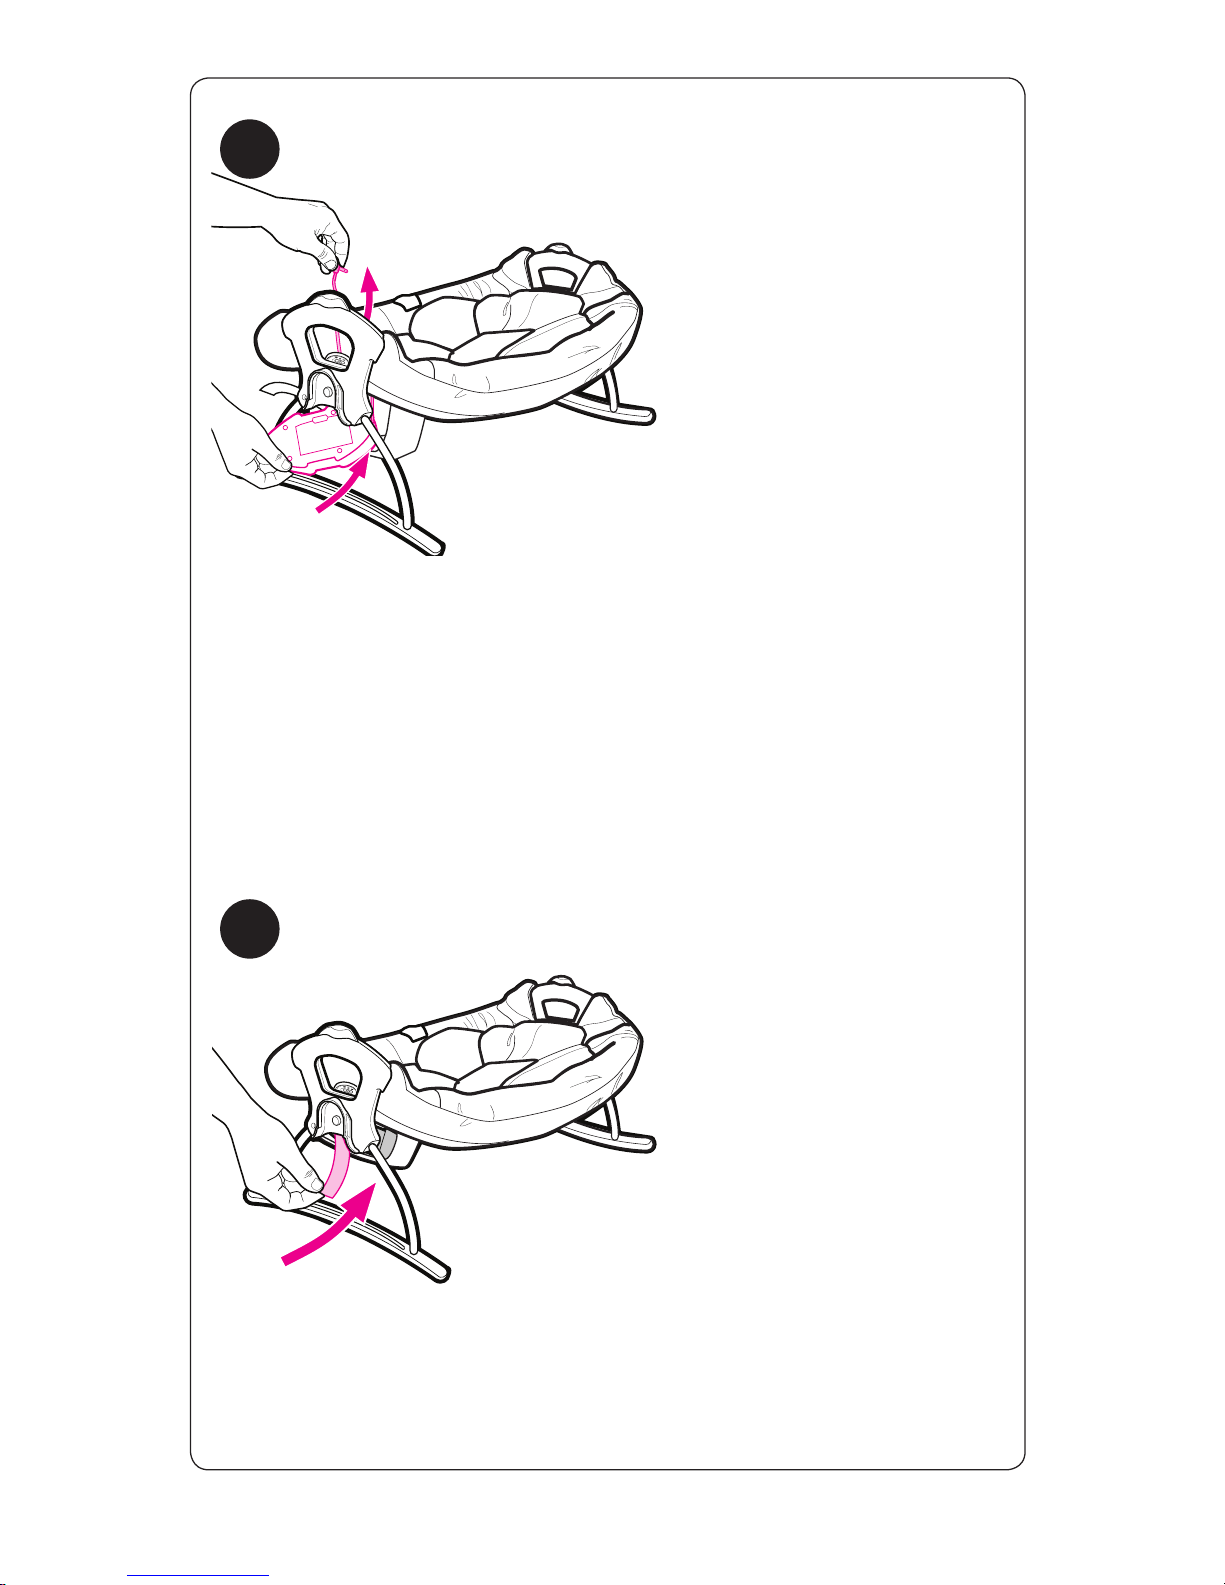
Insert vibration unit into
pocket.
Close pocket by re-attaching
hook and loop tape as
shown.
59
Page 41
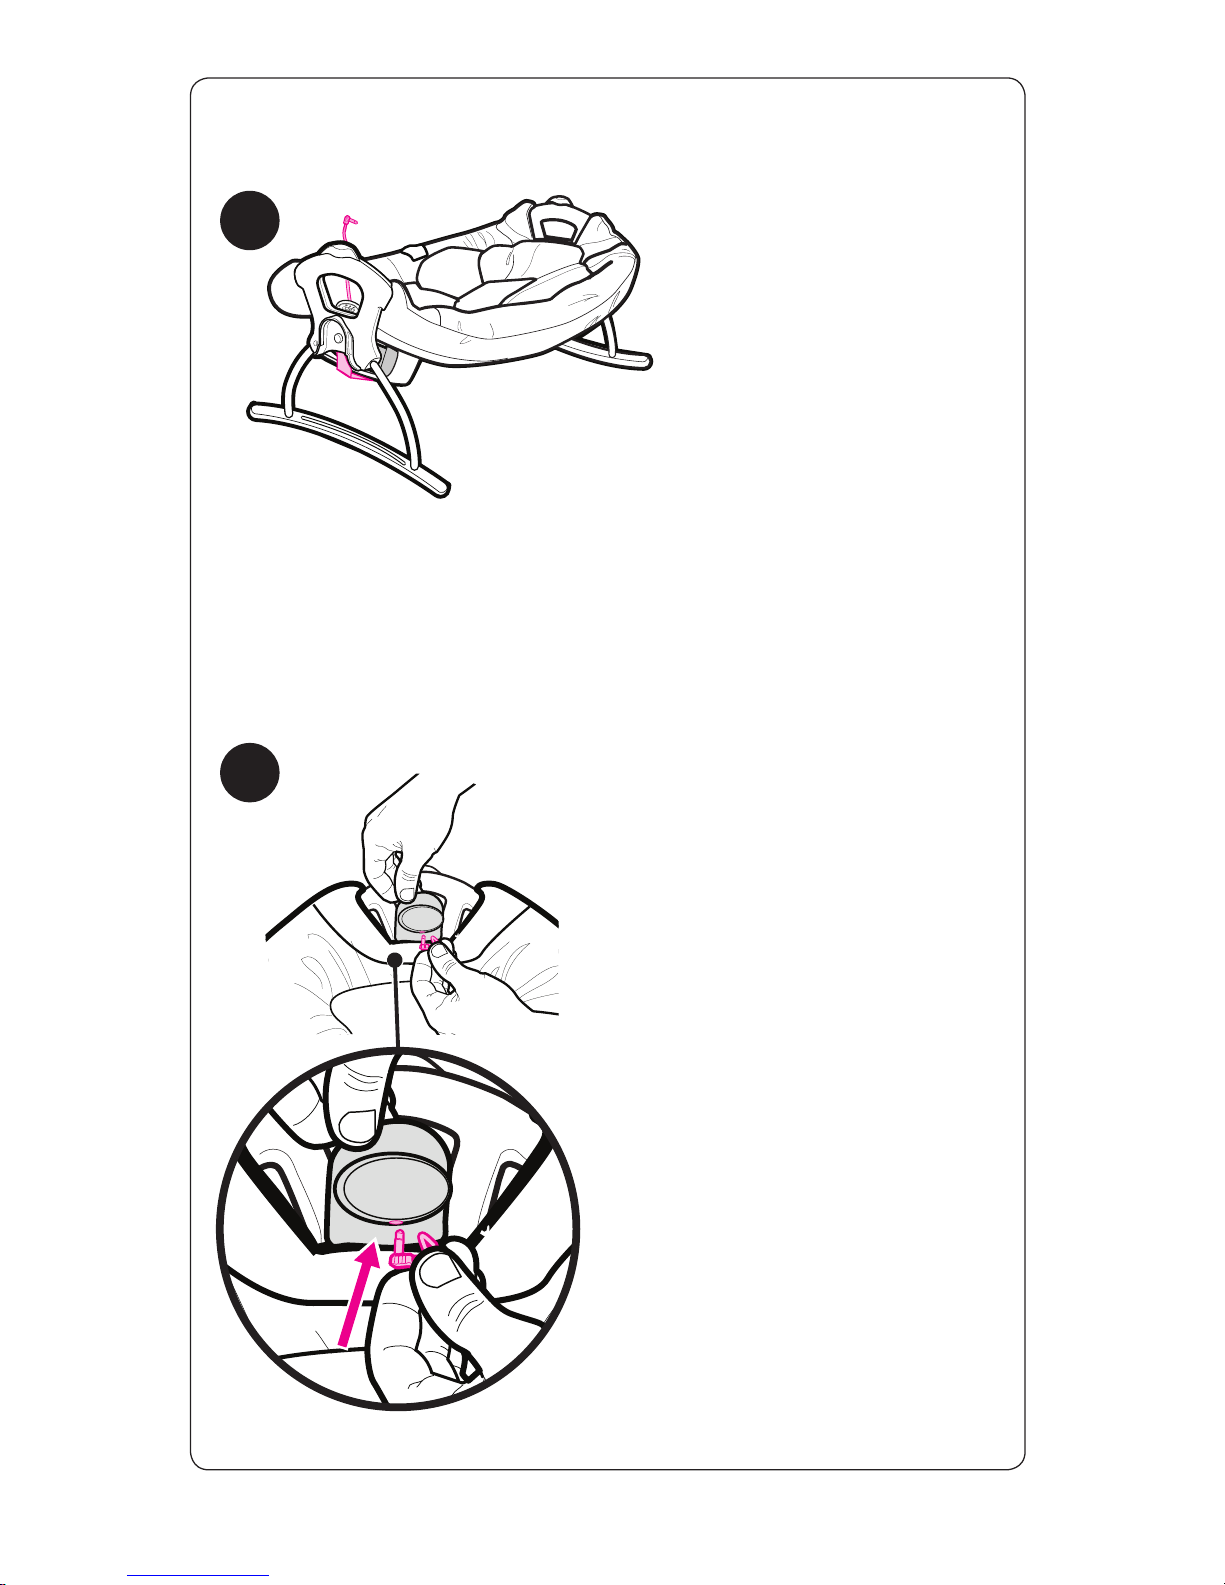
After closing the pocket make
sure the short cord is sticking
out as shown.
60
61
Plug-in the other end of the short
cord into the back of the electronic
switch as shown.
Page 42
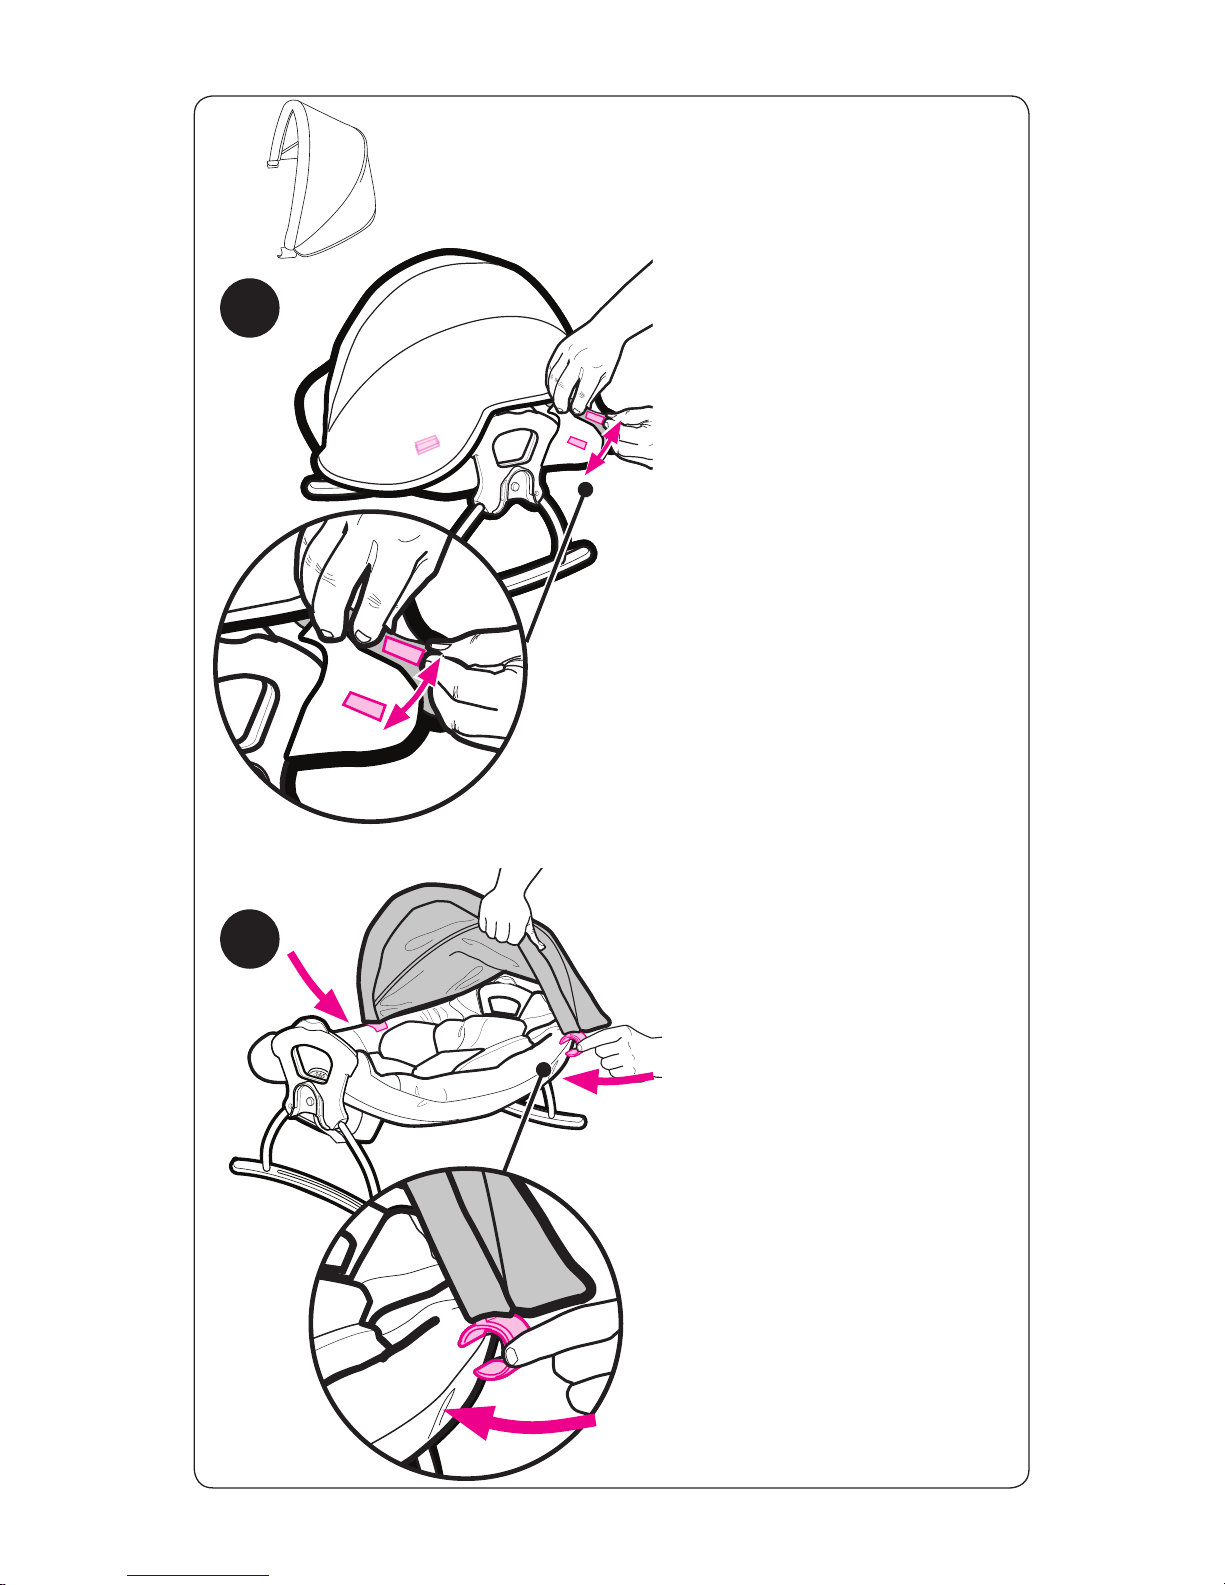
Attach the canopy mounts to
the sides as shown.
62
63
Secure the back of the
canopy to the headend of the
seat using the hook and loop
tape as shown.
Page 43
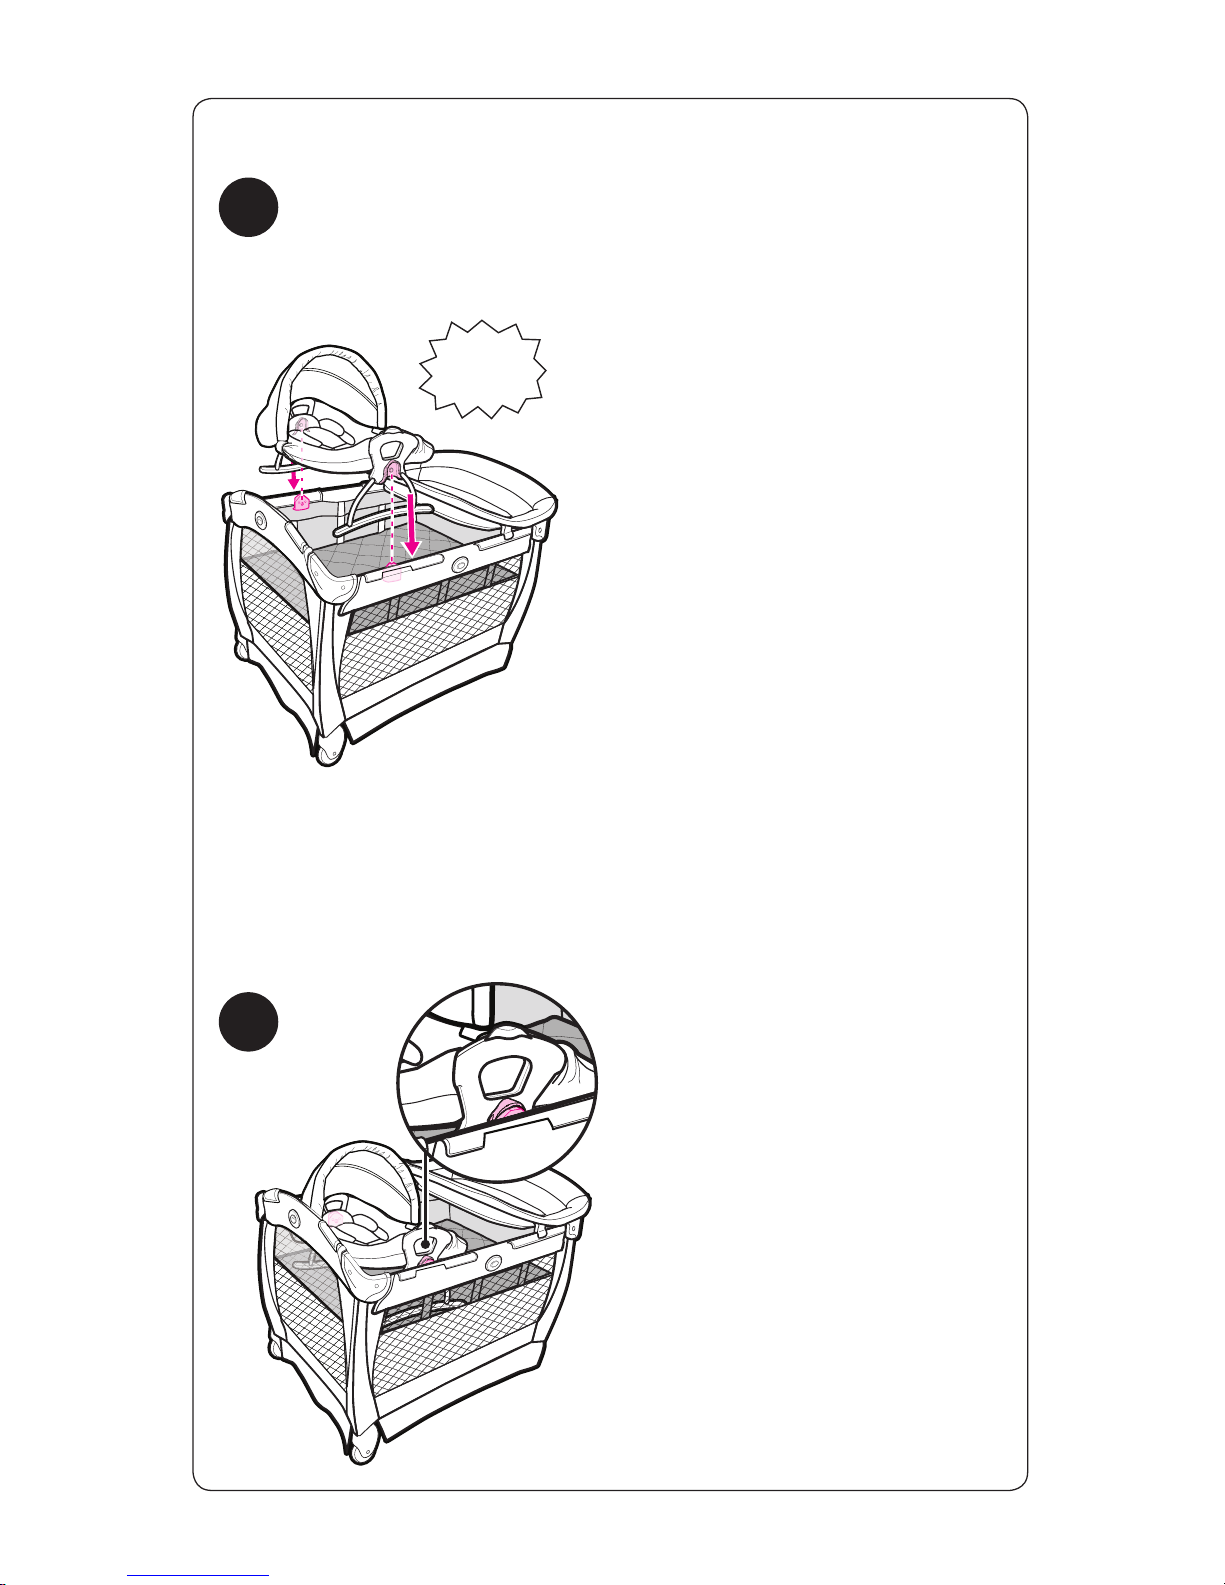
NOTE: Seat should always be
attached opposite the changing
table.
Latch the seat onto the bassinet
mounts on both sides of the
bassinet as shown.
Make sure both sides of the
seat are securely latched to the
bassinet mounts by pulling up on
it.
64
65
SNAP!
Page 44
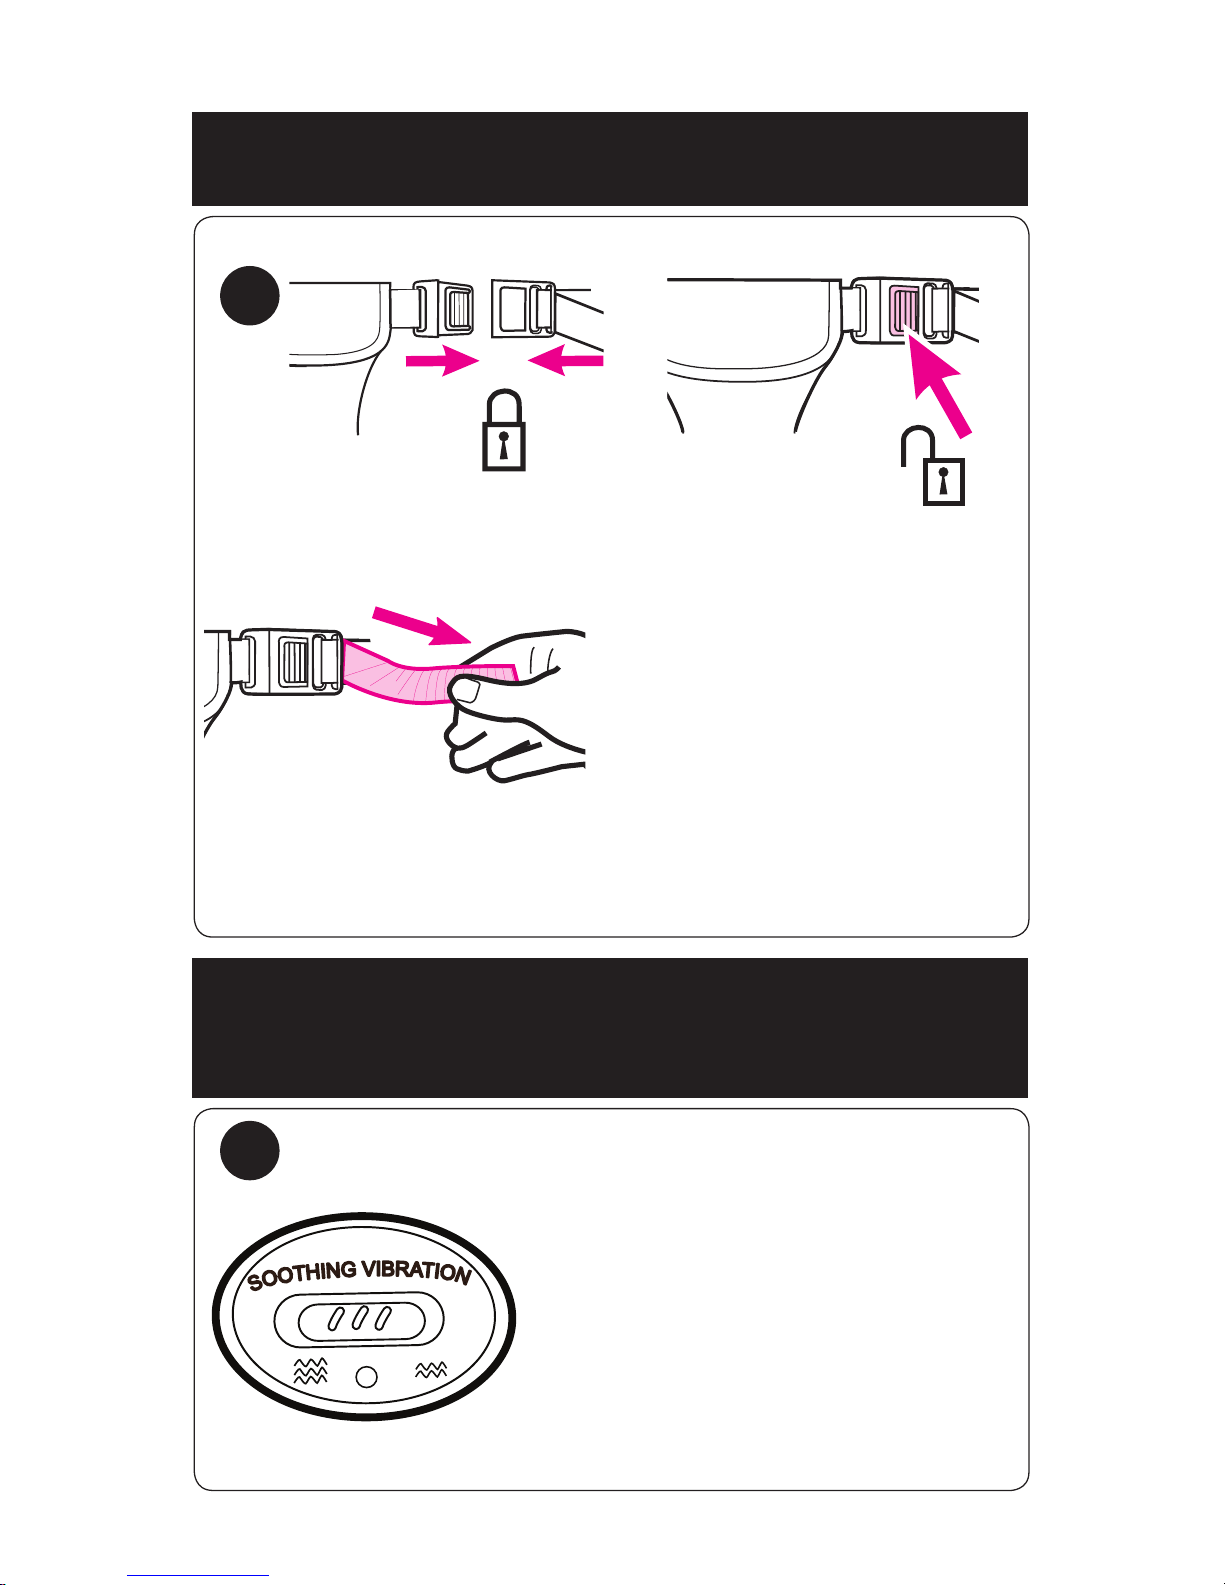
To use integrated electronic switch, slide
button to left or right for hi or lo speed.
To Secure Child
To Use Electronic Switch
66
67
Use slide adjuster at waist for
tighter adjustment.
Page 45
68
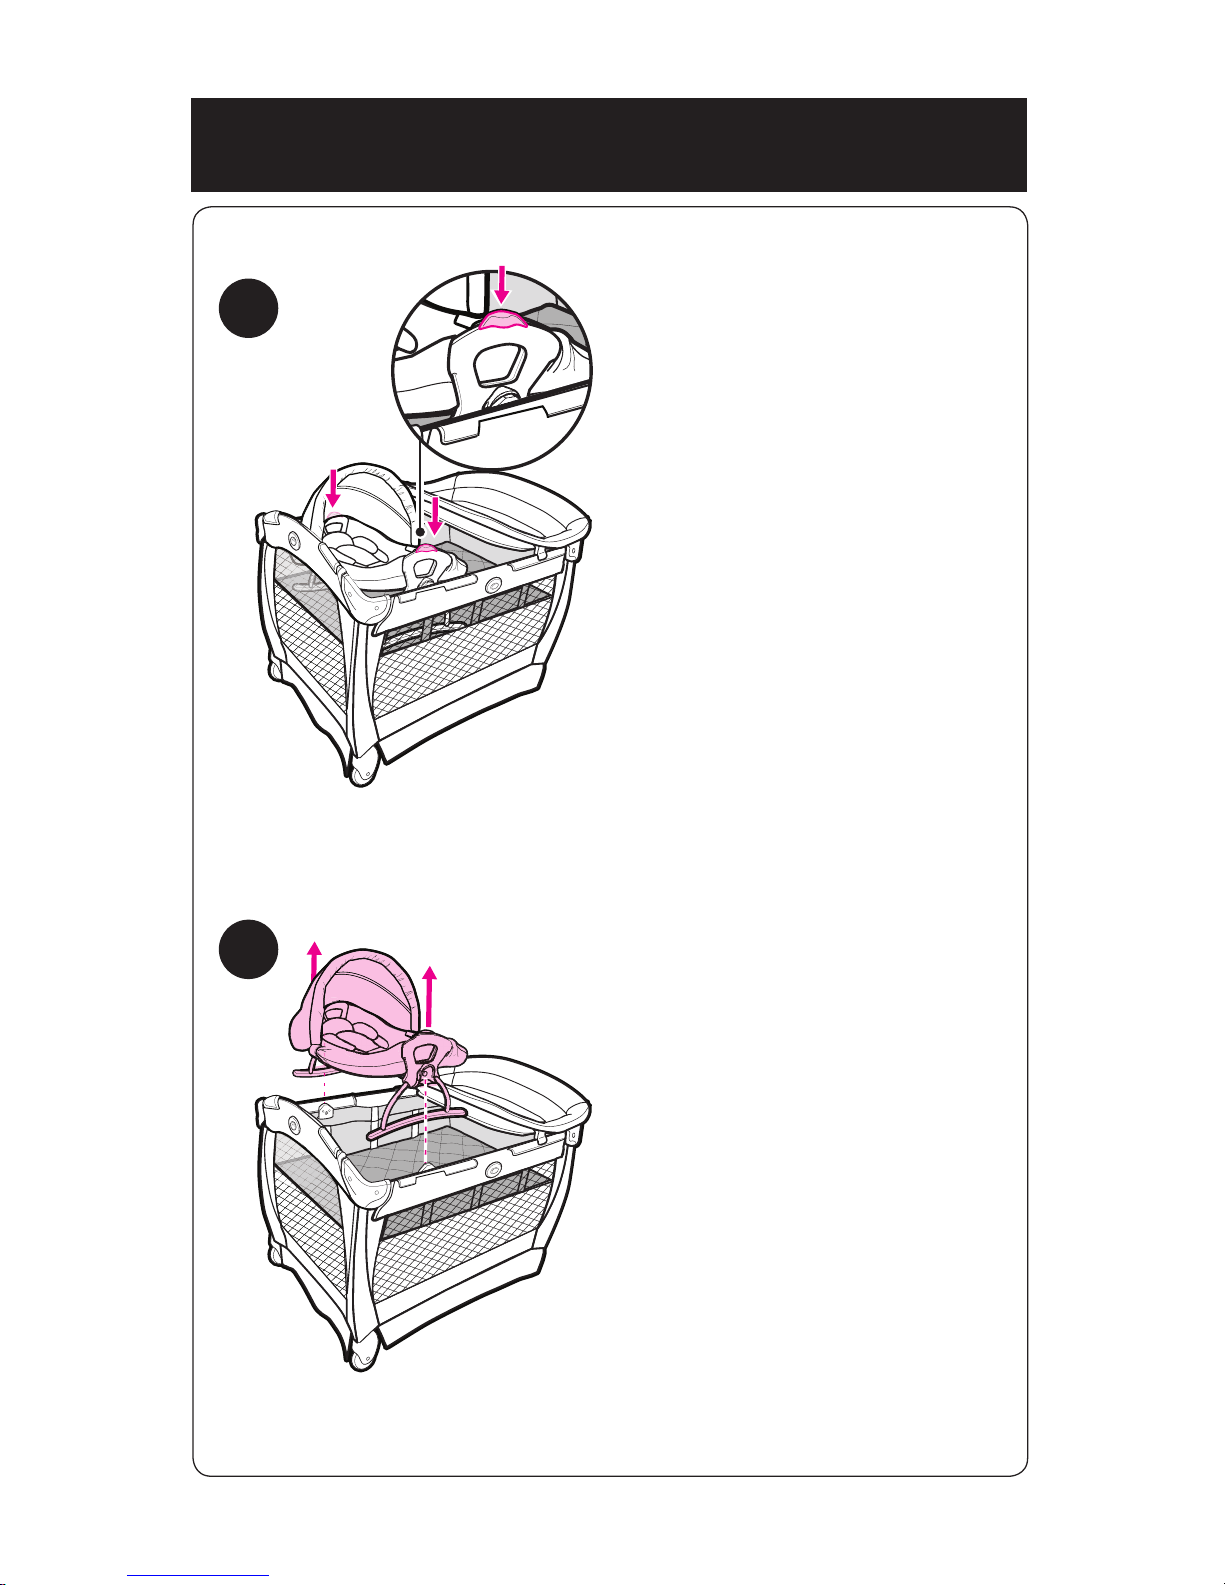
To remove, press buttons on
both sides of the seat handles
and pull up as shown.
To Remove Seat
69
Page 46
2X
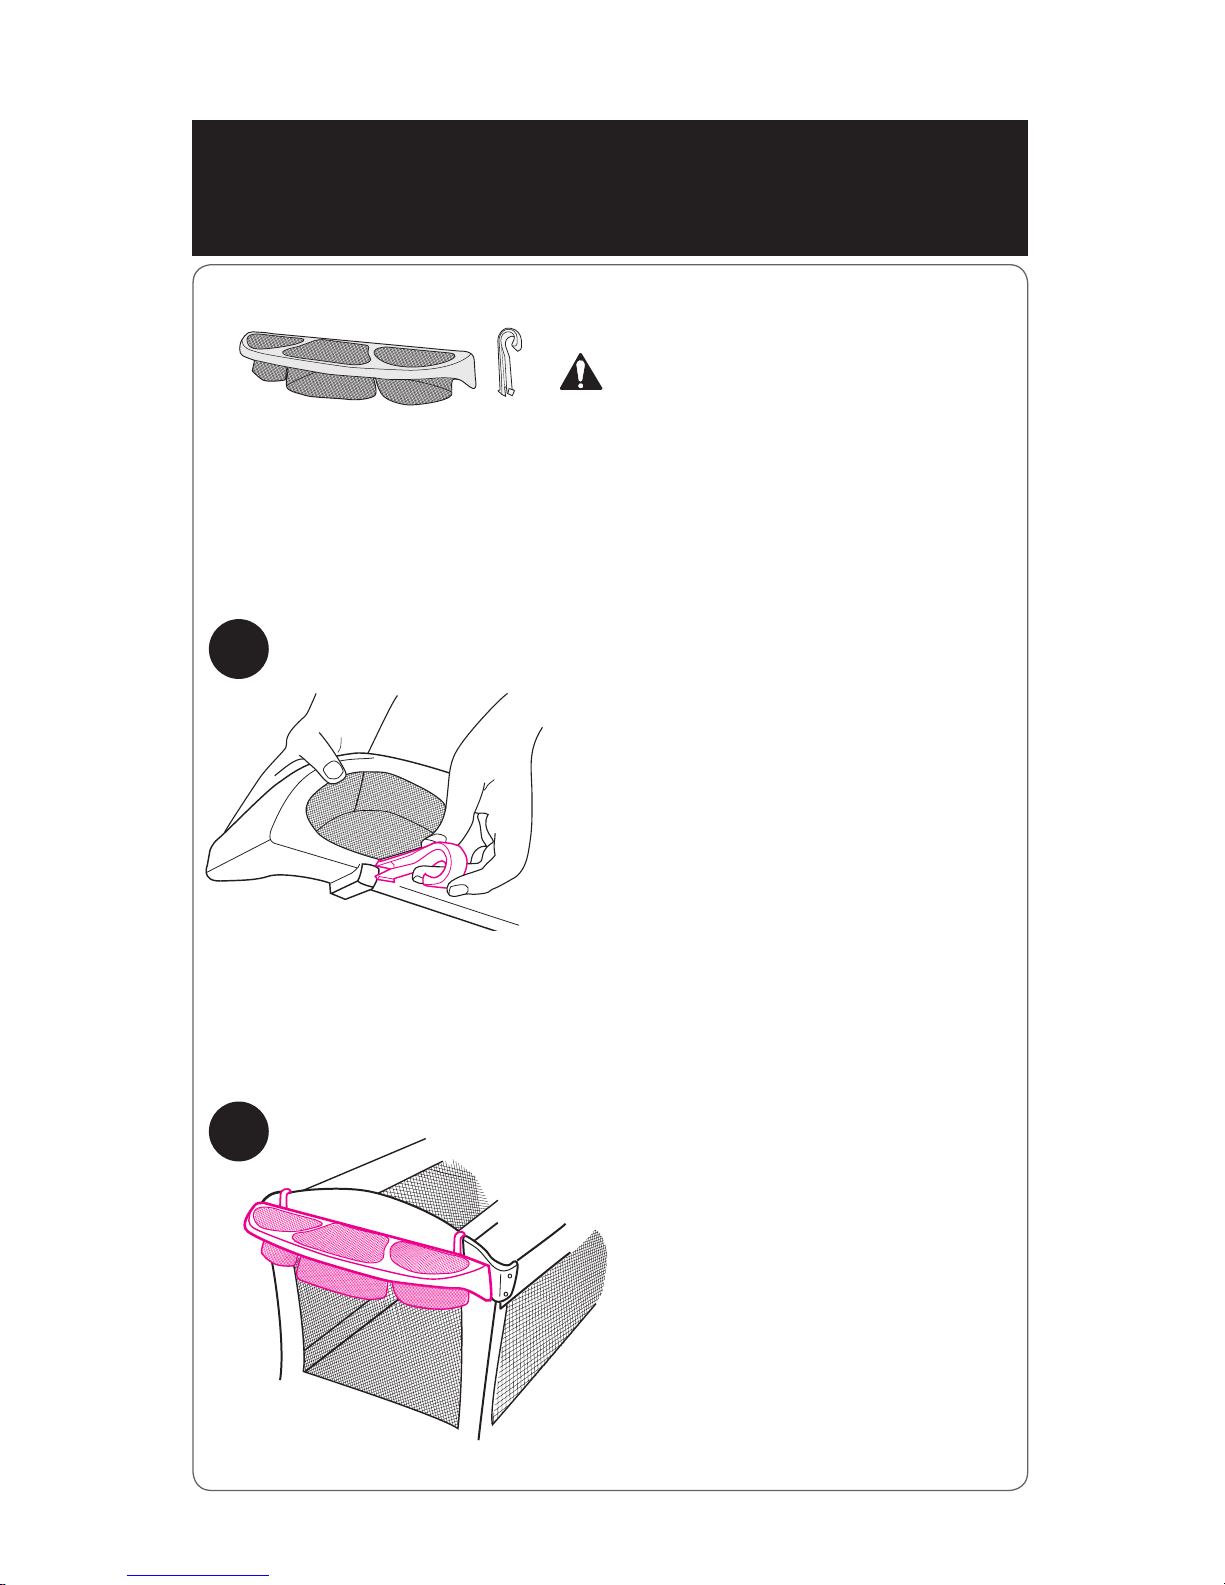
WARNING
Always keep objects out of child’s
reach. Remove this accessory when
child is able to pull himself up in the
playard.
70
71
Parent Organizer
Page 47
FROM TIME TO TIME CHECK YOUR PLAYARD for worn parts, torn
material or stitching. Replace or repair the parts as needed. Use only
Graco® replacement parts.
IF PLAYARD IS USED AT THE BEACH, you MUST clean sand off your
playard, including the feet, before packing it into cover. Sand in top rail
lock may damage it.
TO CLEAN PLAYARD, use only household soap or detergent and
warm water.
TO WASH CARRY BAG, machine wash in cold water on delicate cycle
and drip-dry. NO BLEACH.
TO WASH BASSINET: Remove electronics module and vibration unit.
NEVER remove cord from bassinet. Hand wash with warm water and
household soap. Drip dry.
Care and Maintenance
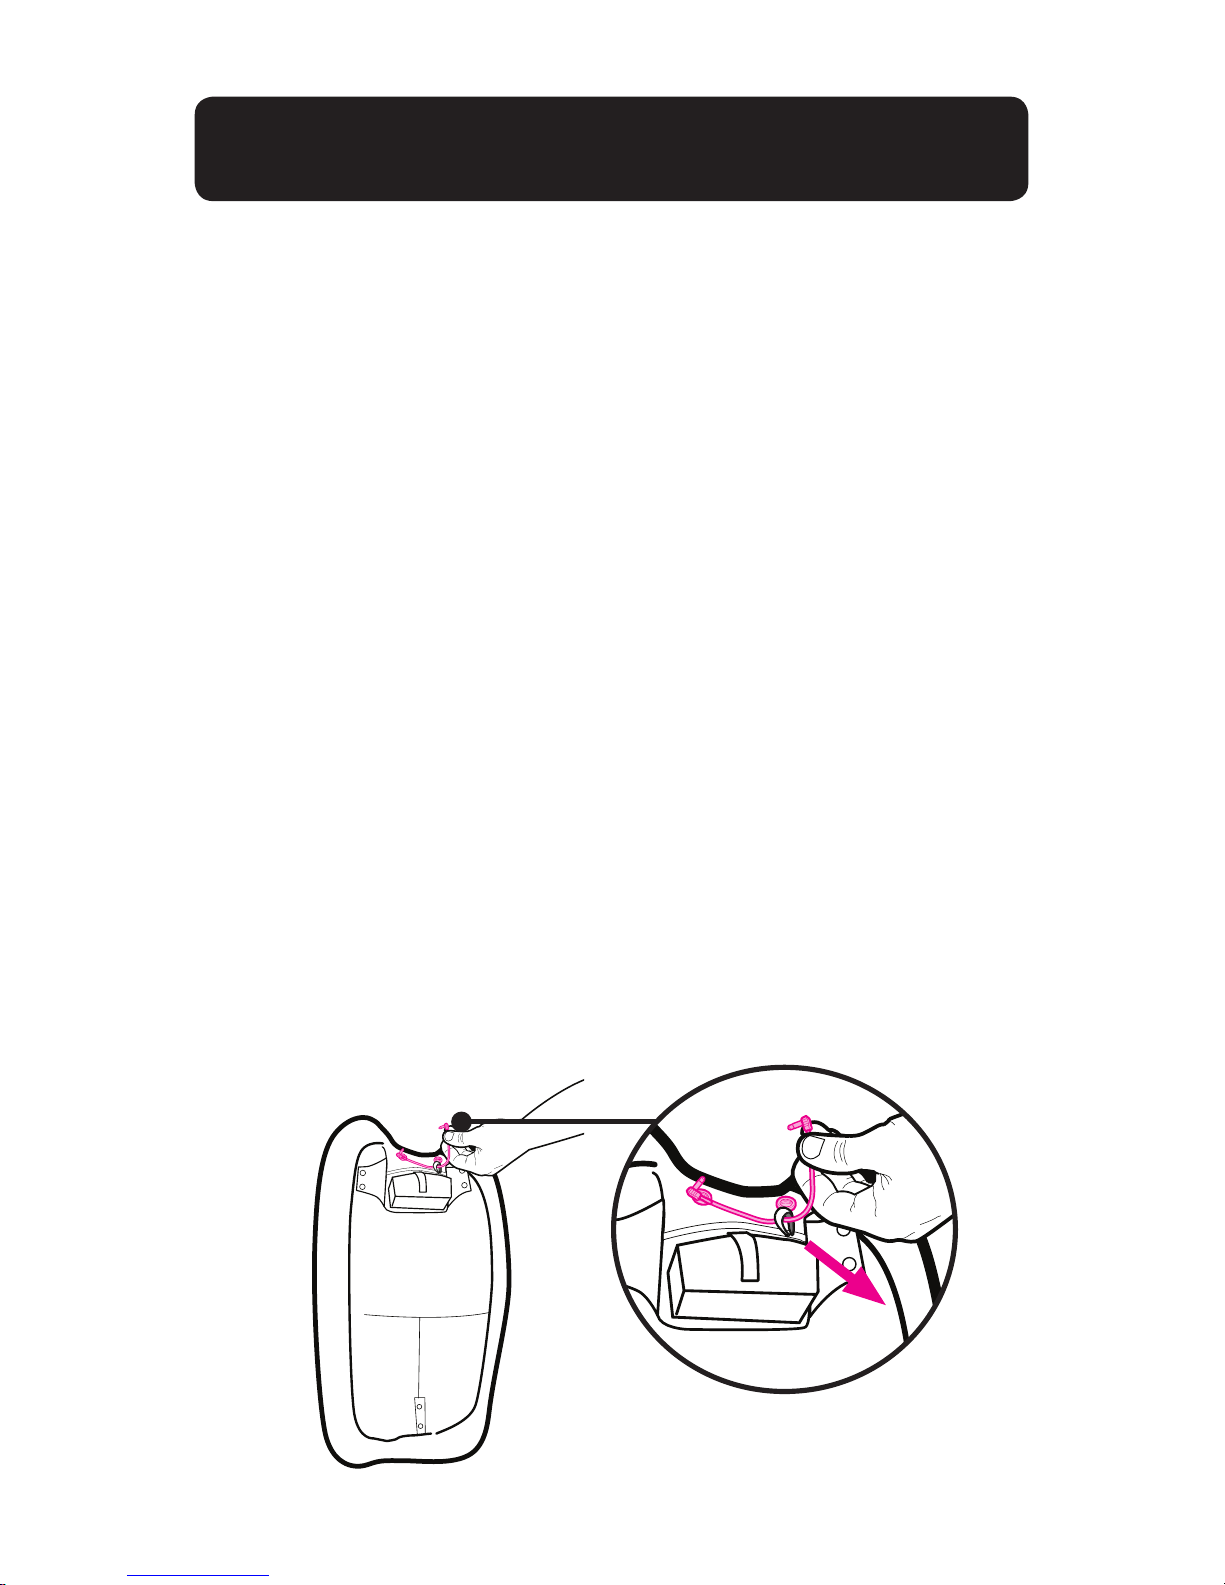
TO WASH SEAT:
1. Remove vibration unit.
2. Remove small cord as shown below.
Machine wash in cold water on delicate cycle and drip-dry.
NO BLEACH. Refer to your care tag on your seat pad for washing
instructions.
Page 48

WARNING: Changes or modifications to this unit
not expressly approved by the party responsible for compliance could
void the user authority to operate the equipment.
This device complies with part 15 of the FCC Rules. Operation is subject
to the following two conditions: (1) This device may not cause harmful
interference, and (2) this device must accept any interference received,
including interference that may cause undesired operation.
Note: This equipment has been tested and found to comply with the
limits for a Class B digital device, pursuant to part 15 of the FCC Rules.
These limits are designed to provide reasonable protection against
harmful interference in a residential installation. This equipment
generates, uses and can radiate radio frequency energy and, if not
installed and used in accordance with the instructions, may cause
harmful interference to radio communications.
However, there is no guarantee that interference will not occur in a
particular installation. If this equipment does cause harmful interference
to radio or television reception, which can be determined by turning
the equipment off and on, the user is encouraged to try to correct the
interference by one or more of the following measures:
• Reorient or relocate the receiving antenna.
• Increase the separation between the equipment and receiver.
• Connect the equipment into an outlet on a circuit different from that
to which the receiver is connected.
• Consult the dealer or an experienced radio/TV technician for help.
 Loading...