

Graco Pack‘n Play, Pack‘n Play Playard Reversible Napper & Changer LX, 1967964 Owner's Manual
Page 1

Read all instructions BEFORE assembly and USE of product.
KEEP INSTRUCTIONS FOR FUTURE USE.
See back page for
quick set up guide.
P
ack ‘n Play® Playard
Reversible Napper & Changer™LX
Page 2
Failure to follow these warnings and the
instructions could result in serious injury or death.
Setting Up the Playard
• THIS PRODUCT REQUIRES ADULT
ASSEMBLY.
• Keep fingers clear of top corners
during setup. Be sure playard is
completely set up before use.
Check that the four top rails are
completely latched, the center of
the floor is pushed down, the
mattress/pad is flat, the straps are
securely fastened to the
bottom of the unit and the four
corners are tucked under the
stiffeners. Always follow the
instructions in the owner’s manual
to set up the playard.
Using the playard
• The playard is for playing or
sleeping. When used for playing,
never leave child unattended and
always keep child in view. When
used for sleeping, you must still
provide the supervision necessary
for the continued safety of your
child.
• Always keep the playard away
from hazards in the area that may
injure your child.
• When child is able to pull to
standing position, remove large
toys and other objects that could
serve as steps for climbing out.
• Stop using this product when your
child reaches 35 inches (89 cm)
in height, weighs more than 30 lb
(14 kg), or is able to climb out.
• Do not modify playard or add any
attachments that are not
listed in the owner’s manual,
including an add-on bassinet.
• Child can become entrapped and
die when improvised netting or
covers are placed on top of a
playard. Never add such items to
confine child in playard.
• NEVER leave child in product with
side lowered. Be sure side is in
raised and locked position
whenever child is in product.
• If refinishing, use a nontoxic finish
specified for children’s products.
Avoiding Suffocation Hazards
• Unlike cribs that have rigid sides,
the playard has flexible sides.
As a result, the playard mattress/
pad is specially designed to
prevent suffocation. The playard
mattress/pad has a solid base, a
certain length and width, and is
less than one inch thick in order to
meet safety standards. Using a
thicker or a different sized
mattress/pad may allow a child’s
head to get between mattress/pad
and the side of the playard
causing suffocation.
• Infants can suffocate
• In gaps between a mattress
too small or too thick and
products sides
• On soft bedding.
NEVER add a mattress,
pillow, comforter or padding.
Use ONLY mattress pad
provided by Graco.
Page 3

• To reduce the risk of SIDS,
pediatricians recommend healthy
infants be placed on their backs to
sleep, unless otherwise advised by
your physician.
• Never use plastic shipping bags or
other plastic film as mattress
covers not sold and intended for
that purpose. They can cause
suffocation.
• NEVER use a water mattress with
the playard.
Avoiding Strangulation
Hazards
• Strings and cords can cause
strangulation. Keep strings and
cords away from child.
• NEVER place the playard near a
window where cords from blinds
or drapes can strangle a child.
• NEVER hang strings on or over the
playard.
• NEVER place items with a string
around a child’s neck, such as
hood strings, pacifier cords, etc.
• NEVER attach strings to toys.
• This product is not intended for
commercial use.
Page 4
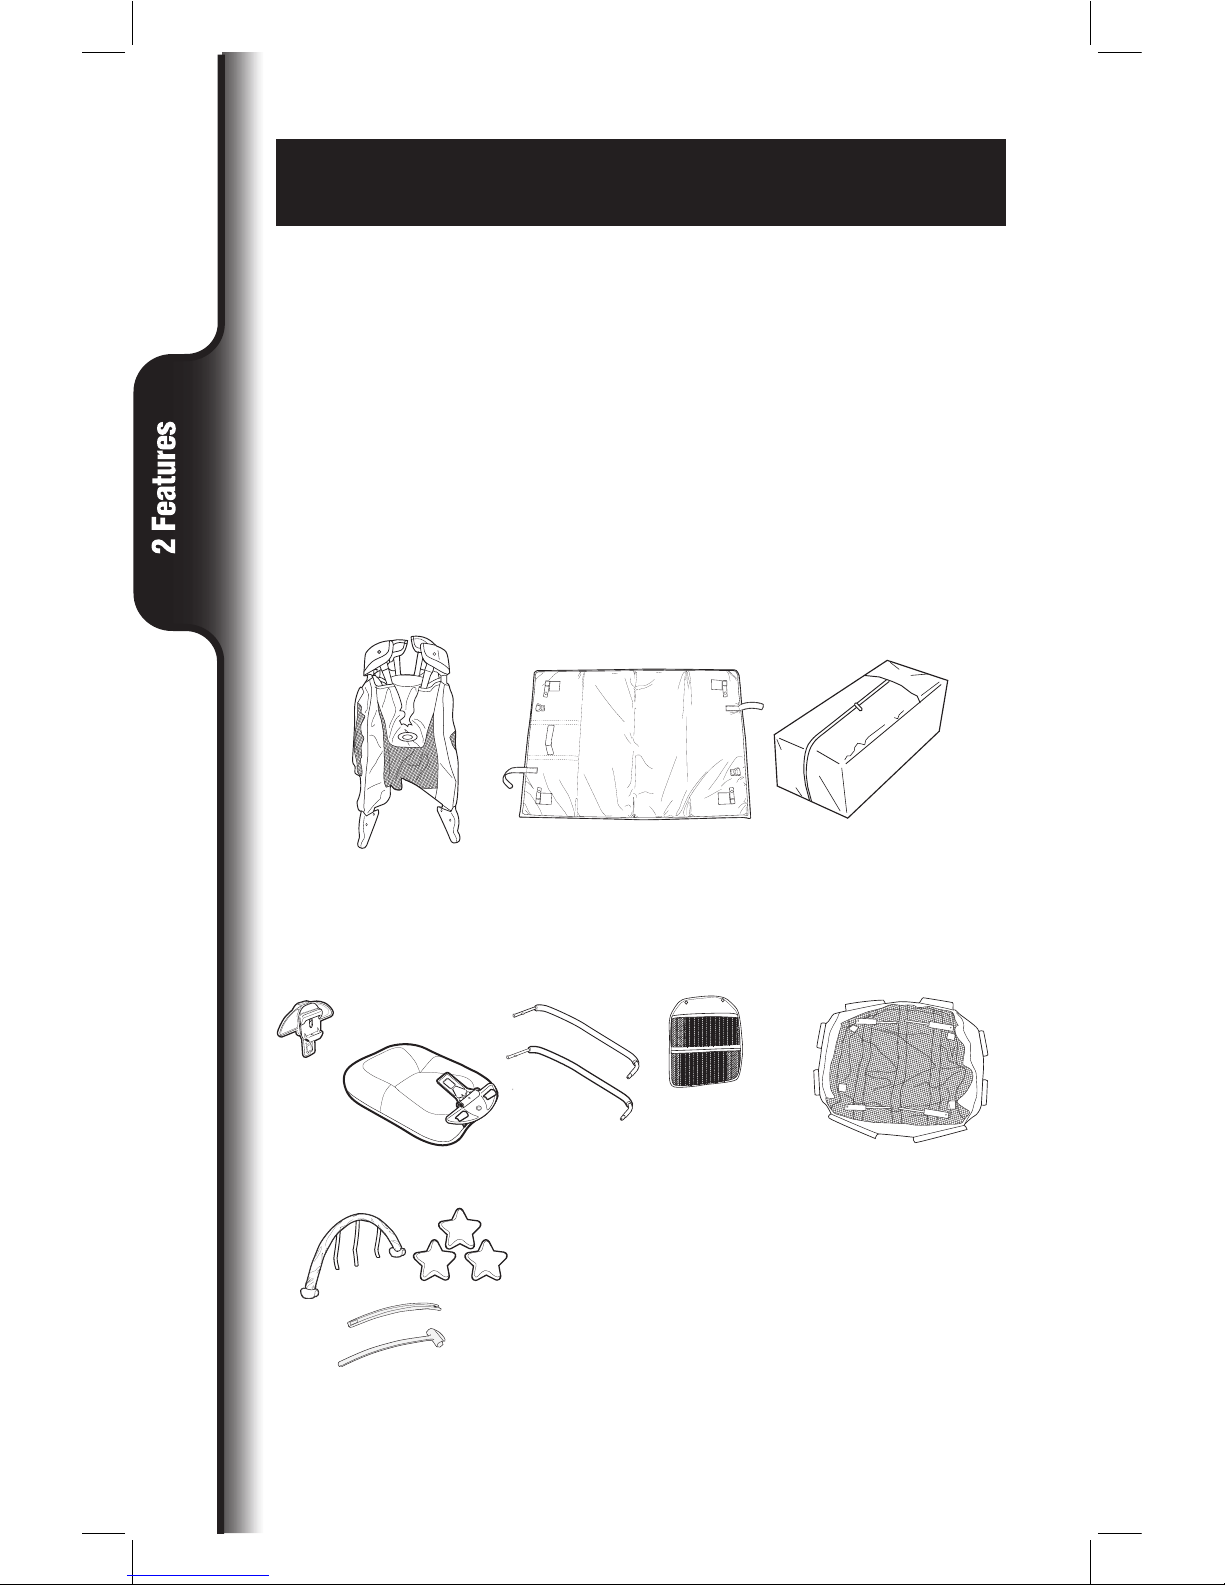
2-A Parts list
FEATURES ON CERTAIN MODELS
ALL MODELS
This model may not include some
features shown below. Check that
you have all the parts for this model
BEFORE assembling your product. If
any parts are missing, call Customer
Service.
No tools required.
2X
A
B C
D
E
F
G
H
I
J
K
L
M
Page 5
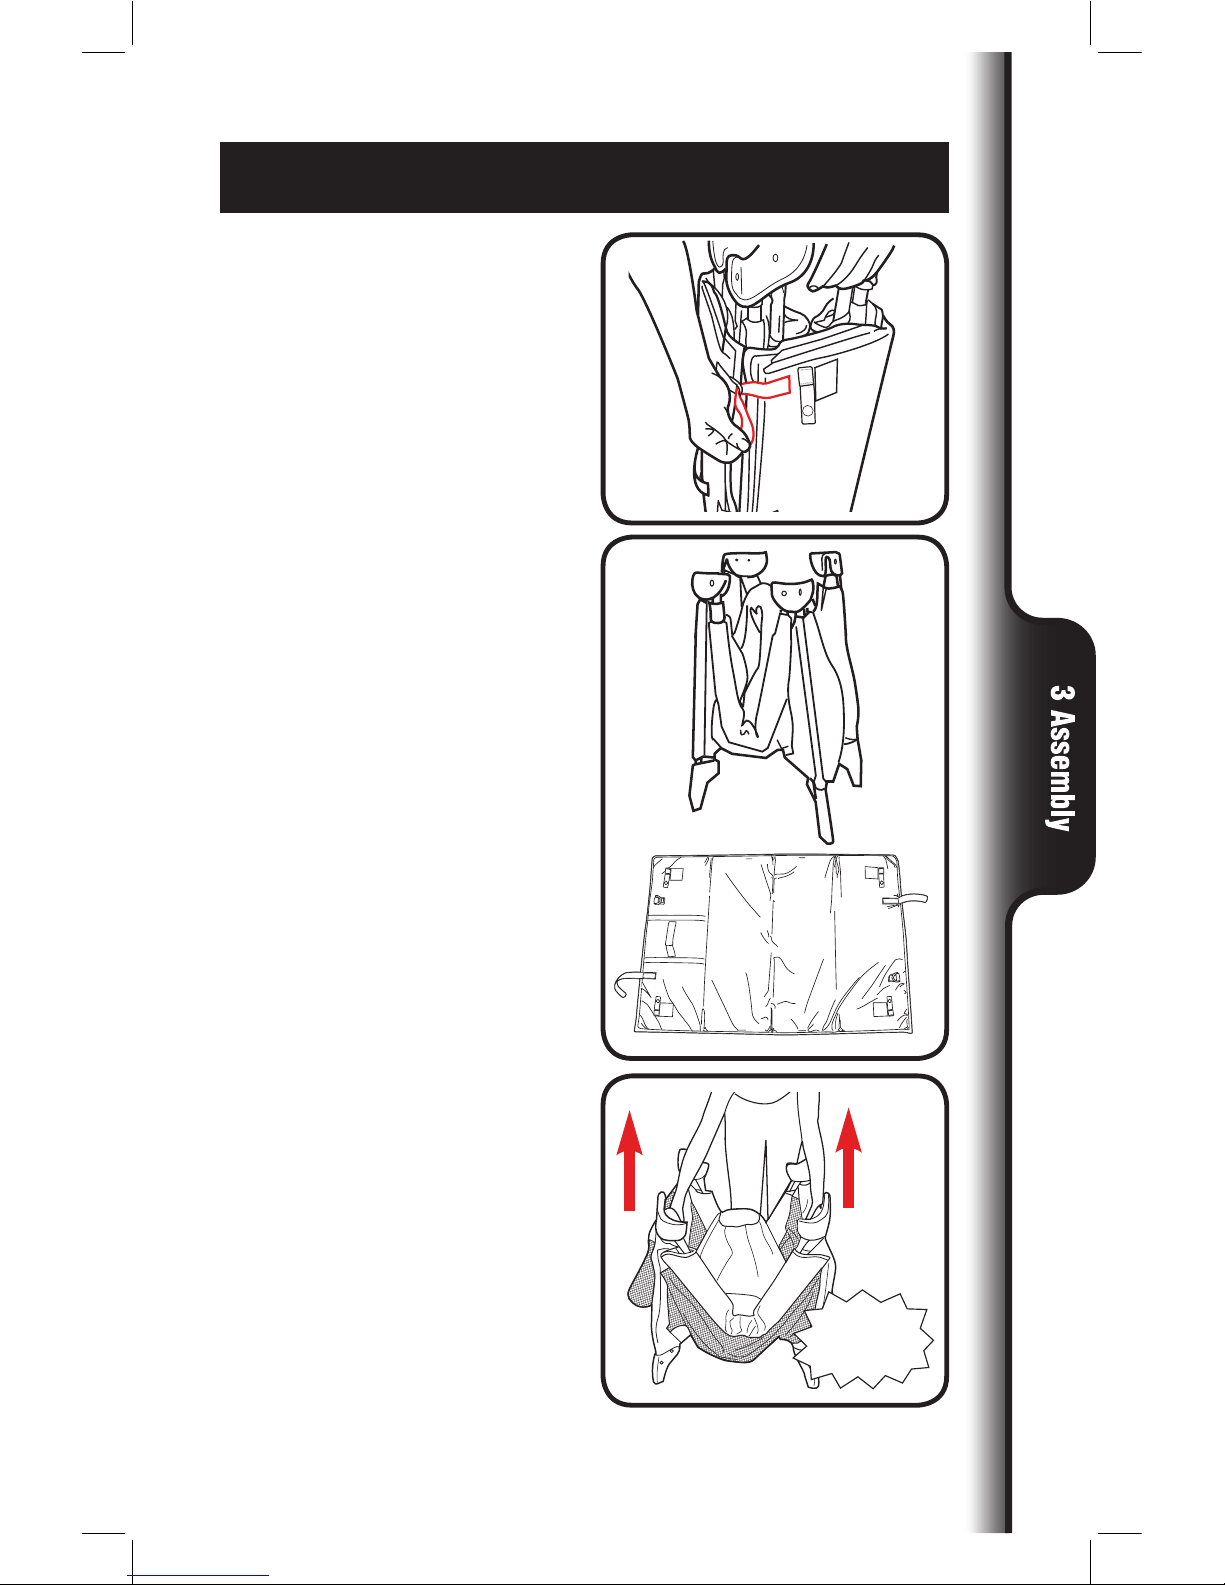
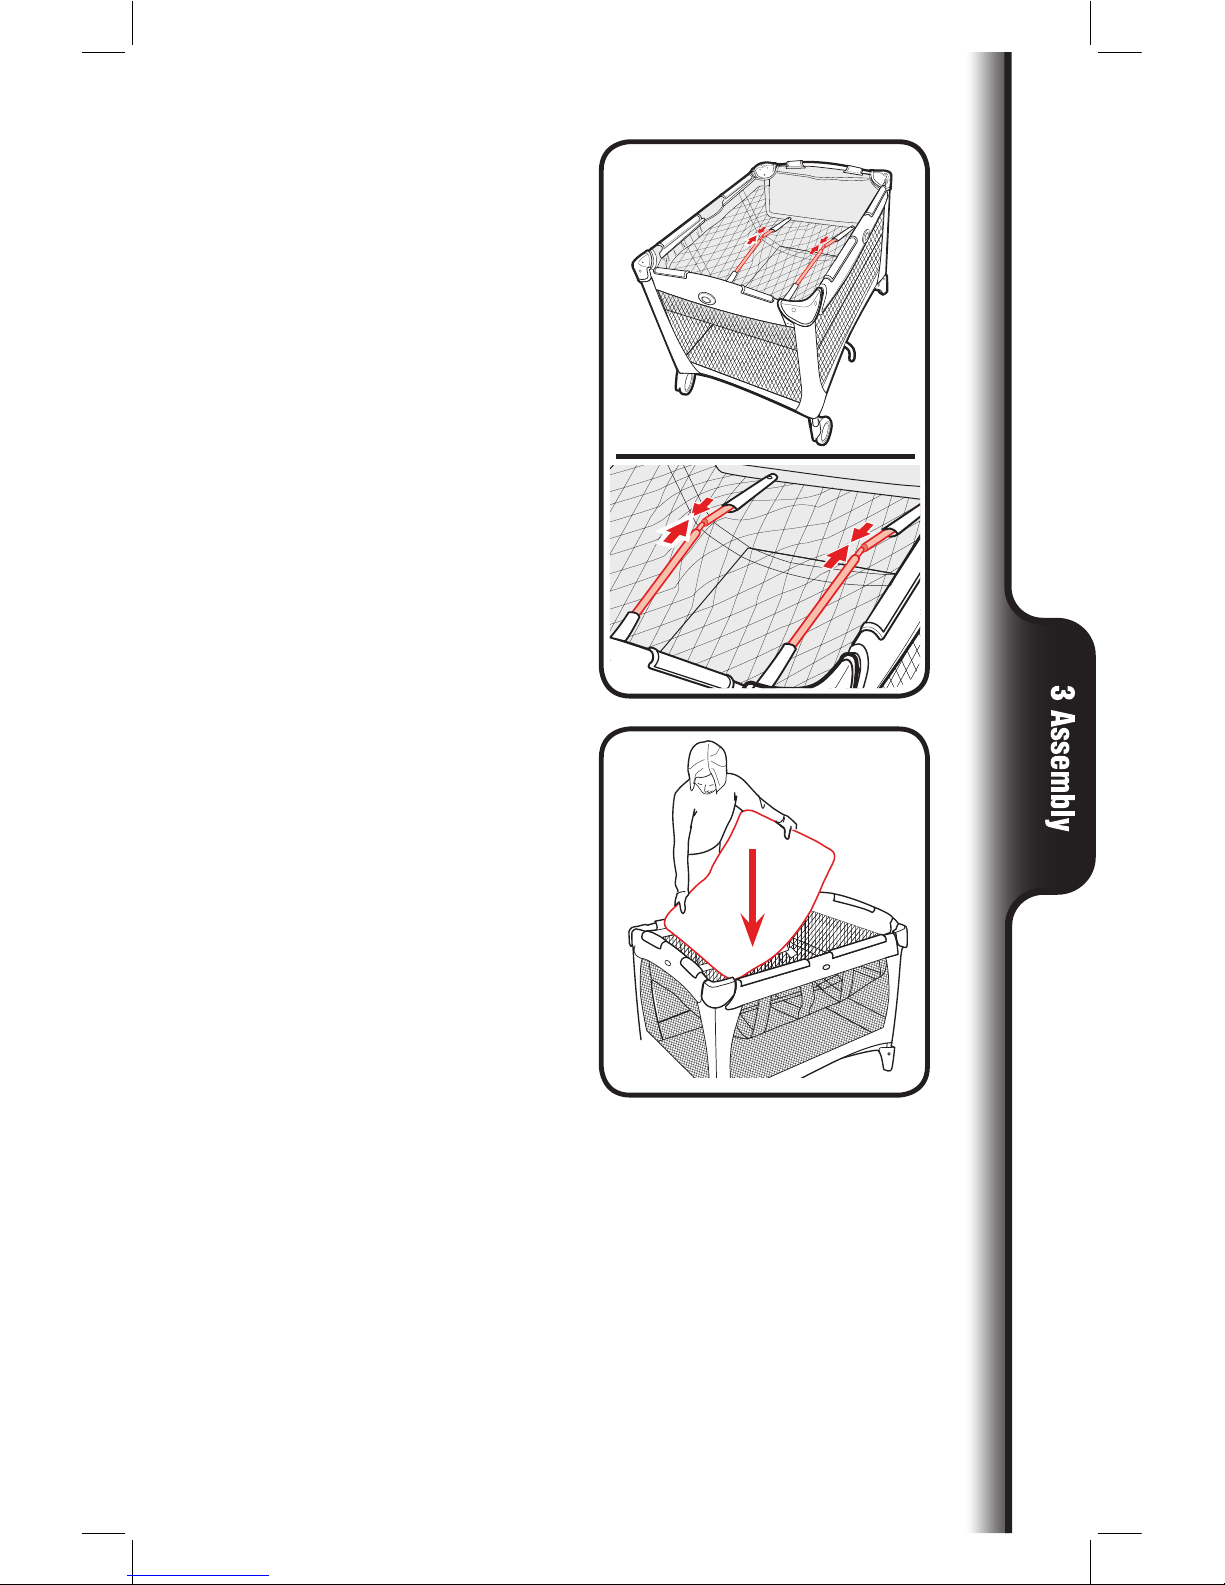
3-A Playard Setup
3. Pull up on side rails in middle
above push button until all four
sides are locked. DO NOT push
center down yet.
1. Disconnect straps holding
mattress around playard.
2. Remove mattress from around
playard.
SNAP!
Page 6
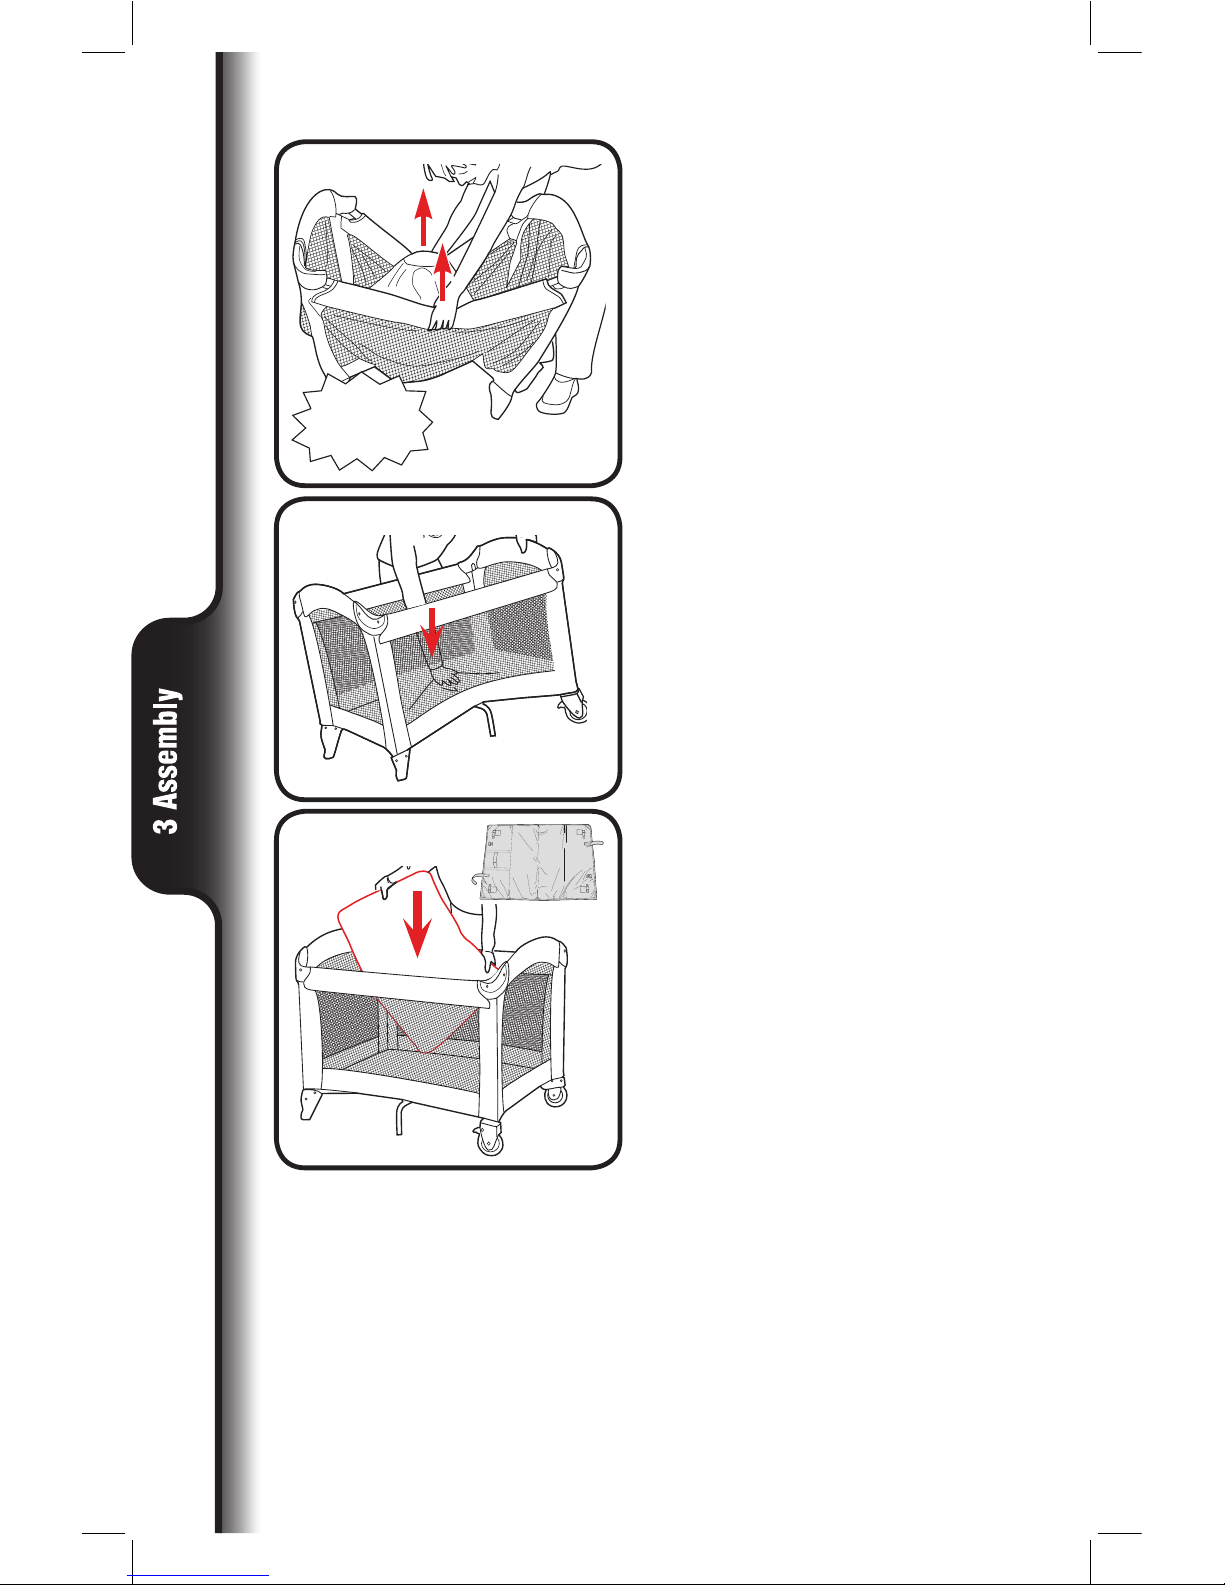
SNAP!
4. When setting up, lock rails
BEFORE lowering center.
Be sure top rails have become
rigid. If not, pull up again until
they are rigid. If top rails do not
latch, lift the center of the floor
higher.
CHECK that fabric covers
corners.
5. Hold one end of the unit up and
push the center of the floor down
until locked securely into place.
6. Always use mattress/pad soft
side up.
Page 7
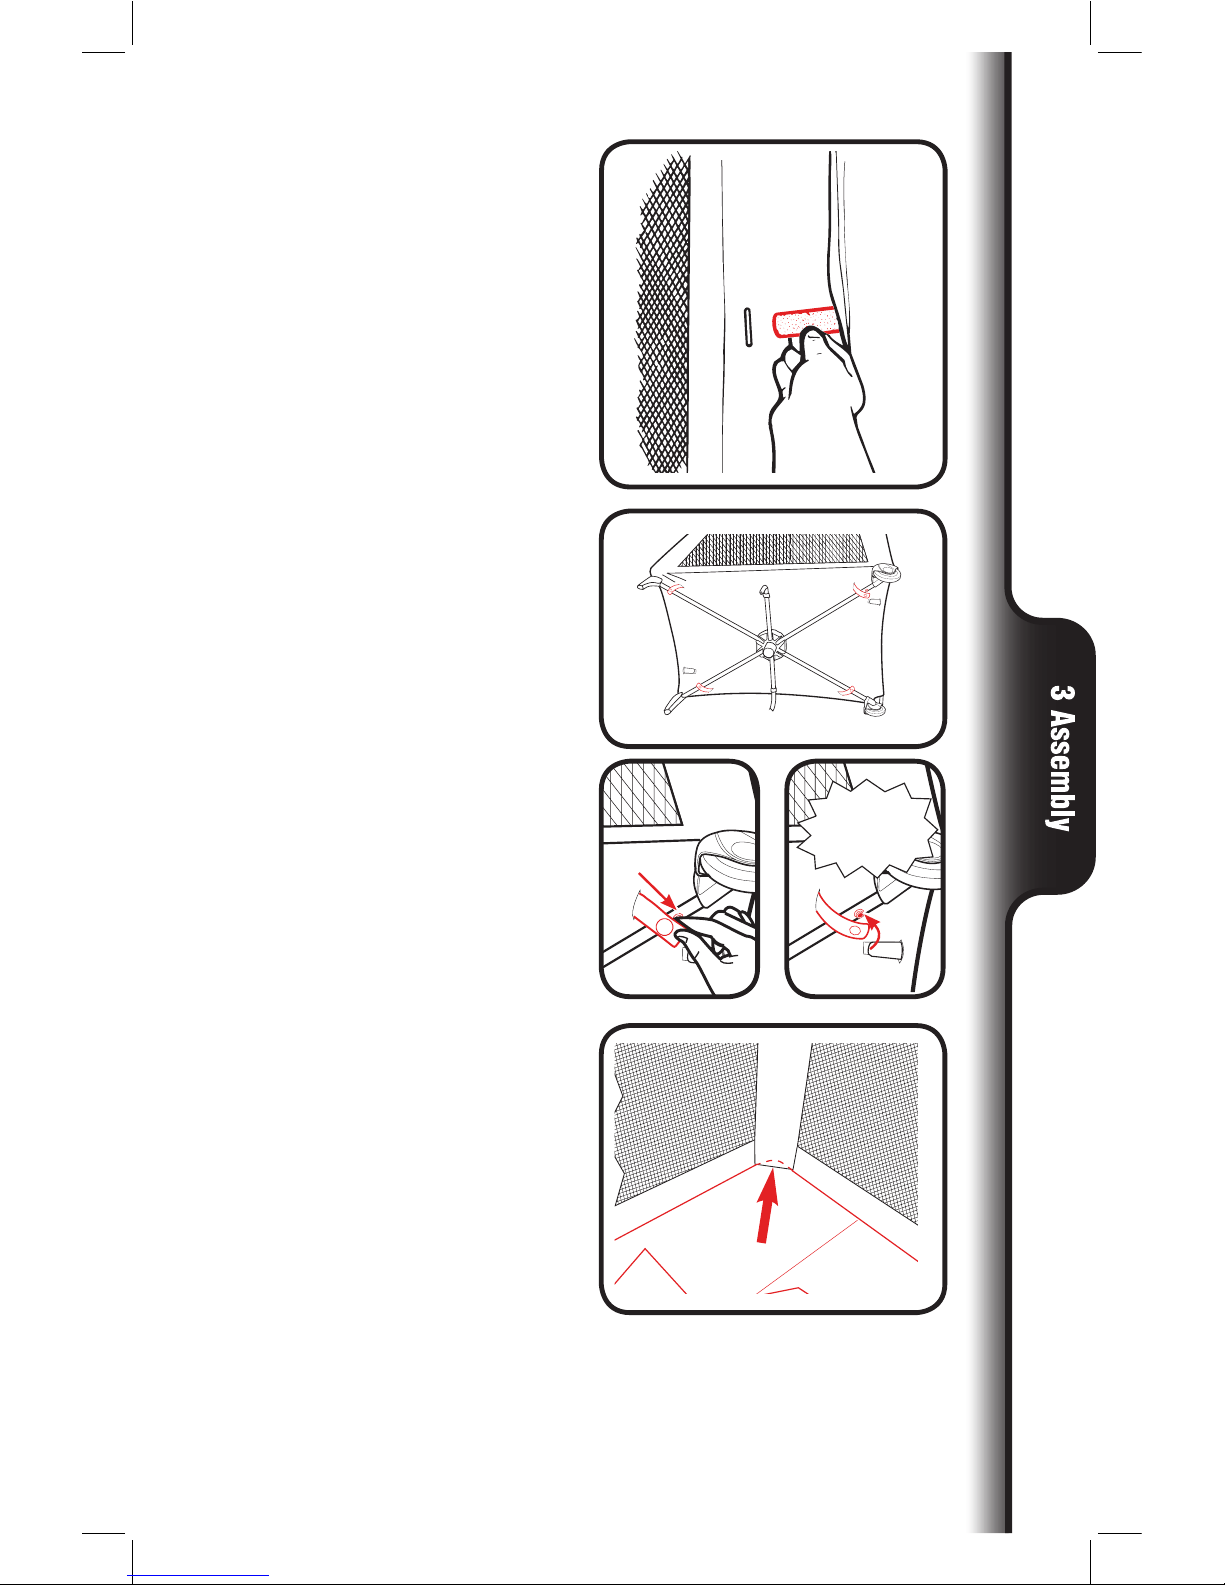
SNAP!
7. Pull the two hook and loop tabs
under mattress/pad through the
slotted holes and attach to hook
and loop patch on bottom of
playard.
8. Pull the four snap straps on
corners of playard mattress
through bottom of playard. Wrap
around the tube and fasten snap
onto the tube. Repeat on all
corners.
9. Tuck four corners of mattress/pad
under corner stiffeners.
Page 8

WARNING
SUFFOCATION HAZARD Infants have suffocated:
• In gaps between extra padding and side of the bassinet, and
• On soft bedding.
Use ONLY mattress/pad provided by Graco. NEVER add a pillow,
comforter or another mattress for padding.
• FALL HAZARD: To help prevent falls, do not use this product when
the infant begins to push up on hands and knees or weighs over
15 lb (6.8 kg), whichever comes first.
• Use bassinet with only one child at a time.
• Never place a child under the bassinet.
• The bassinet must be fully assembled and installed, including four
metal tubes, eight clips and mattress/pad, before using. Do not
modify bassinet or add any attachments that are not listed in the
owner’s manual.
• DO NOT store the bassinet in the playard while in use.
• To help prevent heat build-up inside the playard and to avoid
overheating your child, when using the bassinet DO NOT use an
outdoor canopy.
• To reduce the risk of SIDS, pediatricians recommend healthy infants
be placed on their backs to sleep, unless otherwise advised by your
physician.
• If a sheet is used with the pad use only the one provided by Graco
or one specifically designed to fit the dimensions of the bassinet.
• Never place child in bassinet while napper/changer is attached.
3-B Bassinet Set Up
Page 9
1. You will need to remove the
mattress/pad from the bottom
of the playard to use inside your
bassinet.
2. Make sure to fasten the
bassinet clips to the playard
Always press down on the left
side of the clip, then the right as
shown. Repeat on all eight clips.
Page 10
3. Insert tapered end of bar into end
of other bar with hole in it. Repeat
with other set of bars.
CHECK: Tubes MUST be
assembled before placing
mattress/pad in bassinet.
4. Insert the mattress/pad soft side
up into the playard, making sure
the hook and loop patches on
bottom of mattress attaches to
matching hook and loop patches
on the bassinet.
Page 11

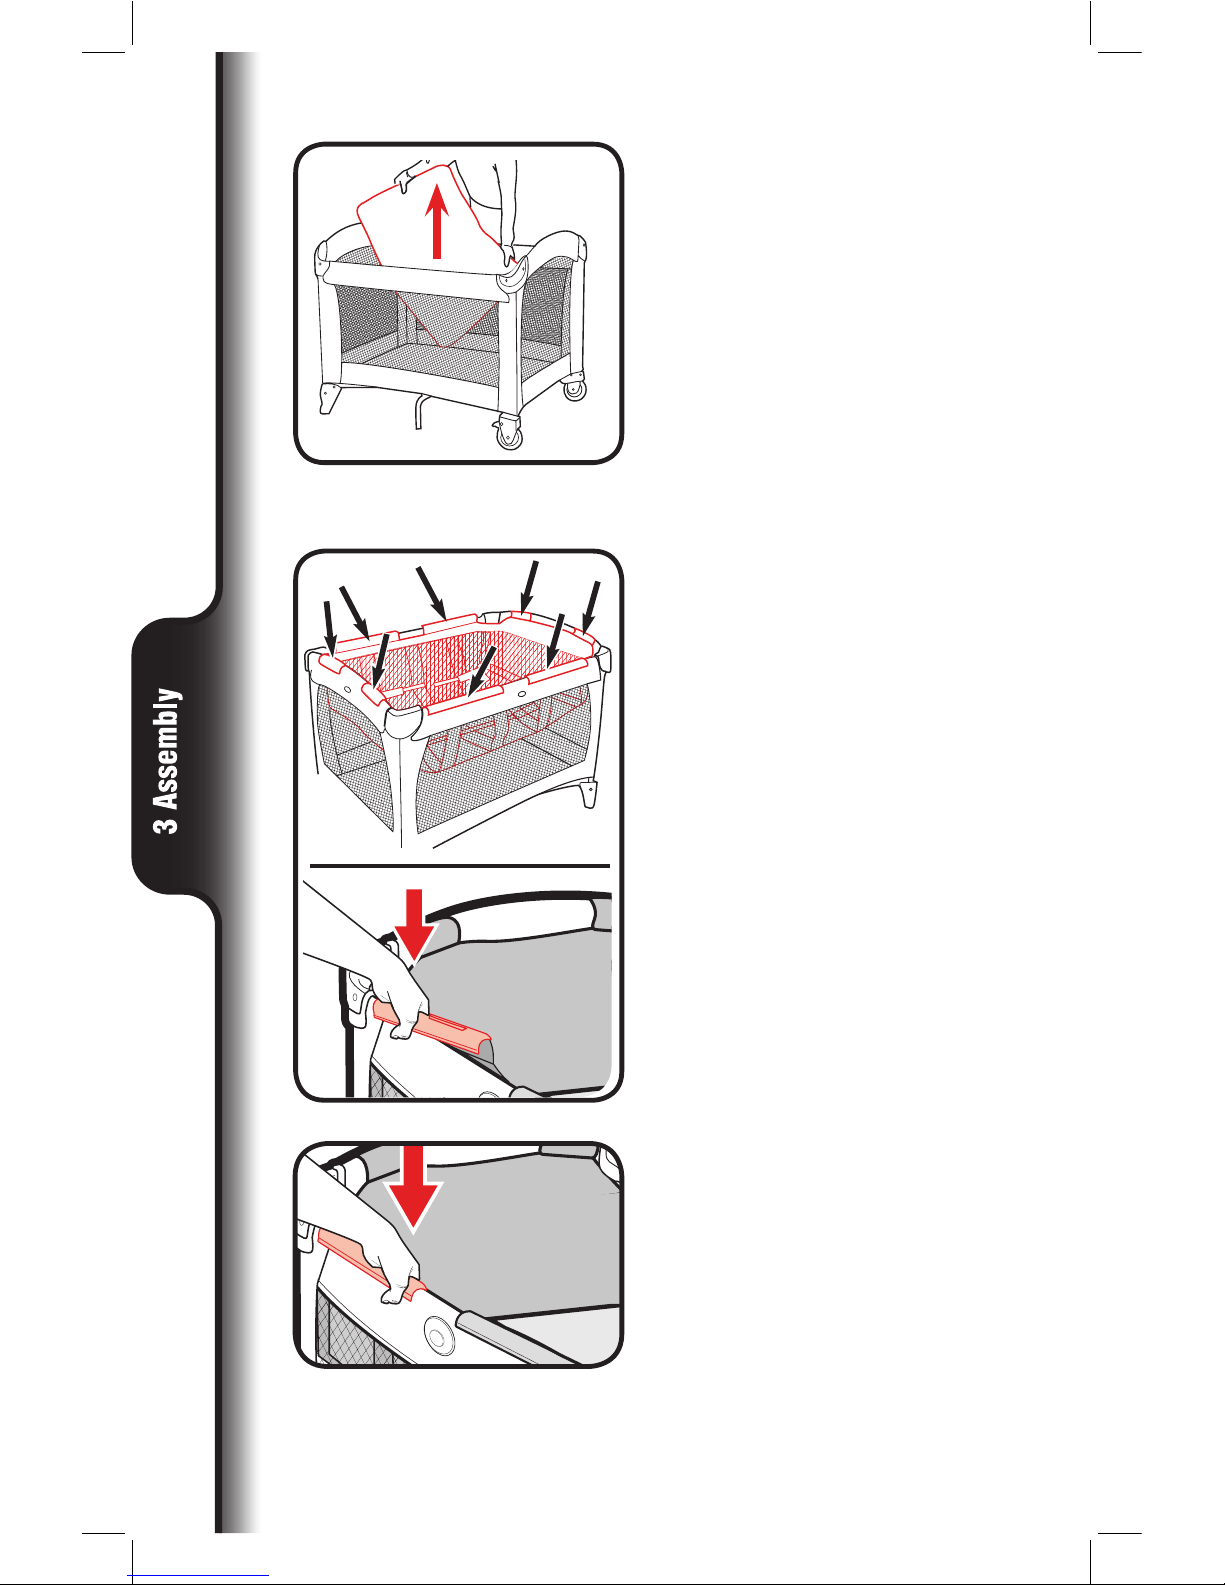
4-A To Fold
2. DO NOT unlock top rails yet.
Pull the center of the playard
floor up with the tab in the
middle of the playard. Center of
floor must be halfway up before
top rails will unlock.
1. Release snap straps and hook
and loop straps on bottom of
playard. Pull mattress fully out of
playard.
Page 12

3. Center of floor must be up.
a. Lift up slightly on the top rail.
b. Push in on the button
located on the side of the top
rail to release the two tubes.
c. Push down.
d. Repeat on all four rails until
all tubes are released.
• If top rails do not unlatch, DO
NOT FORCE. Lift the
center of the floor higher.
• Both tubes must be released
for the top rail to fold.
Page 13

4. Do not force. If unit will not
fold, look for a partially latched
top rail. Squeeze the latch
button to release the rail.
Page 14

4-B To Cover
1. Cover unit with handle out.
2. Zip together.
Page 15

5 Accessories
5-A Reversible Napper & Changer
WARNING
Prevent serious injury or death: follow these warnings and the
instructions.
NAPPER MODE
• You are responsible to provide adult supervision when using your
napper.
• Napper must be properly attached to bassinet before use.
FALL HAZARD: To prevent falls, stop using the product when infant:
• Begins to wiggle out of position or turn over in the product or
• Head touches the upper edge of the product or
• Weights more than 15 lb (6.8 kg) (approximately 3 months of age).
SUFFOCATION HAZARD: Infants have suffocated
• On added pillows, blankets and extra padding. ONLY use the pad
provided by the manufacturer. NEVER place extra padding under or
beside infant.
• When trapped between product and adjacent surfaces. Only use in
bassinet when it is securely attached. NEVER use napper in different
product.
• To reduce the risk of SIDS, pediatricians recommend healthy infants
be placed on their backs to sleep, unless otherwise advised by your
physician.
• ALWAYS place child on back to sleep.
• Never place any objects in napper while child is in it.
• Use napper with only one child at a time.
• Do not carry child in napper.
STRANGULATION HAZARD: • Strings can cause strangulation! Do not
place items with a string around a child’s neck, such as hood strings
or pacifier cords. Do not suspend strings over product or attach strings
to toys.
This model may not include some features shown
Page 16

CHANGING TABLE MODE:
FALL HAZARD- To prevent death or serious injury,
• Always stay within arm’s reach of your child when using the
changing table. Never leave child unattended.
• Use changing table only on this playard model. Check that it is
supported by the playard by pushing down into center of changing
table.
• Do not use on the floor, bed, counter or other surfaces.
• Do not use changing table as a sleeping or play area.
• Weight limit for the changing table is 15lb (6.8kg). Do not use the
changing table as extra storage.
• Strangulation Hazard: Child can lift changing table and get neck
trapped between changing table and playard frame. Always remove
the changing table when your child is in the playard.
• Never place child in bassinet while napper/changer is attached.
• Never place baby face down on the changing table.
• Do not carry child in changer.
Page 17

WARNING
To prevent serious injury or death, DO NOT REMOVE FOAM.
ADVERTENCIA
NOTE: Napper/changer should always
be attached opposite the wheels.
Page 18

5 Accessories
NOTE: Start assembly with the button
housing in this orientation. If not in this
orientation, follow steps 1-3.
Tube opening
1. Press button and pull up to
unlock and rotate as shown.
1
2
2. Rotate until tube opening is on the
bottom, then press down to lock it
in place.
3. CORRECT.
Changing Table Mode
Page 19

4. Insert the long end of the tube into
the button housing as shown.
5. The metal button should be facing
out when snapped in place as
shown.
SNAP!
6. With the napper side up, insert
the button housing tube as
shown.
Page 20

5 Accessories
7. Pull up on the flap with the 2
straps and insert the tube into
the opposite side of the napper/
changer.
8. Insert the button housing tube as
shown. The metal button should
be facing out when snapped in
place as shown.
SNAP!
Page 21

9. Secure the tubes on both ends of
the napper/changer as shown.
10. Secure the tubes on both ends of
the napper/changer as shown.
SNAP!
SNAP!
Page 22

5 Accessories
11. Attach napper/changer to the
sides of the bassinet as shown.
Napper/changer should always be
attached opposite the wheels.
12. The tabs on the sides of the
napper will snap in place as
shown.
SNAP!
SNAP!
13. Push down on the inside of napper/
changer until it clicks into place.
Check that napper/changer is
securely attached by pulling up
on it.
Page 23

Napper Mode
1. Press button and pull up to
unlock and rotate to the napper
side.
2. Push down on the inside of napper
until it clicks into place.
Check that napper is securely
attached by pulling up on it.
SNAP!
Page 24

5 Accessories
Changer Mode
WARNING
Never place baby face down on the
changing table.
1. Press button on housing and pull
up
to unlock and rotate to the
changer side.
2. Push down on the inside of
changer until it clicks into place.
Check that changer is securely
attached by pulling up on it.
SNAP!
Page 25

To Remove Reversible Napper/Changer
1. Pull up on bassinet clip to detach it
from the playard.
2. Press button and pull up on
napper/changer to release. Repeat
steps 1- 2 on the opposite side.
3. Remove the napper/changer.
Page 26

5 Accessories
2X
4. Make sure to fasten the bassinet
clips to the playard as shown.
WARNING
• Possible entanglement or strangulation injury. Remove toy bar when baby
begins to push up on hands and knees. Recommended use from birth to 5
months.
• Toys are not intended to be mouthed by the baby and should be positioned
clearly out of reach of the baby's face and mouth.
• Always attach all provided fasteners (strings, straps, clamps, etc.) tightly to
playard according to these instructions.
Check frequently.
• Do not add additional strings or straps to attach to any other crib or
playpen.
5-B Toybar
Page 27

1. Attach one end of toybar into
center connector.
2. Insert assembled toybar parts into
toybar fabric.
3. Attach other end of toybar to
center connector.
4. Attach toy to toybar with hook and
loop tape.
5. Attach toybar to playard as shown.
Page 28

5 Accessories
5-C Storage Bag
WARNING
• Always keep objects out of child’s reach.
• Remove the bag when child is able to pull himself up in the
Pack ‘N Play.
• NEVER use on inside of unit. Child may use as a step to climb out
or reach items in bag.
• TO AVOID SERIOUS INJURY, NEVER place sharp or pointed
objects in storage bag.
Page 29

6-A Care and Maintenance
FROM TIME TO TIME CHECK YOUR PLAYARD for worn parts, torn material
or stitching. Replace or repair the parts as needed. Use only Graco®
replacement parts.
IF PLAYARD IS USED AT THE BEACH, you MUST clean sand off your
playard, including the feet, before packing it into cover. Sand in top rail lock
may damage it.
TO CLEAN PLAYARD, use only household soap or detergent and warm water.
TO WASH CARRY BAG, machine wash in cold water on delicate cycle and
drip-dry. NO BLEACH.
TO WASH BASSINET: Hand wash with warm water and household soap. Drip
dry.
TO WASH NAPPER/CHANGER: Wipe clean with damp cloth.
Page 30

Quick Fold Guide
1
2
3
2. Lift rail up slightly, press button
and lower rail. Repeat on all 4
sides. (See page 16)
1. Pull red tab up to unlock. Stop
when you hear it click. (See page
15)
3. Wrap mattress around play yard.
(See Page 17)
Page 31

SNAP!
SNAP!
SNAP!
SNAP!
Quick Set Up Guide
1
2
2. Push center of playard
down until you hear a
click. (See page 9)
1. Pull up on all 4 sides
and snap into place.
Do not push center of
Playard down until top
rails are locked. (See
pages 8 and 9)
 Loading...