

Page 1
Instruction
Manual
Avoid injury or death -
Read and understand this manual!
ISPC099BA 5/06 US
Page 2

TABLE OF CONTENTS
Instruction manual is for:
• ComfortSport5-Point Newborn/Toddler Child Restraint
• ComfortSport Overhead Shield Newborn/Toddler
Child Restraint
Instructions for these models are the same unless
otherwise noted.
Before You Begin
F
Important Information.....................................1
Warnings.......................................................2
Basic Information.............................................4
What is LATCH?...............................................5
LATCH System..................................................6
Use
F
Height & Weight Limits....................................7
Rear-facing Installation With LATCH..................8
Forward-facing Installation With
Rear-facing Installation With
Vehicle Seat Belts............................................
Forward-facing Installation With
Vehicle Seat Belts............................................
Placing Child in Child Restraint.......................16
LATCH.........
10
12
14
Operations and Adjustments..........................18
• Harness Straps
• Harness Tie
• Buckle
• Recline / Upright Positions
• 5-Point Crotch Strap Adjustment
• Overhead Shield Adjustment
• Changing Harness Strap Slots
• LATCH Belt Routing
• Removing LATCH from Vehicle Anchor Points
• LATCH Storage
Special Information
F
Vehicle Seat Belts........................................... 26
• Locking Clip........................................ 31
Additional Information ...................................32
• Tether Storage
• Cup Holder
• Body Pillow/Head Support/ Harness Cover
• Care and Cleaning
• Aircraft Use
• Second Hand Child Restraint
Replacement Parts.........................................
Storage.....................................Back Cover
• Locking Clip
• Instruction Manual
Help Information.......................
Back Cover
40
Page 3

IMPORTANT INFORMATION
No child restraint can guarantee protection
from injury in every situation, but proper use
helps reduce the risk of serious injury or death.
READ THIS MANUAL CAREFULLY.
Registration Information
F
Child restraints could be recalled for safety
reasons. You must register this restraint
to be reached in a recall. Fill out the
registration card attached to child restraint and
mail today or send your name, address, and the
restraint’s model number and manufacturing
date to:
Graco Children’s Products, Inc.
150 Oaklands Blvd.
Exton, PA 19341
or call 1-800-345-4109
www.gracobaby.com
For recall information:
• Call the U.S Government’s Auto Safety
Hotline at 1-800-424-9393
(202-366-0123 in D.C. area)
• TTY: (1–800–424–9153), or
http://www.NHTSA.gov
• Call Graco Children’s Products Inc. at
1-800-345-4109
www.gracobaby.com
Safety First Check List
F
Read and understand instruction manual
and child restraint labels.
Infants less than 20 lbs. (9 kg) must use
child restraint rear-facing.
Do not use child restraint rear-facing in
vehicle seat with air bag.
Secure children in rear seat of vehicle
whenever possible.
Never leave child unattended.
Install child restraint securely with vehicle seat
belt or LATCH belt.
Do not use after date shown on back of
child restraint.
Do not allow anyone (babysitter, relatives,
etc.) to use child restraint without first
understanding all instructions.
LATCH
F
This child restraint may be installed in a vehicle
using either the vehicle seat belt or the
LATCH system (for vehicles equipped with
LATCH).
1
Page 4
WARNINGS - Prevent serious injury or death:
Failure to follow these instructions
and child restraint labels can result
in child striking the vehicle’s interior
during a sudden stop or crash.
Secure child restraint with a vehicle
seat belt or LATCH that is properly
routed as shown in this manual.
Select a suitable location for the
child restraint in your vehicle.
Choose the correct mode of use for
the child restraint depending on
your child’s size. Infants less than
20 lbs. (9 kg) must use this child
restraint rear-facing. Serious
crippling injury or death can result
if infant faces front of vehicle. The
American Academy of Pediatrics
recommends that children should be
at least one year of age before being
positioned forward facing.
Vehicle seat belt system MUST hold
child restraint securely. Not all
vehicle seat belts can be used with
a child restraint.
If vehicle seat belt does not hold
child restraint securely, read
“Vehicle Seat Belts” section.
Never put a child restraint in a front
vehicle seat unless recommended
by vehicle owner’s manual.
National Highway Traffic Safety
Administration (NHTSA) alerts
vehicle owners that according to
accident statistics, children up to
age 12 are safer in the back seat.
For vehicles with air bags, refer to
vehicle owner’s manual for child
restraint installation information.
2
Page 5
WARNINGS - Prevent serious injury or death (continued):
If child restraint is in a crash, it
must be replaced. DO NOT use it
again! A crash can cause unseen
damage and using it again could
result in serious injury or death.
DO NOT use child restraint if it is
damaged or missing parts.
DO NOT use accessories or parts
other than those provided by
Graco. Their use could alter the
performance of the child restraint.
Rear-facing child restraint must be
properly leveled:
• Too reclined can result in injury
or ejection.
• Too upright can result in
breathing difficulties.
Insert the harness straps in the
proper slots for your child. Never
leave child unattended, even when
sleeping. Child may become tangled
in harness straps and suffocate or
strangle.
DO NOT remove LATCH system from
child restraint. If using vehicle seat
belt to secure child restraint, LATCH
connectors must be stored. (see
section “LATCH storage”)
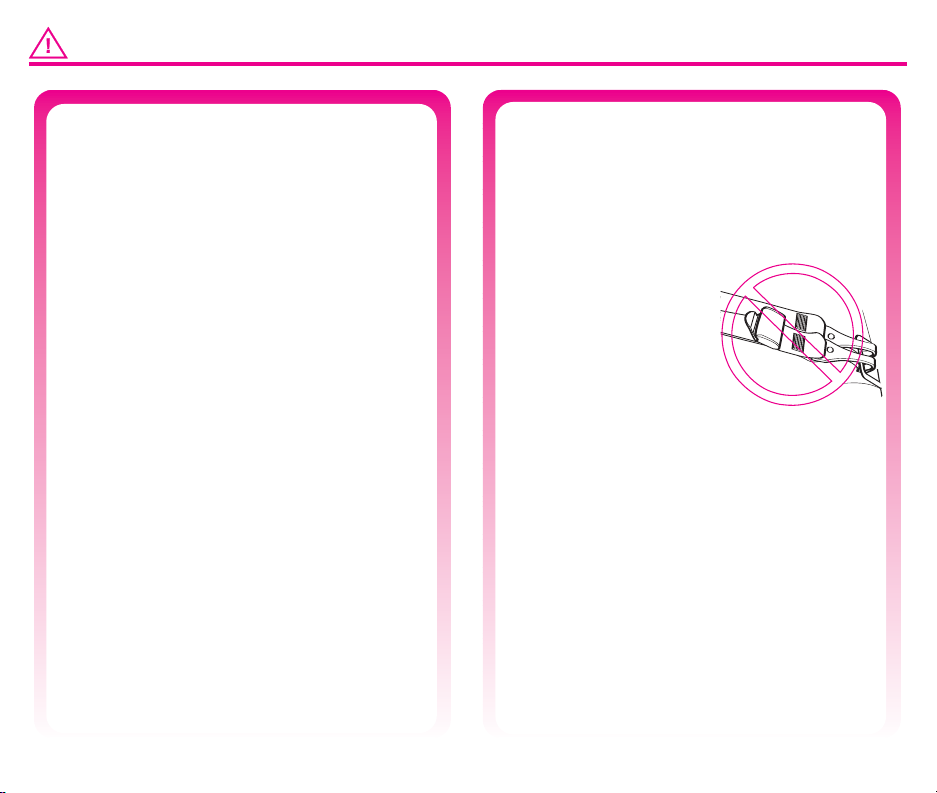
Never attach two
LATCH connectors
to one vehicle lower
anchor point unless
specifically allowed
by the vehicle
manufacturer.
3
Page 6
BASIC INFORMATION
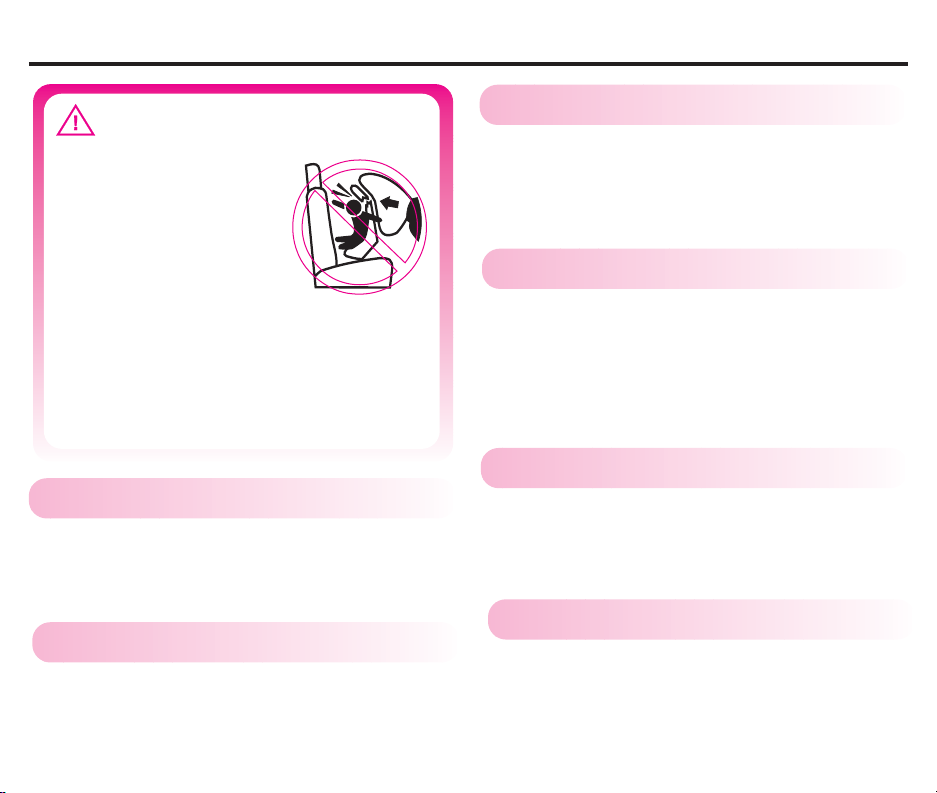
WARNING
DO NOT place this
child restraint in
a vehicle seating
location that has a
front air bag. If an
air bag inflates, it
can hit the child and
child restraint with great force
and cause serious injury or death
to your child. Check vehicle owner’s
manual for information about
side air bags and child restraint
installation.
Certification
F
This child restraint meets or exceeds all
applicable requirements of Federal Motor
Vehicle Safety Standard 213 for use in motor
vehicles and aircraft.
Unoccupied Child Restraint
F
Always secure child restraint with LATCH or a
vehicle seat belt, even when unoccupied.
In a crash, an unsecured child restraint can
injure passengers.
4
Dangerous Vehicle Seats
F
Do not use child restraint on rear-facing or
side-facing vehicle seats.
Child Restraint Useful Life
F
STOP using child restraint and throw it away
after the date molded into the back of
the child restraint.
Look for:
Vehicle Seat Protection
F
Protect vehicle seat. Use a child restraint mat,
towel or thin blanket under and behind child
restraint.
Warm Weather
F
Child restraint parts can get very hot in the sun
or warm weather.
To avoid burns, always check before putting
child in child restraint.
Do not use this car
seat after December
Year
Page 7
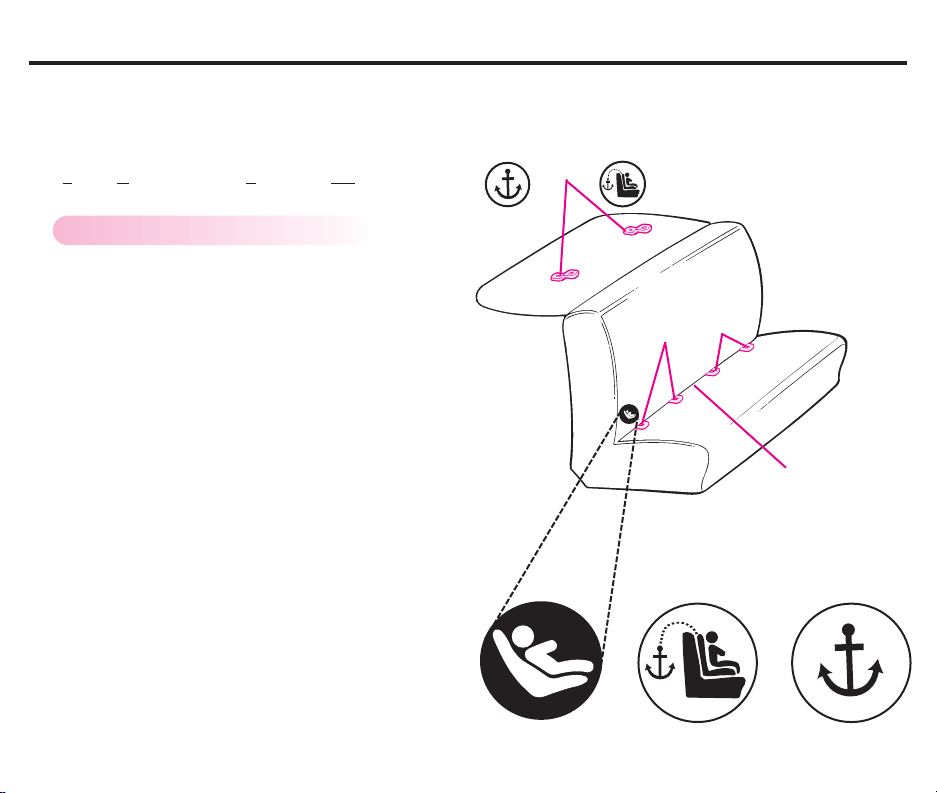
WHAT IS LATCH?
United States Federal Motor Vehicle Safety
Standards have defined a new system for
installing child restraints in vehicles. The
system is called LATCH. LATCH stands for:
L
ower Anchorage and Tether for CHildren.
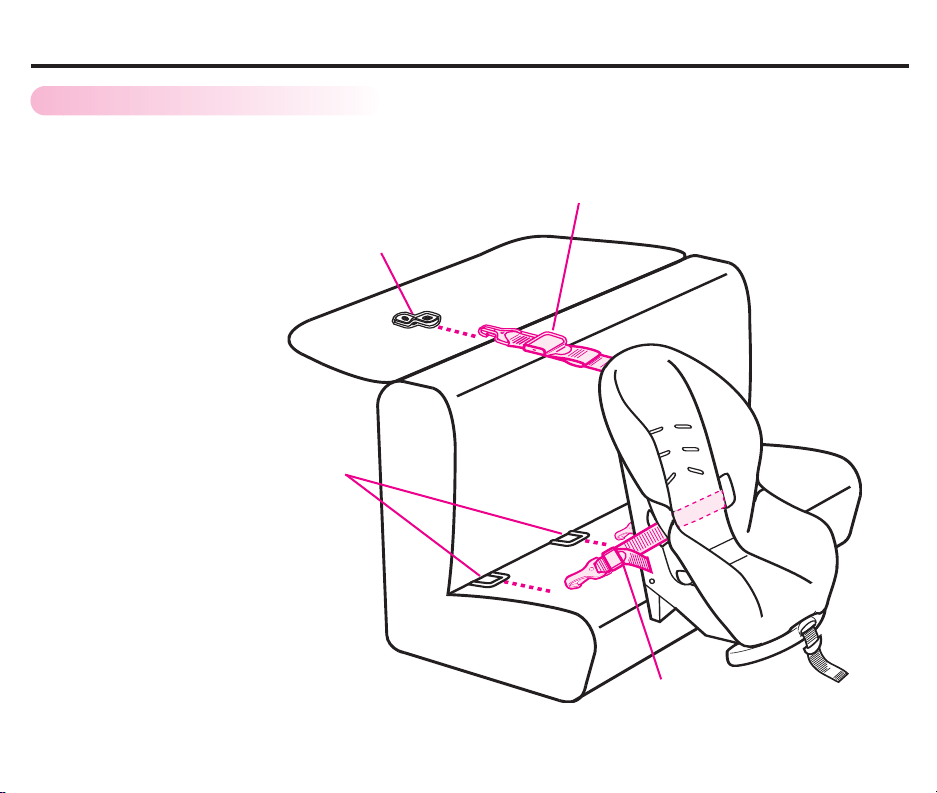
LATCH System for Vehicles:
LATCH in the vehicle consists of a top tether
anchor point and two lower anchor points.
Some vehicle owner manuals use the term
ISOFIX to identify the new child restraint
anchorage system. This child restraint with
LATCH can also be used in vehicle seating
positions equipped with ISOFIX.
Newer vehicles may have one or more seating
positions equipped with LATCH anchor points.
If vehicle is equipped with LATCH, the vehicle
lower anchor points may be visible at the vehicle
seat crease. If not visible, they may be marked
with a symbol (Fig. a) or a colored dot.
See your vehicle owner’s manual for exact
locations, anchor identification, and
requirements for use with a child restraint.
Vehicle
Top Tether Anchor
Points
Typical seat in a
passenger vehicle.
Other vehicle types
may have different
LATCH locations.
Vehicle
Lower Anchor
Points
Vehicle
Seat Crease
Check vehicle owner’s manual for vehicle top
tether anchor locations. They may be identified
using one of the anchor symbols (Fig. b or Fig. c).
(Fig. a)
(Fig. b)
(Fig. c)
5
Page 8
LATCH SYSTEM
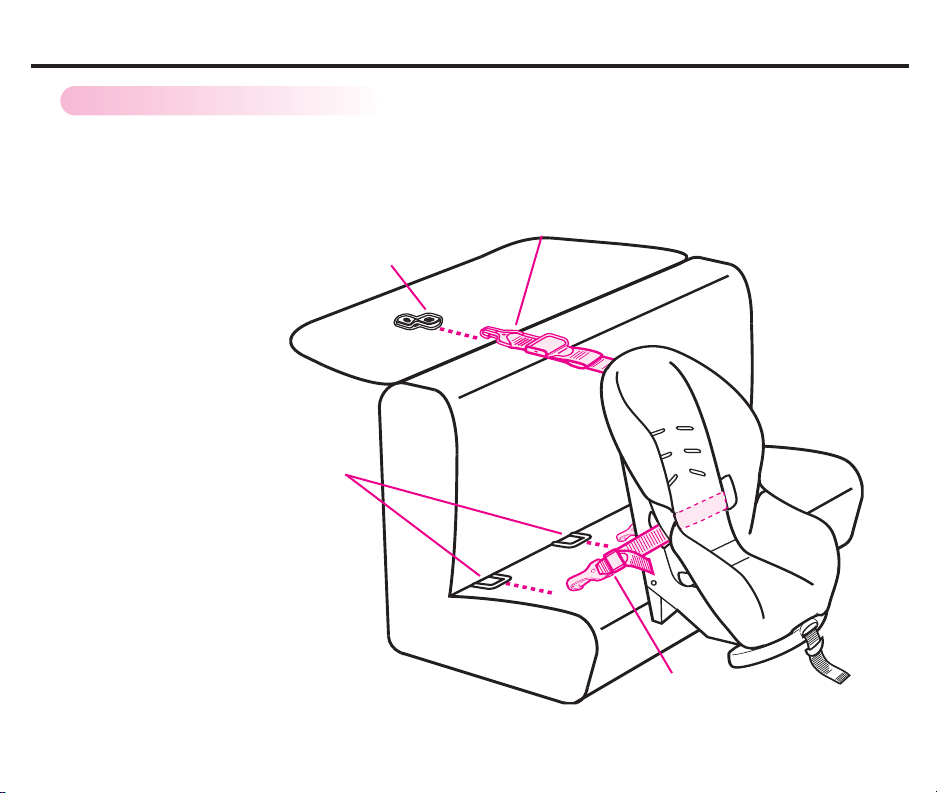
LATCH System:
LATCH consists of a permanently attached
lower anchorage belt and a top tether strap
(Fig. a).
ONLY use
position recommended
by vehicle manufacturer.
LATCH is defined
as anchorages 280mm
(11.02 inches) on center.
As a manufacturer, we do
not recommend using the
LATCH system in the center
position if it exceeds this
length.
LATCH in a seating
Vehicle
Lower
Anchor
Points
Vehicle
Top Tether
Anchor
Point
Child Restraint
Top Tether
(Fig. a)
Child Restraint
Lower Anchorage
Belt
6
Page 9
HEIGHT & WEIGHT LIMITS
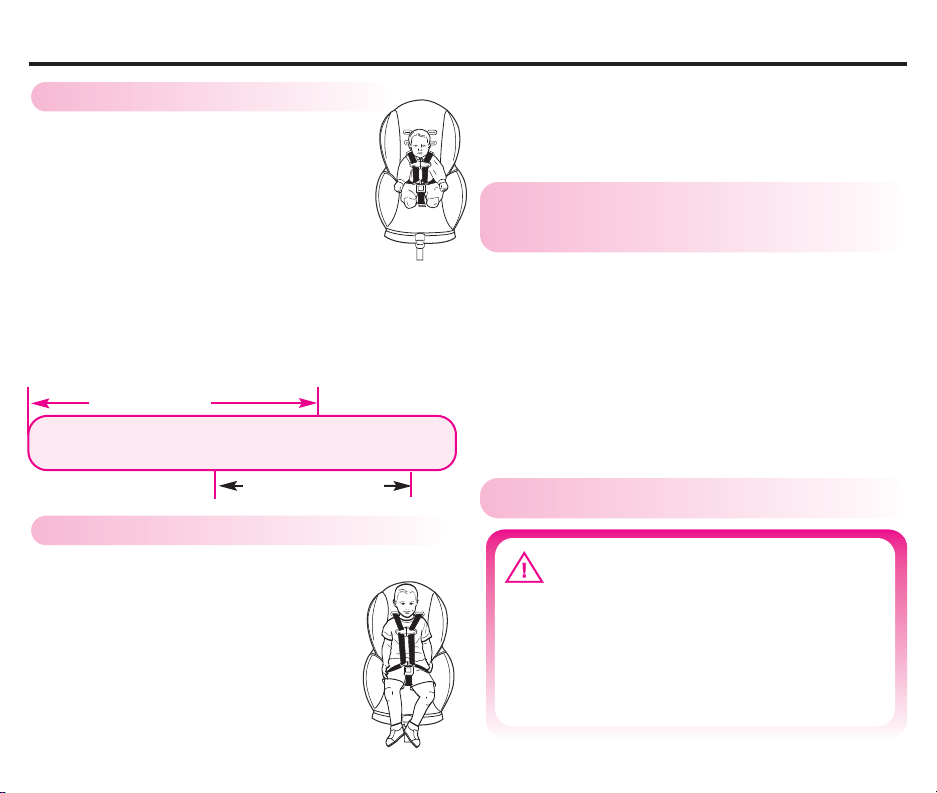
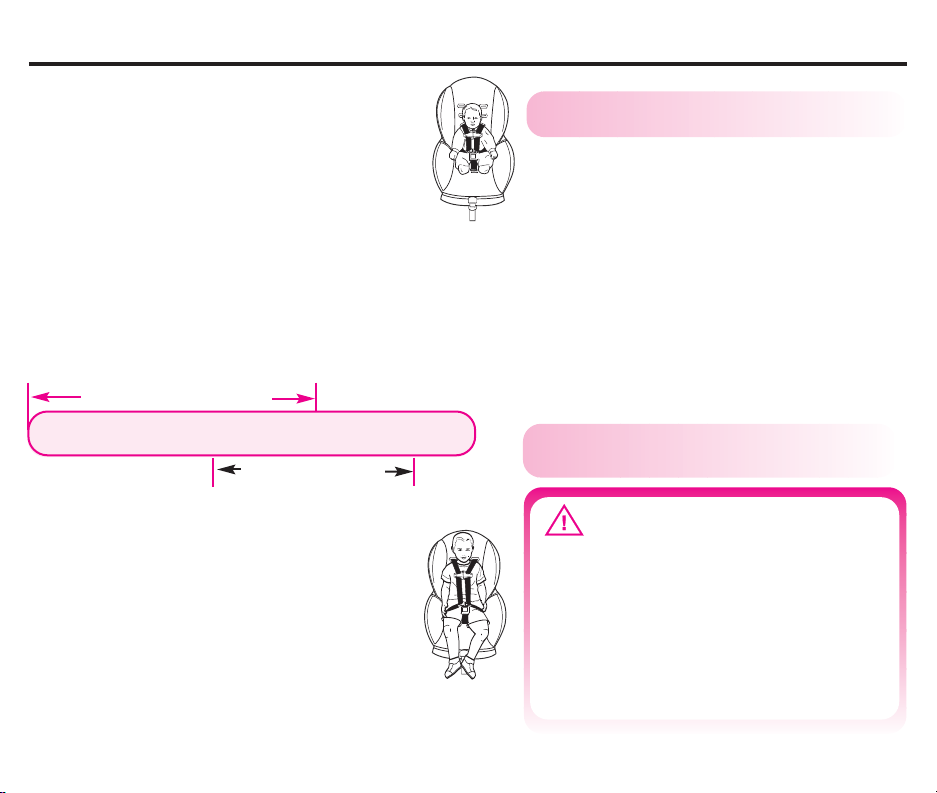
Rear-facing: 5 to 30 lbs. (2.2-13.6 kg)
• Infants who weigh less than 20 lbs.
(9 kg) MUST be rear-facing.
• Infants or toddlers 20 to 30 lbs.
(9 to 13.6 kg) may be rear-facing.
IMPORTANT: This child restraint is
certified for use
up to 30 lbs. (13.6 kg). However, some
children approaching 30 lbs. (13.6 kg) may be
too tall to fit comfortably rear-facing. When
child can no longer comfortably fit and knees
remain bent, child should use car seat
forward-facing only if child is over 20 lbs.
(9 kg) and can sit upright unassisted.
Rear-facing
5 lbs.
(2.2 kg)
Forward-facing: 20 to 40 lbs. (9 to 18 kg)
• Toddlers 20 to 30 lbs. (9 to 13.6 kg)
who are capable of sitting upright
unassisted may be forward-facing
If unable to sit unassisted, use
rear-facing.
• Toddlers 30 to 40 lbs.
(13.6 to 18 kg) and up to
40 inches (101.6 cm) tall MUST
be forward-facing.
rear-facing with children
*
20 lbs.
(9 kg)
30 lbs.
(13.6 kg)
Forward-facing
.
(18 kg)
*
40 lbs.
The American Academy of Pediatrics
recommends that children should be at least one
*
year of age before being positioned forward facing.
Preterm or Low Birth Weight
F
Infants
A preterm infant or low birth weight infant may
be at special risk in a vehicle or aircraft.
According to the American Academy of
Pediatrics, these infants may suffer breathing
difficulties if improperly reclined in a child
restraint.
Graco advises that you have your physician or
hospital staff evaluate your infant and recommend
the proper child restraint or car bed before you
and your infant leave the hospital.
Outgrowing Child Restraint
F
WARNING
Prevent serious injury or death:
•Top of child’s ears must be below
top edge of child restraint.
• Child’s shoulders MUST not be
above top harness slots.
7
Page 10
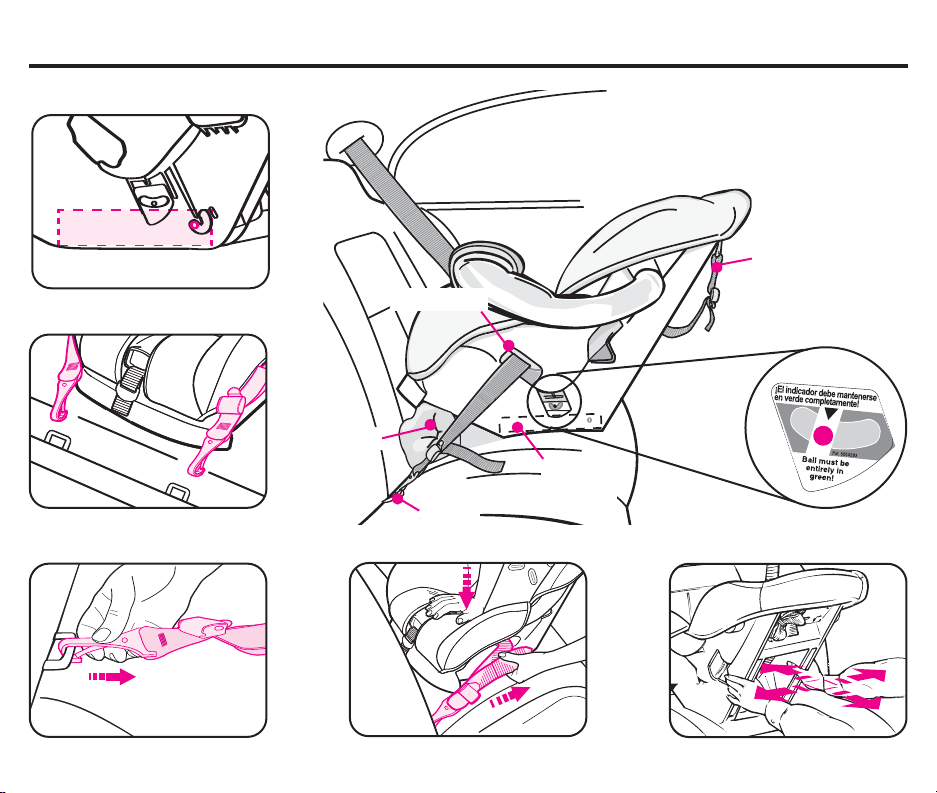
REAR-FACING INSTALLATION WITH LATCH
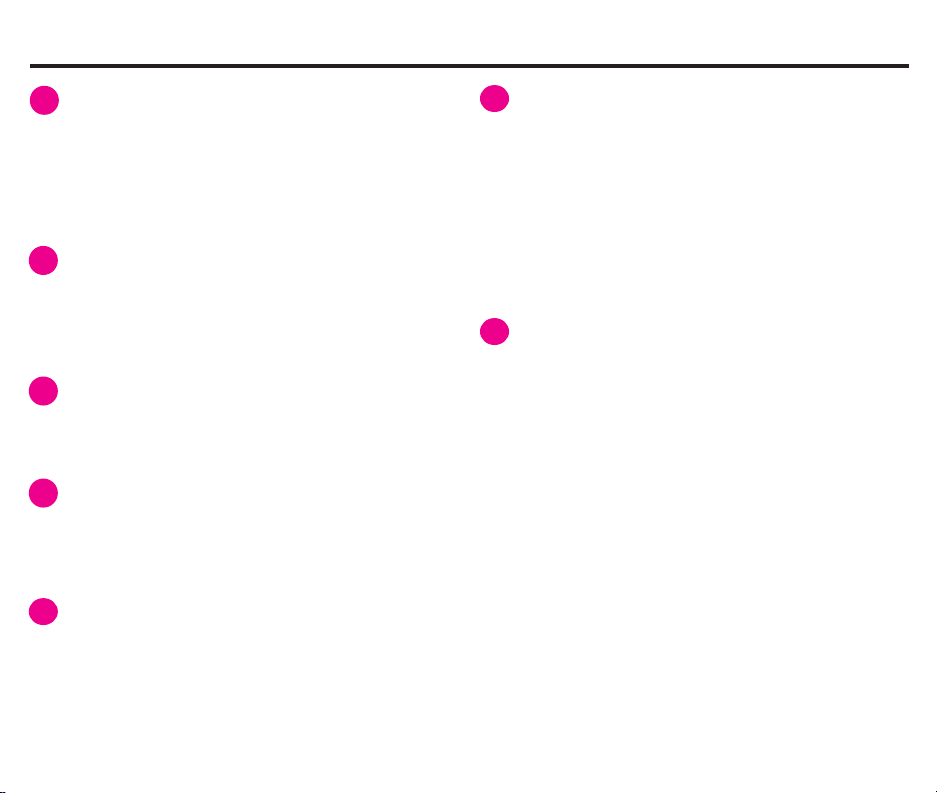
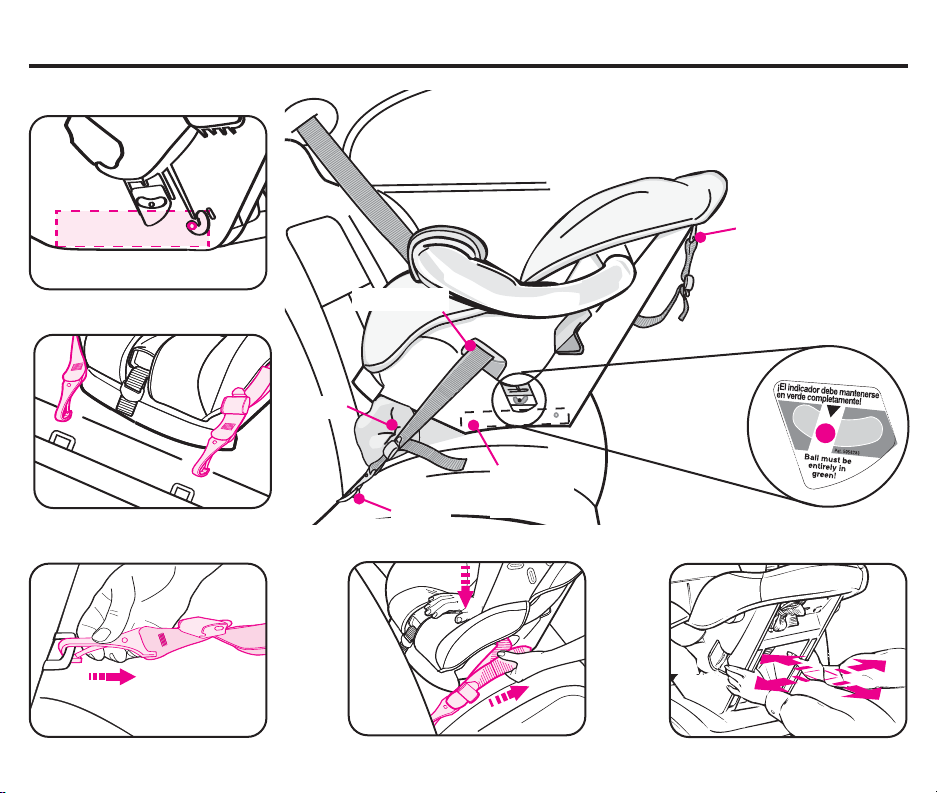
LATCH belt must be routed through
1
opening in child restraint for rear-facing mode.
(see page 23, fig. k).
Belt must lay flat and not be twisted.
Adjust child restraint to recline position
2
(see fig. a and pages 18 and 19, fig. b) Place
rear-facing on vehicle seat equipped with
LATCH anchors.
For ease of installation, extend LATCH belt
3
to its maximum length.
Hook connectors to vehicle lower anchors
4
(fig. b). Pull connectors to be sure they are
securely attached to the anchor points. (fig. c).
Press down firmly in center of child restraint
5
while pulling LATCH adjustment belt. (fig. d).
Pull front to back and left to right to check for
6
secure installation (fig. e).
Check that the lower anchorage belt stays
tight and does not slip from the tightened
position. If it does not stay tight, try another
seating position or contact Customer Service
(see back cover).
Check level indicator on child restraint.
7
Vehicle must be on level ground and child in
child restraint when checking level indicator.
Ball MUST be entirely in green zone (fig. f). If
necessary, place rolled towels under child
restraint, at vehicle seat crease, until entire ball
is in green zone. Then re-check level indicator.
DO NOT use tether rear-facing. Tether must
be stored (see “Tether Storage” page 32).
Periodically check that child restraint is
securely installed and properly leveled; adjust
if necessary.
8
Page 11
REAR-FACING INSTALLATION WITH LATCH
LAPC011
0A
(continued):
Recline position
(fig. a)
(fig. b)
(fig. c)
Towels
Openings
LATCH
(fig. d)
Recline
Position
Tether
(fig. f)
(fig. e)
9
Page 12

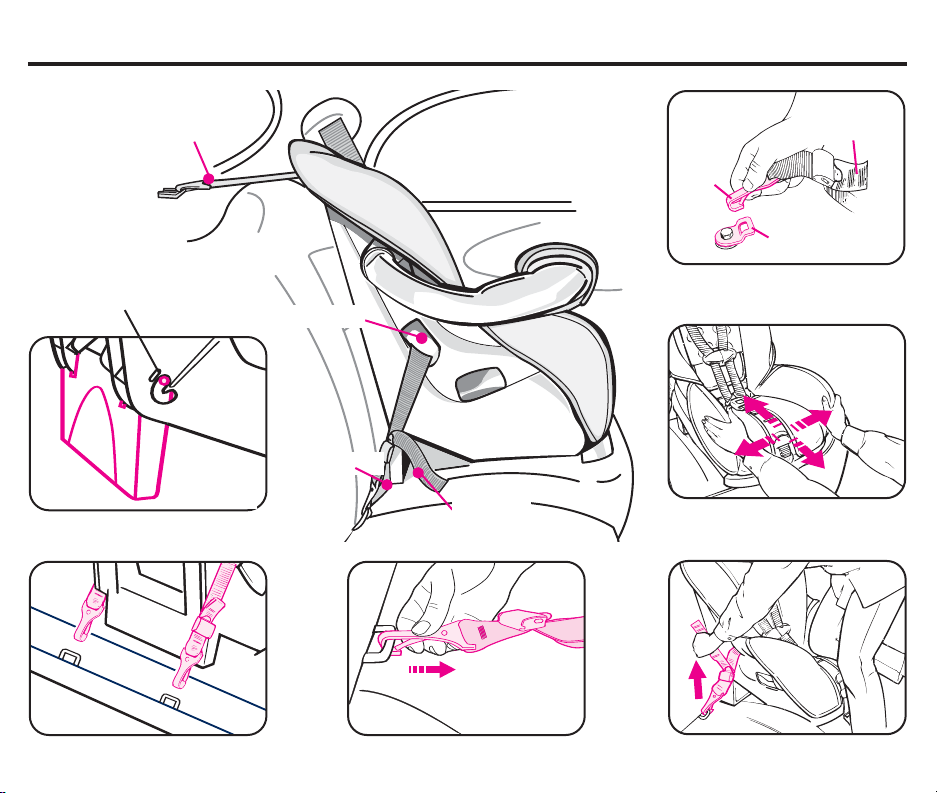
FORWARD-FACING INSTALLATION WITH LATCH
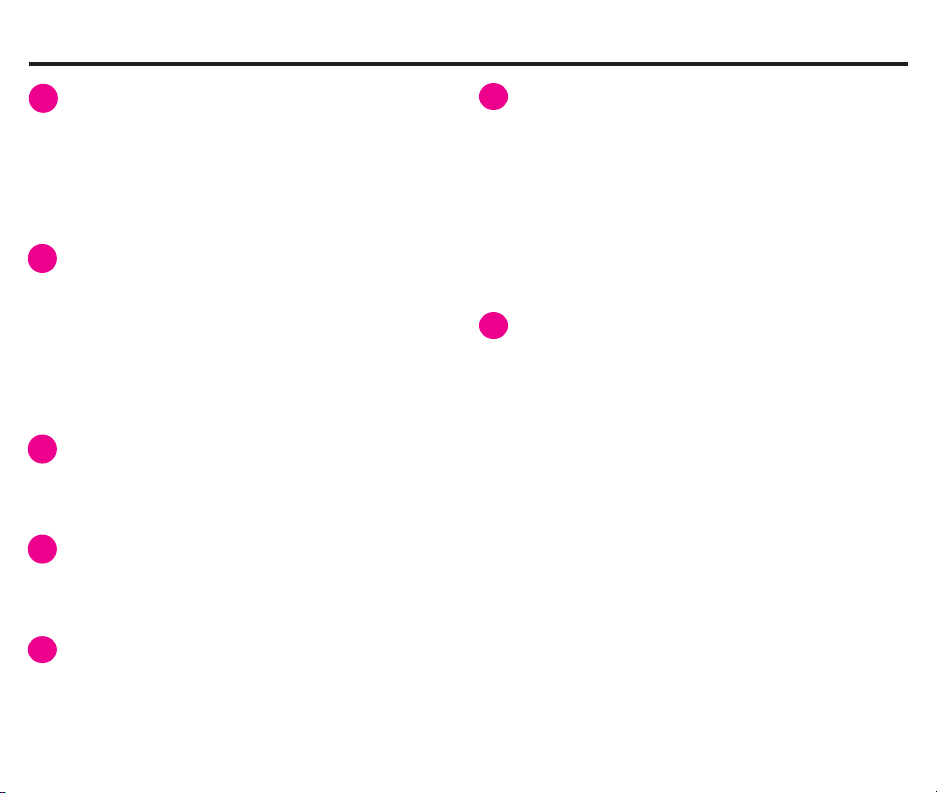
LATCH belt must be routed through
1
opening in child restraint for forward-facing
(see page 23, fig. l).
Belt must lay flat and not be twisted.
Adjust car seat to upright position (see fig. a
2
and pages 18 and 19, fig. b). Secure recline
stand into Upright Position by pushing tabs
into lock position.
Place forward-facing on vehicle seat equipped
with LATCH anchors.
For ease of installation, extend LATCH belt
3
to its maximum length.
Hook connectors to vehicle lower anchors
4
(fig. b). Pull connectors to be sure they are
securely attached (fig. c).
Press down firmly in center of child restraint to
5
compress vehicle seat cushion while tightening
LATCH belt by pulling adjustment belt (fig. d).
Use your knee to press down in center of
child restraint (fig. d).
Pull front to back and left to right to check for
6
secure installation (fig. e).
Check that the lower anchorage belt stays
tight and does not slip from the tightened
position. If it does not stay tight, try another
seating position or contact Customer Service
(see back cover).
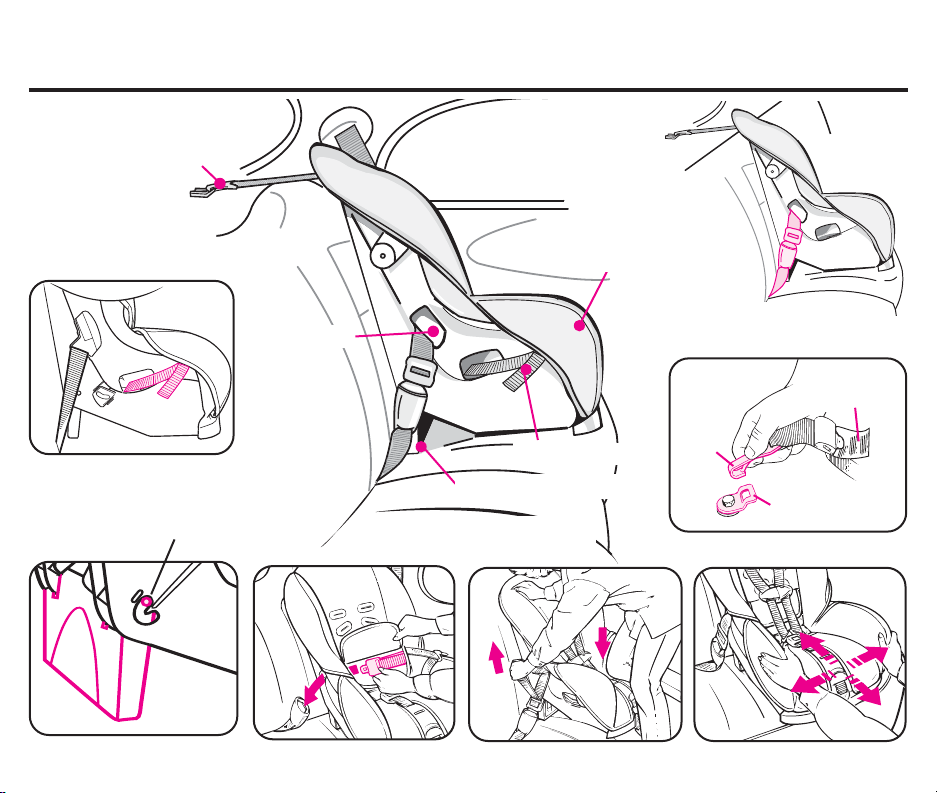
Attach tether strap hook (A) to anchor
7
hardware (B) and tighten adjustment belt to
remove any slack (fig. f).
Belt must lay flat and not be twisted.
Periodically check that child restraint is securely
installed; adjust if necessary.
10
Page 13
FORW ARD-F ACING INSTALLATION WITH LATCH
):
Tether
(A)
(continued
Pull to
tighten
(B)
Lock
Position
(fig. a)
(fig. b)
Upright
Position
Openings
LATCH
Upright
Position
(fig. c)
(fig. f)
(fig. e)
(fig. d)
11
Page 14
REAR-FACING INSTALLATION WITH VEHICLE SEAT BELTS
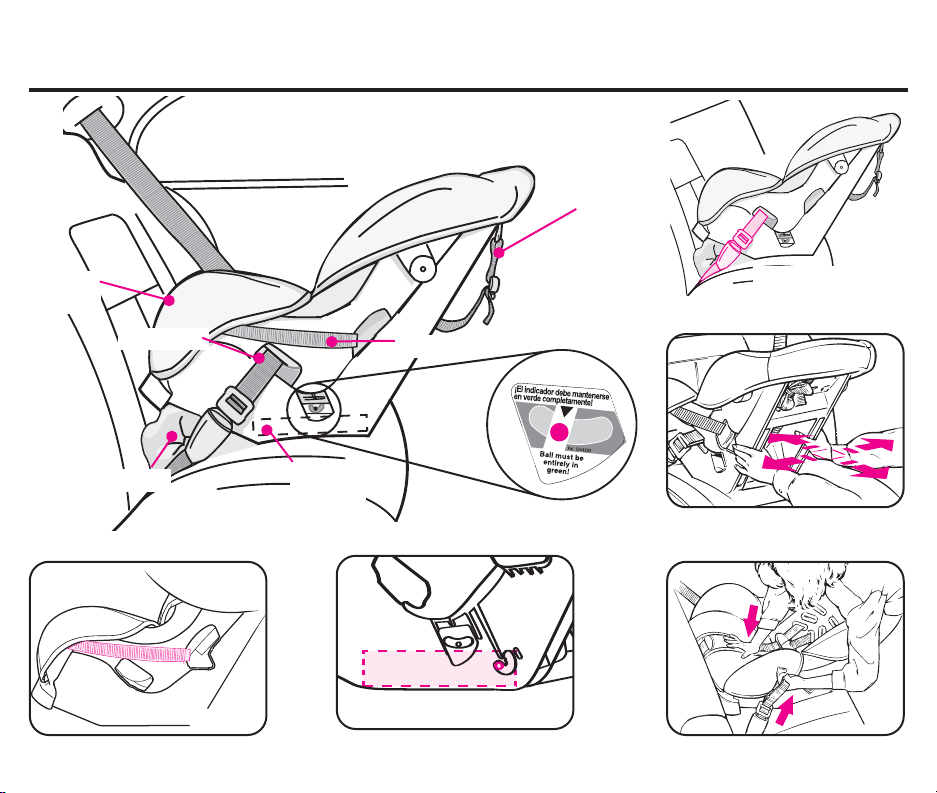
Pull front to back and left to right to check for
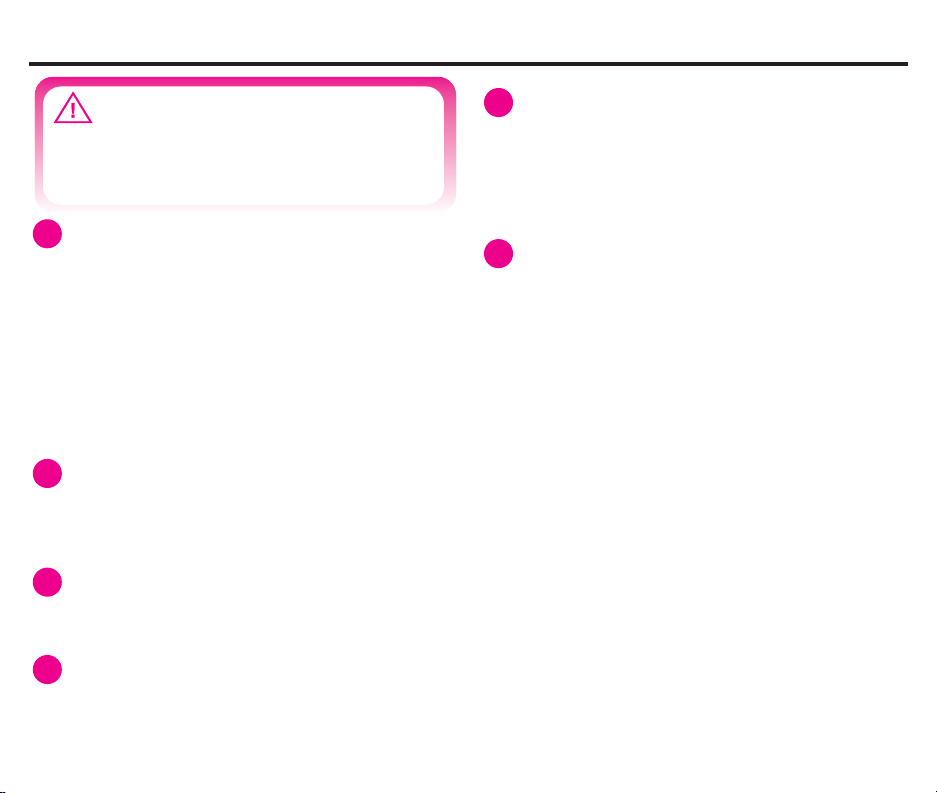
WARNING
LATCH belt MUST be stored when
using vehicle seat belt to install
child restraint.
Store LATCH belt by attaching to connectors
1
through forward-facing openings
(see page 25, fig. r).
• Attach connectors to storage bar on each
side (fig. a).
• Adjust LATCH belt to remove excess
slack by pulling adjustment belt.
Adjust car seat to recline position
2
(see fig. b and pages 18 and 19, fig. b).
Place rear-facing on vehicle seat.
Thread vehicle seat belt through openings and
3
buckle belt.
5
secure installation (fig. d). Vehicle lap belt
MUST stay tight.
If not secure, see “Vehicle Seat Belts” page 26.
6
Check level indicator on child restraint.
Vehicle must be on level ground and child in
child restraint when checking level indicator.
Ball MUST be entirely in green zone (fig. e).
If necessary, place rolled towels under child
restraint, at vehicle seat crease, until entire ball
is in green zone. Then re-check level indicator.
DO NOT use tether rear-facing. Tether must
be stored (see “Tether Storage” page 32).
Periodically check that child restraint is
securely installed and properly leveled;
adjust if necessary.
Press down firmly in center of child restraint to
4
compress vehicle seat cushion while tightening
vehicle seat belt (fig. c).
12
Page 15
REAR-FACING INSTALLATION WITH VEHICLE SEAT BELT
S
L
AP
C
01
1
0A
(continued):
Tether
Storage
Bar
Openings
Towels
Recline
Position
Installation with Lap/shoulder belt
(fig. a)
LATCH (stored)
Recline position
(fig. b)
(fig. e)
Installation with
Lap belt only
(fig. d)
(fig. c)
13
Page 16

FORW ARD-FACING INSTALLATION WITH VEHICLE SEA T BEL
TS
Pull front to back and left to right to check for
5
WARNING
LATCH belt MUST be stored when
using vehicle seat belt to install
child restraint.
Store LATCH belt by attaching to connectors
1
through rear-facing openings
(see page 25, fig. q).
• Attach connectors to storage bar on each
side (fig. a).
• Adjust LATCH belt to remove excess
slack by pulling adjustment belt.
secure installation (fig. e). Vehicle lap belt
MUST stay tight.
If not secure, see “Vehicle Seat Belts” page 26.
Attach tether strap hook (A) to anchor
6
hardware (B) and tighten adjustment belt to
remove any slack (fig. f). If vehicle does not
have anchor points to attach tether hook,
tether hook should be stored, see “Tether
Storage”, page 32.
Belt must lay flat and not be twisted.
Adjust car seat to upright position (see fig. b
2
and pages 18 and 19, fig. b). Secure recline
stand into Upright Position by pushing tabs
into lock position.
Place forward-facing on vehicle seat.
Lift seat pad flap (available on some models).
3
Thread vehicle seat belt through openings.
Buckle belt (fig. c).
4
Press down firmly in center of child restraint to
compress vehicle seat cushion while tightening
vehicle seat belt.
Use your knee to press down in center of
child restraint (fig. d).
14
Periodically check that child restraint is securely
installed; adjust if necessary.
Page 17
FORW ARD-FACING INSTALLATION WITH VEHICLE SEAT BEL T
S
(continued):
Tether
Storage
Bar
Installation with
Openings
Lap belt only
Pull to
tighten
(fig. a)
(fig. b)
Lock
Position
Upright
Position
(fig. c)
LATCH (stored)
Upright Position
Installation with
Lap/shoulder belt
(fig. d) (fig. e)
(A)
(B)
(fig. f)
15
Page 18
PLACING CHILD IN CHILD RESTRAINT
5-Point Models Only:
WARNING
To prevent serious injury or death:
•Keep harness straps snug and
positioned on shoulders with
harness tie at arm pit level.
•Do not use strap covers, blankets,
cushions, or padding under harness
straps or child unless provided
by Graco.
• Child should be dressed in clothing
that does not interfere with
buckling the harness.
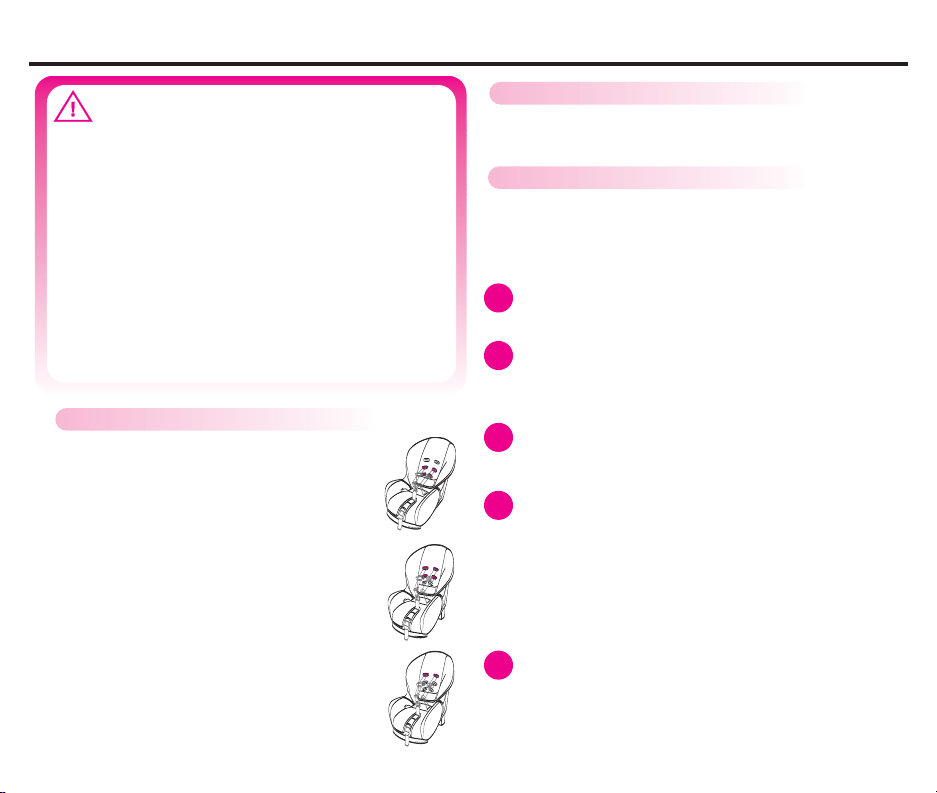
Check harness system:
Rear-facing - 5-30 lbs (2.2-13.6 kg)
•
Harness straps must be
through bottom or middle
slots at or below shoulders.
•
Forward-facing - 20-30 lbs (9-13.6 kg)
and are at least one year old.
Harness straps must be
through middle or top slots
at or above shoulders.
•
Forward-facing - 30-40 lbs (13.6-18 kg)
Harness straps must be
through top slots only.
DO NOT use middle slots
for child over 30 lbs. (13.6 kg).
16
• Crotch strap must be in opening closest to
but not under child.
Overhead Shield Models Only:
• Harness tongue must be in opening
closest to but not under child.
Place child in child restraint with child’s back flat
1
against back of child restraint.
Place harness straps over child’s shoulders and
2
insert tongue(s) into buckle.
Pull up on tongue(s) to be sure they are locked.
Close harness tie:
3
Position harness tie at arm pit level.
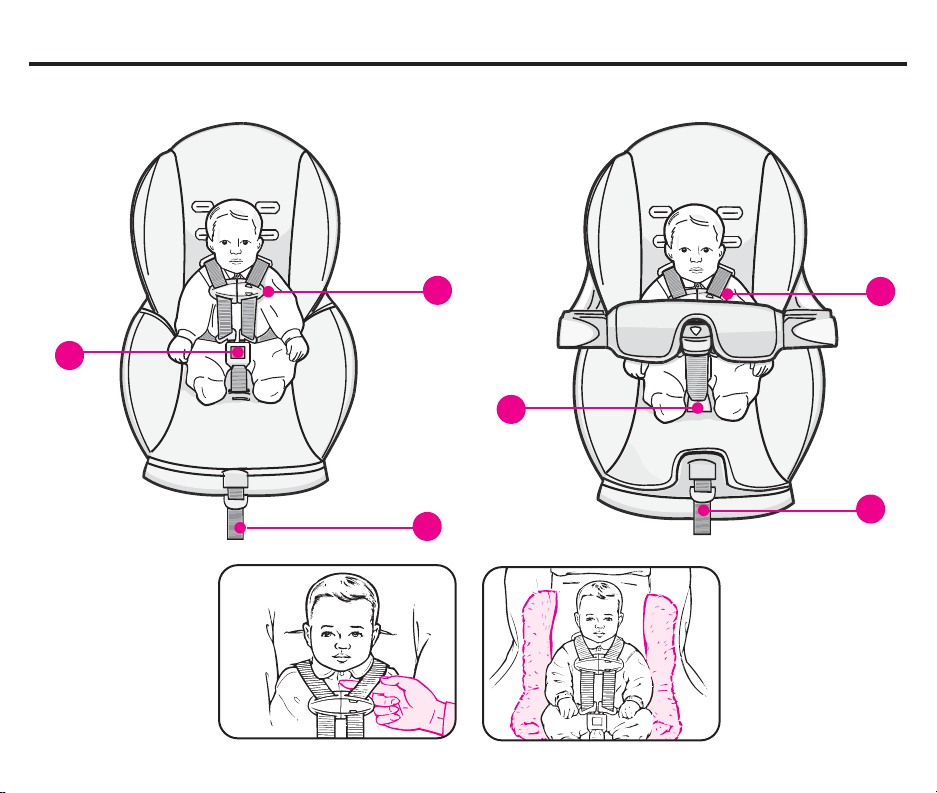
Adjust harness straps to be snug. A snug strap
4
should not allow any slack. It lies in a relatively
straight line without sagging. It does not press
on the child’s flesh or push the child’s body into
an unnatural position (fig. a).
Check that harness straps on chest and thighs
are snug.
A rolled towel can be used on each side to
5
support small children (fig. b). Be sure towels
do not interfere with harness system. Towels
should NOT be placed under child.
Page 19
PLACING CHILD IN CHILD RESTRAINT (continued)
5-Point
Models
2
(fig. a)
Overhead
Shield
Models
3
2
4
(fig. b)
3
4
17
Page 20

OPERATIONS and ADJUSTMENTS
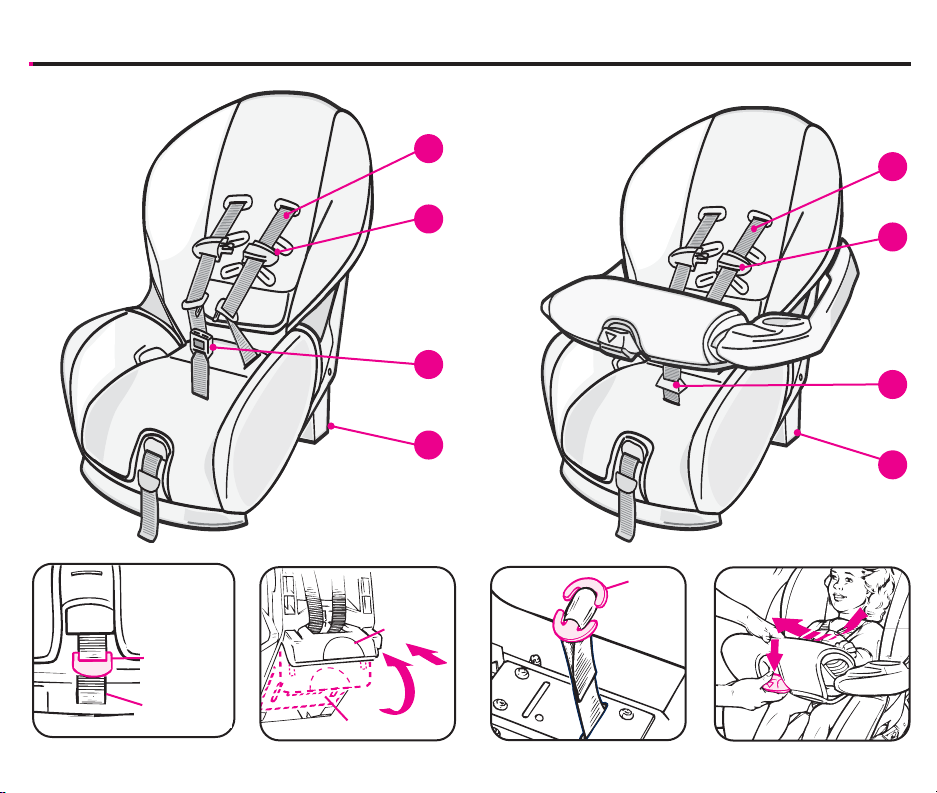
Harness Straps (fig. a):
1
• To tighten: Pull lower belt.
• To loosen: Pull and hold upper belt tab
while pulling shoulder harness straps.
2
Harness Tie:
• To open: Press tabs and pull apart.
• To close: Snap halves together. Make
sure harness tie is locked by pulling out
on each half.
Buckle:
3
MUST be in opening closest to but not under
child.
5-Point Models
• To buckle: Insert both tongues into
buckle. Pull up on tongues to be sure
they are locked.
• To unbuckle: Press red button and pull
tongues out of buckle.
Overhead Shield Models
• To buckle: Push tongue into opening.
Pull up on tongue to be sure it is locked.
• To unbuckle: Press red button, pull
tongue out of opening and lift shield
18
over top of child restraint.
Recline / Upright Positions (fig. b):
4
Rear-facing - MUST use Recline position.
Forward-facing - MUST use Upright position
Upright Position: Rotate stand out and push
into child restraint (fig. b). Secure recline stand
by pushing tabs into lock position.
Recline Position: Pull stand out and rotate
into child restraint.
Harness straps MUST move freely. Make sure
harness straps are not pinched by recline stand.
5-Point Crotch Strap Adjustment (fig. c):
5
• From bottom of child restraint, pull crotch
strap clip out and remove clip from crotch
strap loop.
• From top of child restraint, pull crotch strap
out and thread through desired slot. Make
sure red button is facing away from child.
• From bottom of child restraint, re-attach clip
to crotch strap loop exactly as shown.
Overhead Shield Adjustment (fig. d):
6
• To adjust: Press button down and slide
shield to desired position closest to child.
Release button to lock shield into one of
multiple positions.
NOTE: Shield does not need to contact
child when in closest position; harness
system restrains child.
Page 21
OPERATIONS and ADJUSTMENTS (continued)
5-Point
Models
Upper Tab
(to loosen)
Lower Belt
(to tighten)
(fig. a)
Recline
(fig. b)
1
2
3
4
Upright
Overhead
Shield
Models
Clip
(fig. c)
(fig. d)
1
2
3
4
19
Page 22

OPERATIONS and ADJUSTMENTS (continued)
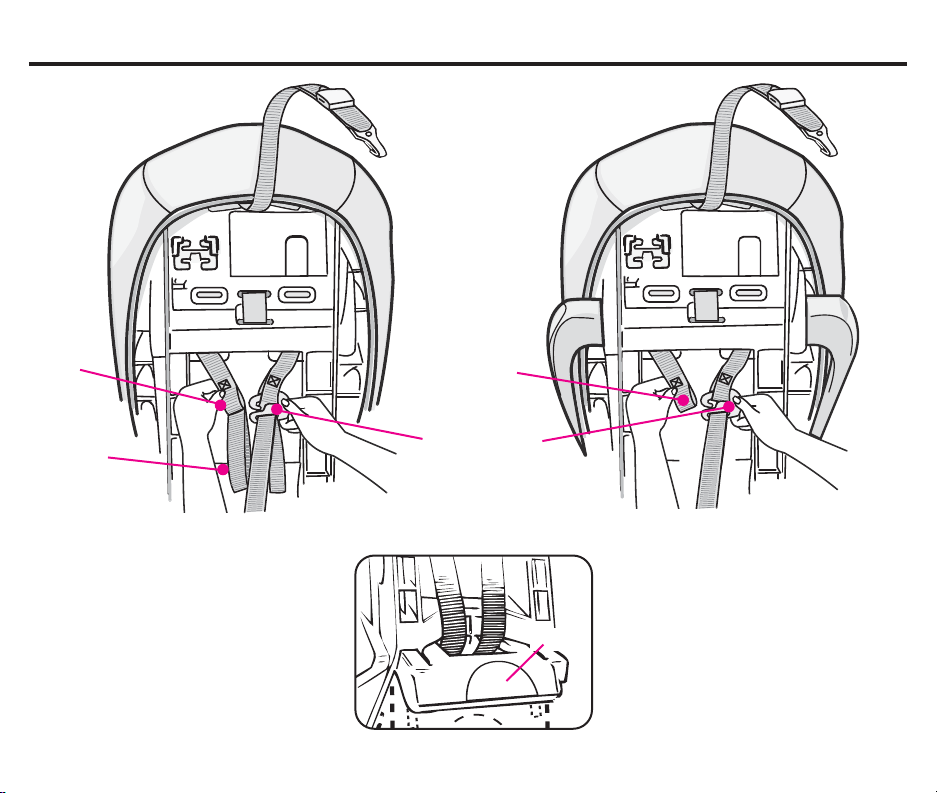
7
Changing Harness Strap Slots:
A Loosen harness straps:
Pull and hold upper belt tab.
Pull harness straps out.
D Re-attach harness strap loops to Splitter
Plate:
5-Point Models (fig. e):
• For Infants or Small Toddlers:
B Remove both shoulder harness strap
loops from Splitter Plate on back of
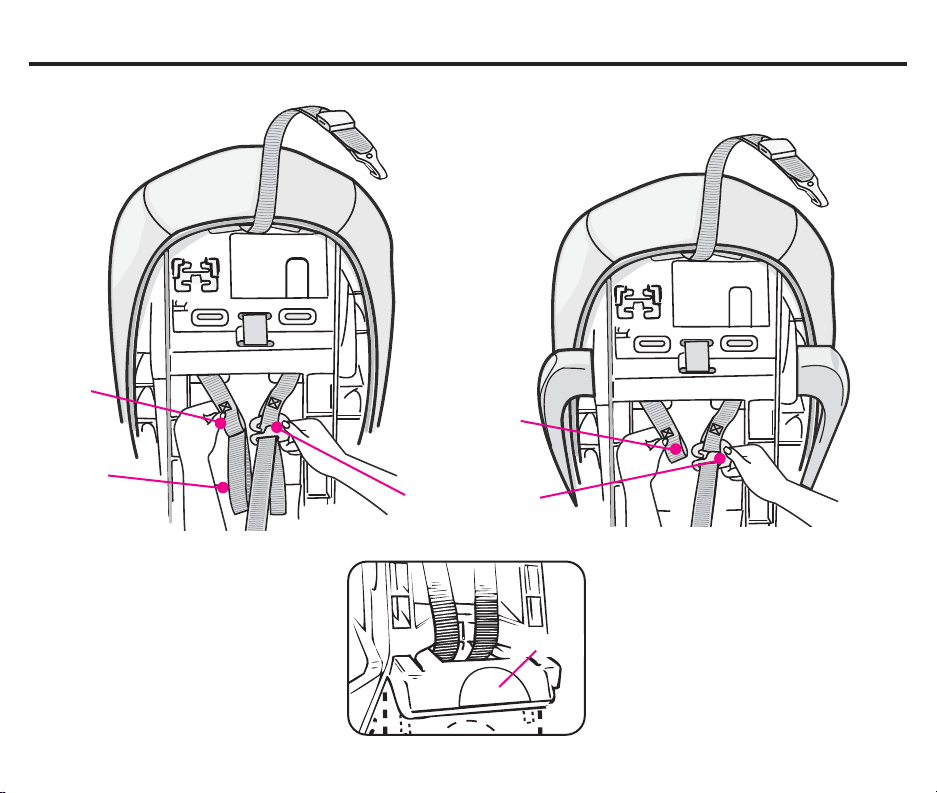
child restraint.
C Change harness strap slots.
Make sure harness straps are threaded
through matching slot of seat pad and
child restraint.
It may be necessary to remove seat pad
from top of child restraint while relocating.
20
Put Top right strap loop on Splitter
Plate first, then attach Top left strap
loop.
NOTE: Make sure ends of straps are
behind Splitter Plate.
• For Toddlers:
Put Bottom right strap loop on Splitter
Plate first, then attach Bottom left
strap loop.
Overhead Shield Models (fig. f):
Put right strap loop on Splitter Plate
first, then attach left strap loop.
NOTE:
• Make sure both strap loops are securely
attached within Splitter Plate hook.
• Make sure straps are NOT twisted and
are routed behind stand (fig. g).
Page 23
OPERATIONS and ADJUSTMENTS (continued)
5-Point
Models
Overhead
Shield
Models
Top
Loop
Bottom
Loop
(fig. e)
Loop
Splitter Plate
(fig. g)
(fig. f)
Stand
21
Page 24

OPERATIONS and ADJUSTMENTS (continued)
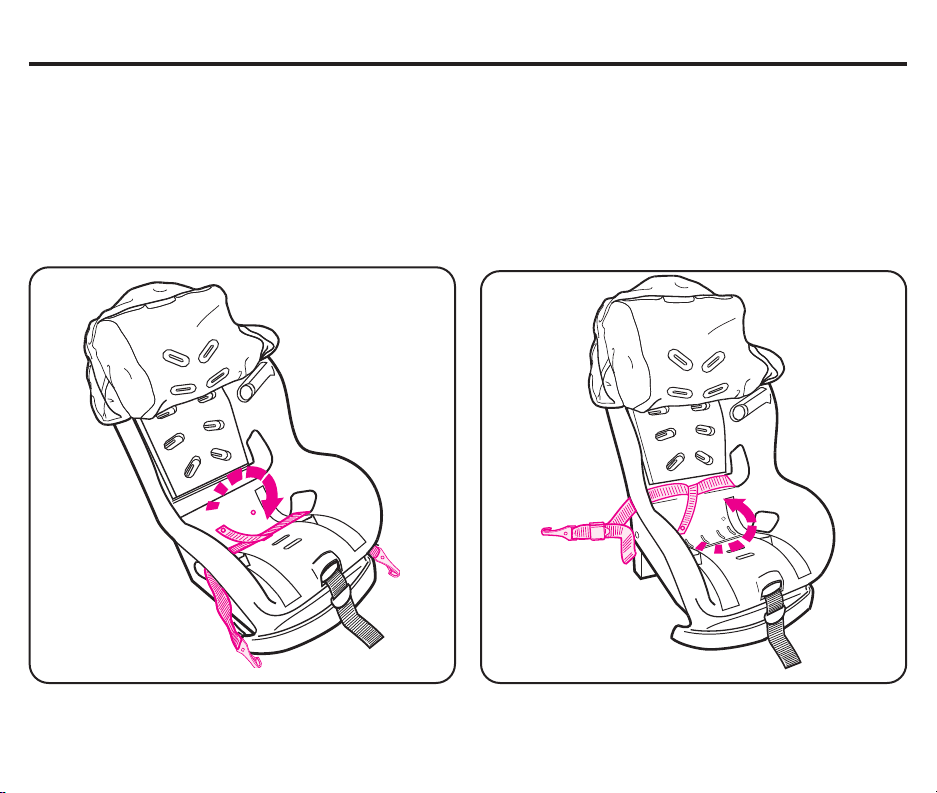
8
LATCH Belt Routing:
LATCH belt MUST be routed through
the proper openings depending on direction
of child restraint use.
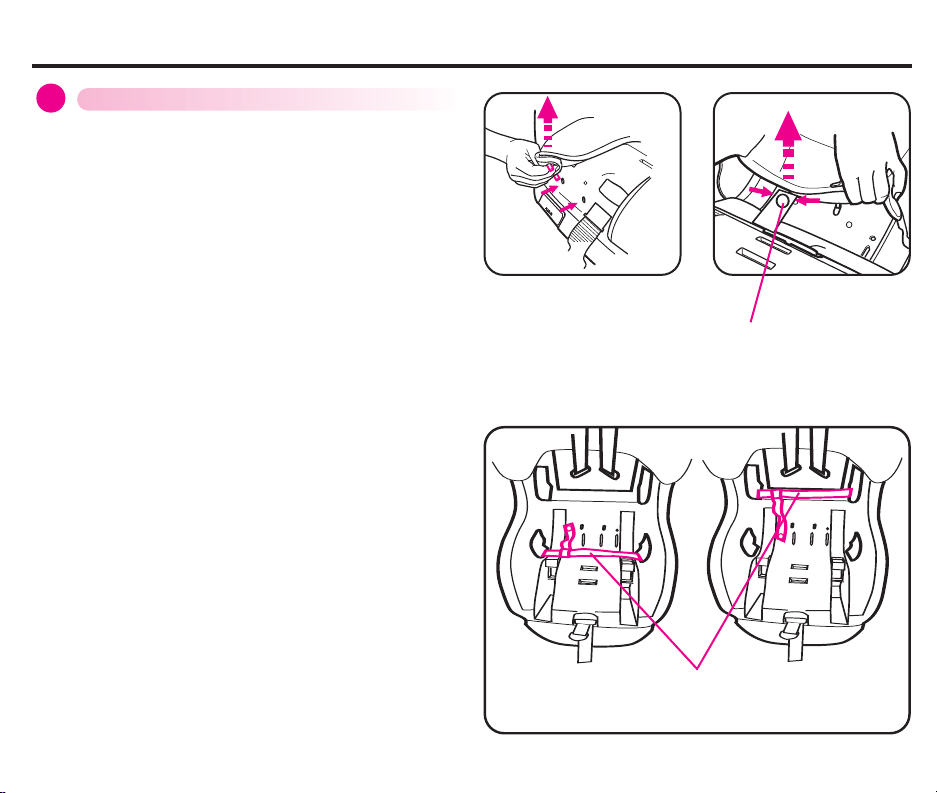
A Remove pad from front of seat area by
pulling out 2-button clips on lower front
edge of child restraint (fig. h) and
2-button clip in center of seat.
Removing pad will expose the rotating
LATCH belt. (fig. i)
B Rotate LATCH belt so that the belt routes
through the proper openings (Pg 23,
fig. k and fig. l). Belts must remain flat
and tight against the child restraint
BEFORE reattaching the three seat pad
2-button clips. (fig. j) LATCH belt must not
interfere with the harness.
C Re-attach pad to child restraint by
snapping the three 2-button clips back in
place. DO NOT allow 2-button clip to
interfere with the LATCH belt or vehicle
seat belt.
(fig. h)
Rotating LATCH Belt
(under seat pad)
Belt must be
flat and tight
(fig. i)
22
(fig. j)
Page 25
OPERATIONS and ADJUSTMENTS (continued)
Route LATCH belt through Rear-facing
openings for:
• LATCH Rear-facing use.
or
• LATCH storage with Forward-facing
vehicle seat belt use. Pg. 25, fig. q.
All belts must be flat and the adjuster belt must be facing out for easy adjustment.
Route LATCH belt through Forward-facing
openings for:
• LATCH Forward-facing use.
or
• LATCH storage with Rear-facing
vehicle seat belt use. Pg. 25, fig. r.
Rear-facing openings Forward-facing openings
(fig. k)
(fig. l)
23
Page 26
OPERATIONS and ADJUSTMENTS (continued)
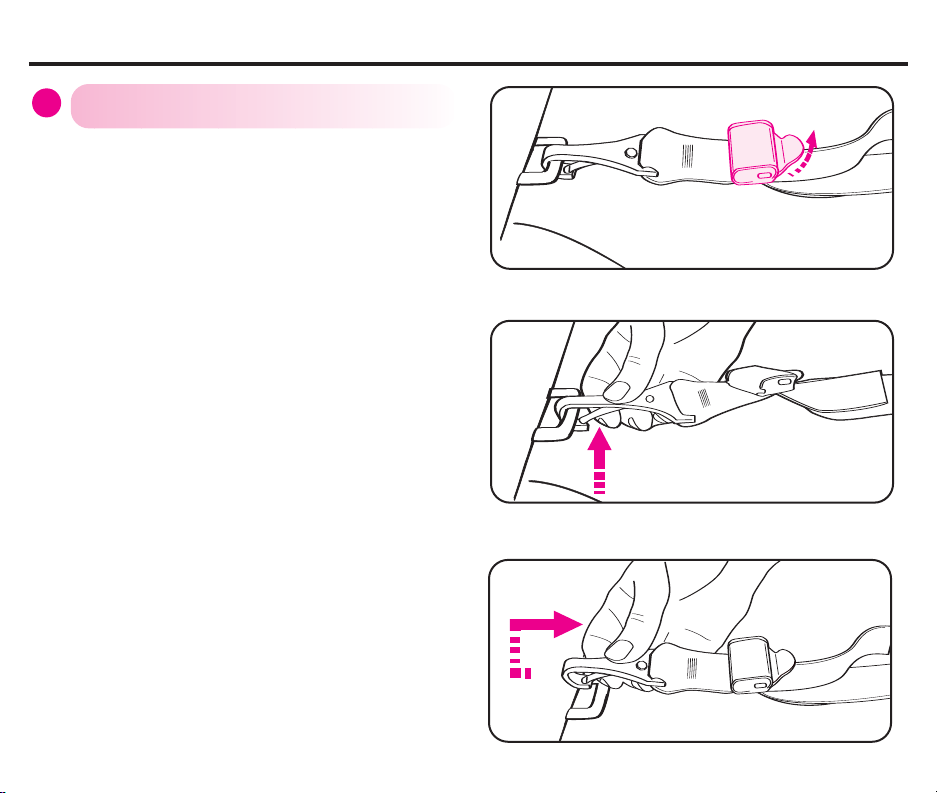
Removing LATCH from Vehicle
9
Anchor Points:
A Tilt metal tab of adjuster to release tension
(fig. m).
Press down on child restraint compressing
vehicle seat cushion to reduce tension on
lower anchorage belt.
(fig. m)
B Press and hold LATCH release hinge.
(fig. n).
C Push connector in, lift connector up and
pull out (away from anchor point) (fig. o).
Repeat step A, B and C for other
connector.
(fig. n)
24
(fig. o)
Page 27
OPERATIONS and ADJUSTMENTS (continued)
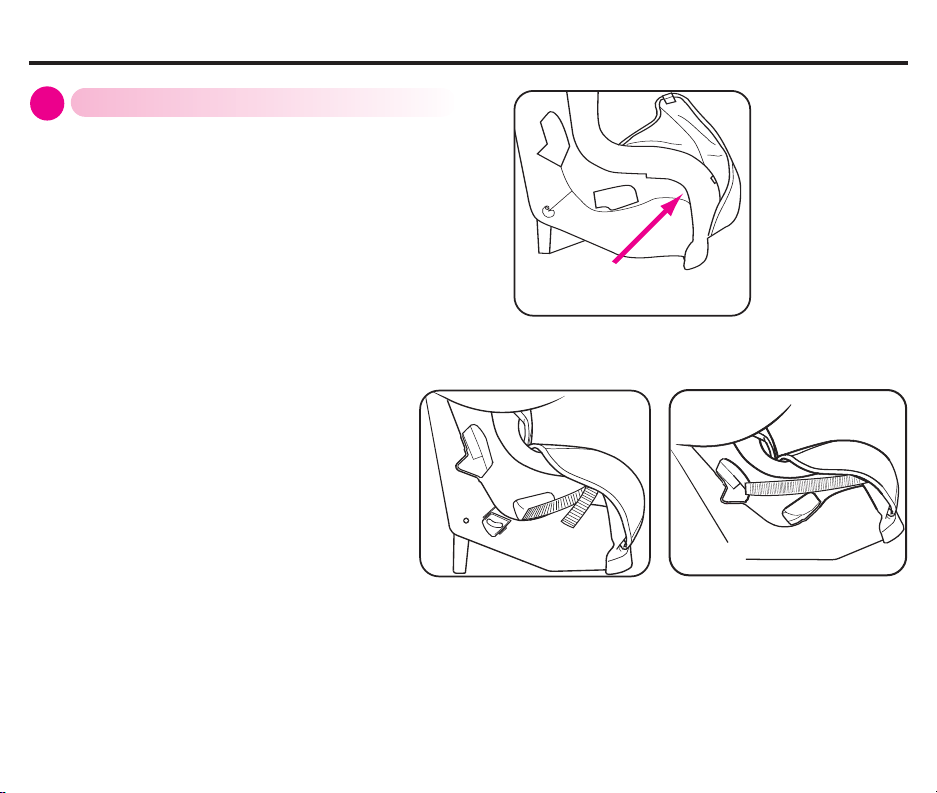
LATCH storage:
10
• Locate LATCH storage bars under arm rest
on sides of child restraint (fig. p).
• Fasten LATCH onto storage bar as shown.
(fig. q or r)
LATCH
Repeat for other side of seat.
storage bar
(fig. p)
(fig. q)
(fig. r)
25
Page 28
VEHICLE SEAT BELTS
WARNING
Not all vehicle seat belts can be
used with a child restraint. The
child restraint must be held
securely at all times by a lap belt
(or lap belt portion of a
lap/shoulder belt) that will not
change length while driving.
To provide the most secure installation of the
child restraint:
• Read the vehicle owner’s manual regarding
child restraint installation and seat belt use
with child restraints.
• Follow all instruction labels on vehicle seat
belt and child restraint.
If child restraint is not held securely after
following instructions in this manual, vehicle
seat belt labels, and vehicle owner’s manual:
• Move child restraint to another seating
location and try again, or
• Contact vehicle dealer for possible seat
belt modification parts.
26
Page 29
VEHICLE SEAT BELTS (continued)
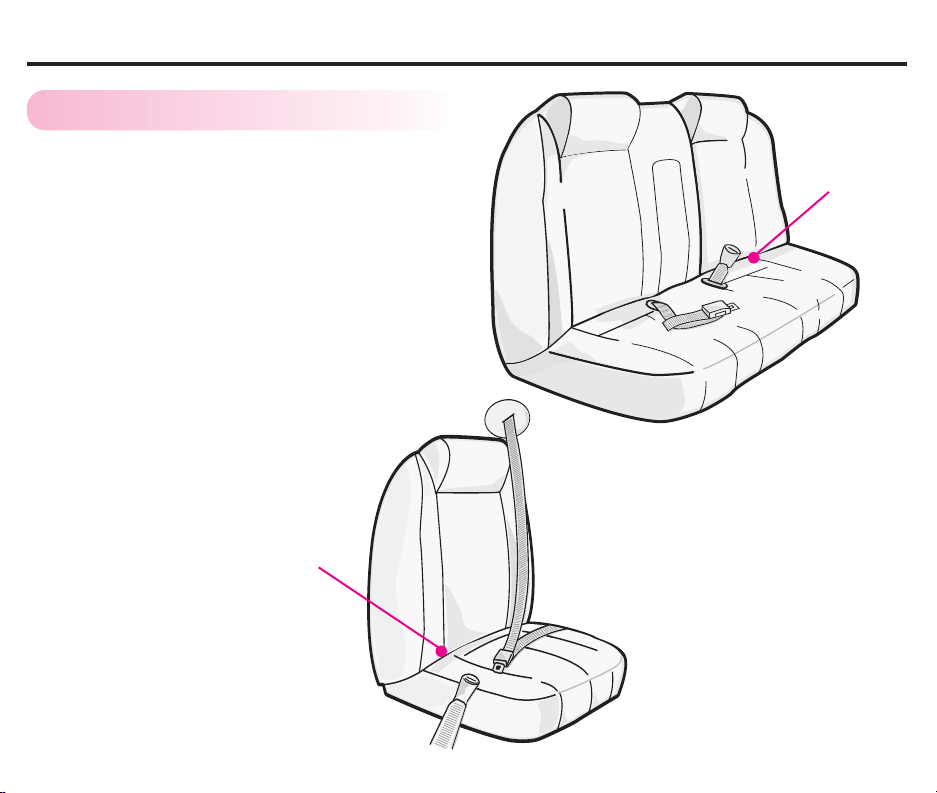
Belts Forward of Seat Crease
F
Vehicle seat belts located forward of seat
crease may not securely hold child restraint.
Check vehicle owner’s manual or see vehicle
dealer for car seat installation requirements.
• If approved for use with child restraint, install
child restraint and check for secure
installation by pulling child restraint front to
back. If child restraint slides forward, DO
NOT use these seat belts.
Seat Crease
Seat Crease
27
Page 30
VEHICLE SEAT BELTS (continued)
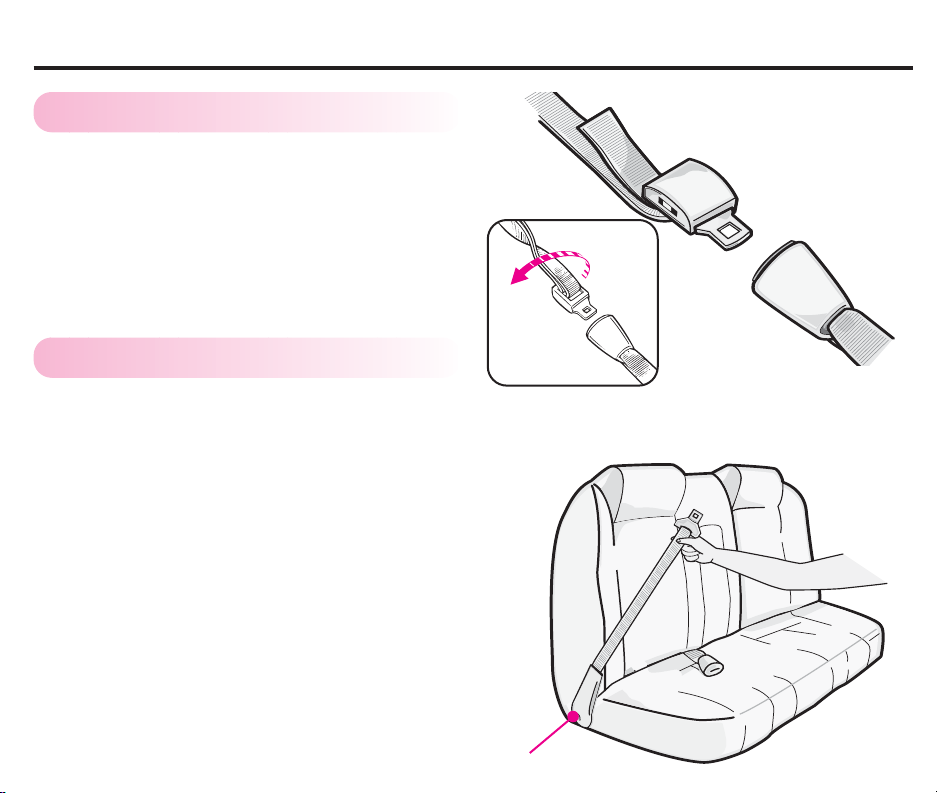
Lap Belts - Manually Adjustable
F
The locking latch plate on some seat belts may
slip and loosen after being buckled on child
restraint if positioned at a certain angle. If this
happens, flip latch plate over (fig. a) and
re-buckle. Test installation again to see if this
works. If not, move child restraint to another
seating position.
Flip
Lap Belts - With Retractor
F
Lap belts with retractors may or may not hold
a child restraint securely.
Follow these steps to determine if you have a
retractor system that will hold child restraint
securely:
a. Pull belt all the way out.
b. Allow belt to retract about 6 inches (15 cm).
c. Pull out on belt again.
If belt is locked and you cannot pull the belt out
any further, you have an Automatic Locking
Retractor which may be used with a child restraint.
Remember, when installing a child restraint, pull
belt all the way out, buckle belt, and then tighten.
If you can pull the belt out again (Step c above),
you have an Emergency Locking Retractor which
MUST NOT be used with a child restraint.
28
(fig. a)
Retractor
Page 31
VEHICLE SEAT BELTS (continued)
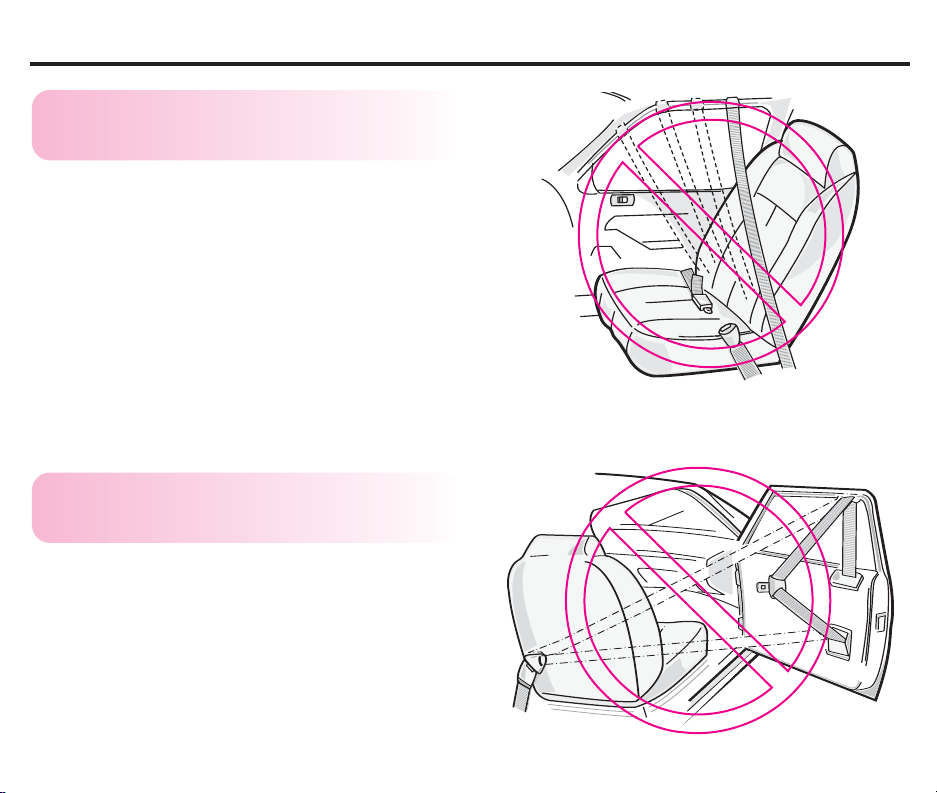
Passive Restraint - Lap Belt
F
with Motorized Shoulder Belt
DO NOT use with any child restraint.
Passive Restraint- Lap or
F
Shoulder Belt Mounted on Door
DO NOT use with any child restraint. Belts will
not stay tight while driving.
29
Page 32
)
VEHICLE SEAT BELTS (continued)
)
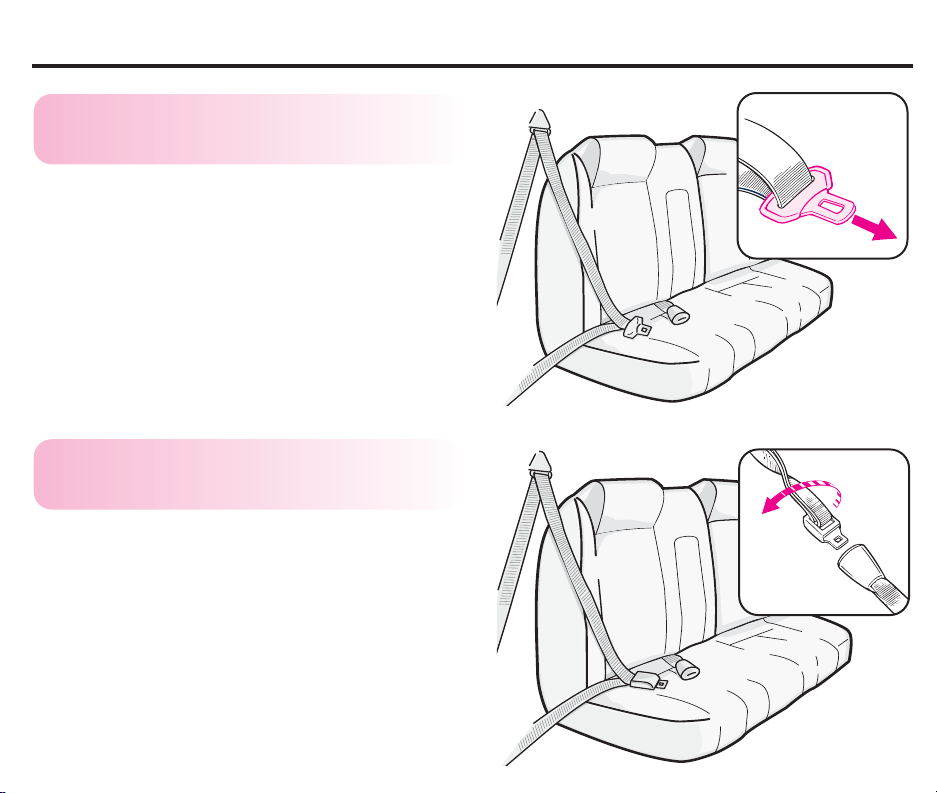
Combination Lap/Shoulder
F
Belt with Sliding Latch Plate
Pull on latch plate (fig. a). If belt slides freely
through latch plate, a locking clip MUST
be used (see Pg. 31 “Locking Clip” section).
Some combination lap/shoulder belts with
sliding latch plates may be converted into an
“automatic locking mode” that will allow use
without a locking clip. See vehicle owner’s
manual and label on vehicle belts for
instructions.
Combination Lap/Shoulder
F
Belt with Locking Latch Plate
The locking latch plate on some seat belts may
slip and loosen after being buckled on child
restraint if positioned at a certain angle. If this
happens, flip the latch plate over (fig. b) and
re-buckle. Test installation again to see if this
works. If not, move child restraint to another
seating position.
30
Flip
Pull
(fig. a
(fig. b
Page 33
VEHICLE SEAT BELTS (continued)
Locking Clip
F
5
WARNING
Avoid serious injury or death:
• Failure to use locking clip where
required will result in child
restraint not being securely held
in place.
• Remove locking clip from seat
belts when not being used with
child restraint.
• DO NOT use locking clip as a
vehicle seat belt shortener.
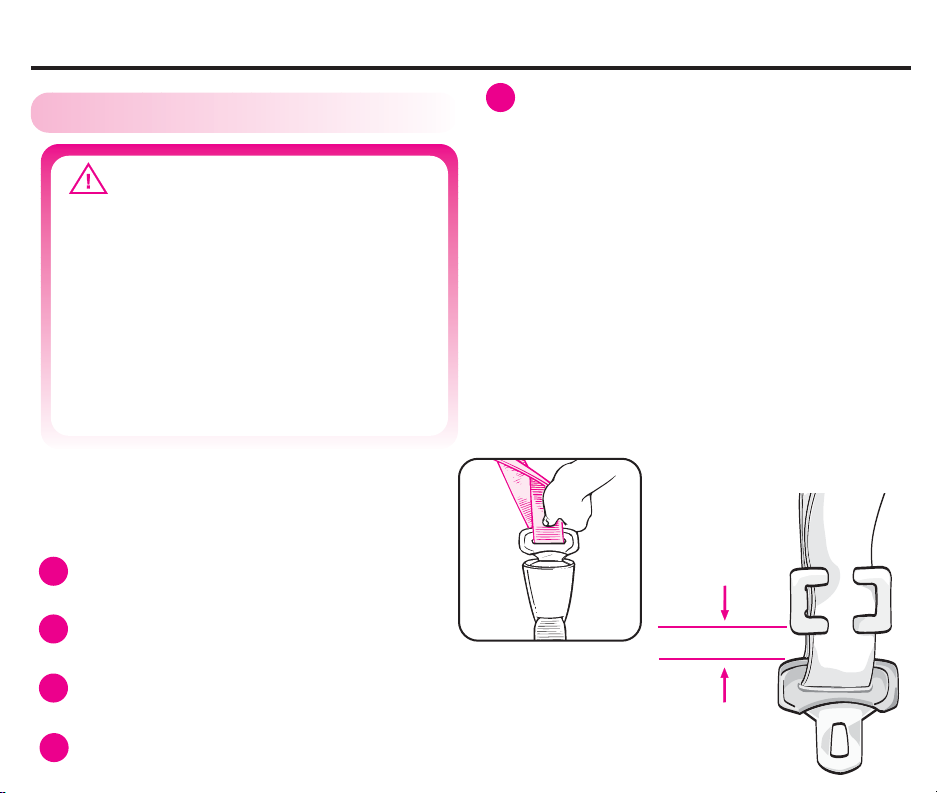
You MUST use locking clip provided with
child restraint with a vehicle seat belt that
slides freely through the latch plate or the lap
belt cannot be tightly secured.
Install child restraint and tighten vehicle
1
seat belt.
2
Hold seat belts together at latch plate (fig. a)
then unbuckle.
3
Slide locking clip on seat belts approximately
1/2 inch (1 cm) away from latch plate.
Test installation to see if child restraint is secure.
If not secure, additional belt tightening may be
required:
• Unbuckle vehicle seat belt.
• Hold belts together and remove locking
clip.
• Shorten length of lap belt portion slightly
by pulling belt through latch plate.
• Re-attach locking clip.
• Buckle vehicle seat belt.
Press child restraint further down into vehicle
seat cushion to help buckle vehicle seat belt.
Test installation to see if child restraint is secure.
If not secure, repeat above step until secure.
(fig. a)
1/2 inch (1 cm)
4
Re-buckle seat belt.
31
Page 34
ADDITIONAL INFORMATION
Tether Storage
F
DO NOT anchor tether strap to the vehicle
when using child restraint rear-facing.
Tether hook must be attached to child restraint
for rear-facing use or if vehicle is not equipped
with tether anchors.
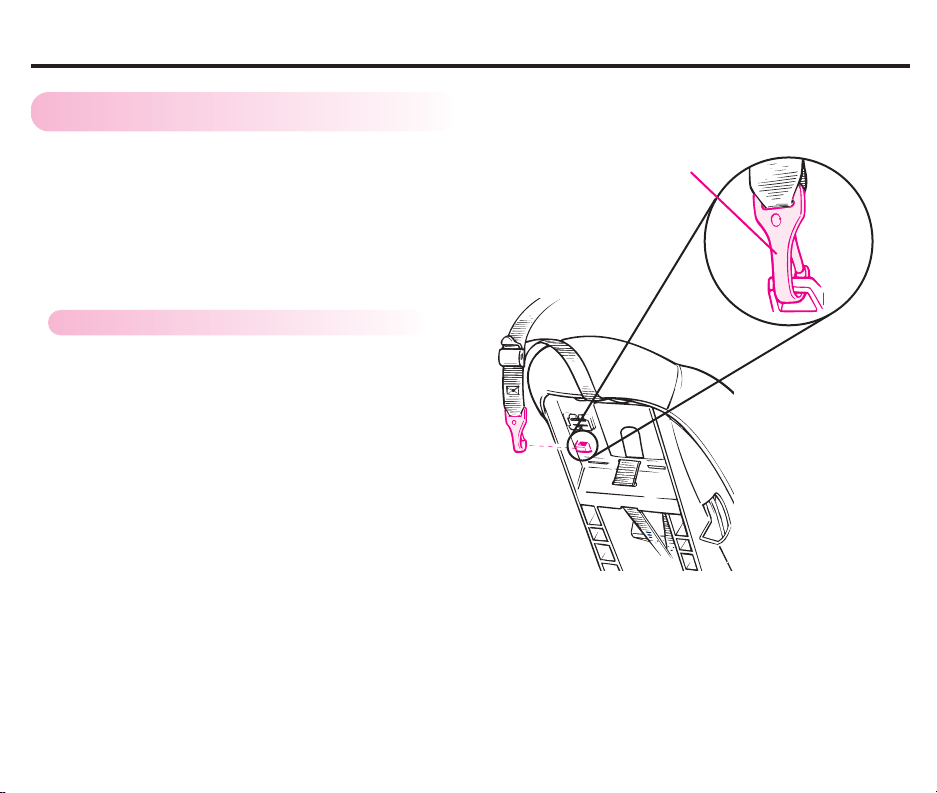
For storage of tether hook:
• Attach tether hook to back of child
restraint as shown.
• Pull loose end of adjustment strap to
remove any slack.
• Roll loose end of adjustment strap up
and secure with a rubber band.
Tether Hook
Back of Child Restraint
32
Page 35
ADDITIONAL INFORMATION
Cup Holder
F
WARNING
Never place sharp or pointed
objects in a cupholder. In a crash,
these objects could hit your child
and cause serious injuries.
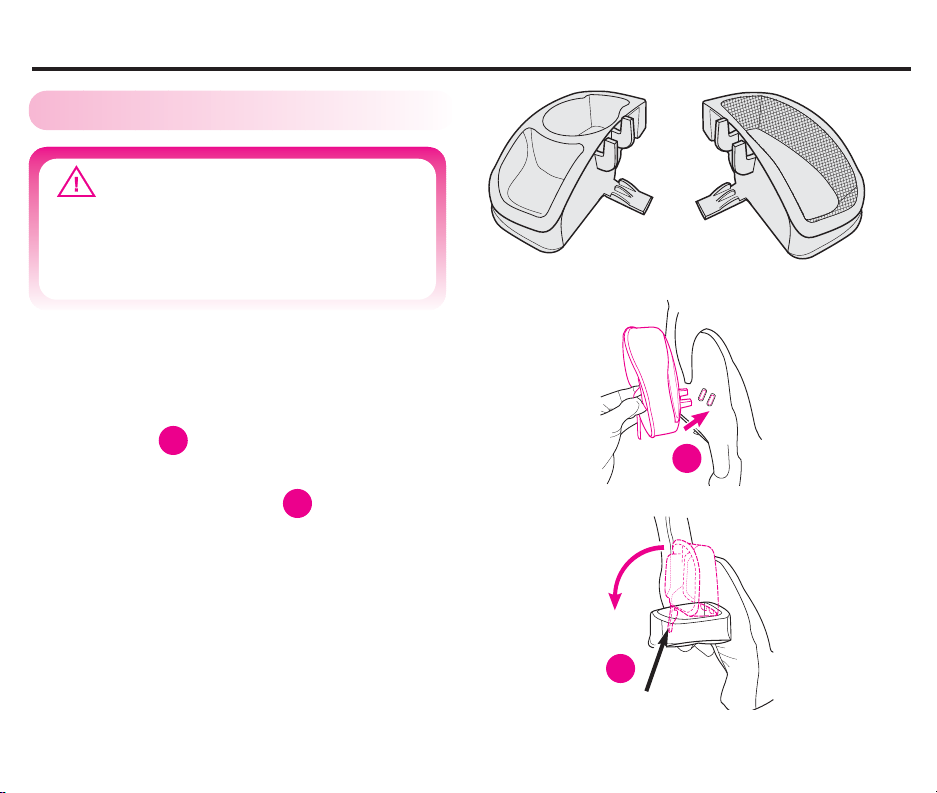
Available on some models:
• Insert the two prongs of the cupholder into
the two slots on either the left or right side of
the seat
• Push cupholder down until the clip snaps
onto the bottom of seat . CHECK that
cupholder is secure by pulling on it.
.
1
2
1
2
Clip
33
Page 36
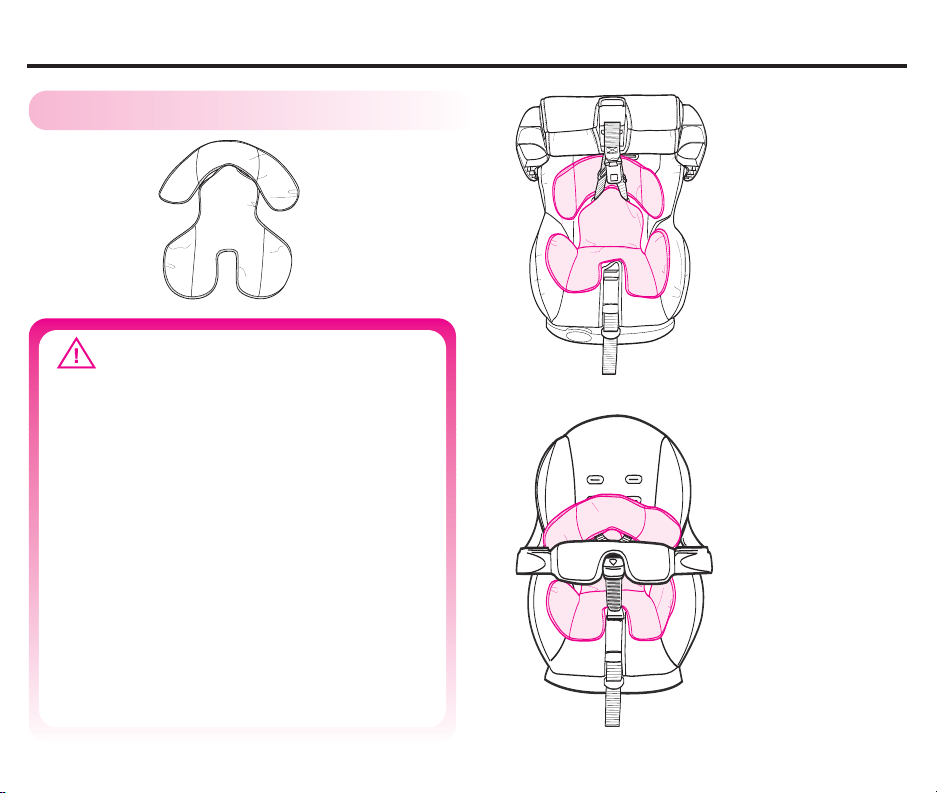
ADDITIONAL INFORMATION (continued)
Body Pillow
F
(available on some models)
WARNING
To prevent ejection in sudden
stop or crash:
• Make sure that the harness system
is properly secured and shoulder
straps are threaded through slots
and properly positioned on
shoulders.
• Never allow pillow to interfere
with the harness system or
vehicle belt.
• Do not allow pillow to bunch
under or behind child's body.
• This product is designed ONLY for
Graco ComfortSport convertible
child restraints.
Push top of body
pillow in between
harness straps and
fit into seat exactly
as shown.
34
Page 37
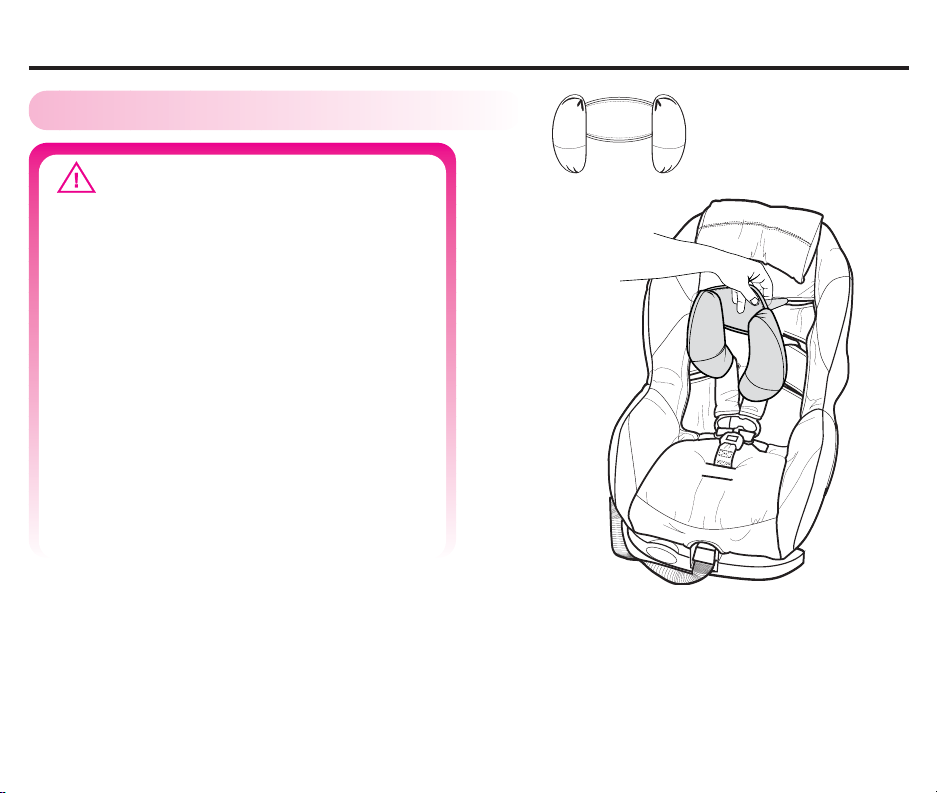
ADDITIONAL INFORMATION (continued)
Head Support
F
(available on some models)
WARNING
For use with top and middle
harness slots only! Use head support in slot ABOVE harness, NOT in
the same slot with the harness.
To prevent ejection in a sudden
stop or crash:
• Use proper harness strap
shoulder slots.
• Keep harness straps positioned
on shoulders and adjusted snugly.
• Do not use strap covers,
blankets, cushions, or padding
under harness straps or child
unless provided by Graco.
Position Head Support in center of car seat
with ends pointing down and snap into belt
slots above harness as shown.
Head Support may be machine washed
separately in cold water and air dried.
35
Page 38
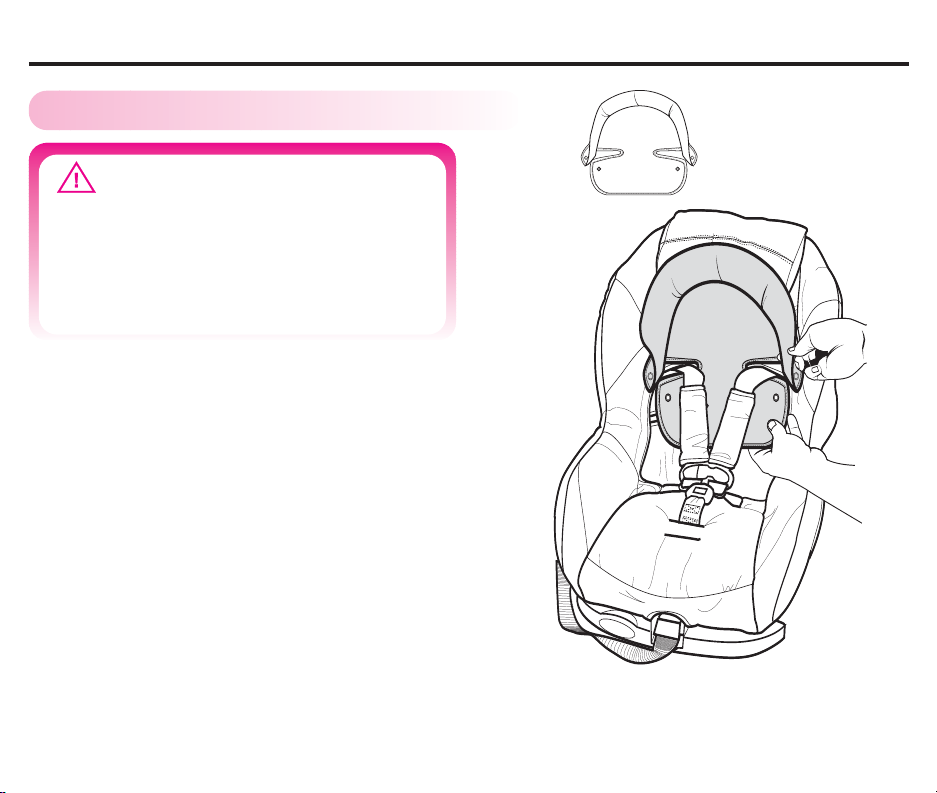
ADDITIONAL INFORMATION (continued)
Head Support
F
(available on some models)
WARNING
To prevent ejection in sudden
stop or crash:
• shoulder straps must be threaded
through slots and properly positionned on shoulders.
36
Unsnap the sides and resnap them with the
harness straps threaded through the slots in
the cushion.
Page 39
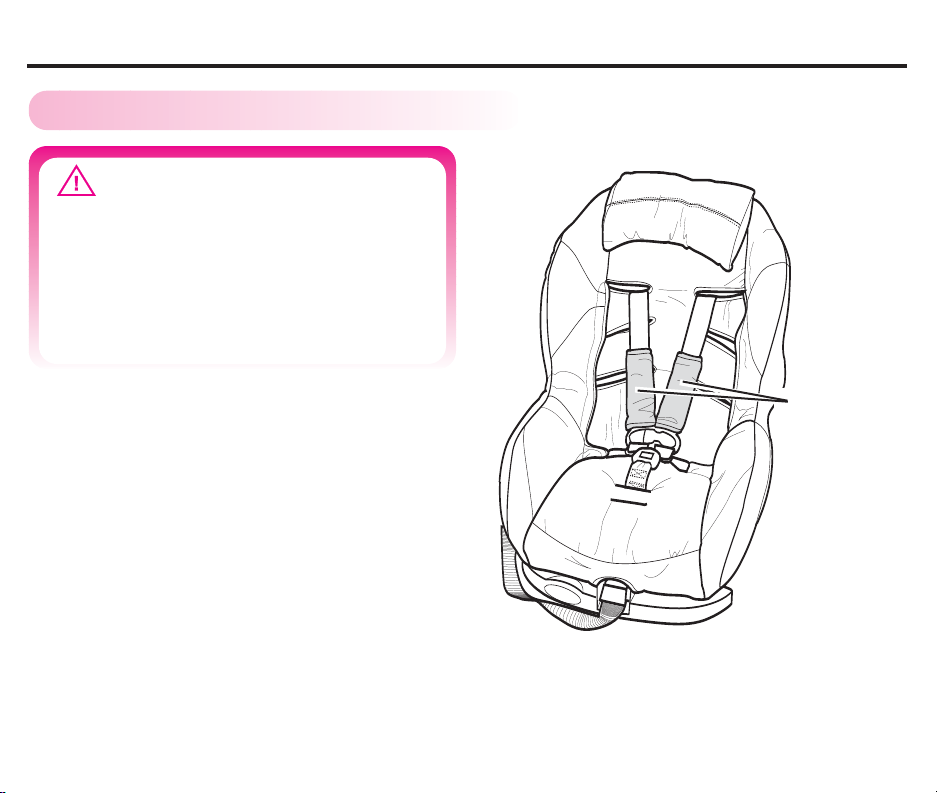
ADDITIONAL INFORMATION (continued)
Harness Covers
F
(available on some models)
WARNING
• Make sure the harness system is
properly secured.
• Check that harness straps are not
twisted.
• Make sure that harness covers do
not interfere with placement of the
chest clip.
Harness
Covers
37
Page 40
ADDITIONAL INFORMATION (continued)
Care & Cleaning
F
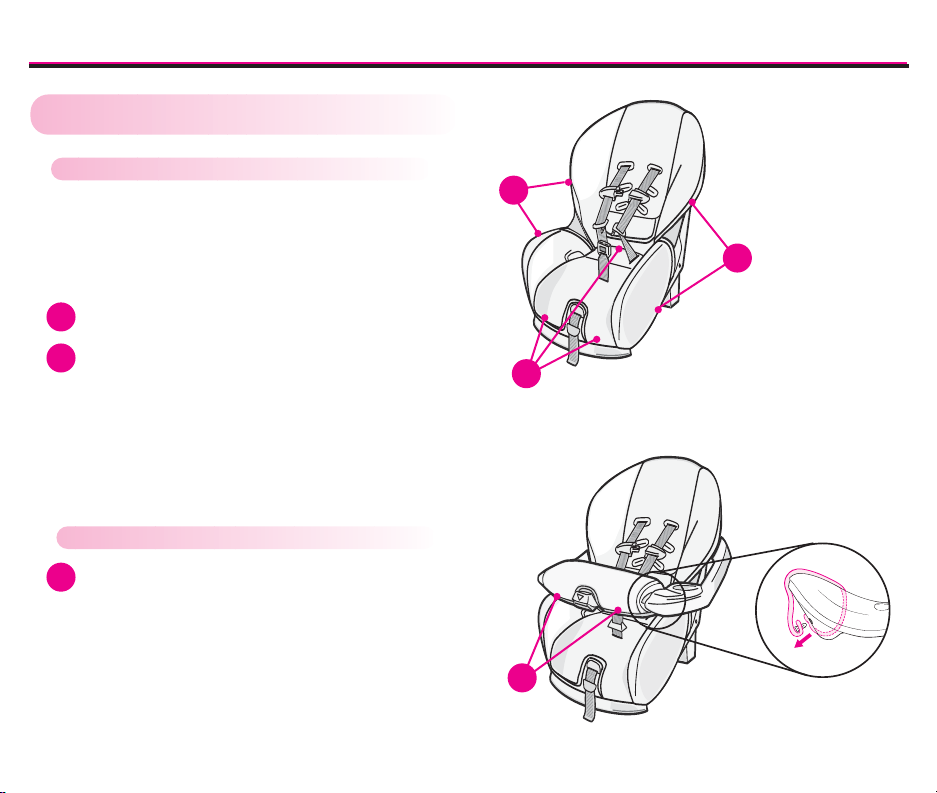
Removing Seat Pad (all models):
Remove both harness strap loops from
Splitter Plate on back of child restraint and
pull through front of pad. Open harness tie,
release tongues from buckle. (see pages
18-21)
1
Unhook “J” hooks from child restraint shell.
Pull three 2-button clips out of lower front
2
edge of child restraint shell and inside center
of child restraint shell.
Removing Overhead Shield Pad:
Pull both 2-button clips out of shield and
3
unwrap pad from around shield.
1
2
1
Reverse above steps for replacing seat pad,
overhead shield pad and harness system.
3
38
Page 41
ADDITIONAL INFORMATION (continued)
Seat Pad and Overhead Shield Pad:
Remove the plastic 2-button clips.
Machine-wash separately on gentle cycle
and drip dry.
Harness Straps and LATCH belt:
Surface wash only with mild soap and damp
cloth.
If harness straps or belt are frayed or heavily
soiled, they MUST be replaced.
WARNING
Prevent serious injury or death:
• Buckle must be properly latched.
• Periodically inspect and clean
buckle to remove objects or
debris that could prevent latching.
Aircraft Use
F
This child restraint is certified for use on aircraft
(see label on child restraint). Contact airline
about their policy.
Shell and Overhead Shield Cup Holder:
Wipe with mild solution of soap and water.
Avoid wetting labels.
Never use “household detergents”: they can
weaken plastic.
Buckle:
Rinse buckle with warm water. DO NOT use
household detergents. Never lubricate
buckle.
39
Use this child restraint only on forward-facing
aircraft seats.
Install child restraint on an aircraft the same way
it is installed in a vehicle when using a vehicle
seat belt.
Second Hand Child Restraint
F
Graco Children’s Products Inc. advises against
loaning or passing along a child restraint.
Page 42

REPLACEMENT PARTS
To purchase parts or accessories in the United States, please contact us at the following:
www.gracobaby.com
or
1-800-345-4109
40
Page 43

NOTES
41
Page 44
If a part is damaged,
missing, or you need help
or replacement parts,
DO NOT return child restraint
to the store.
CALL US FIRST
Call toll-free 1-800-345-4109
from anywhere in the U.S. or Canada
or fax at 1-610-884-8730.
or write us at:
Graco Children’s Products
150 Oaklands Blvd.
Exton, PA 19341
1
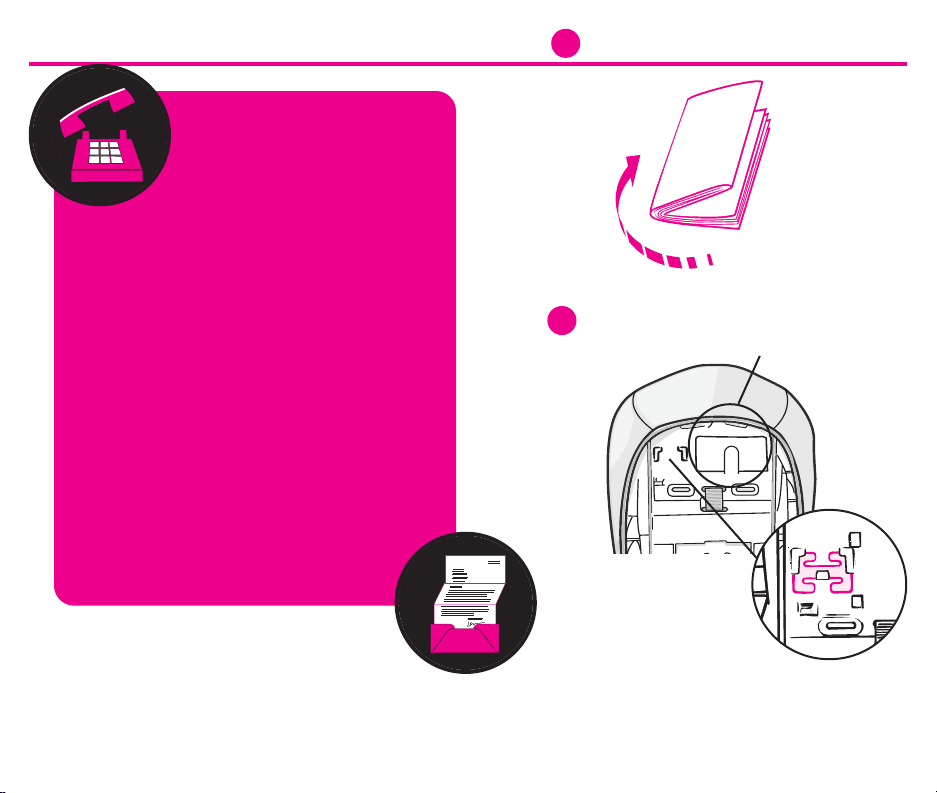
Fold instruction manual.
2
Store instruction manual
behind this tab.
Attention: Customer Service
Department
or visit our internet website:
www.gracobaby.com
Graco Children’s Products Inc.
A Division of Newell Rubbermaid
150 Oaklands Blvd.
Exton, PA 19341
Store locking clip
here.
Page 45
Manual de
instrucciones
Evite lesiones o la muerte -
Lea detenidamente este manual!
ISPC099BA 5/06 US
Page 46

TABLA DE CONTENIDO
Este manual de instrucciones
est indicado para el uso del:
• Asiento de seguridad omfortSport de 5 puntos
• para reci n nacidos / ni os de corta edad
• Asiento de seguridad omfortSport con barra
• protectora para reci n nacidos / ni os de corta edad
Las instrucciones para estos modelos son las mismas
a menos que se indique lo contrario.
Antes de Empezar
F
Informaci n importante ..................................1
Advertencia ..................................................2
Informaci n b sica ......................................... 4
u es el LATCH ..........................................5
El sistema LATCH.............................................6
Utilizaci n
F
L mites de altura y peso.............................................7
Instalaci n orientada hacia atr s con LATCH ............8
Instalaci n orientada hacia delante con LATCH .... 10
Instalaci n de
cinturones
Instalaci n orientada hacia delante con
el cintur n de seguridad del veh culo ....................
Colocar al ni o en el asiento de seguridad .............16
orientacion trasera con los
de seguridad del veh culo ....................12
14
Operaciones y ajustes ..........................................18
• Correas del arn s
• Cierre del arn s
• Hebilla
• Posiciones reclinada y vertical
• Ajuste de la correa de entrepierna de 5 puntos
• Ajuste de la barra protectora
• Cambiar las ranuras de las correas del arn s
• Colocaci n del cintur n LA TCH
• Retirar el LATCH de los puntos
de anclaje del veh culo
• Almacenaje del LATCH
Informaci n especial
F
Cinturones de seguridad del veh culo ............ 26
• Clip de cierre ...................................... 31
Informaci n adicional .....................................32
• Almacenaje del anclaje
• Apoya vasos
• El coj n del cuerpo/Soporte de la cabeza/
Cubiertas de arn s
• Cuidado y limpieza
• Uso en aeronaves
• Asiento de seguridad para autos
de segunda mano
Piezas de repuesto.........................................40
Almacenaje.......................Contraportada
• Clip de cierre
• Manual de instrucciones
Informaci n de ayuda ......
Contraportada
Page 47

INFORMACI N IMPORTANTE
Ning n asiento de seguridad garanti a la
protecci n contra lesiones en cualquier situaci n,
pero su utili aci n correcta ayuda a reducir el
riesgo de lesiones graves o la muerte.
LEA ATENTAMENTE ESTE MANUAL.
Informaci n de registro
F
Los asientos de seguridad para ni os (asientos para
autos) se pueden retirar por razones de seguridad.
Debe registrar este asiento en caso de que deba ser
retirado, para que le puedan localizar. Complete la
tarjeta de registro adjunta al asiento y env ela por
correo hoy, o enve su nombre, direcci n y el
n mero de modelo y fecha de fabricaci n del
asiento de seguridad para ni os a:
Graco Children’s Products, Inc.
150 Oaklands Blvd.
Exton, PA 19341
o llame al 1-800-345-4109
www.gracobaby.com
Para obtener informaci n sobre las retiradas:
• Llame a la l nea gratuita de informaci n
de seguridad automotriz del Gobierno de
EE.UU. al 1-800-424-9393
(202-366-0123 en la zona de Washington D.C)
• TTY: (1–800–424–9153), o
http://www.NHTSA.gov
• Llame a Graco Children’s Products Inc.
al 1-800-345-4109
Lista de control de seguridad
F
Lea detenidamente este manual de instrucciones
y las etiquetas del asiento de seguridad.
Los ni os de peso inferior a 20 libras (9 kg)
deben usar el asiento orientado hacia atr s
No coloque el asiento orientado hacia atr s
en el asiento del veh culo equipado con
la bolsa de aire.
Siente a los ni os con sistema de seguridad
en el asiento trasero del veh culo siempre que
sea posible.
No deje a los ni os solos.
Coloque firmemente el asiento con el cintur n
de seguridad del veh culo o el cintur n LATCH.
No use el asiento de seguridad despu s de la
fecha indicada en la parte trasera del mismo.
No permita que nadie (ni era, familiares, etc.)
use el asiento de seguridad para autos sin haber
le do y comprendido primero todas las
instrucciones.
LATCH
F
Este asiento de seguridad se puede colocar en el
veh culo utilizando el cintur n de seguridad del
veh culo o el sistema LATCH (para veh culos
equipados con LATCH).
1
Page 48
ADVERTENCIA - Prevenga lesiones graves o la muerte:
El incumplimiento de estas
instrucciones y de las indicaciones de
las etiquetas del asiento podr a
causar el choque del ni o contra el
interior del veh culo durante una
parada repentina o un accidente.
Sujete el asiento con un cintur n de
seguridad del veh culo o un sistema
LATCH que est bien colocado seg n
las indicaciones de este manual.
Elija el lugar adecuado para el
asiento de seguridad en su veh culo.
Elija el modo de empleo correcto
para el asiento de seguridad de
acuerdo al tama o de su ni o. Los
ni os de peso inferior a 20 libras
(9 kg) deben usar este asiento de
seguridad orientado hacia atr s.
La orientaci n de los ni os hacia
la parte delantera del veh culo les
podr a causar lesiones graves o la
muerte. La Academia Americana
de Pediatr a advierte de que solo se
debe sentar en posici n orientada
hacia la parte delantera a los ni os
de un a o de edad como m nimo.
El sistema de cinturones de seguridad
del veh culo DEBE sujetar firmemente
el asiento de seguridad. No todos los
cinturones de seguridad de todos los
veh culos pueden utilizarse con los
asientos de seguridad.
Si el cintur n de seguridad del
veh culo no sujeta firmemente
el asiento de seguridad, lea la
secci n Cinturones de seguridad
del veh culo .
Se debe reemplazar el asiento de
seguridad si ha sufrido un accidente.
NO lo use de nuevo! Un accidente
podr a causar da os ocultos y usarlo
de nuevo podr a causar lesiones
graves o la muerte.
NO use el asiento de seguridad si ha
resultado da ado o si faltan piezas.
2
Page 49
ADVERTENCIA - Prevenga lesiones graves o la muerte:
No coloque nunca el asiento de
seguridad en el asiento delantero del
veh culo a menos que lo recomiende
el manual de propietario del veh culo.
La Administraci n Nacional de
Seguridad de Tr fico en Carreteras
(NHTSA) advierte a los propietarios
de veh culos de que seg n las
estad sticas de accidentes, los ni os
de hasta 12 a os de edad viajan m s
seguros en el asiento trasero.
Rem tase al manual del propietario
del veh culo para obtener
informaci n sobre la instalaci n
de los asientos de seguridad en los
veh culos con la bolsa de aire.
NO use accesorios o piezas que
no sean los proporcionados por
Graco, ya que ello podr a alterar
el rendimiento del asiento
de seguridad.
Introduzca las correas de arn s en las
ranuras adecuadas para su ni o. No
deje nunca al ni o solo, ni siquiera
mientras duerme, ya que se podr a
quedar atrapado entre las correas y
asfi iarse o estrangularse.
El asiento de seguridad de
orientaci n trasera debe nivelarse
correctamente:
• Una posici n demasiado
reclinada podr a causar lesiones
o la e pulsi n del asiento.
• Una posici n demasiado vertical
podr a causar dificultad
respiratoria.
NO retire el sistema LATCH
del asiento de seguridad. Si usa el
cintur n de seguridad del veh culo
para sujetar el asiento de seguridad,
debe almacenar los conectores
LATCH (consulte la secci n
Almacenaje del LATCH ).
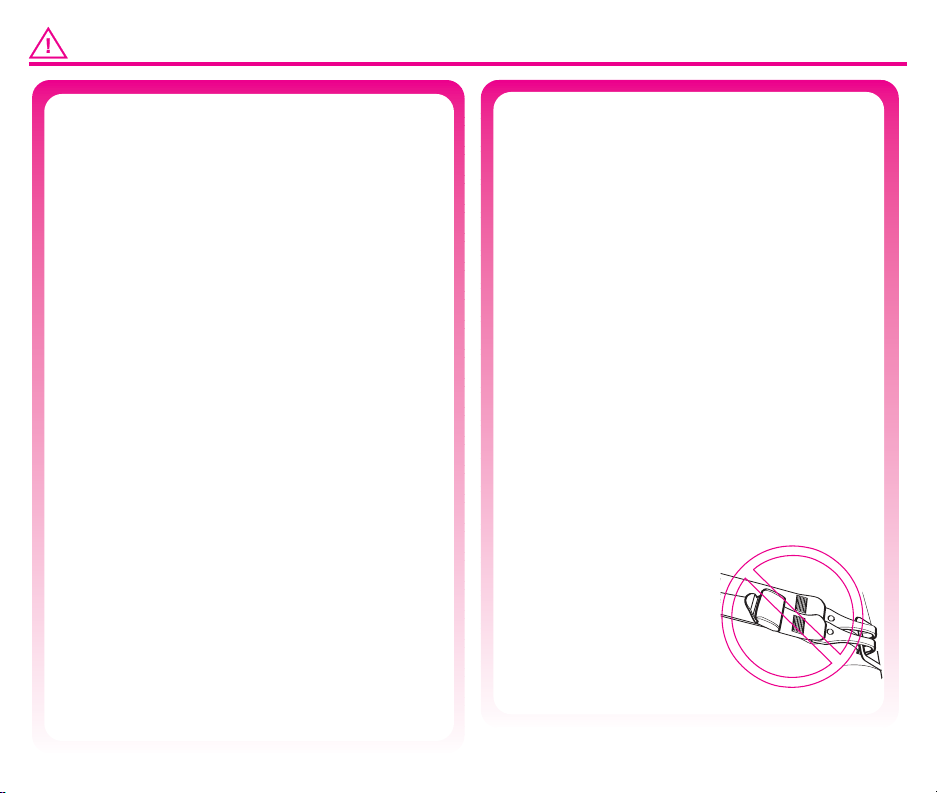
No conecte nunca dos
conectores LATCH a
un punto de anclaje
inferior del veh culo
a menos que
el fabricante
del veh culo
lo especifique.
3
Page 50
INFORMACI N B SICA
ADVERTENCIA
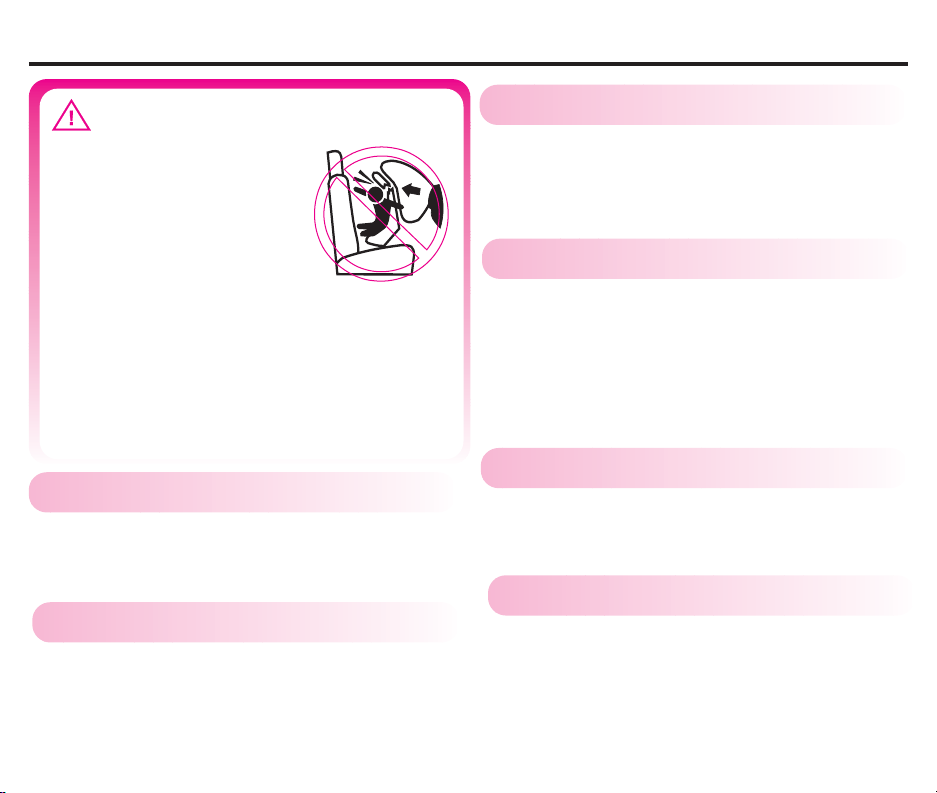
NO ponga este sistema
de seguridad para ni os
en un asiento del
veh culo que tenga
instalado una bolsa de
aire delantera. Si la
bolsa de aire se infla,
puede golpear al ni o y al sistema de
seguridad para ni os con mucha
fuerza y causar lesiones serias o la
muerte de su ni o.Consulte el manual
del propietario del veh culo para
obtener informaci n sobre las bolsas
de aire laterales y la instalaci n del
sistema de seguridad para ni os.
Certificaci n
F
Este asiento de seguridad cumple o excede todos los
requisitos requeridos por la Norma Federal 213 de
Seguridad de Autom viles para uso en autom viles
y aeronaves.
Asiento de seguridad desocupado
F
Sujete siempre el asiento de seguridad con el
sistema LATCH o el cintur n de seguridad del
veh culo, incluso cuando est desocupado. Al
detenerse de repente, Si el asiento de seguridad
no est sujeto puede causar lesiones a los pasajeros.
4
Asientos peligrosos del veh culo
F
No use el asiento de seguridad en los asientos del
veh culo orientados hacia atr s o hacia un lado.
Vida til del asiento de seguridad
F
DEJE de usar el asiento para autom vil y des chelo
despu s de la fecha MOLDEADA en la parte
posteriora del asiento para autom vil.
Busque:
Protecci n del asiento del veh culo
F
Proteja el asiento del veh culo. Use una alfombrilla,
una toalla o una manta fina debajo y detr s del
asiento de seguridad.
Cuando hace calor
F
Las piezas del asiento de seguridad se pueden
calentar mucho bajo el sol o cuando hace calor.
Para evitar quemaduras, compruebe siempre
la temperatura del asiento antes de sentar
a los ni os.
No use este asiento de
seguridad despu s de
diciembre del
ao
Page 51
U ES EL LATCH?
Las Normas Federales para Seguridad de Autom viles
de Estados Unidos han determinado un nuevo
sistema de instalaci n de asientos de seguridad en los
veh culos. Este sistema se denomina LATCH, que son
las siglas en ingl s de:
Anclaje inferior y superior para ni os
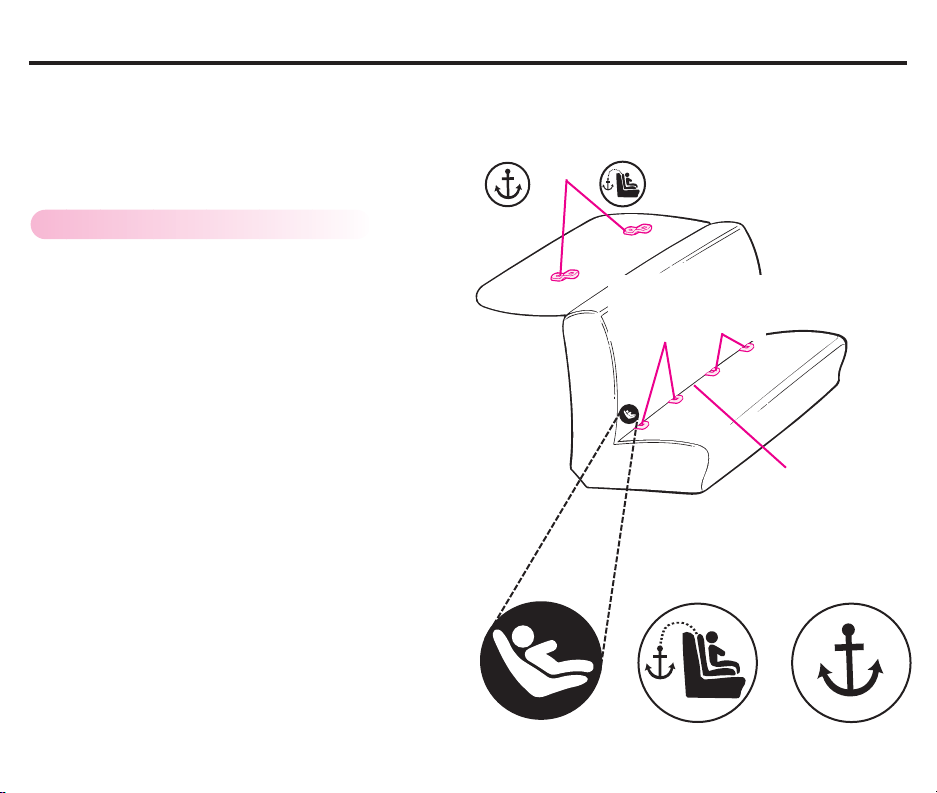
Sistema LATCH para veh culos:
l LATCH del veh culo consta de un punto de ancla e
superior y dos puntos de ancla e inferiores.
Los manuales del propietario de algunos veh culos
emplean el t rmino ISOFI para definir al nuevo
sistema de anclaje para asientos de seguridad para
autos. El asiento de seguridad con LATCH tambi n
puede usarse en asientos del veh culo equipados con
ISOFI .
Los veh culos nuevos suelen tener uno o varios
asientos equipados con puntos de anclaje LATCH.
Si el veh culo viene equipado con LATCH, se pueden
ver los puntos de anclaje inferiores en el pliegue del
asiento del veh culo. Si no se ven, puede que est n
marcados con un s mbolo (Fig. a) o un punto de
color. Vea el manual del propietario de su veh culo
para informarse sobre las ubicaciones exactas, la
identificaci n de los anclajes y los requisitos para
su uso con el asiento de seguridad.
Puntos de
anclaje
superior del
veh culo
Asiento t pico
en un veh culo de
pasajeros. Otros tipos
de veh culos pueden
tener otras
ubicaciones para
el sistema
Puntos de anclaje
inferior del
veh culo
LATCH.
Pliegue del
asiento del
veh culo
Compruebe las ubicaciones del anclaje superior del
veh culo en el manual del propietario del veh culo.
Se pueden localizar por medio de los s mbolos de
anclaje (Fig. b o Fig. c).
(Fig. a)
(Fig. b)
(Fig. c)
5
Page 52
SISTEMA LATCH
El sistema LATCH:
El LATCH consta de un cintur n
de anclaje inferior permanente y
una correa de anclaje
superior (Fig. a).
Utilice con
en el asiento recomendado por
el fabricante del veh culo.
LATCH se define como
anclajes de hasta 280 mm
(11,02 pulgadas) en el
centro. Como fabricante,
no recomendamos el uso
del sistema LATCH en la
posici n central si
sobrepase esta longitud.
LATCH NICAMENTE
Puntos de
anclaje
inferiores
del veh culo
Punto de anclaje
superior del
veh culo
Anclaje
superior del
asiento de
seguridad
(Fig. a)
Cintur n de anclaje
inferior del asiento de
seguridad
6
Page 53
L MITES DE ALTURA Y PESO
Orientado hacia atr s: 5 a 30 libras (2,2-13,6 kg)
• Ni os que pesan menos que 20 libras (9 kg)
DEBEN sentarse orientados hacia atr s.
• Ni os de 20 y 30 libras de peso (9 y 13,6 kg)
pueden sentarse orientados hacia atr s.
IMPORTANTE: Este asiento de seguridad para
autos cuenta con la certificaci n para utilizarlo
orientados hacia atr s con ni os de hasta 30
libras de peso (13,6 kg). Sin embargo, es probable que
algunos ni os que se acercan a las 30 libras (13,6 kg)
resulten ser demasiado altos para viajar c modos
orientados hacia atr s. Cuando ya no se pueda
acomodar al ni o f cilmente y tenga que doblar las
rodillas, se debe ajustar su asiento de seguridad orientado
hacia delante, solamente si pesa m s de 20 libras (9 kg)
y es capaz de sentarse por s mismo. *
Orientado hacia atr s
5 libras
(2,2 kg)
Orientados hacia delante: de 20 a 40 libras (de 9 a 18 kg)
• Los ni os de 20 a 30 libras (de 9 a 13,6 kg)
que son capaces de sentarse por s mismos
pueden sentarse orientados hacia delante
Si no se pueden sentar por s solos, ajuste el
asiento de seguridad orientado hacia atr s.
• Los ni os de 30 a 40 libras (de 13,6 a 18 kg)
y hasta 40 pulgadas (101,6 cm) de altura
DEBEN sentarse orientados hacia delante.
La American Academy of Pediatrics recomienda
que los ni os tengan un a o de edad como mnimo
*
para poder sentarse orientados hacia delante.
20 libras
(9 kg)
30 libras
(13,6 kg)
Orientado hacia
delante
40 libras
(18 kg)
.
*
Ni os prematuros o de bajo
F
peso de nacimiento
Un ni o prematuro o de bajo peso de
nacimiento corre peligro en un veh culo
o aeronave.
Seg n la American Academy of Pediatrics
(Academia de Pediatr a de los Estados
Unidos), estos ni os podr an sufrir dificultades
de respiraci n si son recostados de forma
incorrecta en un asiento de seguridad.
Graco aconseja que pida a su m dico o al
personal del hospital que examinen a su ni o
y que le recomienden un asiento o cama para
auto adecuado antes de que usted y su ni o
salgan del hospital.
Cuando el asiento de seguridad
F
se les queda chico a los ni os
ADVERTENCIA
Prevenga lesiones graves o
la muerte:
•La parte superior de las orejas
del ni o debe quedar por debajo
del borde superior del asiento.
• Los hombros del ni o NO DEBEN
quedar por encima de la ranura
superior del arn s.
7
Page 54

INSTALACI N ORIENTADA HACIA ATR S CON LATCH
El cintur n LATCH debe pasar por la
1
apertura del asiento de seguridad
destinada al modo de orientaci n trasera.
(vea la p gina 23, fig. k).
El cintur n debe mantenerse en posici n
plana sin torcerse.
Coloque el asiento de seguridad en posici n
2
reclinada (vea fig. a y las p ginas 18 y 19,
fig. b) Orientado hacia atr s en el asiento
del veh culo equipado con anclajes LATCH.
Para facilitar la instalaci n, extienda el cintur n
3
LATCH hasta el m ximo.
Enganche los conectores a los anclajes inferiores
4
del veh culo (fig. b). Jale los conectores para
asegurarse que est n bien sujetos a los puntos
de anclaje. (fig. c).
Presione fuertemente en el centro del asiento
5
de seguridad para comprimir el coj n del asiento
del veh culo al tiempo que aprieta el cintur n
LATCH jalando la correa (fig. d).
J lela de atr s hacia delante y de izquierda a
6
derecha para asegurarse de que est
perfectamente instalado (fig. e).
Aseg rese de que el cintur n de anclaje inferior
se mantiene apretado y no se suelta de la
posici n de apretado. De no mantenerse
apretado, col quelo en otro asiento o p ngase
en contacto con Servicio al Cliente
(vea la contraportada).
Compruebe el indicador de nivel del asiento
7
de seguridad.
El veh culo debe estar en una
superficie plana con el ni o dentro del
asiento de seguridad al comprobar el
indicador de nivel.
El indicador DEBE quedar completamente
dentro de la zona verde (fig. f). Si es necesario,
coloque toallas enrolladas debajo del asiento,
exactamente en el pliegue del asiento del
veh culo, hasta que quede completamente
dentro de la zona verde. Vuelva a comprobar
el indicador de nivel.
NO use el anclaje superior con el asiento de
seguridad orientado hacia atr s. Se debe
almacenar el anclaje superior (vea Almacenaje
del anclaje en la p gina 32).
Compruebe peri dicamente si el asiento de
seguridad est perfectamente instalado y
correctamente nivelado y aj stelo si es
necesario.
8
Page 55
INSTALACI N ORIENTADA HACIA ATR S CON LATCH
LAPC011
0A
Anclaje
Posici n reclinada
(fig. a)
Toallas
(fig. b)
Aperturas
LATCH
Posici n
reclinada
(fig. f)
(fig. c)
(fig. d)
(fig. e)
9
Page 56
INSTALACI N ORIENTADA HACIA DELANTE CON LATCH
El cintur n LATCH debe pasar por la
1
apertura del asiento de seguridad destinada
al modo de orientaci n delantera
(vea la p gina 23, fig. l).
El cintur n debe quedar plano y no torcido.
Ajuste el asiento de seguridad a la posici n
2
vertical (vea fig. a y las p ginas 18 y 19,
fig. b) Asegure el soporte reclinable en la
posici n vertical empujando las leng etas en
la posici n trabado. Col quelo orientado
hacia delante en el asiento del veh culo
equipado con anclajes LATCH.
Para facilitar la instalaci n, extienda el cintur n
3
LATCH hasta el m ximo.
Enganche los conectores a los anclajes inferiores
4
del veh culo (fig. b). Jale los conectores para
asegurarse de que est n bien conectados a los
puntos de anclaje (fig. c).
Presione fuertemente en el centro del asiento
5
de seguridad para comprimir el coj n del asiento
del veh culo al el cintur n LATCH jalando la
correa (fig. d). Oprima el centro del asiento de
seguridad con la rodilla (fig. d).
10
J lela de atr s hacia delante y de izquierda a
6
derecha para asegurarse de que est
perfectamente instalado (fig. e).
Aseg rese de que el cintur n de anclaje inferior
se mantiene apretado y no se suelta de la
posici n de apretado. De no mantenerse
apretado, col quelo en otro asiento o p ngase
en contacto con Servicio al Cliente
(vea la contraportada).
Conecte el gancho de la correa de anclaje (A)
7
al anclaje (B) y apri telo del todo (fig. f).
El cintur n debe quedar plano y no estar retorcido.
Compruebe peri dicamente si el asiento de
seguridad est perfectamente instalado y
aj stelo si es necesario.
Page 57
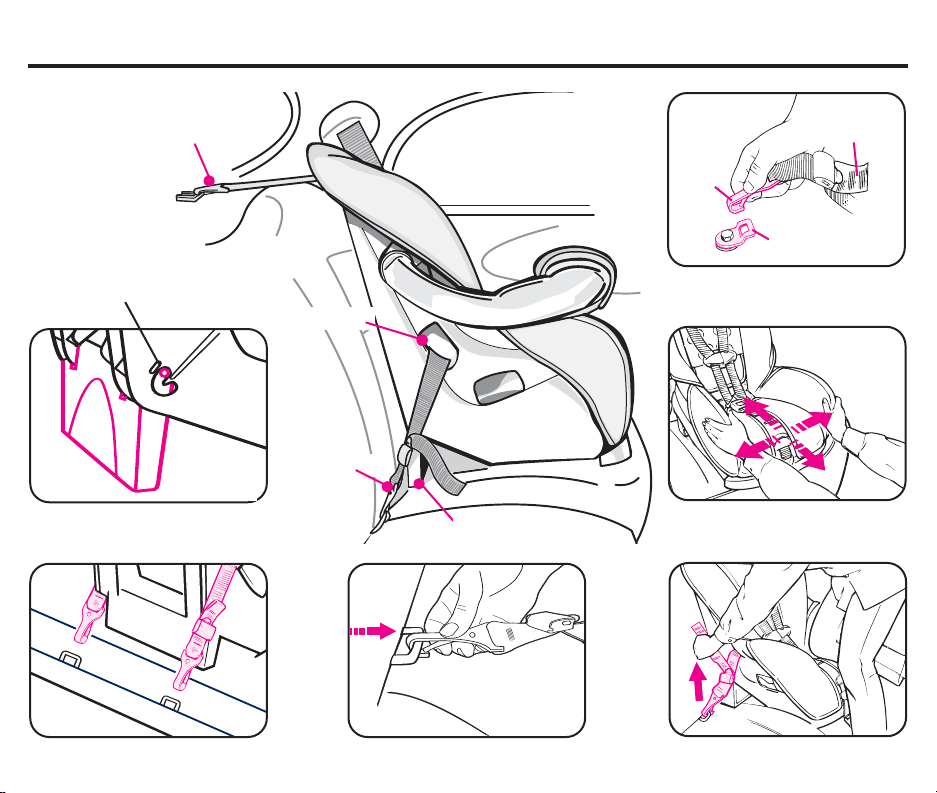
INSTALACI N ORIENTADA HACIA DELANTE CON LATCH
ale para
Anclaje
(A)
Posici n
trabada
Aperturas
apretar
(B)
(fig. f)
(fig. a)
(fig. b)
Posici n
vertical
LATCH
Posici n
vertical
(fig. c)
(fig. e)
(fig. d)
11
Page 58
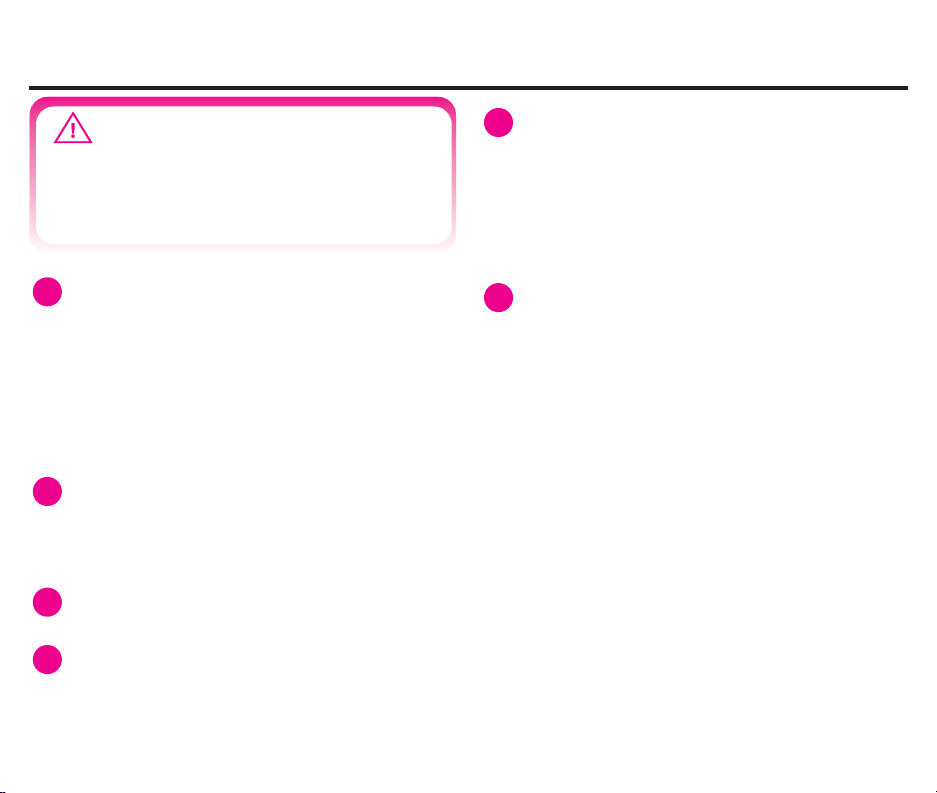
INSTALACI N DE ORIENTACION TRASERA
CON
12
LOS CINTURONES DE SEGURIDAD DEL VEH CULO
J lela de atr s hacia delante y de izquierda a
ADVERTENCIA
El cintur n LATCH DEBE almacenarse
cuando se utilice el cintur n de
seguridad del veh culo para instalar
el asiento de seguridad.
Almacene el cintur n LATCH conectando los
1
conectores por las aperturas para la orientaci n
hacia delante (vea la p gina 25, fig. r).
• Enganche los conectores a la barra de
almacenaje de cada lado (fig. a).
• Ajuste el cintur n LATCH para evitar
se afloje demasiado jalando la correa.
Coloque el asiento de seguridad en posici n
2
reclinada (vea fig. b y las p ginas 18 y 19,
fig. b) Orientada hacia atr s en el asiento
del veh culo.
Pase el cintur n de seguridad del veh culo
3
por las aperturas y abr chelo.
Presione fuertemente en el centro del asiento de
4
seguridad para comprimir el coj n del asiento
del veh culo al tiempo que aprieta el cintur n de
seguridad del veh culo (fig. c).
5
derecha para asegurarse de que est
perfectamente instalado (fig. d). El cintur n de
regazo del veh culo DEBE mantenerse
apretado.
Si no queda bien sujeto, vea Cinturones de
seguridad del veh culo en la p gina 26.
Compruebe el indicador de nivel del asiento
6
de seguridad.
El veh culo debe estar en una
superficie plana con el ni o dentro del
asiento al comprobar el indicador de nivel.
El indicador DEBE quedar completamente
dentro de la zona verde (fig. e). Si es
necesario, coloque toallas enrolladas debajo del
asiento, en el pliegue del asiento del veh culo,
hasta que quede completamente dentro de la
zona verde. Vuelva a comprobar el indicador
de nivel.
NO use el anclaje superior con el asiento de
seguridad orientado hacia atr s. Se debe
almacenar el anclaje superior (vea
Almacenaje del anclaje en la p gina 32).
Compruebe peri dicamente si el asiento de
seguridad est perfectamente instalado y
correctamente nivelado y aj stelo si es
necesario.
Page 59
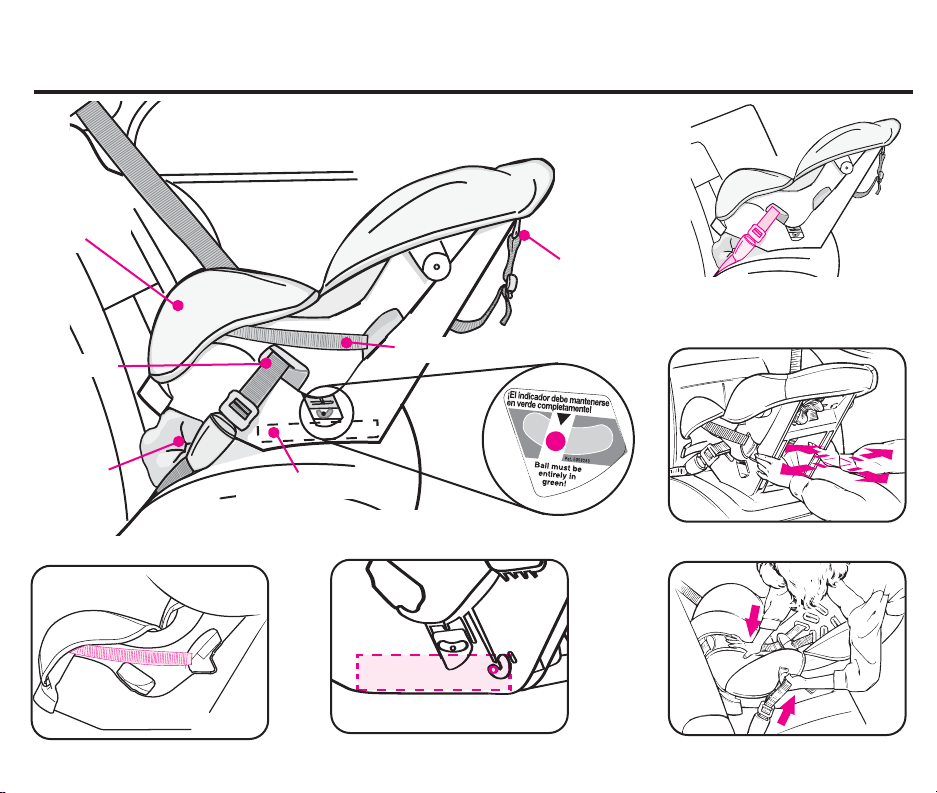
INSTALACI N DE ORIENTACION TRASERA
L
APC0110A
CON LOS CINTURONES DE SEGURIDAD DEL VEH CULO
Barra de
almacenaje
Aperturas
Toallas
Posici n reclinada
Instalaci n con cintur n de
seguridad para la cintura / hombro
(fig. a)
LATCH (almacenar)
Posici n reclinada
(fig. b)
Anclaje
(fig. e)
Instalaci n con cintur n
de seguridad para la
cintura solamente
(fig. d)
(fig. c)
13
Page 60
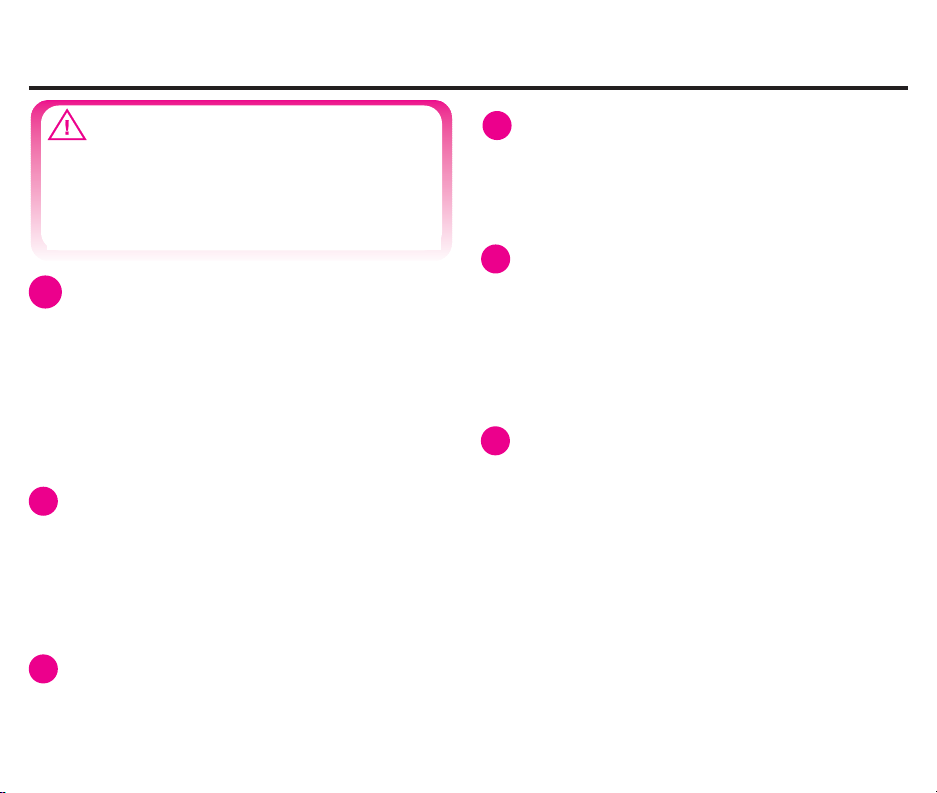
INSTALACI N ORIENTADA HACIA DELANTE CON
LOS CINTURONES DE SEGURIDAD DEL VEH CULO
Presione fuertemente en el centro del asiento
ADVERTENCIA
El cintur n LATCH DEBE almacenarse
cuando se use el cintur n de seguridad
del veh culo para instalar el asiento
de seguridad.
Almacene el cintur n LATCH conectando los
1
conectores a trav s de las aperturas destinadas
a la orientaci n trasera (vea la p gina 25, fig. q).
• Enganche los conectores a la barra de
almacenaje de cada lado (fig. a).
4
de seguridad para comprimir el coj n del
asiento del veh culo al tiempo que aprieta el
cintur n de seguridad del veh culo.
Oprima el centro del asiento de seguridad con
la rodilla (fig. d).
J lela de atr s hacia delante y de izquierda a
5
derecha para asegurarse de que est
perfectamente instalado (fig. e). El cintur n
de regazo del veh culo DEBE mantenerse
apretado.
Si no queda bien sujeto, vea Cinturones de
seguridad del veh culo en la p gina 26.
• Ajuste el cintur n LATCH para evitar
que se afloje demasiado, jalando la correa.
Ajuste el asiento de seguridad a la posici n
2
vertical (vea fig. b y las p ginas 18 y 19,
fig. b) Asegure el soporte reclinable en la
posici n vertical empujando las leng etas en
la posici n trabado.
Col quelo orientado hacia delante en el
asiento del veh culo.
Levante la leng eta en la almohadilla del asiento
3
(disponible en algunos modelos). Pase el cintur n
de seguridad del veh culo por las aperturas.
Abroche el cintur n (fig. c).
14
Conecte el gancho de la correa de anclaje (A)
6
al anclaje (B) y apri telo del todo (fig. f) .
Si el veh culo no cuenta con puntos de anclaje
para conectar el gancho, debe almacenarlo;
vea Almacenaje del anclaje en la p gina 32.
El cintur n debe quedar plano y no estar retorcido.
Compruebe peri dicamente si el asiento de
seguridad est perfectamente instalado y
aj stelo si es necesario.
Page 61
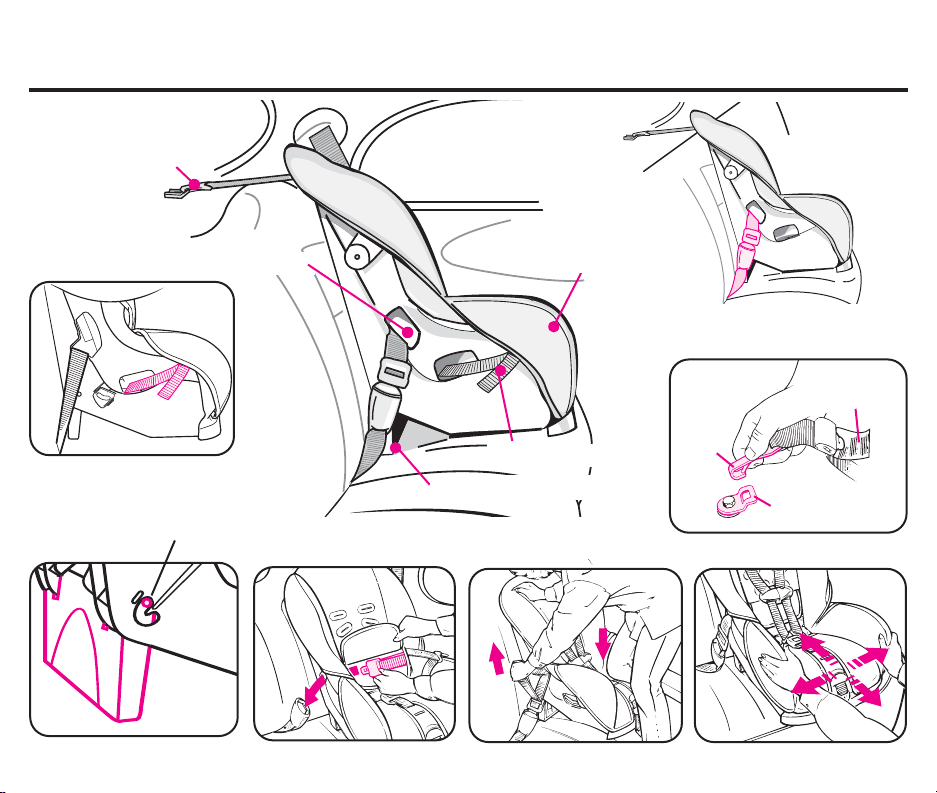
INSTALACI N ORIENTADA HACIA DELANTE CON
LOS CINTURONES DE SEGURIDAD DEL VEH CULO
Anclaje
Barra de
Aperturas
almacenaje
Instalaci n con cintur n de seguridad
para la cintura solamente
ale para
apretar
(fig. a)
(fig. b)
Posici n
trabada
Posici n
vertical
LATCH (almacenar)
Posici n vertical
Instalaci n con cintur n de
seguridad para la cintura / hombro
(fig. c)
(fig. d) (fig. e)
(A)
(B)
(fig. f)
15
Page 62
COLOCAR AL NI O EN EL ASIENTO DE SEGURIDAD
Modelos de 5 puntos solamente:
ADVERTENCIA
Para prevenir lesiones graves o la
muerte:
• Mantenga las correas del arn s bien
apretadas y colocadas en los hombros
con el cierre del arn s abrochado al
nivel de las a ilas. Ajuste las correas
del arn s para que est n apretadas.
• No ponga almohadillas, mantas ni
cojines debajo de las correas o del
ni o, a menos que sean proporcionados
por Graco.
• El ni o debe llevar ropa que no
estorbe al abrochar el arn s.
Compruebe el sistema del arn s:
• Orientado hacia atr s - 5 a 30 libras
(2.2 a 13.6 kg) Las correas del arn s deben
pasar por las ranuras inferiores o medianas
a nivel o por debajo de los hombros.
Orientado hacia delante - 20 a 30 libras
•
(9 a 13.6 kg) y tienen por lo menos un
a o de edad. Las correas del arn s deben
pasar por las ranuras medianas o
superiores a nivel o por encima
de los hombros.
Orientado hacia delante - 30 a 40 libras
•
(13.6 a 18 kg) Las correas del arn s DEBE
pasar por las superiores. NO use las ranuras
medianas para ni os de peso superior a
30 libras (13.6 kg).
16
• La correa de la entrepierna debe pasar por la
apertura m s cercana pero no por la de debajo
del ni o.
Modelos con barra protectora solamente:
• La leng eta del arn s debe pasar por la apertura
m s cercana pero no por la de debajo del ni o.
Coloque al ni o en el asiento de seguridad con
1
la espalda apoyada contra el respaldo del asiento.
Coloque las correas del arn s por encima de los
2
hombros del ni o e inserte la(s) leng eta(s) en
la hebilla.
Jale la(s) leng eta(s) para asegurarse de que
est n bien sujeta(s).
Abroche el cierre del arn s:
3
Coloque el cierre del arn s a nivel de las axilas.
Ajuste las correas del arn s para que est n
4
apretadas. Una correa tensa no deber estar
floja. Se mantiene en una l nea recta sin doblarse.
No aprieta la carne del ni o ni empuja el cuerpo
del ni o en una posici n que no sea natural. (fig. a).
Compruebe si las correas del arn s en el pecho
y los muslos est n bien ajustadas.
Se puede usar una toalla enrollada en cada lado
5
como soporte para los ni os peque os (fig. b).
Aseg rese de que las toallas no interfieren en el
sistema del arn s. NO se deben colocar toallas
debajo del ni o.
Page 63
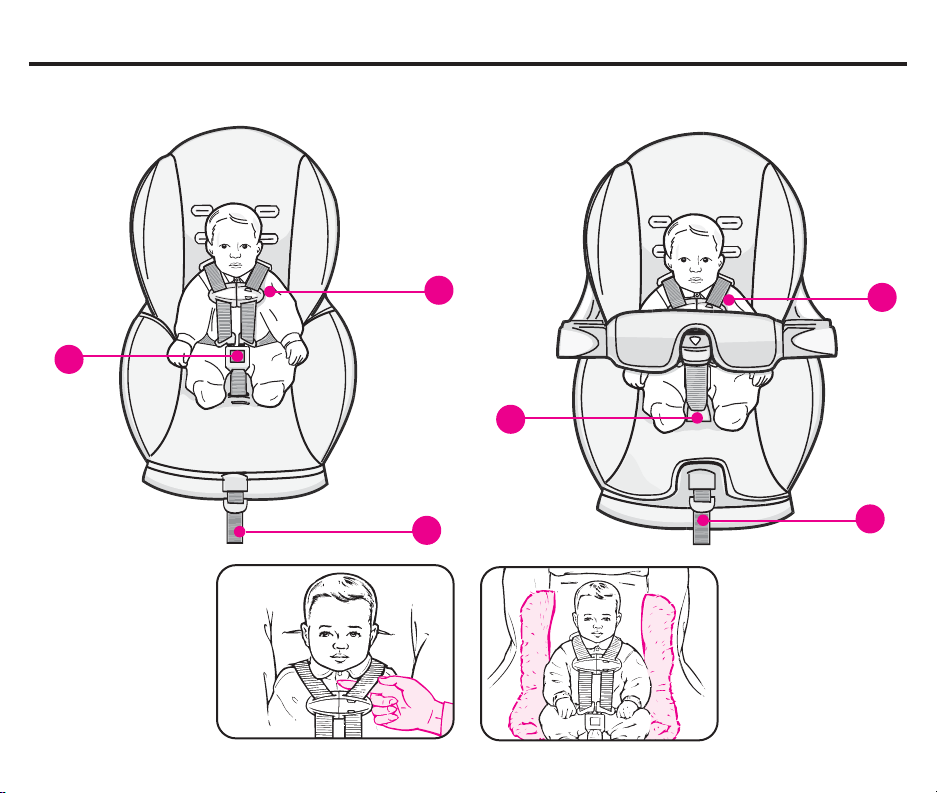
COLOCAR AL NI O EN EL ASIENTO DE SEGURIDAD
Modelos de
5 puntos
2
Modelos con
barra protectora
3
2
3
4
(fig. a) (fig. b)
4
17
Page 64

OPERACIONES Y AJUSTES
o.
Correas del arn s (fig. a):
1
• Para apretar: Jale del cintur n inferior.
• Para soltar: Jale la leng eta superior del cintur n
y sost ngala al tiempo que jala las correas de los
hombros.
Cierre del arn s:
2
• Para abrir: Oprima los leng etas y sep rela.
• Para abrochar: Junte las dos mitades. Aseg rese
que el cierre del arn s est abrochado, jalando
cada mitad.
Hebilla:
3
DEBE pasar por la apertura m s cercana pero
no por la de debajo del ni o.
Modelos de 5 puntos
• Para abrochar: Inserte ambas leng etas en la
hebilla. Jale las leng etas para asegurarse de que
est n cerradas.
• Para desabrochar: Oprima el bot n rojo y
jale las leng etas de la hebilla.
Modelos con barra protectora
• Para abrochar: Introduzca la leng eta en la apertura.
Jale la leng eta para asegurarse de que est cerrada.
• Para desabrochar: Oprima el bot n rojo, saque la
leng eta de la apertura y levante la barra por
encima de la parte superior del asiento.
18
Posiciones reclinada / vertical (fig. b):
4
Orientado hacia atr s -
SE DEBE usar la posici n reclinada.
Orientado hacia delante -
SE DEBE usar la posici n vertical.
Posici n vertical: Gire el soporte hacia fuera y
emp jelo dentro del asiento (fig. b). Asegure el
soporte reclinable en la posici n vertical
empujando las leng etas en la posici n trabado.
Posici n reclinada: Saque el soporte y g relo para
meterlo dentro del asiento.
Las correas del arn s DEBEN quedar sueltas.
Aseg rese de que las correas del arn s no quedan
enganchadas en el soporte.
5
Ajuste de la correa de entrepierna
de 5 puntos (fig. c)
• Desde la parte inferior del asiento de seguridad,
saque el clip de la correa de la entrepierna y
qu telo del bucle de la correa.
• Desde la parte superior del asiento, saque la correa
de la entrepierna y p sela por la ranura deseada.
Aseg rese de que el bot n rojo queda orientado
hacia el lado opuesto al ni o.
• Desde la parte inferior del asiento, vuelva a unir el
clip al bucle de la correa de la entrepierna
exactamente como se indica.
6
Ajustar la barra protectora (fig. d):
• Para ajustar: Oprima el bot n y coloque la barra
en la posici n deseada m s cercana al ni o. Suelte
el bot n para cerrar la barra en una de las
m ltiples posiciones.
NOTA: La barra no tiene que tocar al ni o en la posi-
ci n m s cercana; el sistema del arn s sujetar al ni
Page 65
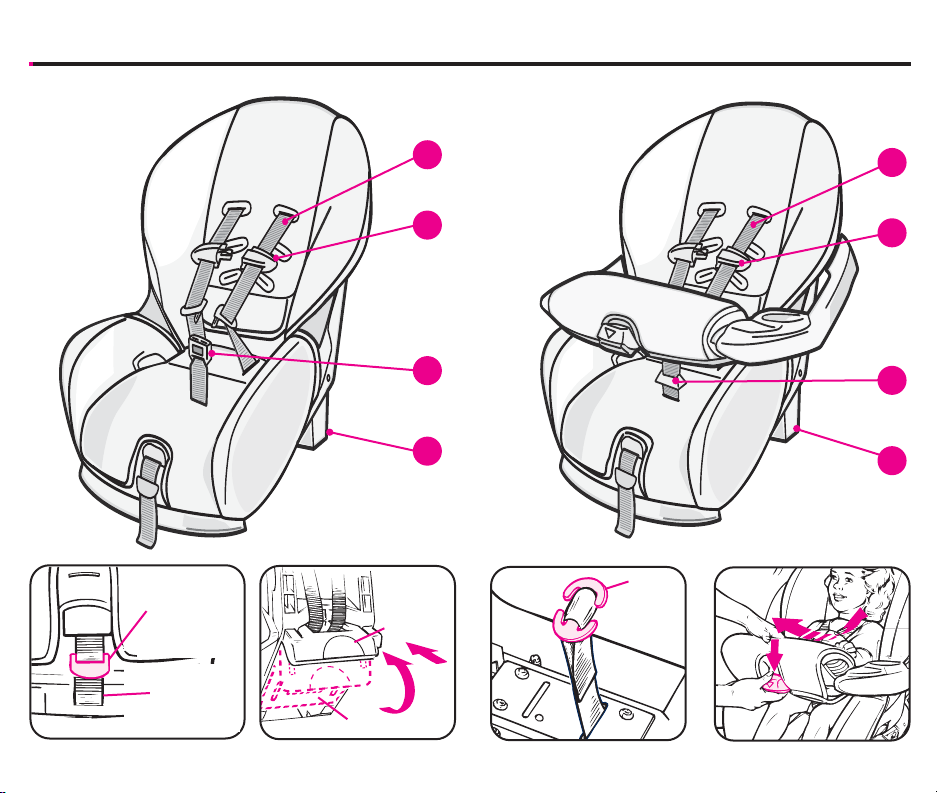
OPERACIONES Y AJUSTES
Modelos de
5 puntos
Leng eta
superior
(para
soltar)
Cintur n
inferior
(para apretar)
(fig. a)
Vertical
Reclinada
(fig. b)
1
1
Modelos con
2
barra protectora
3
4
Clip
(fig. c)
(fig. d)
2
3
4
19
Page 66

OPERACIONES Y AJUSTES
7
Cambiar las ranuras de las correas del arn s:
A Suelte las correas del arn s:
Jale la leng eta superior del cintur n
y sost ngala al tiempo que jala las correas
de los hombros.
B uite ambos bucles de las correas de los
hombros de la placa de uni n de la parte
trasera del asiento.
C Cambie las ranuras de las correas del arn s.
D Vuelva a conectar los bucles de las correas
del arn s a la placa de uni n:
Modelos de 5 puntos (fig. e):
• Para beb s o ni os peque os:
Primero coloque el bucle de la correa derecha
superior en la placa de uni n, y despu s coloque
el bucle de la correa izquierda superior.
NOTA: Aseg rese de que los extremos de las
correas quedan detr s de la placa de uni n.
20
Aseg rese que las correas del arn s pasan
por las ranuras correspondientes de la
almohadilla del asiento y del asiento de
seguridad.
Puede resultar necesario quitar la
almohadilla de la parte superior del asiento
al realizar el cambio.
• Para ni os m s grandes:
Primero coloque el bucle de la correa derecha
inferior en la placa de uni n, y despu s coloque
el bucle de la correa izquierda inferior.
Modelos con barra protectora (fig. f):
Primero coloque el bucle de la correa derecha en
la placa de uni n, y despu s coloque el bucle de
la correa izquierda.
NOTA:
• Aseg rese que los bucles de ambas correas
quedan bien sujetos dentro del gancho de la placa
de uni n.
• Aseg rese que las correas NO est n torcidas y
pasan detr s del soporte (fig. g).
Page 67
OPERACIONES Y AJUSTES
Modelos de
5 puntos
Bucle
superior
Bucle
inferior
Placa de uni n
Modelos con
barra protectora
Bucle
(fig. e)
(fig. g)
(fig. f)
Soporte
21
Page 68
OPERACIONES Y AJUSTES
8
Colocaci n del cintur n LATCH:
El cintur n LATCH DEBE pasar por las
aperturas adecuadas seg n la
orientaci n del asiento.
A uite la almohadilla de la parte delantera
del asiento, sacando los clips de dos
botones en el borde delantero inferior del
asiento (fig. h) y la traba de 2 botones del
centro del asiento.
Al quitar la almohadilla, se ver el cintur n
LATCH giratorio. (fig. i)
B Gire el cintur n LATCH para que pase por
las aperturas correctas (P g. 23 fig. k y
fig. l). Los cinturones deben estar planos y
tensos contra el sistema de seguridad para
ni os ANTES de reemplazar las tres
almohadillas del asiento con trabas de 2
botones.(fig. j) El cintur n del LATCH no
debe interferir con el arn s.
C Vuelva a colocar la almohadilla en el
asiento, apretando los clips de dos botones
para colocarlos en su lugar. No deje que las
trabas de 2 botones interfieran con el
cintur n LATCH o el cintur n del asiento
del veh culo.
22
(fig. h)
El cintur n debe
estar plano y tenso
(fig. i)
Cintur n LATCH
giratorio (debajo
de la almohadilla
del asiento)
(fig. j)
Page 69
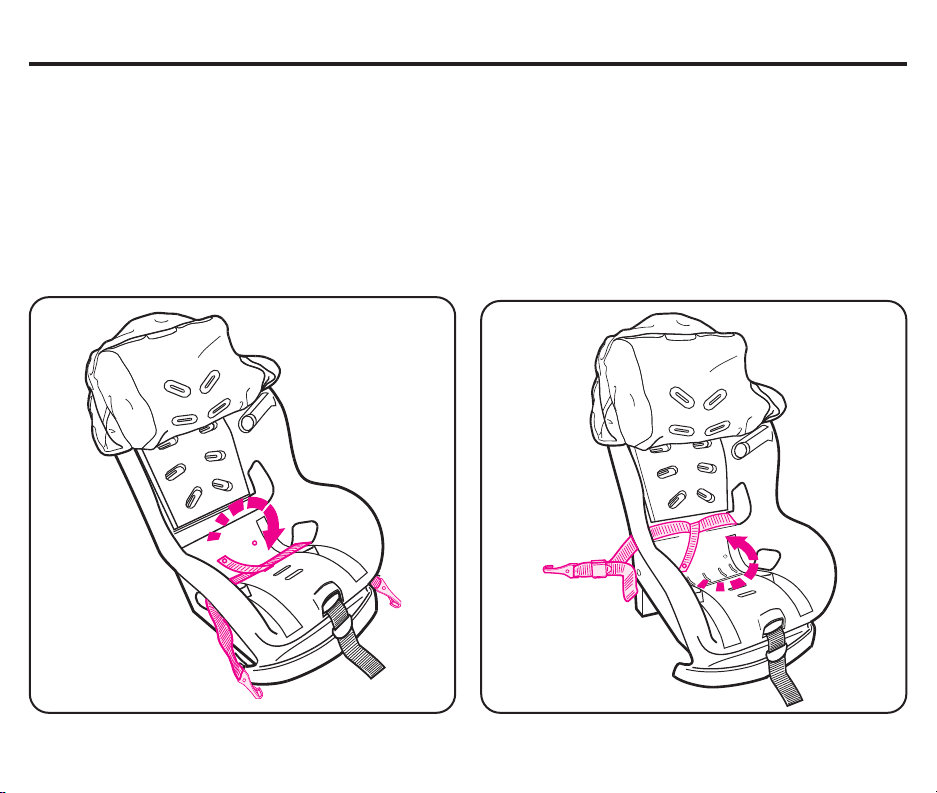
OPERACIONES Y AJUSTES
Pase el cintur n LATCH por las aperturas de
orientaci n hacia atr s para:
• usar el sistema LATCH orientado hacia atr s.
o
• Almacena e LATCH con el uso del cintur n de
seguridad del veh culo orientado hacia
delante. P g. 25, fig q.
Todos los cinturones deben estar planos y la hebilla de ajuste debe mirar hacia adelante para
facilitar el ajuste.
Pase el cintur n LATCH por las aperturas de
orientaci n hacia delante para:
• usar el sistema LATCH orientado hacia delante.
o
• Almacena e LATCH con el uso del cintur n de
seguridad del veh culo orientado hacia atr s.
P g. 25, fig. r.
Aperturas orientado hacia atr s
(fig. k)
Aperturas orientado hacia delante
(fig. l)
23
Page 70
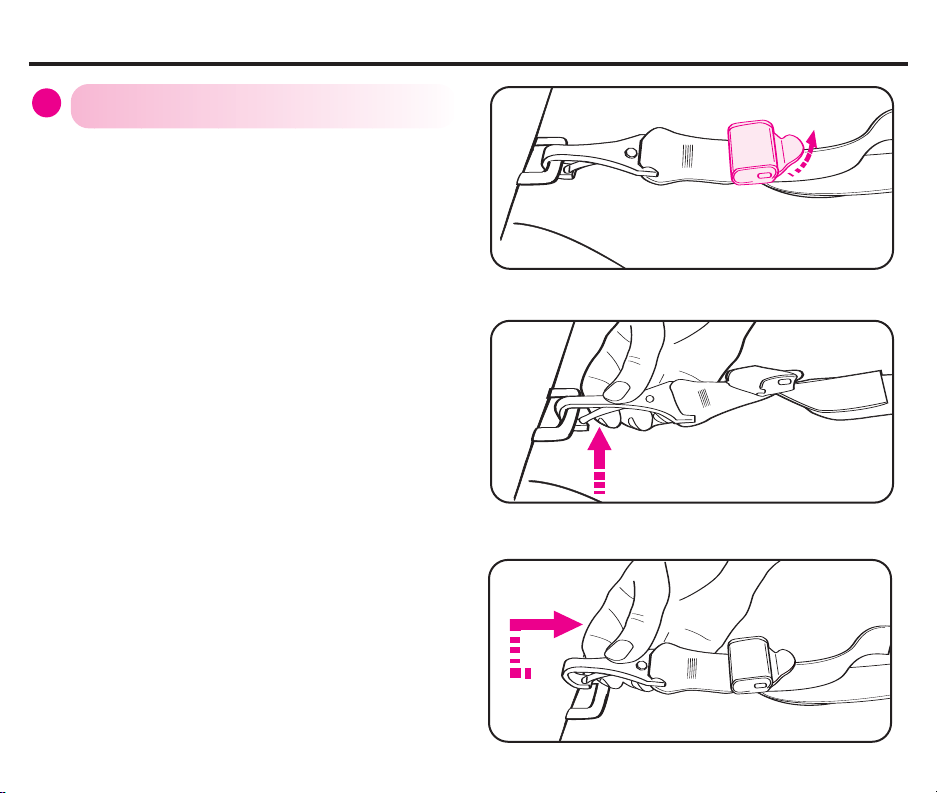
OPERACIONES Y AJUSTES
Retirar el LATCH de los puntos de anclaje
9
del veh culo:
A Incline la leng eta met lica del dispositivo
de ajuste para soltar la tensi n (fig. m).
Oprima el asiento, comprimiendo el
coj n del asiento del veh culo para
reducir la tensi n del cintur n
de anclaje inferior.
B Oprima y sujete la bisagra LATCH.
(bisagra inferior) (fig. n).
C Empuje el conector hacia dentro, levante el
conector y j lelo (en el sentido opuesto al
punto de anclaje) (fig. o).
Repita los pasos A, B y C para el otro
conector.
(fig. m)
(fig. n)
24
(fig. o)
Page 71
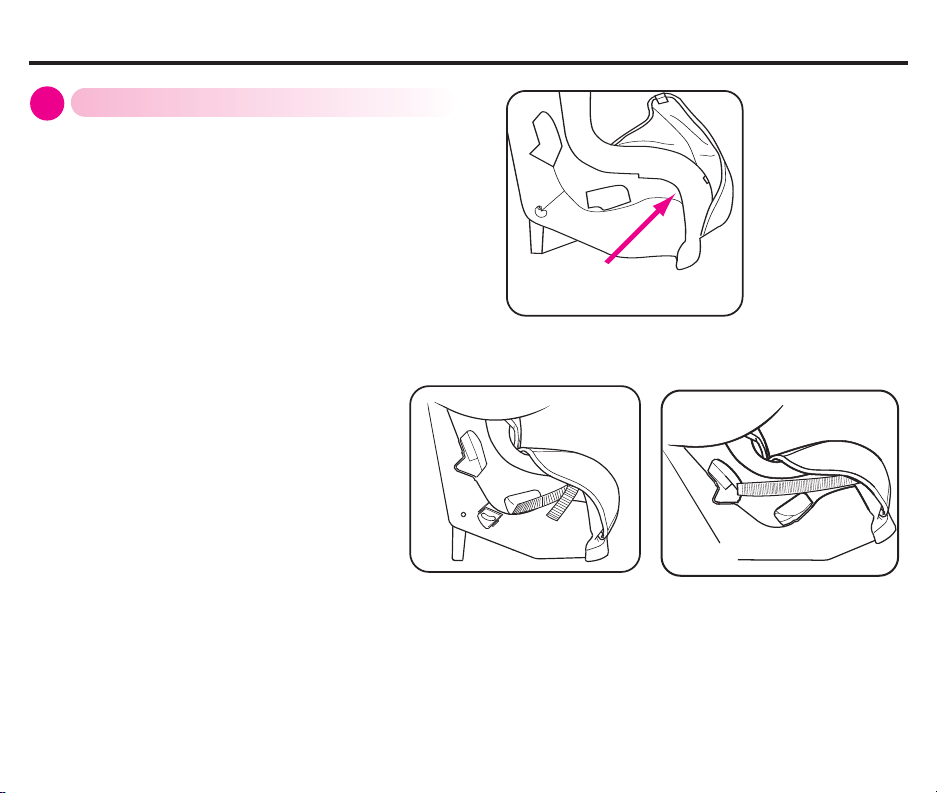
OPERACIONES Y AJUSTES
Almacenaje LATCH:
10
• Ubique las barras de almacenaje LATCH
debajo la almohadilla del asiento en
el lado del asiento de seguridad infantil
(fig. p).
• Abroche el sistema LATCH en la barra de
almacenaje como se indica. (fig. q o r)
Repita para el otro lado del asiento.
Barra de almacenaje
LATCH
(fig. p)
(fig. q)
(fig. r)
25
Page 72
CINTURONES DE SEGURIDAD DEL VEH CULO
Para lograr la instalaci n del asiento de seguridad
ADVERTENCIA
No se pueden usar todos los
cinturones de seguridad de
veh culos con los asientos de
seguridad. Durante el manejo,
sujete siempre el asiento con el
cintur n de seguridad de regazo
o con una parte del cintur n de
regazo/hombro que no cambie
de longitud.
m s segura:
• Lea la secci n del manual del propietario del
veh culo referente a la instalaci n de los
asientos de seguridad y el uso de los
cinturones de seguridad con los asientos.
• Siga las instrucciones de todas las etiquetas
del cintur n de seguridad del veh culo y del
asiento de seguridad.
Si el asiento no queda bien sujeto despu s de seguir
las instrucciones de este manual, de las etiquetas de
los cinturones de seguridad del veh culo y del
manual del propietario del veh culo:
• Coloque el asiento de seguridad en otro
asiento diferente e int ntelo de nuevo, o
• P ngase en contacto con el concesionario del
veh culo para que le proporcionen piezas de
modificaci n de los cinturones de seguridad
que posiblemente necesite.
26
Page 73
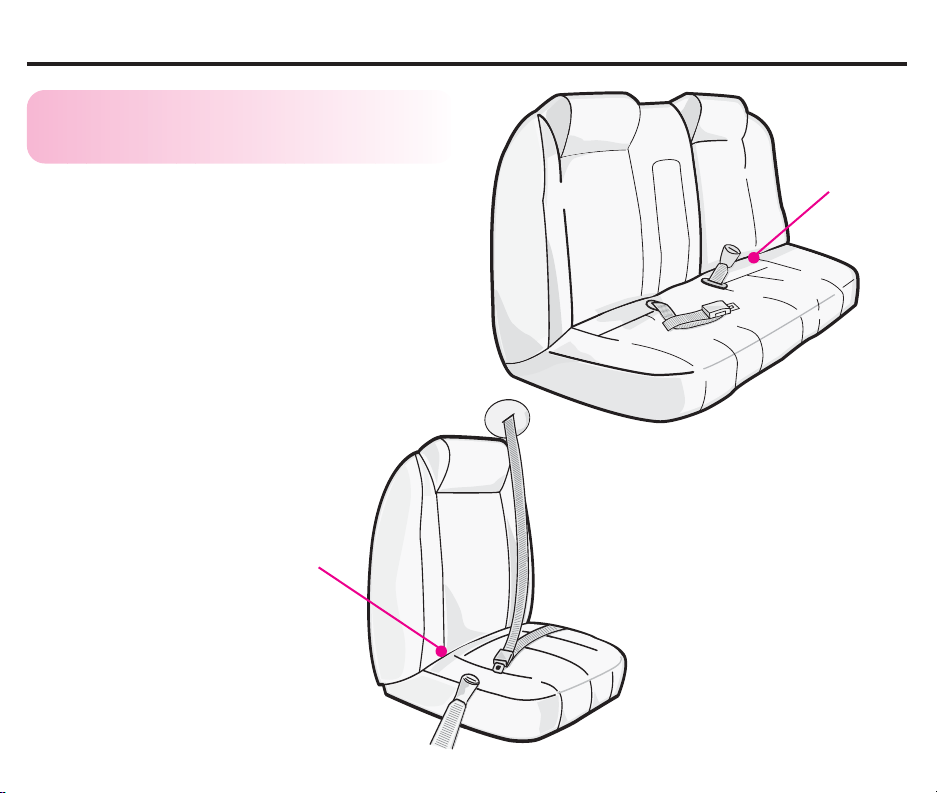
CINTURONES DE SEGURIDAD DEL VEH CULO
Cinturones ubicados delante
F
del pliegue del asiento
Los cinturones de seguridad del veh culo ubicados
delante del pliegue en el asiento quiz no sujeten
bien el asiento. Consulte el manual del propietario
del veh culo o visite el concesionario del veh culo
para informarse sobre los requisitos de instalaci n
de los asientos.
• Si ueda aprobado para utili arlo con el asiento,
inst lelo y compruebe si est perfectamente
instalado alando el asiento de atr s hacia
delante. Si el asiento se despla a hacia delante,
NO use estos cinturones de seguridad.
Pliegue del
asiento
Pliegue del
asiento
27
Page 74
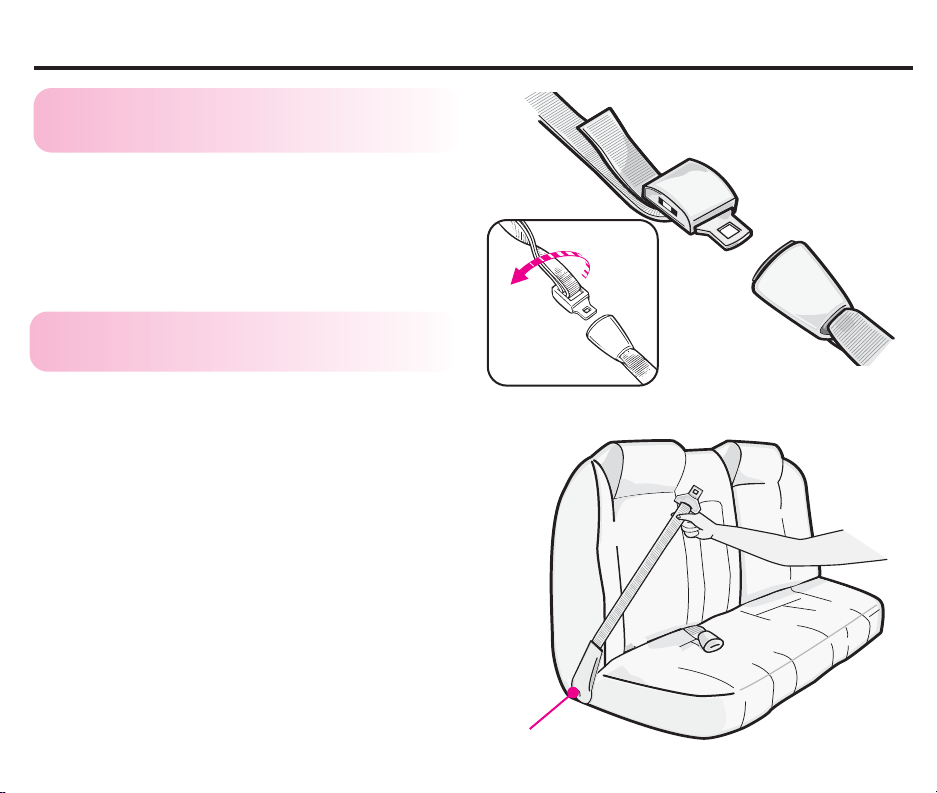
CINTURONES DE SEGURIDAD DEL VEH CULO
Cinturones de regazo -
F
ajustables manualmente
La placa de cierre en algunos cinturones de
seguridad se puede deslizar y soltar tras abrocharla
al asiento en ciertos ngulos. En este caso, d la
vuelta a la placa de cierre (fig. a) y vuelva a
abrocharla. Compruebe la instalaci n de nuevo
para ver si funciona. Si no funciona, coloque el
asiento de seguridad en otra posici n diferente.
Cinturones de regazo -
F
con retractor
D le la
vuelta
Los cinturones de regazo con retractor pueden o no
sujetar el asiento firmemente.
Siga estos pasos para determinar si su sistema de
retractor que sujeta el asiento firmemente :
a. Sa ue el cintur n de seguridad del todo.
b. De e ue el cintur n se retraiga apro imadamente
6 pulgadas (15 cm).
c. Sa ue el cintur n de nuevo.
Si el cintur n se cierra a tope y no puede jalarlo m s,
usted dispone de un retractor de cierre autom tico que
se puede usar con el asiento. Recuerde, cuando instale
el asiento, saque el cintur n del todo, abr chelo y
luego, apri telo.
Si puede sacar el cintur n de nuevo (paso c arriba),
tiene un retractor de cierre para emergencias que
NO SE DEBE usar con el asiento.
28
(fig. a)
Retractor
Page 75
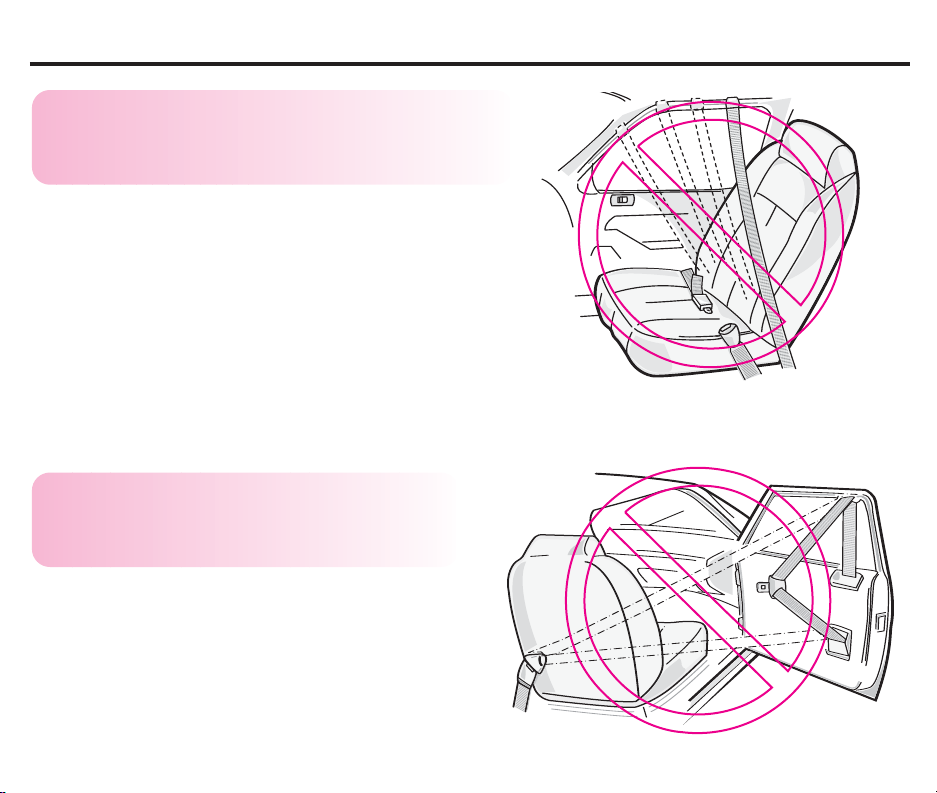
CINTURONES DE SEGURIDAD DEL VEH CULO
Cintur n pasivo - cintur n de
F
regazo con cintur n de
hombro motorizado
NO SE DEBE usar con ning n asiento.
Cintur n pasivo - cintur n de
F
regazo y hombro montado en
la puerta
NO SE DEBE usar con ning n asiento.
Los cinturones no se mantendr n apretados
durante el manejo del auto.
29
Page 76
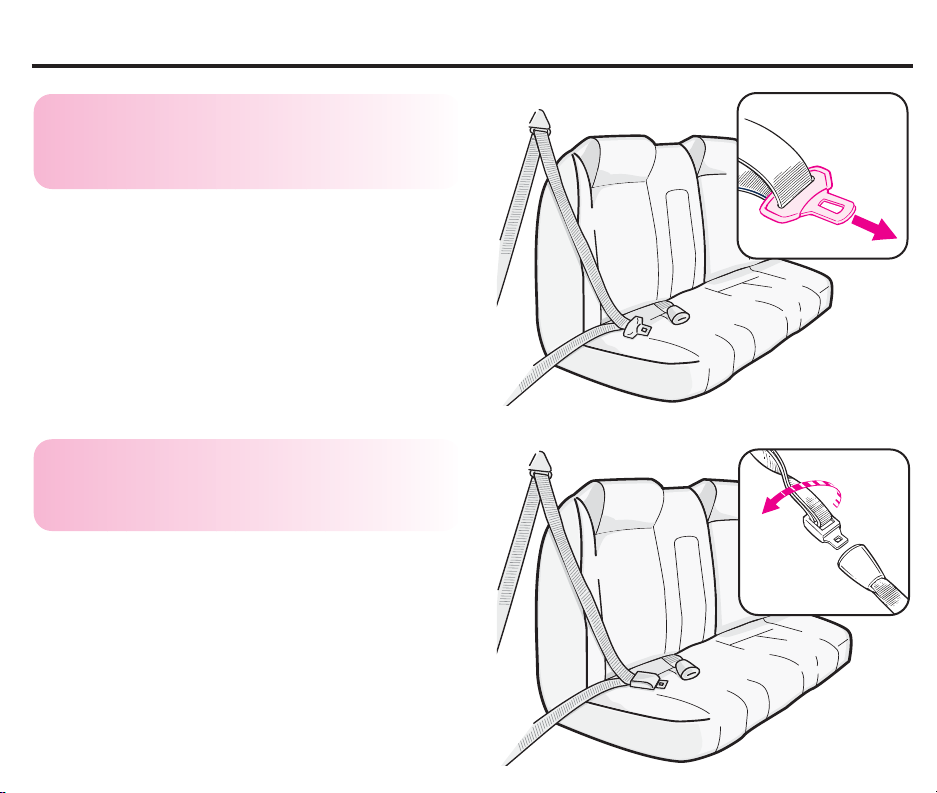
)
CINTURONES DE SEGURIDAD DEL VEH CULO
)
Cintur n combinado de
F
regazo / hombro con placa de
cierre deslizante
Jale la placa de cierre (fig. a). Si el cintur n se
desliza f cilmente por la placa de cierre, SE DEBE
utilizar un clip de cierre (vea la secci n Clip de
cierre en la p gina 31).
Algunos cinturones combinados de regazo /
hombro con placas de cierre deslizantes se pueden
convertir al modo de cierre autom tico que
permitir utilizarlos sin clip de cierre. Consulte el
manual del propietario del veh culo y lea la etiqueta
ubicada en los cinturones para ver las instrucciones.
Cintur n combinado de
F
regazo / hombro con una
placa de cierre fija
ale
(fig. a
La placa de cierre fija de algunos cinturones de
seguridad se puede deslizar y soltar tras abrocharla
al asiento en ciertos ngulos. En este caso, d la
vuelta a la placa de cierre (fig. b) y vuelva a
abrocharla. Compruebe la instalaci n de nuevo para
ver si funciona. Si no funciona, coloque el asiento en
otra posici n diferente.
30
D le la
vuelta
(fig. b
Page 77
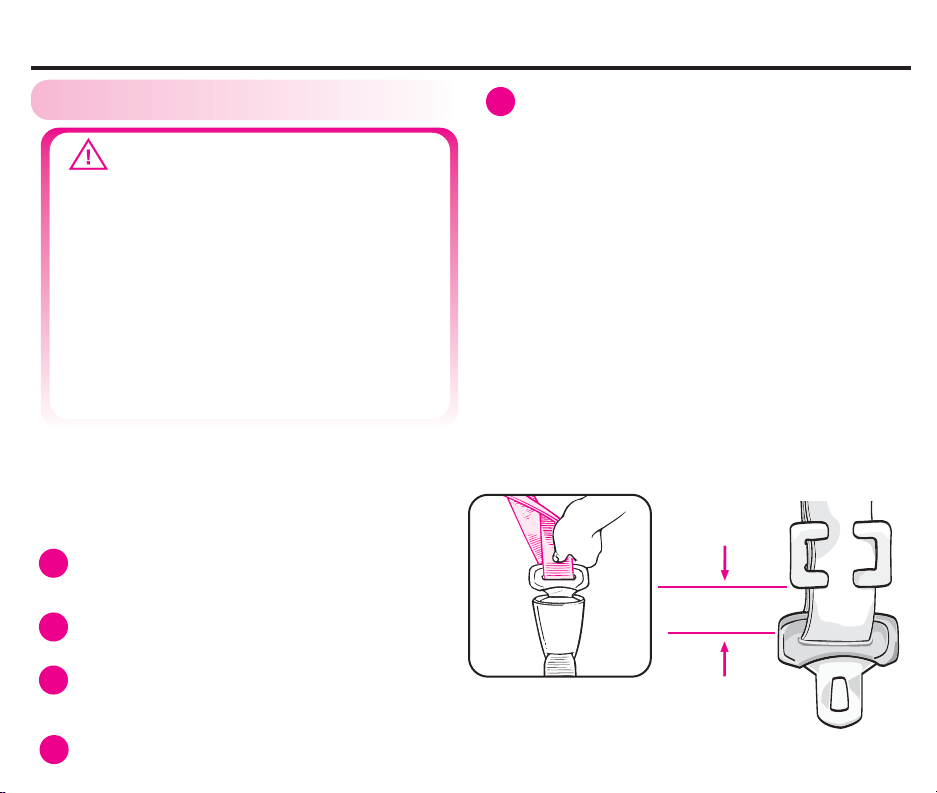
CINTURONES DE SEGURIDAD DEL VEH CULO
Clip de cierre
F
ADVERTENCIA
Evite lesiones graves o la muerte:
• No usar el clip de cierre cuando se
requiere impide que el asiento
quede bien sujeto.
• uite el clip de cierre de los
cinturones de seguridad cuando
no lo utilice con el asiento.
• NO use el clip de cierre para
acortar la longitud del cintur n
de seguridad.
SE DEBE usar el clip de cierre que se incluye con el
asiento con el cintur n de seguridad del veh culo
que se desliza f cilmente por la placa de cierre o
cuando el cintur n de regazo no se pueda
mantener bien sujeto.
Instale el asiento y apriete el cintur n de
1
seguridad del veh culo.
Sujete los cinturones de seguridad en la placa
2
de cierre (fig. a) y desabr chelos.
Compruebe la instalaci n para ver si el asiento
5
ha quedado bien sujeto.
Si no ha quedado bien sujeto, quiz sea necesario
apretar m s el cintur n:
• Desabroche el cintur n de seguridad del veh culo.
• Sujete los cinturones y quite el clip de cierre.
• Acorte la longitud de la parte del cintur n del
regazo, jal ndolo por la placa de cierre.
• Vuelva a colocar el clip de cierre.
• Abroche el cintur n de seguridad del veh culo.
Oprima el asiento en el coj n del
asiento del veh culo para poder abrochar el
cintur n de seguridad del veh culo.
Compruebe la instalaci n para ver si el asiento
ha quedado bien sujeto. Si no, repita los pasos
anteriores hasta que quede bien sujeto.
1/2 pulgada
(1 cm)
3
Deslice el clip de cierre en el cintur n de
seguridad aproximadamente 1/2 pulgada
(1 cm) en sentido opuesto a la placa de cierre.
Vuelva a abrochar el cintur n de seguridad.
4
(fig. a)
31
Page 78
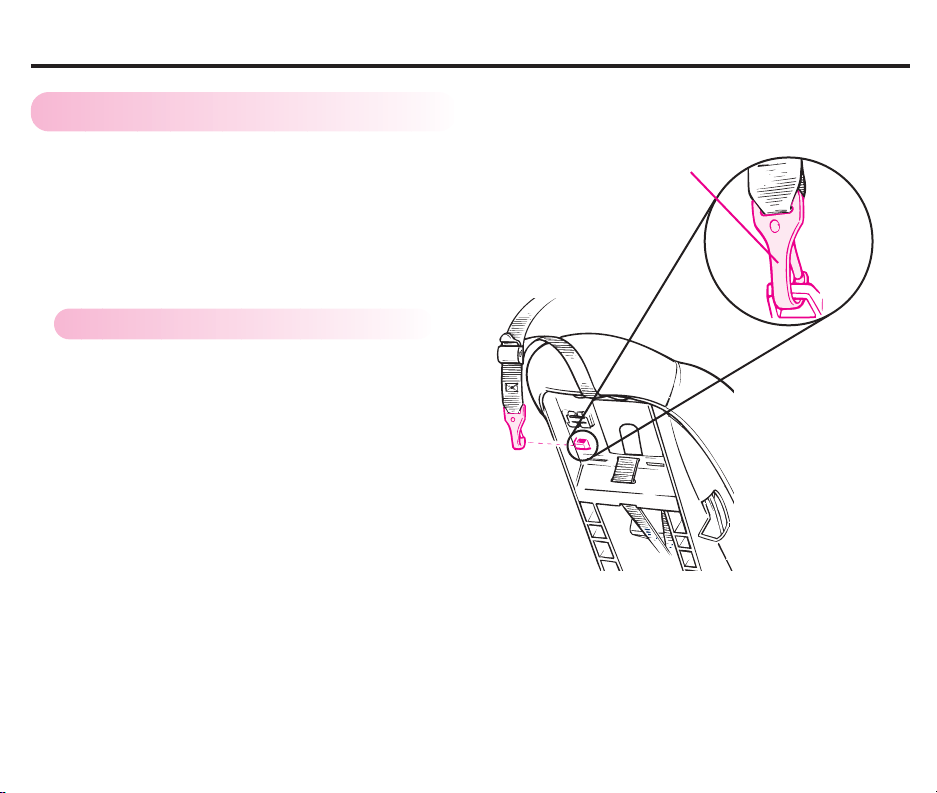
INFORMACI N ADICIONAL
Almacenaje del anclaje
F
NO conecte la correa de anclaje superior al veh culo
al utilizar el asiento orientado hacia atr s.
El gancho del anclaje debe conectarse cuando
el asiento se usa en orientaci n trasera o si el
veh culo no viene equipado con los anclajes
correspondientes.
Para almacenar el gancho del anclaje:
• Conecte el gancho del anclaje a la parte
trasera del asiento como se indica.
• Jale el extremo suelto de la correa para
apretarla.
• Enrolle el extremo suelto de la correa y
suj tela con una goma.
ancho del anclaje
Parte trasera del asiento de seguridad
32
Page 79
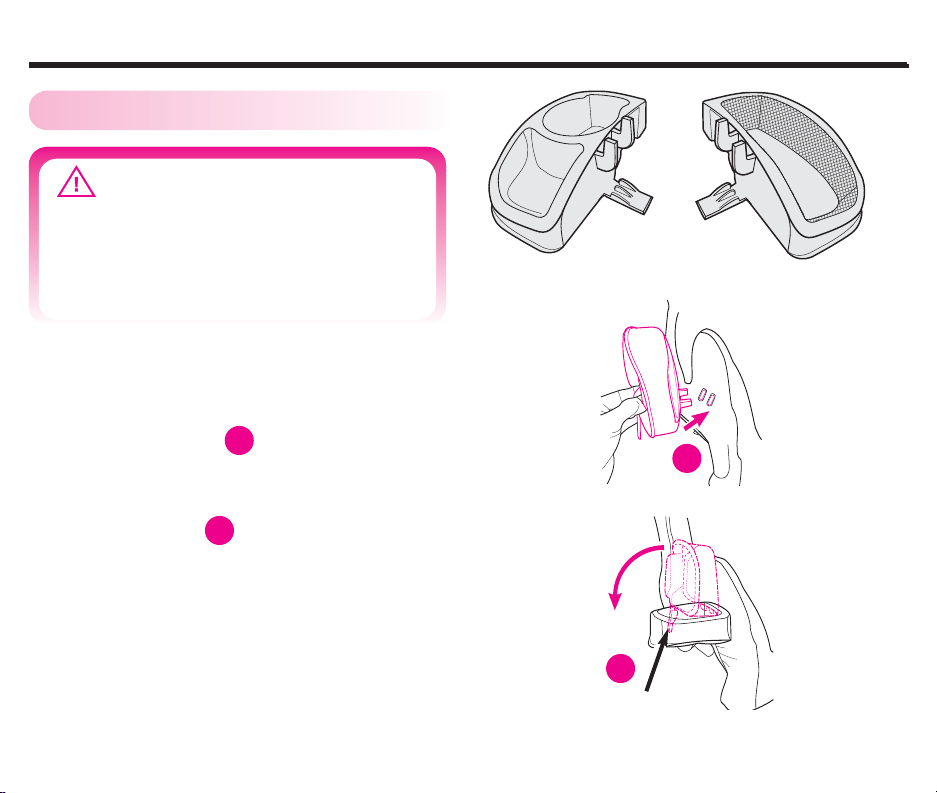
INFORMACI N ADICIONAL
Apoya vasos
F
ADVERTENCIA
Nunca ponga objetos filosos o con
punta en el apoya vasos. En un
accidente, estos objetos podr an
golpear a su ni o y causar serias
heridas.
Disponible en ciertos modelos:
• Inserte las dos clavijas del apoya vasos
en las dos ranuras del costado izquierdo o
derecho del asiento.
• Empuje el apoya vasos hacia abajo
hasta que la traba se asegure al
fondo del asiento.
VERIFI UE que el apoya vasos est seguro
tirando del mismo.
1
2
1
2
Traba
33
Page 80
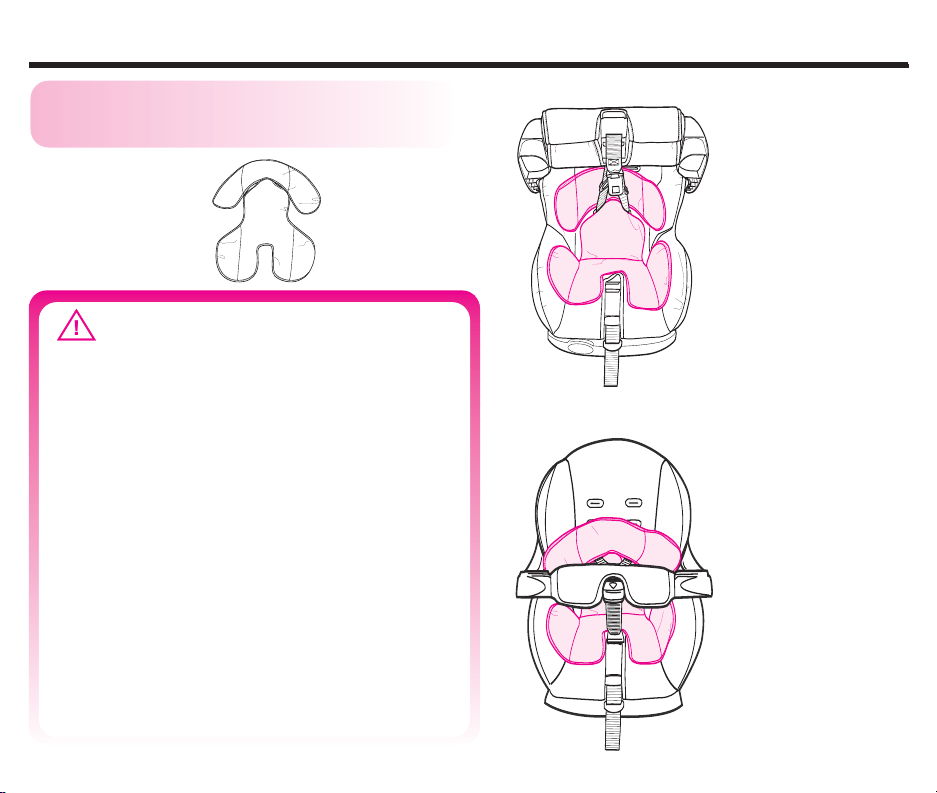
INFORMACI N ADICIONAL
F El coj n del cuerpo
(Disponible en algunos modelos)
ADVERTENCIA
Para prevenir la eyecci n en un
accidente o parada repentina:
• Aseg rese de que el sistema del arn s
est asegurado correctamente y las
correas del hombro pasen a trav s
de las ranuras y est n debidamente
colocadas sobre los hombros.
• Nunca permita que la almohada
interfiera con el sistema del arn s
del cintur n del veh culo.
• No permita que la almohada se
apretuje debajo o atr s del cuerpo
del ni o.
• Este producto ha sido dise ado
SOLAMENTE para los asientos de
autom viles convertibles Graco
ComfortSport.
Empuje la parte de
arriba del coj n del
cuerpo entre las
correas del arn s y
p ngalo en el asiento
exactamente como
se indica.
34
Page 81
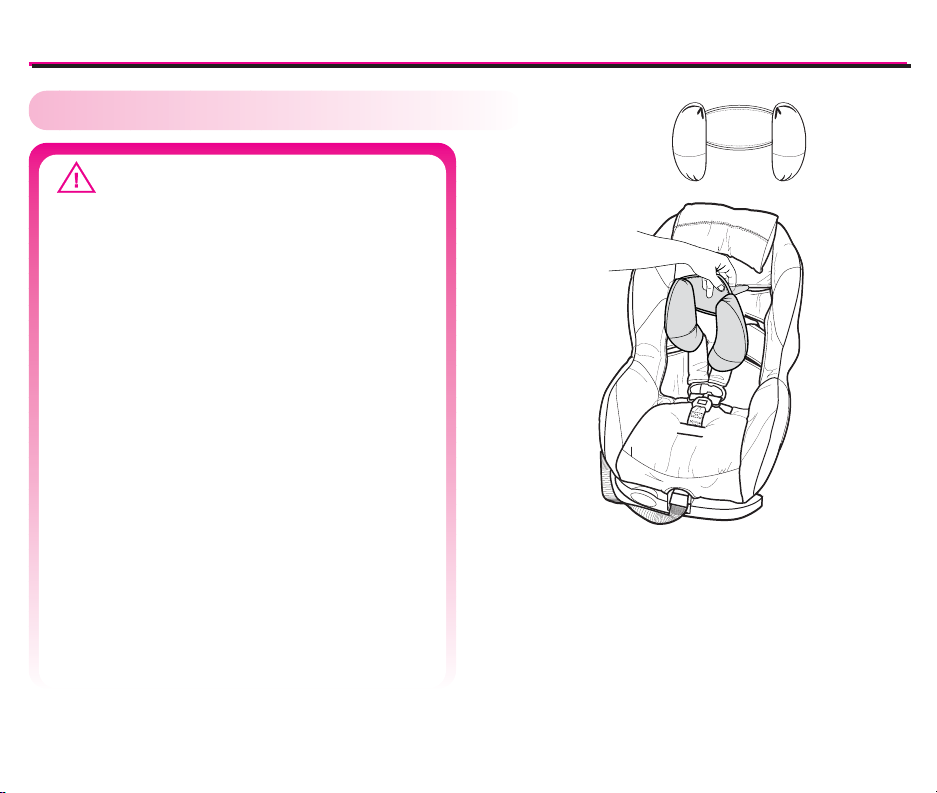
INFORMACI N ADICIONAL
Soporte de la cabeza
F
(Disponible en algunos modelos)
ADVERTENCIA
Para usarse solamente con las
ranuras superiores y centrales del
arn s! Use el apoya cabeza en la
ranura de ARRIBA del arn s, NO en la
misma ranura del arn s.
Para evitar que el beb salga
despedido durante una parada
repentina o un accidente:
• Use las ranuras apropiadas para
los hombros en las correas del
arn s.
• Mantenga las ranuras del arn s
colocadas sobre los hombros y bien
ajustadas.
• No use cubiertas para las correas,
frazadas, cojines o acolchados
debajo de las correas del arn s o
del ni o, a menos que hayan sido
provistos por Graco.
Coloque el soporte de la cabeza en el
centro del asiento para el autom vil con los
extremos orientados hacia abajo y tr belo
en las ranuras del cintur n, por encima del
arn s, como se muestra.
El soporte de la cabeza puede lavarse a
m quina por separado, en agua fr a, y
secarse al aire.
35
Page 82
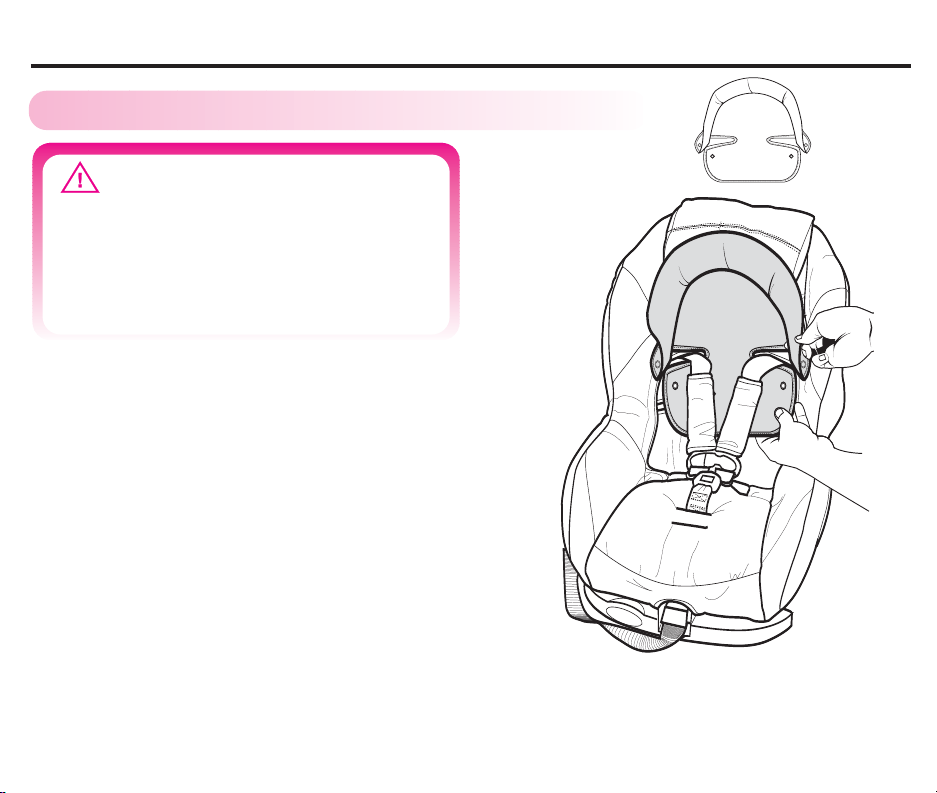
INFORMACI N ADICIONAL
Soporte de la cabeza
F
(Disponible en algunos modelos)
ADVERTENCIA
Para prevenir la eyecci n en un
accidente o parada repentina, las
correas del hombro deben pasar a
trav s de las ranuras y estar debidamente colocadas sobre los hombros.
36
Destrabe los costados y vuelva a trabarlos
con las correas del arn s pasadas a trav s de
las ranuras en el coj n.
Page 83
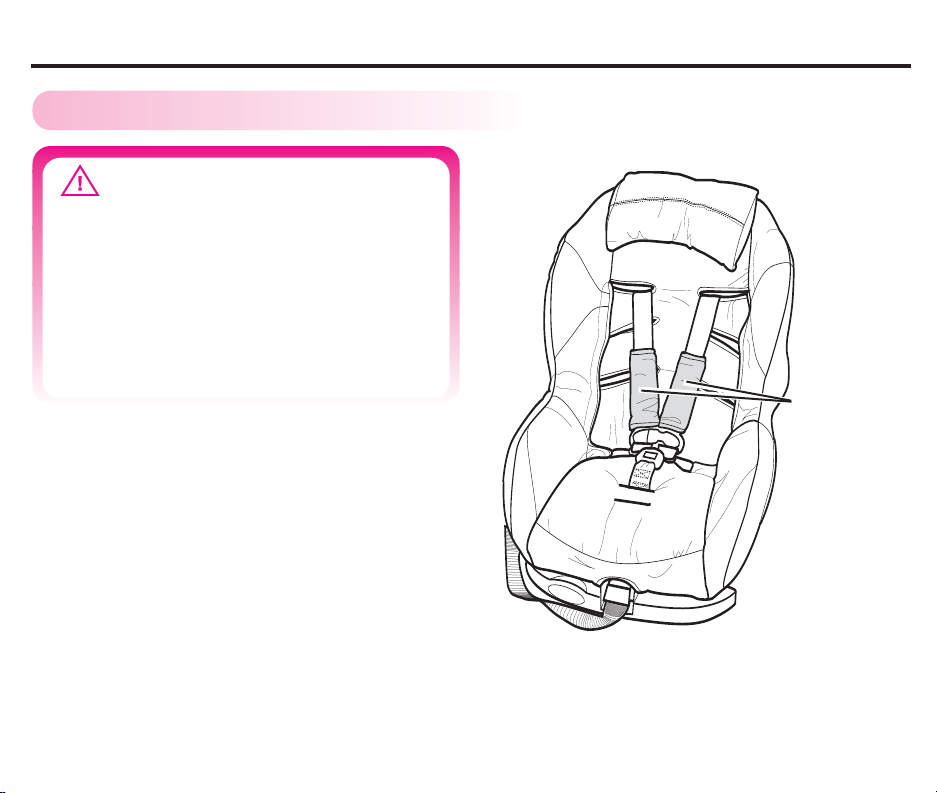
INFORMACI N ADICIONAL
Cubiertas del arn s
F
(available on some models)
ADVERTENCIA
• Aseg rese de que el sistema del
arn s est asegurado correctamente.
• Revise que las correas del arn s no
est n torcidas.
• Aseg rese de que las cubiertas del
arn s no interfieran con la
colocaci n del pasador del pecho.
Cubiertas
del arn s
37
Page 84
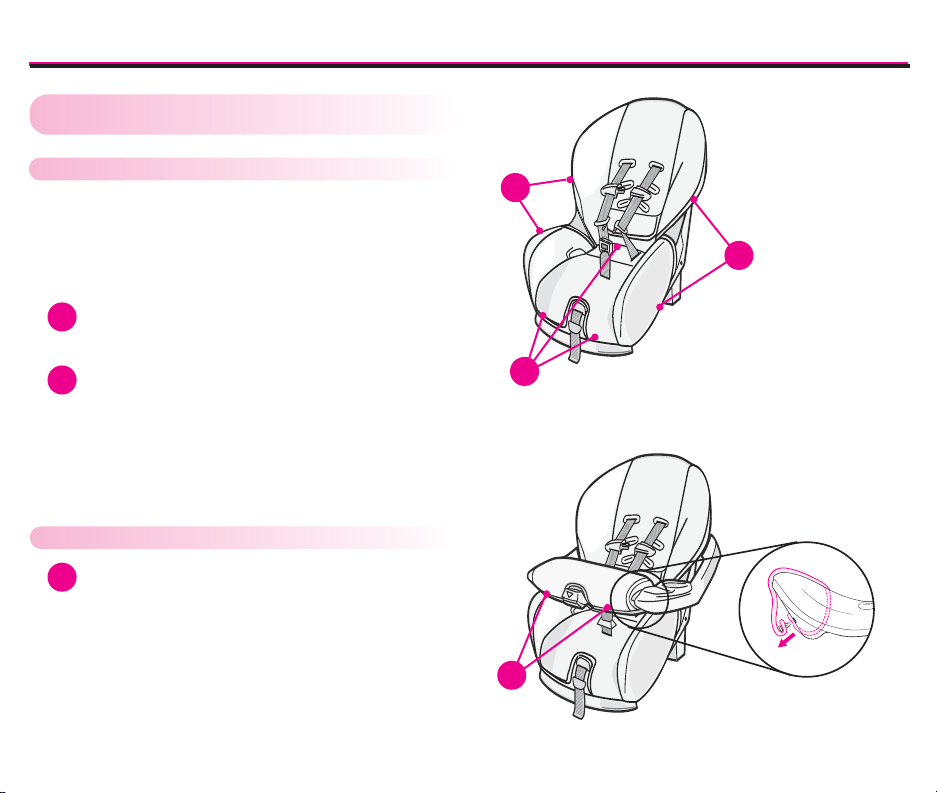
INFORMACI N ADICIONAL
Cuidado y limpieza
F
Retirar la almohadilla (todos los modelos):
Retire los dos bucles de las correas del arn s de la
placa de uni n de la parte trasera del asiento y
p selos por la parte delantera de la almohadilla.
Desabroche el cierre del arn s, retire las leng etas
de la hebilla. (vea las p ginas 18-21)
1
Desenganche los ganchos en forma de
J del armaz n del asiento.
1
1
Saque tres clips de dos botones del borde
2
delantero inferior del armaz n del asiento y
del centro de la parte interior del armaz n
del asiento.
Retirar la almohadilla de la barra protectora:
Saque ambos clips de dos botones de la
3
barra y retire la almohadilla de alrededor
de la barra.
Siga los pasos anteriores en orden inverso
para reemplazar la almohadilla del asiento,
la almohadilla de la barra y el sistema del
arn s.
38
2
3
Page 85
INFORMACI N ADICIONAL
Las almohadillas del asiento y de la
barra protectora:
Saque las dos trabas de 2 botones de pl stico.
Se lavan a m quina por separado en el ciclo
delicado y se secan al aire.
Correas del arn s y del sistema LATCH:
Se lava la superficie solamente con un jab n
suave y un pa o mojado.
Si las correas del arn s est n deshilachadas o
muy sucias, DEBEN reemplazarse.
Arma n y apoyavasos de la barra protectora:
Se limpian con una soluci n de jab n suave y
agua. Evite mojar las etiquetas.
Nunca use detergentes dom sticos : pueden
da ar el pl stico.
Hebilla:
Enjuague la hebilla con agua caliente. NO use
detergentes dom sticos. Nunca lubrique la
hebilla.
ADVERTENCIA
Prevenga lesiones graves o la
muerte:
• La hebilla debe abrocharse
correctamente.
• Inspeccione y limpie la hebilla
peri dicamente para quitar
objetos o desechos que podr an
impedir la sujeci n.
Uso en aeronaves
F
Este asiento ha sido certificado para uso en
aeronaves (vea la etiqueta del asiento). P ngase
en contacto con las aerol neas para obtener
informaci n sobre su pol tica.
Utilice este asiento solamente en asientos de
aeronaves orientados hacia delante.
Instale el asiento en la aeronave de la misma
manera que se instala en un veh culo, cuando se
usa el cintur n de seguridad del veh culo.
Asiento de seguridad para
F
autos de segunda mano
Graco Childrens Products Inc. desaconseja prestar o
regalar el asiento.
39
Page 86

PIE AS DE REPUESTO
Para comprar repuestos o accesorios en los Estados Unidos, por favor comun quese con
nosotros en:
www.gracobaby.com
o
1-800-345-4109
40
Page 87

NOTAS
41
Page 88
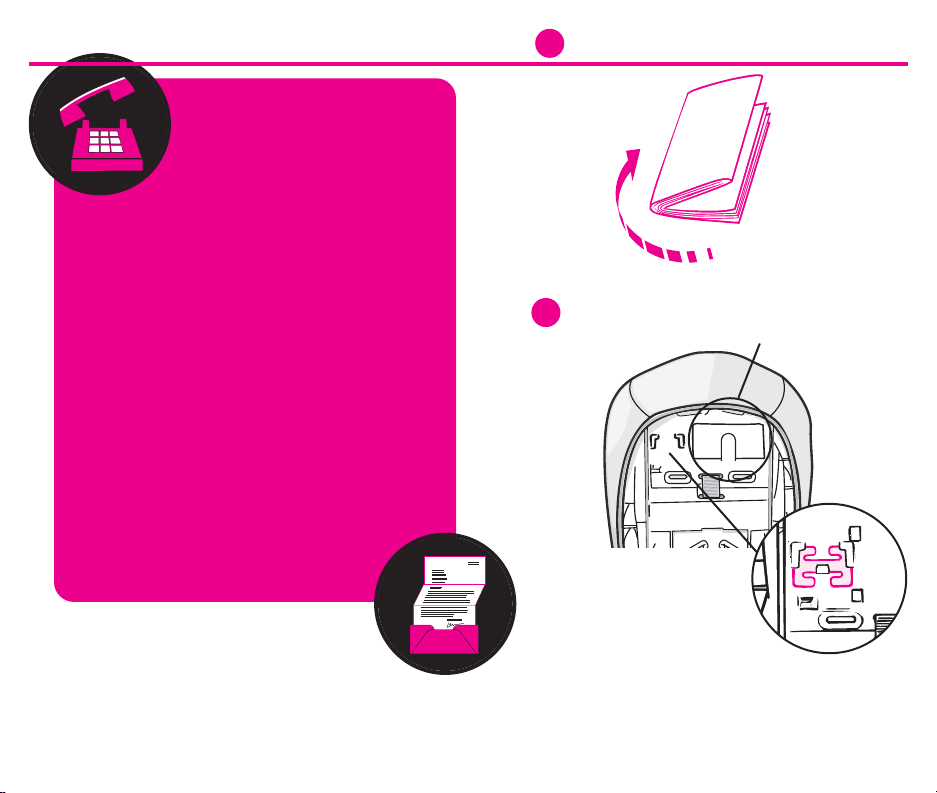
Si falta alguna pieza o resulta
da ada, o si necesita obtener
ayuda o pedir repuestos, NO
devuelva el asiento a la tienda.
LL MENOS PRIMERO
Llame a nuestra l nea gratuita al 1-800-345-4109
desde cualquier lugar de EE.UU. o Canad
o env enos un fax al 1-610-884-8730.
o escr banos a:
Graco Children’s Products
150 Oaklands Blvd.
Exton, PA 19341
Atenci n: Departamento de
Servicio al Cliente
o vis tenos en:
www.gracobebe.com
Doble el manual de instrucciones.
1
Guarde el manual de instrucciones
2
detr s de estas leng etas.
Guarde aqu el
clip de cierre.
Graco Children’s Products Inc.
Una divisi n de Newell Rubbermaid
150 Oaklands Blvd.
Exton, PA 19341
Page 89
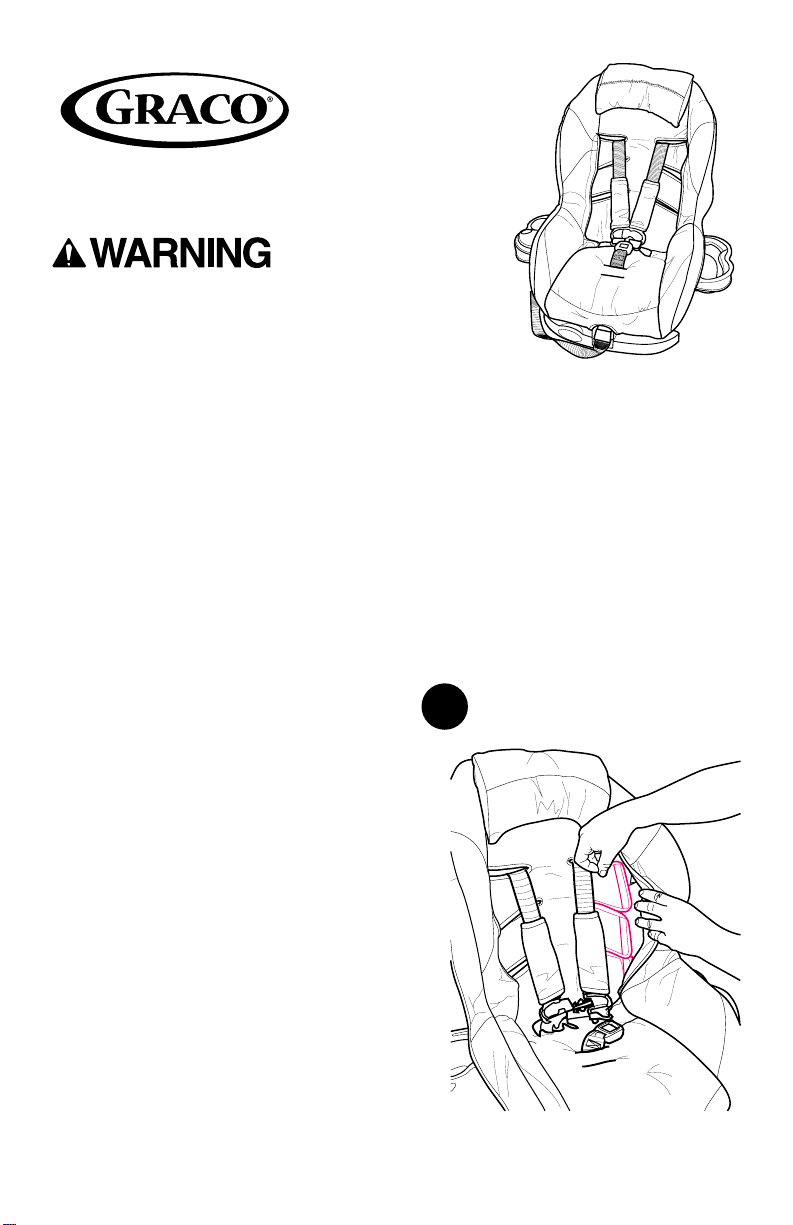
© 2003 Graco ISPC063BA 08/03
To prevent ejection in sudden stop or crash:
• Make sure that the harness system is
properly secured and shoulder straps are
threaded through the seat and slots and
properly positioned on shoulders.
• Never allow seat pad or GracoPedic foam to
interfere with the harness system or
vehicle belt.
• This product is designed ONLY for Graco
ComfortSport convertible car seats.
STEP 1.
To remove seat pad, unbuckle
harness and unfasten VELCRO®on
both sides of seat pad.
1
EZ Wash Seat Pad
PLEASE REFER TO YOUR COMFORTSPORT OWNER’S MANUAL,
FOR HARNESS ADJUSTMENT, LATCH INSTALLATION AND
VEHICLE BELT USE.
Page 90
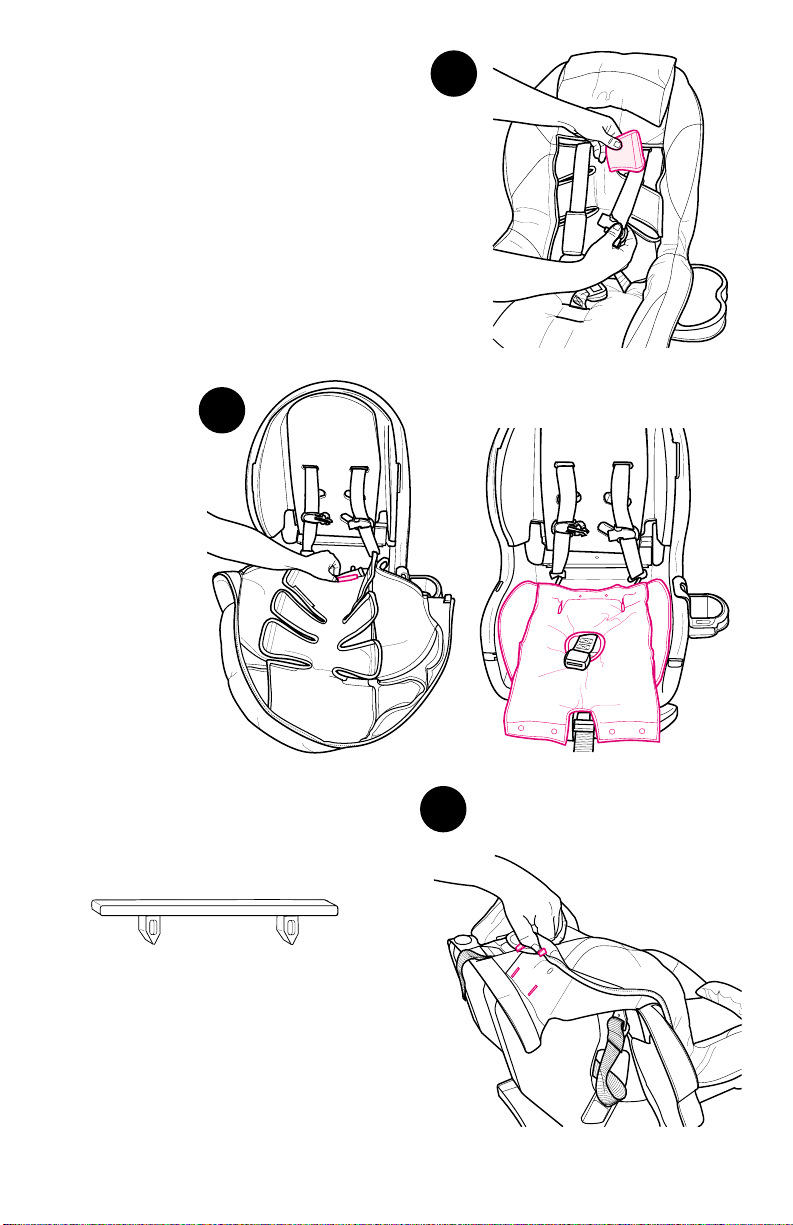
STEP 2.
Push harness behind seat pad as
shown. Repeat on other side of pad.
Push crotch strap through seat pad.
2
STEP 4.
Remove 2 plastic clips at front base of
seat as shown.
Flip seat over and remove plastic
J-hooks from the sides of the seat.
Pull off the seat pad for washing.
NEVER USE CAR SEAT WITHOUT THE
SEAT PAD.
Reverse steps to re-attach.
4
Clip
STEP 3.
Remove plastic
clip from the
back of seat pad
as shown.
GracoPedic foam
is NOT to be
washed, keep it
with the seat.
2
3
Page 91
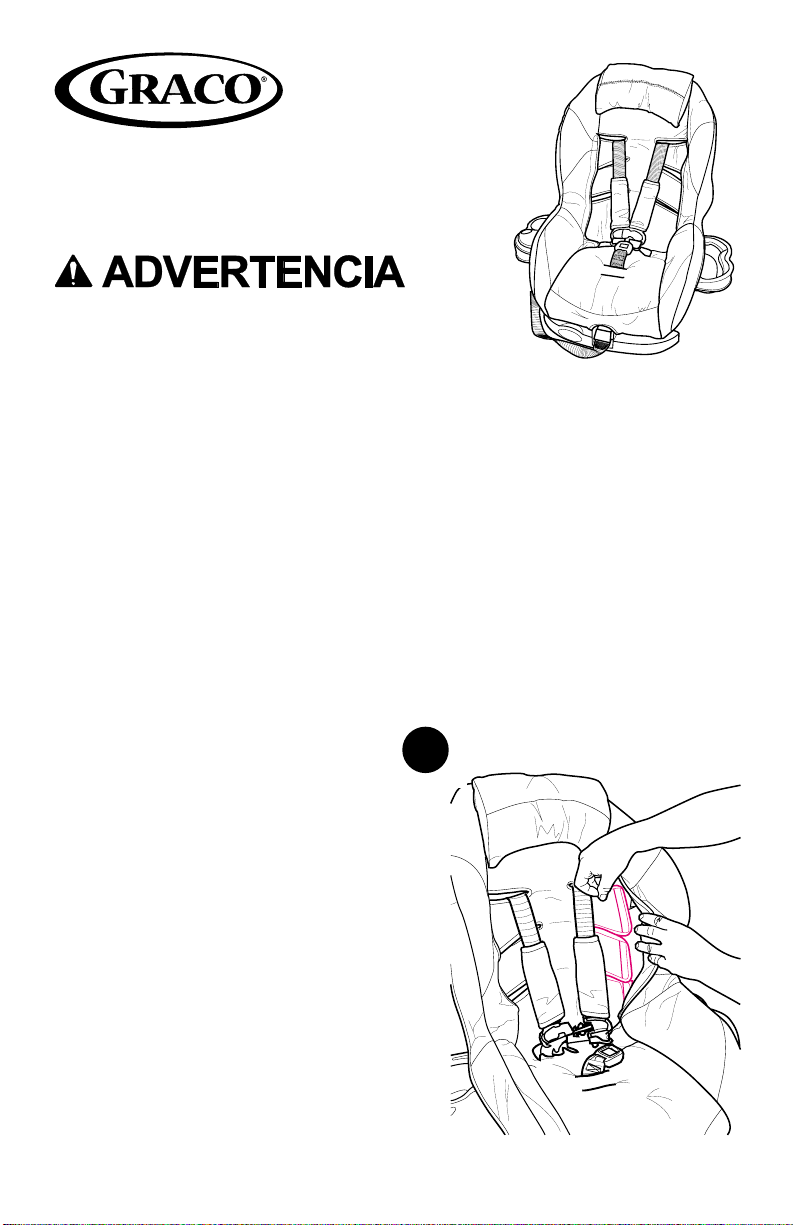
© 2003 Graco ISPC063BA 08/03
Para prevenir la eyección en un accidente
o frenada repentina:
• Asegúrese de que el sistema del arnés esté
debidamente asegurado y que las correas
del hombro pasan a través del asiento y las
ranuras y están debidamente colocados en los hombros.
• Nunca deje que la almohadilla para asiento o la goma espuma
GracoPedic interfiera con el sistema del arnés o cinturón del vehículo.
• Este producto ha sido diseñado SOLAMENTE para los asientos
convertibles para automóvil ComfortSport de Graco.
PASO 1.
Para sacar la almohadilla del
asiento, destrabe el arnés y el
VELCRO®en ambos costados de
la almohadilla del asiento.
1
Almohadilla para
asiento EZ Wash
POR FAVOR, CONSULTE SU MANUAL DEL DUEÑO
COMFORTSPORT PARA DETERMINAR EL AJUSTE DEL ARNÉS,
LA INSTALACIÓN DEL LATCH Y EL USO DEL CINTURÓN
DEL VEHÍCULO.
Page 92
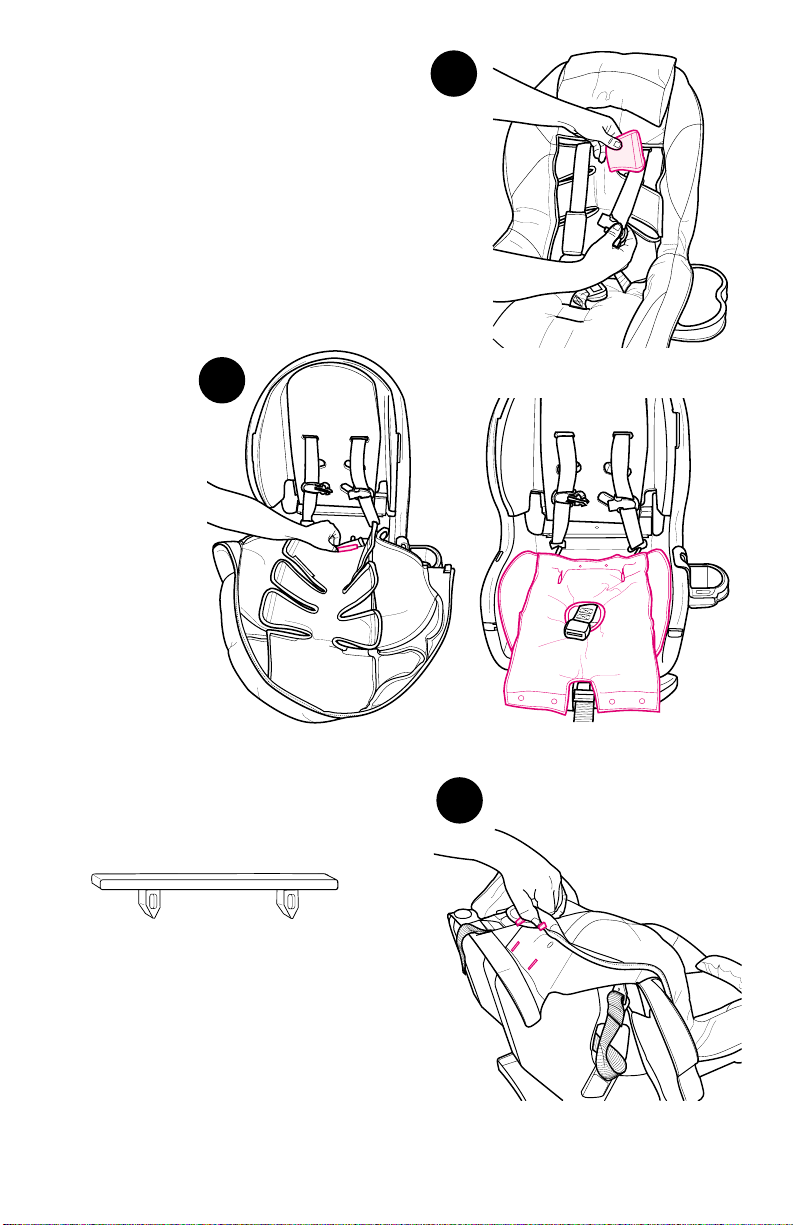
PASO 2.
Empuje el arnés detrás de la
almohadilla del asiento como se
indica. Repita el procedimiento del
otro lado de la almohadilla.
Empuje la correa de la entrepierna
por la almohadilla del asiento.
2
PASO 4.
Saque las 2 trabas de plástico de la base
delantera del asiento como se indica.
De vuelta el asiento y saque los ganchos
en J de plástico de los costados del
asiento. Levante la almohadilla del
asiento para lavarla. NUNCA USE EL
ASIENTO PARA AUTOMÓVIL SIN LA
ALMOHADILLA PARA EL ASIENTO.
Invierta los pasos para volver
a instalarla.
4
Presilla
PASO 3.
Saque la traba
de plástico del
respaldo de la
almohadilla del
asiento como
se indica.
La espuma de
goma GracoPedic
no debe lavarse, y
debe mantenerse
con el asiento.
2
3
 Loading...