

Page 1
LAPB0014A
04.44.164
LAPB0014A
04.44.164
LAPB0034A
04.44.165
22-36 kg
READ THIS MANUAL.
LIRE CETTE NOTICE.
LESEN SIE DIESE
BEDIENUNGSANLEITUNG
DURCH.
LEA ESTE MANUAL.
LEES DEZE
AANWIJZINGEN !
LEGGERE QUESTO
MANUALE.
LEIA ESTE MANUAL.
PRZECZYTAJ TĘ
INSTRUKCJĘ
OLVASSA EL A
KÉZIKÖNYVET
PREČÍTAJTE SI
TÚTO PRÍRUČKU
LÆS DENNE
BRUGERVEJLEDNING
PROČITAJTE OVAJ
PRIRUČNIK
22-36 kg
EN
Owner’s
Manual
FR
Notice de
l'utilisateur
DE
Gebrauchs-
anleitung
ES
Manual de Uso
NL
Handleiding
IT
Manuale
d’istruzioni
PT
Manual do
Proprietário
PL
Instrukcja
użytkowania
HU
Felhasználói
kézikönyv
SK
Príručka pre
používateľa
DA
Brugsvejledning
HR
Priručnik za
korisnika
SR
Korisnički
priručnik
©2014 Graco ISPB053HD 10/14
1
Page 2
1
EN
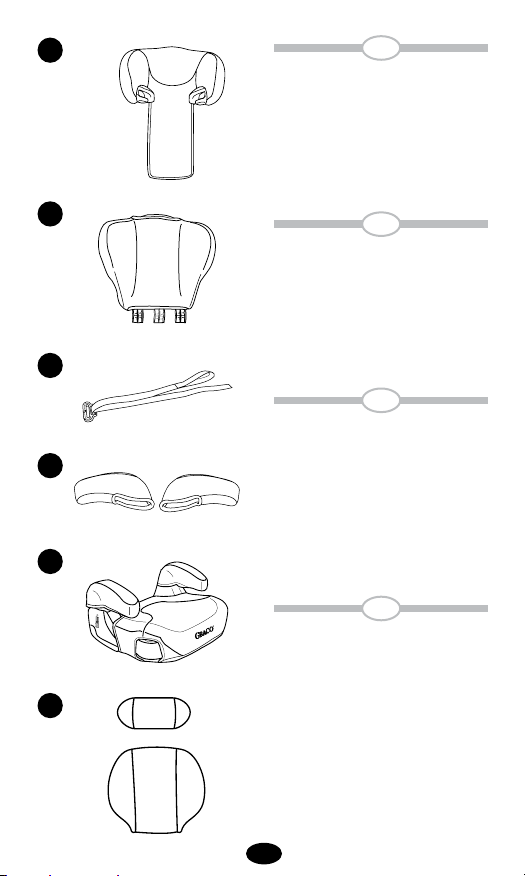
Parts list
Adult assembly required.
1 Head Support (on certain models)
2 Lower back support (on certain models)
3 Shoulder belt positioning clip
4 Armrest covers (on certain models)
5 Base
6 Body pillows (on certain models)
2
FR
Liste des pièces
Montage par un adulte exclusivement.
1 Appui tête (sur certains modèles)
2 Dossier (sur certains modèles)
3 Clip de positionnement de la bretelle
4 Protège accoudoirs (sur certains modèles)
3
5 Assise du siège
6 Oreillers de corps (sur certains modèles)
DE
Teileliste
Der Zusammenbau darf nur von einer
4
5
erwachsenen Person durchgeführt werden.
1 Kopfstütze (Bei bestimmten Modellen)
2 Rückenlehne (Bei bestimmten Modellen)
3 Schultergurthalterung
4 Armlehnenbezüge
(Bei bestimmten Modellen)
5 Basis
6 Körperkissen (bei bestimmten Modellen)
S
E
Teileliste
Se requiere el montaje por un adulto.
1 Apoyacabeza (en ciertos modelos)
2 Respaldo (en ciertos modelos)
6
3 Clip de colocación del cinturón de hombro
4 Armlehnenbezüge
(Bei bestimmten Modellen)
5 Fundas de los apoyabrazos
(en ciertos modelos)
6 Cojines para el cuerpo
(en ciertos modelos)
2
Page 3
NL
Onderdelenlijst
Montage moet door volwassenen gebeuren.
1 Hoofdsteun (op bepaalde modellen)
2 Rugleuning (op bepaalde modellen)
3 Schoudergordel-clip
4 Armleuningbekledingen
(op bepaalde modellen)
5 Zitverhoger
6 Lichaamskussens (bij bepaalde modellen).
I
T
Elenco delle parti
È necessario l'assemblaggio da parte
di un adulto.
1 Appoggiatesta (in alcuni modelli)
2 Supporto inferiore per la schiena
(in alcuni modelli)
3 Clip di posizionamento della cintura da spalla
4 Copertura per i braccioli (in alcuni modelli)
5 Base
6 Cuscini per il corpo (solo alcuni modelli)
PR
Lista de Peças
A montagem deve ser realizada por adulto.
1 Apoio de cabeça (em alguns modelos)
2 Encosto (em alguns modelos)
3 Alças de ombro prendedor de posição
4 Capas dos descansos de braço
(em alguns modelos)
5 Base
6 Almofadas de corpo (em alguns modelos)
PL
Lista części
Montaż musi przeprowadziæ osoba dorosła.
1 Zagłówek (w niektórych modelach)
2 Oparcie dla pleców
(w niektórych modelach)
3 Zatrzask pozycjonujący pas piersiowy
4 Pokrowce na podłokietniki (w niektórych
modelach)
5 Podstawa
6 Miękkie oparcia (dla niektórych modeli).
HU
Alkatrész lista
Felnőtt kell összeszerelje.
1 Fejtámla (bizonyos modelleken)
2 Alsó háttámla (bizonyos modelleken)
3 Vállöv pozícionáló kapocs
4 Kartámasz huzatok (bizonyos modelleken)
5 Alap
6 Testpárnák (bizonyos modelleken)
SK
Zoznam súčiastok
Montáž je povolená len dospelým osobám.
1 Opierka hlavy (niektoré modely)
2 Opierka dolnej časti chrbta
(niektoré modely)
3 Nastaviteľná príchytka bezpečnostného pása
4 Kryty bočných opierok (niektoré modely)
5 Podklad
6 Vankúše (niektoré modely)
DA
Liste over dele
Monteringen skal foretages af en voksen.
1 Hovedstøtte (på nogle modeller)
2 Sænk rygstøtten (på nogle modeller)
3 Klemme til placering af skuldersele
4 Armlænsbetræk (på nogle modeller)
5 Understel
6 Kropspuder (på nogle modeller)
HR
Popis dijelova
Sjedalicu mora sastaviti odrasla osoba.
1 Oslonac za glavu (kod nekih modela)
2 Oslonac za donji dio leđa (kod nekih modela)
3 Kopča za postavljanje ramenog pojasa
Navlake za oslonce za ruke (kod nekih modela)
4
5 Baza
6 Jastuci za tijelo (kod nekih modela)
S
R
Spisak delova
Mora da sastavlja odrasla osoba.
1 Zaštita glave (kod nekih modela)
2
Naslon za donji deo leđa (kod nekih modela)
3 Držač za rameni sigurnosni pojas vozila
Pokrivači za naslone za ruke (kod nekih modela)
4
5 Baza
6 Jastučići za telo (kod nekih modela)
3
Page 4

1
2
3
4
5
6
7
8
4
Page 5
9
10
11
12
13
5
Page 6
14
17
15
16
18
6
Page 7

19
20
22
23
24
21
1
2
7
Page 8

25
27
OK
26
OK
28
8
Page 9

29
OK
31
Back of seat
Arrière du siège
Rückseite des Sitzes
Parte trasera del asiento
Achterkant van stoel
Schienale del sedile
Encosto do assento
Spód siedziska
Az ülés háta
Zadná časť sedadla
Ryglæn
Naslon sjedalice
Poleđina sedišta
30
32
9
Page 10

33
37
34
35
36
38
39
40
41
10
Page 11

41
Certain models only
EN
Always keep this Owner’s Manual with the booster seat. Provisions are made
on the bottom of the seat shell.
European Standard
Your
booster seat has been approved
to European Standard
ECE R44.04
Universal Group 3 22-36 kg
An approval number is attached
to the seat shell and must not be
removed.
Only suitable for use in a vehicle fitted with 3-point with retractor safety
belts, approved to ECE Regulation
No. 16 or other equivalent standards.
11
Page 12

EN
WARNING
DO NOT INSTALL OR USE THIS BOOSTER SEAT UNTIL YOU
READ AND UNDERSTAND THE INSTRUCTIONS IN THIS
MANUAL AND IN YOUR VEHICLE OWNER’S MANUAL.
IT IS MOST IMPORTANT that the booster seat is correctly routed
with the lap portion of the belt across the red belt guides under the armrests and the diagonal belt through the red shoulder belt guides when
used with a back support or through the red shoulder belt
positioning clip when used as a back-less booster. Ensure the belt webbing is not twisted.
DO TAKE CARE to locate and install the booster seat so that it is not
liable to become trapped by a moveable seat or in a door of the vehicle.
FAILURE TO PROPERLY USE THIS BOOSTER SEAT
INCREASES THE RISK OF SERIOUS INJURY OR DEATH IN A
SHARP TURN, SUDDEN STOP OR CRASH.
DO NOT use another manufacturers seat cover with this booster seat.
See your retailer for Graco replacement parts only.
DO NOT USE in any configuration not shown in the instructions.
DO NOT use alternative load-bearing points not shown in these
instructions.
According to accident statistics, CHILDREN ARE SAFER WHEN
PROPERLY RESTRAINED IN REAR VEHICLE SEATING
POSITIONS, RATHER THAN FRONT SEATING POSITIONS.
For a vehicle with a front passenger air bag, refer to your vehicle owner’s
manual as well as these instructions for booster seat installation.
NEVER LEAVE YOUR CHILD UNATTENDED.
NEVER LEAVE A BOOSTER SEAT UNSECURED IN YOUR
VEHICLE. An unsecured booster seat can be thrown around and may
injure occupants in a sharp turn, sudden stop or crash. Remove it or
make sure that it is securely belted in the vehicle.
12
Page 13

WARNING
NEVER LEAVE LUGGAGE or other objects unsecured in a vehicle,
they are liable to cause injuries in the event of a collision.
REPLACE THE BOOSTER SEAT AFTER AN ACCIDENT OF
ANY KIND. An accident can cause damage to the booster seat that you
cannot see.
DO NOT MODIFY YOUR BOOSTER SEAT or use any accessories
or parts supplied by other manufacturers.
NEVER USE BOOSTER SEAT IF IT HAS DAMAGED OR
MISSING PARTS. DO NOT use a cut, frayed or damaged vehicle seat
belt.
THE BOOSTER SEAT CAN BECOME VERY HOT IF LEFT IN
THE SUN. Contact with these parts can burn your child’s skin. Always
touch the surface of any metal or plastic parts before putting your child
in the booster seat.
NEVER GIVE THIS BOOSTER SEAT to someone else without also
giving them this manual.
NEVER USE A SECOND-HAND BOOSTER SEAT or a booster
seat whose history you do not know.
NEVER USE THIS BOOSTER SEAT without the armrests attached
to the base.
Care and Maintenance
• CONTINUOUS USE OF BOOSTER SEAT MAY CAUSE DAMAGE TO
VEHICLE SEAT. Use a towel or thin blanket to protect upholstery.
• METAL AND PLASTIC PARTS: clean with mild soap and cool water. No
bleach or detergents.
• FROM TIME TO TIME CHECK YOUR BOOSTER SEAT for worn parts,
torn material and stitching. If damage is found, DO NOT try to modify the
booster seat. Replace the booster seat.
• DO NOT USE BOOSTER SEAT without its cover.
13
Page 14

EN
Assembling the booster seat
1
To adjust armrests, remove screw and press in button on side of base as
shown to raise or lower. Reinsert screw and tighten. CHECK to make
2
sure armrests are securely attached by pulling up on them.
Slip armrest covers (on certain models) onto armrests as shown.
3
Your Graco booster seat is now ready to use. See “Securing Child in
4
Vehicle with Shoulder Belt Positioning Clip”.
5
FOR MODELS with a back support continue on to
Flip head support and lower back support over as shown.
5
Squeeze red adjustment button and slide two pieces together until they
6
snap into place.
CHECK to make sure two pieces are securely snapped together by pulling
on them.
Attach elastic strap as shown.
7
Flip seat over and insert the fabric from the head support underneath the
8
fabric on the lower back support as shown.
To make insertion of fabric easier, slide the upper and lower back pieces
apart by squeezing the red adjustment button.
Attach backrest to base. “U”-shaped hooks on bottom of backrest will
9
interlock with bars on base.
Make sure that no part of the seat covering interferes when attaching
backrest to the base.
.
Once backrest is securely attached to the base, push backrest up as shown.
10
Your Graco booster seat is now ready to use. See “Using your Graco
11
Booster Seat” and “Securing Your Child in Vehicle”.
14
Page 15

FAILURE TO USE booster seat in a manner appropriate for your
child’s size may increase the risk of serious injury or death.
Weight and Height Limits
To use this Graco booster seat, your child MUST meet ALL of the
following requirements:
With back support (approximately 6 to 12 years old) :
12
• weigh between 22-36 kg, and
• are between 125 and 150 cm in height, and
• the shoulder belt MUST lay across child’s shoulders in red zone as shown
and the lap portion is positioned low on the childs hips, and
in
12
• the child’s ears are below top of booster seat. If tops of ears are above top
of seat, your child is too large for the booster seat
Without back support (approximately 6 to 12 years old) :
13
• weigh between 22-36 kg, and
• are between 125 and 150 cm in height, and
• the shoulder belt MUST lay across child’s shoulders in red zone as shown
and the lap portion is positioned low on the childs hips, and
in
13
• when sitting on the booster seat, your child’s ears are below the top of the
vehicle seat cushion / head rest.
Your Graco booster seat can be used with or without the back support (on
certain models) as long as the above requirements are met.
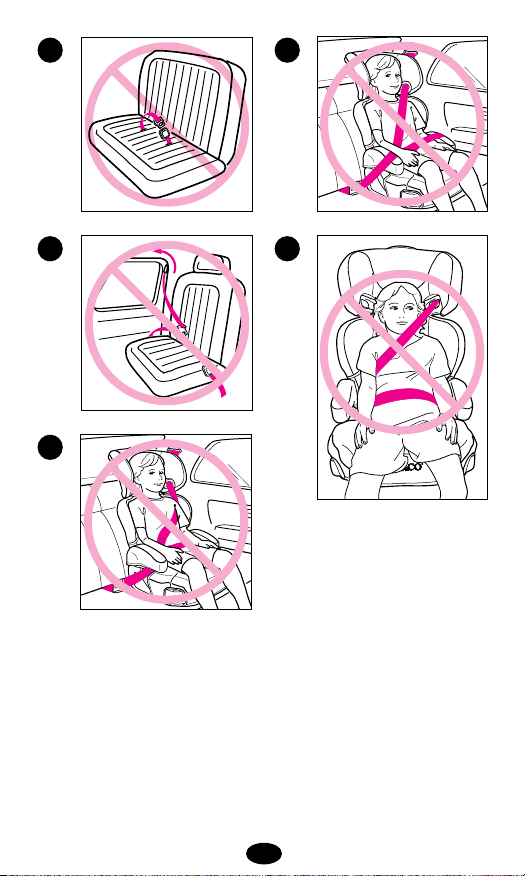
UNSAFE Vehicle Seat Belt Systems
DO NOT USE ANY OF THE FOLLOWING VEHICLE BELT
SYSTEMS.
• NEVER use a lap-only belt.
14
• NEVER use a Passive Restraint Lap or Shoulder Belt Mounted on
15
Door
15
Page 16

Vehicle belts MUST lay flat against child and MUST not be twisted.
16
DO NOT use shoulder belt loose or positioned under child’s arm.
DO NOT position vehicle belt over top of the armrests. It must pass under-
17
neath the armrests.
Make sure vehicle belt is NOT twisted.
Lap portion of lap/shoulder belt MUST be low and snug on hips, just
touching thighs.
DO NOT allow child to slide down in booster seat. If child will not keep
18
vehicle restraint properly positioned, DO NOT use this booster seat. Use a
different child restraint system.
Vehicle seat headrest must not interfere with booster seat head support.
19
The front of booster seat MUST NOT hang over front of vehicle seat.
The back of the booster seat MUST fit tight against the vehicle seat back
20
as shown.
Booster Seat Positions
Your booster seat has two positions as shown.
21
The back of the booster seat MUST fit tight against the vehicle seat back as
22
shown in either the first or second position.
DO NOT USE booster seat beyond reclined position.
23
Securing your Child in Vehicle
24
Place booster seat firmly against the back of a forward-facing vehicle seat
equipped with a lap/shoulder belt only.
Have your child sit in booster seat with their back flat against back of
booster seat.
Position shoulder belt through the shoulder belt guide shown in
25
NOT as shown in
26
tighten.
. Fasten buckle and pull up on the shoulder belt to
26
,
25
To ensure the correct head support height is obtained, the bottom of the
27
headrest MUST be even with the top of child’s shoulders as shown
28
and the shoulder belt must be positioned in the red zone as
in
27
shown in
.
28
16
Page 17

The lap belt portion MUST pass under the armrests and
be positioned low on the hips.
Belt MUST NOT be twisted.
29
If the belt lays across child’s neck, head or face, readjust head support
height. Follow instructions, “Adjusting the Head Support” .
30
Adjusting the Head Support
BEFORE adjusting the head support height, have your child lean
forward slightly.
31
Squeeze the red adjustment button on top of seat and pull back support up
until it snaps into one of the 6 height positions.
32
To lower, squeeze red adjustment button and push down.
CHECK to make sure it is securely snapped into one of the 6 height positions by pulling up on head support.
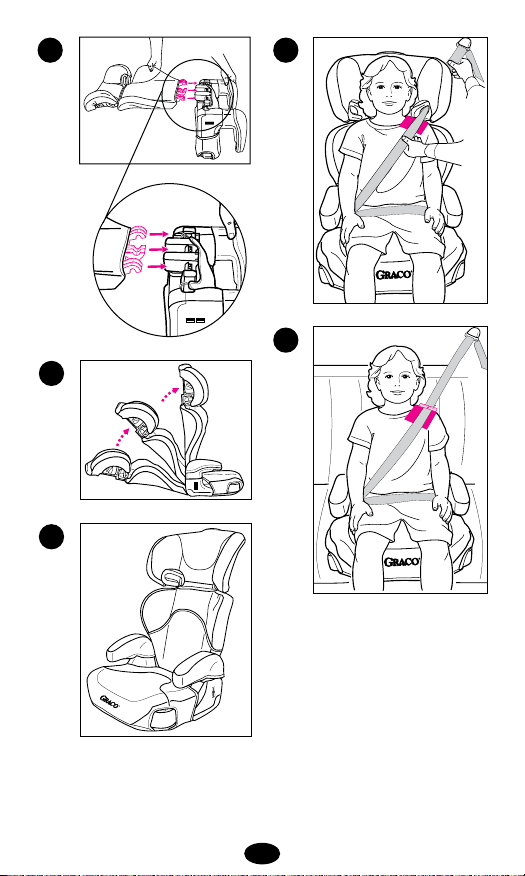
Securing Child in Vehicle with Shoulder Belt Positioning Clip
33
The shoulder belt MUST lay across child’s shoulders in red zone as shown.
If shoulder belt lays outside this zone, the shoulder belt positioning clip
MUST be used.
To attach clip to booster seat:
Insert the loop end of strap around vertical bar on rear of seat as shown.
34
The shoulder belt positioning clip MUST be attached onto the vertical
bar of the base farthest from where the vehicle shoulder belt lays across the
child.
35
Pass the clip and strap through the loop end as shown and pull strap up.
NOTE: Free end of strap should face front of seat.
36
Slide the vehicle shoulder belt onto the clip as shown and pull strap down
37
to tighten clip against child’s shoulder.
38
Rear view of child sitting in seat
The lap belt portion MUST pass under the armrests and
be positioned low on the hips.
The belt MUST NOT be twisted.
17
Page 18

Cupholders
To avoid burns, NEVER put hot liquids in your cupholders.
Cupholders are included on both sides of the seat.
39
To Remove Seat Cover
40
Remove elastic loops and hooks from seat as shown.
On some models, there is a plastic clip in the front of the seat pad on the
41
base that will need to be removed before washing.
Machine wash cover in cold water on delicate cycle and
drip-dry. DO NOT USE BLEACH.
To put the seat cover back on, reverse preceding instructions.
42
Body Pillows (on certain models)
Slide pillows through headrest and backrest as shown.
18
 Loading...