

Page 1
®
GPSMAP
62 series
quick start manual
For use with the GPSMAP 62,
62s, and 62st
Page 2

Getting Started
‹
WARNING
See the Important Safety and Product
Information guide in the product
box for product warnings and other
important information
When using your device the rst time,
you should complete the following
tasks to set up the device and get to
know the basic features.
Getting More Information
Go to www.garmin.com to download
the latest manuals.
Battery Information
The device operates on two AA
batteries. Use alkaline, NiMH, or
lithium batteries. Use precharged
NiMH or lithium batteries for best
results.
1. Install the batteries (page 2).
2. Turn on the device (page 3).
3. Acquire satellites (page 3).
4. Mark a waypoint (page 5).
5. Calibrate the compass (page 6).
6. Navigate with the search menu
(page 8).
7. Navigate a route (page 8).
2 GPSMAP 62 Series Quick Start Manual
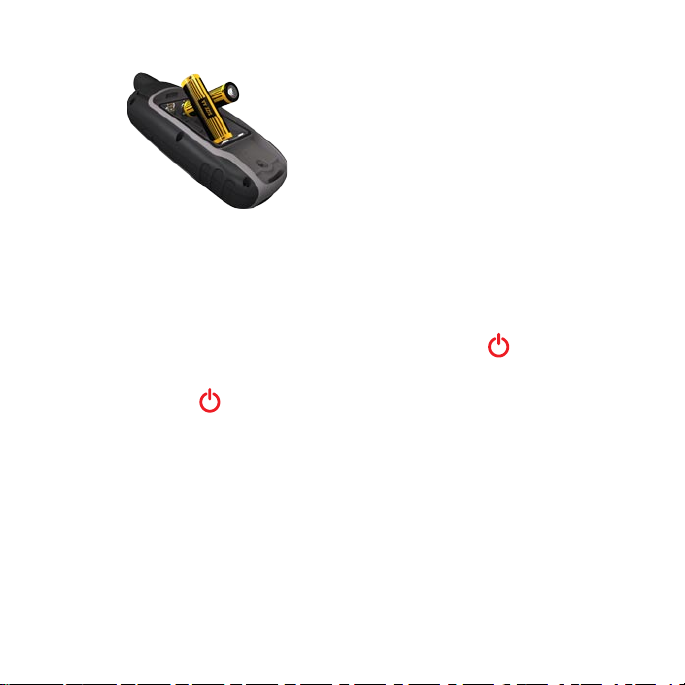
Installing the Batteries
1. Remove the battery cover by
turning the D-ring 1/4 turn counterclockwise and pulling up.
2. Insert the batteries, observing
polarity.
Page 3
Acquiring Satellite
Signals
It may take 30 to 60 seconds to acquire
signals.
1. Go outdoors to an open area.
3. Replace the battery cover.
For best results, after you install new
batteries, update the battery type in the
system settings (page 10).
Turning the Device On or
Off
Press and hold .
Setting Your Language
1. Turn on the unit.
2. Use the Rocker to select a
language.
GPSMAP 62 Series Quick Start Manual 3
2. If necessary, turn on the device.
3. Wait while the device searches for
satellites.
A question mark ashes while the
device determines your location.
4. Quickly press to open the
backlight status page.
The GPS bars indicate satellite
strength. When the bars are green,
the device has acquired satellite
signals.
Page 4
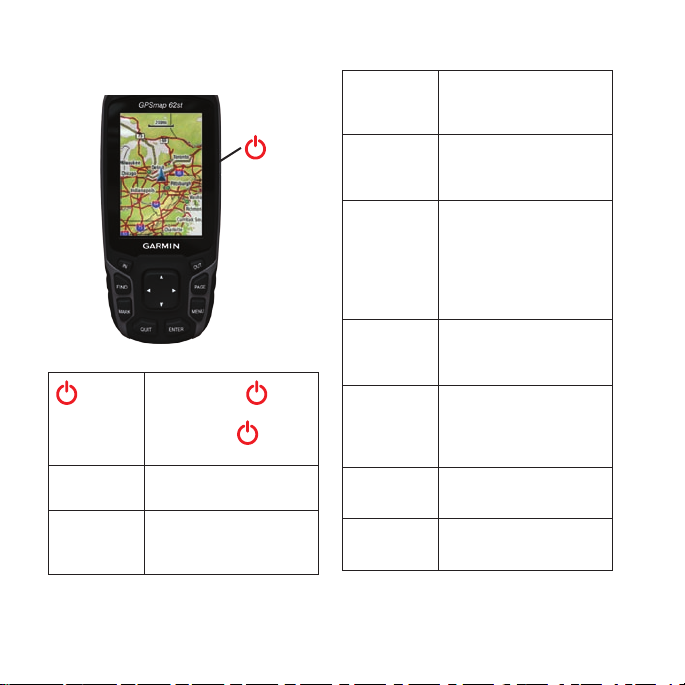
Buttons
Press and hold to turn
the device on and off.
Quickly press to open
the backlight status page.
FIND
MARK
4 GPSMAP 62 Series Quick Start Manual
Press FIND to open the
search menu
Press MARK to save
your current location as a
waypoint.
QUIT Press QUIT to cancel
ENTER
MENU
PAGE
Rocker
IN Press IN to zoom in on
OUT Press OUT to zoom out
or return to the previous
menu or page.
Press ENTER to select
options and acknowledge
messages.
Press MENU to open the
options menu for the page
that is currently open.
Press MENU twice to
open the main menu
(from any page).
Press PAGE to scroll
through the main pages
(page 5).
Press up, down, right, and
left to select menu options
and to move the map
cursor.
the map.
on the map.
Page 5

Waypoints
Waypoints are locations you record and
store in the device.
3. Press
4. Select Delete > Yes.
MENU.
Main Pages
Creating Waypoints
1. From any page, press MARK.
2. Select Done.
Editing a Waypoint
Before you can edit a waypoint, you
must create a waypoint.
1. From the main menu, select
Waypoint Manager.
2. Select a waypoint.
3. Select an attribute (such as the
name or location).
4. Enter the new information.
5. Select Done.
Deleting a Waypoint
1. From the main menu, select
Waypoint Manager.
2. Select a waypoint.
GPSMAP 62 Series Quick Start Manual 5
The information needed to operate this
device is found on the following pages:
map, compass, main menu, and trip
computer.
Map
The position icon represents your
location on the map. As you travel,
the position icon moves and leaves a
track log (trail). Waypoint names and
symbols also appear on the map.
Changing the Map Orientation
1. From the map, press MENU.
2. Select Setup Map > Orientation.
3. Select an orientation:
Select North Up to show north
•
at the top of the page.
Page 6

Select Track Up to show your
•
current direction of travel at the
top of the page.
Select Automotive Mode to
•
show a perspective view.
Measuring Distance
You can move the cursor around the
map to measure distance from the
current location.
1. From the map, press MENU.
2. Select Measure Distance.
The device automatically begins
measuring from your current
location.
3. Move the cursor to a point you
want to measure to.
The distance appears at the bottom
of the page.
4. Press QUIT to stop measuring.
6 GPSMAP 62 Series Quick Start Manual
Compass
When navigating to a destination,
the bearing pointer points to your
destination, regardless of the direction
you are moving. When the bearing
pointer points toward the top of the
electronic compass, you are traveling
directly toward your destination. If
it points any other direction, turn
toward that direction until the arrow is
pointing toward the top of the compass.
Calibrating the Compass
notice
Calibrate the electronic compass
outdoors. Do not stand near objects that
inuence magnetic elds, such as cars,
buildings, or overhead power lines.
NOTE: The three-axis compass is
available only with the GPSMAP 62s
and GPSMAP 62st.
You should calibrate the compass after
moving long distances, experiencing
Page 7

temperature changes, or changing the
batteries.
1. From the compass, press MENU.
2. Select Calibrate Compass > Start.
3. Follow the on-screen instructions.
Calibrating the Barometric
Altimeter
NOTE: The elevation plot page is
available only with the GPSMAP 62s
and GPSMAP 62st.
You can manually calibrate the
barometric altimeter if you know
the correct elevation or the correct
pressure.
1. From the elevation plot, press
MENU.
2. Select Calibrate Altimeter.
3. Follow the on-screen instructions.
GPSMAP 62 Series Quick Start Manual 7
Trip Computer
The trip computer displays your current
speed, average speed, maximum
speed, trip odometer, and other helpful
statistics.
Customizing Data Fields
You can customize the data elds
displayed on each main page.
For data eld descriptions, see the
GPSMAP 62 Series Owner’s Manual.
1. From a main page, press MENU.
2. Select Change Data Fields.
3. Select a data eld.
4. Press ENTER.
About Tracks
Your Garmin device records a track log
while you are moving. You can save
these tracks and navigate using them
later.
Page 8

Navigating to a Waypoint
Using the Search Menu
You can use the search menu to quickly
nd waypoints, tracks, routes, and
coordinates that you have saved.
1. From any page, press FIND.
2. Select Waypoints.
3. Select a waypoint.
4. Select Go.
Change Your Guidance
Method
You can select a guidance method that
is for off-road use, that follows the
roads, or that prompts you each time
you begin navigating.
1. From the main menu, select Setup
> Routing > Guidance Method.
2. Select an option.
8 GPSMAP 62 Series Quick Start Manual
Creating a Route
1. From the main menu, select Route
Planner > Create Route > Select
First Point.
2. Select a category.
3. Select the rst point in the route.
4. Select Use.
5. Select Select Next Point.
6. Repeat steps 2–5 until the route is
complete.
A route must contain at least two
points.
7. Press QUIT to save the route.
Navigating a Route
1. Press FIND.
2. Select Routes.
3. Select a route.
4. Select Go.
Page 9

Using Sight ‘N Go
NOTE: Sight ‘N Go is available only
with the GPSMAP 62s and GPSMAP
62st.
You can point the device at an object
in the distance, such as a bridge, lock
in the direction, and then navigate to
the object.
1. From the main menu, select Sight
‘N Go.
2. Point the device at an object.
3. Select Lock Direction > Set
Course.
4. Use the compass to navigate to the
object.
2. Route the strap through the loop,
and pull it tight.
Attaching the Carabiner
Clip
Attaching the Wrist Strap
1. Place the loop of the wrist strap
through the slot opening at the
bottom of the device.
GPSMAP 62 Series Quick Start Manual 9
1. Position the carabiner clip in the
slots on the mounting spine.
2. Slide the clip up until it locks in
place.
Page 10

Removing the Carabiner Clip
Lift the bottom of the clip, and
gently push down on the carabiner
clip until it releases.
Adjusting the Backlight
Timeout
1. From the main menu, select Setup
> Display > Backlight Timeout.
2. Select a time.
Maximizing Battery Life
Using the Battery Save Option
Use the battery save option to save
battery power and prolong battery life.
From the main menu, select Setup
> Display > Battery Save > On.
Decreasing the Backlight
Extensive use of screen backlighting
can signicantly reduce battery life.
You can adjust the backlight brightness
and decrease the backlight timeout to
maximize battery power.
1. Quickly press to open the
backlight status page.
2. Use the Rocker to adjust the
brightness.
10 GPSMAP 62 Series Quick Start Manual
Selecting the Battery Type
1. From the main menu, select Setup
> System > Battery Type.
2. Select Alkaline, Lithium, or
Rechargeable NiMH.
Long-Term Storage
When you do not plan to use the
device for several months, remove the
batteries. Stored data is not lost when
batteries are removed.
Page 11

Registering Your Device
Help us better support you by
completing our online registration
today.
Go to http://my.garmin.com.
•
Keep the original sales receipt, or a
•
photocopy, in a safe place.
Resetting the Device
If your device screen or buttons stop
responding, you can reset the device.
1. Remove the batteries.
2. Reinstall the batteries (page 2).
NOTE: This does not erase any of your
data or settings.
Updating the Software
1. Go to www.garmin.com
/webupdater.
2. Follow the on-screen instructions.
GPSMAP 62 Series Quick Start Manual 11
NOTE: This does not erase any of your
data or settings.
Contacting Garmin
Product Support
You can contact Garmin Product
Support if you have any questions
about this product.
In the USA, go to www.garmin
•
.com/support, or contact Garmin
USA by phone at (913) 397.8200 or
(800) 800.1020.
In the UK, contact Garmin (Europe)
•
Ltd. by phone at 0808 2380000.
In Europe, go to www.garmin.com
•
/support and click Contact
Support for in-country support
information, or contact Garmin
(Europe) Ltd. by phone at +44 (0)
870.8501241.
Page 12

Garmin®, the Garmin logo, and GPSMAP® are trademarks of Garmin Ltd. or its subsidiaries, registered in the
USA and other countries. These trademarks may not be used without the express permission of Garmin.
Other trademarks and trade names are those of their respective owners. For the latest free software updates
(excluding map data) throughout the life of your Garmin products, visit the Garmin Web site at
www.garmin.com.
© 2010 Garmin Ltd. or its subsidiaries
1200 East 151st Street, Olathe, Kansas 66062, USA
Garmin International, Inc.
Garmin (Europe) Ltd.
Liberty House, Hounsdown Business Park, Southampton, Hampshire, SO40 9LR UK
Garmin Corporation
No. 68, Jangshu 2nd Road, Sijhih, Taipei County, Taiwan
April 2010 Part Number 190-01215-01 Rev. A Printed in Taiwan
 Loading...