

Page 1

EZ Greaser
Installation Instructions
The EZ Greaser® lubrication system is designed to lubricate 8, 14,
or 16 points from a single fitting—all at the same time from one
convenient location. The EZ Greaser ensures that you are getting
the proper amount of lubricant to each fitting – every time. Each
kit comes complete with the items necessary for installation so
you can get back on the road quickly and stay on the road.
IMPORTANT: Pre-grease all lube points before installing the
system. Make sure that each lube point will accept grease from a
grease gun with minimum effort. This system can deliver grease
at pressures up to 1500 psi. If a fitting requires extreme effort to
inject grease, it must be fixed before attaching the EZ Greaser to
that point.
NOTE: Do not plug any outlets on the EZ Greaser block. The
block will not operate correctly.
INSTALLATION
Verify the number of lubrication points and locations and 1.
inspect to ensure lube points will accommodate use of the
included threaded fittings. Optional press-in fittings are
available from your EZ Greaser Distributor. See vehicle layout
on page 3.
Install mounting plate either by welding or bolting to a spot 2.
that allows easy access to the grease fitting on the top of
the block and within ten (10) feet of the furthest lube point.
Mount block to the mounting plate
Using the included diagrams, route the tubing lines to 5.
the appropriate points following the color scheme on the
diagrams. Bundle tubes together when routing tubes from
the block to the lube points. Use wire ties every 6-8 inches
and anchor to the frame and steering components making
sure the tubes move with these objects. This will assure that
the tubes stay in place under normal operating conditions.
IMPORTANT: Allow ample slack for tube movement and ease
of installation. A self-aligned captured ferrule is supplied
with all 3/16" fittings. It is not necessary to remove the nut
and ferrule to seat the tube into the fitting. Care should be
taken to make sure the tube is well seated into each fitting
before tightening.
Attach the Orange tube from the Tri-tube bundle to the Upper 6.
King Pin grease fitting. Attach the Blue tube to the Lower
King Pin grease fitting. Attach Black tube to Tie Rod grease
fitting. This fitting should be pointing towards the rear of the
vehicle and on a 45° angle toward the inside centerline of the
vehicle. Repeat for other side of the vehicle. Do not attach
grease tubes to hydraulic brake lines.
Attach single Black tubes to front and rear Drag Link grease 7.
fittings. Allow for movement of the arm. Be sure to secure
the line to the steering arm so that line moves when steering
the vehicle but does not rub or slide against frame, shock
absorber or steering components. Tubes and steering
components should move as one (1) unit.
Remove all the existing grease fittings from the points to 3.
be attached to the EZ Greaser and replace with fittings
according to the diagrams for the specific kit.
Prepare tubing:4.
Cut the outside sheath on multi-tube bundles back to a.
the point where this bundle meets the first lube point.
Be careful not to puncture or cut the tubes. Use a
“Romex” stripper to help prevent this damage.
Peel back the outside sheath rolling it back on itself b.
and cut off the excess. Be careful not to nick or cut the
remaining tubes.
Align tubing with fitting and make a clean square cut c.
with an anvil style cutter.
Attach other tubes to spring pins and spring hangers as 8.
required.
OPERATING INSTRUCTIONS
Remove the dust cover protective cap from the grease fitting
on the divider module. Ensure the fitting is free from dirt and
contamination and connect a grease gun or low volume power
grease gun to the grease fitting. Pump a manual gun one time
for each lube point in the system: 8 strokes for 8-point system,
14 strokes for the 14-point system, and 16 strokes for a 16-point
system. Wipe off the end of the fitting and put the protective cap
back onto the fitting. Repeat every 2-3 weeks or more often when
operating the vehicle in wet or high dust environments to flush out
contaminants with fresh grease.
Page 2
EZ Greaser Installation Instructions L44000
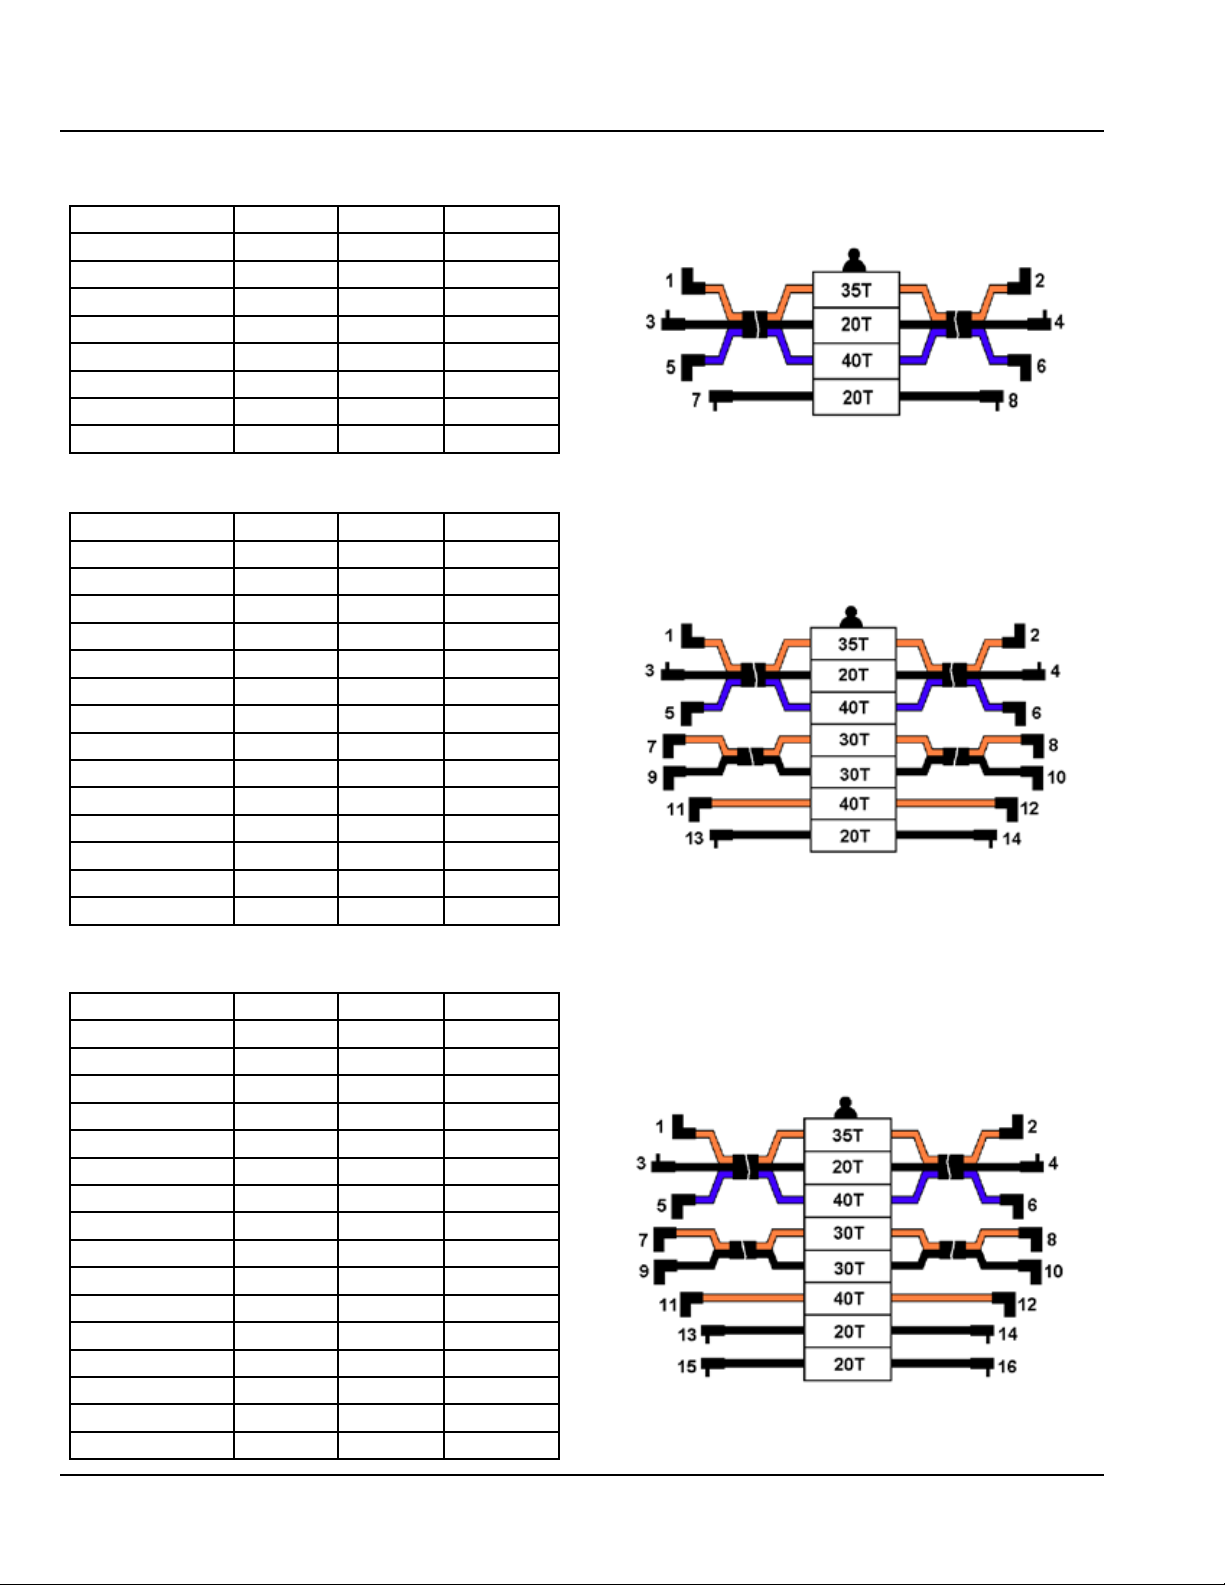
Kit Number 563853 (Old: 550-503-634) 8-Point Manual System
Lube Points Block Size Tube Color Fitting
1 King Pin Upper 35T Orange 1/8 Elbow
2 King Pin Upper 35T Orange 1/8 Elbow
3 Tie Rod 20T Black 1/4 SAE Elbow
4 Tie Rod 20T Black 1/4 SAE Elbow
5 King Pin Lower 40T Blue 1/8 Elbow
6 King Pin Lower 40T Blue 1/8 Elbow
7 Drag Link of Pitman 20T Black 1/4 SAE Elbow
8 Drag Link of Idler 20T Black 1/4 SAE Elbow
Kit Number 563855 (Old: 550-503-636) 14-Point Manual System
Lube Points Block Size Tube Color Fitting
1 King Pin Upper 35T Orange 1/8 Elbow
2 King Pin Upper 35T Orange 1/8 Elbow
3 Tie Rod 20T Black 1/4 SAE Elbow
4 Tie Rod 20T Black 1/4 SAE Elbow
5 King Pin Lower 40T Blue 1/8 Elbow
6 King Pin Lower 40T Blue 1/8 Elbow
7 Spring Hanger 30T Black 1/8 Elbow
8 Spring Hanger 30T Orange 1/8 Elbow
9 Spring Hanger 30T Orange 1/8 Elbow
10 Spring Hanger 30T Black 1/8 Elbow
11 Spring Pin 40T Orange 1/8 Elbow
12 Spring Pin 40T Orange 1/8 Elbow
13 Drag Link 20T Black 1/4 SAE Elbow
14 Drag Link 20T Black 1/4 SAE Elbow
Kit Number 563864 (Old: 550-503-646) 16-Point Manual System
Lube Points Block Size Tube Color Fitting
1 King Pin Upper 35T Orange 1/8 Elbow
2 King Pin Upper 35T Orange 1/8 Elbow
3 Tie Rod 20T Black 1/4 SAE Elbow
4 Tie Rod 20T Black 1/4 SAE Elbow
5 King Pin Lower 40T Blue 1/8 Elbow
6 King Pin Lower 40T Blue 1/8 Elbow
7 Spring Hanger 30T Black 1/8 Elbow
8 Spring Hanger 30T Orange 1/8 Elbow
9 Spring Hanger 30T Orange 1/8 Elbow
10 Spring Hanger 30T Black 1/8 Elbow
11 Spring Pin 40T Orange 1/8 Elbow
12 Spring Pin 40T Orange 1/8 Elbow
13 Drag Link 20T Black 1/4 SAE Elbow
14 Drag Link 20T Black 1/4 SAE Elbow
15 Drag Link 20T Black 1/4 SAE Elbow
16 Drag Link 20T Black 1/4 SAE Elbow
Page 2
Page 3

Typical vehicle layout for 16 point front-end grease fitting locations:
Upper Kingpin
Tie Tubing to
Tie Rod (Black)
Lower King
Pin (Blue)
(Red)
Clamp bolt
Pin (Blue)
Tie Rod (Black)
Drag link
Upper Kingpin (Red)
Follow Air hose from
frame to brake can
(Twin No Ta g)
Lower King
L44000EZ Greaser Installation Instructions
Page 3
Curbside Kingpin
Roadside Kingpin
Drag Link
Page 4

HARDWARE KIT CONTENTS ORDERING INFORMATION
Description No. of Pieces Kit Part No. Kit Old Part No. Part No. Old Part No.
Elbow 3/16 TX x 1/8 P 4
Connector 3/16 T x 1/8 PM 6 556644 435-460-030
Elbow ST 1/8 Pipe 2 15K783 509-110-000
Elbow ST 1/4-28 SAE 1/8 FP 4 15K740 550-400-800
MSP MTG Bracket 1 557967 550-402-770
Tie Straps – 100 per pack 1 563770 550-402-340
563853 550-503-634
556638 435-440-030
Elbow 3/16 TX x 1/8 P 10
Connector 3/16 T x 1/8 PM 4 556644 435-460-030
Elbow ST 1/8 Pipe 2 15K783 509-110-000
Elbow ST 1/4-28 SAE 1/8 FP 4 15K740 550-400-800
MSP MTG Bracket 1 557967 550-402-770
Tie Straps – 100 per pack 1 563770 550-402-340
Elbow 3/16 TX x 1/8 P 10
Connector 3/16 T x 1/8 PM 6 556644 435-460-030
Elbow ST 1/8 Pipe 2 15K783 509-110-000
Elbow ST 1/4-28 SAE 1/8 FP 6 15K740 550-400-800
MSP MTG Bracket 1 557967 550-402-770
Tie Straps – 100 per pack 1 563770 550-402-340
SPARE PARTS
Description Part No. Old Part No.
Elbow, Street,
1/4-28 SAE x
1/8 FP
15K740 550-400-800
563855 550-503-636
563864 550-503-646
556638 435-440-030
556638 435-440-030
Male 90º Elbow
Connector, 3/16
in, 1/8 NPT
556638 435-440-030
Male Connector,
3/16 in Tube,
1/8 in NPT
Elbow, Street,
18 in NPT to 1/8
in NPT
Distribution Lines, 3/16 in OD Tubing Bundles Prefilled
3 Tube Bundle,
15 ft
2 Tube Bundle,
15 ft
1 Tube Orange,
20 ft
1 Tube Black,
15 ft
All written and visual data contained in this document are based on the latest product information available at the time of publication. Graco reserves the right to make changes at any time without notice.
556644 435-460-030
15K783 509-110-000
563794 550-450-950
563792 550-450-930
563993 550-450-820
564087 550-450-220
OPTIONAL CONNECTORS FOR NON-REMOVABLE
GREASE FITTINGS
Nylon Tie Straps
(11.5 in), 100
pcs
Zerk Adaptors,
3/16 in Tube
Conn. Straight
Zerk Adaptors,
3/16 in Tube
Conn. Elbow
Contact us today!
To receive product information or talk with a Graco representative,
call 800-533-9655 or visit us online at www.graco.com.
563770 550-402-340
550-402-870
550-402-860
©2006-2009 Graco Inc. Form No. L44000 Rev. B 3/09 Printed in U.S.A. All other brand names or marks are used for identification purposes and are trademarks of their respective owners. All written and
visual data contained in this document are based on the latest product information available at the time of publication. Graco reserves the right to make changes at any time without notice.
 Loading...