

Graco EcoQuip 300, EQ300C, EcoQuip 600, EQ60XC, EQ600C Operation, Repair, And Parts
...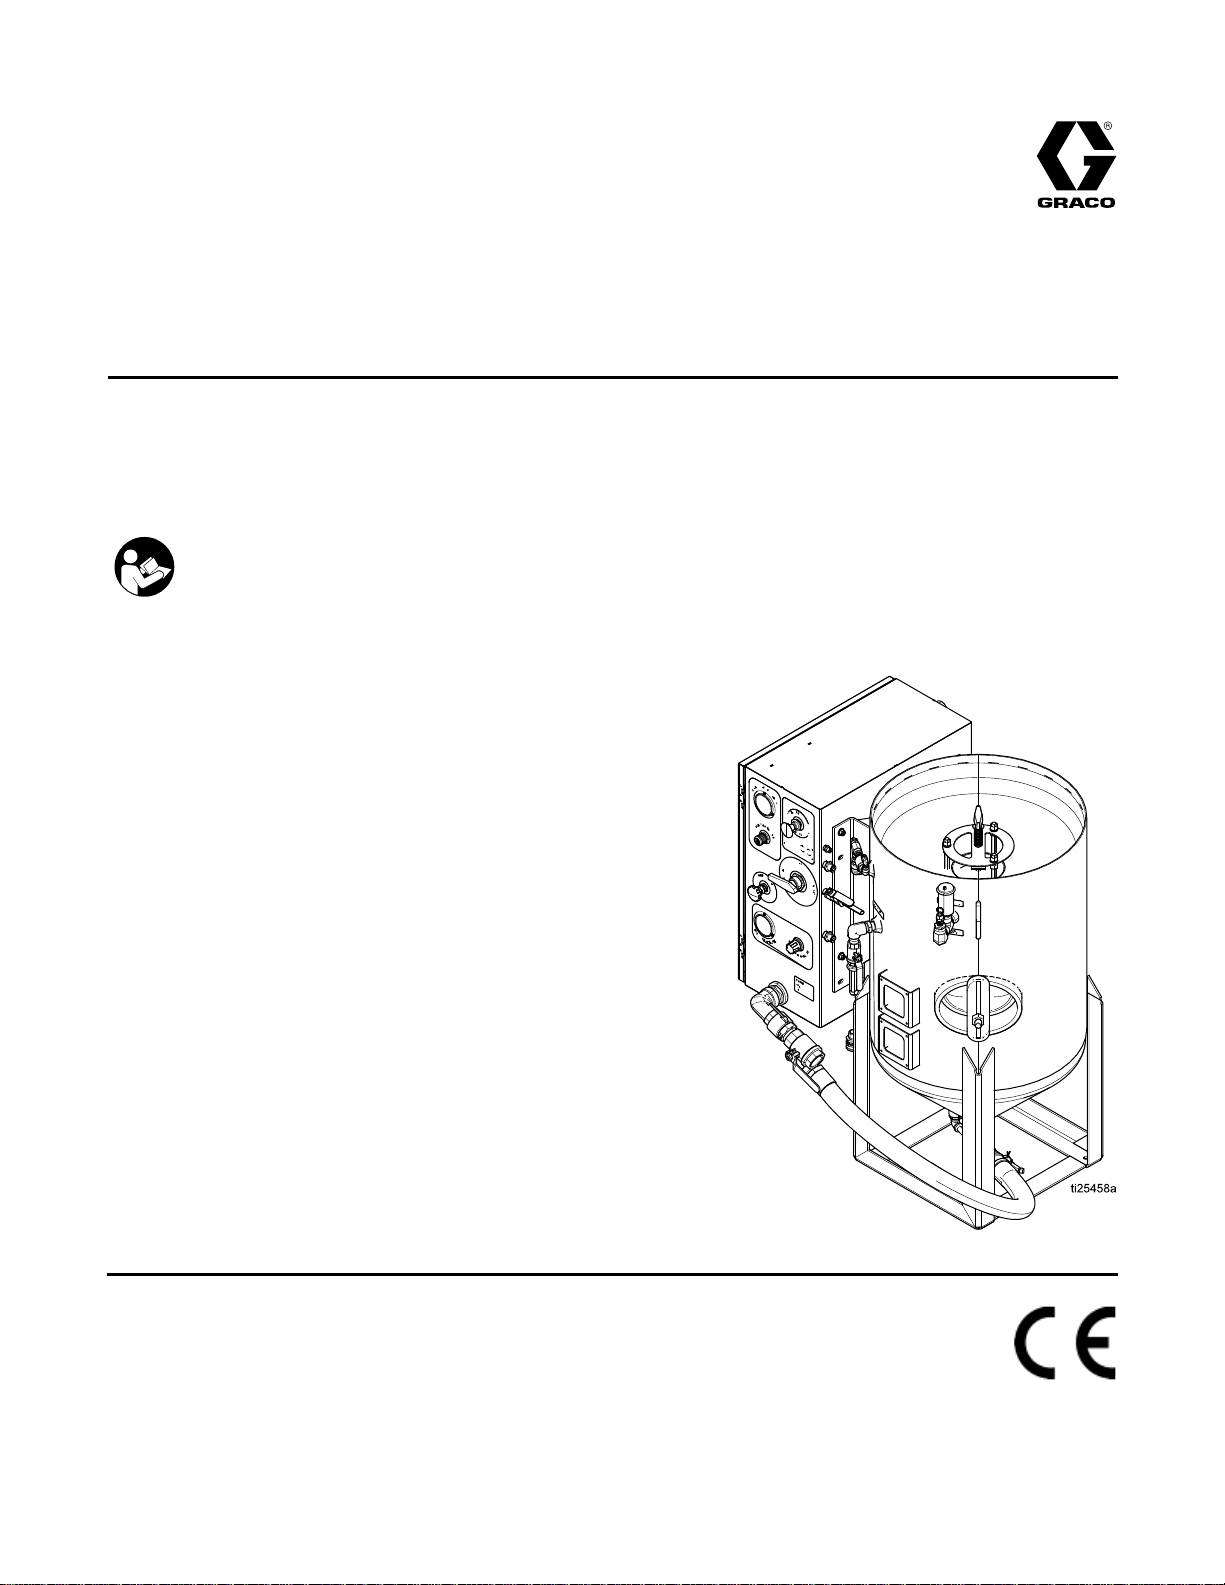
Operation,Repair,andParts
EcoQuip
EcoQuip EcoQuip
Blast
Blast Blast
Vapor
Vapor Vapor
or
or or
125
125 125
Working
Working Working
See
See See
abrasive
abrasive abrasive
hazardous
hazardous hazardous
Important
Important Important
Readallwarningsandinstructionsinthismanual.Savethese
instructions.
psi
psi psi
page
page page
System
System System
blast
blast blast
locations.
locations. locations.
Safety
Safety Safety
(8.6
bar,
(8.6 (8.6
bar, bar,
Pressure
Pressure Pressure
for
Model
2 22for for
Model Model
Vapor
Vapor Vapor
Abrasive
Abrasive Abrasive
334667G
EN
system.
system. system.
Instructions
Instructions Instructions
0.86
0.86 0.86
For
professional
For For
professional professional
MPa)
MPa) MPa)
Maximum
Maximum Maximum
information.
information. information.
use
only.
Not
use use
only. only.
approved
Not Not
approved approved
for
use
for for
use use
explosive
in ininexplosive explosive
atmospheres
atmospheres atmospheres
PROVENQUALITY.LEADINGTECHNOLOGY.

Contents
Contents Contents
Models...............................................................3
RelatedManuals................................................3
Warnings...........................................................4
OEMSystemGuidelines.....................................7
SystemComponentIdentication.........................8
EQ300CandEQ600C..................................8
DataTrakControls........................................9
PressureReliefProcedure..................................10
Grounding(ATEXSystemsonly).........................10
Operation...........................................................11
ChecklistBeforeStarting..............................11
LiftingtheSystem........................................11
ConnectingtheBlastHoseandAir
Hose..............................................12
SettingUptheEquipment.............................14
BlastingTips................................................18
UsingtheWashFeature...............................20
RellingthePotwithAbrasive.......................21
ShuttingDown.............................................22
WinterizingtheEquipment............................24
Troubleshooting..................................................25
TroubleshootingExamples...........................28
Repair................................................................30
RepairingtheMainAirRegulator..................30
FlushingtheDiaphragmValve......................31
RepairingtheDiaphragmValve.....................32
CleaningtheAuto-VentValve.......................33
ReplacingtheDataTrakBattery....................34
ReplacingtheDataTrakFuse.......................35
Parts..................................................................36
EQ300CandEQ600C..................................36
Enclosure....................................................38
PressurePot................................................40
BlastHoses.................................................41
HoseSchematic.................................................42
VaporAbrasiveBlastSystemsand
Accessories..........................................43
EcoQuipSystemCongurator.......................43
ModelSeries...............................................44
BlastHoseswithControl
Hoses/Cables.................................45
BlastHoseswithoutControl
Hose/Cables..................................45
BlastControlHoses/Cables..........................46
Nozzles.......................................................46
OtherAccessories........................................46
CommonSpareParts...................................47
Dimensions........................................................48
TechnicalSpecications......................................49
GracoExtendedWarrantyforEcoQuip™
Components.........................................50
2
334667G

Models
Models
Models Models
Model
Model Model
EQ300CEcoQuip300VaporBlastSystem
EQ600CEcoQuip600VaporBlastSystem
EQ30XCEcoQuip300VaporBlastSystemATEXApproved
EQ60XCEcoQuip600VaporBlastSystemATEXApproved
Related
Related Related
Manuals
Manuals Manuals
Manual
Manual Manual
313840DataTrak
333397Pump
334143
334142
334666
Description
Description Description
Number
Number Number
Approvals
Approvals Approvals
2G
Ex
II IIII2G 2G
Ex Ex
2G
Ex
II IIII2G 2G
Ex Ex
Product
Product Product
EQ300M,EQ600M
EQ100M
EQ200T,EQ400T
IIA
T3
Gb
h hhai aiaiIIA IIA
h hhai aiaiIIA IIA
T3 T3
IIA
T3
T3 T3
X
Gb Gb
X X
Gb
X
Gb Gb
X X
334667G 3
Warnings
Warnings
Warnings Warnings
Thefollowingwarningsareforthesetup,use,grounding,maintenance,andrepairofthisequipment.The
exclamationpointsymbolalertsyoutoageneralwarningandthehazardsymbolsrefertoprocedure-specic
risks.Whenthesesymbolsappearinthebodyofthismanualoronwarninglabels,referbacktothese
Warnings.Product-specichazardsymbolsandwarningsnotcoveredinthissectionmayappearthroughout
thebodyofthismanualwhereapplicable.
WARNING
WARNING WARNING
SPECIAL
SPECIAL SPECIAL
CONDITIONS
CONDITIONS CONDITIONS
FOR
USE
FOR FOR
USE USE
•Groundallequipmentintheworkarea.SeeGrounding Grounding
•Alllabelandmarkingmaterialmustbecleanedwithadampcloth(orequivalent).
DUST
DUST DUST
Useofthisequipmentcanresultinthereleaseofpotentiallyharmfuldustortoxicsubstances
fromtheabrasivebeingused,thecoatingsbeingremoved,andthebaseobjectbeingblasted.
•Foruseonlybysophisticatedusersfamiliarwithapplicablegovernmentalsafetyandindustrial
•Useequipmentonlyinawell-ventilatedarea.
•Wearaproperlyt-testedandgovernmentapprovedrespiratorsuitableforthedustconditions.
•Followlocalordinancesand/orregulationsfordisposaloftoxicsubstancesanddebris.
AND
DEBRIS
AND AND
DEBRIS DEBRIS
hygieneregulators.
HAZARD
HAZARD HAZARD
Grounding
Instructions,
Instructions, Instructions,
page
page page
10
.
10 10
. .
4
334667G
Warnings
WARNING
WARNING WARNING
EQUIPMENT
EQUIPMENT EQUIPMENT
Misusecancausedeathorseriousinjury.
•Donotoperatetheunitwhenfatiguedorundertheinuenceofdrugsoralcohol.
•Donotexceedthemaximumworkingpressureortemperatureratingofthelowestrated
systemcomponent.SeeTechnical Technical
•Donotusethisequipmentwithouthoserestraintsandcouplerpinsinstalledonallairand
blasthosecouplings.
•Donotblastunstableobjects.Thehighamountofuidowfromthenozzlecanpotentially
moveheavyobjects.
•Donotexceedloadratingoflifteyes.
•Donotoperateequipmentonorstandonanunstablesupport.Keepeffectivefootingand
balanceatalltimes.
•Useuidsandsolventsthatarecompatiblewithequipmentwettedparts.SeeTechnicalData
inallequipmentmanuals.Readuidandsolventmanufacturer’swarnings.Forcomplete
informationaboutyourmaterial,requestMSDSfromdistributororretailer.
•Donotleavetheworkareawhileequipmentisenergizedorunderpressure.
•TurnoffallequipmentandfollowthePressure Pressure
notinuse.
•Checkequipmentdaily.Repairorreplacewornordamagedpartsimmediatelywithgenuine
manufacturer’sreplacementpartsonly.
•Donotalterormodifyequipment.Alterationsormodicationsmayvoidagencyapprovals
andcreatesafetyhazards.
•Makesureallequipmentisratedandapprovedfortheenvironmentinwhichyouareusingit.
•Useequipmentonlyforitsintendedpurpose.Callyourdistributorforinformation.
•Routehosesandcablesawayfromtrafcareas,sharpedges,movingparts,andhotsurfaces.
•Donotkinkoroverbendhosesorusehosestopullequipment.
•Keepchildrenandanimalsawayfromworkarea.
•Complywithallapplicablesafetyregulations.
BURN
BURN BURN
HAZARD
HAZARD HAZARD
MISUSE
MISUSE MISUSE
HAZARD
HAZARD HAZARD
Technical
Specications,
Specications, Specications,
Pressure
page
49
page page
49 49
inallequipmentmanuals.
Relief
Procedure,
Relief Relief
Procedure, Procedure,
page
10
page page
10 10
whenequipmentis
Equipmentsurfacesanduidthatisheatedcanbecomeveryhotduringoperation.Toavoid
severeburns:
•Donottouchhotuidorequipment.
FIRE
AND
FIRE FIRE
Flammablefumes,suchassolvent,inworkareacanigniteorexplode.Tohelppreventre
andexplosion:
•Useequipmentonlyinwellventilatedarea.
•Abrasivematerialexitingblastnozzlecangeneratesparks.Whenammableliquidsareused
neartheblastnozzleorforushingorcleaning,keeptheblastnozzleatleast20feet(6
meters)awayfromexplosivevapors.
•Keepworkareafreeofdebris,includingsolvent,ragsandgasoline.
•Keepaworkingreextinguisherintheworkarea.
EXPLOSION
AND AND
EXPLOSION EXPLOSION
HAZARD
HAZARD HAZARD
334667G 5
Warnings
WARNING
WARNING WARNING
PERSONAL
PERSONAL PERSONAL
Wearappropriateprotectiveequipmentwhenintheworkareatohelppreventseriousinjury,
includingeyeinjury,hearingloss,inhalationoftoxicfumes,andburns.Protectiveequipment
includesbutisnotlimitedto:
•Protectiveeyewearandhearingprotection
•Protectiveclothing,shoes,andgloves
•Properlyt-testedandgovernmentapprovedrespiratorsuitableforthedustconditions
RECOIL
RECOIL RECOIL
Blastnozzlemayrecoilwhentriggered.Ifyouarenotstandingsecurely,youcouldfalland
beseriouslyinjured.
PROTECTIVE
PROTECTIVE PROTECTIVE
HAZARD
HAZARD HAZARD
EQUIPMENT
EQUIPMENT EQUIPMENT
6 334667G

OEMSystemGuidelines
OEM
OEM OEM
SystemWeight(Dry)
SystemWeight(Wet)
WaterTankSize(mustbewater
compatible)
PumpInletFittingDixon6EM6-Bquickdisconnectinterchangeincluded
MinimumID3/4in.1.9cm
MaximumRecommendedPumpInlet
HoseLength
Maximumrecommendedrisefromwater
tankoutlettopumpinlet
AvailableGracoInlethoses(w/quickdisconnectinterchanges)
17C032
EQ1848
AvailableGracowatertankshutoffvalve
assembly(3/4"NPTmaleto6EM6-B
quickdisconnect)
Forairinlethoserecommendations,seeTechnicalSpecications,page49.
System
System System
Guidelines
Guidelines Guidelines
U.S.
U.S. U.S.
450lb204kg
1600lb726kg
100gallon(recommended)378liter(recommended)
(3/4"NPTalsoonpump)
5ft
16in.41cm
19in.length48cm
36in.length91cm
EQ5131EQ5131
Metric
Metric Metric
4.5m
SeeVaporAbrasiveBlastSystemsandAccessories,page43forGracorecommendedblasthosesand
nozzles.
Forsystemdimensionsandmountinglocations,seeDimensions,page48.
334667G
7

SystemComponentIdentication
System
System System
EQ300C
EQ300C EQ300C
Component
Component Component
and
EQ600C
and and
EQ600C EQ600C
Identication
Identication Identication
8 334667G

SystemComponentIdentication
Key:
Key: Key:
A
B
B2BlastNozzle
C
EPot
FPop-UpPin
G
HWaterTankLid
JPotDumpValve
KAutoVentValve
L
MAbrasiveBallValve
P
QEmergencyStop
RBlastAirRegulator
S
TPotPressureRegulator
Cart
BlastControlSwitch
BlastHose
WaterTank
BlastCheckValve
ControlBox
AbrasiveMeteringValve
Key:
Key: Key:
U
V
W
XRinseBallValve
Y
Z
ZA
ZB
ZCSupplyAirPressureGauge
ZD
ZEAccessoryExtensionhose
ZFAbrasiveMedia
ZG
ZH
PotPressureGauge
BlastAirPressureGauge
SelectorValve
AirSupplyConnection
BlastConnection
PneumaticControlConnection
ElectricControlConnection(non-ATEX
systemsonly)
DataTrak(seeDataTrakControls,page9)
FillPort
GroundWireandClamp(ATEXSystems
only)
DataTrak
DataTrak DataTrak
Key:
Key: Key:
RK
CRCycle/Rate
BTBatchTotalizer
GTGrandTotalizer
Controls
Controls Controls
ResetKey—Resultsinfaults.Pressand
holdforthreesecondstoclearthebatch
totalizer.
334667G 9
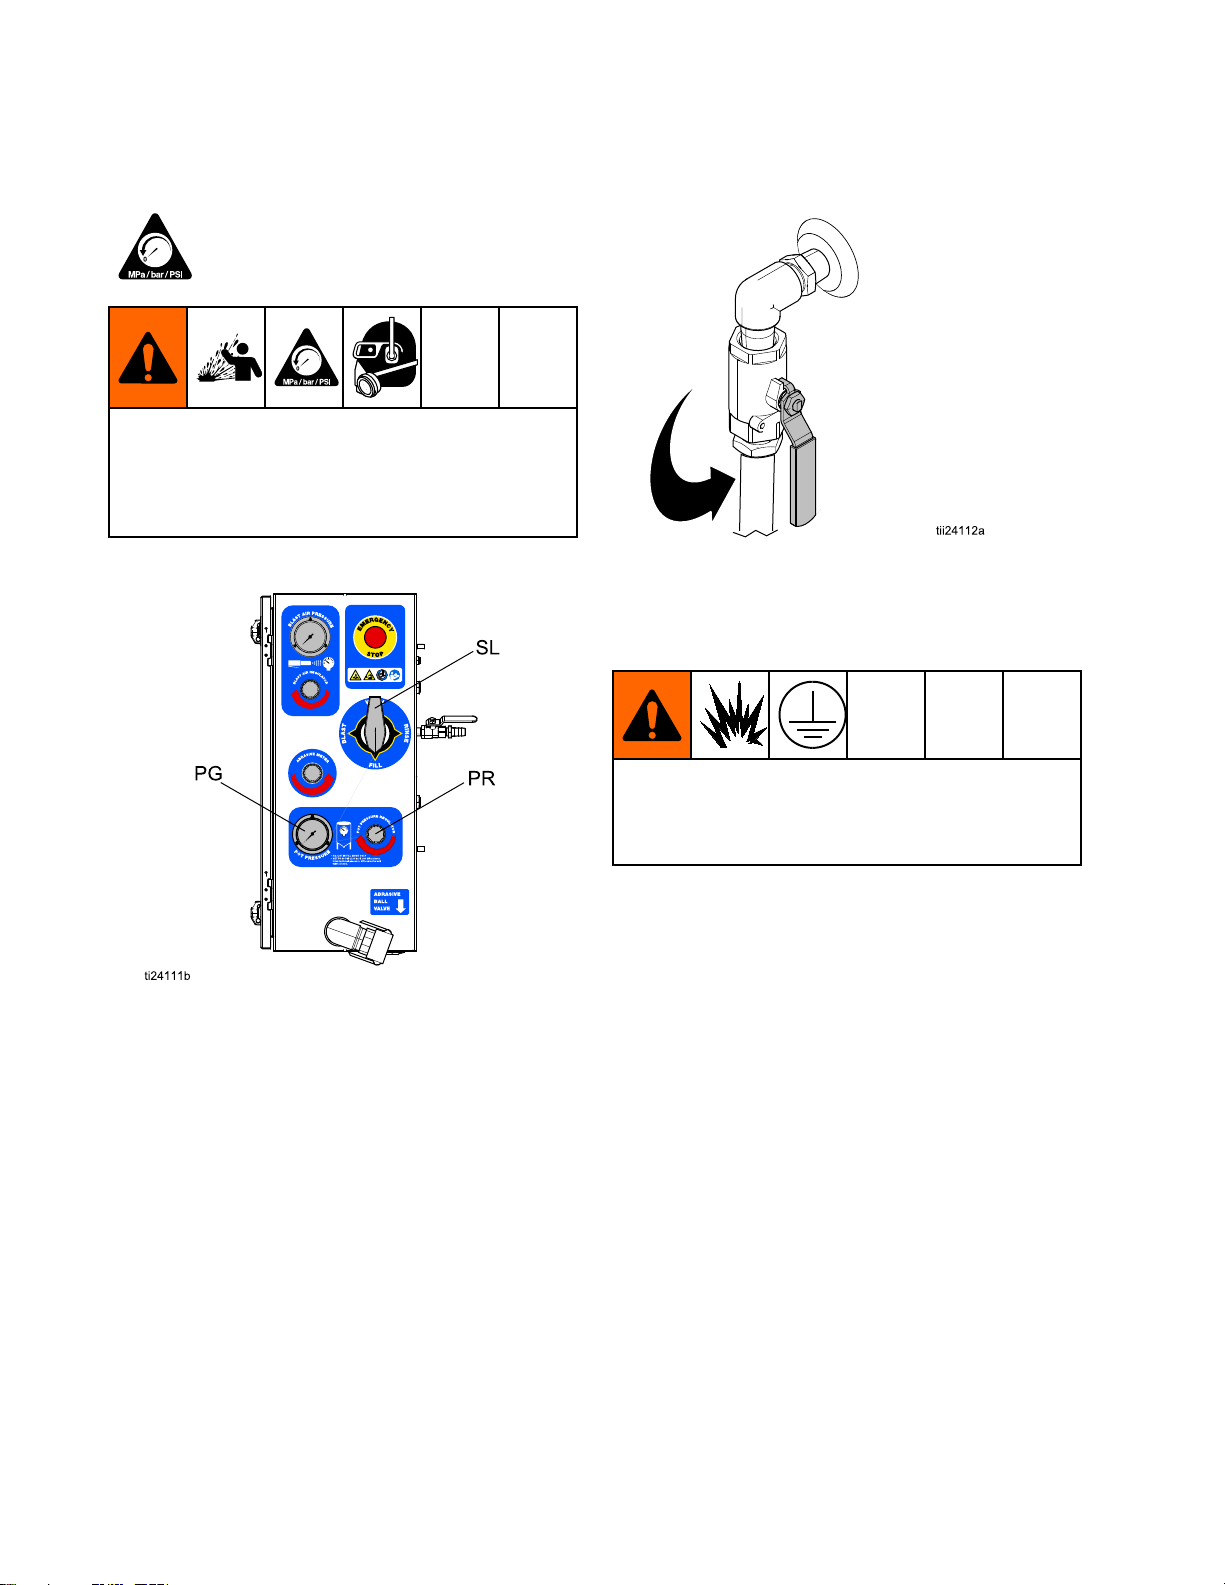
PressureReliefProcedure
Pressure
Pressure Pressure
Thisequipmentstayspressurizeduntilpressure
ismanuallyrelieved.Tohelppreventserious
injuryfrompressurizeduid,suchassplashing
uid,followthePressureReliefProcedurewhen
instructed.
1.Turnthepotpressureregulator(PR)off.
Relief
Relief Relief
FollowthePressureReliefProcedure
wheneveryouseethissymbol.
Procedure
Procedure Procedure
6.Turntheselectorvalve(SL)toFILL.
7.Openthedumpvalve.
8.Verifythatthepotpressuregauge(PG)displays
zeropressure.
Grounding
Grounding Grounding
(ATEX
(ATEX (ATEX
Systems
Systems Systems
only)
only) only)
2.Closetheabrasiveballvalve.
3.Turnthecompressoroff.Closethecompressor
supplyairvalve.
4.Engagetheblastcontrolswitchtorelieve
pressureinthesystem.
5.Verifythattheairpressuregaugereads0psi.
Thendisconnecttheairinlethosefromthe
system.
Theequipmentmustbegroundedtoreducethe
riskofstaticsparking.Staticsparkingcancause
fumestoigniteorexplode.Groundingprovidesan
escapewirefortheelectriccurrent.
Systems:
Systems: Systems:
(237686).
Air
and
Air Air
and and
rated,conductivehoseswithamaximumlength
of150ft(45m)combinedhoselengthtoensure
groundingcontinuity.Checktheelectricalresistance
ofthehoses.Ifthetotalresistancetogroundexceeds
29megaohms,replacethehoseimmediately.
Air
Air Air
recommendations.
Usesuppliedgroundwireandclamp
uid
hoses:
uid uid
hoses: hoses:
Compressor:
Compressor: Compressor:
UseonlygenuineGracoATEX
Followmanufacturer’s
10 334667G

Operation
Operation
Operation Operation
Topreventfreezing,thisequipmentisshippedfrom
thefactorywithbluewindshieldwasheruidinside
thesystem.Itisnotnecessarytodrainbefore
using.Disposeoftheuidinaccordancewithlocal
regulations.
Checklist
Checklist Checklist
•Checkthecompressedairsupplyaccordingtoits
operatormanual.Makesuretheairbeingsupplied
iscleanandrelativelyfreeofmoistureandoil
topreventwatercontaminationoftheaircontrol
components.
•Makesureairdeliveryvalvesareclosedbeforethe
airsupplycompressorisstarted.
•Makesureallrequiredhoserestraintsandcoupler
pinsareinworkingconditionandproperlyinstalled.
•Makesuretheequipmentissituatedonlevel
ground.Failuretokeeptheunitonlevelground
willmakeitdifcultorimpossibletopurgeallofthe
airfromthepressurevessel.
•Makesuretheequipmentisproperlysupportedon
asurfacethatcanholditstotalweight.Theweight
ofallpersonnel,thematerialbeingblasted,and
anyabrasivebeingstoredmustalsobeconsidered
(seeTechnicalSpecications,page49).
Before
Before Before
Starting
Starting Starting
•Makesurethatthepotiscleanandfreeofany
internaldebris.
•Makesuretousethecorrecttypeofblastcontrol.
Blastingwith150feet(45m)ormoreofblasthose
requirestheuseofanelectricblastcontrol.An
electricblastcontrolcanalsobeusedonhose
lengthsbelow150feet(45m).
•Makesuretheblasthoseislaidoutasstraightas
possiblebetweentheequipmentandtheworksite
(acoiledblasthosewilluncoilunderpressure).
NOTICE
NOTICE NOTICE
Sharpbendsintheblasthosecouldcausethe
abrasivetowearthroughthehoseandcause
prematurefailureofthehose.
•Makesuretherubbergasketineachhosecoupler
isinworkingcondition.
Lifting
Lifting Lifting
•Liftthesystemwithaliftapparatusrated
appropriatelyfortheweightofthesystem(see
TechnicalSpecications,page49).
•Thesystemcanbeliftedusingtheliftringonthe
potorthecarthandle.
the
System
the the
System System
•Makesurethewatertankwillremainfullysupplied
withcleanwatertoavoidanypossibilityofthe
pumprunningdryduringblasting.
334667G
11

Operation
Connecting
Connecting Connecting
Hose
Hose Hose
EQ30XS
1.EQ30XS EQ30XS
groundingcabletotheexternalgroundstud(ZH)
ontheenclosure,thenconnecttheclamptoa
trueearthground.
2.Alwayspurgetheairsupplyhose15–20seconds
beforeconnectingtheairsupplyhosefromthe
compressor(oron-sitecompressedairsource)
tothepanel.Makesurealldebrisisclearedfrom
thehose.
the
Blast
the the
Blast Blast
and
EQ60XS
and and
EQ60XS EQ60XS
Hose
Hose Hose
only:
only: only:
Connectthe
and
Air
and and
Air Air
3.Connectanappropriatelysizedair
supplyhosetotheairinlet.See
TechnicalSpecications,page49.
NOTE:
NOTE: NOTE:
restraintsandcouplerpinstothequick-coupler
andtheairline.Iftheholesonthequick-coupler
donotalign,thereissomethingwrongandthe
twocouplersarenotcompatible.DO DO
ON
ON ON
resolved.
Makesuretoproperlyinstallhose
THE
AIR
THE THE
AIR AIR
.Seekhelptogetthesituation
DO
NOT
NOT NOT
TURN
TURN TURN
12
334667G

Operation
4.Opentheairsupplyvalve(125psi,8.6Bar,0.86
MPamaximum).Ifnecessary,usearegulatorin
thesupplyairlinetomeetthesespecications.
NOTE:
NOTE: NOTE:
theappropriate appropriate
TechnicalSpecications,page49.
Makesuretheairsupplymeets
appropriate
air
air air
ow
requirements.
ow ow
requirements. requirements.
5.Connecttheblasthose,hoserestraints,control
hoses,andcouplerpins.
NOTE:
NOTE: NOTE:
checkalloftheelectricalconnectionsfromthe
paneltotheblastcontrol.
See
Ifyouareusinganelectricblastcontrol,
NOTICE
NOTICE NOTICE
Makesurenoelectricalconnectionswill
beexposedtowater.Exposuretowater
couldcauseashortcircuitanddamagethe
equipment.
334667G 13
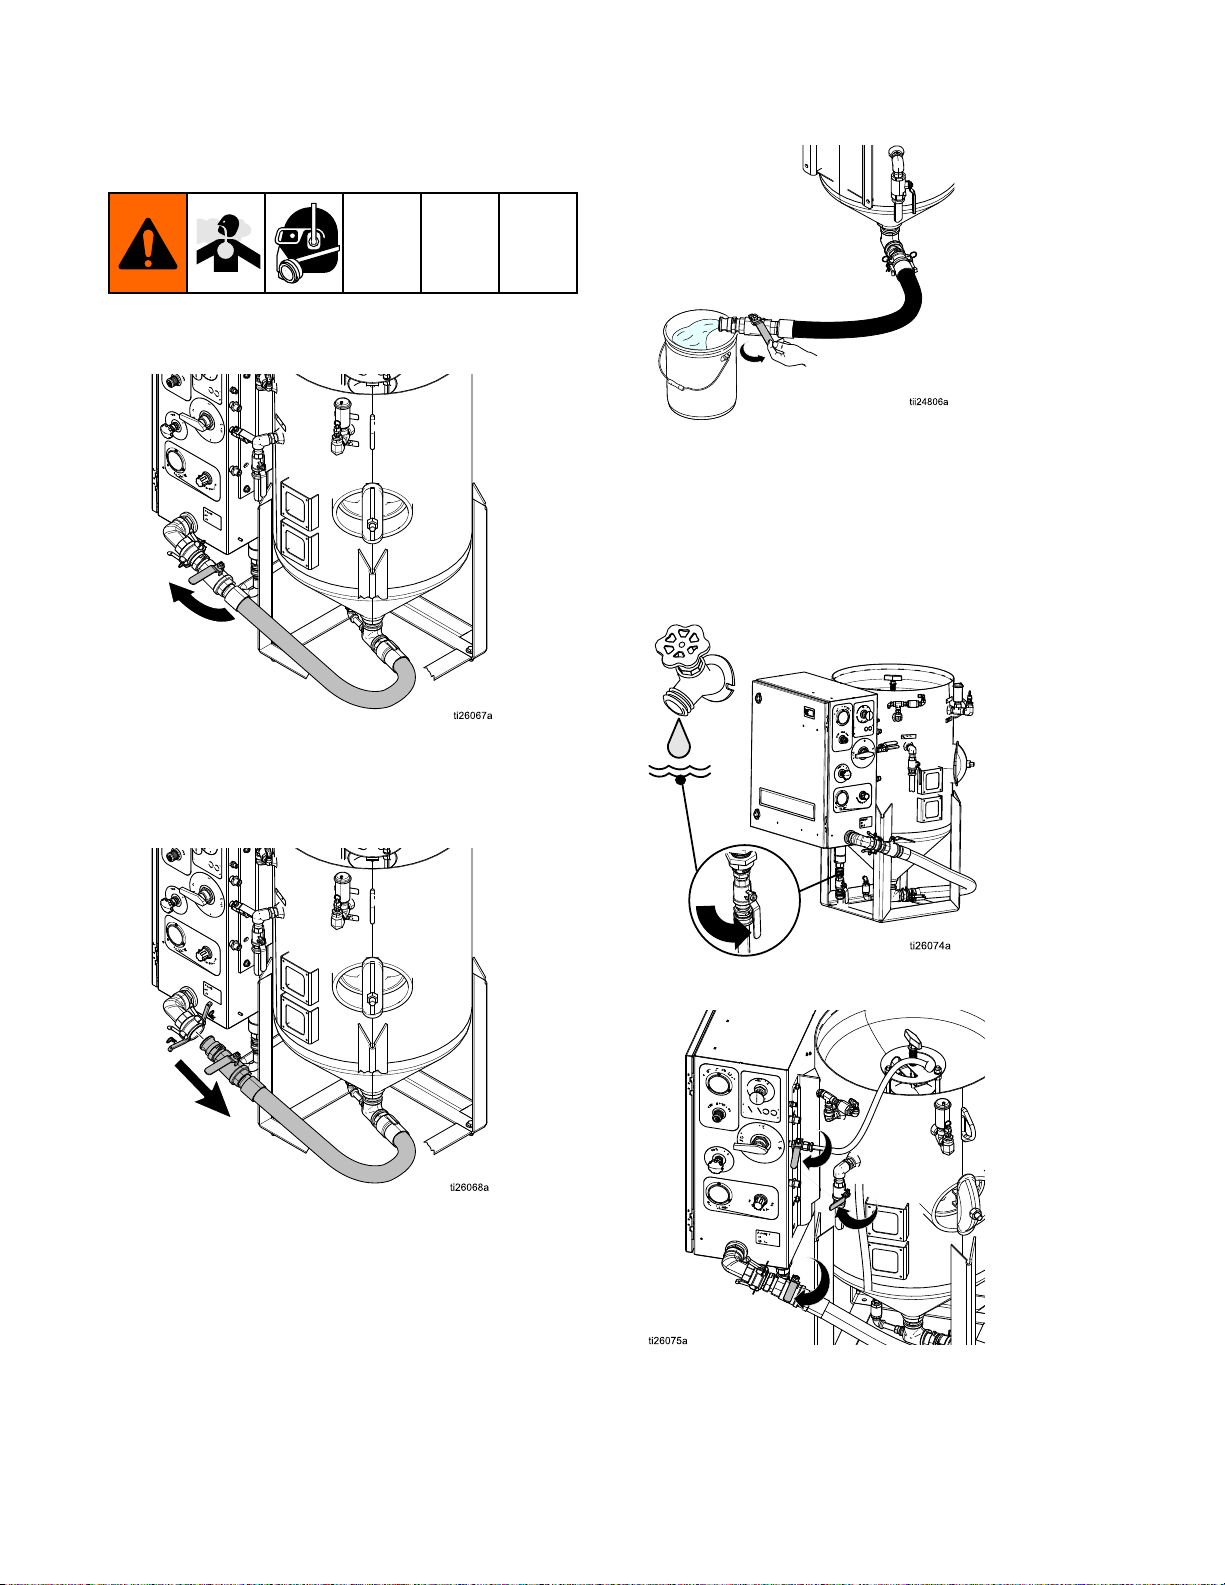
Operation
Setting
Setting Setting
1.Disconnecttheabrasivehoseatthecamand
Up
the
Up Up
groovewiththeabrasiveballvalveclosed.
Equipment
the the
Equipment Equipment
3.Reconnecttheabrasivehose.
4.Disconnectthepumpinlethoseandushthe
watertanktoremoveanyremainingdebris.
Reconnectthepumpinlethose.
5.Fillthewatertankonlywithfreshwater,then
opentheinletballvalve.
NOTE:
NOTE: NOTE:
(especiallyunderpressure),releasingthecam
andgroovewiththeballvalveopenwillcausean
unintentionalreleaseofabrasive.
2.Flushwaterthroughthepotandoutthe
disconnectedabrasiveballvalvebeforellingthe
potwithwaterandabrasive.
Ifthepotcontainswaterandabrasive
6.Closetherinse,dump,andabrasiveballvalves.
14
334667G
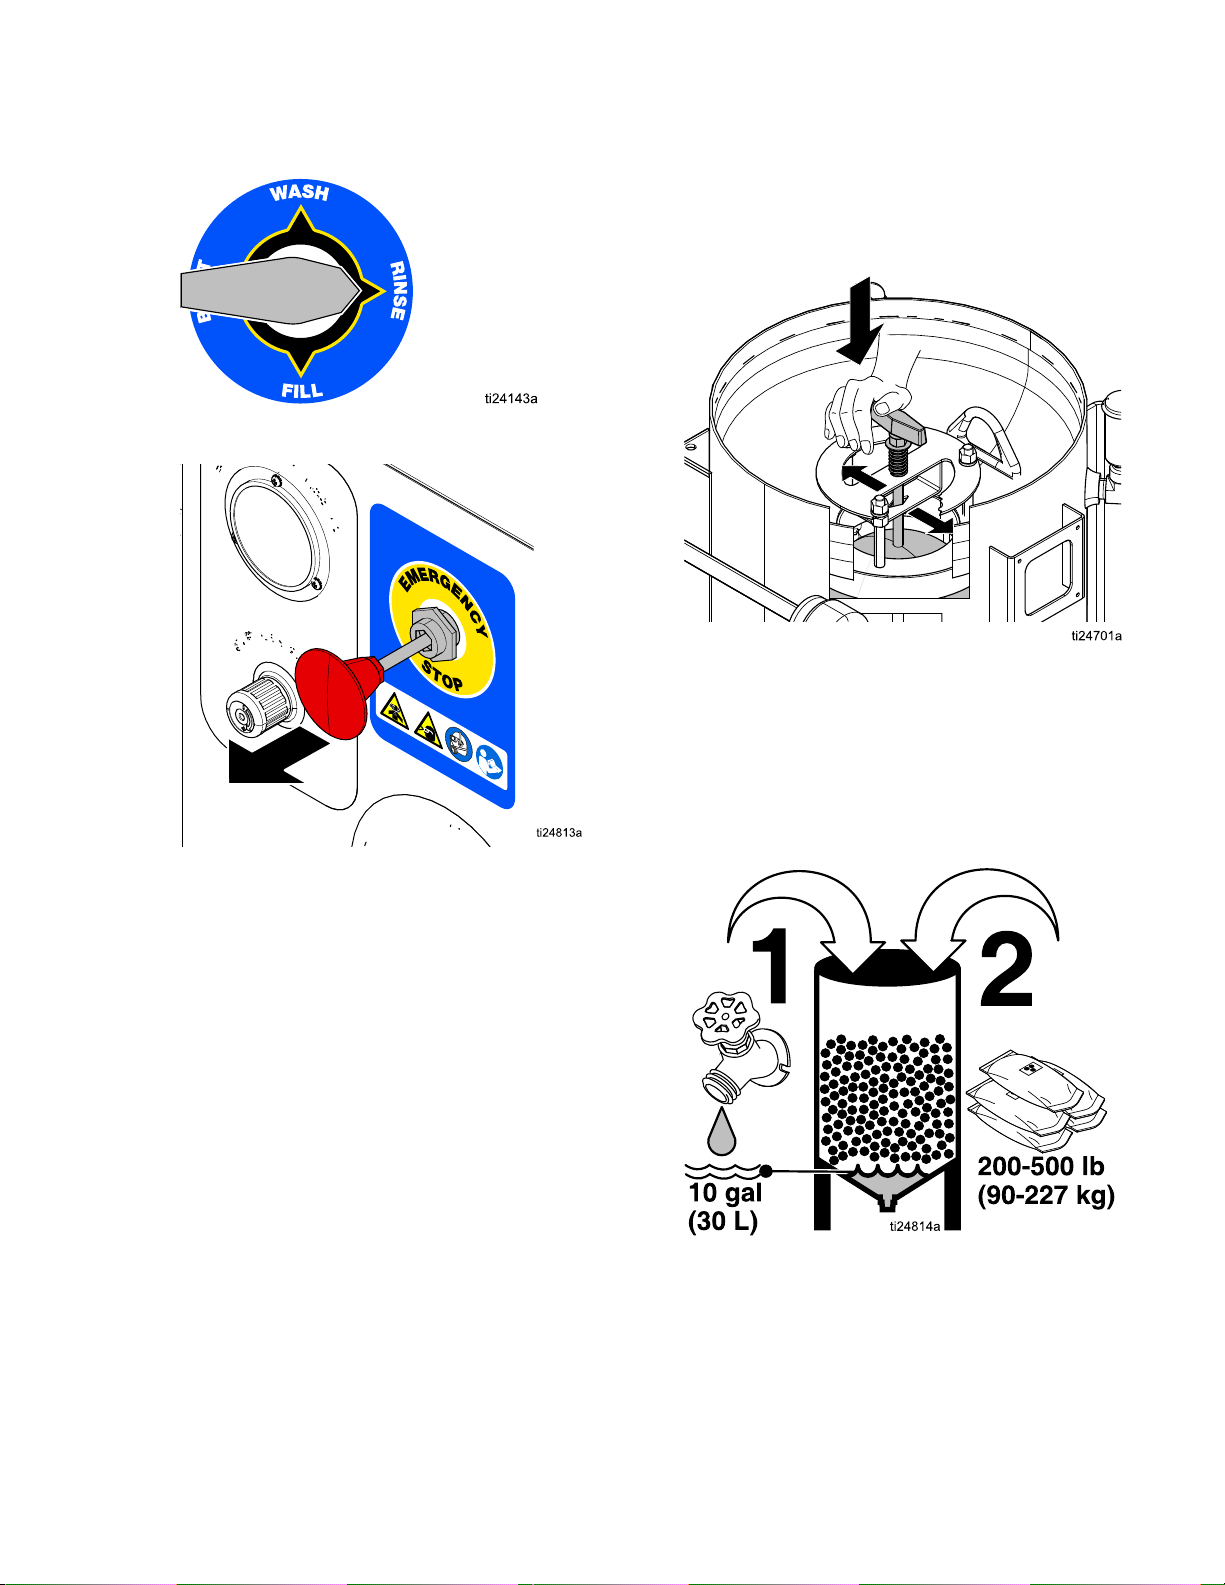
Operation
7.TurntheselectorvalvetoRINSE.
8.DisengagetheEmergencyStop.
NOTE:
NOTE: NOTE:
EmergencyStopisdisengaged.
Thewaterpumpwillnotworkunlessthe
9.Alignthepop-uphandlewiththepinslot,and
thenrmlypushandturnthehandle90°afterthe
pinisbelowthebracketslot.Properengagement
ofthepinwillholdthepop-updownuntilitis
released.
10.Add10gallons(30liters)offreshwaterto
thepot.Wearappropriatepersonalprotective
equipment,includinganappropriatelyt-tested
governmentapprovedrespiratorsuitableforthe
dustconditions.Addabrasivematerial(minimum
fourbags,maximumten50lb(23kg)bagsof
high-massabrasive,oreight50lb(23kg)bags
oflowmassabrasive).
11.Useagardenhoseortherinsehosetowashthe
abrasiveintothepotandclearanyabrasivefrom
thepop-upandgasket.
334667G 15
 Loading...