

Page 1
1
NWL0000644864B 10/18
CONTENDER
TM
65
CHILD RESTRAINT
www.gracobaby.ca
Do not install or use this
child restraint until you read,
understand and follow the
instructions in this manual and
the warnings on the car seat.
FAILURE TO PROPERLY USE
THIS CHILD RESTRAINT
INCREASES THE RISK OF
SERIOUS INJURY OR DEATH
IN A SUDDEN STOP OR
CRASH.
Page 2

2
1-A Quick Guide to Your Manual
What Seating Location Should I Use?
Which Installation Method Should I Use?
What is UAS?
Does Your Car Seat Fit Your Child Correctly?
1-B Welcome to the Graco Family
1-C Right Mode of Use
1-D Before You Begin
Register This Car Seat
If You Need Help
Certification
Airplane Installation
Car Seat’s Useful Life
Vehicle Seat Protection
Warm Weather Use
1-E Safety Warnings
1 Important Pages 6-23
Page 3
3
4-A Install Forward-Facing with UAS Strap
4-B Installing With Vehicle Seat Belt
4 Forward-Facing Use Pages 45-58
3-A Install Rear-Facing with UAS Strap
3-B Installing With Vehicle Seat Belt
3 Rear-Facing Use Pages 30-44
5 Securing Child In Car Seat Pages 59-66
2 Car Seat Features Pages 24-29
Page 4

4
7 Moving UAS Pages 69-71
6 Accessories (on select models) Pages 67-68
8 Additional Information Pages 72-81
8-A How to Remove UAS and Tether
8-B Unsafe Vehicle Seat Locations
8-C Vehicle Seat Belts
Page 5

5
9-A Cleaning Seat Pad
9-B Cleaning Buckle Strap
9-C Cleaning Harness and UAS Straps
9 Care & Cleaning Pages 82-85
Page 6
6
1-A Quick Guide to Your Manual
This car seat is for children: Rear-Facing: 2.2-16 kg (5-35 lb)
46-110 cm (18-43 in)
Forward Facing: 10-30 kg (22-65 lb)
69-125 cm (27-49 in)
Children less than 10 kg (22 lb) and cannot walk unassisted MUST use this car
seat rear-facing. Review section 1-C for more information.
Get to Know Your Car Seat
What Seating Location Should I Use?
Review section 2 to see all of the features of this car seat.
The best seating location for this car seat is one that:
• Is recommended by your vehicle owner’s manual, and
• Results in a secure installation of this car seat.
Some vehicles have specific requirements for where the car seat can be
installed, so be sure to check your vehicle owner’s manual for available seating
positions, if any.
Review sections 1-A, 8-B, 8-C of this manual AND your vehicle owner’s manual.
Page 7

7
Which Installation Method Should I Use?
This car seat can be installed in your vehicle using either the vehicle seat belt OR the
Universal Anchorage System (UAS). Both systems are equally safe to use. DO NOT
USE BOTH AT THE SAME TIME.
Vehicle Seat Belt: Review section 8 and your vehicle owner’s manual to
learn how to install your car seat with the vehicle seat belts.
UAS: The UAS allows you to securely attach your car seat in your car
without using the vehicle seat belt and possibly to get a better fit. All 2003
and newer model year vehicles are required to have a UAS, although some
manufacturers began including UAS earlier. Some vehicle owner manuals
use the term ISOFIX to identify the UAS.
According to collision statistics, the safest
place for your child in any vehicle is the
back seat. The centre of the back seat can
be the safest during a possible side impact.
Page 8
8
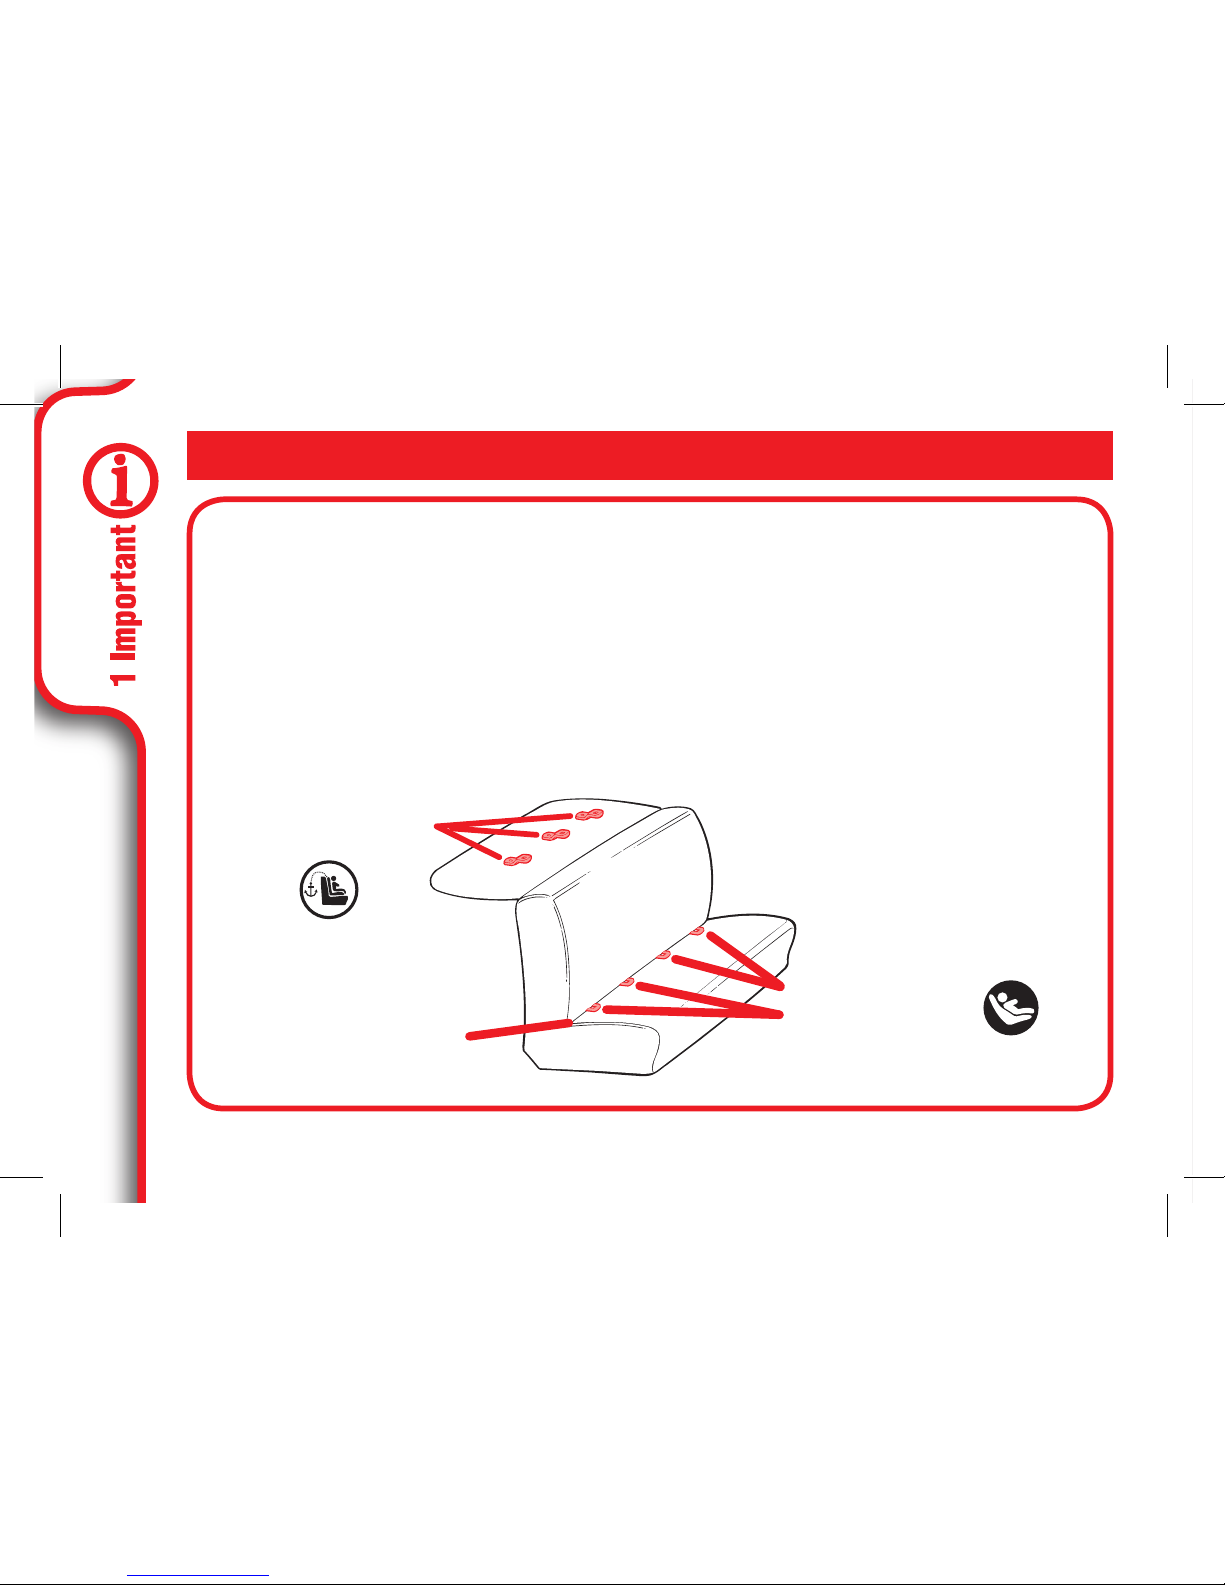
UAS consists of lower anchors and top tether anchors, which are built-in
to your vehicle, and connecting hooks that are built-in to your car seat.
Lower anchors are used INSTEAD of the vehicle’s seat belt to secure the
child seat to the vehicle. Top tethers are used IN ADDITION to the lower
anchors OR the vehicle’s seat belt to secure a forward-facing car seat to
the vehicle.
Review your vehicle’s owner manual for exact location and use.
What is UAS?
Vehicle Top Tether
Anchor Points
Vehicle Lower
Anchor Points
Typical seat in a passenger
vehicle. Other vehicle types
may have different UAS
locations.
Vehicle Seat Crease
Page 9
9
When Installing Rear-Facing & Forward-Facing
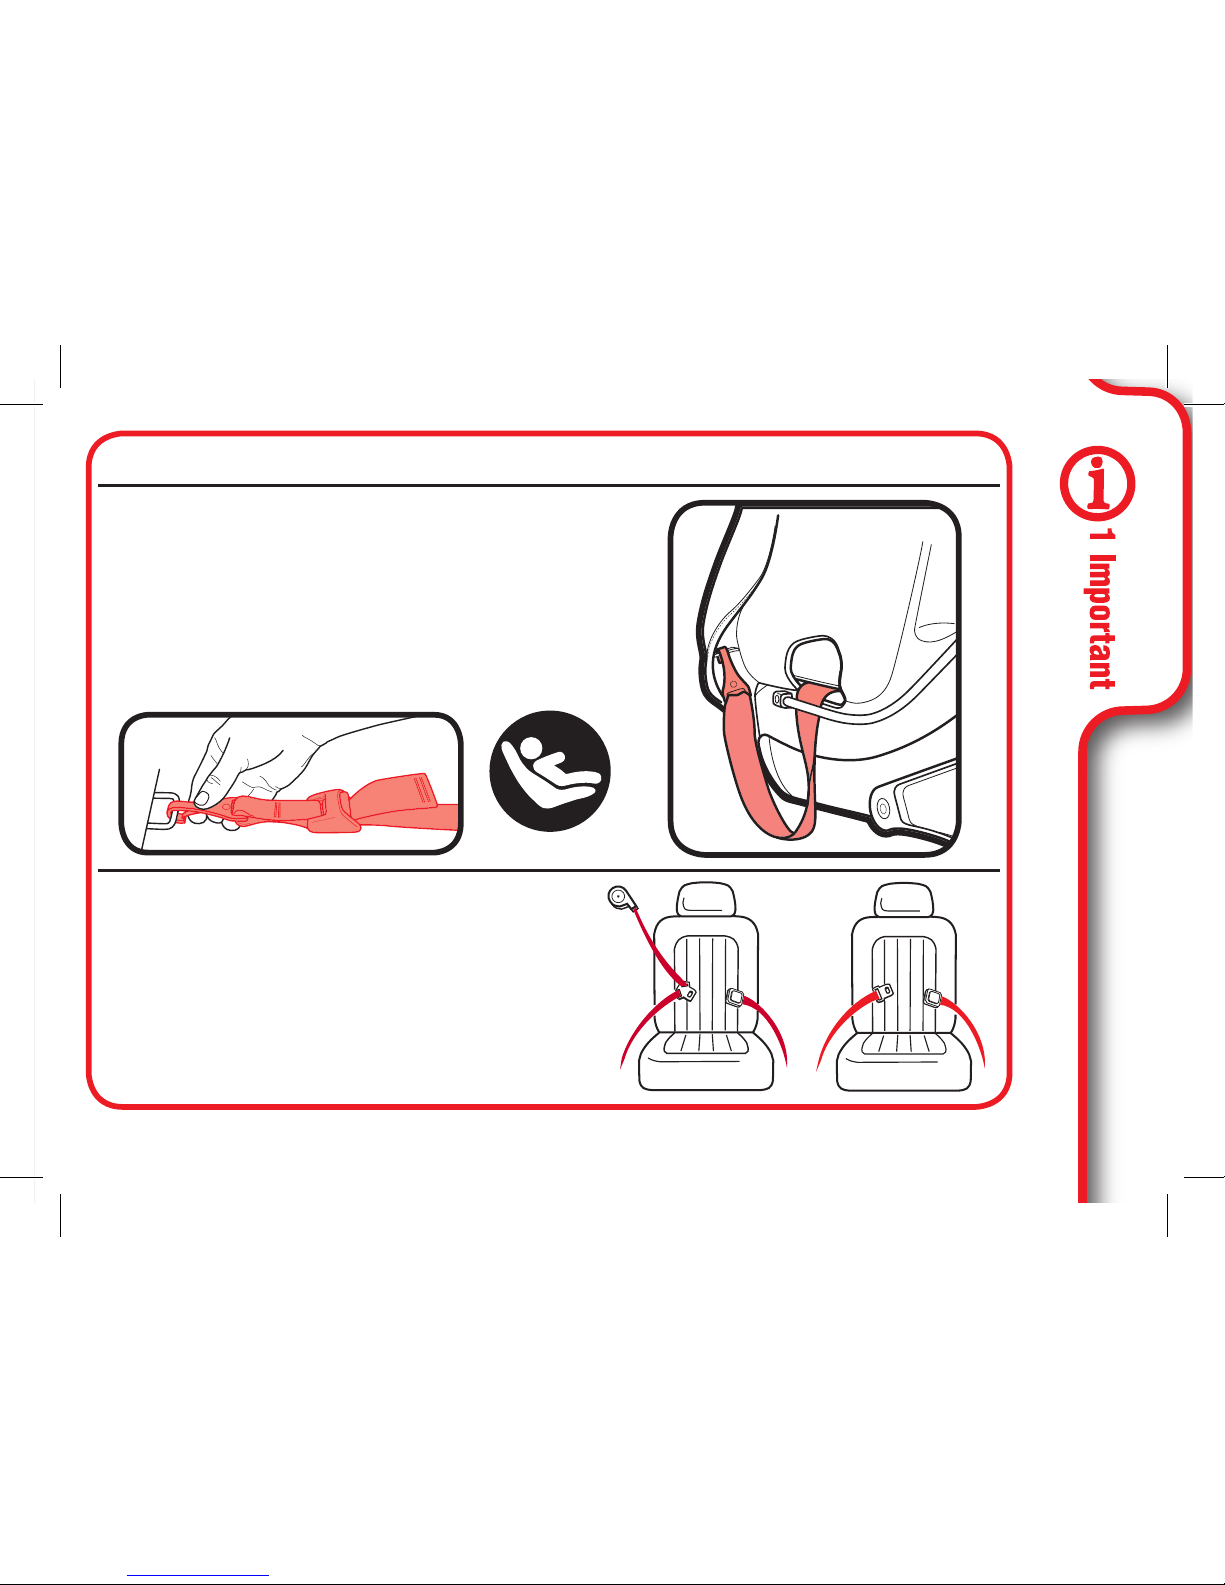
Vehicle Seat Belt
There are two types of vehicle seat belts
that can be used. Lap/Shoulder Seat Belt
or Lap Only Seat Belt.
Review section 3-B & 4-B of this manual
AND your vehicle owner’s manual.
UAS System
UAS consists of two lower anchors, which
are built-in to your vehicle, and connecting
hooks that are built-in your car seat.
Review section 3-A & 4-A of this manual
AND your vehicle owner’s manual.
Page 10

10
Does Your Car Seat Fit Your Child Correctly?
To make sure your child is secured properly, review section 3, 4 and 5 to
understand all of the actions you need to take to properly adjust the car seat
to fit your child.
Harness Height, Rear-Facing (A)
Harness straps at or just below the child’s
shoulders and top of child’s head must be at
least 2.5 cm (1 in) below the handle (B).
Review section 5.
Buckle Position (C)
The correct slot is the one that is closest to
your child without being underneath them.
Review section 5.
Harness Tightness (D)
If your fingers slide off the harness straps
without pinching the straps, it is tight enough.
Review section 5.
For Rear-Facing, You Need to Adjust:
A
C
B
D
Page 11
11
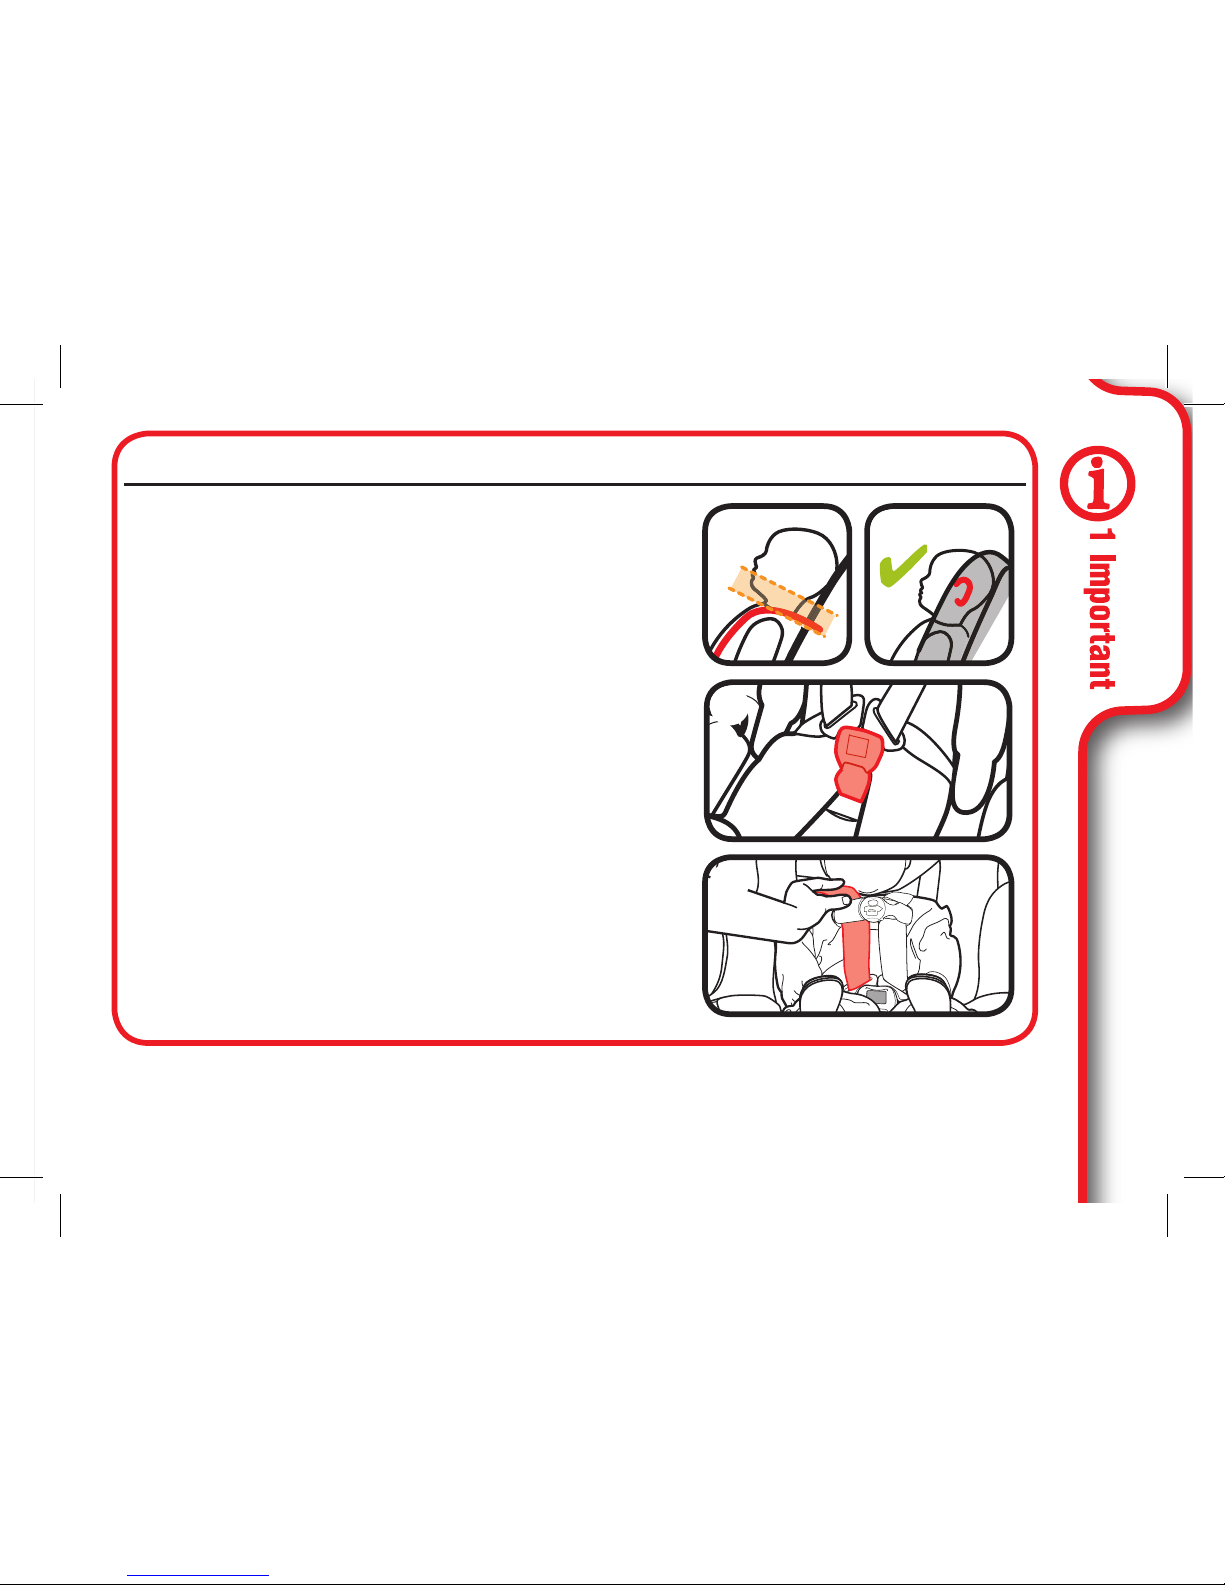
Harness Height, Forward-Facing (A)
Harness straps at or just above the child’s
shoulders and top of child’s ears below top of
headrest (B). Review section 5.
Buckle Position (C)
The correct slot is the one that is closest to
your child without being underneath them.
Review section 5.
Harness Tightness (D)
If your fingers slide off the harness straps
without pinching the straps, it is tight enough.
Review section 5.
For Forward-Facing, You Need to Adjust:
A
C
B
D
Page 12
12
PD308354A
3+months
3+ mois
0+months
0+ mois
Ball MUST be entirely in blue.
La bille DOIT être entièrement
dans la zone bleue.
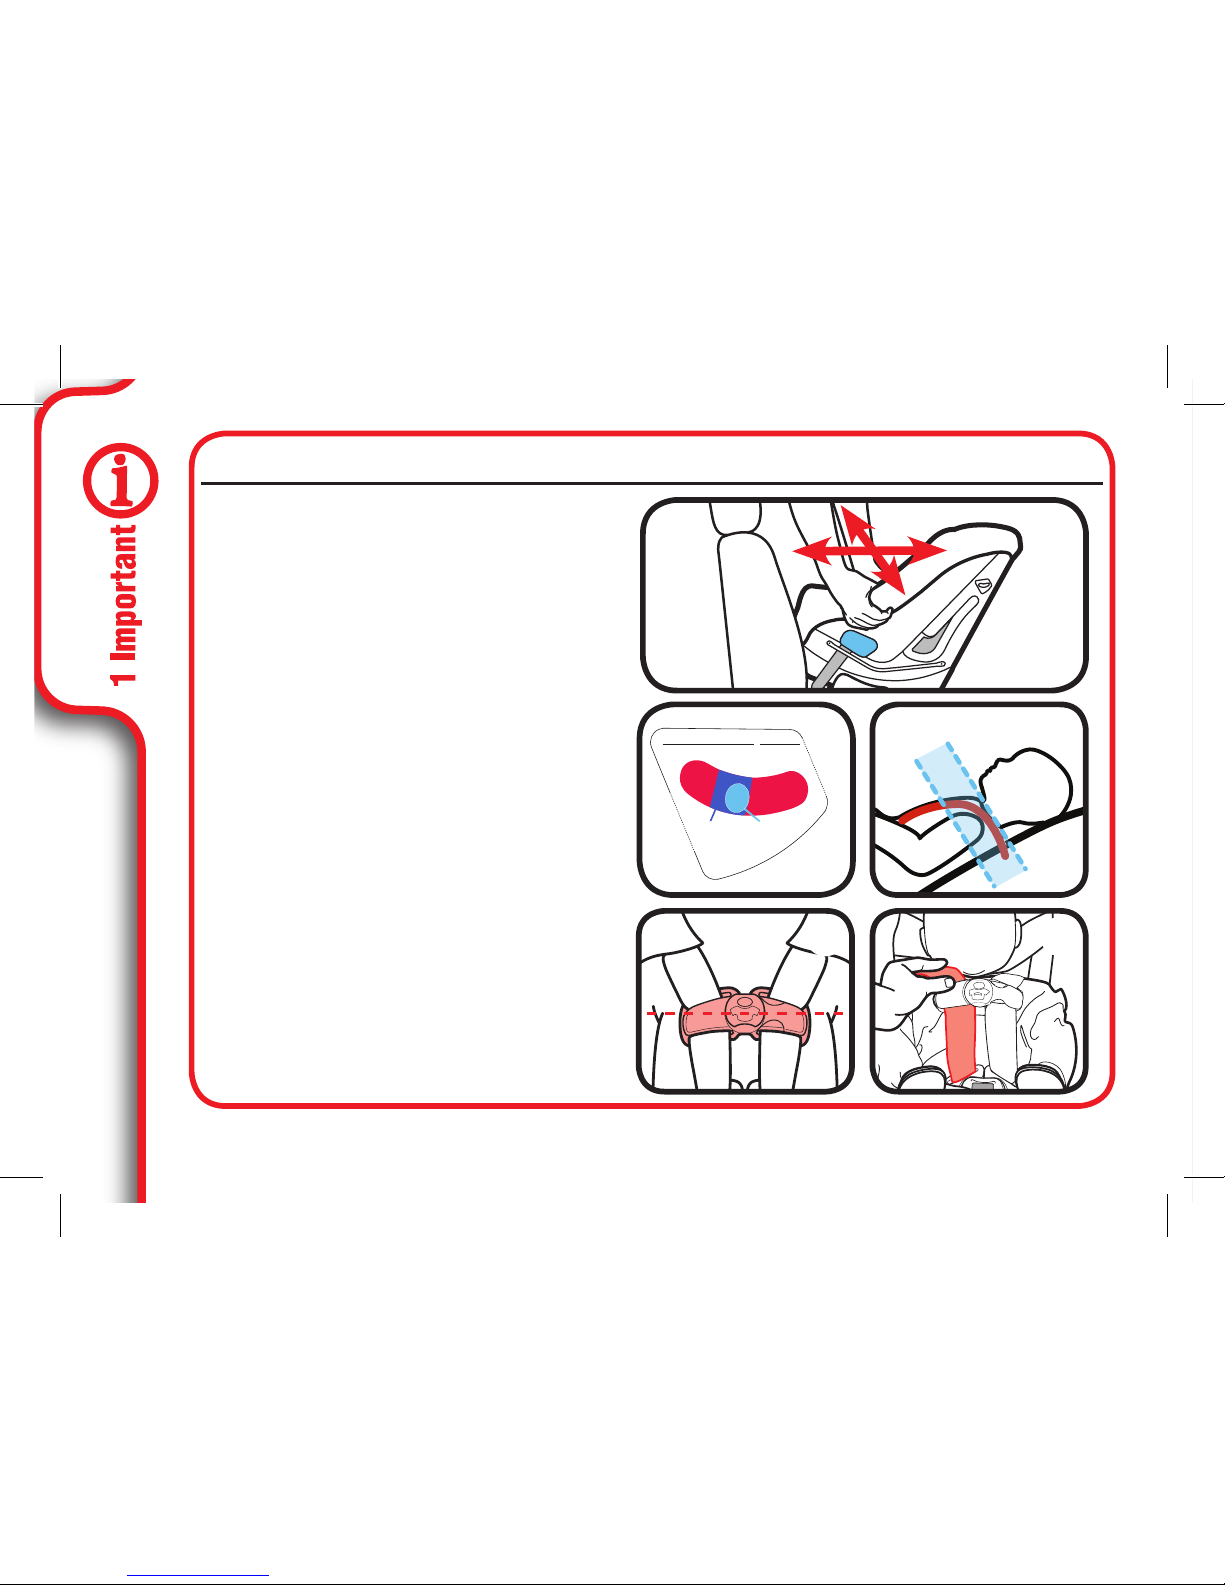
Car Seat Does Not Move More
than 2.5 cm (1 in) at the Belt
Path (A)
Review section 3
Check level indicator (B)
Review section 3
Harness Straps at or Just
Below Child’s Shoulders (C)
Review section 5
Chest Clip Even With Armpits (D)
Review section 5
Cannot Pinch Harness Straps
at the Shoulder (E)
Review section 5
Rear-Facing Installation
B
A
D E
C
Page 13
13
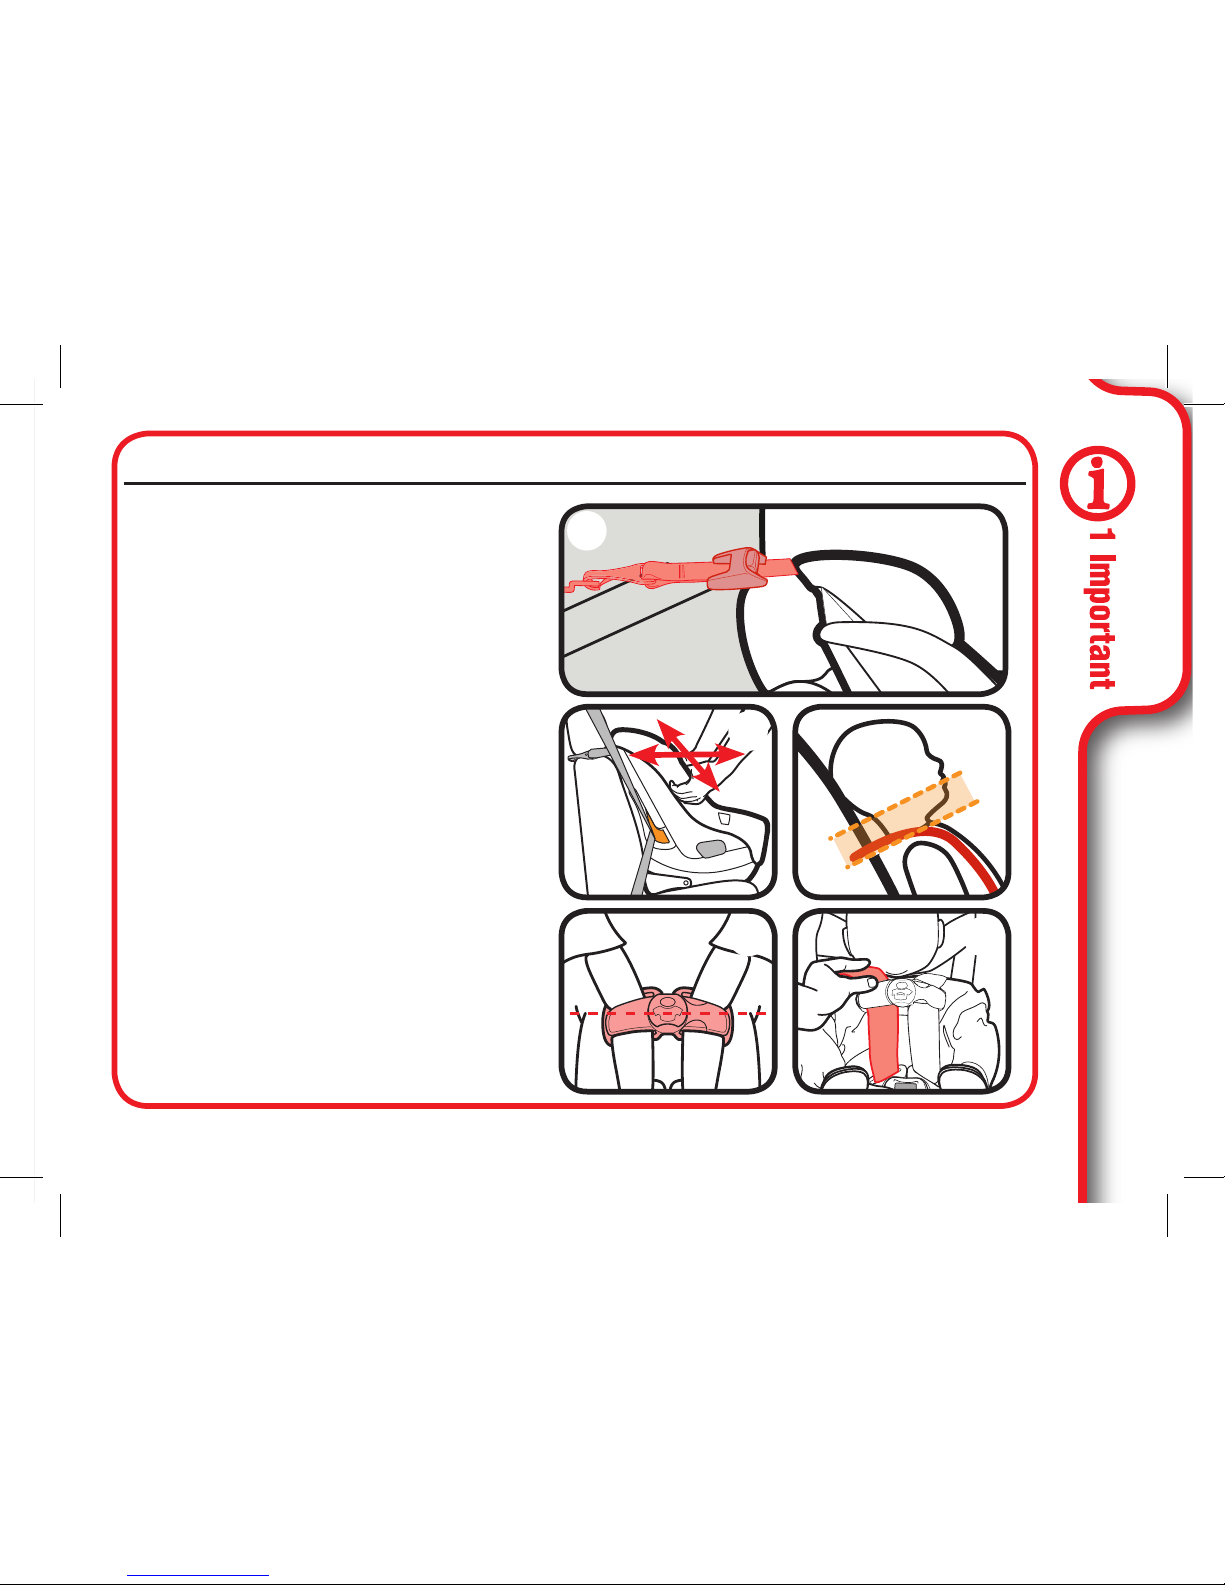
Use the top tether strap when
using forward-facing (A)
When used properly, the top tether
helps reduce injury in a sudden
stop or crash.
Review section 4
Car Seat Does Not Move More
than 2.5 cm (1 in) at the Belt
Path (B)
Review section 4
Harness Straps at or Just
Above Child’s Shoulders (C)
Review section 5
Chest Clip Even With Armpits (D)
Review section 5
Cannot Pinch Harness Straps
at the Shoulder (E)
Review section 5
Forward-Facing Installation
B
A
D E
C
Page 14

14
1-B Welcome to the Graco Family!
Your child’s safety depends on you. No car seat can guarantee protection from injury in
every situation, but proper use helps reduce the risk of serious injury or death.
Even if this car seat seems easy to figure out on your own, you must follow the detailed
instructions in this instruction manual to ensure the steps below are performed correctly.
Page 15
15
1-C Right Mode of Use
2.2 kg
(5 lb)
10 kg
(22 lb)
16 kg
(35 lb)
30 kg
(65 lb)
Rear-Facing with 5-Point Harness*
2.2-10 kg (5-22 lb), 46-110 cm (18-43 in) less than
1 year old MUST be rear-facing.
10-16 kg (22-35 lb) SHOULD be rear-facing.
Forward-Facing with 5-Point Harness*
10-16 kg (22-35 lb), 69-125 cm (27-49 in) can walk unassisted and
over 1 year old CAN be forward-facing.
16-30 kg (35-65 lb) MUST be forward-facing.
* Children are safer riding rear-facing and should ride rear-facing as long as possible, until
they reach the maximum rear-facing height or weight rating for their car seat. Then children
should ride forward-facing, using the built-in harness system for as long as possible until they
reach the maximum forward-facing weight or height for their car seat. Be sure to check your
Provincial/Territorial Laws, as well as AAP and Transport Canada recommendations, for car
seat usage.
Page 16
16
1-D Before You Begin
Please fill out the prepaid registration postcard attached to the harness and mail
it in today or register online at www.gracobaby.ca
Child restraints could be recalled for safety reasons. You must register this
restraint to be reached in a recall. Send your name, address, and the restraint’s
model number and manufacturing date to:
Newell Industries Canada Inc.
PO Box 20090 Oaktown Plaza, Oakville, ON L6K 3Y7
or call 1-800-345-4109
For recall information, call the Customer Service in Canada at www.gracobaby.ca or at
1-800-345-4109
Register This Child Restraint
Page 17
17
Model Name _________________________
Model Number _______________________
Date of Manufacture __________________
Date of Purchase _____________________
For future reference or if you change addresses, record the model name, model
number, date of manufacture and purchase date of this car seat on the below.
You can find this information either on the registration card if you still have it or
on the date label located on the back of the car seat.
Please contact our Customer Service Department with any questions you may have
concerning parts, use, or maintenance. When you contact us, please have your
product’s model number and date of manufacture ready so that we may help you
efficiently. These numbers can be found on a sticker on the back of your infant restraint.
www.gracobaby.ca
1-800-345-4109
If You Need Help
Page 18

18
THIS INFANT RESTRAINT CONFORMS to Canada Motor Vehicle Safety Standard 213
and 213.1, and is certified for use in motor vehicles and aircraft.
Certification
Airplane Installation
When installing in an airplane, install the same way as you would in an
automobile with a lap only belt. This child restraint is certified for use in
aircraft. Use only on forward-facing aircraft seats. Follow the instructions
for vehicle installation. See section 3-B, 4-B and 8-C, but do not use top
tether. Contact the airline for their specific policies.
Page 19
19
STOP using this car seat and throw it away 7 years after the date of
manufacture. Look for this sticker on back of the car seat.
Graco Children’s Products Inc. advises against loaning or passing along a car
seat unless you know the complete history of the product. We also advise
against purchasing a car seat second hand.
Car Seat’s Useful Life
Protect vehicle seat. Use a car seat mat, towel, or thin blanket under and behind
car seat.
Vehicle Seat Protection
Car seat parts can get very hot in the sun or warm weather. To avoid burns,
always check before putting child in car seat.
Warm Weather Use
Page 20
20
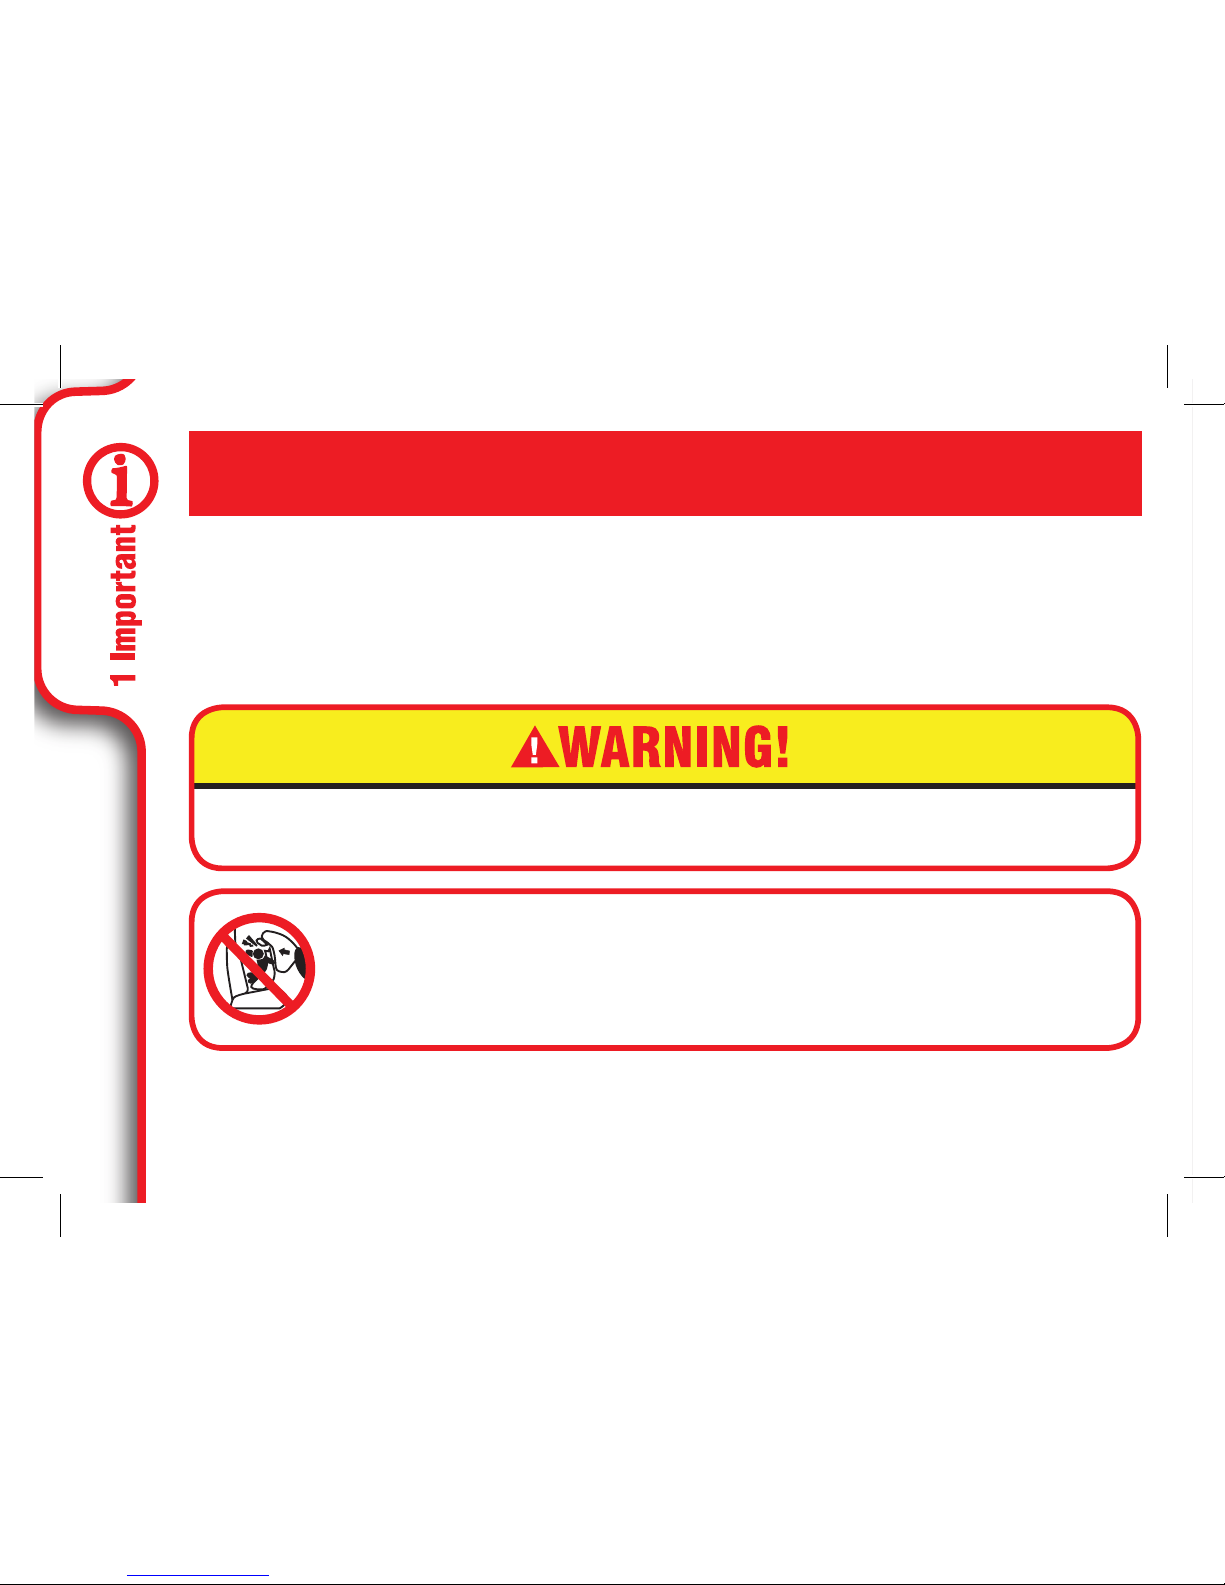
Failure to follow these instructions and child restraint’s labels can result
in child striking the vehicle’s interior during a sudden stop or crash.
! NEVER PLACE THIS CHILD RESTRAINT REAR-FACING IN A
VEHICLE SEATING LOCATION THAT HAS AN ACTIVE FRONT
AIR BAG. If an air bag inflates, it can hit the child and car seat
with great force and cause serious injury or death to your child.
1-E Safety Warnings
No car seat can guarantee protection from injury in
every situation, but proper use helps reduce the risk of
serious injury or death. READ THIS MANUAL CAREFULLY.
Page 21
21
! Choose the correct mode of use for the car seat depending on your
child’s size. Infants less than 10 kg (22 lb) and cannot walk
unassisted MUST use this car seat rear-facing.
! Review your vehicle owner’s manual for more information about air
bags and car seat use.
! Children are safer riding rear-facing and should ride rear-facing as
long as possible, until they reach the maximum rear-facing height or
weight rating for their car seat. Then children should ride forwardfacing, using the built-in harness system for as long as possible until
they reach the maximum forward-facing weight or height for their
car seat. Be sure to check your Provincial/Territorial Laws, as well as
AAP and Transport Canada recommendations, for car seat usage.
! If your vehicle does not have a back seat, review your vehicle
owner’s manual.
! Select a suitable location for the car seat in your vehicle.
! Secure car seat with a vehicle seat belt or UAS that is properly
routed as shown in this manual.
Page 22
22
! Vehicle seat belt system MUST hold car seat securely. Not all
vehicle seat belts can be used with a car seat.
! If vehicle seat belt does not hold car seat securely, read “Vehicle
Seat Belts” section 8 and your vehicle owner’s manual.
! Always secure car seat with UAS or a vehicle seat belt, even
when unoccupied. In a crash, an unsecured car seat can injure
passengers.
! DO NOT use car seat if it is damaged or missing parts.
! If car seat is in a crash, it must be replaced. DO NOT use it again!
A crash can cause unseen damage and using it again could result in
serious injury or death.
! DO NOT use accessories or parts other than those provided by Graco
except for a thin towel or mat to protect your vehicle seat or a rolled towels
or pool noodles to help get your car seat level. Their use could alter the
performance of the car seat.
! DO NOT remove UAS system from car seat. If using vehicle seat belt
to secure car seat, UAS connectors must be stored.
Page 23
23
! Never leave child unattended, even when sleeping. Child may
become tangled in harness straps and suffocate or strangle.
! Do not use both the vehicle seat belt and UAS strap at the same
time when using the car seat.
! Rear-facing car seat must be properly leveled:
• Too reclined can result in injury or ejection.
• Too upright can result in breathing difficulties.
! Never attach two UAS connectors to one vehicle
lower anchor point unless specifically allowed by the vehicle
manufacturer.
! This restraint system may only be used in these classes of
vehicles: passenger cars, multi-purpose passenger vehicles and
trucks that have vehicle lap/shoulder belts and tether anchors.
Page 24
24
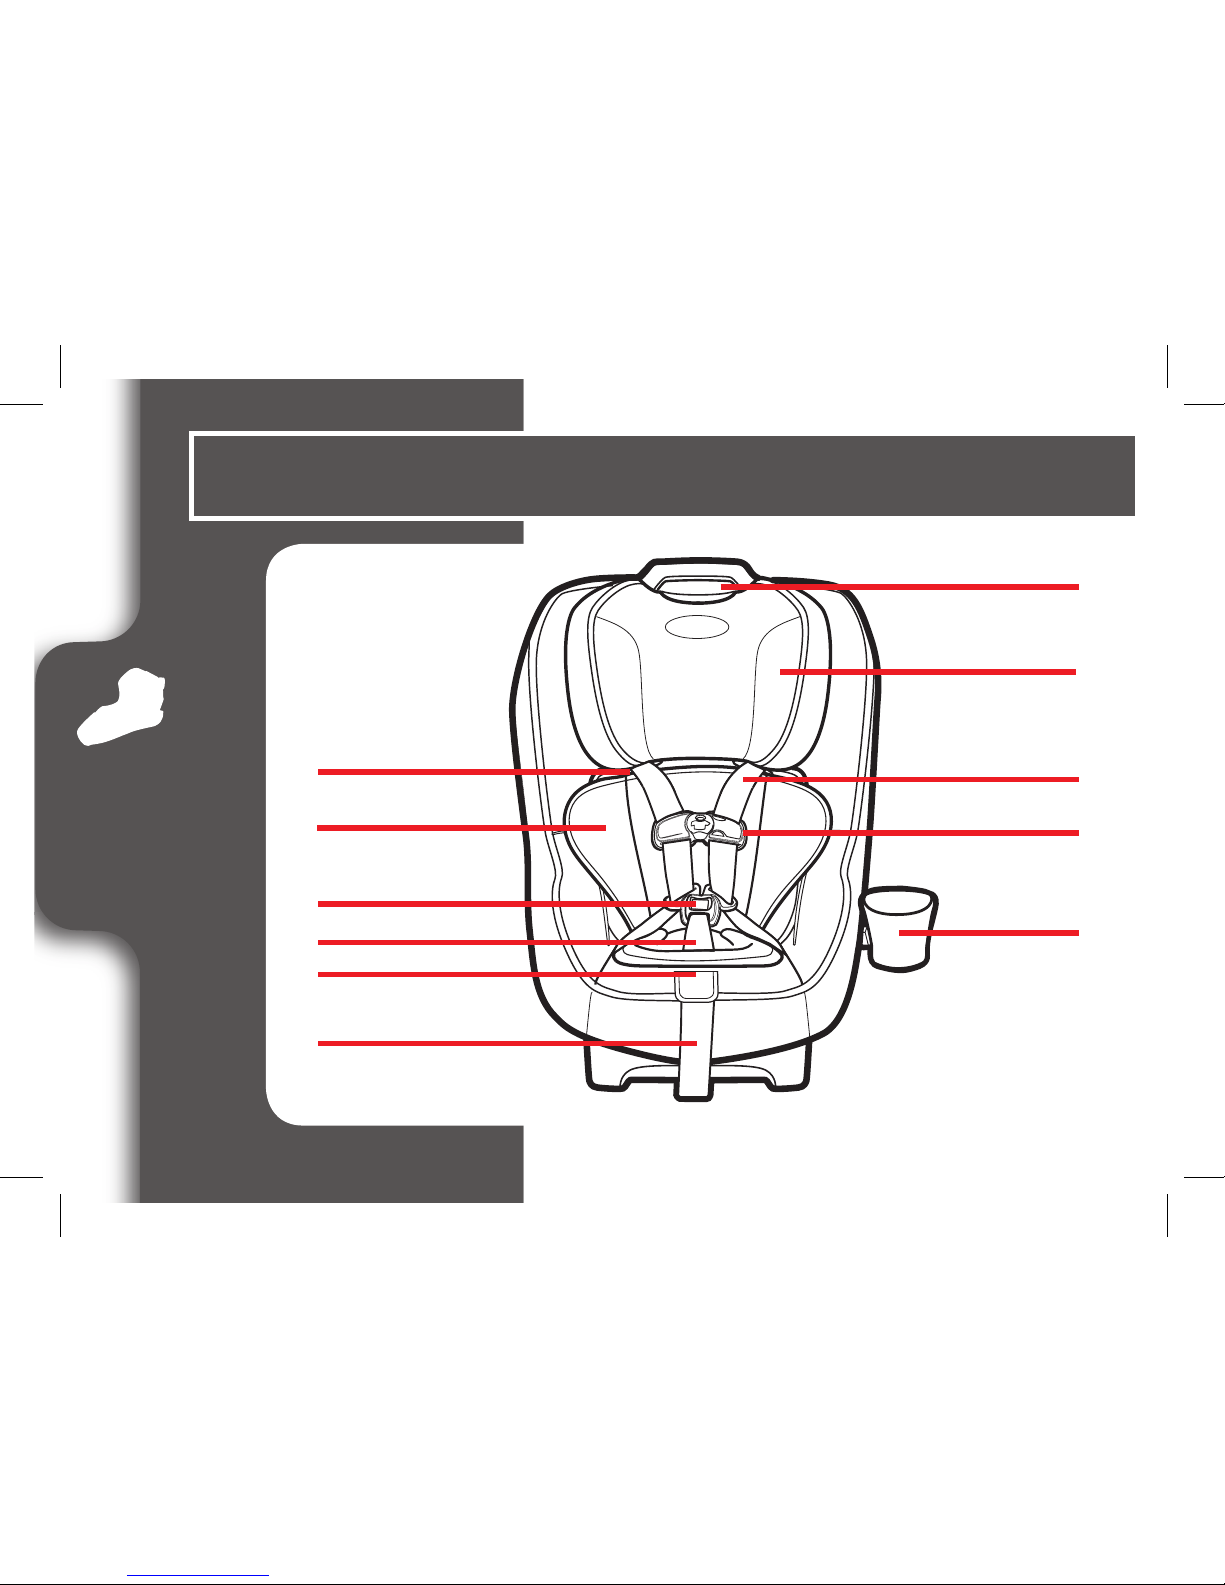
2 Features
2-A Car Seat Features
A
B
G
F
H
C
D
E
I
J
K
Page 25

25
2 Features
A Harness Slots
B Body Support
C Harness Buckle
D Buckle Strap
E Harness Release Lever
(Under Flap)
F Harness Adjustment Strap
G Headrest/ Harness
Adjustment Handle
H Harness Straps
I Chest Clip
J Cup Holder
K Headrest
Page 26
26
2 Features
C
D
E
A
B
A
B
F
Page 27
27
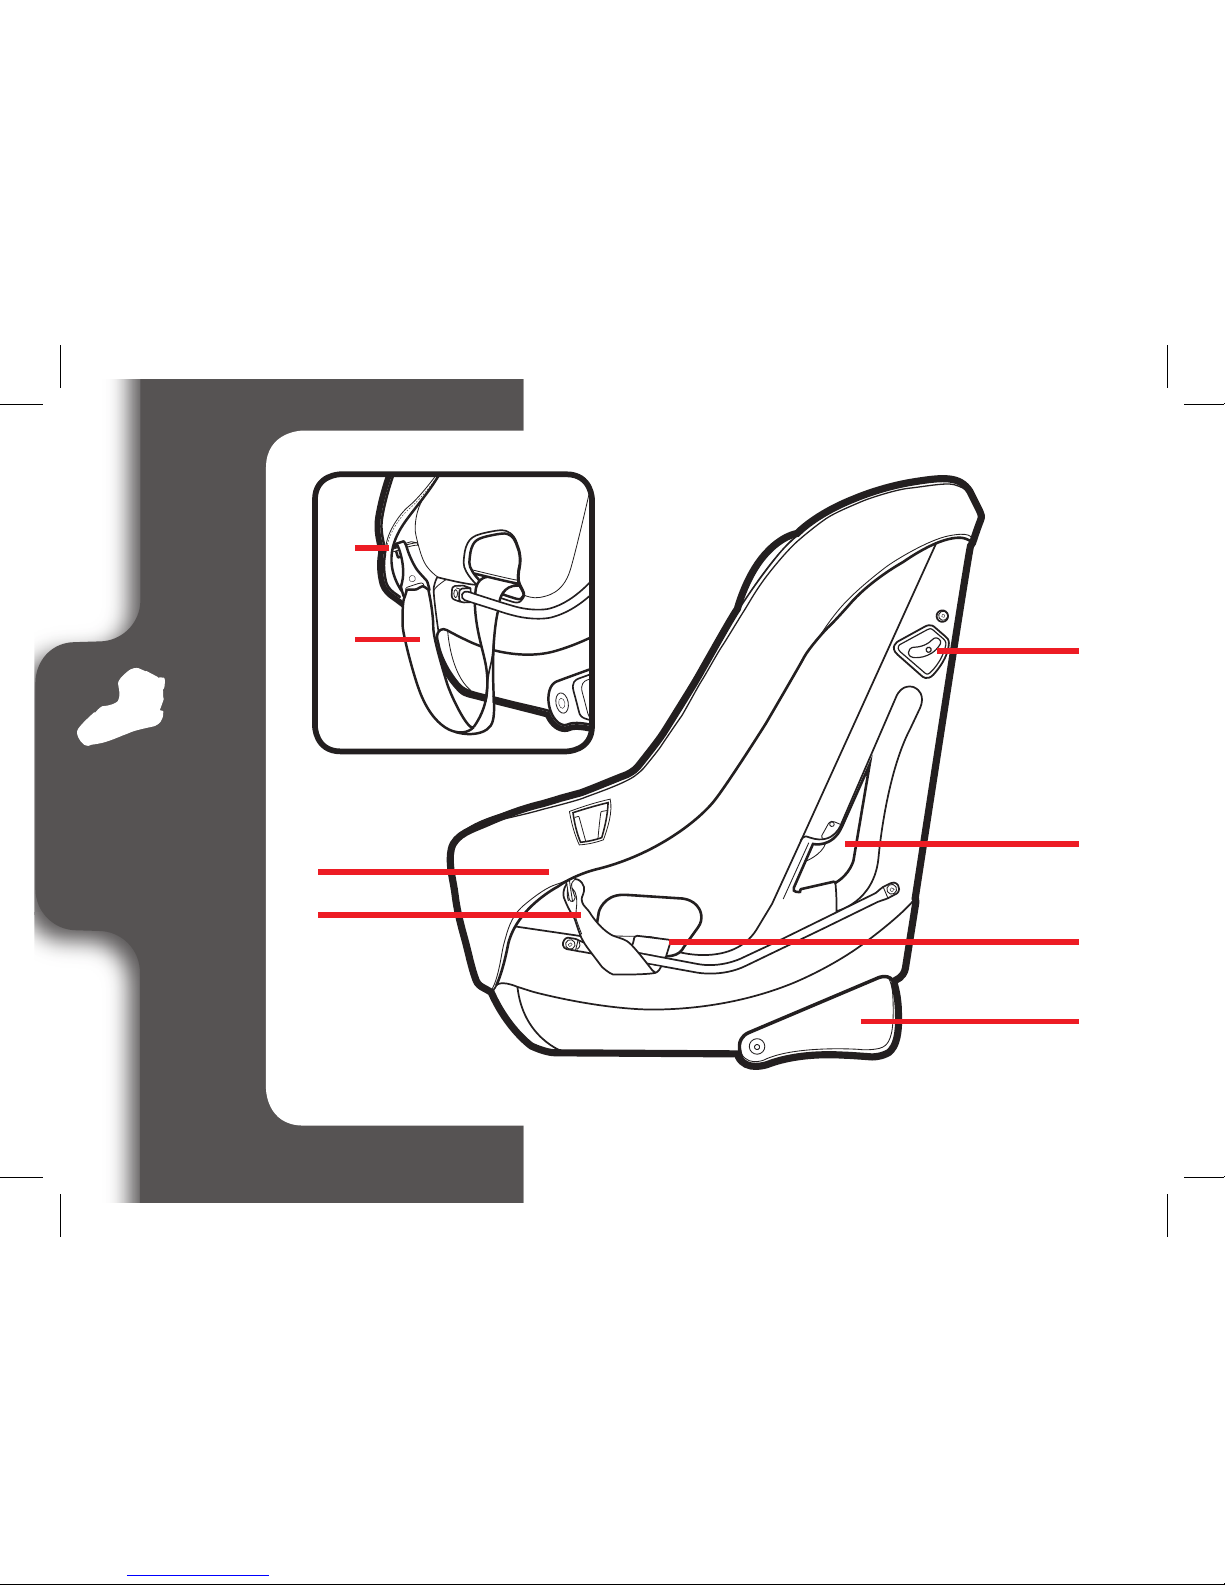
2 Features
A UAS Storage Bar
B UAS Strap (stored)
C Level Indicator
D Forward-Facing Belt Path
E Rear-Facing Belt Path
F Recline Foot
Page 28

28
2 Features
A
B
E
F
G
H
C
D
Page 29

29
2 Features
A Harness Straps
B Splitter Plate
C Harness Cover Plate
D Locking Clip Storage
E Tether Storage Bar
F Tether Hook
G Tether Strap
H Instruction Manual Storage
Page 30

30
3 Rear
Facing
3 Rear-Facing
Rear-Facing:
2.2-16 kg (5-35 lb), 46-110 cm (18-43 in)
• Infants who weigh less than 10 kg (22 lb) and
cannot walk unassisted MUST be rear-facing.
• Place car seat rear-facing in the vehicle back seat.
• Make sure UAS strap or vehicle seat belt is routed
through the rear-facing belt path marked with a
blue label.
• Install this car seat tightly in your vehicle. Car seat
should not move at the rear-facing belt path more
than 2.5 cm (1 in) from side to side, front to back.
• Check recline level making sure the bubble is
within the blue area. Vehicle MUST be on level
ground.
UAS Strap
Vehicle Seat Lap/
Shoulder Belt
Page 31

31
3 Rear
Facing
NEVER place this child
restraint rear-facing in a
vehicle seating location that
has an active front air bag.
• Harness straps need to be even with or just below
the top of child’s shoulders and chest clip is at
armpit level.
• Children are safer riding rear-facing and should ride
rear-facing as long as possible, until they reach the
maximum rear-facing height or weight rating for their
car seat. Then children should ride forward-facing,
using the built-in harness system for as long as
possible until they reach the maximum forwardfacing weight or height for their car seat. Be sure to
check your Provincial/Territorial Laws, as well as
AAP and Transport Canada recommendations, for car
seat usage.
Vehicle Seat Lap Belt
Note: Preterm or low birth
weight infants may be at
special risk in a vehicle or
aircraft. Graco advises that
you have your physician or
hospital staff evaluate your
infant and recommend the
proper car seat or car bed
before you and your infant
leave the hospital.
Page 32

32
3 Rear
Facing
How to Read the Level Indicator:
Use corrected age for preemies.
• Vehicle MUST be on level ground.
• If the ball is entirely in light blue, the restraint is
level for infants 0+ months in age.
• If the ball is in light blue and dark blue, the
restraint is level for a child 3+ months in age.
• If the ball is in RED, child restraint is NOT
level. You must adjust your recline position.
Page 33

33
3 Rear
Facing
3-A Install Rear-Facing with
UAS Strap
Review your vehicle’s owner manual for UAS location and use.
1. Recline the Car Seat
Flip recline foot toward the
front of the car seat for
rear-facing use.
2. Store Top Tether Strap
Attach tether hook to the plastic bar on either
side of the car seat.
Page 34

34
3 Rear
Facing
3. Remove UAS Strap from Storage
Location
4. Make Sure UAS Strap is in the Rear-
Facing Belt Path Marked With
a Blue Label
If it is not, see section 7 to move UAS strap.
Page 35

35
3 Rear
Facing
5. Extend the UAS Strap
For easier installation, extend the UAS strap
to its maximum length by pressing the grey
button and pulling on the strap.
6. Place Car Seat Rear-Facing
in Back Seat of the Vehicle
Place rear-facing in vehicle seat and center
the car seat between the lower UAS anchors.
The bottom of the car seat should sit as flat as
possible on the vehicle seat.
Page 36

36
3 Rear
Facing
7. Check the Level Indicator
Vehicle MUST be on level ground. Ball must
be completely in the blue zone. Readjust if
needed.
For infants 3 months and under, the ball must
completely cover the light blue circle.
If needed, rolled towels may be placed under
the car seat at the vehicle seat crease, until
the ball is completely in the blue zone.
8. Attach UAS Hooks to Vehicle’s Lower
UAS Anchors.
UAS strap should lie flat and not be twisted.
PD308354A
3+months
3+ mois
0+months
0+ mois
Ball MUST be entirely in blue.
La bille DOIT être entièrement
dans la zone bleue.
Page 37

37
3 Rear
Facing
9. Tighten the UAS Strap
Press down firmly in the center of the car seat
while tightening the UAS strap.
10. Test For Tightness
Grab the sides of the seat where the UAS
strap is and slide the car seat side-to-side
and front-to-back.
If the seat moves less than 2.5 cm (1 in), it
is tight enough.
Page 38

38
3 Rear
Facing
11. Check the Level Indicator
Vehicle MUST be on level ground. Ball must
be completely in the blue zone. Readjust if
needed.
For infants 3 months and under, the ball
must completely cover the light blue circle.
If needed, rolled towels may be placed under
the car seat at the vehicle seat crease, until
the ball is completely in the blue zone.
See section 5 to secure your child.
Recheck the level indicator with child in seat.
12. To Remove UAS Strap From Vehicle
See section 8-A.
PD308354A
3+months
3+ mois
0+months
0+ mois
Ball MUST be entirely in blue.
La bille DOIT être entièrement
dans la zone bleue.
Page 39

39
3 Rear
Facing
Is Everything Correct?
Car Seat Does Not Move More than
2.5 cm (1 in) at the Belt Path
Level Indicator’s Ball
in the Blue Zone and
Vehicle on Level Ground
Harness Straps at or Just Below the
Child’s Shoulders.
Review section 5
Chest Clip Even With Armpits
Review section 5
Cannot Pinch Harness Straps at the
Shoulder
Review section 5
PD308354A
3+months
3+ mois
0+months
0+ mois
Ball MUST be entirely in blue.
La bille DOIT être entièrement
dans la zone bleue.
Page 40

40
3 Rear
Facing
3-B
Installing With Vehicle Seat Belt
1. Store Top Tether
and UAS Strap
Attach tether hook
and UAS
hooks to the
plastic bars as
shown.
2. Recline the Car
Seat
Flip recline foot
toward the front of
the car seat for rear
facing use.
Page 41

41
3 Rear
Facing
3. Place Car Seat Rear-Facing in Back
Seat of the Vehicle
Place rear-facing in vehicle seat. The bottom
of the car seat should sit as flat as possible on
the vehicle seat.
4. Check the Level Indicator
Vehicle MUST be on level ground. Ball must
be completely in the blue zone. Readjust if
needed.
For infants 3 months and under, the ball must
completely cover the light blue circle.
If needed, rolled towels may be placed under
the car seat at the vehicle seat crease, until
the ball is completely in the blue zone.
PD308354A
3+months
3+ mois
0+months
0+ mois
Ball MUST be entirely in blue.
La bille DOIT être entièrement
dans la zone bleue.
Page 42

42
3 Rear
Facing
Review your vehicle’s owner manual for vehicle seat belt use
5. Route the Vehicle Seat Belt
Thread vehicle seat belt through the rear-facing
belt path (marked with a blue label) and out the
other side. Buckle it. The seat belt should lie as
flat as possible and not be twisted.
6. Tighten the Vehicle Seat Belt
In most vehicles today, slowly pull the
shoulder belt all the way out and then let it go
back in. You will hear a clicking sound. Slowly
pull out on the belt and it should be locked.
If not, review your car’s owner manual and
section 8-C.
Press down firmly in the center of the car
seat. Pull on the shoulder belt to tighten while
feeding the slack back in the retractor.
Page 43

43
3 Rear
Facing
7. Test For Tightness
Grab the sides of the seat where the vehicle
seat belt is and slide the car seat side-to-side
and front-to-back.
If the seat moves less than 2.5 cm (1 in), it is
tight enough.
8. Check the Level Indicator
Vehicle MUST be on level ground. Ball must
be completely in the blue zone. Readjust if
needed.
For infants 3 months and under, the ball must
completely cover the light blue circle.
If needed, rolled towels may be placed under
the car seat at the vehicle seat crease, until
the ball is completely in the blue zone.
See section 5 to secure your child
Recheck the level indicator with child in seat.
PD308354A
3+months
3+ mois
0+months
0+ mois
Ball MUST be entirely in blue.
La bille DOIT être entièrement
dans la zone bleue.
Page 44

44
3 Rear
Facing
Is Everything Correct?
Car Seat Does Not Move More than
2.5 cm (1 in) at the Belt Path
Level Indicator’s Ball
in the Blue Zone and
Vehicle on Level Ground
Harness Straps at or Just Below the
Child’s Shoulders.
Review section 5
Chest Clip Even With Armpits
Review section 5
Cannot Pinch Harness Straps at the
Shoulder
Review section 5
PD308354A
3+months
3+ mois
0+months
0+ mois
Ball MUST be entirely in blue.
La bille DOIT être entièrement
dans la zone bleue.
Page 45

45
Important
I
m
p
ortant
4 Forward
Facing
4 Forward-Facing
Forward-Facing:
10-30 kg (22-65 lb) 69-125 cm
(27-49 in)
• Place car seat forward-facing in the vehicle
back seat.
• Make sure UAS strap or vehicle seat belt is
routed through the forward-facing belt path
marked with a orange label.
• Install this car seat tightly in your vehicle. Car
seat should not move at the forward-facing
belt path more than 2.5 cm (1 in) from side to
side, front to back.
• Harness straps need to be even with or just
above the top of child’s shoulders and chest
clip is at armpit level.
Vehicle Lap/Shoulder
Seat Belt
UAS Strap
Page 46

46
4 Forward
Facing
• Children are safer riding rear-facing and should
ride rear-facing as long as possible, until they
reach the maximum rear-facing height or weight
rating for their car seat. Then children should
ride forward-facing, using the built-in harness
system for as long as possible until they
reach the maximum forward-facing weight or
height for their car seat. Be sure to check your
Provincial/Territorial Laws, as well as AAP and
Transport Canada recommendations, for car
seat usage.
Vehicle Seat Lap Belt
Page 47

47
Important
I
m
p
ortant
4 Forward
Facing
4-A Install Forward-Facing
with UAS Strap
Review your vehicle’s owner manual for UAS location and use.
1. Make Sure UAS Strap is in the
Forward-Facing Belt Path Marked with
Orange Label
If it is not, see section 7 to move UAS strap.
2. Flip Recline Foot
Toward the Rear of the
Car Seat for ForwardFacing Use
Page 48

48
4 Forward
Facing
3. Remove UAS Connectors and Top
Tether Strap from Storage Locations
Unhook tether and lay it in the seat.
4. Extend the UAS Strap.
For easier installation, extend the UAS strap
to its maximum length by pressing the grey
button and pull out on the strap.
Page 49

49
Important
I
m
p
ortant
4 Forward
Facing
5. Place Car Seat Forward-Facing in
Back Seat of the Vehicle
Place forward-facing in vehicle seat. The
bottom of the seat should sit as flat as
possible on the vehicle seat.
6. Attach UAS Hook to Vehicle’s Lower
UAS Anchors.
UAS strap should not be twisted.
Page 50

50
4 Forward
Facing
7. Tighten the UAS Strap
Press down firmly in the center of the car seat
while tightening the UAS strap.
8. Attach Top Tether Strap
Extend the top tether by
pressing the grey button and
pulling out on the strap and
attach. Consult vehicle’s
owner manual for specific location.
9. Tighten Top Tether Strap
Push the car seat back while tightening the
tether strap to remove all the slack.
Page 51

51
Important
I
m
p
ortant
4 Forward
Facing
10. Test For Tightness
Grab the sides of the seat where the UAS
strap is and slide the car seat side-to-side and
front-to-back.
If the seat moves less than 2.5 cm (1 in), it is
tight enough.
See section 5 to secure your child.
11. To Remove UAS Strap From Vehicle
See section 8-A.
Page 52

52
4 Forward
Facing
Is Everything Correct?
Car Seat Does Not Move More than
2.5 cm (1 in) at the Belt Path
Harness Straps at or Just Above the
Child’s Shoulders.
Review section 5
Chest Clip Even With Armpits
Review section 5
Cannot Pinch Harness Straps at the
Shoulder
Review section 5
Page 53

53
Important
I
m
p
ortant
4 Forward
Facing
4-B
Installing With Vehicle Seat Belt
1. Store UAS Strap
Attach UAS hooks to the plastic bars as
shown.
2. Adjust child restraint to Upright
position.
Flip recline foot toward the rear of the car seat
for forward-facing use.
Page 54

54
4 Forward
Facing
3. Unhook Top Tether Strap From
Storage location and Lay it in the
Seat
4. Place Car Seat Forward-Facing in
Back Seat of the Vehicle
Place forward-facing in vehicle seat. The
bottom of the seat should sit as flat as
possible on the vehicle seat.
Page 55

55
Important
I
m
p
ortant
4 Forward
Facing
5. Route the Vehicle Seat Belt
Thread vehicle seat belt through the forwardfacing belt path (marked with a orange label)
and out the other side. Buckle it. The seat
belt should lie as flat as possible and not be
twisted.
6. Lock the Vehicle Seat Belt
In most vehicles today, slowly pull the
shoulder belt all the way out and then let it go
back in. You will hear a clicking sound. Slowly
pull out on the belt and it should be locked.
If not, review your car’s owner manual and
section 8-C.
Review your vehicle’s owner manual for vehicle seat belt use
Page 56

56
4 Forward
Facing
7. Tighten the Vehicle Seat Belt
Press down firmly in the center of the car
seat. Pull on the shoulder belt to tighten
while feeding the slack back in the retractor.
8. Attach Top Tether Strap
Extend the top tether by pressing the grey
button and pulling out
on the strap and attach.
Consult vehicle’s owner
manual for specific location.
9. Tighten the Tether Strap
Push the car seat back while tightening the
tether strap to remove all the slack.
Page 57

57
Important
I
m
p
ortant
4 Forward
Facing
10. Test For Tightness
Grab the sides of the seat where the vehicle
seat belt is and slide the car seat side-to-side
and front-to-back.
If the seat moves less than 2.5 cm (1 in), it is
tight enough.
See section 5 to secure your child.
Page 58

58
4 Forward
Facing
Is Everything Correct?
Car Seat Does Not Move More than
2.5 cm (1 in) at the Belt Path
Harness Straps at or Just Above the
Child’s Shoulders.
Review section 5
Chest Clip Even With Armpits
Review section 5
Cannot Pinch Harness Straps at the
Shoulder
Review section 5
Page 59

59
5 Securing
Child
5
Securing Child In Car Seat
WARNING! In cold weather, do not put snowsuits or bulky garments on
your child when placing them in the car seat. Bulky clothing can prevent
the harness straps from being tightened properly. To keep child warm, buckle
your child in the car seat and place a blanket around the child or place the
child’s coat on backwards after buckling in.
1. Loosen Harness Straps
(A) Push down on the harness release lever
while pulling out on the harness straps at
the chest clip.
(B) Unbuckle the chest
clip and the buckle. (C)
Place harness straps off
to the sides.
A
B
Page 60

60
5 Securing
Child
2. Place Your Child in the Seat
Make sure their back is flat against the car
seat back.
3. Place Harness Straps Over
Child’s Shoulders and Buckle
You will hear a “click” when buckle tongues
are securely attached. Pull up on each buckle
tongue to make sure it is securely attached.
Page 61

61
5 Securing
Child
4. Be Sure the Harness Straps Are at the
Proper Height
Rear-Facing: Harness straps should be at
or just below the child’s shoulders. Top of
head MUST be at least 2.5 cm (1 in) below
the handle.
Forward-Facing: Harness straps should be
at or just above the child’s shoulders. Top of
child’s ears below top of car seat.
To Raise or Lower
Headrest/Harness
Height
Squeeze the adjustment
handle and move
headrest for the proper
harness height.
Rear-Facing
Forward-Facing
Page 62

62
5 Securing
Child
When headrest is in lowest position, always
pull flap forward as shown.
5. Check the Buckle Position
The correct slot is the one that is closest to
your child without being underneath them.
For adjusting buckle
position only,
recline foot should
be positioned for
forward-facing use.
Page 63

63
5 Securing
Child
From bottom of car seat, rotate metal
retainer to side in order to push it
through slot easier.
Pull buckle strap from the front of the
child restraint as shown.
Page 64

64
5 Securing
Child
Insert buckle strap into desired slot.
Pull up on buckle strap to be sure it is
secure.
When changing buckle strap location
UAS belt must pass between the belt
lines as shown.
Page 65

65
5 Securing
Child
6. Buckle the Chest Clip
You will hear a “click” when the chest clip is
securely buckled.
7. Pull All the Slack Out From Around
the Waist
Pull up on the harness strap while pushing
the chest clip down. Do this to both sides.
Page 66

66
5 Securing
Child
8. Tighten the Harness by Pulling the
Harness Adjustment Strap
A snug harness should not allow any slack. It
lies in a relatively straight line without sagging.
It does not press on the child’s flesh or push
the child’s body into an unnatural position.
When you are not able to pinch any of the
harness webbing at your child’s shoulder, the
harness is tight enough.
9. Raise the Chest Clip to Child’s Armpit
Level
Check again for tightness. Tighten more if
needed.
Page 67

67
Important
I
m
p
ortant
6 Accessories
6 Accessories (on select models)
Cup Holder
Cup holder can be on either side.
To attach, pull back the seat pad to
expose the attachment guide. Slide the
cup holder down the guide until it locks
into place.
To remove, place both hands under the
cup holder and push up on the cup holder.
Page 68

6 Accessories
68
Body Support
Use only in the rear-facing mode.
Body support must be used if shoulders
are below the lowest harness setting.
Never allow body support to bunch or fold
behind child.
Page 69

69
7 Moving
UAS
7
Moving the UAS Strap
1. For Ease of Moving the UAS Strap
A. Unclip The Seat Pad From The Front Of
The Child Restraint.
B. Pull the UAS strap out of the belt path
opening, so that the UAS hooks end up on
the same side of the child restraint.
A
B
Page 70

7 Moving
UAS
2. Slide Entire UAS Strap Along Bar to
Correct Belt Path Opening
Rear-Facing: Slide UAS strap down to the
blue label.
Forward-Facing: slide the UAS strap up
to the orange label.
3. Feed the UAS Connector with the Adjuster Closest to it
Through the Chosen Belt Path
Rear-Facing: Make sure the UAS strap is between the belt lines, is flat
and is not twisted.
70
Page 71

71
7 Moving
UAS
4. Replace the seat pad fabric on the
front of the child restraint.
Pull the harness adjustment strap through
pad. Replace the seat pad.
Forward-Facing: Make sure the strap
is flat and not twisted.
Page 72

72
8 Additiona
l
Information
8-A
How to Remove UAS and Tether
72
Top Tether Strap
To remove, press the grey
button and pull out on the strap
to release the tension. Press
in on the hook’s spring. Push
tether hook in, then lift up and
pull away from tether anchor.
UAS
Push gray button in while pulling on UAS strap to loosen. Press in on the
hook’s spring. Push hook in, lift hook up, twist and pull out away from
anchor point.
Page 73

8 Additional
Information
73
Review your vehicle owner’s manual for seating locations.
In the event there is no available back seat and / or you have no other option than
to place a child other than an infant in a rear-facing car seat in a front passenger
seating position, experts recommend that you take the following steps:
• Ensure the child is properly restrained according to their age and size
• Move the seat as far back as possible
• Make sure the child is not leaning out of position, such as leaning
forward into the deployment path of the air bag
• Set the air bag ON-OFF switch, if available, to the OFF position
8-B
Unsafe Vehicle Seat Locations
Never install this car seat in any of the following vehicle seating locations:
Rear-facing or side-facing vehicle seats
Rear-facing with an active front air bag
Page 74

74
8 Additiona
l
Information
74
This car seat can be installed using a vehicle seat belt. To do this, you will
need to change the seat belt to a locked mode for use with car seats. With
some vehicle seat belts, this is done with the latchplate; with other vehicle
seat belts, this is done with the retractor.
8-C
Vehicle Seat Belts
Review your vehicle owner’s manual for vehicle seat belt use
Vehicle Seat Belt Terms
Retractor
A device that winds up the unused vehicle seat
belt. It is often hidden inside the panels on the
walls of the vehicle or in the vehicle seatback.
Latchplate
The male end of the seat belt with the silver tongue.
Seat Bight
The crease where the vehicle seat back and seat
bottom meet.
Page 75

75
8 Additional
Information
75
There are two different types of vehicle seat belts that can be used with this car seat:
Identify Your Seat Belt Type
Lap Belt Only
2 connection
points.
Lap/Shoulder
Belt
3 connection
points. Can
be used in
all car seats
modes of use.
Some vehicles you may not
get a secure fit. Read both your
vehicle and car seat manuals.
Belts Forward of the Seat Bight
The following types of vehicle seat belts CANNOT
be used safely with this car seat:
Lap Belt with Motorized
Shoulder Belt
Lap Belt or Shoulder
Belt Mounted on Door
Page 76

76
8 Additiona
l
Information
76
Always review your vehicle owner’s manual for specific information about
your vehicle seat belts.
There are three types of retractors: ELR (Emergency Locking
Retractor), ALR (Automatic Locking Retractor) , and
Switchable (ELR switch to ALR). To determine your type of
retractor, follow these steps:
1. Slowly pull the belt out about halfway and stop.
2. Let the belt retract back several inches.
3. Try to slowly pull the belt out more. If the belt cannot be pulled any further, it is
ALR. If it can be pulled further, go to the next step.
4. Slowly pull the belt all the way out, and then allow it to retract several inches.
5. Try to pull the belt all the way out again. If it cannot be pulled out, it is
Switchable. If it can still be pulled out freely, it is ELR.
Note: Most vehicles manufactured after 1996 will have Switchable retractors in
the back seat. If you have any questions about your retractor type, consult your
vehicle owner’s manual or call Graco for assistance.
Lap/Shoulder Belt Installation - Rear-Facing/Forward-Facing Modes
Page 77

77
8 Additional
Information
77
How to Lock Your Lap and Shoulder Vehicle Seat Belt
Note: With the vehicle seat belt in this locking mode, all the tension is upwards in the
shoulder belt. This may start to tilt your car seat sideways. If this happens, use a locking
clip instead of this switching the retractor. See Sliding Latchplate and ELR Retractor.
Sliding Latchplate and Switchable
Retractor
A latchplate that slides freely on the belt webbing
and cannot, by itself, hold the belt snug around a car
seat.
When installing the car seat, route the vehicle seat
belt through the proper belt path and buckle it in.
Slowly pull the shoulder belt all the way out to
switch it to locking mode. Then, as you pull the
vehicle seat belt tight, feed all the slack back into the
retractor.
Grab the sides of the seat at the belt path and slide
the seat side-to-side and front-to-back. The seat
should not move more than 2.5 cm (1 in).
Page 78

78
8 Additiona
l
Information
78
Locking Latchplate and ELR Retractor
A latchplate that holds the lap belt snug
after it has been adjusted; contains a metal
bar on the underside of the hardware that
“locks” the belt in position.
When installing the car seat, route the
vehicle seat belt through the proper belt path
and buckle it in. Then, pull upwards on the
shoulder belt so that the lap belt gets tight
around the car seat.
Grab the sides of the seat at the belt path and
slide the seat side-to-side and front-to-back.
The seat should not move more than 2.5 cm
(1 in).
Page 79

79
8 Additional
Information
79
Sliding Latchplate and ALR Retractor
A latchplate that slides freely on the belt
webbing and cannot, by itself, hold the belt
snug around a car seat.
Slowly pull the shoulder belt all the way
out. Route the vehicle seat belt through the
proper belt path and buckle it in. Then, as
you pull the vehicle seat belt tight, feed all
the slack back into the retractor.
Grab the sides of the seat at the belt path
and slide the seat side-to-side and front-toback. The seat should not move more than
2.5 cm (1 in).
Page 80

80
8 Additiona
l
Information
80
2.5 cm (1 in)
Locking Clip
located on the back of
the backrest.
Sliding Latchplate and ELR Retractor
A latchplate that slides freely on the belt
webbing and cannot, by itself, hold the belt
snug around a car seat.
With this retractor, you will need to use the
locking clip to lock the vehicle seat belt.
Route the vehicle seat belt through the
proper belt path and buckle it in. Pull the
vehicle seat belt tight. While pushing down
on seat, pinch the two straps together
behind the buckle tongue. Unbuckle the belt
without allowing it to slip.
Attach locking clip to lap and shoulder belts
as shown.
Rebuckle belt. Check that lap belt does not
move by pulling hard. If belt loosens or
lengthens, repeat procedure.
Page 81

81
8 Additional
Information
81
Locking Latchplate and No Retractor
When installing the car seat, route the lap seat
belt through the proper path and buckle it in.
Then, pull upwards on the tail of the belt so that
the lap belt gets tight around the car seat.
Sewn On Latchplate and ALR
Slowly pull the lap belt all the way out. Route
the vehicle seat lap belt through the proper belt
path and buckle it in. Then, pull the lap belt tight
while feeding all the slack back into the retractor.
Lap Belt Installation
Always review your vehicle owner’s manual for specific information
about your vehicle seat belts.
Grab the sides of the seat
at the belt path and slide
the seat side-to-side and
front-to-back. The seat
should not move more
than 2.5 cm (1 in).
Page 82

82
9 Care &
Cleaning
Clean with a damp sponge using mild soap and
cool water. Refer to seat pad care tag for washing
instructions.
1. Make sure harness straps are loose, remove
both harness strap loops from splitter plate on
back of child restraint and pull through front
of pad. Open chest clip, release tongues from
buckle.
9-A
Cleaning Seat Pad
2. Remove the elastic straps from the
hooks on back of seat as shown.
Page 83

83
Important
I
m
p
ortant
9 Care &
Cleaning
3. Remove seat pad from shell by
pushing harness straps and buckle
strap through seat pad.
4. Remove headrest cover by
pulling the tab out from behind the
headrest foam and then peel the
cover off the headrest.
DO NOT remove
foam padding.
Page 84

84
9 Care &
Cleaning
Recline the car seat and locate the metal retainer.
Rotate the metal retainer up through the shell and
pad. From the front, pull the buckle strap out.
To clean buckle, place in a cup of warm water
and gently agitate the buckle. Press the red
button several times while in the water.
DO NOT SUBMERGE THE BUCKLE STRAP. DO
NOT USE SOAPS, HOUSEHOLD DETERGENTS or
LUBRICANTS.
Shake out excess water and allow to air dry.
Repeat steps as needed until it fastens with a
click. Re-insert the buckle into the same slot it
was removed. Pull up on buckle strap to make
sure it is secured.
9-B Cleaning Buckle Strap
WARNING! Inspect and
clean buckle from time
to time to remove any
objects or debris that
could prevent latching.
Page 85

85
Important
I
m
p
ortant
9 Care &
Cleaning
9-C Cleaning Harness and UAS
Straps
Surface wash only with mild soap and damp
cloth. DO NOT IMMERSE THE HARNESS
STRAPS or UAS STRAP IN WATER Doing so
may weaken the straps.
If harness straps or UAS strap are frayed or
heavily soiled, contact Customer Service at
www.gracobaby.ca or 1-800-345-4109.
Page 86

86
NOTES:
Page 87

87
NOTES:
Page 88

88
Store instruction manual behind the tab
with the instruction book icon as shown.
Replacement Parts
PD000000 9/14
CONTENDER
TM
65
CHILD RESTRAINT
www.gracobaby.com
Do not install or use this
child restraint until you
read and understand the
instructions in this manual.
FAILURE TO PROPERLY USE
THIS CHILD RESTRAINT
INCREASES THE RISK OF
SERIOUS INJURY OR DEATH
IN A SUDDEN STOP OR
LockingClip
Storage
To purchase parts or accessories in the Canada, please contact us at the following:
www.gracobaby.ca
gracoconsumercareca@newellco.com
or
1-800-345-4109
 Loading...