

Page 1
IMPORTANT! KEEP FOR FUTURE REFERENCE
© 2008 Graco PD110210A 12/08
CONTEMPO
Page 2
PARTSACCESSORIES (certain models only)
1
2
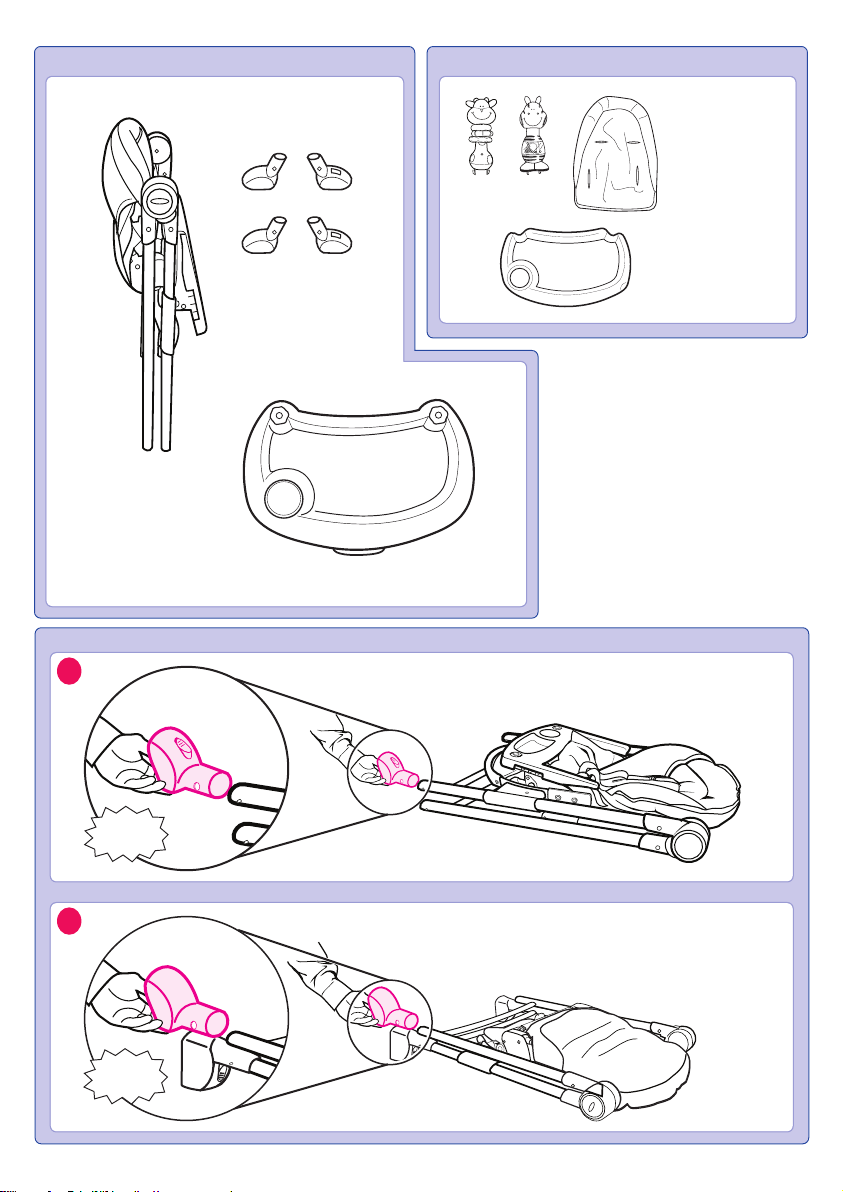
Attaching Front Casters (Certain models only)
Attaching Rear Feet (Certain models only)
CLIK!
CLIK!
2
Page 3

Opening Highchair
Adjusting Height
9
6
7
8
3
Reclining Seat
CLIK!
4
5
3
Page 4
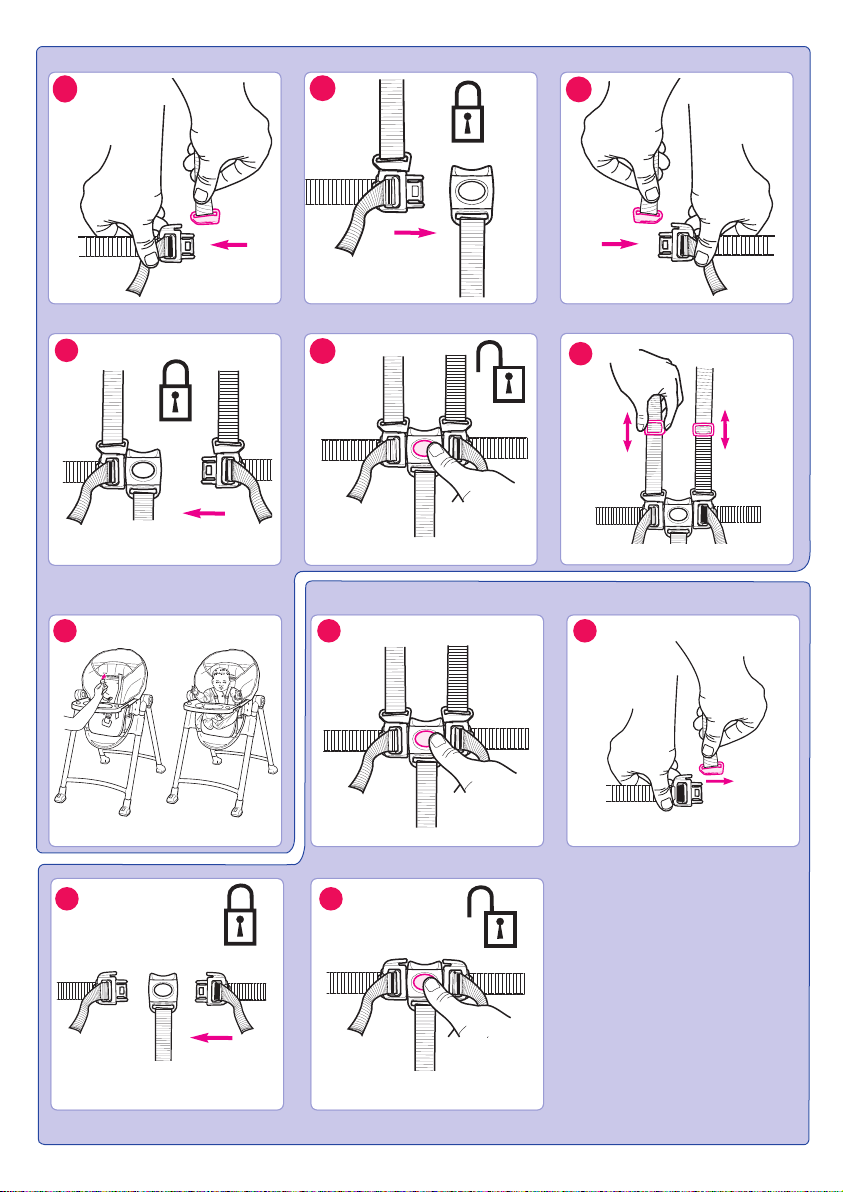
To Secure your Child
10
11
12
13
14
16
3 Point Buckle
17 18
19 20
15
4
Page 5

Storage
28
29
30
31
32
Attaching Tr ay
21
22
25
23
24
Head Support (on certain models)
Tr ay Insert
26
27
CLIK!
1
2
5
Page 6

Removing Seat Pad
33
34
35
36
37
38
39
40
41
42
1
2
6
Page 7

Casters (Certain models only)
43
44
Mix ‘N Move To ys (certain models only)
47
48
4645
7
Page 8

WARNINGS
IMPORTANT! KEEP FOR FUTURE REFERENCE
PLEASE SAVE OWNER’S
MANUAL FOR FUTURE USE.
EN 14988-1:2006
WARNING: DO NOT leave your child unattended. Always keep your child in view.
WARNING: DO NOT use highchair unless all
components are correctly fitted and adjusted.
WARNING: Always make sure that the harness is correctly fitted and adjusted.
DO NOT use the highchair until the child can
sit up unaided.
DO NOT move highchair with child inside.
Use only on a level stable surface.
STORE HIGHCHAIR away from children
when not in use.
ENSURE THAT all additional hazards such as
electrical flex are kept out of reach of the
child in the highchair. If the highchair is used
by someone unfamiliar with it, e. g. grandparents, always show them how it works.
PREVENT SERIOUS INJURY OR DEATH
FROM FALLS OR SLIDING OUT. Always use
seat belt. Secure your child at all times with
the restraint system provided, in either the
reclining or upright position. The tray is not
designed to hold your child in the highchair.
Regularly check the locks and fittings for security.
DO NOT FORCE TRAY against child. Use
only the four adjustment positions. Be sure
both adjustment fingers are engaged in armrest slots.
STRANGULATION HAZARD:
Do not place highchair in any location where
there are cords, such as window blind cords,
drapes, phone cords, etc.
THIS HIGHCHAIR IS DESIGNED TO BE used
by a child up to 3 years of age. Maximum
weight 40 pounds (18. 1 kg).
FOLLOW ASSEMBLY INSTRUCTIONS
CAREFULLY.
If you experience any difficulties, please cotact
the Customer Ser vice Department.
DO NOT TO USE THE HIGHCHAIR if any
part is broken, torn or missing.
WARNING: A child’s safety is your
responsibility. Child should be harnessed at all times and
the highchair must be fully open and locked
before placing child inside.
For extra safety, D-rings are provided for a
separate safety harness approved to BS6684
and EN13210.
WARNING: Be aware of the risk of open fire
and other sources of strong heat, such as electric bar fires, gas fires etc. in the vicinity of the
high chair.
C
ARE AND MAINTENANCE
FROM TIME TO TIME CHECK YOUR HIGHCHAIR for worn parts, torn vinyl or stitching.
Replace or repair the parts as needed. Use
only Graco replacement parts.
TO CLEAN HIGHCHAIR FRAME, use onlyhousehold soap and warm water. NO
BLEACH or detergent.
TO CLEAN REMOVABLE SEAT COVER, DO
NOT machine wash or dr y. Use only household soap and warm water. NO BLEACH or
detergent.
EN
8
Page 9

– To attach toy
Attach front casters with locks onto front legs.
2
1
EN
Instructions
Attaching Casters (Certain models only)
Reclining Seat
3 recline positions
7
Head Support
See images –
25
Casters (Certain models only)
To lock casters.
To unlock casters.
43
44
Storage
Remove tray before folding highchair.
Push red buttons on each side of snack tray to
release, as you push side bars back.
Place tray on highchair for storage, as shown.
Optional: for maximum storage, lower highchair.
27
28
Removing Seat Pad
Unhook elastic straps on seat pad from the
back of footrest.
33
Adjusting Height
See images –
8
To Secure Your Child
See images –
10920
Use slide adjuster at shoulder and waist for
further adjustment. Repeat on other side.
15
When changing harness strap slots, MAKE
SURE harness straps are going through same
slots in seat pad and seat back.
The harness straps must go into the slot
that is even with or slightly above the shoulders. Avoid twisting straps.
16
Attaching Tr ay
Squeeze adjustment button on front of tray
to adjust tray to fit child.
22
Slide tray onto snack tray.
21
Tr ay Insert
To remove, lift tray up from corner.
24
Snap tray insert onto tray.
23
26
31
Unfasten hook and loop tape on back of
seat pad.
34
Pull bottom of seat pad out through opening behind snack tray.
35
Push red buttons on each side of snack tray
to release, as you push side bars back.
36
Push crotch strap through
bottom slot.
37
Pull sides of seat pad fabric out of the channels located in the back of the snack tray.
38
Push waist straps through slots in seat pad.
39
Pull harness straps through slots in seat
pad.
40
Pull seat pad off backrest.
41
Mix ‘N Move To ys (Certain models only)
To remove plugs.
42
46 47
See images –
63
Opening Highchair
32
Snap rear feet onto rear legs.
To reattach plugs when not using
Mix “N Move To ys.
48
45
9
Page 10

10
Page 11

11
Page 12

Graco Continential Europe
Newell Rubbermaid Luxembourg SARL
1 rue Edmond Reuter
L-5326 CONTERN
Luxembourg
Graco Children’s Products UK & Ireland
Halifax Avenue
Fradley Park
Lichfield WS 13 8SS
United Kingdom
www. graco.eu
12
 Loading...