

Page 1
R
R
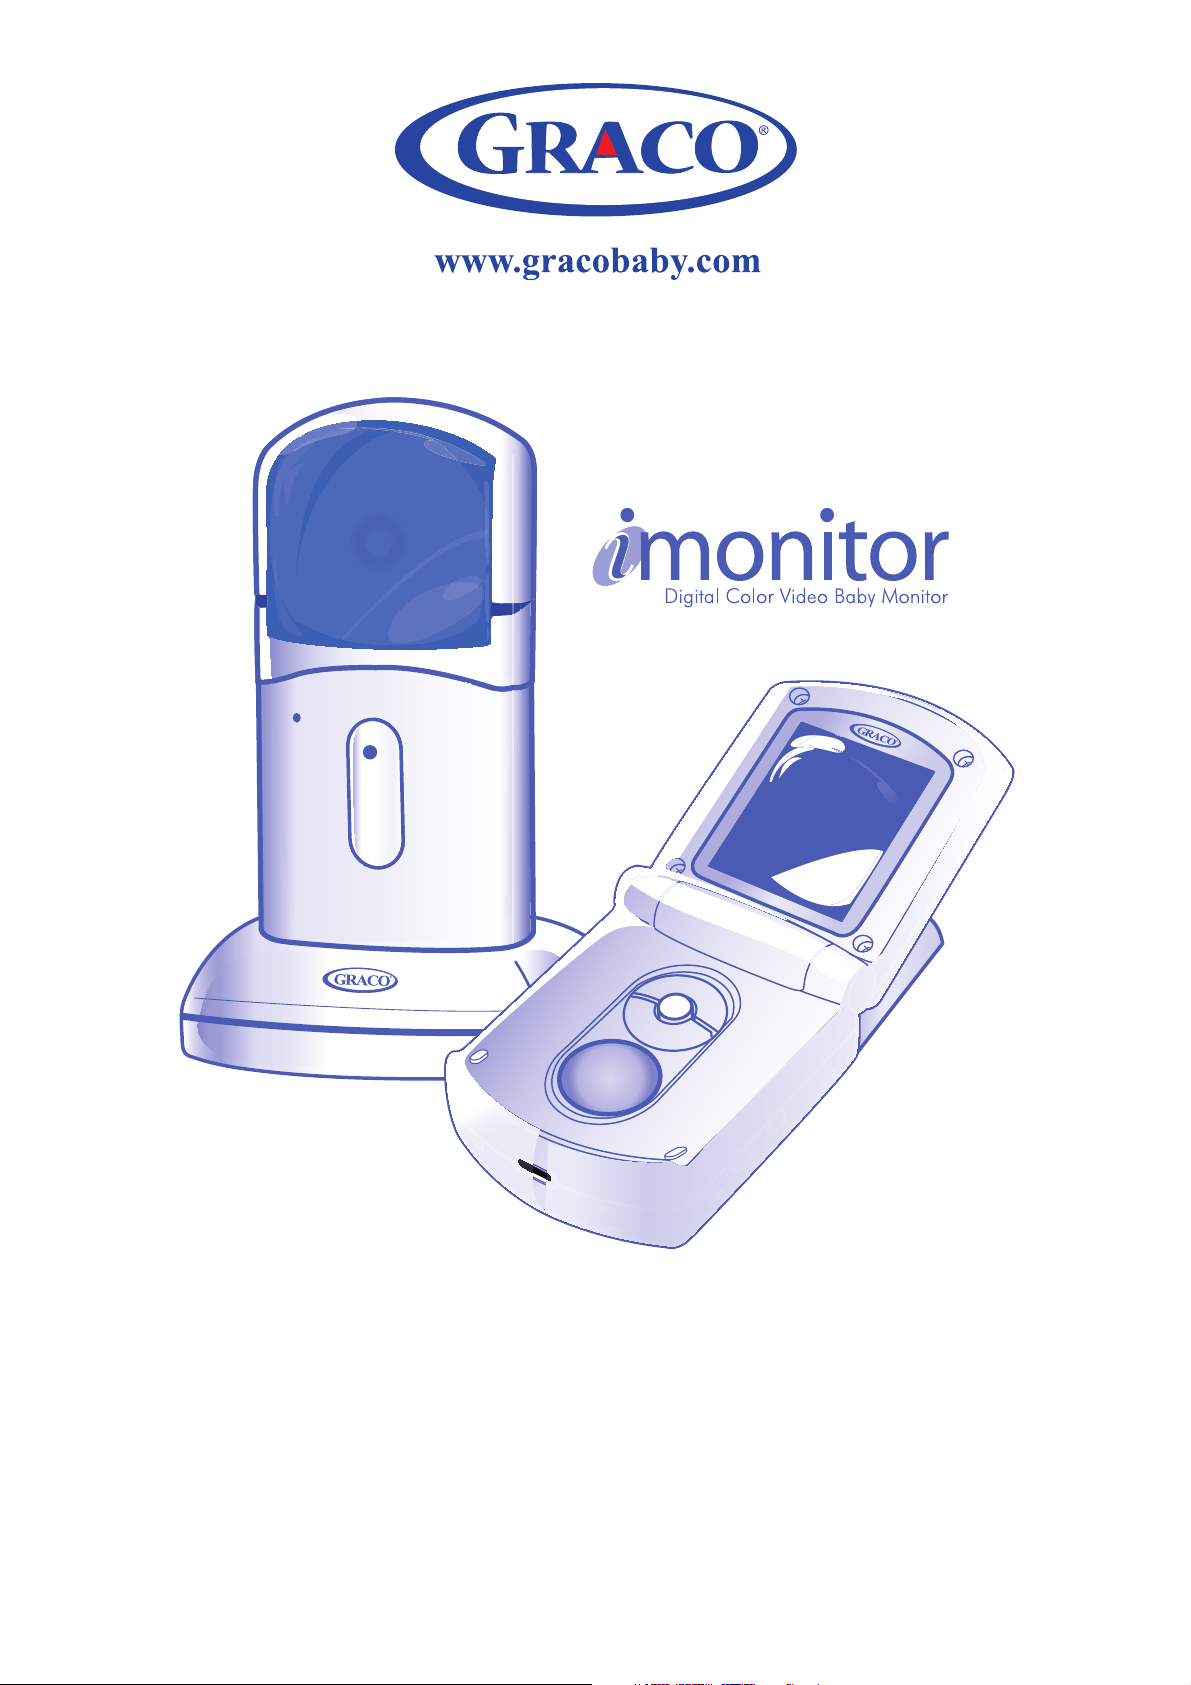
OWNER’S MANUAL
©2008 Graco ISPM024BA 3/08
Keep Instructions For Future Reference
Page 2
Warnings to Parents and Other Users
Failure to follow these warnings and the assembly
instructions could result in serious injury or death.
This device is designed to aid in the monitoring of
your child. When using the monitor, you must still
provide the supervision necessary for the continued
safety of your child. This product is not designed or
intended for use as a medical monitor. Always be sure
that both the transmitter and receiver are working
properly and are within range of each other.
• STRANGULATION HAZARD. Keep the adapter
cords out of the reach of children. Do not use with
extension cords.
• DO NOT place the Nursery Unit or its cord within
your child’s reach. Do not put the Nursery Unit inside a
crib or playard.
• Use ONLY with 110-120 volt AC electrical outlets.
• Protect the AC adapter cords. Place them so they are
not walked on or pinched by furniture or other items.
• Allow for proper ventilation when units are in use.
Do not cover the Nursery Unit or Parent Units with any
object such as a blanket. Do not place it in a drawer or in
any location which would muffle the sound or interfere
with the normal flow of air.
• DO NOT immerse any part of the Nursery Unit, Parent
Units, or docking station in water. Clean only with a dry
cloth.
2
Page 3
• DO NOT place unit near water and moisture. Do not
WARNING Modifications not authorized by the
manufacturer may void users authority to operate this
device.
NOTE: This equipment has been tested and found to
comply with the limits for a Class B digital device,
pursuant to Part 15 of the FCC Rules.
use the Nursery Unit outdoors. Do not use the Nursery
Unit near possible wet areas, such as a bathtub, shower,
wash basin, sink, laundry tub, swimming pool, wet
basement, etc.
• Keep Nursery Unit away from heat sources, such as
fireplaces, radiators, stoves, and TVs or other appliances.
Heat can damage the case or electrical parts.
• Do not use the Nursery Unit if:
• The adapter cords or plugs have been damaged.
• The unit has been exposed to liquids.
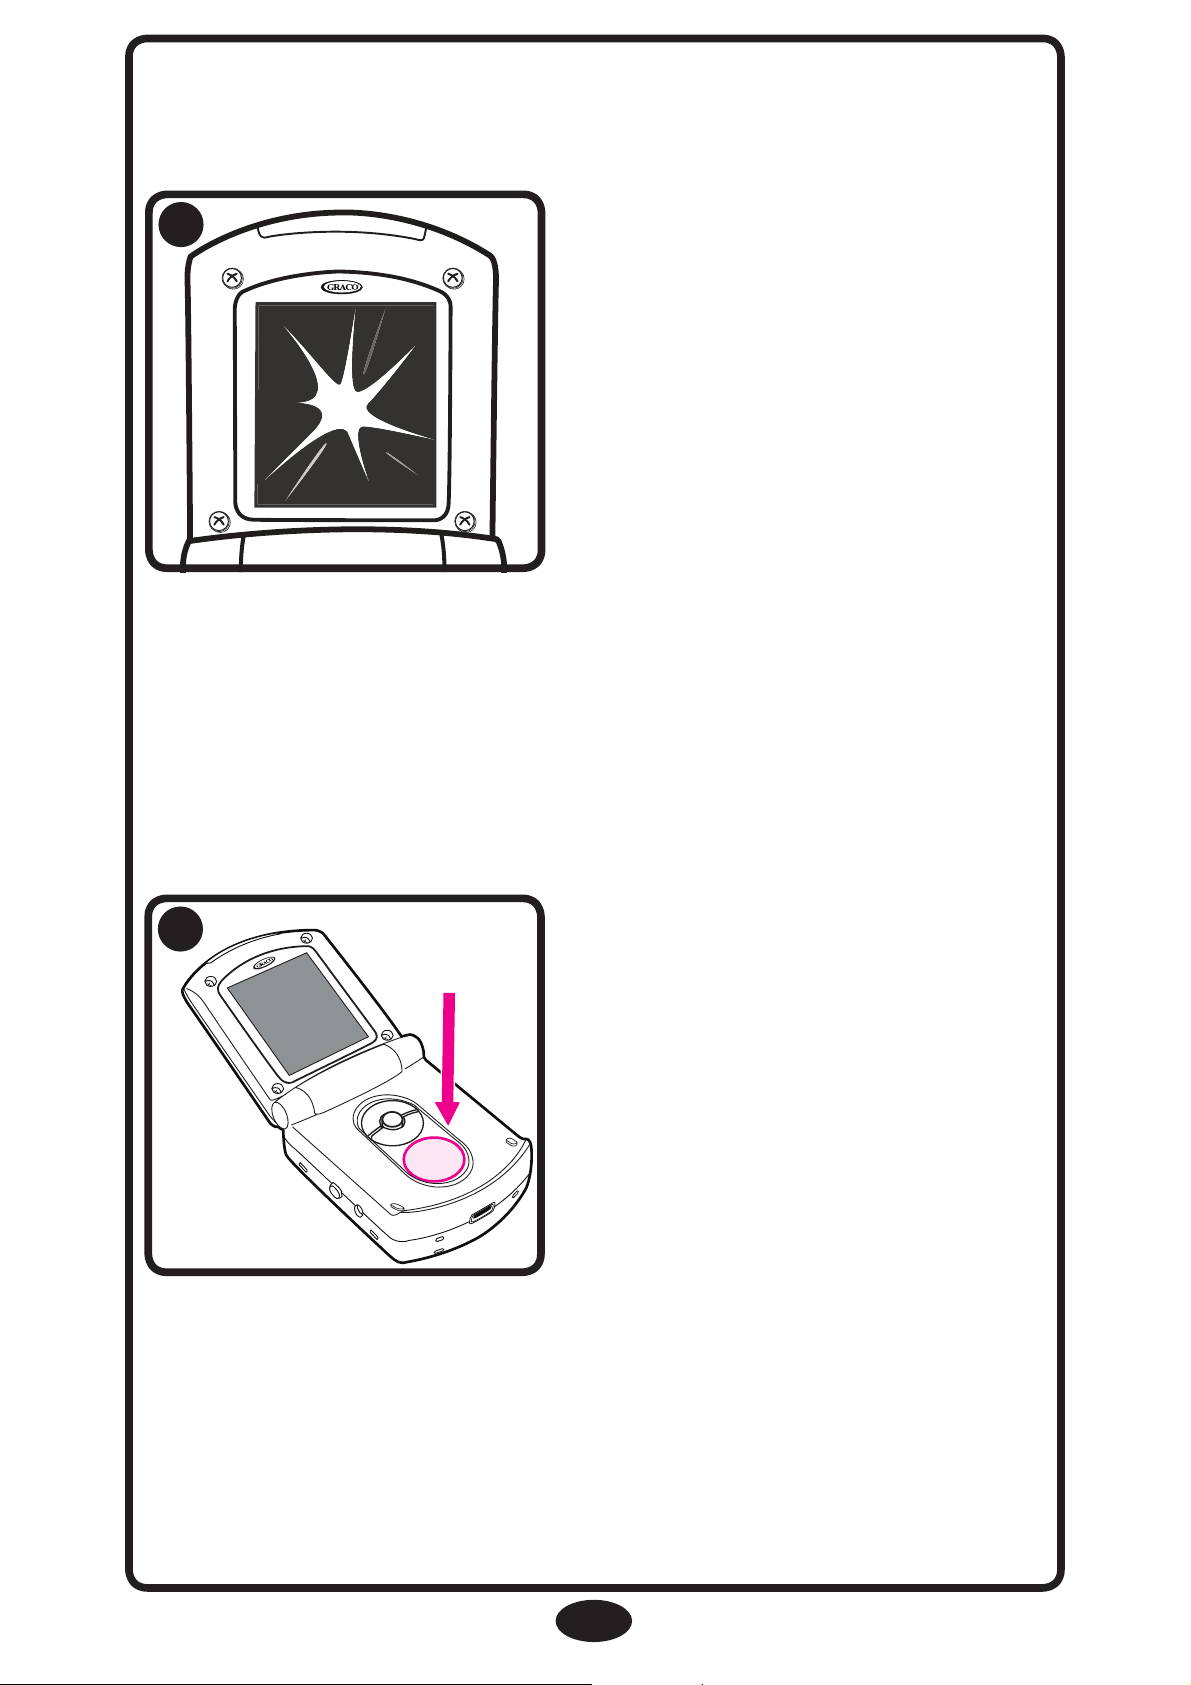
• Unit has been dropped or is damaged.
•
DO NOT OPEN THE NURSERY UNIT, PARENT
UNIT, NURSERY UNIT BASE OR ADAPTERS.
user-serviceable parts inside. Risk of electrical shock,
fire or death.
• The antenna used for this transmitter must be installed
to provide a separation distance of at least 20 cm (7.9”)
from all persons and must not be co-located or operating
in conjunction with any other antenna or transmitter.
FCC Statement:
No
3
Page 4

4
These limits are designed to provide reasonable
protection against harmful interference in a residential
installation. This equipment generates, uses and can
radiate radio frequency energy and, if not installed and
used in accordance with the instructions, may cause
harmful interference to radio communications.
However, there is no guarantee that interference will not
occur in a particular installation. If this equipment does
cause harmful interference to radio or television
reception, which can be determined by turning the
equipment off and on, the user is encouraged to try to
correct the interference by one or more of the following
measures:
• Reorient or relocate the receiving antenna.
• Increase the separation between the equipment and
receiver.
• Connect the equipment into an outlet on a circuit
different from that to which the receiver is connected.
• Consult the dealer or an experienced radio/TV
technician for help.
This device complies with part 15 of the FCC Rules.
Operation is subject to the following two conditions:
(1) This device may not cause harmful interference, and
(2) This device must accept any interference received,
including interference that may cause undesired
operation.
Page 5
R
R
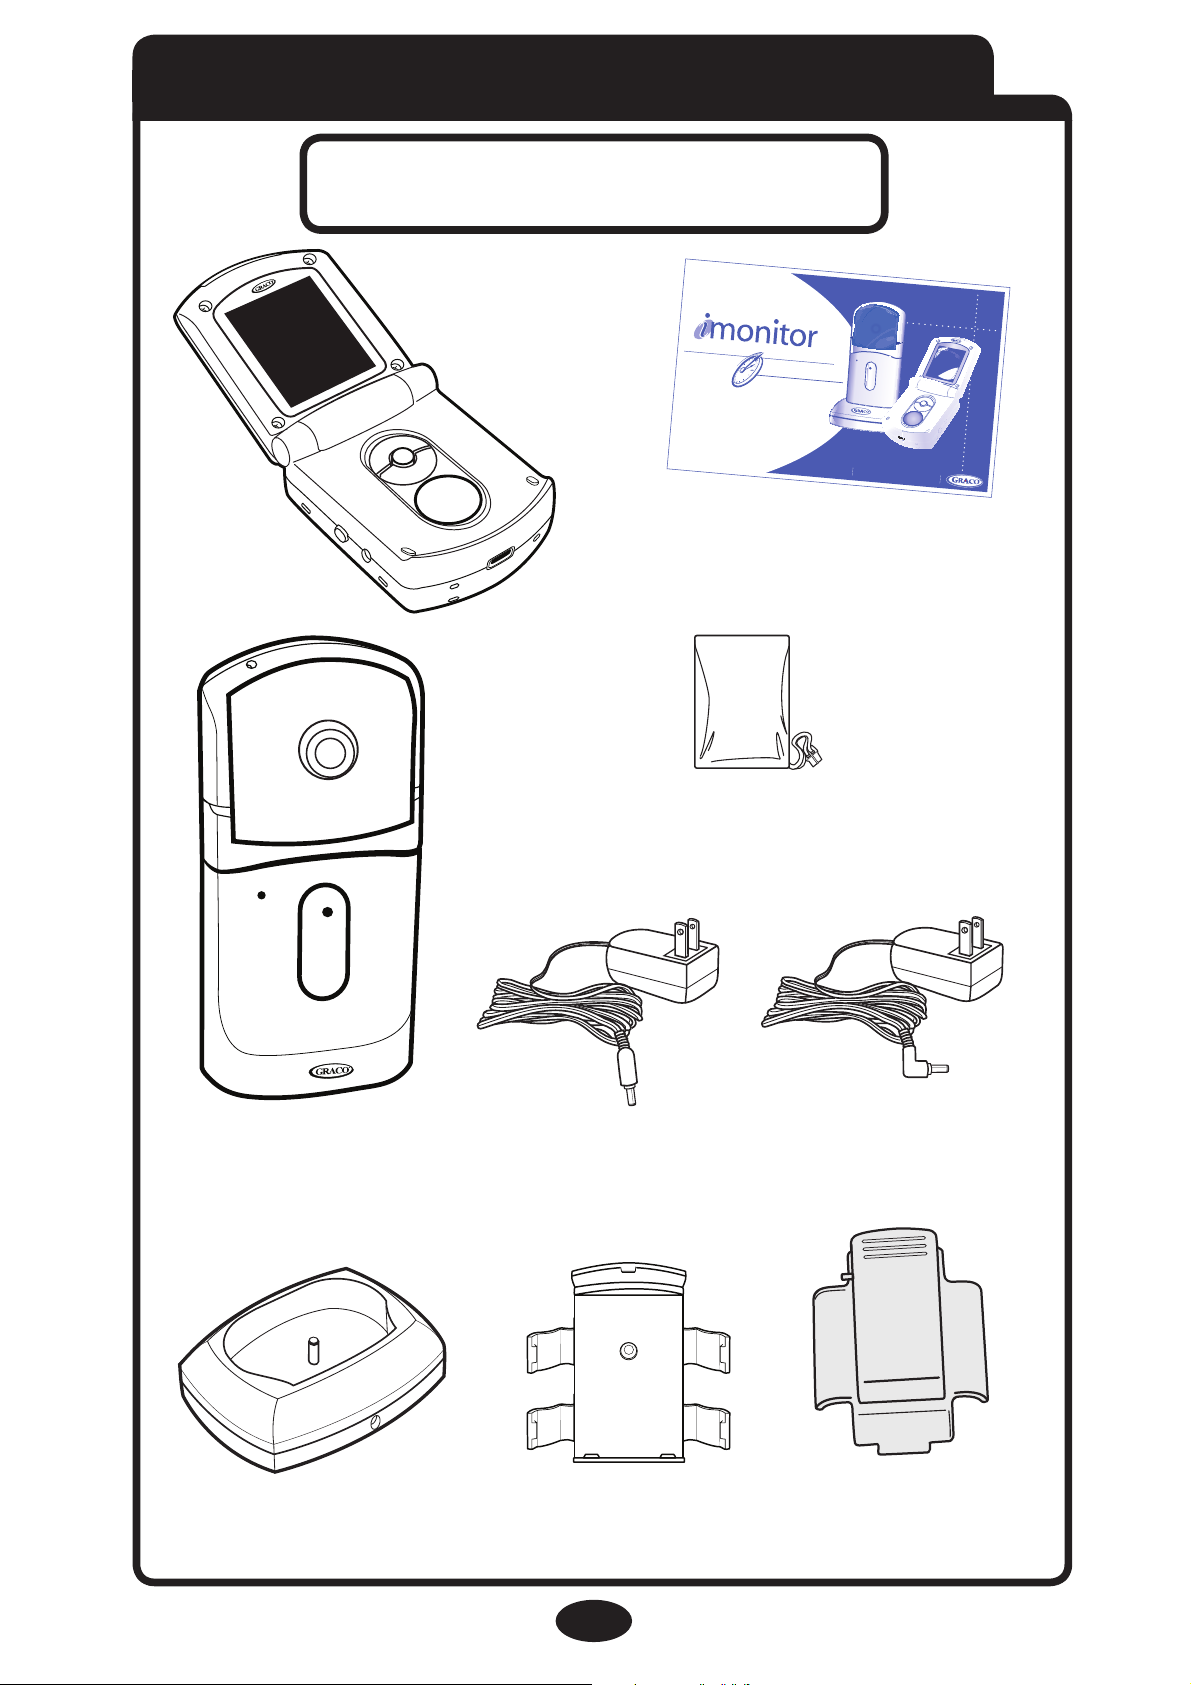
Parent Unit
(A6402)
Parent Unit Battery
Nursery Unit Base
(A5195)
(1) AC Adapter
OWNER’S MANUAL Keep instructions for future use.
Digital Color Video Baby Monitor
Qu
ick Start
Product Instruction Manual
Quick Start Manual
Wall Mount
(1) AC Adapter
Belt Clip
5
Parts List
Adult assembly required.
Tool required: Phillips screwdriver
Nursery Unit
(A6403)
Page 6
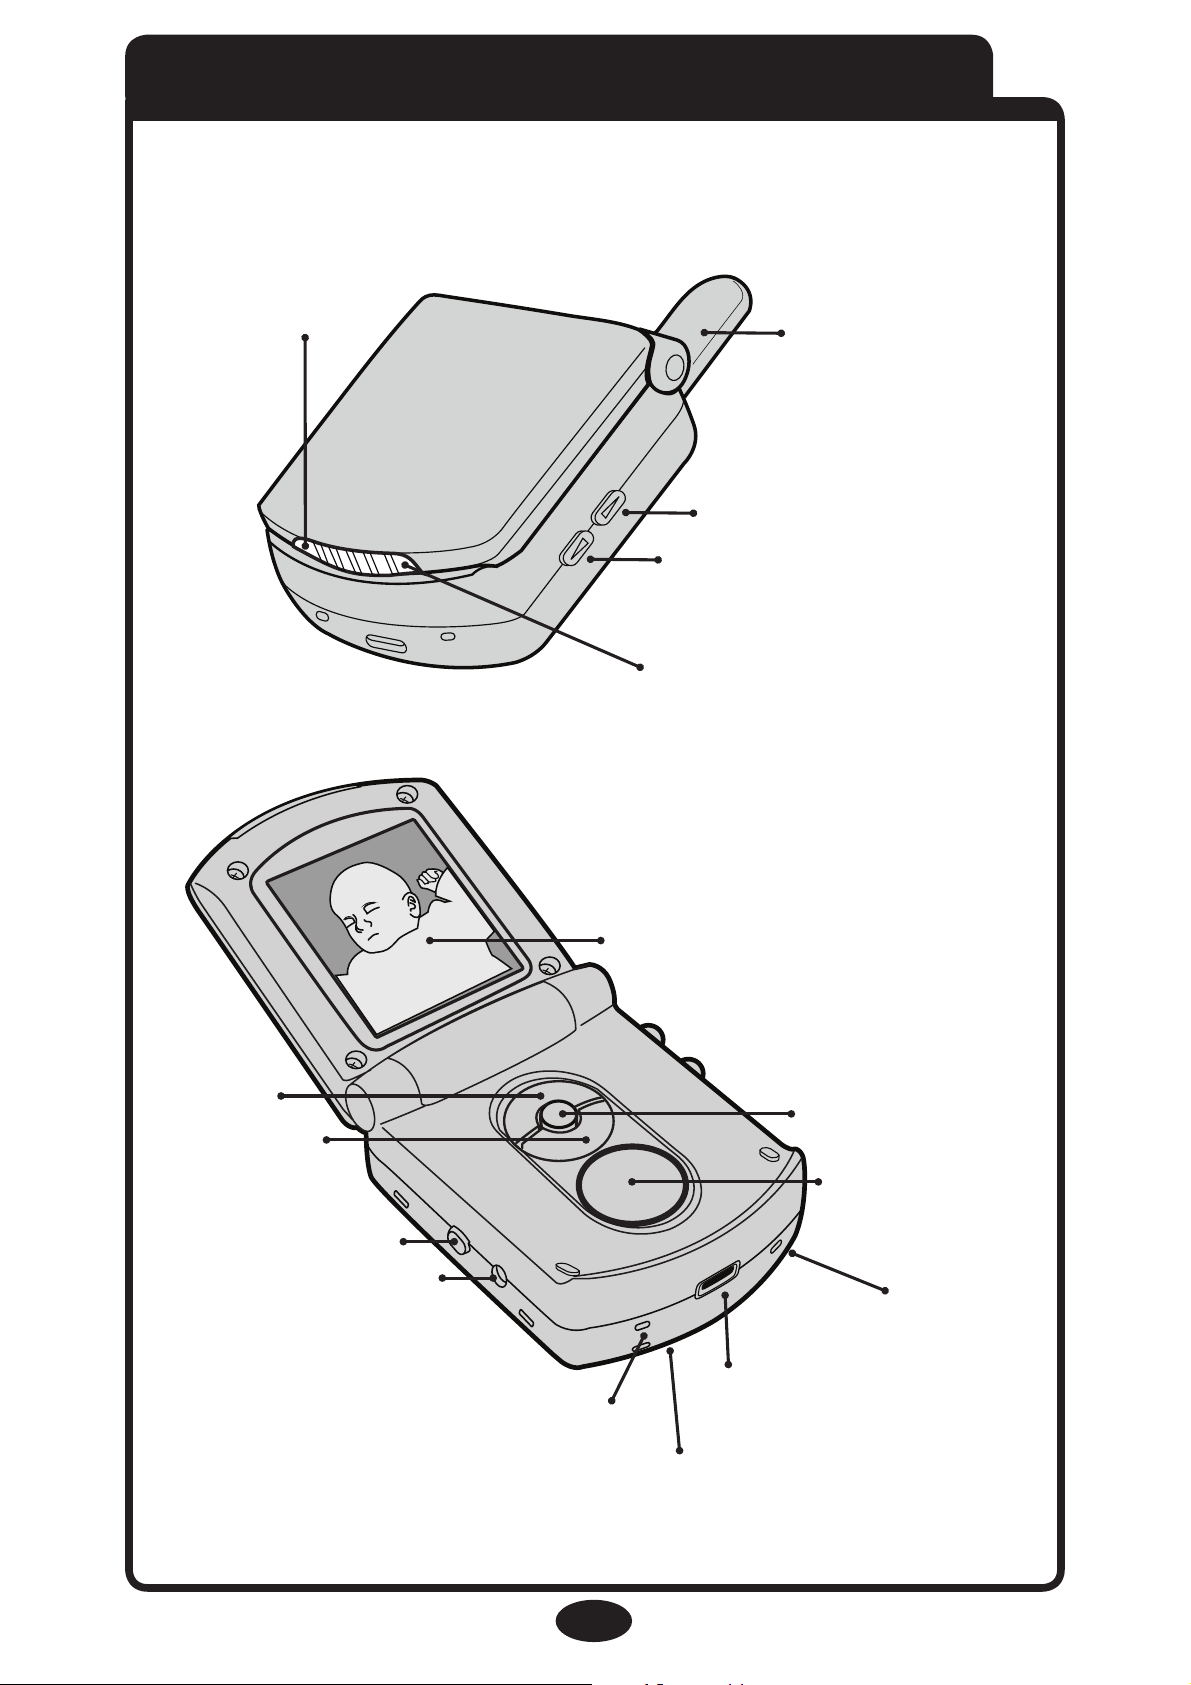
VIDEO ON/OFF (pg14)
CHARGING
STATUS LIGHT
(pg26)
LCD
SCREEN
SPEAKER
BATTERY LEVEL LIGHT (pg25)
POWER ON/OFF (pg13)
AC ADAPTER JACK (pg8)
UP(pg15)
OK (pg15)
DOWN (pg15)
BATTERY(pg7)
6
Parent Unit
CONNECTION
LIGHT
(pg13)
SOUND LIGHTS
ANTENNA
VOLUME DOWN (pg24)
VOLUME UP (pg24)
Page 7
7
Installing Batteries
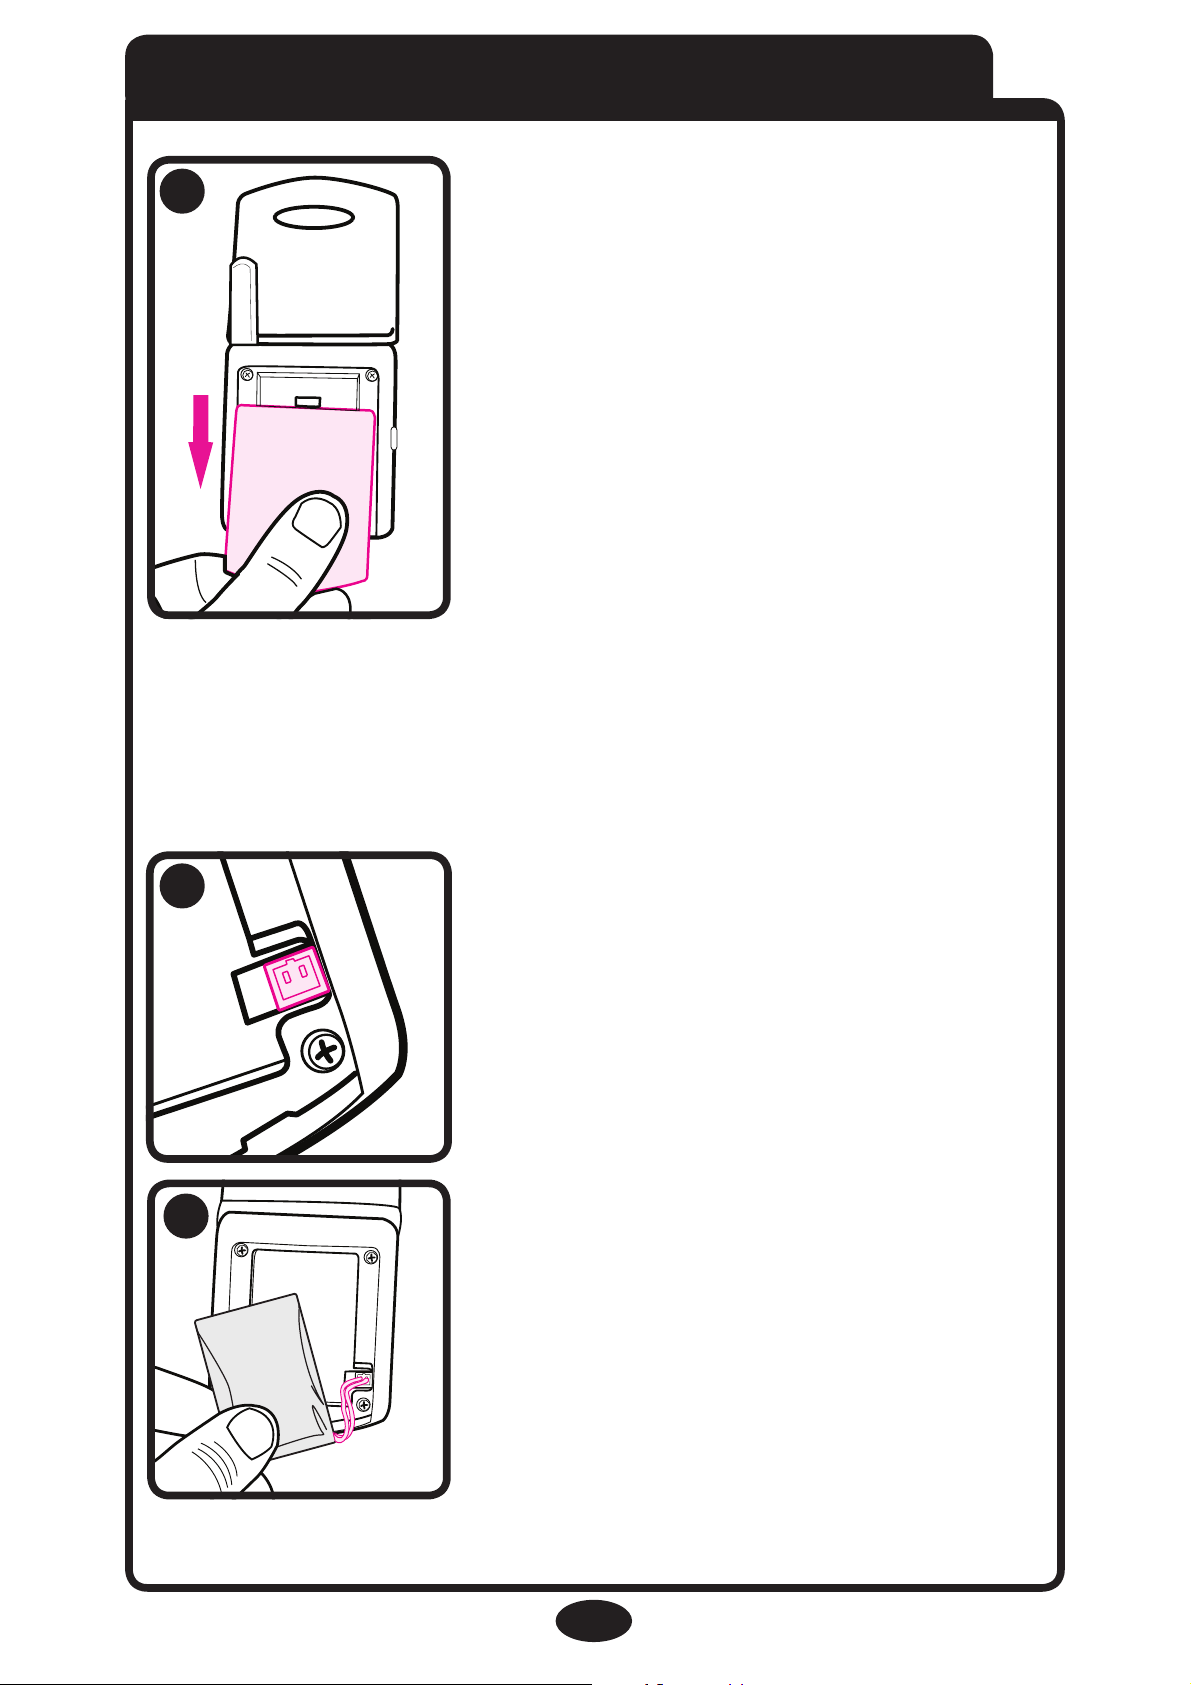
The battery must be plugged
into the Parent Unit before
the unit will be ready for use.
Remove the battery door
cover on the Parent Unit by
sliding it down.
Place battery pack into recess
and press wire into the slot.
Plug battery into the slot
shown in #2.
1
2
3
Page 8
8
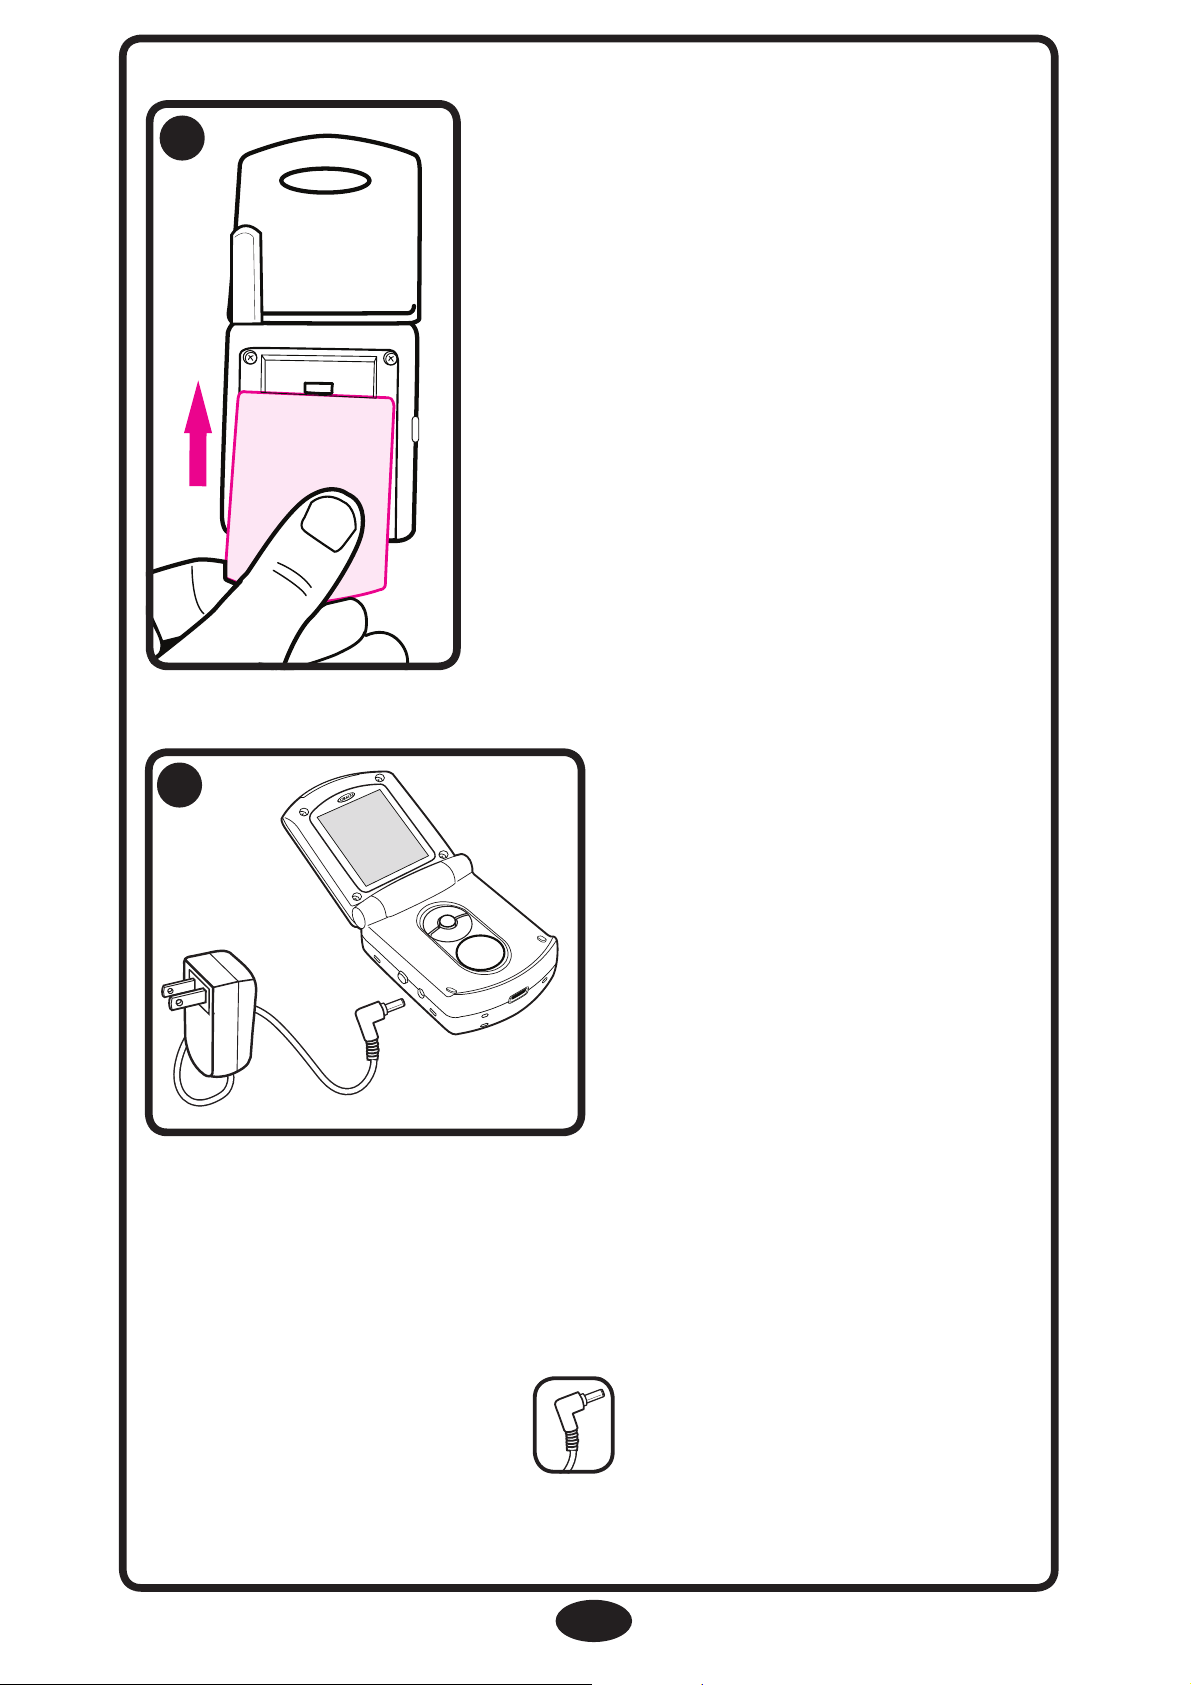
Replace the battery door.
4
R
Attach the AC Adapter
to the unit and plug into
wall to charge the
battery. Charge battery
for 3 hours.
5
NOTE: Make sure to use the adapter with the “L”
shaped end, as shown.
Page 9
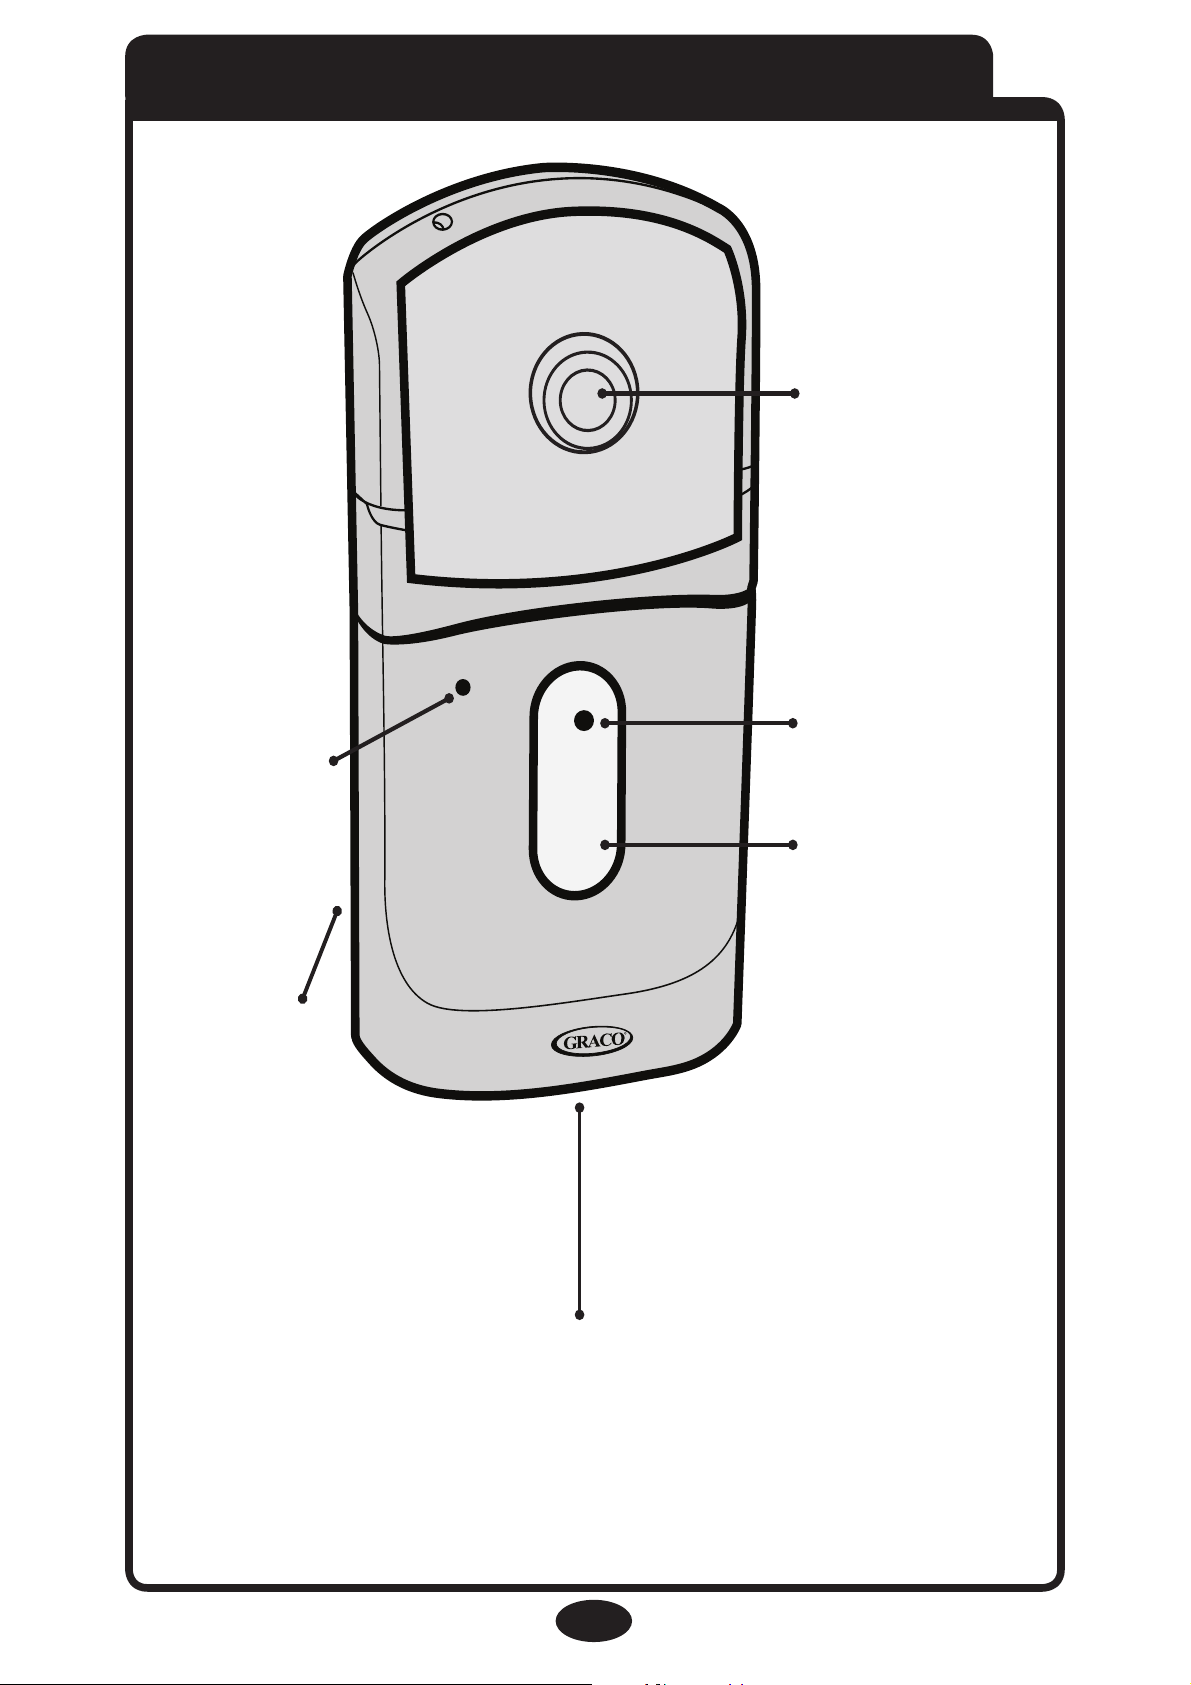
Nursery Unit
R
MICROPHONE
BATTERIES
(pg10)
VIDEO CAMERA
POWER LIGHT
(pg26)
ON/OFF
(pg12)
AC ADAPTER JACK
(pg11)
9
Page 10
10
Installing Batteries
Use AC adapters for normal
power usage – batteries
intended as backup for
power outage.
(Optional)
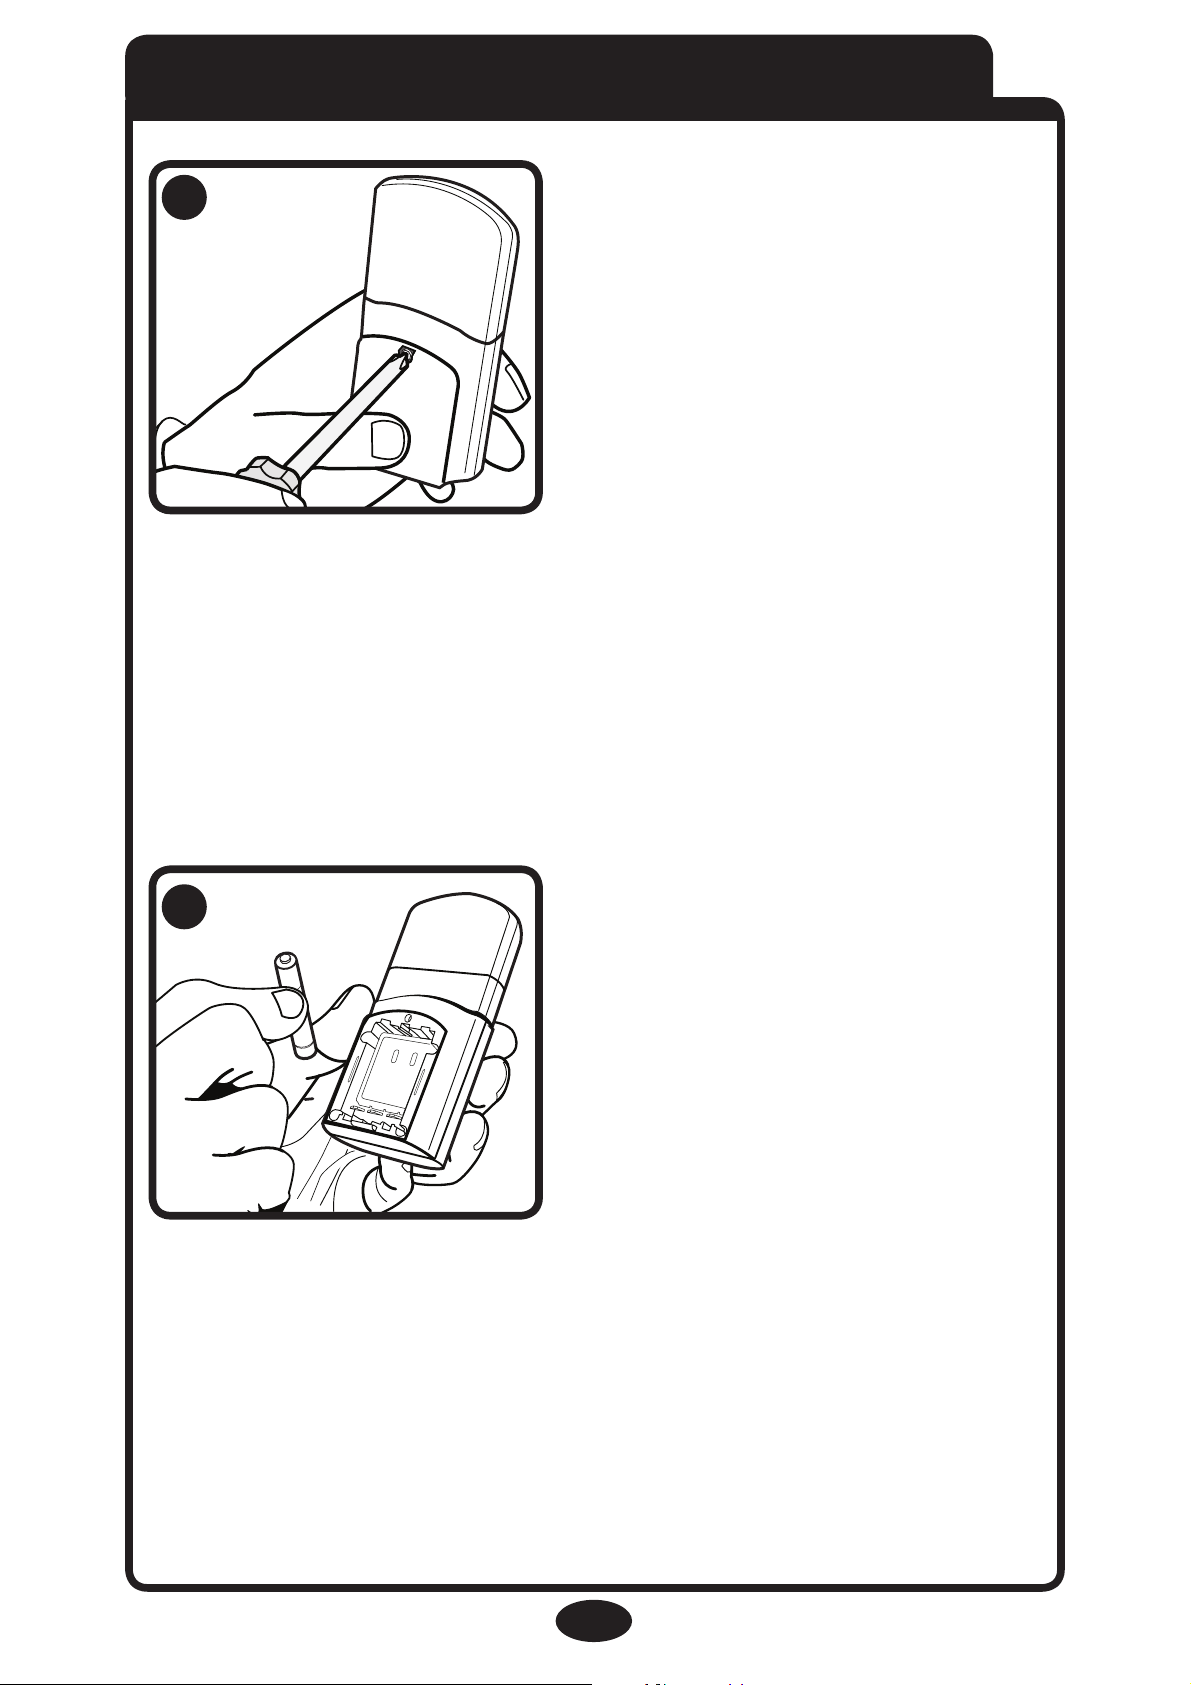
Use a Phillips head
screwdriver to remove the
battery door.
NOTE: Screw should be
loosened but stay attached
to battery door.
(Optional)
Insert 3 AAA (LR03)
batteries.
Make sure they are inserted
correctly.
● Batteries can be useful in the case of a power outage.
● Batteries should be replaced periodically.
● Batteries should only be used in case of emergency
or for short periods of time.
● To save battery power, only audio functions are active
while using batteries (NO VIDEO).
6
7
Page 11
Attaching Nursery Unit Base
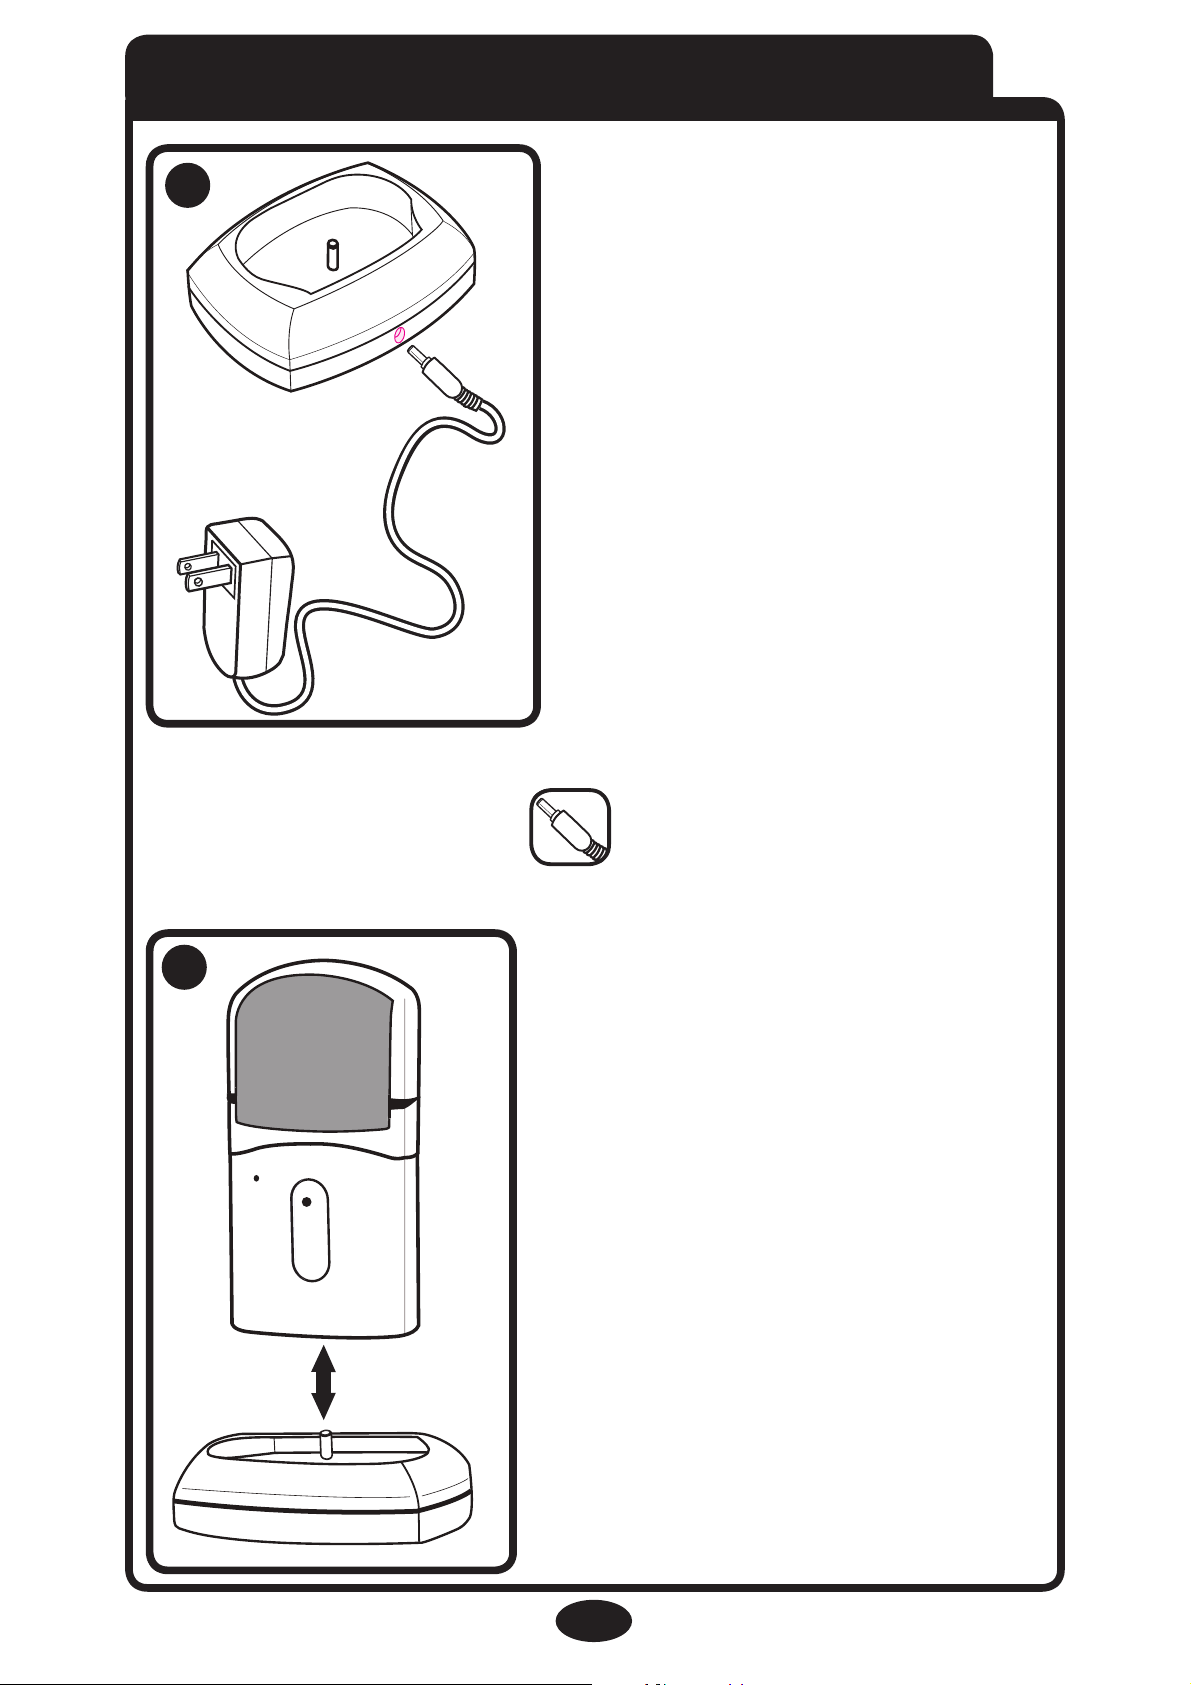
Attach the AC Adapter to
the back of the nursery
unit base and plug into
wall.
Mount nursery unit onto
base to operate.
8
9
NOTE: Make sure to use the adapter with the straight
shaped end, as shown.
11
Page 12
R
R
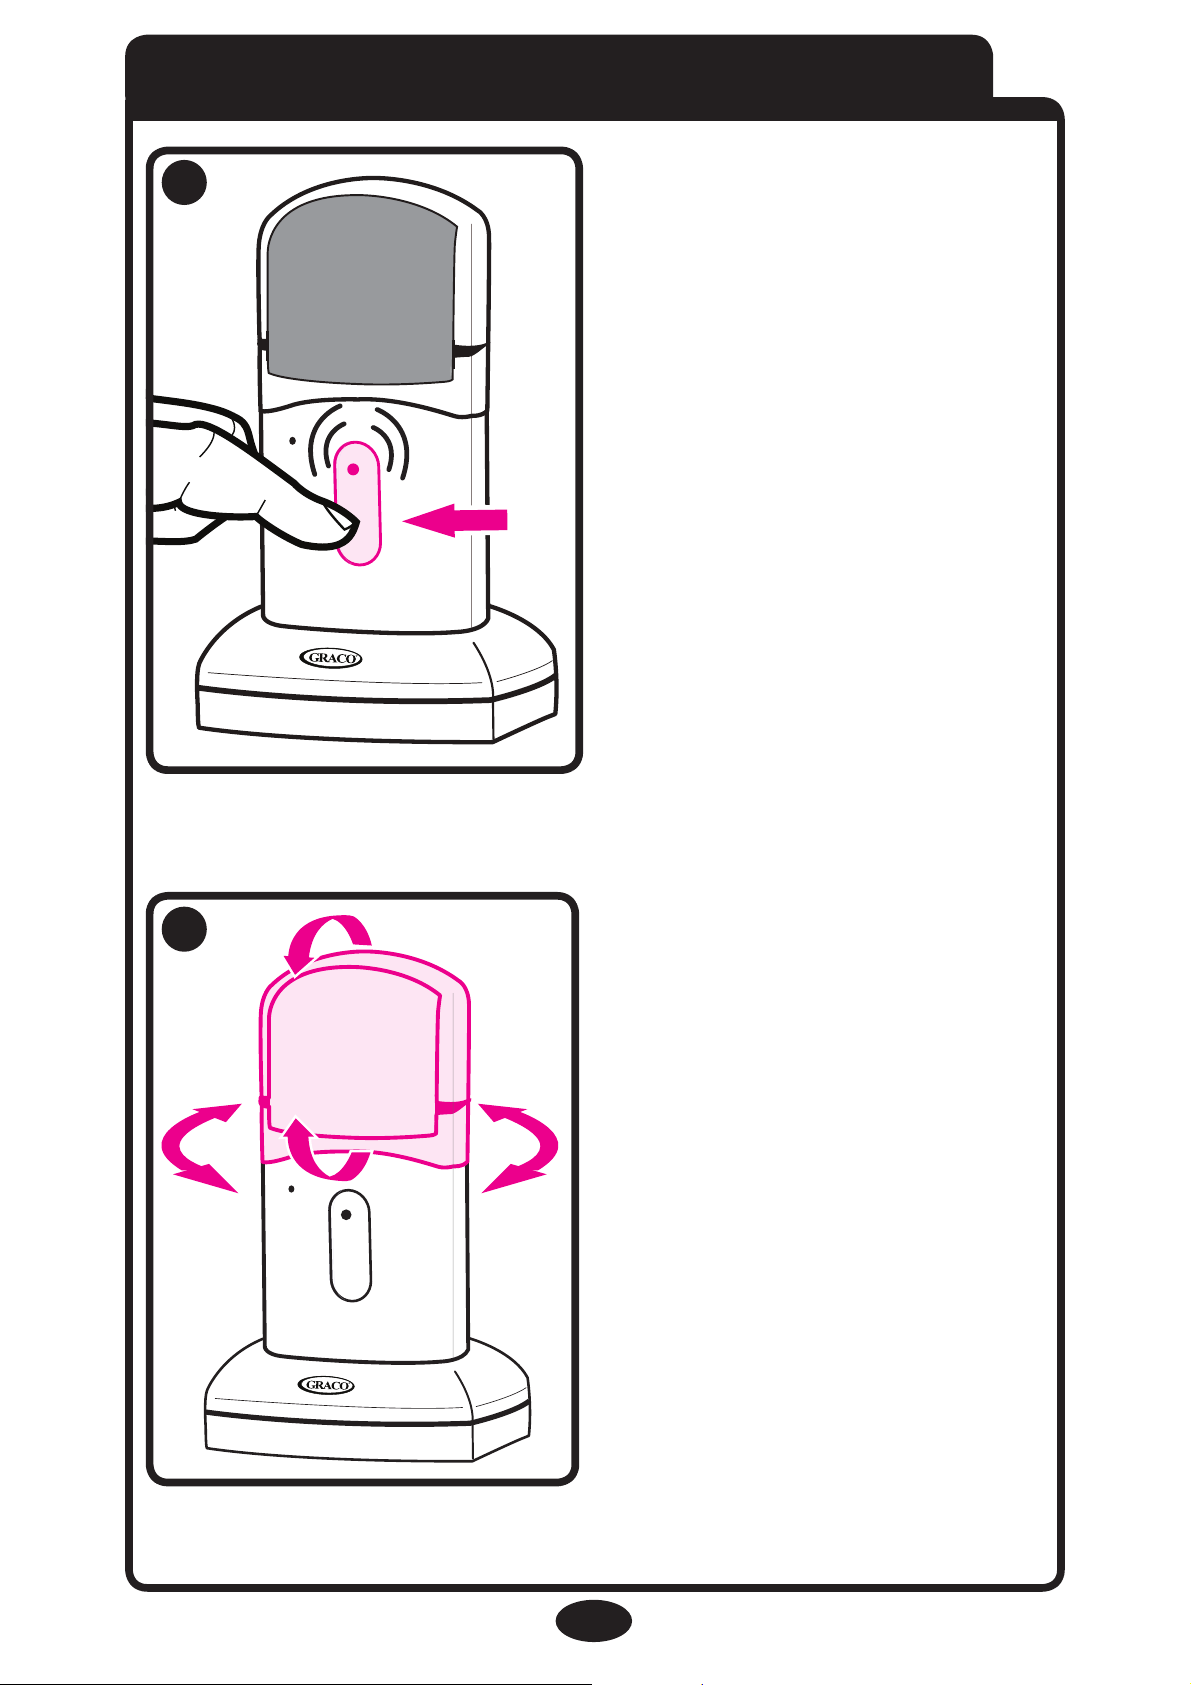
Nursery Unit Power On/Off
Depress button for 1 sec.
to turn camera on.
To change camera angle,
swivel the nursery unit
top in the desired
direction. Please note that
camera cannot swivel
completely around.
10
11
12
Page 13
R
R
9:22pm
13
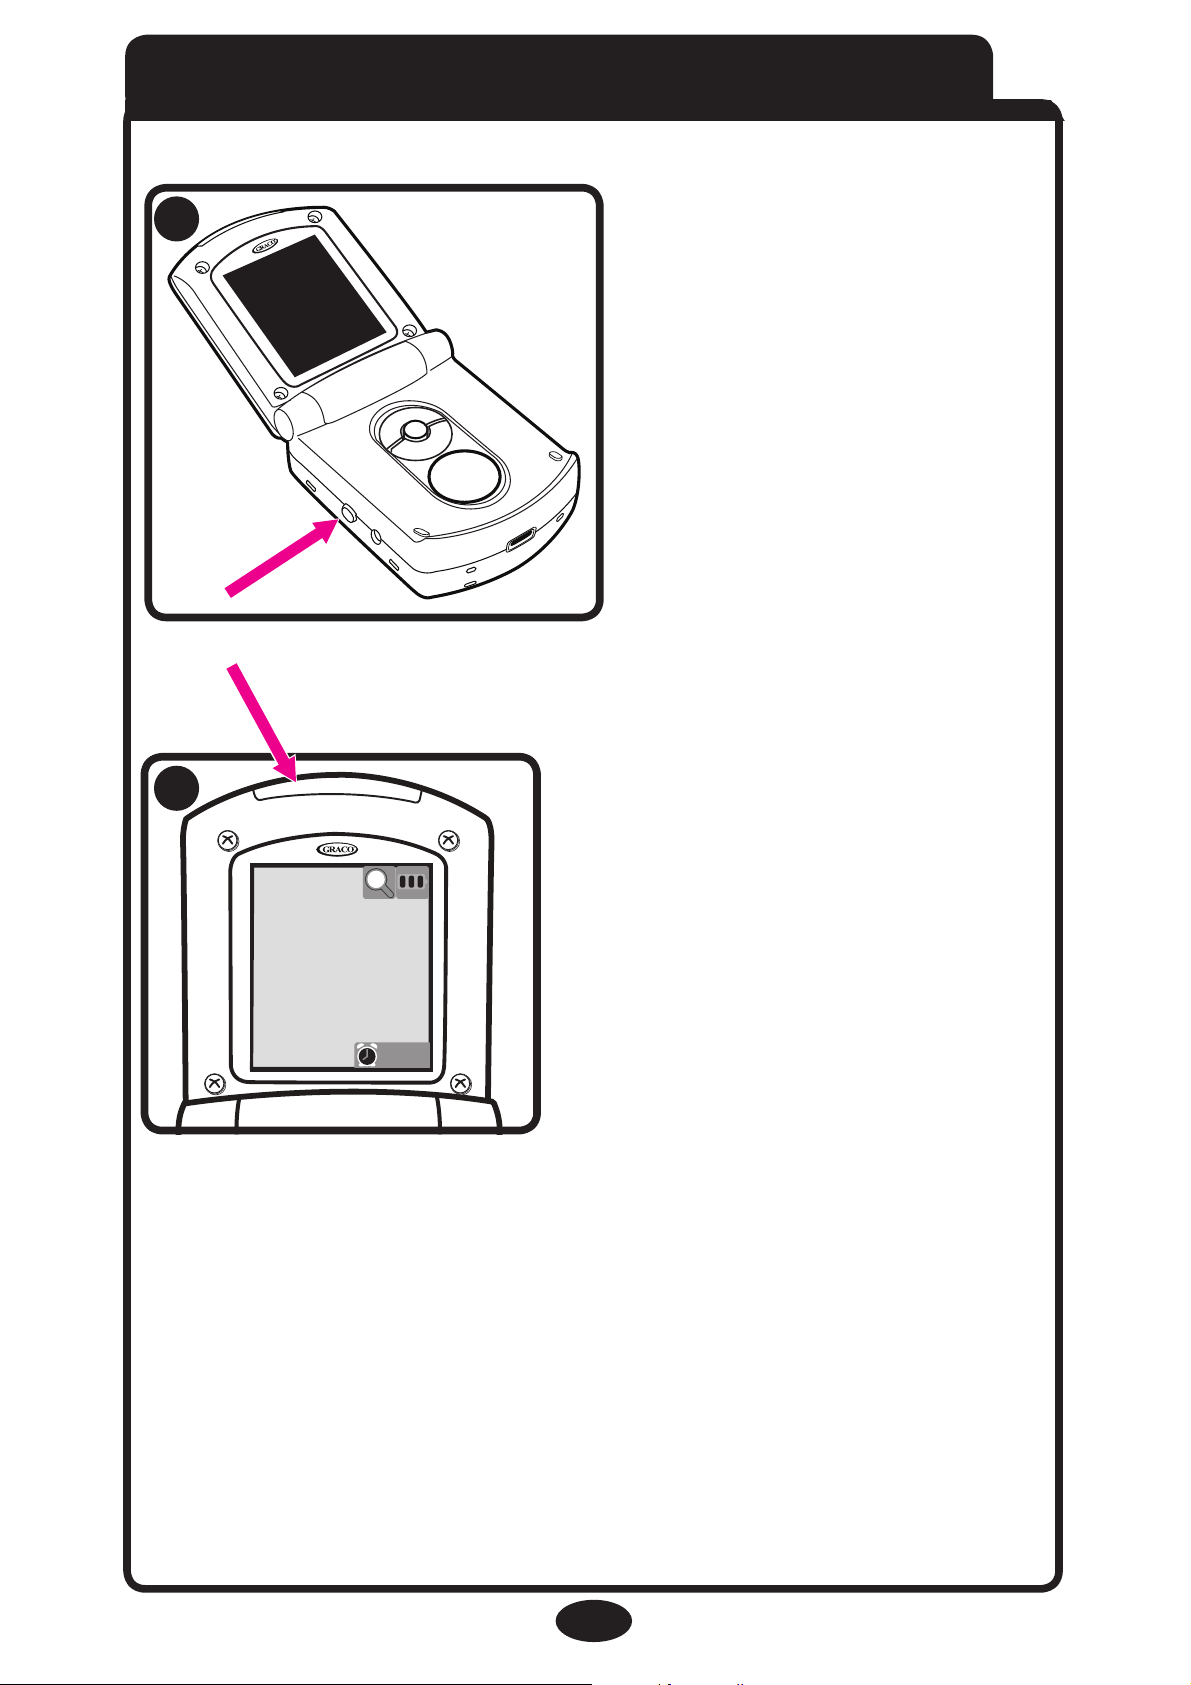
Parent Unit Power On/Off
Press and hold Power
On/Off button for 1
second. Unit will cycle
through intro and begin
searching for the Nursery
Unit.
Make sure Nursery Unit is
turned on. The live video
feed will then be shown.
The Connection Light at
the top of the unit, will turn
from red to green.
Connection Light
12
13
Page 14
R
R
Press and hold Power
On/Off button for
1 second to turn unit off.
14
To activate or deactivate the
live video feed, press the
Video button.
Pressing the Video button will allow the user to view
the image from the Nursery Unit.
14
15
Page 15
R
R
R
15
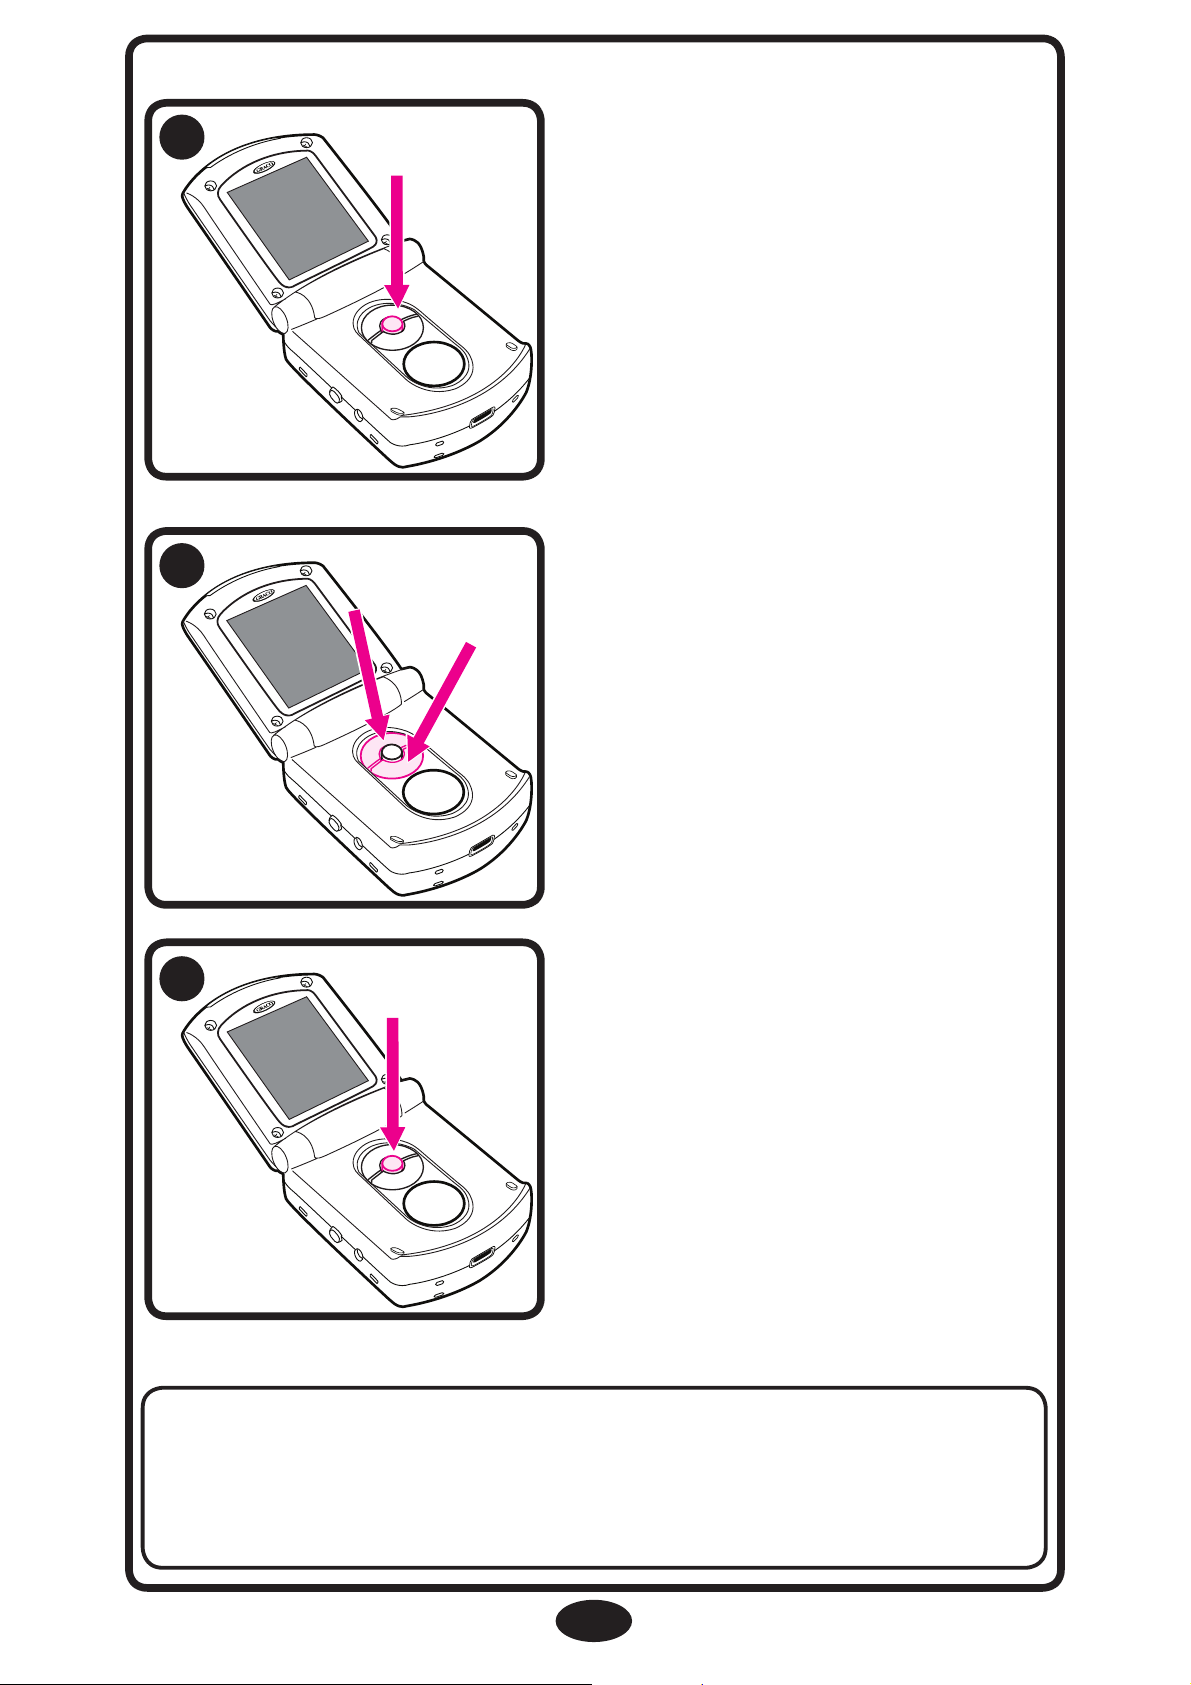
To cycle through the
different choices, press up
or down.
After choosing one of the
options, press the “OK”
button to make the
selection.
NOTE: Once you make a selection (OK), the unit will
automatically advance you to the next option/screen or
return you to the live video feed (if applicable).
To set up preferences, press
the “OK” button.
16
17
18
Page 16
9:22pm
9:22pm
Use UP/DOWN to
choose, OK to select
22pm
9:22pm
The Zoom icon will appear at
the top the status screen.
Monitor will return to the live
video feed if available.
16
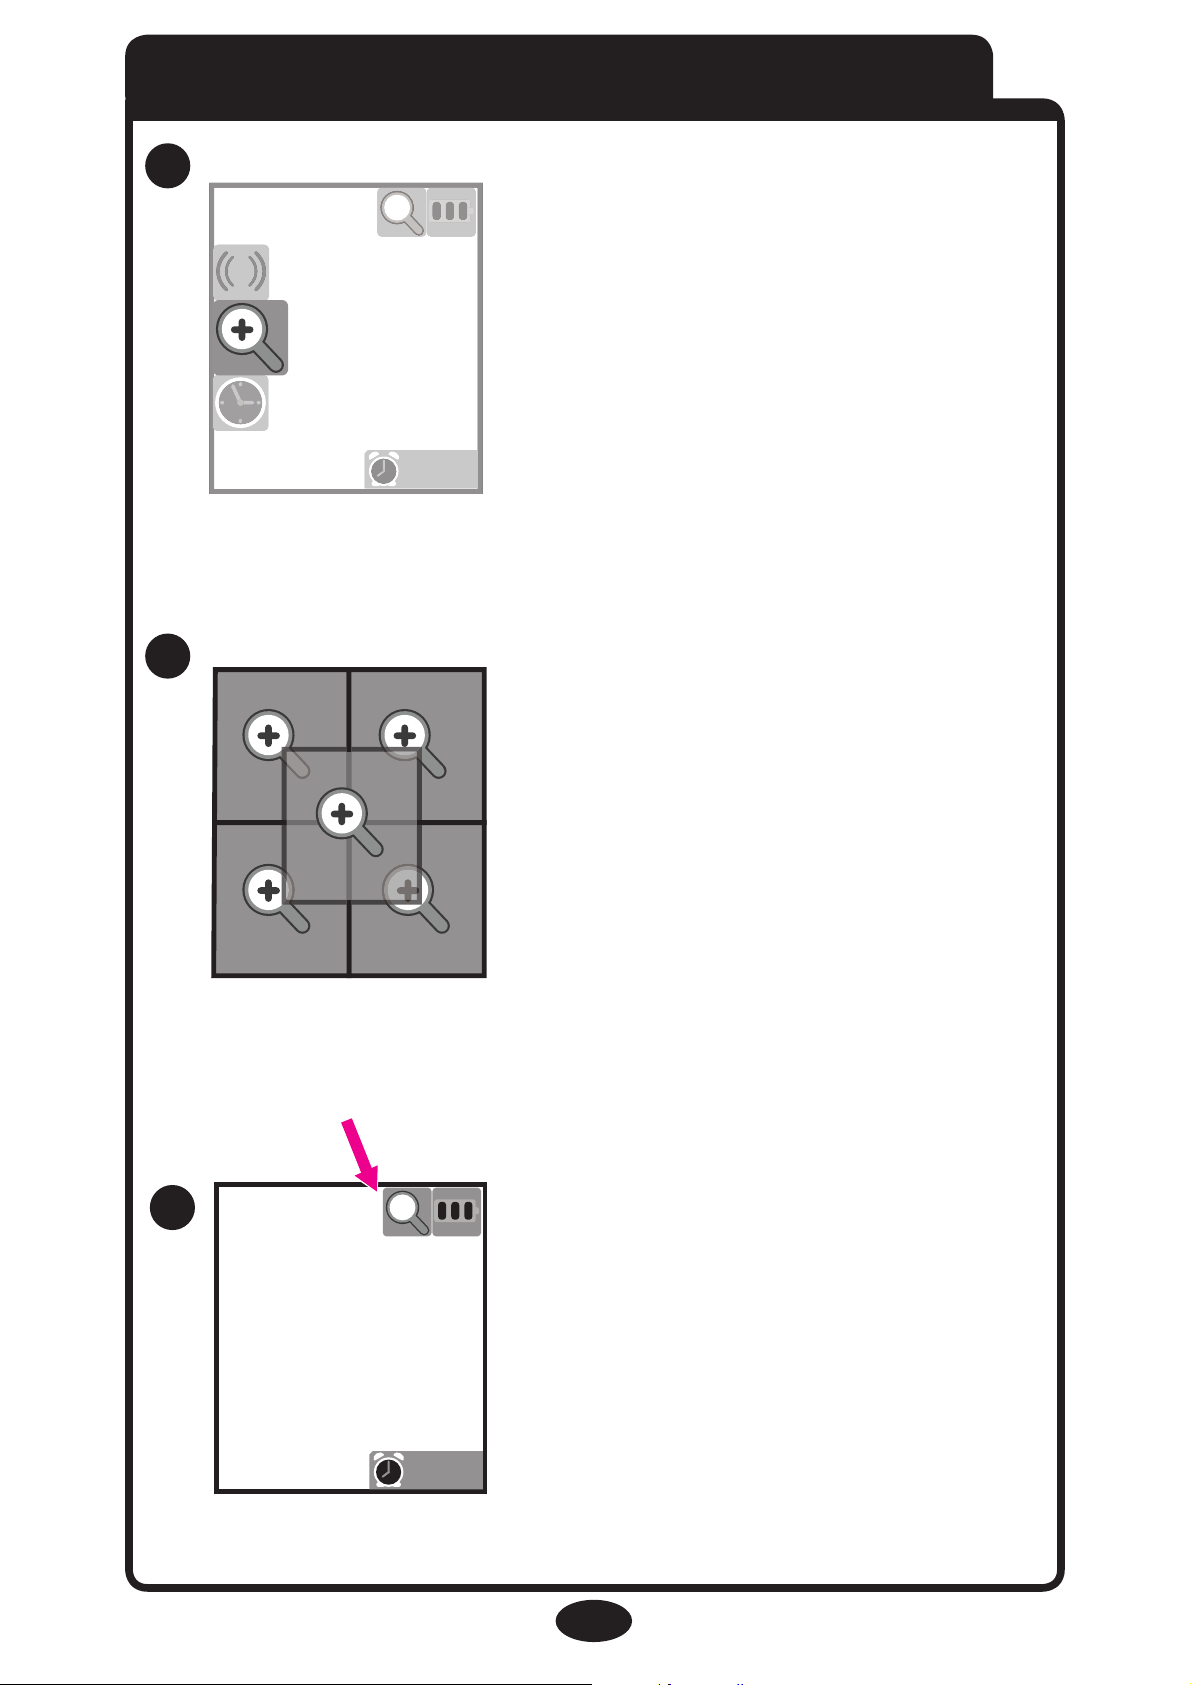
Zoom
Press “OK” to open Menu.
Press Up/Down to choose
Zoom icon. Press “OK” to
select it.
Press Up/Down to choose
Zoom area. Press “OK” to
select it.
Choose one of the 5 positions
19
20
21
Page 17
9:22pm
9:22pm
17
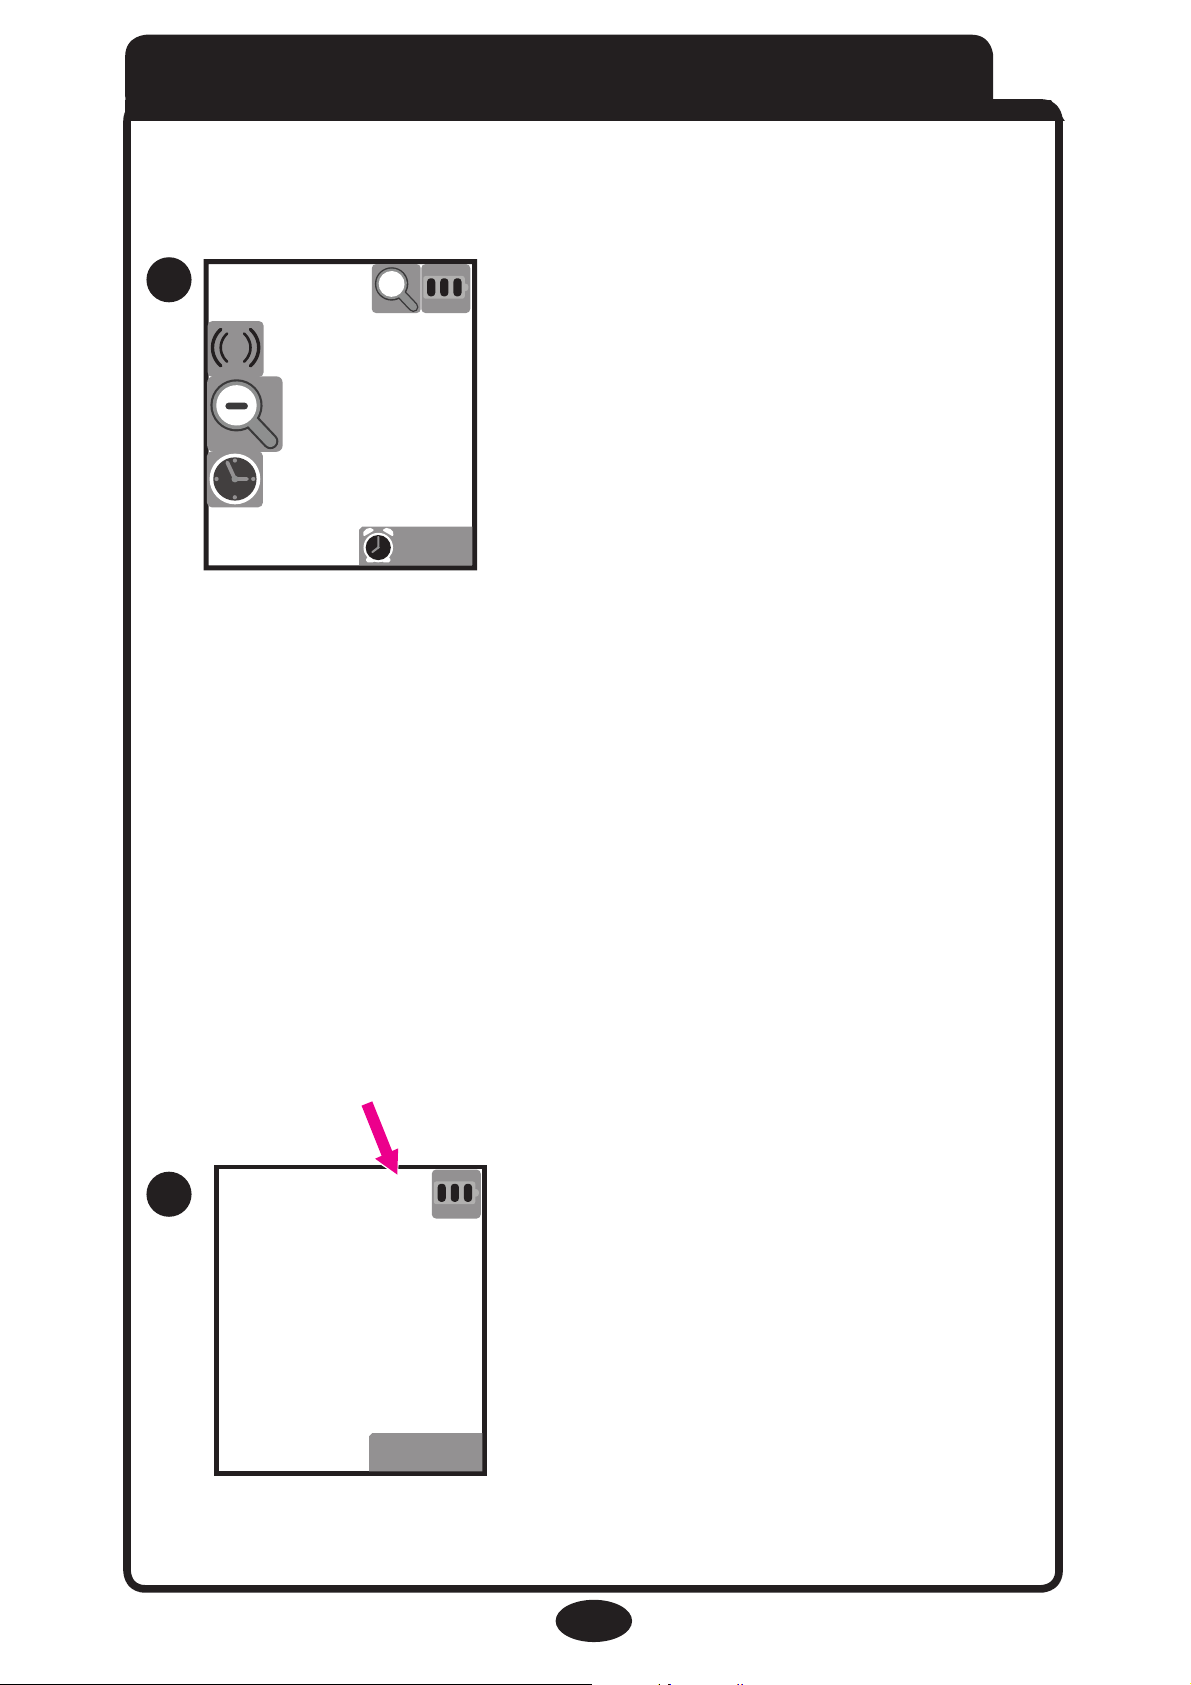
Press OK to open Menu.
Press Up/Down to choose
Zoom out icon. Press OK to
select it.
Monitor will return to live video
screen if available.
Zoom icon will not be visible
on the status screen.
Zoom Out
22
23
Page 18
9:22pm
9:22p
m
9:22pm
9:22p
m
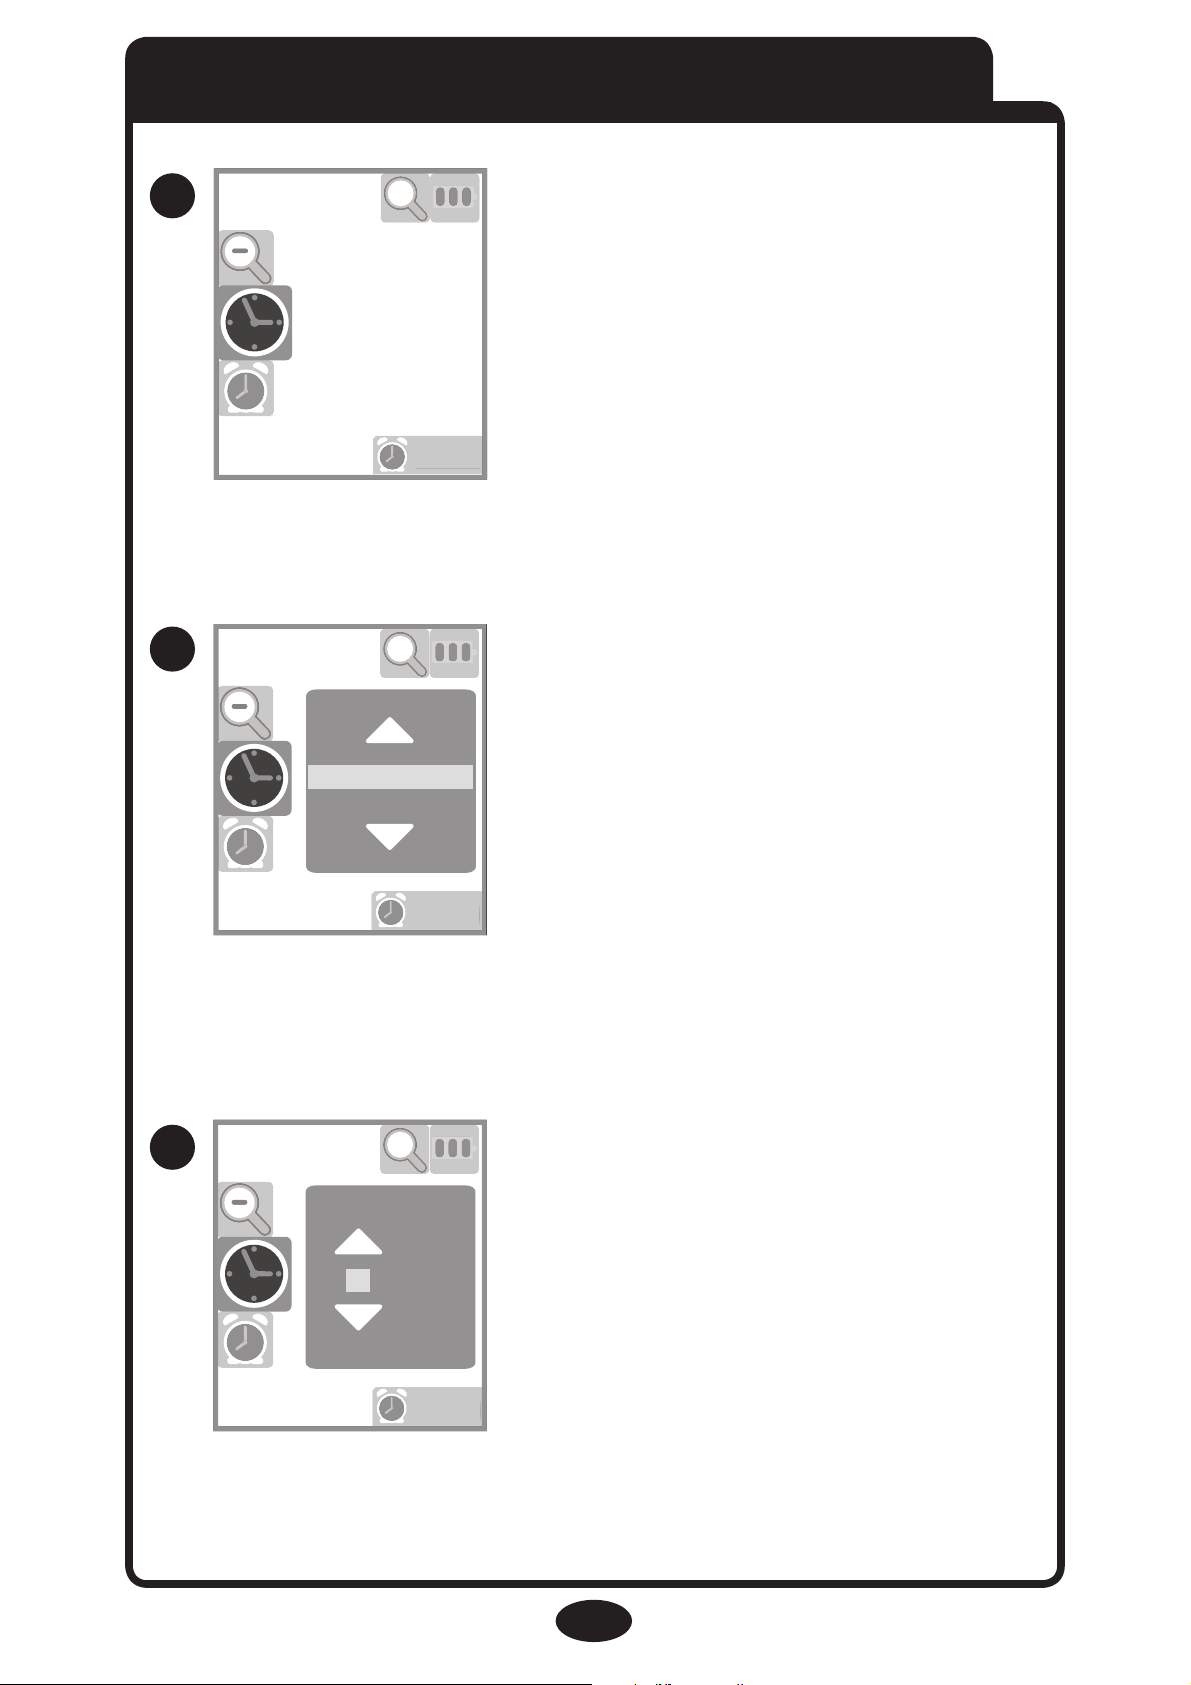
12 Hour(am/pm)
24 Hour
Press Up/Down to choose your
preferred time display format
and press OK to select.
Press Up/Down to adjust the
first digit. Press OK to move
to the next digit. Monitor will
return to the live feed after
adjusting all digits.
18
Press “OK” to open Menu.
Press Up/Down to choose
Clock icon. Press “OK” to select
it.
Setting Time
26
9:22pm
9:22p
m
07:32 pm
25
24
Page 19
9:22pm
9:22p
m
9:22pm
9:22p
m
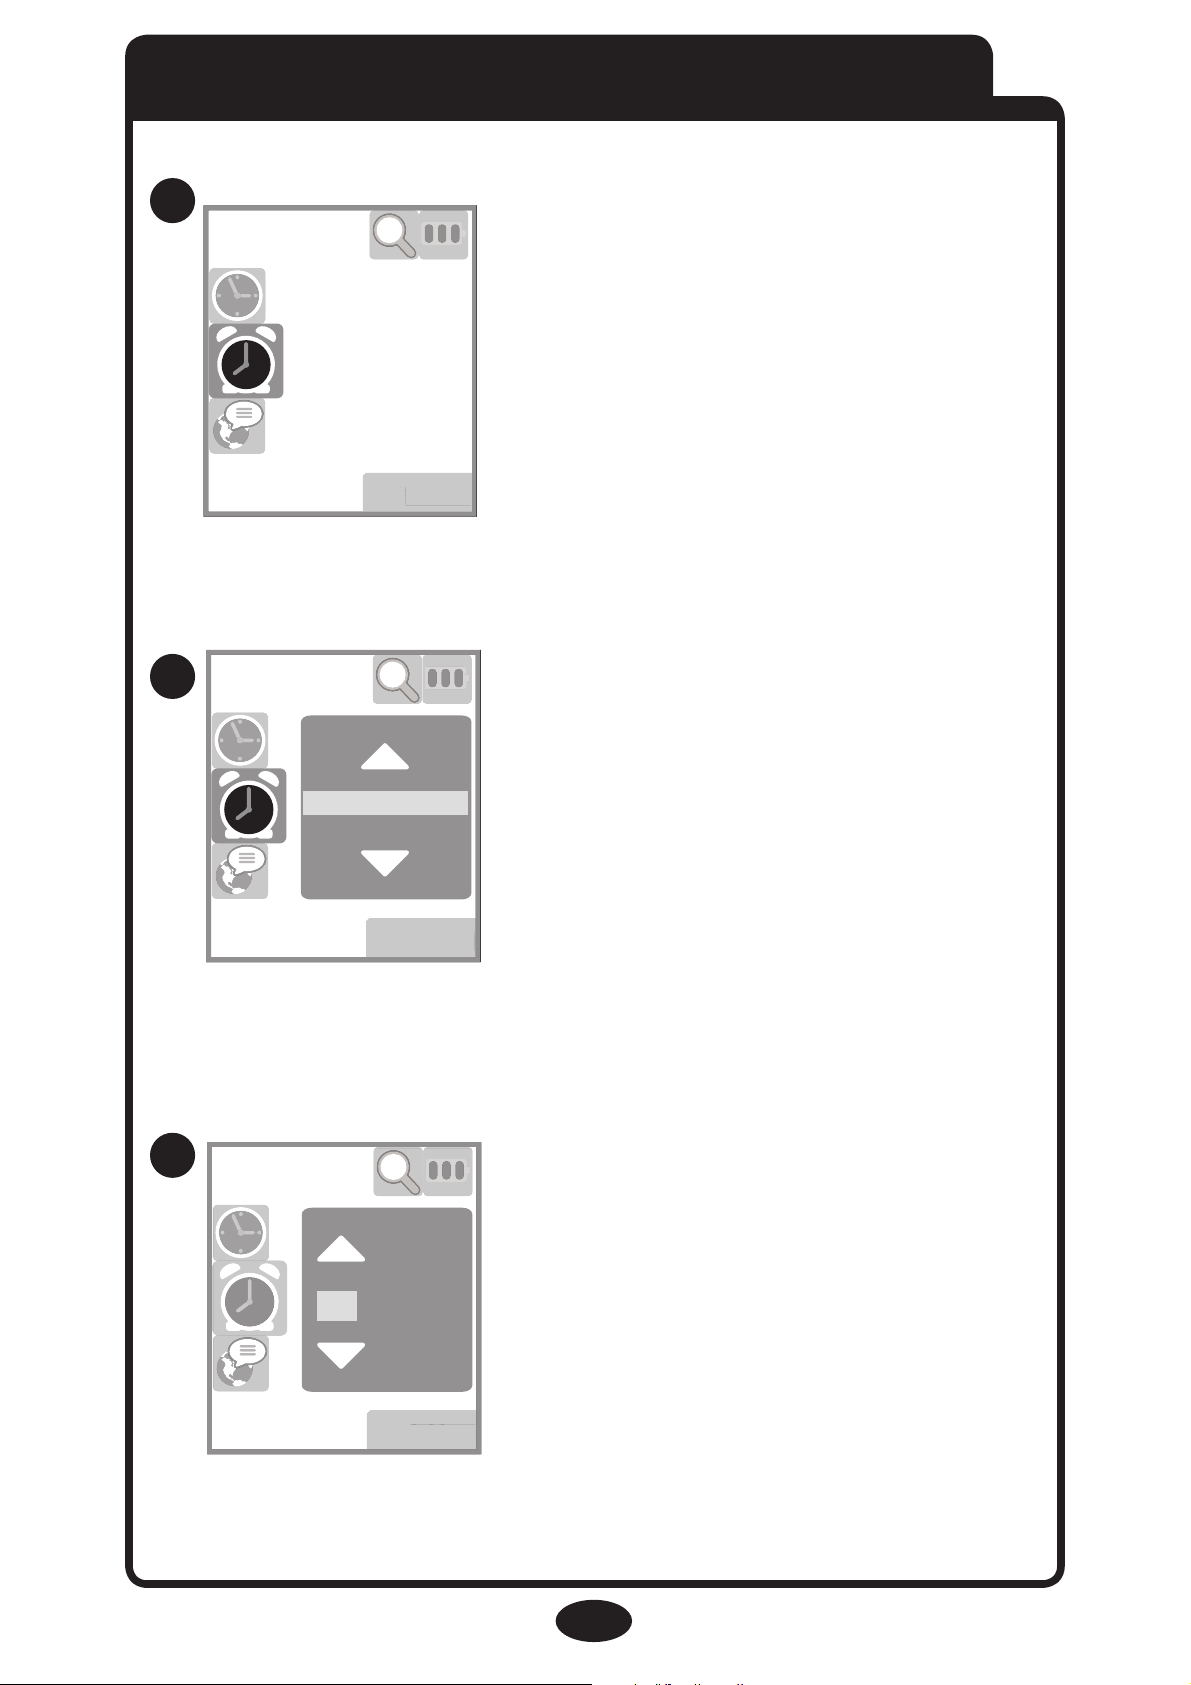
Alarm On
Alarm Off
9:22pm
9:22pm
07:22 PM
19
Setting Alarm
Press “OK” to open Menu.
Press Up/Down to choose
Alarm Clock icon.
Press “OK” to select it.
Press Up/Down to choose,
OK to select.
Press Up/Down to adjust the
first digit. Press OK to move
to the next digit. Monitor will
return to the live feed after
adjusting all digits.
27
28
29
Page 20
9:22pm
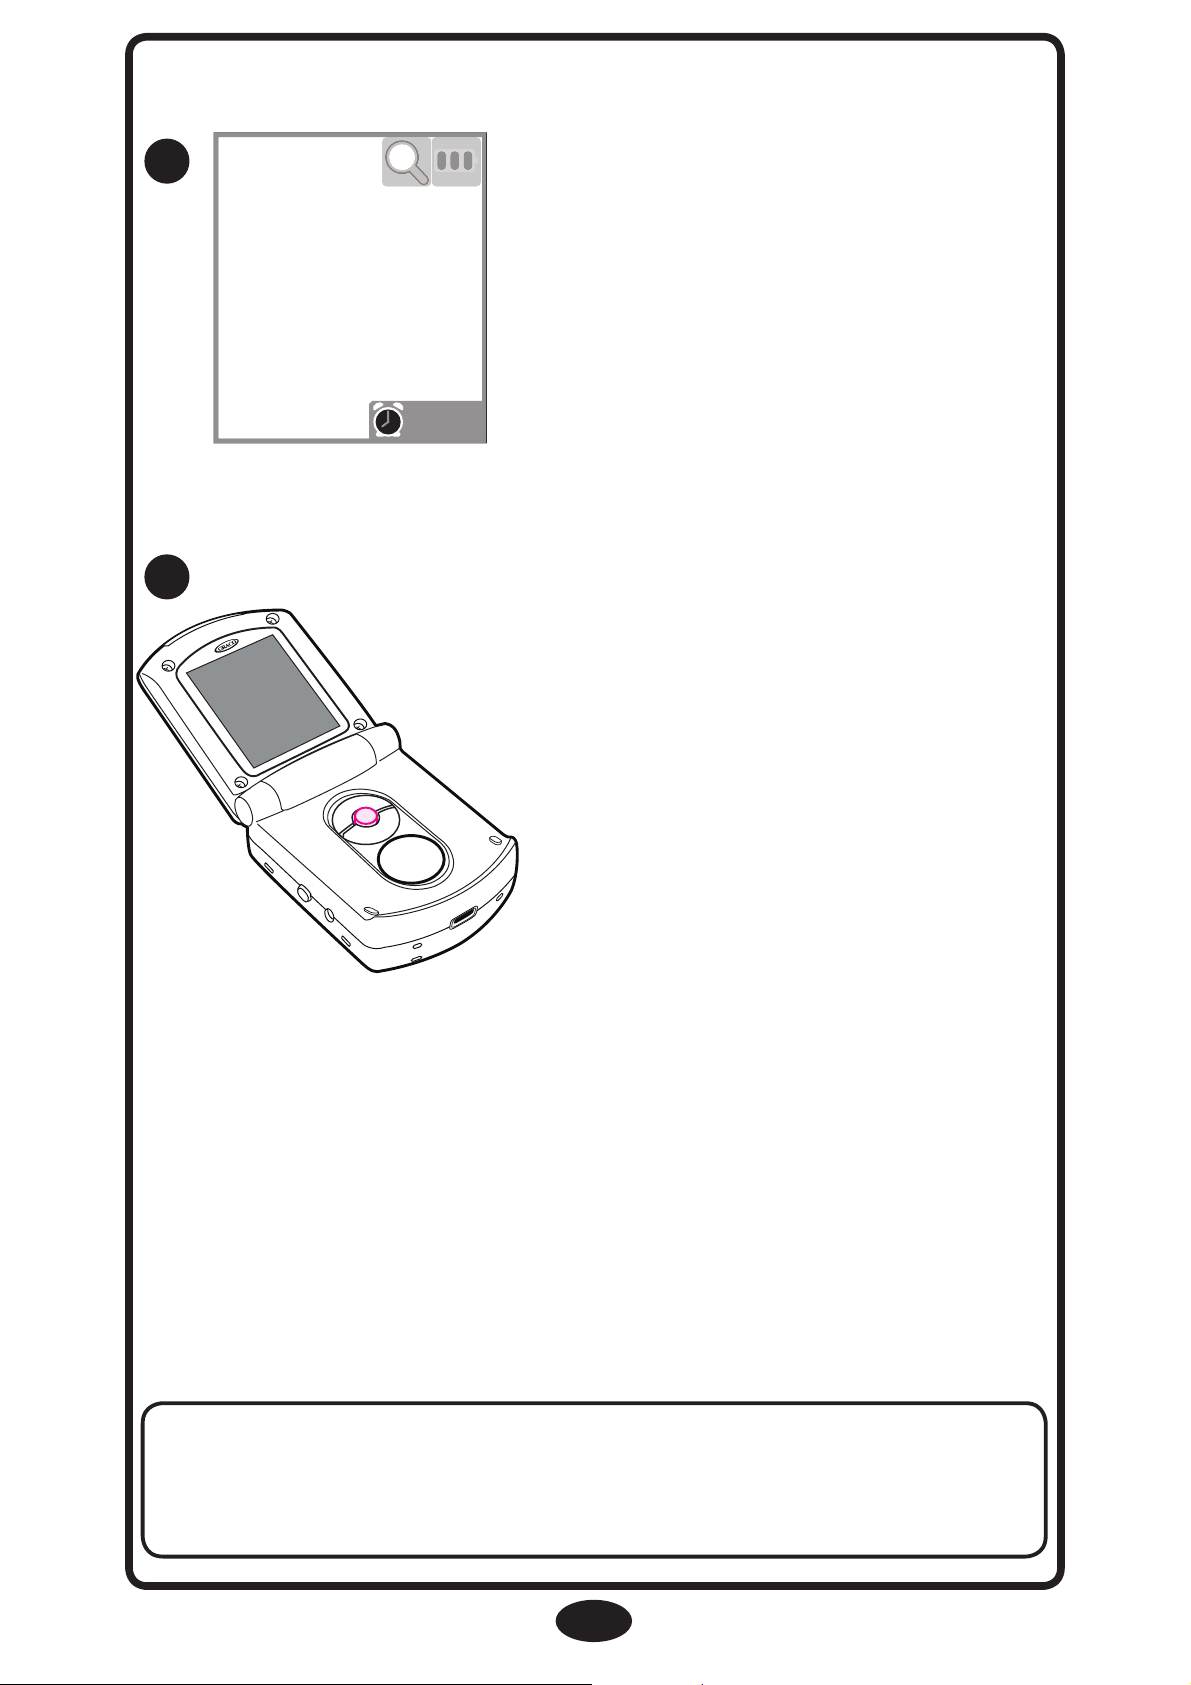
Alarm Clock icon will appear
on the bottom of the screen,
next to the time.
NOTE: If Alarm Clock icon
is not visible, it has not been
activated.
When Alarm sounds, press any button to deactivate it.
Alarm will sound off every 2 seconds for 10 minutes, or
until user stops it.
20
NOTE: Alarm will chime
every day at the pre-selected
time until Alarm is
deactivated, new time is
selected. or if unit if powered
off.
30
31
R
To silence Alarm, press any
button.
Page 21
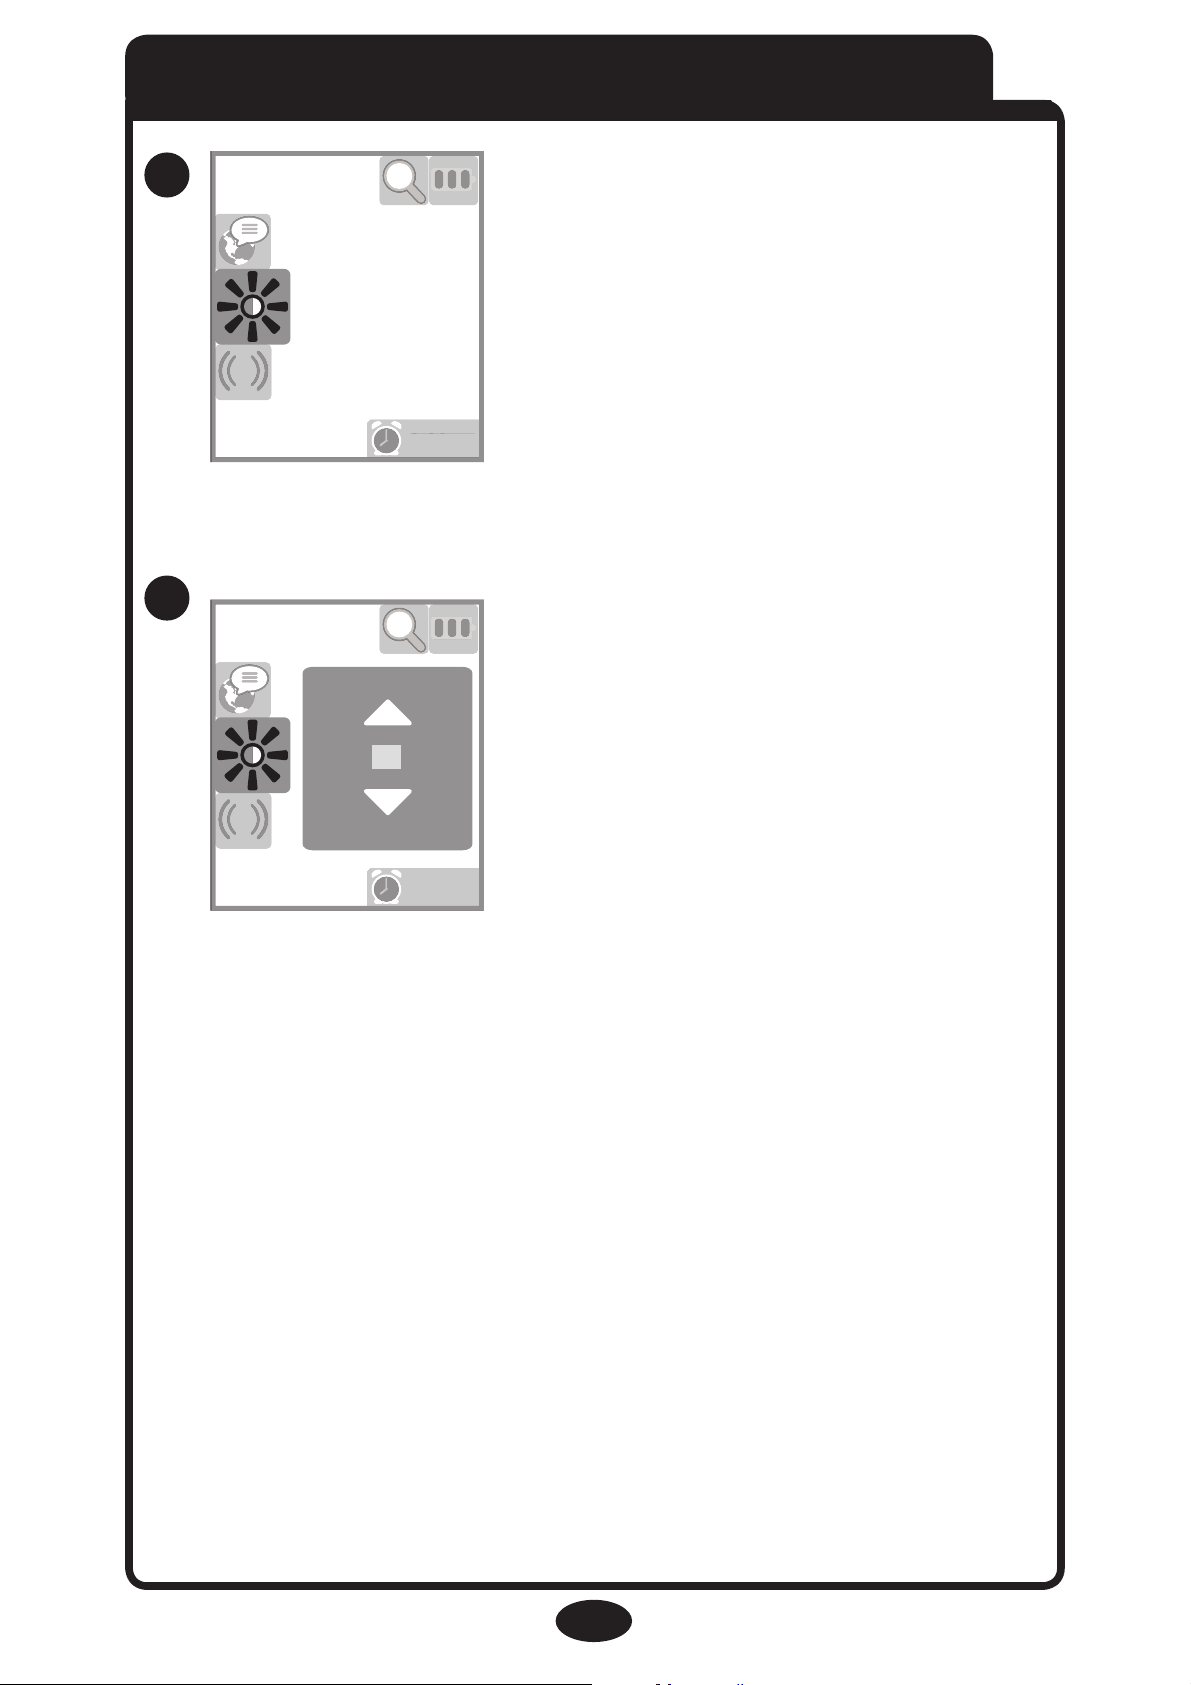
Brightness
9:22pm
9:22pm
9:22pm
9:22pm
10
32
33
Press “OK” to open Menu.
Press Up/Down to choose
Brightness icon.
Press “OK” to select it.
Press Up/Down to choose
brightness value, OK to select.
(10 levels in all)
Monitor will return to the live
feed after adjusting all digits.
21
Page 22
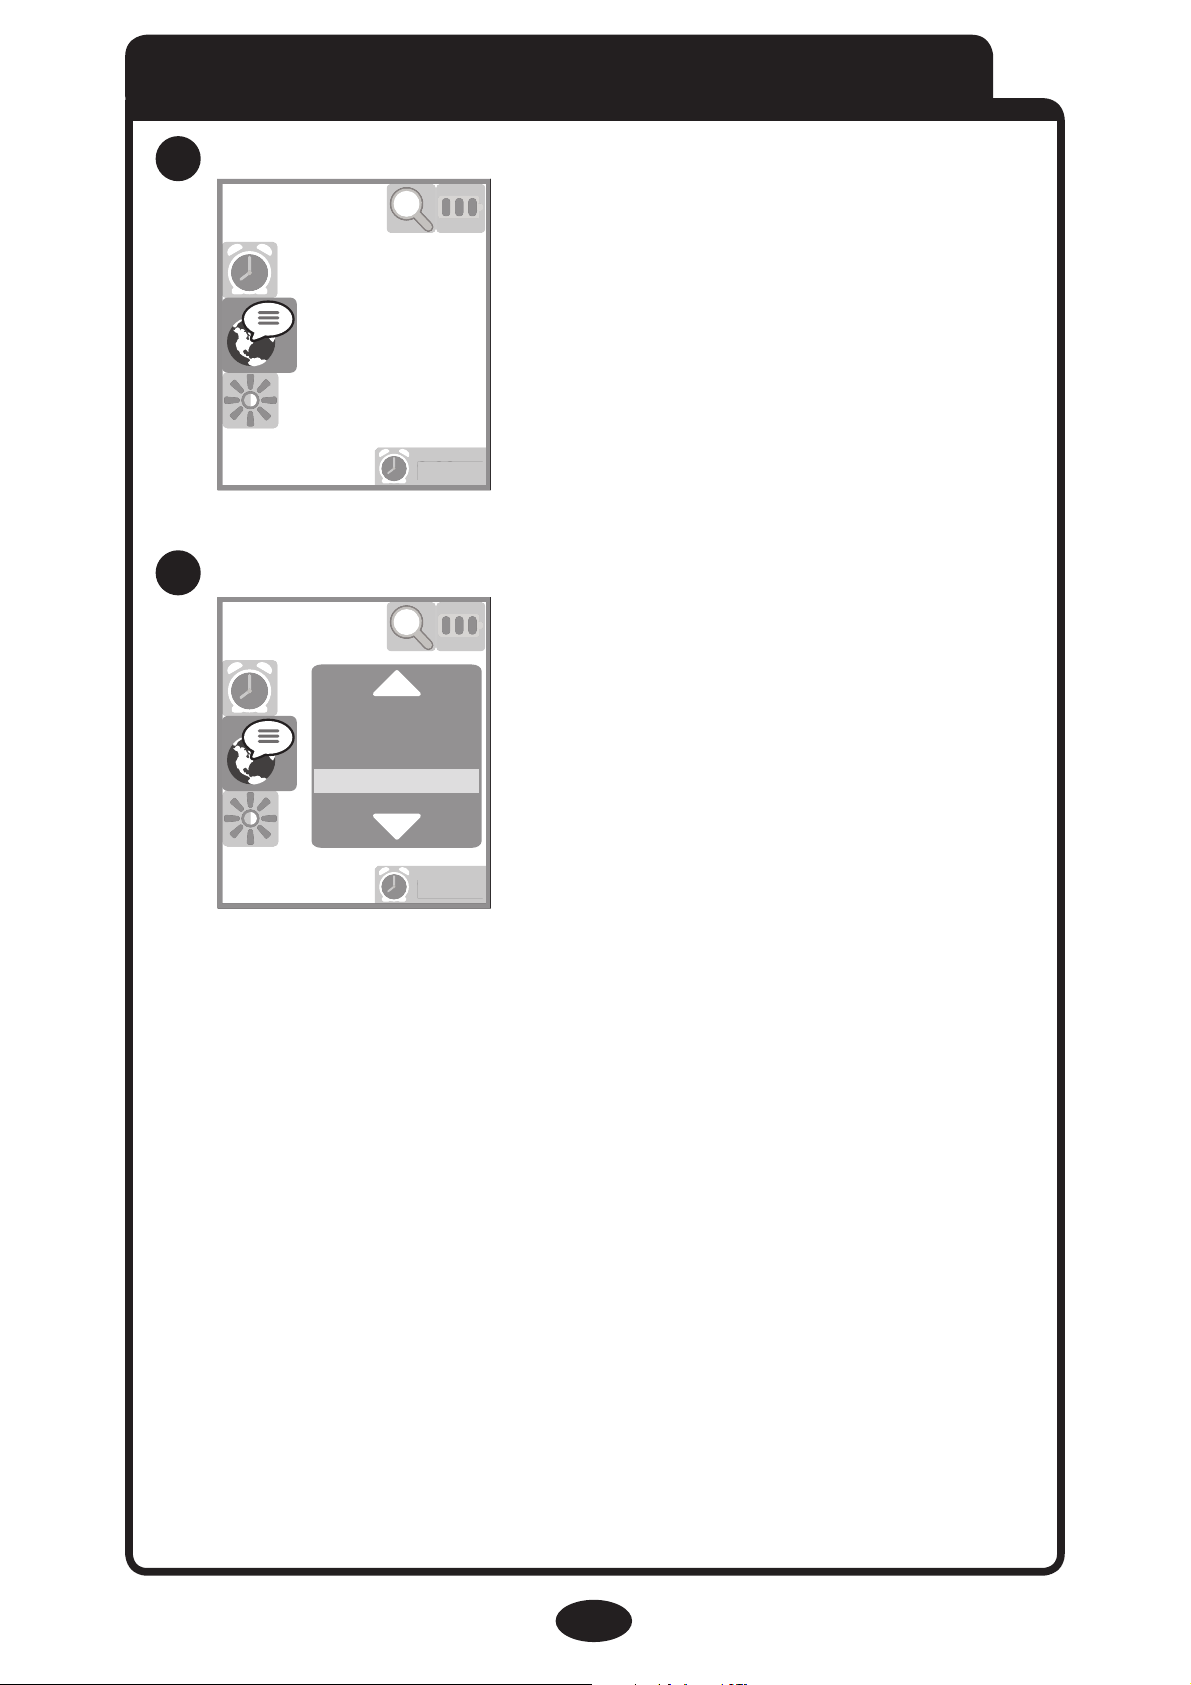
34
35
22
9:22pm
9:22pm
9:22pm
9:22pm
English
Français
Espanol
Press “OK” to open Menu.
Press Up/Down to choose
Language icon.
Press “OK” to select it.
Language
Press Up/Down to choose,
OK to select.
Monitor will return to the live
feed after selecting a language.
Page 23
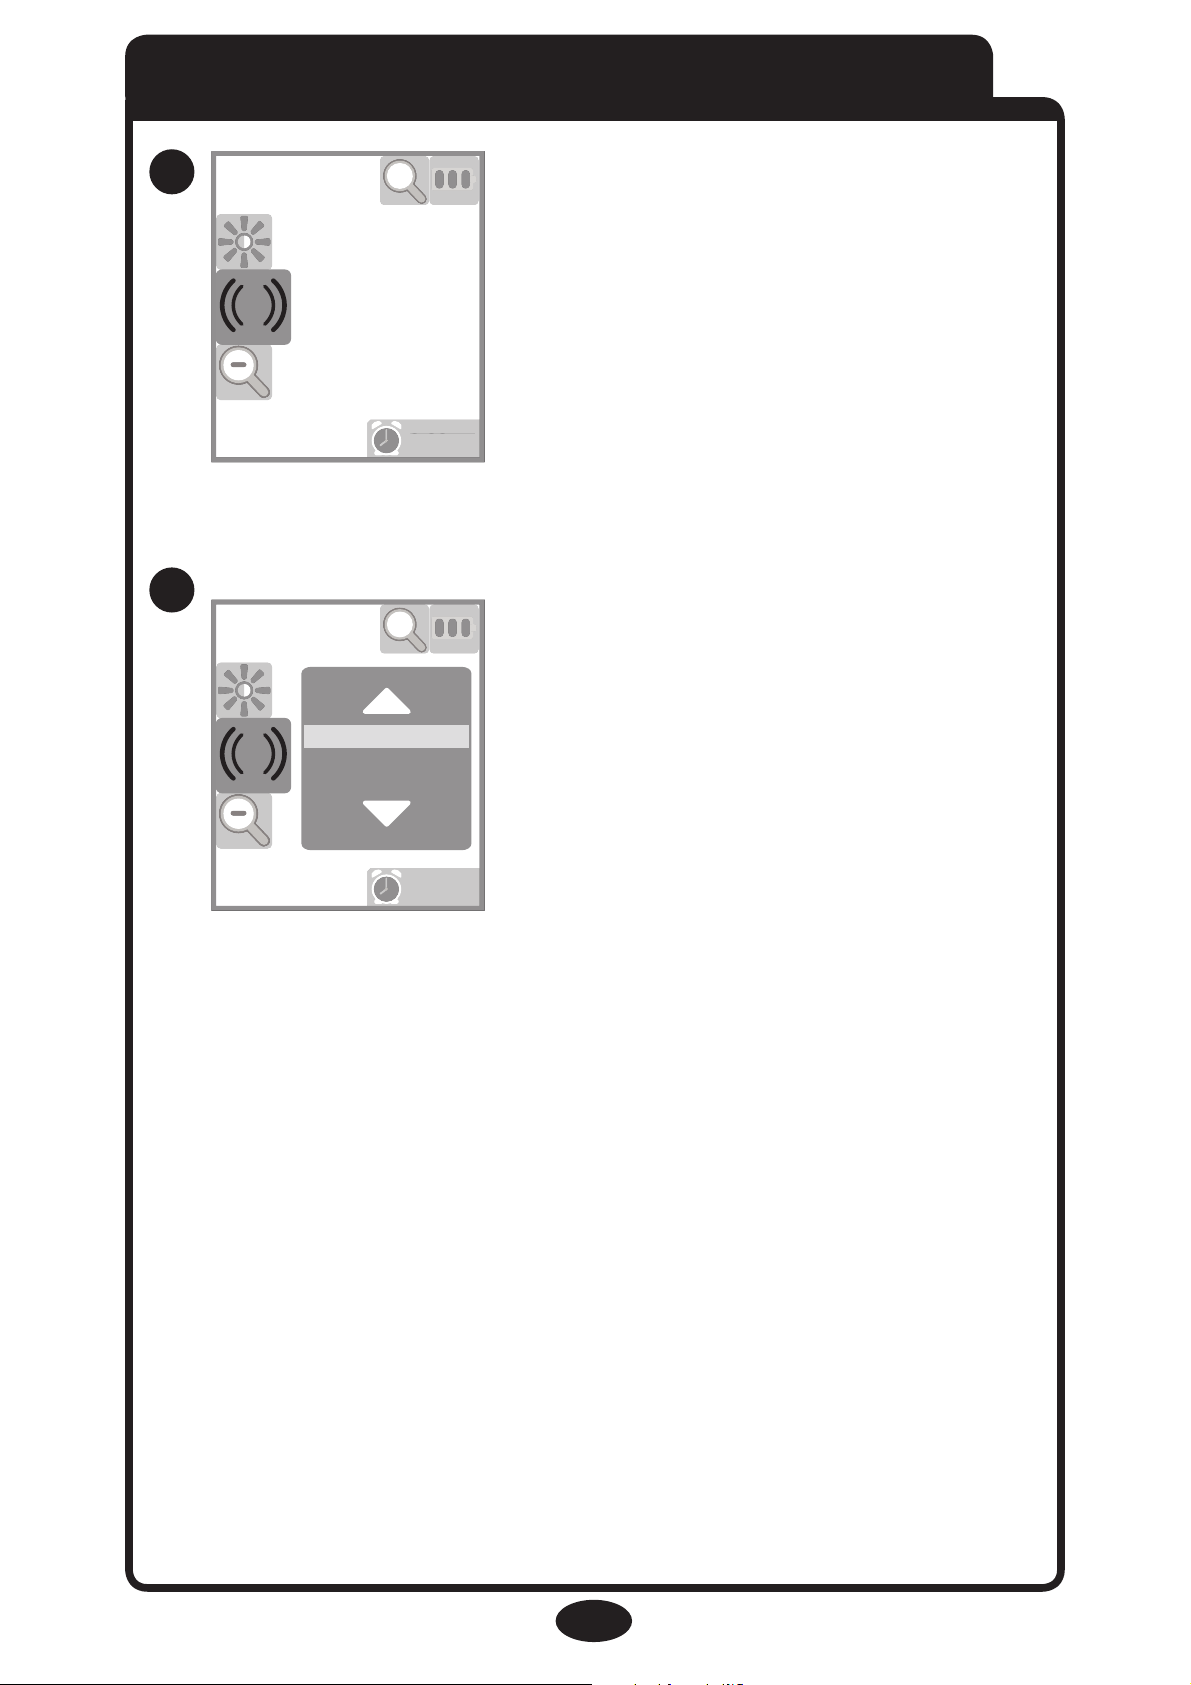
Vibration
9:22pm
9:22pm
9:22pm
9:22pm
Vibe on
Vibe off
36
37
Press “OK” to open Menu.
Press Up/Down to choose
Vibration icon.
Press “OK” to select it.
Press Up/Down to choose, OK
to select.
When “Vibe On” is selected,
Parent Unit will vibrate when
it is activated with sounds from
the Child Unit.
23
Page 24
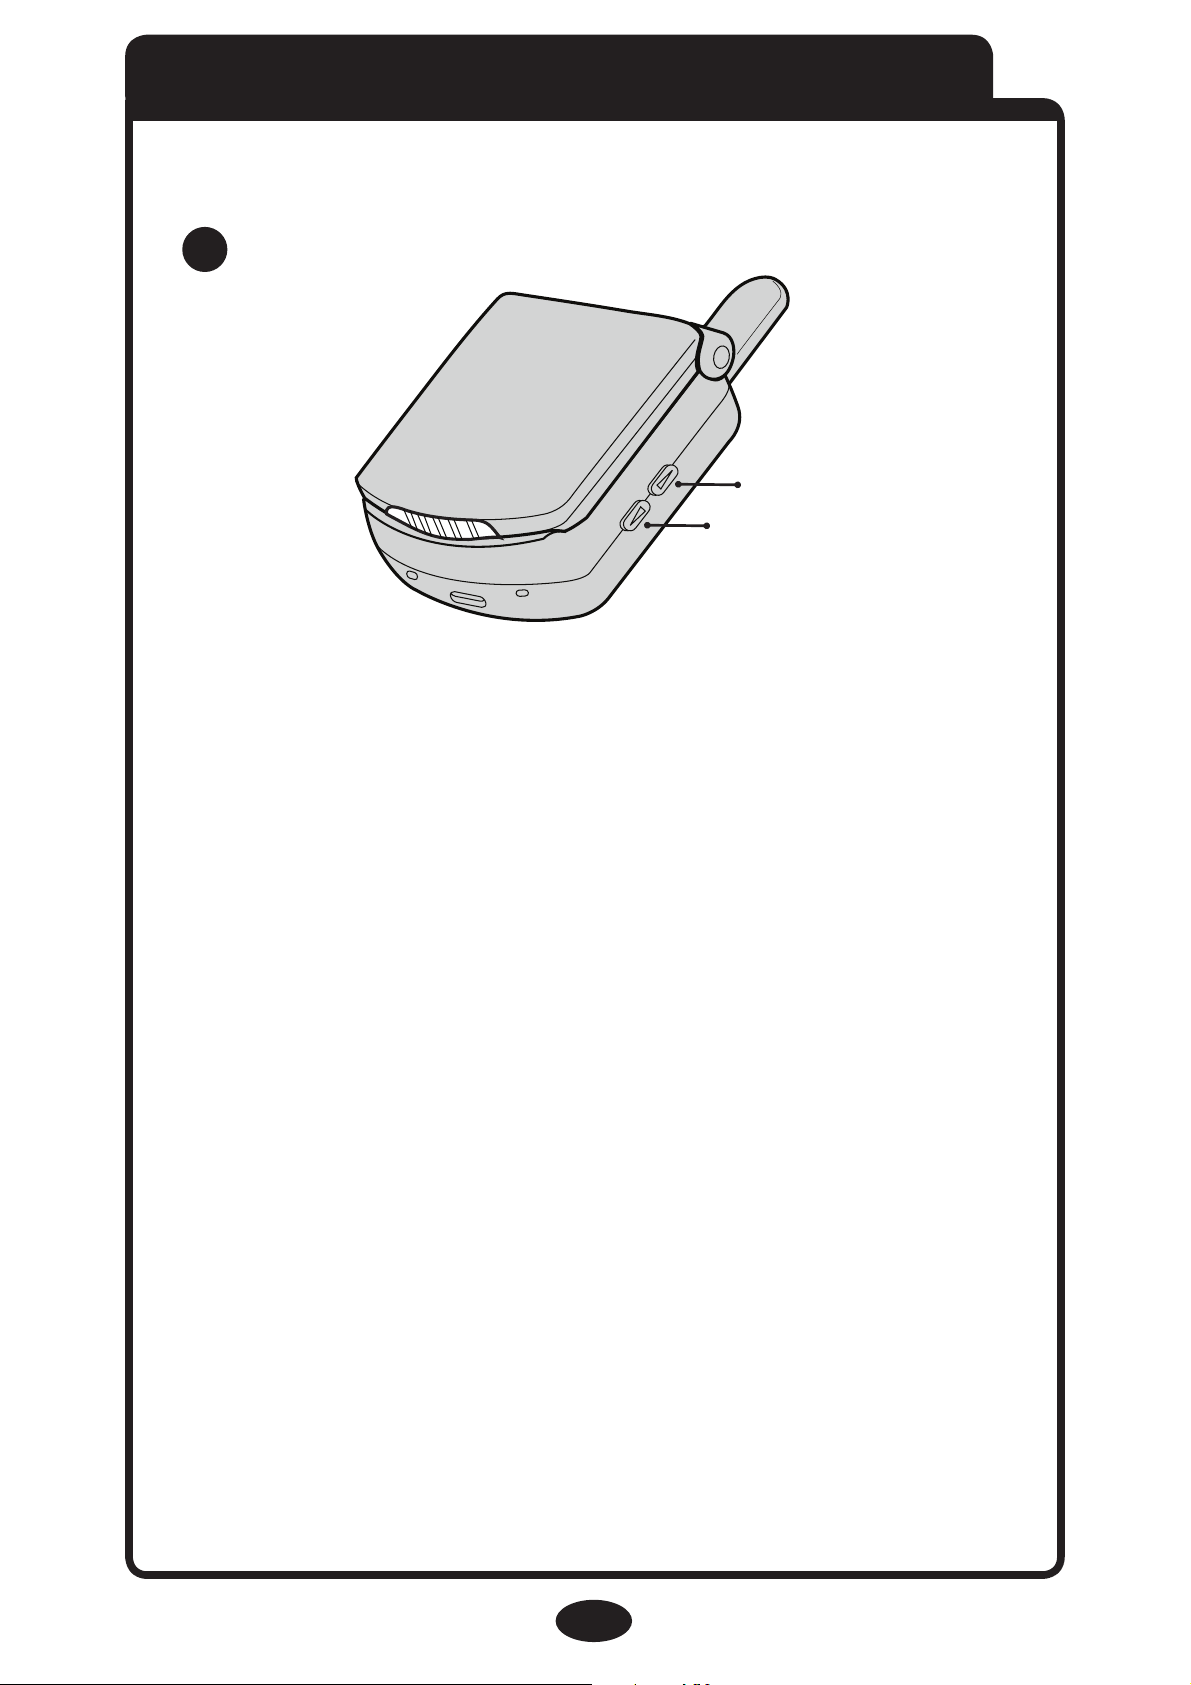
Volume Up/Down
VOLUME DOWN
VOLUME UP
38
• Press the Volume up or
Down button to change the
Volume.
24
Page 25
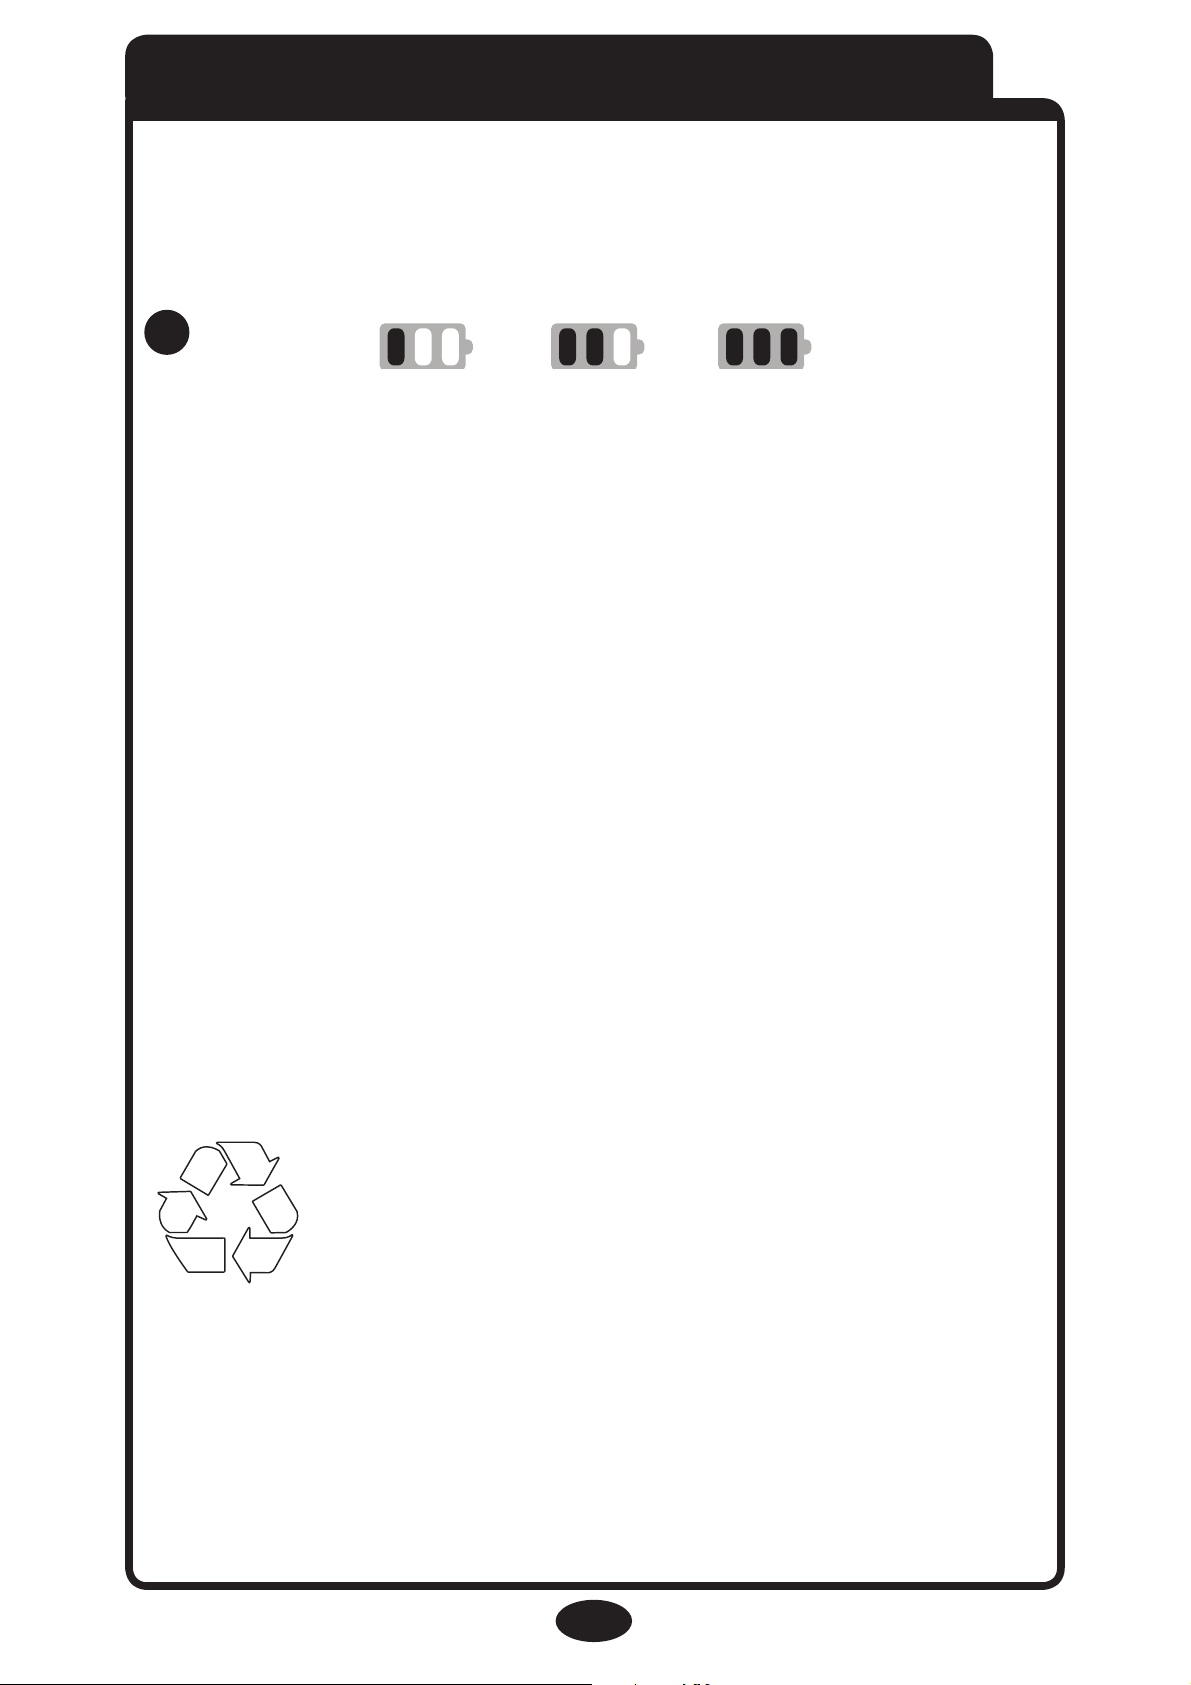
LOW FULL
39
Battery Information
Parent Unit Battery Level
The Battery Icon shows how much power is left in
the batteries:
The Battery icon will cycle while batteries are
charging.
• When the batteries are low, the Battery Icon will
blink and the monitor will beep once every minute.
• When the batteries are extremely low, the screen
will display the warning ,“Batteries are very low.
Turning off…” The unit will then turn off.
• The Battery Level Light will illuminate green when
the batteries are OK, red when the batteries are low.
The Battery Level Light can be seen easily when the
Parent Unit is closed.
• Batteries should be disposed of
properly by recycling.
Parent Unit Battery Charging
• Plug the AC Adapter into the Parent Unit to start
charging the batteries.
25
Page 26

• The Charging Status Light will illuminate red while
the batteries are being charged, green when the
batteries are fully charged. The Charging Status Light
can be seen easily when the Parent Unit is closed.
Nursery Unit Backup Batteries
• Three AAA (LR03) batteries can be optionally
installed in the Nursery Unit in case AC power is lost.
• When the Nursery Unit is on battery power, only
the audio will be transmitted. This helps to extend the
battery life.
• The Power Light is green when the batteries are
good, red when the batteries are low.
• The Parent Unit will show “Nursery Unit AC Power
Disconnected” when the Nursery Unit is on battery
power.
• Remove the batteries from the unit if it is no longer
being used or will be stored for an extended period of
time.
26
Page 27
27
Accessories/ Wall Mount & Belt Clip
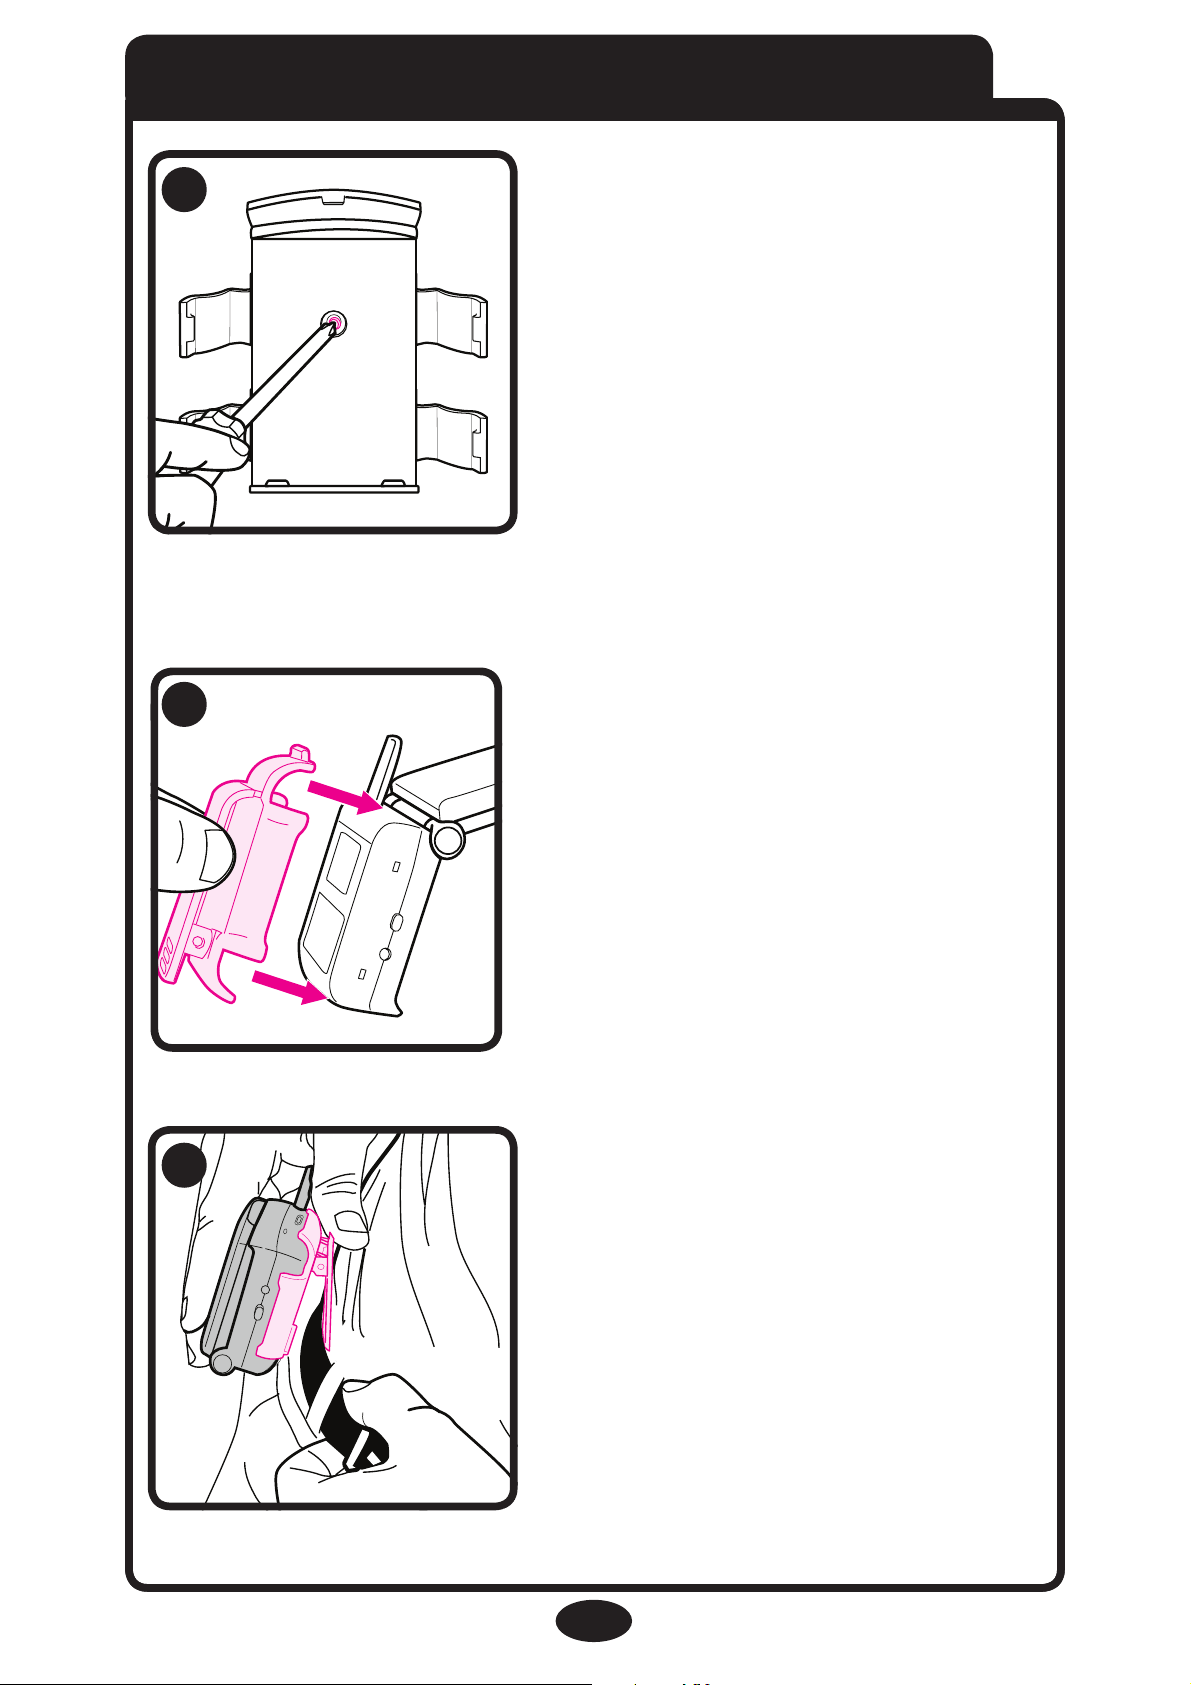
Attach wall mount to wall
using a #6 screw and
drywall anchor
(not included). Make sure all
cords are not within child’s
reach. Make sure there is
an electrical outlet readily
available to plug in the AC
adapter. DO NOT use an
extension cord.
40
41
42
Attach the belt clip to the
parent unit as shown.
Using the belt clip, you can
fasten the parent unit to your
waist/belt for hands free use.
Page 28

Trouble Shooting
Most problems have a simple solution.
First, check that:
• Power is turned ON for both units
• Both units are plugged in (or batteries are fresh in
Nursery Unit and fully charged in Parent Unit)
• Electrical outlet works
• Volume is turned up on Parent Unit
• Parent Unit is in range of the Nursery Unit
Parent Unit Only Works With AC Adapter
• Check that the battery is properly installed and
plugged into connector.
No Sound or No Video
• Batteries dead or weak — replace or use AC Adapter.
• AC Adapter not properly connected — check the
connections.
• Nursery Unit covered or blocked — remove the
obstruction.
• Press the Video Button to view the video.
28
Page 29

Weak Sound, Static or Poor Video.
• Nursery Unit too far from baby — move closer.
• Parent Unit too far from Nursery Unit — move them
closer.
• Large objects blocking the signal —
try repositioning Nursery Unit.
• Volume setting too low — turn it up.
• Interference from other electrical equipment—
eliminate cause of static (TVs, mixers, computers,
fans, fluorescent lights, light dimmers, etc.)
• Significant amount of obstructions between Parent
Unit and Nursery Unit such as walls, ceilings and
buildings. Try moving the Nursery Unit to another
part of the room.
Shrill Sound (Feedback)
• Nursery Unit and Parent Unit too close together—
move them farther apart.
• Volume set too high — lower the volume.
29
Page 30

Pairing the Parent Unit and Child Unit
To ensure privacy, your Parent Unit is paired with
your Nursery Unit at the factory. Your Parent Unit
will not work with any other Nursery Units.
If your Parent Unit won’t lock onto your Nursery
Unit, or you purchased a new Parent Unit or Nursery
Unit, follow the procedure below to pair the Parent
Unit and Nursery Unit. If you purchased a new Parent
Unit, skip Step 1. The new Parent Unit is ready to pair
with your Nursery Units.
1. Erase the Pairing from the Parent Unit
• Press Volume Up, Volume Down, and Video
buttons simultaneously for 3 seconds.
• The screen will display “Are you sure you want to
disconnect from the Nursery Unit?”
• Select “Yes” and press “OK”.
• The Parent Unit is ready to pair with the Nursery
Unit.
30
Page 31

2. Pair the Parent Unit with the Nursery Unit
• If the Parent Unit is not on, turn it on now.
• The Parent Unit will display “Looking for a Nursery
Unit to pair with. Turn on your Nursery Unit now.”
• Place the Nursery Unit in the same room, as the
Parent Unit.
• Turn the Nursery Unit Off then On again using the
On/Off Button. The green power light should come
on.
• Within a few seconds, the Parent Unit will find the
Nursery Unit. The Parent Unit will display “Nursery
Unit found. Pairing complete.”
• The Parent Unit will begin monitoring normally.
Nothing happened when I turned on the Nursery
Unit. What do I do?
• With the Parent Unit on, turn the Nursery Unit off,
and then on again.
• If there is still a problem, repeat steps 1 and 2.
31
Page 32
Replacement Parts
Warranty Information (USA)
To purchase parts or accessories or for warranty
information in the United States, please contact us at
the following:
Graco Children’s Products
150 Oaklands Blvd.
Exton, PA 19341
www.gracobaby.com
or
1-800-345-4109
Product Registration (USA)
To register your Graco product from
within the U.S.A. visit us online at
www.gracobaby.com/productregistration.
We currently do not accept product registrations from
those living outside the United States of America
.
32
 Loading...