

Page 1
234
© 1999 Graco 374-7-99
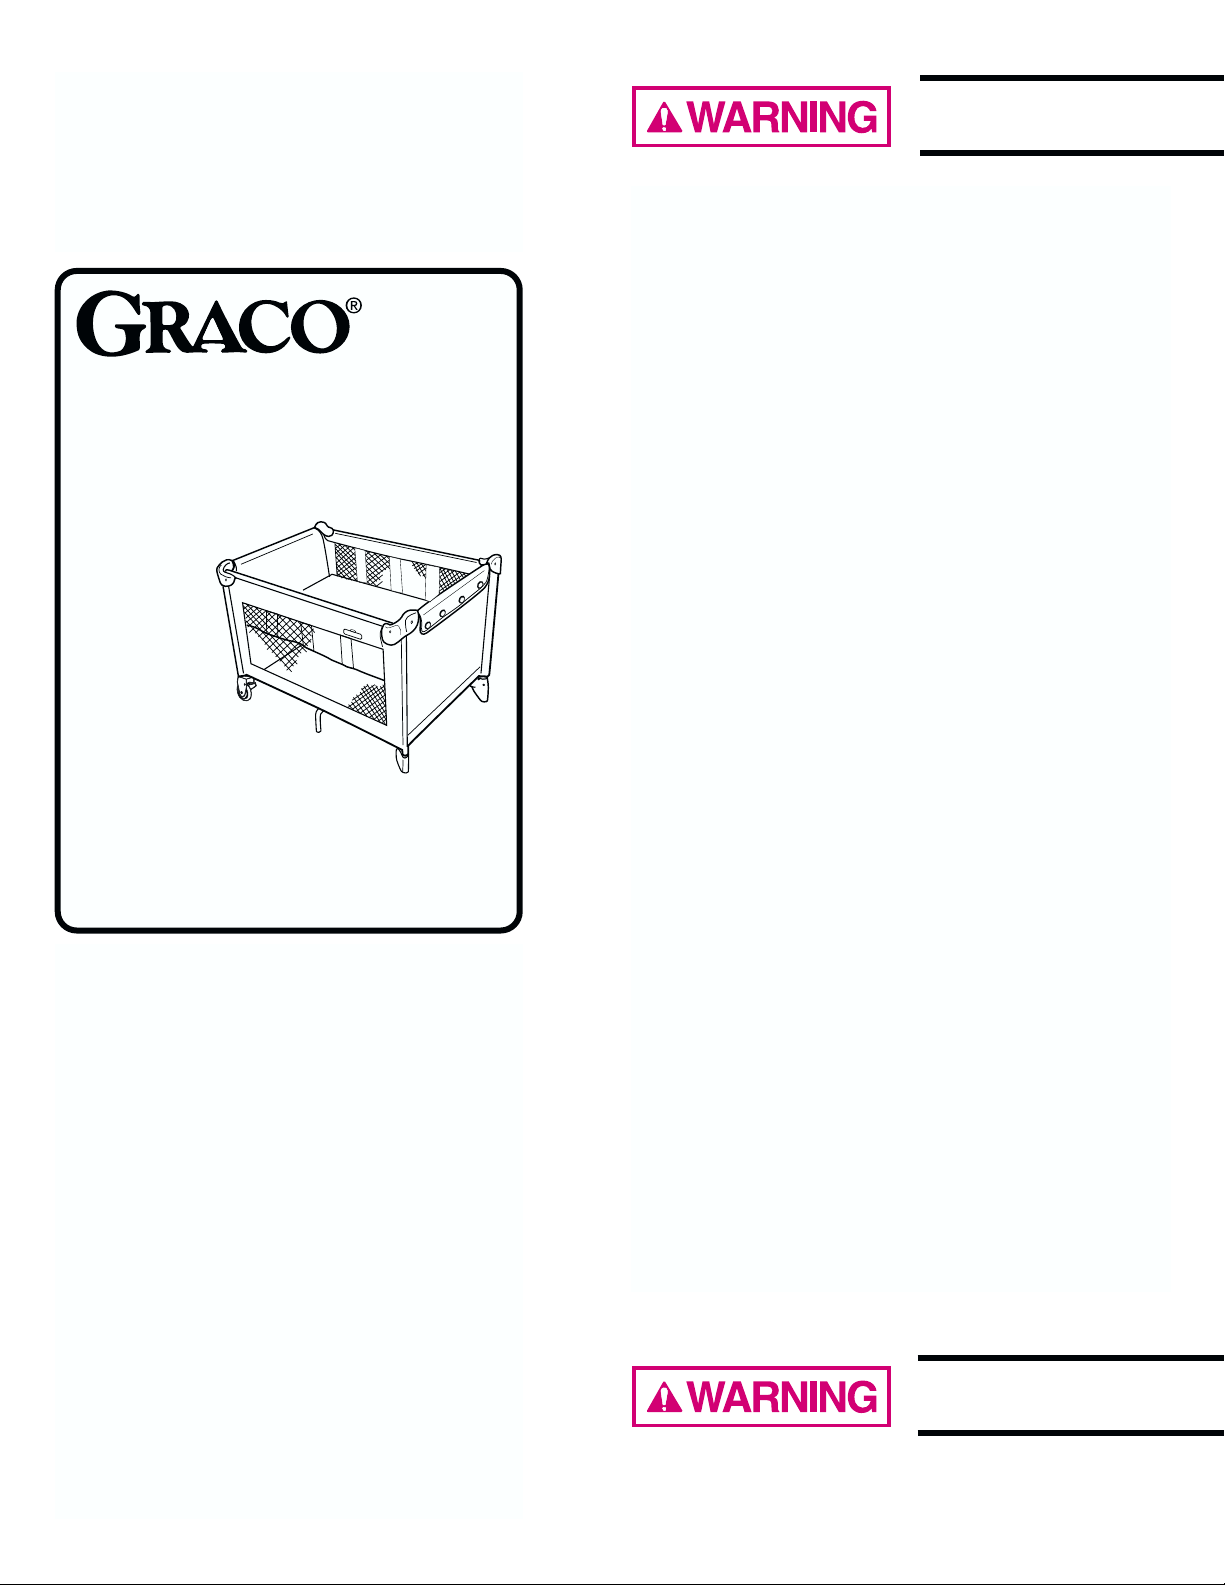
Congratulations on your purchase of a
Graco
®
Pack N Play®!
Graco is the recognized leader in the
design and manufacture of quality baby
products. We believe your new Graco
®
Pack N Play®is a wise choice, promising
many hours of enjoyment for your baby.
Your Pack N Play
®
may be used as a playard,
portable crib, bassinet or canopy unit.
Customer Satisfaction
Our goal is to make every product the best it
can be! We are also committed to supporting our
products after purchase. If you would like to speak
to Graco about your product, please contact our
Customer Service Department at 1-800-345-4109
or visit our Internet website, www.gracobaby.com.
Our knowledgeable staff will be ready to answer
any questions you may have concerning parts, use,
or maintenance. When you call, please have the
model and serial numbers ready so your call may
be processed quickly and efficiently.
Model Nos. 9651 & 9744
Model No. _________
Serial No. _________
Dear Customer,
Please fill in the model and serial numbers
above from the label in the center of the
bottom of your new Pack N Play.
Pack N Play
®
Bassinet and Canopy
Read all instructions BEFORE
assembly and use of this product.
Keep instructions for future use.
We recommend that you keep these instructions
with your Pack N Play. A storage pocket has been
provided for them on the bottom panel of your unit.
Failure to follow these warnings and the assembly
instructions could result in serious injury or death.
Setting Up the Pack N Play
!
THIS PRODUCT REQUIRES ADULT ASSEMBLY.
!
Keep fingers clear of top corners during setup.
Be sure Pack N Play is completely set up before use.
Check that the four top rails are completely latched, the
center of the floor is pushed down, and the mattress is
flat and secured by the
VELCRO
®
straps. Always follow
the instructions in the owners manual to set up the
Pack N Play.
!
When using a bassinet make sure
VELCRO
®
patches
underneath mattress firmly attach to bassinet mesh.
!
Before each use, inspect this product for damaged
hardware, loose joints, missing parts or sharp edges.
Do not use Pack N Play if any parts are missing
or broken. Call 1-800-345-4109 for replacement parts or
owners manual. Do not substitute parts.
Using the Pack N Play
!
The Pack N Play can be used as a playard, bassinet or
sleeping crib. When used as a playard, never leave child
unattended and always keep child in view. When used as
a sleeping crib or bassinet, you must still provide the
supervision necessary for the continued safety of your
child.
!
Always keep the Pack N Play away from hazards in the
area that may injure your child.
!
Do not add padding or other objects inside the Pack N
Play that will permit your child to climb out.
!
Stop using this product when your child reaches 35 inches
(89 cm) in height, weighs more than 30 pounds (14 kg), or
is able to climb out.
!
Do not modify Pack N Play or add any attachments
that are not listed in the owners manual, including an
add-on bassinet.
Using the Bassinet
!
Use bassinet with only one child at a time.
!
Never place a child under the bassinet.
Failure to follow these warnings and
instructions could result in serious injury or death.
OWNERS
MANUAL
Page 2
!
The bassinet must be fully assembled and installed,
including top rails, snaps and bottom pad, before using.
!
Discontinue using your bassinet if child weighs over
15 lbs. (6.8 kg), can roll over, or can push up on hands
and knees.
!
DO NOT store the bassinet in the Pack N Play while in
use. Store rails in pocket in the bassinet.
!
To help prevent heat build-up inside the playard and to
avoid overheating your child, when using the bassinet DO
NOT use a canopy.
Avoiding Suffocation Hazards
!
Unlike cribs that have rigid sides, the Pack N Play and
the bassinet have flexible sides. As a result, the Pack N
Play mattress is specially designed to prevent suffocation.
The Pack N Play mattress has a solid base, a certain
length and width, and is less than one inch thick in order
to meet safety standards. Using a thicker or a different
sized mattress may allow a childs head to get between
mattress and the side of the Pack N Play or bassinet
causing suffocation.
!
To help prevent suffocation from entrapment,
USE ONLY THE MATTRESS PROVIDED BY GRACO.
Never use additional mattress or padding.
!
Never use plastic shipping bags or other plastic film as
mattress covers not sold and intended for that purpose.
They can cause suffocation.
!
Do not use a water mattress with the Pack N Play.
Avoiding Strangulation Hazards
!
Strings and cords can cause strangulation. Keep strings
and cords away from child.
!
Do not place the Pack N Play near a window where
cords from blinds or drapes can strangle a child.
!
Do not hang strings on or over the Pack N Play.
!
Do not place items with a string around a childs neck,
such as hood strings, pacifier cords, etc.
!
Do not attach strings to toys.
This product is not intended for commercial use.
To Set Up Your Pack N Play
®
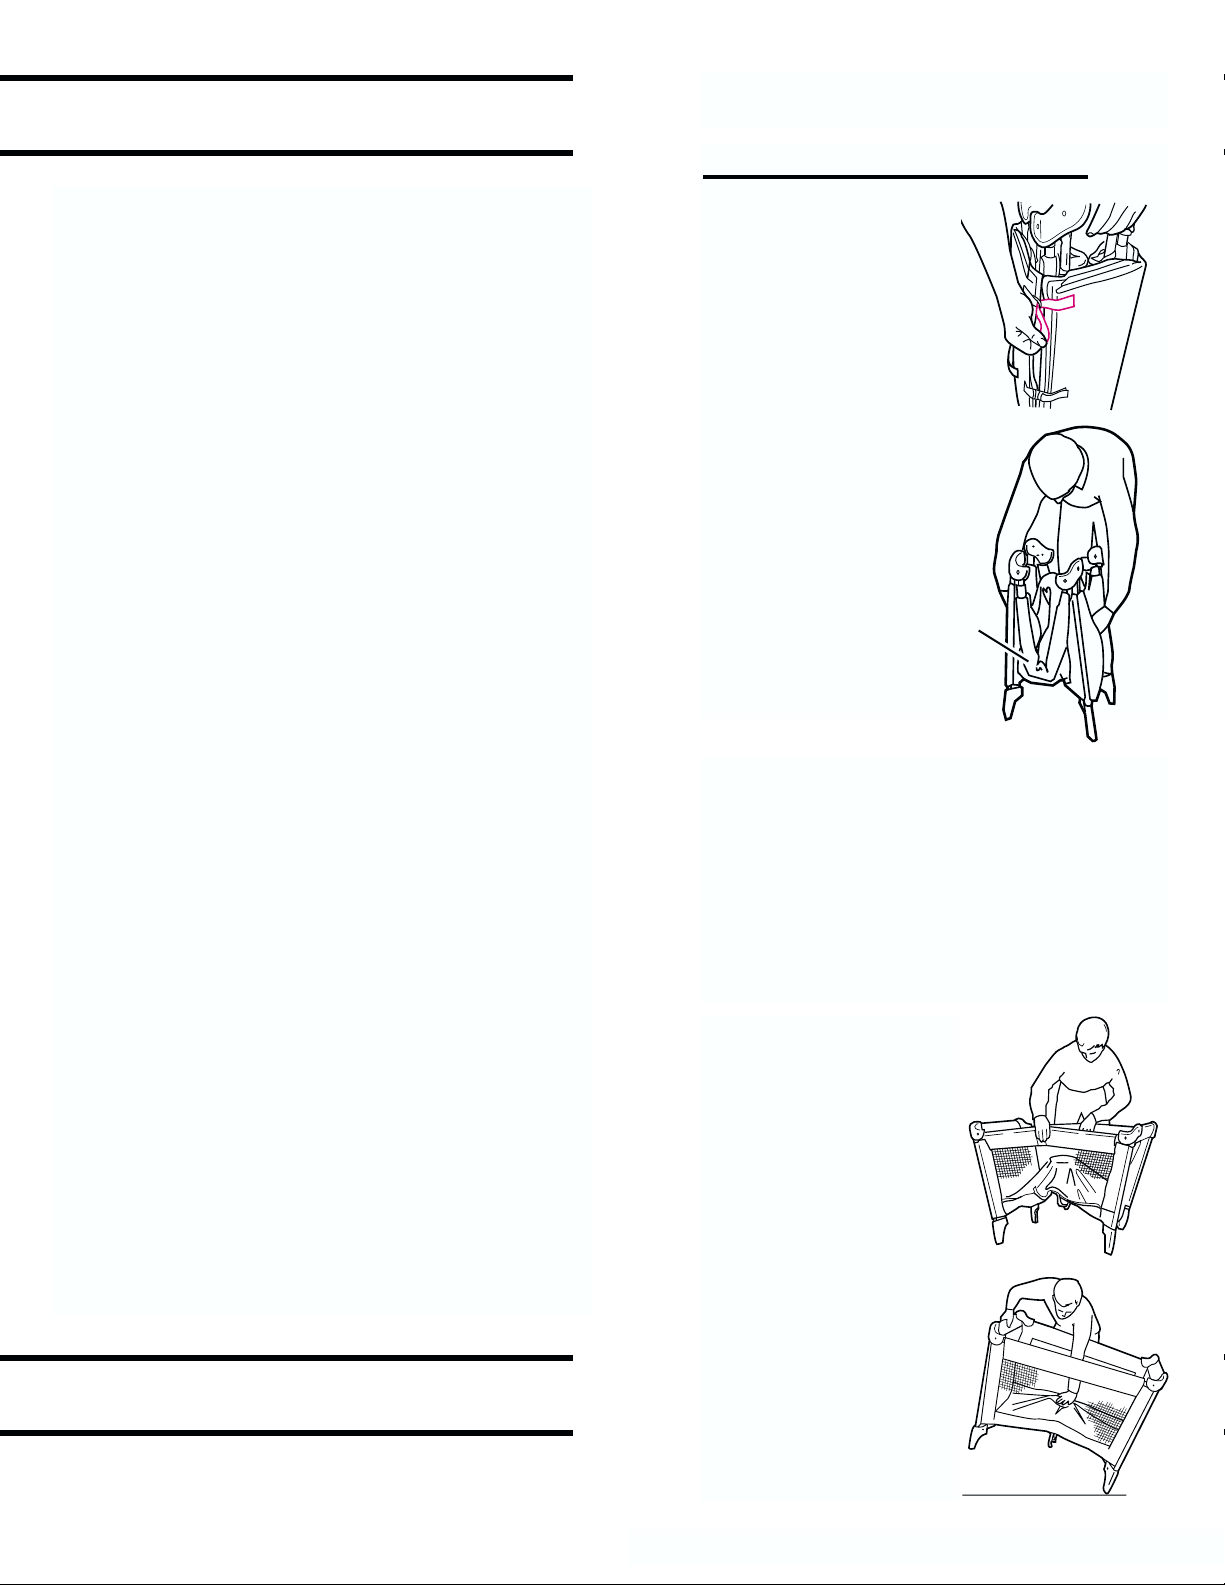
Step 1.
Undo the three VELCRO
®
straps. Fold
VELCRO
®
straps
back onto themselves.
Set mattress aside.
Step 2.
IMPORTANT: Leave
center of floor UP
until all four top
rails are latched.
Grasp the bottom of two
of the top rails, and pull
up until you hear a click.
Be sure top rails
have become rigid.
If not, pull up again
until they are rigid.
Top rail
FOR SMOOTH SETUP and takedown, its
important to remember one thing: the center
of the floor must be at least halfway up when
locking OR unlocking rails (see picture below).
Therefore:
!!
When setting up, lock rails
BEFORE lowering center.
!!
When taking down, raise center halfway
BEFORE unlocking rails.
Step 3.
Pull up the other two sides
until they latch.
If top rails do not latch,
lift the center of the floor
higher. Center of floor
must be at least halfway
up for the latches to catch
properly.
Be sure all top rails are
rigid.
Step 4.
Hold one end of the
unit up and push the
center of the floor down.
Setting up the Pack N Play®is easy,
once you know how:
Page 3
5
374-7-99
6 87
To Install Your Bassinet
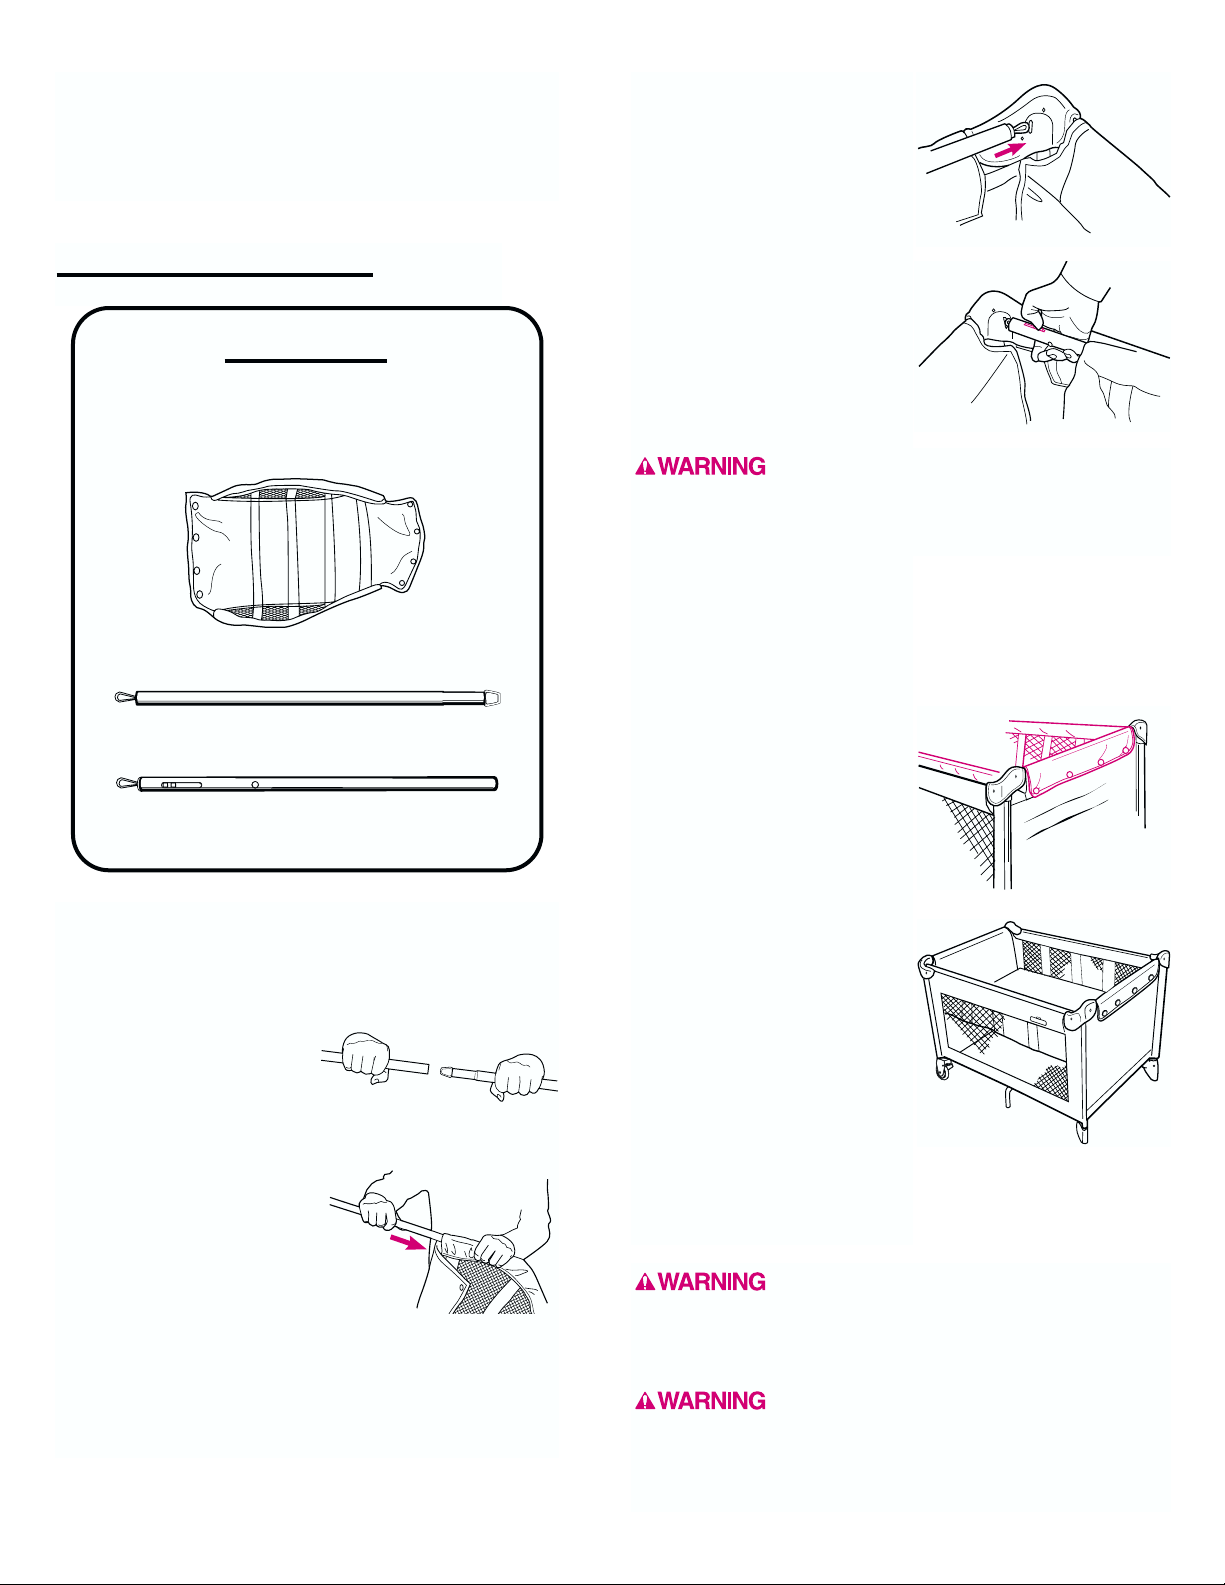
PARTS LIST
CHECK that you have all the parts listed below
BEFORE assembling your bassinet.
No tools required.
Bassinet
Tube (2)
Tube (2)
Loop end
Wire end
Red spring
latch end
Round end
To avoid SUFFOCATION, DO NOT use
extra padding such as a water mattress, mattress, or
pillows inside the bassinet. Use ONLY mattress
provided by Graco.
To help prevent heat build-up inside
the playard and to avoid overheating your child, when
using the bassinet DO NOT use a canopy.
Your bassinet is now ready to use.
Step 4.
Install the end of the tube
without the red spring latch
by placing the loop end into
the slot in the plastic corner.
Step 5.
On the other end of the tube,
pull back on the red spring
latch and insert the loop into
the slot in the plastic corner.
Step 6.
Repeat steps 4 and 5 on the
other side of the bassinet.
Step 7.
Snap both of the end flaps of
the bassinet to the Pack N
Play with the eight snaps
(four on each end).
Step 8.
Cover soft side of mattress
with fitted sheet (on certain
models) and place the
mattress in the bassinet
soft side up. Push down
on the mattress to secure
the mattress to the
VELCRO
®
on the bassinet.
DO NOT use your bassinet
without the mattress
provided by Graco.
At first your Pack N Play may be like a new pair of
shoes. You may need to break it in by slightly stretching
the netting and fabric. If the center does not stay down,
place some weight (several books) in the center of the
unit and let it stand overnight.
The four bassinet tubes are located in storage pockets
sewn into the bassinet itself.
Step 1.
Insert wire end of one tube
into the round end of a tube
with a red spring latch.
Repeat with other tubes.
Step 2.
Slide the assembled tubes
into the tunnels on the sides
of the bassinet.
Step 3.
Lift bassinet by the two tubes and lower it into the
Pack N Play. Make sure the printed warnings on
the end flap are facing up.
The loop ends must be in the slots in the
corners to secure the bassinet in the Pack N Play. Pull
up on the tube and bassinet to ensure that the tube is
in place.
Page 4
Step 1.
Remove the mattress from your bassinet.
Step 2.
Unsnap the end flaps from your Pack N Play.
Step 3.
Pull back the fabric at one corner of the bassinet to find the
red spring latch.
Step 4.
Pull the red spring latch back
and lift up the tube.
Step 5.
Pull the tube out of the bassinet
and set aside.
Step 6.
Repeat steps 3, 4 and 5 to remove the other tube.
Step 7.
Use extreme
care when pulling the tubes
apart.
Pull the tubes apart by twisting
the tubes as you pull. Store the
tubes in the pockets in the
bassinet.
To Remove Your Bassinet
To Use as a
Playard/Portable Crib
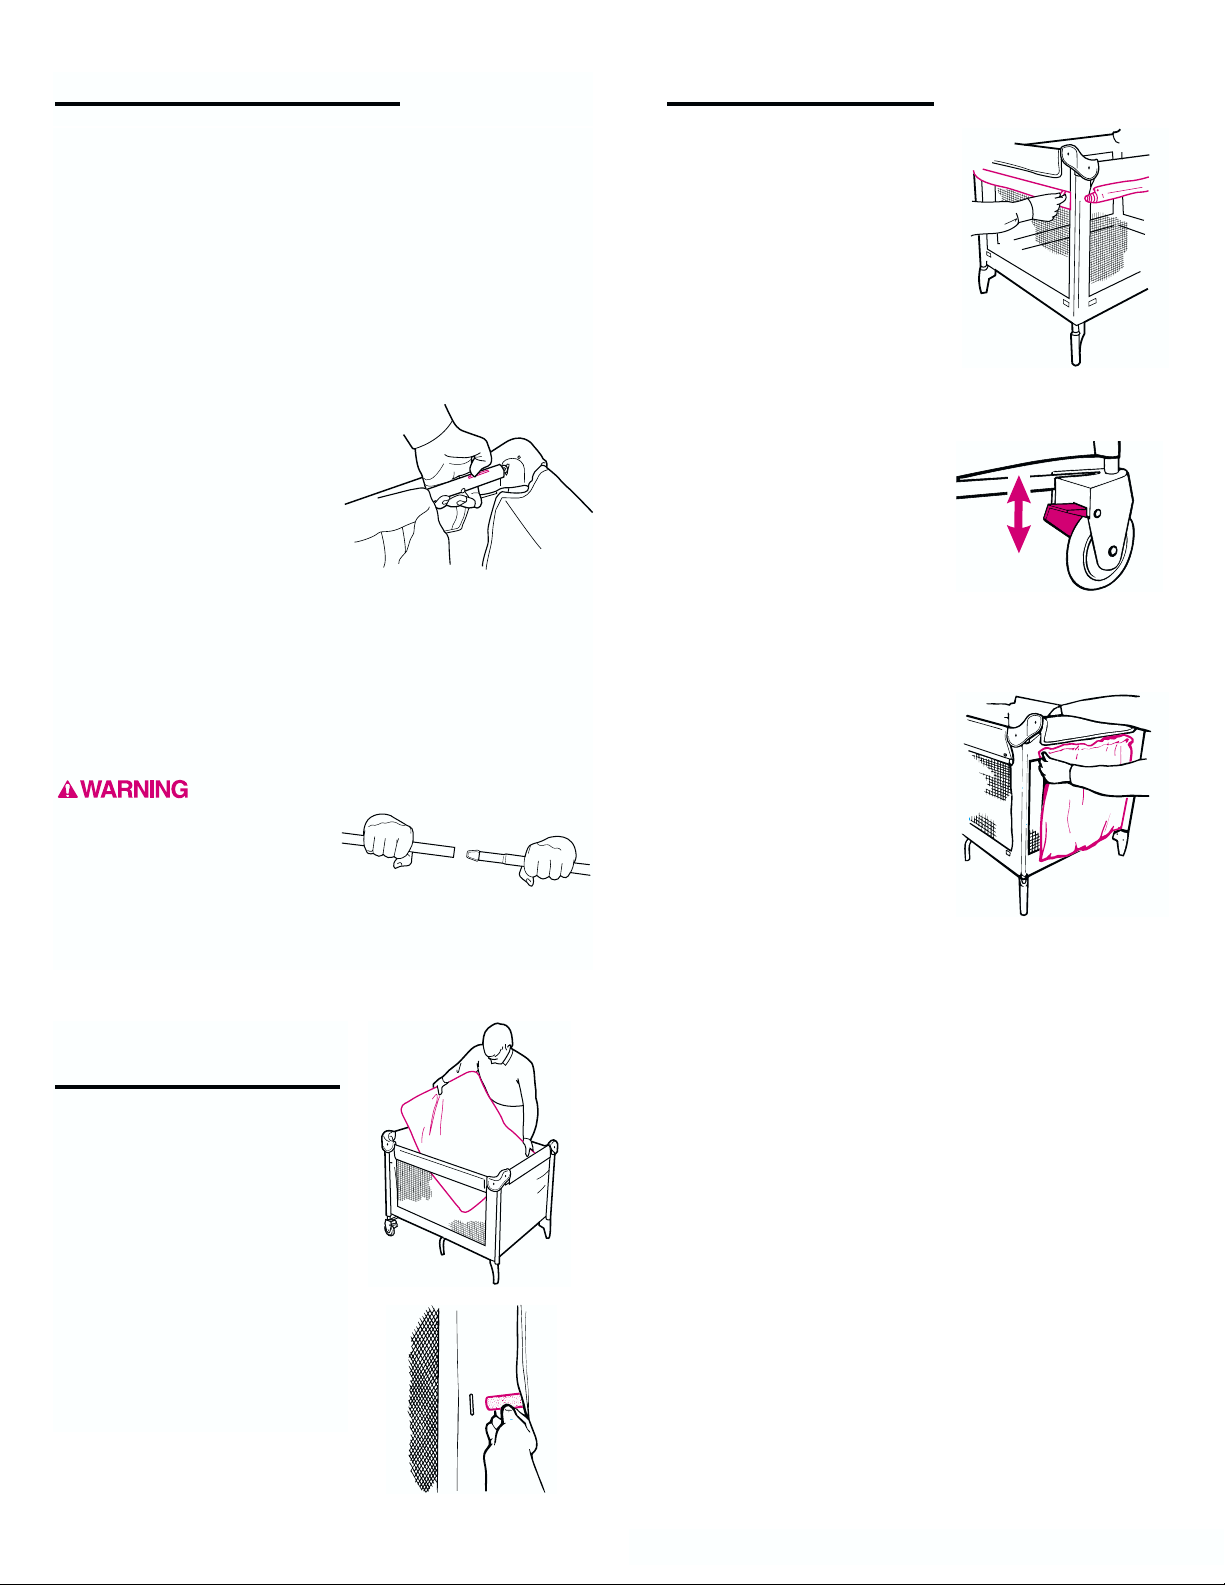
Place mattress into your unit
with padded side up.
Always use your unit with
mattress installed soft side up.
Slide the two
VELCRO
®
straps
through slots in bottom of Pack
N Play and fasten to VELCRO
®
on underside. This will prevent
mattress from moving.
Your Pack N Play is ready to
use.
Accessory Features
SIDE FLAP:
You can raise side flap if
desired.
Unfasten VELCRO®straps at
bottom of flap. Roll flap up.
Fasten in place with snap
loops at top.
WHEELS:
To apply the locks, push
DOWN on the levers.
To release the locks, lift UP
on the levers.
TOY BAG:
Toy bag snaps on end of
unit. Maximum weight
2 lbs (0.9 kg).
DO NOT machine wash or dry
in a dryer. DO NOT dry clean.
Spot clean with a damp cloth
and a mild detergent. NO
BLEACH.
Page 5
9
374-7-99
10 11 12
To Use Your Changing Table
(on certain models)
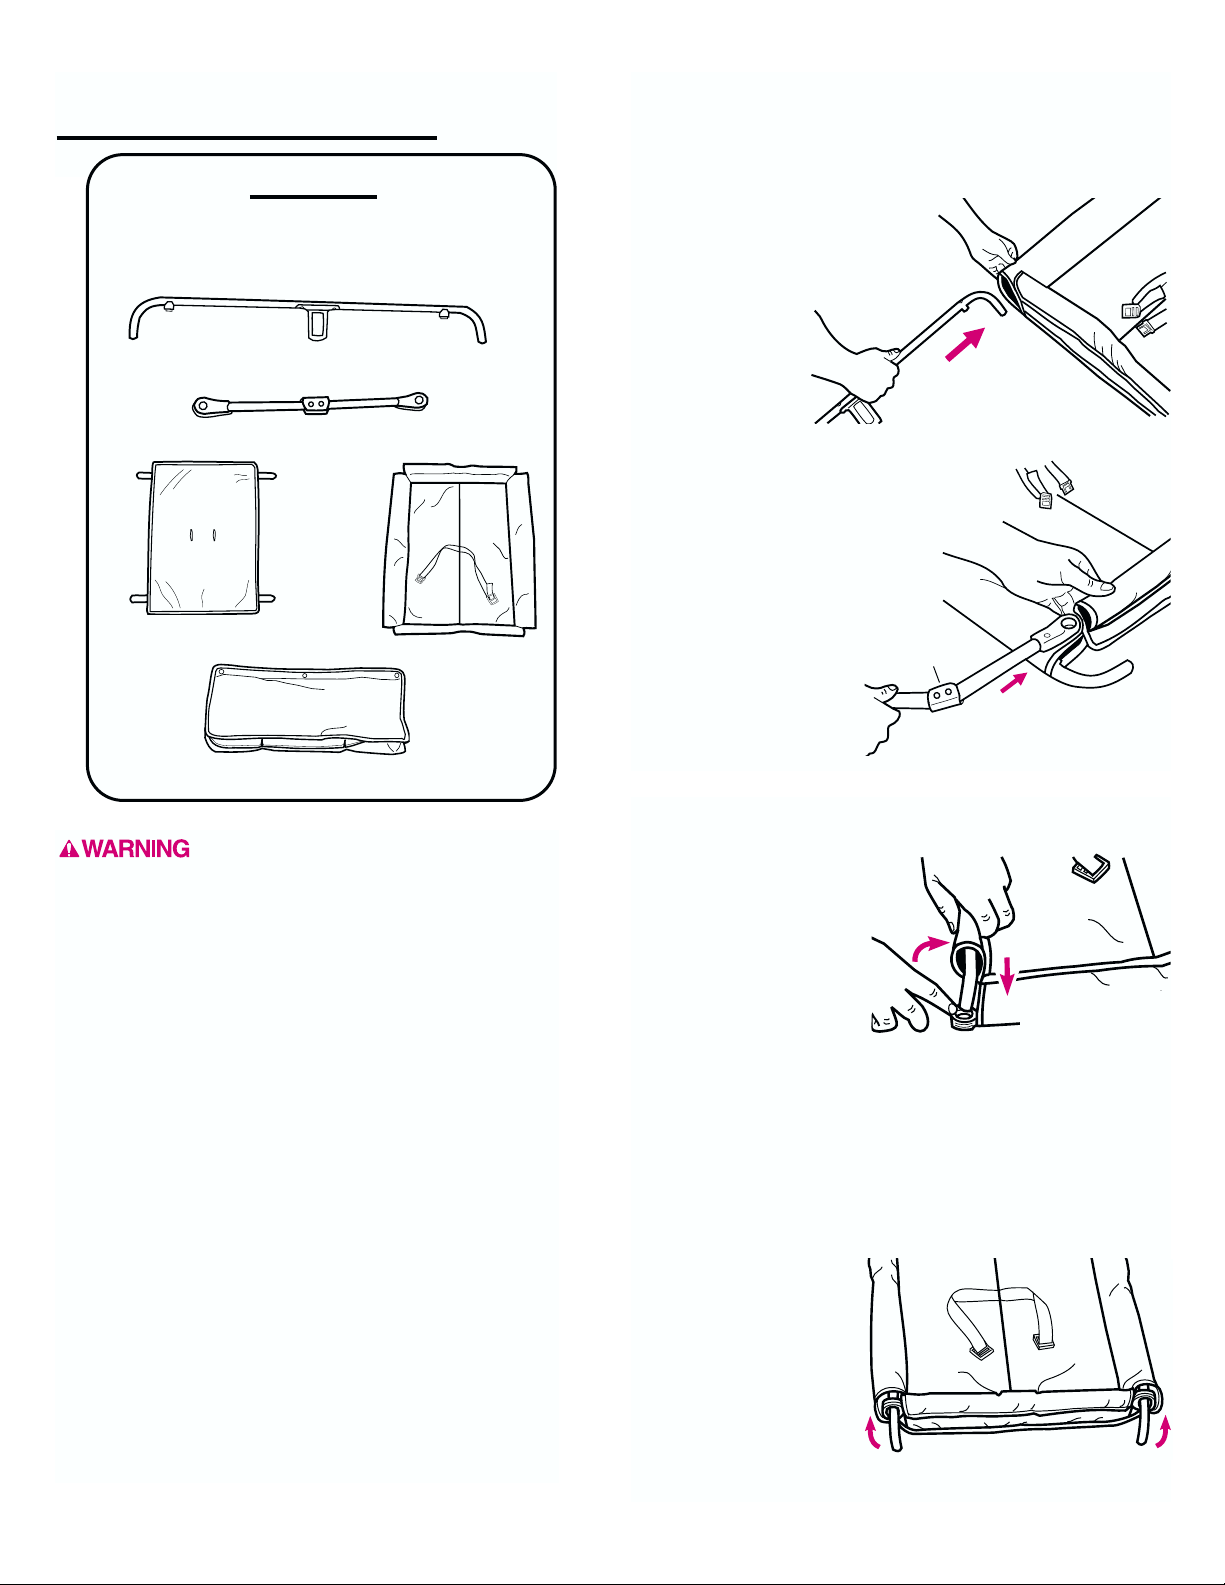
Parts List
CHECK that you have all parts listed below
BEFORE assembling your changing table.
No tools required.
Long tube (2)
Short tube (2)
Changing pad
Accessory bag
Changing
table
Step 1.
Lay changing table flat on floor with short side in front
of you and belt facing up. Gently slide one long tube into
opening on long side exactly as shown.
Repeat on other side.
Step 2.
Slide one short tube
into opening on end
as shown.
For proper orientation,
be sure folding side of
hinge faces pad as
shown.
DO NOT insert
other short tube
at this time.
Fold side
of hinge
Long
side
Short side
Step 3.
Turn up long tube so
that its end points down.
Insert end of long tube
into opening on end of
short tube as shown.
DO NOT slide short
tube up around the bend
of long tube until you
have finished next step.
Make sure fabric does
not get caught in
opening when inserting
long tube into short tube.
Step 4.
Repeat step 3 on other
end of short tube, then
slide short tube ends up
onto long tubes.
TO AVOID TEARING
FABRIC, slide this end
up before proceeding
with step 4.
Short tube side
Slide ends up
To protect your child from falls and
other injuries:
Always stay within arms reach of your child when
using the changing table. Always use waist belt
when child is on the changing table. Never leave
child unattended.
The changing table is designed for use only with
this Graco Pack N Play. Do not attempt to use it
with any other product. Before each use, make
sure the changing table is properly secured to
the Pack N Play by pushing down firmly in the
middle of the changing table. The changing table
should not fall.
Do not use the changing table as a sleeping or
play area.
Weight limit for the changing table is 25 pounds
(11.3 kg). Do not use the changing table as extra
storage. Always remove the changing table when
your child is in the Pack N Play.
The Pack N Play changing table can be used on
the floor without being attached to the Pack N
Play. Never place the changing table on a piece of
furniture, bed, counter or any raised surface from
which the changing table or your child could fall.
Page 6
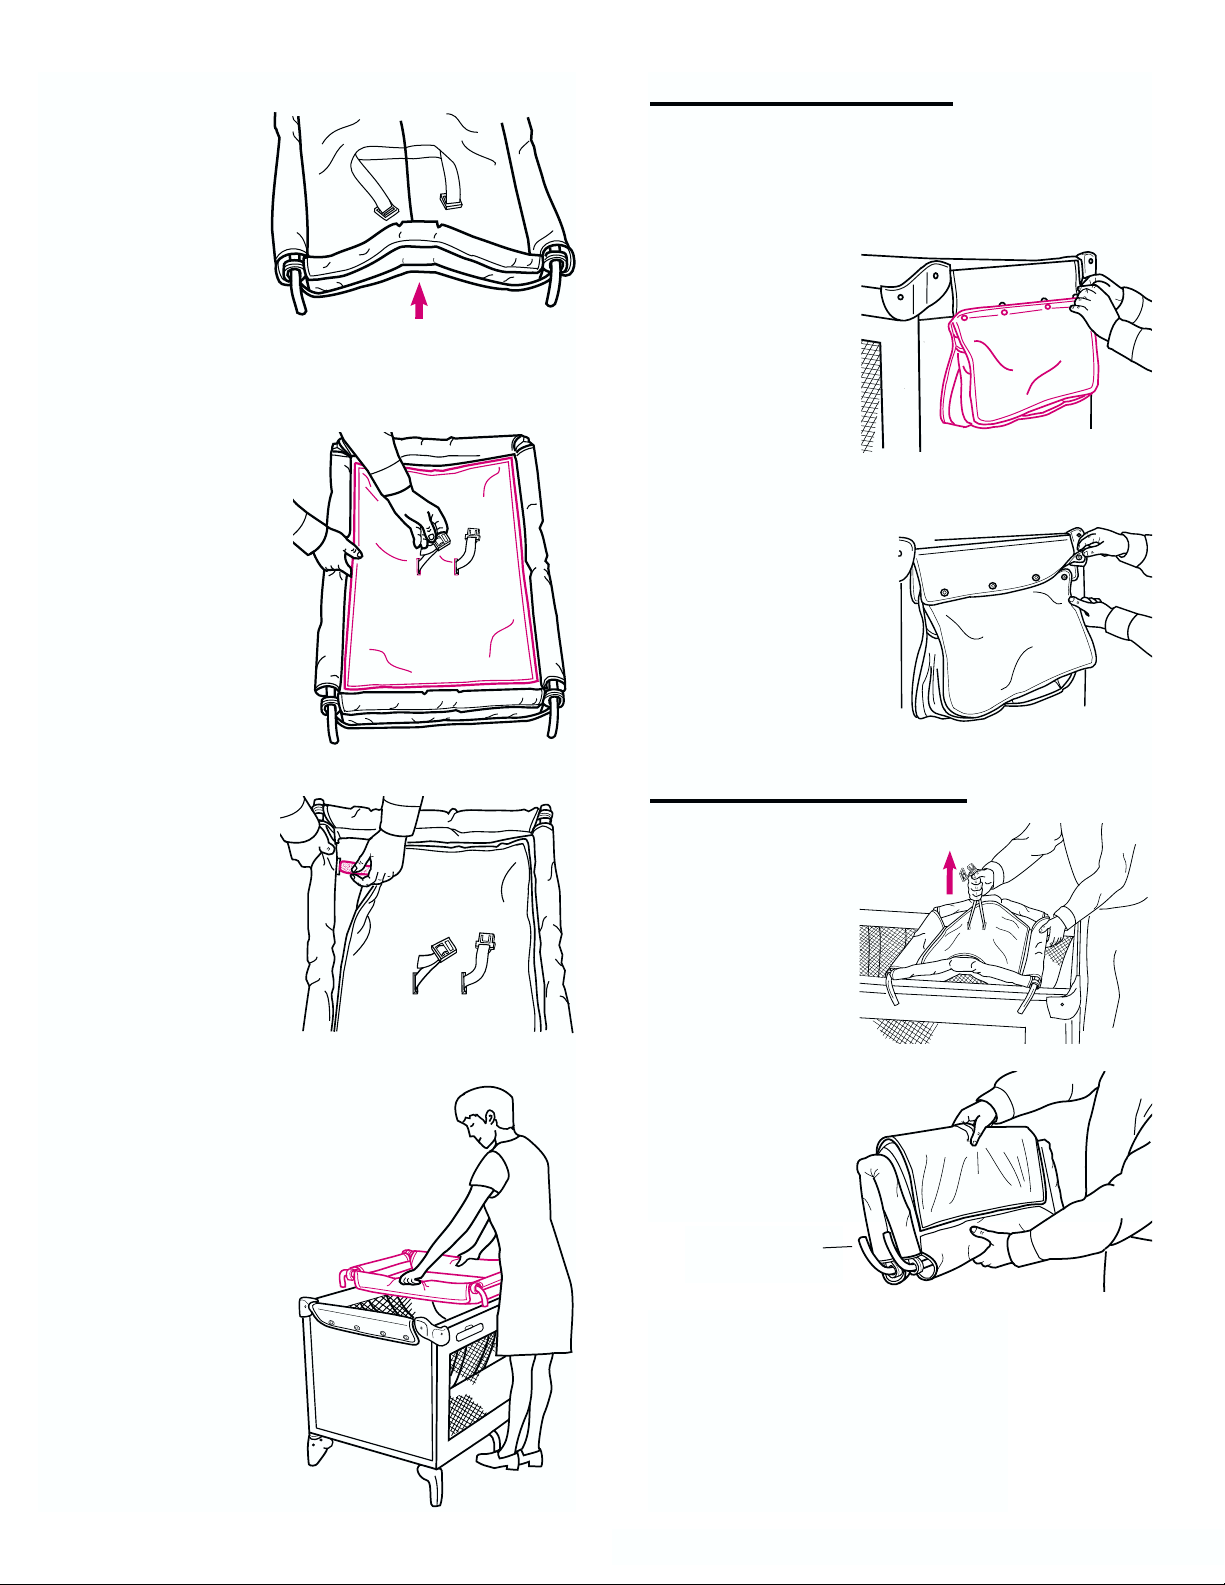
Step 5.
Repeat steps 2
and 3 on other end
of changing table.
If the short tubes have
been inserted correctly,
the changing table
should be able to
FOLD UP in the
center as shown. If you
cannot fold the tubes
up in the center, review
steps 2, 3, and 4.
Step 6.
Place pad in changing
table with vinyl side up.
Pull belt straps through
holes in center of pad.
Step 7.
Insert VELCRO®straps
into the four slots at the
corners of changing table
and attach to VELCRO
®
on underside of changing
table. This will prevent
pad from moving.
Step 8.
Place changing table on
Pack N Play as shown.
You may use your changing
table with or without your
bassinet installed. Make
sure tubes are securely
over the sides of the
Pack N Play.
Check that the changing
table is supported
by the Pack N Play by
pushing firmly down into
center of changing table.
To Use Accessory Bag
If your bassinet is already installed, unsnap the four
snaps on the bassinet end flap from either end of
Pack N Play.
Step 1.
Snap accessory bag
onto end of Pack N
Play with four snaps
as shown.
Step 2.
Snap bassinet end flap
over the accessory bag
with the four snaps.
To Fold Changing Table
Step 1.
Pull up on waist belt
straps to fold.
Step 2.
Ends of long tubes
must point up when
folded as shown.
Fold up
Ends of tubes
point up
Step 3.
To carry or store your changing table
with your folded Pack N Play, see
To Cover Your Pack N Play section
in these instructions.
Page 7
13
374-7-99
14 15 16
To Set Up and Use Your Canopy
When properly used, the canopy provides shade for
your child. However, your child may be warmer inside
the playard than in a shaded area outside the playard.
To help prevent build-up of heat inside the playard and
to avoid over-heating your child:
!
Turn canopy mesh away from the sun. Keep entire
mattress shaded from sunlight at all times.
!
Keep playard well ventilated:
!
Always keep the front mesh panel and one side
mesh panel of the playard open.
!
Never cover the canopy mesh.
!
Never use the canopy with a bassinet in use.
As always, use good judgment to protect your child
from exposure to heat which can lead to serious injury
or death.
NEVER leave your child unattended.
ALWAYS keep your child in view.
Side mesh
panel
Canopy mesh
Front mesh
panel
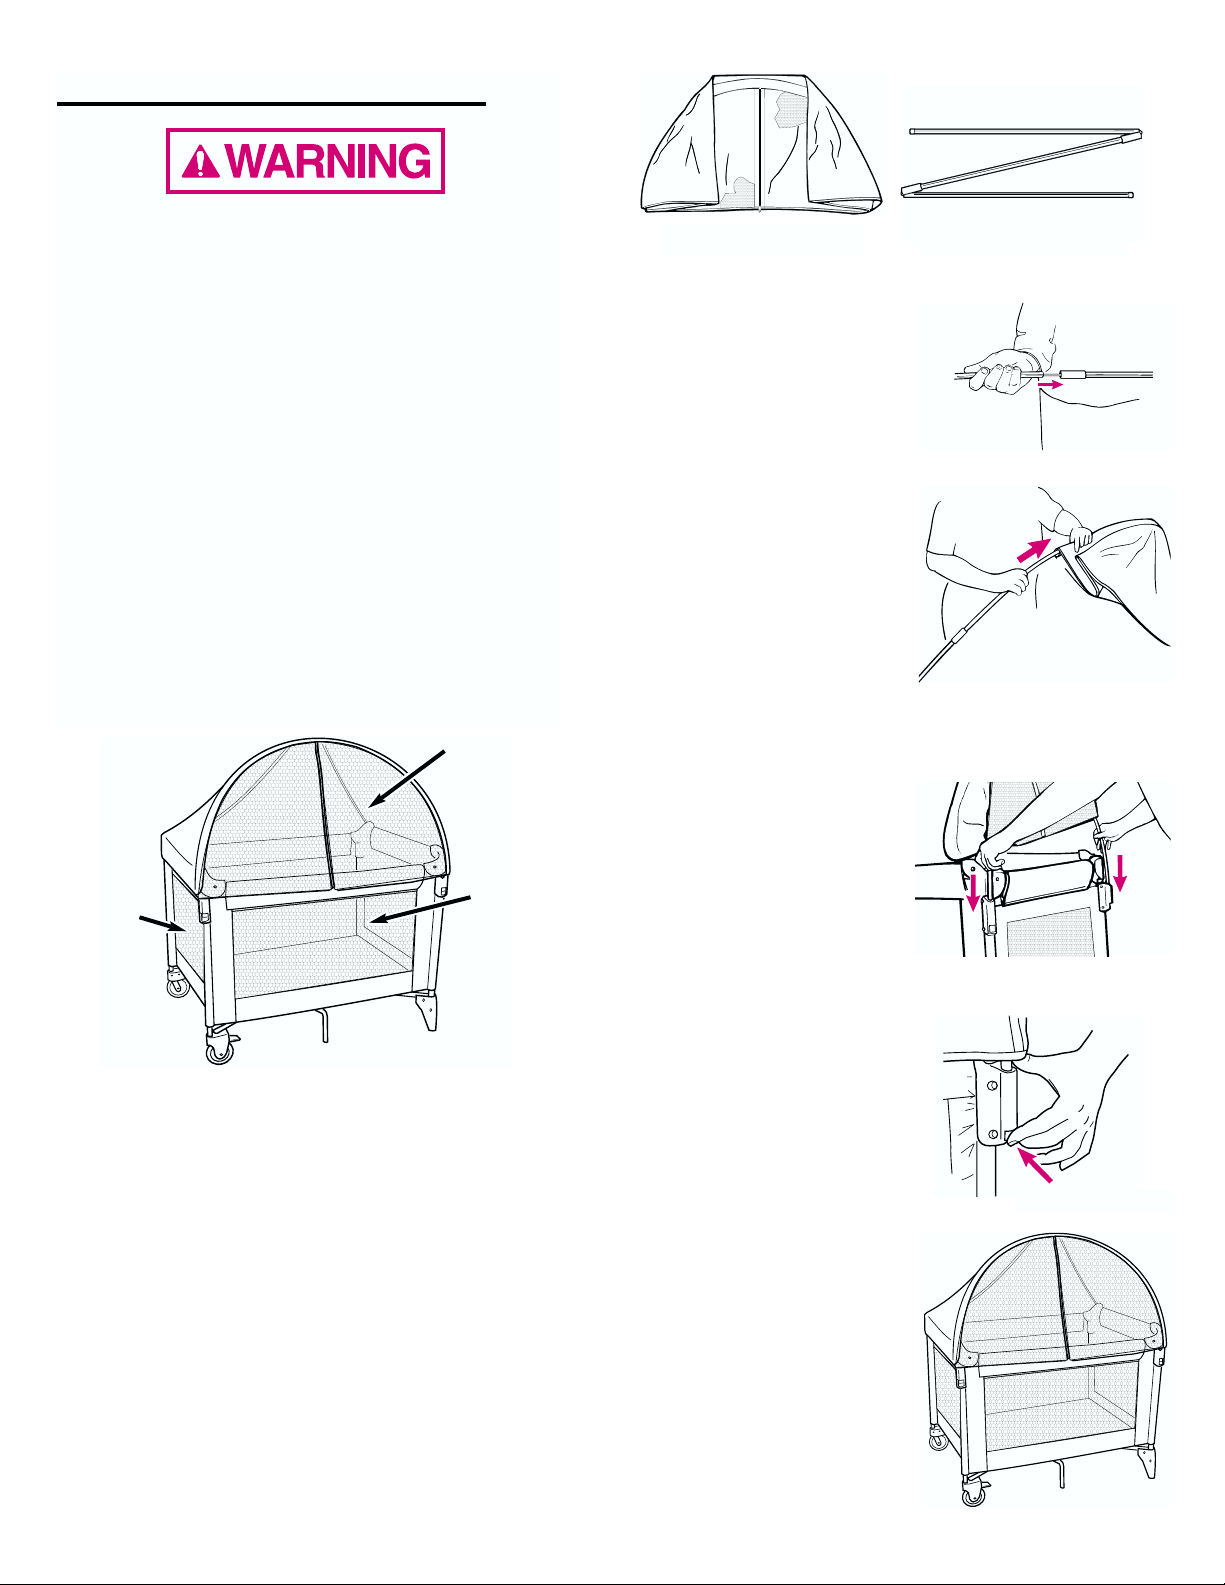
Step 1.
Unfold the tubing and slide
the three sections together to
form one long tube. The
elastic cord in the tubing will
hold the pieces together.
Step 2.
Slide the long tube into the
tunnel in the canopy until
both ends stick out of the
tunnel 3 or 4 inches
(7.5-10 cm). The tunnel is
on the shiny side near the
netting.
Step 3.
Push the tube ends into
the corner brackets on the
Pack N Play. Tube end caps
will snap into place in the
brackets.
The mesh side of the canopy
goes on the same side of the
unit as the brackets. The
shiny side goes on the inside
of the unit.
To remove canopy, first
grasp tube firmly so that it
will not spring out. Then push
in on end caps to release
them from brackets and pull
tube ends up.
Step 4.
Pull the back corners of the
canopy over the back corners
of the Pack N Play and fasten
the
VELCRO
®
squares located
on the ends of the top rail and
back corners of the canopy.
Canopy
Tubing
Push in, then up
Page 8
Side mesh
panel
Canopy mesh
Front mesh
panel
Step 5.
To help prevent build-up of heat inside the playard and to
avoid over-heating your child:
!
Never use the canopy with a bassinet in use.
!
Turn canopy mesh away from the sun. Keep the entire
mattress shaded from sunlight at all times.
!
Keep playard well ventilated:
!
Always keep the front mesh panel and one side mesh
panel of the playard open.
!
Never cover the canopy mesh.
Maintenance of Canopy:
DO NOT machine wash or dry in a dryer.
DO NOT dry clean. Spot clean with a damp
cloth and a mild detergent. NO BLEACH.
To fold the top rail:
!
Lift up slightly on the top rail.
!
Push up on the button located under the symbol
!
to release the two tubes.
!
Push down.
To Fold Your Pack N Play
®
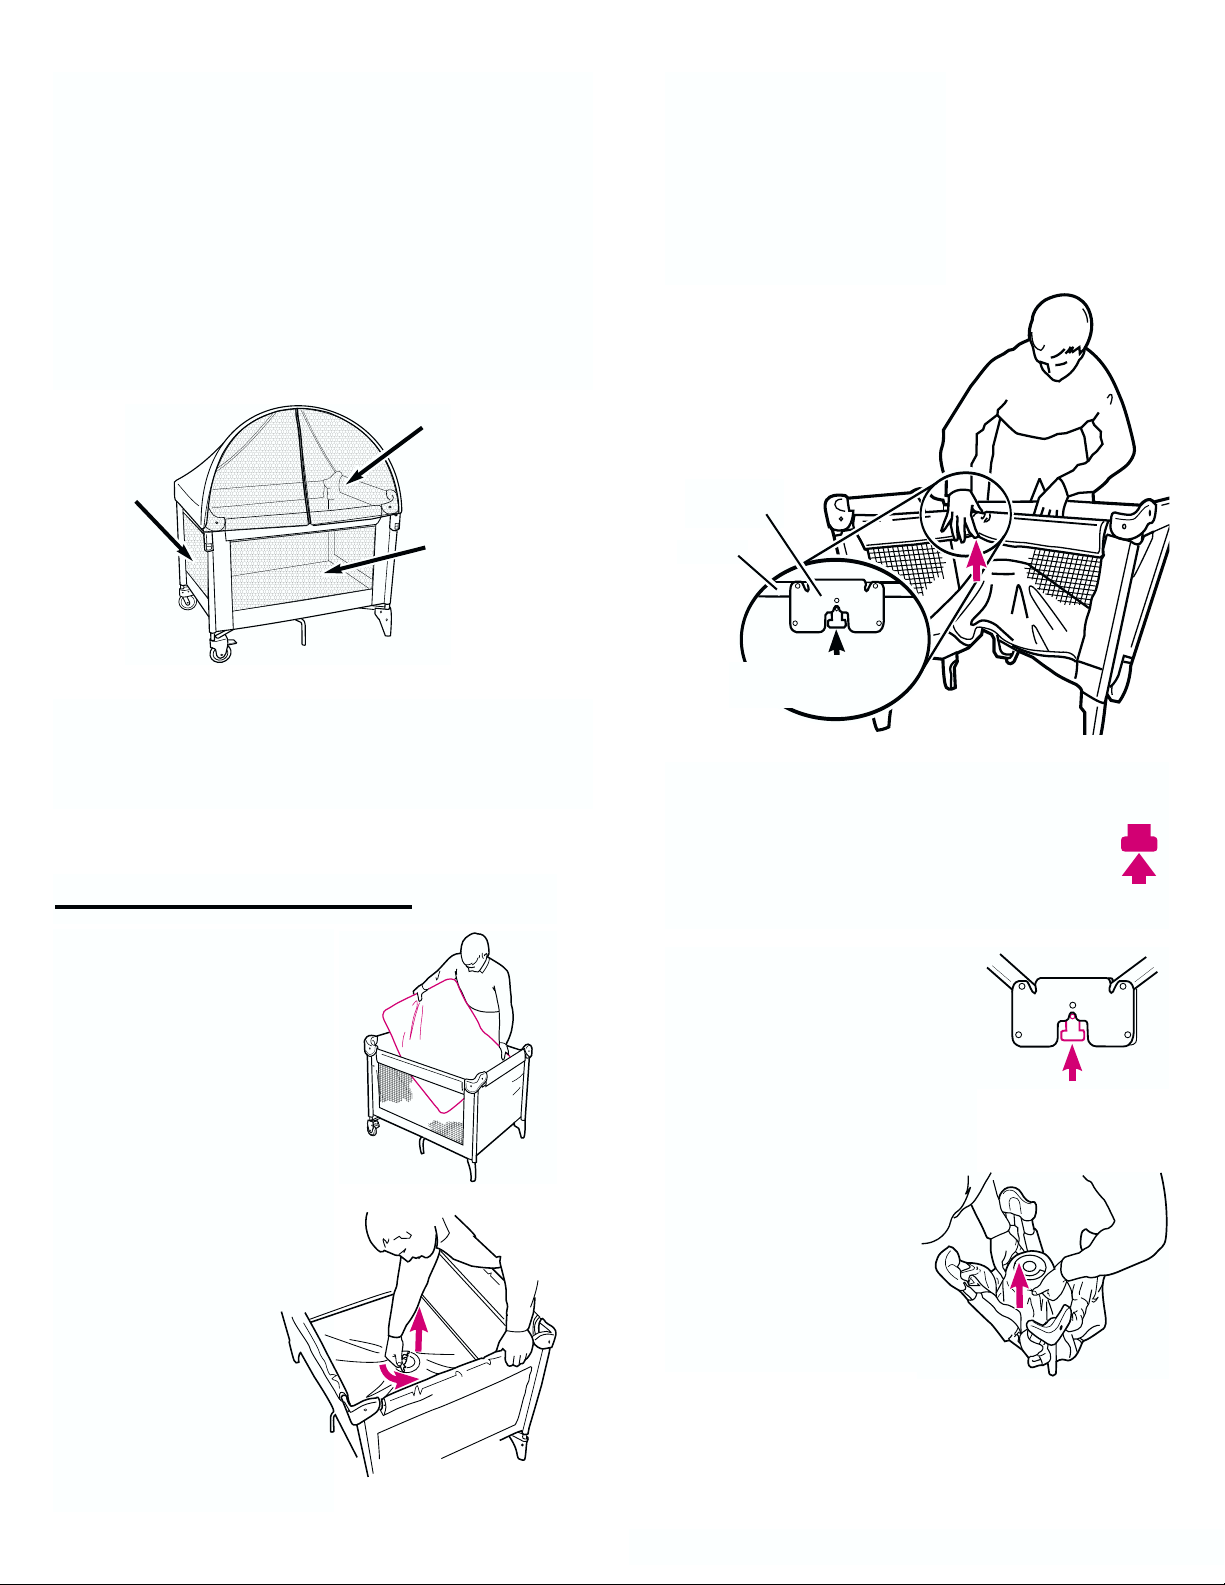
Step 1.
Lower the back flap. Apply
locks on wheels. Release the
two
VELCRO
®
straps under the
Pack N Play, and remove the
mattress.
Step 2.
IMPORTANT:
Raise center halfway
BEFORE unlocking
rails.
Grasp the red handle
on the center of the floor
as shown.
Push down and turn
handle. Then pull up
approximately halfway
to the top rails.
Center
piece
Tube
Push UP button
under fabric
Step 3.
The top rail has a center piece
with two tubes hidden under
the fabric. The button on the
bottom of the center piece
releases the two tubes when
it is pushed up.
!
If top rails do not unlatch, lift
!
the center of the floor higher.
!
Both tubes must be released
!
for the top rail to fold.
Step 4.
Pull center up all the way.
Page 9
17
374-7-99
18 19
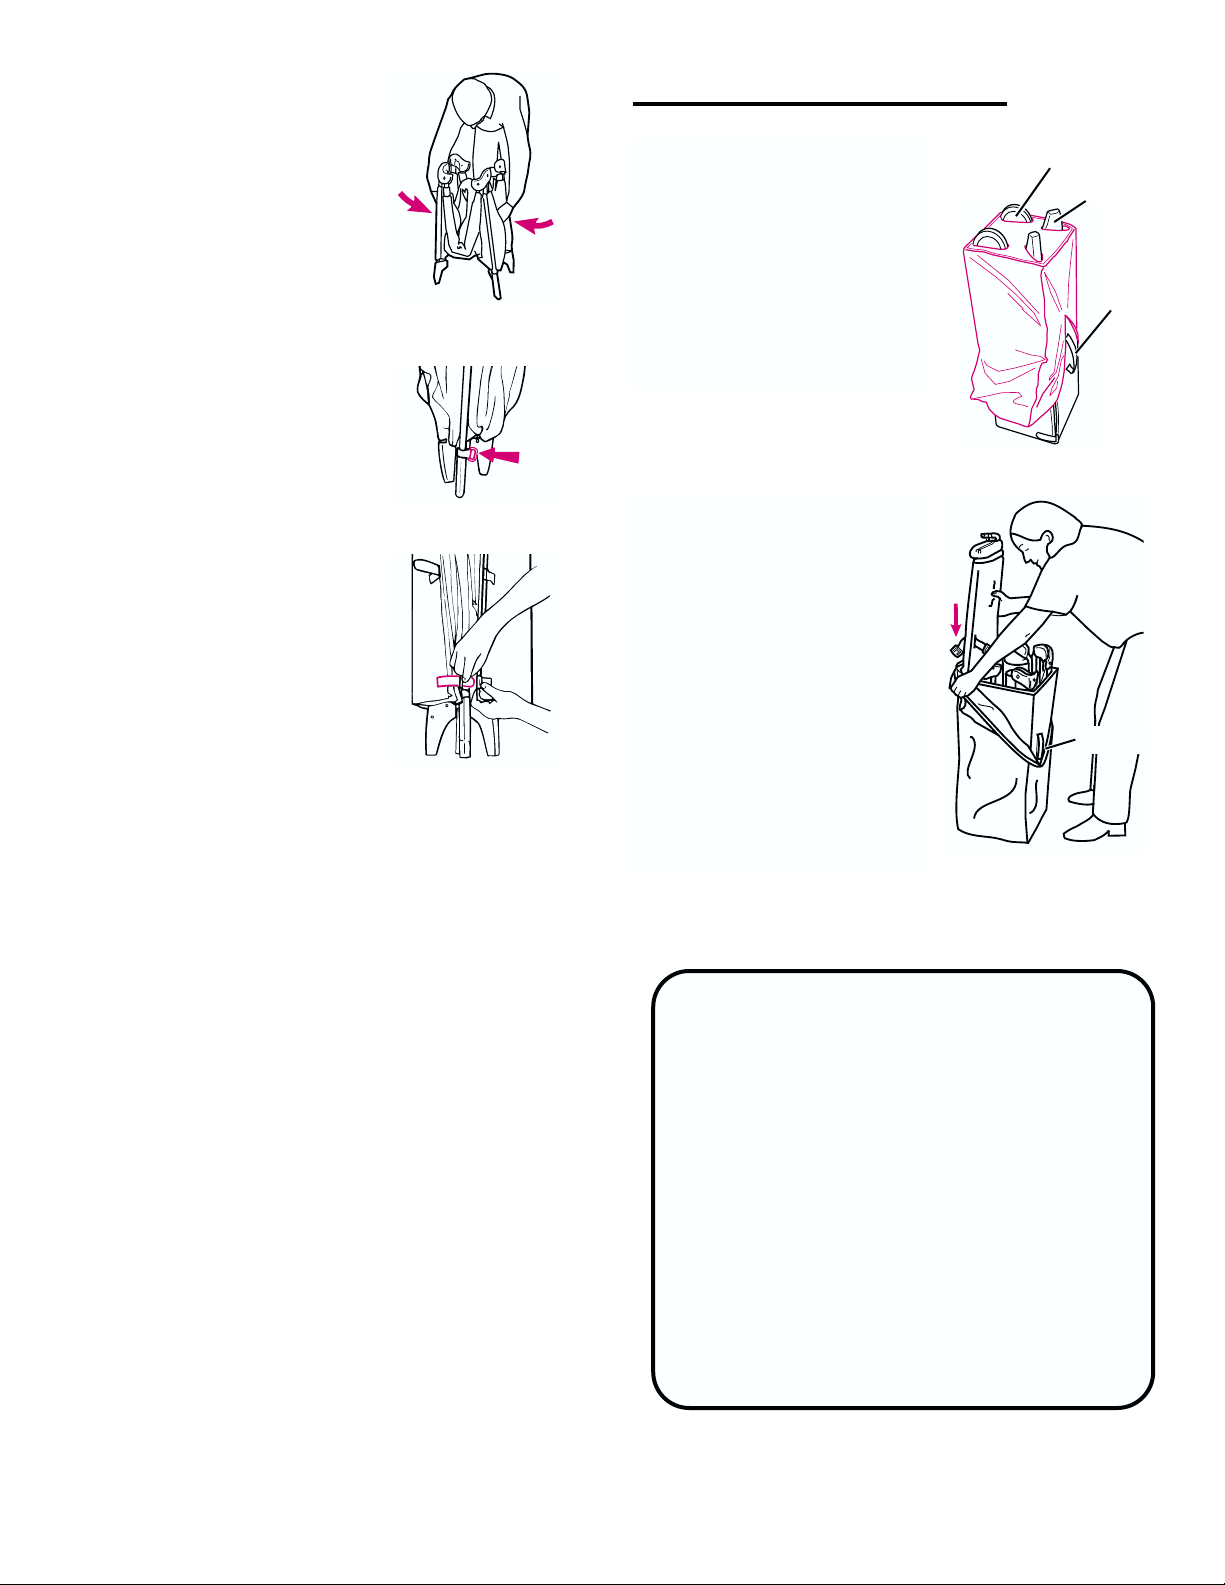
Step 5.
Gather your unit together.
Do not force.
If unit will not fold, look for a
partially latched top rail. Squeeze
the latch button to release the rail.
Step 6.
Find the bottom corner belt loop
(only one). This loop is for holding
unit and mattress together while
carrying.
Step 7.
Wrap the mattress around your unit.
Fasten together the VELCRO
®
straps,
attaching the bottom strap to the
bottom corner belt loop.
CARE AND MAINTENANCE
FROM TIME TO TIME CHECK YOUR PACK N
PLAY for worn parts, torn material or stitching.
Replace or repair the parts as needed. Use only
Graco®replacement parts.
IF PACK N PLAY IS USED AT THE BEACH, you
MUST clean sand off your Pack N Play, including
the feet, before packing it into cover. Sand in top
rail lock may damage it.
TO CLEAN PACK N PLAY, use only household
soap or detergent and warm water.
TO WASH CARRY BAG, machine wash in
lukewarm water on delicate cycle and drip-dry.
NO BLEACH.
To Cover Your Pack N Play
®
Models with
changing table:
Turn unit upside down, so that
wheels point up. Pull the cover
over your unit, making sure
carry handle attached to
Pack N Play mattress is lined
up with zipper. Turn unit over.
Before pulling bag up, insert
folded changing table into the
side opposite the handle as
shown. Pull bag up to cover
end. Zip together.
Turn unit upside down, so that
wheels point up. Pull the cover
over your unit. Make sure carry
handle attached to Pack N Play
mattress is lined up with zipper.
Push the plastic end of the bag
over wheels and feet. Turn unit
over and pull bag up to cover
end. Zip together.
Handle
Wheel
Foot
Handle
Page 10
Model Number
(Must be filled in)
SHIP TO:
Name
Address
City, State, Zip
( )
Telephone
Total:
Shipping
& handling: $5.00
6% sales tax
(PA only):
Total amount
due:
Check enclosed
(payable to Graco Childrens
Products Inc.)
Charge to credit card:
Visa
MasterCard
Discover
Account #:
Expiration date:
Signature:
Mattress
Carry bag
Wheels
Bassinet
Wire end tube
Round end tube
Canopy
Canopy tube
Canopy bracket
Toy bag
Long tube
Short tube
Changing pad
Changing table
Accessory bag
Fitted sheet
Replacement Parts
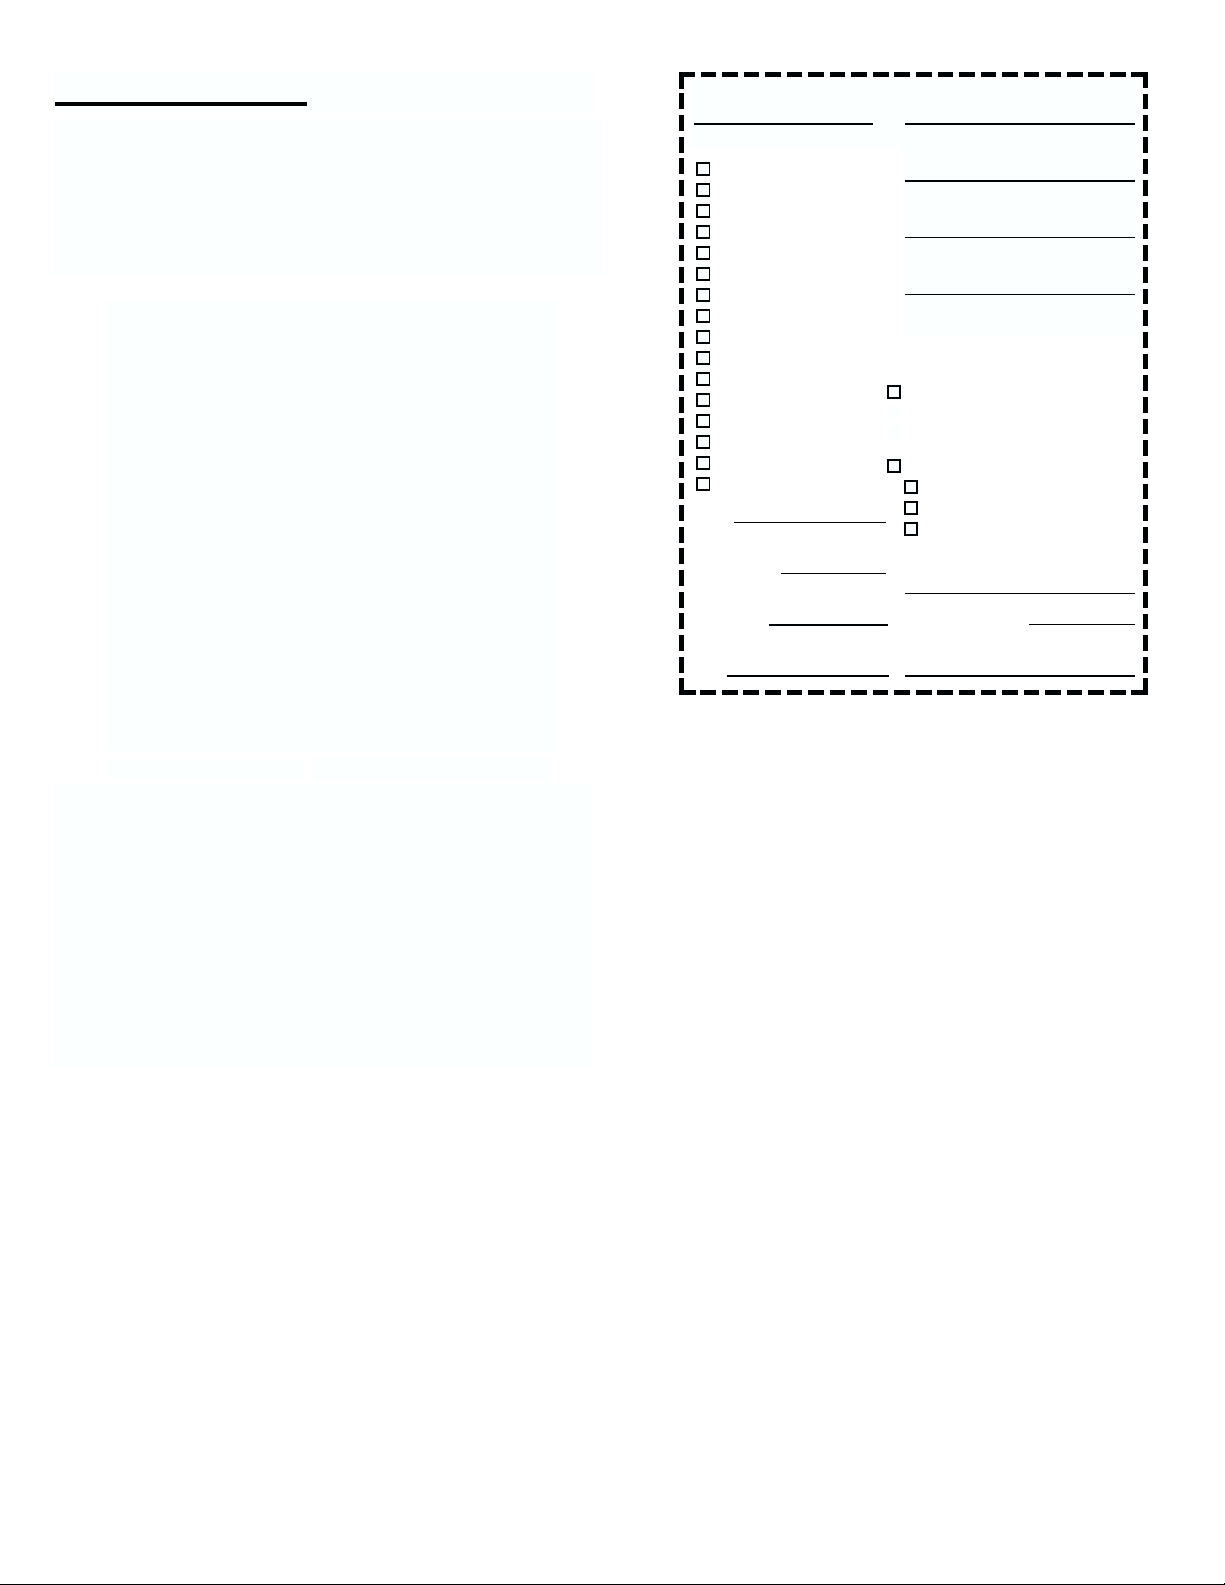
Instructions for ordering Pack N Play®parts:
Complete form below. Your Pack N Play model number
MUST be included on the form to ensure proper replacement
parts. Your model number can be found on a label on the
center of the bottom of the unit. Payment must accompany your order.
* On certain modelscertain models
** Prices subject to change without notice.
Parts List:
Mattress ......................
Carry bag ...................
Wheels ........................
Fitted sheet..................
Bassinet parts:
Bassinet ......................
Wire end tube .............
Round end tube ..........
Canopy parts:
Canopy .......................
Canopy tube ...............
Canopy bracket ..........
Toy bag .......................
Changing table parts:
Long tube* ..................
Short tube* .................
Changing pad* ...........
Changing table* ..........
Accessory bag* ..........
Price:**
$19.00
$13.00
$ 7.00 (each)/$10.50 (2)
$10.00
$17.00
$ 5.00
$ 5.00
$17.00
$ 5.00
$ 5.00 (each)/$7.50 (2)
$13.00
$ 9.00
$ 7.00
$10.00
$15.00
$ 7.00
IF YOU NEED HELP
If you have any questions or if you need any part
not listed, please call toll-free:
1-800-345-4109
or visit our Internet website, www.gracobaby.com.
Return the form below with payment to:
GRACO CHILDRENS PRODUCTS INC.
CUSTOMER SERVICE DEPARTMENT
P.O. BOX 100, MAIN STREET
ELVERSON, PA 19520
20
 Loading...