

Page 1
1
READ THIS MANUAL
KEEP INSTRUCTIONS FOR FUTURE USE
Do not install or use this infant restraint until you
read and understand the instructions in this manual.
FAILURE TO PROPERLY USE THIS INFANT RESTRAINT
INCREASES THE RISK OF SERIOUS INJURY OR DEATH IN
A SUDDEN STOP OR CRASH.
© 2001 Graco 428-9-01
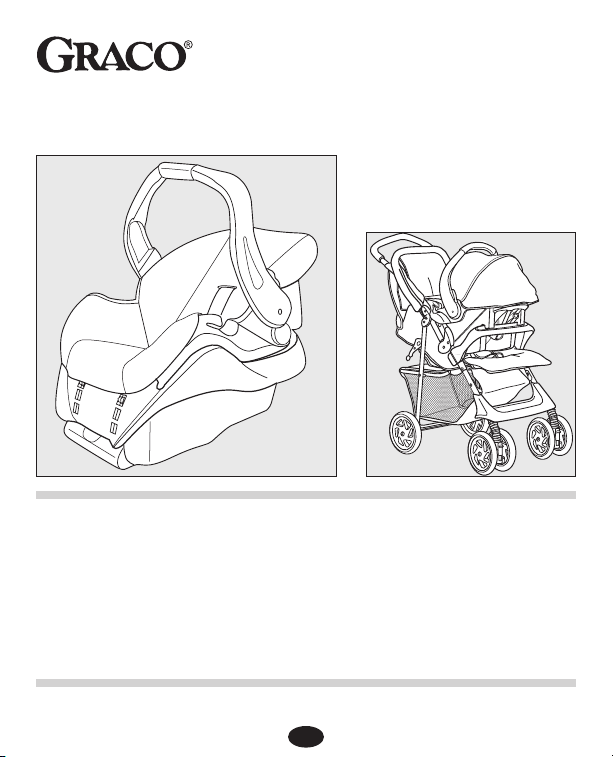
Infant Restraint/Carrier
Owner’s Manual Model 8474
Page 2

2
1.0 Registration Information . . . . . . . . . . . . . . . . . . . . . . . . . . .4-5
1.1 Register Your Infant Restraint . . . . . . . . . . . . . . . . . . . . . .4
1.2 Recall Information . . . . . . . . . . . . . . . . . . . . . . . . . . . . . . .4
1.3 If You Need Help . . . . . . . . . . . . . . . . . . . . . . . . . . . . . . . .5
2.0 Features and Components . . . . . . . . . . . . . . . . . . . . . . . .6-10
2.1 Removing and Attaching Base . . . . . . . . . . . . . . . . . . . . .8
2.2 Adjusting Handle . . . . . . . . . . . . . . . . . . . . . . . . . . . . . . . .8
2.3 Attaching Canopy . . . . . . . . . . . . . . . . . . . . . . . . . . . . . . .9
2.4 Head Support (on certain models) . . . . . . . . . . . . . . . . . .10
3.0 Important Information . . . . . . . . . . . . . . . . . . . . . . . . . . .11-15
3.1 Warnings for Use as Infant Restraint . . . . . . . . . . . . . . . .11
3.2 Warning for Use With a Stroller . . . . . . . . . . . . . . . . . . . .13
3.3 Additional Warnings for Use as Carrier . . . . . . . . . . . . . .14
3.4 Height and Weight Limits . . . . . . . . . . . . . . . . . . . . . . . .15
4.0 Infant Restraint Location . . . . . . . . . . . . . . . . . . . . . . . .16-20
4.1 Vehicle Seat Requirements . . . . . . . . . . . . . . . . . . . . . . .16
4.2 Vehicle Seat Belt Requirements . . . . . . . . . . . . . . . . . . .17
4.2.1 UNSAFE Vehicle Belt Systems . . . . . . . . . . . . . . . .18
4.2.2 SAFE Vehicle Belt Systems . . . . . . . . . . . . . . . . . .19
Page 3

3
5.0 Using Infant Restraint . . . . . . . . . . . . . . . . . . . . . . . . . . . . . . .21-30
5.1 Positioning Harness Straps . . . . . . . . . . . . . . . . . . . . . . .21
5.2 Securing Child in Infant Restraint . . . . . . . . . . . . . . . . . .23
5.3 Installing the Infant Restraint/Base . . . . . . . . . . . . . . . . .25
5.4 Reclining Infant Restraint/Base . . . . . . . . . . . . . . . . . . . .28
6.0 Additional Information . . . . . . . . . . . . . . . . . . . . . . . . . . . . .31
6.1 Airplane Use . . . . . . . . . . . . . . . . . . . . . . . . . . . . . . . . . .31
6.2 Cleaning and Maintenance . . . . . . . . . . . . . . . . . . . . . . .31
Replacement Parts . . . . . . . . . . . . . . . . . . . . . . . . . . . . . . . . .32-33
Page 4
4
Model Number:
Serial Number:
Purchase Date:
1.1 Register Your Infant Restraint
Please fill in the above information. The model and serial numbers
can be found on a label underneath your infant restraint. Fill out the
prepaid registration postcard attached to the seat cover and mail
it today.
Child restraints could be recalled for safety reasons. You must
register this restraint to be reached in a recall. Send your name,
address and model/serial numbers to:
Graco Children’s Products Inc.
P.O. Box 100
Elverson, PA 19520-9974
or call 1-888-224-6549
• Call the U.S. Government’s Auto Safety Hotline
at 1-800-424-9393 (202-366-0123 in D.C. area)
• www.nhtsa.dot.gov
• Graco: 1-888-224-6549 or www.gracobaby.com
1.2 Recall Information
1.0 Registration Information
Page 5

5
1.3 If You Need Help
In the U.S.A. or Canada, please contact our Customer Service
Department with any questions you may have concerning parts, use,
or maintenance. When you contact us, please have your product’s
model and serial numbers ready so that we may help you
efficiently. These numbers can be found on a sticker on the
underside of your infant restraint.
USA: 1-888-224-6549 or www.gracobaby.com
Canada: 1-800-667-8184 Montreal: 514-344-3533
Page 6
6
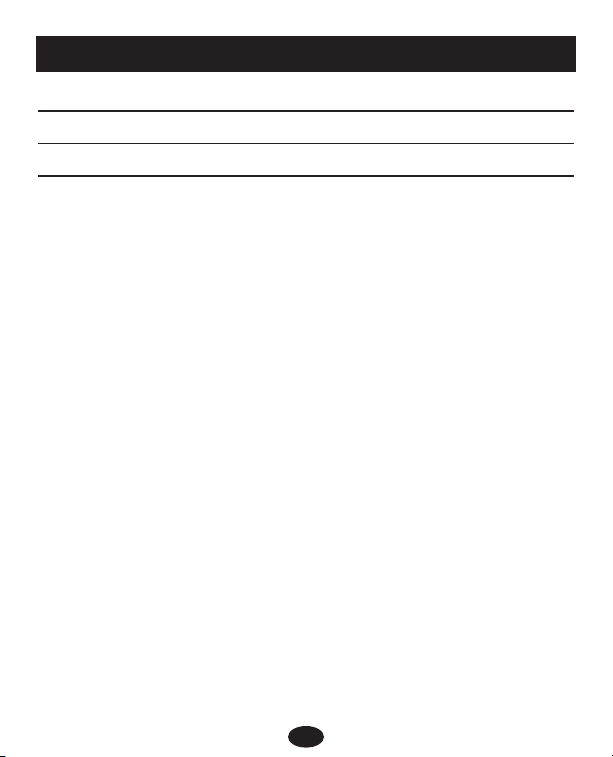
2.0 Features and Components
Vehicle belt
path
FRONT VIEW
Handle
Harness
slots
Vehicle
belt
hook
Handle
adjustment
button
Harness
clip
Harness
buckle
Harness
buckle tongues
Base
Page 7

7
REAR VIEW
Canopy
Harness slot
Release handle
Attachment
latch
Level
indicator*
Owner’s manual
pocket
Mounting
notch
Harness
tightener
Locking clip**
The level indicator is attached to the side of
the infant restraint, and indicates whether or
not the infant restraint is properly reclined.
The locking clip is stored on the bottom of
the infant restraint. You will need to use it
with certain types of vehicle seat belts.
**Locking
Clip
*Level
Indicator
Page 8
8
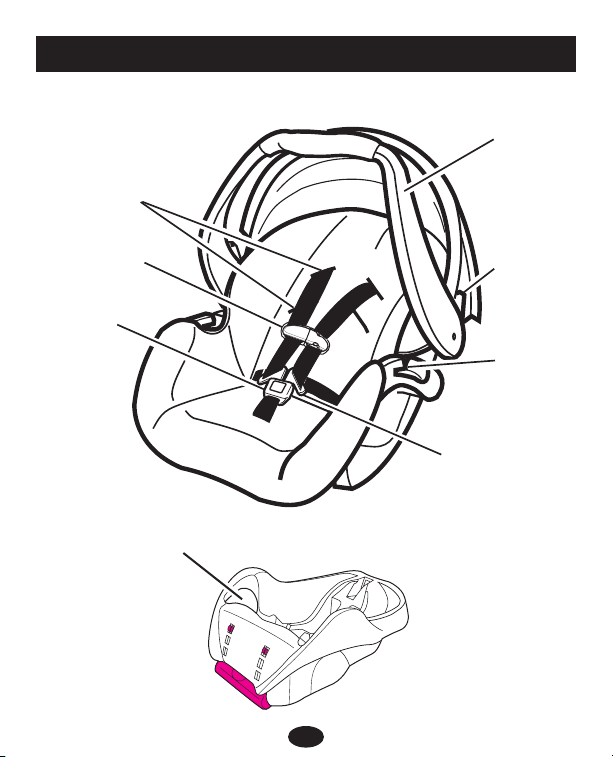
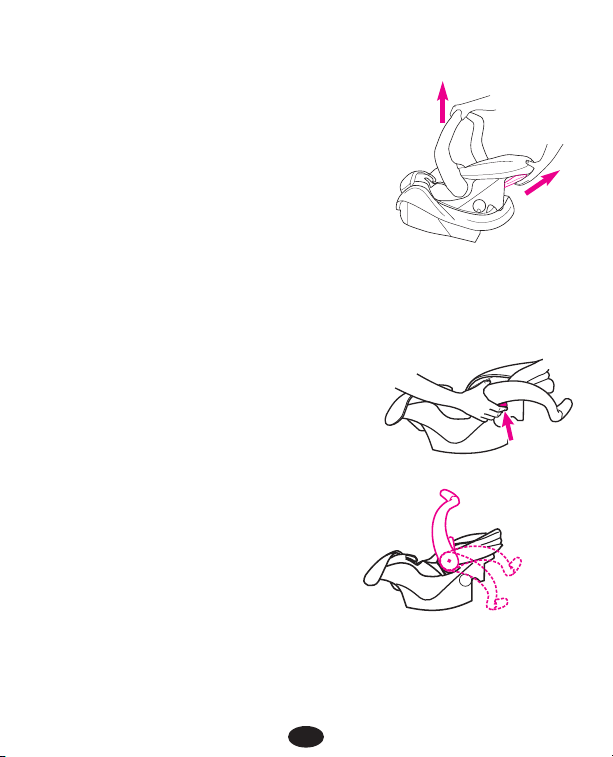
2.1 Removing and Attaching Base
2.2 Adjusting Handle
To remove infant restraint, squeeze release
handle at back of seat and lift infant
restraint from base as shown
.
To put infant restraint in base, push infant
restraint down until it clicks into base.
Pull up on infant restraint to be sure
it is latched firmly into base.
1. Press handle adjustment buttons on
both sides of handle
.
2. Rotate handle until it clicks into any
of three positions (for carrying,
reclining, or sitting). BOTH handle
adjustment buttons must pop out
to lock handle in place
.
3. Push and pull on the handle to be
sure it is locked firmly in position.
Carrying
Reclining
Sitting
Page 9
9
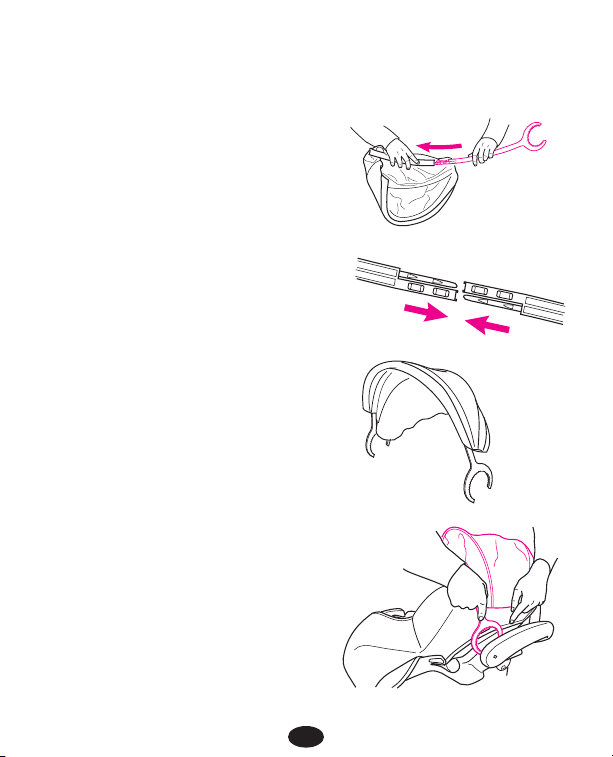
2.3 Attaching Canopy
1. Infant restraint comes with two
identical canopy support parts.
Thread one canopy support
completely through sewn
tunnel
.
2. Slide straight end of a second
support into the straight end of the
first support
.
3. The canopy should appear as
shown
.
4. Attach canopy in the areas
between the infant restraint
and the handle base
.
Page 10
10
2.4 Head Support (on certain models)
Some infants may need extra support
to keep their head and body in a
comfortable position. Unsnap the sides
and resnap them with the harness
straps threaded through the slots in
the cushion
.
If your model does not include
a head support, you may want
to use a rolled towel or a
blanket for support
.
MAKE SURE THAT NOTHING
INTERFERES WITH THE
HARNESS. It must still be
flat and snug against your
child’s shoulders.
Page 11
11
3.0 Important Information
3.1 Warnings for Use as Infant Restraint
• DO NOT INSTALL OR USE THIS INFANT RESTRAINT
AND BASE UNTIL YOU READ AND UNDERSTAND THE
INSTRUCTIONS IN THIS MANUAL AND IN YOUR VEHICLE
OWNER’S MANUAL. DO NOT let others install or use the
infant restraint unless they understand how to use it.
• FAILURE TO PROPERLY USE THIS INFANT RESTRAINT
AND BASE INCREASES THE RISK OF SERIOUS INJURY
OR DEATH IN A SUDDEN STOP OR CRASH. Your child can
be injured in a vehicle even if you are not in a crash. Sudden
braking and sharp turns can injure your child if the infant
restraint is not properly installed or if your child is not properly
secured in the infant restraint.
• PLACE THIS INFANT RESTRAINT IN A REAR-FACING
POSITION when using it in the vehicle.
• NEVER PLACE THIS INFANT RESTRAINT IN A VEHICLE
SEATING LOCATION THAT HAS AN AIR BAG. If an air bag
inflates, it can hit the infant restraint with great force and cause
serious injury or death to your child. Refer to your vehicle
owner’s manual for information about air bags and infant
restraint installation.
Page 12

12
• SOME SPECIAL NEEDS CHILDREN, such as pre-term babies
or those who have tested positive for positional apnea, may be
at increased risk of suffering breathing or other difficulties in an
infant restraint. If your child has special needs, we recommend
that you have your physician or hospital staff evaluate your child
and recommend the proper infant restraint or car bed before
using this product.
• According to accident statistics, CHILDREN ARE SAFER WHEN
PROPERLY RESTRAINED IN REAR VEHICLE SEATING
POSITIONS, RATHER THAN FRONT SEATING POSITIONS.
For a vehicle with a front passenger air bag, refer to your vehicle
owner’s manual as well as these instructions for infant restraint
installation.
• NEVER LEAVE YOUR CHILD UNATTENDED.
• NEVER LEAVE AN INFANT RESTRAINT AND BASE
UNSECURED IN YOUR VEHICLE. An unsecured infant
restraint can be thrown around and may injure occupants in
a sharp turn, sudden stop or crash. Remove it or make sure
that it is securely belted in the vehicle.
• REPLACE THE INFANT RESTRAINT AND BASE AFTER AN
ACCIDENT OF ANY KIND. An accident can cause damage to
the infant restraint that you cannot see.
• STOP USING INFANT RESTRAINT AND BASE AND THROW IT
AWAY after the date molded into the back of the infant restraint.
• DO NOT MODIFY YOUR INFANT RESTRAINT AND BASE or
use any accessories or parts supplied by other manufacturers.
Page 13

13
• NEVER USE INFANT RESTRAINT AND BASE IF IT HAS
DAMAGED OR MISSING PARTS. DO NOT use a cut, frayed
or damaged infant restraint harness or vehicle seat belt.
• THE INFANT RESTRAINT CAN BECOME VERY HOT IF LEFT IN
THE SUN. Always touch the surface of any metal or plastic parts
before putting your child in the infant restraint.
• THIS INFANT RESTRAINT CONFORMS to all applicable
Federal Motor Vehicle Safety Standards and is certified for
use in motor vehicles and aircraft.
• NEVER GIVE THIS INFANT RESTRAINT AND BASE to
someone else without also giving them this manual.
• NEVER USE A SECOND-HAND INFANT RESTRAINT AND
BASE or an infant restraint whose history you do not know.
• USE ONLY WITH STROLLERS THAT ARE PART OF THE
GRACO TRAVEL SYSTEM. Refer to stroller instruction sheet
for details about how to attach the infant restraint to your stroller.
If you do not have an instruction sheet, please call toll-free,
1-888-224-6549 to obtain one, or visit our website,
www.gracobaby.com.
3.2 Warning for Use With a Stroller
Page 14
14
• FALL HAZARD: Child’s movements can slide carrier.
NEVER place carrier near edges of countertops, tables or other
high surfaces. Always stay within arms reach whenever carrier is
not on floor/ground.
BE SURE handle locks into position before lifting carrier.
NEVER place carrier in the top of a shopping cart.
• SUFFOCATION HAZARD: Infant Carrier can roll over on soft
surfaces and suffocate child. Never place carrier on beds, sofas
or other soft surfaces.
• STRANGULATION HAZARD: Child can strangle in loose restraint
straps. Always use harness, never leave child in carrier when
straps are loose or undone.
KEEP STRINGS AND CORDS AWAY FROM CHILD. Strings and
cords can cause strangulation.
DO NOT place carrier near a window where cords from blinds or
drapes can strangle a child.
DO NOT hang strings on or over the carrier.
DO NOT place items with a string around a child’s neck, such
as hood strings, pacifier cords, etc.
DO NOT attach strings to toys.
3.3 Additional Warnings
for Use as Carrier
Page 15
15
3.4 Height and Weight Limits
Your child MUST meet all requirements:
• WEIGHT: 20 lbs. (9 kg) or less
• HEIGHT: 26 inches (66 cm) or less
FAILURE TO USE INFANT RESTRAINT IN A MANNER
APPROPRIATE FOR YOUR CHILD’S SIZE MAY INCREASE
THE RISK OF SERIOUS INJURY OR DEATH.
Page 16
16
4.0 Infant Restraint Location
4.1 Vehicle Seat Requirements
IMPROPER PLACEMENT OF THE INFANT RESTRAINT
INCREASES THE RISK OF SERIOUS INJURY OR DEATH.
Some seating positions in your vehicle may not be safe for this infant
restraint. Some vehicles do not have any seating positions that can
be used safely with the infant restraint. If you are not sure where to
place the infant restraint in your vehicle, consult your vehicle owner’s
manual or Graco Children's Products Inc., 1-888-224-6549.
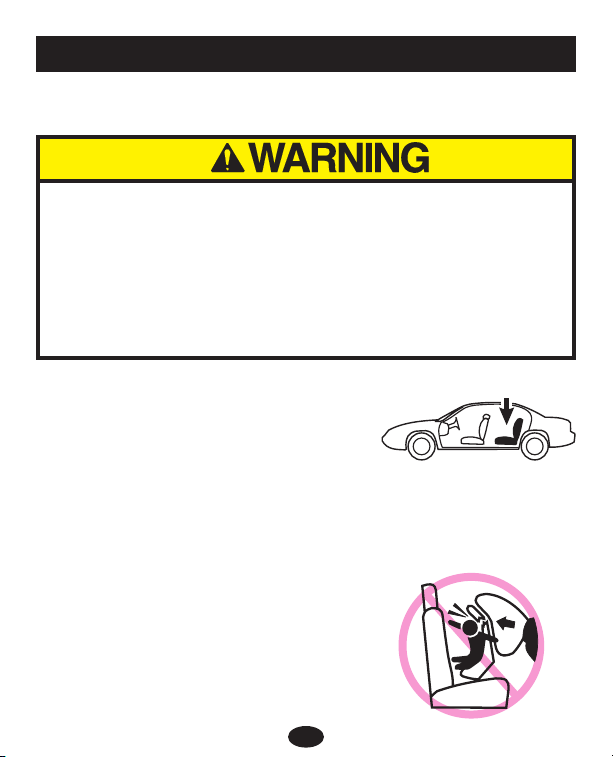
• Whenever possible, secure the infant
restraint in the center position of the
seat directly behind the front seats
.
An adult should ride in the rear seat to
watch the child. If the driver is the only
adult present, a child may need to ride in the front seat. BUT
ONLY if there is no passenger-side air bag and all of the other
vehicle seat and seat belt requirements listed are met.
• NEVER place this infant restraint in a
vehicle seating location that has an
air bag
. See “3.1 Warnings for Use
as Infant Restraint”, p.11.
Page 17
17
4.2 Vehicle Seat Belt Requirements
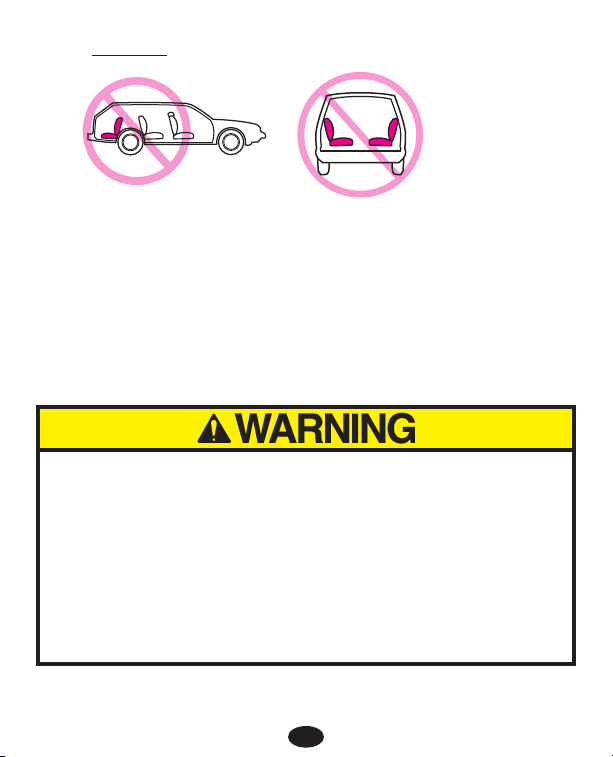
• The VEHICLE seat must face forward.
• DO NOT use infant restraint on vehicle seats with seat backs
that will not lock in an upright position. DO NOT use seats that
can fold down without having to release a lock or latch of some
kind. These seats can fly forward and strike the child in a sudden
stop or crash.
MANY SEAT BELT SYSTEMS ARE NOT SAFE TO USE WITH
THE INFANT RESTRAINT. THE VEHICLE SEAT BELT MUST BE
DESIGNED TO HOLD THE INFANT RESTRAINT TIGHTLY AT
ALL TIMES.
Pay careful attention to these systems; some of the seat belts that
are not safe to use look very much like seat belts that are safe to
use. If you are unsure,
consult your vehicle owner’s manual or Graco
Children's Products Inc., 1-888-224-6549.
Page 18
18
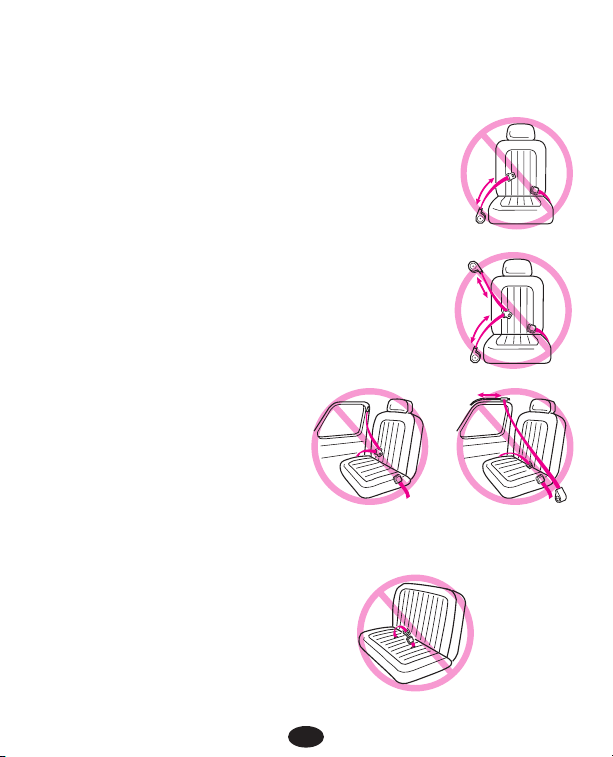
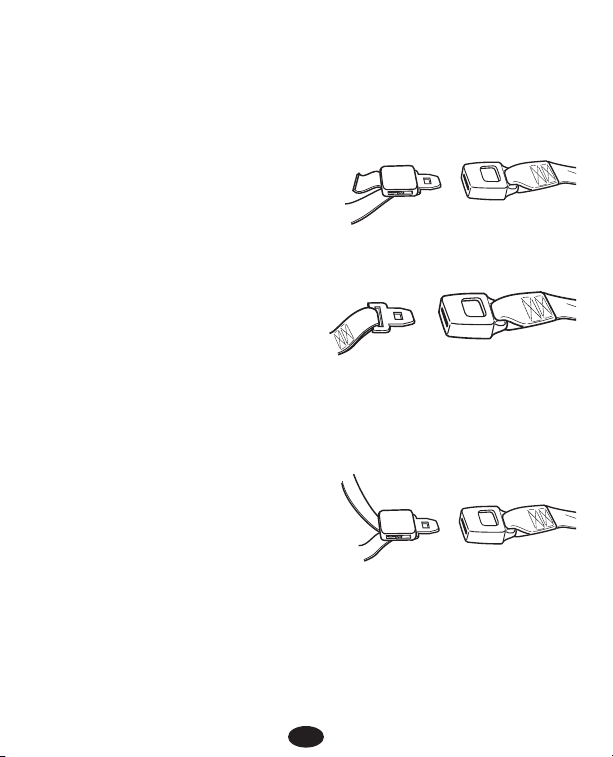
• Lap Belts with Emergency Locking Retractor (ELR)
This lap belt stays loose and can move until it locks
in a crash or sudden stop.
• Combination Lap/Shoulder Belt with Retractor
Each strap has a retractor at one end and is
attached to the latch plate at the other end.
• Passive Restraint - Lap Belt
with Motorized Shoulder Belt
• Passive Restraint - Lap or
Shoulder Belt Mounted on Door
DO NOT use vehicle belts that
are attached to the door in any way or that move along a track to
automatically surround the passenger when the door is closed.
• Lap Belts Forward of Seat Crease
DO NOT use any of the following systems to secure the infant restraint.
4.2.1 UNSAFE Vehicle Belt Systems
Page 19
19
4.2.2 SAFE Vehicle Belt Systems
THE FOLLOWING BELT SYSTEMS CAN BE USED WITH YOUR
INFANT RESTRAINT, IF the seat location meets all other require-
ments of these instructions and those in your vehicle owner's manual.
• Lap Belts - Manually Adjusted
When buckled, the belt is
tightened manually by pulling
on the excess belt while pushing
down hard on the infant restraint.
• Lap Belts with Automatic
Locking Retractor (ALR)
The automatic locking retractor
will not permit the lap belt to
lengthen once it is buckled. Tighten
the belt by feeding the belt back
into the retractor while pushing
down hard on the infant restraint.
• Combination Lap/Shoulder Belt
with Locking Latch Plate
Once it is buckled, this type of
belt has a latchplate that will not
allow the lap portion of the belt to
loosen. Belt is tightened by pulling
hard on the shoulder portion of the
vehicle belt while pushing down
hard on the infant restraint.
Page 20
20
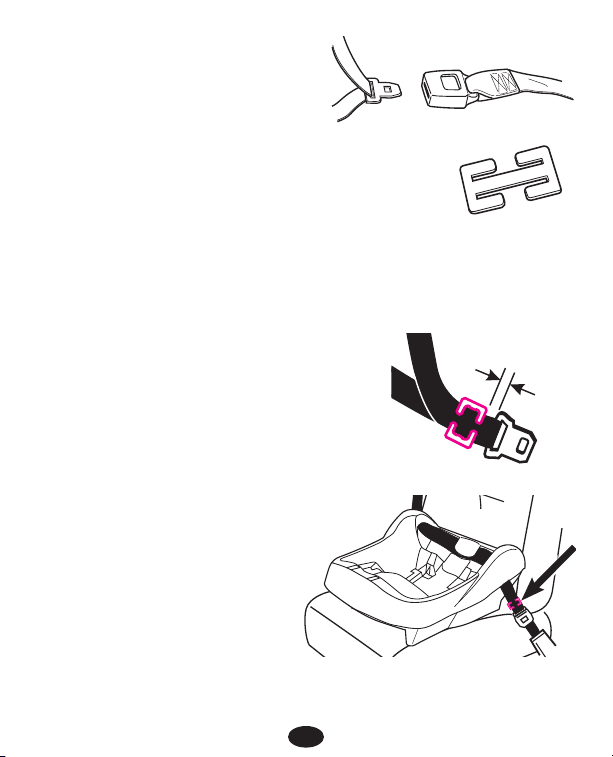
• Combination Lap/Shoulder
Belt with Sliding Latch Plate
This belt has a latchplate that
slides freely along the belt.
This belt MUST be converted to prevent
movement of the lap portion of the belt. You
must use the locking clip provided with the
infant restraint, unless your vehicle's seat belt
can be converted in another way as described in
your vehicle owner's manual.
To Install Locking Clip:
1. Tighten the buckled belt by pushing down
hard on the infant restraint and pulling
hard on the shoulder belt.
2. While pushing down on infant restraint,
pinch the two straps together behind the
buckle tongue. Unbuckle the belt without
allowing it to slip.
3. Connect lap and shoulder
belts with locking clip as
shown
and .
4. Rebuckle belt. Check that
lap belt does not move by
pulling and pushing hard on
infant restraint. If belt
loosens or lengthens,
repeat procedure.
Locking clip
½
inch
Locking clip goes here,
1
/2 inch from the buckle
Page 21

5.1 Positioning Harness Straps
FAILURE TO PROPERLY ADJUST THE HARNESS STRAPS
FOR YOUR CHILD INCREASES THE RISK OF SERIOUS
INJURY OR DEATH IN THE EVENT OF A SHARP TURN,
SUDDEN STOP OR CRASH.
The harness straps must be properly
adjusted to fit your child according to the following instructions.
1. Remove infant restraint from base and rotate handle down to
sitting position. See “2.1 Removing and Attaching Base” and
“2.2 Adjusting Handle”, p. 8.
2. Place child in infant restraint as shown
.
3. Determine which pair of harness slots are even
with or just below your child’s shoulders
.
DO NOT use upper harness slots if they
are above your child’s shoulders. They
will not hold a small child securely in a
sudden stop or crash.
4. If the harness straps must be adjusted:
remove child from infant restraint and move
harness straps to other harness slots.
Use harness slots
even with or just below
child’s shoulders
21
5.0 Using Infant Restraint
Page 22

5. From back, remove harness straps from
harness tighteners. From front pull strap
from slot
.
6. Reinsert strap in the appropriate slot
.
7. Thread straps through tighteners exactly
as shown
.
8. SAFETY CHECK:
a) CHECK that straps are not twisted;
b) CHECK that straps are secure:
pull on harness straps from front.
Harness tighteners
22
Page 23

23
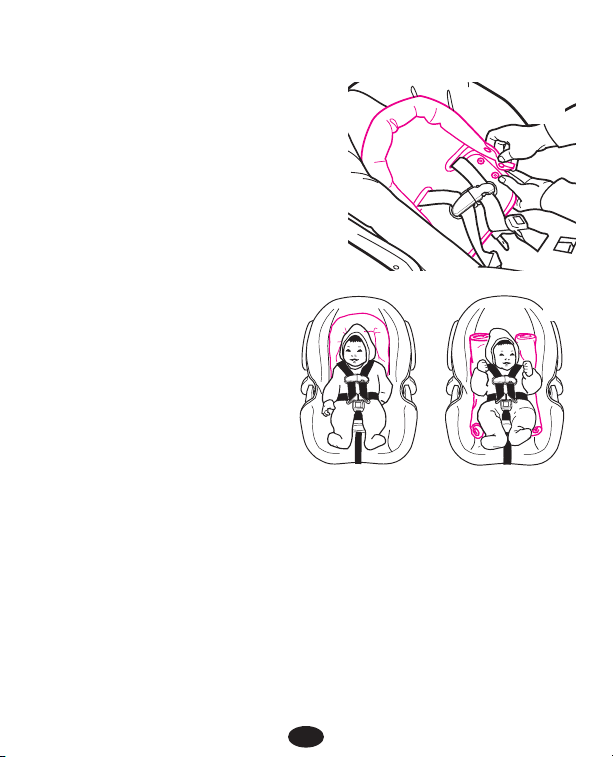
5.2 Securing Child in Infant Restraint
Failure to properly secure your child in the infant restraint/carrier
increases the risk of serious injury or death from suffocation or
falls, or in the event of a sudden stop or crash. Even when used
only as a carrier, make sure the harness straps are properly
secured.
1. Move infant restraint handle to sitting position (see page 8).
2. Open harness clip by squeezing both sides and
unbuckle as shown
.
3. Place your child in the infant
restraint as shown in
, not
. Pull the harness straps
down over your child.
4. Insert the two buckle tongues into the harness buckle on the
crotch strap. Make sure that you hear each tongue click into
the buckle.
DO NOT use the infant restraint if the harness does not latch
in place. Call Graco at 1-888-224-6549.
Page 24

5. From the back, pull strap through
harness tightener to tighten the straps
as shown
. The remaining straps
should be about equal in length.
CHECK that both straps are flat
and tight on child’s shoulders.
To loosen the straps, hold the harness
tightener up and pull the strap from the
front of the seat
.
6. Snap harness clip pieces together
.
Position harness clip in middle of chest,
level with armpits and away from the
neck
.
7. SAFETY CHECK:
a) CHECK that harness straps are not
twisted.
b) CHECK that the harness is snug.
You should not be able to insert more
than one finger between the harness
and your child’s shoulder
.
24
Page 25

25
5.3 Installing the Infant Restraint/Base
You must carefully follow the instructions provided by your vehicle
manufacturer, in addition to the information in this manual. Before
proceeding, be sure you have read and understood section 4,
“Infant Restraint Location” on p. 16-20.
Also:
Make sure vehicle is on level ground so that
the level indicator, which is attached to the
infant restraint, can be used to properly
recline the infant restraint .
If a front passenger seat is used, slide the
vehicle seat rearward as far as possible
from the dashboard. If a rear seat is used,
make sure the seat in front of it is moved
forward enough and is upright enough to
allow room for the infant restraint.
1. Remove infant restraint from base, regardless of whether or
not you plan on using the base.
2. Place the base
or infant restraint in a rear-facing position
in a forward-facing vehicle seat.
Page 26

26
3. Thread the seat belt:
4. Buckle the seat belt. Make sure the buckle
goes into the correct buckle
. The seat
belt should not be twisted or turned.
5. Tighten the vehicle seat belt. Refer to your vehicle owners
manual and the instructions in “4.2.2 SAFE Vehicle Belt
Systems”, p. 19-20, on tightening your vehicle belt.
To create a very
tight installation,
push down hard
with your knee or
free hand in the
middle of the infant
restraint or base
and pull and tighten
the vehicle belt.
Base and infant restraint Infant restraint only
Belt MUST go
under tongue
Page 27

27
6. Push the infant restraint down into the base
and make sure that you hear a “click”
.
Pull up on the infant restraint to be sure
it is latched securely into the base.
If the infant restraint does not securely
latch into the base, the infant restraint
provides NO protection for your child.
DO NOT use the infant restraint/base
if the infant restraint does not securely
latch into the base.
Page 28

28
For your child’s safety, it is important that your infant restraint/base
be properly reclined. Attached to the side of your infant restraint is a
level indicator to help properly recline the infant restraint/base on the
vehicle seat.
Failure to properly recline the infant restraint on the vehicle seat
increases the risk of serious injury or death.
If the infant restraint is too upright, a child’s
head may drop forward and cause breathing
problems.
If the infant restraint is too reclined, a crash
could put too much force on a child’s neck
and shoulders.
The infant restraint must be properly reclined
according to the following instructions.
5.4 Reclining Infant Restraint/Base
Check the level indicator. You must look straight on at the indicator.
—If the indicator shows ONLY blue, the infant restraint is
properly leveled.
—If any orange is showing in the level indicator adjust the recline.
Page 29

29
When using the base:
To lower the foot; pull down on the bottom of
the foot to the desired setting to adjust the
recline .
To raise the foot; set the base on a flat
surface, push in on the fingers on the base
and push down on the base to adjust the
recline .
If there is still orange in the level indicator
when the foot is completely extended then
place a rolled towel under the foot until
ONLY blue shows .
When using only the infant restraint, if there
is still orange in the level indicator when the
infant restraint is resting on the vehicle seat
then place a rolled towel under the infant
restraint until ONLY blue shows .
Readjust the vehicle seat belt as necessary
to secure the infant restraint firmly in the
vehicle seat.
Page 30

30
Final Safety Check: Every time
you drive with your child,
PUSH DOWN on the top of the infant restraint
slowly but firmly to make sure the vehicle belt
does not lengthen at all and that the vehicle
belt is fastened very tightly around the infant
restraint/base
.
Holding the infant restraint near the vehicle belt
path, TWIST AND PULL the seat forward and to
both sides to make sure the vehicle belt does not
lengthen or loosen and the infant restraint does
not easily move
.
Page 31

31
6.1 Airplane Use
Install in an airplane the same way as in an
automobile. Notify the airline ahead of time
that you intend to bring the seat on board.
Use only in forward-facing aircraft seat. Follow the flight attendant’s
instructions about infant restraint placement. Do not use this infant
restraint if the airplane seat belt does not hold the infant restraint tightly.
6.2 Cleaning and Maintenance
TO REMOVE AND WASH INFANT RESTRAINT PAD, follow
instructions in “5.1 Positioning Harness Straps”, p. 21-22.
Carefully remove the seat pad. Machine wash on delicate cycle
and drip-dry. DO NOT USE BLEACH. Reverse steps to reinstall
seat pad. Check that harness system is not twisted, and pull on
harness system to be sure harness is securely reinstalled.
INFANT RESTRAINT METAL AND PLASTIC PARTS may be
cleaned by wiping with a mild soap and water solution. DO NOT
USE BLEACH. Use of bleach may weaken plastic parts.
HARNESS STRAPS may be spot cleaned or replaced. DO NOT
IMMERSE THE HARNESS STRAPS IN WATER. Doing so may
weaken the harness straps.
BUCKLE may be cleaned with a damp cloth.
DO NOT LUBRICATE the buckle.
DO NOT USE INFANT RESTRAINT without seat pad.
6.0 Additional Information
Page 32

Return the form with payment to:
Graco Children’s Products Inc.
Customer Service Department
P.O. Box 100, Main Street
Elverson, PA 19520
32
How to Order:
Complete the form that follows. Your infant restraint model
and serial numbers MUST be included on the form to ensure
proper replacement parts. Your model number can be found on a
sticker on the underside of your infant restraint. Payment must
accompany your order.
Parts may also be ordered from Graco’s web site at www.gracoba-
by.com.
Parts List:
Seat pad .................................
Canopy ...................................
Canopy bow ...........................
Harness ..................................
Harness clip ...........................
Locking clip ...........................
Head support*.........................
Base .........................................
* On certain models
Price:**
$20.00
$17.00
$ 5.00
$10.00
$ 5.00
$ 5.00
$ 8.00
$30.00
** Prices subject to change
without notice.
IF YOU NEED HELP
If you have any questions or need any parts not listed, please call
toll-free: 1-888-224-6549
or visit our Internet website,
www.gracobaby.com.
Page 33

33
Seat pad
Canopy
Canopy bow
Harness
Harness clip
Locking clip
Head support
Base
Subtotal:
Shipping
& handling*: $5.00
Sales tax**:
Total:
* $15.00 outside the
continental U.S.
**CA 6%, IL 6.25%, IN 5%, NY 8.25%,
OH 5.75%, PA 6%, SC 5%
Model No. Serial No.
(Both Numbers Required)
Check or money order enclosed
(payable to Graco Children’s Products Inc.)
Charge to credit card
Visa MasterCard Discover
Account #
Expiration date
Signature
SHIP TO:
Name
Address
City, State, Zip Code
Telephone (including Area Code)
Page 34

1
LEA ESTE MANUAL
GUARDE LAS INSTRUCCIONES PARA SU USO EN EL FUTURO.
No instale ni use este asiento de seguridad infantil hasta que
lea y entienda las instrucciones en este manual.
EL USO INCORRECTO DE ESTE ASIENTO DE SEGURIDAD
INFANTIL AUMENTA EL RIESGO DE LESIONES GRAVES O LA
MUERTE EN UNA PARADA REPENTINA O UN ACCIDENTE.
© 2001 Graco 428-9-01
Asiento de seguridad infantil/
portabebés
Manual del propietario Modelo 8474
Page 35

2
1.0 Información de inscripción . . . . . . . . . . . . . . . . . . . . . . . . .4-5
1.1 Inscriba su asiento de seguridad infantil . . . . . . . . . . . . . .4
1.2 Información de retirada . . . . . . . . . . . . . . . . . . . . . . . . . . .4
1.3 Si necesita ayuda . . . . . . . . . . . . . . . . . . . . . . . . . . . . . . .5
2.0 Características y componentes . . . . . . . . . . . . . . . . . . . .6-10
2.1 Quitar y sujetar la base . . . . . . . . . . . . . . . . . . . . . . . . . . .8
2.2 Ajustar el asa . . . . . . . . . . . . . . . . . . . . . . . . . . . . . . . . . .8
2.3 Sujetar la capota . . . . . . . . . . . . . . . . . . . . . . . . . . . . . . . .9
2.4 Soporte de la cabeza (En ciertos modelos). . . . . . . . . . . .10
3.0 Información importante . . . . . . . . . . . . . . . . . . . . . . . . . .11-15
3.1 Advertencias para su uso como asiento de seguridad infantil. . . . .11
3.2 Advertencia para su uso con un cochecito . . . . . . . . . . . .13
3.3 Advertencias adicionales para su uso como portabebés .14
3.4 Límites de altura y de peso . . . . . . . . . . . . . . . . . . . . . . .15
4.0 Ubicación del asiento de seguridad infantil . . . . . . . . . .16-20
4.1 Requisitos para el asiento del auto . . . . . . . . . . . . . . . . .16
4.2 Requisitos para los cinturones de seguridad del auto . . .17
4.2.1 Sistemas de cinturones de autos INSEGUROS . . .18
4.2.2 Sistemas de cinturones de autos SEGUROS . . . . .19
Page 36

3
5.0 Usar el asiento de seguridad infantil . . . . . . . . . . . . . . . . . . .21-30
5.1 Posición de las correas . . . . . . . . . . . . . . . . . . . . . . . . . .21
5.2 Sujetar al niño en un asiento de seguridad infantil . . . . . .23
5.3 Instalar el asiento de seguridad infantil y la base . . . . . . .25
5.4 Reclinar el asiento de seguridad infantil y la base . . . . . .28
6.0 Información adicional . . . . . . . . . . . . . . . . . . . . . . . . . . . . .31
6.1 Uso en aviones . . . . . . . . . . . . . . . . . . . . . . . . . . . . . . . .31
6.2 Limpieza y mantenimiento . . . . . . . . . . . . . . . . . . . . . . . .31
Repuestos . . . . . . . . . . . . . . . . . . . . . . . . . . . . . . . . . . . . . . . .32-33
Page 37

4
Número de modelo:
Número de serie:
Fecha de compra:
1.1 Inscriba su asiento de seguridad infantil
Complete la información arriba indicada. Los números de serie y
modelo se pueden encontrar en la etiqueta debajo del asiento de
seguridad infantil. Complete la tarjeta de inscripción con sello ya
franqueado adjunta a la funda del asiento y envíela hoy por correo.
Los asientos de seguridad infantil pueden retirarse del mercado por
razones de seguridad. Debe inscribir este asiento de seguridad
infantil para que se le pueda localizar en caso de una retirada.
Envíe su nombre, dirección y números de serie/modelo a:
Graco Children’s Products Inc.
P.O. Box 100
Elverson, PA, 19520-9974
O llame al 1-888-224-6549
• Llame a la línea de información sobre seguridad de autos del
gobierno de EE.UU. al 1-800-424-9393 (202-366-0123 en el
área de Washington D.C.)
• www.nhtsa.dot.gov
• Graco: 1-888-224-6549 o www.gracobaby.com
1.2 Información de retirada
1.0 Información de inscripción
Page 38

5
1.3 Si necesita ayuda
En los EE.UU. o Canadá, póngase en contacto con nuestro
departamento de servicio al cliente con cualquier pregunta que
tenga sobre piezas, uso o mantenimiento. Cuando nos llame, tenga
a mano los números de modelo y serie de su producto para que
le podamos atender de manera eficaz. Estos números se pueden
encontrar en una etiqueta en el lado inferior de su asiento de
seguridad infantil.
USA: 1-888-224-6549 o www.gracobaby.com
Canada: 1-800-667-8184 Montreal: 514-344-3533
Page 39

6
2.0 Características y componentes
Colocación del
cinturón del auto
VISTA DELANTERA
Asa
Ranuras
para las
correas
Gancho para
el cinturón
del auto
Botón para
ajustar el
asa
Clip de
correas
Hebilla
Lengüetas de
correas para
la hebilla
Base
Page 40

7
VISTA TRASERA
Capota
Ranura para
las correas
Mango para
soltar
Seguro para
la unión
Indicador
de nivel*
Bolsillo para
el manual
del propietario
Agujero de
montaje
Ajuste de
correas
Clip de cierre**
El indicador de nivel se encuentra en el
lado del asiento de seguridad infantil e
indica si el asiento de seguridad infantil
está reclinado correctamente.
El clip de cierre se almacena en el fondo
del asiento de seguridad infantil. Tendrá
que usarlo con ciertos tipos de cinturones
de seguridad.
**Clip de
cierre
*Indicador
de nivel
Page 41

8
2.1 Quitar y sujetar la base
2.2 Ajustar el asa
Para quitar el asiento de seguridad infantil,
apriete el mango detrás del asiento y levante
el asiento de seguridad infantil de la base
como se muestra
.
Para colocar el asiento de seguridad infantil
en la base, empuje el asiento hacia abajo
hasta que se enganche en la base. Jale el
asiento de seguridad infantil hacia arriba
para asegurarse de que esté bien sujeto
en la base.
1. Apriete los botones de ajuste del
asa en ambos lados del asa
.
2. Gire el asa hasta que enganche en
cualquiera de las tres posiciones
(para llevar, reclinar o sentarse).
AMBOS botones de ajuste del asa
deben sobresalir para que el asa
se enganche en su sitio
.
3. Empuje y jale el asa para
asegurarse de que esté
bien cerrada.
Llevar
Reclinar
Sentarse
Page 42

9
2.3 Sujetar la capota
1. El asiento de seguridad infantil
viene con dos piezas de soporte
idénticas para la capota.
Pase un soporte de capota
completamente por una de las
costuras
.
2. Deslice el extremo recto del
segundo soporte en el extremo
recto del primer soporte
.
3. La capota debe aparecer como
se muestra
.
4. Sujete la capota en las áreas
entre el asiento de seguridad
infantil y la base del asa
.
Page 43

10
2.4 Soporte de la cabeza (en ciertos modelos)
Algunos niños pueden necesitar
soporte adicional para mantener su
cabeza y cuerpo en una posición
cómoda. Desabroche los lados y
vuelva a abrocharlos en las correas
pasándolas por las ranuras en la
almohadilla
.
Si su modelo no cuenta con un
soporte para la cabeza, quizá
desee usar una toalla o cobija
enrollada para soporte
.
ASEGÚRESE DE QUE
NADA INTERFIERA CON
LAS CORREAS. Deben
estar planas y ajustadas en
los hombros de su niño.
Page 44

11
3.0 Información importante
3.1 Advertencias para su uso como
asiento de seguridad infantil
• NO INSTALE NI USE ESTE ASIENTO DE SEGURIDAD
INFANTIL NI SU BASE HASTA QUE HAYA LEIDO Y
ENTENDIDO LAS INSTRUCCIONES EN ESTE MANUAL
Y EN EL MANUAL DEL PROPIETARIO DE SU VEHÍCULO.
NO deje a otros instalar o usar el asiento de seguridad infantil
a menos que sepan usarlo.
• EL USO INCORRECTO DE ESTE ASIENTO DE SEGURIDAD
INFANTIL Y BASE AUMENTA EL RIESGO DE LESIONES
GRAVES O LA MUERTE EN PARADAS REPENTINAS O
ACCIDENTES. Su niño podrá lesionarse en un vehículo incluso
si no ocurre un accidente. El frenado repentino y giros bruscos
pueden lesionar a su niño si el asiento de seguridad infantil no está
instalado correctamente o si su niño no está bien sujeto en el mismo.
• COLOQUE ESTE ASIENTO DE SEGURIDAD INFANTIL
ORIENTADO HACIA ATRÁS al usarlo en el vehículo.
• NUNCA COLOQUE ESTE ASIENTO DE SEGURIDAD INFANTIL
EN UNA ASIENTO DEL VEHÍCULO QUE TIENE UNA BOLSA
DE AIRE. Si una bolsa de aire se infla, puede golpear el asiento de
seguridad infantil con gran fuerza y causar lesiones graves o
la muerte de su niño. Refiérase al manual del propietario de su
vehículo para información sobre bolsas de aire y la instalación
de asientos de seguridad infantil restraint installation.
Page 45

12
• ALGUNOS NIÑOS CON NECESIDADES ESPECIALES, tales
como bebés prematuros o aquellos que han sido diagnosticados
con apnea posicional, pueden correr un riesgo aumentado de
sufrir trastornos respiratorios y otros trastornos en un asiento de
seguridad infantil. Si su niño tiene necesidades especiales,
recomendamos que pida a su médico o al personal del hospital
una evaluación de su niño y que le recomienden el asiento o cama
de seguridad infantil apropiado antes de usar este producto.
• Según las estadísticas de accidentes, LOS NIÑOS ESTÁN MÁS
SEGUROS CUANDO ESTÁN CORRECTAMENTE SUJETADOS
EN POSICIÓN SENTADA EN LA PARTE TRASERA DEL
VEHÍCULO, EN VEZ DE EN UN ASIENTO DELANTERO.
Para vehículos con bolsas de aire en el lado del pasajero
delantero, refiérase al manual del propietario de su vehículo
además de estas instrucciones para la instalación del asiento
de seguridad infantil.
• NUNCA DEJE A SU NIÑO SOLO.
• NUNCA DEJE UN ASIENTO DE SEGURIDAD INFANTIL
Y LA BASE SIN SUJETAR EN SU VEHÍCULO. Un asiento de
seguridad infantil sin sujetar puede lanzarse y lesionar a los
ocupantes en un giro brusco, una parada repentina o accidente.
Quítelo o asegúrese de que está bien sujeto en el vehículo.
• REEMPLACE EL ASIENTO DE SEGURIDAD INFANTIL Y LA
BASE DESPUÉS DE CUALQUIER TIPO DE ACCIDENTE.
Un accidente puede dañar el asiento de seguridad infantil de
manera imperceptible.
• DEJE DE USAR EL ASIENTO DE SEGURIDAD INFANTIL Y
LA BASE Y BÓTELOS después de la fecha indicada en el lado
inferior del asiento de seguridad infantil.
Page 46

13
• NO MODIFIQUE SU ASIENTO DE SEGURIDAD INFANTIL Y
BASE ni use cualquier accesorio o pieza proporcionados por
otros fabricantes.
• NUNCA USE EL ASIENTO DE SEGURIDAD INFANTIL Y LA
BASE SI TIENE PIEZAS DAÑADAS O FALTANTES. No use una
correa del asiento de seguridad infantil ni un cinturón de seguridad
del vehículo si está cortado, deshilachado o dañado.
• EL ASIENTO DE SEGURIDAD INFANTIL PUEDE CALENTARSE
MUCHO SI SE DEJA AL SOL. Siempre toque la superficie de
cualquier pieza de plástico o metálica antes de colocar a su niño
en el asiento de seguridad infantil.
• ESTE ASIENTO DE SEGURIDAD INFANTIL CUMPLE CON todas
las normas federales aplicables de seguridad para automóviles y
está certificado para su uso en automóviles y aeronaves.
• NUNCA REGALE ESTE ASIENTO DE SEGURIDAD INFANTIL
Y BASE a otra persona sin darles este manual.
• NUNCA USE UN ASIENTO DE SEGURIDAD INFANTIL Y
BASE DE SEGUNDA MANO ni un asiento de seguridad infantil
cuyo historial no conoce.
• USE SOLAMENTE CON COCHECITOS QUE FORMAN PARTE
DEL SISTEMA DE TRANSPORTE GRACO. Refiérase a la hoja
de instrucciones para el cochecito para detalles sobre cómo sujetar el asiento de seguridad infantil a su cochecito. Si no tiene una
hoja de instrucciones, llame gratuitamente al 1-888-224-6549 para
obtener una, o visite nuestro sitio Web en www.gracobaby.com.
3.2 Advertencia para su uso con un cochecito
Page 47

14
• PELIGRO DE CAÍDA: Los movimientos del niño pueden hacer
que el portabebés se deslice.
NUNCA coloque el portabebés cerca de los bordes de encimeras,
mesas u otras superficies altas. Siempre manténgase al alcance
de la mano cuando el portabebés no está en el piso/suelo.
ASEGÚRESE de que el asa se enganche en su posición cerrada
antes de levantar el portabebés.
NUNCA coloque el portabebés encima de un carrito de compras.
• PELIGRO DE ASFIXIA: El portabebés puede volcarse en
superficies blandas y asfixiar al niño. Nunca coloque el
portabebés en una cama, sofá u otra superficie blanda.
• PELIGRO DE ESTRANGULACIÓN: Un niño puede estrangularse
con las correas sueltas del asiento. Siempre use las correas y
nunca deje al niño en el asiento cuando las correas estén
sueltas o desabrochadas.
MANTENGA CUERDAS Y CORDONES LEJOS DEL NIÑO.
Las cuerdas y cordones pueden causar la estrangulación.
NO coloque el portabebés cerca de una ventana donde los cordones de las persianas o cortinas pueden estrangular a un niño.
NO cuelgue cuerdas en o encima del portabebés.
NO coloque artículos con cuerdas alrededor del cuello del niño
tales como cuerdas de capuchas, chupetes, etc.
NO ate cuerdas a juguetes.
3.3 Advertencias adicionales
para su uso como portabebés
Page 48

15
4.1 Requisitos para el asiento del auto
LA COLOCACIÓN INCORRECTA DEL ASIENTO DE SEGURIDAD
INFANTIL AUMENTA EL RIESGO DE LESIONES GRAVES O LA
MUERTE. Algunas posiciones del asiento en su vehículo quizá no
sean seguras para este asiento de seguridad infantil. Algunos
vehículos no tienes posiciones de asientos que se pueden usar de
manera segura con el asiento de seguridad infantil. Si no está
seguro dónde colocar el asiento de seguridad infantil en su vehículo,
consulte el manual del propietario de su vehículo o con Graco
Children's Products Inc. al 1-888-224-6549.
3.4 Límites de altura y de peso
Su niño DEBE cumplir con todos los requisitos:
• PESO: 20 libras (9 kg) o menos
• ALTURA: 26 pulgadas (66 cm) o menos
NO USAR ESTE ASIENTO DE SEGURIDAD INFANTIL DE
MANERA APROPIADA PARA EL TAMAÑO DE SU NIÑO PUEDE
AUMENTAR EL RIESGO DE LESIONES GRAVES O LA MUERTE.
4.0 Ubicación del asiento de
seguridad infantil
Page 49

16
• El asiento del VEHÍCULO debe orientarse hacia delante.
• NO USE EL ASIENTO DE SEGURIDAD INFANTIL EN
ASIENTOS DEL VEHÍCULO CON RESPALDOS QUE NO SE
CIERREN EN LA POSICIÓN VERTICAL. NO use asientos que
se doblan sin contar con un cierre de algún tipo para soltarlos.
Estos asientos pueden lanzarse hacia delante y golpear al niño
en una parada repentina o un accidente.
• Cuando sea posible, sujete el asiento
de seguridad infantil en la posición
central del asiento directamente
detrás de los asientos delanteros
.
Un adulto debe ir en el asiento trasero para controlar al niño. Si el
conductor es el único adulto presente, un niño podrá necesitar ir
en el asiento delantero, PERO SOLAMENTE si no hay una bolsa
de aire en el lado del pasajero y se cumplan todos los demás requisitos para el asiento y los cinturones de
seguridad del vehículo.
• NUNCA coloque este asiento de seguridad
infantil en una posición en el vehículo que
tiene una bolsa de aire
. Vea "3.1
Advertencias para su uso como asiento de
seguridad infantil", en la pág.11.
Page 50

17
4.2 Requisitos para los cinturones
de seguridad del auto
MUCHOS SISTEMAS DE CINTURONES DE SEGURIDAD NO
SON SEGUROS PARA USAR CON EL ASIENTO DE SEGURIDAD
INFANTIL. EL CINTURÓN DE SEGURIDAD DEL VEHÍCULO DEBE
SER DISEÑADO PARA SUJETAR EL ASIENTO DE SEGURIDAD
INFANTIL FIRMEMENTE EN TODO MOMENTO.
Es importante prestar atención a estos sistemas; muchos de los
cinturones de seguridad que no son seguros son muy parecidos a
los que sí son seguros. Si no está seguro, consulte el manual del
propietario de su vehículo o con Graco Children's Products Inc.
al 1-888-224-6549.
Page 51

18
• Cinturones de regazo con retractor de cierre en
caso de emergencia (ELR)
Este cinturón de seguridad se mantiene suelto
y puede moverse hasta que se cierra en un
accidente o una parada repentina.
• Cinturones combinados de regazo/hombro
con retractor
Cada correa tiene un retractor en un extremo y se
junta a la placa de unión en el otro extremo.
• Cinturones pasivos - cinturón
de regazo con cinturón de
hombro motorizado
• Cinturón pasivo - cinturón de
regazo u hombro montado en
la puerta
NO use cinturones de vehículos que están unidos a la
puerta de cualquier manera o que se mueven
automáticamente cuando el pasajero cierra la puerta.
• Cinturones de regazo sujetos delante de la
unión del asiento
NO use ninguno de los siguientes sistemas para sujetar el asiento
de seguridad infantil.
4.2.1 Sistemas de cinturones
de autos INSEGUROS
Page 52

19
LOS SIGUIENTES SISTEMAS DE CINTURONES SE PUEDEN
USAR CON SU ASIENTO DE SEGURIDAD INFANTIL, SI la
ubicación del asiento cumple con todos los demás requisitos de
estas instrucciones y las del manual del propietario de su vehículo.
• Cinturones de regazo -
ajustados manualmente
Cuando se abroche, el cinturón
se ajusta manualmente jalando el extremo del cinturón y
empujando fuerte hacia abajo en el asiento de seguridad infantil.
• Cinturones de regazo con
retractor de cierre automático
(ALR)
El retractor de cierre automático no permitirá que el cinturón de
regazo se alargue una vez que esté abrochado. Ajuste el cinturón
dejándolo que vuelva a entrar en el retractor y empujando fuerte
hacia abajo en el asiento de seguridad infantil.
• Cinturones combinados de
regazo/hombro con placa de cierre
Una vez abrochado, este tipo de
cinturón cuenta con una placa de
cierre que no permitirá que la parte del regazo del cinturón se
suelte. Se ajusta el cinturón jalando fuerte en la parte del hombro
del cinturón del vehículo y empujando fuerte hacia abajo en el
asiento de seguridad infantil.
4.2.2 Sistemas de cinturones
de autos SEGUROS
Page 53

20
• Cinturones combinados de
regazo/hombro con placa de
cierre deslizable
Este cinturón cuenta con una
placa de cierre que se desliza libremente a lo largo del cinturón.
Este cinturón DEBE convertirse para prevenir el
movimiento de la parte del regazo del cinturón.
Debe usar el clip de cierre proporcionado con
el asiento de seguridad infantil, a menos que el
cinturón de seguridad de su vehículo se pueda
convertir de otra forma, según el manual del
propietario de su vehículo.
Instalar el clip de cierre:
1. Ajuste el cinturón abrochado, empujando
fuerte hacia abajo en el asiento de
seguridad infantil y jalando fuerte el
cinturón del hombro.
2. Cuando empuje hacia abajo en el asiento
de seguridad infantil, junte las dos correas detrás de la lengüeta
de la hebilla. Desabroche el cinturón sin dejar que se deslice.
3. Conecte los cinturones de regazo
y de hombro con el clip de cierre
como se indica en el
y .
4. Vuelva a abrochar el cinturón.
Verifique que el cinturón de regazo
no se mueve al empujar y jalar
fuerte en el asiento de seguridad
infantil. Si el cinturón se suelta
o se alarga, repita el proceso.
Clip de cierre
½
pulgada
El clip de cierre va aquí,
½ pulgada desde la hebilla
Page 54

5.1 Posición de las correas
NO AJUSTAR LAS CORREAS DE MANERA APROPIADA EN
SU NIÑO AUMENTA EL RIESGO DE LESIONES GRAVES O LA
MUERTE EN EL CASO DE UN GIRO BRUSCO, UNA PARADA
REPENTINA O UN ACCIDENTE. Las correas deben ajustarse
correctamente en su niño según las instrucciones siguientes
.
1. Quite el asiento de seguridad infantil de la base y gire el asa
hacia abajo hasta la posición de sentarse. Vea "2.1 Quitar y
sujetar la base" y "2.2 Ajustar el asa" en la pág. 8.
2. Coloque al niño en el asiento de seguridad infantil
como se indica
.
3. Determine qué par de ranuras para las correas
quedan al nivel o justo debajo de los
hombros del niño
.
NO use las ranuras superiores si quedan
encima de los hombros del niño. No
sujetarán a un niño pequeño en una
parada repentina o un accidente.
4. Si se deben ajustar las correas: quite
al niño del asiento de seguridad infantil
y siga las instrucciones para su tipo
de sistema de correas.
Use las ranuras de las
correas al nivel o justo debajo
de los hombros del niño.
21
5.0 Usar el asiento de
seguridad infantil
Page 55

5. Desde la parte trasera, quite las correas
de los tensores. Si es necesario, desde
la parte delantera, use la correa para
jalarla de la ranura
.
6. Vuelva a insertar la correa en la ranura
apropiada
.
7. 7. Pase las correas por los tensores exactamente
como se muestra
.
8. CONTROL DE SEGURIDAD:
a) VERIFIQUE que las correas no estén dobladas;
b) VERIFIQUE que las correas estén sujetas:
jale las correas desde la parte delantera.
Ajuste de correas
22
Page 56

23
5.2 Sujetar al niño en el asiento
de seguridad infantil
No sujetar a su niño correctamente en el asiento de seguridad
infantil/portabebés aumenta en riesgo de graves lesiones o la
muerte debido a la asfixia o caídas o en el caso de una parada
repentina o un accidente. Incluso cuando se usa exclusivamente
como portabebés, asegúrese de que las correas estén sujetas
correctamente.
1. Mueva el asiento de seguridad infantil hasta
la posición de sentarse (vea la página 8).
2. Open harness clip by squeezing both sides
and unbuckle as shown
.
3. Coloque a su niño en el
asiento de seguridad infantil
como se muestra en el
, no
el
. Jale las correas hacia
abajo por encima de su niño.
4. Inserte las dos lengüetas de la hebilla en la hebillas de las
correas en la correa de la entrepierna. Asegúrese de que
oiga el "clic" de cada lengüeta en la hebilla.
NO use el asiento de seguridad infantil si la correa no
se cierra en su sitio. Llame a Graco al 1-888-224-6549.
Page 57

5. Desde la parte trasera, jale la correa
por el tensor para ajustar las correas
como se muestra
. Las demás
correas deben tener aproximadamente
la misma longitud. VERIFIQUE que
ambas correas queden planas y a
justadas en los hombros del niño.
Para soltar las correas, sujete el tensor
hacia arriba y jale la correa desde la
parte delantera del asiento
.
6. Junte las piezas del clip de correas
.
Coloque el clip de las correas en el
centro del pecho, al nivel de las axilas
y lejos del cuello
.
7. CONTROL DE SEGURIDAD:
a) VERIFIQUE que las correas no
estén dobladas.
b) VERIFIQUE que las correas estén
bien ajustadas. No debe poder insertar
más de un dedo entre la correa y el
hombro de su niño
.
24
Page 58

25
5.3 Instalar el asiento de
seguridad infantil y la base
Debe seguir cuidadosamente las instrucciones proporcionadas por el
fabricante de su vehículo, además de la información en este manual.
Asegúrese de que haya leído y entendido las sección 4, "Ubicación
del asiento de seguridad infantil" en las páginas 16 a 20.
Asegúrese de que el vehículo esté en una
superficie plana para que el indicador de
nivel, adjunto al asiento de seguridad
infantil, pueda usarse para reclinar el
asiento de seguridad infantil correctamente .
Si se usa un asiento delantero de pasajero,
deslice el asiento del vehículo lo más
posible hacia atrás desde el tablero de
mandos. Si se usa un asiento trasero,
asegúrese de que el asiento de delante
se coloque suficientemente hacia
delante y que esté suficientemente
vertical para dejar espacio para el
asiento de seguridad infantil.
1. Quite el asiento de seguridad
infantil de la base, sin importar
si piensa usar la base o no.
2. Coloque la base
o el asiento
de seguridad infantil
en una
posición orientada hacia atrás
en un asiento del vehículo
orientado hacia delante.
Page 59

26
3. Pase el cinturón de seguridad:
4. Abroche el cinturón de seguridad.
Asegúrese de que la lengüeta de la
hebilla se coloca en la hebilla correcta
.
El cinturón de seguridad no debe estar
doblado ni torcido.
5. Ajuste el cinturón de seguridad del vehículo. Refiérase al
manual del propietario de su vehículo y las instrucciones en
"4.2.2 Sistemas de cinturones de autos SEGUROS" en las
páginas 19 a 20, sobre ajustar el cinturón de su vehículo.
La base y asiento de
seguridad infantil
Asiento de seguridad
infantil solamente
El cinturón DEBE ir
debajo de la lengüeta
Page 60

27
Para una instalación
bien ajustada,
empuje hacia abajo
fuerte con su rodilla
o con una mano
libre en el centro del
asiento de seguridad
infantil o su base
y jale y ajuste el
cinturón del vehículo.
6. Empuje el asiento de seguridad infantil
hacia abajo en la base y asegúrese de
que oiga un "clic"
. Jale el asiento de
seguridad infantil hacia arriba para
asegurarse de que está bien sujeto
en la base.
Si el asiento de seguridad infantil no se
sujeta firmemente en la base, el asiento
de seguridad infantil NO ofrece ninguna
protección para su niño. NO use el asiento
de seguridad infantil / base si el asiento de
seguridad infantil no se sujeta firmemente
en la base.
Page 61

28
Para la seguridad de su niño, es importante que su asiento de
seguridad infantil / base se recline correctamente. Adjunto al lado
de su asiento de seguridad infantil se encuentra un indicador de
nivel para ayudar a reclinar el asiento de seguridad infantil/base
correctamente en el asiento del vehículo.
No reclinar el asiento de seguridad infantil correctamente en el asiento
del vehículo aumenta el riesgo de lesiones graves o la muerte.
Si el asiento de seguridad infantil queda
demasiado vertical, la cabeza del niño
puede caer hacia delante y causar
problemas respiratorios.
Si el asiento de seguridad infantil queda
demasiado reclinado, un accidente podrá
poner demasiada fuerza en el cuello y los
hombros del niño.
El asiento de seguridad infantil debe reclinarse
correctamente según las siguientes instrucciones.
5.4 Reclinar el asiento de seguridad
infantil y la base
Verifique el indicador de nivel. Debe mirar el indicador en línea recta.
—Si el indicador muestra SOLAMENTE azul, el asiento de
seguridad infantil está bien nivelado.
—Si se ve color naranja en el indicador de nivel, ajuste el reclinado.
Page 62

29
Al usar la base:
Para bajar el pie; jale del fondo del pie hasta
el nivel deseado para ajustar el reclinado .
Para levantar el pie; coloque la base en
una superficie plana, empuje hacia dentro
en las lengüetas de la base para ajustar
el reclinado .
Si todavía queda color naranja en el in
dicador de nivel cuando el pie está
completamente extendido, coloque una
toalla enrollada debajo del pie hasta que
se vea el color azul SOLAMENTE .
Al usar solamente el asiento de seguridad
infantil, si todavía queda color naranja en el
indicador de nivel cuando el asiento de
seguridad infantil esté encima del asiento
del vehículo, coloque una toalla enrollada
debajo del asiento de seguridad infantil hasta
que se vea el color azul SOLAMENTE .
Reajuste el cinturón del asiento del vehículo
según sea necesario con el fin de sujetar el
asiento de seguridad infantil firmemente en el
asiento del vehículo.
Page 63

30
Control de seguridad final: Cada
vez que maneje con su niño,
EMPUJE HACIA ABAJO la parte superior del
asiento de seguridad infantil despacio pero
firmemente con el fin de asegurar que el cinturón
del vehículo no se alargue y que el cinturón del
vehículo esté bien abrochado alrededor del
asiento de seguridad infantil/base
.
Sujetando el asiento de seguridad infantil cerca
del cinturón del vehículo, DOBLE Y JALE el
asiento hacia delante y hacia ambos lados para
asegurar que el cinturón del vehículo no se
alargue ni se suelte y que el asiento de
seguridad infantil no se mueva fácilmente
.
Page 64

31
6.1 Uso en aviones
Instálelo en un avión de la misma manera que en
un automóvil. Notifique a la compañía aérea por
adelantado que va a usar el asiento abordo.
Úselo solamente en un asiento del aeronave orientado hacia delante.
Siga las instrucciones del personal de vuelo sobre la colocación
del asiento de seguridad infantil. No use este asiento de seguridad
infantil si el cinturón de seguridad del avión no sujeta el asiento de
seguridad infantil firmemente.
6.2 Limpieza y mantenimiento
PARA QUITAR Y LAVAR LA ALMOHADILLA DEL ASIENTO DE
SEGURIDAD INFANTIL, siga las instrucciones en "5.1 Posición de
las correas", en las páginas 21 a 22. Con cuidado, quite la almohadilla
del asiento. Lávela a máquina en el ciclo delicado y déjela secar al
aire. NO USE CLORO. Siga los pasos en sentido inverso para volver
a instalar la almohadilla. Verifique que el sistema de correas no esté
doblado y jale el sistema de correas para asegurar que las correas
están bien reinstaladas.
LAS PIEZAS METÁLICAS Y DE PLÁSTICO DEL ASIENTO DE
SEGURIDAD INFANTIL se pueden limpiar con una solución de agua
y jabón suave. NO USE CLORO. El uso de lejía puede debilitar las
piezas de plástico.
LAS CORREAS se pueden limpiar en el momento o se pueden
reemplazar. NO SUMERJALAS CORREAS EN AGUA. Hacerlo
puede debilitar las correas.
LA HEBILLA se puede limpiar con un paño mojado.
NO LUBRIQUE la hebilla.
NO USE EL ASIENTO DE SEGURIDAD INFANTIL sin la almohadilla.
6.0 Información adicional
Page 65

32
Cómo efectuar los pedidos:
Complete el formulario a continuación. Los números de modelo y
serie del asiento de seguridad infantil DEBEN incluirse en el
formulario para asegurar los repuestos apropiados. Su número de
modelo se puede encontrar en una etiqueta debajo de su asiento
de seguridad infantil. El pago debe acompañar al pedido.
Las piezas también se pueden pedir del sitio Web de Graco en
www.gracobaby.com.
Lista de piezas:
Almohadilla del asiento ............
Capota ...................................
Arco de la capota .....................
Correas ..................................
Clip de correas .........................
Clip de cierre ...........................
Soporte de cabeza*..................
Base .........................................
* En ciertos modelos
Precio:**
$20.00
$17.00
$ 5.00
$10.00
$ 5.00
$ 5.00
$ 8.00
$30.00
** Los precios están sujetos a
cambio sin previo aviso.
SI NECESITA AYUDA
Si tiene alguna pregunta o necesita cualquier pieza que no está
en la lista, llame gratuitamente al: 1-888-224-6549
o visite nuestro sitio Web en Internet en, www.gracobaby.com.
Devuelva el formulario con su pago a:
Graco Children’s Products Inc.
Customer Service Department
P.O. Box 100, Main Street
Elverson, PA 19520
Page 66

33
Model No. • N° de modelo Serial No. • N° de serie
(Both Numbers Required/Se requieren ambos números)
Check or money order enclosed
(payable to Graco Children’s Products Inc.)
Cheque o giro adjunto (a nombre de Graco
Children’s Products, Inc.)
Charge to credit card
Cargar a la tarjets de crédito
Visa MasterCard Discover
Account # • Cuenta N°
Expiration date • Fecha de vencimiento
Signature • Firma
SHIP TO • Enviar a
Name • Nombre
Address • Dirección
City, State, Zip • Cuidad, Estado, Código postal
Telephone • Telefóno
Seat pad/Almohadilla del asiento
Canopy/Capota
Canopy bow/Arco de la capota
Harness/Correas
Harness clip/Clip de correas
Locking clip/Clip de cierre
Head support/Soporte de cabeza
Base/Base
Subtotal/Total:
Shipping & handling*
Gastos de envio*: $5.00
Sales tax**
Impuestos**:
Total due
Total a pagar:
* $15.00 outside the continental U.S.
*US$15.00 para fuera del
continente de EE.UU
**CA 6%, IL 6.25%, IN 5%, NY 8.25%,
OH 5.75%, PA 6%, SC 5%
 Loading...