

Page 1
234
© 1997 Graco 749-12-97
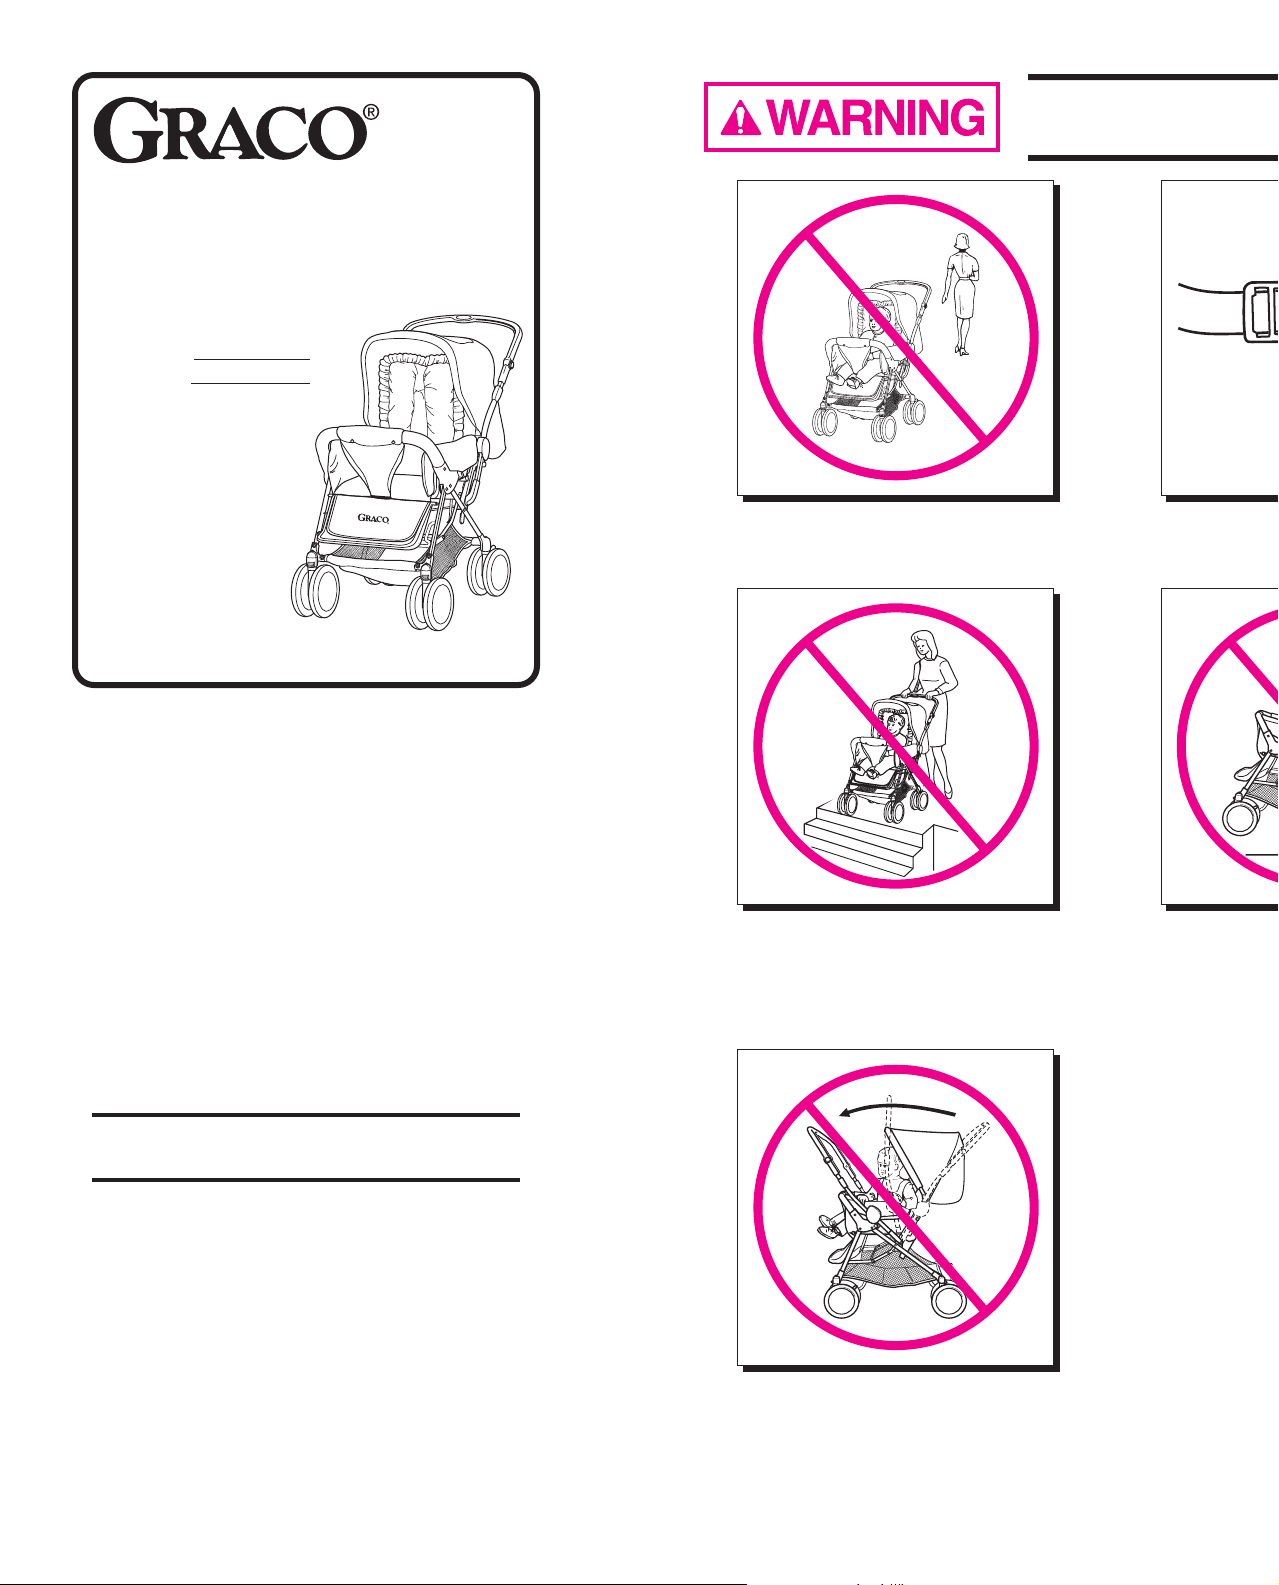
Avoid serious injury from falling or
sliding out. Always use seat belt.
Never leave child unattended.
Always keep your child in view.
DO NOT place purses, shopping
bags, parcels and accessory items
on handle or canopy. They may fall
on the child or change the balance
of the stroller and make it unstable.
Congratulations on your purchase of a
Graco
®
stroller!
Graco is a world leader in strollers and
has helped thousands of parents transport
their children in comfort. We believe your
new Graco
®
stroller is a wise choice,
promising many hours of enjoyment for
your baby.
Before using your stroller, please take a
few minutes to read this Owners Manual.
The short time you spend reading these
instructions will help you assemble and
use your stroller properly.
Please save your Owners Manual
for future use.
Customer Satisfaction
Our goal is to make every product the best it can
be! We are also committed to supporting our
products after purchase. If you would like to speak
to Graco about your product, please contact our
Customer Service Department at 1-800-345-4109.
Our knowledgeable staff will be ready to answer
any questions you may have concerning parts, use
or maintenance. When you call, please have the
model and serial numbers ready so your call may
be processed quickly and efficiently.
OWNERS
MANUAL
Model No.
Serial No.
Dear Customer,
Please fill in the model
and serial numbers
above from the label
on the rear leg of your
new stroller.
Stroller
Never use stroller on stairs or escalators.
You may suddenly lose control of the
stroller or your child may fall out. Also,
use extra care when going up or down a
step or curb.
7575, 7600 and 7700 Models
Use care when reversing handle to
avoid catching childs arms or hands
in the mechanism. When making
adjustments to your stroller, always
be sure that all parts of your childs
body are clear of any moving parts.
TO PREVENT A HAZARDOUS CONDITION, do not place more than 10 lbs.
(4.5 kg) in the storage basket or more than 2 lbs. (0.9 kg) in the canopy bag.
NEVER ALLOW YOUR STROLLER to be used as a toy.
STROLLER TO BE USED only at walking speed. Product not intended for use
while jogging, skating, etc.
AVOID STRANGULATION. DO NOT place items with a string around your childs
neck, suspend strings from this product, or attach strings to toys.
DISCONTINUE USING YOUR STROLLER should it become damaged or broken.
THIS PRODUCT IS NOT INTENDED FOR COMMERCIAL USE.
Page 2
Failure to follow these warnings and the assembly
instructions could result in serious injury or death.
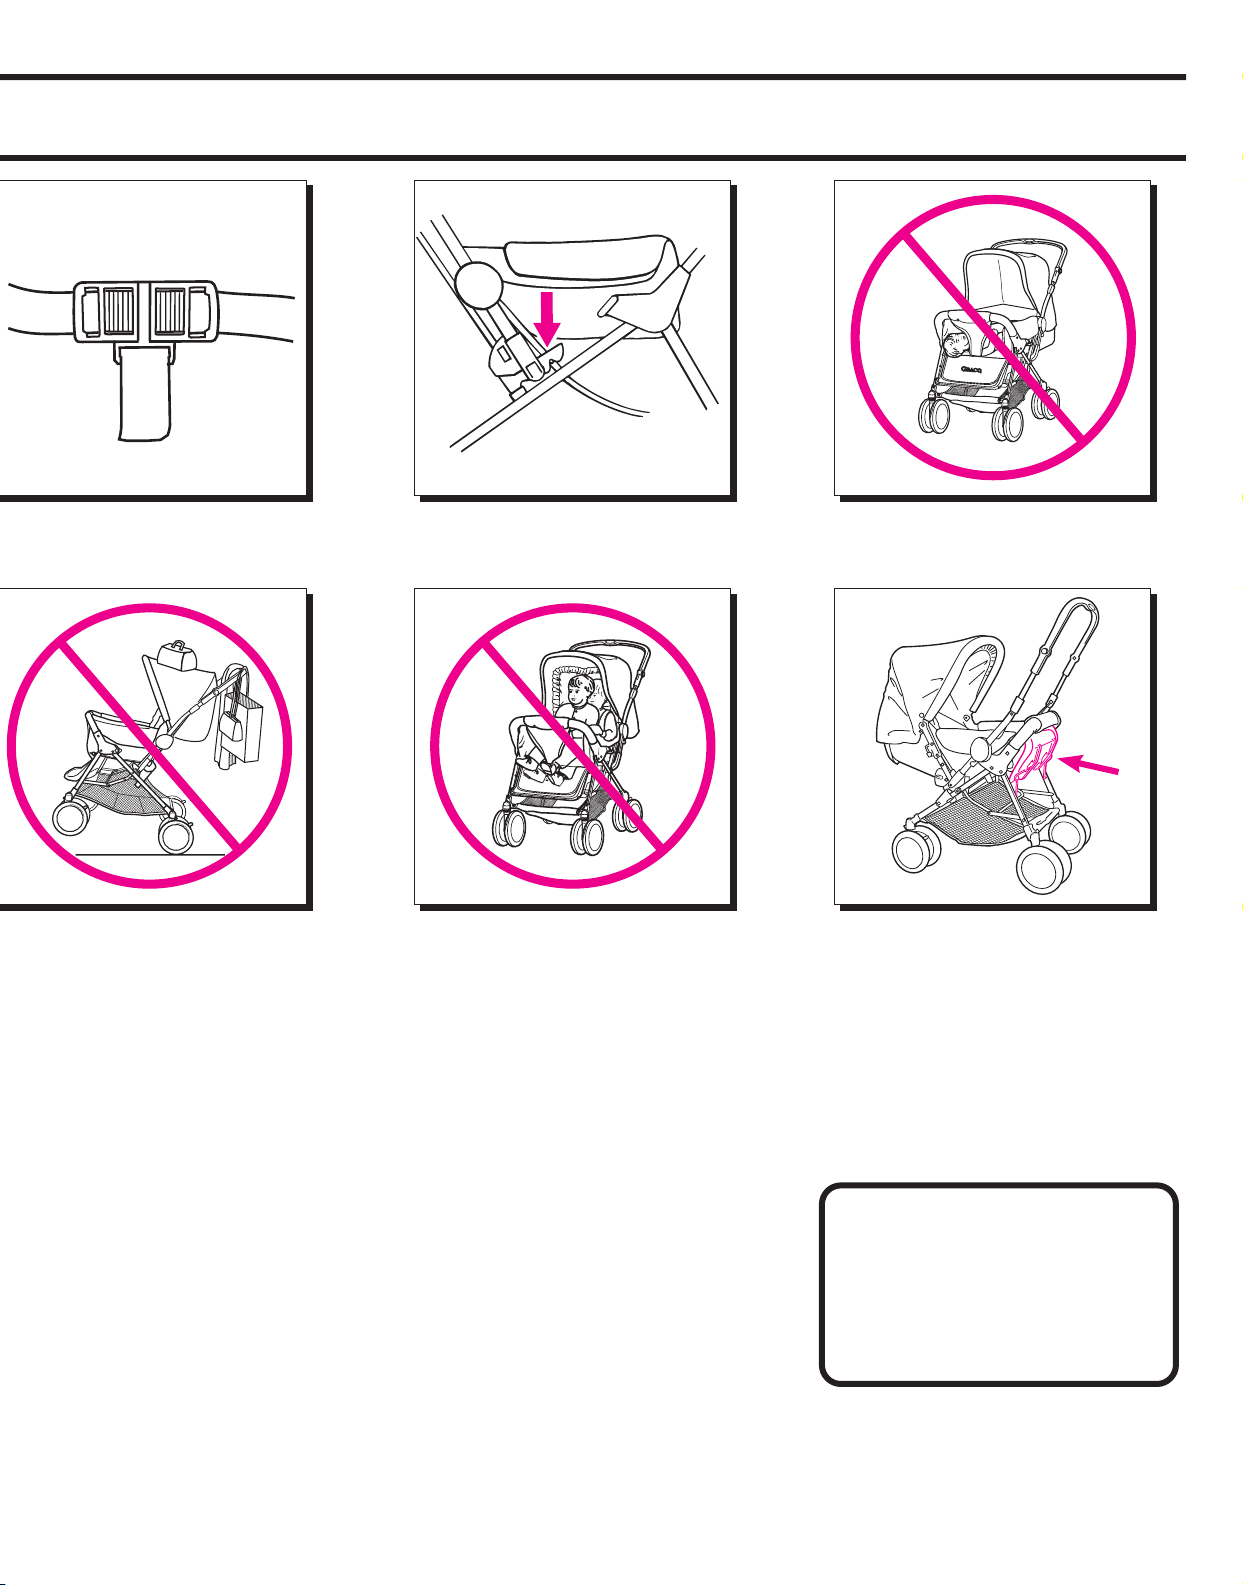
Avoid serious injury from falling or
sliding out. Always use seat belt.
Be certain the stroller is fully erected
and latched before allowing your
child near the stroller.
Never place child in the stroller with
head toward front of the stroller.
Use of the stroller with a child weighing
more than 40 lbs. (18.1 kg) will cause
excessive wear and stress on the stroller.
Use the stroller with only one child at a
time.
Child may slip into leg openings
and strangle. Never use in reclined
carriage position unless footrest is
placed under padded front bar and
wire snapped into lower notch.
TO PREVENT A HAZARDOUS CONDITION, do not place more than 10 lbs.
(4.5 kg) in the storage basket or more than 2 lbs. (0.9 kg) in the canopy bag.
NEVER ALLOW YOUR STROLLER to be used as a toy.
STROLLER TO BE USED only at walking speed. Product not intended for use
while jogging, skating, etc.
AVOID STRANGULATION. DO NOT place items with a string around your childs
neck, suspend strings from this product, or attach strings to toys.
DISCONTINUE USING YOUR STROLLER should it become damaged or broken.
THIS PRODUCT IS NOT INTENDED FOR COMMERCIAL USE.
FOR ADDITIONAL IMPORTANT
INFORMATION, please see the
Helpful Hints and Care and
Maintenance sections in these
instructions.
Page 3
5
749-12-97
To Unpack Stroller
Step 1.
Flatten stroller carton to
protect floor.
Step 2.
Open stroller on
carton as shown
until latched.
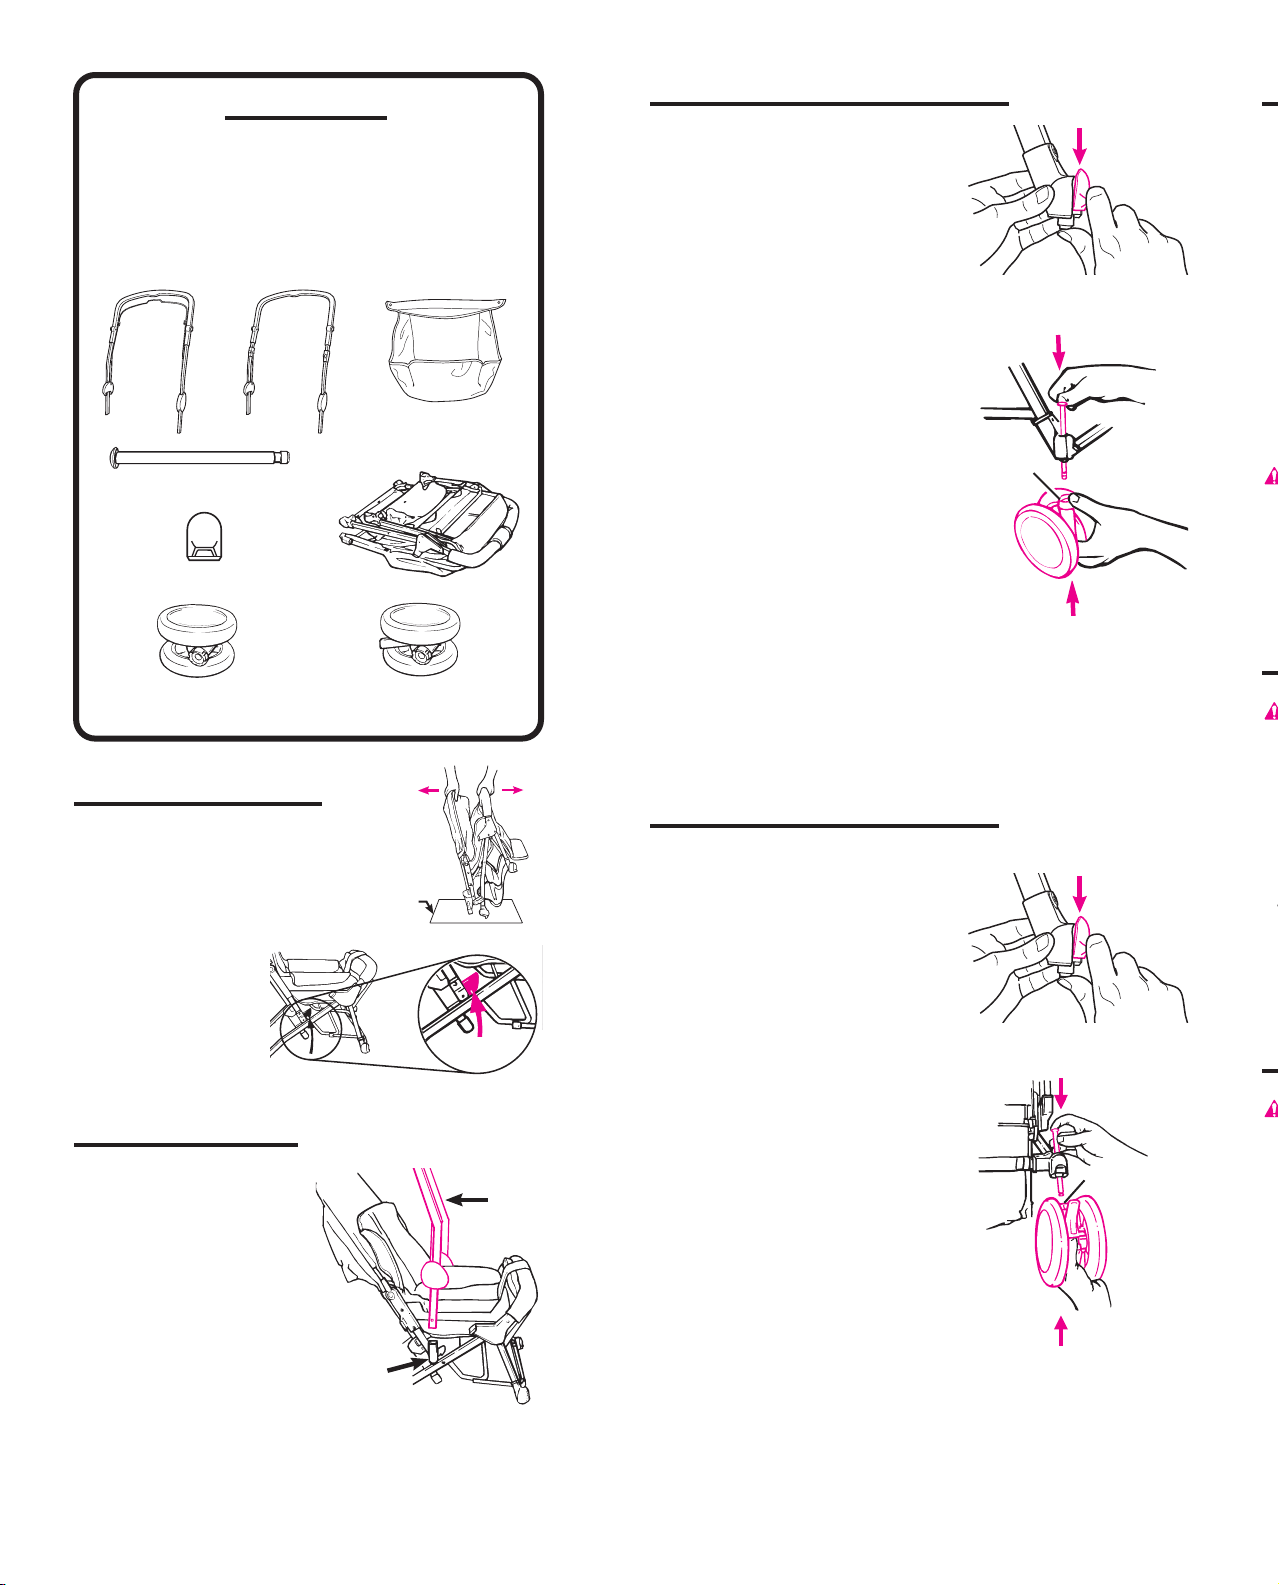
PARTS LIST
CHECK that you have all the parts listed below
BEFORE assembling your stroller.
If any parts are missing, call Customer Service
at 1-800-345-4109.
THIS PRODUCT REQUIRES ADULT ASSEMBLY.
No tools required for assembly.
Handle
with
wire
Pin (4)
Frame
Front wheel assembly
without brake (2)
Flattened
carton
Latch
Rear wheel assembly
with brake (2)
To Install Handle
Step 1.
Turn handle brackets
straight up.
Step 2.
Position handle as shown.
Step 3.
Place both sides of handle into brackets and push
down until latched.
NOTE: Be sure buttons are securely latched in
bracket holes. Check by pulling firmly up on handle.
Handle
bent
towards
rear
Handle
bracket
Insert pin
Push
wheels up
Step 1.
Snap swivel lock button onto
wheel mount as shown. This
must be done BEFORE pin is
inserted (next step).
Step 2.
Insert pin through hole in wheel
mount. Then push round end
of a rear wheel assembly (with
brake) up onto pin as shown
until it snaps into place.
NOTE: Check wheel attachment
by pulling down on rear wheel
assembly.
Step 3.
Repeat above steps for other
side.
To Assemble Rear Wheels
Handle
without
wire
OR
To Unfold Stroller
Step 1.
Unfold footrest from under
armrest.
Step 2.
Release storage latch.
Step 3.
Unfold as shown.
is latched before allowing
your child near the stroller.
To Use Brakes
both brakes to park stroller.
Push DOWN to park.
Lift UP to stroll.
Swivel lock button (4)
To Secure Your Child
injury from falling or sliding
out. Always use seat belt.
Step 1.
Place crotch strap between
childs legs and snap both side
buckles to the center buckle.
Adjust belt as needed to get a
snug fit around your child.
Step 2.
Push in on front of buckle to
release.
Step 1.
Snap swivel lock button onto
wheel mount as shown. This
must be done BEFORE pin is
inserted (next step).
Step 2.
Insert pin through hole in wheel
mount. Then push round end of
a front wheel assembly (without
brake) up onto pin as shown
until it snaps into place.
NOTE: Check wheel attachment
by pulling down on the front
wheel assembly.
Step 3.
Repeat above steps for the
other side.
Insert pin
Push
wheels up
To Assemble Front Wheels
Round
end
Round
end
Boot
(on certain models)
Page 4

867
To Adjust Back
Step 1.
Push back of seat slightly
forward while squeezing wire
to unlock, as shown.
Step 2.
Adjust to desired position.
To Unfold Stroller
Step 1.
Unfold footrest from under
armrest.
Step 2.
Release storage latch.
Step 3.
Unfold as shown.
Be sure frame
is latched before allowing
your child near the stroller.
To Use Brakes
Always apply
both brakes to park stroller.
Push DOWN to park.
Lift UP to stroll.
To Secure Your Child
Avoid serious
injury from falling or sliding
out. Always use seat belt.
Step 1.
Place crotch strap between
childs legs and snap both side
buckles to the center buckle.
Adjust belt as needed to get a
snug fit around your child.
Step 2.
Push in on front of buckle to
release.
To Change to Swivel
or Non-swivel Wheels
For smooth travel, always lock both rear swivels
(closest to handle). On uneven surfaces such as
grass, stones or gravel, lock all four swivels.
Before locking swivels, push stroller forward a
few feet to ensure that the wheels are correctly
positioned.
Push buttons up or down, depending on model, to
lock or release swivels. Turn swivel to check that it
is locked or released.
When reversing position of the handle, check that
rear swivels are locked and front swivels are
released.
Direction of
travel
When reversing
handle, push
stroller forward,
then lock rear
wheels and release
front wheels.
LOCK
Direction of
travel
LOCK
Page 5

9
749-12-97
To Adjust Canopy
Push canopy forward.
Canopy bag (only on some
models) carries a maximum
of 2 pounds (0.9 kg).
On certain models, you can
unzip the rear panel and fold it
out of the way to see your
baby.
To Move Handle to
Carriage Position
Step 1.
For handle with wire, squeeze
in center to unlock.
OR
For handle without wire, pull
up on both plastic slides on
the handle to unlock, as
shown.
Step 2.
Move handle to new position.
Use care
when reversing handle to
avoid catching childs arms
or hands in the mechanism.
Push in both buttons at sides of
handle and slide handle to new
position.
Be sure handle is engaged in
one of the latching
positions.
To Raise Footrest
Lift footrest and hook wire into
footrest bracket.
Child may
slip into leg openings and
strangle. Never use in
reclined carriage position
unless footrest is placed
under padded front bar and
wire is snapped into lower
notch.
To Use Head Supports
(on certain models)
Back of cloth seat
pad
To use stroller with a smaller
child, pull the plastic pieces from
pockets located in the back of
the cloth seat pad, and reinsert
them with curved side toward
the front.
To use stroller with a larger child
who does not need head support, insert the plastic pieces
with the curved side toward the
back.
Step 3.
Push on secondary lock
on right side of stroller
(red button).
Step 4.
Lock storage latch as shown.
To Fold Stroller
NOTE: Before folding, (1) remove boot if present; (2) adjust
back to upright position; (3) adjust handle to rear position;
(4) fold canopy.
Step 1.
Push on latch to fold as shown.
To Adjust Handle Height
(on certain models)
Step 2.
Push handle forward.
To Attach Boot
(on certain models)
Step 1.
Raise footrest and place boot
under footrest. Slide boot over
the front of stroller.
Step 2.
Snap straps at top of boot around
stroller frame on both sides as
shown.
Page 6

1210 11
Step 3.
Push on secondary lock
on right side of stroller
(red button).
Step 4.
Lock storage latch as shown.
OR
To Fold Stroller
NOTE: Before folding, (1) remove boot if present; (2) adjust
back to upright position; (3) adjust handle to rear position;
(4) fold canopy.
Step 1.
Push on latch to fold as shown.
OR
Step 2.
Push handle forward.
HELPFUL HINTS
IF WHEEL SQUEAKS, use a
light oil (e.g., WD-40, 3-in-1,
or sewing machine oil). It is
important to get the oil into
the axle and wheel assembly
as shown.
WHEN USING YOUR STROLLER OVER
UNEVEN SURFACES (such as grass, stones
or gravel), lock all swivel wheels.
BEFORE LOCKING SWIVEL WHEELS, it is
important to first push the stroller forward a few
feet to ensure that the wheels are correctly
positioned.
WHEN USING YOUR STROLLER AT THE
BEACH, completely clean your stroller
afterward to remove sand and salt from
mechanisms and wheel assemblies.
IF FOOTREST BECOMES CAUGHT under
arm bar when unfolding your stroller, first refold
the stroller, pull footrest down into correct
position, then proceed to unfold your stroller.
IF STROLLER WONT STAND IN
UPRIGHT FOLDED POSITION,
check position of wheels to ensure
they are in the correct position as
shown.
CARE AND MAINTENANCE
DO NOT MACHINE WASH SEAT (with perma-
nent inner boards). It should only be wiped with
a mild detergent, taking care not to soak the
material. Seat with removable inner boards (on
certain models) may be machine washed in
lukewarm water on delicate cycle and dripdried. NO BLEACH.
REMOVABLE PAD may be machine washed
in lukewarm water on delicate cycle and dripdried. NO BLEACH.
FROM TIME TO TIME CHECK YOUR
STROLLER for loose screws, worn parts, torn
material or stitching. Replace or repair the parts
as needed. Use only Graco®replacement parts.
TO CLEAN STROLLER FRAME, use only
household soap or detergent and warm water.
NO BLEACH.
EXCESSIVE EXPOSURE TO SUN OR HEAT
could cause fading or warping of parts.
Page 7

Return the form below with payment to:
GRACO CHILDRENS PRODUCTS INC.
CUSTOMER SERVICE DEPARTMENT
MAIN STREET
ELVERSON, PA 19520
13
749-12-97
Replacement Parts
IF YOU NEED HELP
If you have any questions, please call toll-free:
1-800-345-4109
Model Number
(Must be filled in)
SHIP TO:
Name
Address
City, State, Zip
( )
Telephone
Total:
6% sales tax
(PA only):
Total amount
due:
Check enclosed
(payable to Graco Childrens
Products Inc.)
Charge to credit card:
Visa
MasterCard
Discover
Account #:
Expiration date:
Signature:
Removable seat pad
Front wheel assembly
Rear wheel assembly
Slung basket
Footrest cover
Canopy
Handle with wire
Handle without wire
Seat
Boot
Wheel hardware
Canopy hardware
Swivel lock
Seat belt buckle
Parts List:
Removable seat pad .........
Front wheel assembly ......
(without brake)
Rear wheel assembly ........
(with brake)
Slung basket .....................
Footrest cover ...................
Canopy ..............................
Handle with wire ...............
Handle without wire ..........
Seat ...................................
Boot ...................................
Wheel hardware ................
Canopy hardware .............
Swivel lock ........................
Seat belt buckle .................
Price:*
$ 22.00
$ 15.00 (each)
$ 15.00 (each)
$ 15.00
$ 12.00
$ 17.00
$ 25.00
$ 25.00
$ 30.00
$ 15.00
No charge
No charge
No charge
No charge
* Prices subject to change without notice.
Instructions for ordering stroller parts:
To order by phone using Visa, MasterCard or Discover,
call 1-800-345-4109. Have your stroller model number
ready when you call. Your model number can be found on
a sticker on the rear leg of your stroller. To order by mail,
complete the form below. Your model number MUST be
included on the form to ensure proper replacement parts.
Payment must accompany your order.
 Loading...