

Page 1
2
© 1999 Graco 1107-11-99
Failure to follow these warnings
and instructions could result
in serious injury or death.
Congratulations on your purchase of a
Graco
®
soft carrier!
Graco is the recognized leader in the
design and manufacture of quality baby
products. We believe your new Graco
®
soft carrier is a wise choice, promising
many hours of enjoyment for your baby.
Before using your carrier, please take a
few minutes to read this Owners Manual.
The short time you spend reading these
instructions will help you to use your
carrier properly.
Please save your Owners Manual
for future use.
Customer Satisfaction
Our goal is to make every product the best it
can be! We are also committed to supporting our
products after purchase. If you would like to speak
to Graco about your product, please contact our
Customer Service Department at 1-800-345-4109
or visit our Internet website, www.gracobaby.com.
Our knowledgeable staff will be ready to answer
any questions you may have concerning parts, use,
or maintenance. When you call, please have the
model and serial numbers ready so your call may
be processed quickly and efficiently.
OWNERS
MANUAL
Model No. _______
Serial No. ________
Dear Customer,
Please fill in the
model and serial
numbers above
from the label on
the inside of your
new soft carrier.
Model 5070 Series
Soft Carrier
Even if this carrier seems easy to figure out, you must
read and understand the instructions before you use the
carrier. If you experience any difficulties, please contact our
Customer Service Department. Always keep instructions for
future reference.
Use of this carrier could expose your child
to everyday situations that seem harmless to an
adult, but could be very harmful to baby.
Please be aware and understand that actions,
motions and activities you normally don't consider
dangerous (such as cooking, cleaning, etc.) could
present danger to your baby. Use good judgment
when wearing the carrier and keep your baby safe.
CARRIER FOR USE with children who weigh between
8 and 21 lbs.
CHECK THAT ALL buckles, snaps, straps and adjustments
are secure before each use.
DO NOT USE CARRIER with baby facing outward or on
back until baby can easily support head.
DO NOT USE SOFT CARRIER IN A VEHICLE. Always use
a child safety seat.
CARRIER IS INTENDED to hold child when secured to
adult. Do not leave child in carrier unattached to caregiver.
NEVER LEAVE CHILD UNATTENDED.
DO NOT USE THIS PRODUCT if it is damaged.
CARE AND MAINTENANCE
CARRIER AND ITS ACCESSORIES MAY BE WASHED BY
HAND ONLY in lukewarm water and drip-dried. DO NOT
machine wash or dry. NO BLEACH.
REGULARLY INSPECT your carriers buckles, snaps and
fabric for wear, especially after washing or cleaning.
Page 2
43
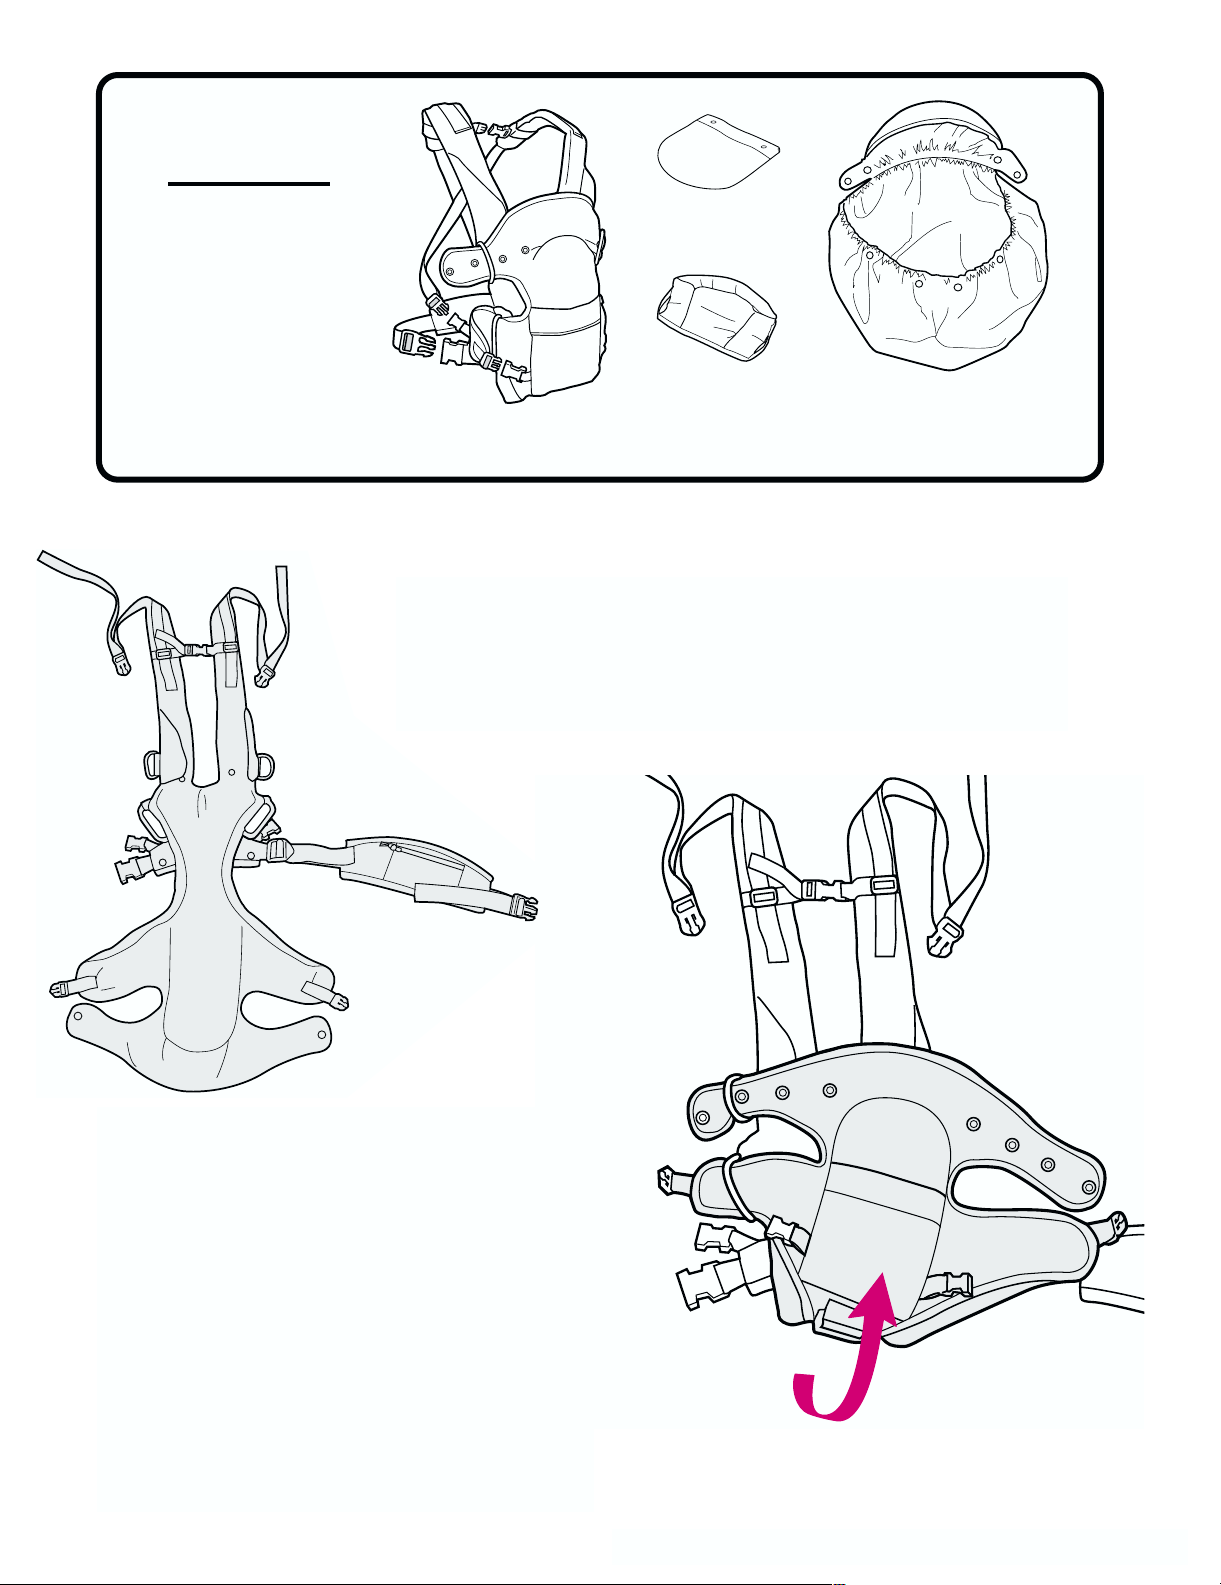
PARTS LIST
CHECK that you have all
the parts listed at right.
If any parts are missing,
call Customer Service at
1-800-345-4109
or visit
our Internet website,
www.gracobaby.com.
Carrier
Head support
cushion
Bib
Outer cover (on certain
modelstabs and hood
are at the top)
Ê
Ê Padded adjustable length shoulder straps
can be adjusted while you are wearing carrier.
Ë Upper strap will be at your shoulder blades (when
carrier is worn on the front) or at your chest (when
carrier is worn on your back). It can be lengthened
or moved up and down.
Ì Shoulder strap buckles will attach to Ìb at waist.
Í Narrow top ring
Î Wide bottom ring
Ï Bottom tab with strap and buckle is fed through Î.
Ð Top tab with snaps is fed through Í.
Ñ Waist strap and buckle will attach to Ñb.
Ò Soft side of the carrier with no straps or pocket is
the insidenext to baby.
Ë
Ì
Í
Î
Ñ
b
Ìb
Ñ
Ï
Ð
Ò
Please take a few moments to familiarize yourself
with the parts and features of your Graco®soft carrier.
There are a number of snaps and buckles. Please read through the
instructions (which begin on the reverse side) and try the steps to make
sure you understand them before your first use with your baby.
Í
Î
Ï
Ð
Page 3
5
1107-11-99
6 87
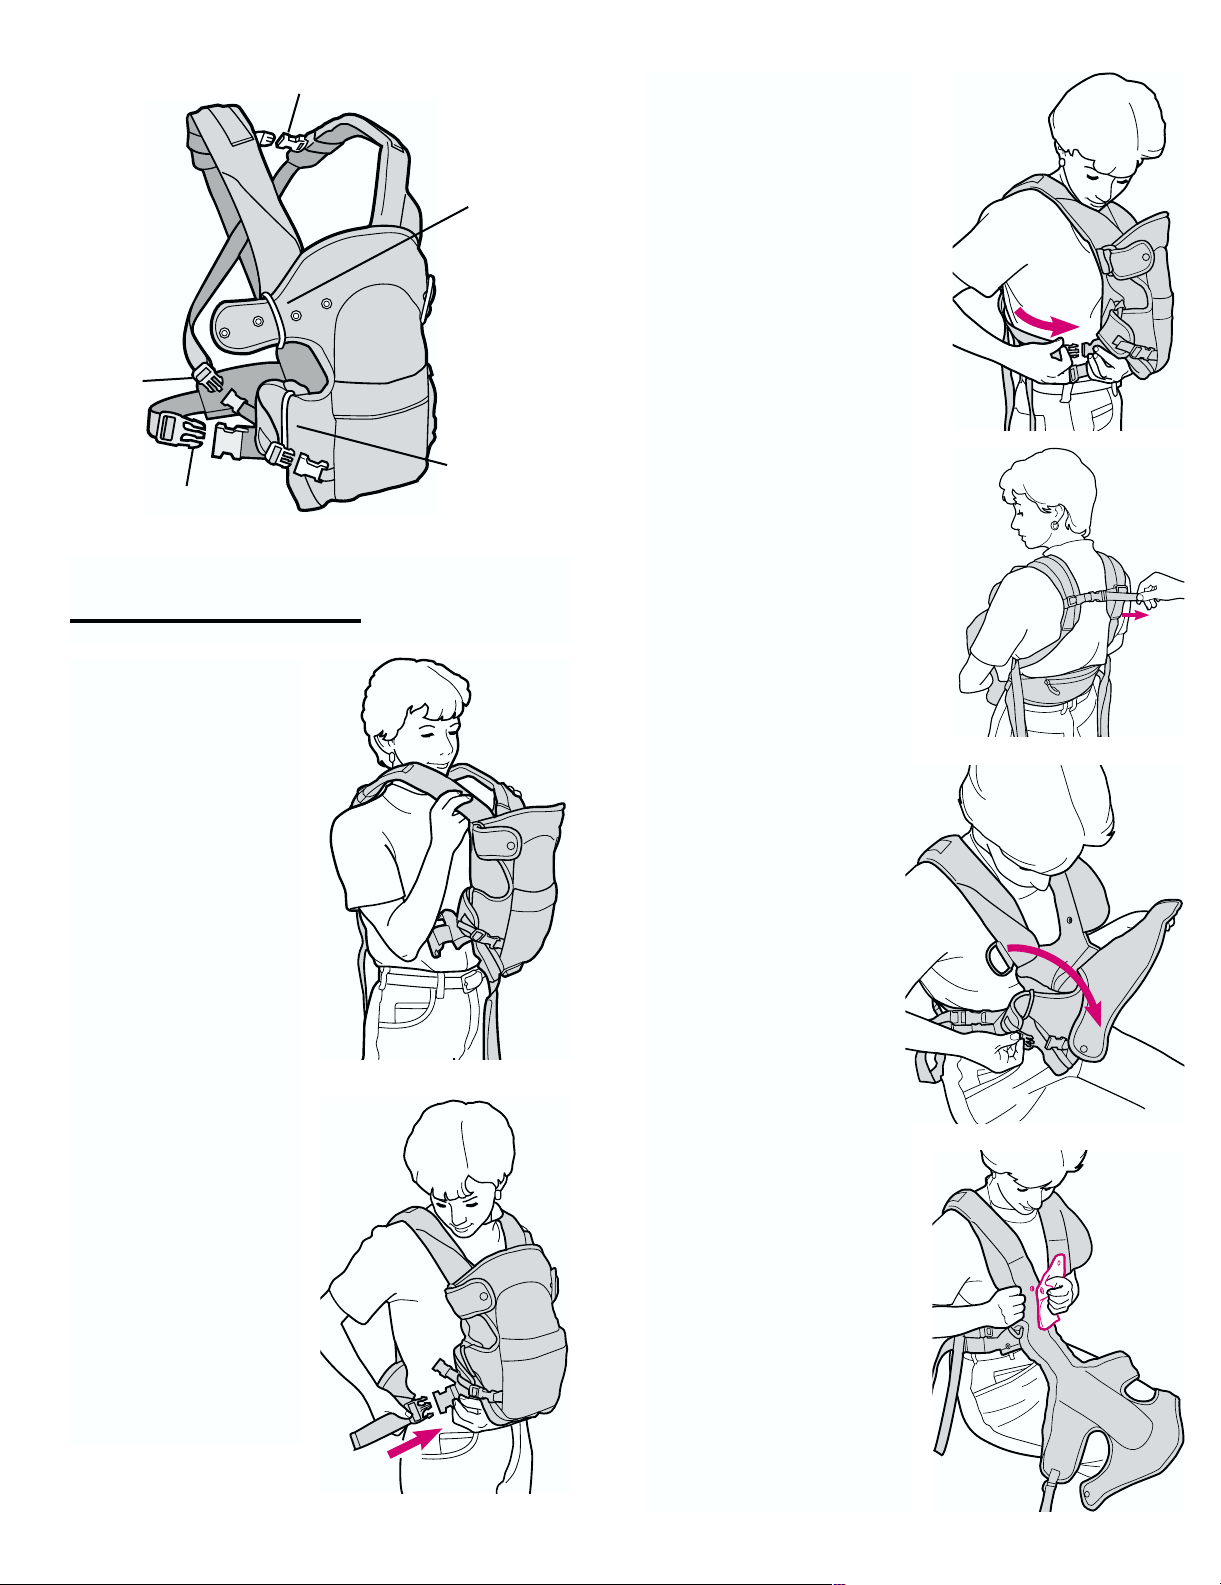
Step 1.
Put the carrier on as
shown, with the pouch in
front and the straps over
your shoulders.
Step 2.
Pull the waist strap
around you and secure
it with the large buckle.
Pull the free end of the
strap for a comfortable fit.
To Use the Carrier
with Baby Facing You
Upper strap
Bottom tab
with buckle
always goes
through wider
bottom ring
Large
waist buckle
Small
shoulder
strap
buckle
Step 3.
Fasten the two shoulder
straps with the smaller
buckles. You may cross them
in the back or not, whichever
is more comfortable. Pull the
free ends of the straps for
a comfortable fit.
Ask someone else to help
you adjust the upper strap
if desired. The strap can
be tightened or moved up
or down for your comfort.
Check all buckles to make
sure they are secure.
Step 4.
Undo the two top snaps and
the two bottom buckles and
lay the carrier, opened flat,
in your lap.
Step 5.
If you want to use the bib,
snap it in place as shown.
To p t ab
with snaps
always
goes
through
narrower
top ring
Page 4

Step 9.
Adjust babys pouch if
needed by adjusting the
strap under the crotch to
raise or lower your baby.
Compare your fitted
carrier to this picture,
making sure that babys
arms go through the
top openings and legs
go through the bottom
openings. Check that
all buckles and snaps
are secure.
A very small baby may
need extra head support.
Thread the top tabs
through the head support
loops, then through the
top rings as shown.
Step 6.
Pick up your baby and sit
down, placing the babys
bottom on the narrow
crotch section of the carrier.
Step 7.
Gently raise baby up
against you, taking special
care to support a young
infants head.
Thread the bottom tabs
through the bottom rings.
Make sure babys legs
go through the openings
under the buckles. Buckle
them (listen for a click) and
pull the straps snug.
Step 8.
Then thread the top tabs
through the top rings. The
end of the tab must be turned
sideways as shown to fit it
through the ring.
Babys arms must go
through the opening, NOT
over the top of the carrier.
Snap the tabs securely in
the best position for your
babys size.
Babys arms
should be
between the
two tabs
Page 5

9
1107-11-99
10 11 12
Step 1.
Fasten the snaps at the very
bottom of the cover to the
outermost snap on the waist
support. For a smaller baby,
fasten the next set of snaps
as well.
Step 2.
Wrap the cover up over your
baby. Thread the tabs at the
top of the cover through the
top rings of the carrier and
snap it back onto itself on
both sides.
Step 3.
Bring the upper hood part of
the cover up and over your
babys head.
To Use the Outer Cover
(on certain models)
Step 5.
Thread the bottom tabs through the bottom rings,
buckle them (listen for a click) and pull the straps snug.
Step 6.
Fold the top of the carrier down as shown.
Thread both top tabs through the narrow top rings from
the outside in. Fasten the snaps securely.
To Use the Carrier
with Baby Facing Out
Do not use carrier with baby facing outward
or on back until baby can easily support head.
The main difference in this
position is that the top tab threads
differently through the top ring to
keep the top of the carrier folded
down. See illustration at right.
Follow steps 1-4 above until the
carrier is opened out onto your lap.
Place the baby sitting up on your
lap, facing away from you.
Arms go through
openings
Top tab now
snaps to the
inside
Make sure:
!
top is folded over,
!
tabs are snapped to the
!
inside (this is different than
!
when baby faces you), and
!
babys arms go through
!
the openings, NOT over
!
the top of the carrier.
Step 7.
Adjust babys pouch if needed
by tightening or loosening the strap underneath the
crotch area to raise or lower your baby.
Top folds
down
Legs go
through openings
below buckles
Page 6

Step 1.
Put on the carrier with the
childs pouch (snaps and
buckles fastened) in back as
shown. Buckle the waist and
shoulder straps; adjust them
until they are comfortably
snug. Waist strap pocket will
be in front, facing out.
Check that waist strap
and BOTH shoulder straps
are buckled.
Do not cross straps when
carrying your baby on
your back.
Step 2.
Adjust the upper strap as
desired. It can be tightened
and/or moved up and down.
Step 3.
Have your helper check
that the bottom tabs are
still securely buckled.
The top tabs should be
unsnapped, but not
removed from the top
rings.
To Use the Carrier
with Baby on your Back
Step 4.
Have your helper gently
lower your baby into
the seat of the carrier,
making sure that babys
feet go through the
bottom openings,
below the buckles.
It may help for you to
reach up and help guide
babys feet through the
openings.
Step 5.
Have your helper snap
the top tab securely in
the most comfortable
position for your baby.
Babys arms should go
through the openings
beneath the tabs as long
as that is comfortable.
Some longer or older
babies will be more
comfortable with their
arms over the top.
That is okay.
Step 6.
With your helper, check
all buckles and snaps
to make sure they are
secure and adjust them
for comfort (including the
strap under the crotch) if
necessary.
Do not use carrier with baby facing outward or on back
until baby can easily support head.
You will need help to properly secure baby in this
position.
Page 7

13
Return the form below with payment to:
GRACO CHILDRENS PRODUCTS INC.
CUSTOMER SERVICE DEPARTMENT
P.O. BOX 100, MAIN STREET
ELVERSON, PA 19520
IF YOU NEED HELP
If you have any questions or if you need any parts
not listed, please call toll-free:
1-800-345-4109
or visit our Internet website, www.gracobaby.com
Model Number
(Must be filled in)
SHIP TO:
Name
Address
City, State, Zip
( )
Telephone
Check enclosed
(payable to Graco Childrens
Products Inc.)
Charge to credit card:
Visa
MasterCard
Discover
Account #:
Expiration date:
Signature:
Head support cushion
Bib
Outer cover
Replacement Parts
Instructions for ordering carrier parts:
Complete form below. Your carrier model number
MUST be included on the form to ensure proper
replacement parts. Your model number can be
found on the inside of the carrier below the bib
snaps. Payment must accompany your order.
Parts List:
Head support cushion ...........
Bib .........................................
Outer cover ...........................
Price:*
$ 8.00
$ 6.00
$12.00
* Prices subject to change without notice.
Total:
Shipping
& handling*: $5.00
6% sales tax
(PA only):
Total amount
due:
*Outside the continental U.S.,
please call for shipping cost.
1107-11-99
 Loading...