

Page 1

2 3 4
© 2000 Graco 651-3-00 651699
Congratulations on your purchase of a
Graco
®
Entertainer®activity center!
Graco is the recognized leader in the
design and manufacture of quality baby
products. We believe your new Graco
®
Entertainer®activity center is a wise choice,
promising many hours of enjoyment for
your baby.
Before using your activity center, please
take a few minutes to read this Owners
Manual. The short time you spend reading
these instructions will help you to use your
activity center properly.
Customer Satisfaction
Our goal is to make every product the best it
can be! We are also committed to supporting our
products after purchase. If you would like to speak
to Graco about your product, please contact our
Customer Service Department at 1-800-345-4109
or visit our Internet website, www.gracobaby.com.
Our knowledgeable staff will be ready to answer
any questions you may have concerning parts, use
or maintenance. When you call, please have the
model and serial numbers ready so your call
may be processed quickly and efficiently.
Model No. __________
Serial No. __________
Dear Customer,
Please fill in the
model and serial
numbers above
from the label
under the tray
of your new
Entertainer
®
activity center.
OWNERS MANUAL
Model 4650
Failure to follow these warnings and the assembly
instructions could result in serious injury or death.
THIS PRODUCT REQUIRES ADULT ASSEMBLY.
READ ALL INSTRUCTIONS BEFORE ASSEMBLY AND USE OF THIS PRODUCT.
If you experience any difficulties, please contact the Customer Service Department.
KEEP INSTRUCTIONS FOR FUTURE USE.
IN CLOSED-TRAY INFANT MODE, this product is for use only by a child who is able
to sit upright unassisted but unable to walk, weighs less than 30 pounds, and is less
than 32 inches tall. IN OPEN-TRAY TODDLER MODE, this product is for use only by
a child who is able to walk.
EXCESSIVE EXPOSURE TO SUN OR HEAT could cause fading or warping of parts.
DO NOT USE THIS PRODUCT if it is damaged or broken.
Strings can cause strangulation! DO
NOT place items with a string around
your childs neck, such as hood
strings or pacifier cords. DO NOT
suspend strings over the activity
center or attach strings to toys.
Never leave child unattended. Always
keep child in view while in product.
Never lift or carry this product with
child in it.
Product may gradually move across
the floor as child plays in it. Watch for
movement of product and be sure
child stays away from hazards in the
area such as stairs, cords, hot liquids,
pools, sources of heat and anything
else that may injure your child. Never
use near stairs.
Convertible Entertainer
2-in-1 Activity Center
®
Page 2
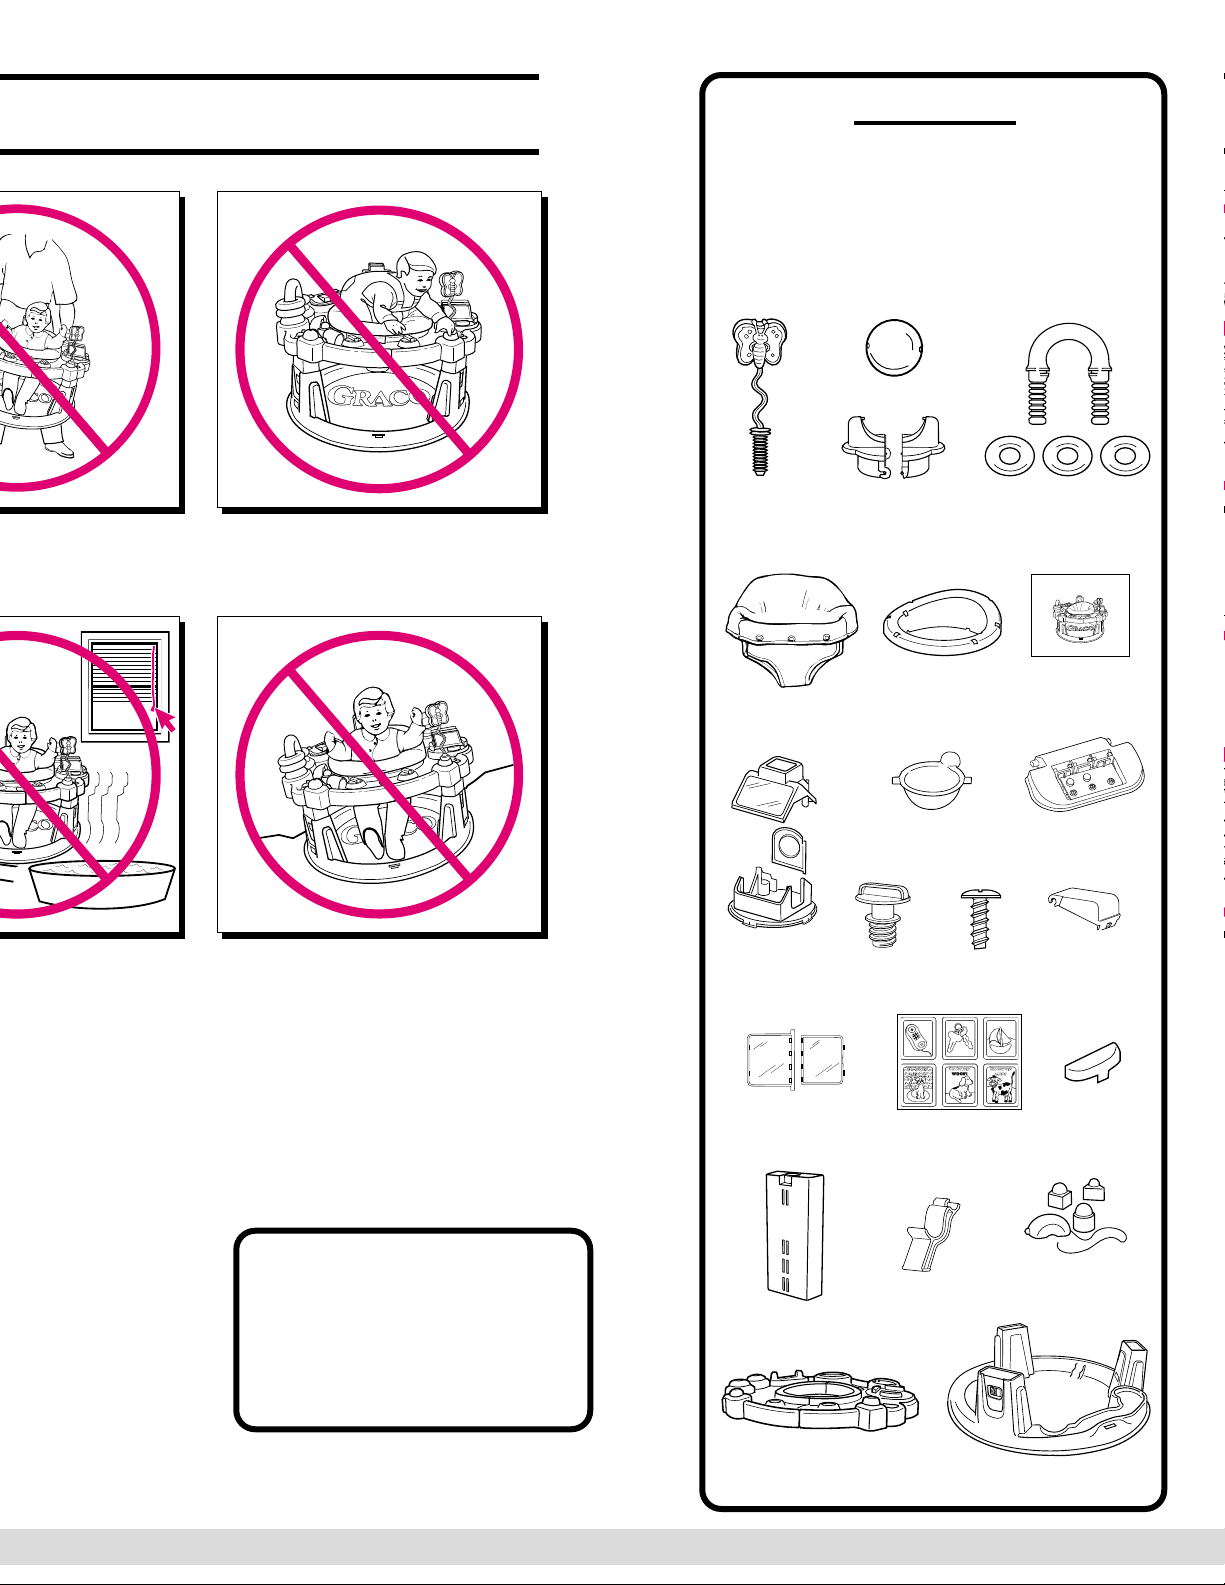
PARTS LIST
CHECK that you have all the parts listed below
BEFORE assembling. If any parts are missing,
call Customer Service at 1-800-345-4109
or visit our Internet website, www.gracobaby.com.
THIS PRODUCT REQUIRES ADULT ASSEMBLY
.
Tool required: Phillips screwdriver
Butterfly
wand
Loop and rings
Seat
Ball holder
(2 parts)
Cup
Pages (3 large,
3 small halves)
Do not use product in closed-tray
infant mode with a child who can tip
over or climb out of product.
To avoid tipovers, place product on
flat, level floor/ground. Adjust legs to
same height so that the tray is level
before placing child in product.
Do not use in open-tray toddler mode
unless legs are set to lowest position.
Screw (8)
Music lid with
circuit board
Ball
Bolt (5)
Stand (3)
Music
button (3)
House
(3 parts)
Seat ring
Phone and
people toys
Page
retainer
FOR ADDITIONAL IMPORTANT
INFORMATION, please see the
Helpful Hints and Care and
Maintenance sections in these
instructions.
Toddler Mode
instructions
Page artwork
Upper leg (3)
Tray (2 parts)
Base
Entertainer®Toddler
Conversion Instructions
Model 4650
INFANT
Unfold instruction sheet completely and review steps
before beginning conversion of your Entertainer
SETUP
®
.
Page 3
6 7 85
651-3-00 651699
To Assemble Your Convertible
Entertainer®Activity Center
Step 1.
Position three stands under
base as shown, and push
down on base until stands
snap in place.
Stands can fold flat under
base to permit rocking.
Step 2.
With notch at bottom of
upper leg as shown, push
in the button on front of
each lower leg and insert
an upper leg section until it
snaps into one of three
heights for infant use. Set all
three legs to same height.
Step 3.
Turn two halves of tray
upside down. Put the end
of tray with an A printed
on it inside the end with a
B. Fasten ends A and
B to each other with four
Phillips head screws. Do
not overtighten screws.
Snap the other two ends of
tray together so it forms a
closed circle in the center
of the tray.
Step 4.
Turn tray right side up.
Push five large plastic bolts
into the five holes as shown
until they snap in place.
Step 5.
Place tray on top of legs so
that snapped ends of tray
are in front of the Graco
®
name on the base, and
bolt in circle at back of tray
goes into back leg on the
base. Align other two bolts
with holes in the legs.
Fasten all three bolts.
Check that bolts are secure
by pulling up on tray.
Step 6.
Place folded Toddler Unit
Conversion Instructions into
clear plastic seat pocket.
Step 7.
Put cloth seat inside the seat
ring as shown. Toddler Unit
instructions must face high
side of seat ring as shown.
Attach seat to the seat ring
by wrapping top edge of seat
around seat ring. Under the
seat ring, snap the grommets
onto the pegs as shown.
Tuck the seam on both sides
of the cloth seat between the
outside of the ring and the
plastic partitions as shown.
Check that edge of cloth
seat does not cover
wheels or partitions.
Step 8.
Turn the seat over and push
seat down into the seat ring.
Step 9.
Snap the seat ring onto the
tray. Push down all around
seat to make sure it is
completely snapped onto the
tray. Seat must turn freely.
Toddler Unit
instructions
Grommet
Snapped
ends in front
Bolt in
circle
Back leg
High
side of
ring
Seam behind
partition
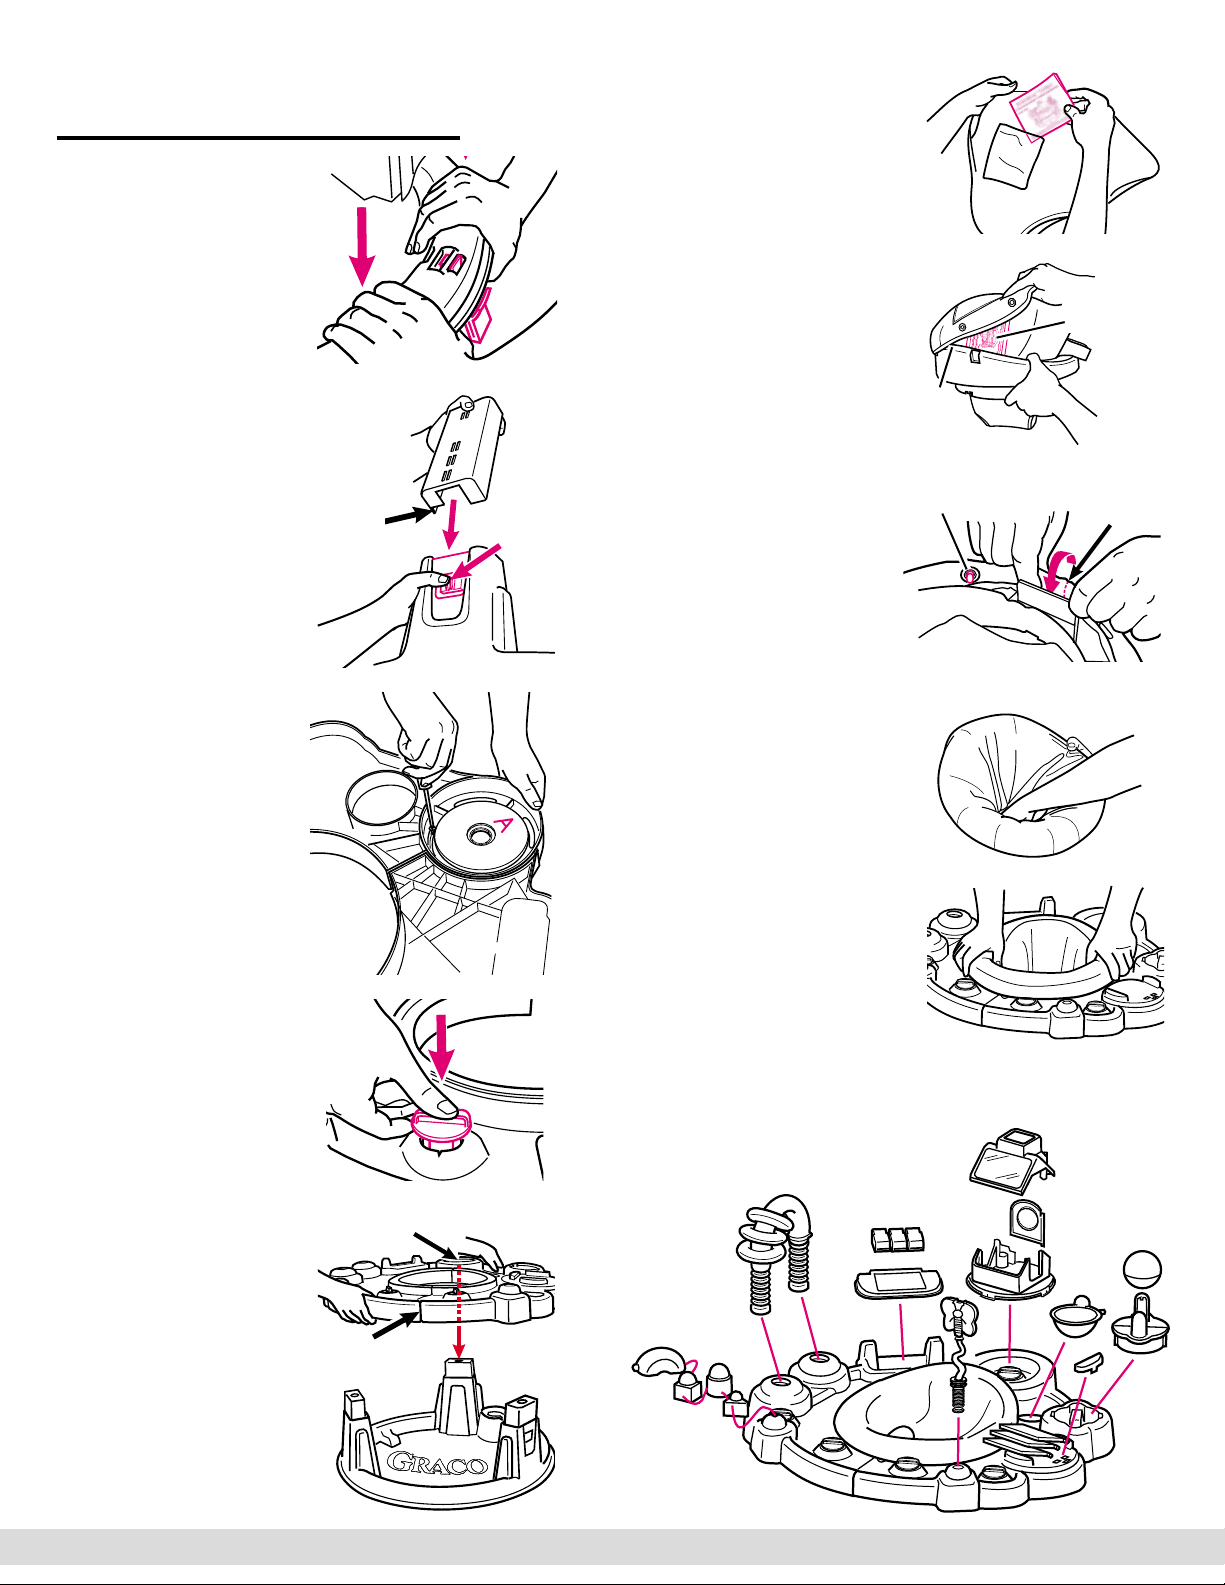
Step 10.
Refer to illustration below to attach
toys to tray. Detailed assembly
instructions follow.
Notch
PUSH
Page 4

1. Thread cord attached to
dog phone through the two
holes found on each of the
three people figures. Insert
end of cord into small hole
on tray as shown.
Tie a knot under the tray to
hold cord in place.
2. Push three rings past the
bumps onto the ring loop,
and insert ends of ring loop
into the two holes in tray as
shown. Push down firmly
until loop snaps in place.
3. Remove and immediately
discard the plastic pull tab
on the printed circuit board.
Attach three music buttons
over circuit board in music
lid. For each button, first put
front end of button into lid so
tooth fits into slot in lid, then
push down back of button so
it snaps onto pegs. Check
that both front and back of
each button are snapped
in place.
Snap pegs of lid into holes
at both sides of the storage
compartment in tray.
4. Assemble the house. Put
lower pivot pin of door into
hole in house base. Align
roof over base so upper pin
of door fits into hole at side
of doorway. Holding pieces
together, turn assembly
upside down, locate the four
screw holes, and fasten with
four screws. Do not overtighten screws.
After house is assembled,
align house over round ends
of tray halves so mirror faces
center of tray. Insert base of
house into the four slots, and
turn clockwise until house is
latched to tray.
5. Align cup over largest hole
in tray so cup handle is next
to the house. Snap pins of
cup into holes in tray.
6. Snap together the two
halves of ball holder as
shown. Spread ends apart
and attach ball by inserting
two pins on ball holder into
holes in ball.
Holding ball/ball holder
assembly together, push
holder down into tray as
shown until it snaps in place.
7. Cut out the double-sided
pictures from included artwork,
or use your own pictures.
Insert a picture into smaller
half of each clear plastic
page, then snap small and
large halves together.
Insert one peg of each page
into one of the three holes in
tray as shown. Insert other
peg into corresponding hole
in plastic page retainer. Snap
retainer into slots in tray.
To open pages to replace
pictures, insert a coin into
the center slot and pry it
open as shown.
8. Push end of butterfly
wand firmly into remaining
hole on tray as shown until it
snaps in place.
Bumps
Page 5

10 119
651-3-00 651699
To Adjust the Seat Height
Do not adjust height while child is in
activity center.
Step 1.
Press in the buttons on each
leg to adjust seat to desired
height.
For your
childs safety, all three legs
must be set to the same
height. Tray must be level.
Step 2.
Turn house/mirror toy so that rib
on base of house (see closeup)
lines up with arrow on tray. Lift
house to remove.
Step 3.
Unscrew the three large plastic
bolts attaching tray to legs. Do
not try to pull bolts out of tray.
Remove tray from legs.
Step 4.
Underneath tray, pull back finger latch where the two halves
of tray meet. While holding latch, lift right side of tray up to
release it from left half. Pull tray open.
Step 5.
For each leg: (1) push and hold in the leg button; (2) push
leg down to the lowest position. (Top of inner leg section
must be slightly below top edge of outer leg.)
Tipping or fall hazard. Do not use in
toddler mode unless legs are set to lowest position.
Step 6.
Place open tray over base so
Graco
®
name is seen through
opening in trays as shown. Align
bolts over holes in legs.
Starting with bolt under the house,
partially tighten all bolts (to allow
alignment), then fully tighten.
Be sure bolts are tight. Pull up tray at each bolt to make
sure it is attached to leg.
Tray at proper height
Step 2.
After adjusting height of the seat, CHECK that your
childs feet can rest completely on the floor of your
activity center
. Tray should not be too high or too low.
Remove child and readjust height if necessary.
TRAY TOO HIGH TRAY TOO LOW
To Convert Your Convertible
Entertainer®for Toddler Use
When your child is able to walk, you can convert your
Entertainer
®
into the toddler mode. This open tray
arrangement, along with changing the toys to allow new
activities, can give your child a whole new play experience.
A. Change base and tray
Step 1.
From top of seat, reach
through the leg openings as
shown and pull plastic tabs
(also found at back and front
of seat) slightly inward while
lifting seat to remove.
Lift
Legs must be
at this height!
1. Push in
2. Push
down
Partially tighten
this bolt first
Page 6

Step 5.
Ball holder: Squeeze latches under tray to release
ball holder.
Pull ball holder out of tray. Open ball holder to
remove ball. Put ball into cup. Turn ball holder
upside down and reinsert into tray as a cup holder.
Push it all the way down onto tray.
Step 6.
Wand: Pull up on handle of butterfly wand to
detach it from tray for toddler to play with. Do not
pull butterfly off handle.
Step 7.
Seat: Store in a safe place, not exposed to sun or
heat, in case you wish to convert back to an infant
setup in the future.
Your Entertainer
®
should now look like the open-tray
toddler mode below.
B. Convert toys for toddler use
Step 1.
House: Replace on tray with
mirror facing outside of unit. Turn
base counterclockwise to fasten
it to tray.
Step 2.
Shape toys: Untie string under
tray and remove them. (Shapes
fit into different openings in
house.) Replace string, attached
only to phone, and retie again
under tray.
Step 3.
Ring loop: Remove by pulling ends slightly apart under
tray and pushing loop up. Remove rings. Turn loop upside
down. From underside of tray, insert ends of loop back into
holes and push up until peg ends snap in place. Put rings
onto pegs.
Step 4.
Cup: Reach underneath tray, wrap fingers around cup, and
squeeze toward you with both hands to release pivot pin of
cup from hole in tray. Turn cup around so handle is away
from house as shown, and reattach to tray. Cup now can
pivot to drop ball onto ball track beneath.
Mirror faces
outside of unit
Pull pin out
12
Page 7

13
651-3-00 651699
Replacement Parts
Instructions for ordering activity center parts:
Complete form below. Your model number MUST be
included on the form to ensure proper replacement
parts. Your model number can be found on a
sticker on the bottom of the tray. Payment must
accompany your order.
Model No. (required)
Serial No. (required)
SHIP TO:
Name
Address
City, State, Zip
( )
Telephone
Check enclosed
(payable to Graco Childrens
Products Inc.)
Charge to credit card:
Visa
MasterCard
Discover
Account #:
Expiration date:
Signature:
Dog phone & people
Loop & rings
Music lid & buttons
House with mirror
Cups
Ball & ball holder
Pages & page retainer
Butterfly wand
Stands
Cloth seat
Plastic bolts & screws
Seat ring and bearings
Complete tray unit
Complete base unit
Parts List:
Dog phone and people toys ......................
Loop and rings ..........................................
Music lid and buttons ................................
House with mirror ......................................
Cup ...........................................................
Ball and ball holder ...................................
Pages (set of 3) and page retainer ............
Butterfly wand ...........................................
Stands (set of 3) ........................................
Cloth seat ..................................................
Plastic bolts (set of 5) and screws ............
Seat ring and bearings ..............................
Complete tray unit (no toys) ......................
Complete base unit (no toys) ....................
Price:*
$ 5.00
$ 5.00
$ 7.00
$ 6.00
$ 5.00
$ 5.00
$ 6.00
$ 5.00
$ 5.00/set, n/c for 1
$ 15.00
$ 5.00
$ 10.00
$ 25.00
$ 20.00
* Prices subject to change
without notice.
CARE AND MAINTENANCE
FROM TIME TO TIME CHECK YOUR ACTIVITY CENTER
for loose screws, worn parts, torn material or stitching.
Replace or repair the parts as needed. Use only Graco
®
replacement parts.
REMOVABLE CLOTH SEAT may be machine washed in
lukewarm water on delicate cycle and drip-dried. DO NOT
MACHINE DRY. NO BLEACH.
TO CLEAN FRAME, use only household soap or detergent
and warm water. NO BLEACH. Use only a damp cloth to
clean the music buttons.
IF YOU NEED HELP
If you have any questions or if you need any part
not listed, please call toll-free:
1-800-345-4109
or visit our Internet website, www.gracobaby.com.
Return the form below with payment to:
GRACO CHILDRENS PRODUCTS INC.
CUSTOMER SERVICE DEPARTMENT
P.O. BOX 100, MAIN STREET
ELVERSON, PA 19520
14
Subtotal:
Shipping
& handling*: $5.00
6% sales tax
(PA only):
Total:
*$15.00 outside the continental U.S.
 Loading...