

Page 1

Repair
24W996
ti25242a
24B748
24W997
24W995
GH™130/200/230/300 and
DutyMax GH/EH™230/300 Displacement Pump
For professional use only.
Not approved for use in explosive atmosphere or hazardous locations.
For portable airless spraying of architectural paints and coatings.
Models: 24B748, 24W995, 24W996, 24W997, 24W998, 24W999, 24X001
Important Safety Instructions
Read all warnings and instructions in this manual and related manuals.
Be familiar with the controls and the proper usage of the equipment.
Save these instructions.
334654A
EN
Use only genuine Graco replacement parts.
The use of non-Graco replacement parts may void warranty.
24W998
24X00124W999
Page 2

Table of Contents
Table of Contents
Warnings . . . . . . . . . . . . . . . . . . . . . . . . . . . . . . . . . . . . . . . . . . . . . . . . . 3
Repair . . . . . . . . . . . . . . . . . . . . . . . . . . . . . . . . . . . . . . . . . . . . . . . . . . . . 4
Trigger Lock . . . . . . . . . . . . . . . . . . . . . . . . . . . . . . . . . . . . . . . . . . . . 4
Pressure Relief Procedure . . . . . . . . . . . . . . . . . . . . . . . . . . . . . . . . . 4
Disassemble Pump . . . . . . . . . . . . . . . . . . . . . . . . . . . . . . . . . . . . . . 6
Assemble Pump . . . . . . . . . . . . . . . . . . . . . . . . . . . . . . . . . . . . . . . . . 9
Throat Packing Adjustment . . . . . . . . . . . . . . . . . . . . . . . . . . . 12
Notes . . . . . . . . . . . . . . . . . . . . . . . . . . . . . . . . . . . . . . . . . . . . . . . . . . . 13
Parts . . . . . . . . . . . . . . . . . . . . . . . . . . . . . . . . . . . . . . . . . . . . . . . . . . . . 14
Pump 24B748 . . . . . . . . . . . . . . . . . . . . . . . . . . . . . . . . . . . . . . . . . 14
Parts List . . . . . . . . . . . . . . . . . . . . . . . . . . . . . . . . . . . . . . . . . . . . . 15
Parts . . . . . . . . . . . . . . . . . . . . . . . . . . . . . . . . . . . . . . . . . . . . . . . . . . . . 16
Pump 24W995 . . . . . . . . . . . . . . . . . . . . . . . . . . . . . . . . . . . . . . . . . 16
Parts List . . . . . . . . . . . . . . . . . . . . . . . . . . . . . . . . . . . . . . . . . . . . . 17
Parts . . . . . . . . . . . . . . . . . . . . . . . . . . . . . . . . . . . . . . . . . . . . . . . . . . . . 18
Pump 24W996 . . . . . . . . . . . . . . . . . . . . . . . . . . . . . . . . . . . . . . . . . 18
Parts List . . . . . . . . . . . . . . . . . . . . . . . . . . . . . . . . . . . . . . . . . . . . . 19
Parts . . . . . . . . . . . . . . . . . . . . . . . . . . . . . . . . . . . . . . . . . . . . . . . . . . . . 20
Pump 24W997 . . . . . . . . . . . . . . . . . . . . . . . . . . . . . . . . . . . . . . . . . 20
Parts List . . . . . . . . . . . . . . . . . . . . . . . . . . . . . . . . . . . . . . . . . . . . . 21
Parts . . . . . . . . . . . . . . . . . . . . . . . . . . . . . . . . . . . . . . . . . . . . . . . . . . . . 22
Pump 24W998 . . . . . . . . . . . . . . . . . . . . . . . . . . . . . . . . . . . . . . . . . 22
Parts List . . . . . . . . . . . . . . . . . . . . . . . . . . . . . . . . . . . . . . . . . . . . . 23
Parts . . . . . . . . . . . . . . . . . . . . . . . . . . . . . . . . . . . . . . . . . . . . . . . . . . . . 24
Pump 24W999 . . . . . . . . . . . . . . . . . . . . . . . . . . . . . . . . . . . . . . . . . 24
Parts List . . . . . . . . . . . . . . . . . . . . . . . . . . . . . . . . . . . . . . . . . . . . . 25
Parts . . . . . . . . . . . . . . . . . . . . . . . . . . . . . . . . . . . . . . . . . . . . . . . . . . . . 26
Pump 24X001 . . . . . . . . . . . . . . . . . . . . . . . . . . . . . . . . . . . . . . . . . 26
Parts List . . . . . . . . . . . . . . . . . . . . . . . . . . . . . . . . . . . . . . . . . . . . . 27
Technical Specifications . . . . . . . . . . . . . . . . . . . . . . . . . . . . . . . . . . . 28
Graco Standard Warranty . . . . . . . . . . . . . . . . . . . . . . . . . . . . . . . . . . 29
Graco Information . . . . . . . . . . . . . . . . . . . . . . . . . . . . . . . . . . . . . . . . . 30
2 334654A
Page 3
Warnings
Warnings
The following warnings are for the setup, use, grounding, maintenance, and repair of this
equipment. The exclamation point symbol alerts you to a general warning and the hazard
symbols refer to procedure-specific risks. When these symbols appear in the body of this
manual or on warning labels, refer back to these Warnings. Product-specific hazard symbols
and warnings not covered in this section may appear throughout the body of this manual
where applicable.
SKIN INJECTION HAZARD
High-pressure spray is able to inject toxins into the body and cause serious bodily injury. In the
event that injection occurs, get immediate surgical treatment.
• Do not aim the gun at, or spray any person or animal.
• Keep hands and other body parts away from the discharge. For example, do not try to stop
leaks with any part of the body.
• Always use the nozzle tip guard. Do not spray without nozzle tip guard in place.
• Use Graco nozzle tips.
• Use caution when cleaning and changing nozzle tips. In the case where the nozzle tip clogs
while spraying, follow the Pressure Relief Procedure for turning off the unit and relieving
the pressure before removing the nozzle tip to clean.
• Equipment maintains pressure after power is shut off. Do not leave the equipment
energized or under pressure while unattended. Follow the Pressure Relief Procedure
when the equipment is unattended or not in use, and before servicing, cleaning, or
removing parts.
• Check hoses and parts for signs of damage. Replace any damaged hoses or parts.
• This system is capable of producing 3300 psi. Use Graco replacement parts or accessories
that are rated a minimum of 3300 psi.
• Always engage the trigger lock when not spraying. Verify the trigger lock is functioning
properly.
• Verify that all connections are secure before operating the unit.
• Know how to stop the unit and bleed pressure quickly. Be thoroughly familiar with the
controls.
PRESSURIZED ALUMINUM PARTS HAZARD
Use of fluids that are incompatible with aluminum in pressurized equipment can cause serious
chemical reaction and equipment rupture. Failure to follow this warning can result in death,
serious injury, or property damage.
• Do not use 1,1,1-trichloroethane, methylene chloride, other halogenated hydrocarbon
solvents or fluids containing such solvents.
• Do not use chlorine bleach.
• Many other fluids may contain chemicals that can react with aluminum. Contact your
material supplier for compatibility.
PERSONAL PROTECTIVE EQUIPMENT
Wear appropriate protective equipment when in the work area to help prevent serious injury,
including eye injury, hearing loss, inhalation of toxic fumes, and burns. This protective
equipment includes but is not limited to:
• Protective eye wear, and hearing protection.
• Respirators, protective clothing, and gloves as recommended by the fluid and solvent
manufacturer.
CALIFORNIA PROPOSITION 65
This product contains a chemical known to the State of California to cause cancer, birth defects
or other reproductive harm. Wash hands after handling.
334654A 3
Page 4

Repair
ti24612a
ti24851a
OI
I
O
t
ti18812a
Repair
Trigger Lock
Always engage the trigger lock when sprayer
is stopped to prevent the gun from being
triggered accidentally by hand or if dropped
or bumped.
1. Engage trigger lock.
2. If applicable, turn electric motor ON/OFF
switch to OFF position. Wait 7 seconds
for power to dissipate.
3. Unplug power cord or shut engine off.
Pressure Relief Procedure
This equipment stays pressurized until
pressure is manually relieved. To help
prevent serious injury from pressurized
fluid, such as skin injection, splashed fluid
and moving parts, follow the Pressure
Relief Procedure whenever sprayer is
stopped and before sprayer is cleaned or
checked, and before equipment is
serviced.
4 334654A
ti7529a
ti24853a
Page 5

Repair
ti22700a
ti24608a
4. Disengage trigger lock.
5. Hold a metal part of the gun firmly to a
grounded metal pail. Trigger the gun to
relieve pressure.
Solvent and oil-based fluids: follow
local code. Use only conductive metal
pails, placed on a grounded surface
such as concrete.
Do not place pail on a non-conductive
surface such as paper or cardboard
which interrupts grounding continuity.
6. Engage trigger lock.
7. Open any fluid drain valves in system.
Leave drain valves open until ready to
spray again.
ti24585a
334654A 5
Page 6
Repair
ti25168a
ti25169a
ti25170a
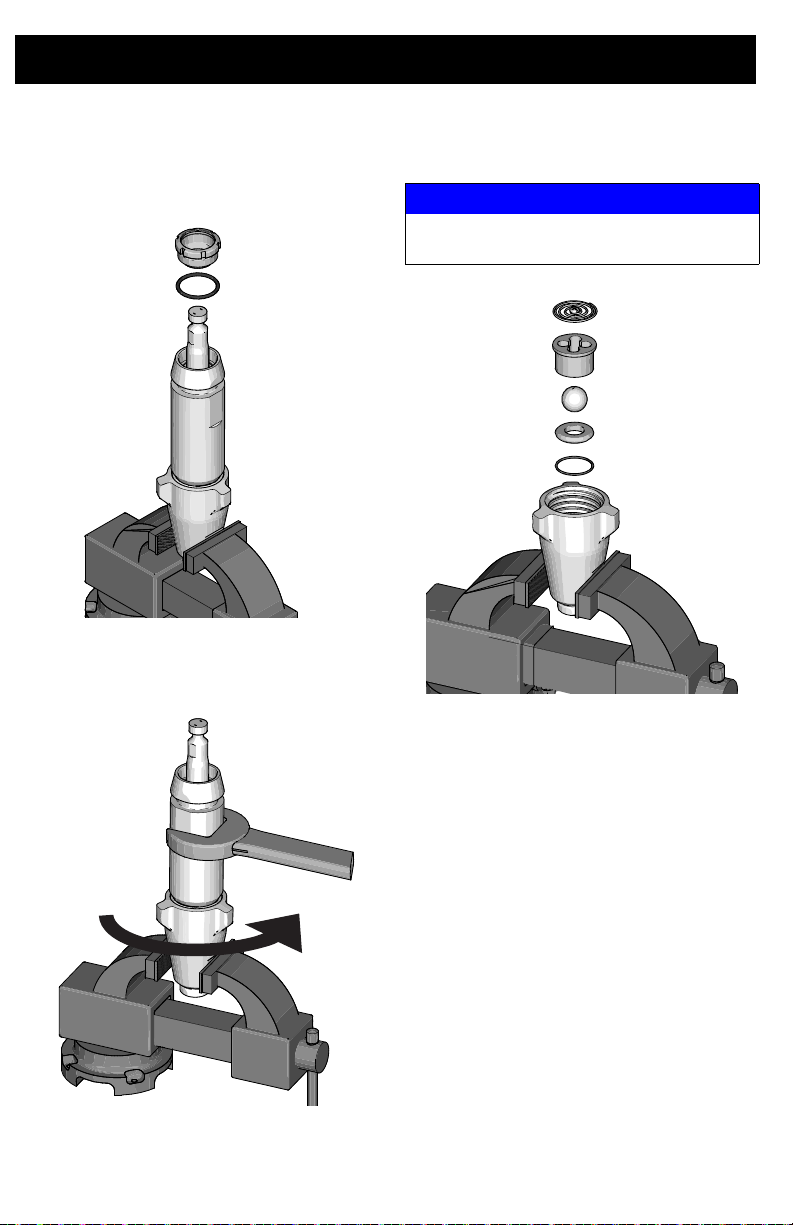
Disassemble Pump
1. Remove packing nut and throat
adjustment spacer.
2. Unscrew cylinder from intake valve.
3. Disassemble intake valve. Clean and
inspect. O-ring may require a pick for
removal.
NOTICE
If using a pick to remove the O-ring use care
to avoid damage to the machined surfaces.
6 334654A
Page 7

4. Tap piston rod out of cylinder with a
ti25171a
ti8849a
hammer or flip over and tap piston rod
out against a bench.
5. Remove piston rod from sleeve.
Repair
Do not clean or wipe the piston valve
threads. Cleaning the piston valve threads
could destroy the special sealing patch and
cause the piston valve to come loose
during operation, causing a pump burst
and possible serious bodily injury.
6. Unscrew piston valve from piston rod.
334654A 7
Page 8

Repair
ti25172a
ti25173a
7. Clean and inspect parts. (The piston has
a special thread locking/sealing patch.
Do not remove the patch. The patch
allows for disassembly/assembly
procedures before it is necessary to
apply thread sealant to the threads. On
fifth assembly apply thread sealant to
threads.
8. Remove and discard throat packing and
glands from the cylinder.
8 334654A
Page 9

Assemble Pump
Leather
Packings
Blue
Brown
Blue
ti25174a
Leather
Packings
ti25175a
ti25176a
ti24892a
1. If applicable, soak leather packings in
SAE 30W oil for one hour before
assembly.
Repair
2. Install ball in piston rod. Apply thread
sealant to piston valve threads; ensure
that none gets on the ball.
3. Torque to 55 ± 3 ft-lb (75 ± 4 N•m).
334654A 9
Page 10

Repair
Leather
s
ti25178a
ti25179a
ti25180a
4. Assemble leather throat packings
soaked earlier.
Packing
ti25175a
5. Loosely install packing nut with o-ring
onto cylinder.
6. Install o-rings inside cylinder and on
sleeve. Slide sleeve into bottom of
cylinder. Replace o-ring if necessary.
7. Apply liberal amounts of grease or oil to
piston packings.
8. Grease top inch or two of piston rod that
will go through the cylinder throat
packings. Gently guide displacement
rod up through throat packings. Tap
10 334654A
bottom of piston valve as necessary with
a leather or plastic hammer.
Page 11

Repair
ti25181a
ti25182a
ti25183a
9. Grease o-ring and place on outside
diameter ring groove.
10. Clean seat thoroughly. Reassemble
intake valve with a seat, ball, and new
o-ring. Seat may be flipped over and
used on other side.
11. For GH130 torque foot valve to 110 ± 5
ft-lb (149 ± 7 N•m). For GH200/230/300
torque foot valve to 200 ± 15 ft-lb (271 ±
20 N•m).
334654A 11
Page 12

Repair
ti25184a
ti25185a
ti25186a
12. For GH130 torque packing nut to 125 ±
10 in-lbs (14 ± 1 N•m). All other GH
models torque packing nut to 140 ± 10
in-lbs (16 ± 1 N•m).
13. Storage
Throat Packing Adjustment
When pump packings begin to leak after
much use, perform Pressure Relief
Procedure, page 4, and tighten packing nut
down until leakage stops or lessens. This
allows approximately 100 gallons of
additional operation before a repacking is
required. Packing nut can be tightened
without o-ring removal.
12 334654A
Page 13

Notes
Notes
334654A 13
Page 14

Parts
1
2
20
4
5
6
7
8
9
10
24
12
14
14
16
17
18
19
26
21
27
23
22
24
3
ti25243a
12
13
28
8
2
4
1
3
1
2
3
4
Parts
Pump 24B748
Torque to 110 ± 5 ft/lbs
(149 ± 5 N•m)
Torque to 125 ± 10 in/lbs
(14 ± 1 N•m)
Torque to 55 ± 3 ft/lbs
(75 ± 4 N•m)
Soak in SAE 30W oil for 1 hour
prior to assembly
14 334654A
Page 15

Parts List
Ref. Part Description Qty.
1 288727 CYLINDER, pump 1
2 248210 SLEEVE, cylinder,
chrome
3 195894 HOUSING, intake 1
4+ 196866 SEAT, carbide 1
5+ 108526 PACKING, o-ring, ptfe 1
6+ 102972 BALL, metallic 1
7 193027 GUIDE, ball 1
8* 107098 PACKING, o-ring 2
9* 156633 PACKING, o-ring 1
10 288479 ROD, piston 1
12* 193125 PACKING, vee 8
13* 15E329 PACKING, vee 3
14* 183185 GLAND, packing,
female
16* 118504 WIPER, piston 1
17* 15J382 PACKING, vee 3
18* 24U983 VALVE, piston 1
19* 101947 BALL, bearing 1
20 193032 NUT, packing 1
21 C20987 PACKING, o-ring 1
22* 183171 PLUG 1
23* 15C998 WASHER, backup 1
24* 183178 GLAND, packing, male 2
26 15J141 PIN, pump 1
27 15Y463 FITTING, bushing 1
28 196178 ADAPTER, nipple 1
Parts
1
2
* Included in Repair Kit 288471
+ Included in Repair Kit 244199
334654A 15
Page 16

Parts
1
2
3
4
5
6
7
9
10
11
12
13
8
14
16
13
18
19
20
21
22
23
24
8
25
15
28
12
ti25244a
26
29
30
1
2
4
4
3
1
234
Parts
Pump 24W995
Torque to 55 ± 3 ft/lbs
(75 ± 4 N•m)
Torque to 200 ± 15 ft/lbs
(271 ± 20 N•m)
Torque to 140 ± 10 in/lbs
(16 ± 1 N•m)
Soak in SAE 30W oil for 1 hour
prior to assembly
16 334654A
Page 17

Parts
Parts List
Ref. Part Description Qty.
1 245413 CYLINDER, pump 1
21
248979 SLEEVE, cylinder,
249121 SLEEVE, cylinder,
3 15E655 HOUSING, intake 1
4+ 193395 SEAT, carbide 1
5*+ 107098 PACKING, o-ring 1
6*+ 107167 BALL, sst 1
7 198505 GUIDE, ball 1
8* 108822 PACKING, o-ring, ptfe 2
9* 160325 PACKING, o-ring 1
10 1
249000 ROD, piston
249119 ROD, piston, MaxLife
11* 189585 GLAND, packing, male 1
12* 198701 PACKING, vee 8
13* 198718 PACKING, vee 6
14* 15G657 GLAND, female 1
15* 189588 GLAND, packing,
16* 119636 WIPER, piston 1
18 287388 VALVE, piston 1
19* 107203 BALL, valve, check 1
20 15J792 NUT, packing 1
21* 157195 PACKING, o-ring 1
22* 112590 PLUG, throat seal 1
23* 15J800 WASHER, back-up 1
24* 15G658 GLAND, male 1
25 245256 SPRING, intake ball 1
26 197443 PIN, pump 1
28 196178 ADAPTER, nipple 1
29 116551 RING, retaining 1
30 119566 WASHER 1
chrome
MaxLife
1
female
* Included in Repair Kit 17D601
+ Included in Repair Kit 240918
334654A 17
Page 18

Parts
1
2
3
4
5
6
7
9
10
11
12
13
8
14
16
17
18
19
20
21
22
23
24
8
25
15
28
12
ti25245a
30
29
3
4
2
1
1
234
Parts
Pump 24W996
Torque to 55 ± 3 ft/lbs
(75 ± 4 N•m)
Torque to 200 ± 15 ft/lbs
(271 ± 20 N•m)
Torque to 140 ± 40 in/lbs
(16 ± 1 N•m)
Soak in SAE 30W oil for 1 hour
prior to assembly
18 334654A
Page 19

Parts List
Ref. Part Description Qty.
1 17D122 CYLINDER, pump 1
2 249121 SLEEVE, cylinder 1
3 15E655 HOUSING, intake 1
4+ 193395 SEAT, carbide 1
5*+ 107098 PACKING, o-ring 1
6*+ 107167 BALL, sst 1
7 198505 GUIDE, ball 1
8* 108822 PACKING, o-ring, ptfe 2
9* 160325 PACKING, o-ring 1
10 288469 ROD, piston 1
11* 189585 GLAND, packing, male 1
12* 198701 PACKING, vee 8
13* 198718 PACKING, vee 3
14* 15G657 GLAND, female 1
15* 189588 GLAND, packing,
female
16* 119636 WIPER, piston 1
17* 15F875 PACKING, vee 3
18 287388 VALVE, piston 1
19* 107203 BALL, valve, check 1
20 15J792 NUT, packing 1
21* 157195 PACKING, o-ring 1
22* 112590 PLUG, throat seal 1
23* 15J800 WASHER, back-up 1
24* 15G658 GLAND, male 1
25 245256 SPRING, intake ball 1
28 15J413 FITTING, pump 1
30 119566 WASHER 1
Parts
1
* Included in Repair Kit 287813
+ Included in Repair Kit 240918
NOTE: For Chromex Pump Kit order 24X018
334654A 19
Page 20

Parts
3
1
ti25246a
1
2
3
4
6
7
9
10
12
13
5
14
16
11
18
19
20
21
22
23
24
8
25
15
12
8
13
28
26
30
29
3
4
2
4
1
1
234
Parts
Pump 24W997
Torque to 55 ± 3 ft/lbs
(75 ± 4 N•m)
Torque to 200 ± 15 ft/lbs
(271 ± 20 N•m)
Torque to 140 ± 10 in/lbs
(16 ± 1 N•m)
Soak in SAE 30W oil for 1 hour
prior to assembly
20 334654A
Page 21

Parts
Parts List
Ref. Part Description Qty.
1 245932 CYLINDER, pump 1
21
248980 SLEEVE, cylinder,
287817 SLEEVE, cylinder,
3 15E655 HOUSING, intake 1
4+ 193395 SEAT, carbide 1
5*+ 107098 PACKING, o-ring 1
6*+ 107167 BALL, sst 1
7 198505 GUIDE, ball 1
8* 108822 PACKING, o-ring, ptfe 2
9* 160325 PACKING, o-ring 1
10 1
249001 ROD, piston
287816 ROD, piston, MaxLife
11* 189585 GLAND, packing, male 1
12* 198701 PACKING, vee 8
13* 198718 PACKING, vee 6
14* 15G657 GLAND, female 1
15* 189588 GLAND, packing,
16* 119636 WIPER, piston 1
18 287388 VALVE, piston 1
19* 107203 BALL, valve, check 1
20 15J792 NUT, packing 1
21* 157195 PACKING, o-ring 1
22* 112590 PLUG, throat seal 1
23* 15J800 WASHER, back-up 1
24* 15G658 GLAND, male 1
25 245256 SPRING, intake ball 1
26 197443 PIN, pump 1
28 196178 ADAPTER, nipple 1
29 116551 RING, retaining 1
30 119566 WASHER 1
chrome
MaxLife
1
female
* Included in Repair Kit 17D601
+ Included in Repair Kit 240918
334654A 21
Page 22

Parts
1
2
3
4
5
6
7
9
10
11
12
13
8
14
16
17
18
19
20
21
22
23
24
8
25
15
28
ti25247a
12
30
3
4
2
1
1
2
3
4
Parts
Pump 24W998
Torque to 55 ± 3 ft/lbs
(75 ± 4 N•m)
Torque to 200 ± 15 ft/lbs
(271 ± 20 N•m)
Torque to 140 ± 10 in/lbs
(16 ± 1 N•m)
Soak in SAE 30W oil for 1 hour
prior to assembly
22 334654A
Page 23

Parts List
Ref. Part Description Qty.
1 17D123 CYLINDER, pump 1
2 287817 SLEEVE, cylinder,
chrome
3 15E655 HOUSING, intake 1
4+ 193395 SEAT, carbide 1
5*+ 107098 PACKING, o-ring 1
6*+ 107167 BALL, sst 1
7 198505 GUIDE, ball 1
8* 108822 PACKING, o-ring, ptfe 2
9* 160325 PACKING, o-ring 1
10 288470 ROD, piston 1
11* 189585 GLAND, packing, male 1
12* 198701 PACKING, vee 8
13* 198718 PACKING, vee 3
14* 15G657 GLAND, female 1
15* 189588 GLAND, packing,
female
16* 119636 WIPER, piston 1
17* 15F875 PACKING, vee 3
18 287388 VALVE, piston 1
19* 107203 BALL, valve, check 1
20 15J792 NUT, packing 1
21* 157195 PACKING, o-ring 1
22* 112590 PLUG, throat seal 1
23* 15J800 WASHER, back-up 1
24* 15G658 GLAND, male 1
25 245256 SPRING, intake ball 1
28 15J413 FITTING, pump 1
30 119566 WASHER 1
Parts
1
1
* Included in Repair Kit 287813
+ Included in Repair Kit 240918
NOTE: For Chromex Pump Replacement Kit
order 24X019
334654A 23
Page 24

Parts
1
2
3
4
5
6
9
11
12
13
14
15
16
29
18
19
20
21
22
23
24
8
10
7
ti25248a
26
12
13
8
25
3
4
4
2
1
1
234
Parts
Pump 24W999
Torque to 55 ± 3 ft/lbs
(75 ± 4 N•m)
Torque to 200 ± 15 ft/lbs
(271 ± 20 N•m)
Torque to 140 ± 10 in/lbs
(16 ± 1 N•m)
Soak in SAE 30W oil for 1 hour
prior to assembly
24 334654A
Page 25

Parts
Parts List
Ref. Part Description Qty.
1 17D124 CYLINDER, pump 1
21
248980 SLEEVE, cylinder,
287817 SLEEVE, cylinder,
3 15A303 HOUSING, intake 1
4+ 15J038 SEAT, carbide 1
5*+ 107098 PACKING, o-ring 1
6*+ 118602 BALL, ceramic 1
7 193391 GUIDE, ball 1
8* 108822 PACKING, o-ring, ptfe 2
9* 160325 PACKING, o-ring 1
10 17D121 ROD, piston 1
11* 189585 GLAND, packing, male 1
12* 198701 PACKING, vee 8
13* 198718 PACKING, vee 6
14* 15G657 GLAND, female 1
15* 189588 GLAND, packing,
16* 119636 WIPER, piston 1
18 287388 VALVE, piston 1
19* 118601 BALL, ceramic 1
20 15J792 NUT, packing 1
21* 157195 PACKING, o-ring 1
22* 112590 PLUG, throat seal 1
23* 15F183 WASHER, back-up 1
24* 15G658 GLAND, male 1
25+ 24E027 SPRING, intake ball 1
26 197443 PIN, pump 1
29 116551 RING, retaining 1
chrome
MaxLife
1
female
* Included in Repair Kit 24N012
+ Included in Repair Kit 24N013
334654A 25
Page 26

Parts
1
2
3
4
5
6
9
11
12
13
14
15
16
17
18
19
20
21
22
23
24
8
10
7
ti25249a
25
8
12
3
4
1
2
1
234
Parts
Pump 24X001
Torque to 55 ± 3 ft/lbs
(75 ± 4 N•m)
Torque to 200 ± 10 ft/lbs
(271 ± 20 N•m)
Torque to 140 ± 10 in/lbs
(16 ± 1 N•m)
Soak in SAE 30W oil for 1 hour
prior to assembly
26 334654A
Page 27

Parts List
Ref. Part Description Qty.
1 17D125 CYLINDER, pump 1
2 287817 SLEEVE, cylinder 1
3 15A303 HOUSING, intake 1
4+ 15J038 SEAT, carbide 1
5*+ 107098 PACKING, o-ring 1
6*+ 118602 BALL, ceramic 1
7 193391 GUIDE, ball 8
8* 108822 PACKING, o-ring, ptfe 2
9* 160325 PACKING, o-ring 1
10 288821 ROD, piston 1
11* 189585 GLAND, packing, male 1
12* 198701 PACKING, vee 8
13* 198718 PACKING, vee 3
14* 15G657 GLAND, female 1
15* 189588 GLAND, packing,
female
16* 119636 WIPER, piston 1
17* 15F875 PACKING, vee 3
18 287388 VALVE, piston 1
19* 118601 BALL, ceramic 1
20 15J792 NUT, packing 1
21* 157195 PACKING, o-ring 1
22* 112590 PLUG, throat seal 1
23* 15F183 WASHER, back-up 1
24* 15G658 GLAND, male 1
25+ 24E027 SPRING, intake ball 1
Parts
1
* Included in Repair Kit 24X096
+ Included in Repair Kit 24N013
334654A 27
Page 28

Technical Specifications
Technical Specifications
Displacement Pumps
Maximum fluid working pressure 3300 psi
25 bar, 22.8 MPa
Inlet/Outlet Sizes
Fluid inlet size 1-5/16 UN (m) models 24W995, 24W996, 24W997,
Fluid outlet size 3/8 npt (f)
Wetted materials on all models stainless steel, PTFE, leather, nylon, zinc-plated carbon
24W998
1-11 1/2 NPSM (M) models 24W999, 24X001
3/4-14 npt (m) model 24B748
steel, tungsten carbide, brass, fluorelastomer, acetal,
polyethylene, ceramic
28 334654A
Page 29

Graco Standard Warranty
Graco Standard Warranty
Graco warrants all equipment referenced in this document which is manufactured by Graco and bearing
its name to be free from defects in material and workmanship on the date of sale to the original purchaser
for use. With the exception of any special, extended, or limited warranty published by Graco, Graco will,
for a period of twelve months from the date of sale, repair or replace any part of the equipment
determined by Graco to be defective. This warranty applies only when the equipment is installed,
operated and maintained in accordance with Graco’s written recommendations.
This warranty does not cover, and Graco shall not be liable for general wear and tear, or any malfunction,
damage or wear caused by faulty installation, misapplication, abrasion, corrosion, inadequate or
improper maintenance, negligence, accident, tampering, or substitution of non-Graco component parts.
Nor shall Graco be liable for malfunction, damage or wear caused by the incompatibility of Graco
equipment with structures, accessories, equipment or materials not supplied by Graco, or the improper
design, manufacture, installation, operation or maintenance of structures, accessories, equipment or
materials not supplied by Graco.
This warranty is conditioned upon the prepaid return of the equipment claimed to be defective to an
authorized Graco distributor for verification of the claimed defect. If the claimed defect is verified, Graco
will repair or replace free of charge any defective parts. The equipment will be returned to the original
purchaser transportation prepaid. If inspection of the equipment does not disclose any defect in material
or workmanship, repairs will be made at a reasonable charge, which charges may include the costs of
parts, labor, and transportation.
THIS WARRANTY IS EXCLUSIVE, AND IS IN LIEU OF ANY OTHER WARRANTIES, EXPRESS OR
IMPLIED, INCLUDING BUT NOT LIMITED TO WARRANTY OF MERCHANTABILITY OR WARRANTY
OF FITNESS FOR A PARTICULAR PURPOSE.
Graco’s sole obligation and buyer’s sole remedy for any breach of warranty shall be as set forth above.
The buyer agrees that no other remedy (including, but not limited to, incidental or consequential
damages for lost profits, lost sales, injury to person or property, or any other incidental or consequential
loss) shall be available. Any action for breach of warranty must be brought within two (2) years of the
date of sale.
GRACO MAKES NO WARRANTY, AND DISCLAIMS ALL IMPLIED WARRANTIES OF
MERCHANTABILITY AND FITNESS FOR A PARTICULAR PURPOSE, IN CONNECTION WITH
ACCESSORIES, EQUIPMENT, MATERIALS OR COMPONENTS SOLD BUT NOT MANUFACTURED
BY GRACO. These items sold, but not manufactured by Graco (such as electric motors, switches, hose,
etc.), are subject to the warranty, if any, of their manufacturer. Graco will provide purchaser with
reasonable assistance in making any claim for breach of these warranties.
In no event will Graco be liable for indirect, incidental, special or consequential damages resulting from
Graco supplying equipment hereunder, or the furnishing, performance, or use of any products or other
goods sold hereto, whether due to a breach of contract, breach of warranty, the negligence of Graco, or
otherwise.
334654A 29
Page 30

Graco Information
For the latest information about Graco products, visit www.graco.com.
For patent information, see www.graco.com/patents.
TO PLACE AN ORDER, contact your Graco distributor or call 1-800-690-2894 to identify the
nearest distributor.
All written and visual data contained in this document reflects the latest product information available at
Graco reserves the right to make changes at any time without notice.
Original instructions. This manual contains English. MM 334654
International Offices: Belgium, China, Japan, Korea
GRACO INC. AND SUBSIDIARIES • P.O. BOX 1441 • MINNEAPOLIS MN 55440-1441 • USA
Copyright 2014, Graco Inc. All Graco manufacturing locations are registered to ISO 9001.
the time of publication.
Graco Headquarters: Minneapolis
www.graco.com
Revision A, December 2014
 Loading...