

Page 1

Kit Instructions
Retro-Fit Kit for LL250 and LL200 Pressurized
Bead Systems Built BEFORE January 1, 2013
For professional use only.
Model 16U272
Important Safety Instructions
Read all warnings and instructions in the
striper manual. Save these instructions.
3
7
6
5
4
11
332223B
EN
ti20896a
10
9
2
12
Ref. Part Description Qty.
1 15F213 BRACKET, cable 2
2 16U904 TOOL, drill bit, no. 15 1
3 16U205 PULLEY, fan, with attachment holes 1
4 120087 SCREW, set, 1/4 in. x 1/2 in. 2
5 260387 SCREW, pan hd, X recess 4
6 116876 WASHER, flat 4
7 116969 NUT, lock 4
8 24M638 BAR, gun holder, LL IV 250 SPS 2
9 101690 TOOL, allen wrench 1
10 100633 TOOL, allen wrench 1
11 15F211 S T U D , c a ble 2
12 16U913 TOOL, torx bit, T-20 1
8
1
Page 2

Tools Needed:
Tools Needed:
• 1/8 in. Allen Wrench
• 7/64 in. Allen Wrench
• 3/8 in. Wrench
• 7/16 in. Wrench
• 9/16 in. Wrench
• .180 in. Drill Bit
• T-20 Torx Bit
• Phillips Screwdriver
• Power DRill
•Pliers
•Marker
2 332223B
Page 3
Instructions for LL250 Units
Instructions for LL250 Units
Fan Belt Removal
1. Turn off unit. Relieve pressure in paint striper and
remove paint hopper.
2. Locate belt shroud (A). Use 3/8 in. wrench to loosen
or remove four screws and remove shroud.
A
ti19128a
3. Before loosening belt assembly, mark location of
hydraulic reservoir against stationary base.
5. Loosen two belt tensioning bolts (C) to take tension
off of belt. Loosen only until belt can be removed.
C
ti19146a
6. Remove belt (D) from fan pulley (E).
E
D
ti20885a
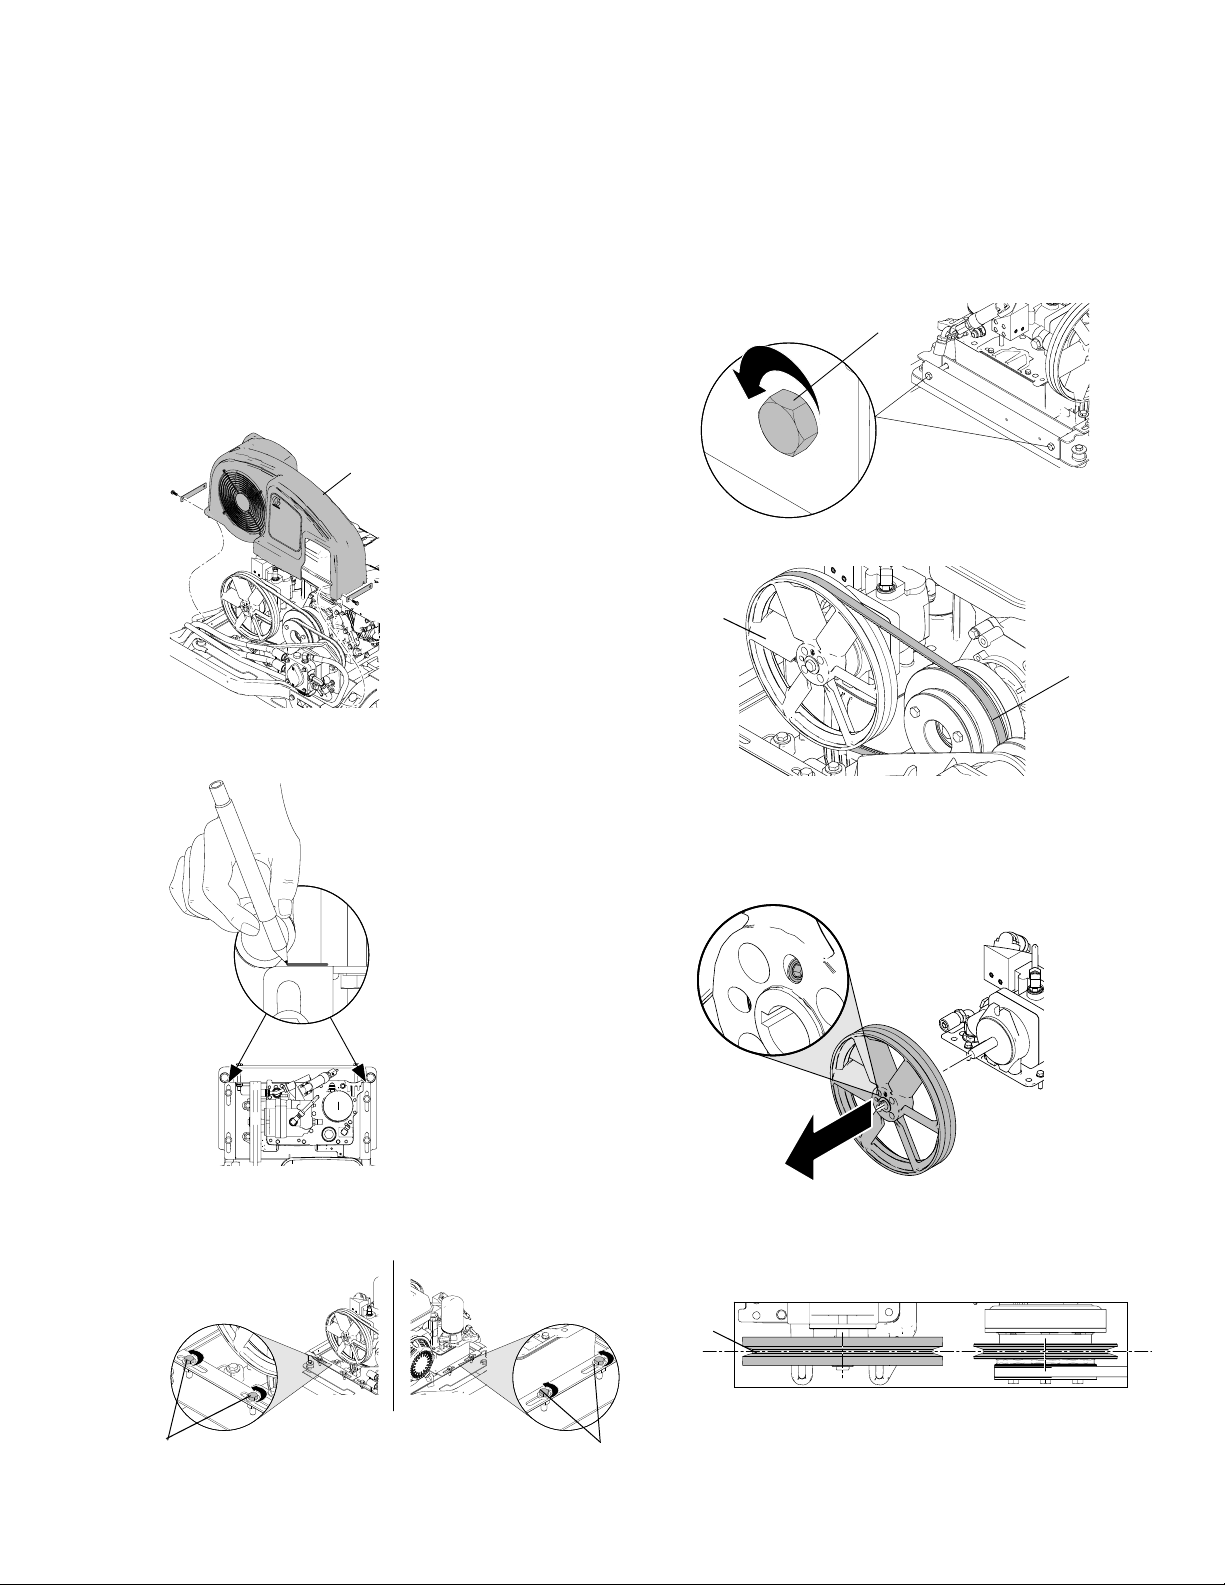
Replace Pulley
ti20529a
4. Use 9/16 in. wrench to loosen (but do not remove)
four bolts (B) that secure hydraulic reservoir system
to base plate.
B
ti19147a
1. Remove original pulley and replace with new pulley.
Use 1/8 in Allen wrench to tighten two set screws.
ti20526a
NOTE: Make sure key is in place before installing
new pulley.
2. Align new fan pulley (E) with engine pulley.
E
ti20528a
B
332223B 3
Page 4

Instructions for LL250 Units
3. Use 1/8 in. Allen wrench to tighten two set screws to
secure pulley onto shaft. Torque to 58 to 62 in-lb
(6.6 to 7.0 N•m).
ti20527a
4. Route belt (D) over new pulley.
D
ti20885a
Remove Original Fan Grill and Rivets
1. Remove belt shroud removed from unit.
2. Use .180 diameter drill bit (supplied) to drill-out
rivets from back side of shroud.
ti20524a
3. Once ridge has been drilled away on rivet, the
remaining portion can be pushed through hole.
NOTE: The pressurized bead system comes with a
new fan grill with open center. Leave belt shroud off
for installment of pressurized bead system. Replace
with grill from pressurized bead kit.
5. Tighten two tensioning bolts (C) until hydraulic reservoir is in its original location noted by marker line.
C
ti19150a
6. Tighten four reservoir bolts.
ti19151a
B
ti20520a
B
4 332223B
Page 5

Install New Gun Arm Bracket
Instructions for LL250 Units
1. Remove clip (F) from cable eyelet (G).
F
G
ti20522a
2. Pinch retaining teeth (H) in and pull actuation cable
(J) out of bracket.
J
H
3. Replace original gun arm assembly with new gun
arm assembly.
ti20716a
4. Push bracket (X) all the way forward in slots.
X
ti21406a
5. Use 5/32 in. Allen wrench to tighten two head
screws (K).
ti20523a
K
ti20217a
6. Reinstall cable and clip.
332223B 5
Page 6

Instructions for LL200 Units
Instructions for LL200 Units
Fan Belt Removal
1. Turn off unit. Relieve pressure in paint striper and
remove paint hopper.
2. Loosen knob and rotate belt shroud out of way.
3. Rotate engine upward and remove belt (D) from fan
pulley (E).
E
D
ti20712a
3. Use 1/8 in. Allen wrench to tighten two set screws to
secure pulley onto shaft. Torque to 58 to 62 lb-in
(6.6 to 7.0 N•m).
ti20527a
4. Route belt (D) over new pulley (E).
E
D
ti20885a
Remove Original Fan Grill
1. Use star bit (supplied) to remove four screws (L)
from shroud. Remove original fan grill (M).
L
Replace Pulley
1. Remove original pulley and replace with new pulley.
Use 1/8 in Allen wrench to tighten two set screws.
ti20526a
NOTE: Make sure key is in place before installing
new pulley.
2. Align new fan pulley (E) with engine pulley.
M
2. NOTE: The pressurized bead system comes with a
new fan grill with open center. Leave belt shroud off
for installment of pressurized bead system. Replace
with grill from PBS kit.
3. Close belt shroud with new fan grill onto unit.
NOTE: You may need to flex shroud around
extended shaft on the fan pulley.
ti20713a
ti20714a
E
6 332223B
ti20528a
ti21196a
Page 7

Instructions for LL200 Units
Install New Gun Arm Bracket
1. Remove trigger cable (N) on old gun.
N
ti20886a
ti20887a
2. Remove old gun arm.
3. Loosen allen heads (P) and remove LL250 bracket
(R).
R
ti20718a
5. Replace the LL250-style cable stud with LL200-style
cable stud.
ti21323a
ti21322a
LL250-Style LL200-Style
6. Replace old gun bracket with new bracket
assembly (T).
T
ti20710a
P
4. Replace with LL200 bracket (S). Push all the way
forward in slots and tighten Allen heads (P).
S
ti20719a
P
NOTE: See installation manual 332230 for additional
information.
7. Reinstall cable.
ti21325a
GH200
ti21324a
250SPS
332223B 7
Page 8

Graco Standard Warranty
Graco warrants all equipment referenced in this document which is manufactured by Graco and bearing its name to be free from defects in
material and workmanship on the date of sale to the original purchaser for use. With the exception of any special, extended, or limited warranty
published by Graco, Graco will, for a period of twelve months from the date of sale, repair or replace any part of the equipment determined by
Graco to be defective. This warranty applies only when the equipment is installed, operated and maintained in accordance with Graco’s written
recommendations.
This warranty does not cover, and Graco shall not be liable for general wear and tear, or any malfunction, damage or wear caused by faulty
installation, misapplication, abrasion, corrosion, inadequate or improper maintenance, negligence, accident, tampering, or substitution of
non-Graco component parts. Nor shall Graco be liable for malfunction, damage or wear caused by the incompatibility of Graco equipment with
structures, accessories, equipment or materials not supplied by Graco, or the improper design, manufacture, installation, operation or
maintenance of structures, accessories, equipment or materials not supplied by Graco.
This warranty is conditioned upon the prepaid return of the equipment claimed to be defective to an authorized Graco distributor for verification of
the claimed defect. If the claimed defect is verified, Graco will repair or replace free of charge any defective parts. The equipment will be returned
to the original purchaser transportation prepaid. If inspection of the equipment does not disclose any defect in material or workmanship, repairs will
be made at a reasonable charge, which charges may include the costs of parts, labor, and transportation.
THIS WARRANTY IS EXCLUSIVE, AND IS IN LIEU OF ANY OTHER WARRANTIES, EXPRESS OR IMPLIED, INCLUDING BUT NOT LIMITED
TO WARRANTY OF MERCHANTABILITY OR WARRANTY OF FITNESS FOR A PARTICULAR PURPOSE.
Graco’s sole obligation and buyer’s sole remedy for any breach of warranty shall be as set forth above. The buyer agrees that no other remedy
(including, but not limited to, incidental or consequential damages for lost profits, lost sales, injury to person or property, or any other incidental or
consequential loss) shall be available. Any action for breach of warranty must be brought within two (2) years of the date of sale.
GRACO MAKES NO WARRANTY, AND DISCLAIMS ALL IMPLIED WARRANTIES OF MERCHANTABILITY AND FITNESS FOR A
PARTICULAR PURPOSE, IN CONNECTION WITH ACCESSORIES, EQUIPMENT, MATERIALS OR COMPONENTS SOLD BUT NOT
MANUFACTURED BY GRACO. These items sold, but not manufactured by Graco (such as electric motors, switches, hose, etc.), are subject to
the warranty, if any, of their manufacturer. Graco will provide purchaser with reasonable assistance in making any claim for breach of these
warranties.
In no event will Graco be liable for indirect, incidental, special or consequential damages resulting from Graco supplying equipment hereunder, or
the furnishing, performance, or use of any products or other goods sold hereto, whether due to a breach of contract, breach of warranty, the
negligence of Graco, or otherwise.
FOR GRACO CANADA CUSTOMERS
The Parties acknowledge that they have required that the present document, as well as all documents, notices and legal proceedings entered into,
given or instituted pursuant hereto or relating directly or indirectly hereto, be drawn up in English. Les parties reconnaissent avoir convenu que la
rédaction du présente document sera en Anglais, ainsi que tous documents, avis et procédures judiciaires exécutés, donnés ou intentés, à la suite
de ou en rapport, directement ou indirectement, avec les procédures concernées.
Graco Information
For the latest information about Graco products, visit www.graco.com.
TO PLACE AN ORDER, contact your Graco distributor or call 1-800-690-2894 to identify the nearest distributor.
All written and visual data contained in this document reflects the latest product information available at the time of publication.
GRACO INC. AND SUBSIDIARIES • P.O. BOX 1441 • MINNEAPOLIS MN 55440-1441 • USA
Copyright 2012, Graco Inc. All Graco manufacturing locations are registered to ISO 9001.
Graco reserves the right to make changes at any time without notice.
For patent information, see www.graco.com/patents.
Original instructions.
This manual contains English. MM 332223
Graco Headquarters: Minneapolis
International Offices: Belgium, China, Japan, Korea
www.graco.com
Revision B - October 2013
 Loading...