

Page 1

Instructions - Parts
XM PFP
Hot Water Flush Kit
For flushing the XM PFP system with hot water. For professional use only.
Not approved for use in explosive atmospheres or hazardous locations.
Part No. 16T859
Six Gallon Electric Water Heater Kit
100 psi (0.7 MPa, 7 bar) Maximum Inlet Pressure to Regulator
180°F (82°C) Maximum Outlet Fluid Temperature
332073B
EN
Important Safety Instructions
Read all warnings and instructions in this manual, the
XM PFP Operation manual 3A2776, and the Hatco
C-5 instruction manual. Save all instructions.
Contents
Component Identification ....................2
Installation ................................3
Optional Location 1 .......................3
Optional Location 2 .......................4
Priming the Heater .........................5
OtherInstructions ..........................5
Parts .....................................6
16T859 Kit ..............................6
TechnicalData .............................9
Graco Standard Warranty ...................10
®
ti20139a
Page 2
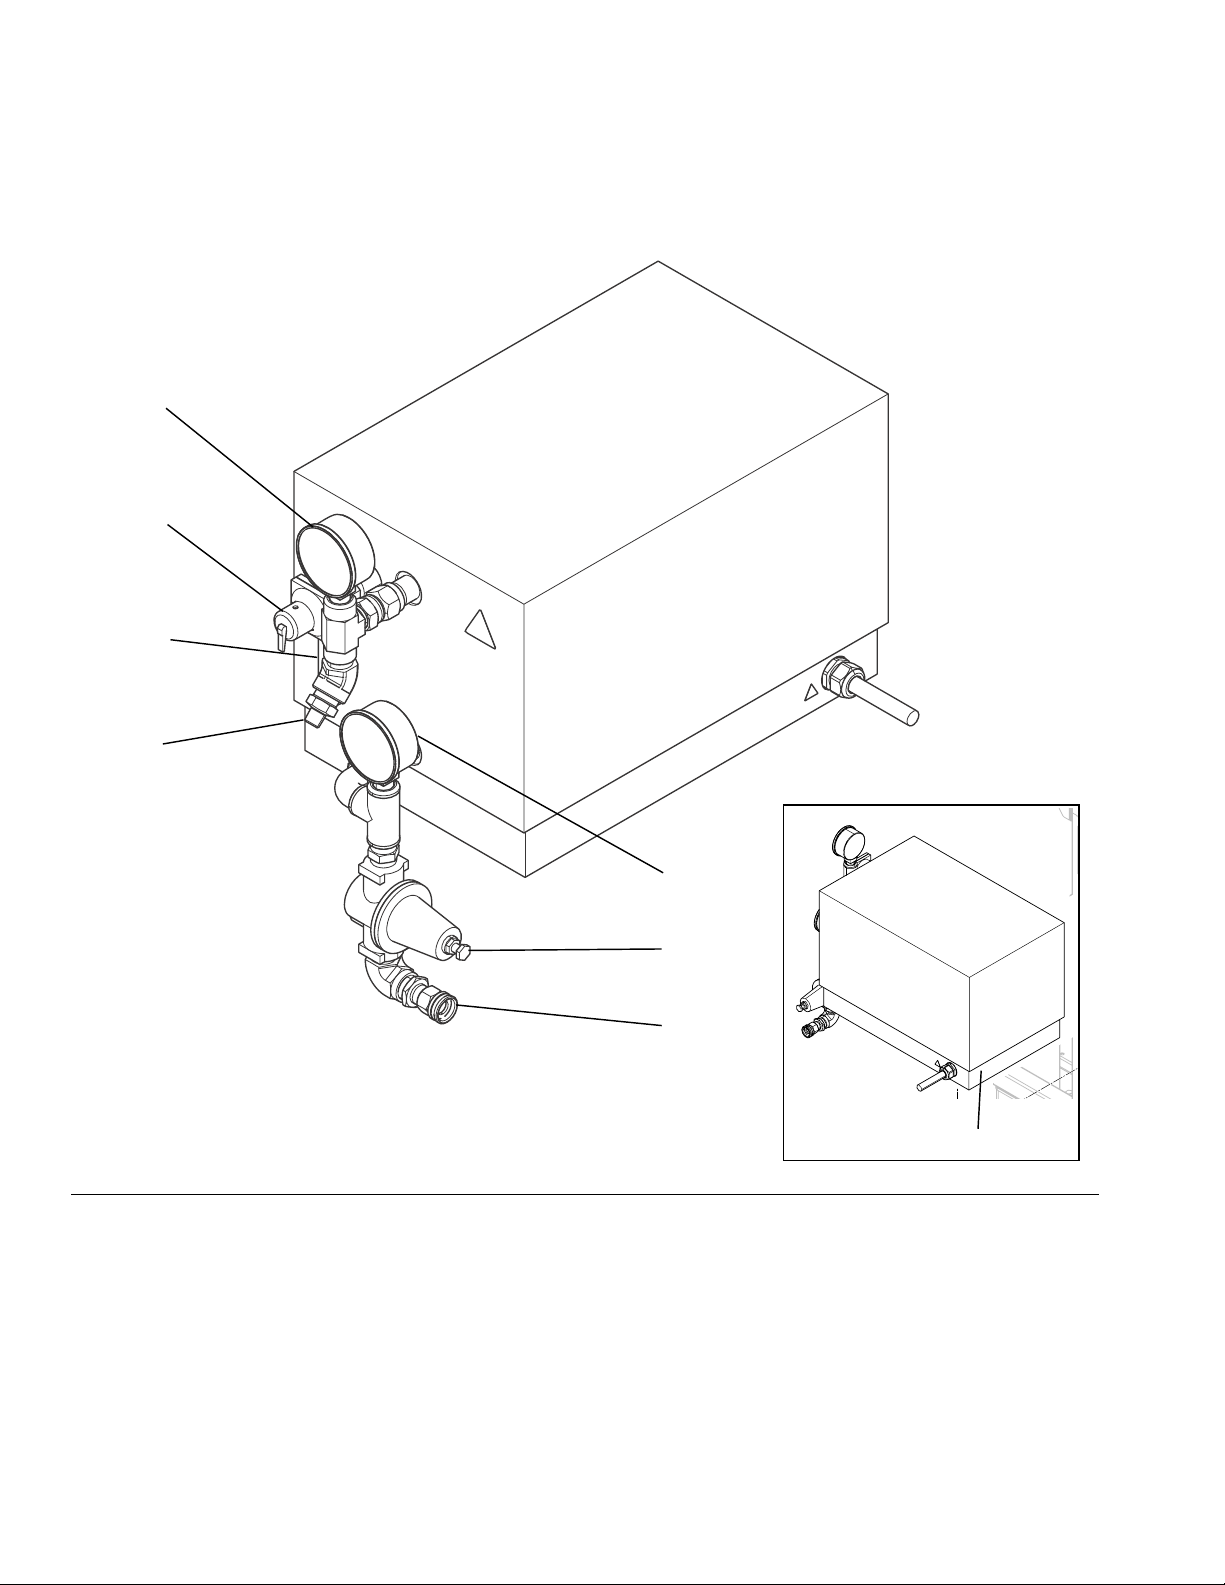
Component Identification
Component Identification
F
D
FIG.1
E
ti20139a
G
C
B
A
ti20152a
H
Key:
A 3/4 NFR Garden Hose Inlet
B Fluid Pressure Regulator
C Inlet Temperature/Pressure Gauge
D Over-Pressure/Over-Temperature Relief Valve
E Relief Valve Outlet
F Outlet Temperature/Pressure Gauge
G Hot Water Outlet to Flush Pump
H On/Off Toggle Switch
2 332073B
Page 3

Installation
Installation
The equipment must be grounded to reduce the risk
of static sparking and electric shock. Electric or static
sparking can cause fumes to ignite or explode.
Improper grounding can cause electric shock.
Grounding provides an escape wire for the electric
current.
Optional Location 1
See FIG. 1 on page 2 and FIG. 2 on page 3.
1
1. Use four bolts and washers (20, 14) to install the
bracket (13) onto the system frame.
2. Use four bolts and washers (19, 15) to install
heater (1) onto bracket.
3. Connect water supply hose to heater inlet (A). Connect hose from heater outlet (G) to XM PFP solvent
flush pump bottom inlet.
NOTICE
To prevent burning out the heater element, never
turn on the heater without it completely filled with
water.
4. With the heater ON/OFF toggle switch (H) OFF,
connect power cable to the corded receptacle hanging below the junction box on the XM PFP sprayer.
13
14
20
19
15
FIG. 2: Optional Location 1
332073B 3
ti20152a
Page 4

Installation
Optional Location 2
See FIG. 1 on page 2 and FIG. 3 on page 4.
1. Use four bolts and washers (20, 14) to connect the
three bracket pieces (13, 22, 23).
2. Use four bolts and washers (21, 19) to install the
bracket assembly onto system frame.
3. Use four bolts and washers (19, 15) to install
heater (1) onto bracket assembly.
4. Connect water supply hose to heater inlet (A). Connect hose from heater outlet (G) to PFP solvent
flush pump bottom inlet.
NOTICE
To prevent burning out the heater element, never
turn on the heater without it completely filled with
water.
5. With the heater ON/OFF toggle switch (H) OFF,
connect power cable to the corded receptacle hanging below the junction box on the XM PFP sprayer.
1
1
19
21
22
23
FIG. 3: Optional Location 2
21, 19
13
19
15
14
20
1
Items are shipped assembled.
1
ti20140a
4 332073B
Page 5

Priming the Heater
BURN HAZARD
Equipment surfaces and fluid that’s heated can
become very hot during operation. To avoid severe
burns:
• Do not touch hot fluid or equipment.
NOTICE
To prevent burning out the heater element, never
turn on the heater without it completely filled with
water.
1. With the heater ON/OFF toggle switch (H) OFF, turn
on the water supply.
Priming the Heater
2. Adjust the fluid pressure regulator (B) to 20 psi
(0.14 MPa, 1.4 bar).
3. Turn the XM PFP solvent flush pump ON to begin
running water through the heater.
4. Spray until the water is dispensed from the gun.
5. Turn the heated water flush switch on the XM PFP
sprayer to the ON position. The switch is located
next to the main power switch above the dosing
valves.
6. Turn on the heater ON/OFF toggle switch (H). Allow
heater to warm until outlet temperature gauge
shows 180°F (82°C).
7. Continue flushing as necessary.
Other Instructions
See the Hatco®C-5 instruction manual.
332073B 5
Page 6

Parts
Parts
16T859 Kit
1
1b
18
11
1d
37
5
27
28
29
26
16
35
3
4
35
36
25
1d
5
2
10
1c
6
7
8
9
19
21
22
23
21, 19
13
19
15
14
20
NOTE: Use sealant on all pipe threads.
6 332073B
ti20140a
Page 7

Ref Part Description Qty
1 16T869 HEATER, Hatco C-5 1
2 166466 FITTING, tee, pipe, female 1
3 113445 FITTING, elbow, street 1
4 194048 FITTING, nipple, reducing 1
5 107219 BUSHING 2
6 166590 FITTING, elbow, street 1
7 157191 FITTING, adapter (1/2 npt x 3/4 npt) 1
8 16T886 ADAPTER, 3/4 nhr to 1/2 npt 1
9 115099 WASHER, garden hose 1
10 119992 FITTING, pipe, nipple, 3/4 x 3/4 npt 1
11 16T619 FITTING, nipple, thread on one end 1
13 16T751 BRACKET, hot water flush 1
14 100018 WASHER, lock, spring 4
15 C19138 SCREW, cap, hex head 4
16 --- CORD, 3 conductor, #10, SE00W 8
17 16T891 PLUG, electrical, locking, L6-30P 1
18 121603 GRIP, cord, 0.51-0.71, 3/4 1
19 115625 WASHER, fender, 3/8 4
20 112395 SCREW, cap, flange head 4
21 121488 SCREW, hex head, flanged 4
22 256254 BRACKET, hopper, b-mt 1
23 256256 BRACKET, hopper, b-mt, lower 1
24▲ 189285 LABEL, hot surface 1
25▲ 189930 LABEL, electric shock 1
26 H43806 HOSE, coupled, 4500 psi, 0.38 ID, 6 ft 1
27 156589 FITTING, union, adapter, 90 deg 1
28 100505 BUSHING, pipe 1
29 156849 PIPE, nipple 1
35 156172 FITTING, union, swivel 2
36 295847 FITTING, elbow, pipe, male 1
37 125548 FITTING, 3/4 npt, male branch tee 1
Parts
--- Not for sale.
▲ Replacement Danger and Warning labels, tags and
cards are available at no cost.
332073B 7
Page 8

Parts
8 332073B
Page 9

Technical Data
See the Hatco®C-5 instruction manual for full technical
data.
PFP Hot Water Flush Kit
US Metric
Maximum Water Inlet Pressure to Regulator 100 psi 7 MPa, 7 bar
Maximum Regulated Pressure 20 psi 140 kPa, 1.4 bar
Maximum Outlet Fluid Temperature 180°F 82°C
Supply Voltage 220-250 Volts AC, 1 phase
Power 5000 Watts
Tank Size 6 gallon 22.7 liter
Inlet Fitting 3/4 NHR Garden Hose
Wetted Parts
Plated Carbon steel, stainless steel, brass, Castone®lining
Technical Data
332073B 9
Page 10

Graco Standard Warranty
Graco warrants all equipment referenced in this document which is manufactured by Graco and bearing its name to be free from defects in
material and workmanship on the date of sale to the original purchaser for use. With the exception of any special, extended, or limited warranty
published by Graco, Graco will, for a period of twelve months from the date of sale, repair or replace any part of the equipment determined by
Graco to be defective. This warranty applies only when the equipment is installed, operated and maintained in accordance with Graco’s written
recommendations.
This warranty does not cover, and Graco shall not be liable for general wear and tear, or any malfunction, damage or wear caused by faulty
installation, misapplication, abrasion, corrosion, inadequate or improper maintenance, negligence, accident, tampering, or substitution of
non-Graco component parts. Nor shall Graco be liable for malfunction, damage or wear caused by the incompatibility of Graco equipment with
structures, accessories, equipment or materials not supplied by Graco, or the improper design, manufacture, installation, operation or
maintenance of structures, accessories, equipment or materials not supplied by Graco.
This warranty is conditioned upon the prepaid return of the equipment claimed to be defective to an authorized Graco distributor for verification of
the claimed defect. If the claimed defect is verified, Graco will repair or replace free of charge any defective parts. The equipment will be returned
to the original purchaser transportation prepaid. If inspection of the equipment does not disclose any defect in material or workmanship, repairs will
be made at a reasonable charge, which charges may include the costs of parts, labor, and transportation.
THIS WARRANTY IS EXCLUSIVE, AND IS IN LIEU OF ANY OTHER WARRANTIES, EXPRESS OR IMPLIED, INCLUDING BUT NOT LIMITED
TO WARRANTY OF MERCHANTABILITY OR WARRANTY OF FITNESS FOR A PARTICULAR PURPOSE.
Graco’s sole obligation and buyer’s sole remedy for any breach of warranty shall be as set forth above. The buyer agrees that no other remedy
(including, but not limited to, incidental or consequential damages for lost profits, lost sales, injury to person or property, or any other incidental or
consequential loss) shall be available. Any action for breach of warranty must be brought within two (2) years of the date of sale.
GRACO MAKES NO WARRANTY, AND DISCLAIMS ALL IMPLIED WARRANTIES OF MERCHANTABILITY AND FITNESS FOR A
PARTICULAR PURPOSE, IN CONNECTION WITH ACCESSORIES, EQUIPMENT, MATERIALS OR COMPONENTS SOLD BUT NOT
MANUFACTURED BY GRACO. These items sold, but not manufactured by Graco (such as electric motors, switches, hose, etc.), are subject to
the warranty, if any, of their manufacturer. Graco will provide purchaser with reasonable assistance in making any claim for breach of these
warranties.
In no event will Graco be liable for indirect, incidental, special or consequential damages resulting from Graco supplying equipment hereunder, or
the furnishing, performance, or use of any products or other goods sold hereto, whether due to a breach of contract, breach of warranty, the
negligence of Graco, or otherwise.
FOR GRACO CANADA CUSTOMERS
The Parties acknowledge that they have required that the present document, as well as all documents, notices and legal proceedings entered into,
given or instituted pursuant hereto or relating directly or indirectly hereto, be drawn up in English. Les parties reconnaissent avoir convenu que la
rédaction du présente document sera en Anglais, ainsi que tous documents, avis et procédures judiciaires exécutés, donnés ou intentés, à la suite
de ou en rapport, directement ou indirectement, avec les procédures concernées.
Graco Information
For the latest information about Graco products, visit www.graco.com.
TO PLACE AN ORDER, contact your Graco distributor or call to identify the nearest distributor.
Phone: 612-623-6921 or Toll Free: 1-800-328-0211 Fax: 612-378-3505
All written and visual data contained in this document reflects the latest product information available at the time of publication.
GRACO INC. AND SUBSIDIARIES • P.O. BOX 1441 • MINNEAPOLIS MN 55440-1441 • USA
Copyright 2012, Graco Inc. All Graco manufacturing locations are registered to ISO 9001.
Graco reserves the right to make changes at any time without notice.
)RUSDWHQWLQIRUPDWLRQVHHZZZJUDFRFRPSDWHQWV
2ULJLQDOLQVWUXFWLRQV This manual contains English. MM 332073
Graco Headquarters: Minneapolis
International Offices: Belgium, China, Japan, Korea
www.graco.com
Revised February 2013
 Loading...