

Page 1
Replacement Parts
• Warranty Information
(USA)
To purchase parts or accessories or
for warranty information in the
United States, please contact us at the
following:
www.gracobaby.com
OR
1-800-345-4109
2L01VIB/2L02VIB
Product Registration
(USA)
To register your Graco product from
within the U.S.A. visit us online at
www.gracobaby.com/productregistration.
We currently do not accept product
registrations from those living outside the
United States of America.
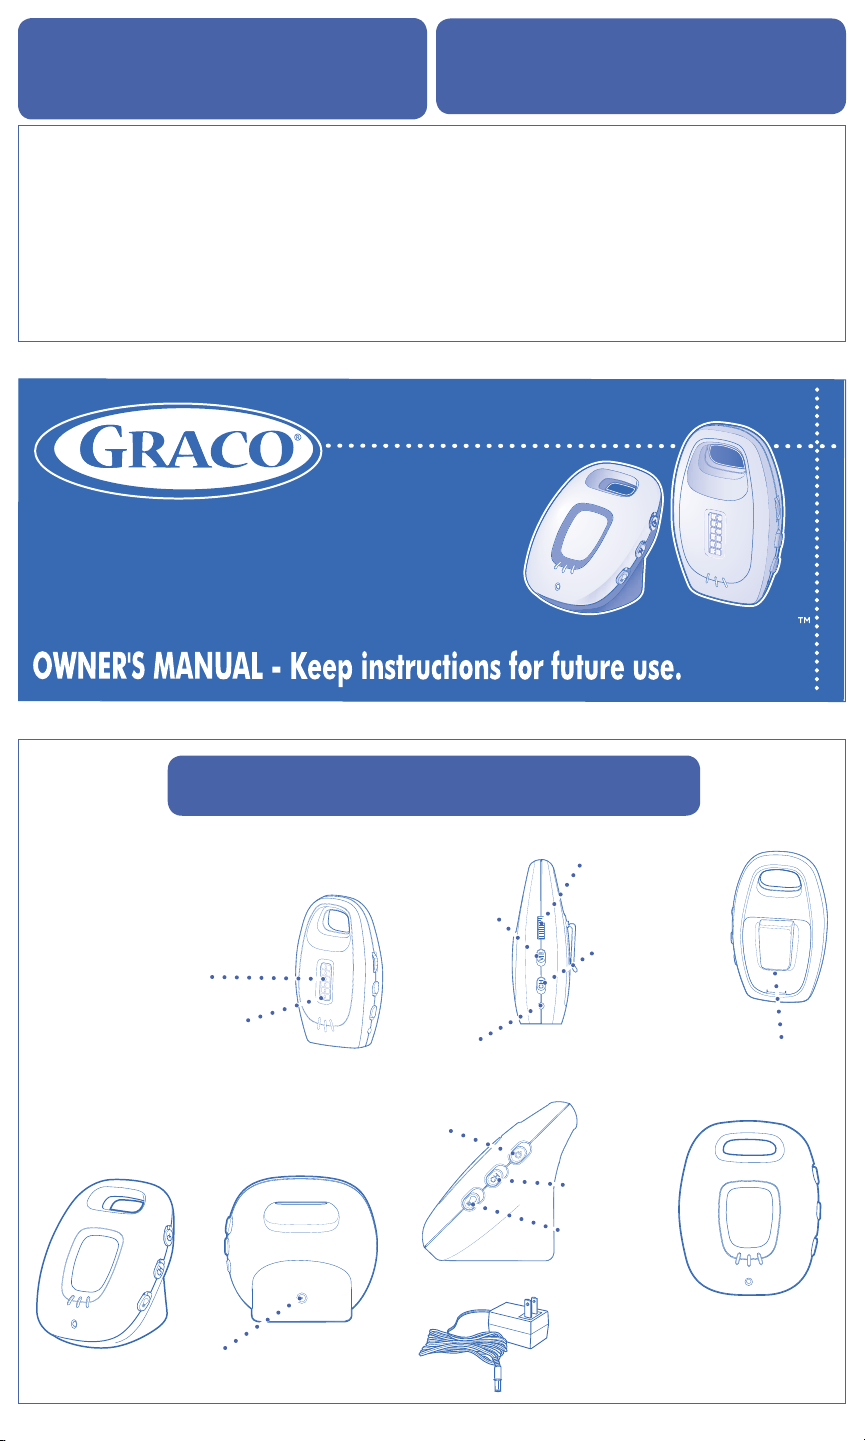
Product Features
Parent’s Unit (PD141837)
Model 2L01 - 1 unit
Model 2L02 - 2 units
SoundLights
Power LED
Nursery Unit (PD141818)
Model 2L01/2L02 - 1 unit
Vibrate
Power
©2010 Graco PD142728B 4/10
Power/Volume
Channel
Selector
DC Adapter Jack
Channel
Selector
Ultra Clear
Clip
DC Adapter Jack
NightLight
AC Adapter
Model 2L01 - Qty. 2
Model 2L02 - Qty. 3
1
Page 2

Failure to follow these warnings and the assembly
instructions could result in serious injury or death.
This device is designed only to monitor the sounds of your child. It will not alert you
to your child’s silent activities. When using the monitor, you must still provide the
supervision necessary for the continued safety of your child. This product is not designed
or intended for use as a medical monitor. Always be sure that both the transmitter and
receiver are working properly and are within range of each other.
• STRANGULATION HAZARD. Keep the adapter cords out of the reach of children. Do
not use with extension cords.
• DO NOT place the Nursery Unit or its cord within your child’s reach. Do not put the
Nursery Unit inside a crib or play yard.
• Use ONLY with 110-120 volt AC electrical outlets.
• Protect the AC adapter cords. Place them so they are not walked on or pinched by
furniture or other items.
• Allow for proper ventilation when units are in use. Do not cover the Nursery
Unit or Parent Units with any object such as a blanket. Do not place it in a drawer or in
any location which would muffle the sound or interfere with the normal flow of air.
• DO NOT immerse any part of the Nursery Unit or Parent Units in water. Clean only with
a dry cloth.
• DO NOT place unit near water and moisture. Do not use the Nursery Unit outdoors. Do
not use the Nursery Unit near possible wet areas, such as a bathtub, shower, wash basin,
sink, laundry tub, swimming pool, wet basement, etc.
• Keep Nursery Unit away from heat sources, such as fireplaces, radiators, stoves,
and TVs or other appliances. Heat can damage the case or electrical parts.
• DO NOT use the Nursery Unit if:
• The adapter cords or plugs have been damaged.
• The unit has been exposed to liquids.
• Unit has been dropped or is damaged.
• DO NOT OPEN THE NURSERY UNIT, PARENT UNITS, OR ADAPTERS. No
user-serviceable parts inside. Risk of electrical shock, fire or death.
• The antenna used for this transmitter must be installed to provide a separation distance
of at least 20 cm (7.9”) from all persons and must not be co-located or operating in
conjunction with any other antenna or transmitter.
FCC Statement:
WARNING Modifications not authorized by the manufacturer may void users
authority to operate this device.
NOTE: This equipment has been tested and found to comply with the limits for a Class B
digital device, pursuant to Part 15 of the FCC Rules. These limits are designed to provide
reasonable protection against harmful interference in a residential installation. This
equipment generates, uses and can radiate radio frequency energy and, if not installed
and used in accordance with the instructions, may cause harmful interference to radio
communications.
However, there is no guarantee that interference will not occur in a particular installation.
If this equipment does cause harmful interference to radio or television reception, which
can be determined by turning the equipment off and on, the user is encouraged to try to
correct the interference by one or more of the following measures:
• Reorient or relocate the receiving antenna.
• Increase the separation between the equipment and receiver.
• Connect the equipment into an outlet on a circuit different from that to which the
receiver is connected.
• Consult the dealer or an experienced radio/TV technician for help.
This device complies with part 15 of the FCC Rules. Operation is subject to the following
two conditions: (1) This device may not cause harmful interference, and (2) this device
must accept any interference received, including interference that may cause undesired
operation.
• Look for the FCC ID on the bottom of the Nursery Unit and inside the Battery
compartment on the Parent Unit.
Ultra Clear
2L01VIB/2L02VIB
2
Graco Children’s Products
3 Glenlake Pkwy Atlanta, GA 30328
Page 3
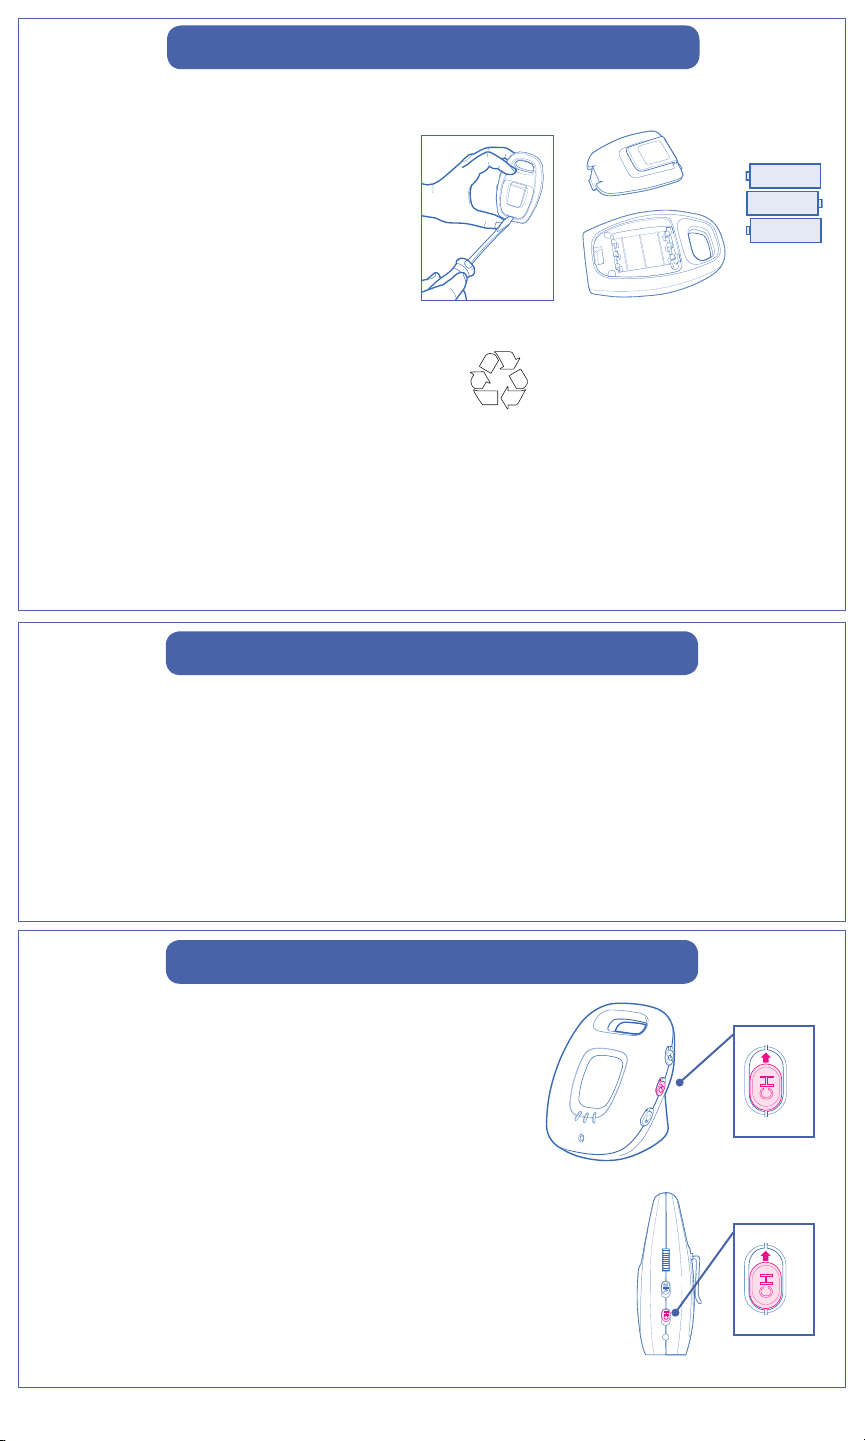
Battery Installation
Parent Unit
• Remove the battery door cover on the
Parent Unit with a key or flat blade screw
driver.
• Place 3-AAA (1.5V-LR03) batteries into
the battery compartment. Note the
proper orientation of the batteries.
• Do not mix old and new batteries.
• Do not mix alkaline, standard
(carbon zinc), or rechargeable
(ni-cadmium, etc) batteries.
• Place the battery door back on the unit.
• Please remove a dead battery promptly.
Batteries should be disposed of
properly by recycling.
A dead battery left in the unit may leak,
damaging your unit.
• Do not attempt to recharge a
non-rechargeable battery.
• A rechargeable battery CANNOT be recharged by plugging the AC adapter into the
Parent Unit.
• Remove the batteries from the unit if it is no longer being used or will be stored for an
extended period of time.
+
-
+
-
+
-
Using AC Adapters
• The Parent Unit uses 3-AAA (1.5V-LR03) batteries or standard 120 volt AC household
current. The Nursery Unit uses standard 120 volt AC household current.
• To use AC adapters, plug the connector on the cord into the AC adapter jack on the side
of the Parent Unit and the back of the Nursery Unit. Then plug adapter into a standard
wall outlet.
• Use ONLY the Graco adapters included with the unit. Do not use these adapters with
other equipment under any circumstances.
• If units do not work, check that AC adapters are plugged into working outlets.
Selecting Channels
• In case you are experiencing some interference, the
channel on the Nursery Unit can be changed by sliding
the “ch” button on the side of the unit to either
channel A or B ("X" or "Y").
• The channel on the Parent Unit can be changed by
sliding the “ch” button on the side of the unit to either
channel A or B ("X" or "Y").
NOTE: Both units must be on the same channel.
A
B
A
B
3
Page 4
Low Battery Indication
Parent Unit
• If operated too long on a low battery, you may also experience a poor signal and the
Power LED on the front of the parent unit may change from green to red.
• You may either turn off the unit, plug in the A/C adapter.
Out of Range Indication
• If the Parent Unit begins to lose the signal from the Nursery Unit you may
hear static or other noise. Immediately move the Parent Unit closer to the
Nursery Unit to regain connection.
***Note: It is not uncommon for the Parent Unit to occasionally
lose and regain connection with the Nursery Unit in
environments that have a significant amount of obstructions.
Setting Up the Baby Monitor
1. For optimum operation, it is best to use new batteries in the Parent Unit.
2. Place the Nursery Unit within 10 feet (3 meters) of your baby. Plug an AC adapter into
the jack on the side of the Nursery Unit. Plug it into a working 120 volt AC outlet.
3. Aim the Nursery Unit toward your baby. Check that there are no walls or large objects
that could block sound transmission.
4. Set both the Nursery Unit and Parent Unit to the same channel, “A” or “B” (“X” or
“Y”).
5. Turn on the Nursery Unit using the On/Off switch on the side. The green power light
should come on.
6. Place the Parent Unit within five (5) feet (1.5 meters) of the Nursery Unit and turn on
the Parent Unit using the On/Off switch on the side of the unit. The green power light
should come on.
7. If you have 2 Parent Units, repeat same set-up procedure for 2nd Parent Unit if not
continue to Step 8.
8. Your monitor is now ready for use.
4
Page 5

Testing the System
It is VERY IMPORTANT to test the system when first set up, and at regular
times thereafter. Test the units if you suspect they may have been damaged or have
not been used for a long time.
1. If two adults are present, have one take the Parent Units to different locations, trying
various volume settings, while the other speaks into the Nursery Unit.
2. If only one adult is available, place a ticking clock, radio, or other sound-producing
device near the Nursery Unit to test it.
3. When testing, keep the level of your child’s sounds in mind, and adjust the volume
accordingly.
4. If there is sound interference, switch the Nursery Unit and the Parent Units to the other
channel setting.
Operation
To Listen To Baby
• Turn on Nursery Unit using the ON/OFF switch.
• Turn on Parent Unit using the Power/Volume wheel.
• Adjust the volume on the Parent Unit by turning the Power/Volume wheel.
• The Sound Lights on the Parent Unit will illuminate as your child (or other
objects) make noise near the Nursery Unit. Please note that the Sound Lights
and
volume control on the Parent Unit are independent of each other. With the
volume turned all the way down, the Sound Lights will still illuminate as your child (or
other objects) make noise near the Nursery Unit.
Vibration Alert Feature
•
To turn on the Vibration Alert Feature, set the switch on the
side of the parent unit to ON.
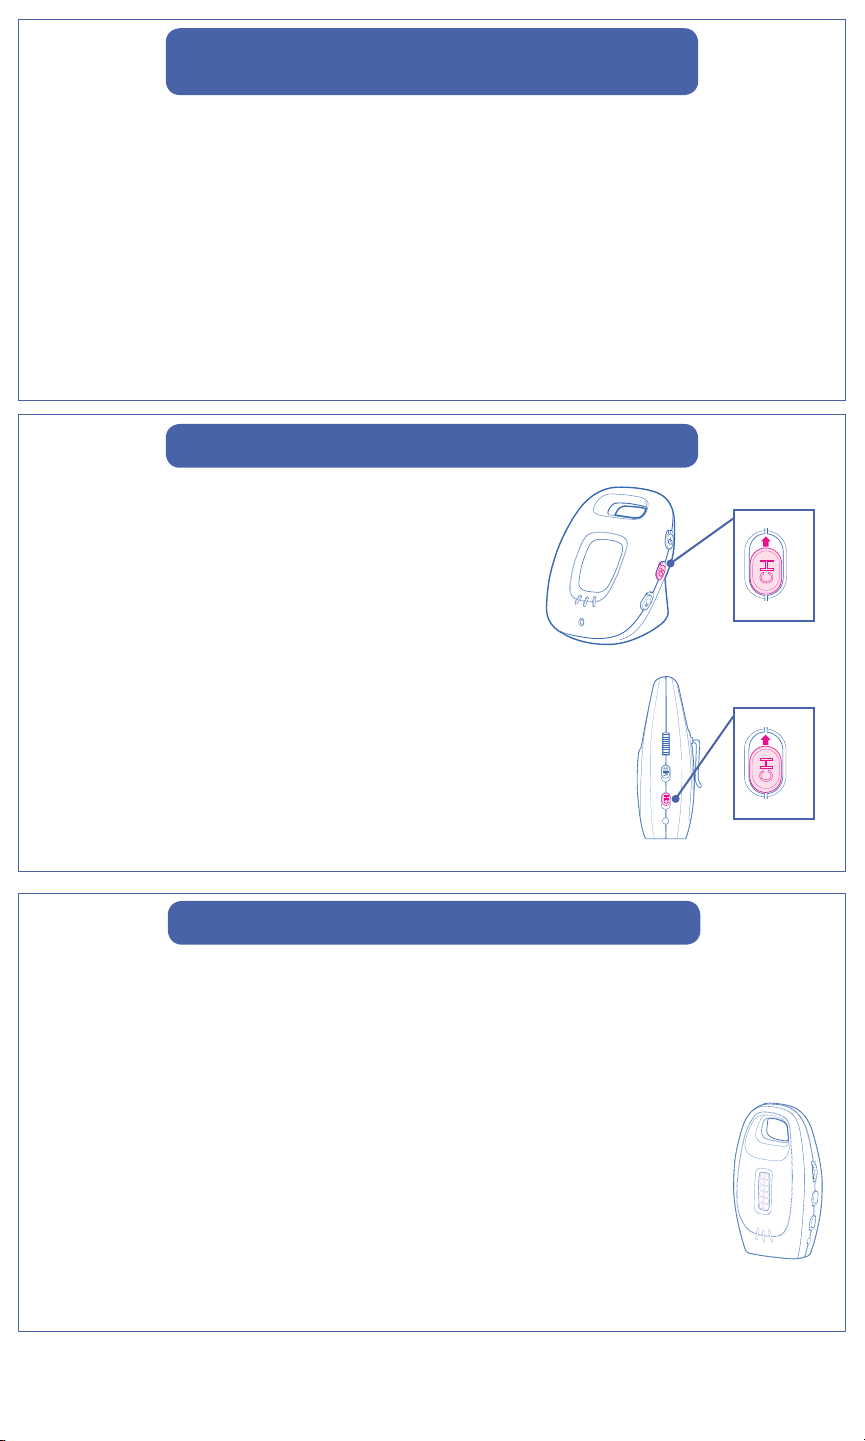
NightLight Feature
•To turn on NightLight slide button on side of Nursery Unit up.
5
Page 6

TroubleShooting
DO NOT ATTEMPT to modify the unit. Any modifications to the transmitter
and/or receiver can void the operator’s authority to operate the equipment.
Most problems have a simple
solution. First, check that:
• Power is turned ON for both units
• Both units are plugged in (or batteries are
fresh in Parent Unit)
• Electrical outlet works
• Volume is turned up on Parent Unit
• Parent Unit is in range of the Nursery Unit
No Sound
• Battery dead or weak — replace or use AC
adapter.
• AC adapter not properly connected —
check the connections.
• Nursery Unit covered or blocked —
remove the obstruction.
Weak Sound
• Nursery Unit too far from baby — move
closer.
• Large objects blocking the signal — try
repositioning Nursery Unit.
• Volume setting too low — turn it up.
Static
• Interference from other electrical
equipment — eliminate cause of static
(TVs, mixers, computers, fans, fluorescent
lights, light dimmers, etc.)
• Parent Unit too far from Nursery Unit —
move them closer.
• Significant amount of obstructions
between Parent Unit and Nursery Unit such
as walls, ceilings & buildings. Try moving
the Nursery Unit to another part of the
room.
• Change channel on Nursery Unit.
Shrill Sound (Feedback)
• Nursery Unit and Parent Unit too close
together — move them farther apart.
• Volume set too high — lower the volume.
6
Page 7

Piezas de repuesto
• Información sobre la
garantía (EE.UU.)
Para comprar piezas o accesorios o
para obtener información sobre la
garantía en los Estados Unidos, por
favor comuníquese con nosotros en:
www.gracobaby.com
O
1-800-345-4109
2L01VIB/2L02VIB
Registro del producto
(EE.UU.)
Para registrar su producto Graco desde
dentro de los EE.UU., visítenos en línea en
www.gracobaby.com/productregistration.
Actualmente no aceptamos registros de los
productos de quienes viven fuera de los
Estados Unidos de América.
Características del producto
Unidad para padres (PD141837)
Modelo 2L01 - 1 unidad
Modelo 2L02 - 2 unidads
Luces indicadoras
de sonido
Diodo
electroluminiscente
de luz
Unidad del dormitorio (PD141818)
Modelo 2L01/2L02 - 1 unidad
de la
vibración
Enchufe del adaptador
de corriente continua
con funda de goma
Ultra Clear
©2010 Graco PD142728B 4/10
Encendido/
Volumen
Selector de
canales
Clip
Encendido
Selector de
canales
Luz nocturna
Enchufe del adaptador
de corriente continua
con funda de goma
Adaptador de corriente alternada
Modelo 2L01 - Cant. 2
Modelo 2L02 - Cant. 3
1
Page 8

No observar estas advertencias y las instrucciones de armado podría
resultar en lesiones serias o la muerte.
Este dispositivo ha sido diseñado solamente para monitorizar los sonidos de su niño. No
le enviará alertas sobre las actividades silenciosas de su niño. Cuando se usa el
monitor, debe proporcionar la supervisión necesaria para mantener la continua seguridad
de su niño. Este producto no ha sido diseñado ni debe usarse como un monitor médico.
Tenga siempre la seguridad de que el transmisor y el receptor funcionan correctamente y
se encuentran a la distancia requerida.
• PELIGRO DE ESTRANGULACIÓN. Mantener los cordones del adaptador fuera del
alcance de los niños. No lo use con cordones de extensión.
• NO ponga la Unidad del dormitorio o su cordón cerca del alcance de su niño. No
ponga la Unidad del dormitorio en el interior de una cuna o corralito.
• Úselo SOLAMENTE con tomacorrientes eléctricos de corriente alternada de
110-120 voltios.
• Proteja los cordones del adaptador de corriente alternada. Colóquelos de
manera que nadie camine encima de ellos ni que resulten apretados por muebles u otros
artículos.
• Permita una adecuada ventilación cuando usa las unidades. No tape la Unidad
del dormitorio ni la Unidad para padres con ningún objeto como por ejemplo, una
frazada. No lo ponga en un cajón ni en un lugar que pudiera silenciar el sonido o
interferir con el flujo normal del aire.
• NO sumerja ninguna parte de la Unidad del dormitorio, Unidades para padres o
estación de trabajo en agua. Límpielo solamente con un trapo seco.
• NO ponga la unidad cerca del agua o humedad. No use la Unidad del dormitorio a la
intemperie. No use la Unidad del dormitorio cerca de posibles lugares húmedos, tales
como bañera, ducha, lavadero, fregadero, lavarropa, piscina, sótano húmedo, etc.
• Mantenga la Unidad del dormitorio lejos de fuentes de calor, tales como
estufas a leña, radiadores, cocinas y televisores u otros aparatos. El calor puede dañar la
caja o piezas eléctricas.
• NO use la Unidad del dormitorio si:
• Los cordones del adaptador o enchufes han resultado dañados.
• La unidad ha entrado en contacto con líquidos.
• La unidad se ha caído o ha resultado dañada.
• NO ABRA LA UNIDAD DEL DORMITORIO, UNIDADES PARA PADRES, ESTACIÓN
DE TRABAJO O ADAPTADORES.
No hay partes que el usuario pueda arreglar en el interior. Riesgo de choque eléctrico,
incendio o muerte.
• La antena usada en este transmisor debe instalarse para proporcionar una separación de
por lo menos 20 cm (7,9 pulgadas) de todas las personas y no debe estar ubicada ni
usada junto con ninguna otra antena o transmisor.
2
Page 9
Declaración de la Comisión Federal de Comunicaciones:
ADVERTENCIA Las modificaciones no autorizadas por el fabricante pueden anular
autoridad de los usuarios para funcionar este dispositivo.
NOTA: Este equipo ha sido probado y se ha determinado que cumple con los límites de
un dispositivo digital Clase B, según la parte 15 de las normas de la FCC. Estos límites han
sido creados para proporcionar una protección razonable contra la peligrosa interferencia
en una instalación residencial. Este equipo genera, usa y puede emitir energía de
radiofrecuencia y si no se lo instala y usa de acuerdo a las instrucciones, podría causar
interferencias peligrosas con las comunicaciones de radio.
Sin embargo, no se garantiza que la interferencia no ocurrirá en una instalación particular.
Si este equipo causa interferencia peligrosa con la recepción de radio o televisión, lo cual
se puede determinar apagando y encendiendo el equipo, se sugiere al usuario que trate
de corregir la interferencia a través de una de las siguientes medidas:
• Reorientar o cambiar de lugar la antena de recepción.
• Aumentar la separación entre el equipo y el receptor.
• Conectar el equipo a un tomacorriente en un circuito diferente del que está conectado
el receptor.
• Consultar al minorista o a un técnico experimentado de radio y televisión para obtener
ayuda.
Este dispositivo cumple con la parte 15 de las Normas de la Comisión Federal de
Comunicaciones (FCC por sus siglas en inglés). El funcionamiento está sujeto a las dos
condiciones siguientes: (1) Este dispositivo no debe causar interferencia peligrosa y
(2) este dispositivo debe aceptar cualquier interferencia recibida, incluyendo interferencia
que pudiera causar un funcionamiento inadecuado .
• Busque la identificación de la Comisión Federal de Comunicaciones (FCC) abajo de la
unidad para el dormitorio y en el interior del compartimiento de las pilas de la unidad
para padres.
Ultra Clear
2L01VIB/2L02VIB
Graco Children’s Products
3 Glenlake Pkwy Atlanta, GA 30328
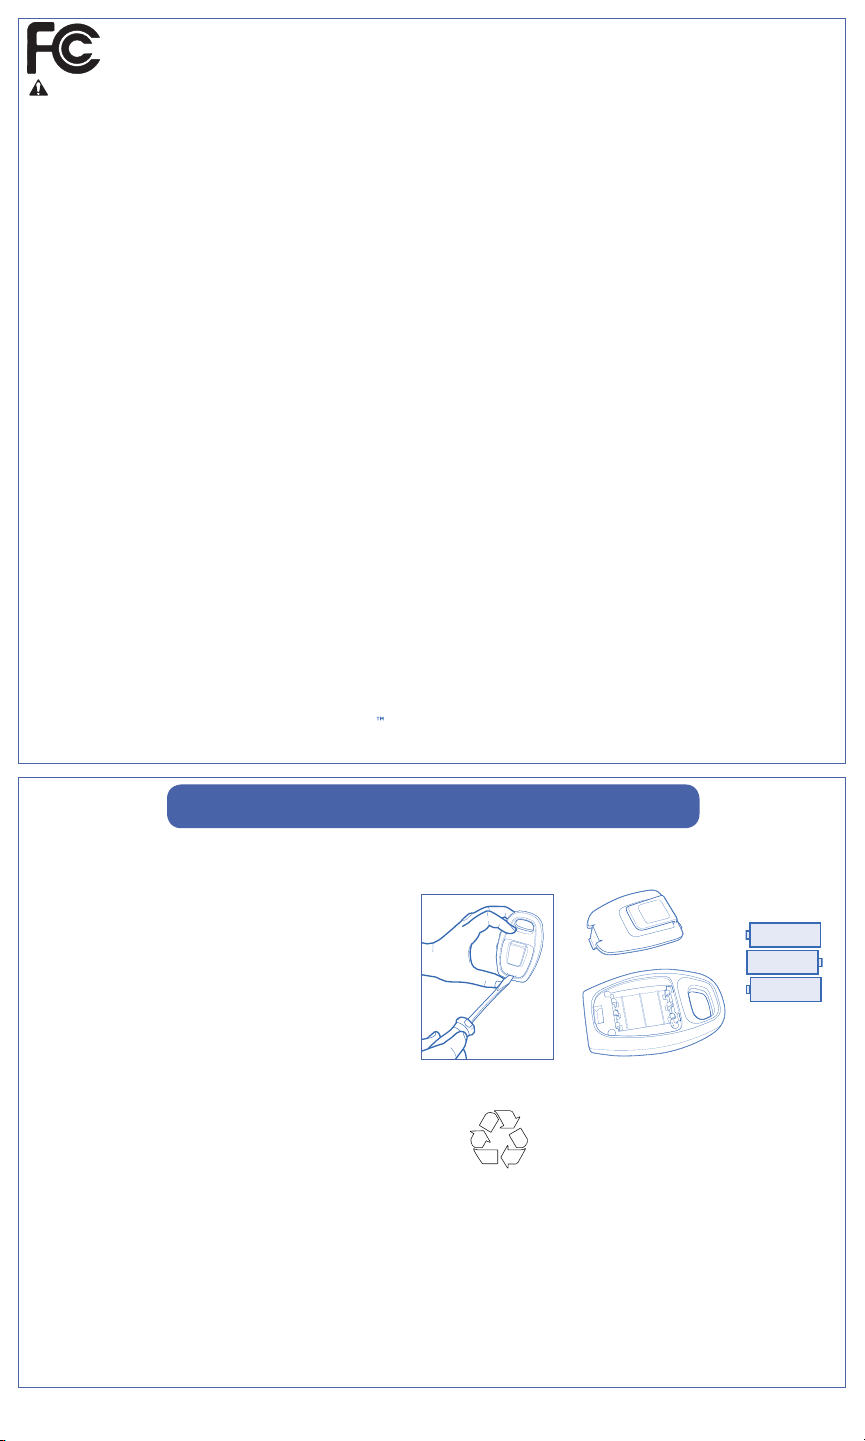
Battery Installation
Unidad para padres
• Saque la puerta de las pilas de la
unidad para padres con una llave o
destornillador plano.
• Ponga 3 pilas tamaño AAA (1,5V-LR03)
en el compartimiento de las pilas. Note la
orientación correcta de las pilas.
• No mezcle pilas viejas con nuevas.
• No mezcle pilas alcalinas, estándar
(carbono-cinc) o recargables
(níquel-cadmio).
• Ponga la puerta de las pilas de nuevo en
la unidad.
• Por favor, saque la pila descargada
Se deben desechar las pilas
correctamente a través del
reciclado.
inmediatamente. Una pila descargada en
la unidad podría perder y dañar a la
unidad.
• No trate de recargar pilas que no son recargables.
• Una pila recargable NO PUEDE recargarse enchufando el adaptador de corriente
alternada a la unidad para padres.
• Saque las pilas de la unidad si ya no la usa más o si la guardará durante un período
largo de tiempo.
+
-
+
-
+
-
3
Page 10
Uso de los adaptadores de
corriente alternada
• La unidad para padres usa 3 pilas tamaño AAA (1,5 V-LR03) o la electricidad estándar de
la vivienda de 120 voltios de corriente alternada. La unidad del dormitorio usa la
electricidad estándar de la vivienda de 120 voltios de corriente alternada.
• Para usar los adaptadores de corriente alternada, enchufe la conexión del cordón en el
enchufe del adaptador de la corriente alternada en el costado de la Unidad para padres y
la parte trasera de la Unidad del dormitorio. Luego enchufe el adaptador en un
tomacorriente estándar de la pared.
• Use SOLAMENTE los adaptadores Graco que se incluyen con la unidad. No use estos
adaptadores con otros equipos en ninguna circunstancia.
• Si las unidades no funcionan, verifique que los adaptadores de corriente alternada están
enchufados en tomacorrientes activados.
Selección de canales
• En caso de experimentar alguna interferencia, el canal
de la unidad del dormitorio puede cambiarse
deslizando el botón “ch” en el costado de la unidad al
canal A ó B ("X" ó "Y").
• El canal de la unidad para padres puede cambiarse
deslizando el botón “ch” en el costado de la unidad al
canal A ó B ("X" ó "Y").
NOTA: Ambas unidades deben estar programadas en el
mismo canal.
Indicador de pilas descargadas
Unidad para padres
• Si funcionó durante mucho tiempo con una pila descargada, también podría
experimentar una señal pobre y el diodo electroluminiscente de luz al frente de la
Unidad para padres podrá cambiar de verde a rojo.
• Puede apagar la unidad, enchufar el adaptador de corriente alternada.
Indicación de que está fuera de rango
•Si la unidad para padres comienza a perder la señal de la unidad del
dormitorio, podría escuchar estática u otros ruidos. Mueva inmediatamente
la Unidad para padres más cerca a la Unidad del dormitorio para recuperar
la conexión.
***Nota: Es poco común que la Unidad para padres ocasionalmente
pierda y recupere la conexión con la Unidad del dormitorio en
ambientes que tienen una gran cantidad de obstrucciones.
A
B
A
B
4
Page 11

Instalación del monitor del bebé
1. Para obtener un mejor funcionamiento, es mejor usar nuevas pilas en la Unidad para
padres.
2. Ponga la Unidad del dormitorio dentro de una distancia de 10 pies (3 metros) de su
bebé. Enchufe un adaptador de corriente alternada en el enchufe del costado de la
Unidad del dormitorio. Enchúfelo a un tomacorriente energizado de 120 voltios de
corriente alternada.
3. Oriente la Unidad del dormitorio hacia su bebé. Verifique que no haya paredes ni
objetos grandes que pudieran bloquear la transmisión del sonido.
4. Programa la Unidad para padres y la Unidad del dormitorio en el mismo canal, el canal
“A” o “B” (“X” o “Y”).
5. Encienda la Unidad del dormitorio usando el interruptor de encendido y apagado del
costado. Se deberá encender la luz verde de encendido.
6. Ponga la Unidad para padres dentro de una distancia de cinco (5) pies (1,5 metros) de
la Unidad del dormitorio y encienda la Unidad para padres usando el interruptor de
encendido y apagado del costado de la unidad. Se deberá encender la luz verde de
encendido.
7. Si tiene 2 unidades para padres, repita el mismo procedimiento de programación para
la segunda unidad para padres, de lo contrario, continúe con el paso 8.
8. El monitor está ahora listo para el uso.
Prueba del sistema
Es MUY IMPORTANTE probar al sistema cuando lo instala por primera vez y
periódicamente en adelante. Pruebe las unidades si sospecha que podrían haber
resultado dañadas o no han sido usadas durante un tiempo largo.
1. Si hay dos adultos presentes, haga que uno lleve las Unidades para padres a lugares
diferentes, probando varios niveles del volumen mientras el otro habla en la Unidad del
dormitorio.
2. Si solamente hay un adulto disponible, ponga un reloj que suene, radio u otro
dispositivo que produzca sonidos cerca de la Unidad del dormitorio para probarla.
3. Mientras hace la prueba, mantenga el nivel del sonido de su niño en mente y ajuste el
volumen lo necesario.
4. Si hay interferencia con el sonido, pase la Unidad del dormitorio y las Unidades para
padres a otro canal.
Funcionamiento
Para escuchar al bebé
• Encienda la Unidad del dormitorio usando el interruptor
de ENCENDIDO/APAGADO.
• Encienda la unidad para padres usando la rueda de
encendido/volumen.
• Ajuste el volumen en la unidad para padres girando la rueda
de encendido/volumen.
• Las luces indicadoras de sonido de la Unidad para padres se iluminarán
cuando su niño (u otros objetos) hacen ruido cerca de la Unidad del
dormitorio. Por favor, note que las luces indicadoras de sonido y el control
del volumen de la Unidad para padres son independientes. Con el volumen
totalmente bajo, las luces indicadoras de sonido se iluminarán cuando su niño (u otros
objetos) hagan ruido cerca de la Unidad del dormitorio.
5
Page 12

Función de alerta con vibración
• Para activar la función de alerta con vibración, ponga el
interruptor del costado de la unidad para padres en la posición
ENCENDIDO (ON).
Función de la luz nocturna
• Para encender la luz nocturna (NightLight), deslice el botón
del costado de la unidad para el dormitorio hacia arriba.
SOLUCION DE DESPERFECTOS
NO INTENTE MODIFICAR LA UNIDAD. CUALQUIER MODIFICACION AL TRANSMISOR
Y/O RECEPTOR PUEDE CANCELAR LA AUTORIDAD DEL OPERADOR PARA USAR EL
EQUIPO.
La mayoría de los problemas tienen
simple solución. Primero, verifique
que:
• La electricidad esté ENCENDIDA en ambas
unidades.
• Ambas unidades deben estar enchufadas
(o las pilas deben ser nuevas en la unidad
para padres)
• El tomacorriente está energizado
• El volumen está alto en la Unidad para
padres
• La Unidad para padres está dentro de la
distancia requerida de la Unidad del dormitorio
No hay sonido
• La pila está descargada o con poca carga
– cámbiela o use el adaptador de corriente
alternada.
• El adaptador de corriente alternada no
está conectado correctamente – verifique
las conexiones.
• La Unidad del dormitorio está cubierta o
bloqueada – saque la obstrucción.
Bajo sonido
• La Unidad del dormitorio está demasiado
lejos del bebé – muévala más cerca.
• Objetos grandes bloquean la señal – trate
de poner la Unidad del dormitorio en otro
lugar.
• Volumen demasiado bajo – súbalo.
Estática
• Interferencia de otros equipos eléctricos –
elimine la causa de la estática (televisores,
mezcladores, computadoras, ventiladores,
luces fluorescentes, potenciómetro de
luces, etc.)
• La Unidad para padres está demasiado
lejos de la Unidad del dormitorio – muévala
más cerca.
• Una cantidad significante de obstrucciones
entre la Unidad para padres y la Unidad del
dormitorio, como paredes, techos y
edificios. Pruebe mover la Unidad del
dormitorio a otra parte de la sala.
• Cambie el canal en la Unidad del
dormitorio.
Sonido agudo (retroalimentación)
• La Unidad del dormitorio y la Unidad para
padres están demasiado cerca – sepárelas
más.
• Volumen fijado demasiado alto – baje el
volumen.
6
 Loading...