

Page 1
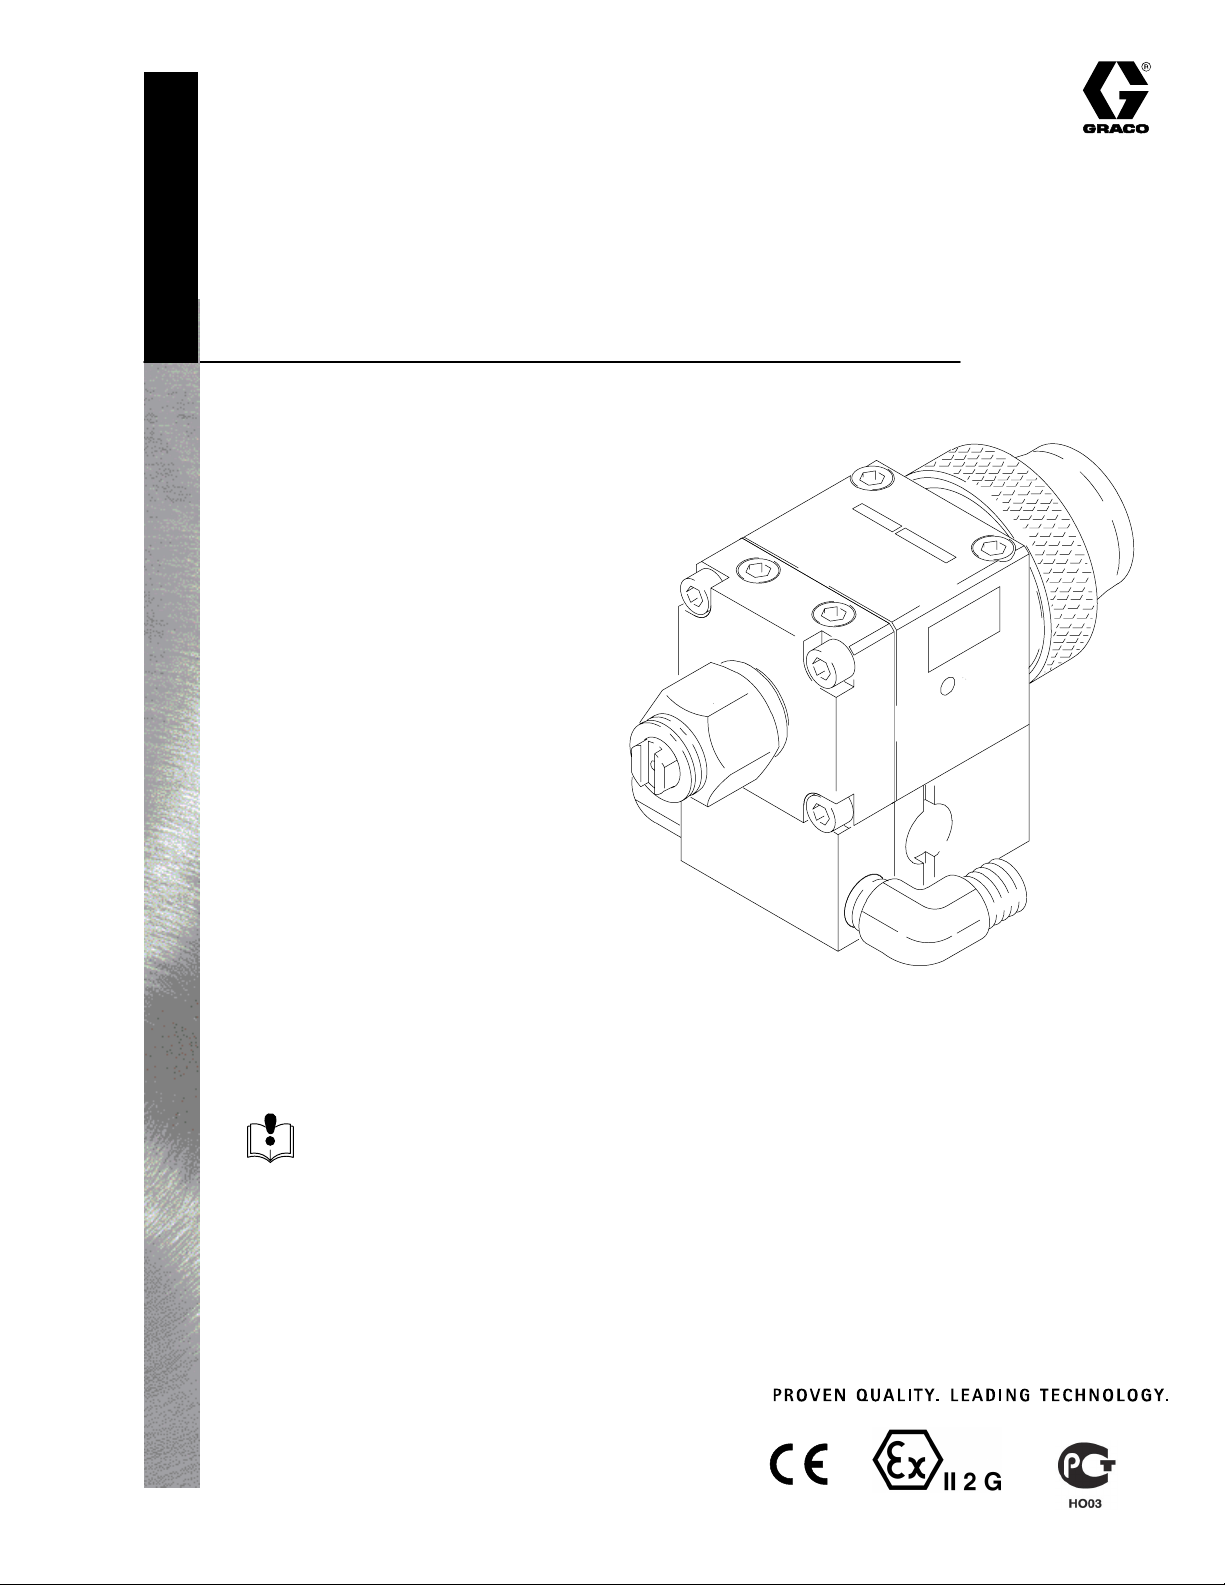
Instructions – Parts List
CIRCULATING, HIGH PRESSURE
Automatic Airless
Spray Gun
4000 psi (28 MPa, 280 bar) Maximum Working Fluid Pressure
Part No. 239786, Series A
Standard Spray Gun
Includes GG0 series tip of choice
Part No. 241469, Series A
Acid Catalyzed Fluid Spray Gun
Includes GG0 series tip of choice
Part No. 233670, Series A
Sealant Streaming Gun
308813J
Read warnings and instructions.
See page 2 for Table of Contents.
GRACO INC.ąP.O. BOX 1441ąMINNEAPOLIS, MNą55440-1441
Copyright 2002, Graco Inc. is registered to I.S. EN ISO 9001
8153A
Page 2

Table of Contents
Symbols
Warnings 2. . . . . . . . . . . . . . . . . . . . . . . . . . . . . . . . . . . . . .
Installation 4. . . . . . . . . . . . . . . . . . . . . . . . . . . . . . . . . . . . .
Operation 9. . . . . . . . . . . . . . . . . . . . . . . . . . . . . . . . . . . . .
Troubleshooting 12. . . . . . . . . . . . . . . . . . . . . . . . . . . . . . .
Service 14. . . . . . . . . . . . . . . . . . . . . . . . . . . . . . . . . . . . . .
Parts 18. . . . . . . . . . . . . . . . . . . . . . . . . . . . . . . . . . . . . . . .
Tip Charts 21. . . . . . . . . . . . . . . . . . . . . . . . . . . . . . . . . . . .
Accessories 27. . . . . . . . . . . . . . . . . . . . . . . . . . . . . . . . . .
Technical Data 28. . . . . . . . . . . . . . . . . . . . . . . . . . . . . . . .
Dimensions and Mounting Hole Layout 30. . . . . . . . . . .
Graco Standard Warranty 32. . . . . . . . . . . . . . . . . . . . . .
Graco Information 32. . . . . . . . . . . . . . . . . . . . . . . . . . . . .
WARNING
EQUIPMENT MISUSE HAZARD
INSTRUCTIONS
Equipment misuse can cause the equipment to rupture, malfunction, or start unexpectedly and result
in serious injury.
This equipment is for professional use only.
Read all instruction manuals, tags, and labels before operating the equipment.
Warning Symbol
WARNING
This symbol alerts you to the possibility of serious
injury or death if you do not follow the instructions.
Caution Symbol
CAUTION
This symbol alerts you to the possibility of damage to
or destruction of equipment if you do not follow the
instructions.
Use the equipment only for its intended purpose. If you are uncertain about usage, call your Graco
distributor.
Do not alter or modify this equipment. Use only genuine Graco parts and accessories.
Check the equipment daily. Repair or replace worn or damaged parts immediately.
Do not exceed the maximum working pressure of the lowest rated system component. This equip-
ment has a 4000 psi (28 MPa, 280 bar) maximum working pressure.
Route the hoses away from the traffic areas, sharp edges, moving parts, and hot surfaces. Do not
expose Graco hoses to temperatures above 180F (82C) or below –40F (–40C).
Use only Graco approved hoses. Do not remove hose spring guards, which help protect the hose
from rupture caused by kinks or bends near the couplings.
Use fluids or solvents that are compatible with the equipment wetted parts. See the Technical
Data section of all the equipment manuals. Read the fluid and solvent manufacturer’s warnings.
Wear hearing protection when operating this equipment.
Comply with all applicable local, state and national fire, electrical and other safety regulations.
TOXIC FLUID HAZARD
Hazardous fluids or toxic fumes can cause serious injury or death if splashed in the eyes or on the
skin, swallowed, or inhaled.
Know the specific hazards of the fluid you are using. Read the fluid manufacturer’s warnings.
Store hazardous fluid in an approved container. Dispose of hazardous fluid according to all local,
Wear the appropriate protective clothing, gloves, eyewear and respirator.
2 308813
state and national guidelines.
Page 3
WARNING
INJECTION HAZARD
Spray from the gun, hose leaks, or ruptured components can inject fluid into your body and cause an
extremely serious injury, including the need for amputation. Splashing fluid in the eyes or on the skin
can also cause a serious injury.
Fluid injected into the skin might look like just a cut, but it is a serious injury. Get immediate medi-
cal attention.
Do not point the spray gun at anyone or at any part of the body.
Do not put hand or fingers over the spray tip.
Do not stop or deflect fluid leaks with your hand, body, glove, or rag.
Do not “blow back” fluid; this is not an air spray gun.
Check the gun diffuser operation weekly.
Follow the Pressure Relief Procedure on page 9 whenever you: are instructed to relieve pres-
sure; stop spraying; clean, check, or service the equipment; or install or clean the spray tip.
Tighten all the fluid connections before operating the equipment.
Check the hoses, tubes, and couplings daily. Replace worn, damaged, or loose parts immediately.
Permanently coupled hoses cannot be repaired; replace the entire hose.
FIRE AND EXPLOSION HAZARD
Improper grounding, poor air ventilation, open flames, or sparks can cause a hazardous condition and
result in fire or explosion and serious injury.
Ground the equipment and the object being sprayed. See Ground the System on page 8.
Provide fresh air ventilation to avoid the buildup of flammable fumes from solvent or the fluid being
sprayed.
Extinguish all the open flames or pilot lights in the spray area.
Electrically disconnect all the equipment in the spray area.
Keep the spray area free of debris, including solvent, rags, and gasoline.
Do not turn on or off any light switch in the spray area while operating or if fumes are present.
Do not smoke in the spray area.
Do not operate a gasoline engine in the spray area.
If there is any static sparking while using the equipment, stop spraying immediately. Identify and
correct the problem.
308813 3
Page 4
Installation
Ventilate the Spray Booth
WARNING
TOXIC FLUID HAZARD
To prevent hazardous concentrations of
toxic and/or flammable vapors, spray
only in a properly ventilated spray booth.
Never operate the spray gun unless ventilation
fans are operating.
Check and follow all of the National, State and
Local codes regarding air exhaust velocity requirements.
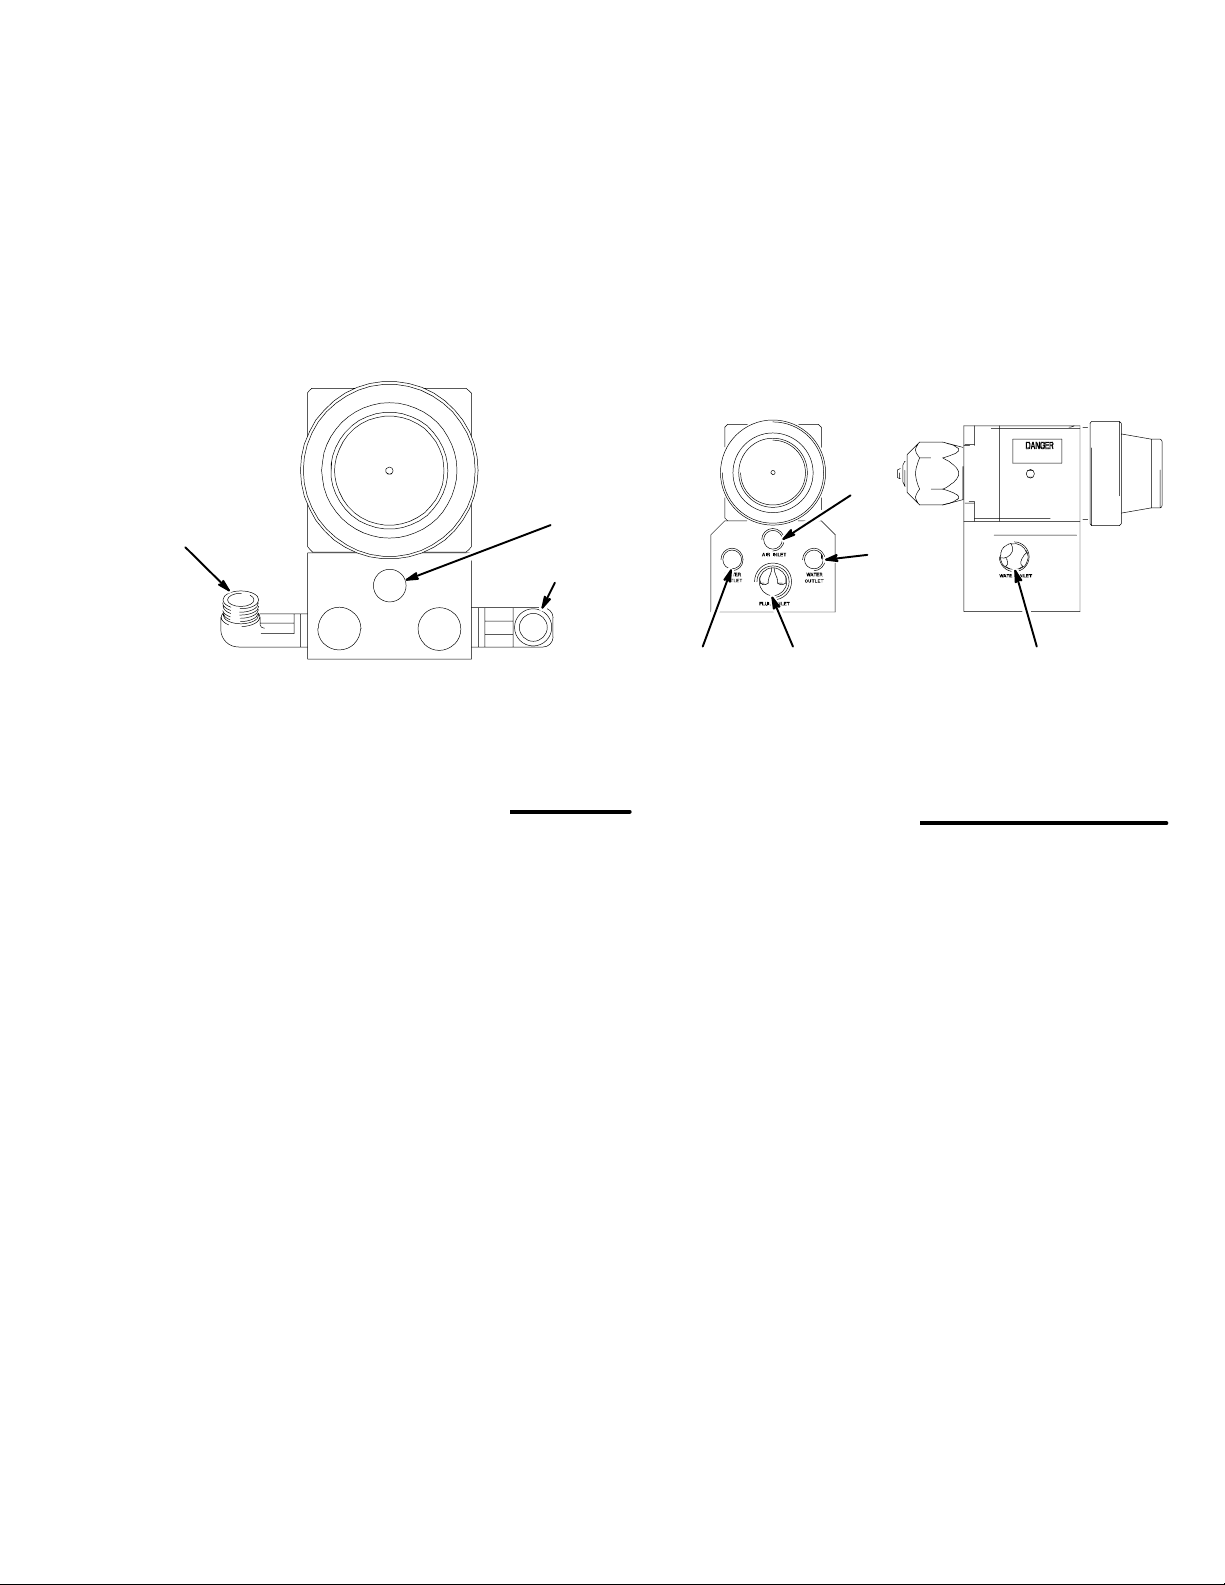
Configure the Gun and Manifold
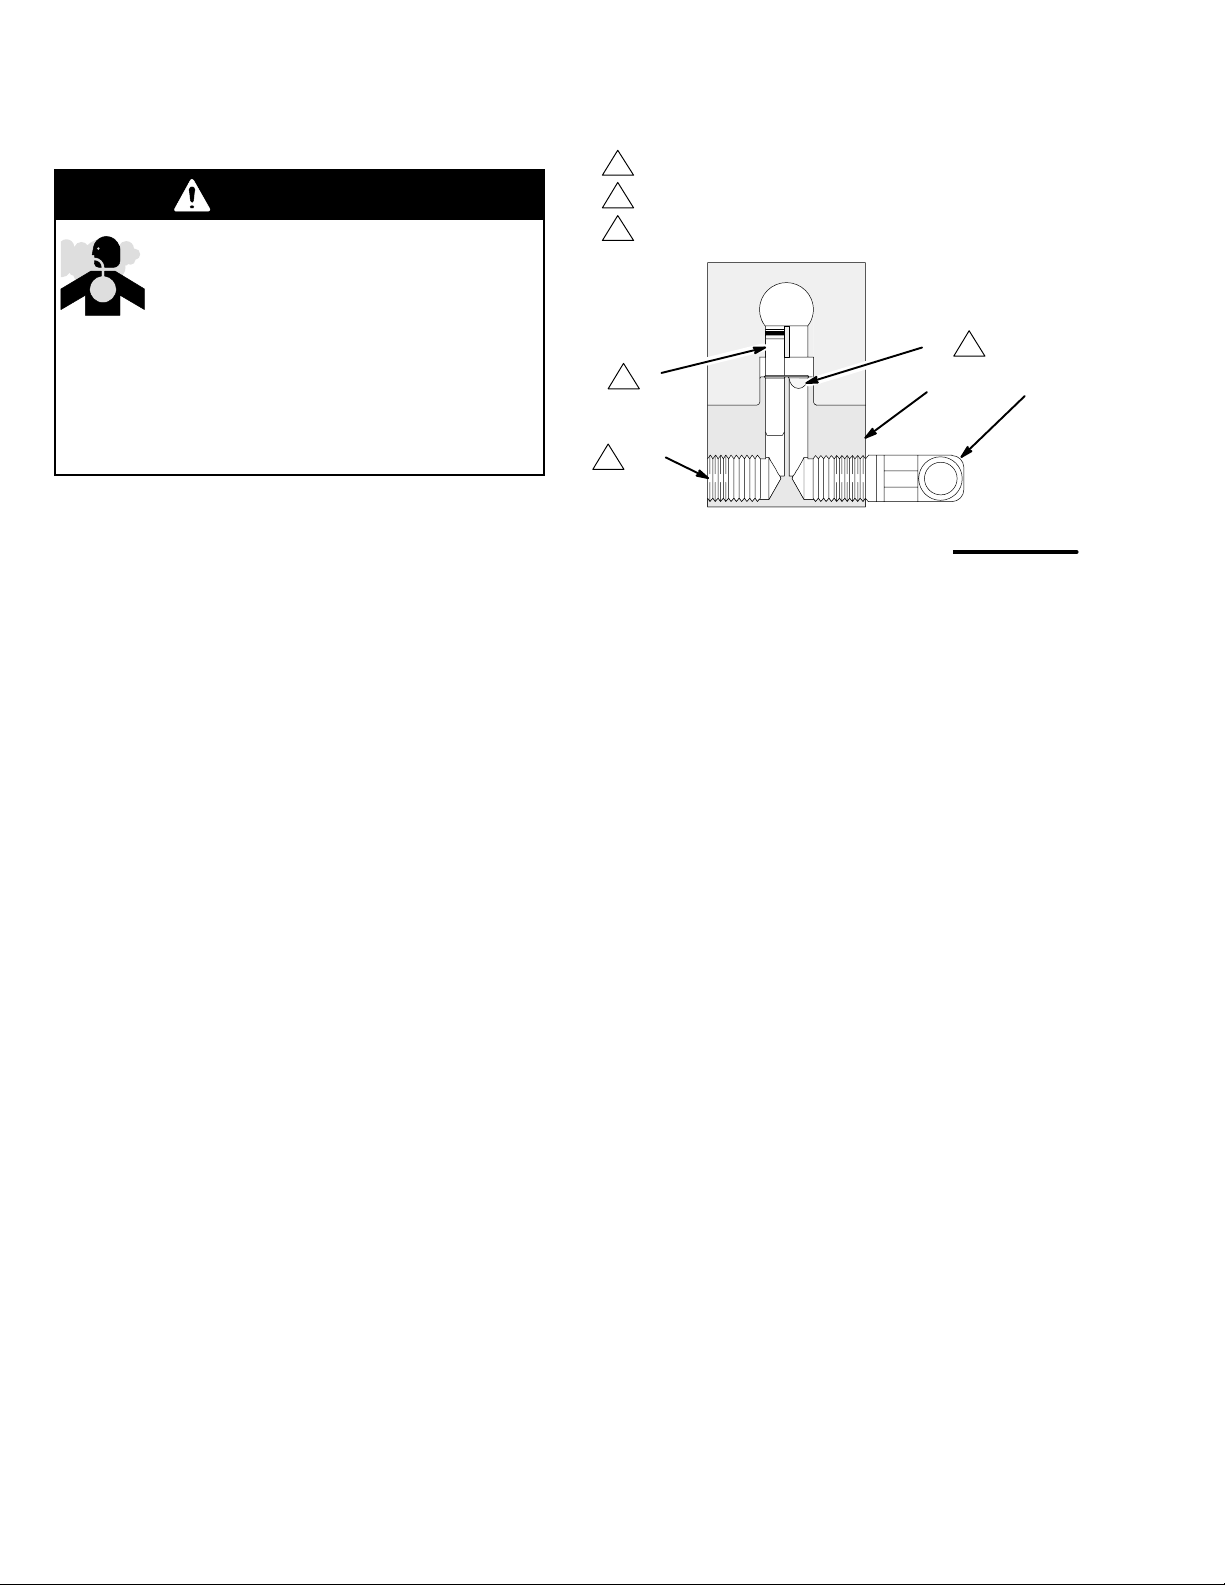
(Order Manifold separately, see page 20)
Models 239786 and 241469
with Manifolds 241161 and 241162
The gun is supplied with an internal fluid plug (4). See
Fig. 1. To use the gun in a circulating system, remove
the internal plug. In a non-circulating system, leave the
plug in place to minimize flush time.
Non–Circulating Setup Shown (cutaway view)
1
Remove when used in circulating systems
2
Replace with an elbow (107) when used in circulating systems
Install filter in the fluid inlet port
3
3
32
4
1
109
2
Fig. 1: Manifolds 241161 and 241162
The gun is supplied with an internal fluid filter (32).
Install the filter in the gun port being used as the fluid
inlet (see Fig. 1).
101
107
8587A
In a circulating system, apply anti-seize lubricant
222955 to the threads and mating faces of the manifold (101) and the elbows (107), supplied unassembled. Install elbows (107) in both fluid ports of the
manifold (101). Connect the fluid supply line to one
elbow and the fluid return line to the other. The manifold fluid ports are reversible.
In a non-circulating system, apply anti-seize lubricant
222955 to the threads and mating faces of the manifold (101), a plug (109), and an elbow (107), supplied
unassembled. Install an elbow (107) in one fluid port of
the manifold, and a plug (109) in the other port. Install
the internal plug (4) in the gun fluid port on the same
side as the manifold plug. Connect the fluid supply line
to the manifold elbow. See Fig. 1.
NOTE: The gun can operate without the filter. If you
are using highly viscous fluid and the filter causes an
unacceptable pressure drop, remove the filter.
Install the gun on the manifold, using the four screws
(17). Thread the screws by hand, then torque alternately and evenly to 65 in-lb (7.3 Nm).
Models 233670
with Manifold 244930
This gun and manifold are designed to be used with
high viscosity material and sealants, such as protective
coatings and automotive sealants. There is no circulation port. The fluid inlet uses both ports to feed the
valve and no filter is used.
4 308813
Page 5

Installation
Mount the Gun
Manifolds 241161 and 241162
To mount the gun on a reciprocating arm [0.5 in.
(13 mm) diameter maximum], insert the bar (A)
through the hole in the manifold as shown in Fig. 2.
Secure the gun to the bar by tightening the mounting
screw (B). The tip of the gun should be 8 to 10 in. (200
to 250 mm) from the surface of the object being
sprayed.
KEY
C M5 x 0.8 Capscrews
All Manifolds
To mount the gun on a stationary support, see Fig. 3.
Also refer to the mounting hole layout on page 30.
Attach the gun to the support with two M5 x 0.8
capscrews (C). The screws must be long enough to
engage the threaded holes in the gun manifold to a
depth of 1/4 in. (6 mm). The tip of the gun should
usually be 8 to 10 in. (200 to 250 mm) from the surface
of the object.
A
B
KEY
A Mounting Bar
B Mounting Screw
8574A
Fig. 2: Manifolds 241161 and 241162
C
8575A
Fig. 3: All Manifolds
308813 5
Page 6
Installation
Air Line and Accessory
Recommendations
1. Install an air pressure regulator on the gun cylinder
air supply line.
A minimum of 70 psi (0.49 MPa, 4.9 bar) air pressure must be supplied to the cylinder for proper
operation. Air pressure opens the valve, a spring
closes the valve. A three-way air valve, which
exhausts cylinder air, is required.
2. Install a bleed-type air shutoff valve on the main air
line. Install an additional bleed-type valve on each
pump air supply line, downstream of the pump air
regulator, to relieve air trapped between this valve
and the pump after the air regulator is shut off.
WARNING
The bleed-type air shutoff valve is required in your
system to relieve air trapped between this valve
and the pump after the air regulator is closed.
Trapped air can cause the pump to cycle unexpectedly, which could result in serious injury.
Fluid Line and Accessory
Recommendations
WARNING
INJECTION HAZARD
To reduce the risk of property damage or
serious injury, including injection, which
could be caused by component rupture
or unrelieved fluid pressure,
A fluid drain valve(s) is required in your system
to assist in relieving fluid pressure in the displacement pump, hose and gun; triggering the
gun to relieve pressure may not be sufficient.
A fluid pressure regulator must be installed in
the system if the pump’s maximum working
pressure exceeds the gun’s maximum fluid
working pressure (see the front cover).
1. Install a fluid filter and drain valve(s) close to the
pump’s fluid outlet.
2. Install a fluid pressure regulator to control fluid
pressure to the gun.
NOTE: Some applications require fine-tuned control of
fluid pressure. You can control fluid pressure more
accurately with a fluid pressure regulator than by
regulating the air pressure to the pump.
3. Install a bleed-type air shutoff valve on the gun air
cylinder supply line, downstream of the air regulator, to shut off air to the gun cylinder. Connect the
air supply line to the gun cylinder air inlet (C). See
Fig. 4.
NOTE: The cylinder air inlet accepts 1/4 in. (6.3 mm)
O.D. tubing.
3. Install a fluid shutoff valve to shut off the fluid
supply to the gun.
4. For paint spray applications, install an in-line fluid
filter, part no. 210500, on the gun fluid inlet (F) to
avoid clogging the spray tip with particles from the
fluid. See Fig. 4.
5. Connect the electrically conductive fluid hose to
the gun fluid inlet (F) or optional in-line filter.
6 308813
Page 7
Installation
Manifolds 241161 and 241162
6. In a circulating system, connect an electrically
conductive fluid hose to the gun fluid outlet (G).
In a non-circulating system, remove the gun
fluid outlet fitting (G) and plug the outlet port with
the pipe plug (109) supplied.
G (or F)
C
F (or G)
FAN
ATO M
CYL
KEY
C Cylinder Air Inlet: accepts 1/4 in. (6.3 mm) O.D. tubing
F Fluid Inlet: 1/4–18 nptf or #5 JIC (1/2–20 unf)
G Fluid Outlet (circulating gun only): 1/4–18 nptf or #5 JIC
(1/2–20 unf)
Fig. 4: Manifolds 241161 and 241162
8576A
Manifold 244930
This manifold is equipped with passages for circulating
water to maintain the temperature of the gun. Ports
provided are:
Side water inlet, 1/4 npt(f)
Top water outlets, 1/8 npt(f)
Side RTD sensor, 1/8 npt(f)
See Accessories, page 27, for available fittings and
sensors.
M
L
TI1397A
L
KEY
L Water Outlet: 1/8 npt(f)
M Air Inlet (to open valve): 1/8 npt(f)
N Fluid Inlet: 3/8(f)
P Water Inlet: 1/4 npt(f)
N
TI1397A
P
Fig. 5: Manifold 244930
308813 7
Page 8

Installation
Ground the System
WARNING
FIRE AND EXPLOSION HAZARD
Improper grounding could cause static
sparking, which could cause a fire or
explosion. To reduce the risk of property
damage or serious injury, follow the
grounding instructions below.
The following grounding instructions are minimum
requirements for a system. Your system may include
other equipment or objects which must be grounded.
Check your local electrical code for detailed grounding
instructions for your area and type of equipment. Your
system must be connected to a true earth ground.
1. Pump: Ground the pump by connecting a ground
wire and clamp between the fluid supply and a true
earth ground as instructed in your separate pump
instruction manual.
2. Air compressors and hydraulic power sup-
plies: Ground them according to the manufacturer
recommendations.
3. Air, fluid, and hydraulic hoses connected to
the pump: Use only electrically conductive hoses
with a maximum of 500 feet (150 m) combined
hose length to ensure grounding continuity. Check
the electrical resistance of your air and fluid hoses
at least once a week. If the total resistance to
ground exceeds 29 megohms, replace the hose
immediately.
NOTE: Use a meter that is capable of measuring
resistance at this level.
4. Spray gun: Ground the gun by connecting it to a
properly grounded fluid hose and pump.
5. Fluid supply container: Ground it according to
local code.
6. Object being sprayed: Ground it according to
local code.
7. All solvent pails used when flushing: Ground
them according to local code. Use only metal pails,
which are conductive. Do not place the pail on a
non-conductive surface, such as paper or cardboard, which interrupts the grounding continuity.
8 308813
Page 9
Operation
Safety
WARNING
INJECTION HAZARD
Remember, this is not an air spray gun.
For your safety be sure to read and
follow the Warnings on pages 2 and 3
and throughout the text of this instruction
manual.
Keep the wallet sized warning card, provided with
the gun, with the operator of this equipment at all
times. The card contains important treatment
information should an injection injury occur. Additional cards are available at no charge from Graco.
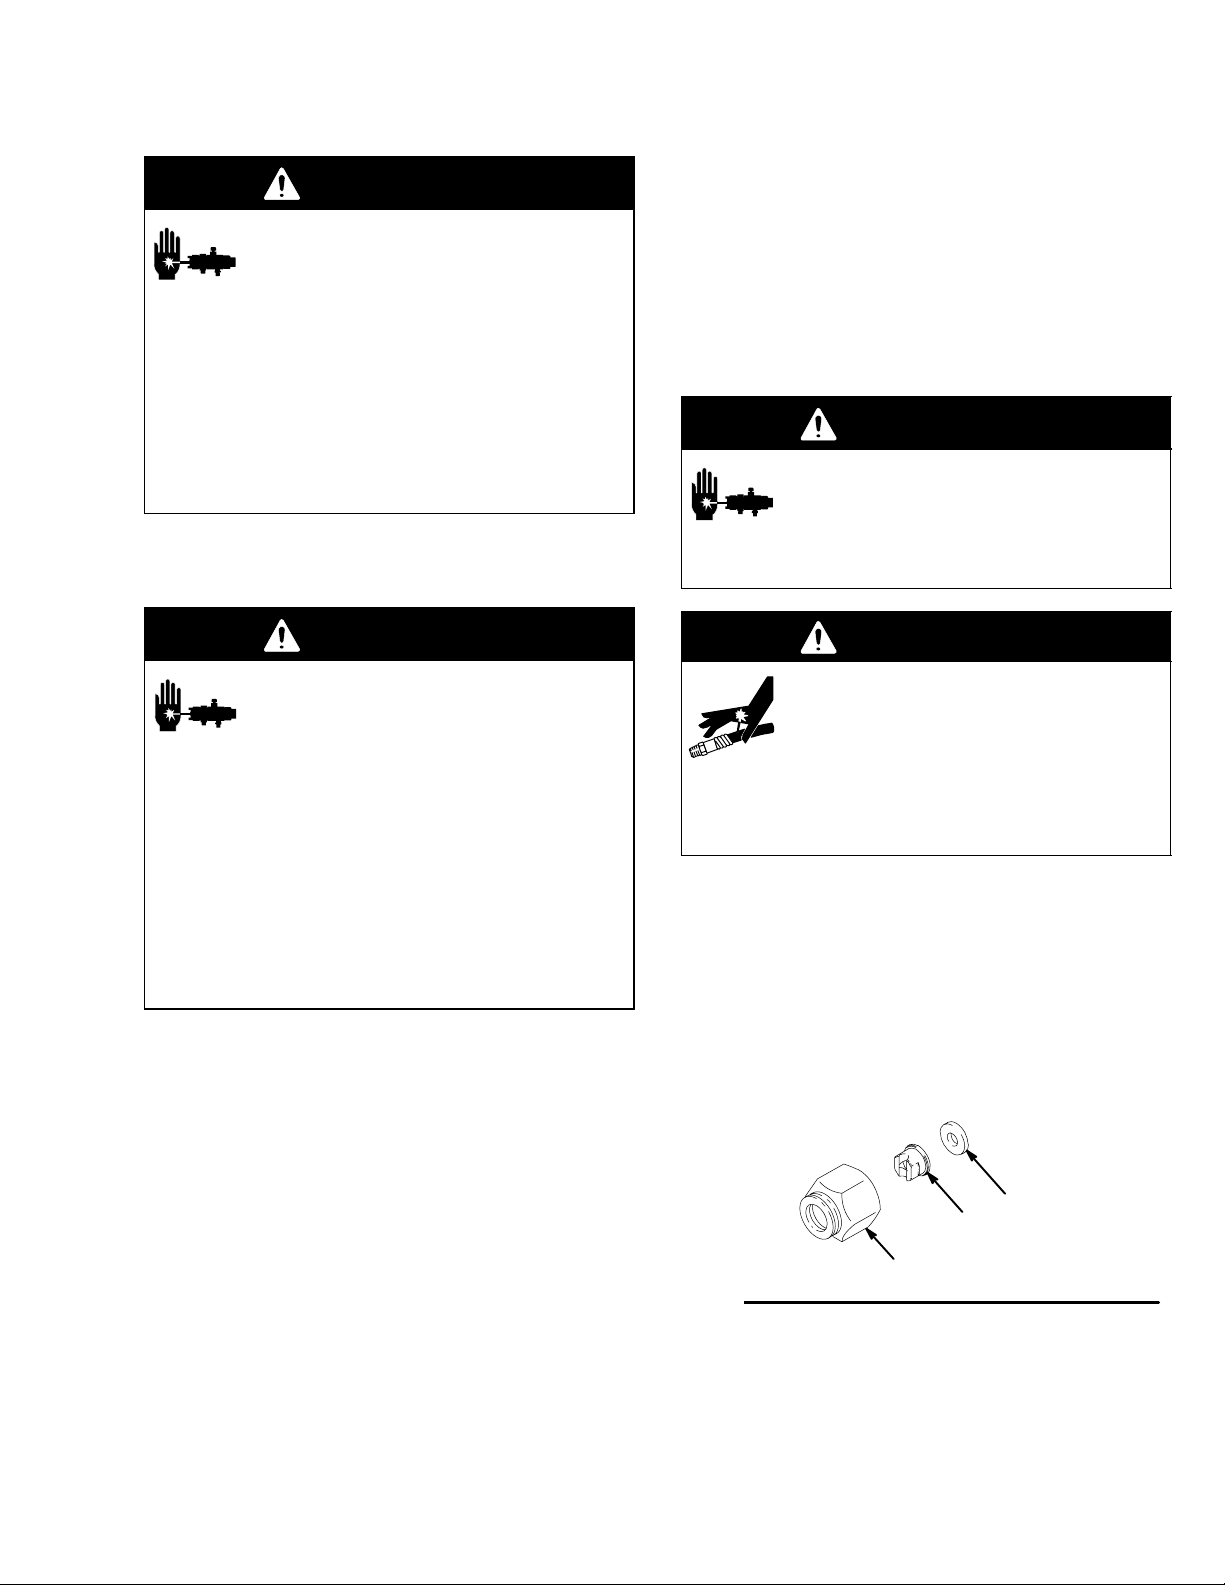
Pressure Relief Procedure
WARNING
INJECTION HAZARD
The system pressure must be manually
relieved to prevent the system from
starting or spraying accidentally. Fluid
under high pressure can be injected through the
skin and cause serious injury. To reduce the risk of
an injury from injection, splashing fluid, or moving
parts, follow the Pressure Relief Procedure
whenever you:
are instructed to relieve the pressure,
stop spraying,
check or service any of the system equipment,
or install or clean the spray tip.
1. Shut off the power to the pump.
2. Close the bleed-type master air valve (required in
the system).
5. Leave the drain valve(s) open until you are ready
to spray again.
6. If you suspect that the spray tip or hose is completely clogged or that pressure has not been fully
relieved after following the steps above, very
slowly loosen the hose end coupling and relieve
pressure gradually, then loosen the coupling
completely. Now clear the tip or hose obstruction.
Install a Spray Tip
WARNING
INJECTION HAZARD
To reduce the risk of an injection injury,
follow the Pressure Relief Procedure
at left before removing or installing a
spray tip.
WARNING
INJECTION HAZARD
To reduce the risk of component rupture
and serious injury, including injection, do
not exceed the gun’s maximum fluid
working pressure (see the front cover) or the
maximum working pressure of the lowest rated
component in the system.
1. Make sure there is no pressure in the system.
Follow the Pressure Relief Procedure at left.
Models 239786 and 241469
with GG0 and GG1 Series Spray Tips
2. Install the spray tip (H) and the gasket (J) in the tip
retainer nut (K). Screw the assembly firmly onto
the gun. Tighten the assembly with a wrench. See
Fig. 6.
3. Trigger the gun to relieve the fluid pressure.
4. Open the pump drain valve (required in the system) to help relieve fluid pressure in the displacement pump. In addition, open the drain valve
connected to the fluid pressure gauge (in a system
with fluid regulation) to help relieve fluid pressure
in the hose and gun. Triggering the gun to relieve
pressure may not be sufficient. Have a container
ready to catch the drainage.
J
H
K
Fig. 6
NOTE: Gaskets are included with Streaming Tips
270XXX or Fan Tips 182XXX (used with Model 233670
Sealant Gun).
308813 9
8577A
Page 10

Operation
Adjust Spray Pattern
1. To adjust the spray pattern direction with fan tips,
orient the slot in the tip horizontally for a horizontal
pattern and vertically for a vertical pattern. See
Fig. 7.
2. Start the pump. Adjust the fluid pressure until the
spray is completely atomized. Use the lowest
pressure necessary to get the desired results.
Higher pressure may not improve the spray pattern
and will cause premature tip wear and pump wear.
3. The spray tip orifice and spray pattern angle
determines the coverage and size of pattern.
When more coverage is needed, follow the Pres-
sure Relief Procedure on page 9, and install a
larger spray tip rather than increasing fluid pressure.
Clean the Spray Gun and System Daily
WARNING
INJECTION HAZARD
To reduce the risk of an injection injury
or splashing fluid in the eyes or on the
skin:
Follow the Pressure Relief Procedure on page
9 before cleaning, removing, or installing a
spray tip and whenever you are instructed to
relieve pressure.
Do not wipe fluid buildup off the gun or spray tip
until pressure is relieved.
CAUTION
To avoid damaging the gun:
Never immerse the gun in solvent as this could
damage packings and allow solvent in the air
passages.
Do not use metal tools to clean holes in the spray
tip.
Tip shown in position for vertical spray pattern
8574A
Fig. 7
Adjust a Streaming Tip
Select a tip which will supply a stream at the required
flow rate at the lowest pressure.
Apply the Fluid
Adjust the system control device, if it is automatic, so
the gun starts spraying just before meeting the workpiece and stops as soon as the workpiece has passed.
Keep the gun a consistent distance, 8 to 10 inches
(200 to 250 mm), from the surface of the object being
sprayed.
CAUTION
This gun is not adjustable. To ensure proper shutoff,
screw the piston cap (18) onto the housing (1) until it
bottoms out.
NOTE: Clean the front of the tip frequently during the
day to help reduce buildup.
1. Relieve the pressure as instructed on page 9.
2. Clean the outside of the gun with a soft cloth
dampened with compatible solvent.
3. To avoid damaging the spray tip, clean it with a
compatible solvent and soft brush.
4. If using the internal filter and/or an in-line filter,
remove and clean it thoroughly in a compatible
solvent.
5. Clean the system’s fluid filter and air line filter.
10 308813
Page 11

Operation
Flush the Gun Daily
WARNING
INJECTION HAZARD
To reduce the risk of an injection injury,
follow the Pressure Relief Procedure
on page 9 before cleaning, removing,
or installing a spray tip and whenever you are
instructed to relieve pressure.
WARNING
To reduce the risk of serious injury, including
splashing fluid in the eyes or on the skin, or static
electric discharge when flushing:
Be sure the entire system, including flushing
pails, are properly grounded.
Remove the spray tip.
Maintain metal to metal contact between the
gun and the flushing pail.
Use the lowest possible pressure.
NOTE:
Flush the pump and gun before the fluid can dry in
it.
If it is available, the flushing procedure provided in
the pump or sprayer manual should be used
instead of this procedure.
1. Relieve the pressure as instructed on page 9.
2. Remove the spray tip. Clean the parts.
3. Supply a compatible solvent to the gun fluid inlet.
4. Start the pump and operate it at its lowest pressure.
5. Trigger the gun into a grounded metal waste
container until all the material is removed from the
gun passages.
6. Relieve the pressure as instructed on page 9.
7. Disconnect the solvent supply.
308813 11
Page 12

Troubleshooting
NOTE:
WARNING
INJECTION HAZARD
To reduce the risk of an injection injury,
follow the Pressure Relief Procedure
on page 9 before checking or servicing
any of the system equipment and whenever you
are instructed to relieve pressure.
General Troubleshooting
Problem Cause Solution
Fluid leakage through venting
holes.
Air leakage through venting hole. Worn o-ring (23). Check and replace as needed.
Air leakage from back of gun. Worn o-rings (22, 23). Replace o-rings.
Fluid leakage from front of gun.
Worn o-rings (31) or needle assembly
(12).
Fluid needle (12) is dirty, worn, or
damaged.
Dirty or worn seat (10).
Check all possible remedies in the troubleshooting
charts before disassembling the gun.
Some improper patterns are caused by the
improper balance between air and fluid. Refer to
Spray Pattern Troubleshooting, on page 13.
Replace o-rings or needle assembly.
Clean or replace fluid needle.
Clean or replace the seat (10) and
gasket (11). The gasket must be
replaced whenever you remove the
seat from the gun.
Spray tip seal is leaking.
Seat (10) is insufficiently tightened or
gasket (11) is missing or worn from
multiple uses.
Fluid needle will not trigger. Loose or missing fluid needle stop
(17) or setscrew (16).
Broken fluid needle (12).
Air leaking around piston (21).
Swollen piston o-ring (22).
Insufficient air pressure on the trigger.
Spray tip (9) is plugged.
Internal fluid filter (32) is plugged.
Plug (4) is in the incorrect fluid port.
Tighten nut (7) or replace spray tip
gasket (8).
Tighten seat (10) and replace gasket
(11). The gasket must be replaced
whenever you remove the seat from
the gun.
Replace stop (17) or tighten setscrew
(16).
Replace fluid needle (12).
Replace o-ring (22) or piston assembly (21).
Replace o-ring (22). Do not immerse
piston in solvent.
Increase the air pressure or clean the
air line.
Clean the spray tip (9).
Clean or replace the filter (32).
Move the plug to the fluid port consistent with manifold plumbing, unless
you are using the gun in a circulating
system. If you are, all fluid ports
should be open, both inside the gun
and on the manifold.
General Troubleshooting is continued on page 13.
12 308813
Page 13

Troubleshooting
WARNING
INJECTION HAZARD
To reduce the risk of an injection injury,
follow the Pressure Relief Procedure
on page 9 before checking or servicing
any of the system equipment and whenever you
are instructed to relieve pressure.
General Troubleshooting (continued)
Problem Cause Solution
Fluid does not shut off. Piston cap (18) is not fully tightened.
Tighten piston cap until it bottoms
out.
Spring (19) is not in place.
Swollen piston o-ring (22).
Check that spring is in position.
Replace o-ring (22). Do not immerse
piston in solvent.
Spray Pattern Troubleshooting
Problem Cause Solution
Fluttering spray
Spitting spray
Irregular pattern Fluid build-up or spray tip partially
Insufficient fluid supply
Air in paint supply line
Worn seat (10) or needle (12) ball.
Dirty spray tip (9).
Swollen piston o-ring (22).
plugged
Adjust fluid regulator or fill fluid supply
tank.
Check, tighten siphon hose connections, bleed air from paint line.
Inspect seat and needle for wear.
Replace if necessary. The gasket (11)
must be replaced whenever you remove the seat from the gun.
Clean.
Replace o-ring. Do not immerse piston in solvent.
Clean spray tip. See page 10.
308813 13
Page 14

WARNING
INJECTION HAZARD
To reduce the risk of an injection injury,
follow the Pressure Relief Procedure
on page 9 before checking or servicing
any of the system equipment and whenever you
are instructed to relieve pressure.
Service
7. Pull the needle assembly (12) straight out the front
of the gun. Remove the o-rings (31) from the fluid
needle (12).
8. Remove the gasket (11).
CAUTION
NOTE:
Follow the Service Notes in Figs. 8 and 9 when
reassembling the gun.
Gun repair kits are available. See page 18. Refer-
ence numbers marked with an asterisk (13*) in the
service procedures are included with the 241480
Air Seal Repair Kit. Reference numbers marked
with a symbol (3) in the service procedures are
included with the 239896 Fluid Repair Kit.
Disassembly
1. Relieve the pressure as instructed on page 9.
2. Unscrew the four screws (14) and remove the gun
from the manifold.
3. Unscrew the tip retainer nut (7). Remove the spray
tip (9) and gasket (8). See Figs. 8 and 9.
4. Remove the cap (18) from the piston housing (1).
Remove the springs (20 and 19).
5. Using the supplied wrench (34), loosen the fluid
needle setscrew (16). Remove the needle stop
(17).
6. Remove the seat (10).
Install a new gasket (11) whenever you remove the
seat (10) from the gun. Failure to install a new gasket may result in fluid leaking into the air chamber.
9. Remove the four screws (15) holding the fluid
housing (2) to the piston housing (1). Remove the
gasket (13) from the bottom of the piston housing.
10. Using a pliers, pull the piston (21) out of the piston
housing (1).
11. Remove the large o-ring (22) from the piston and
the smaller o-ring (23) from the piston shaft.
Remove the two o-rings (25, 26) from each of the
piston stems (T). Check that the stems are solidly
in place. If they are loose, replace the entire piston
assembly (21).
12. Perform the following applicable step:
Non-circulating Paint Guns: Remove the fluid
outlet port plug (4), gasket (3), and filter (32)
from the fluid housing (2). Remove the o-ring (5)
and backup (6) from the plug.
Circulating Paint Guns: Remove the gasket (3)
and filter (32) from the fluid housing (2).
CAUTION
Be sure to keep the needle straight when removing it
from the gun. If the needle is bent it must be replaced.
14 308813
Sealant Gun: Remove the gasket (3).
13. Clean all parts and replace any worn parts. When
assembling, lubricate the threads with anti-seize
lubricant.
Page 15

Cutaway View
9
11
11
Service
10
2
7
11
12
1
21
11
22
26*
18
35
25*
3
3
T
8
16
17
6
7
8 1 3
11
4
3 3 3
Fig. 8: Gun 239786 / 241469 shown
31 12 23*13* 21 22* 2019
SERVICE NOTES:
Seat gasket (11) must be replaced if
1
seat (10) is removed or replaced to
avoid fluid leakage
2
Lubricate threads with anti-seize lubricant
3
Lubricate with light-weight oil
4
Do not lubricate
Torque to 20–25 ft-lb (27–34 Nm)
5
Apply semi-permanent anaerobic sealant.
6
7
Torque to 4–5 in-lb (0.45–0.56 Nm)
8
Tighten cap (18) until it bottoms out
Model 233670 gun uses a different tip (9), tip
11
nut (7), and a gasket (8), and the seat (10)
does not include a diffuser. Model 233670 gun
does not include items 4, 5, 6, 8, 9, and 32.
12
Model 233670 gun only.
Max torque to 5 ft–lb (6.8 N*m)
8151A
308813 15
Page 16

SERVICE NOTES:
Seat gasket (11) must be replaced if
1
seat (10) is removed or replaced to
avoid fluid leakage
Lubricate threads with anti-seize lubricant
2
3
Lubricate with light-weight oil
Do not lubricate
4
5
Torque to 20–25 ft-lb (27–34 Nm)
Apply semi-permanent anaerobic sealant
6
Torque to 4–5 in-lb (0.45–0.56 Nm)
7
Tighten cap (18) until it bottoms out
8
9
Used on non-circulating guns only
10
Torque to 65 in-lb (7.3 Nm)
Service
Model 233670 gun uses a different tip (9), tip
11
nut (7), and a gasket (8), and the seat (10)
does not include a diffuser. Model 233670 gun
does not include items 4, 5, 6, 8, 9, and 32.
12
Model 233670 gun only.
Max torque to 5 ft–lb (6.8 N*m)
15
10
31
3
12
11
1
14
2
10
2
11
5
3
9
4
11
11
7
12
11
8
1
9
10
2
5
6
3
9
4
9
32
3
20
18
8
19
16
6
22*
14
3
T
7
21
17
12 (Ref)
Fig. 9
16 308813
13*
23*
25*
26*
1
2
3
3
3
8150A
Page 17

Service
Reassembly
1. Perform the following applicable step:
Non-circulating Paint Guns: Lubricate the back-
up (6) and o-ring (5) and install them on the
fluid outlet port plug (4). Install the plug in the
fluid outlet port of the fluid housing (2). See
Fig. 9.
Circulating Paint Guns: Reinstall the filter (32)
in the fluid inlet port and the gasket (3) in the
fluid housing (2).
Sealant Gun: Reinstall gasket (3).
2. Install the o-rings (22*, 23*) on the piston (21).
Install two o-rings (25*, 26*) on each of the piston
stems (T). Lubricate all the o-rings, the piston, and
the piston stems.
3. Insert the piston (21) into the piston housing (1).
4. Remove the protective paper from the sticky side
of the gasket (13*) and adhere the gasket to the
bottom of the piston housing (1), making sure the
three holes in the gasket are properly aligned with
the matching holes in the housing.
5. Install the fluid housing (2) on the piston housing
(1). Torque the four screws (15) to 65 in-lb (7.3
Nm).
CAUTION
Install a new gasket (11) whenever you remove the
seat (10) from the gun. Failure to install a new gasket may result in fluid leaking into the air chamber.
6. Install the o-rings (31) on the fluid needle assembly (12). Lubricate with light weight oil.
CAUTION
Be sure to keep the needle straight when installing it
in the piston housing. If the needle is bent it must be
replaced.
7. Insert the needle assembly (12) into the front of
the fluid housing (2). Push it straight back through
the piston.
8. Install a new gasket (11) in the fluid housing (2).
9. Lubricate the threads of the seat (10). Screw it into
the fluid housing (2) and torque to 20–25 ft-lb
(27–34 Nm).
10. Install the needle stop (17) on the needle. Coat the
setscrew (16) with semi-permanent anaerobic
sealant and install the screw into the needle stop.
Torque to 4–5 in-lb (0.45–0.56 Nm). Pull on the
needle to make sure it seats fully.
11. Install the springs (19, 20).
12. Lubricate the threads of the piston housing (1).
Screw the cap (18) onto the housing until it bottoms out.
13. Do not lubricate the gasket (8). Install the spray
tip (9) and gasket (8) in the tip retainer nut (7).
Screw the assembly firmly onto the gun. Tighten
the assembly with a wrench, but do not exceed
5 ft–lb (6.8 Nm) for model 233670 gun.
14. Reinstall the gun on the manifold with the four
screws (14). Torque to 65 in-lb (7.3 Nm).
308813 17
Page 18

Parts
Use Only Genuine Graco Parts and Accessories
Part No. 239786, Series A
Standard Automatic Airless Spray Gun
Includes items 1–34
Part No. 241469, Series A
Automatic Airless Acid Catalyzed Fluid Spray Gun
Includes items 1–34
Ref.
No. Part No. Description Qty.
1 194143 HOUSING, piston 1
2 192688 HOUSING, fluid 1
3 192443 GASKET, fluid;
acetal homopolymer 2
4 192687 PLUG, fluid, internal;
stainless steel 1
5 114244 O-RING; fluoroelastomer 1
6 114340 RING, backup; PTFE 1
7 171602 TIP RETAINER NUT; used with
Part No. 239786 & 241469 1
198391 TIP RETAINER NUT; used with
Part No. 233670 1
8 166969 GASKET 1
9 GG0xxx SPRAY TIP; customer’s choice 1
10 239890 SEAT, diffuser; used with
Part No. 239786 & 241469 1
233671 SEAT, valve; used with
Part No. 233670 1
11 189970 GASKET, diffuser/valve; PEEK 1
12 239807 NEEDLE ASSEMBLY;
3/16 in. carbide ball;
used with Part No. 239786 &
233670; includes item 31 1
241468 NEEDLE ASSEMBLY;
3/16 in. plastic ball;
used with Part No. 241469;
includes item 31 1
13* 114134 GASKET; polyethylene 1
14 114135 SCREW, cap, socket head;
M5 x 0.8; 45 mm long 4
15 114136 SCREW, cap, socket head;
M5 x 0.8; 20 mm long 4
Part No. 233670, Series A
Automatic Sealant Stream/Spray Gun
Includes items 1–3, 7, 10–31, 34
16 114137 SCREW, set; 6–32; 1/8 in. long 1
Ref.
No. Part No. Description Qty.
17 192452 STOP, needle; stainless steel 1
18 192453 CAP, piston 1
19 114138 SPRING, compression 1
20 114139 SPRING, compression 1
21 240895 PISTON 1
22* 115066 O-RING; fluoroelastomer 1
23* 111450 O-RING; fluoroelastomer 1
25* 112319 O-RING; fluoroelastomer 2
26* 111504 O-RING; fluoroelastomer 2
30 222385 CARD, warning; not shown 1
31 111516 O-RING
included with item 12 2
32 240948 FILTER, internal; 60–80 mesh;
stainless steel (package of 10) 1
34 114141 TOOL, wrench, hex 1
Replacement Danger and Warning labels, tags and
cards are available at no cost.
An extra gasket (3) is included as a spare.
* These parts are included in Air Seal Repair Kit
241480, which may be purchased separately. The
kit includes some parts which are not used on this
gun.
These parts are included in Fluid Repair Kit
239896, which may be purchased separately.
Keep these spare parts on hand to reduce down
time.
18 308813
Page 19

Part No. 239786 shown
Parts
14
2
15
31
12
11
1
1
1
9
10
8
7
5
1
6
1
4
1
32
1
3
16
14
25*26*
12 (Ref)
20
18
19
17
13*
22*
21
23*
1
1
Model 233670 gun uses a different tip (9), tip
nut (7), and a gasket (8), and the seat (10)
does not include a diffuser. Model 233670 gun
does not include items 4, 5, 6, 8, 9, and 32.
8150A
308813 19
Page 20

Parts
Use Only Genuine Graco Parts and Accessories
Part No. 241161, Series A
North America Manifold
Part No. 241162, Series A
International Manifold
Ref.
No. Part No. Description Qty.
101 239892 MANIFOLD 1
103 113208 FITTING, tube, air inlet;
1/4 in. (6.3 mm) OD tube x
1/8 npt(m) 1
105 114246 SCREW, set; 5/16; 0.437 in. long 1
107 114342 ELBOW, fluid, male;
1/4 nptf(mbe); stainless steel;
Part No. 241161 only 2
114247 ELBOW, fluid, male; ;
#5 JIC (1/2–20 unf) x
1/4 npt(m); stainless steel;
Part No. 241162 only 2
109 101970 PLUG, pipe; 1/4–18 ptf;
stainless steel; not shown;
install one in the fluid outlet port
in non-circulating applications 3
Flats must be parallel to the surface of the manifold (101) to
1
prevent interference with the gun.
Apply anti-seize lubricant 222955 to threads
2
and mating faces of manifold (101) and any
fittings and/or plugs used in the fluid ports.
107
2
101
1
2
103
Part No. 244930, Series A
High Flow Ambient or Temperature
Conditioned Manifold for streaming or spraying.
Ref.
No. Part No. Description Qty.
101 198325 MANIFOLD, aluminum 1
102 110208 PLUG, 1/8 npt, stanless steel 1
107
105
8673A
101
102
TI1396A
20 308813
Page 21

GG0 Series Tip Selection Charts
Flow Rate
inches
(300 mm)
gal/min
()
()
()
()
()
()
()
()
Flow Rate
inches
(300 mm)
gal/min
()
()
()
()
GG0 Series Spray Tips
For Models 239786 and 241469
Orifice
Size
in
h
(mm)
0.007
(0.178)
0.009
(0.229)
0.011
(0.279)
0.013
(0.330)
Fan Width
at 12”
mm
Inches (mm)
2–2.5
(50–63)
4–4.5
(100–113)
6–6.5
(150–163)
2–2.5
(50–63)
4–4.5
(100–113)
6–6.5
(150–163)
8–8.5
(196–213)
2–2.5
(50–63)
4–4.5
(100–113)
6–6.5
(150–163)
8–8.5
(200–213)
10–10.5
(250–263)
12–13
(300–325)
2–2.5
(50–63)
4–4.5
(100–113)
6–6.5
(150–163)
8–8.5
(200–213)
10–10.5
(250–263)
12–13
(300–325)
14–15
(350–375)
Flow Rate
(tested in
water)
l
min
(liters/min) Part No.
.053
(0.20)
.087
(0.33)
0.13
(0.49)
0.18
(0.69)
GG0107
GG0207
GG0307
GG0109
GG0209
GG0309
GG0409
GG0111
GG0211
GG0311
GG0411
GG0511
GG0611
GG0113
GG0213
GG0313
GG0413
GG0513
GG0613
GG0713
Orifice
Size
in
h
(mm)
0.015
(0.381)
0.017
(0.432)
Fan Width
at 12”
mm
Inches (mm)
2–2.5
(50–63)
4–4.5
(100–113)
6–6.5
(150–163)
8–8.5
(200–213)
10–10.5
(250–263)
12–13
(300–325)
14–15
(350–375)
16–17
(400–425)
2–2.5
(50–63)
4–4.5
(100–113)
6–6.5
(150–163)
8–8.5
(200–213)
10–10.5
(250–263)
12–13
(300–325)
14–15
(350–375)
16–17
(400–425)
18–19
(450–475)
Flow Rate
(tested in
water)
l
min
(liters/min) Part No.
0.24
(0.91)
0.31
(1.17)
GG0115
GG0215
GG0315
GG0415
GG0515
GG0615
GG0715
GG0815
GG0117
GG0217
GG0317
GG0417
GG0517
GG0617
GG0717
GG0817
GG0917
308813 21
Page 22

GG0 Series Tip Selection Charts
Orifice
Fan Width
Flow Rate
Part No
()
()
()
()
()
()
Orifice
Fan Width
Flow Rate
Part No
()
()
()
()
()
()
For Models 239786 and 241469
GG0 and GG1 Series Spray Tips
Orifice Fan Width Flow Rate Part No.
Size
0.019
(0.483)
0.021
(0.533)
0.023
(0.584)
22 308813
2–2.5
(50–63)
4–4.5
(100–113)
6–6.5
(150–163)
8–8.5
(200–213)
10–10.5
(250–263)
12–13
(300–325)
14–15
(350–375)
16–17
(400–425)
18–19
(450–475)
2–2.5
(50–63)
4–4.5
(100–113)
6–6.5
(150–163)
8–8.5
(200–213)
10–10.5
(250–263)
12–13
(300–325)
14–15
(350–375)
16–17
(400–425)
18–19
(450–475)
4–4.5
(100–113)
6–6.5
(150–163)
8–8.5
(200–213)
10–10.5
(250–263)
12–13
(300–325)
14–15
(350–375)
16–17
(400–425)
18–19
(450–475)
0.39
(1.47)
0.47
(1.79)
0.57
(2.15)
GG0119
GG0219
GG0319
GG0419
GG0519
GG0619
GG0719
GG0819
GG0919
GG0121
GG0221
GG0321
GG0421
GG0521
GG0621
GG0721
GG0821
GG0921
GG0223
GG0323
GG0423
GG0523
GG0623
GG0723
GG0823
GG0923
.
Orifice Fan Width Flow Rate Part No.
Size
0.025
(0.635)
0.027
(0.686)
0.029
(0.737)
4–4.5
(100–113)
6–6.5
(150–163)
8–8.5
(200–213)
10–10.5
(250–263)
12–13
(300–325)
14–15
(350–375)
16–17
(400–425)
18–19
(450–475)
20–21
(500–525)
4–4.5
(100–113)
6–6.5
(150–163)
8–8.5
(200–213)
10–10.5
(250–263)
12–13
(300–325)
14–15
(350–375)
16–17
(400–425)
18–19
(450–475)
4–4.5
(100–113)
6–6.5
(150–163)
8–8.5
(200–213)
10–10.5
(250–263)
12–13
(300–325)
14–15
(350–375)
16–17
(400–425)
18–19
(450–475)
0.67
(2.54)
0.78
(2.96)
0.90
(3.42)
GG0225
GG0325
GG0425
GG0525
GG0625
GG0725
GG0825
GG0925
GG1025
GG0227
GG0327
GG0427
GG0527
GG0627
GG0727
GG0827
GG0927
GG0229
GG0329
GG0429
GG0529
GG0629
GG0729
GG0829
GG0929
.
Page 23

GG0 Series Tip Selection Charts
Orifice
Fan Width
Flow Rate
Part No
()
()
()
()
Orifice
Fan Width
Flow Rate
Part No
()
()
()
()
()
()
For Models 239786 and 241469
GG0 and GG1 Series Spray Tips
Orifice Fan Width Flow Rate Part No.
Size
0.031
(0.787)
0.033
(0.838)
0.035
(0.889)
4–4.5
(100–113)
6–6.5
(150–163)
8–8.5
(200–213)
10–10.5
(250–263)
12–13
(300–325)
14–15
(350–375)
16–17
(400–425)
18–19
(450–475)
8–8.5
(200–213)
10–10.5
(250–263)
12–13
(300–325)
14–15
(350–375)
16–17
(400–425)
18–19
(450–475)
4–4.5
(100–113)
6–6.5
(150–163)
8–8.5
(200–213)
10–10.5
(250–263)
12–13
(300–325)
14–15
(350–375)
16–17
(400–425)
18–19
(450–475)
22–23
(550–575)
24–25
(600–625)
1.03
(3.90)
1.17
(4.42)
1.31
(4.98)
GG0231
GG0331
GG0431
GG0531
GG0631
GG0731
GG0831
GG0931
GG0433
GG0533
GG0633
GG0733
GG0833
GG0933
GG0235
GG0335
GG0435
GG0535
GG0635
GG0735
GG0835
GG0935
GG1135
GG1235
.
Orifice Fan Width Flow Rate Part No.
Size
0.037
(0.940)
0.039
(0.991)
0.041
(1.041)
0.043
(1.092)
8–8.5
(200–213)
12–13
(300–325)
14–15
(350–375)
4–4.5
(100–113)
6–6.5
(150–163)
8–8.5
(200–213)
10–10.5
(250–263)
12–13
(300–325)
16–17
(400–425)
18–19
(450–475)
24–25
(600–625)
6–6.5
(150–163)
8–8.5
(200–213)
10–10.5
(250–263)
12–13
(300–325)
16–17
(400–425)
24–25
(600–625)
8–8.5
(200–213)
10–10.5
(250–263)
12–13
(300–325)
22–23
(550–575)
24–25
(600–625)
1.47
(5.56)
1.63
(6.18)
1.80
(6.83)
1.99
(7.51)
GG0437
GG0637
GG0737
GG0239
GG0339
GG0439
GG0539
GG0639
GG0839
GG0939
GG1239
GG0341
GG0441
GG0541
GG0641
GG0841
GG1241
GG0443
GG0543
GG0643
GG1143
GG1243
.
308813 23
Page 24

GG0 Series Tip Selection Charts
Orifice
Fan Width
Flow Rate
Part No
()
()
()
()
Orifice
Fan Width
Flow Rate
Part No
()
()
()
()
()
()
()
()
For Models 239786 and 241469
GG0 and GG1 Series Spray Tips
Orifice Fan Width Flow Rate Part No.
Size
0.045
(1.143)
0.047
(1.194)
0.049
(1.245)
0.051
(1.29)
0.053
(1.35)
0.055
(1.40)
8–8.5
(200–213)
10–10.5
(250–263)
12–13
(300–325)
16–17
(400–425)
24–25
(600–625)
10–10.5
(250–263)
12–13
(300–325)
16–17
(400–425)
8–8.5
(200–213)
14–15
(350–375)
16–17
(400–425)
6–6.5
(150–163)
8–8.5
(200–213)
10–10.5
(250–263)
12–13
(300–325)
20–21
(500–525)
24–25
(600–625)
28–29
(700–725)
10–10.5
(250–263)
8–8.5
(200–213)
10–10.5
(250–263)
12–13
(300–325)
28–29
(700–725)
2.17
(8.23)
2.37
(8.98)
2.58
(9.76)
2.79
(10.6)
3.02
(11.4)
3.25
(12.3)
GG0445
GG0545
GG0645
GG0845
GG1245
GG0547
GG0647
GG0847
GG0449
GG0749
GG0849
GG0351
GG0451
GG0551
GG0651
GG1051
GG1251
GG1451
GG0553
GG0455
GG0555
GG0655
GG1455
.
Orifice Fan Width Flow Rate Part No.
Size
0.057
(1.45)
0.059
(1.50)
0.061
(1.55)
0.063
(1.60)
6–6.5
(150–163)
8–8.5
(200–213)
10–10.5
(250–263)
12–13
(300–325)
14–15
(350–375)
6–6.5
(150–163)
8–8.5
(200–213)
10–10.5
(250–263)
12–13
(300–325)
14–15
(350–375)
28–29
(700–725)
8–8.5
(200–213)
10–10.5
(250–263)
12–13
(300–325)
14–15
(350–375)
16–17
(400–425)
24–25
(600–625)
8–8.5
(200–213)
10–10.5
(250–263)
12–13
(300–325)
14–15
(350–375)
16–17
(400–425)
3.49
(13.2)
3.74
(14.1)
3.99
(15.1)
4.26
(16.1)
GG0357
GG0457
GG0557
GG0657
GG0757
GG0359
GG0459
GG0559
GG0659
GG0759
GG1459
GG0461
GG0561
GG0661
GG0761
GG0861
GG1261
GG0463
GG0563
GG0663
GG0763
GG0863
.
24 308813
Page 25

GG0 Series Tip Selection Charts
Orifice
Fan Width
Flow Rate
Part No
()
()
()
()
()
()
Orifice
Fan Width
Flow Rate
Part No
()
()
()
()
For Models 239786 and 241469
GG0 and GG1 Series Spray Tips
Orifice Fan Width Flow Rate Part No.
Size
0.065
(1.65)
0.067
(1.70)
0.069
(1.75)
8–8.5
(200–213)
10–10.5
(250–263)
12–13
(300–325)
14–15
(350–375)
16–17
(400–425)
8–8.5
(200–213)
10–10.5
(250–263)
12–13
(300–325)
14–15
(350–375)
16–17
(400–425)
28–29
(700–725)
8–8.5
(200–213)
10–10.5
(250–263)
12–13
(300–325)
4.53
(17.2)
4.82
(18.2)
5.11
(19.3)
GG0465
GG0565
GG0665
GG0765
GG0865
GG0467
GG0567
GG0667
GG0767
GG0867
GG1467
GG0469
GG0569
GG0669
.
Orifice Fan Width Flow Rate Part No.
Size
0.071
(1.80)
0.073
(1.85)
0.075
(1.90)
0.077
(1.95)
0.079
(2.00)
0.081
(2.06)
8–8.5
(200–213)
10–10.5
(250–263)
12–13
(300–325)
16–17
(400–425)
28–29
(700–725)
8–8.5
(200–213)
10–10.5
(250–263)
8–8.5
(200–213)
8–8.5
(200–213)
8–8.5
(200–213)
8–8.5
(200–213)
5.41
(20.5)
5.72
(21.7)
6.04
(22.9)
6.36
(24.1)
6.70
(25.4)
7.04
(26.7)
GG0471
GG0571
GG0671
GG0871
GG1471
GG0473
GG0573
GG0475
GG0477
GG0479
GG0481
.
*Fluid output at 600 psi (4.1 MPa, 41 bar).
Fluid output (Q) at other pressures (P) can be calculated by this
formula: Q = (0.041) (QT) (
qP ).
Where QT = Fluid output (fl oz/min) from the above table for
the selected orifice size.
NOTE: Other tips are available on special work order. Allow 4
to 6 weeks for delivery.
308813 25
Page 26

Sealer Application Tip Selection Charts
Fan Width
Orifice
at 12
Fan Width
Orifice
at 12
For Model 233670 with tip nut 198391
Shower Tip
No. of Orifices Orifice Size
inches (mm)
6 0.021 (0.533) C08224
Part No.
Single Orifice Fan Pattern Spray Tips
Orifice
Size
0.021
(0.533)
0.023
(0.584)
0.025
(0.635)
0.027
(0.686)
at 12”
(300 mm) Part No.
8–10 (200–250) 182421
10–12 (250–300) 182521
12–14 (300–350) 182621
14–16 (350–400) 182721
16–18 (400–460) 182821
8–10 (200–250) 182423
10–12 (250–300) 182523
12–14 (300–350) 182623
14–16 (350–400) 182723
16–18 (400–460) 182823
8–10 (200–250) 182425
10–12 (250–300) 182525
12–14 (300–350) 182625
14–16 (350–400) 182725
16–18 (400–460) 182825
8–10 (200–250) 182427
12–14 (300–350) 182627
Streaming Tips
Orifice Size
inches (mm)
0.025 (0.635) 270025 0.037 (0.940) 270037
0.027 (0.686) 270027 0.039 (0.991) 270039
0.029 (0.736) 270029 0.041 (1.041) 270041
0.031 (0.787) 270031 0.043 (1.092) 270043
0.035 (0.889) 270035 0.059 (1.500) 270059
Orifice
Size
0.029
(0.737)
0.031
(0.787)
0.035
(0.889)
0.039
(0.991)
0.043
(1.041)
0.047
(1.194)
Part No. Orifice Size
inches (mm)
at 12”
(300 mm) Part No.
8–10 (200–250) 182429
12–14 (300–350) 182629
16–18 (400–460) 182829
8–10 (200–250) 182431
12–14 (300–350) 182631
16–18 (400–460) 182831
8–10 (200–250) 182435
10–12 (250–300) 182535
12–14 (300–350) 182635
8–10 (200–250) 182439
10–12 (250–300) 182539
12–14 (300–350) 182639
8–10 (200–250) 182443
10–12 (250–300) 182543
12–14 (300–350) 182643
18–20 (450–500) 182943
18–20 (450–500) 182947
Part No.
26 308813
Page 27

Accessories
Use Only Genuine Graco Parts and Accessories
GUN MANIFOLDS
Order separately; not included with gun
(See page 20 for Parts list)
Part No. 241161, Series A
North America Manifold
Part No. 241162, Series A
International Manifold
Part No. 244930, Series A
High Flow Ambient or Temperature Conditioned Manifold for streaming or spraying
Grounding Clamp and Wire 222011
12 ga, 25 ft (7.6 m) wire
High Pressure Ball Valves, Viton Seals
5000 psi (34 MPa, 345 bar) Maximum Working
Pressure
Can be used as fluid drain valve.
210657 1/2 npt(m)
210658 3/8 npt(m)
210659 3/8 x 1/4 npt(m)
Bleed-type Master Air Valve
300 psi (2.1 MPa, 21 bar) Maximum Working Pressure
Relieves air trapped in the air line between the pump
air inlet and this valve when closed.
107141 3/4 npt(m x f) inlet & outlet
107142 1/2 npt(m x f) inlet & outlet
Needle/Diffuser Options
Needles must be used only with the specified seat to
guarantee proper seating and life.
Standard viscosity/standard flow
– Fluid Needle 239807, 3/16 in. carbide ball
– Seat 239890 or 233671
Acid catalyzed materials/very low viscosity
materials
– Fluid Needle 241468, 3/16 in. plastic ball
– Seat 239890
Brush 101892
For cleaning the gun.
Tube Fittings for Air or Water
250 psi (1.7 MPa, 17 bar) Maximum Working Pressure
160 F (71 C) temperature rating
104172 1/8 npt(m) x 1/4 O.D. tube
597151 1/8 npt(m) x 1/4 O.D. tube,
90 elbow (swivel)
Temperature Sensor and Cable
For temperature conditioned manifold
198457 RTD Sensor, 100 ohm, 1/8 npt(m)
with 3 pin Picofast connector
198458 RTD cable 6 ft. (1.83 m) Flex cable
to St. Clair connector
In-line Fluid Filter 210500
5000 psi (35 MPa, 350 bar) Maximum Working Pressure
100 mesh. Fits onto the gun’s fluid connector. 1/4–18
npsm. Includes the parts shown below.
Filter
168517
205264
210501
164075
308813 27
Page 28

Technical Data
Delrin® is a registered trademark of the DuPont Company.
Maximum working fluid pressure . . . . . . . . . . . . 4000 psi (28 MPa, 280 bar)
Maximum working air pressure . . . . . . . . . . . . . 100 psi (0.7 MPa, 7 bar)
Maximum working fluid temperature . . . . . . . . 140 F (60 C)
Minimum air cylinder actuation pressure . . . . . 70 psi (0.49 MPa, 4.9 bar)
Weight . . . . . . . . . . . . . . . . . . . . . . . . . . . . . . . . . . 2 lb (895 g)
Wetted Parts . . . . . . . . . . . . . . . . . . . . . . . . . . . . Stainless Steel, Carbide, Ultra High Molecular Weight
Polyethylene, Delrin, PEEK, Chemically Resistant
Fluoroelastomer, PTFE
Delrin is a registered trademarks of the DuPont
Company.
Triggering Speed
These values apply to a new gun with a 6 ft (1.8 m), 1/4 in. (6.3 mm) OD cylinder air line and a .019” tip. These values will vary slightly with use and with variations in equipment.
Cylinder air pressure
psi (MPa, bar)
70 (0.49, 4.9) 600 (4.2, 42) 51 72
70 (0.49, 4.9) 1800 (12.4, 124) 56 73
70 (0.49, 4.9) 4000 (28, 280) 69 73
Fluid pressure
psi (MPa, bar)
msec to fully open msec to fully close
Sound Pressure Levels (dBa) (measured at 1 meter from unit)
Input Fluid Pressures
1500 psi (10.5 MPa, 105 bar) 4000 psi (28 MPa, 276 bar)
79.0 dB(A) 86.6 dB(A)
Sound Power Levels (dBa) (tested in accordance with ISO 9614–2)
Input Fluid Pressures
1500 psi (10.5 MPa, 105 bar) 4000 psi (28 MPa, 276 bar)
75.7 dB(A) 86.3 dB(A)
28 308813
Page 29

Notes
308813 29
Page 30

Dimensions and Mounting Holes
For Guns 239786 and 241469 with Manifolds 241161 and 241162
2.0 in.
(50.8 mm)
3.86 in.
(98.0 mm)
8576A
5.23 in.
(139.7 mm)
3.0 in.
(76.2 mm)
8581A
0.805 in. (20.5 mm) 0.4 in. (10.2 mm)
0.187 in. (4.8 mm)
2.125 in.
(54 mm)
Two M5 x 0.8 x 0.25 in. (6.3 mm) holes
1.750 in.
(44.5 mm)
1.375 in.
(35 mm)
Two 0.128 diameter x
0.31 in. (7.8 mm) holes
8722A
30 308813
Page 31
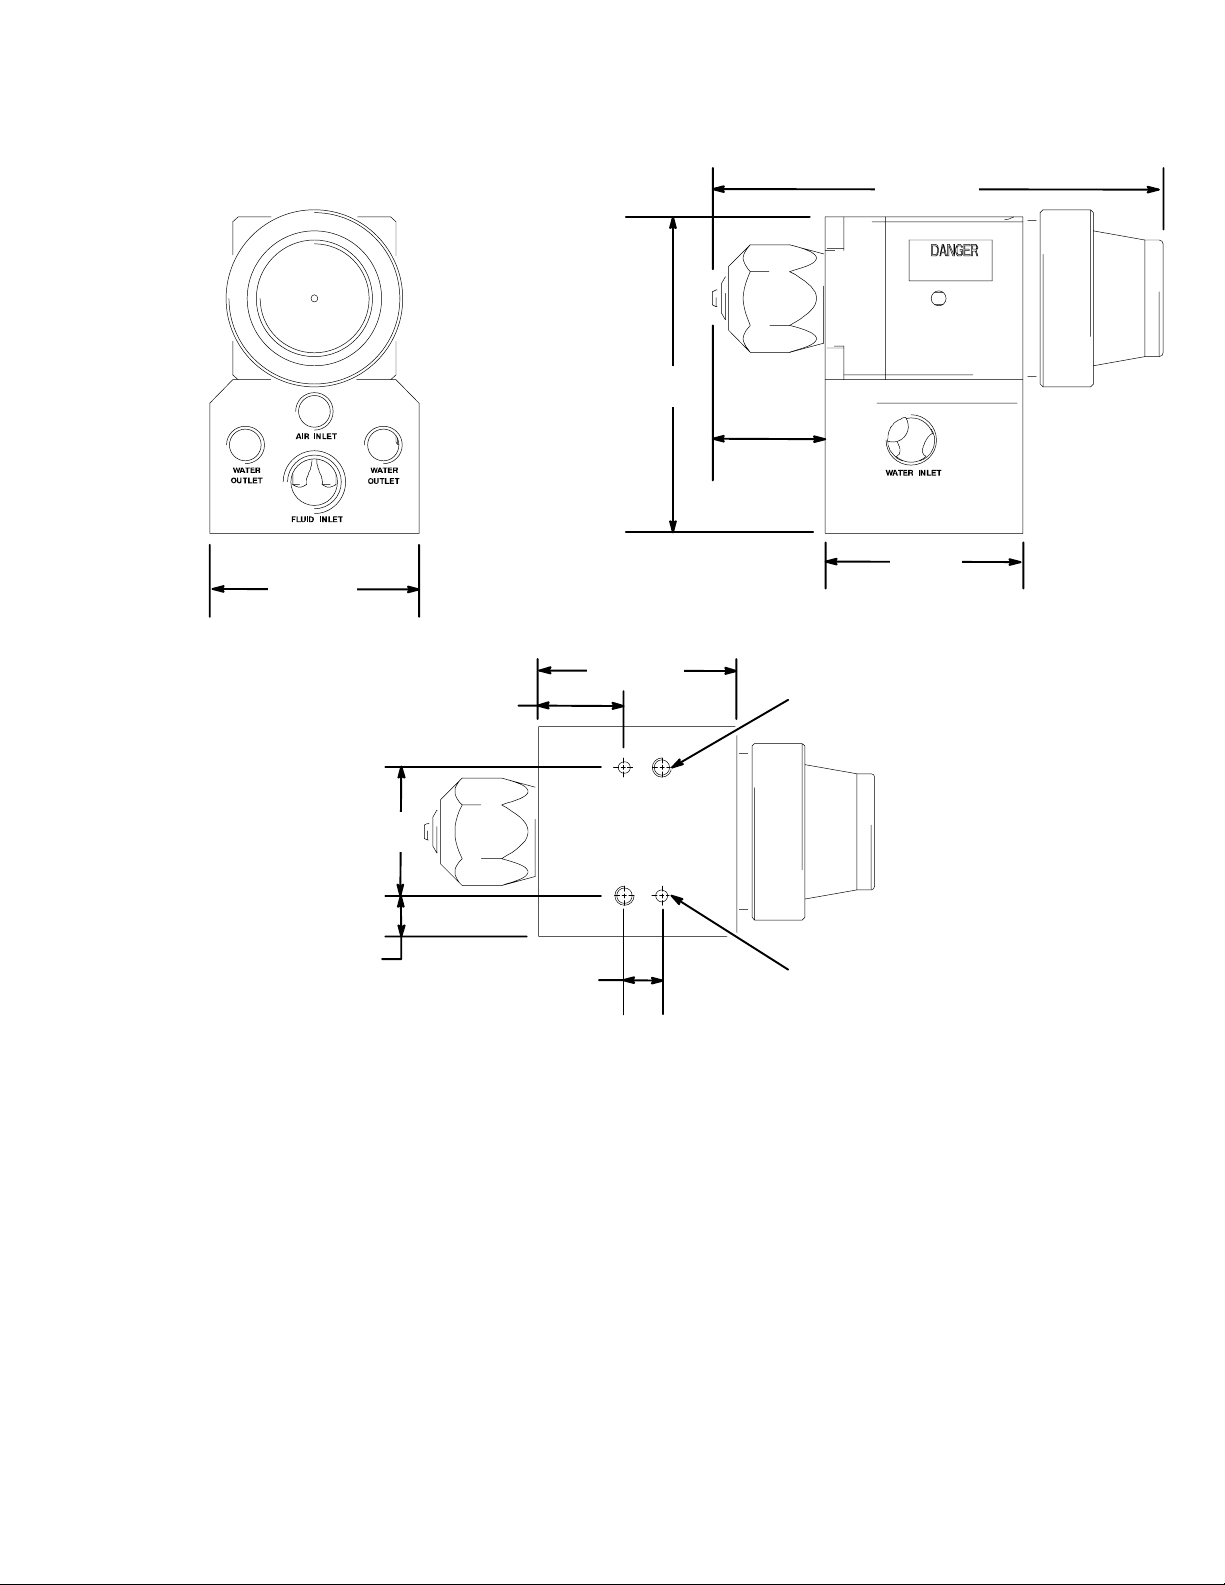
Dimensions and Mounting Holes
For Model 233670
4.8 in.
(121.9 mm)
3.5 in.
(88.9 mm)
1.25 in.
(32 mm)
2.13 in.
2.25 in.
(57.2 mm)
(54 mm)
TI1397A
1.375 in.
(35 mm)
0.437 in.
(11.1 mm)
0.805 in.
(20.4 mm)
0.4 in.
(10.2 mm)
0.92 in.
(23.37 mm)
Two M5 x 0.8 ISO-H holes
0.25 in. (6.35 mm) deep
Two 0.128 in. (3.25 mm) dowel pin holes
0.31 in. (7.8 mm) deep
TI1397A
308813 31
Page 32

Graco Standard Warranty
Graco warrants all equipment manufactured by Graco and bearing its name to be free from defects in material and workmanship on the
date of sale by an authorized Graco distributor to the original purchaser for use. With the exception of any special, extended, or limited
warranty published by Graco, Graco will, for a period of twelve months from the date of sale, repair or replace any part of the equipment
determined by Graco to be defective. This warranty applies only when the equipment is installed, operated and maintained in accordance with Graco’s written recommendations.
This warranty does not cover, and Graco shall not be liable for general wear and tear, or any malfunction, damage or wear caused by
faulty installation, misapplication, abrasion, corrosion, inadequate or improper maintenance, negligence, accident, tampering, or substitution of non–Graco component parts. Nor shall Graco be liable for malfunction, damage or wear caused by the incompatibility of
Graco equipment with structures, accessories, equipment or materials not supplied by Graco, or the improper design, manufacture,
installation, operation or maintenance of structures, accessories, equipment or materials not supplied by Graco.
This warranty is conditioned upon the prepaid return of the equipment claimed to be defective to an authorized Graco distributor for
verification of the claimed defect. If the claimed defect is verified, Graco will repair or replace free of charge any defective parts. The
equipment will be returned to the original purchaser transportation prepaid. If inspection of the equipment does not disclose any defect
in material or workmanship, repairs will be made at a reasonable charge, which charges may include the costs of parts, labor, and
transportation.
THIS WARRANTY IS EXCLUSIVE, AND IS IN LIEU OF ANY OTHER WARRANTIES, EXPRESS OR IMPLIED, INCLUDING BUT
NOT LIMITED TO WARRANTY OF MERCHANTABILITY OR WARRANTY OF FITNESS FOR A PARTICULAR PURPOSE.
Graco’s sole obligation and buyer’s sole remedy for any breach of warranty shall be as set forth above. The buyer agrees that no other
remedy (including, but not limited to, incidental or consequential damages for lost profits, lost sales, injury to person or property, or any
other incidental or consequential loss) shall be available. Any action for breach of warranty must be brought within two (2) years of the
date of sale.
Graco makes no warranty, and disclaims all implied warranties of merchantability and fitness for a particular purpose in connection
with accessories, equipment, materials or components sold but not manufactured by Graco. These items sold, but not manufactured
by Graco (such as electric motors, switches, hose, etc.), are subject to the warranty, if any, of their manufacturer. Graco will provide
purchaser with reasonable assistance in making any claim for breach of these warranties.
In no event will Graco be liable for indirect, incidental, special or consequential damages resulting from Graco supplying equipment
hereunder, or the furnishing, performance, or use of any products or other goods sold hereto, whether due to a breach of contract,
breach of warranty, the negligence of Graco, or otherwise.
FOR GRACO CANADA CUSTOMERS
The parties acknowledge that they have required that the present document, as well as all documents, notices and legal proceedings
entered into, given or instituted pursuant hereto or relating directly or indirectly hereto, be drawn up in English. Les parties reconnaissent avoir convenu que la rédaction du présente document sera en Anglais, ainsi que tous documents, avis et procédures judiciaires
exécutés, donnés ou intentés à la suite de ou en rapport, directement ou indirectement, avec les procedures concernées.
Graco Information
TO PLACE AN ORDER, contact your Graco distributor, or call one of the following numbers
to identify the distributor closest to you:
1–800–367–4023 Toll Free
612–623–6921
612–378–3505 Fax
All written and visual data contained in this document reflects the latest product information available at the time of publication.
Graco reserves the right to make changes at any time without notice.
International Offices: Belgium, Korea, Hong Kong, Japan
Sales Offices: Minneapolis, Detroit
www.graco.com
PRINTED IN USA 308813 10/1998, Revised 7/2003
32 308813
 Loading...