

Page 1
OWNER'S MANUAL
MANUEL D'UTILISATEUR
MANUAL DEL PROPIETARIO
ww.gracobaby.com
©2006 Graco ISP
A204AA 8/06
Page 2

Failure to follow these warnings and the
assembly instructions could result in serious injury or death.
2
• PLEASE SAVE OWNER’S
MANUAL FOR FUTURE USE.
• ADULT ASSEMBLY REQUIRED.
• NEVER LEAVE CHILD
UNATTENDED. Always keep
child in view while in stroller.
• AVOID SERIOUS INJURY from
falling or sliding out. Always use
seat belt. After fastening buckles,
adjust belts to get a snug fit
around your child.
• CHILD MAY SLIP INTO LEG
OPENINGS AND STRANGLE.
Never use in full recline position
unless enclosure is up. Do not
use nclosure with an older child
that can lift up on hands and
knees or crawl out.
• AVOID FINGER ENTRAPMENT:
Use care when folding and
unfolding the stroller. Be certain
the stroller is fully erected and
latched before allowing your
child near the stroller.
• NEVER USE STROLLER ON
STAIRS or escalators. You may
suddenly lose control of the
stroller or your child may fall out.
Also, use extra care when going
up or down a step or curb.
• AVOID STRANGULATION.
DO NOT place items with a
string around your child’s neck,
suspend strings from this
product, or attach strings
to toys.
• USE OF THE STROLLER
with a child weighing more than
50 lbs (22.7 kg) or taller than
45 in (114.3 cm) will cause
excessive wear and stress on the
stroller. Use the stroller with only
one child at a time.
• TO PREVENT TIPPING, do not
place more than 3 lbs (1.4 kg)
on the parent’s tray and
accessory bridge.
• TO AVOID BURNS, never put
hot liquids in the parent’s tray.
• TO PREVENT A HAZARDOUS,
UNSTABLE CONDITION, never
place purses, shopping bags,
parcels or accessory items on the
handle or canopy.
• TO PREVENT A HAZARDOUS,
UNSTABLE CONDITION
, do not
place more than 10 lbs (4.5 kg)
in the storage basket, more than
2 lbs (0.9 kg) in the canopy
pockets (on certain models) and
more than 2 lbs (0.9 kg) in the
side storage pockets (on certain
models).
• DO NOT use storage basket as a
child carrier.
• DO NOT ALLOW your child to
stand on the basket. It may
collapse and cause injury.
• NEVER PLACE child in the
stroller with head toward
front of stroller
.
• NEVER ALLOW YOUR
STROLLER to be used as a toy.
Page 3

3
• STROLLER TO BE USED only
at walking speed. Product not
intended for use while jogging,
skating, etc.
• DISCONTINUE USING YOUR
STROLLER should it become
damaged or broken.
USING GRACO®INFANT CAR
SEAT WITH STROLLER:
• USE ONLY A GRACO
®
SNUGRIDE™OR INFANT
SAFESEAT
™
CAR SEAT with this
travel system. (Not intended for
use with AUTOBABY (Europe
only) and ASSURA infant car
seats.) Improper use of this
stroller with other manufacturers’
car seats may result in serious
injury or death.
• READ THE MANUAL provided
with your Graco car seat before
using it with your stroller.
• ALWAYS SECURE your child
with the car seat harness when
using the car seat in the stroller.
If your child is already in the
car seat, check that the child is
secured with the harness.
Page 4

Manquer de suivre ces avertissements et les instructions
d'assemblage peut entraîner de sérieuses blessures ou un décès.
• VEUILLER GARDER LE
MANUEL D’UTILISATEUR
POUR USAGE ULTÉRIEUR.
• ASSEMBLAGE PAR UN
ADULTE REQUIS.
• NE LAISSEZ JAMAIS VOTRE
ENFANT SANS SURVEILLANCE.
Ayez toujours l’enfant en vue.
• ÉVITEZ DE SÉRIEUSES
blessures. Utilisez toujours la
ceinture de sécurité. Après
avoir attaché les boucles, ajustez
les ceintures pour obtenir un
ajustement confortable autour
de votre enfant.
• L'ENFANT PEUT GLISSER
DANS LES OUVERTURES
DES ET S’ÉTRANGLER.
N'utilisez jamais en position
complètement inclinée à moins
que enceinte qui se remonte.
Ne pas utiliser enceinte qui se
remonte avec un enfant plus
âgé qui peut se remonter sur
ses mains et ses genoux ou
qui peut ramper hors de
la poussette.
• EVITER DE COINÇER LES
DOIGTS: Plier ou déplier la
poussette avec soin. Soyez
assuré(e) que la poussette est
bien droite et que les loquets
sont bien enclenchés avant
de laisser votre enfant près
de la poussette.
• NE JAMAIS UTILISER LA
POUSSETTE SUR LES
ESCALIERS ou les escaliers
roulants. L’enfant pourrait
tomber ou vous pourriez perdre
le contrôle de la poussette. Aussi,
soyez très prudent lorsque que
vous montez et descendez une
marche ou le bord du trottoir.
• ÉVITEZ D’ÉTRANGLEMENT.
NE JAMAIS accrocher des objects
avec ficelles autour du cou de
votre enfant, suspendre des
ficelles au-dessus de ce produit,
ou attacher des jouets à
des ficelles.
• L’USAGE DE LA POUSSETTE
avec un enfant pesant plus de
50 livres (22,7 kg) ou mesure
plus de 45 po (114,3 cm)
occasionnera une usure et une
tension excessive à la poussette.
Utilisez la poussette avec
seulement un enfant à la fois.
• POUR NE PAS DÉSÉQUILIBRER
LA POUSSETTE, ne pas charger
le plateau pour adulte et plateau
à accessoire à plus de
3 livres (1,4 kg).
• POUR ÉVITER LES BRÛLURES,
ne jamais mettre de liquides
brûlants dans ce plateau.
4
Page 5

5
• POUR ÉVITER DES
CONDITIONS HASARDEUSES
ET INSTABLE, ne jamais placer
de sacs à main, sacs à provisions
ou accessoires sur le guidon ou
le baldaquin.
• POUR ÉVITER DES
CONDITIONS HASARDEUSES,
ne placez jamais plus de 10 livres
(4,5 kg) dans le panier, 2 livres
(0,9 kg) dans les pochettes de
baldaquin (sur certain modèles)
et ne pas placer plus de 2 lbs
(0,9 kg) dans les pochettes de
latérales (sur certain modèles).
• NE PAS utiliser le panier
comme porte-bébé.
• NE LAISSEZ PAS votre enfant
debout sur le panier. Il pourrait
s’écrouler et causer des blessures.
• NE JAMAIS PLACER l’enfant
dans la poussette avec la tête
vers l’avant de la poussette.
• NE JAMAIS UTILISER LA
POUSSETTE comme un jouet.
• LA POUSSETTE DOIT ÊTRE
UTILISÉE pour la marche
seulement. Ce produit n’est pas
conçu pour usage pendant la
course à pied, pour patiner, etc.
• CESSEZ L’USAGE DE VOTRE
POUSSETTE si elle devient
endommagée ou brisée.
UTILISATION DU PORTE-BÉBÉ
GRACO®AVEC LA
POUSSETTE :
• UTILISER UNIQUEMENT
UN PORTE-BÉBÉ SNUGRIDE
™
OU SAFESEAT™DE GRACO
®
avec ce système de voyage.
(Non conçu pour utiliser avec
les dispositifs de retenue pour
nourrisson AUTOBABY (Europe
seulement) et ASSURA.) Ne pas
se conformer à toutes les mises
en garde et instructions de
montage peut causer des
blessures corporelles sérieuses
ou même la mort.
• LIRE LE MANUEL d'utilisateur
fourni avec votre porte-bébé
Graco avant de l'utiliser avec
cette poussette.
• TOUJOURS ATTACHER
votre enfant avec le harnais
du porte-bébé lorsqu'il est
utilisé avec la poussette. Si votre
enfant est déjà dans le portebébé, s'assurer qu'il est attaché
avec le harnais.
Page 6

6
Si no se obedecen estas advertencias y se siguen las instrucciones
de montaje, podría resultar en lesiones graves o la muerte.
• POR FAVOR, CONSERVELO
EL MANUEL DEL
PROPIETARIO PARA
UTILIZARLO EN EL FUTURO.
• SE REQUIERE MONTAJE POR
UN ADULTO.
• NUNCA DEJE a su niño
desatendido. Siempre
tenga su niño a la vista.
• EVITE UNA LESIÓN
seria debido a una calda o
resbalamiento del asiento.
Use siempre el cinturón de
seguridad. Luego de ajustar
las hebillas, ajuste las correas
para que queden ajustadas
alrededor de su niño.
• EL NIÑO PUEDE DESLIZARSE
ENTRE LAS APERTURAS
PARA LAS PIERNAS Y
ESTRANGULARSE. Nunca lo
use en una posición reclinada a
menos que recinto de montaje
automático esté en la posición
vertical. No use recinto de
montaje automático con un
niño mayor que puede
levantarse en sus manos y
rodillas o salir gateando.
• EVITE APRETARSE LOS
DEDOS: Use cuidado cuando
abre y cierra el cochecito.
Asegúrese de que el cochecito
esté totalmente montado y
estable antes de que su niño
esté se acerque al cochecito.
• NUNCA USE EL COCHECITO
EN LAS ESCALINATAS o las
escaleras mecánicas. Usted
puede perder súbitamente el
control del cochecito, o su
niño podrá caerse. Asimismo,
tenga cuidado especial cuando
suba o baje un escalón o
la calzada.
• EVITE LA
ESTRANGULACIÓN.
No coloque artículos con
cuerdas alrededor del cuello
del niño, o suspenda cuerdas
del cochecito, o coloque
cordones en los juguetes.
• SI USA EL COCHECITO
para un niño que pese más de
50 libras (22,7 kg) o más alto
que 45 pulgadas (114,3 cm)
causará desgaste y tensión
excesiva en el cochecito.
Empléelo solamente con
un niño a la vez.
• PARA EVITAR
VOLCAMIENTOS, no ponga
mas de 3 libras (1,4 kg) sobre
la bandeja para padres y barra
de accesorios.
• PARA EVITAR
QUEMADURAS nunca
ponga liquidos calientes
sobre la bandeja para padres.
• PARA PREVENIR UNA
SITUACIÓN PELIGROSA
Y INESTABLE, nunca ponga
carteras, bolsas de compras
o accesorios en la manija
o capota.
Page 7

7
• PARA PREVENIR UNA
SITUACIÓN PELIGROSA,
no coloque más de 10 libras
(4,5 kg) en la canasta, 2 libras
(0,9 kg) en los bolsillos de
capota (en ciertos modelos) y
no ponga más de 2 lbs (0.9 kg)
en los bolsillos laterales (en
ciertos modelos).
• NO use dicha canasta para
transportar el niño.
• NO DEJE QUE su niño
se pare en la canasta. Puede
desmoronarse y causar daño.
• NUNCA COLOQUE el niño en
el cochecito con la cabeza en
la delantera parte del
cochecito.
• NUNCA DEJE QUE EL
cochecito sea usado
como juguete.
• EL COCHECITO DEBE SER
USADO solamente a velocidad
de caminar. El producto no
está destinado para usarlo
mientras está corriendo,
patinando, etc.
• PARE DE USAR EL
COCHECITO si éste
se daña o se quiebra.
USO DEL TRANSPORTADOR
PARA BEBÉ GRACO®CON EL
COCHECITO:
• USE SOLAMENTE UN
TRANSPORTADOR
SNUGRIDE™O SAFESEAT™DE
GRACO
®
en este sistema
de viaje. (No debe usarse con
AUTOBABY (Europa solamente)
y asientos de automóvil para
bebé ASSURA.) El uso
inadecuado de este cochecito
con asientos para automóvil de
otros fabricantes podría resultar
en lesiones serias o la muerte.
• LEA EL MANUAL incluido con
su transportador Graco antes
de usarlo con su cochecito.
• ASEGURE SIEMPRE a
su niño con el arnés del
transportador cuando usa el
transportador en el cochecito.
Si su niño ya está en el
transportador, verifique que
esté asegurado con el arnés.
Page 8
8
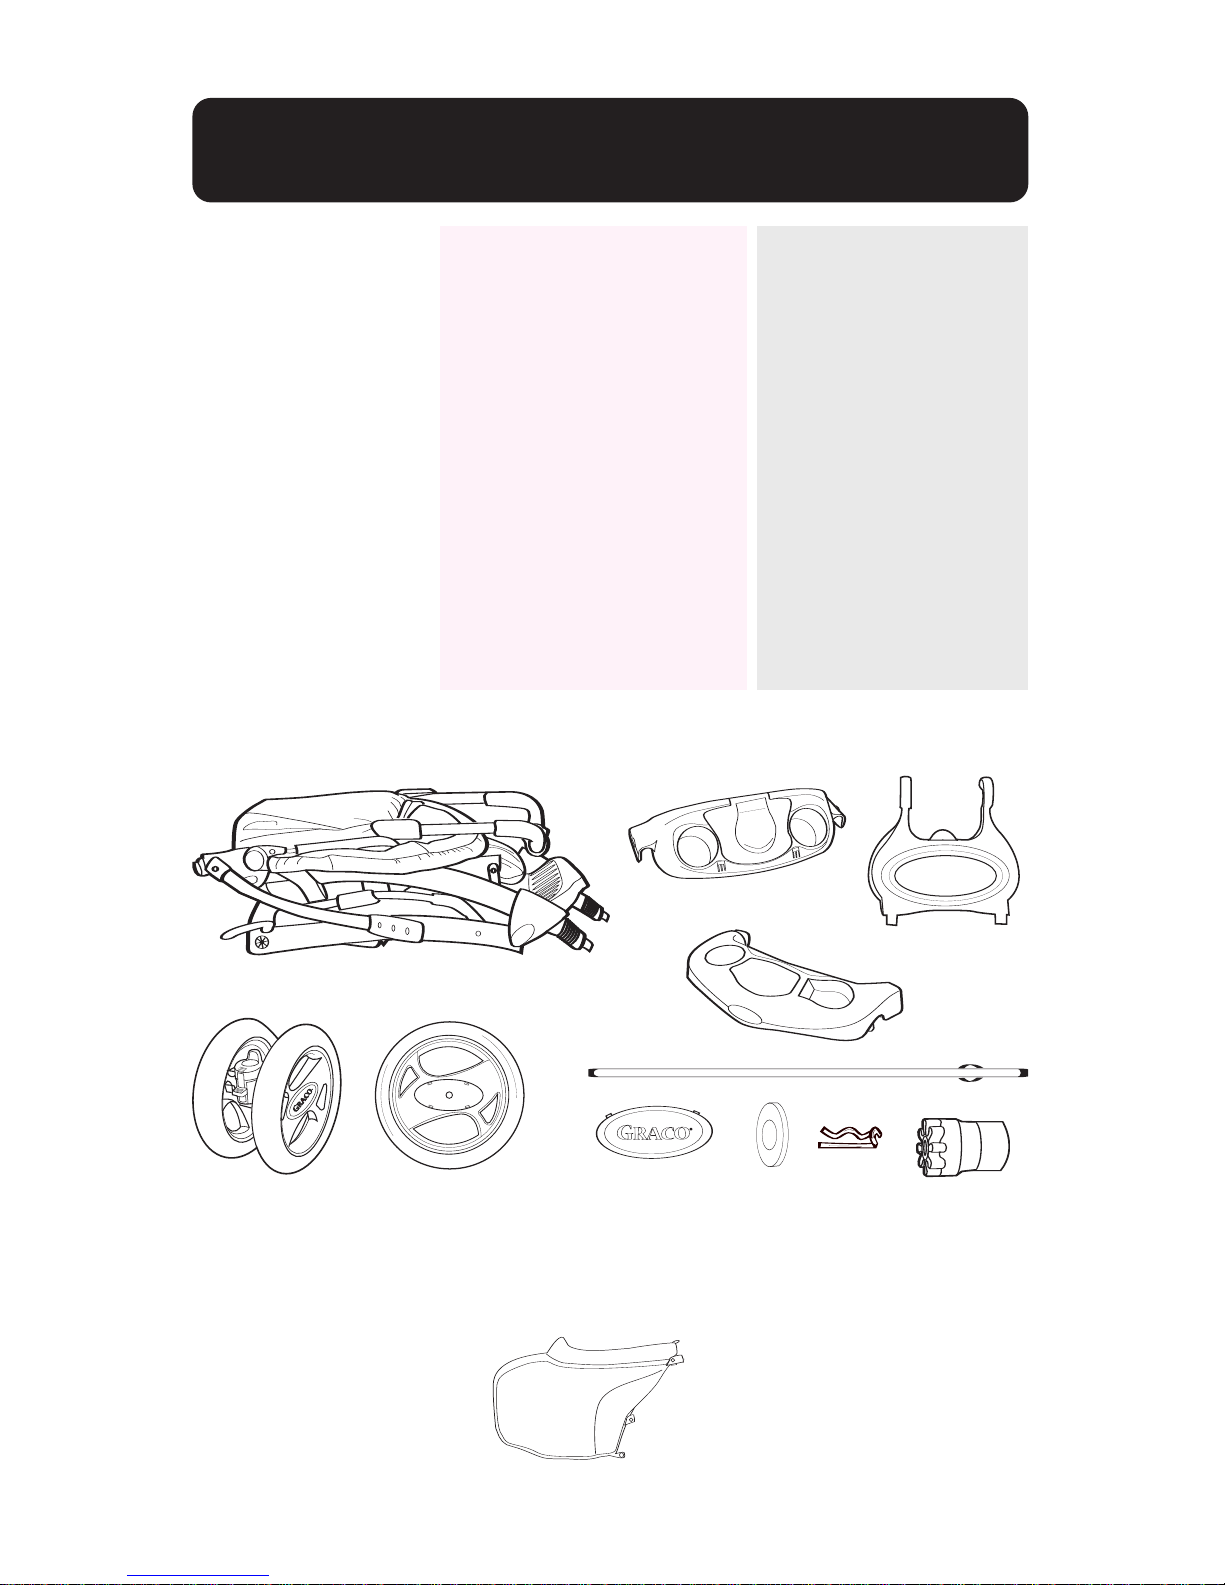
Parts list • Liste des pièces
• Lista de las piezas
2X
2X
2X
2X 2X
2X
FEATURES ON CERTAIN MODELS • DISPOSITIFS SUR CERTAINS
MODÈLES • CARACTERÍSTICAS EN CIERTOS MODELOS
This model may
not include some
features shown
below. Check that
you have all the
parts for this model
BEFORE
assembling your
product. If any
parts are missing,
call Customer
Service.
No tools
required.
Este modelo podría
no incluir algunas
de las características
que se indican a
continuación.
Verifique que tiene
todas las piezas de
este modelo ANTES
de armar su producto.
Si falta alguna pieza,
llame al Departamento
de Servicio al Cliente.
No herramientas
necesarias.
Ce modèle pourrait ne
pas inclure certaines
caractéristiques illustrées
ci-dessous. Vérifiez
que vous avez toutes les
pièces pour ce modèle
AVANT d'assembler votre
produit. S'il vous
manque des pièces,
communiquez avec
notre service à
la clientèle.
Aucun outil requis.
ALL MODELS • TOUS MODÈLES • TODOS MODELOS
Page 9
9
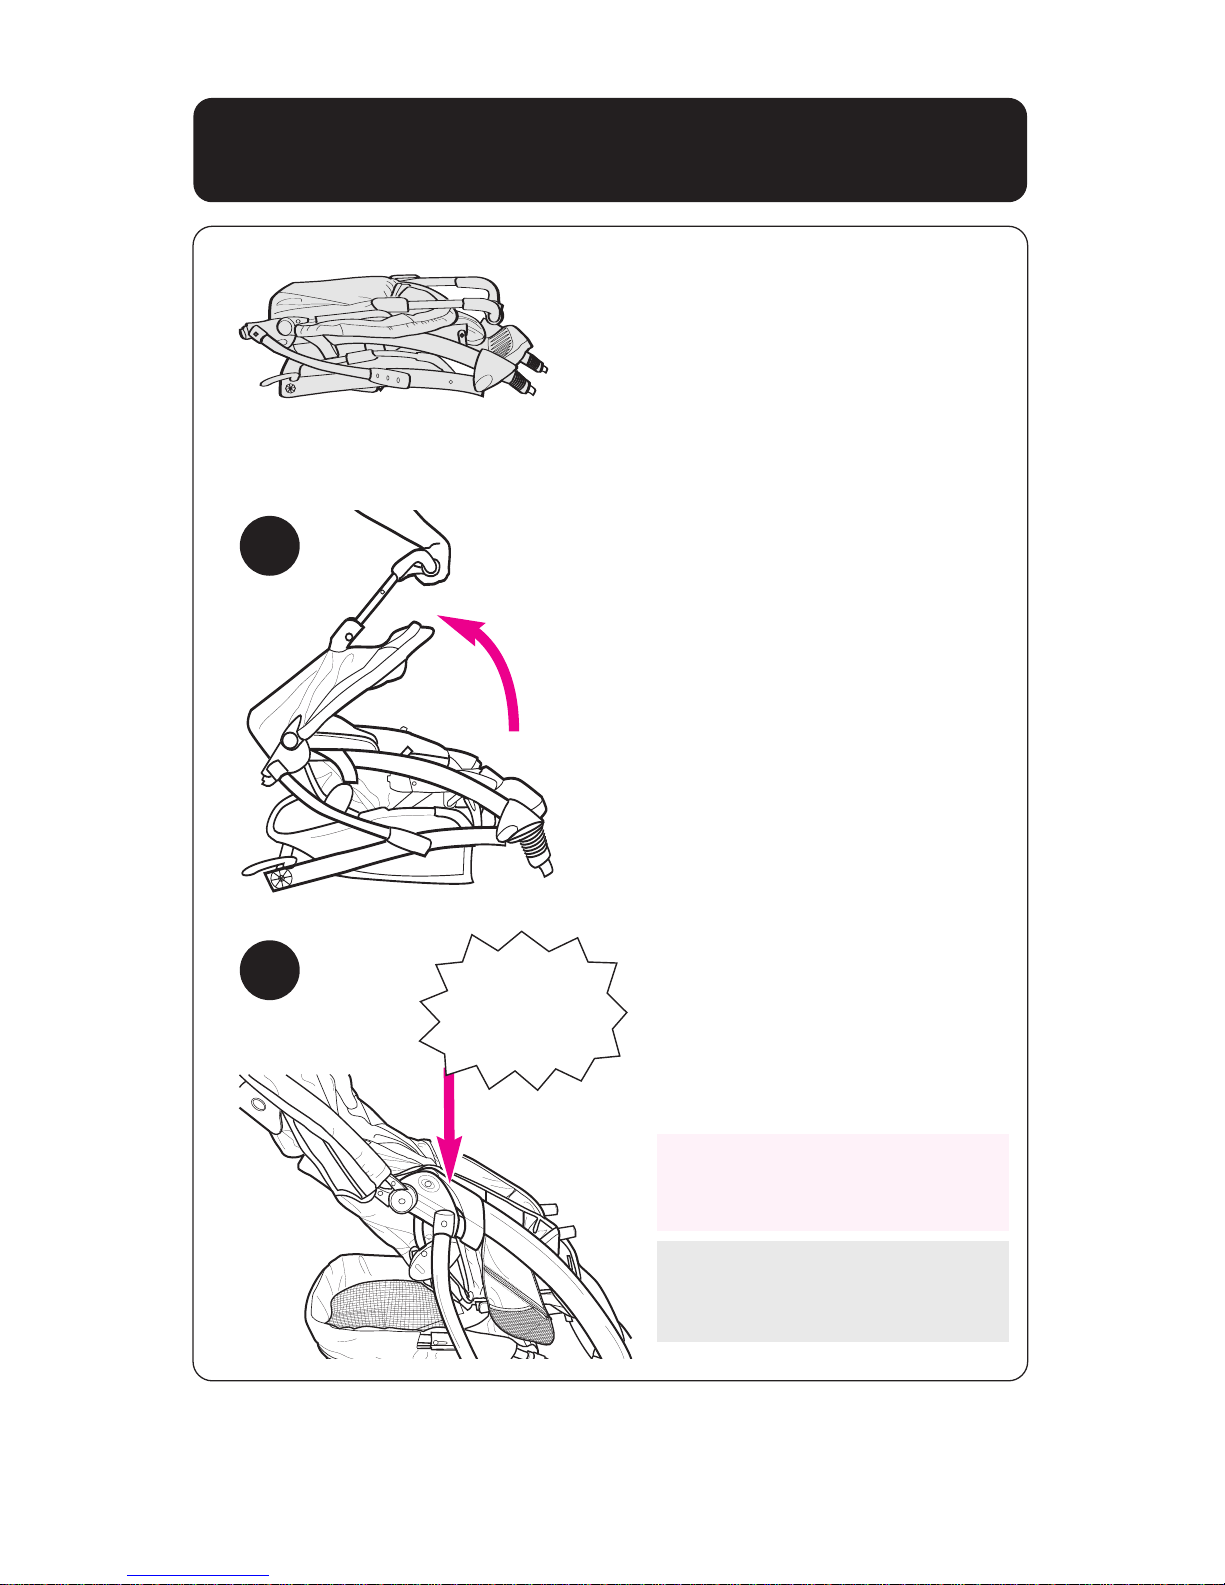
To Open Stroller • Ouvrir la poussette
• Abrir el cochecito
2
1
VÉRIFIEZ que la poussette
est completement dépliée
avant de continuer.
VERIFIQUE que el cochecito
esté completamente abierto
antes de continuar.
CHECK that stroller is
completely open before
continuing.
SNAP!
ENCLENCHEZ!
¡CHASQUIDO!
Page 10
10
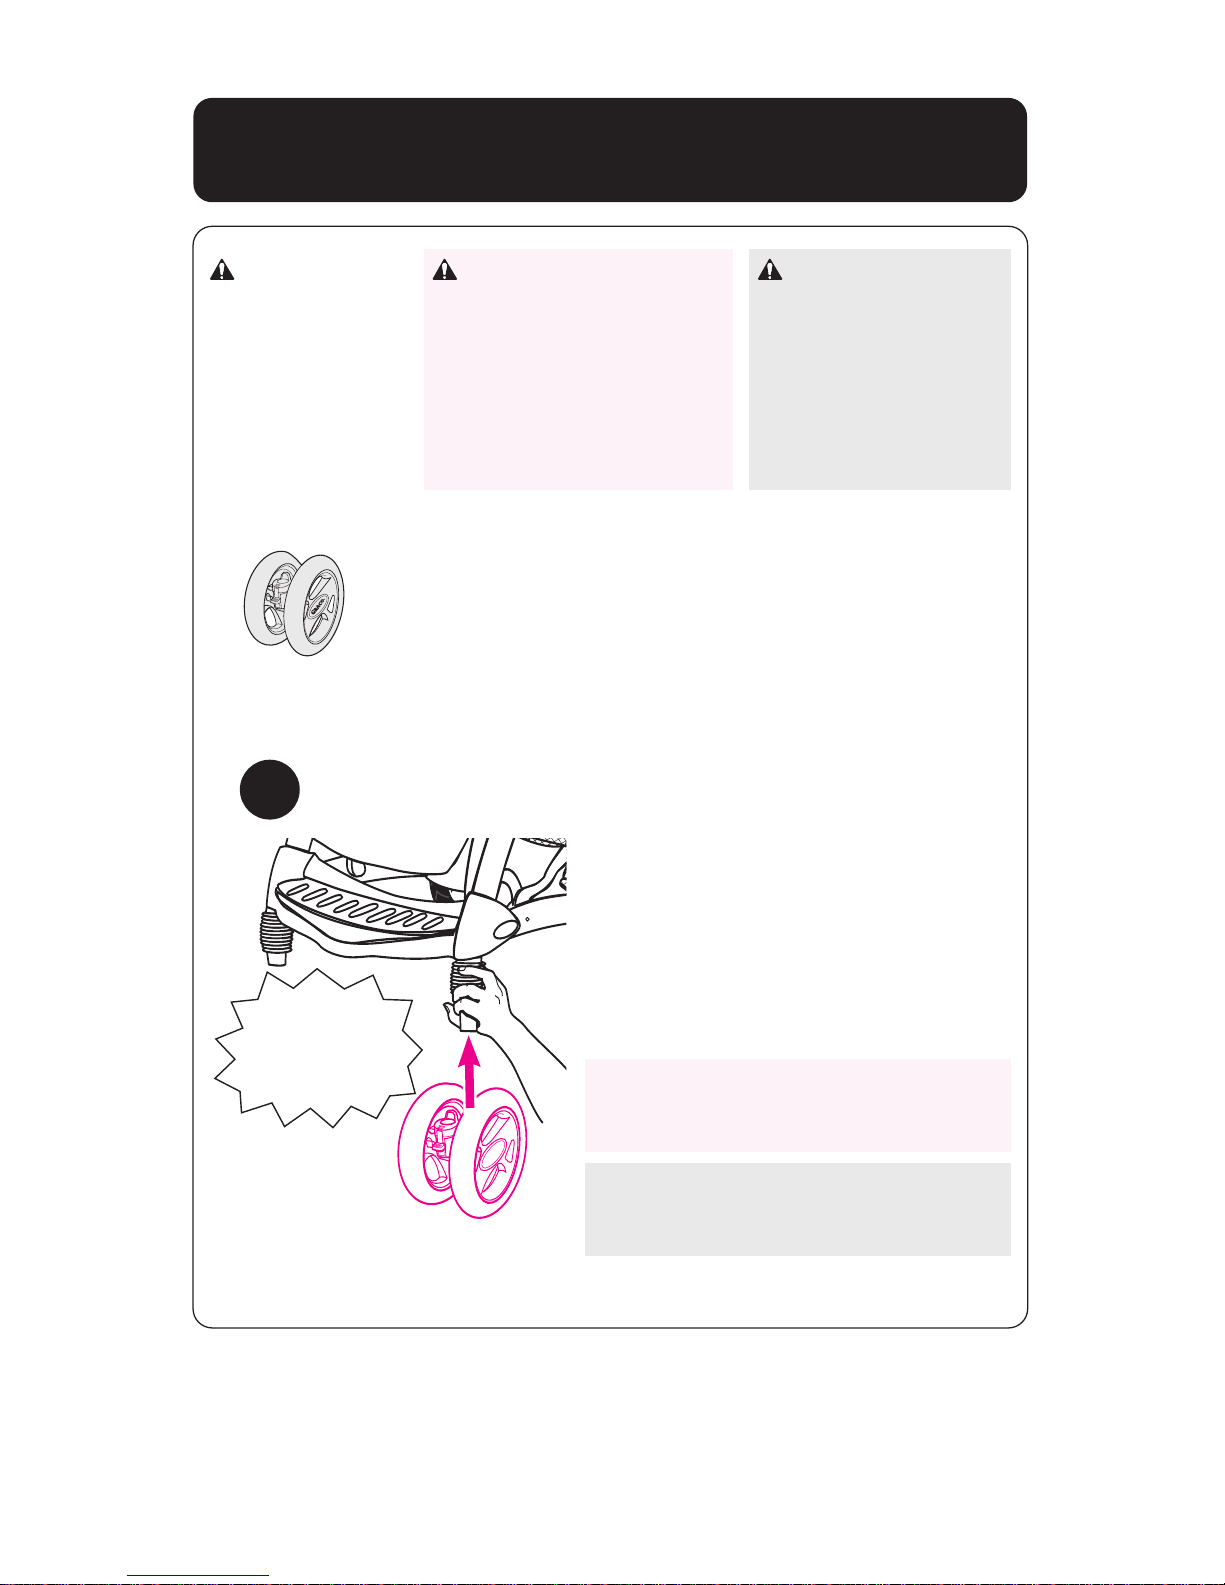
Front Wheels • Les roues avant
• Las ruedas delanteras
2X
CHECK that wheels are securely
attached by pulling on wheel
assemblies.
ASSUREZ-VOUS que les roues sont
attachées solidement en tirant sur
les assemblages de roue.
VERIFIQUE que las ruedas estén
bien contactadas, tirando de los
montajes de las ruedas.
ADVERTENCIA
Sague y deseche
inmediatamente las
tapas de plástico de
los extremos de las
clavijas de las patas
delanteras.
MISE EN GARDE
Danger d'étranglement:
Retirer et jeter à la
poubelle immédiatement
les embouts de
protection des tubes
avant de la poussette.
WARNING
Choking Hazard:
Remove and
immediately
discard protective
end cap from
each front leg.
3
SNAP!
ENCLENCHEZ!
¡CHASQUIDO!
Page 11
11
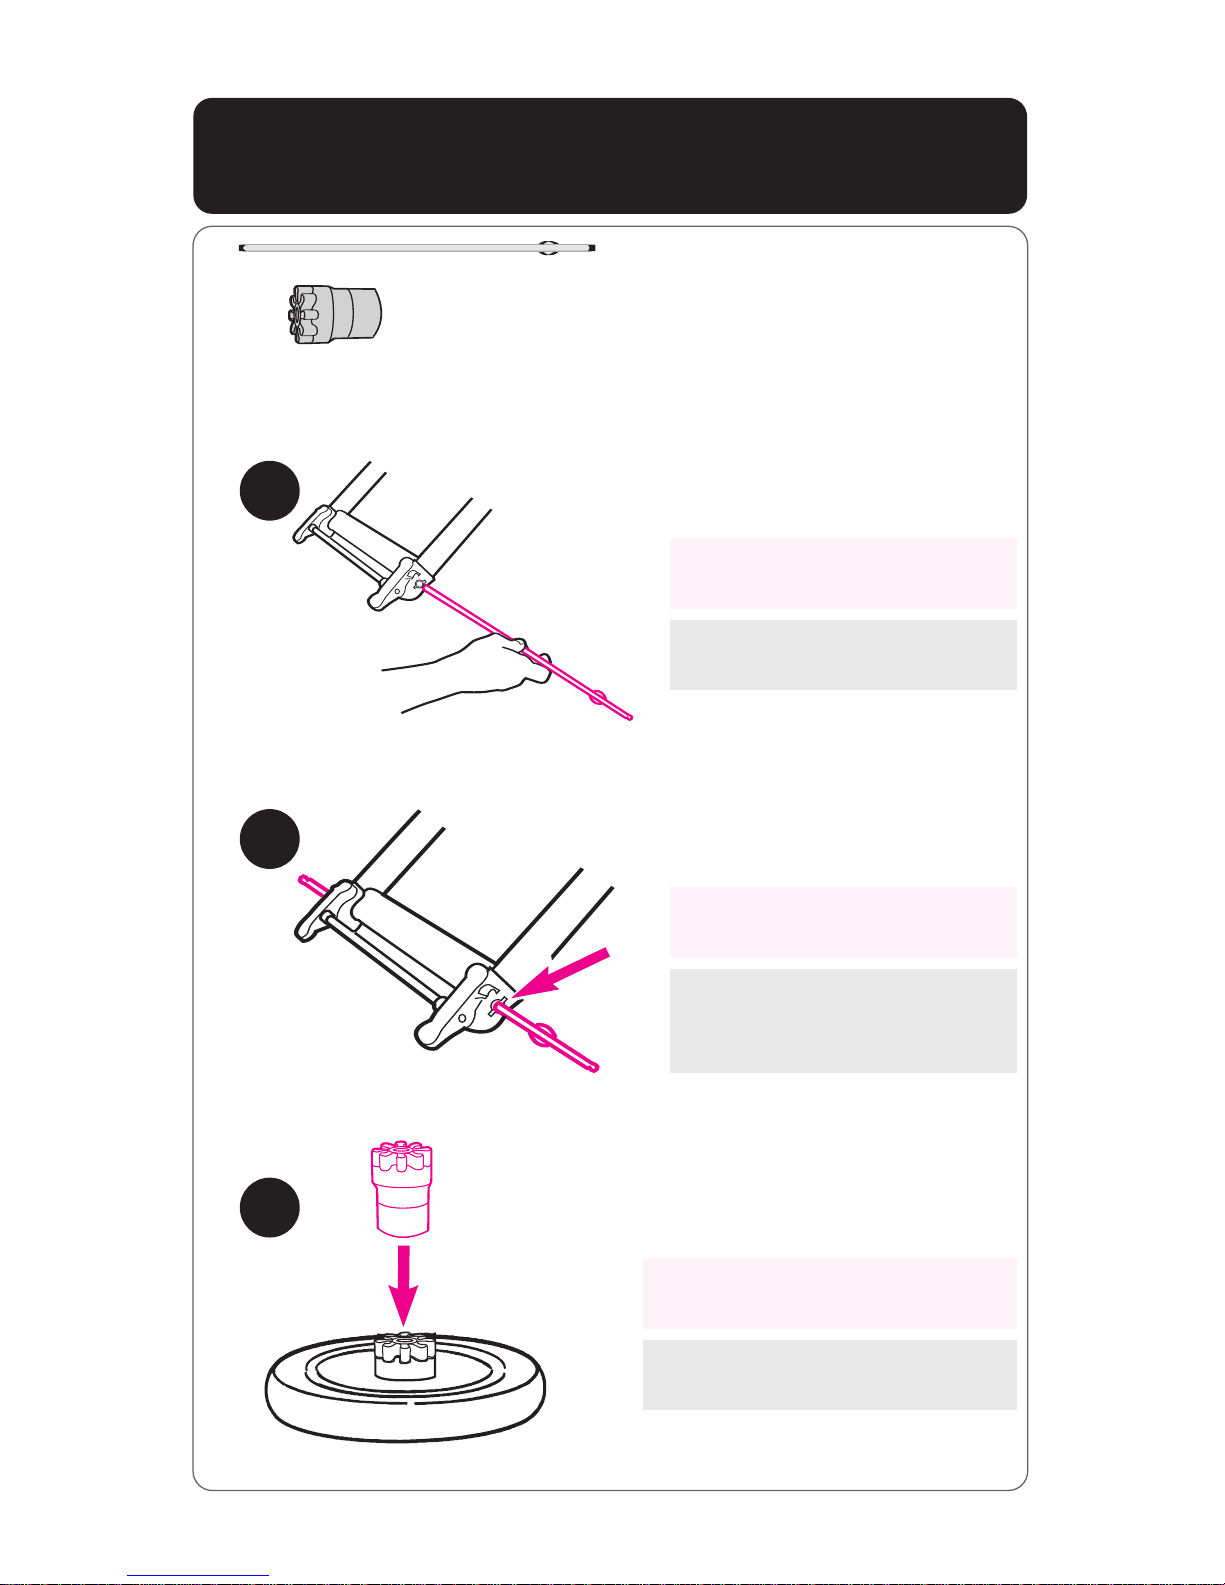
Rear Wheels • Les roues arrières
• Las ruedas traseras
La clé d'essieu doit s'alligner
avec les troux des clés.
La llave del eje debe
alinearse con los
agujeros correspondientes.
Axle key must line up with
key holes.
Insérez l'essieu à manchon à
travers l'ouverture de l'essieu.
Inserte la varilla del eje por la
apertura del eje.
Insert axle rod through
axle opening.
Attachez fermerment l'adapteur
du moyeu sur la roue.
Conecte el adaptador del cubo
firmemente a la rueda.
Firmly attach hub adapter
onto wheel.
2X
4
5
6
Page 12
12
8
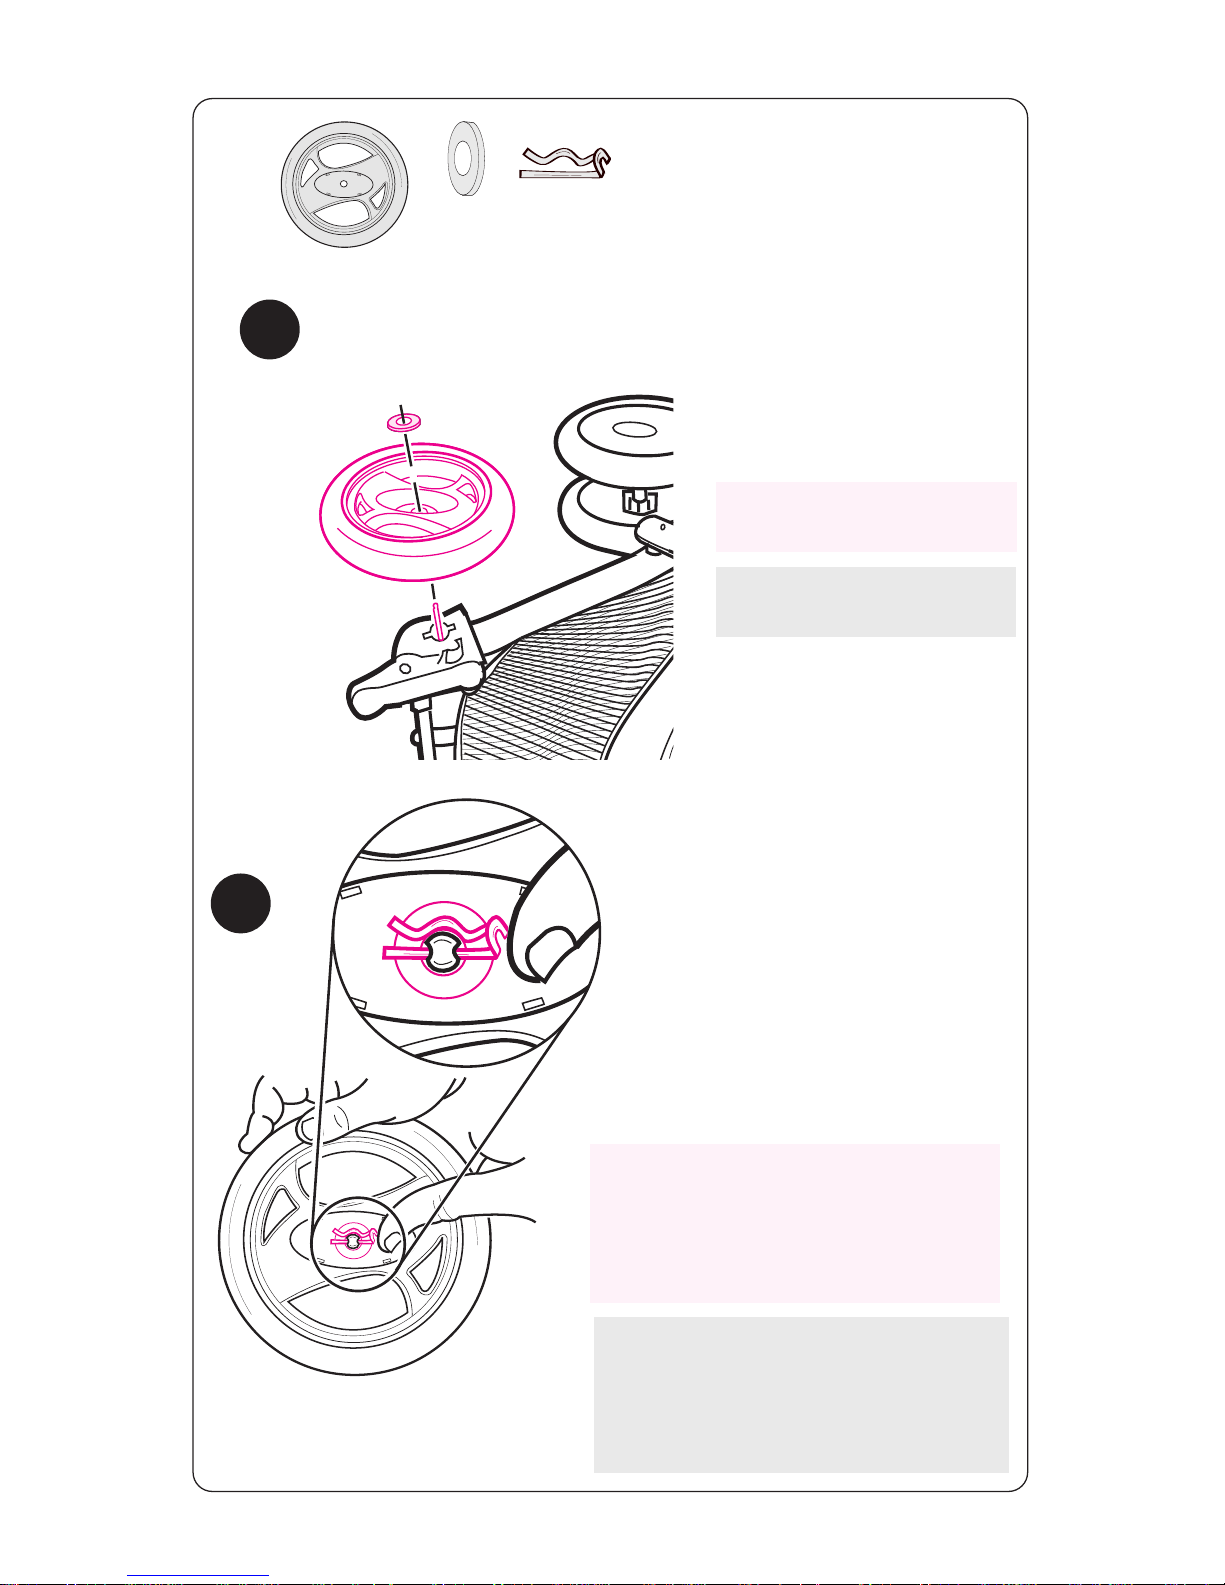
Push straight side of pin through
axle hole. Pin will separate around
the axle. Curved end of pin
MUST face up as shown.
2X
2X
2X
7
Ponga la rueda y la
arandela en el eje.
Place wheel and washer
on axle.
Pousser le côté droit de la tige
dans l'orifice de l'essieu. La tige va
se séparer autour de l'essieu. La
partie recourbée de la tige DOIT
pointer vers le haut, tel qu'illustré.
Empuje el lado recto de la clavija
por el agujero del eje. La clavija se
separará alrededor del eje. El lado
curvo de la clavija DEBE mirar hacia
arriba como se indica.
Placez la roue et la
rondelle sur l'essieu.
Page 13
13
10
Enfilez la courroie du panier
à travers les crochets situé à
l'extrémité avant du panier.
Pase la correa de la cesta
por los ganchos ubicados
en la parte delantera de
la canasta.
Thread basket strap
through hooks located on
front end of basket.
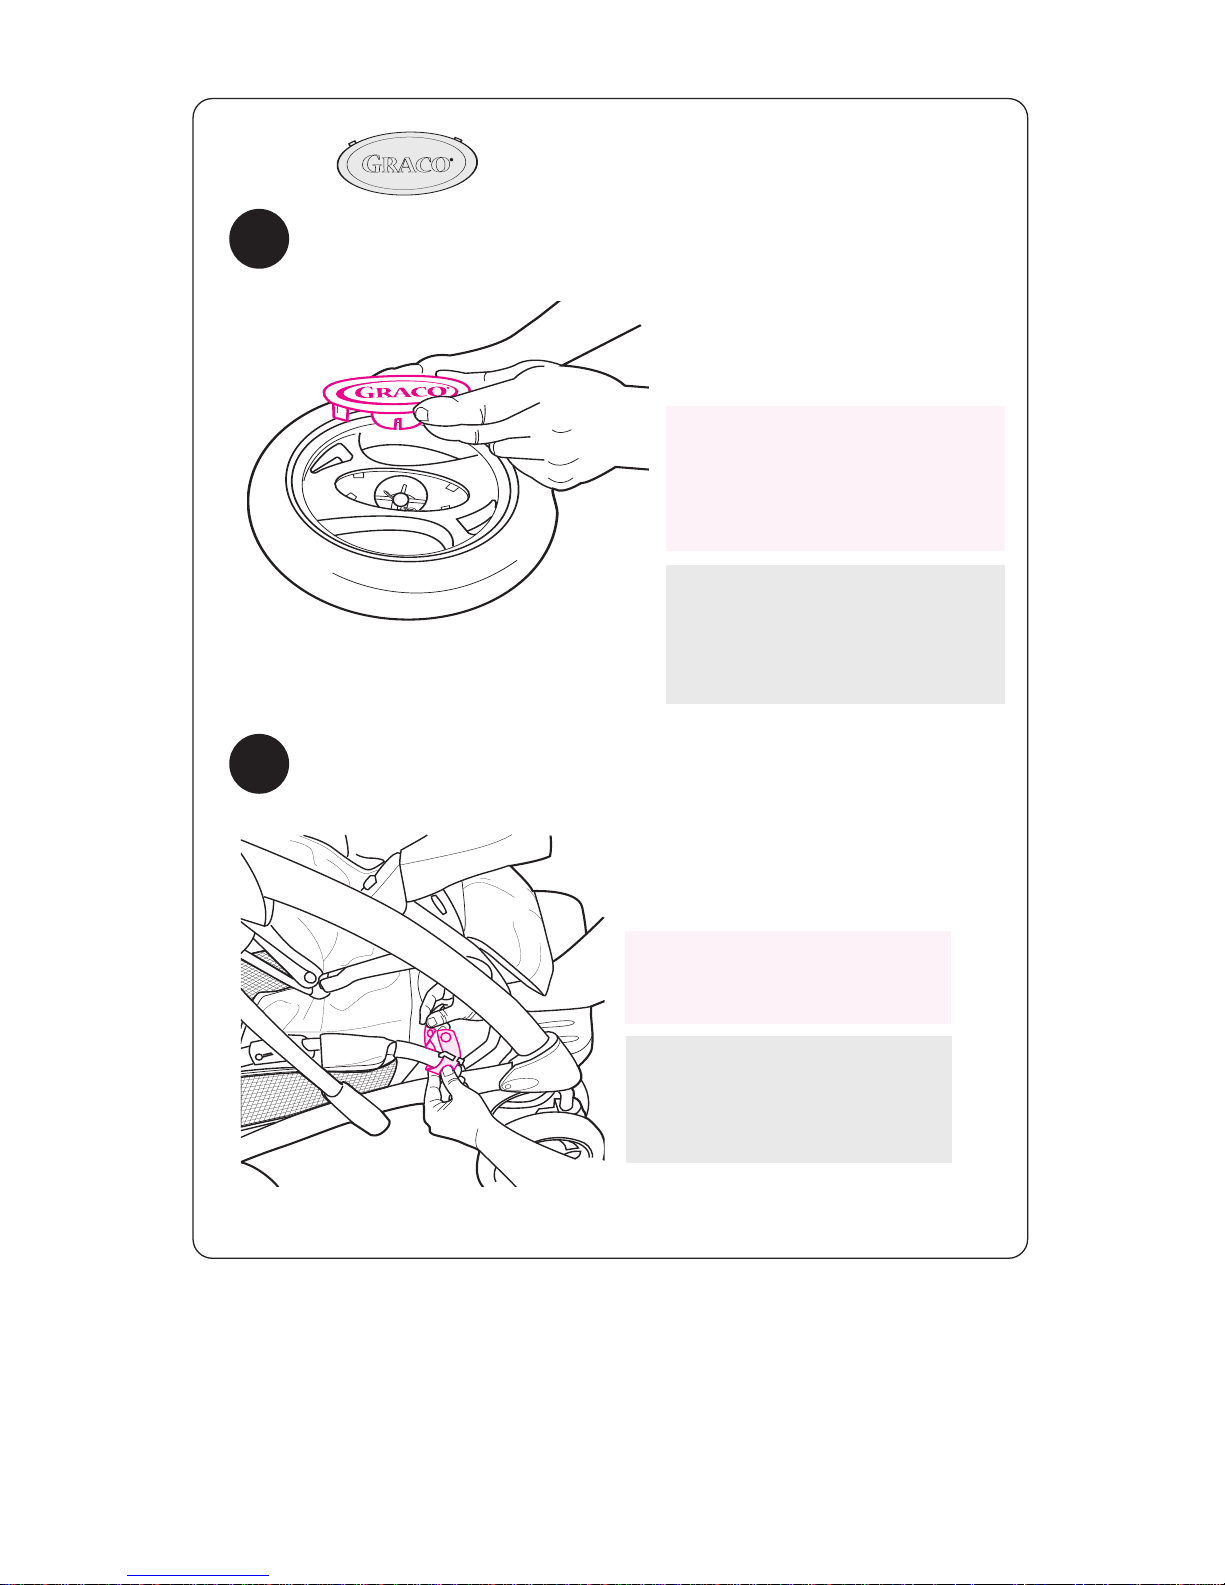
9
Trabe el tapacubos sobre la
clavija como se indica.
Repita el procedimiento en
la otra rueda.
Enclenchez l'enjoliveur de
roue sur la cheville tel
qu'illustré.
Répétez sur l'autre roue.
Snap hubcap over pin as
shown.
Repeat on other wheel.
2X
Page 14
14
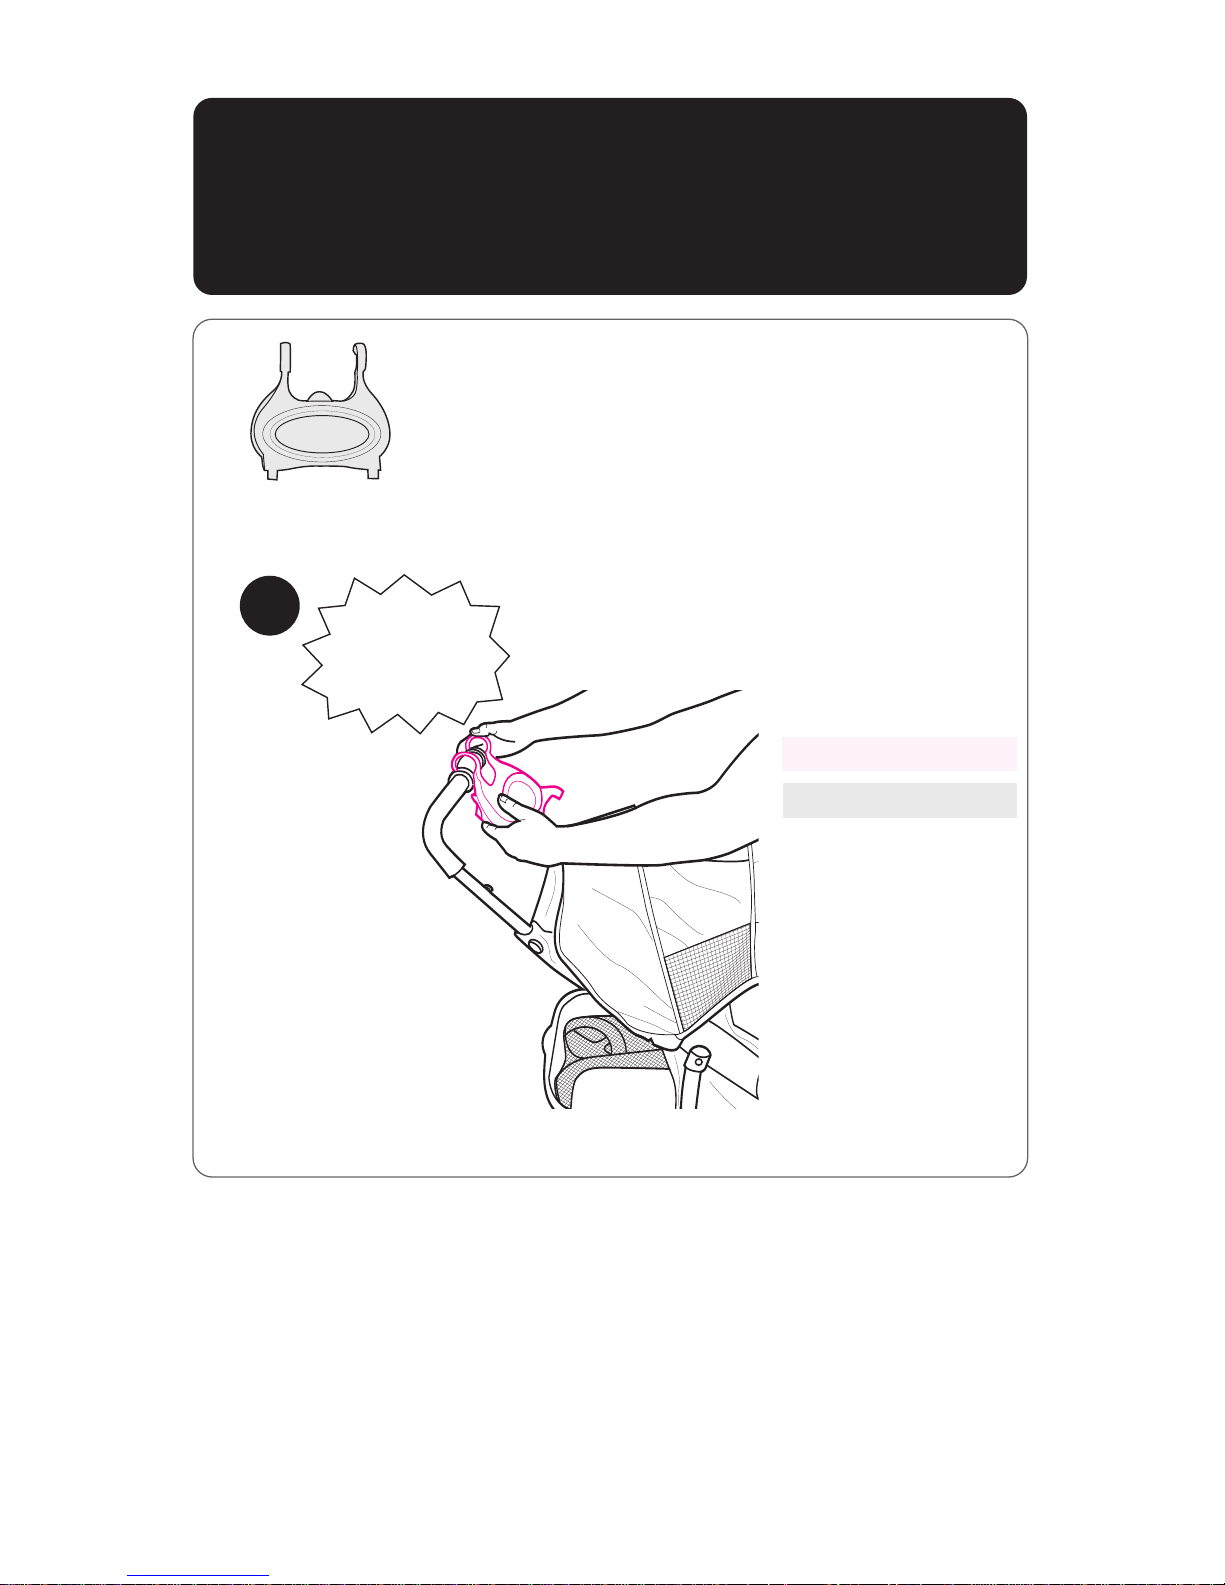
11
Accessory Bridge and Parents Tray
• Plateau à accessoire et plateau pour
adulte • Barra de accesorios y bandeja
de los padres
SNAP!
ENCLENCHEZ!
¡CHASQUIDO!
Ouvrir le baldaquin.
Abra la capota.
Open canopy.
Page 15
15
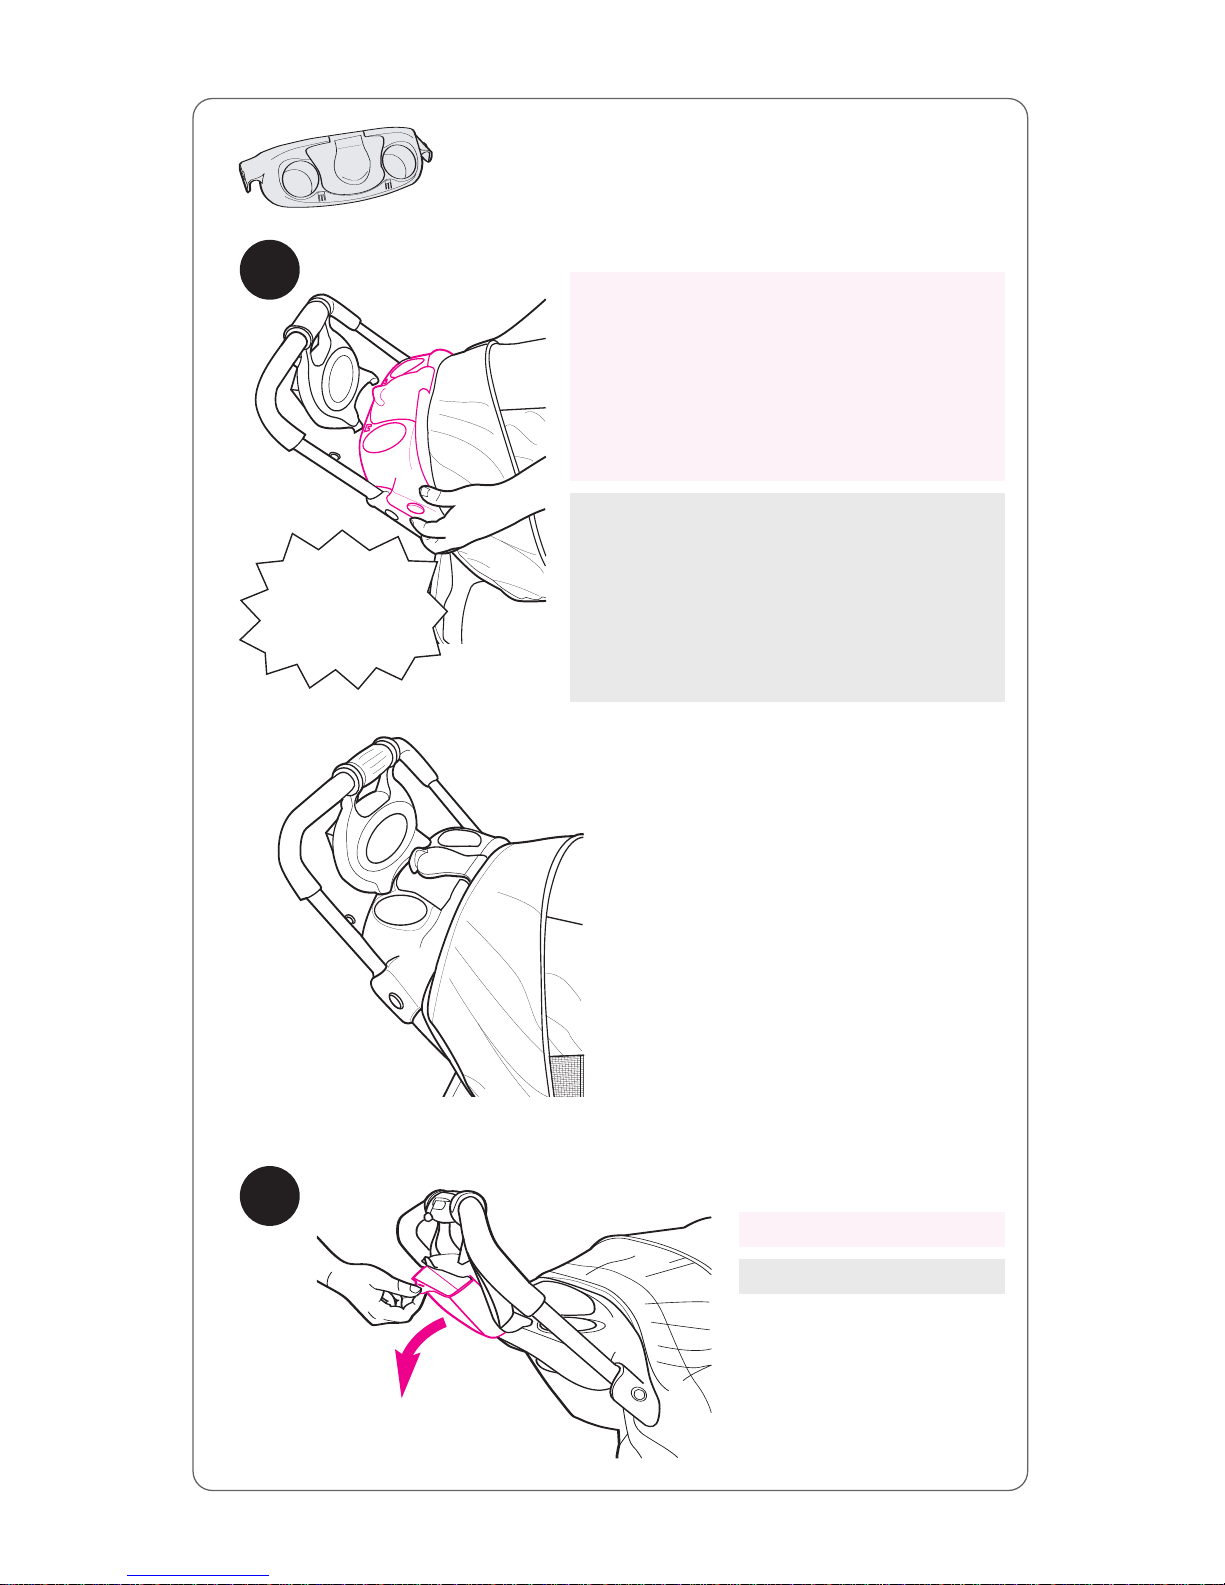
13
Rangement de surplus
Almacenaje adicional
Extra storage
SNAP!
ENCLENCHEZ!
¡CHASQUIDO!
Insert tray into slots, make sure
parent tray is snapped securely onto
pegs on each side of the frame.
Note: Peg may be covered by cloth.
Inserte la bandeja en las ranuras,
asegurándose que la bandeja de los
padres esté bien sujeta en las clavijas
de cada lado del bastidor.
Nota: La clavija podrá quedar
cubierta con tela.
Inserrez le plateau dans les fentes,
s'assurez que le plateau pour adulte
est enclenché sécuritairement sur les
fiches sur chaque côté de l'armature.
Note: Fiche peut être recouverte de
matériel.
12
Page 16
16
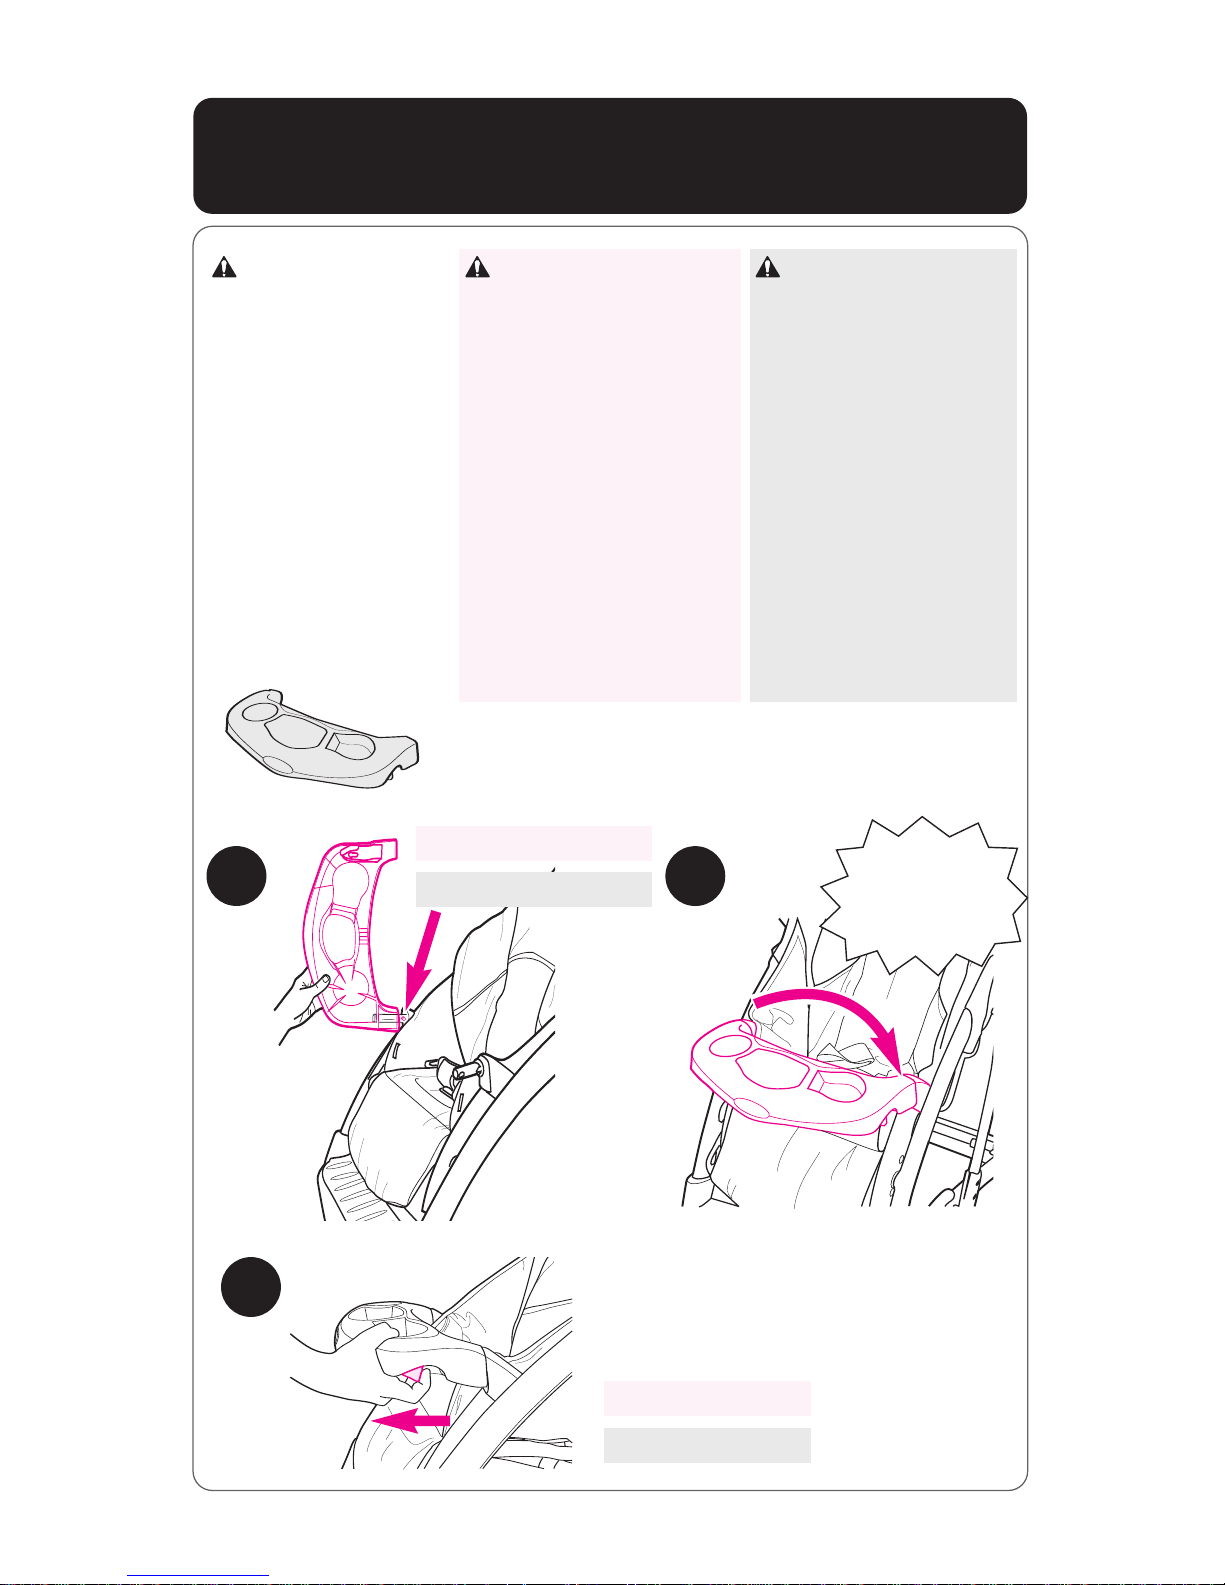
Child’s Tray • Le plateau pour enfant
• La bandeja para niños
WARNING
Always secure your
child with the seat
belt. The tray is not
a restraint device.
DO NOT lift the
stroller by the
child’s tray. Use care
when snapping the
tray on the stroller
with a child in
the stroller.
MISE EN GARDE
Toujours attacher votre
enfant avec la ceinture
de sécurité. Ce plateau
n'est pas un système de
retenue. NE PAS lever
la poussette par le
plateau pour enfant.
Prenez garde lorsque
vous enclenchez le
plateau à la poussette
avec un enfant dans
la poussette.
ADVERTENCIA
Siempre sujete a su
niño con el cinturón
de seguridad. La
bandeja no es un
dispositivo de
seguridad. NO
levante el cochecito
por la bandeja del
niño. Lleve cuidado
al conectar la bandeja
al cochecito cuando
el niño esté dentro
del mismo.
14
Oprima el botón.
Push button in.
Enfoncez le bouton.
SNAP!
ENCLENCHEZ!
¡CHASQUIDO!
15
16
To open the tray.
Abrir la bandeja.
Ouvrir le plateau.
Page 17
17
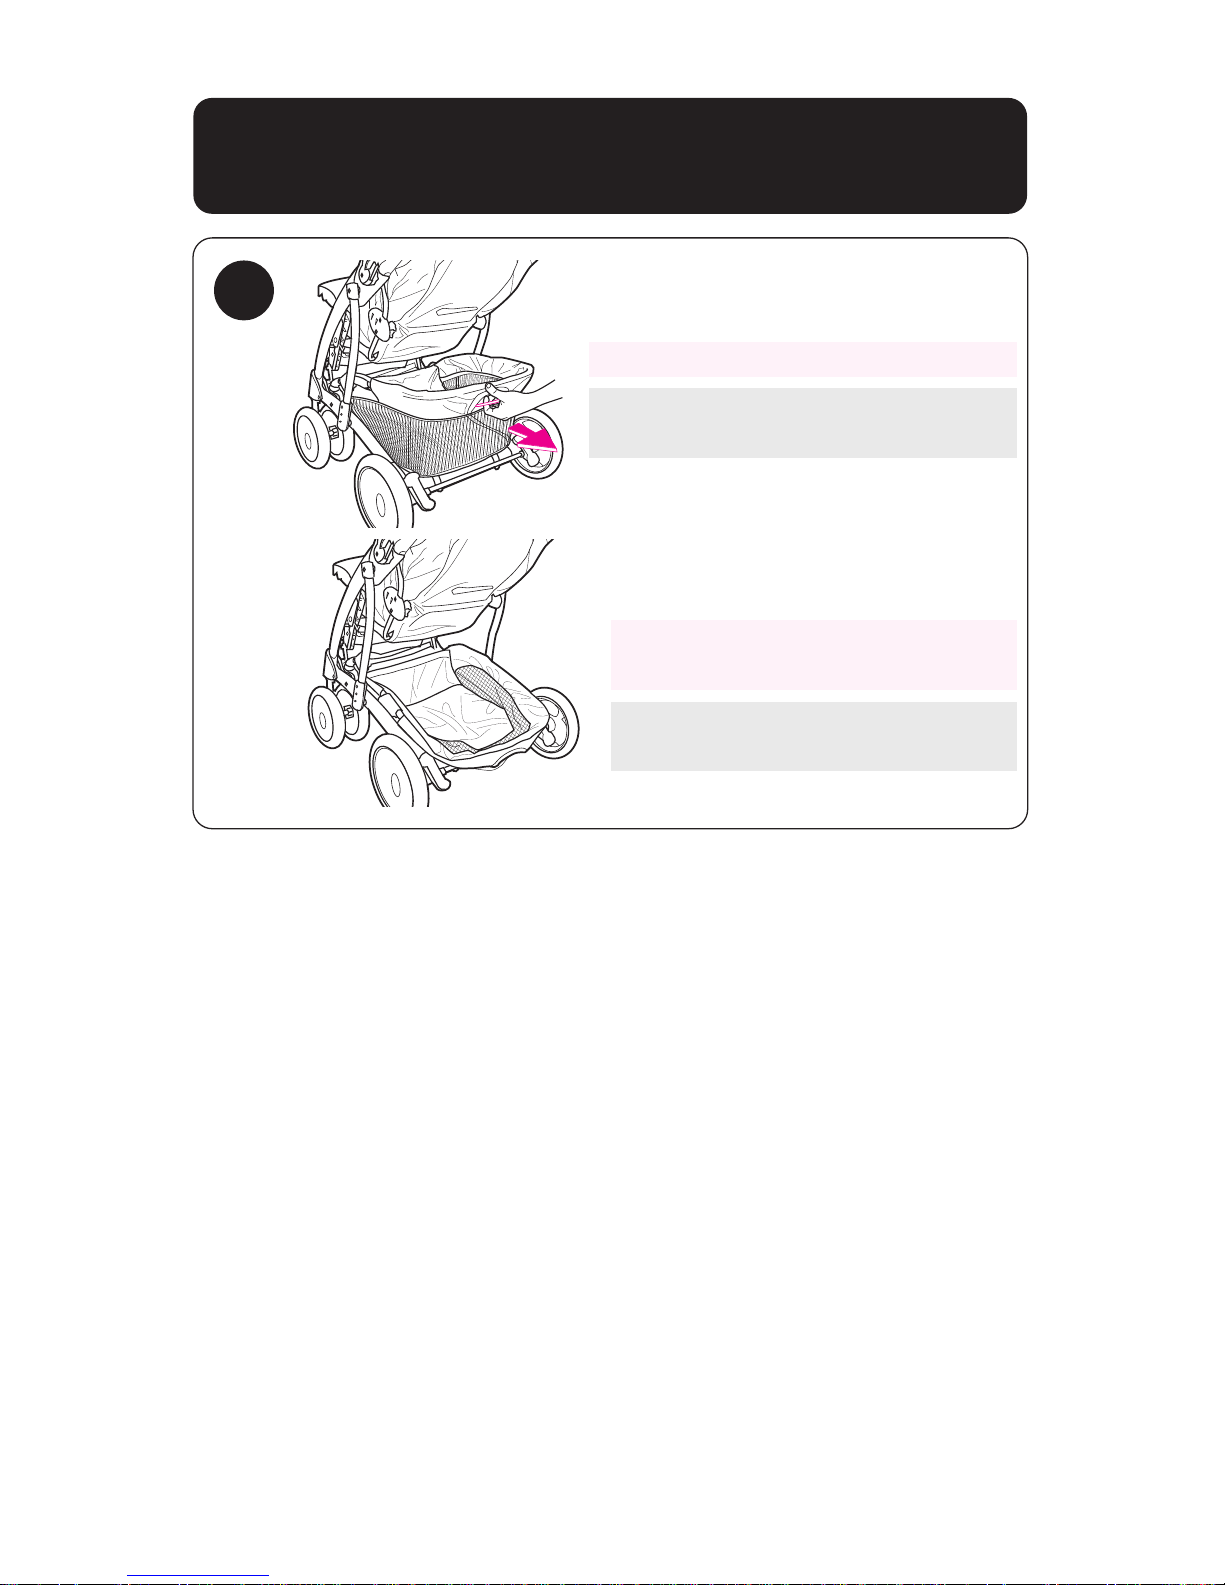
To Lower Basket • Pour plier le panier
• Para plegar la canasta
Retirez le fil du panier pour le plier.
Jale el alambre de la canasta para
plegar la canasta.
Pull basket wire out to
lower basket.
ADVERTENCIA: La canasta
plegada podrá bloquear los frenos.
CAUTION: Lowered basket may
lock brakes.
17
AVERTISSEMENT: Un panier plié
peut verrouiller les freins.
Page 18
18
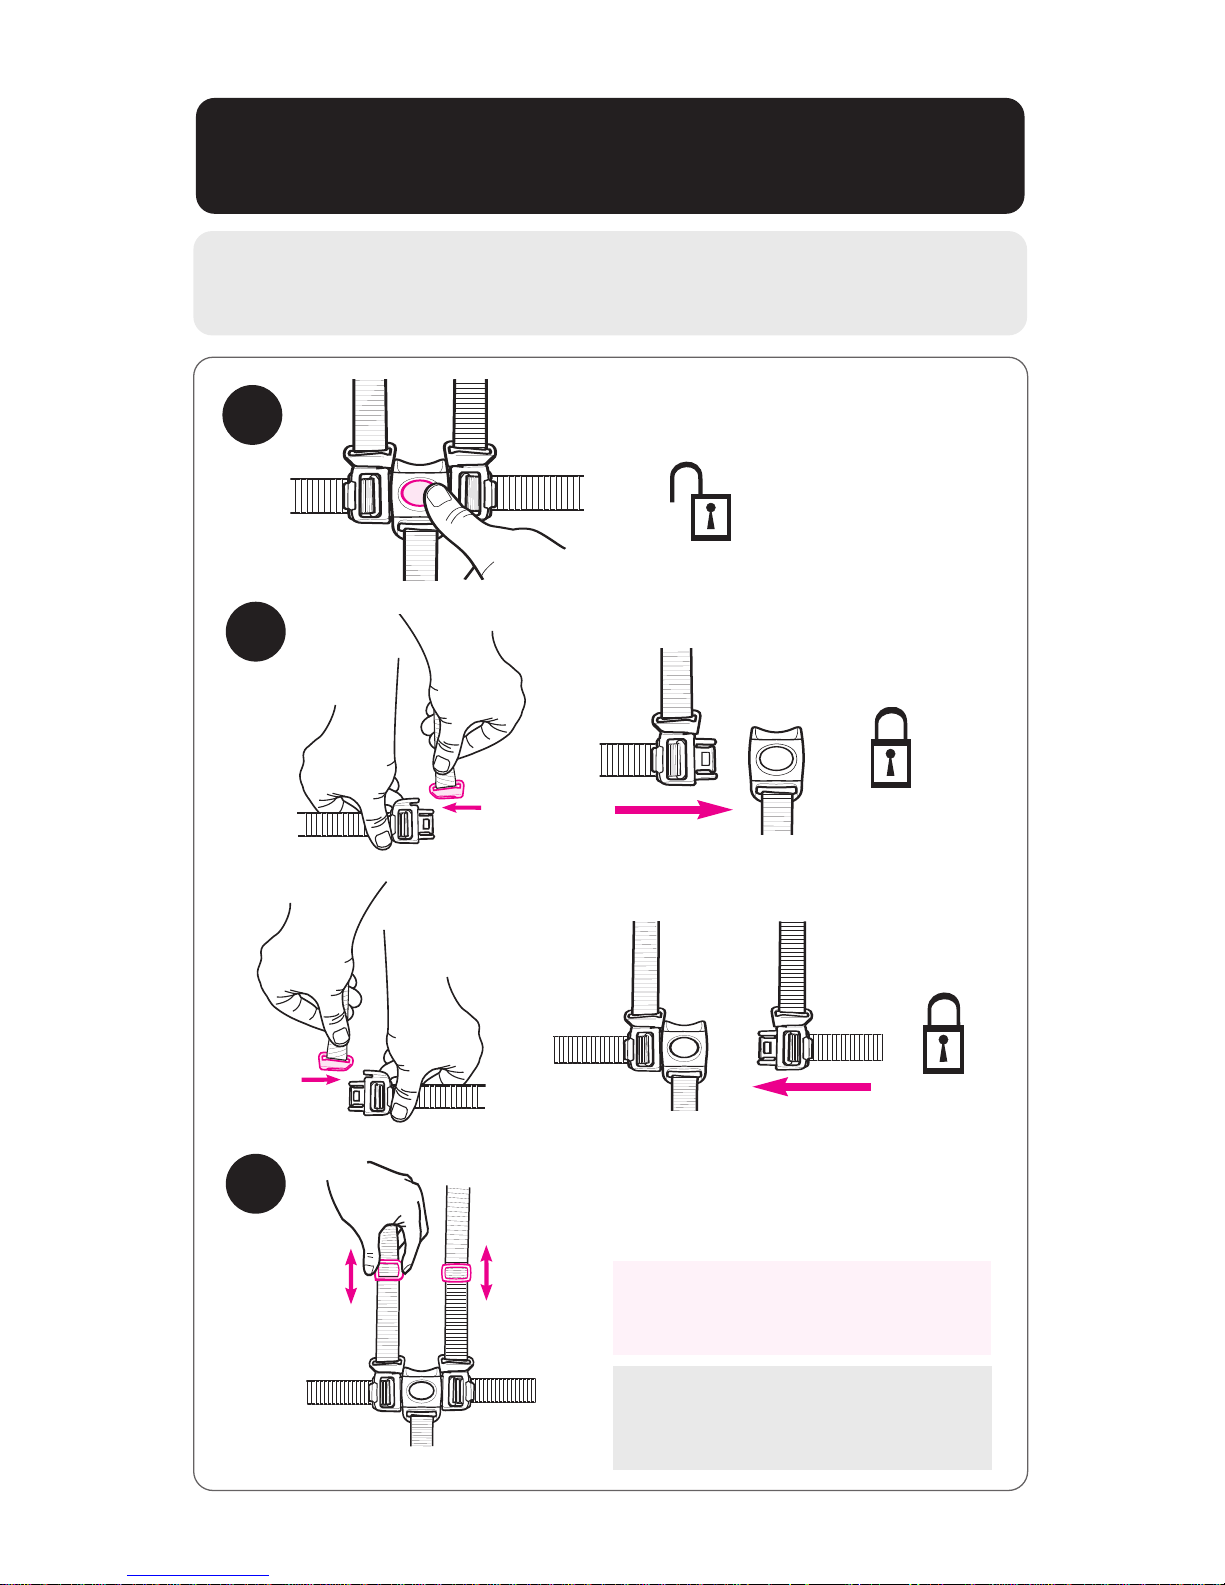
To Secure Child • Attacher l’enfant
• Para asegurar al niño
18
20
To adjust harness.
To change shoulder harness
slots see page 20.
Pour ajuster le harnais.
Pour changer des fentes de
harnais d'épaule voir la page 20.
Para ajustar el arnés.
Para cambiar ranuras del arnés
del hombro vea la página 20.
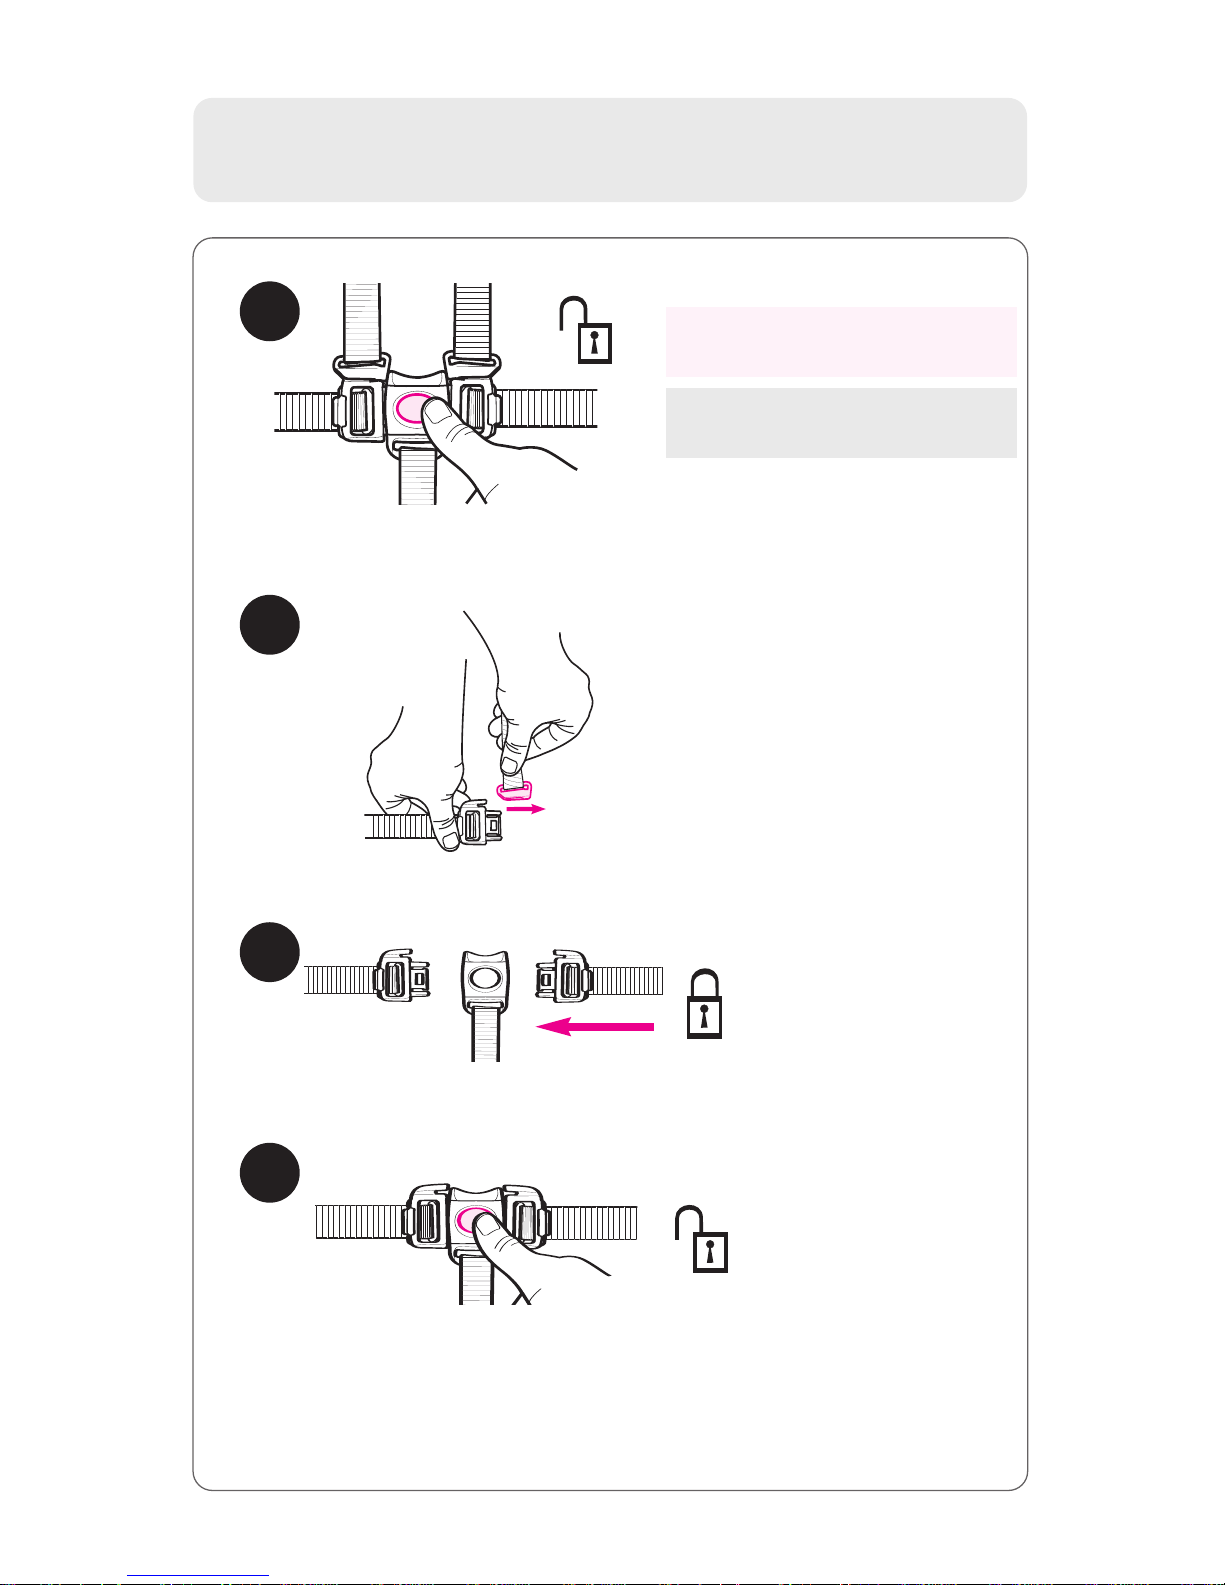
19
5 Point Harness • Harnais à 5 point
• Arnés de 5 puntos
Page 19
19
21
22
23
24
To convert to 3-pt harness.
Pour convertir en harnais
3-points.
Para convertirlo en un arnés
de 3 puntos.
3 Point Buckle • Boucle à 3 point
• Hebilla de 3 puntos
Page 20
20
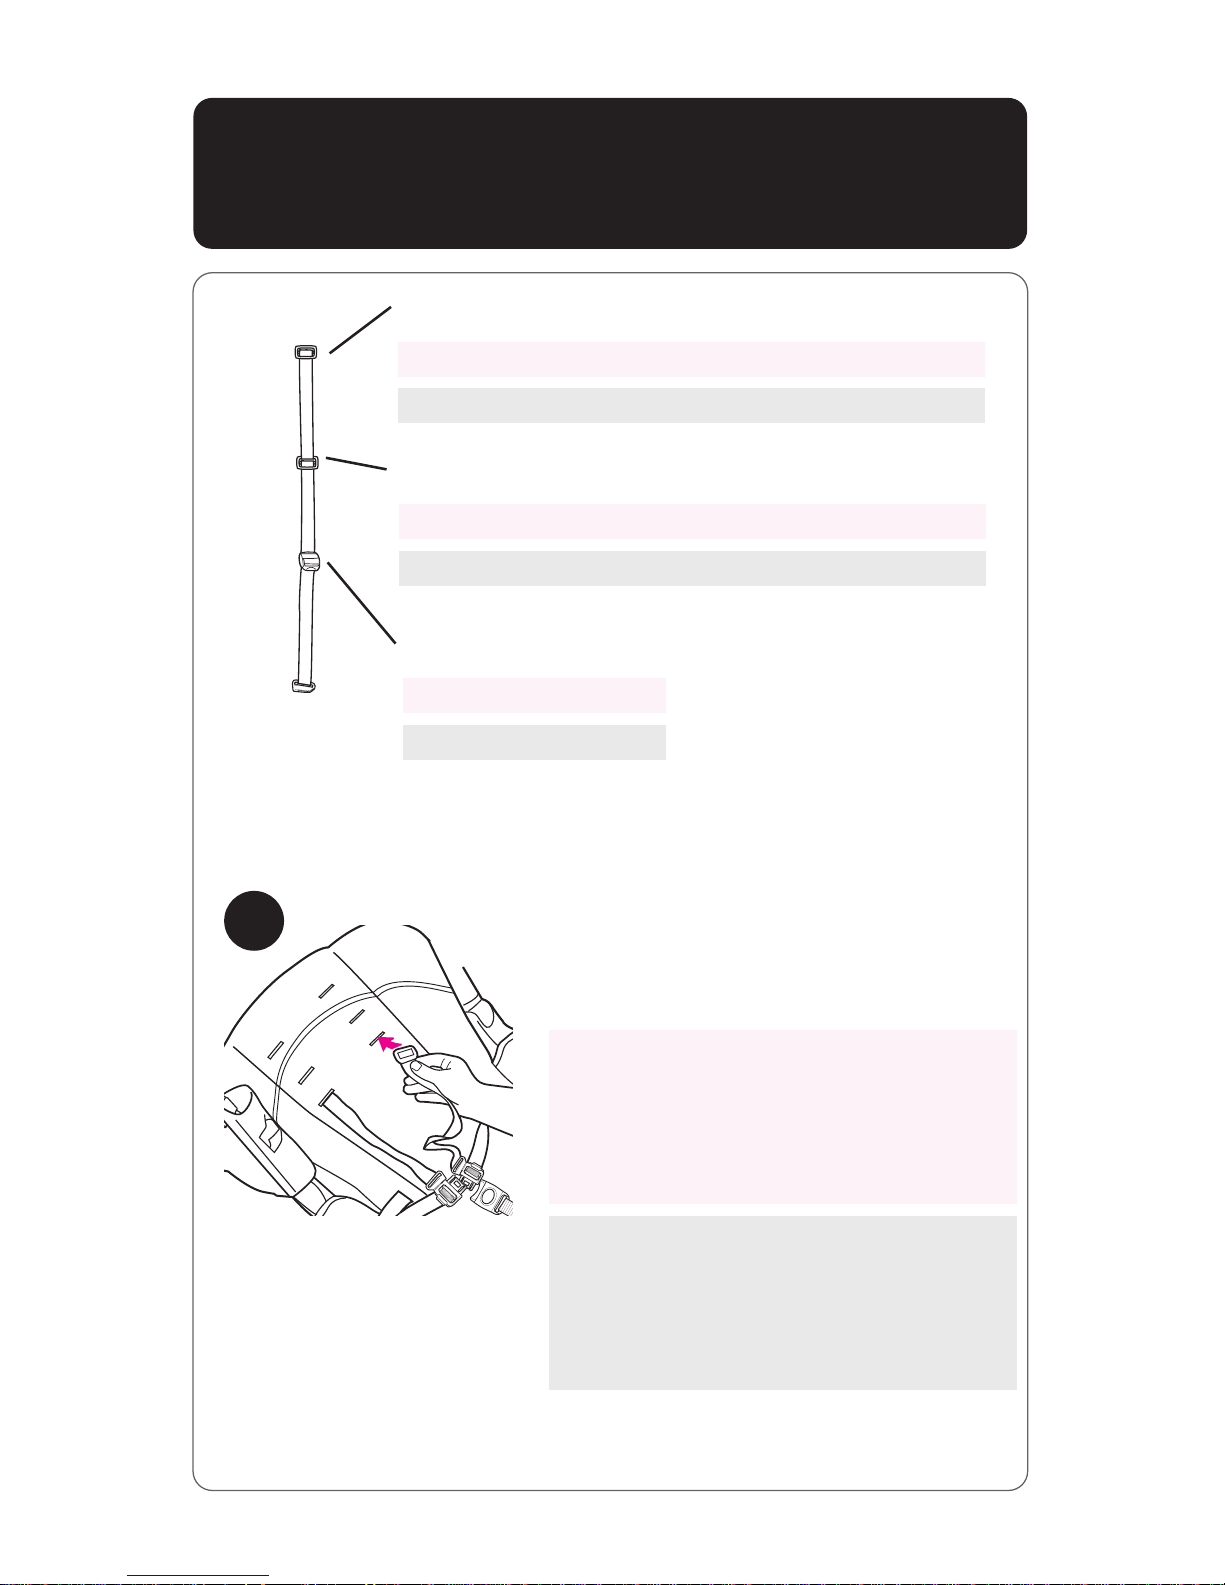
To Change Shoulder Harness Slots
• Pour changer des dentes de harnais d'épaule
• Para cambiar ranuras del arnés del hombro
Anclaje del arnés del hombro - niño grande
Harnais d 'ancrage à l 'épaule pour grand enfant
Shoulder harness anchor—larger child
Anclaje del arnés del hombro - niño pequeño
Harnais d 'ancrage à l 'épaule pour petit enfant
Shoulder harness anchor—smaller child
Ajustador deslizable
Glissez le régleur
Slide adjuster
Use uno de los anclajes del arnés del
hombro en las ranuras que estén más
cerca a la altura del hombro del niño.
Use el ajustador deslizable para lograr
ajustes adicionales.
Utilisez l'un ou l'autre des harnais
d'ancrage à l'épaule dans les fentes
qui sont les plus proches de la hauteur
de l'épaule de l'enfant.
Utilisez le régleur pour plus d'ajustement.
Use either shoulder harness anchor in
the slots that are closest to child’s
shoulder height.
Use slide adjuster for further adjustment.
25
Page 21
21
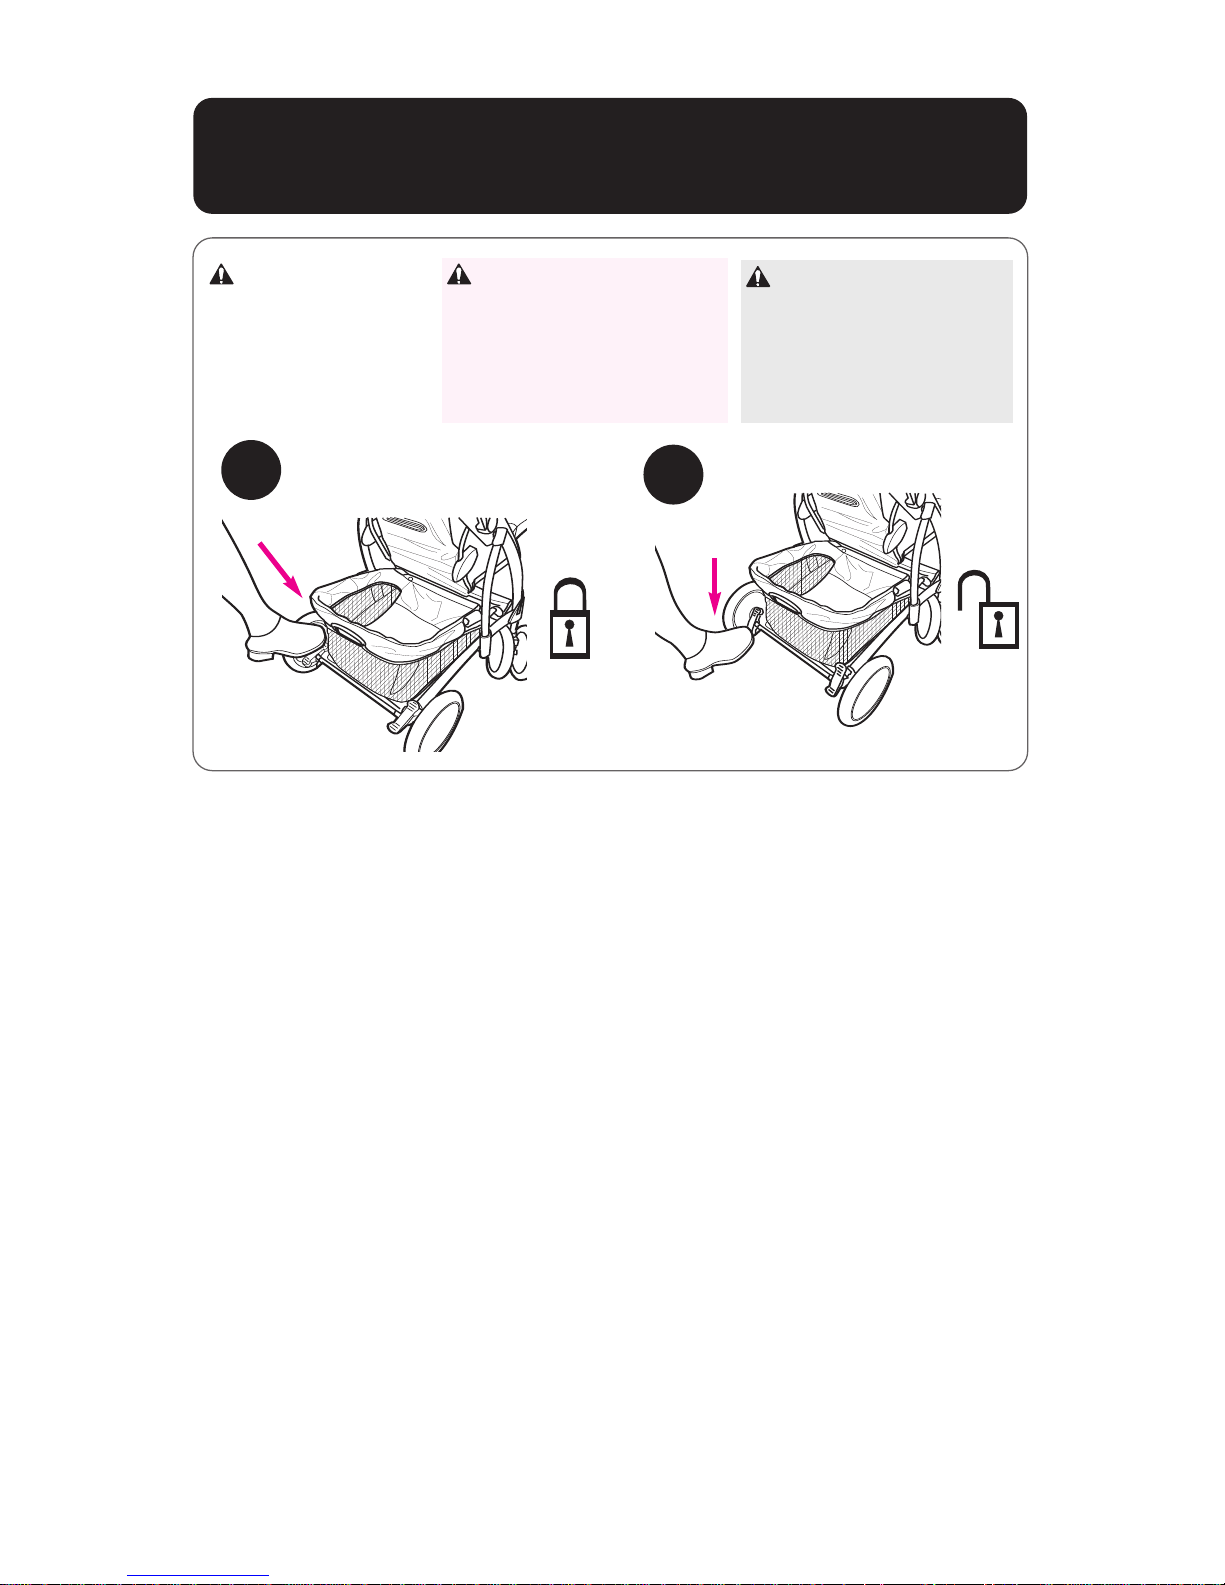
Brakes • Les freins • Los frenos
WARNING
Check that brakes
are on by trying to
push stroller.
MISE EN GARDE
Vérifiez que les freins
fonctionnent en
essayant de pousser
la poussette.
ADVERTENCIA
Inspeccione los frenos
tratando de empujar el
cochecito.
26
27
Page 22
22
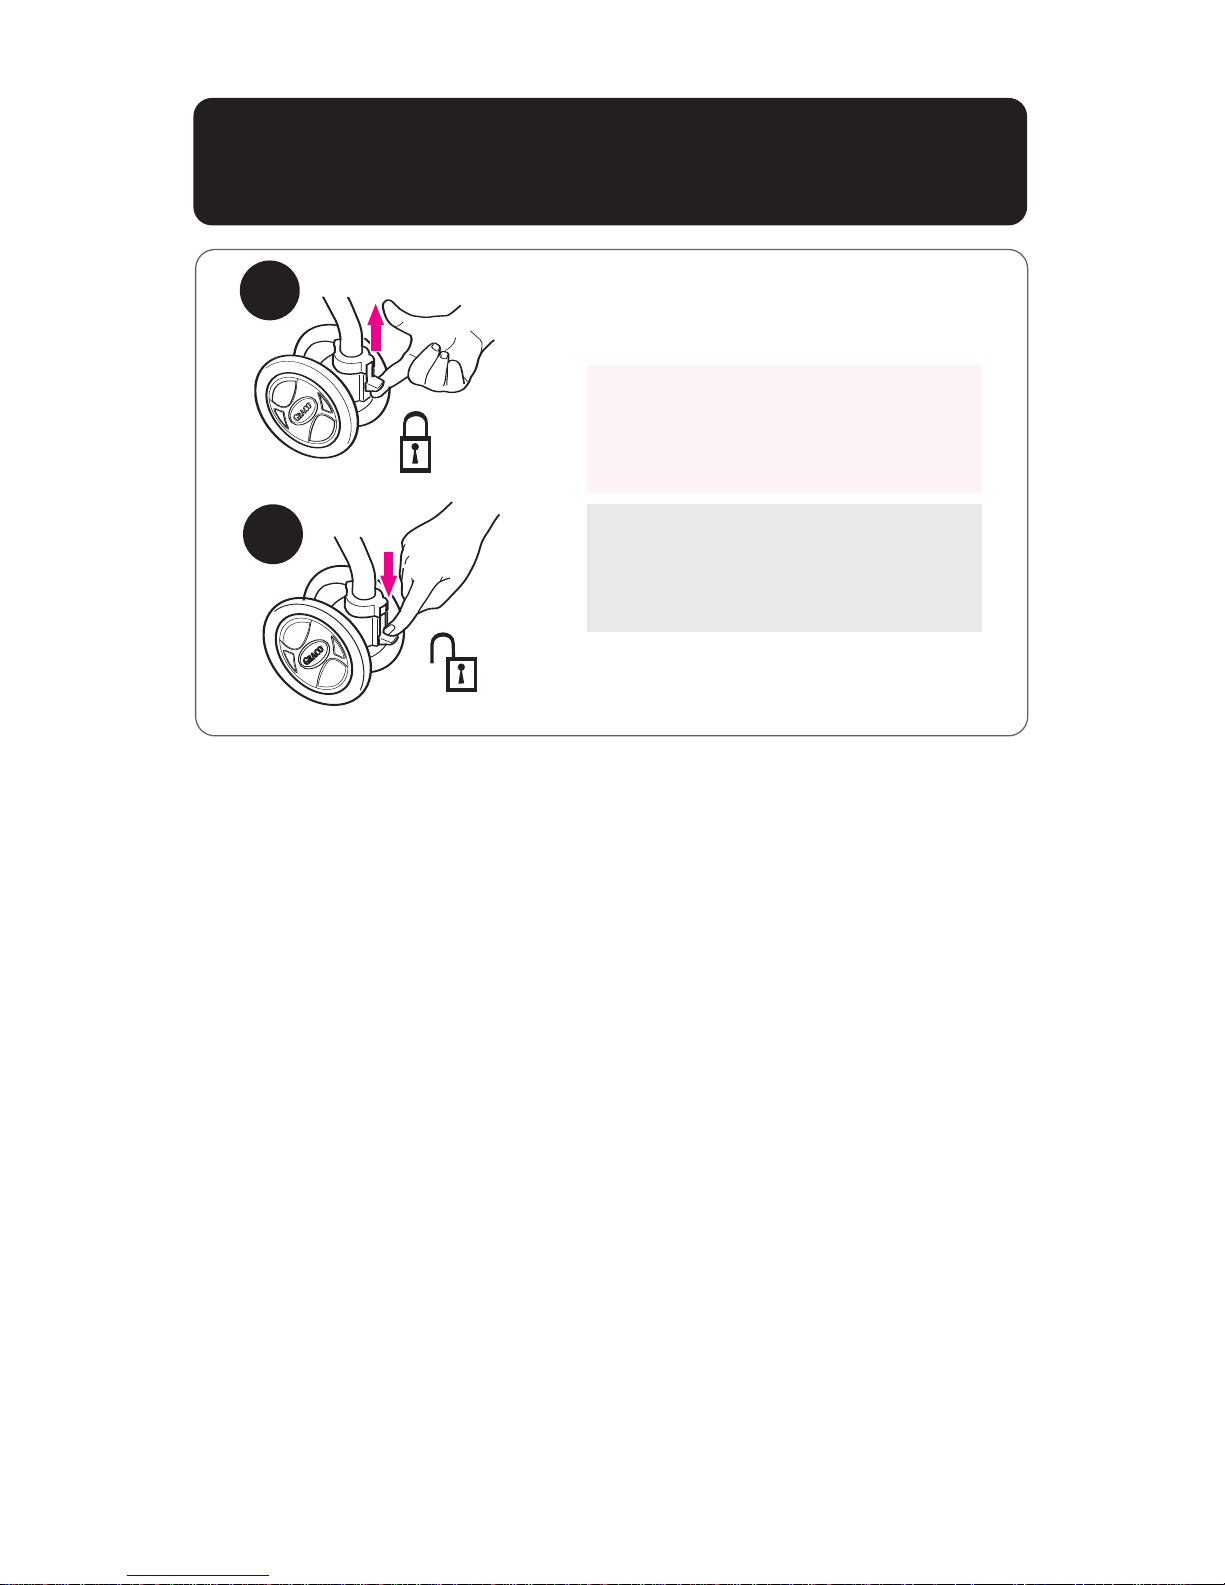
Swivel Wheels • Les roues pivotantes
• Las ruedas giratorias
Les roues pivotantes avant se
barrent pour un usage sur les
surfaces irrégulières tel que le
gazon, les cailloux ou le gravier.
Las ruedas giratorias delanteras se
traban para el uso en superficies
desparejas tales como césped,
piedras o grava.
Front swivel wheels lock for use
on uneven surfaces such as grass,
stones or gravel.
28
29
Page 23
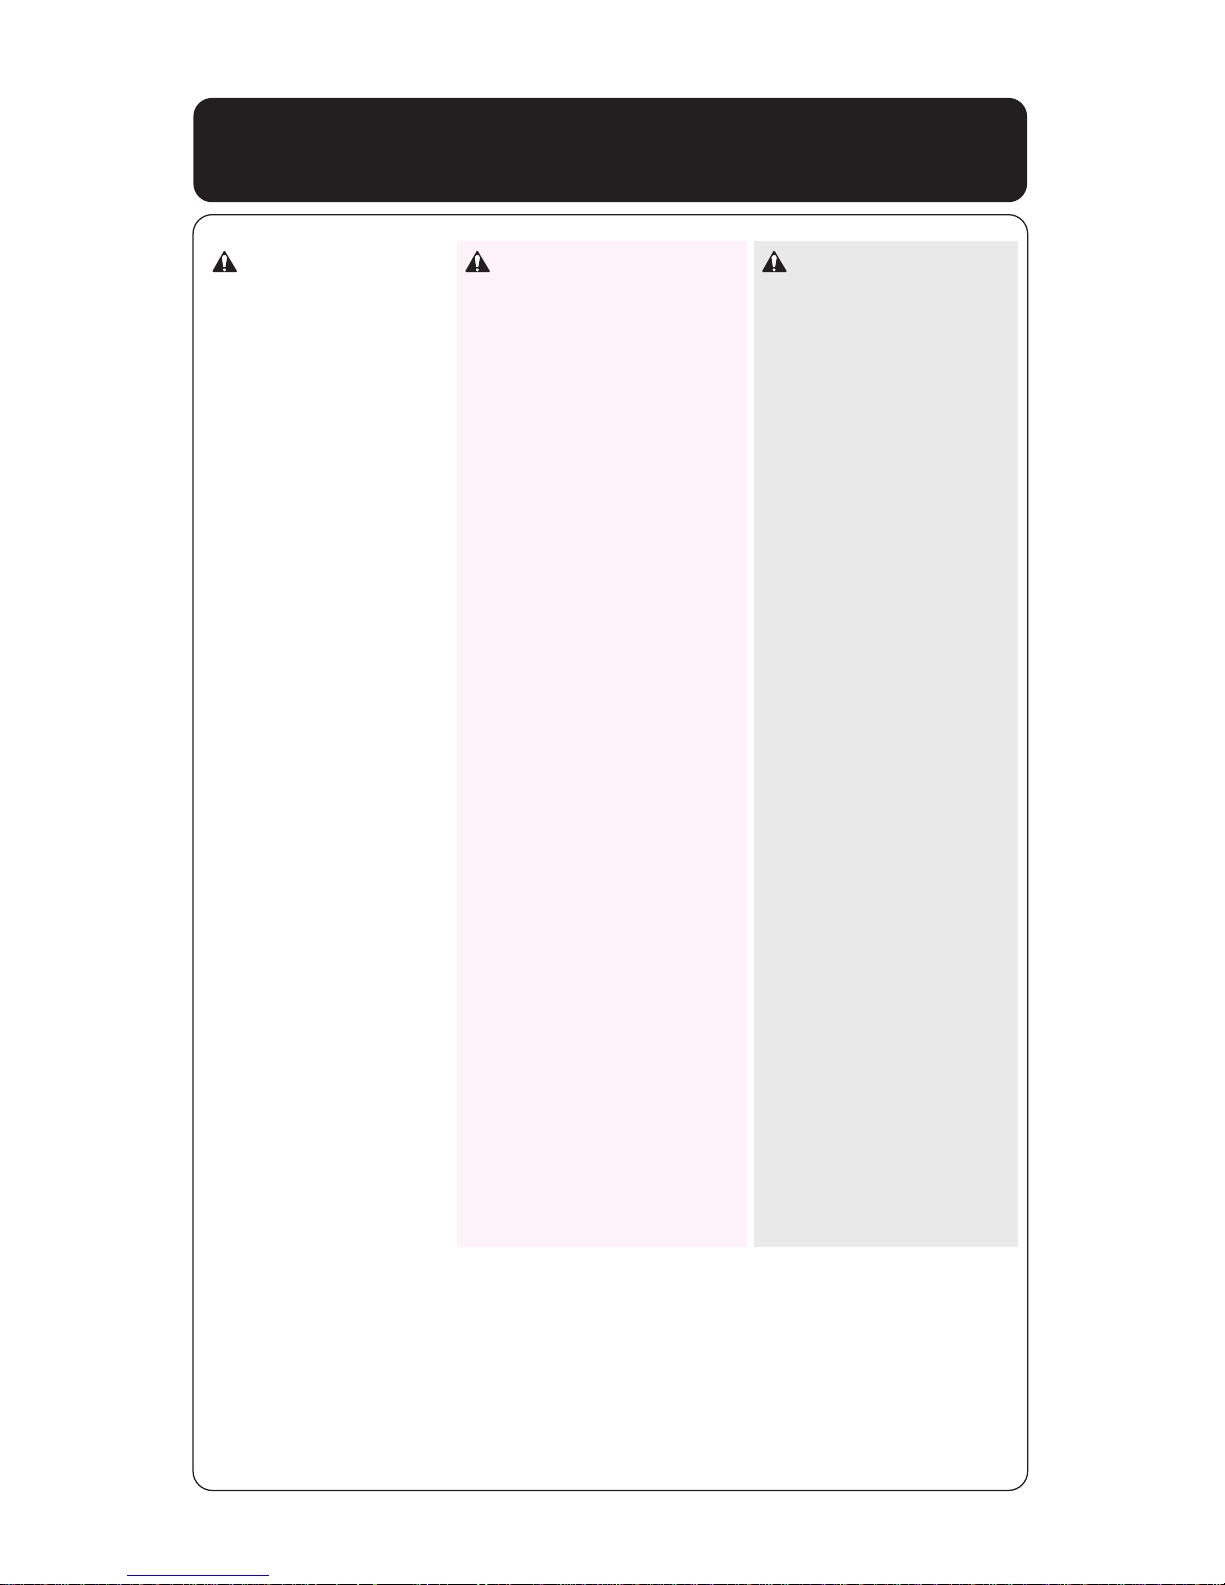
23
To Recline Seat • Pour incliner le siège
• Para reclinar el asiento
ADVERTENCIA
La tela que se agarre
a las trabas podría
prevenir que las
mismas funcionen.
Cuando vuelve a
poner el asiento en la
posición vertical, no
deje que la tela se
agarre en la traba.
El niño puede
deslizarse
entre las aperturas
para las piernas y
estrangularse.
Nunca lo use en una
posición reclinada a
menos que recinto
esté en la posición
vertical.
Cuando realiza
ajustes al asiento del
cochecito, asegúrese
que la cabeza, brazos
y piernas del niño
están lejos de las
piezas del asiento
que se mueven y
del armazón del
cochecito.
WARNING
Fabric caught in the
latches may prevent
them from locking.
When returning seat
to upright position,
do not allow fabric
to be pinched in
the latch.
Child may slip into
leg openings and
strangle. Never use
in full recline
position unless
enclosure is up.
When making
adjustments to the
stroller seat, make
sure child’s head,
arms, and legs are
clear of moving seat
parts and stroller
frame.
MISE EN GARDE
Du tissu coincé dans les
loquets peut empêcher
ceux-ci de barrer.
Lorsque vous remettez
le siège en position
verticale, évitez de
coincer le tissu dans
les loquets.
L'enfant peut glisser
dans les ouvertures
des et s’étrangler.
N'utilisez jamais en
position complètement
inclinée à moins que
enceinte qui se
remonte.
Lorsque vous faites des
ajustements au siège de
la poussette, s'assurer
que la tête de l'enfant,
les bras, et les jambes
soient dégagés des
pièces du siège en
mouvement et de
l'armature de la
poussette.
Page 24
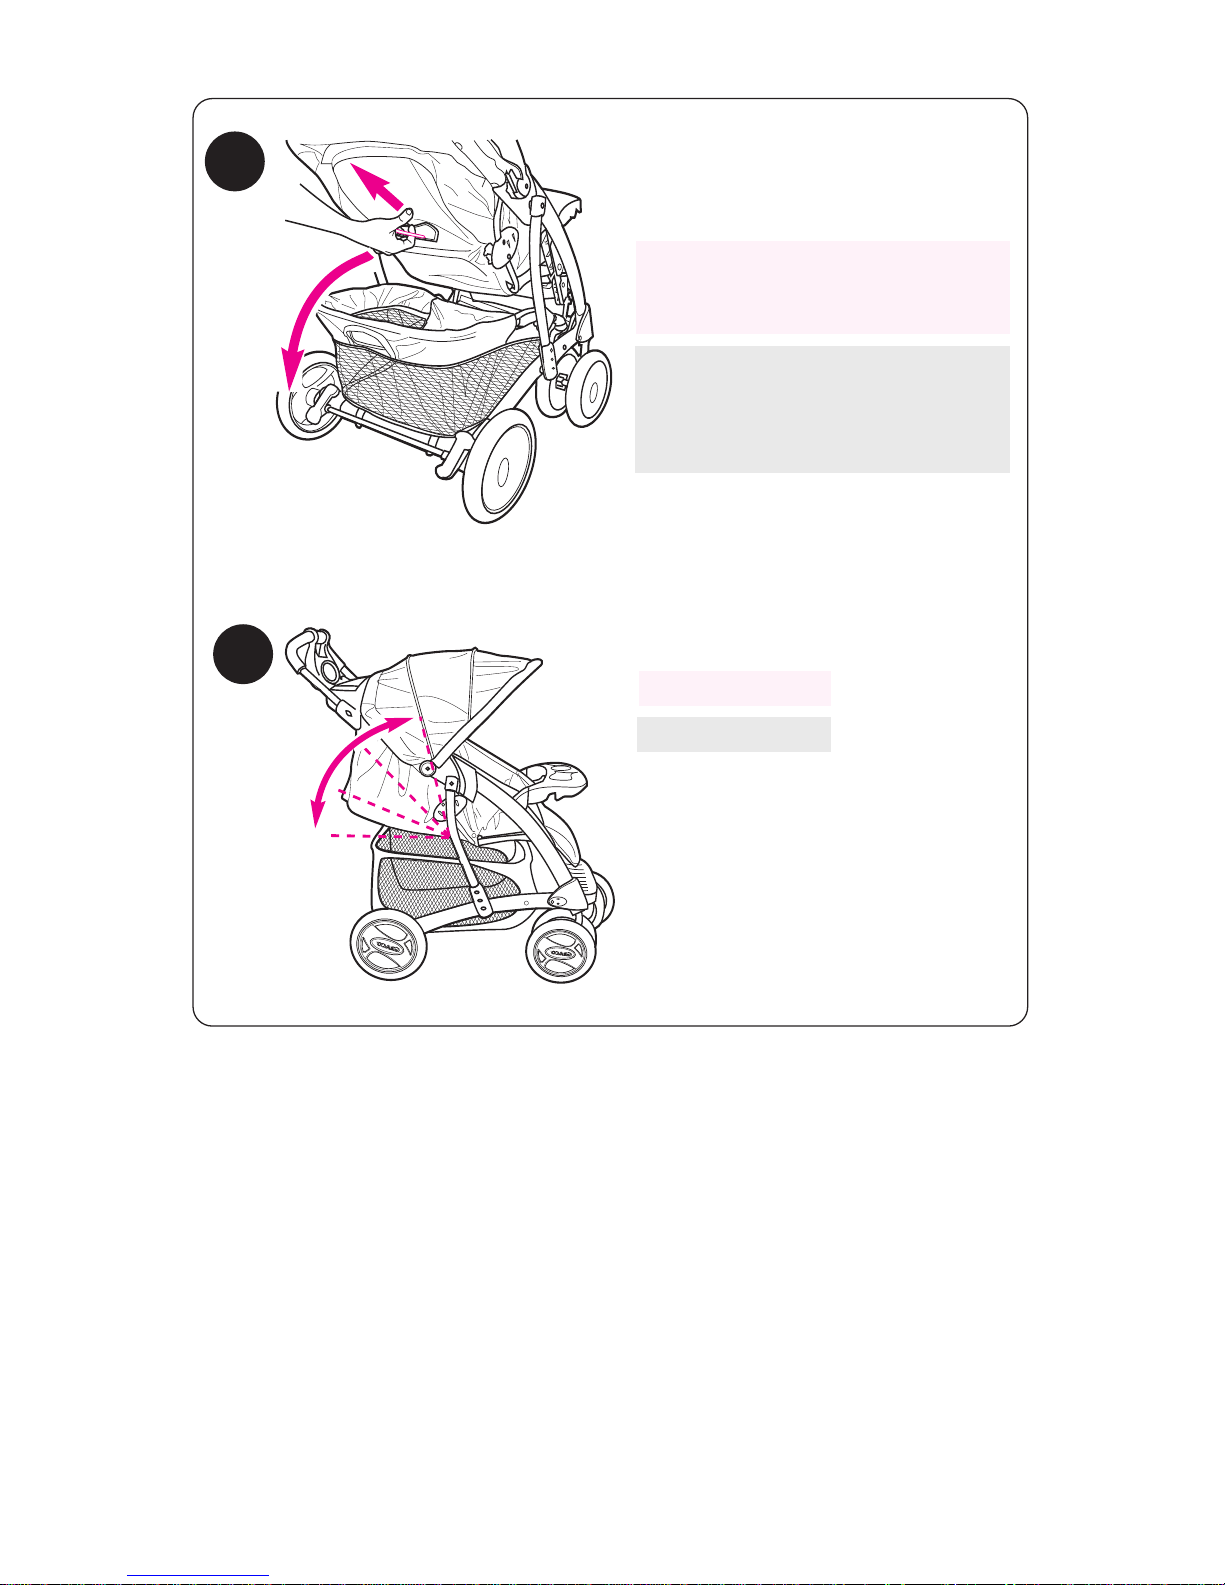
24
30
31
To raise
Pour remonter
Para levantarlo
Pour incliner: soulevez l'arrière
du baldaquin et pressez la tige
d'inclinaison à l'arrière du siège.
Para reclinarlo: levante el
respaldo de la capota y apriete
el alambre de reclinación atrás
del asiento.
To recline: lift back of canopy,
and squeeze recline wire on
back of seat.
Page 25
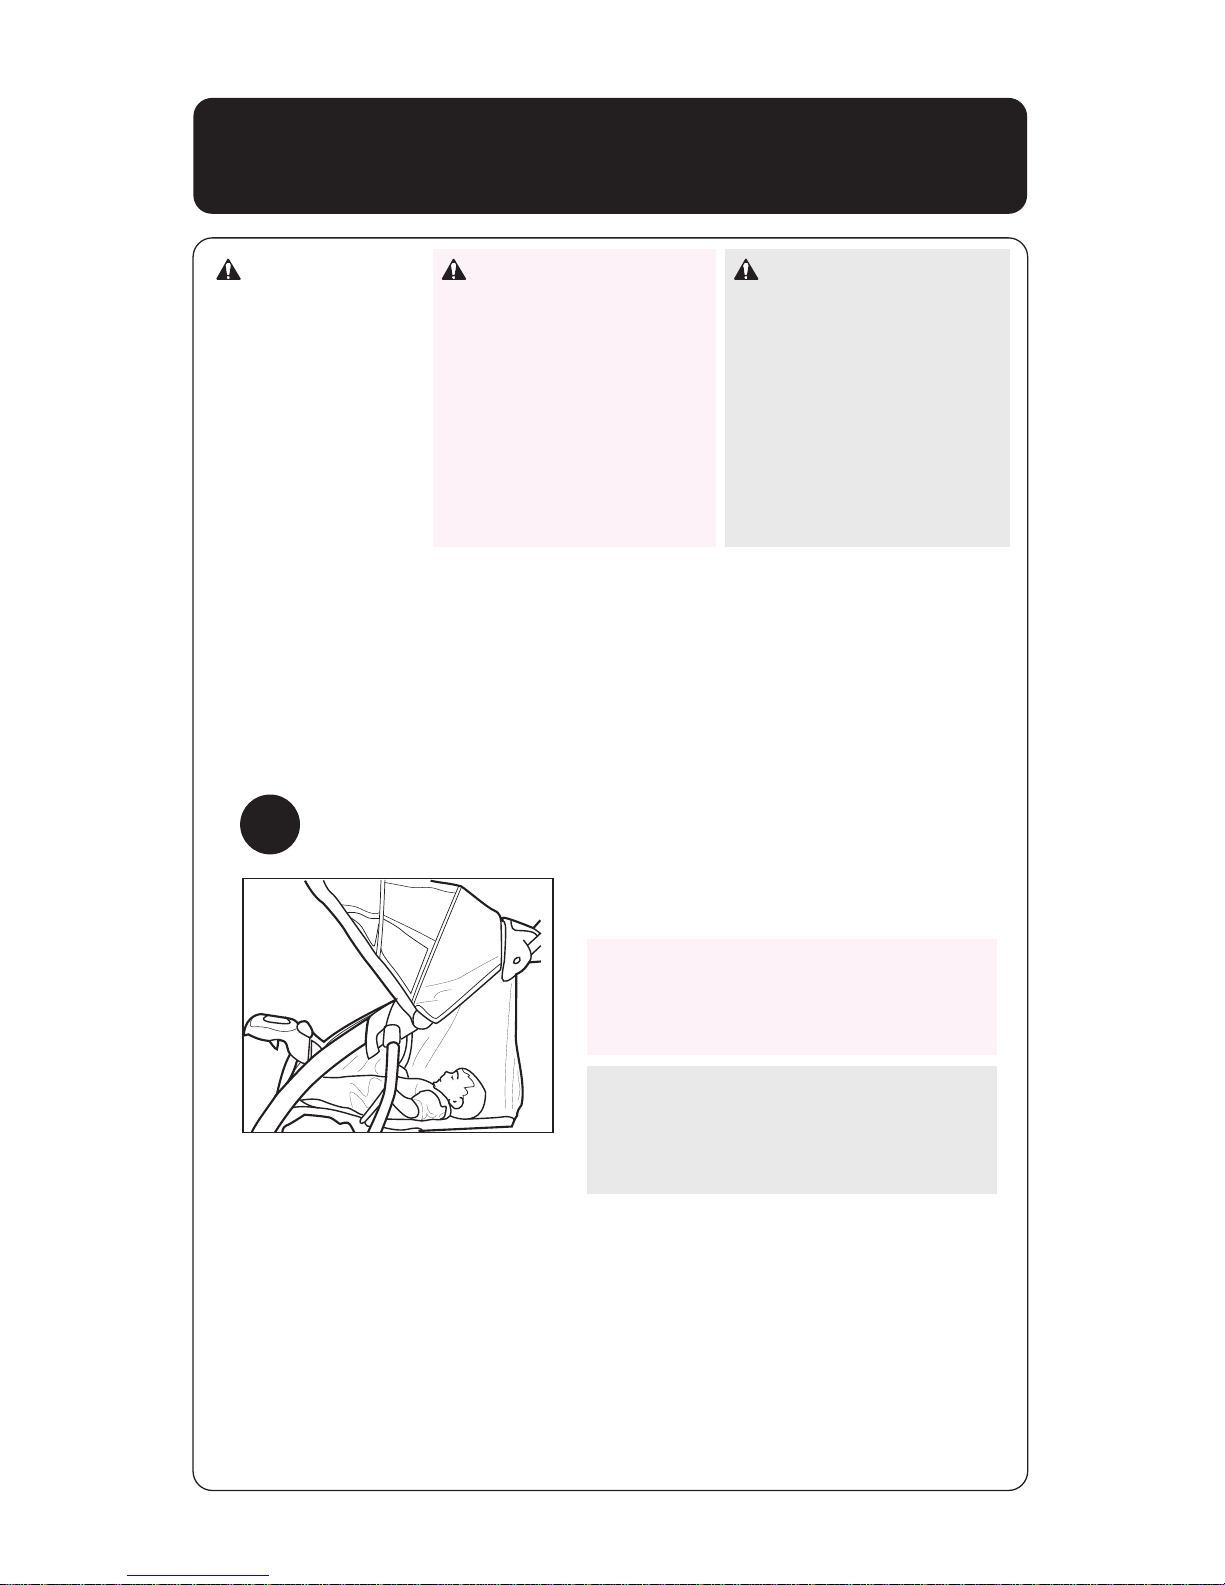
25
WARNING
Do not use
enclosure with an
older child that
can lift up on
hands and knees
or crawl out.
MISE EN GARDE
Ne pas utiliser enceinte
qui se remonte avec un
enfant plus âgé qui
peut se remonter sur
ses mains et ses
genoux ou qui peut
ramper hors de la
poussette.
ADVERTENCIA
No use recinto con un
niño mayor que
puede levantarse en
sus manos y rodillas
o salir gateando.
32
Recline el asiento completamente
y quite el soporte para la cabeza.
Nunca use el soporte de la cabeza
en la posición totalmente reclinada.
Recline seat to full recline position
and remove head support. Never
use any head support in the full
recline position.
Inclinez le siège complètement et
enlevez l’appui-tête. Ne jamais
utiliser d’appui-tête dans la
position assise.
Enclosure • Enceinte qui se remonte
• Recinto
Page 26
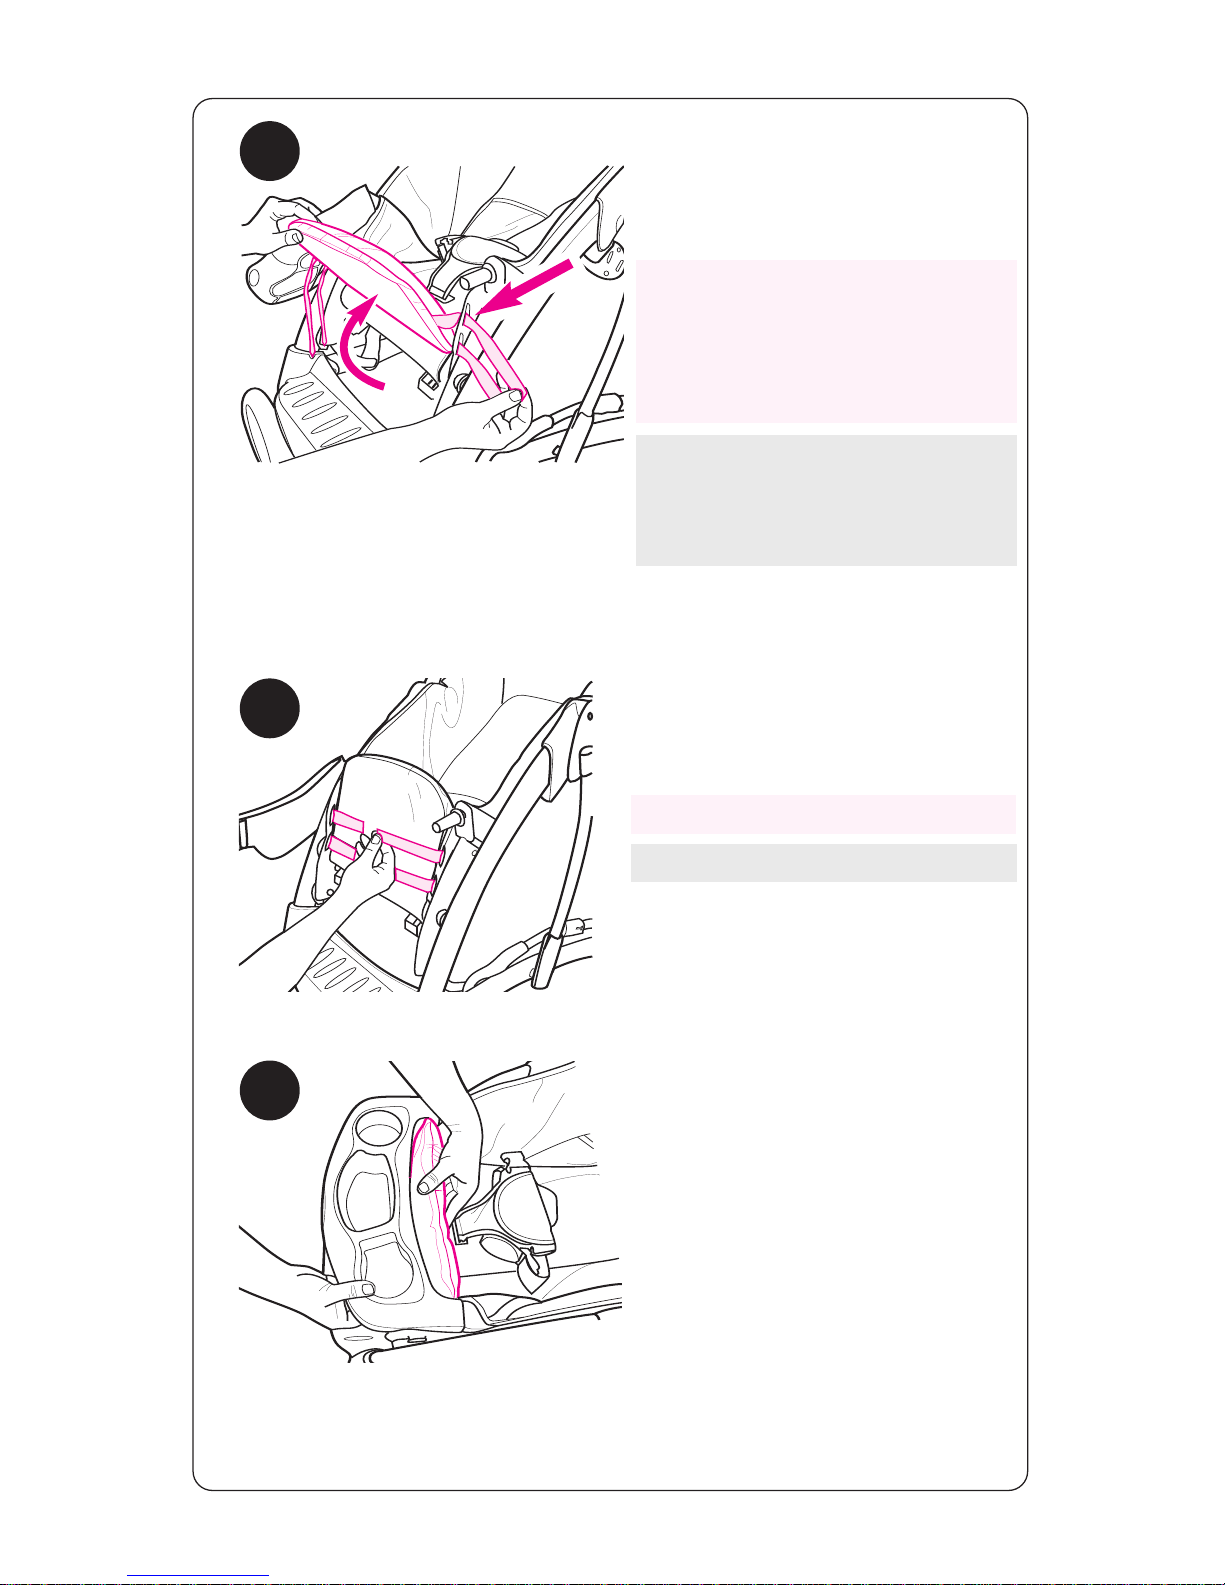
35
34
Abra la bandeja del niño,
levante el recinto y pase las
correas por los ojales en cada
lado del forro del asiento.
33
Open child’s tray, lift enclosure,
and thread straps through
button holes on each side of
seat cover.
Ouvrir le plateau pour enfant,
levez le repose pied, et enfillez
les courroies à travers les troues
à bouton sur chaque côté de la
housse du siège.
Abroche las correas.
Fasten hook and loop straps
together.
Attachez les courroies ensemble.
26
Page 27
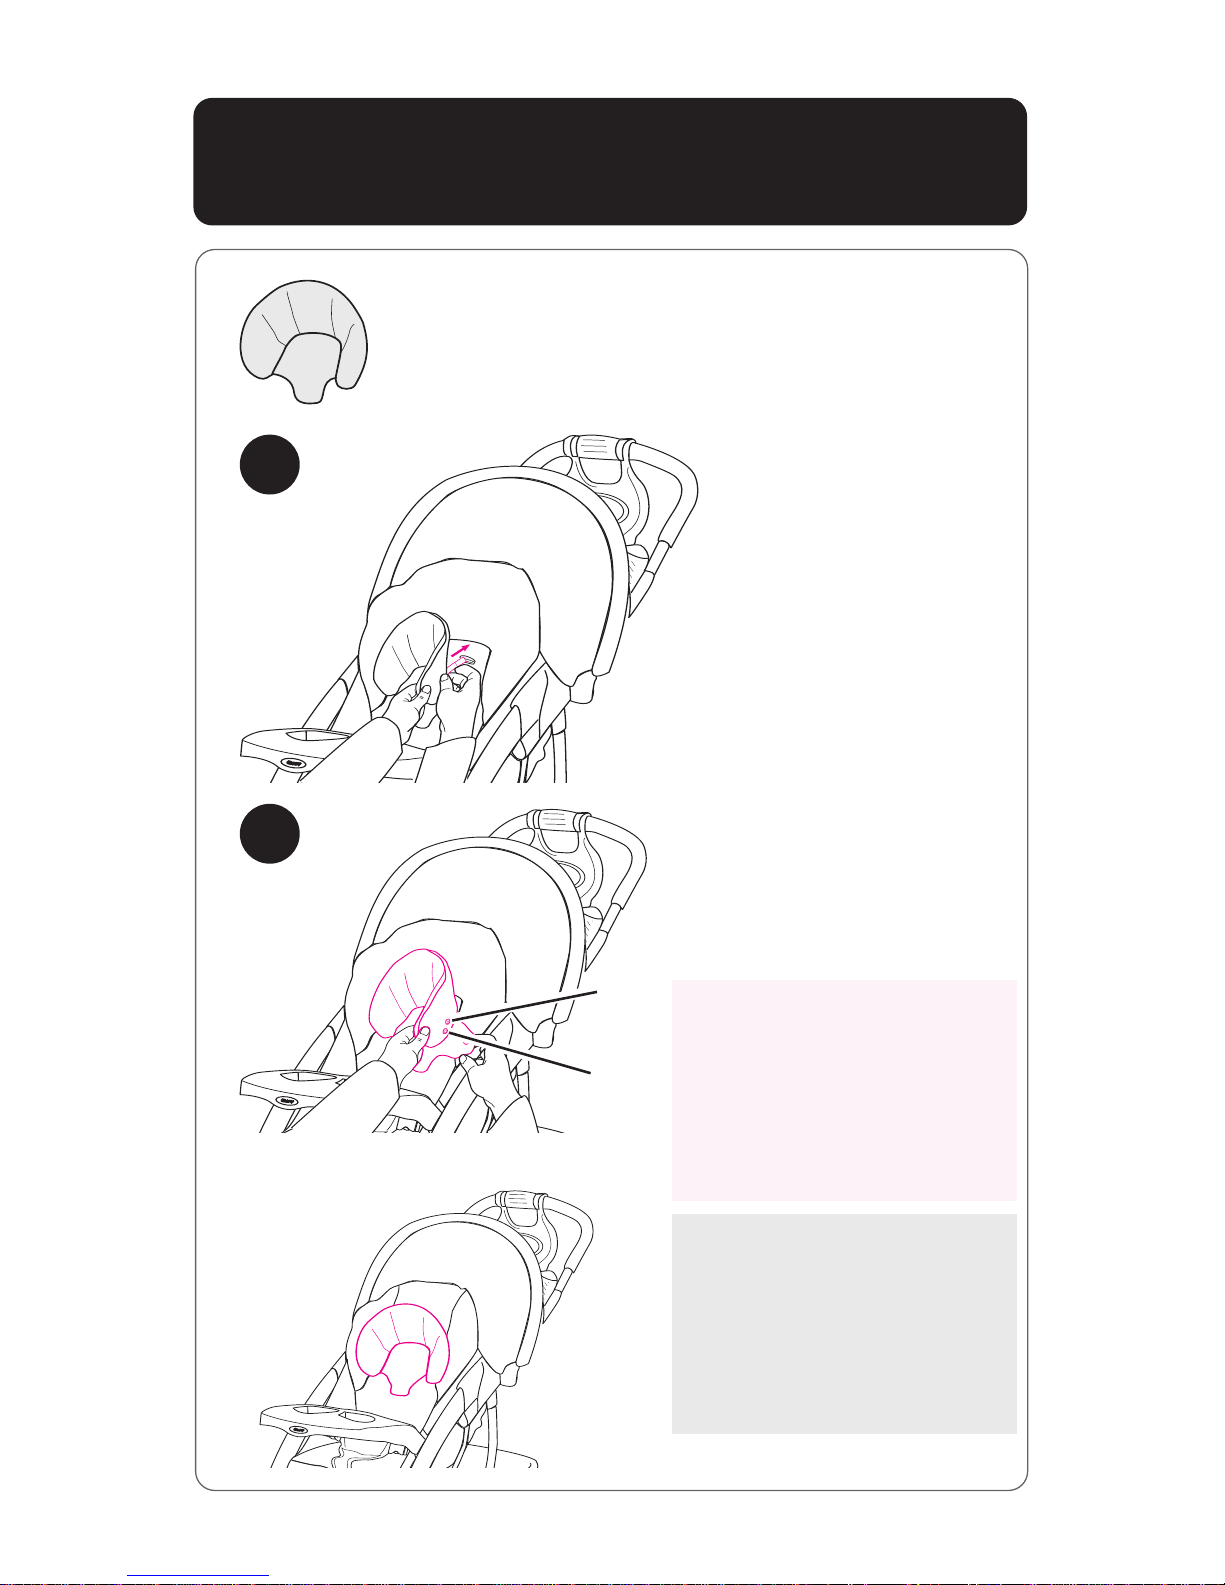
Head Support • Appui-tête
• Soporte para la cabeza
37
To provide head support for
smaller children, choose the
upper snap (A) on both sides
as shown, and the lower
snap (B) for larger children.
Pour fournir un appui-tête
pour des plus petits enfants,
choisir le bouton pression
supérieur (A) sur chaque côté
tel qu'illustré, et le bouton
pression inférieur (B) pour
des enfants plus large.
Para ofrecer suporte a la
cabeza de niños más
pequeños, elija el cierre
superior (A) en ambos
lados, como se indica, y
el cierre inferior (B) para
niños más grandes.
(A)
(B)
36
27
Page 28
28
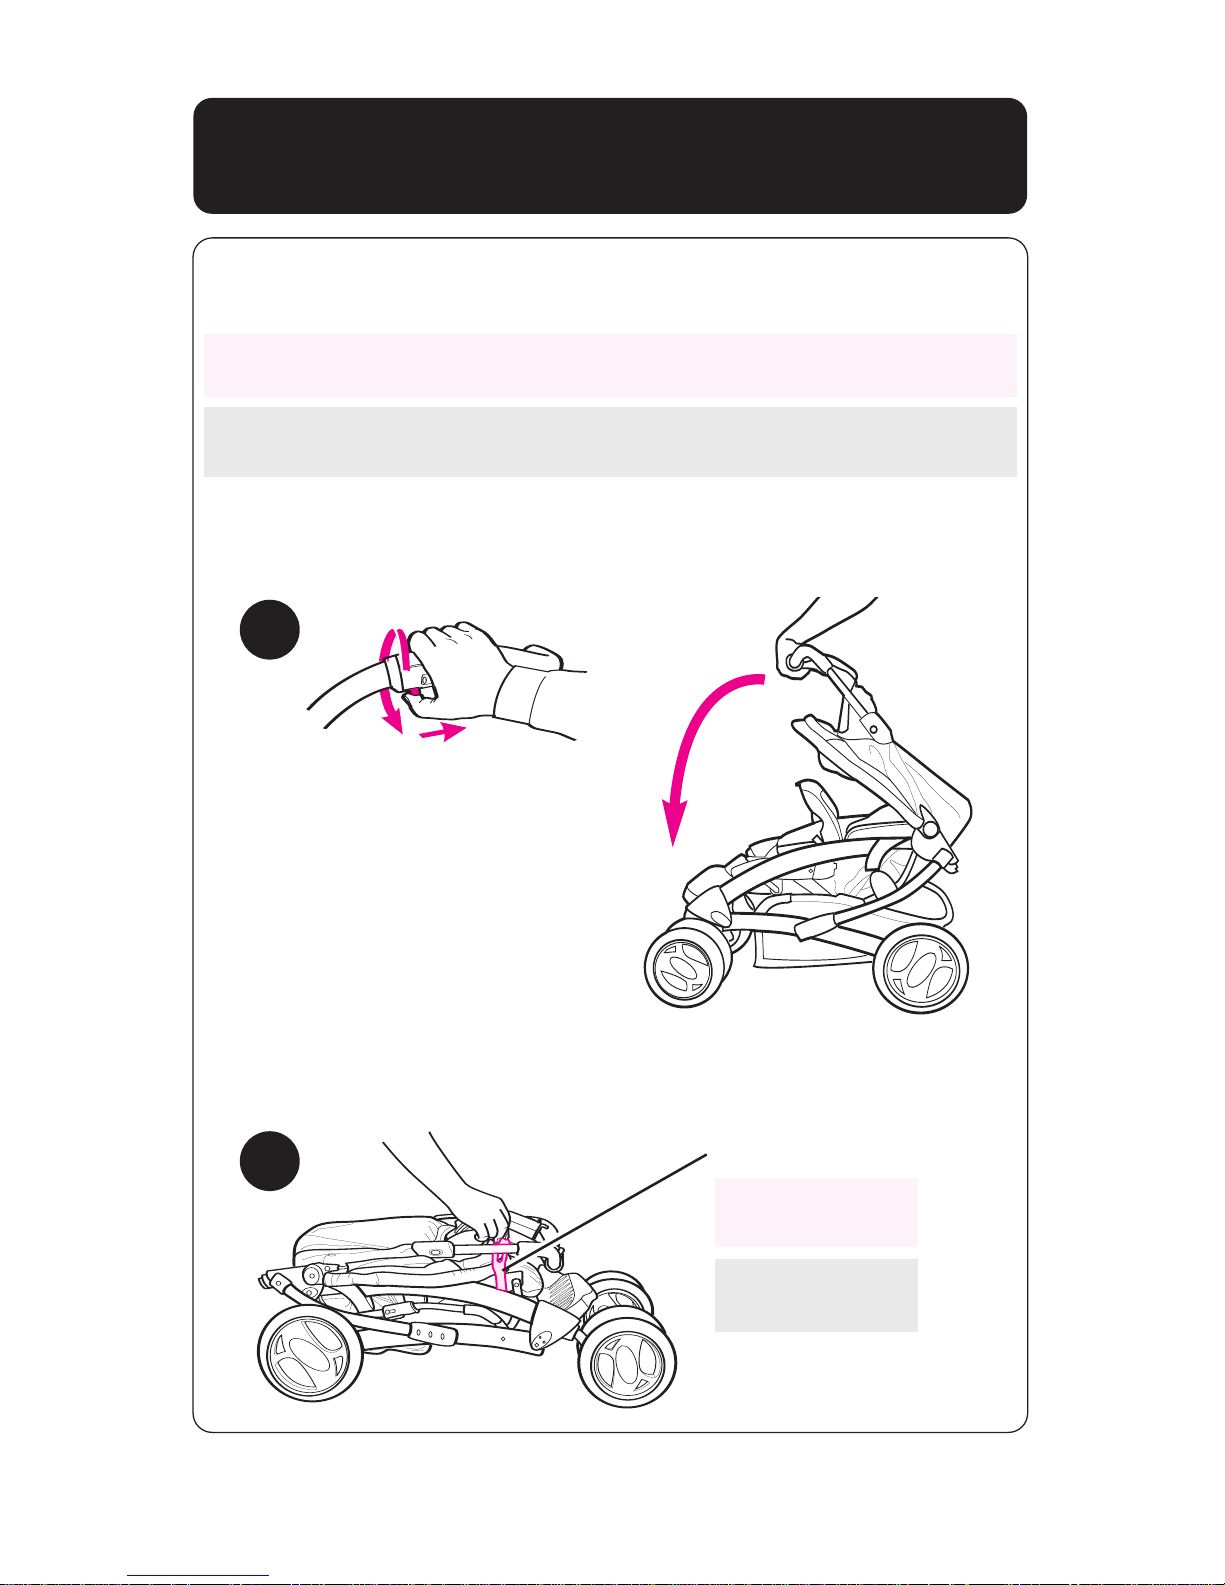
To Fold Stroller • Plier la poussette
• Para plegar el cochecito
Ê
Ë
38
39
Storage latch
Traba de
almacenamiento
Loquet de
rangement
Ì
Before folding stroller: Unhook enclosure, if in use, and refasten straps
to underside of stroller.
Avant de plier la poussette: Décrochez le enceinte qui se remonte si
elle est utilisée, et réattachez les courroies en dessous de la poussette.
Antes de plegar el cochecito: Desconecte el recinto, si está en uso, y
vuelva a conectar las correas a la parte inferior del cochecito.
Page 29
29
To Attach Graco®Infant Car Seat
• Pour fixer le dispositif de retenue
pour bébé Graco
®
• Cómo instalar el asiento de
automóvil para bebé Graco
®
Pour les modèles qui n'ont pas un porte-bébé, vous pouvez en
acheter un séparément.
MISE EN GARDE Utilisez uniquement un dispositif de retenue
pour enfant SnugRide™ou SafeSeat™de Graco®avec ce système de
voyage. (Non conçu pour utiliser avec les dispositifs de retenue pour
nourrisson AUTOBABY (Europe seulement) et ASSURA.) En cas de
doute au sujet du modèle ou pour obtenir plus de renseignements,
veuillez communiquer avec le service à la clientèle de Graco au
1-800-345-4109. Tout mauvais usage de cette poussette avec un
siège d'auto d'une autre marque peut occasionner des blessures
sérieuses ou mortelles. Lire le manuel d'utilisation fourni avec le
porte-bébé Graco avant de l'utiliser avec cette poussette.
• Toujours attacher votre enfant avec le harnais du porte-bébé quand
vous l'utilisez avec la poussette. Si votre enfant est déjà dans le
porte-bébé, assurez-vous que l'enfant est attaché avec le
harnais.
For models that do not come with an infant car seat one may be
purchased separately.
WARNING Use only a Graco
®
SnugRide™or infant SafeSeat™car
seat with this travel system. (Not intended for use with AUTOBABY
(Europe only) and ASSURA infant car seats.) If unsure of the model
or for more information please call Graco’s customer service number:
1-800-345-4109. Improper use of this stroller with other
manufacturers’ car seats may result in serious injury or death.
Read the manual provided with your Graco car seat before using
it with your stroller.
•
Always secure your child with the car seat harness when using the
car seat in the stroller. If your child is already in the car seat, check
that the child is secured with the harness.
Page 30
30
40
SNAP!
ENCLENCHEZ!
¡CHASQUIDO!
• Recline el respaldo del cochecito
hacia atrás hasta la posición
más baja.
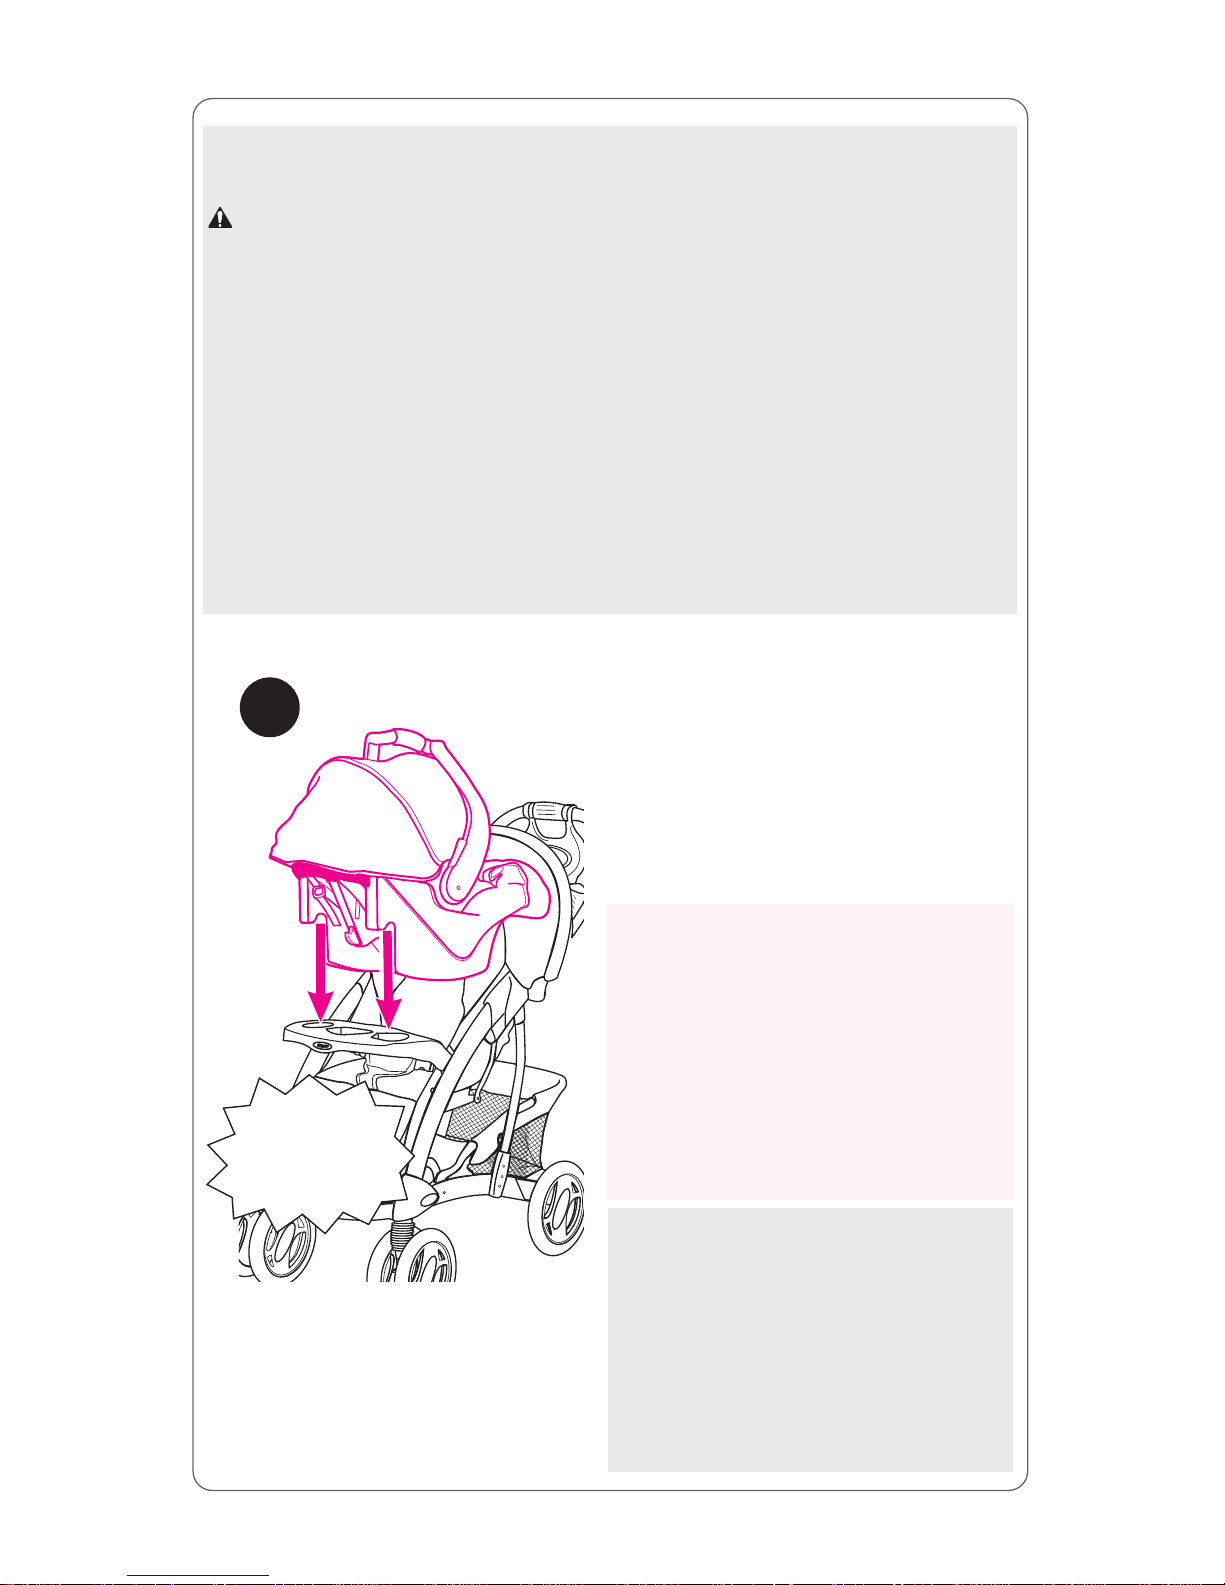
• Coloque las ranuras de montaje
sobre la bandeja. Empuje el
asiento para automóvil hacia
abajo hasta que la traba de
seguridad se trabe en la bandeja.
• Recline the stroller seat back to
its lowest position.
• Position mounting notches over
tray. Push down on car seat until
the attachment latch snaps into
tray.
• Inclinez le dossier de la
poussette en position la plus
basse.
• Placez les encoches du montant
sur le plateau. Abaissez le
dispositif de retenue pour
enfant jusqu’à ce que le loquet
d’attachement s’enclenche
dans le plateau.
En los modelos que no incluyen un asiento para automóvil, se puede
comprar uno por separado.
ADVERTENCIA Use solamente los asientos infantiles para
automóviles SnugRide
™
o SafeSeat™de Graco®en este sistema de
viaje. (No debe usarse con AUTOBABY (Europa solamente) y asientos
de automóvil para bebé ASSURA.) Si no está seguro del modelo o
para obtener más información, por favor llame al número de servicio
al cliente de Graco: 1-800-345-4109. El uso inadecuado de este
cochecito con asientos para automóvil de otros fabricantes podría
resultar en lesiones serias o la muerte. Lea el manual incluido con su
transportador Graco antes de usarlo con su cochecito.
• Asegure siempre a su niño con el arnés del transportador cuando
usa el transportador en el cochecito. Si su niño ya está en el
transportador, verifique que esté asegurado con el arnés.
Page 31
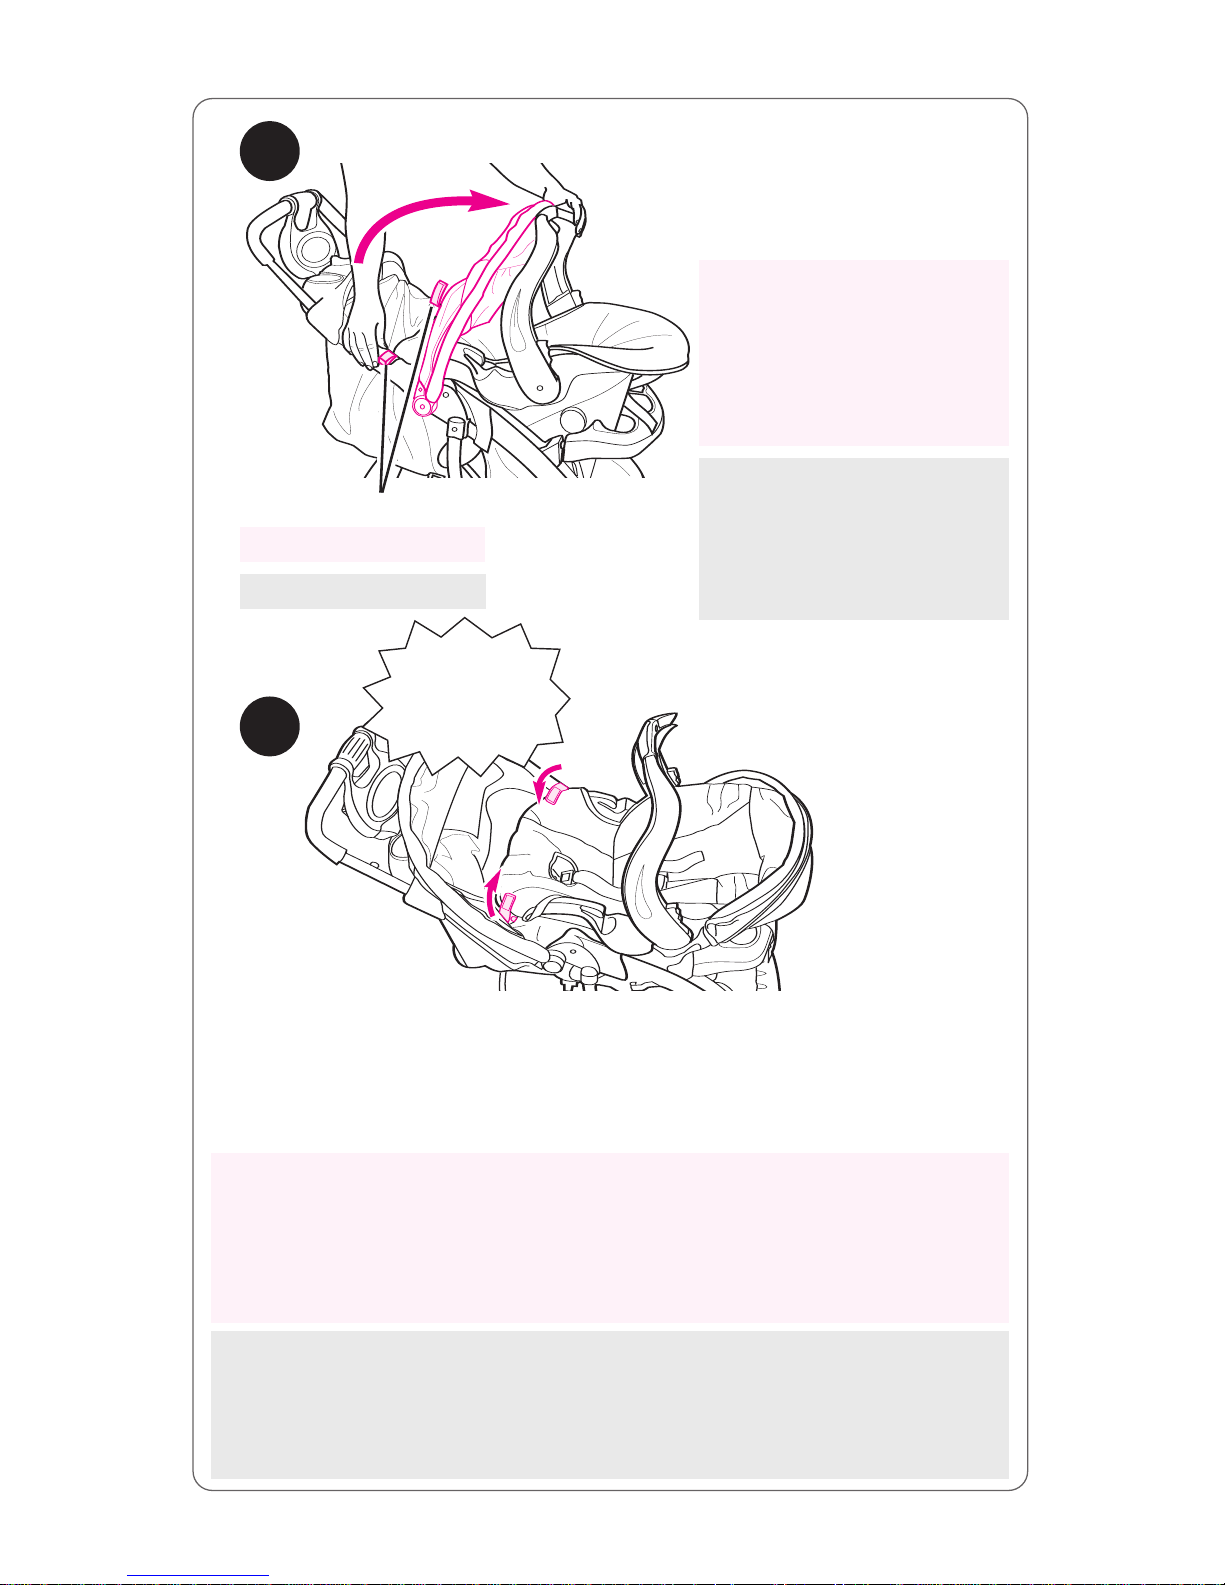
31
42
41
• Empuje la capota del
cochecito hacia delante
como se indica, para
ubicar el seguro en
cada lado del cochecito.
• Push stroller canopy
forward as shown, to
locate restraint latch on
each side of stroller.
• Poussez le baldaquin de
la poussette vers l'avant
tel qu'illustré, pour situé
le retenue de loquet
sur chaque côté de
la poussette.
• Empuje la capota del cochecito hacia atrás y gire los seguros hasta
que el asiento para automóvil quede sujeto.
• V
erifique que el asiento para automóvil esté bien sujeto,
jalando el mismo hacia arriba.
• Repoussez le baldaquin de la poussette, et pivotez les retenues des
loquets jusqu'à ce qu'elle enclenche le dispositif de retenue pour
enfant en place.
• Assurez-vous que le dispositif de retenue pour enfant est
attaché solidement en tirant vers le haut.
SNAP!
ENCLENCHEZ!
¡CHASQUIDO!
• Push stroller canopy back, and rotate restraint latches until they
snap the infant car seat into place.
• Check that infant car seat is securely attached by pulling
up on it.
Retenues des loquets
Ubicar los seguros
Restraint latches
Page 32
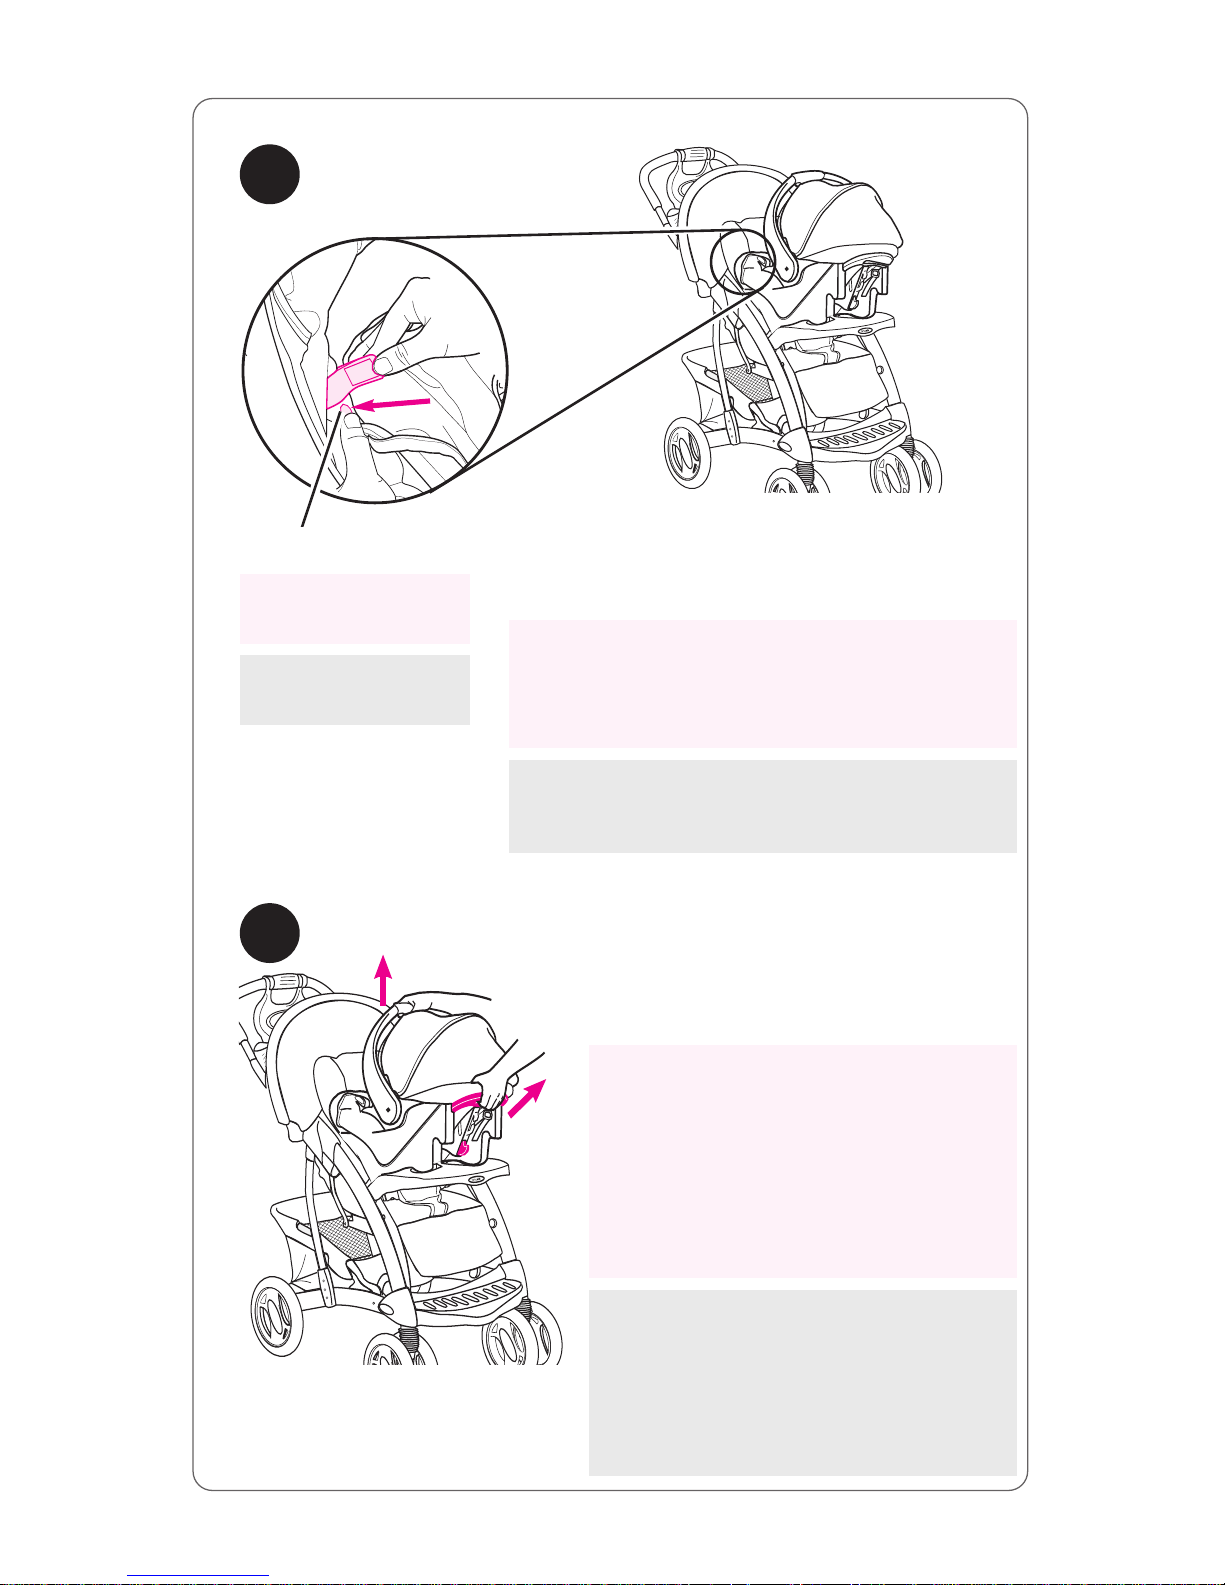
32
43
44
• To unlock restraint latches: Push
release button beneath the restraint latch
and rotate away from infant car seat.
• Para abrir los seguros: Oprima el
botón de debajo del seguro para soltar
y gire los sequros.
Oprima el botón
para soltar
Push release button
• To remove infant carrier:
squeeze release handle at back of
infant car seat, and lift car seat out
of the stroller.
• Para sacar el asiento para
automóvil: apriete la manija de
liberación en la parte trasera del
asiento para automóvil, y levante
el asiento para automóvil del
cochecito.
• Pour retirer le dispositif de
retenue pour enfant: pressez
la poignée de déclenchement
derrière le dispositif de retenue
pour enfant, et soulevez le
dispositif de retenue pour enfant
hors de la poussette.
• Pour déverrouillez les retenues de
loquets: Appuyez le bouton de relâche
en dessous des retenues de loquets et
pivotez les retenues des loquets.
Appuyez sur le
bouton de relâche
Page 33
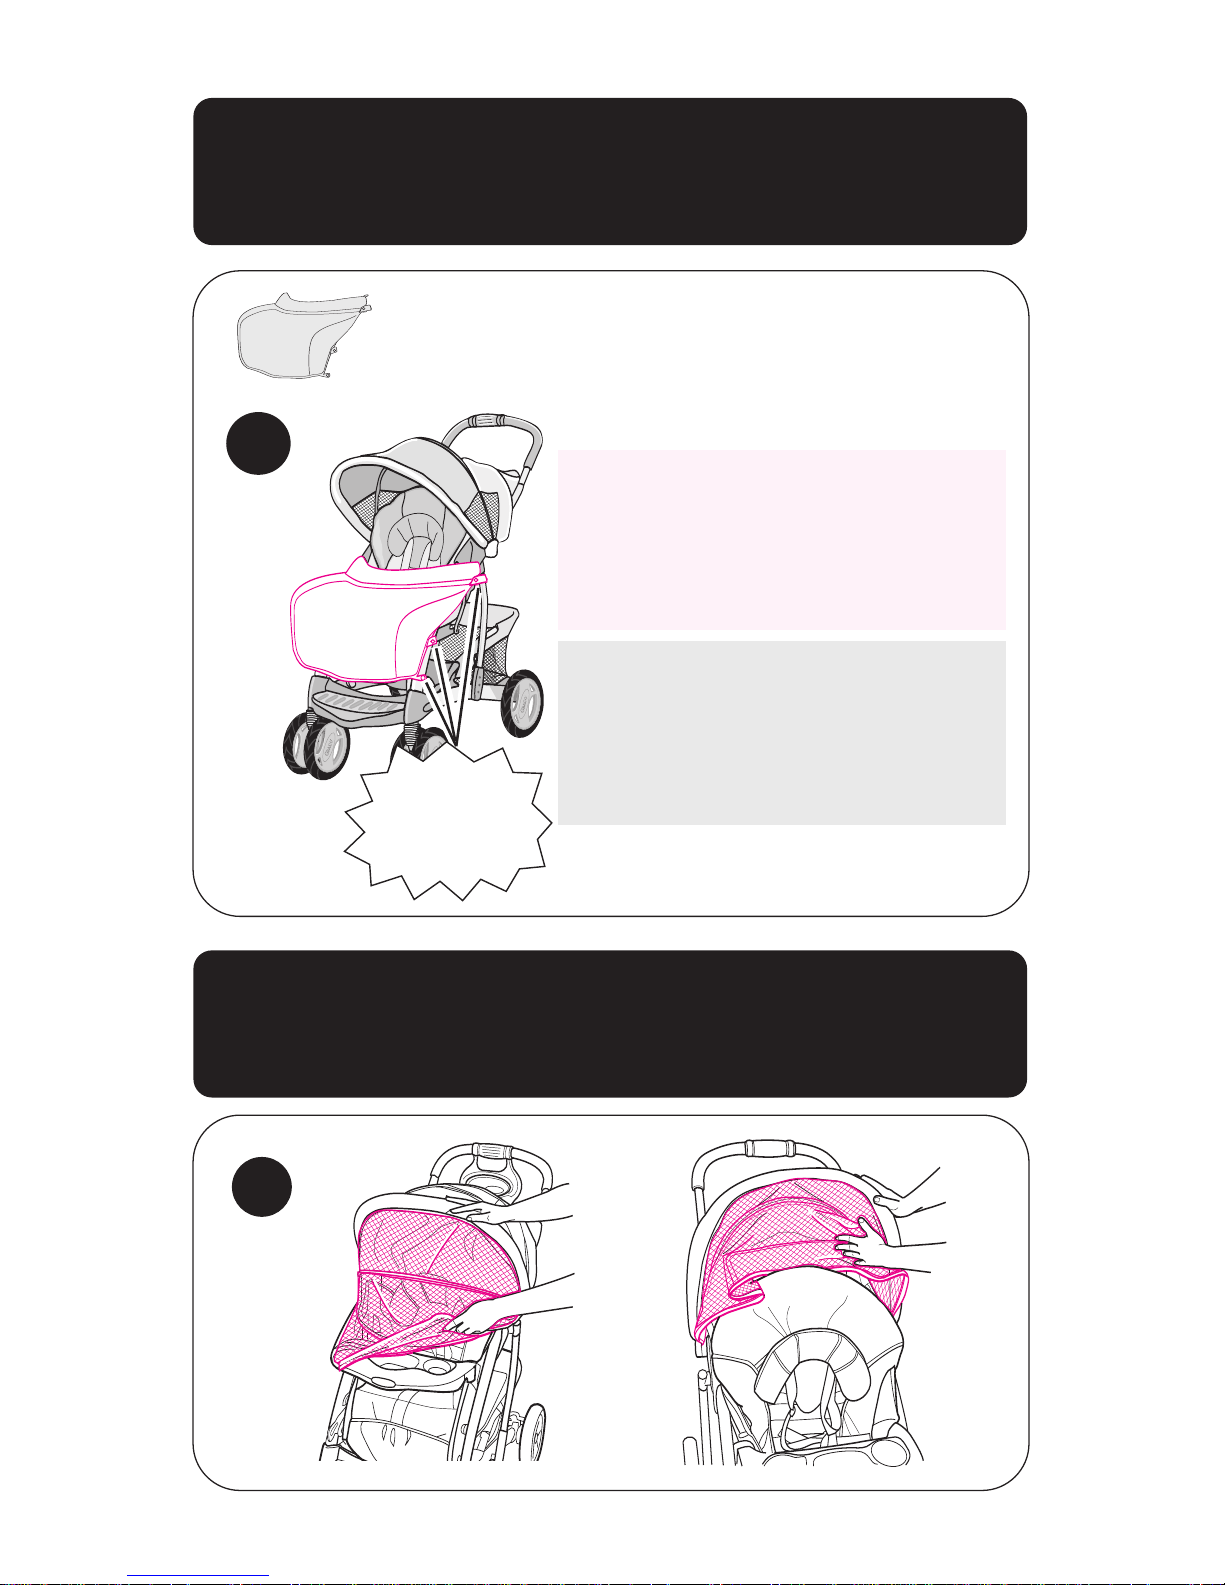
33
45
SNAP!
ENCLENCHEZ!
¡CHASQUIDO!
To Use Boot (on certain models)
• Pour utiliser la chancelière (sur certains modèles)
• Para usar la bota (en ciertos modelos)
Enclenchez la chancelière autour
de la poussette à trois endroits.
Si le siège est utilisé en position
landau complètement inclinée,
fermez l'ouverture des jambes tel
que décrit dans las pages 25-26.
Abroche la bota en el cochecito en
seis lugares.
Si el asiento se usa en la posición
totalmente reclinada del cochecito,
cierre la abertura para la pierna como
se describe en las páginas 25-26.
Snap boot around stroller in six
places.
If seat is being used in fully reclined
carriage position, close off leg
opening as described on pages 25-26.
Netting (on certain models)
• Filet (sur certains modèles)
• Malla (en ciertos modelos)
46
Page 34
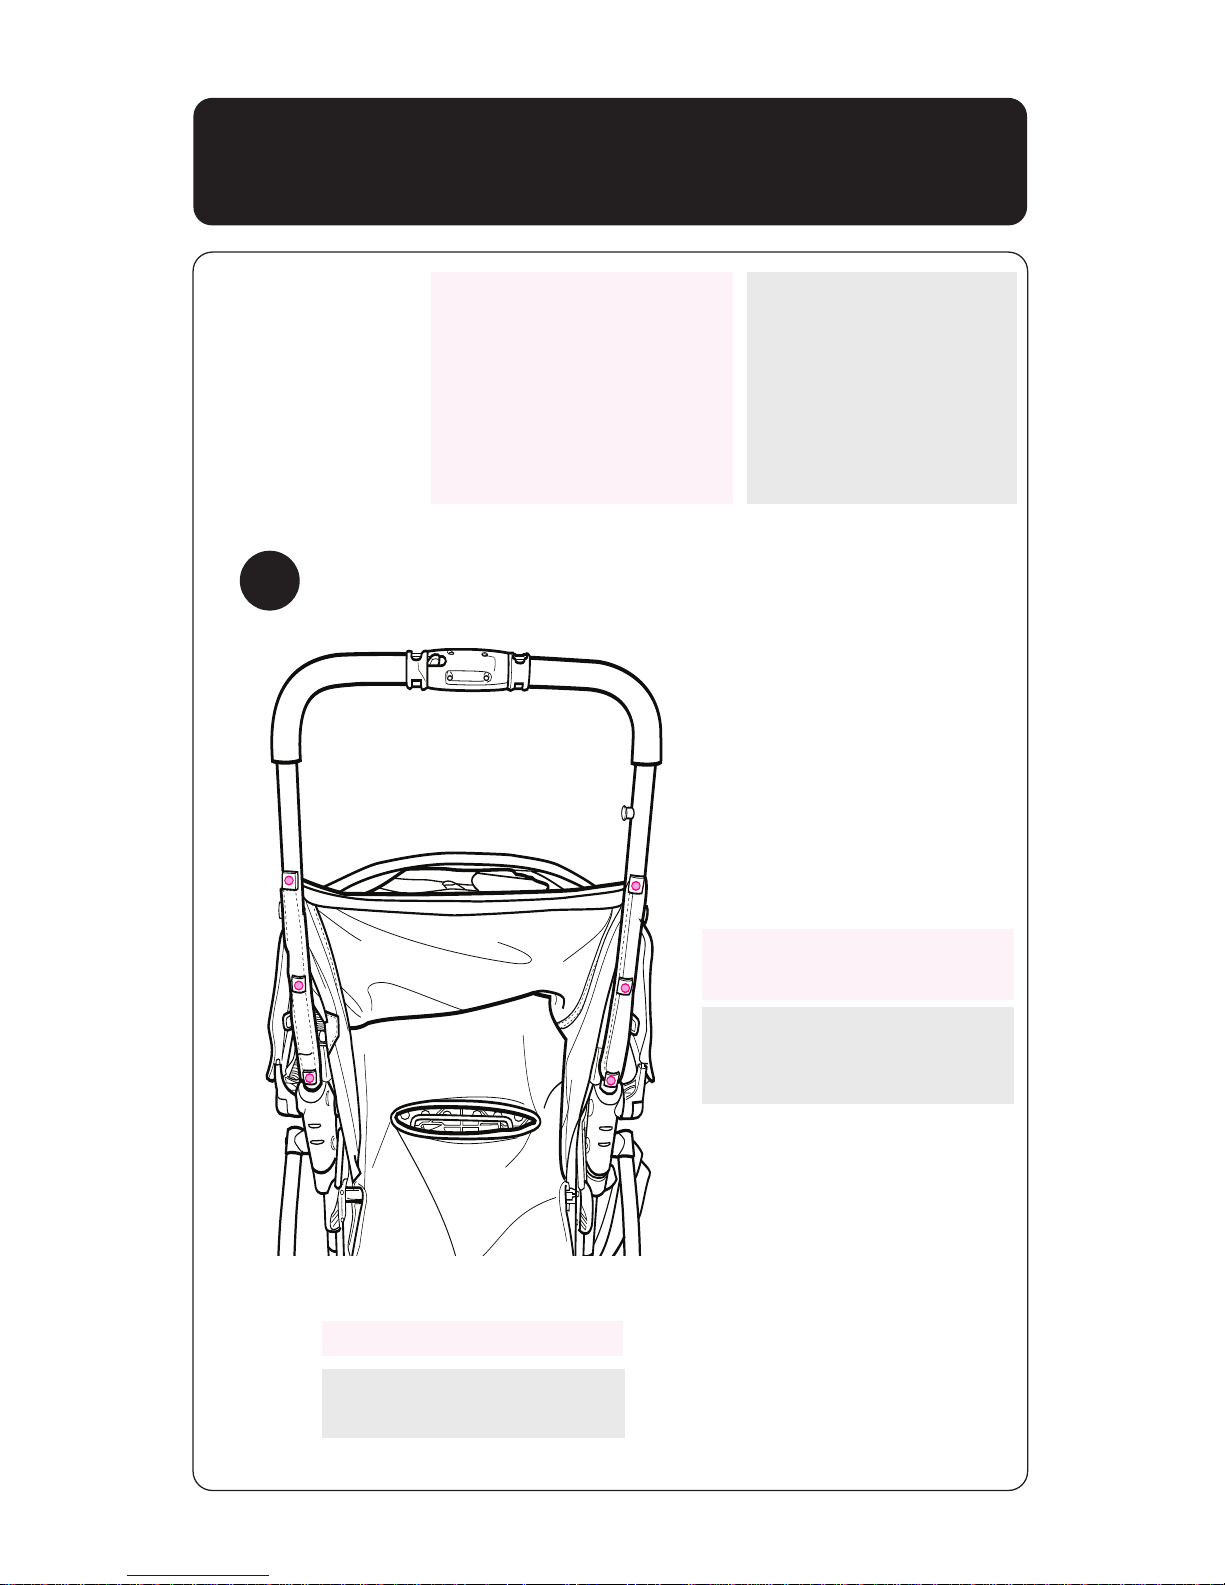
34
To Remove Seat Cover • Enlever la housse
du siege • Para quitar la funda del asiento
Antes de quitar el
forro del asiento,
ajuste el asiento a la
posición vertical, quite
el barra de accesorios
y la bandeja de
los padres.
Before removing
seat cover, adjust
seat to upright
position, remove
the accessory
bridge and
parent tray.
Avant de retirer la housse
du siège, ajustez le siège
à une position verticale,
retirez le plateau à
accessoire et le plateau
pour adulte.
47
L'arrière de la poussette
Parte trasera del
cochecito
Rear of stroller
Remove screws from back
of seat.
Enlevez les vis à l'endos du
l'arrière de la poussette.
Quite los tornillos de la
parte trasera del
cochecito.
Page 35
35
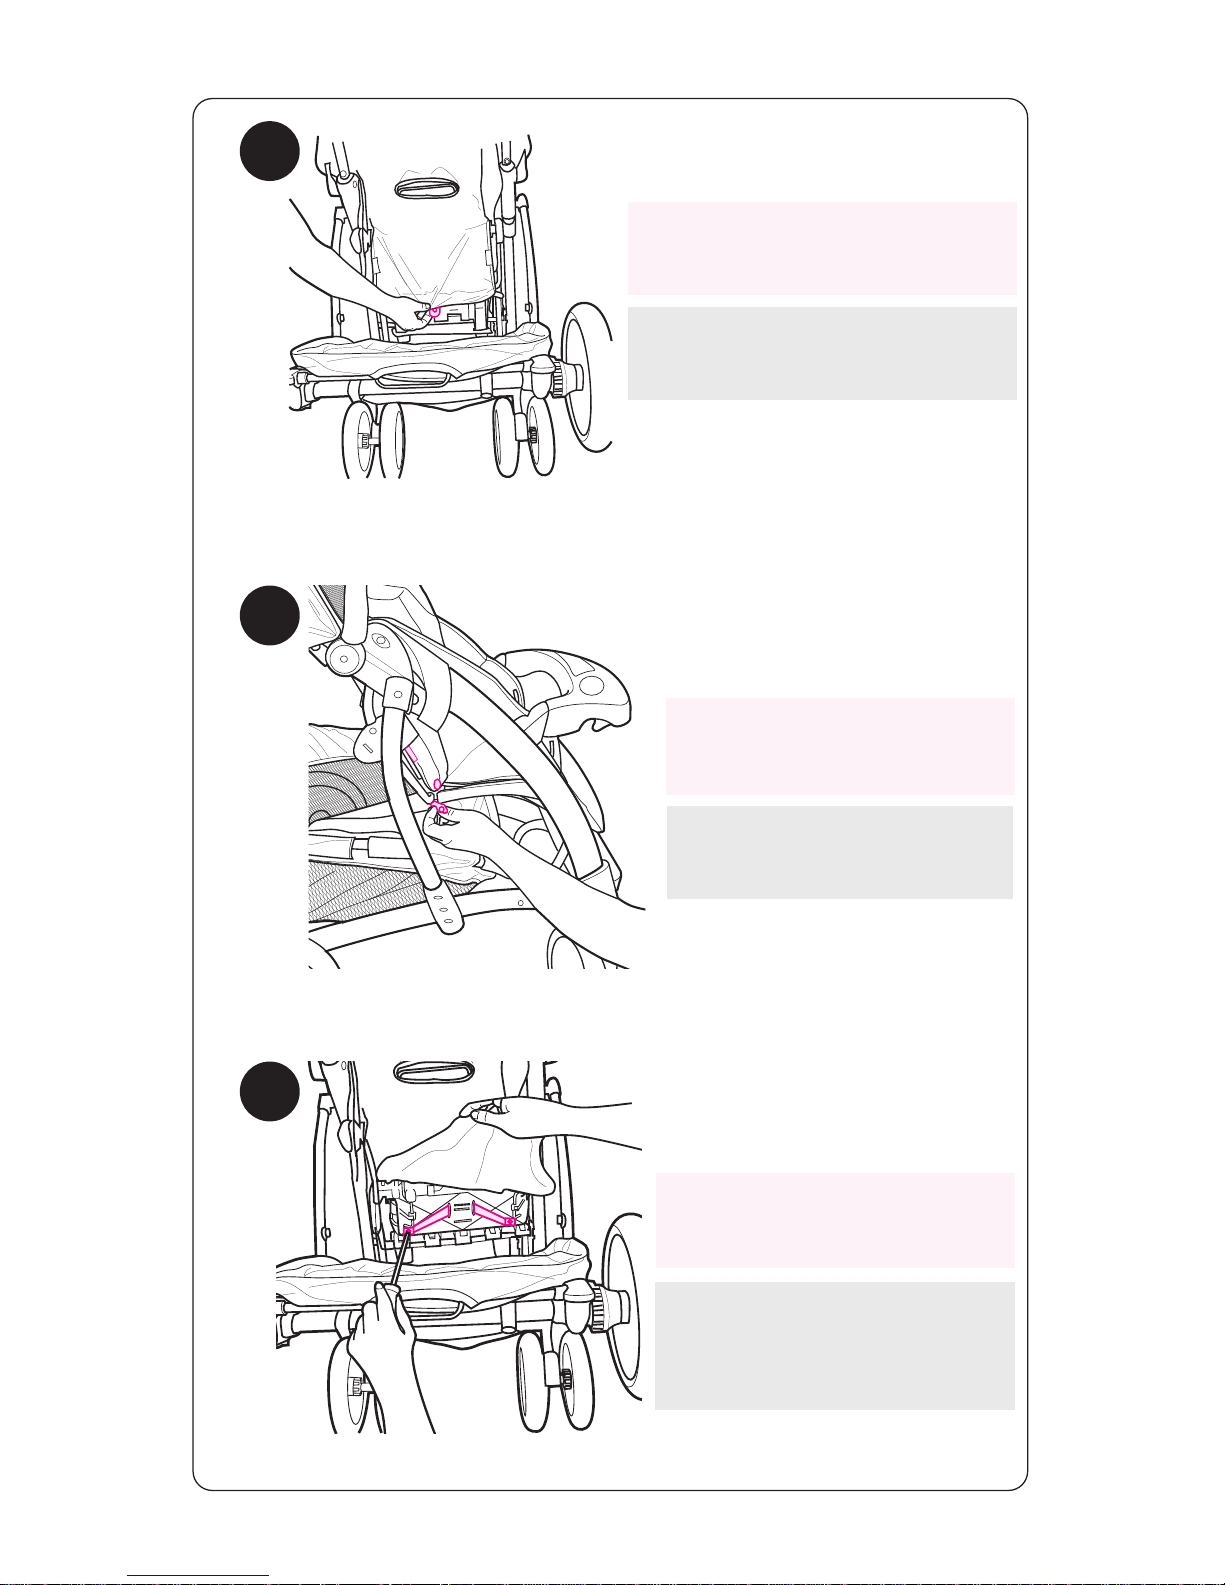
Lift back of seat cover and
remove screws on rear of
backrest.
Levante la parte trasera del
forro del asiento y quite los
tornillos en la parte trasera
del respaldo.
50
Unhook plastic tab on underside
of the back of seat base.
Desabroche la lengüeta de
plástico debajo de la parte
trasera de la base del asiento.
Undo snap and unfasten
hook and loop strap on each
side of the stroller.
Défaire le bouton pression et
détachez le courroie sur
chaque côté de la poussette.
Desabroche el cierre y las
correas en cada lado del
cochecito.
48
49
Décrochez la languette en
plastique en dessous à l'arrière
du socle.
Soulevez le dossier de la
housse du siège et enlevez les
vis à l'endos du repose dossier.
Page 36
36
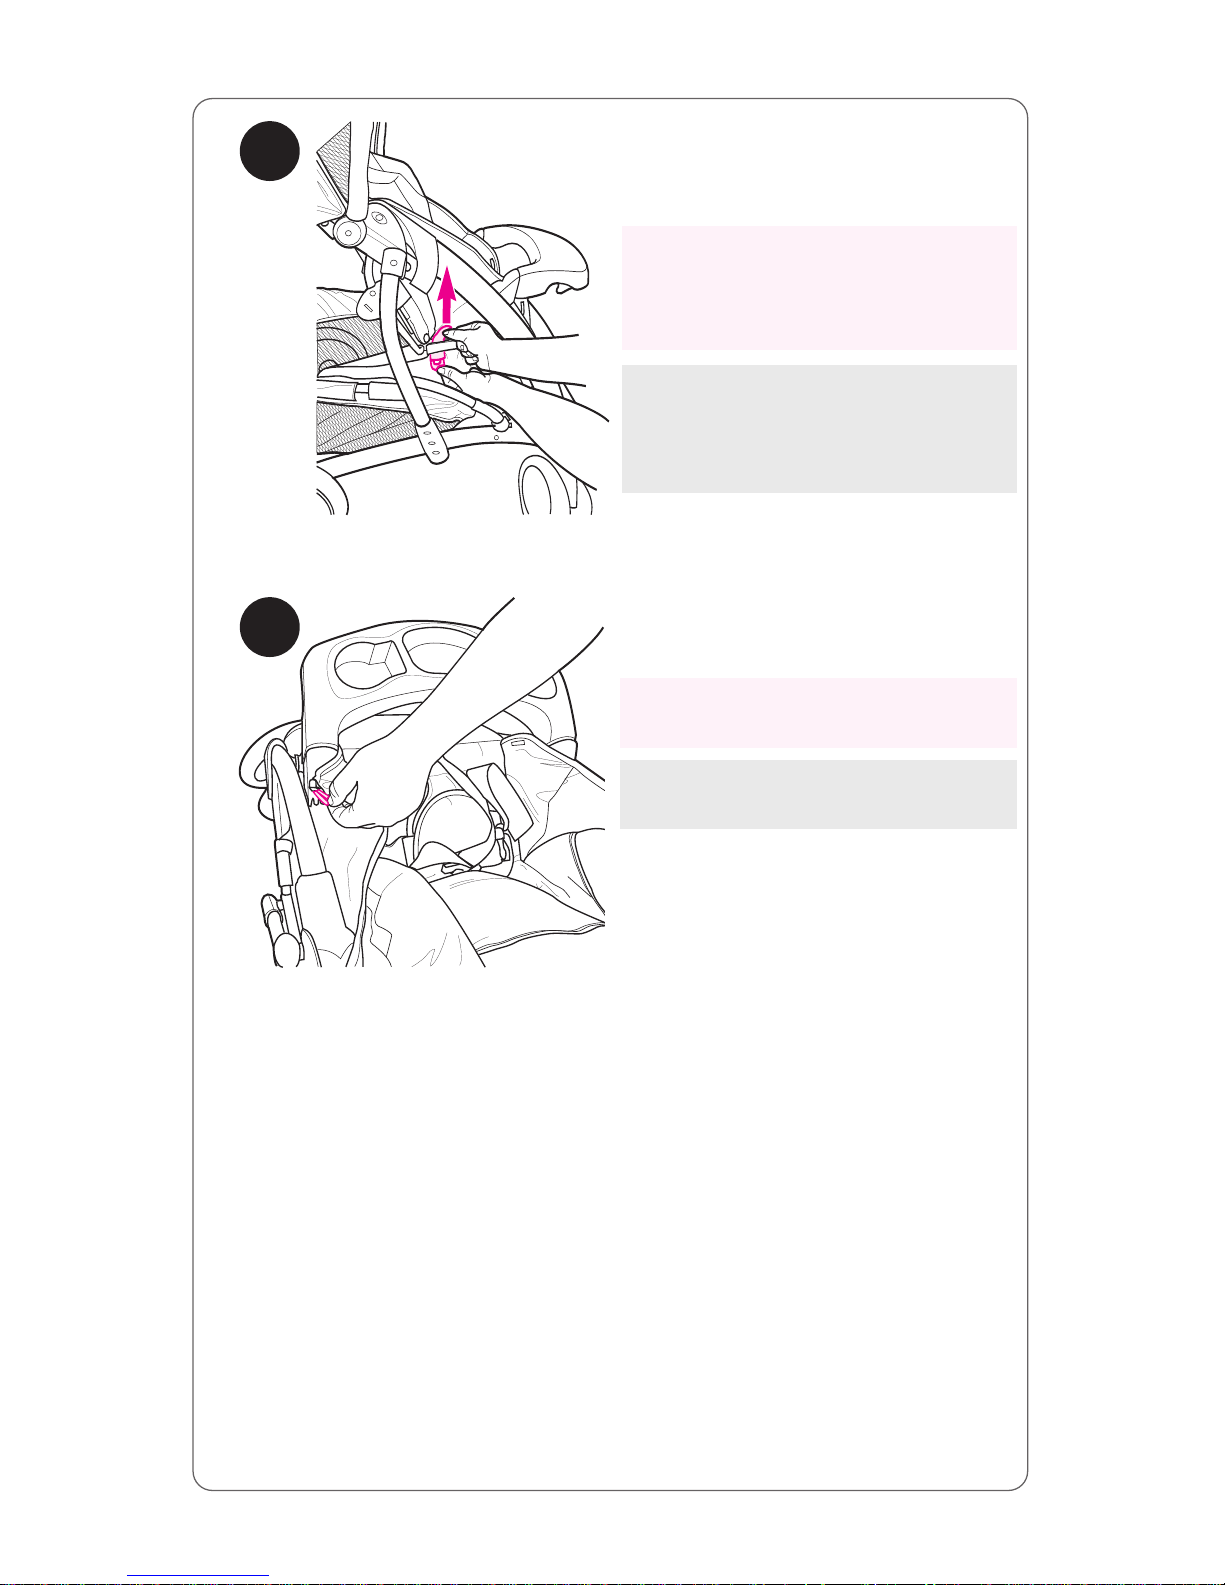
Unhook plastic tabs on each side
of seat bottom, and pull straps
out of slots.
Décrochez les languettes en
plastique sur chaque côté du bas
du siège, et retirez les courroies
des fentes.
Desabroche las lengüetas de
plástico en cada lado de la
parte inferior del asiento y jale
las correas de las ranuras.
51
Unhook elastic strap on each side
of the tray.
Décrochez la courroie élastique
sur chaque côté du plateau.
Desconecte la correa elástica de
cada lado de la bandeja.
52
Page 37
37
Jale la correa de la
entrepierna hacia arriba por
el asiento y quite el forro
del asiento del respaldo.
Tirez la courroie
d'entre-jambes à travers
le câdre du siège, et
glissez la housse du
siège du repose dossier.
Jale las correas de las ranuras
del respaldo.
Siga los pasos en orden
invertido para volver a montar
.
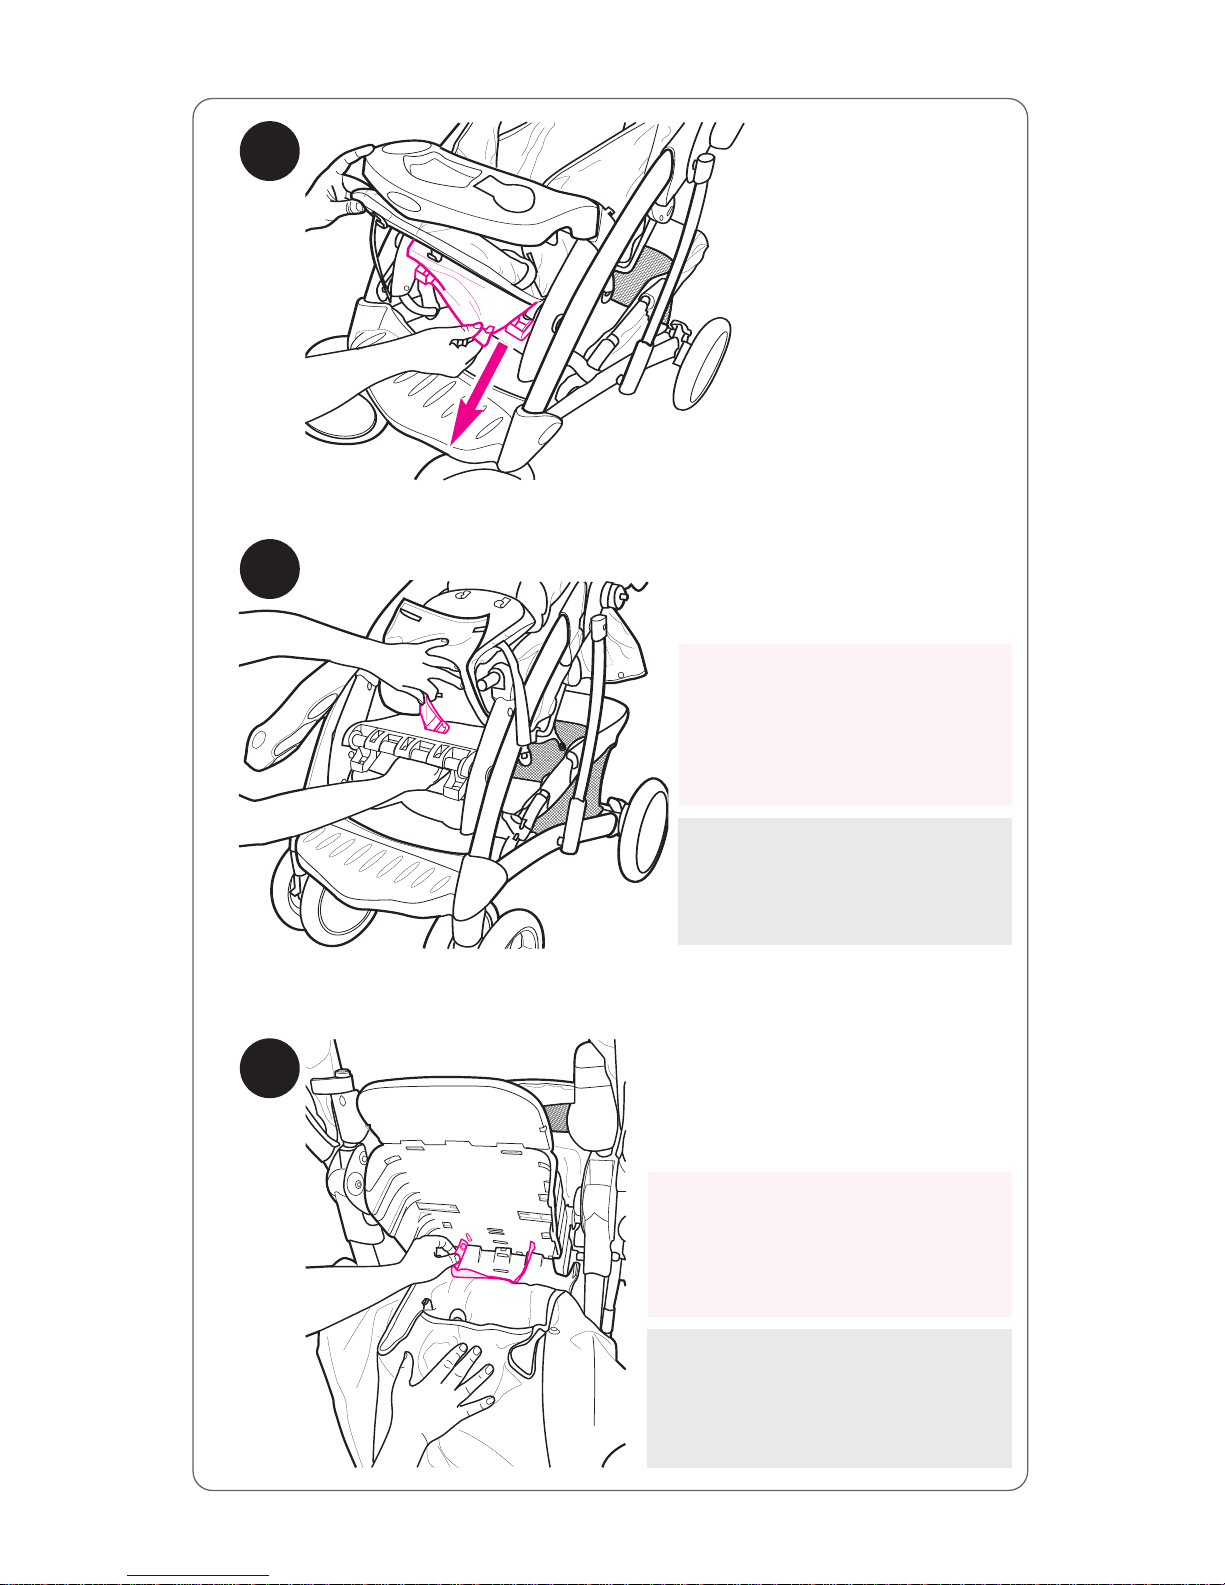
Pull straps out of slots on
backrest.
Reverse steps to reassemble.
Retirez les courroies des fentes
sur le repose dossier.
Inversez les étapes pour
réassembler.
54
55
53
Pull crotch strap up
through seat pan, and slide
seat cover off backrest.
Page 38
38
Care and Maintenance
• REMOVABLE SEAT PAD may be machine washed in cold water on
delicate cycle and drip-dried. NO BLEACH.
• TO CLEAN STROLLER FRAME, use only household soap and warm
water. NO BLEACH or detergent.
• FROM TIME TO TIME CHECK YOUR STROLLER for loose screws,
worn parts, torn material or stitching. Replace or repair the parts as
needed. Use only Graco replacement parts.
• EXCESSIVE EXPOSURE TO SUN OR HEAT could cause fading or
warping of parts.
• IF STROLLER BECOMES WET, open canopy and allow to dry
thoroughly before storing.
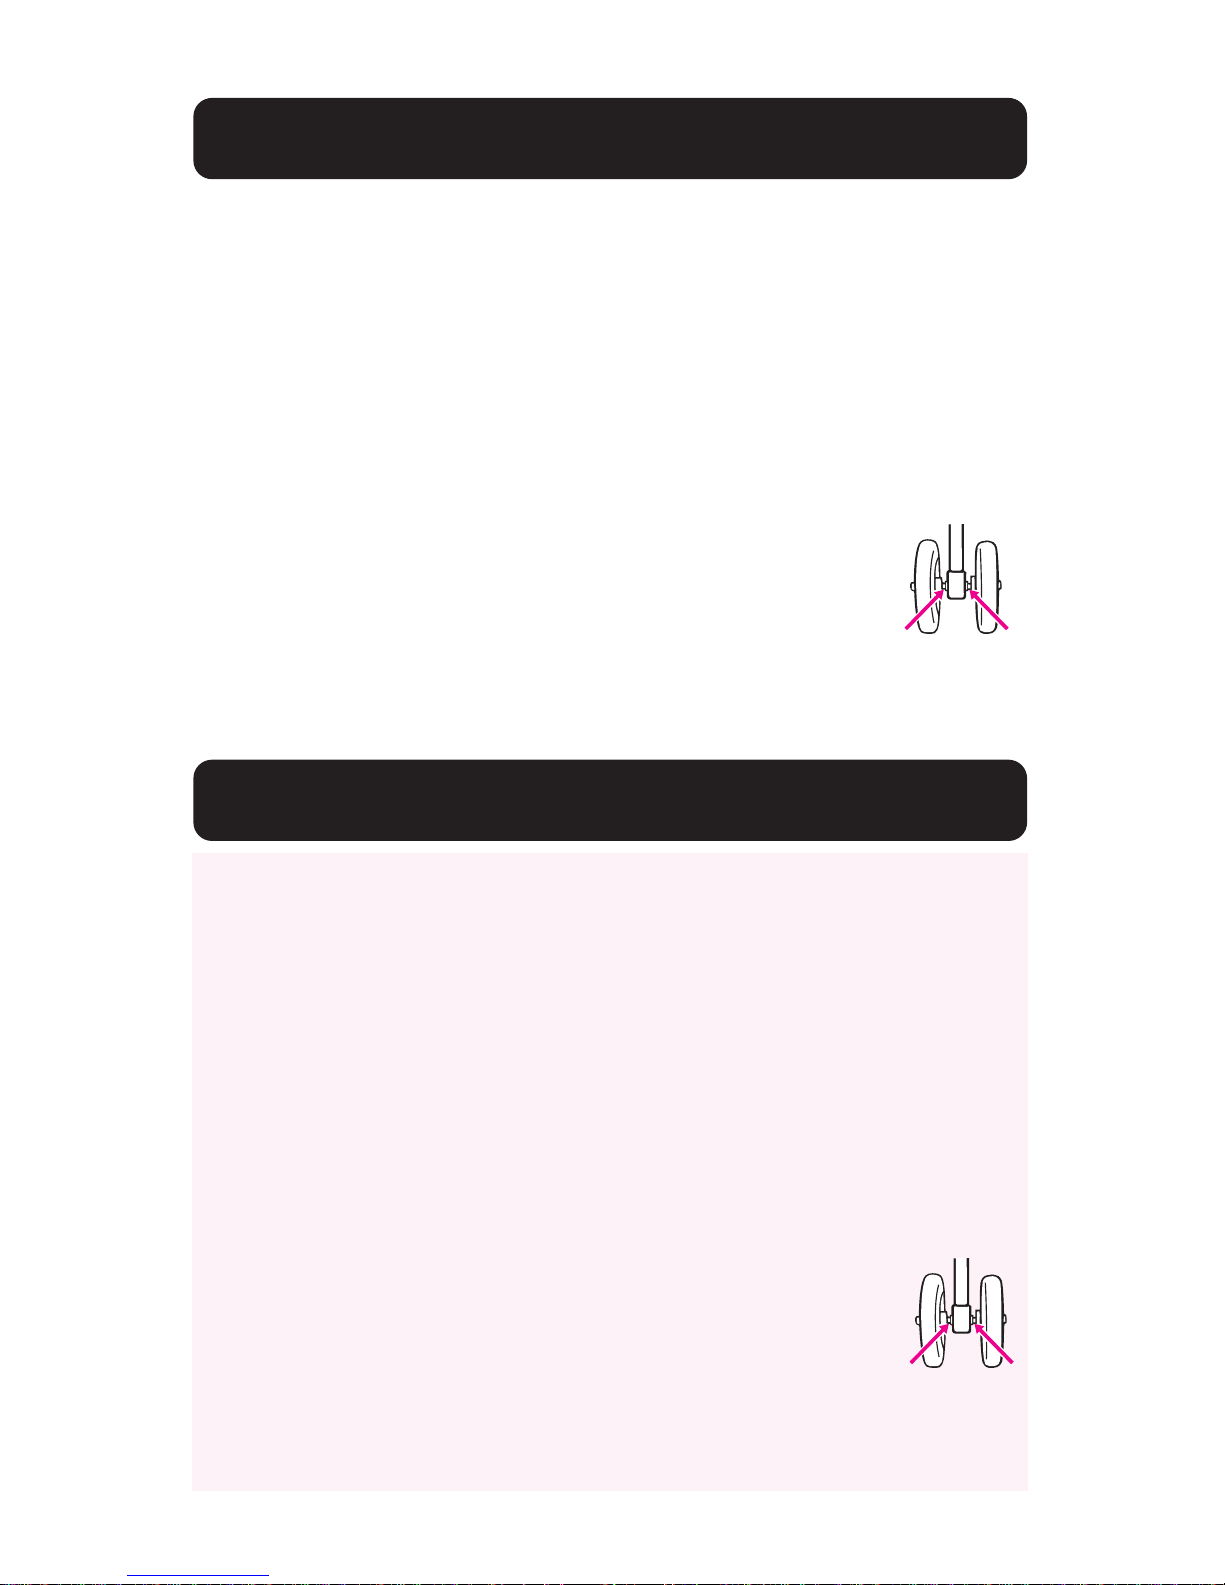
• IF WHEEL SQUEAKS, use a light oil (e.g., WD-40, 3-in-1,
or sewing machine oil). It is important to get the oil into
the axle and wheel assembly as illustrated.
• WHEN USING YOUR STROLLER AT THE BEACH
completely clean your stroller afterward to remove sand
and salt from mechanisms and wheel assemblies.
Soins et entretien
• LE COUSSIN DE SIÈGE AMOVIBLE est lavable à la machine à l’eau
froide et au cycle délicat. Étendre pour sécher. PAS D’EAU DE JAVEL.
• POUR NETTOYER L’ARMATURE DE LA POUSSETTE,
utilisez
un savon de ménage et de l’eau tiède. PAS D’EAU DE JAVEL ou
détergent.
• DE TEMPS EN TEMPS, VÉRIFIEZ VOTRE POUSSETTE pour des vis
desserrées, pièces usagées, tissu ou couture déchiré. Remplacez ou
réparez ces pièces si nécessaire. Utilisez seulement les pièces de
remplacement Graco.
• UNE EXPOSITION PROLONGÉE AU SOLEIL
peut provoquer une
décoloration prématurée du tissu et du plastique.
• SI LA POUSSETTE EST MOUILLÉE, ouvrez le baldaquin et laissez
sécher complètement avant l’entreposage.
• SI LES ROUES GRINCENT, utilisez une huile légère (i.e.
WD-40, 3 dans 1, ou bien une huile pour machine à
coudre). Il est important de déposer l’huile dans l’essieu
de la roue.
• LORSQUE VOUS UTILISEZ VOTRE POUSSETTE À LA PLAGE,
prenez soin de bien la nettoyer après l’usage afin d’enlever le sable
et le sel du mécanisme et des roues.
Page 39

39
Cuidado y mantenimiento
• EL ASIENTO REMOVIBLE puede lavarse a máquina en agua fria en
el ciclo delicado y secarse al aire. NO USE CLORO.
• PARA LIMPIAR EL ARMAZÓN DEL COCHECITO: usar solamente
jabón de uso doméstico y agua tibia. NO USE CLORO o detergente.
• DE VEZ EN CUANDO, INSPECCIONE EL COCHECITO para
determinar si hay tornillos flojos, piezas gastadas, material o costuras
rotas. Cambie o repare las piezas según sea necesario. Use solamente
repuestos marca Graco.
• EL CONTACTO EXCESIVO CON EL SOL o el calor podría causar
que se destiña o se tuerzan algunas piezas.
• SI EL COCHECITO SE MOJA, abra la capota y déjelo secar
completamente antes de guardarlo.
• SI LAS RUEDAS HACEN RUIDO, use un aceite liviano (por ej.,
WD-40, 3-en-1, o aceite para máquinas de coser). Es importante
hacer penetrar el aceite en el eje y equipo de la rueda comose ilustra.
• CUANDO USA EL COCHECITO EN LA PLAYA, limpie el
cochecito completamente después para sacar la arena y la sal
de los mecanismos y equipos de las ruedas.
Page 40
40
In
Replacement Parts • Warranty Information (USA)
Pièces de rechange • Renseignements sur la garantie (au Canada)
Piezas de repuesto • Servicio de la garantía (EE.UU.)
www.gracobaby.com
or/o
1-800-345-4109
To purchase parts or accessories or for warranty
information in Canada, contact Elfe at /
Pour commander des pièces ou pour service sous
garantie au Canada,
communiquez avec Elfe au:
1-800-667-8184
(Montréal : 514-344-3533 / Fax: 514-344-9296).
or/ou
www.elfe.net
To register your Graco product from within the U.S.A. visit us
online at www.gracobaby.com/productregistration. We currently
do not accept product registrations from those living outside
the United States of America.
Para registrar su producto Graco desde los EE.UU., visítenos en línea en
www.gracobaby.com/productregistration. Actualmente no
aceptamos el registro de productos de personas que viven fuera
de los Estados Unidos de América.
Pour inscrire votre produit Graco aux États-Unis, visitez notre site
Internet www.gracobaby.com/productregistration. Pour le moment
nous n’acceptons pas d’inscriptions de produits des
résidents hors des États-Unis.
Product Registration (USA)
Inscription de votre produit (au Canada)
Registro del producto (EE.UU.)
To purchase parts or
accessories or for warranty
information in the United
States, please contact us at
the following:
Para comprar repuestos o
accesorios o para el servicio
de la garantía en los Estados
Unidos, por favor comuníquese
con nosotros en:
Page 41
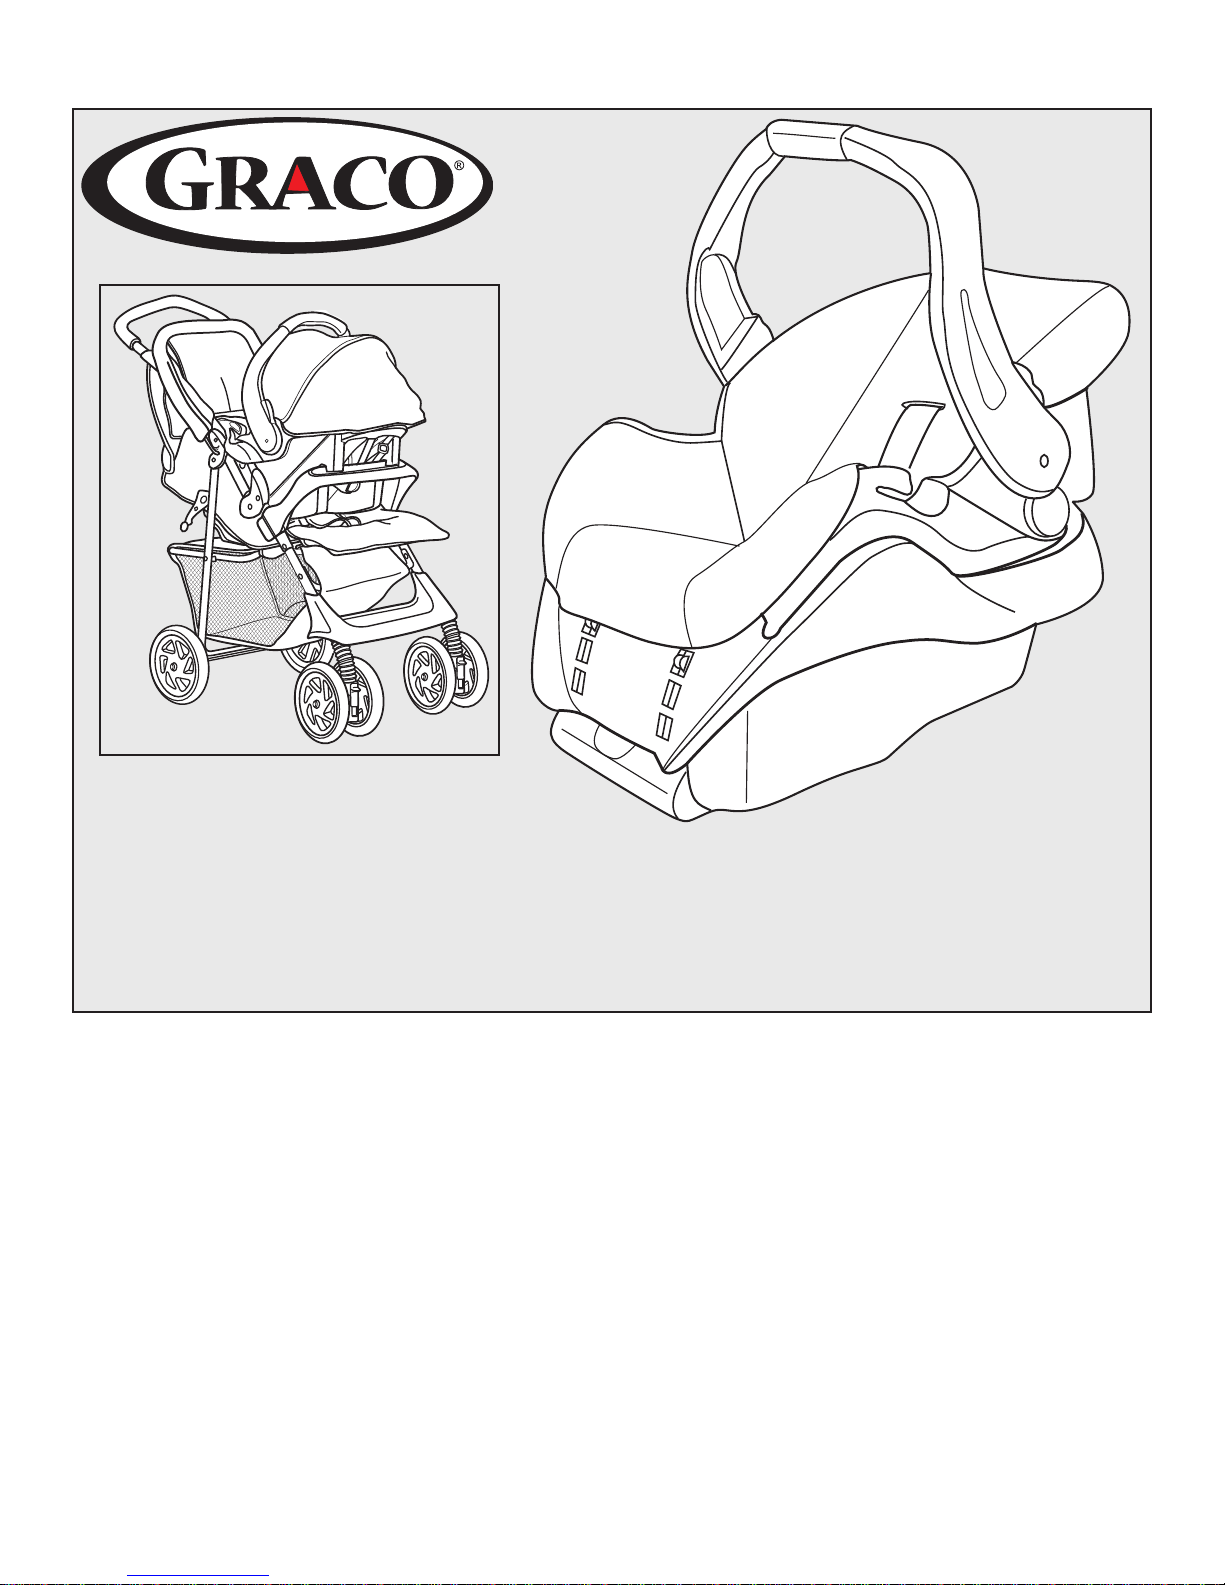
© 2007 Graco ISPC089BB 2/07 US
READ THIS MANUAL
KEEP INSTRUCTIONS FOR FUTURE USE.
Do not install or use this infant restraint until you
read and understand the instructions in this manual.
FAILURE TO PROPERLY USE THIS INFANT RESTRAINT
INCREASES THE RISK OF SERIOUS INJURY OR DEATH IN
A SUDDEN STOP OR CRASH.
Infant Restraint/Carrier
Owner’s Manual
Page 42

2
1.0 Warnings to Parents and Other Users . . . . . . . . . . . . . . . . .4-5
2.0 Registration Information . . . . . . . . . . . . . . . . . . . . . . . . . . . .6-7
2.1 Register Your Infant Restraint . . . . . . . . . . . . . . . . . . . . . . .6
2.2 Recall Information . . . . . . . . . . . . . . . . . . . . . . . . . . . . . . . .6
2.3 If You Need Help . . . . . . . . . . . . . . . . . . . . . . . . . . . . . . . . .7
3.0 Features and Components . . . . . . . . . . . . . . . . . . . . . . . . .8-15
3.1 3-Point Harness Model . . . . . . . . . . . . . . . . . . . . . . . . . . . .9
3.2 5-Point Harness Model . . . . . . . . . . . . . . . . . . . . . . . . . . . .11
3.3 Removing and Attaching Base . . . . . . . . . . . . . . . . . . . . . .13
3.4 Adjusting Handle . . . . . . . . . . . . . . . . . . . . . . . . . . . . . . . .13
3.5 Attaching Canopy (certain models) . . . . . . . . . . . . . . . . . .14
3.6 Seat Pad Assembly (on certain models) . . . . . . . . . . . . . .15
3.7 Head Support (certain models) . . . . . . . . . . . . . . . . . . . . .16
3.8 Cold Weather Boot (certain models) . . . . . . . . . . . . . . . . .16
3.9 Harness Covers (certain models) . . . . . . . . . . . . . . . . . . . .17
4.0 Important Information . . . . . . . . . . . . . . . . . . . . . . . . . . . .18-22
4.1 Warnings for Use as Infant Restraint . . . . . . . . . . . . . . . . .18
4.2 Warning for Use With a Stroller . . . . . . . . . . . . . . . . . . . . .20
4.3 Additional Warnings for Use as Carrier . . . . . . . . . . . . . . .21
4.4 Height and Weight Limits . . . . . . . . . . . . . . . . . . . . . . . . . .22
5.0 Infant Restraint Location . . . . . . . . . . . . . . . . . . . . . . . . . .23-28
5.1 Vehicle Seat Requirements . . . . . . . . . . . . . . . . . . . . . . . .23
5.2 Vehicle Seat Belt Requirements . . . . . . . . . . . . . . . . . . . .24
Page 43

3
5.2.1 UNSAFE Vehicle Belt Systems . . . . . . . . . . . . . . . . .25
5.2.2 SAFE Vehicle Belt Systems . . . . . . . . . . . . . . . . . . .26
5.3 LATCH locations . . . . . . . . . . . . . . . . . . . . . . . . . . . . . . . . .28
6.0 Using Infant Restraint . . . . . . . . . . . . . . . . . . . . . . . . . . . . . . . . .29-42
6.1 Positioning Harness Straps . . . . . . . . . . . . . . . . . . . . . . . .29
6.1.1 3-Point Harness . . . . . . . . . . . . . . . . . . . . . . . . . . .30
6.1.2 5-Point Harness . . . . . . . . . . . . . . . . . . . . . . . . . . .31
6.2 Securing Child in Infant Restraint . . . . . . . . . . . . . . . . . . .33
6.2.1 3-Point Harness . . . . . . . . . . . . . . . . . . . . . . . . . . .34
6.2.2 5-Point Harness . . . . . . . . . . . . . . . . . . . . . . . . . . .35
6.3 Installing Infant Restraint/Base Using Vehicle Belt . . . . . .36
6.4 Using LATCH to Install Base . . . . . . . . . . . . . . . . . . . . . . .39
6.5 Reclining Infant Restraint/Base . . . . . . . . . . . . . . . . . . . . .40
7.0 Additional Information . . . . . . . . . . . . . . . . . . . . . . . . . . . .43-45
7.1 Airplane Use . . . . . . . . . . . . . . . . . . . . . . . . . . . . . . . . . . .43
7.2 Storing LATCH . . . . . . . . . . . . . . . . . . . . . . . . . . . . . . . . . .43
7.3 Cleaning and Maintenance . . . . . . . . . . . . . . . . . . . . . . . .44
Replacement Parts . . . . . . . . . . . . . . . . . . . . . . . . . . . . . . . . . . . . .48
Page 44
4
No infant restraint can guarantee protection from injury in every
situation. However, proper use of this infant restraint reduces the
risk of serious injury or death to your child.
Failure to properly use this infant restraint increases the risk of
serious injury or death in a sharp turn, sudden stop or crash.
Your child’s safety depends on you installing and using this
infant restraint correctly.
Even if using this infant restraint seems easy to figure out on your
own, it is very important to READ THE OWNER’S MANUAL.
The manual is located in the back pocket of the infant restraint.
You must also read your vehicle owner’s manual.
Your child’s safety depends on:
1. Choosing a suitable location in your vehicle. Some seating
positions, such as those equipped with air bags, may not be
safe locations for this infant restraint.
2. Inserting the harness straps in the proper slots for your child.
3. Properly securing your child in the infant restraint.
4. Placing infant restraint/base in a rear-facing position.
1.0 Warnings to Parents and
Other Users
Page 45

5
5. Properly routing the vehicle seat belt or LATCH.
6. Properly reclining the infant restraint.
7. Properly securing the infant restraint in the vehicle using a
seat belt designed to restrain an infant restraint or by using
LATCH. Many seat belts are NOT safe to use with infant
restraints, even though they can easily be threaded through
the infant restraint!
Page 46

6
Model Number:
Manufactured in:
Purchase Date:
2.1 Register Your Infant Restraint
Please fill in the above information. The model number and the
manufactured in (date) can be found on a label underneath your
infant restraint. Fill out the prepaid registration postcard attached to
the seat cover and mail it today.
Child restraints could be recalled for safety reasons. You must
register this restraint to be reached in a recall. Send your name,
address and model number to:
Graco Children’s Products Inc.
150 Oaklands Blvd.
Exton, PA 19341
or call 1-800-345-4109
or www.gracobaby.com
• Call the U.S. Government’s Vehicle Safety Hotline
at 1-888-327-4236 (TTY: 1-800-424-9153) or go to
http://www.NHTSA.gov
• Graco: 1-800-345-4109 or www.gracobaby.com
2.2 Recall Information
2.0 Registration Information
Page 47

7
2.3 If You Need Help
In the U.S.A. or Canada, please contact our Customer Service
Department with any questions you may have concerning parts, use,
or maintenance. When you contact us, please have your product’s
model and serial numbers ready so that we may help you
efficiently. These numbers can be found on a sticker on the
underside of your infant restraint.
USA: 1-800-345-4109 or www.gracobaby.com
Canada: 1-800-667-8184 Montreal: 514-344-3533
Page 48
8
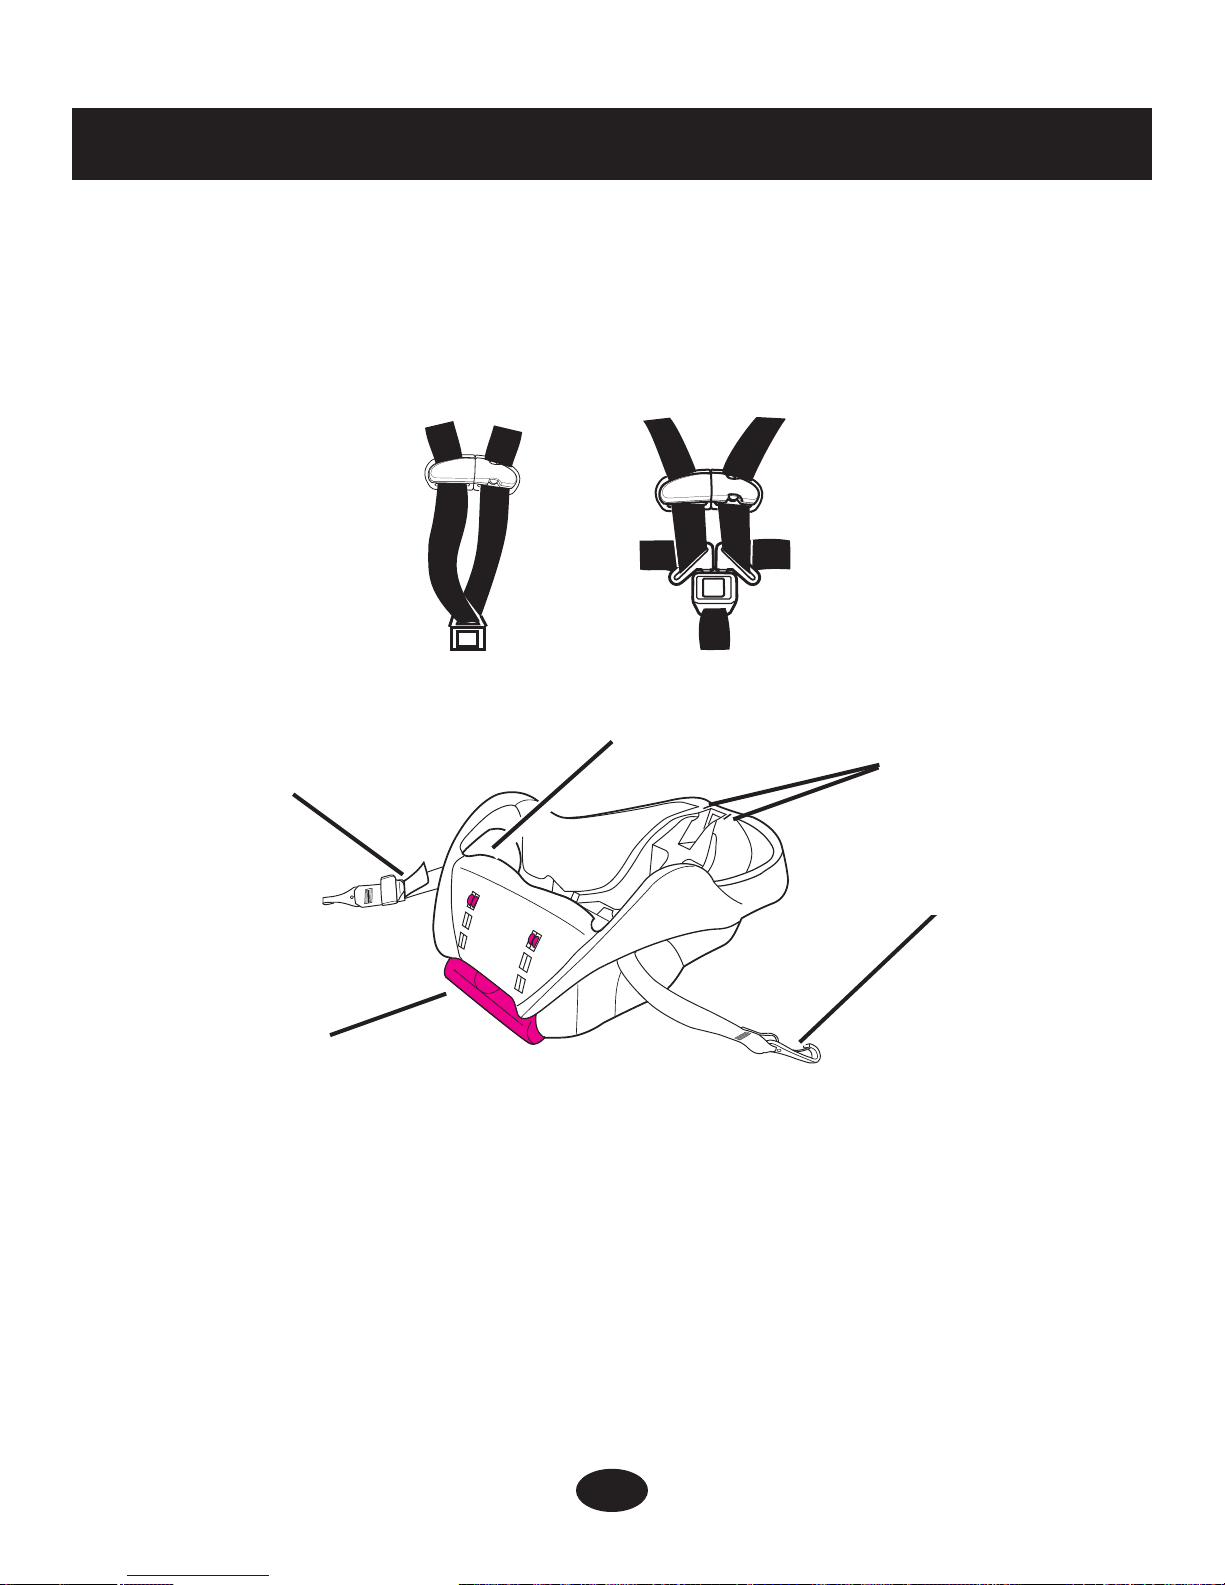
Vehicle belt/LATCH* path
Each model of the infant restraint comes with different harness
options. To adjust your infant restraint properly, it is very
important to follow the instructions that are appropriate for the
model you have purchased.
3.0 Features and Components
OR
5-Point Harness3-Point Harness
United States Federal Motor Vehicle Safety Standards have defined a
new system for installing car seats in vehicles. The system is called
LATCH.
* LATCH may be used IN PLACE of vehicle belt ONLY if vehicle is equipped
with LATCH anchor points. Please refer to vehicle owners manual for
LATCH locations.
Base
Adjustable Foot
LATCH Connectors
Adjustment Belt
LATCH
Storage
Bars
Page 49
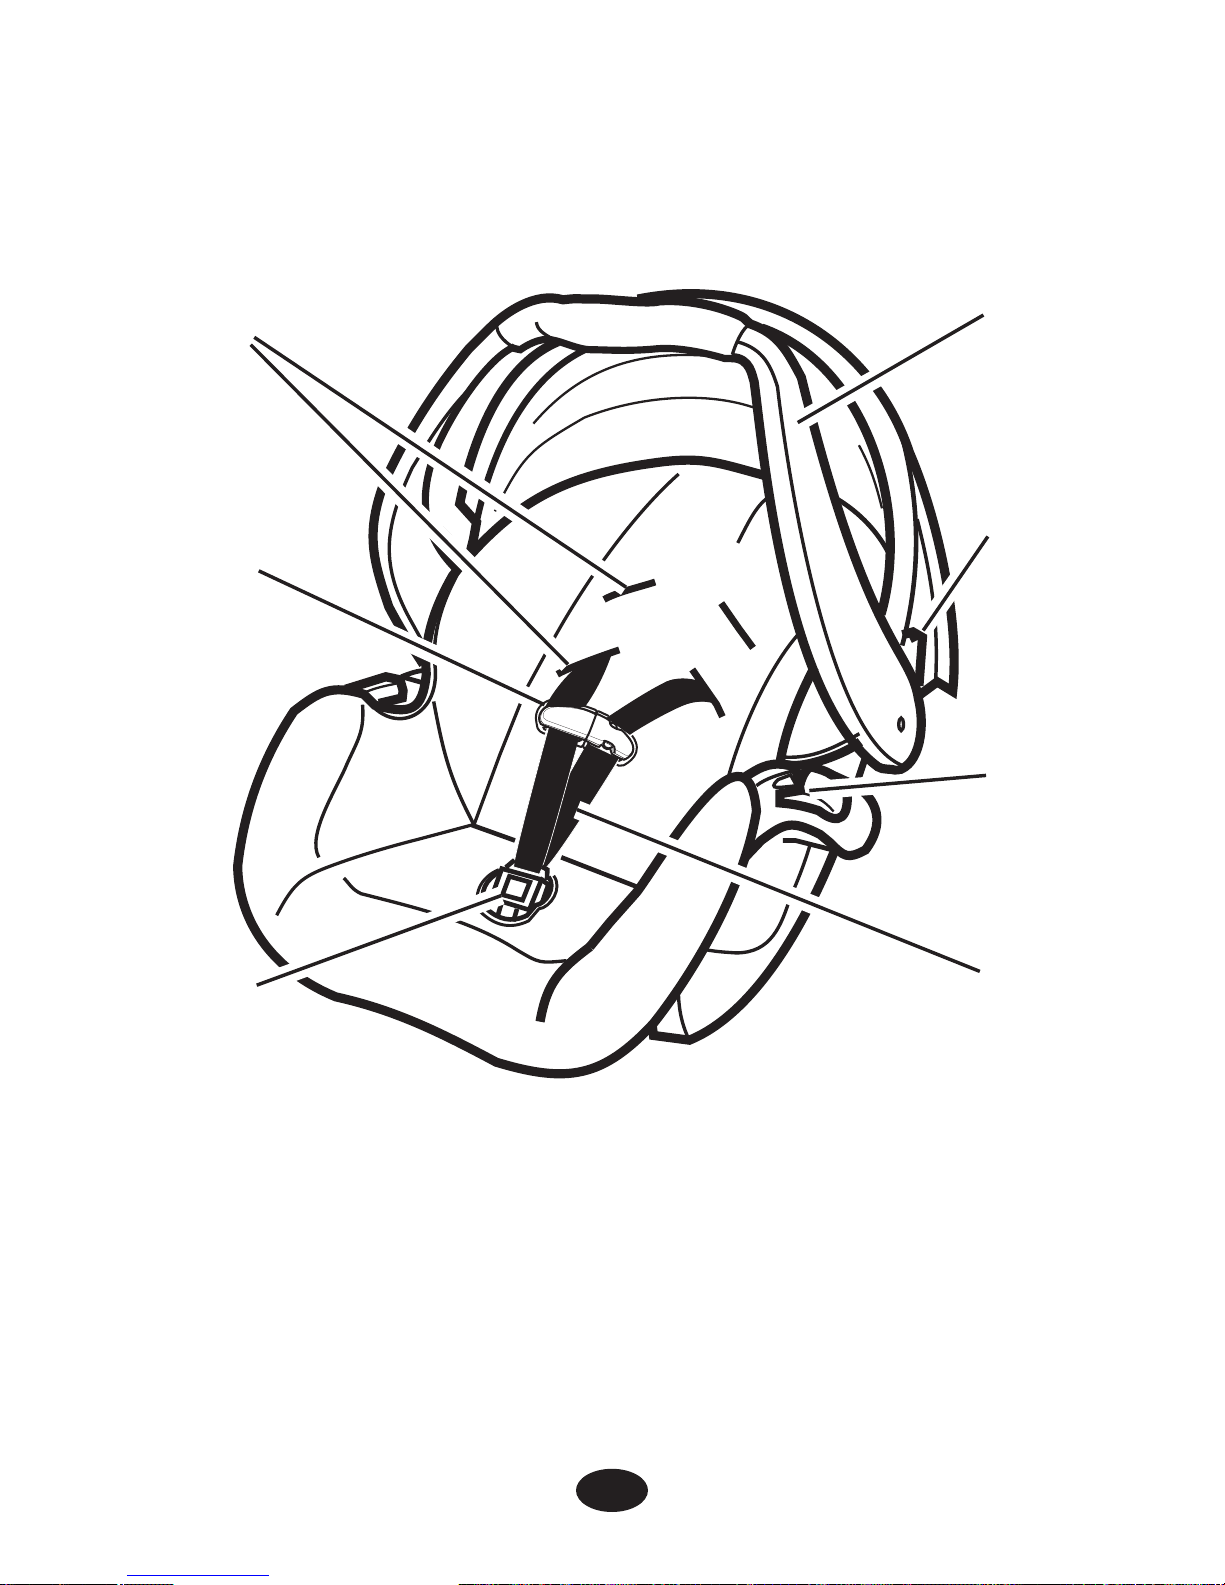
9
3.1 3-Point Harness Model
Handle
Harness
slots
Vehicle belt
hook
Handle
adjustment
button
Harness
clip
Harness
buckle
Harness
straps
FRONT VIEW: 3-POINT HARNESS
Page 50
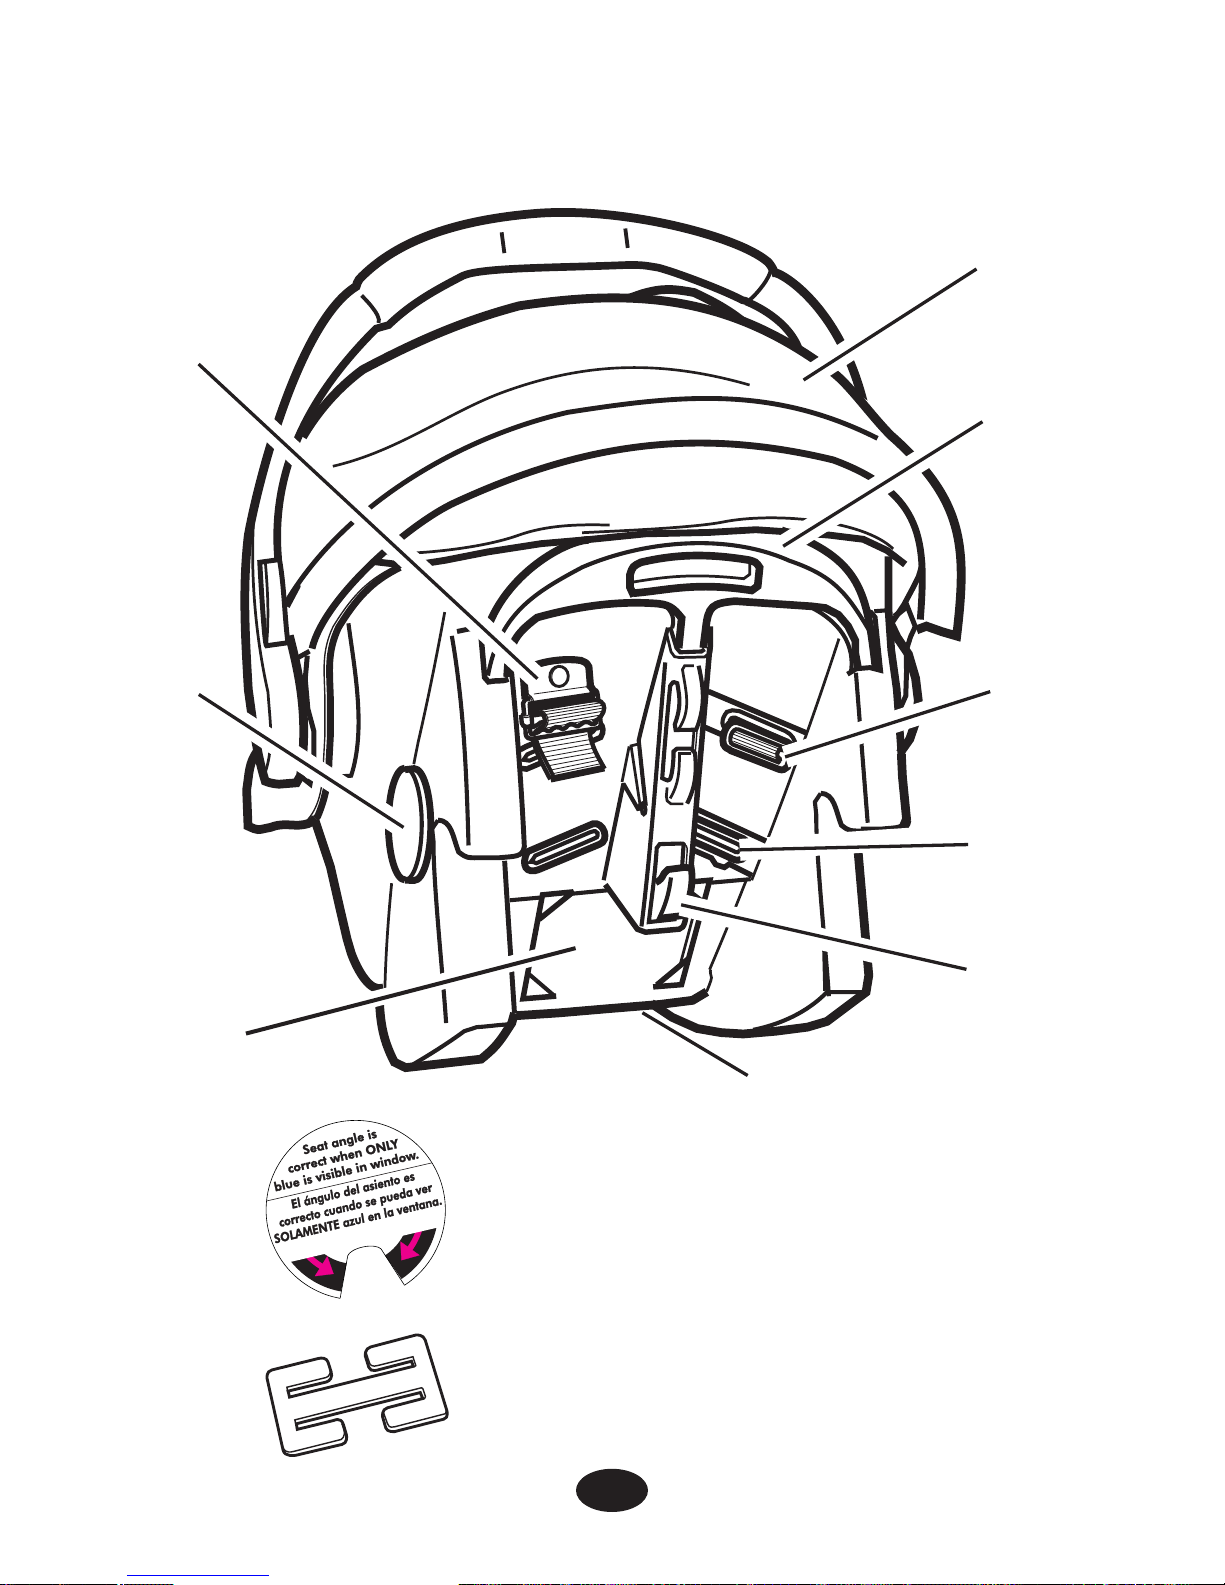
10
REAR VIEW: 3-POINT HARNESS
Canopy
(on certain models)
Harness
slot
Release
handle
Attachment
latch
Level
indicator*
Owner’s
manual
pocket
Locking
clip**
Harness
anchor
buckle
Harness
tightener
The level indicator is attached to the side of
the infant restraint, and indicates whether or
not the infant restraint is properly reclined.
The locking clip is stored on the bottom of
the infant restraint. You will need to use it
with certain types of vehicle seat belts.
**Locking
Clip
*Level
Indicator
Page 51
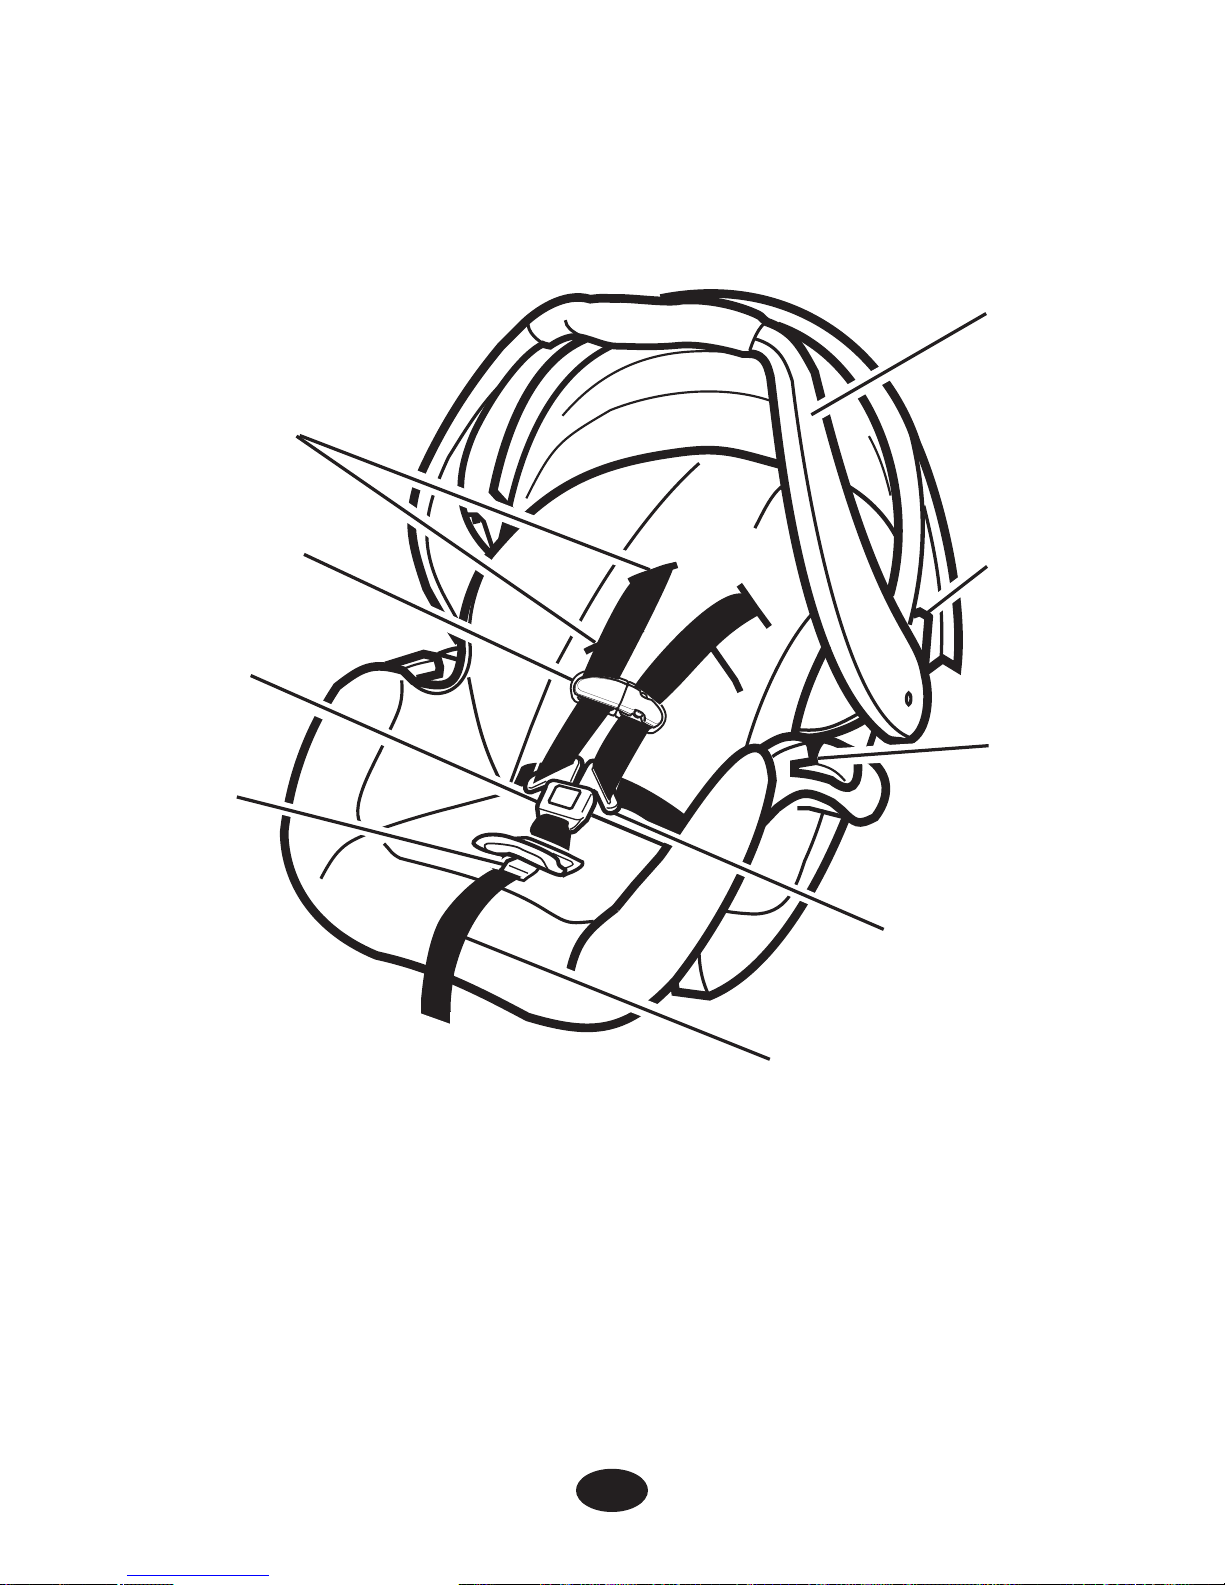
11
3.2 5-Point Harness Model
FRONT VIEW: 5-POINT HARNESS
Handle
Harness
slots
Vehicle
belt
hook
Handle
adjustment
button
Harness
clip
Harness
adjustment strap
Harness
buckle
Harness
adjustment
button
Harness
buckle tongues
Page 52
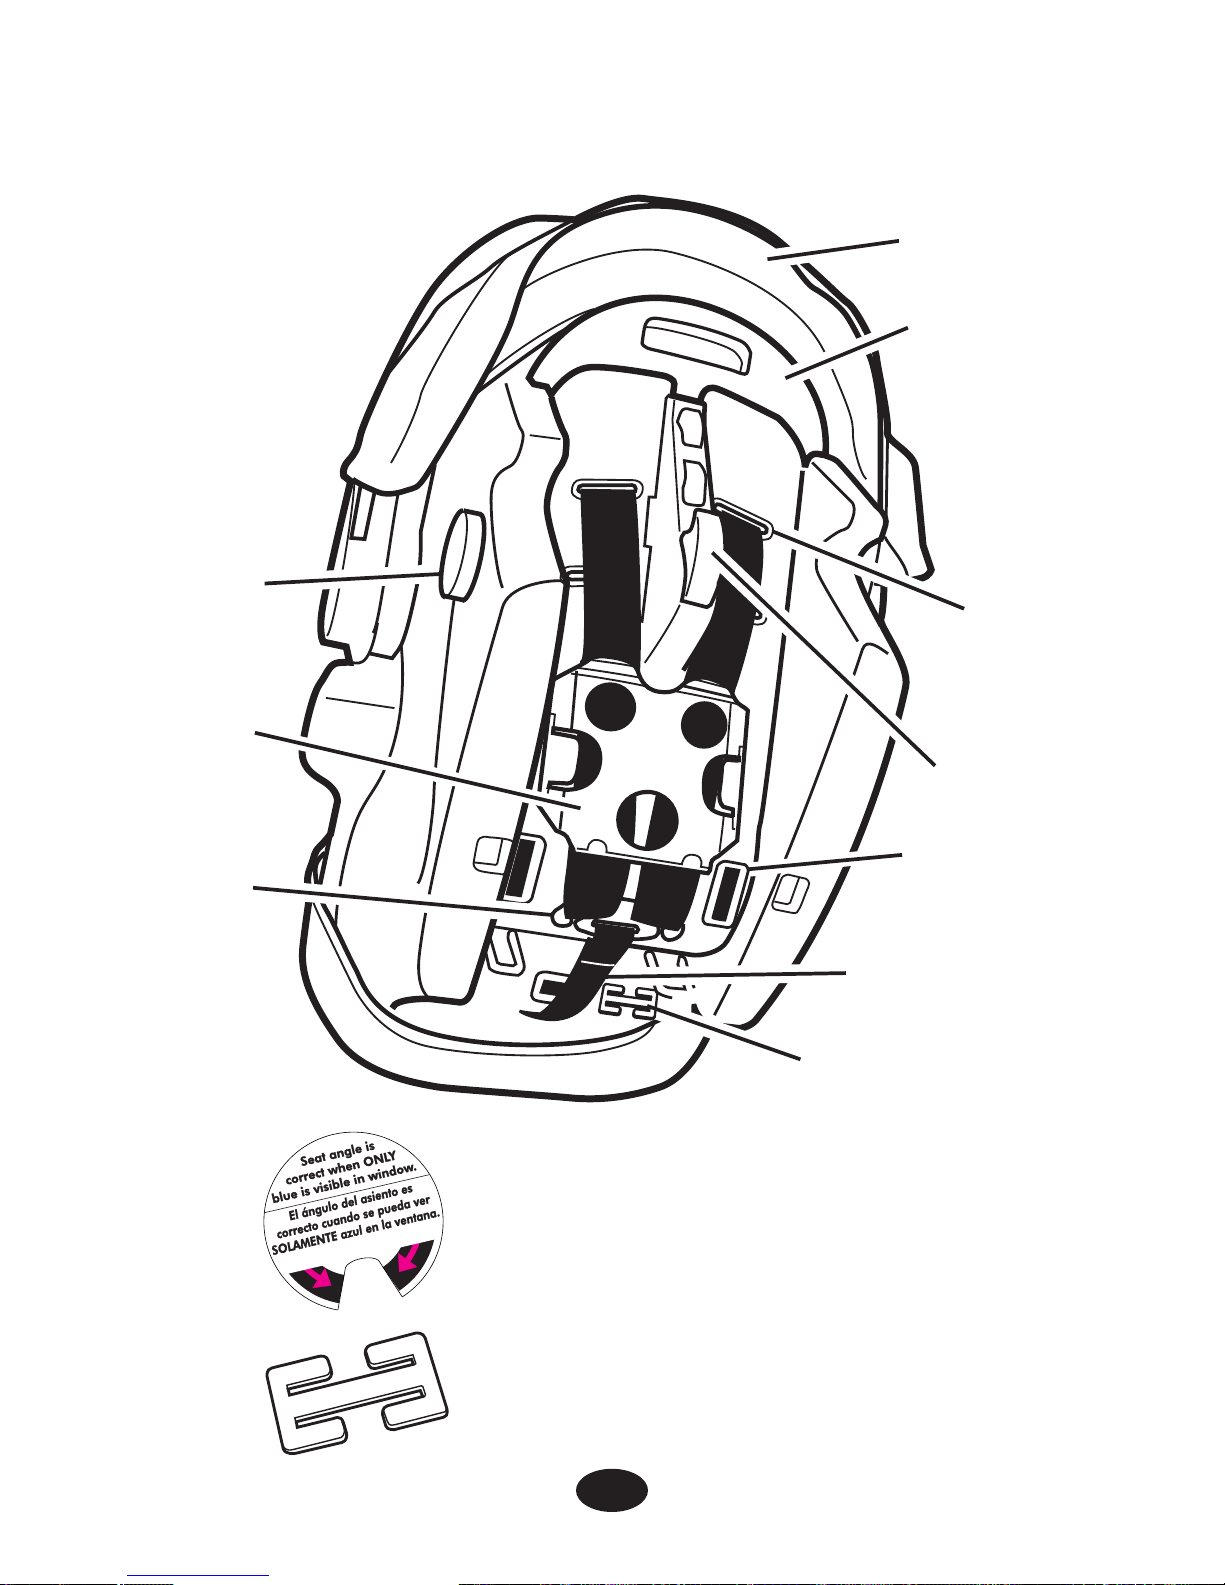
12
REAR VIEW: 5-POINT HARNESS
Canopy
(on certain models)
Harness slot
Release handle
Attachment
latch
Level
indicator*
Owner’s manual
pocket
Harness adjustment
strap
Metal
junction
plate
Locking clip**
Waist strap
anchor buckle
The level indicator is attached to the side of
the infant restraint, and indicates whether or
not the infant restraint is properly reclined.
The locking clip is stored on the bottom of
the infant restraint. You will need to use it
with certain types of vehicle seat belts.
**Locking
Clip
*Level
Indicator
Page 53
13
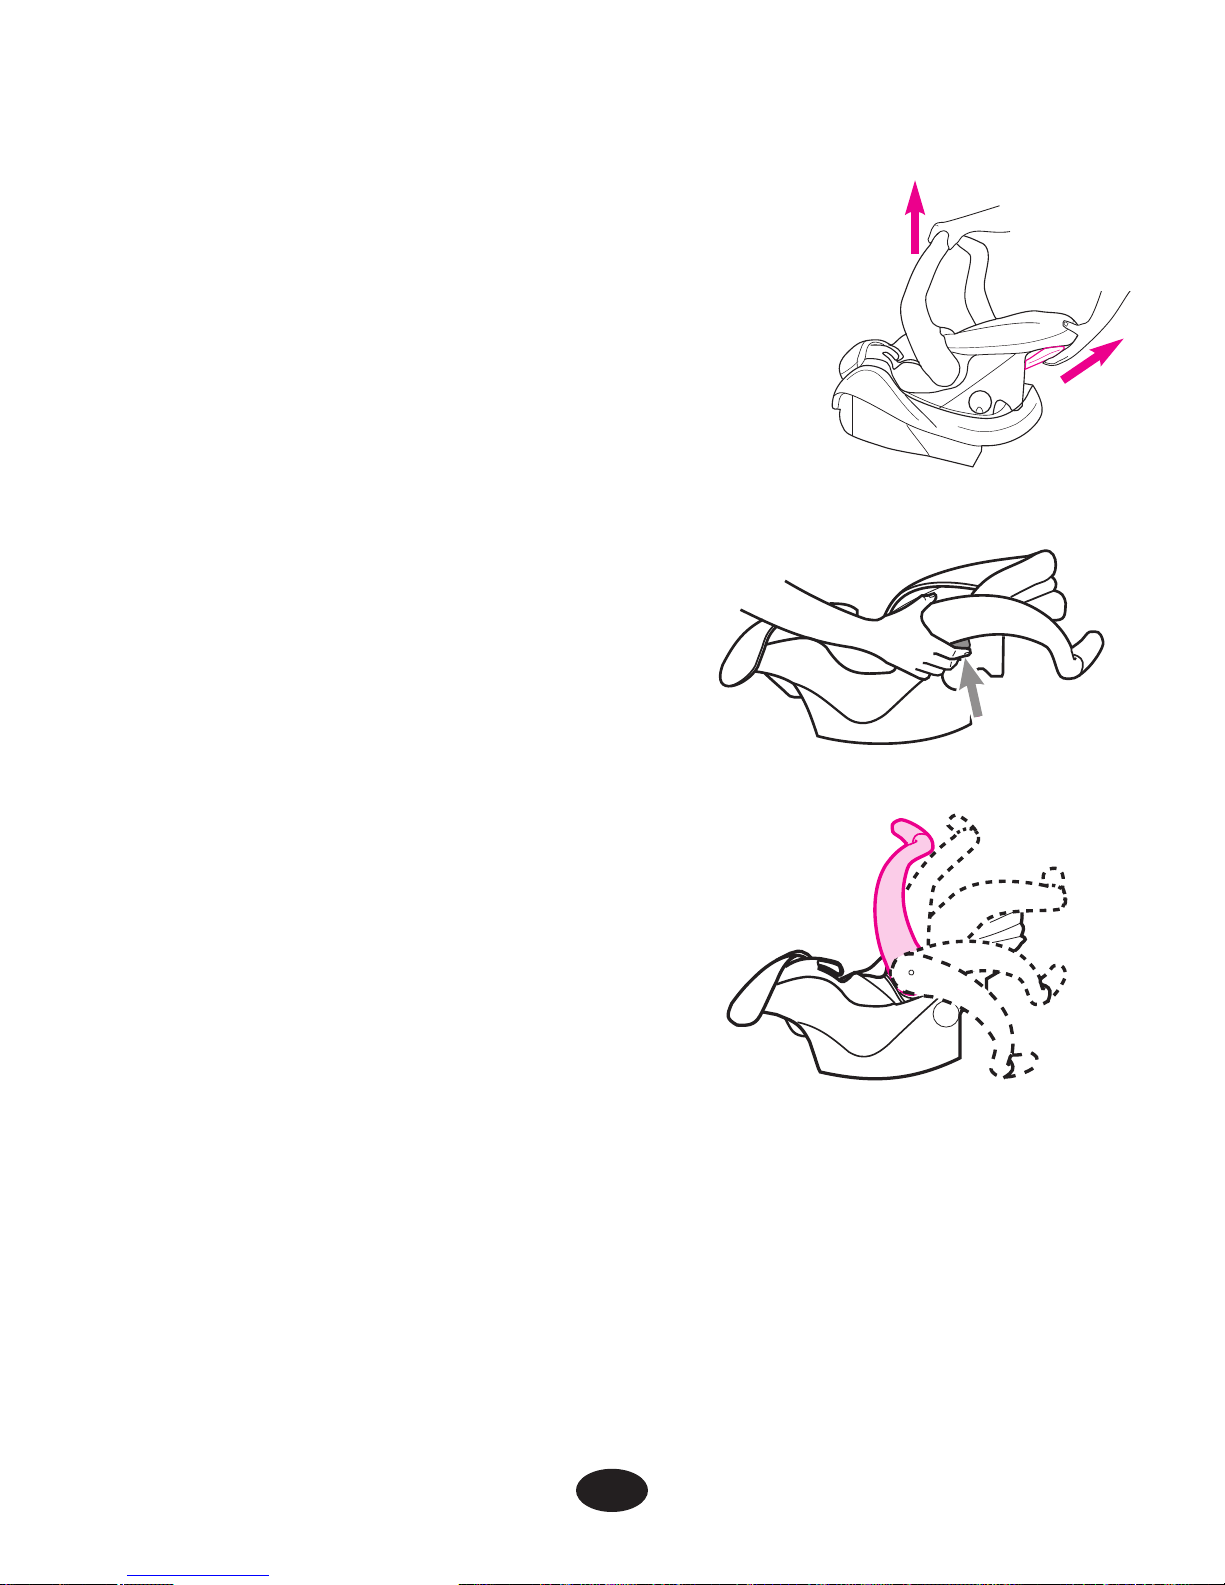
3.3 Removing and Attaching Base
3.4 Adjusting Handle
To remove infant restraint, squeeze handle at
back of seat and lift infant restraint from base
as shown
.
To put infant restraint in base, push infant
restraint down until it clicks into base. Pull up
on infant restraint to be sure it is latched
firmly into base.
1. Press handle adjustment buttons on
both sides of handle
.
2. Rotate handle until it clicks into any
of the 5 positions:
Position A: MUST be used
when carrying by handle,
Position B,C,D: are convenience
positions,
Position E: is the sitting position,
NEVER use positions B or C
in the vehicle.
BOTH handle adjustment
buttons must pop out to lock
handle in place
.
3. Push and pull on the handle
to be sure it is locked firmly
in position.
Carrying
Sitting
A
B
C
D
E
Page 54
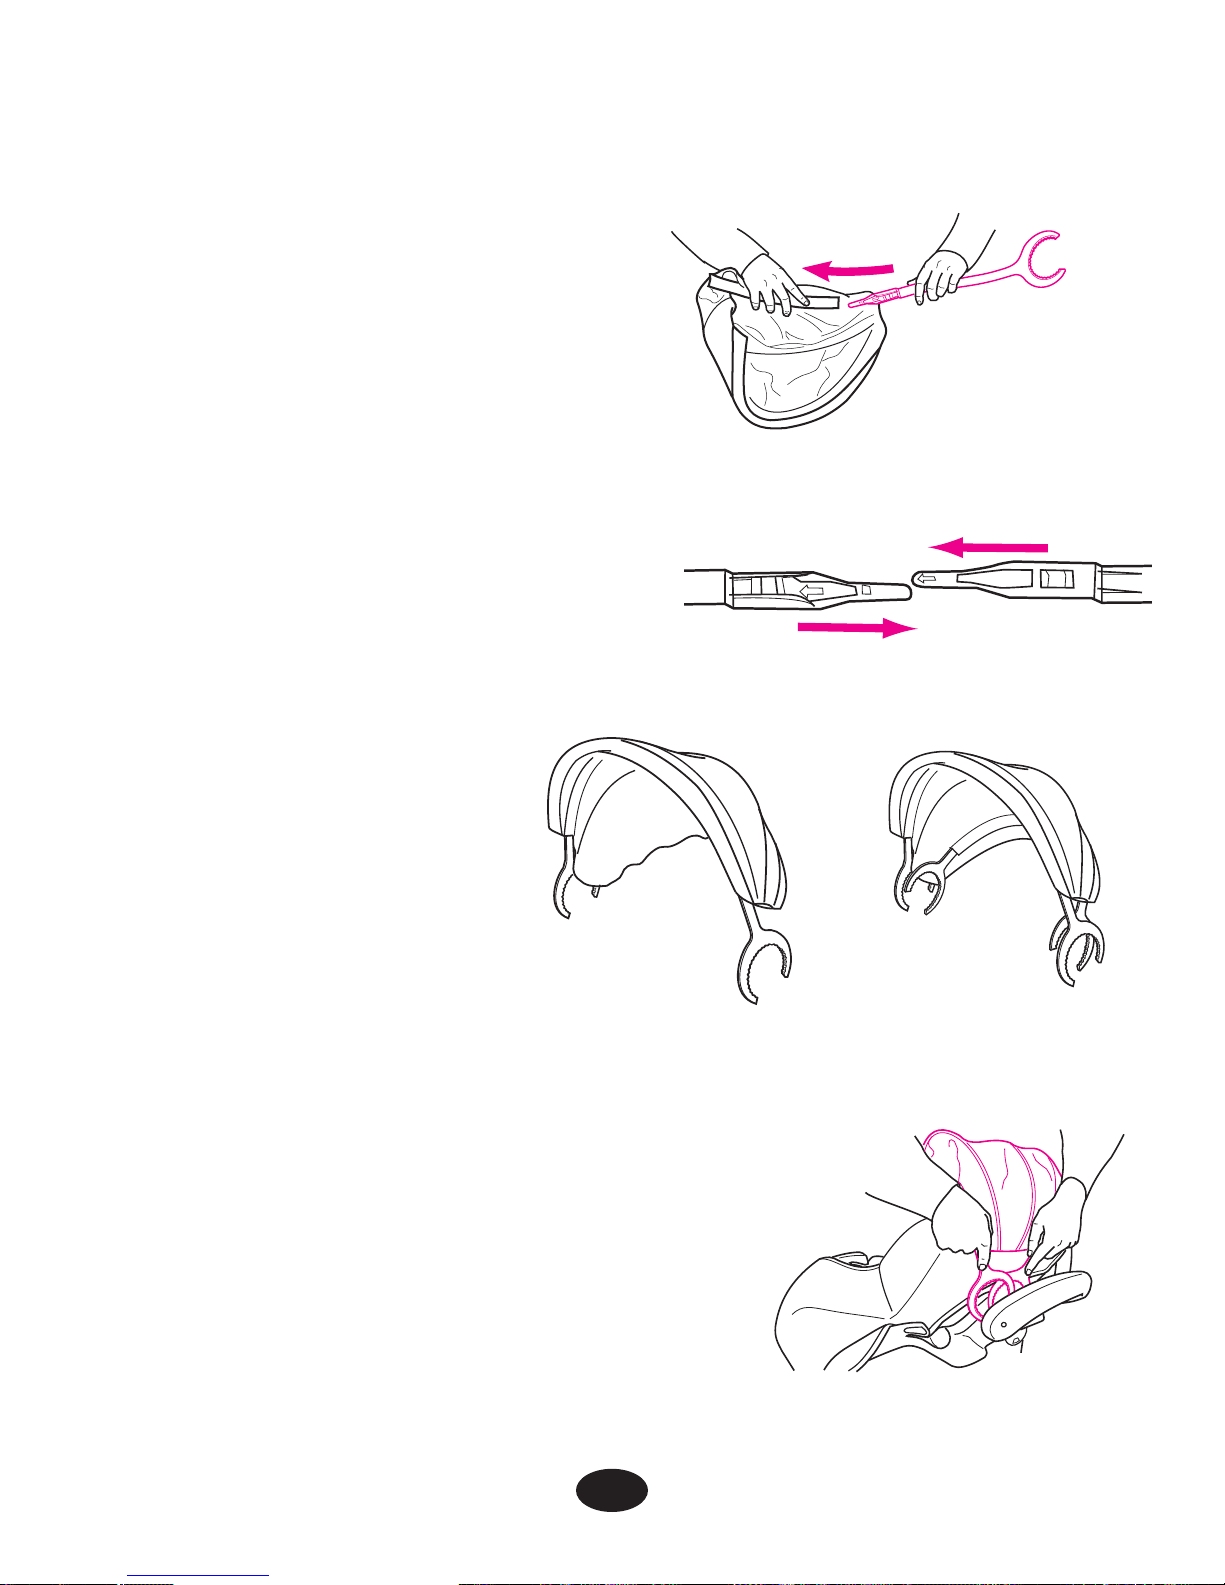
1. Infant restraint comes with four
(two on certain models) identical
canopy support parts.
Thread one canopy support
completely through one sewn
tunnel
.
2. Slide straight end of a second
support into the straight end of
the first support
.
3. On models with four
canopy supports, repeat
steps one and two for the
other canopy tunnel. The
canopy should appear as
shown
.
4. Attach canopy in the areas between the
infant restraint and the handle base
.
To remove canopy, reverse the steps.
3.5 Attaching Canopy (on certain models)
14
OR
Page 55
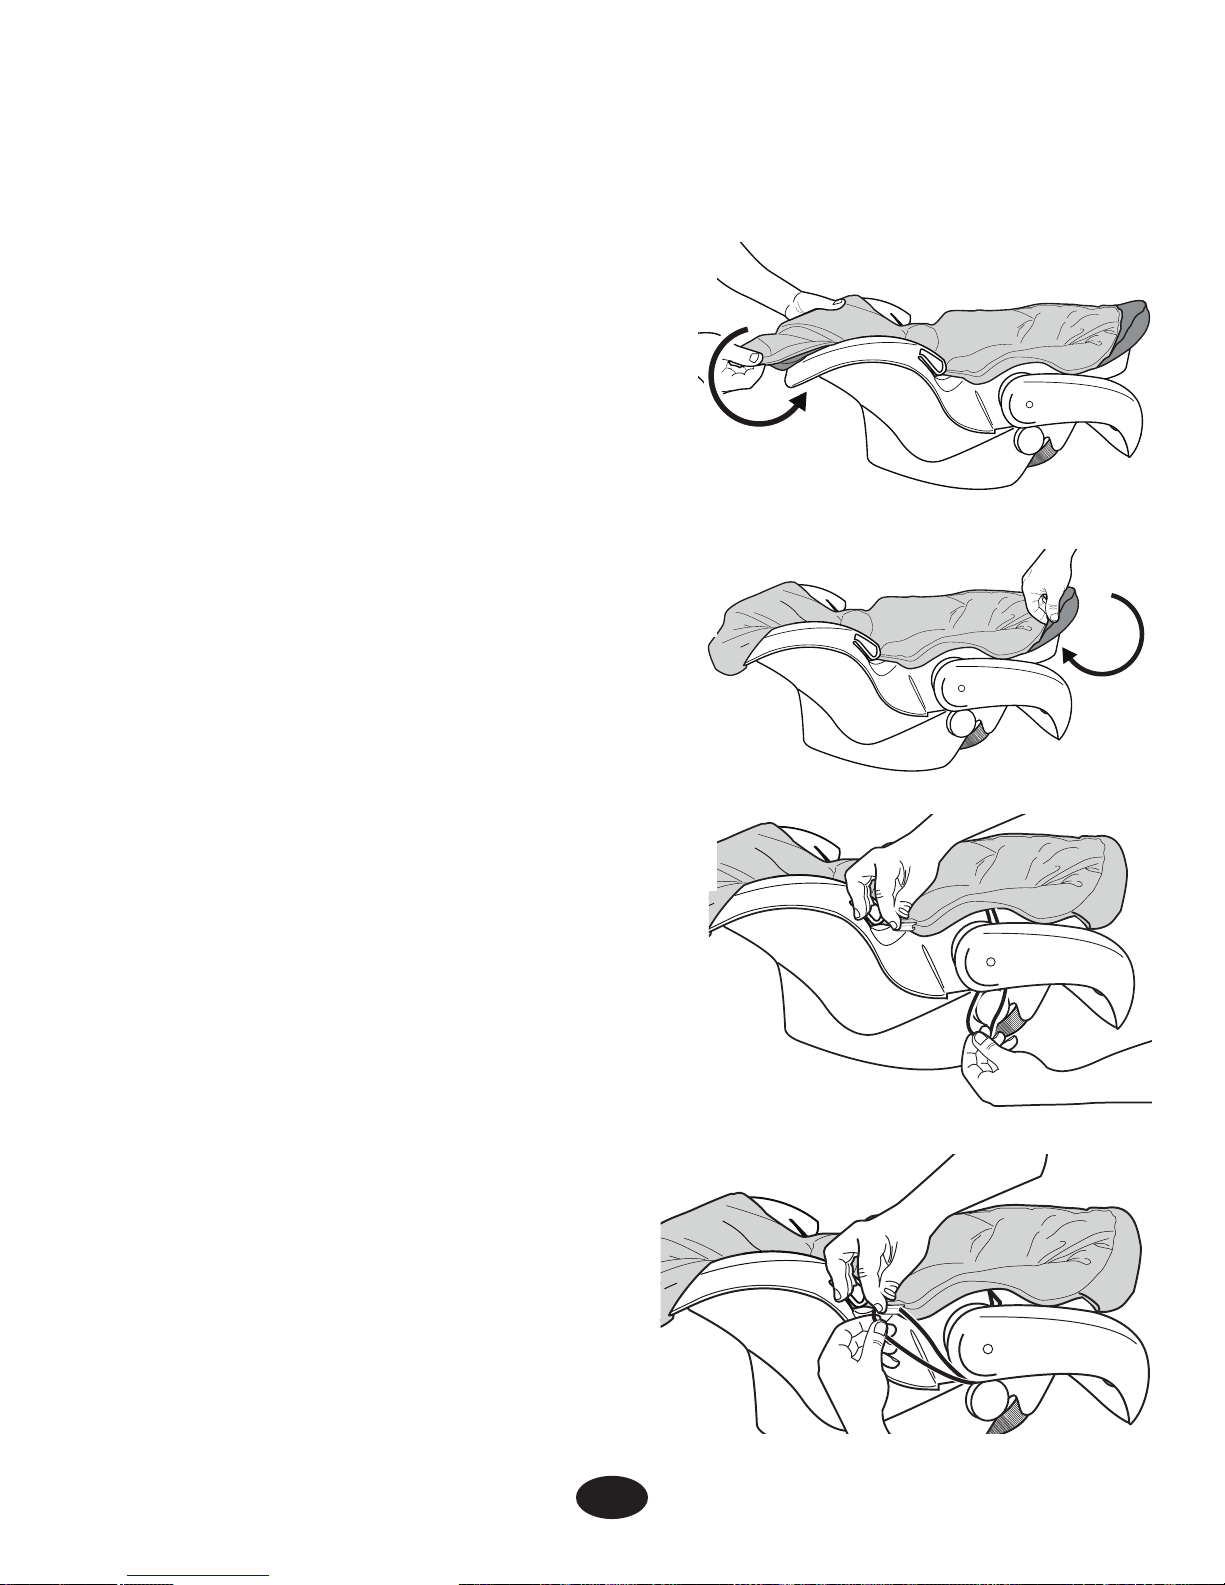
3.6 Seat Pad Assembly
(on certain models)
Step 1.
Wrap bottom edge of seat pad
around the foot end of seat as
shown.
Step 2.
Wrap the top edge of the seat pad
around the head end of the seat
as shown.
Step 3.
On side of seat, wrap elastic strap
around the handle as shown.
Skip Steps 3 and 4 if your model
does not include straps.
Step 4.
Fasten strap to hook that is
attached to the seat pad. Repeat
steps for the elastic strap and
hook on the other side of the seat
pad.
15
Page 56
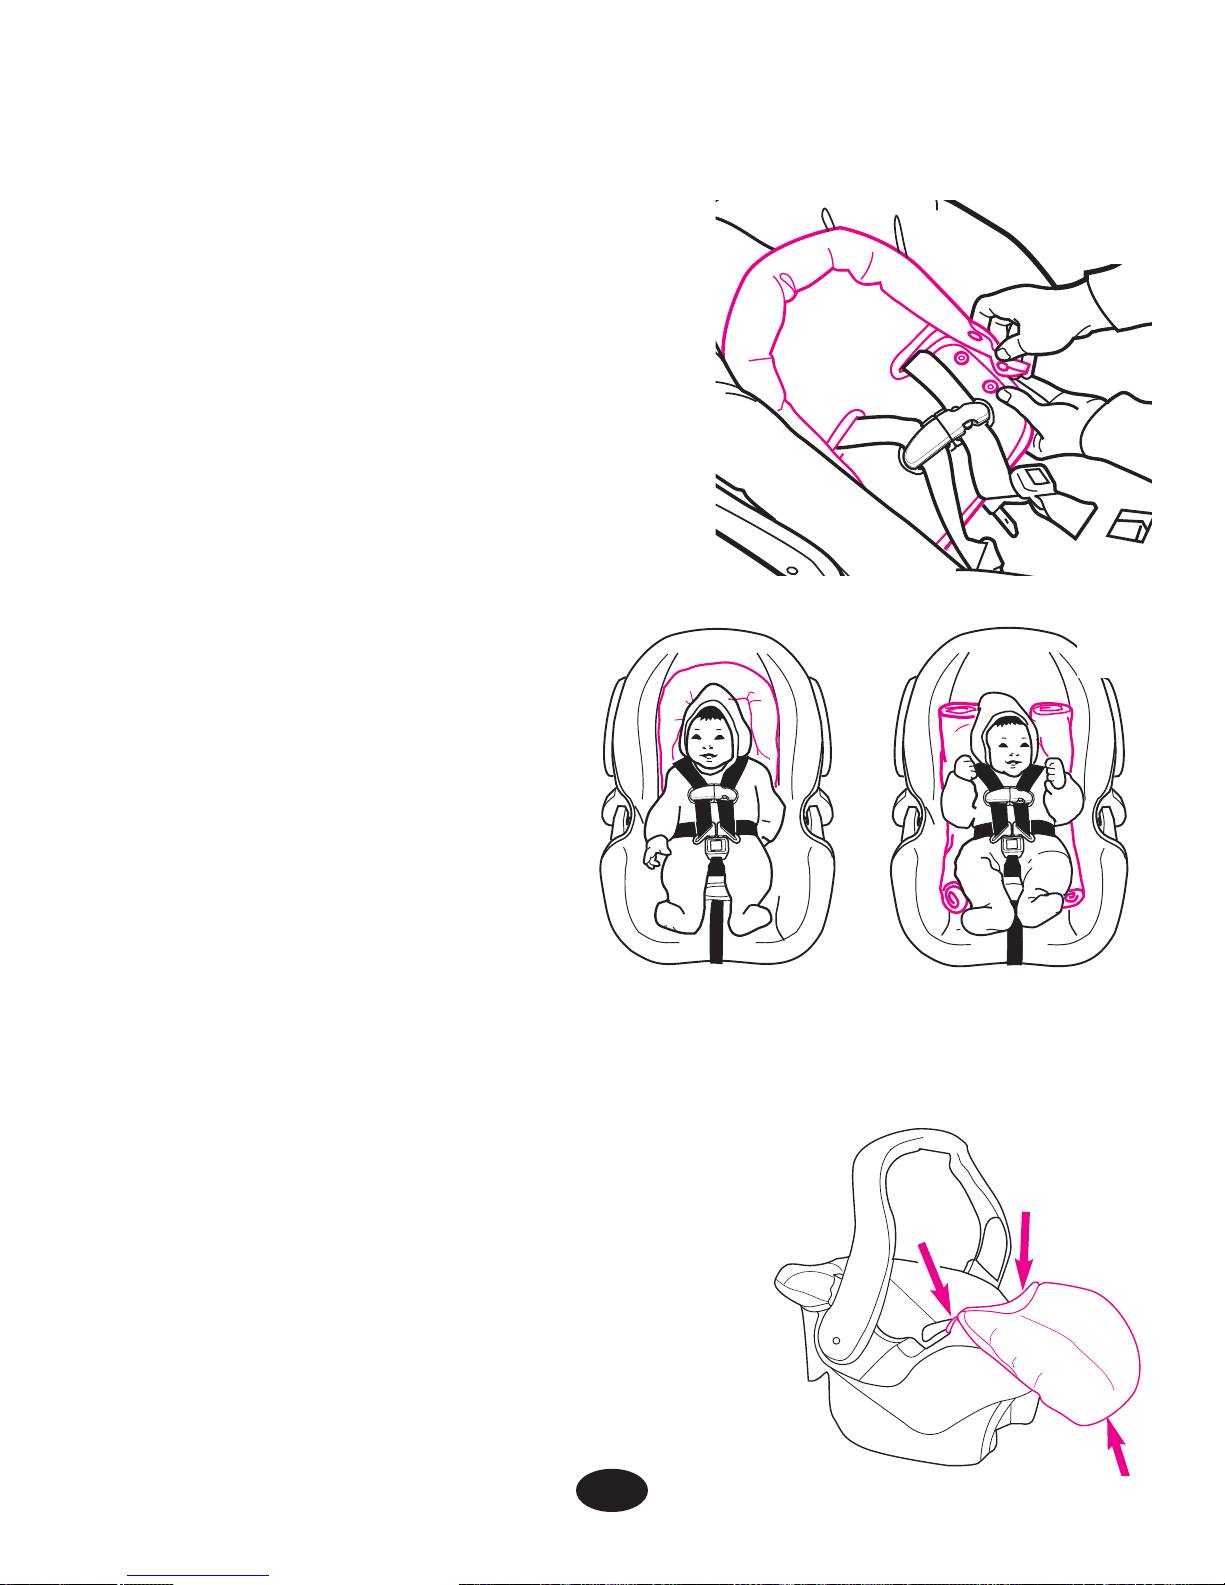
Some infants may need extra support
to keep their head and body in a
comfortable position. Unsnap the sides
and resnap them with the harness
straps threaded through the slots in
the cushion
.
If your model does not include
a head support, you may want
to use a rolled towel or a
blanket for support
. MAKE
SURE THAT NOTHING
INTERFERES WITH THE
HARNESS. It must still be
flat and snug against your
child’s shoulders.
3.8 Cold Weather Boot
(on certain models)
Some models come with a cold weather
boot. To use, wrap elastic around bottom
of seat and place both elastic loops around
vehicle belt hooks as shown
.
3.7 Head Support (on certain models)
16
Page 57
17
3.9 Harness Covers (on certain models)
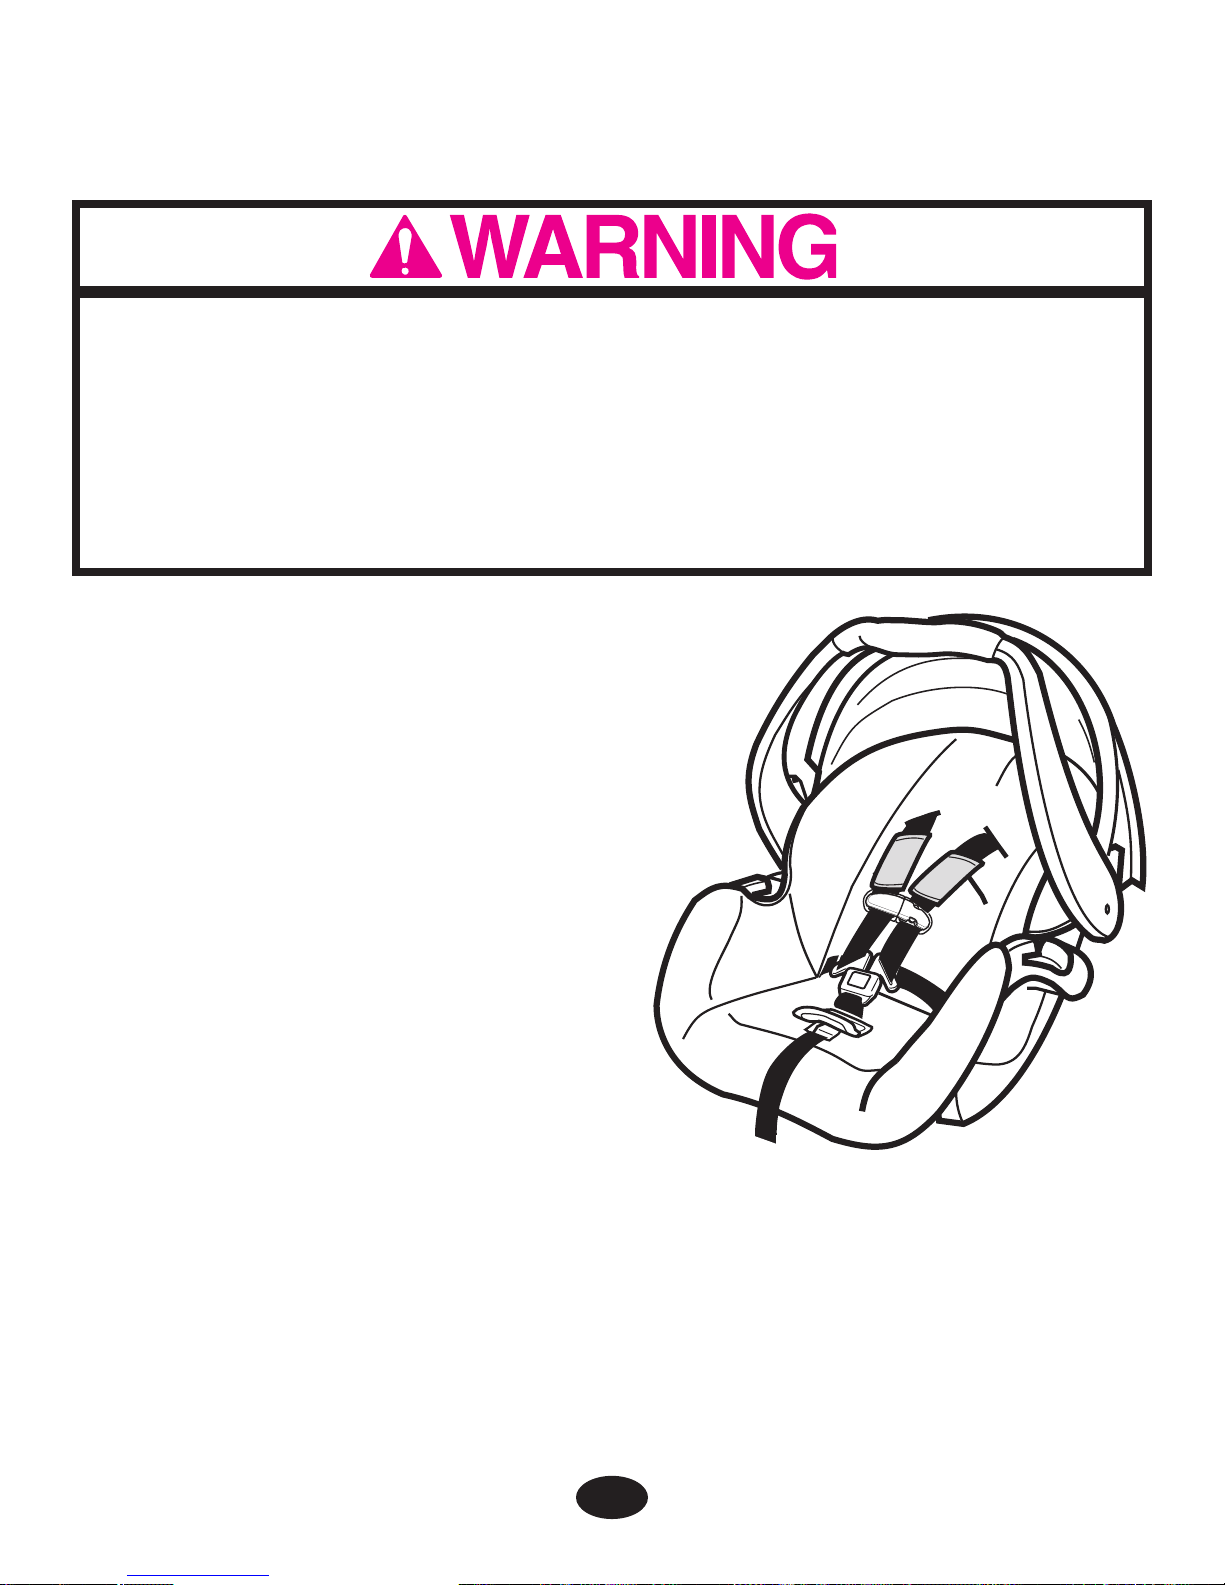
To prevent ejection in sudden stop or crash:
• Always make sure shoulder straps are threaded through slots and
properly positioned on shoulders.
• Make sure that harness covers do not interfere with placement of
the chest clip at armpit level.
Page 58
18
4.0 Important Information
4.1 Warnings for Use as Infant Restraint
• DO NOT INSTALL OR USE THIS INFANT RESTRAINT
AND BASE UNTIL YOU READ AND UNDERSTAND THE
INSTRUCTIONS IN THIS MANUAL AND IN YOUR VEHICLE
OWNER’S MANUAL. DO NOT let others install or use the
infant restraint unless they understand how to use it.
• FAILURE TO PROPERLY USE THIS INFANT RESTRAINT
AND BASE INCREASES THE RISK OF SERIOUS INJURY
OR DEATH IN A SUDDEN STOP OR CRASH. Your child can
be injured in a vehicle even if you are not in a crash. Sudden
braking and sharp turns can injure your child if the infant
restraint is not properly installed or if your child is not properly
secured in the infant restraint.
• PLACE THIS INFANT RESTRAINT IN A REAR-FACING
POSITION when using it in the vehicle.
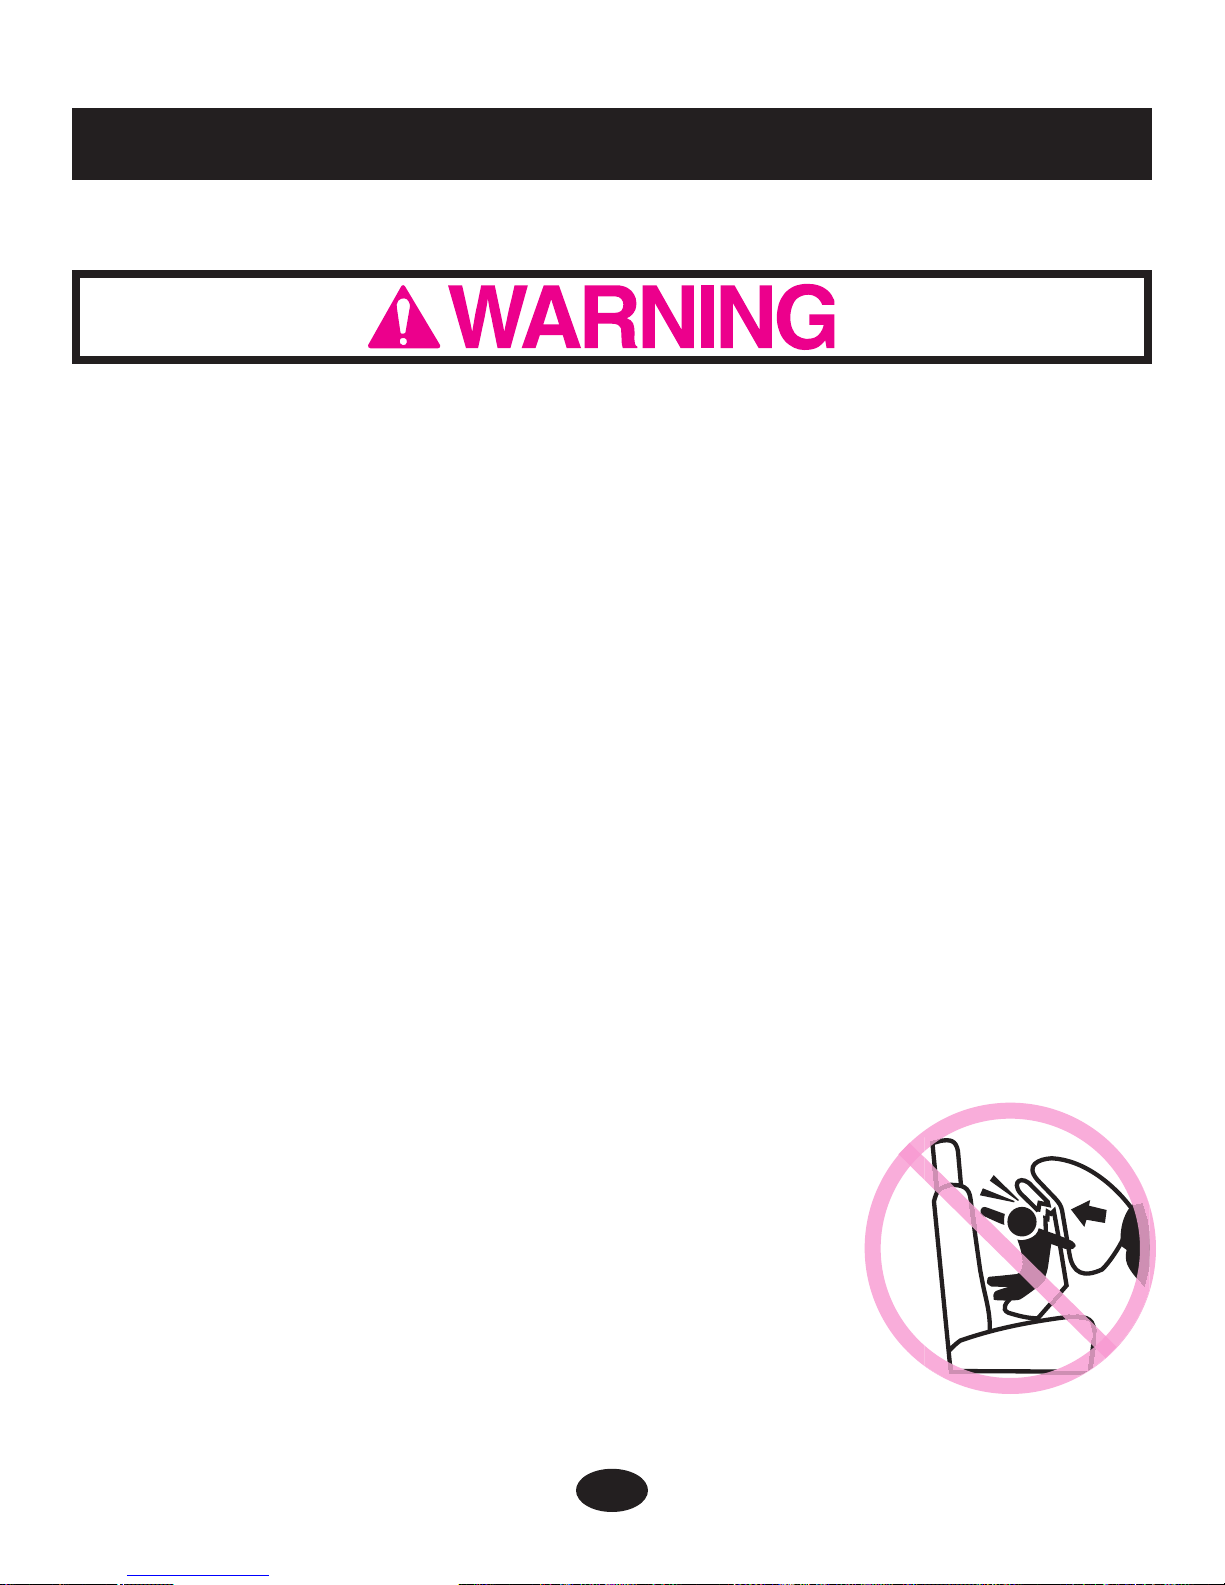
• DO NOT PLACE THIS INFANT RESTRAINT
IN A VEHICLE SEATING LOCATION THAT
HAS A FRONT AIR BAG. If the air bag
inflates, it can hit the infant restraint with great
force and cause serious injury or death to your
child. Check vehicle owner’s manual for
information about side air bags and infant
restraint installation.
Page 59

19
• SOME SPECIAL NEEDS CHILDREN, such as pre-term babies
or those who have tested positive for positional apnea, may be
at increased risk of suffering breathing or other difficulties in an
infant restraint. If your child has special needs, we recommend
that you have your physician or hospital staff evaluate your child
and recommend the proper infant restraint or car bed before
using this product.
• According to accident statistics, CHILDREN ARE SAFER WHEN
PROPERLY RESTRAINED IN REAR VEHICLE SEATING
POSITIONS, RATHER THAN FRONT SEATING POSITIONS.
For a vehicle with a front passenger air bag, refer to your vehicle
owner’s manual as well as these instructions for infant restraint
installation.
• NEVER LEAVE YOUR CHILD UNATTENDED.
• NEVER LEAVE AN INFANT RESTRAINT AND BASE
UNSECURED IN YOUR VEHICLE. An unsecured infant
restraint or base can be thrown around and may injure occupants
in a sharp turn, sudden stop or crash. Remove it or make sure
that it is securely belted in the vehicle. If not using LATCH, make
sure LATCH connectors are properly stored on base.
• REPLACE THE INFANT RESTRAINT AND BASE AFTER AN
ACCIDENT OF ANY KIND. An accident can cause damage to
the infant restraint that you cannot see.
• STOP USING INFANT RESTRAINT AND BASE AND THROW IT
AWAY after the date molded into the underside of the infant
restraint.
Page 60

20
• DO NOT MODIFY YOUR INFANT RESTRAINT AND BASE or
use any accessories or parts supplied by other manufacturers.
• NEVER USE INFANT RESTRAINT AND BASE IF IT HAS
DAMAGED OR MISSING PARTS. DO NOT use a cut, frayed
or damaged infant restraint harness, LATCH belt or vehicle seat
belt.
• THE INFANT RESTRAINT CAN BECOME VERY HOT IF LEFT
IN THE SUN. Always touch the surface of any metal or plastic
parts before putting your child in the infant restraint.
• THIS CHILD RESTRAINT CONFORMS to all applicable Federal
Motor Vehicle Safety Standards and is certified for use in motor
vehicles and aircraft.
• NEVER GIVE THIS INFANT RESTRAINT AND BASE to someone
else without also giving them this manual.
• NEVER USE A SECOND-HAND INFANT RESTRAINT AND BASE
or an infant restraint whose history you do not know.
• USE ONLY WITH STROLLERS THAT ARE PART OF THE
GRACO TRAVEL SYSTEM. Refer to stroller instruction sheet
for details about how to attach the infant restraint to your stroller.
If you do not have an instruction sheet, please call toll-free,
1-800-345-4109 to obtain one, or visit our website,
www.gracobaby.com.
• Improper use of Graco’s infant car seat with other manufacturer’s
strollers may result in serious injury or death.
4.2 Warning for Use With a Stroller
Page 61

• FALL HAZARD: Child’s movements can slide carrier.
NEVER place carrier near edges of countertops, tables or other
high surfaces. Always stay within arms reach whenever carrier is
not on floor/ground.
BE SURE handle locks into position before lifting carrier.
NEVER place carrier in the top of a shopping cart.
• SUFFOCATION HAZARD: Infant carrier can roll over on soft
surfaces and suffocate child. Never place carrier on beds, sofas
or other soft surfaces.
• STRANGULATION HAZARD: Child can strangle in loose restraint
straps. Always use harness, never leave child in carrier when
straps are loose or undone.
• KEEP STRINGS AND CORDS AWAY FROM CHILD. Strings and
cords can cause strangulation.
DO NOT place carrier near a window where cords from blinds or
drapes can strangle a child.
DO NOT hang strings on or over the carrier.
DO NOT place items with a string around a child’s neck, such
as hood strings, pacifier cords, etc.
DO NOT attach strings to toys.
4.3 Additional Warnings for Use as Carrier
21
Page 62
22
4.4 Height and Weight Limits
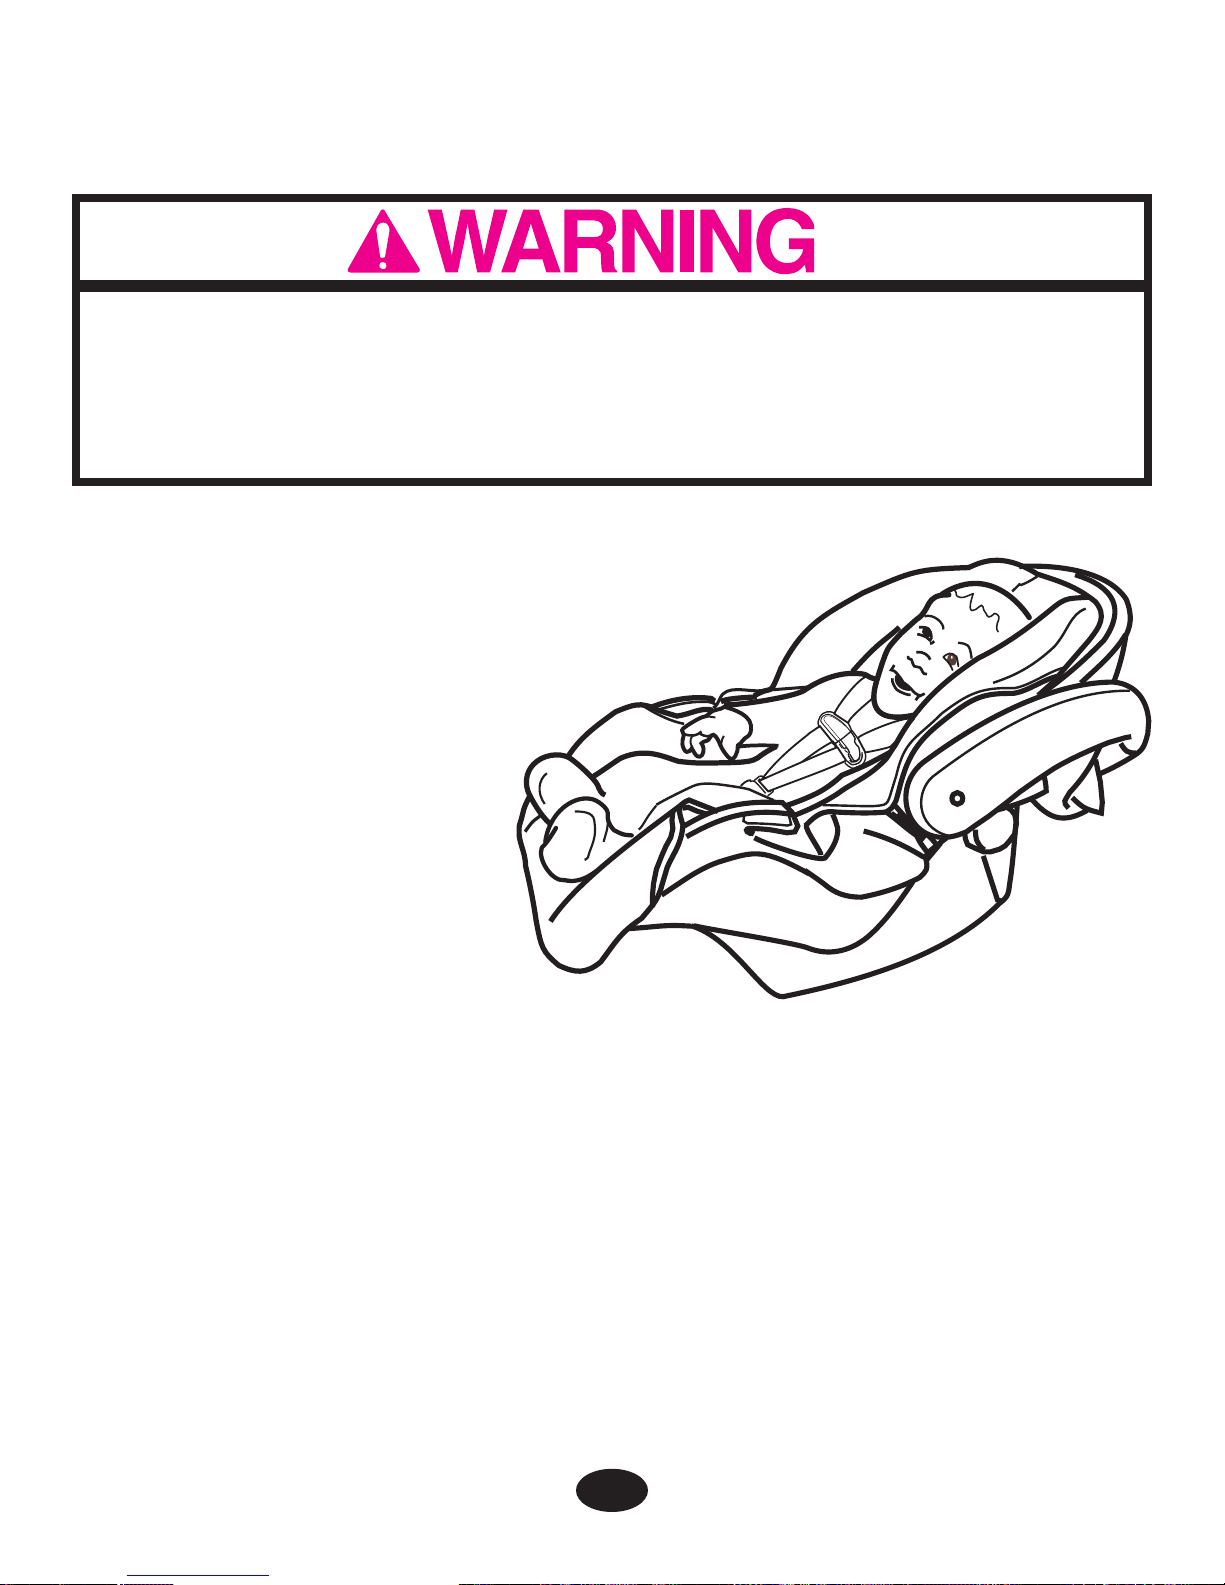
FAILURE TO USE INFANT RESTRAINT IN A MANNER
APPROPRIATE FOR YOUR CHILD’S SIZE MAY INCREASE
THE RISK OF SERIOUS INJURY OR DEATH.
Your child MUST meet all requirements:
• WEIGHT: 5-22 lbs (2.3-10 kg)
• HEIGHT: 29 inches (73 cm) or less
Page 63
5.0 Infant Restraint Location
5.1 Vehicle Seat Requirements
IMPROPER PLACEMENT OF THE INFANT RESTRAINT
INCREASES THE RISK OF SERIOUS INJURY OR DEATH.
Some seating positions in your vehicle may not be safe for this infant
restraint. Some vehicles do not have any seating positions that can
be used safely with the infant restraint. If you are not sure where to
place the infant restraint in your vehicle, consult your vehicle owner’s
manual or call Graco at 1-800-345-4109.
• Whenever possible, secure the infant
restraint in the center position of the
seat directly behind the front seats
.
An adult should ride in the rear seat to
watch the child. If the driver is the only
adult present, a child may need to ride in the front seat. BUT
ONLY if there is no passenger-side air bag and all of the other
vehicle seat and seat belt requirements listed are met.
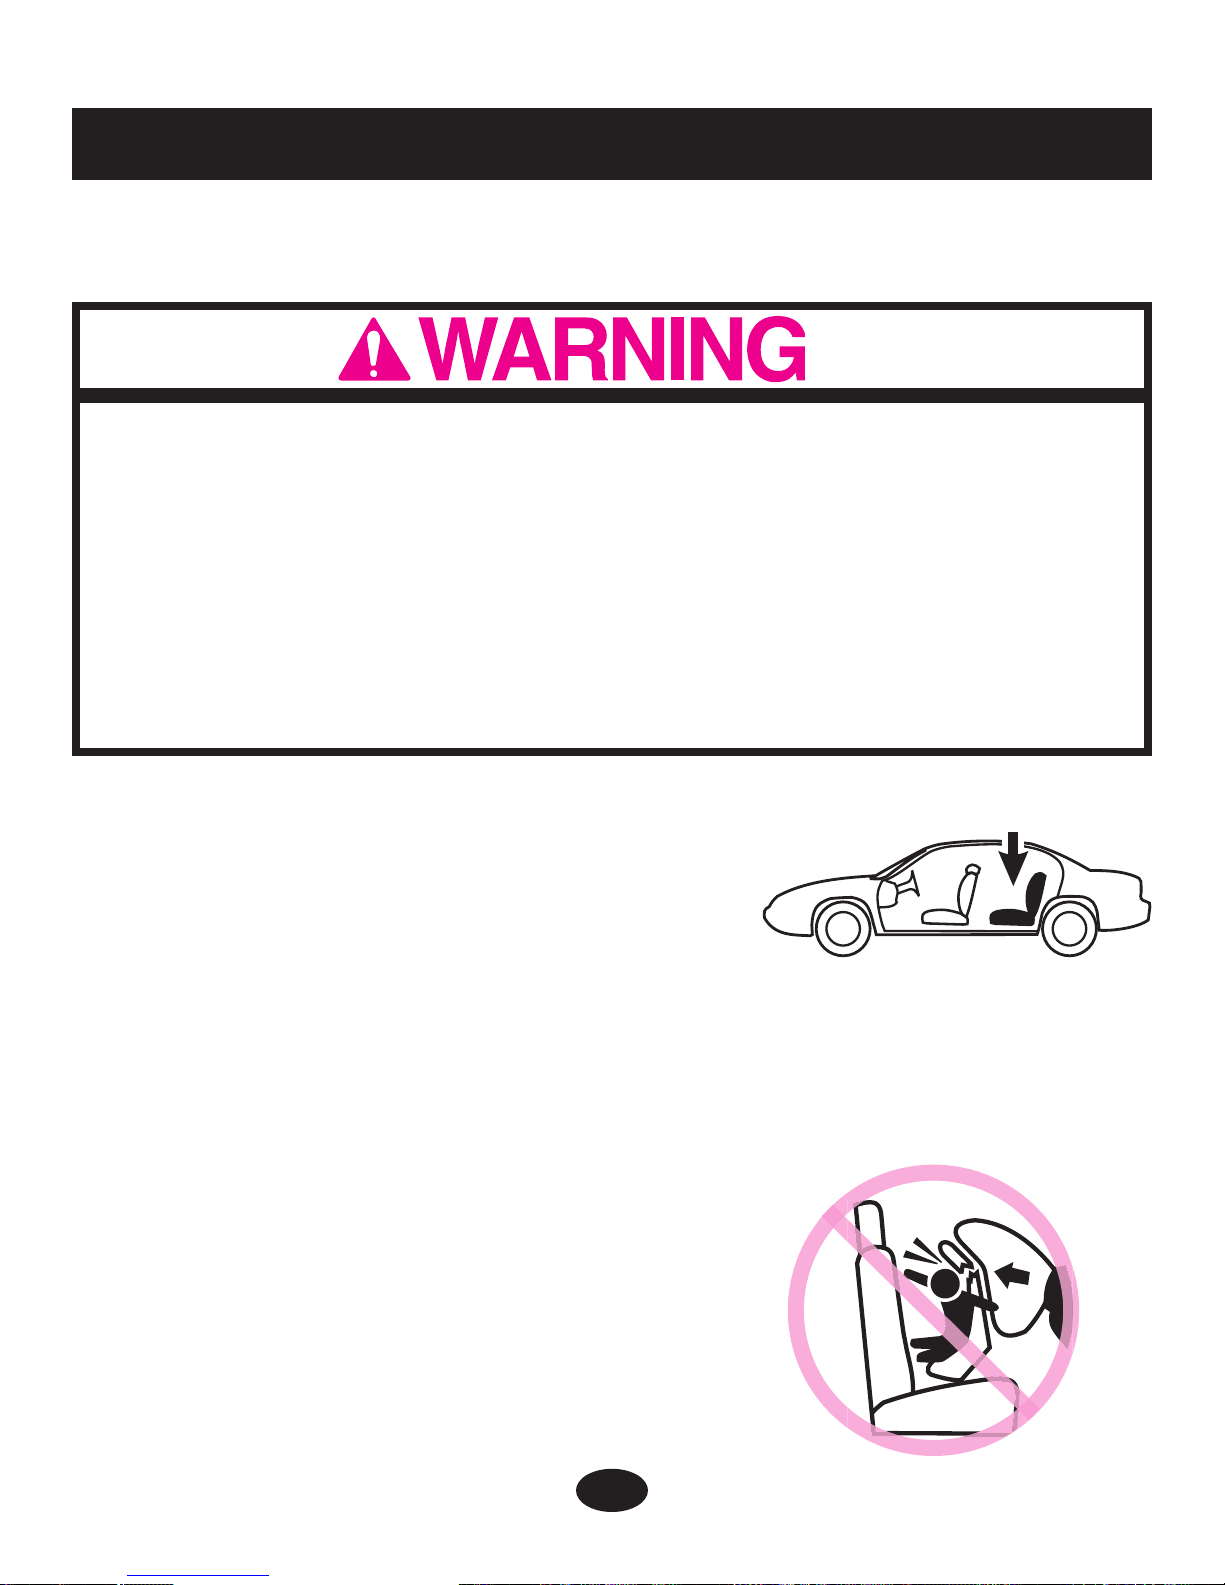
• NEVER place this infant restraint in a
vehicle seating location that has a front
air bag
. See “4.1 Warnings for Use as
Infant Restraint”, p.18.
23
Page 64
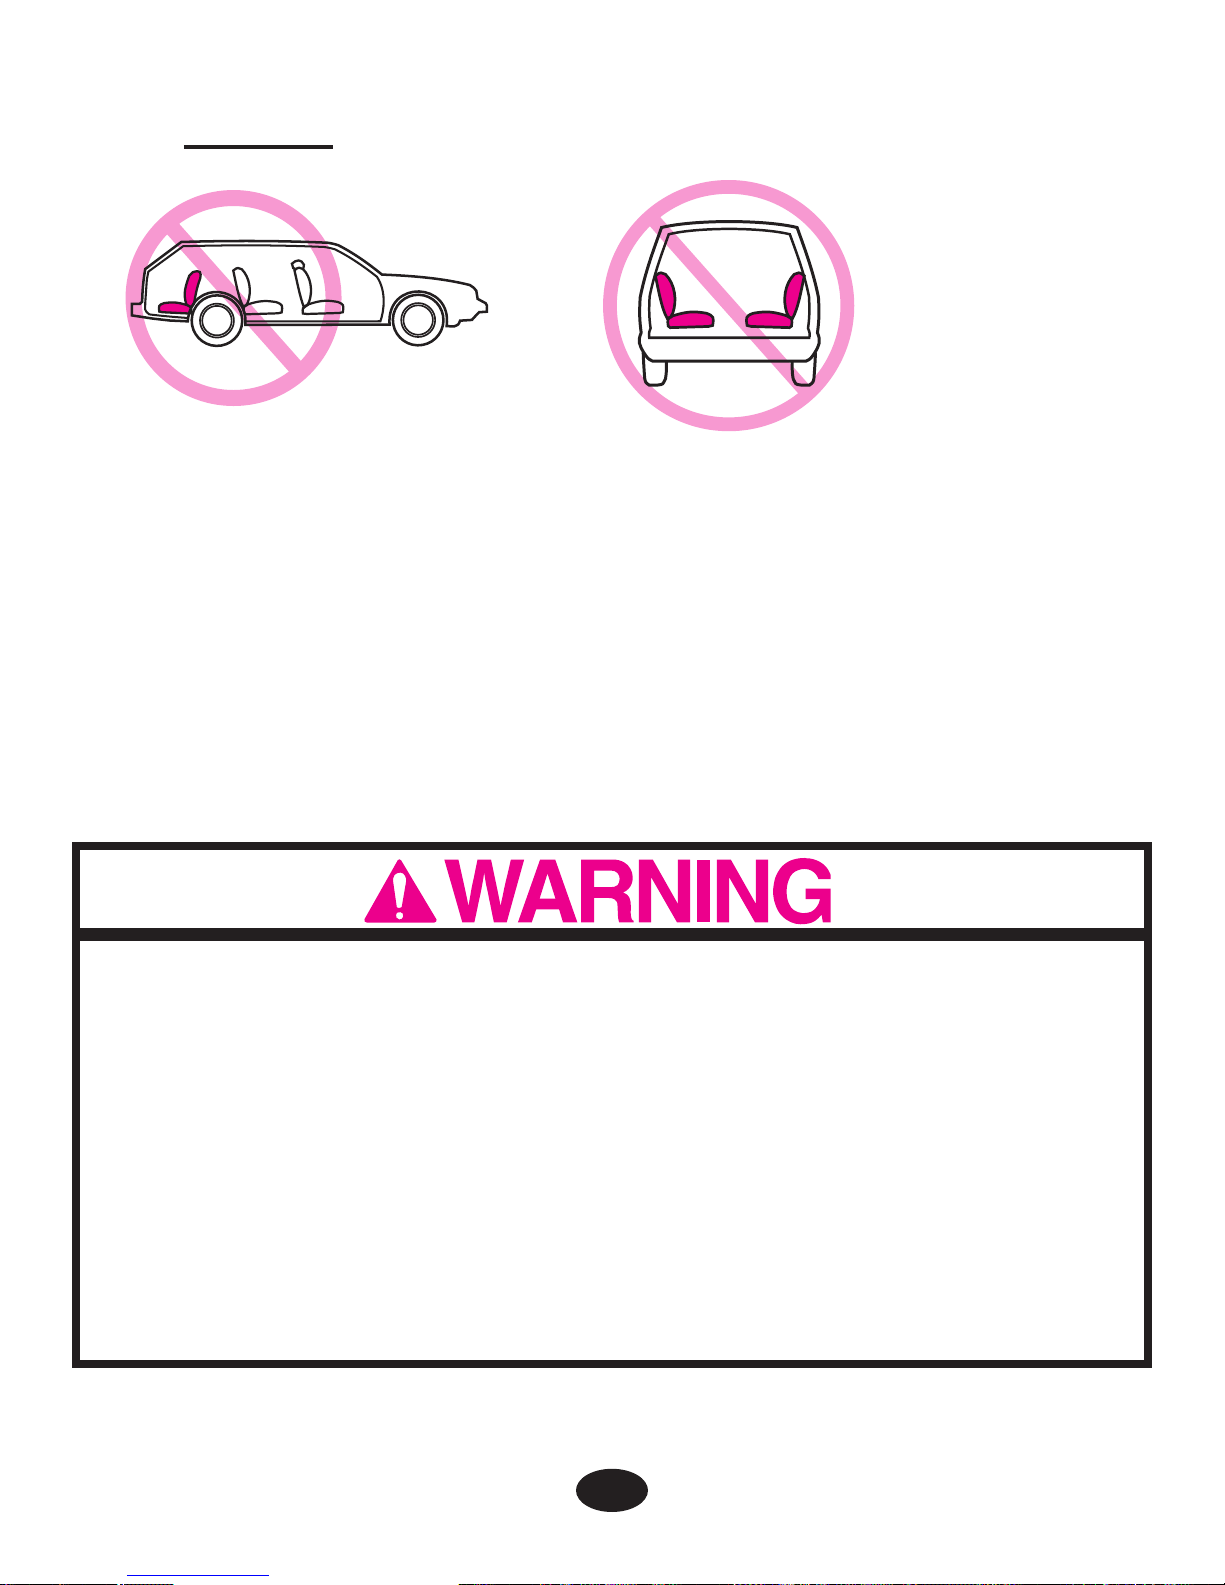
24
5.2 Vehicle Seat Belt Requirements
• The VEHICLE seat must face forward.
• DO NOT use infant restraint on vehicle seats with seat backs
that will not lock in an upright position. DO NOT use seats that
can fold down without having to release a lock or latch of some
kind. These seats can fly forward and strike the child in a sudden
stop or crash.
MANY SEAT BELT SYSTEMS ARE NOT SAFE TO USE WITH
THE INFANT RESTRAINT. THE VEHICLE SEAT BELT MUST BE
DESIGNED TO HOLD THE INFANT RESTRAINT TIGHTLY AT
ALL TIMES.
Pay careful attention to these systems; some of the seat belts that
are not safe to use look very much like seat belts that are safe to
use. If you are unsure,
consult your vehicle owner’s manual or Graco
at 1-800-345-4109.
Page 65
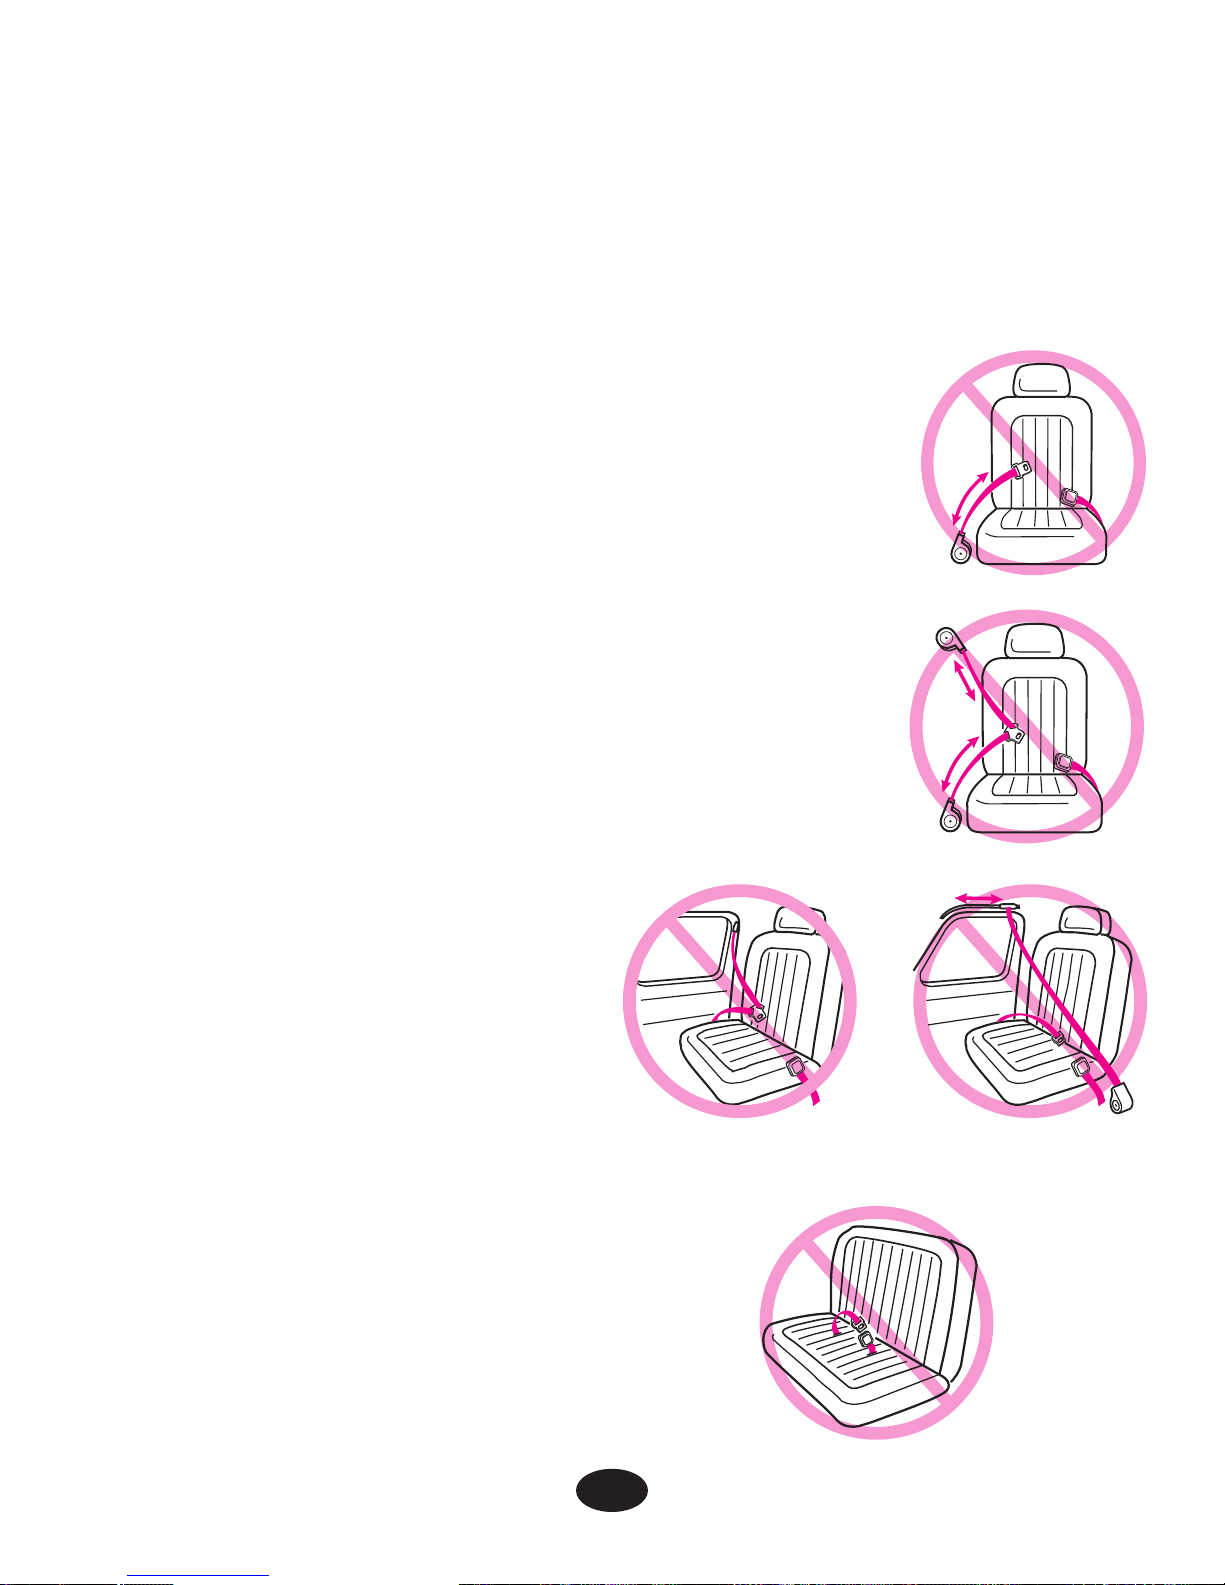
LATCH can be used IN PLACE OF the vehicle belt system. Please
refer to vehicle owners manual for LATCH locations.
• Lap Belts with Emergency Locking Retractor (ELR)
This lap belt stays loose and can move until it locks
in a crash or sudden stop.
• Combination Lap/Shoulder Belt with Retractor
Each strap has a retractor at one end and is
attached to the latch plate at the other end.
• Passive Restraint - Lap Belt with Motorized
Shoulder Belt
• Passive Restraint - Lap or
Shoulder Belt Mounted on Door
DO NOT use vehicle belts that
are attached to the door in any
way or that move along a track
to automatically surround the
passenger when the door is closed.
• Lap Belts Forward of Seat Crease
DO NOT use any of the following systems to secure the infant restraint.
5.2.1 UNSAFE Vehicle Belt Systems
25
Page 66
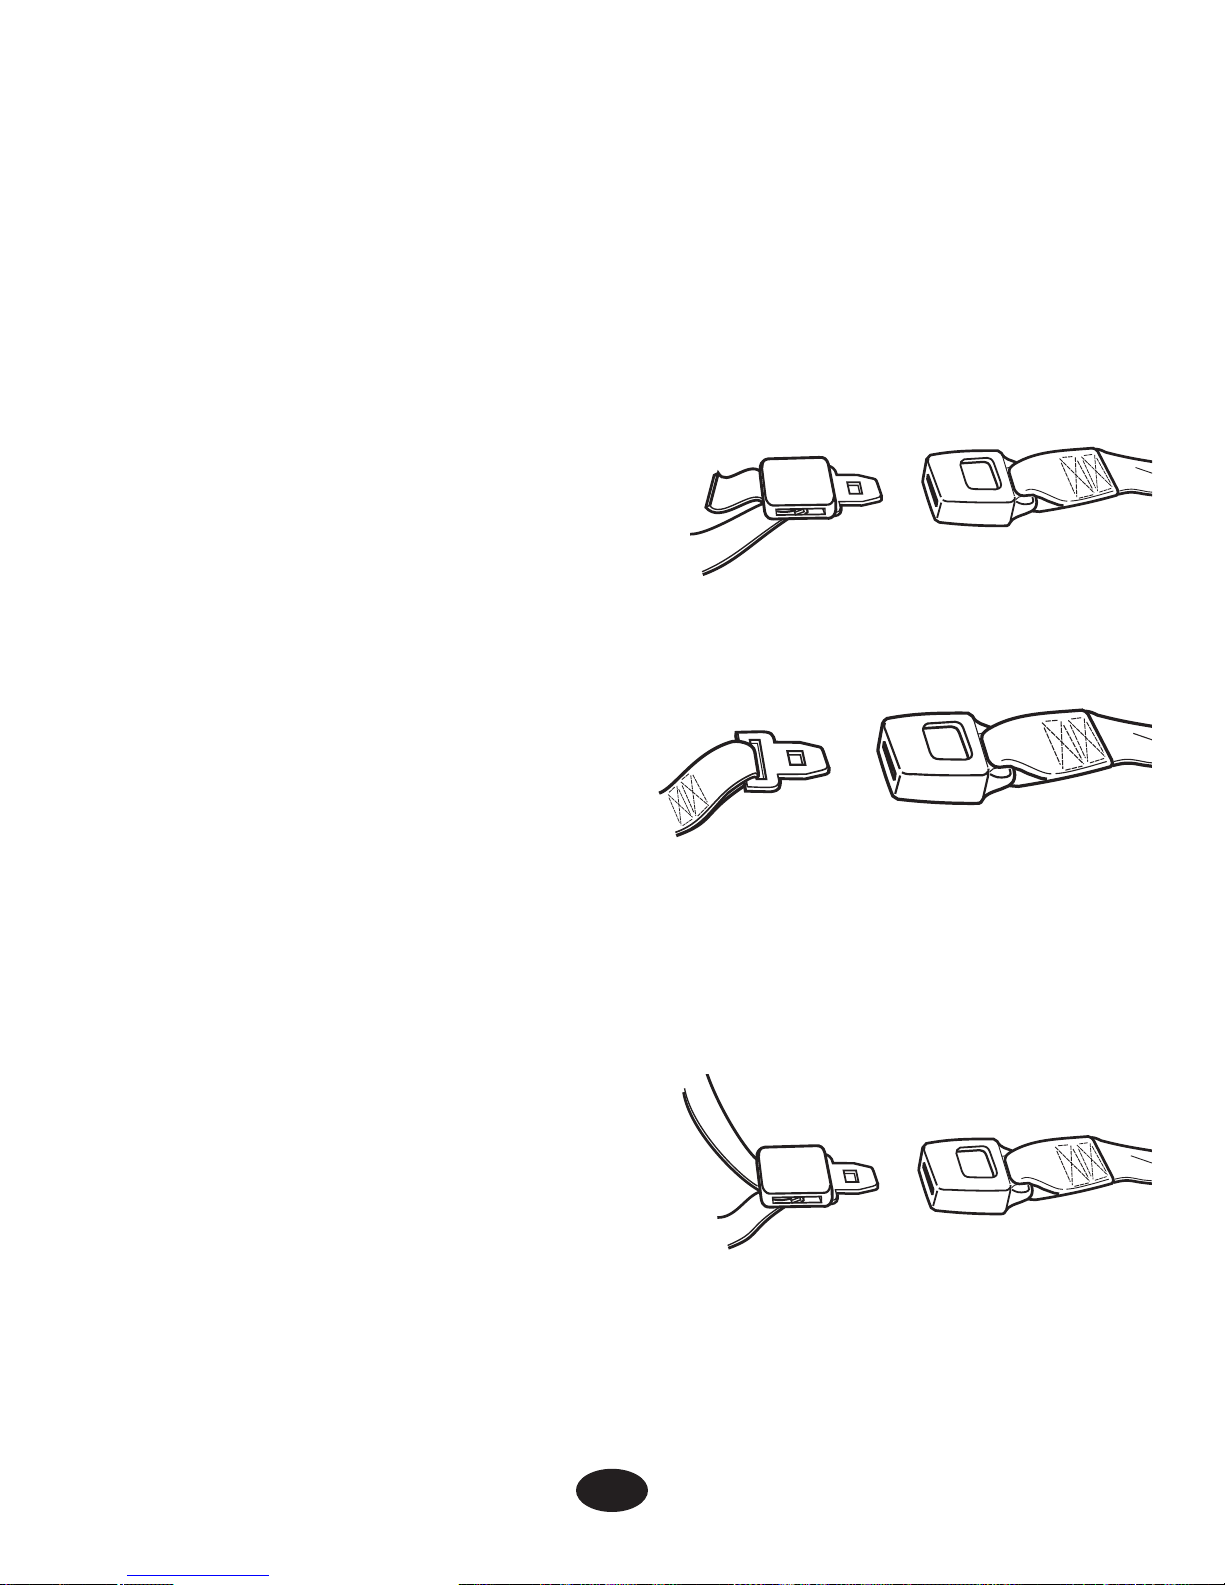
5.2.2 SAFE Vehicle Belt Systems
THE FOLLOWING BELT SYSTEMS CAN BE USED WITH YOUR
INFANT RESTRAINT, IF the seat location meets all other
requirements of these instructions and those in your vehicle owner's
manual. LATCH can be used in place of the vehicle belt system.
Please refer to vehicle owners manual for LATCH locations.
• Lap Belts - Manually Adjusted
When buckled, the belt is
tightened manually by pulling
on the excess belt while pushing
down hard on the infant restraint.
• Lap Belts with Automatic
Locking Retractor (ALR)
The automatic locking retractor
will not permit the lap belt to
lengthen once it is buckled. Tighten
the belt by feeding the belt back
into the retractor while pushing
down hard on the infant restraint.
• Combination Lap/Shoulder Belt
with Locking Latch Plate
Once it is buckled, this type of
belt has a latchplate that will not
allow the lap portion of the belt to
loosen. Belt is tightened by pulling
hard on the shoulder portion of the
vehicle belt while pushing down
hard on the infant restraint.
26
Page 67
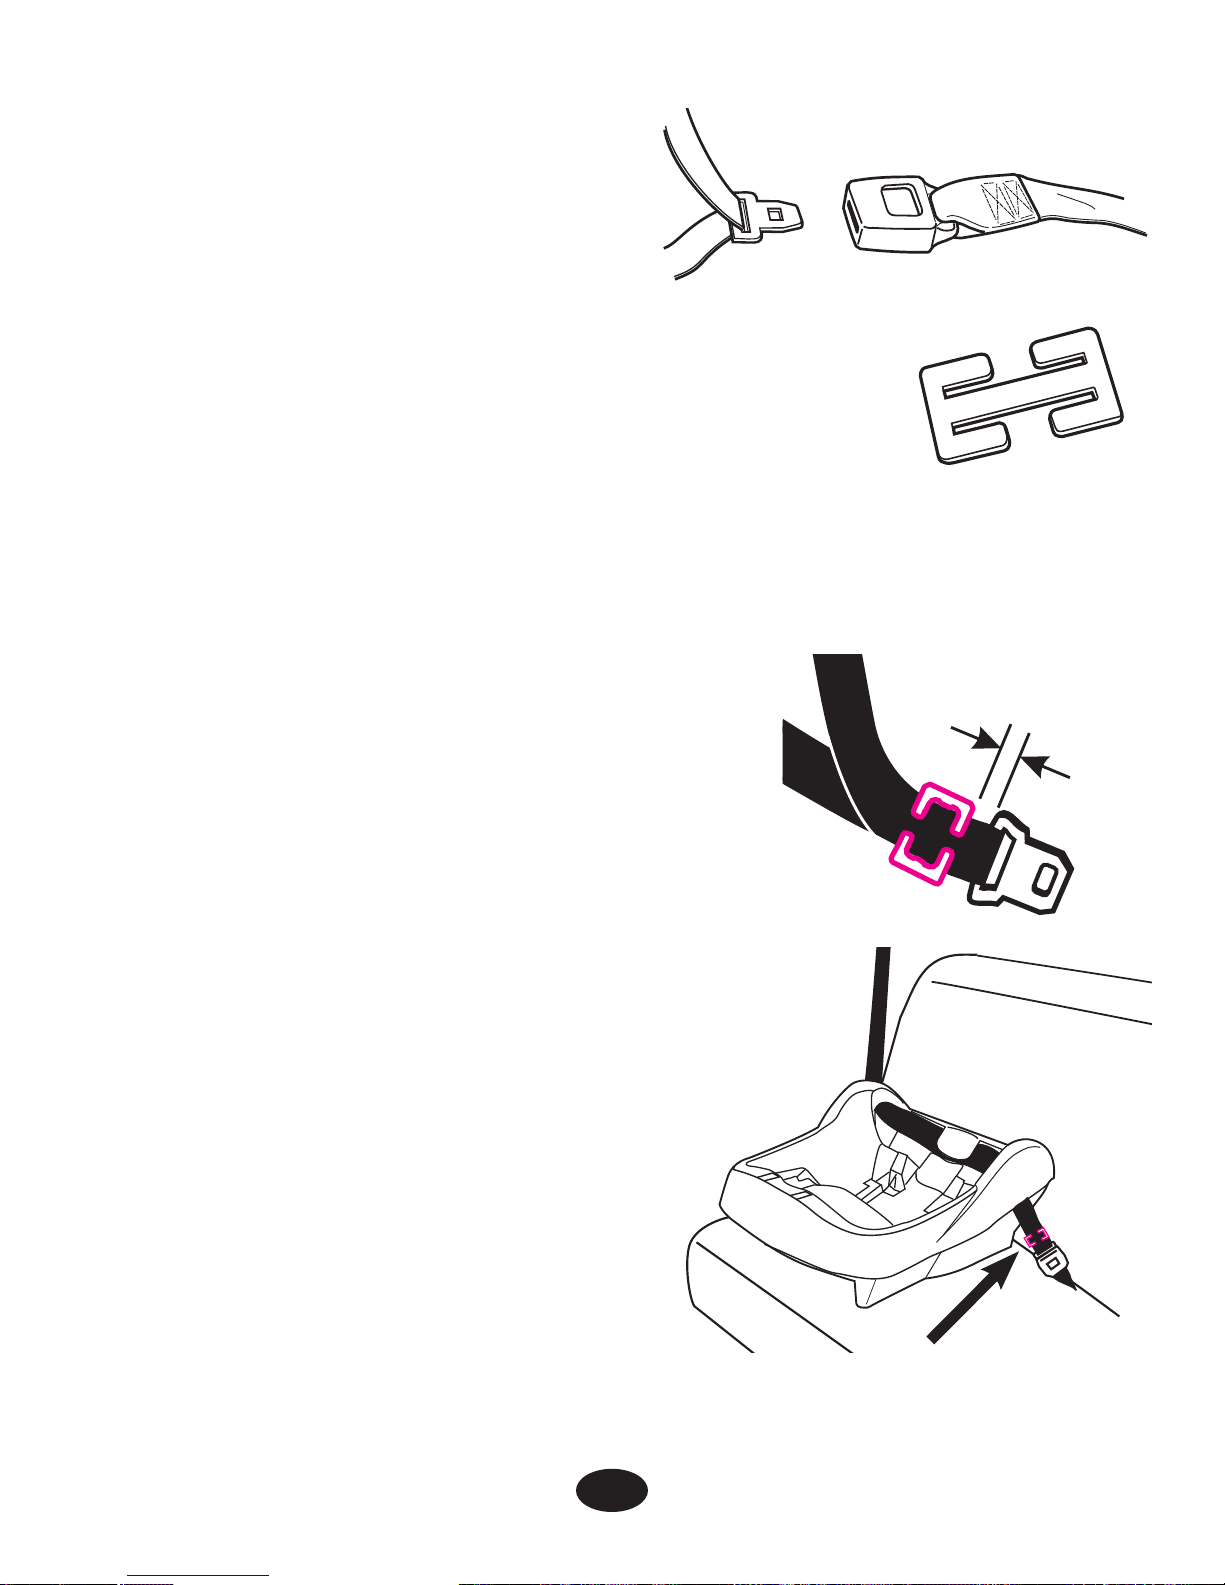
• Combination Lap/Shoulder
Belt with Sliding Latch Plate
This belt has a latchplate that
slides freely along the belt.
This belt MUST be converted to prevent
movement of the lap portion of the belt. You
must use the locking clip provided with the
infant restraint, unless your vehicle's seat belt
can be converted in another way as described
in your vehicle owner's manual.
To Install Locking Clip:
1. Tighten the buckled belt by pushing
down hard on the infant restraint and
pulling hard on the shoulder belt.
2. While pushing down on infant restraint,
pinch the two straps together behind
the buckle tongue. Unbuckle the
belt without allowing it to slip.
3. Connect lap and shoulder belts
with locking clip as shown
and .
4. Rebuckle belt. Check that lap
belt does not move by pulling
and pushing hard on infant
restraint. If belt loosens or
lengthens, repeat procedure.
Locking clip
½
inch
Locking clip goes here,
1
/2 inch from the buckle
27
Page 68
28
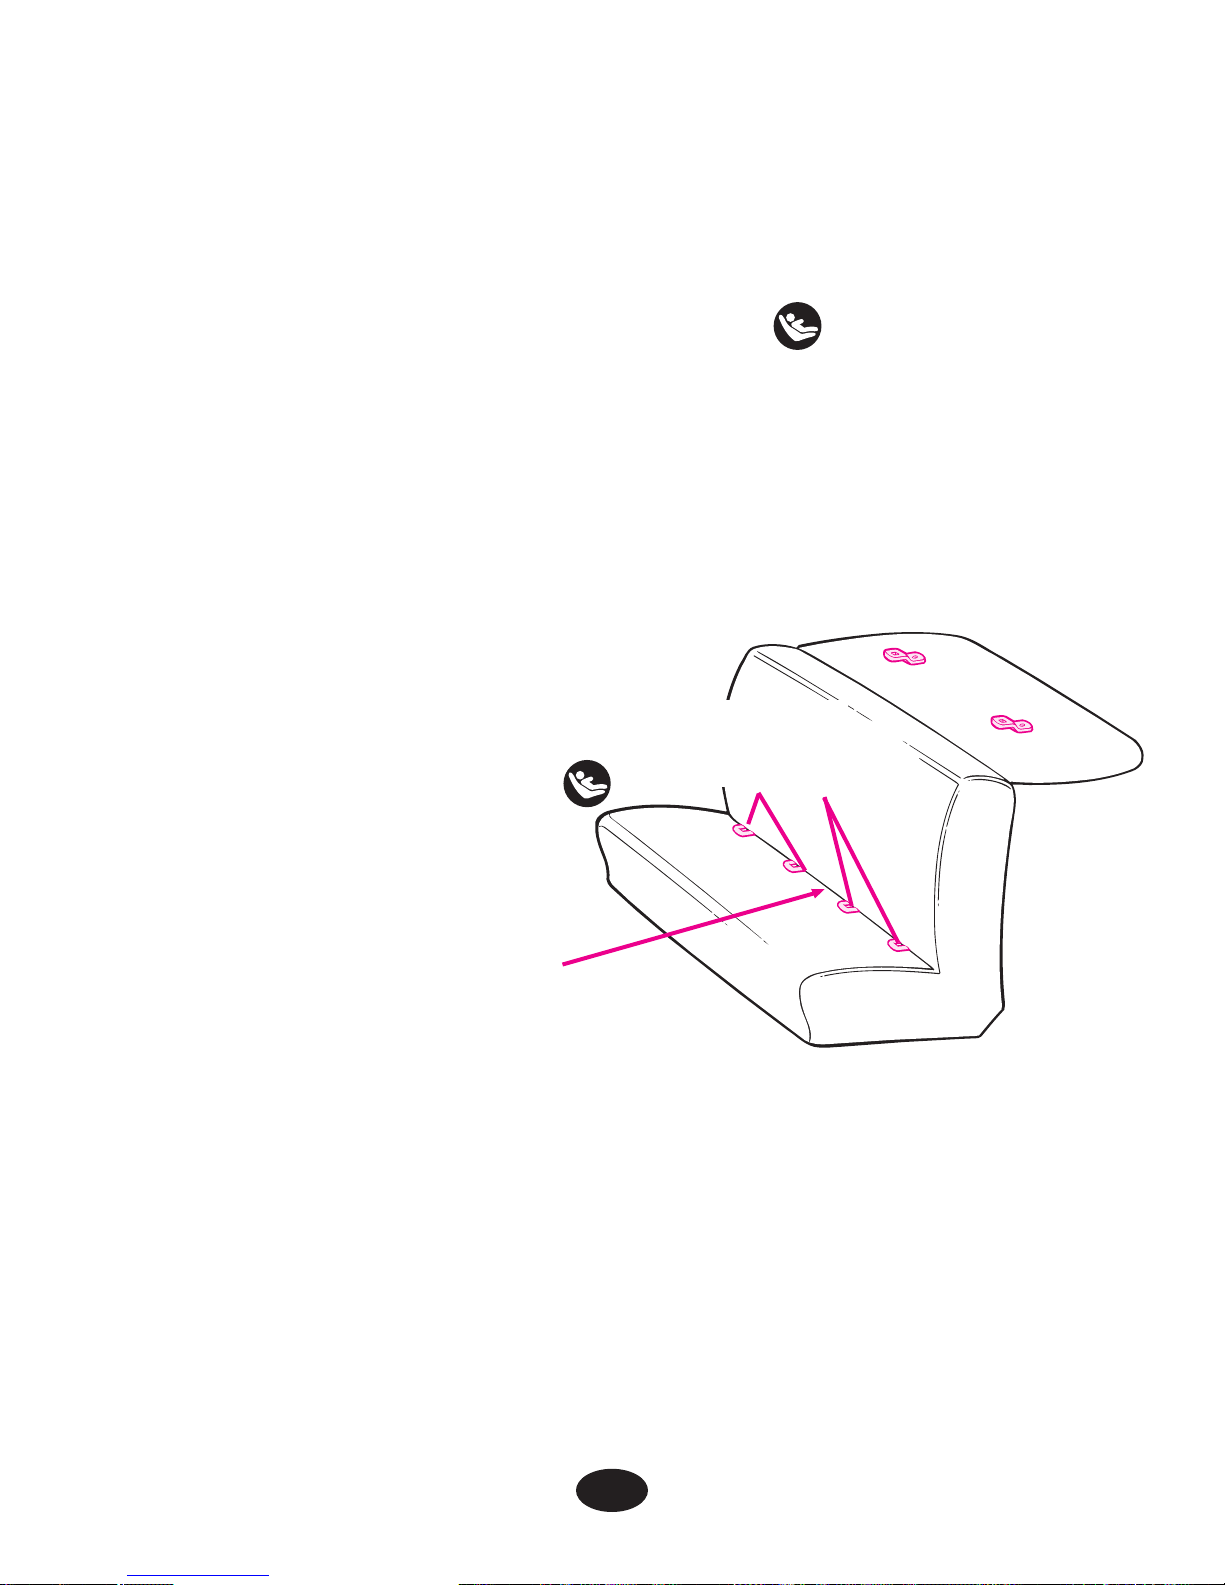
5.3 LATCH locations
Newer vehicles may have one or more seating positions with LATCH
anchorage systems. If vehicle is equipped with LATCH, the vehicle
lower anchor points may be visible at the vehicle seat crease. If not
visible, they may be marked with the symbol .
See your vehicle owner’s manual for exact locations, anchor
identification, and requirements for use with an infant restraint.
Vehicle Lower
Anchor Points
Vehicle
Seat Crease
Typical seat in a passenger vehicle.
Other vehicle types may have
different LATCH locations or
different markings.
LATCH is defined as anchorages 280mm (11.02 inches) on center.
As a manufacturer, we do not recommend using the LATCH system
in the center position if it exceeds this length.
Page 69
29
6.1 Positioning Harness Straps
FAILURE TO PROPERLY ADJUST THE HARNESS STRAPS
FOR YOUR CHILD INCREASES THE RISK OF SERIOUS
INJURY OR DEATH IN THE EVENT OF A SHARP TURN,
SUDDEN STOP OR CRASH.
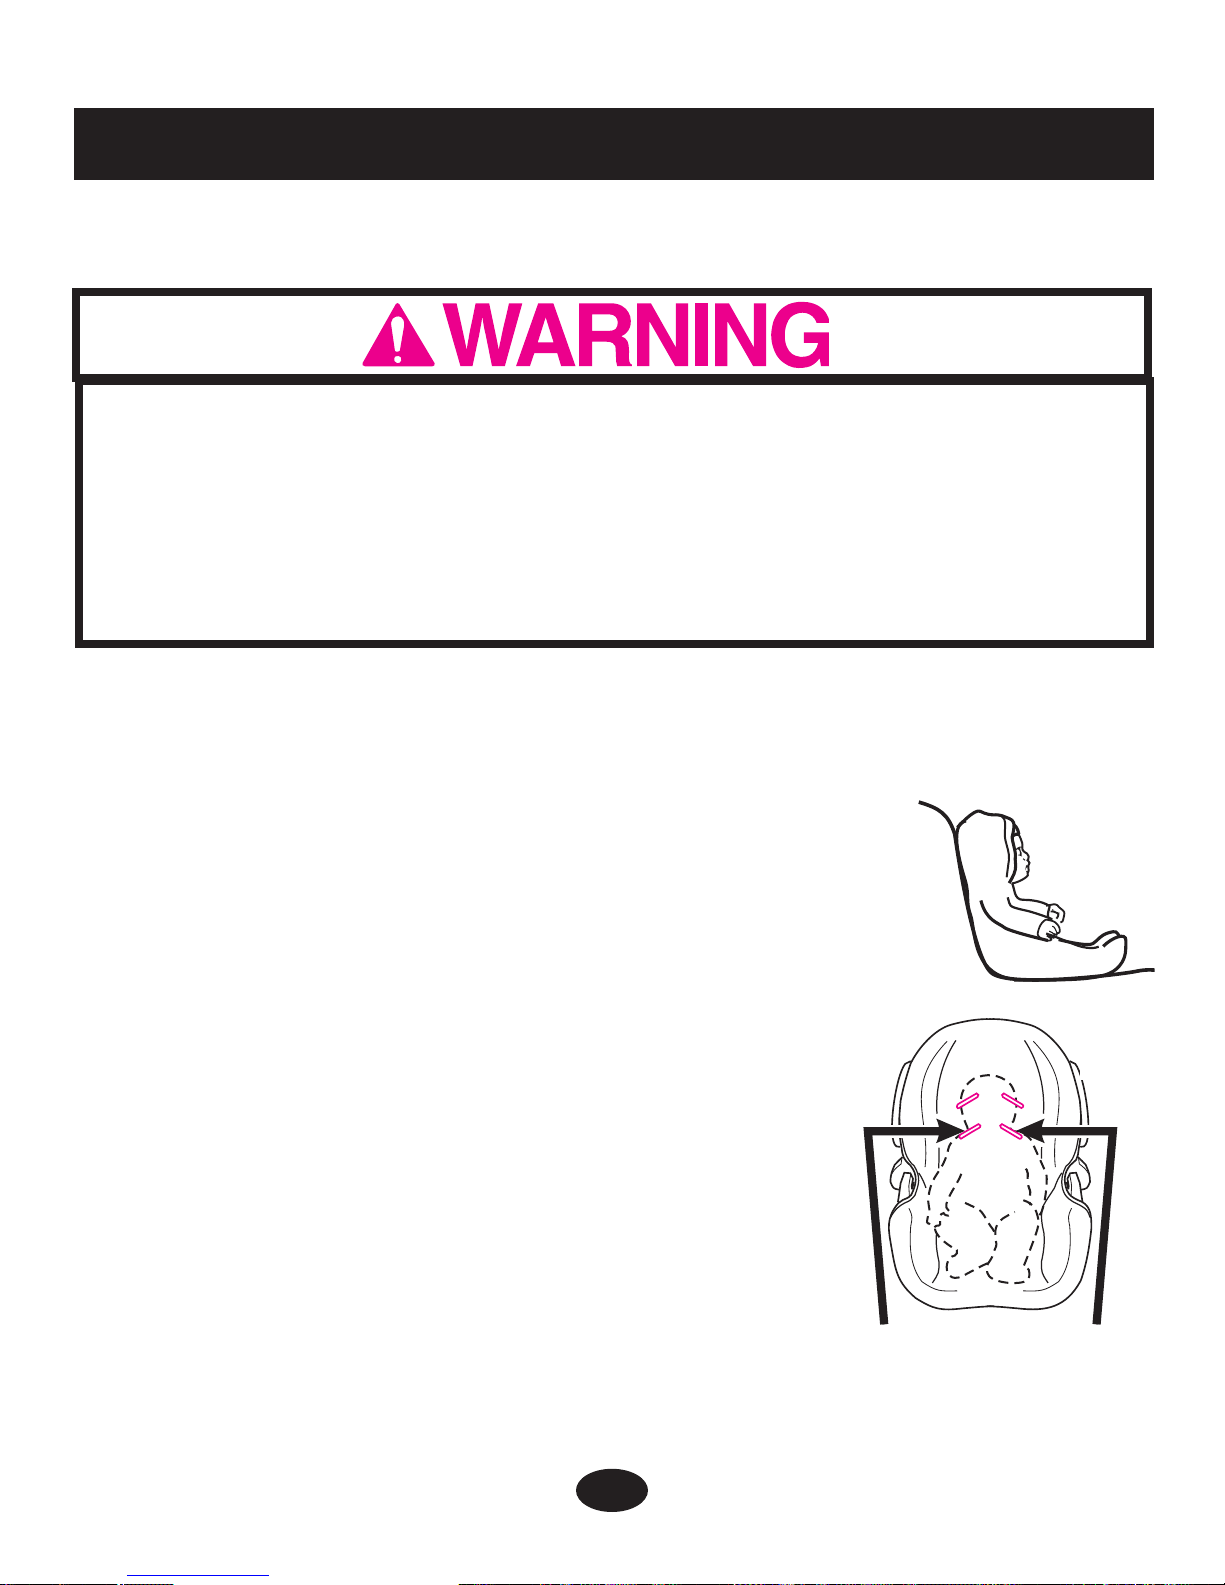
The harness straps must be properly
adjusted to fit your child according to the following instructions.
1. Remove infant restraint from base and rotate handle down to
sitting position. See “3.3 Removing and Attaching Base” and
“3.4 Adjusting Handle”, p. 13.
2. Place child in infant restraint as shown
.
3. Determine which pair of harness slots are even
with or just below your child’s shoulders
.
DO NOT use upper harness slots if they
are above your child’s shoulders. They
will not hold a small child securely in a
sudden stop or crash.
4. If the harness straps must be adjusted:
remove child from infant restraint and follow
directions for your type of harness system:
6.1.1 3-Point Harness - p. 30
6.1.2 5-Point Harness - p. 31
Use harness slots
even with or just below
child’s shoulders
6.0 Using Infant Restraint
Page 70
30
6.1.1 3-Point Harness
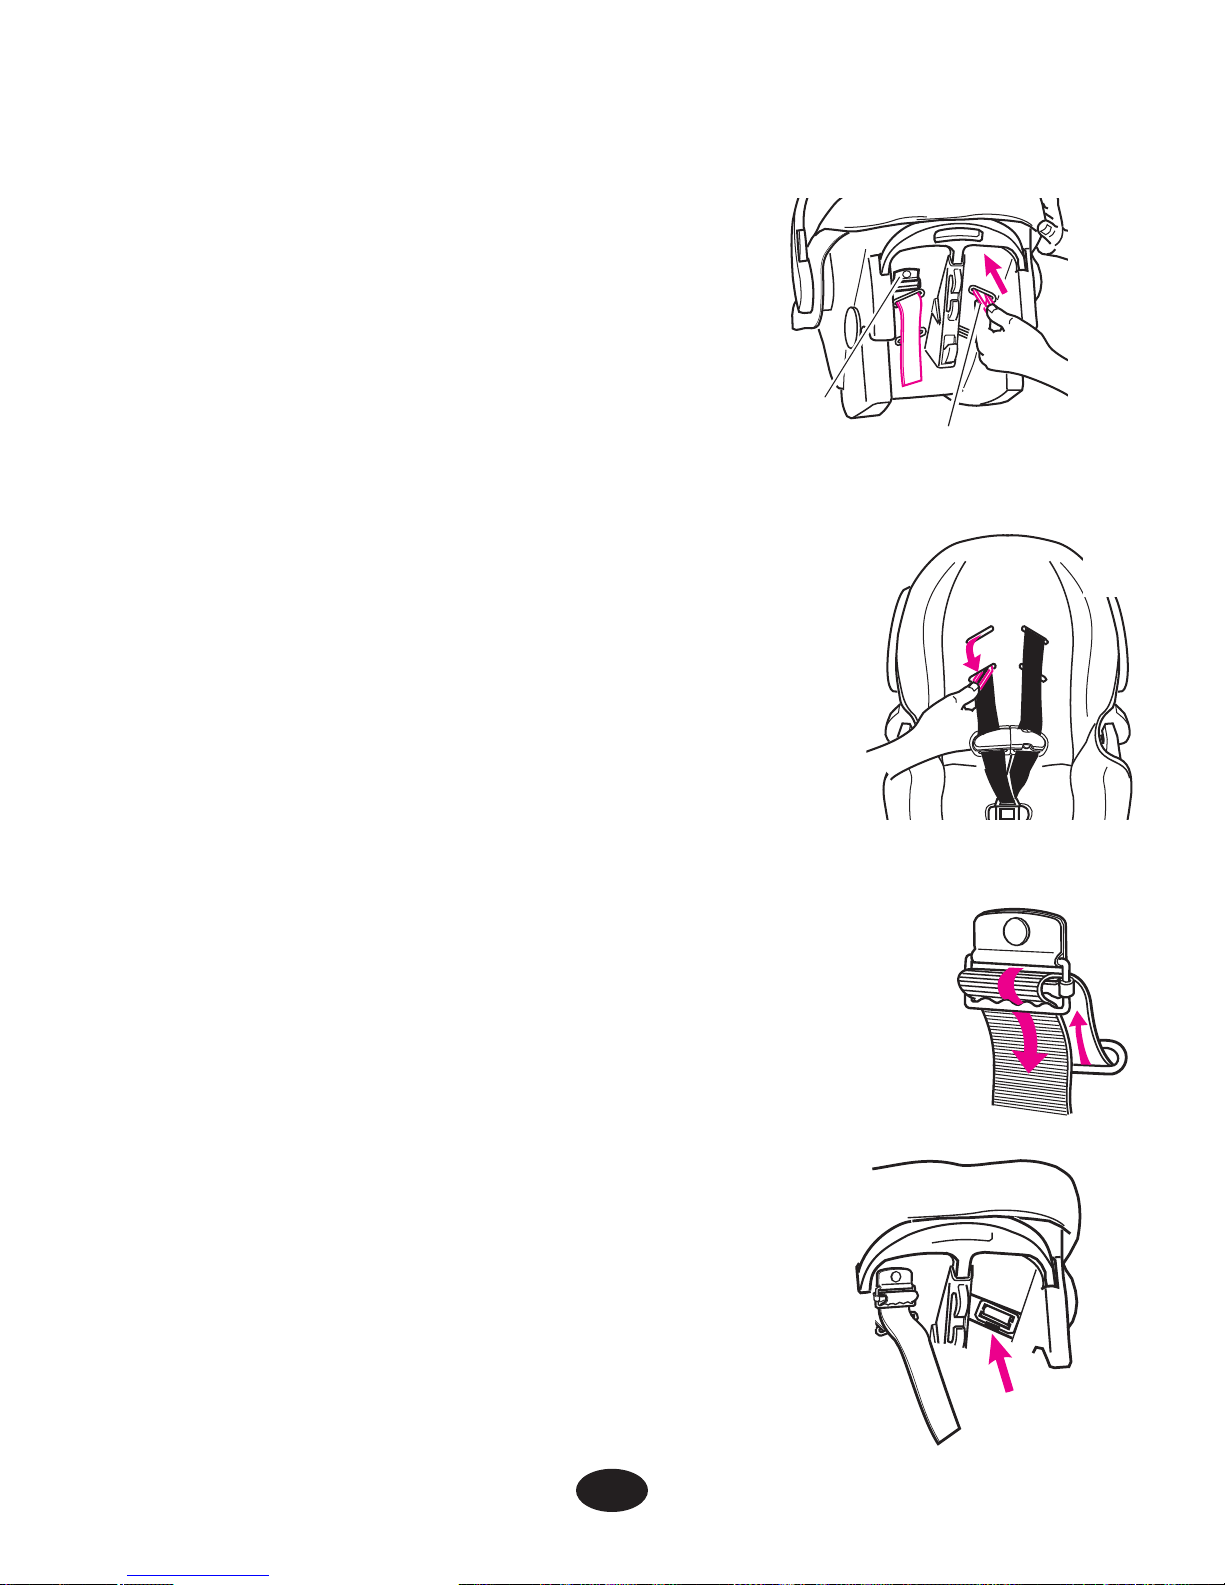
1. From back, push harness anchor
buckle back through harness slot.
If necessary, from front, use harness
strap to pull buckle from slot
.
2. Reinsert harness anchor buckle in the
appropriate slot
.
3. From back, remove harness strap from
harness tightener. If necessary, from front,
use harness strap to pull strap from slot.
4. Reinsert strap in the appropriate slot. Thread
strap through tightener exactly as shown
.
5. SAFETY CHECK:
a) CHECK that straps are not twisted;
b) CHECK that straps are secure: pull on
harness straps from front.
c) CHECK that harness anchor buckle is
snapped flat against back as shown
.
Harness
tightener
Harness anchor
buckle
Page 71
31
6.1.2 5-Point Harness
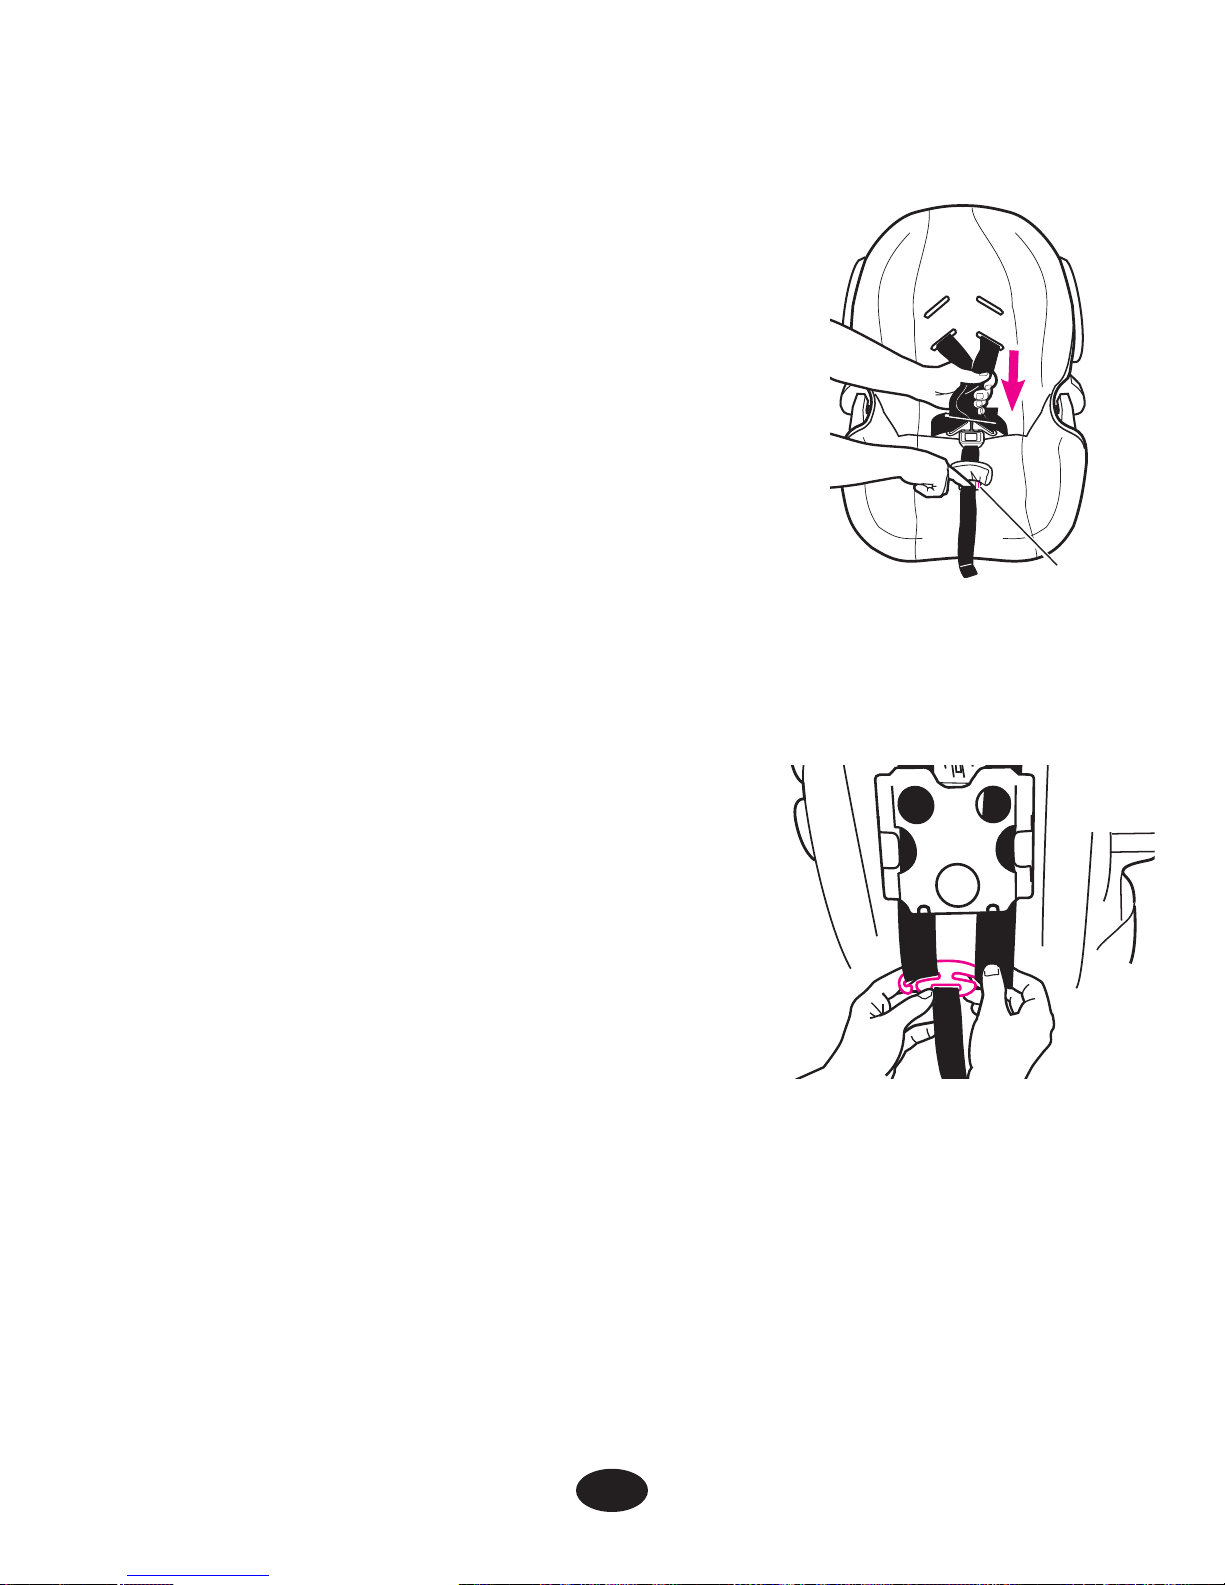
1. Depress the harness adjustment button
under the seat flap
. Pull the shoulder
straps out to loosen the harness.
2. Behind seat, remove the ends of the two
shoulder straps from the metal junction
plate
.
3. From front, pull straps through the
harness slots and then reinsert them
through the appropriate slots.
4. Behind seat, push both shoulder
straps UNDER owner’s manual pocket
and out the bottom.
5. Reassemble the strap ends onto the
metal junction plate
. Follow the
appropriate instructions for a smaller
or larger baby on the following page.
Harness adjustment button
6. SAFETY CHECK:
After the harness has been completely reinstalled,
a) CHECK that harness straps are not twisted in front or back.
b) CHECK that straps are secure by pulling on them.
Page 72
32
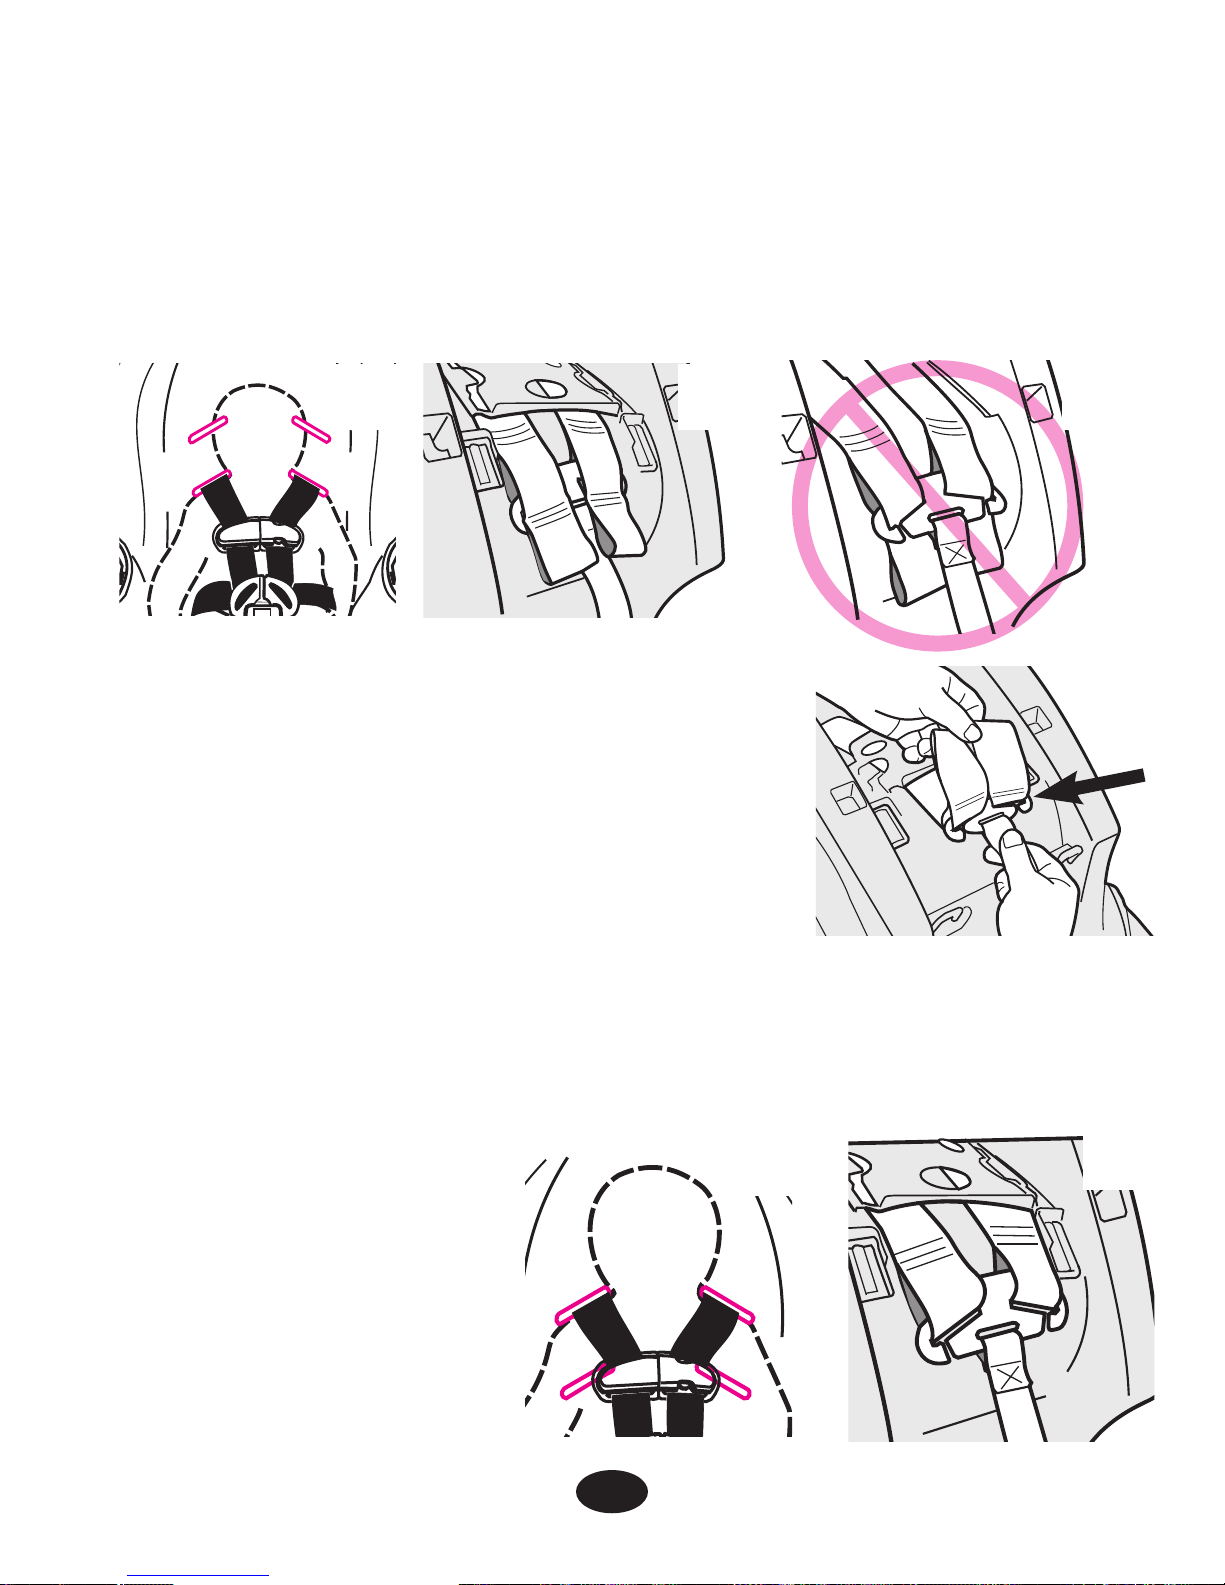
FOR SMALLER BABY:
Use the lower harness slots
(if they are even with or just
below your child’s shoulders) and the upper strap loops
. The
ends of the straps must hang in front of the metal plate as shown
in
, not as shown in .
CHECK that the loops are completely
within junction plate slots
.
CHECK that straps are secure by pulling
on them.
FOR LARGER BABY:
Use upper harness slots and the end strap loops
.
CHECK that the loops are completely within junction plate slots
.
CHECK that straps
are secure by pulling
on them.
Page 73
6.2 Securing Child in Infant Restraint
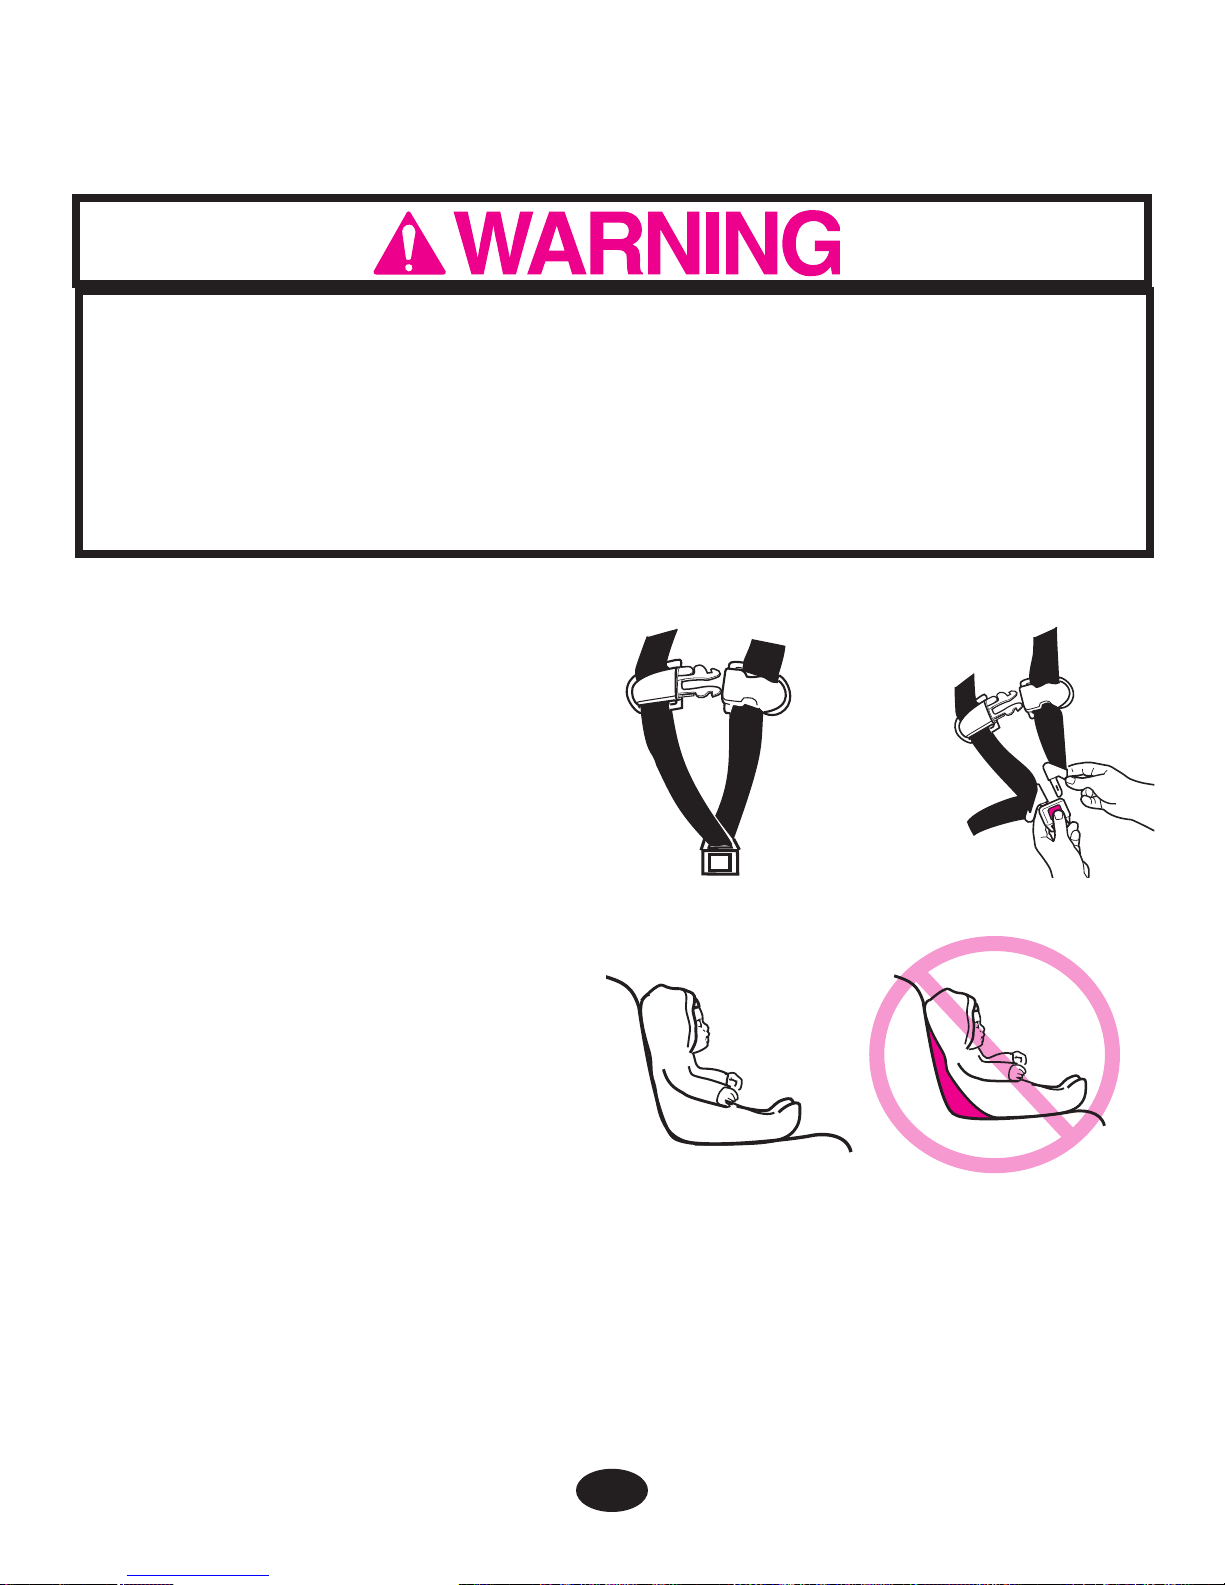
Failure to properly secure your child in the infant restraint/carrier
increases the risk of serious injury or death from suffocation or
falls, or in the event of a sudden stop or crash. Even when used
only as a carrier, make sure the harness straps are properly
secured.
1. Move infant restraint handle to sitting position (see page 13).
2. Open harness clip by
squeezing both sides and
unbuckle as shown
.
3. Place your child in the infant
restraint as shown in
, not .
Pull the harness straps
down over your child.
4. Follow directions for your
harness:
6.2.1 3-Point Harness: p. 34
6.2.2 5-Point Harness: p. 35
OR
33
Page 74
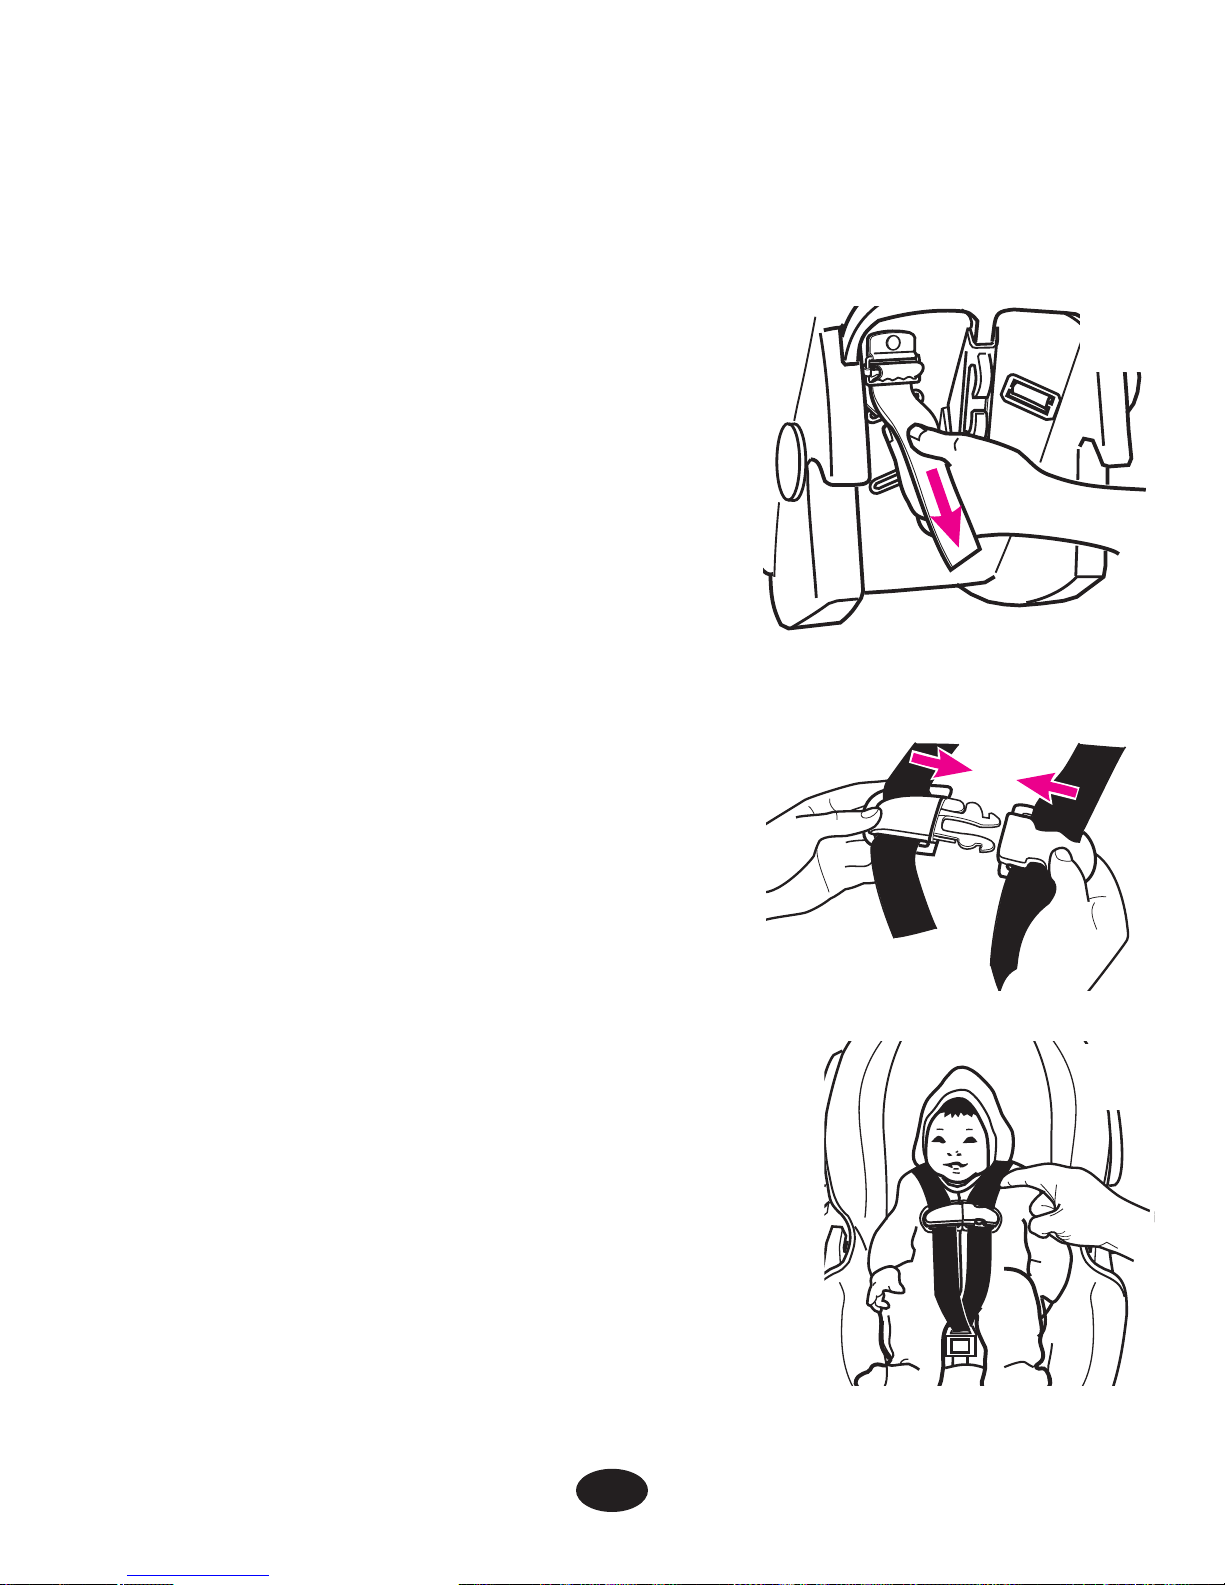
5. Buckle harness to the latch between child’s legs. Make sure that
you hear a “click.”
DO NOT use the infant restraint if
the harness does not latch in place.
Call Graco at 1-800-345-4109.
6. From the back, pull strap through
harness tightener to tighten the straps
as shown
. CHECK that both straps
are flat and tight on child’s shoulders.
7. Snap harness clip pieces together
.
Position harness clip in middle of chest,
level with armpits and away from the
neck
.
8. SAFETY CHECK:
a) CHECK that harness straps are not
twisted.
b) CHECK that the harness is snug. A
snug strap should not allow any slack. It
lies in a relatively straight line without
sagging. It does not press on the child’s
flesh or push the child’s body into an
unnatural position
.
6.2.1 3-Point Harness
34
Page 75
6.2.2 5-Point Harness
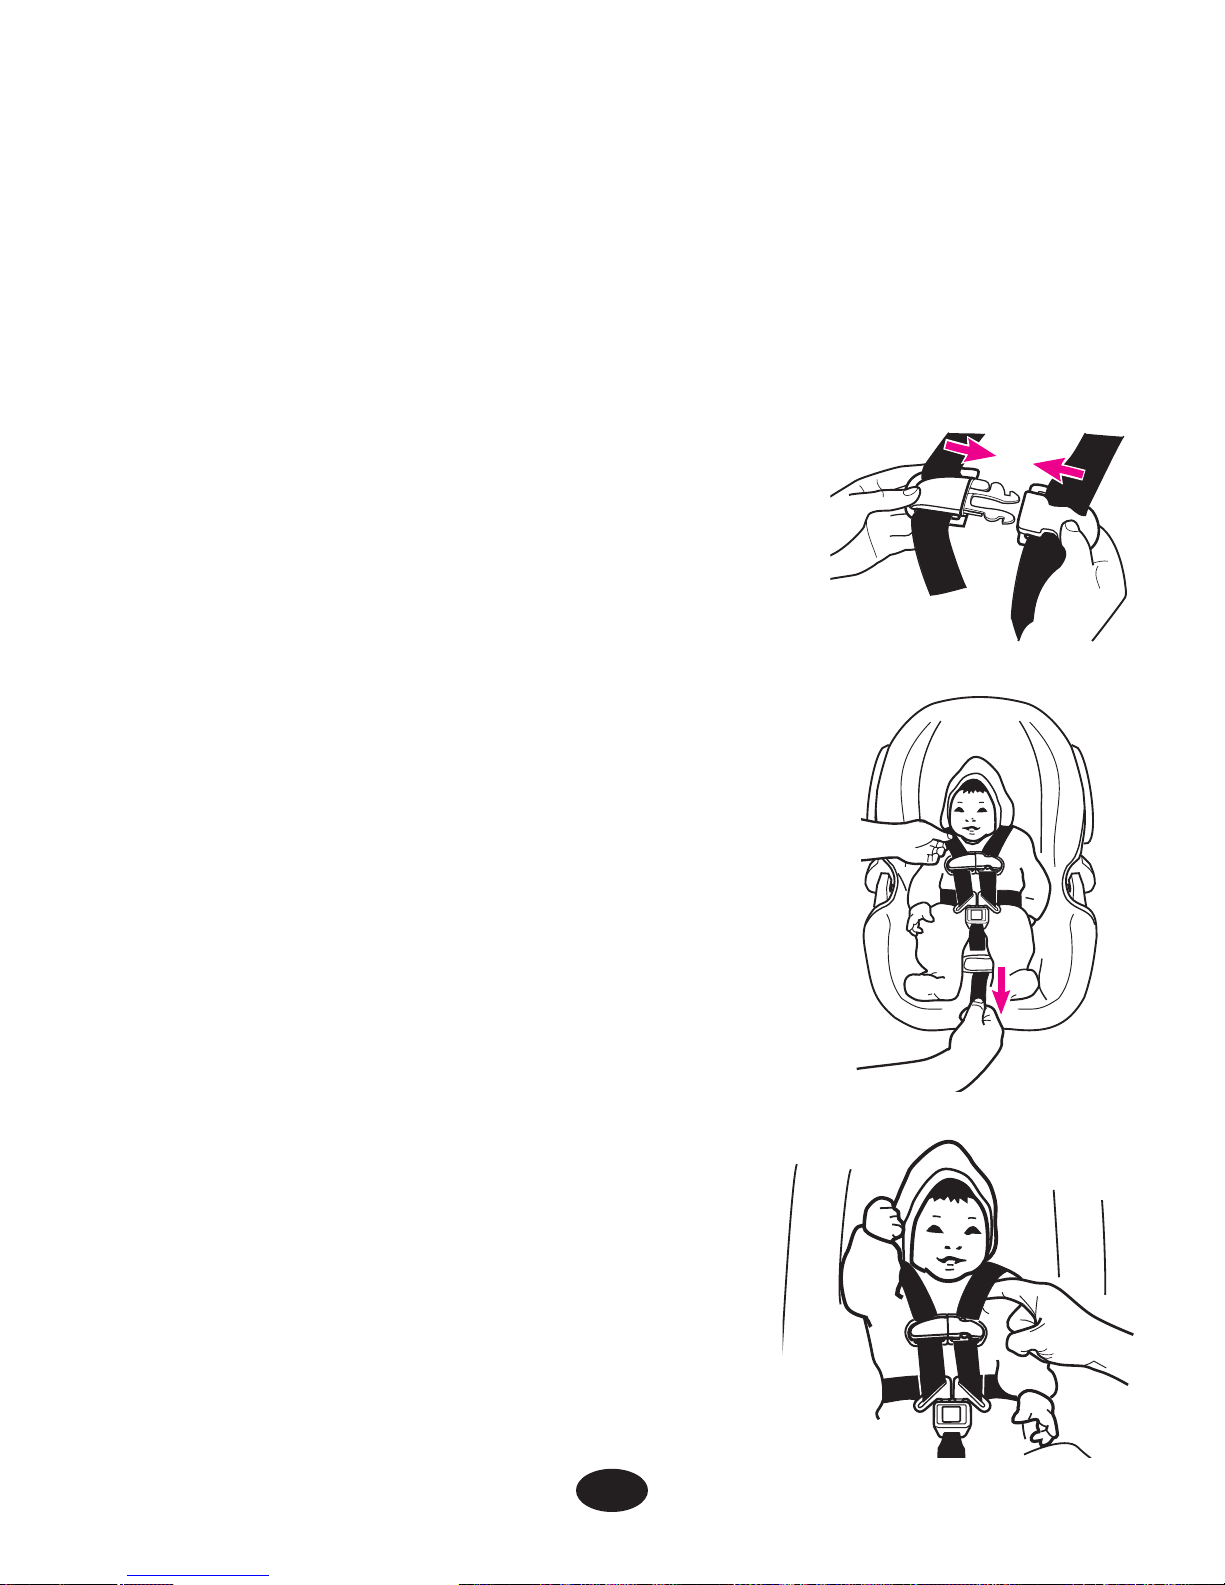
5. Insert the two buckle tongues into the harness buckle on the
crotch strap. Make sure that you hear each tongue click into
the buckle.
DO NOT use the infant restraint if the
harness does not latch in place. Call
Graco at 1-800-345-4109.
6. Snap harness clip pieces together
.
7. Pull on harness adjustment strap to tighten
straps as shown
. CHECK that both
straps are flat and tight on shoulders.
8. Position harness clip in middle of chest,
level with armpits and away from the
neck
.
9. SAFETY CHECK:
a) CHECK that harness straps are
not twisted.
b) CHECK that the harness is snug. A
snug strap should not allow any slack. It
lies in a relatively straight line without
sagging. It does not press on the child’s
flesh or push the child’s body into an
unnatural position
.
35
Page 76
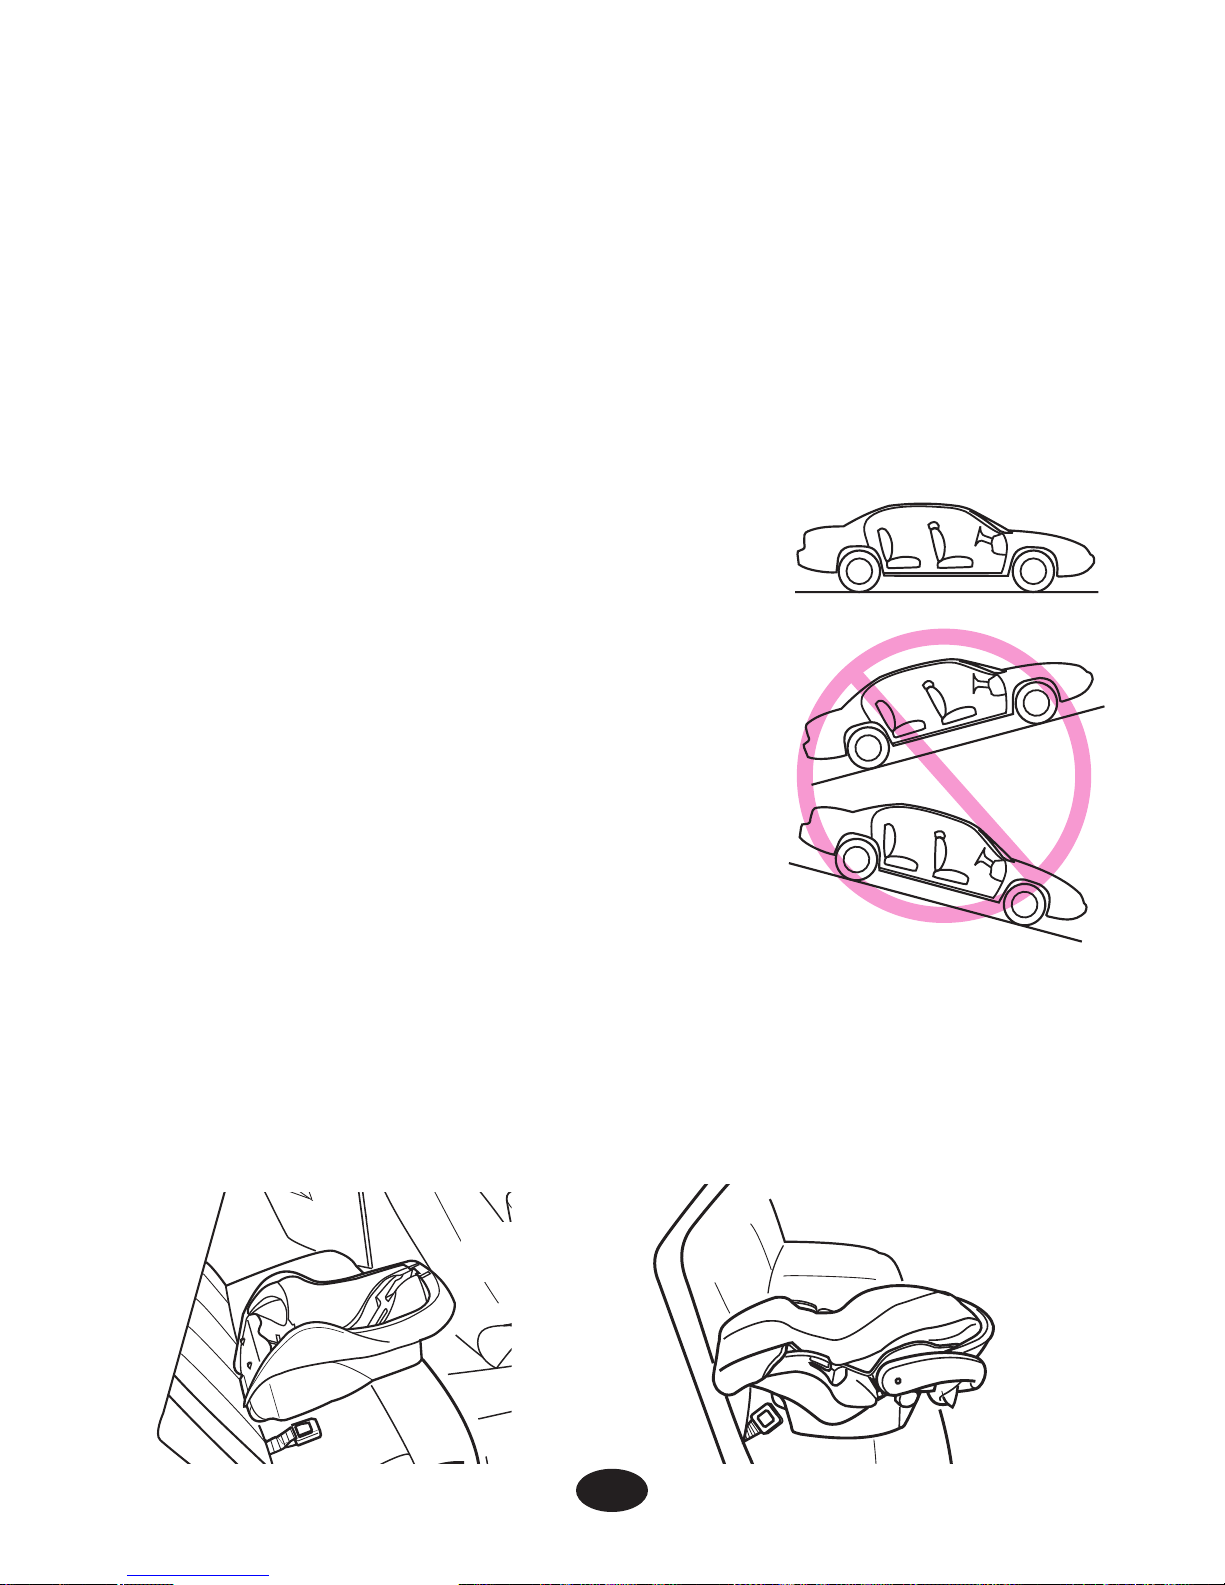
6.3 Installing the Infant Restraint/Base
Using Vehicle Belt
You must carefully follow the instructions provided by your vehicle
manufacturer, in addition to the information in this manual. Be sure
you have read and understood section 5, “Infant Restraint Location”
on p.23-28.
Make sure vehicle is on level ground so
that the level indicator, which is attached to
the infant restraint, can be used to properly
recline the infant restraint .
If a front passenger seat is used, slide the
vehicle seat rearward as far as possible
from the dashboard. If a rear seat is used,
make sure the seat in front of it is moved
forward enough and is upright enough to
allow room for the infant restraint.
1. Remove infant restraint from base, regardless of whether or not
you plan on using the base.
2. Place the base
or infant restraint without base
in a
rear-facing position in a forward-facing vehicle seat.
36
Page 77
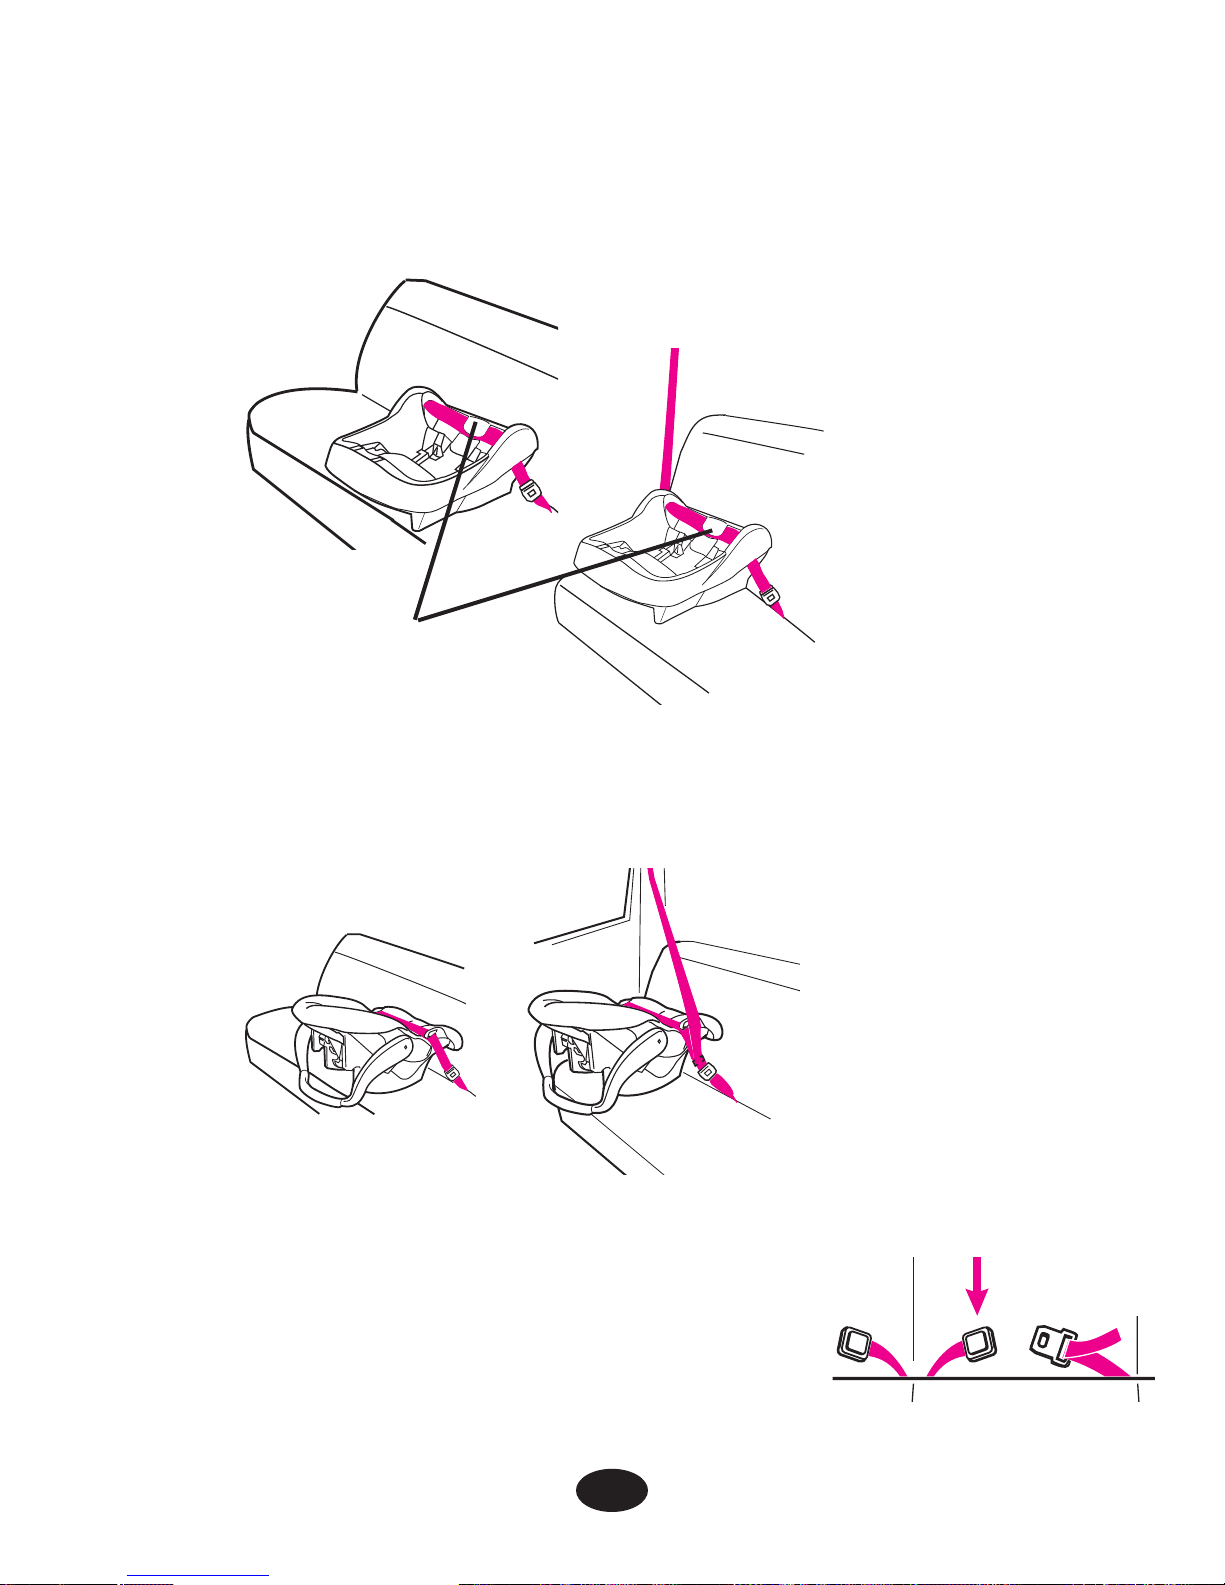
3. Thread the seat belt:
4. Buckle the seat belt. Make sure the buckle tongue goes into the
correct buckle
. The seat belt should not
be twisted or turned.
Infant restraint with seat belt
Base with seat belt
Belt MUST go
under tongue
37
Page 78
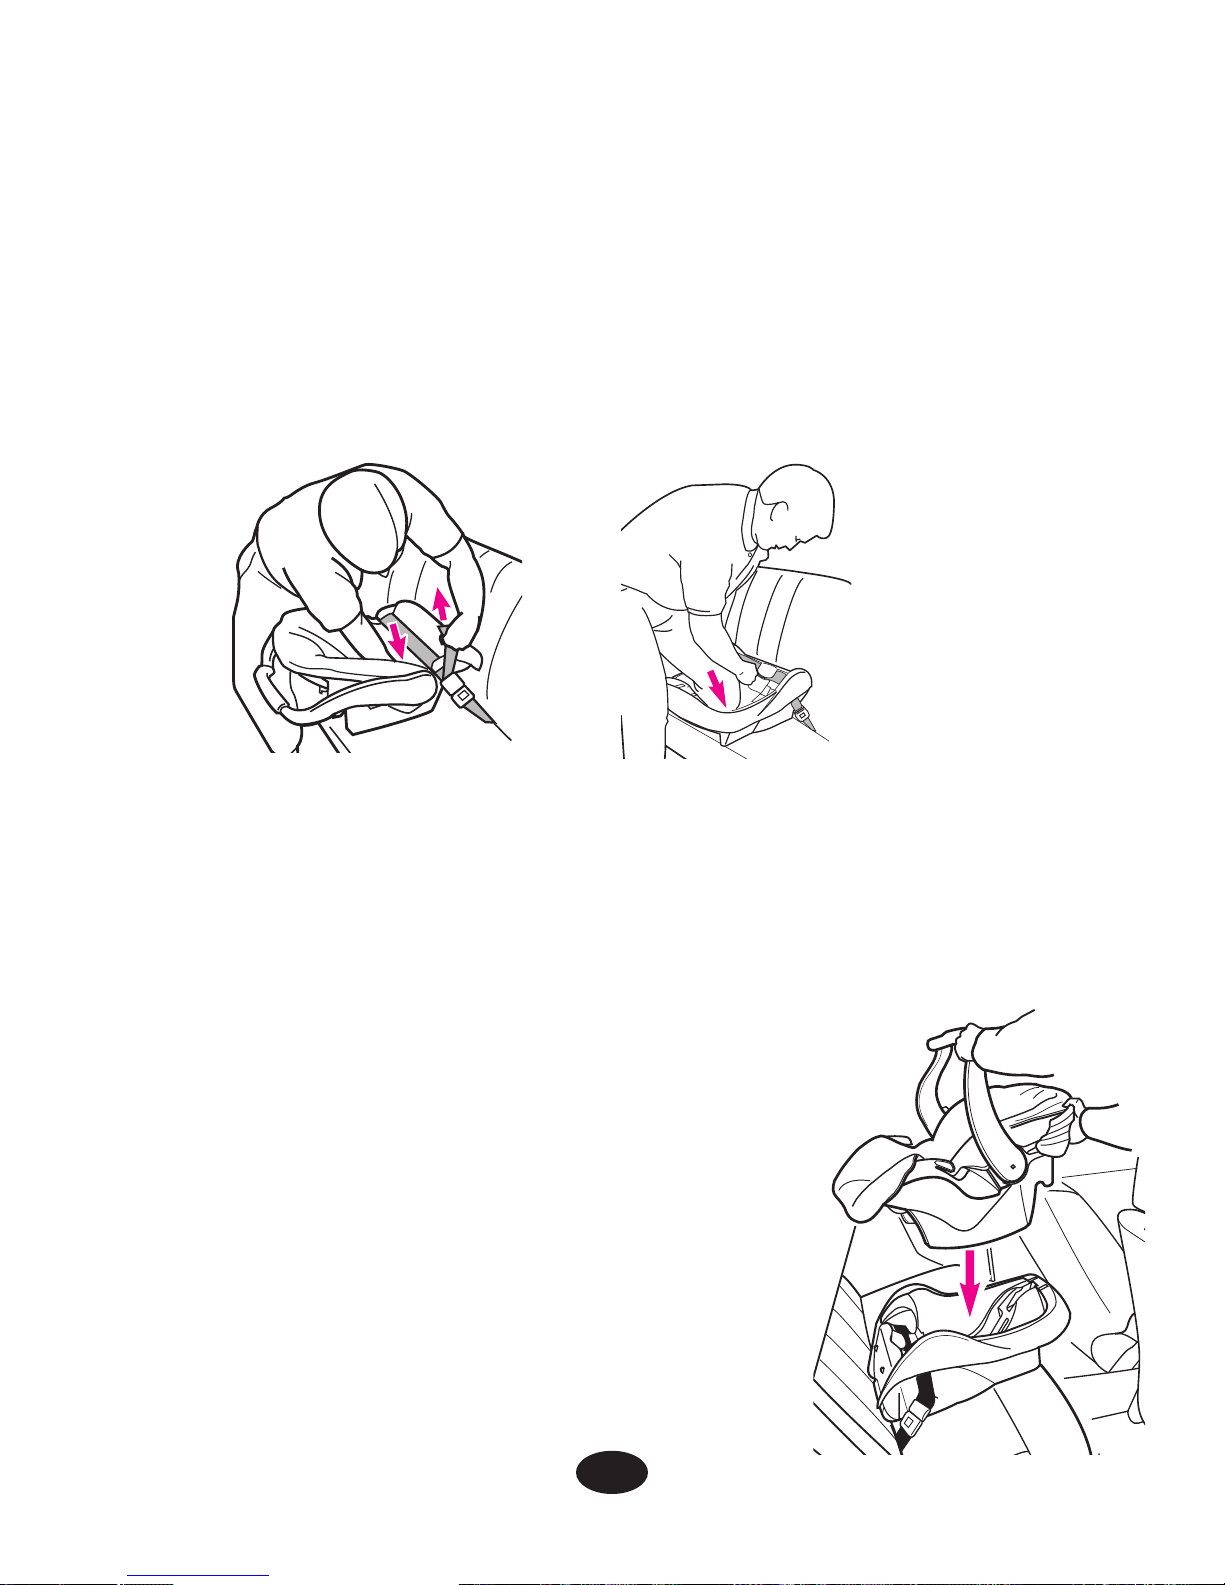
5. Tighten the vehicle seat belt. Refer to your vehicle owners
manual and the instructions in “5.2.2 SAFE Vehicle Belt
Systems”, p. 26-27, on tightening your vehicle belt.
To create a very tight installation, push down hard with your knee
or free hand in the middle of the infant restraint or base
and pull and tighten the vehicle belt.
6. Push the infant restraint down into the base and make sure that
you hear a “click”
. Pull up on the infant restraint to be sure
it is latched securely into the base.
If the infant restraint does not securely
latch into the base, the infant restraint
provides NO protection for your child.
DO NOT use the infant restraint/base
if the infant restraint does not securely
latch into the base.
38
Page 79
39
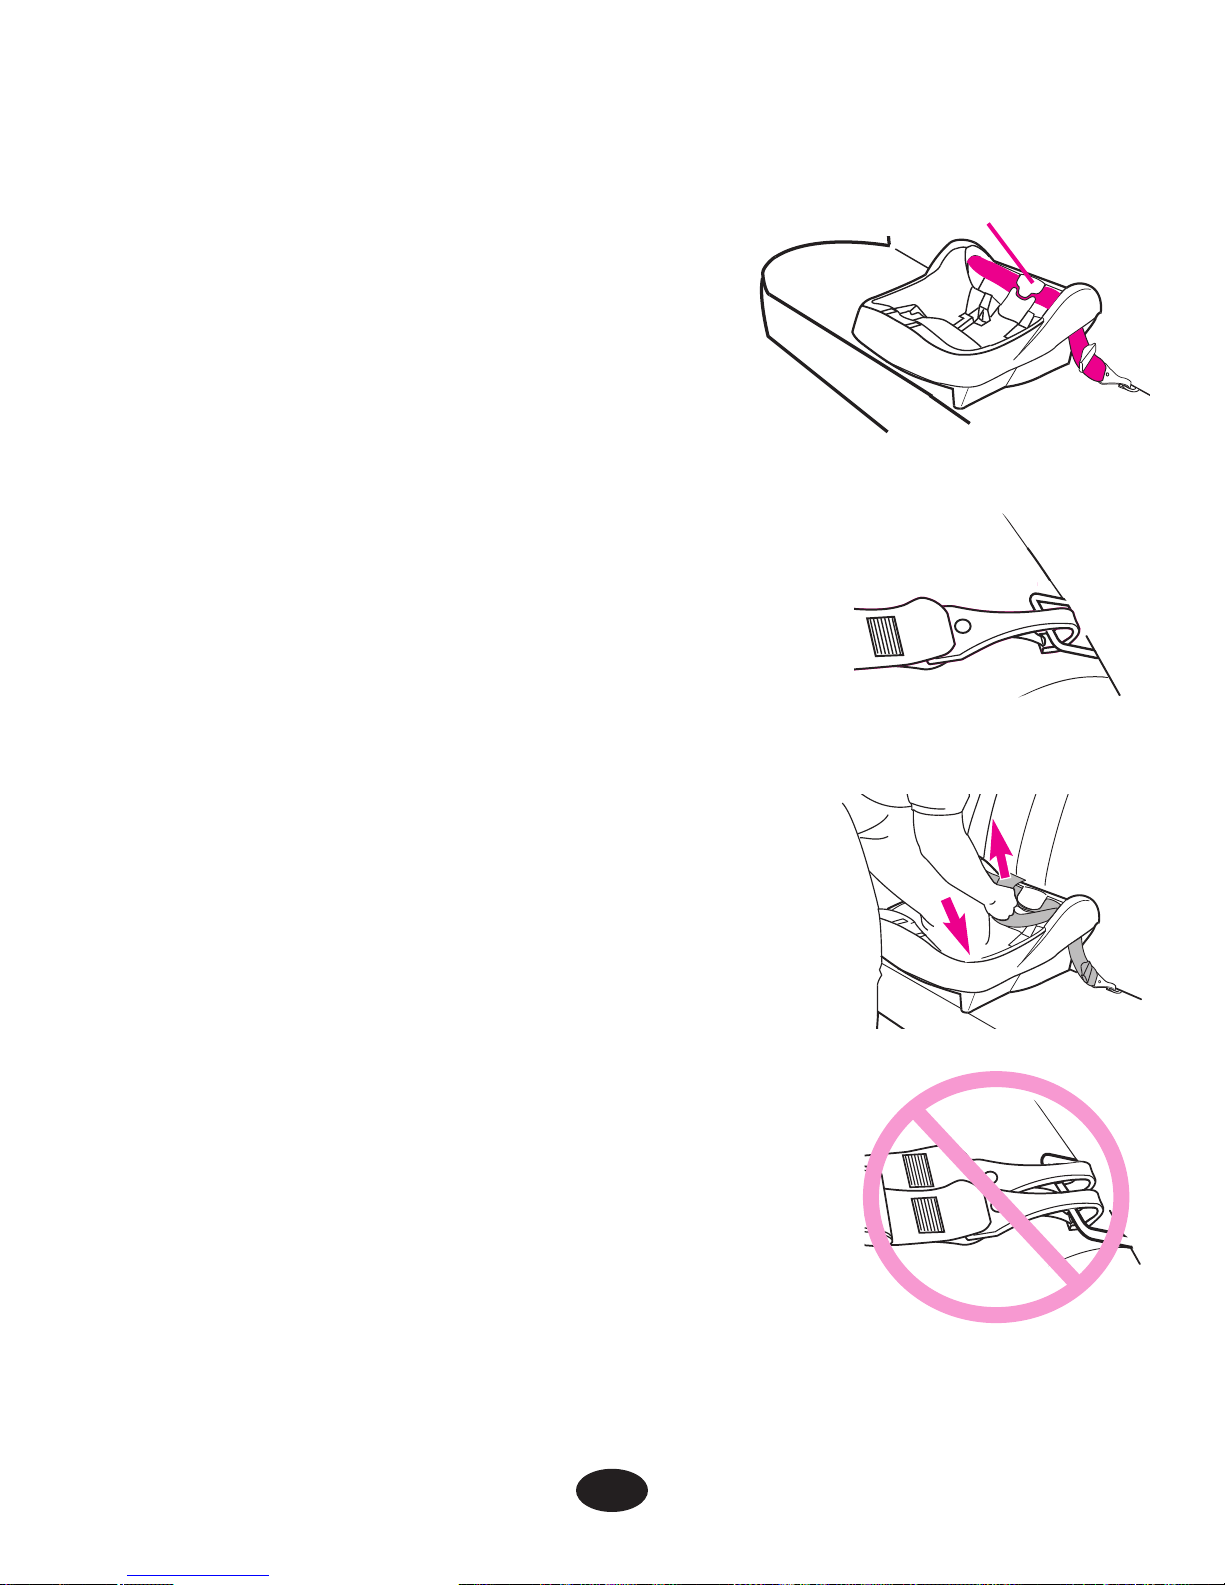
1. For ease of installation, extend LATCH
to its maximum length.
2. Position base in vehicle seat as
shown.
3. Thread LATCH through base belt
path normally used for vehicle
seat belt. Make sure that LATCH is
UNDER tongue on base
.
Belt must lay flat and not be twisted.
4. Hook Connectors to vehicle lower
anchors. Pull firmly on Connectors to
be sure they are attached
.
5. Tighten LATCH by pushing down
hard on base and pulling the
adjustment belt
.
6. NEVER put two LATCH connectors on
one vehicle LATCH anchor unless
specifically allowed by the vehicle
manufacturer
.
7. Test infant restraint for secure
installation as described in infant
restraint “Final Safety Check” p.42.
8. Check that the LATCH stays tight and does not slip from the
tightened position. If it does not stay tight, try another
seating position or contact Customer Service.
6.4 Using LATCH to install Base
Tongue
Page 80
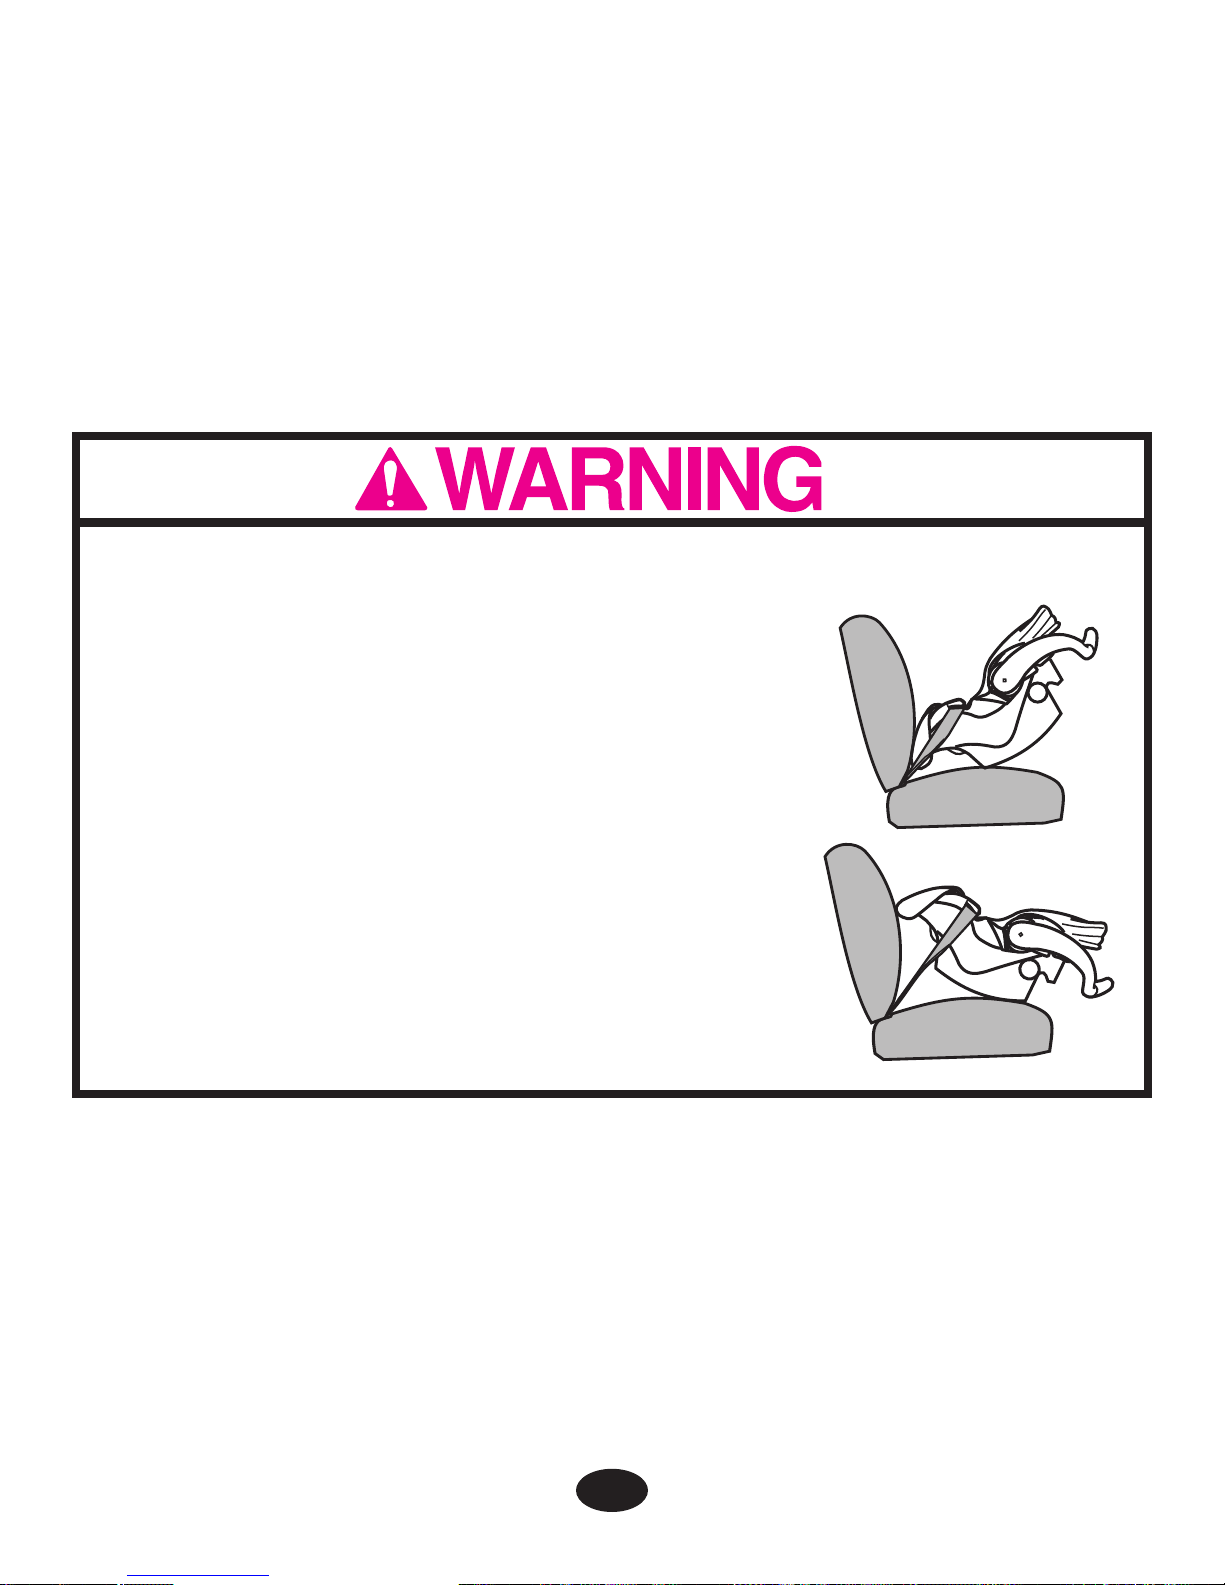
For your child’s safety, it is important that your infant restraint/base
be properly reclined. Attached to the side of your infant restraint is a
level indicator to help properly recline the infant restraint/base on the
vehicle seat.
Failure to properly recline the infant restraint on the vehicle seat
increases the risk of serious injury or death.
If the infant restraint is too upright, a child’s
head may drop forward and cause breathing
problems.
If the infant restraint is too reclined, a crash
could put too much force on a child’s neck
and shoulders.
The infant restraint must be properly reclined
according to the following instructions.
6.5 Reclining Infant Restraint/Base
Check the level indicator. You must look straight on at the indicator.
—If the indicator shows ONLY blue, the infant restraint is properly
leveled.
—If any orange is showing in the level indicator adjust the recline.
40
Page 81
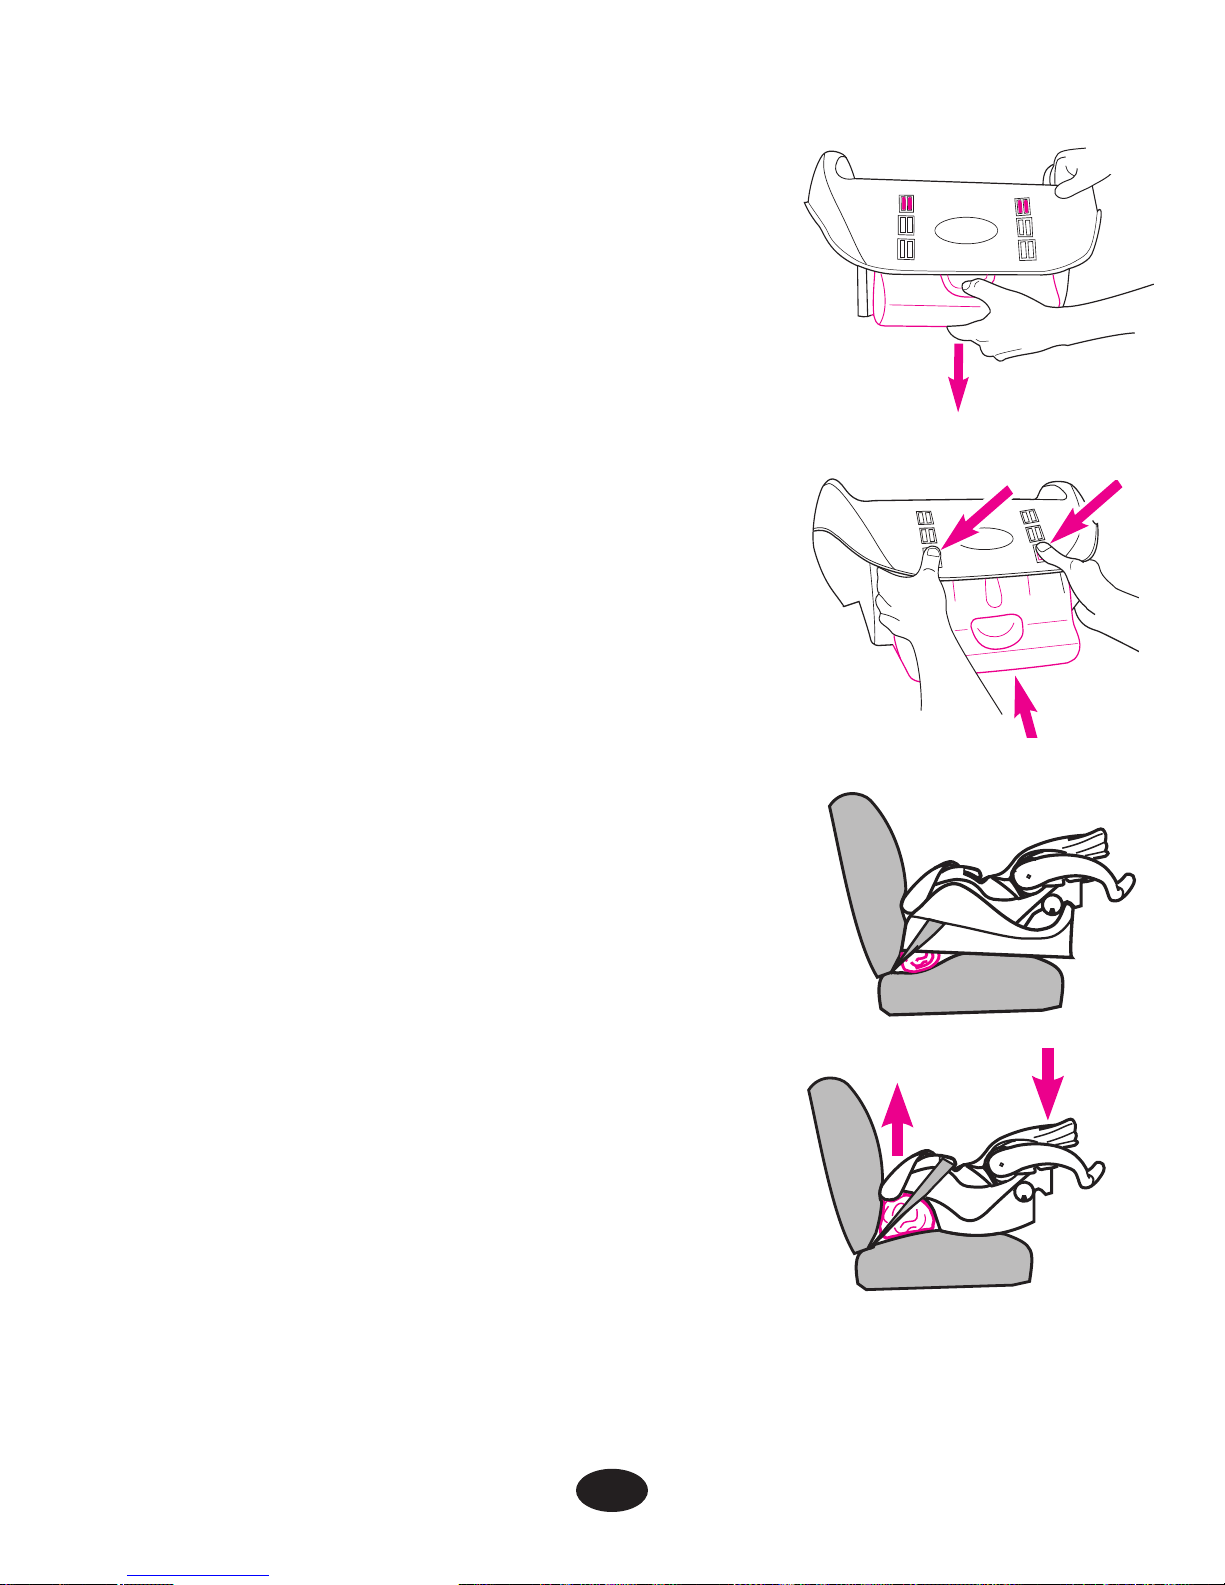
When using the base:
To lower the foot; pull down on the bottom of
the foot to the desired setting to adjust the
recline .
To raise the foot; set the base on a flat
surface, push in on the fingers on the base
and push down on the base to adjust the
recline .
If there is still orange in the level indicator
when the foot is completely extended then
place a rolled towel under the foot until
ONLY blue shows .
When using only the infant restraint, if there
is still orange in the level indicator when the
infant restraint is resting on the vehicle seat
then place a rolled towel under the infant
restraint until ONLY blue shows .
Readjust the vehicle seat belt as necessary
to secure the infant restraint firmly in the
vehicle seat.
41
Page 82
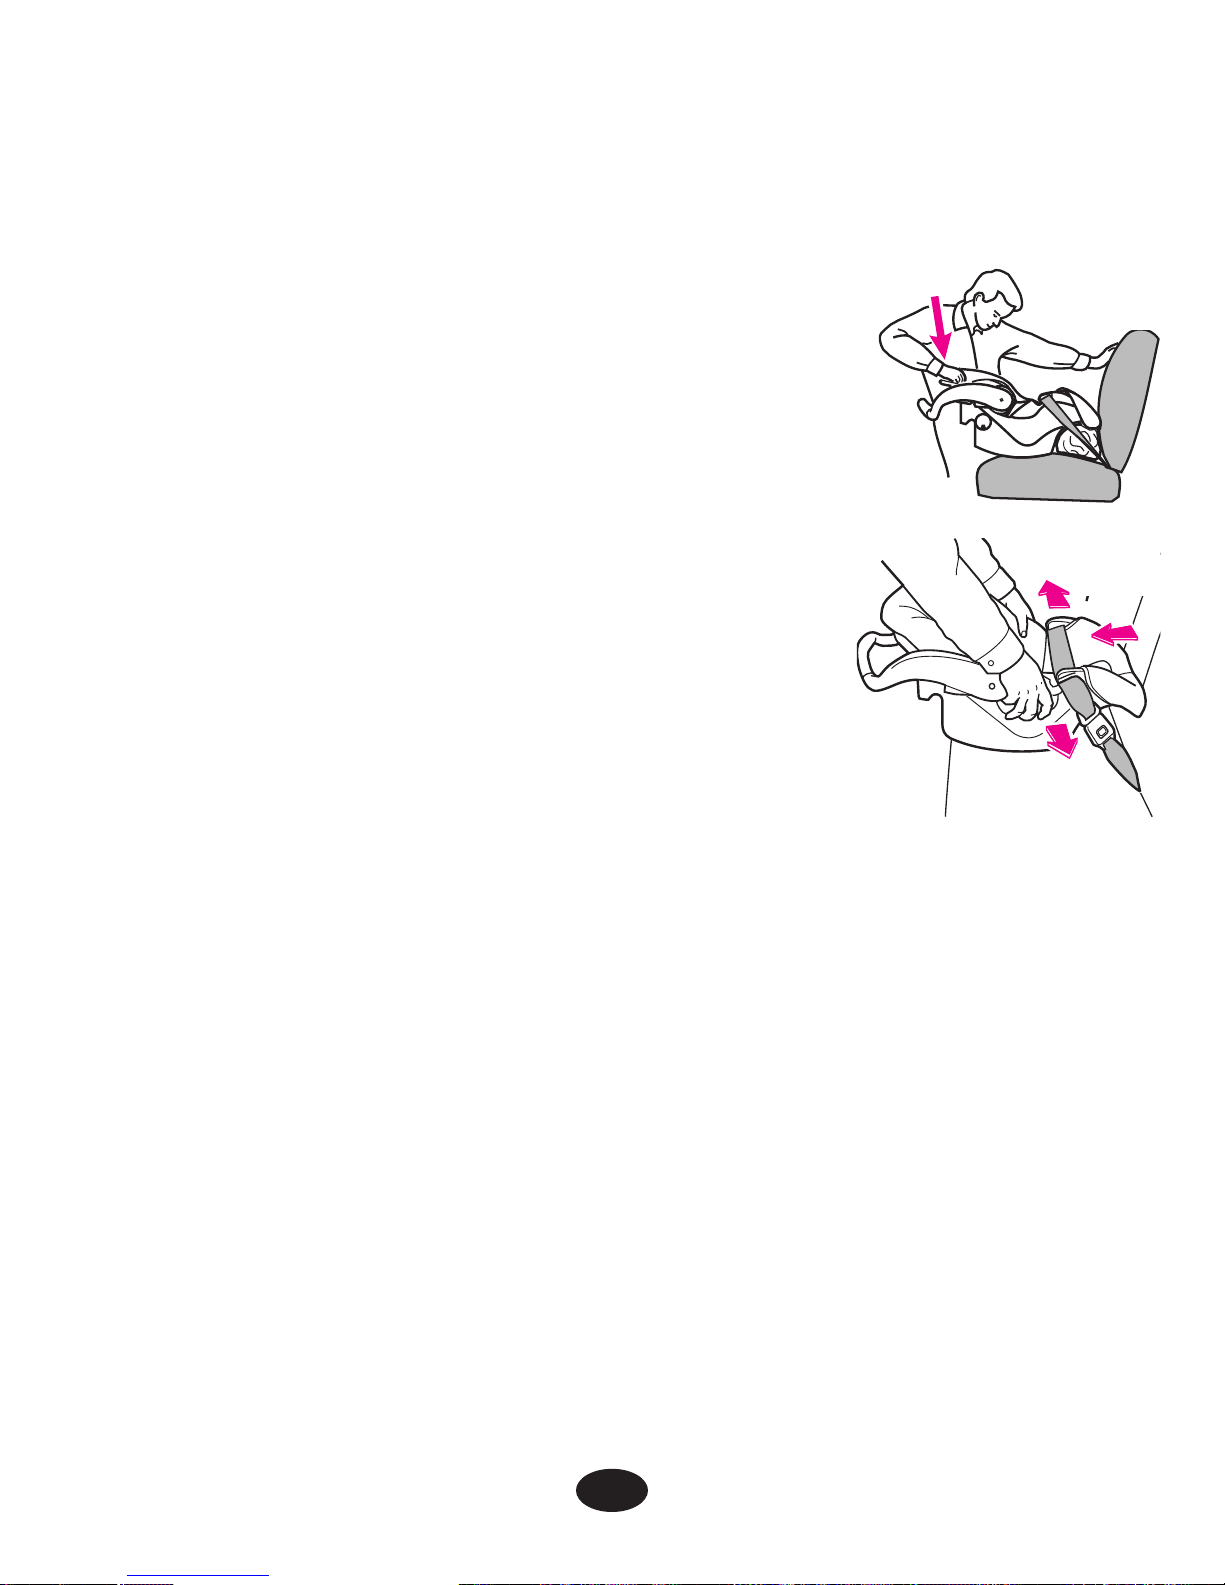
Final Safety Check: Every time
you drive with your child,
PUSH DOWN on the top of the infant restraint
slowly but firmly to make sure the vehicle belt
does not lengthen at all and that the vehicle
belt or LATCH is fastened very tightly around the
infant restraint/base
.
Holding the infant restraint near the vehicle belt
path, TWIST AND PULL the seat forward and to
both sides to make sure the vehicle belt or
LATCH does not lengthen or loosen and the
infant restraint does not easily move
.
42
Page 83
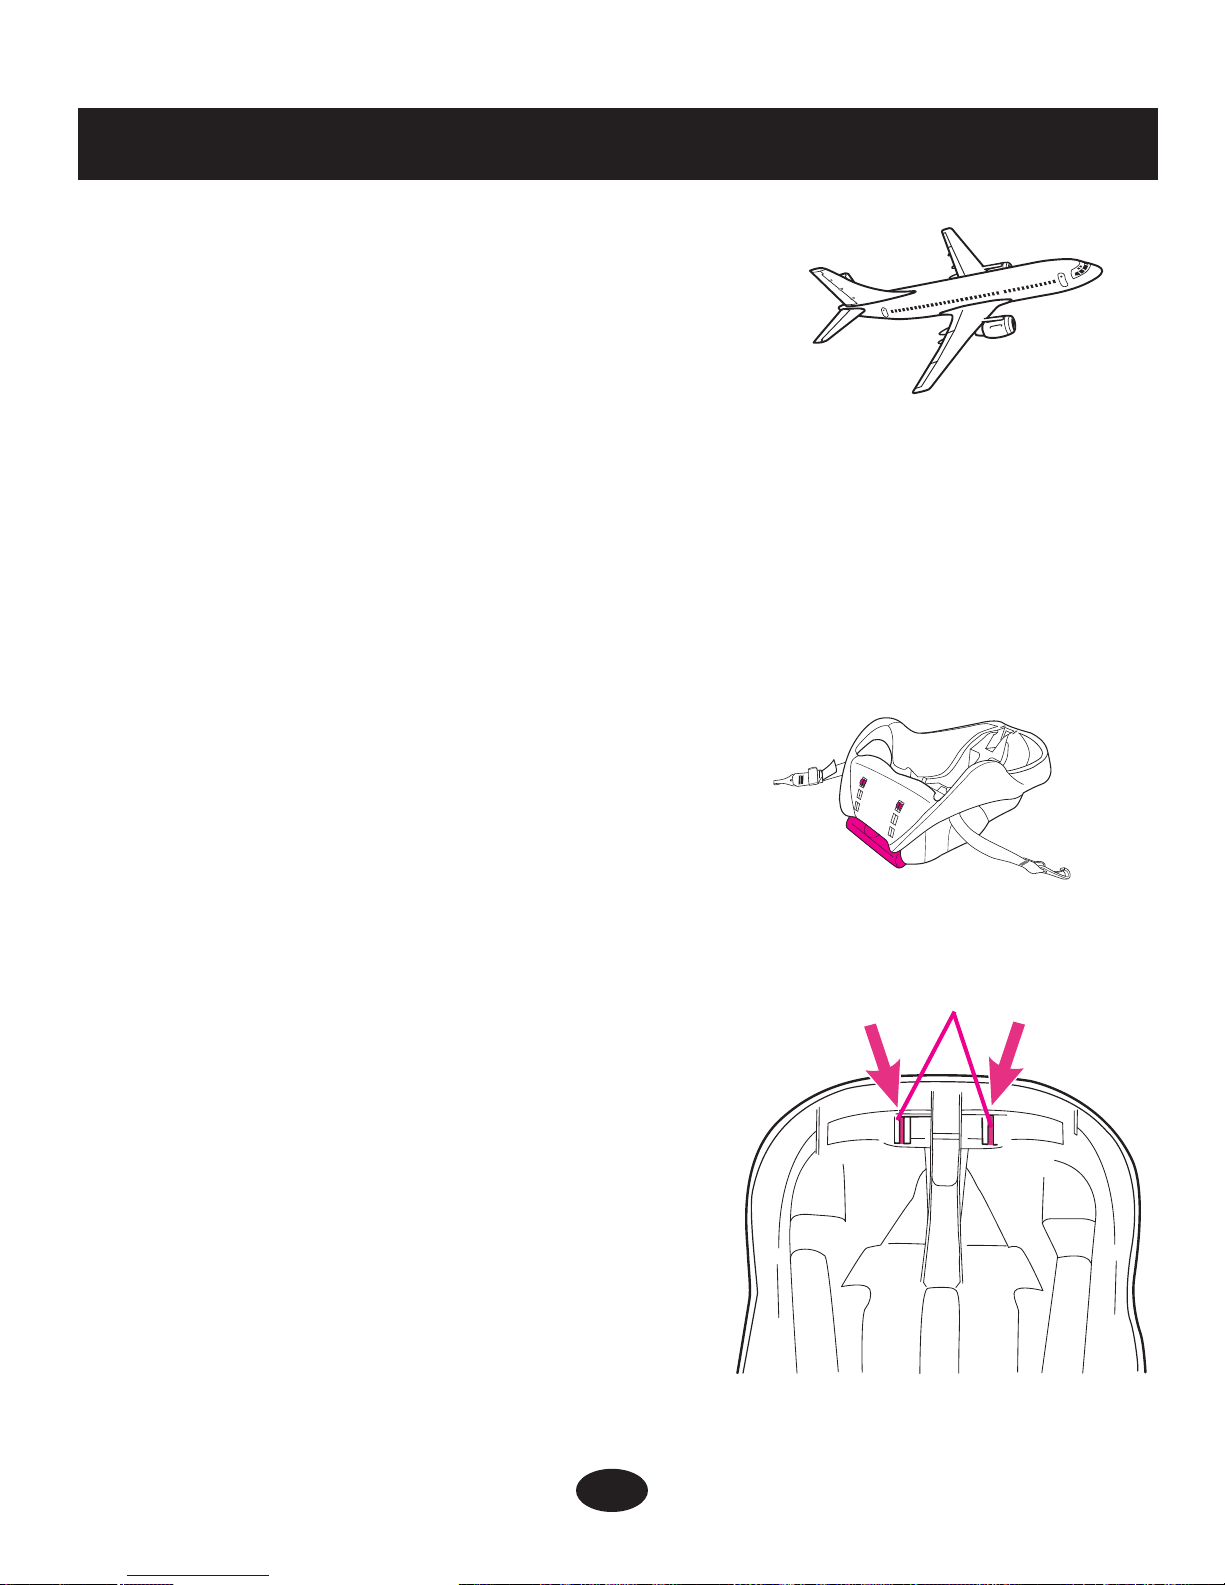
7.0 Additional Information
43
7.2 Storing LATCH
1. For ease of storing, extend
LATCH to its maximum length.
2. Locate the storage bars on
bottom of infant restraint
base
.
3. Fasten end of LATCH (without
adjustment belt) onto storage
bar as shown.
Storage bars
7.1 Airplane Use
Install in an airplane the same way as in an
automobile. Notify the airline ahead of time
that you intend to bring the seat on board.
Use only in forward-facing aircraft seat. Follow the flight attendant’s
instructions about infant restraint placement. Do not use this infant
restraint if the airplane seat belt does not hold the infant restraint tightly.
Page 84
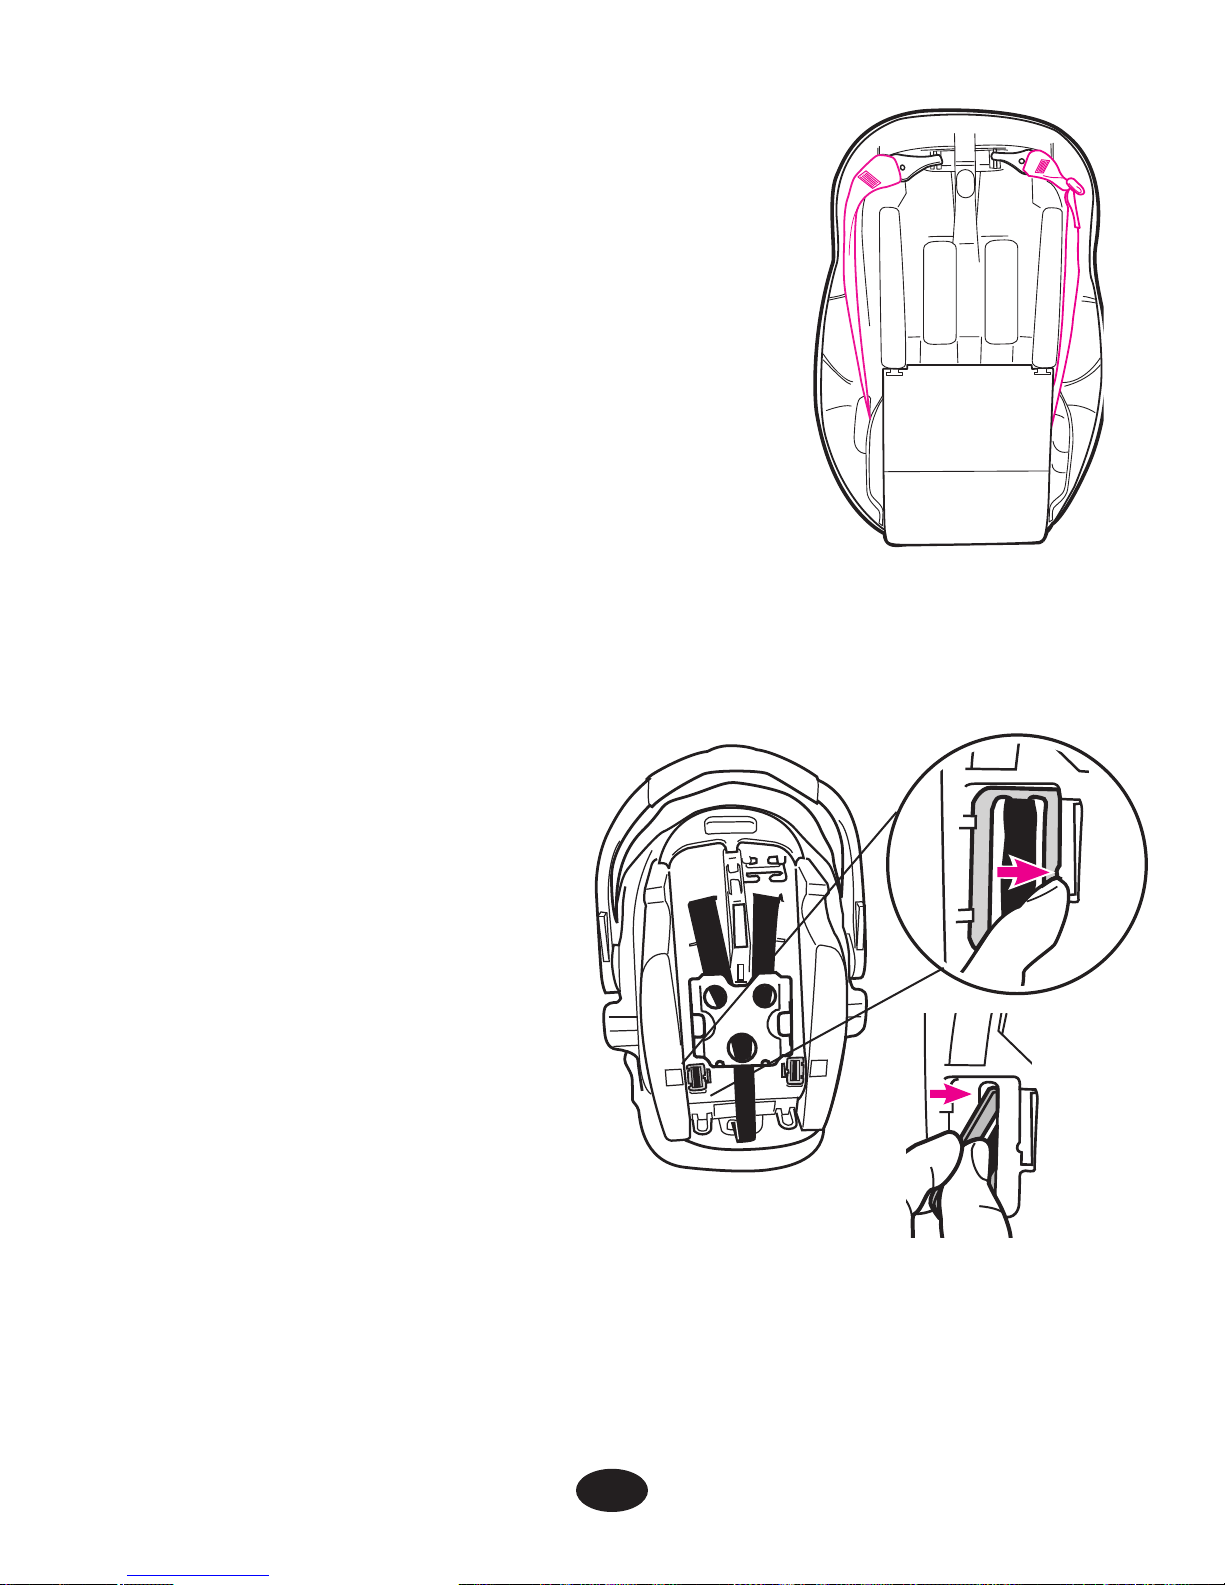
7.3 Cleaning and Maintenance
!
TO REMOVE AND WASH INFANT RESTRAINT PAD, follow
instructions in “6.1 Positioning
Harness Straps”, p. 29-30.
On 5-point harness models,
push aside the small tab that
holds the anchor buckles in
place
and pull the anchor
buckles out of their indentations.
Push a corner of each anchor
buckle back into its slot
.
Carefully remove the seat pad. Machine wash on
delicate cycle and drip-dry. DO NOT USE BLEACH.
Reverse steps to reinstall seat pad. Check that harness system is not
twisted, and pull on harness system to be sure harness is securely
reinstalled.
44
4. Repeat step 3 for LATCH with
adjustment belt. After fastening onto
storage bar, pull on adjustment belt to
make sure LATCH is securely fastened.
5. LATCH storage should look like this
when complete
.
Underside of base
Page 85

45
!
INFANT RESTRAINT METAL AND PLASTIC PARTS may be
cleaned by wiping with a mild soap and water solution. DO NOT USE
BLEACH. Use of bleach may weaken plastic parts.
!
HARNESS STRAPS may be spot cleaned or replaced. DO NOT
IMMERSE THE HARNESS STRAPS IN WATER. Doing so may weaken
the harness straps.
!
BUCKLE may be cleaned with a damp cloth.
!
DO NOT LUBRICATE the buckle.
!
DO NOT USE INFANT RESTRAINT without seat pad.
!
CONTINUOUS USE OF INFANT RESTRAINT MAY CAUSE
DAMAGE TO VEHICLE SEAT. Use an infant restraint mat, towel
or thin blanket to protect upholstery.
Page 86

46
Notes
Page 87

47
Notes
Page 88

48
www.gracobaby.com
or
1-800-345-4109
To purchase parts or accessories in the United States for your
Graco product, please contact us at the following:
Replacement Parts
Page 89
LEA ESTE MANUAL
GUARDE ESTAS INSTRUCCIONES PARA USO FUTURO.
No instale ni use este sistema de seguridad para niños hasta que
haya leído y entendido las instrucciones en este manual.
NO USAR DEBIDAMENTE ESTE SISTEMA DE SEGURIDAD PARA
NIÑOS AUMENTA EL RIESGO DE LESIONES SERIAS O FATALES
EN UN ACCIDENTE O AL DETENERSE DE REPENTE.
© 2007 Graco ISPC089BB 2/07 US
Asiento de seguridad infantil/portabebés
Manual del propietario
Page 90

2
1.0 Advertencias a padres y otros usuarios . . . . . . . . . . . . . . .4-5
2.0 Información sobre el registro . . . . . . . . . . . . . . . . . . . . . . . .6-7
2.1 Registro de su sistema de seguridad para niños . . . . . . . .6
2.2 Información sobre el retiro de productos del mercado . . . .7
2.3 Si necesita ayuda . . . . . . . . . . . . . . . . . . . . . . . . . . . . . . . . .7
3.0 Funciones y componentes . . . . . . . . . . . . . . . . . . . . . . . . .8-15
3.1 Modelo con arnés de 3 puntos . . . . . . . . . . . . . . . . . . . . . .9
3.2 Modelo con arnés de 5 puntos . . . . . . . . . . . . . . . . . . . . .11
3.3 Sacar y conectar la base . . . . . . . . . . . . . . . . . . . . . . . . . .13
3.4 Ajuste de la manija . . . . . . . . . . . . . . . . . . . . . . . . . . . . . .13
3.5 Colocación de la capota (ciertos modelos) . . . . . . . . . . . .14
3.6 Armado de la almohadilla del asiento (ciertos modelos) . .15
3.7 Apoyacabezas (ciertos modelos) . . . . . . . . . . . . . . . . . . . .16
3.8 Bota para tiempo frío (ciertos modelos) . . . . . . . . . . . . . .16
3.9 Cubiertas del arnés (ciertos modelos) . . . . . . . . . . . . . . . .17
4.0 Información importante . . . . . . . . . . . . . . . . . . . . . . . . . . .18-22
4.1 Advertencias para uso como sistema de seguridad
para niños . . . . . . . . . . . . . . . . . . . . . . . . . . . . . . . . . . . . .18
4.2 Advertencias para el uso con un cochecito . . . . . . . . . . . .20
4.3 Advertencias adicionales para el uso como transportador 21
4.4 Limitaciones de peso y estatura . . . . . . . . . . . . . . . . . . . .22
Page 91

3
5.0 Ubicación del sistema de seguridad para niños . . . . . .23-28
5.1 Requisitos del asiento del vehículo . . . . . . . . . . . . . . . . . .23
5.2 Requisitos del cinturón de seguridad del vehículo . . . . . .24
5.2.1Sistemas PELIGROSOS de cinturones para vehículos 25
5.2.2 Sistemas SEGUROS de cinturones para vehículos .26
5.3 Ubicación del LATCH . . . . . . . . . . . . . . . . . . . . . . . . . . . . .28
6.0 Usar el asiento de seguridad infantil . . . . . . . . . . . . . . . . . . . .27-42
6.1 Colocación de las correas del arnés . . . . . . . . . . . . . . . . .29
6.1.1 Arnés de 3 puntos . . . . . . . . . . . . . . . . . . . . . . . . . .30
6.1.2 Arnés de 5 puntos . . . . . . . . . . . . . . . . . . . . . . . . . .31
6.2 Cómo sujetar el niño al sistema de seguridad para niños 33
6.2.1 Arnés de 3 puntos . . . . . . . . . . . . . . . . . . . . . . . . . .34
6.2.2 Arnés de 5 puntos . . . . . . . . . . . . . . . . . . . . . . . . . .35
6.3 Instalación del sistema de seguridad para niños/base
usando el cinturón del vehículo . . . . . . . . . . . . . . . . . . . . .36
6.4 Uso del LATCH para instalar la base . . . . . . . . . . . . . . . .39
6.5 Inclinación del sistema de seguridad para niños/base . . .40
7.0 Información adicional . . . . . . . . . . . . . . . . . . . . . . . . . . . .43-46
7.1 Uso en aviones . . . . . . . . . . . . . . . . . . . . . . . . . . . . . . . . .43
7.2 Almacenamiento del LATCH . . . . . . . . . . . . . . . . . . . . . . .43
7.3 Limpieza y mantenimiento . . . . . . . . . . . . . . . . . . . . . . . . .45
Piezas de repuesto . . . . . . . . . . . . . . . . . . . . . . . . . . . . . . . . . . . . .48
Page 92
Ningún asiento de seguridad infantil puede garantizar la
protección contra lesiones en todas las situaciones. Sin embargo,
el uso correcto de este asiento de seguridad infantil reduce el riesgo
de que su niño sufra lesiones serias o la muerte.
El uso incorrecto de este sistema de seguridad infantil aumenta el
riesgo de graves lesiones o la muerte durante un giro brusco, una
parada repentina o un accidente. La seguridad de su niño depende
de la correcta instalación y uso de este sistema de seguridad infantil.
Incluso si el uso de este sistema de seguridad infantil le parece muy
fácil, es muy importante que LEA EL MANUAL DEL PROPIETARIO.
El manual se encuentra en el bolsillo trasero del sistema de
seguridad infantil. También debe leer el manual del propietario
de su vehículo.
La seguridad de su niño depende de:
1. Elegir una ubicación adecuada en su vehículo. Algunos
asientos, tales como los equipados con bolsas de aire, pueden
resultar ubicaciones inseguras para este sistema de
seguridad infantil.
2. Insertar los cinturones en las ranuras apropiadas para su niño.
4
1.0 Advertencias a padres
y otros usuarios
Page 93

5
3. Sujetar a su niño de manera adecuada en el sistema de
seguridad infantil.
4. Colocar el sistema de seguridad infantil/base en una posición
orientada hacia atrás.
5. Colocar el cinturón de seguridad del vehículo o LATCH de
manera correcta.
6. Reclinar de manera correcta el sistema de seguridad infantil.
7. Sujetar el sistema de seguridad infantil de manera correcta
en el vehículo usando un cinturón de seguridad diseñado para
sujetar un sistema de seguridad infantil o usando LATCH. Muchos
cinturones de seguridad NO son seguros para su uso con sistemas
de seguridad infantil, a pesar de que se colocan fácilmente en
el mismo.
Page 94

Número de modelo:
Fabricado en:
Fecha de compra:
6
2.1 Registro de su sistema de
seguridad para niños
Por favor, complete la información que se solicita más arriba. Los
números de modelo y fabricado en (fecha) pueden encontrarse en
una etiqueta ubicada debajo del sistema de seguridad para niños.
Llene la tarjeta postal de registro prepagada que se encuentra en la
funda del asiento y envíela hoy mismo.
Los dispositivos de seguridad para niños podrán ser retirados del
mercado por problemas de seguridad. Debe registrar este sistema
para que lo podamos contactar en dicho caso. Envíe su nombre y
apellido, dirección y números de serie y de modelo a:
Graco Children’s Products Inc.
150 Oaklands Blvd.
Exton, PA 19341
o llame al 1-800-345-4109
o www.gracobaby.com
2.0 Información sobre el registro
Page 95

7
2.3 Si necesita ayuda
En los EE.UU. o Canadá, por favor, comuníquese con el Departamento
de Servicio al Cliente con cualquier pregunta que pudiera tener sobre
piezas, uso o mantenimiento. Cuando se ponga en contacto con
nosotros, por favor tenga listo los números de modelo y de serie de
su producto para que lo podamos ayudar más eficientemente. Estos
números pueden encontrarse en una etiqueta ubicada en la parte inferior
del sistema de seguridad para niños.
EE.UU.: 1-800-345-4109 o www.gracobaby.com
Canadá: 1-800-667-8184 Montreal: 514-344-3533
2.2 Información sobre el retiro de
productos del mercado
• Llame a la línea telefónica sobre seguridad en automóviles del
gobierno de EE.UU. al 1-888-327-4236 (TTY: 1-800-424-9153) o
http://www.NHTSA.gov
• Graco: 1-800-345-4109 o www.gracobaby.com
Page 96
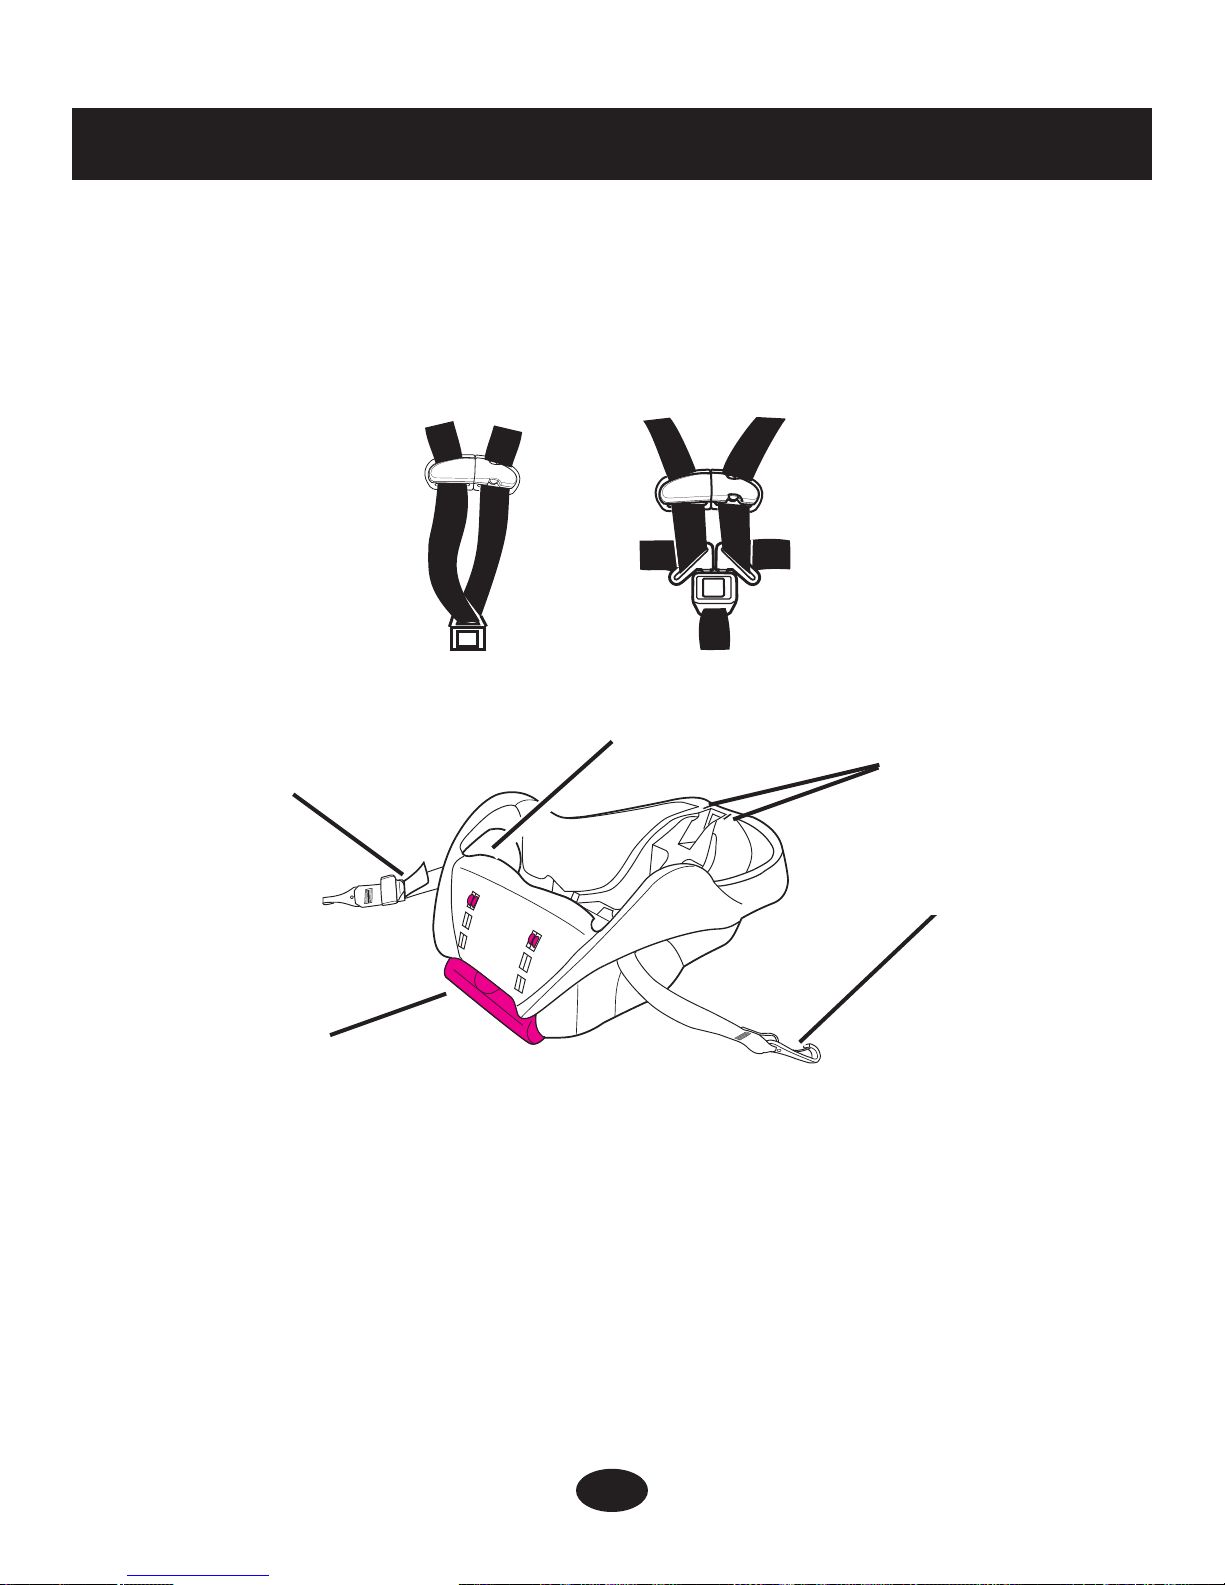
Cinturón del vehículo/recorrido
del LATCH*
8
Cada modelo del sistema de seguridad para niños viene con
diferentes opciones en el arnés. Para ajustar debidamente el
sistema de seguridad para niños, es muy importante que observe
las instrucciones que son apropiadas para el modelo que compró.
3.0 Funciones y componentes
O
Arnés de 5 puntosArnés de 3 puntos
Las Normas Federales para Seguridad de Automóviles de Estados
Unidos han determinado un nuevo sistema de instalación de asientos
de seguridad en los vehículos. El sistema se denomina LATCH.
* LATCH debe usarse EN LUGAR del cinturón del vehículo SOLAMENTE si
el vehículo está equipado con puntos de anclaje LATCH.
Por favor, consulte el manual del propietario del vehículo para obtener las
ubicaciones donde debe instalarse el LATCH.
Base
Apoyapiés ajustable
Gancho del LATCH
Cinturón de ajuste
Barras de
almacenamiento
del LATCH
Page 97
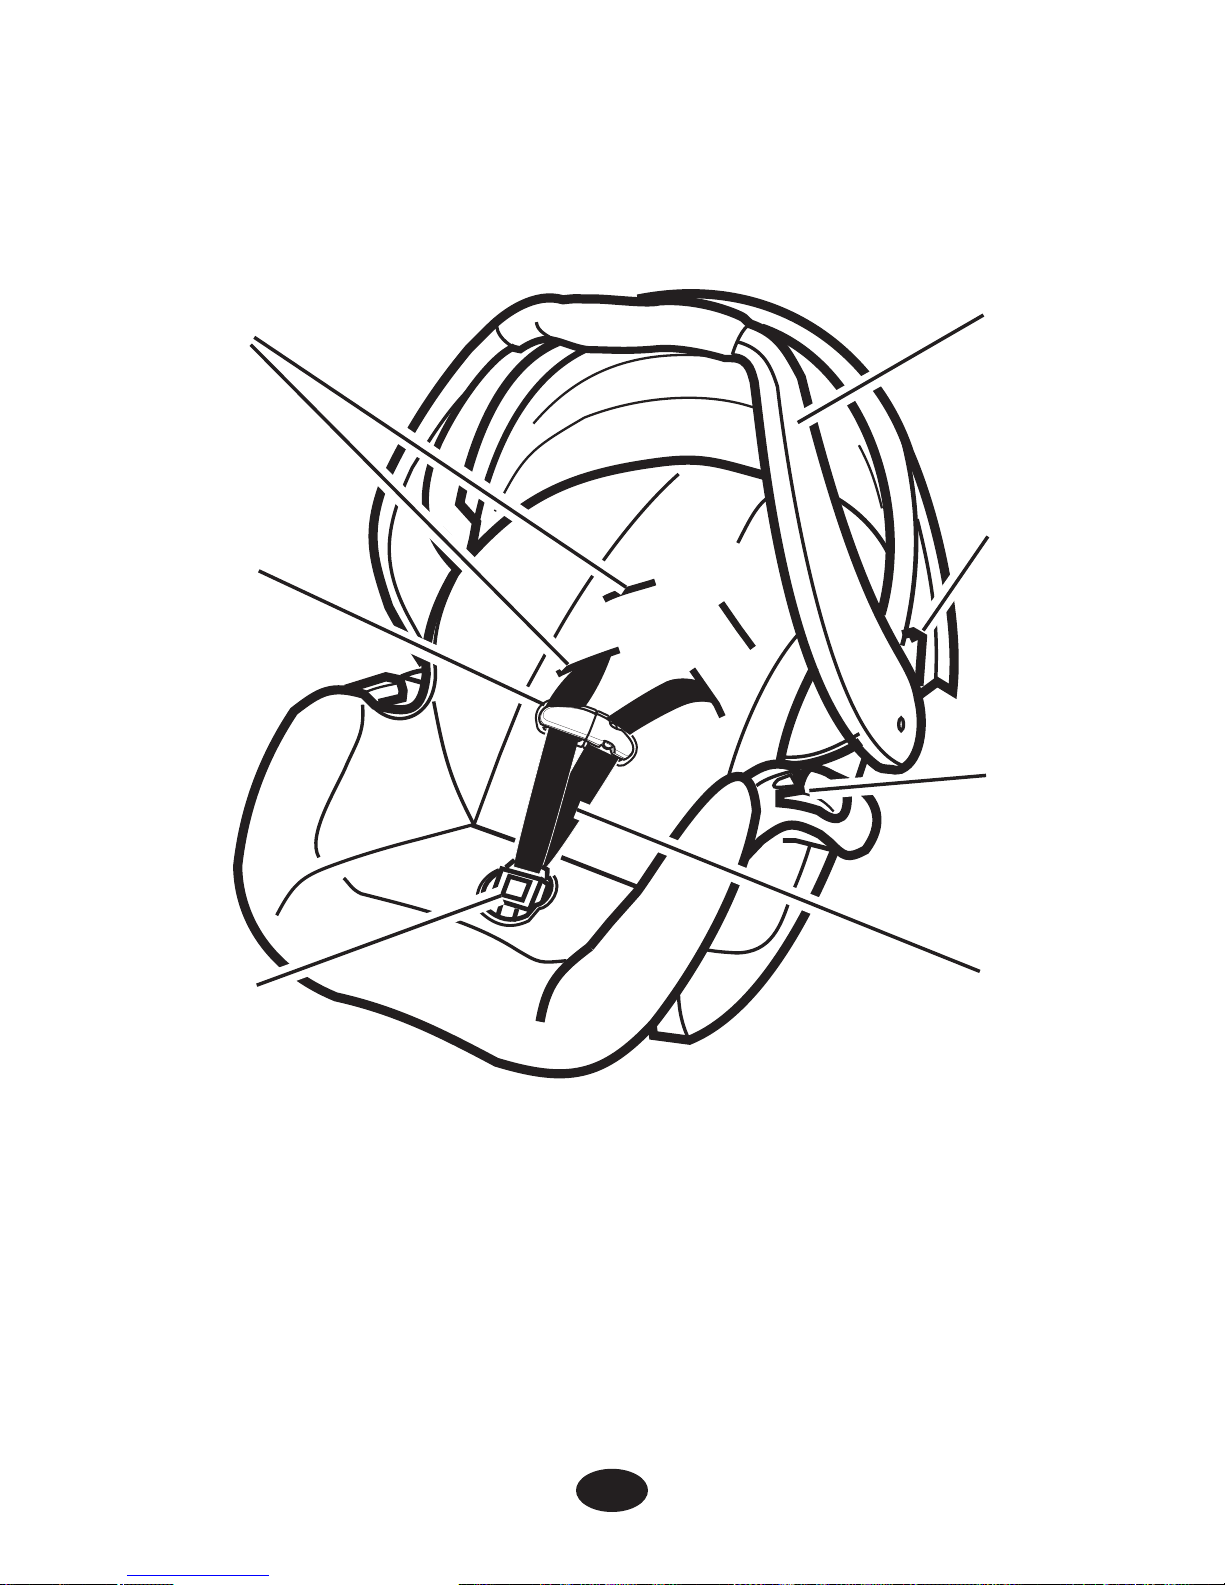
9
3.1 Modelo con arnés de 3 puntos
Manija
Ranura para el
arnés
Gancho del
cinturón del
vehículo
Botón de
ajuste de la
manija
Traba del
arnés
Hebilla del
arnés
Correas
del arnés
VISTA DELANTERA: ARNÉS DE 3 PUNTOS
Page 98
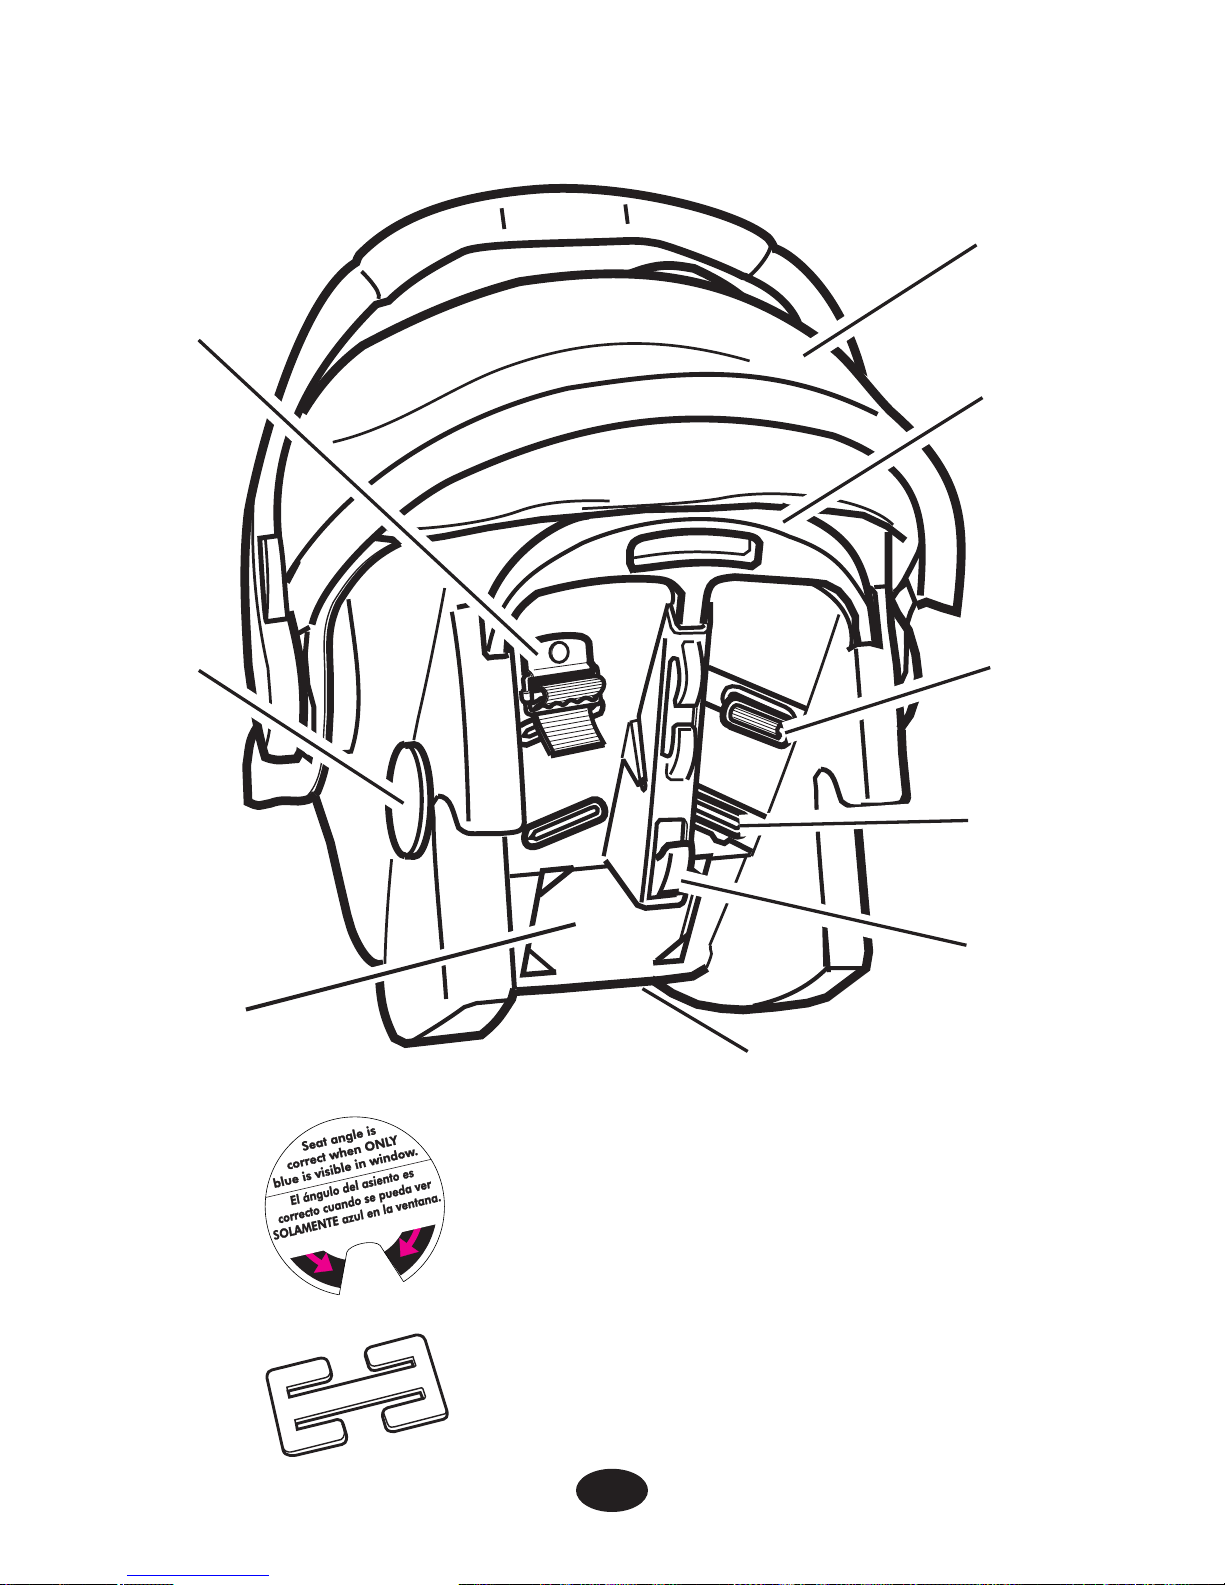
10
VISTA TRASERA: ARNÉS DE 3 PUNTOS
Capota
(en ciertos modelos)
Ranura para
el arnés
Manija de
liberación
Traba de
conexión
Indicador
del nivel*
Bolsillo del
manual del
propietario
Traba de
seguridad**
Hebilla del
anclaje del
arnés
Tensionador
del arnés
El indicador de nivel se conecta al costado del
sistema de seguridad para niños e indica si el
sistema de seguridad para niños está
debidamente inclinado.
La traba de seguridad se guarda en el fondo del
sistema de seguridad para niños. Necesitará
usarlo con ciertos tipos de cinturones de
seguridad de automóviles.
**Traba de
seguridad
*Indicador
del nivel
Page 99
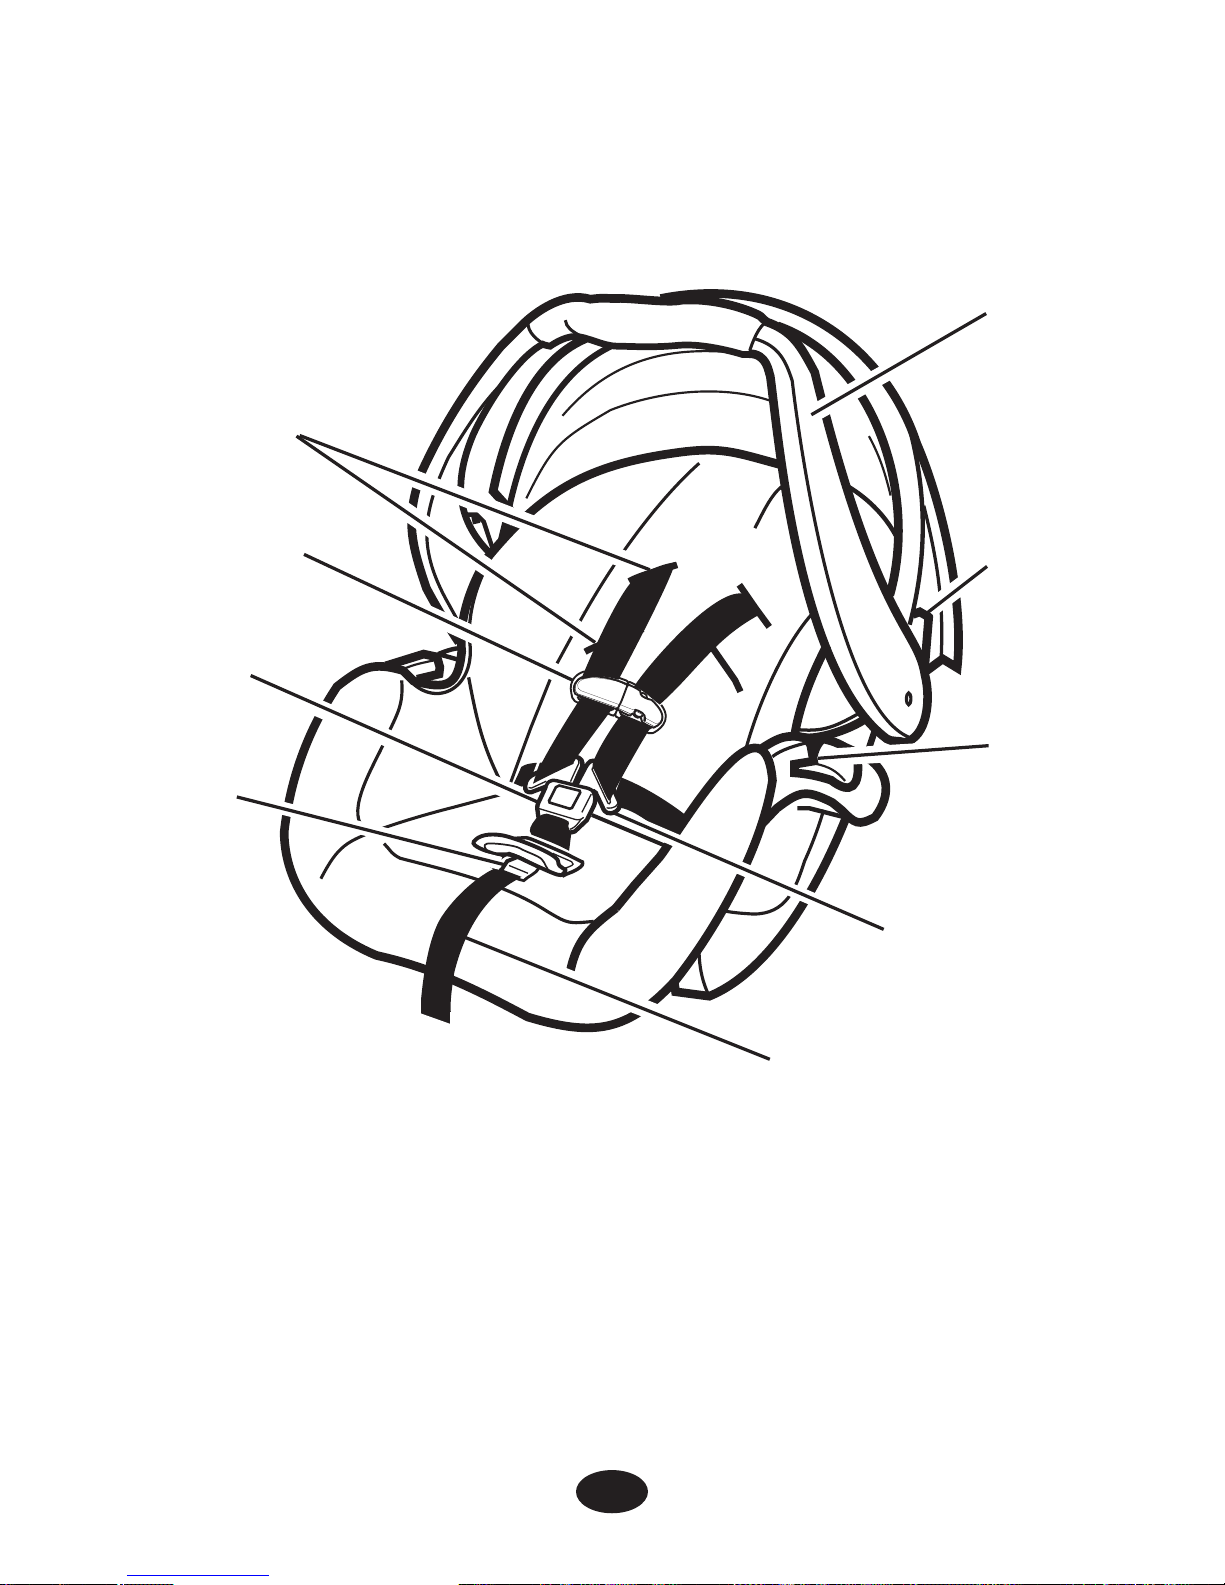
11
3.2 Modelo con arnés de 5 puntos
VISTA DELANTERA: ARNÉS DE 5 PUNTOS
Manija
Ranura para
el arnés
Gancho del
cinturón del
vehículo
Botón de
ajuste de
la manija
Traba del
arnés
Correa de ajuste
del arnés
Hebilla del
arnés
Botón de
ajuste del
arnés
Lengüetas de la
hebilla del arnés
Page 100
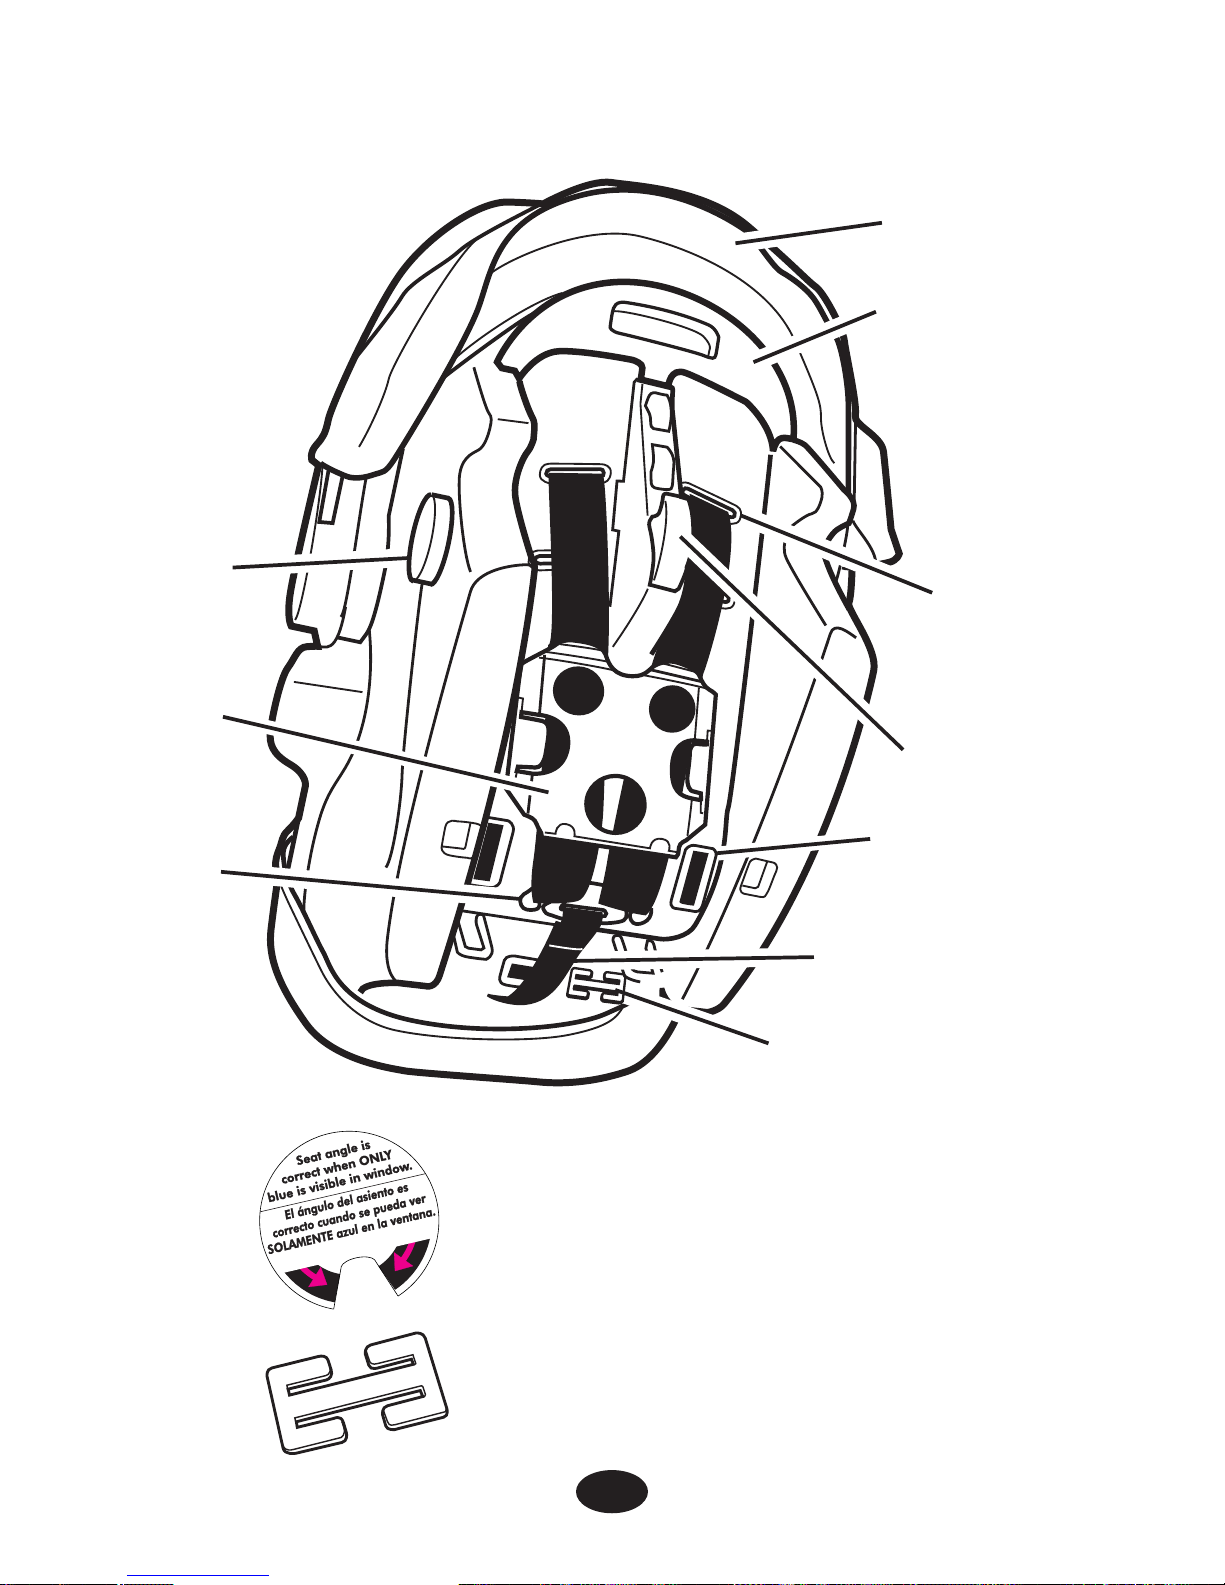
VISTA TRASERA: ARNÉS DE 5 PUNTOS
Capota
(en ciertos modelos)
Ranura para
el arnés
Manija de liberación
Traba de
conexión
Indicador
del nivel*
Bolsillo del
manual del
propietario
Correa de ajuste del
arnés
Placa de
la unión
de metal
Traba de seguridad**
Hebilla del anclaje de
la correa de la cintura
El indicador de nivel se conecta al costado del
sistema de seguridad para niños e indica si el
sistema de seguridad para niños está
debidamente inclinado.
La traba de seguridad se guarda en el fondo del
sistema de seguridad para niños. Necesitará
usarlo con ciertos tipos de cinturones de
seguridad de automóviles.
**Traba de
seguridad
*Indicador
del nivel
12
 Loading...