

Page 1
SuperCELL® Model SC500-H-SM User’s Information
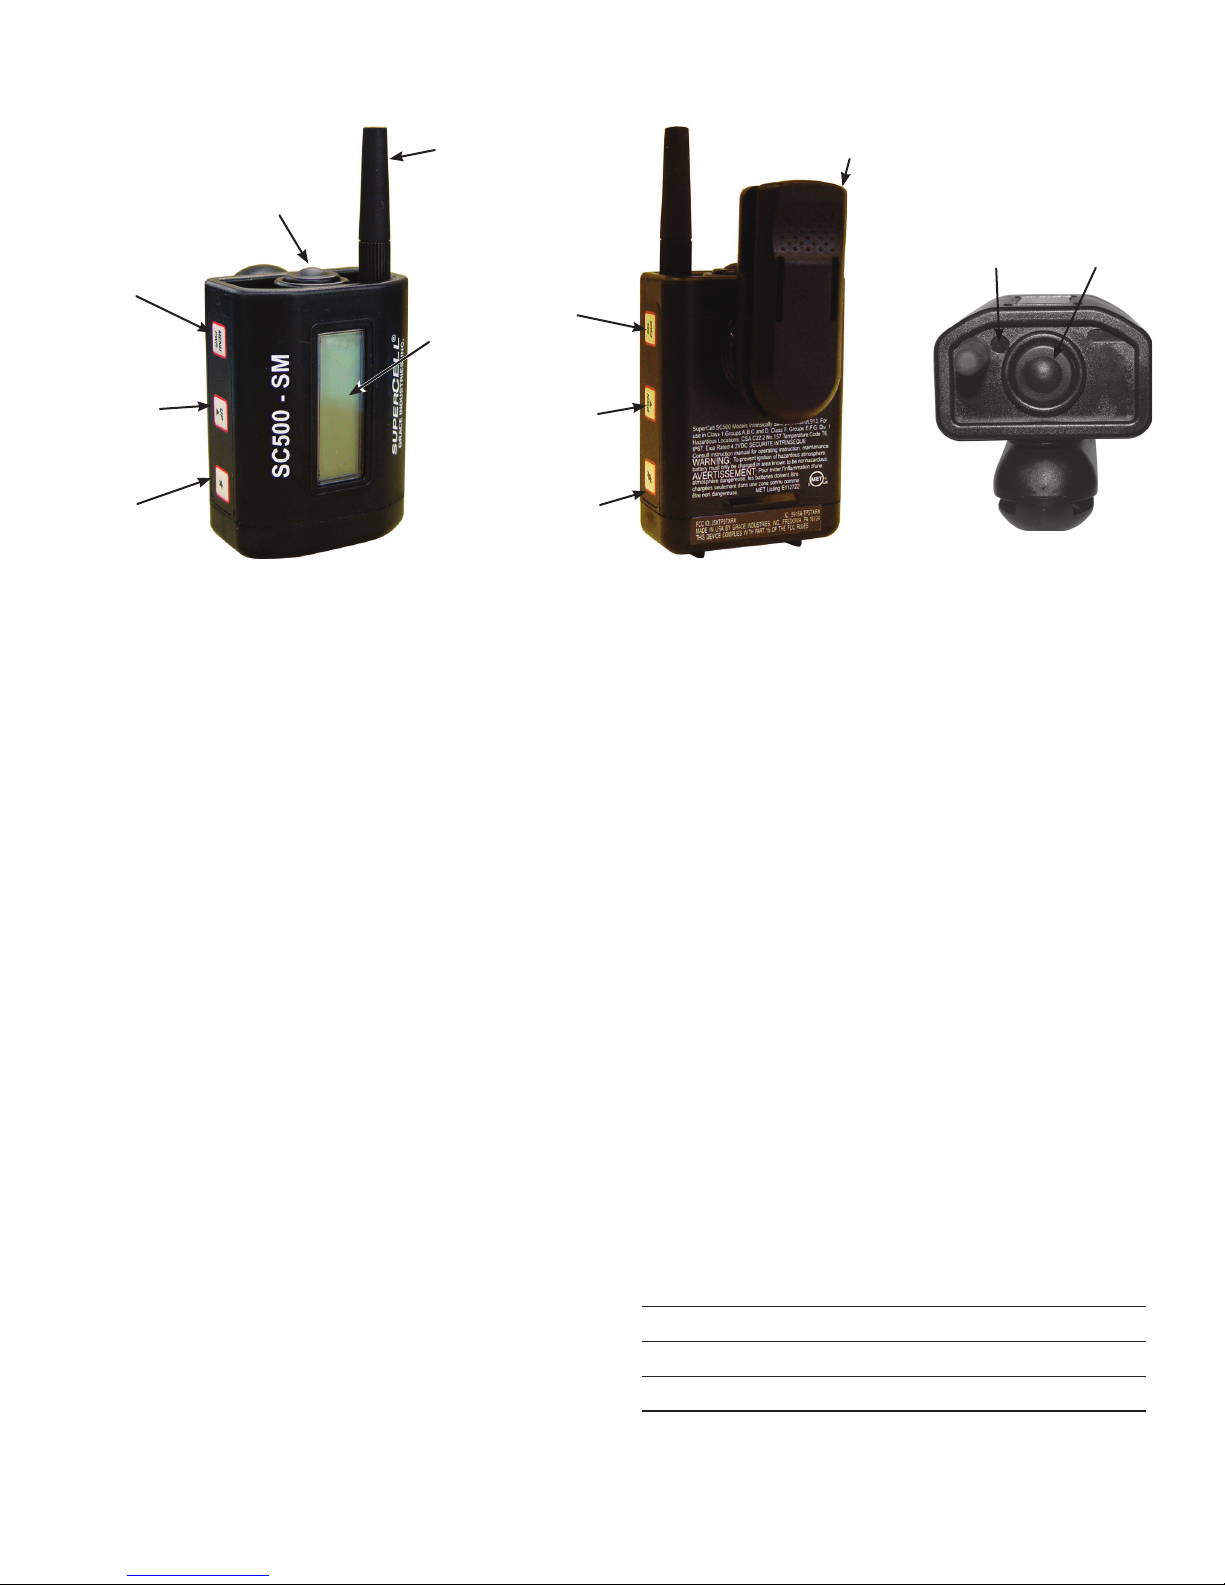
S
Antenna
Alarm
Button
Power
Menu
Button
Up 1
Message
Button
Up 16
Messages
Button
LCD
Display
Front View Top ViewBack View
Power
Select
Button
Down 1
Message
Button
Down 16
Messages
Button
Introduction
SuperCELL® Model SC500-H-SM is an intrinsically safe,
high performance, RF-wireless, emergency signaling
and monitoring device which provides Man-Down
monitoring and noti cation for personnel working
alone in hazardous environments.
Features
• Location: Tracking the location of the SuperCELL® is
possible when used in conjunction with the Grace
Locator Beacon and Grace-Watch® safety monitoring
system.
• Alarm Monitoring: Alerts the Supervisor that a
GRACE Man-Down telemetry device, within signaling
range, is transmitting an alarm message.
• Panic ALARM: Manually activated Emergency Alarm.
• Man Down Alarm: An optional safety monitoring
feature which provides the Supervisor with motion
sensing protection.
• Canned Text Messaging: Allows the Supervisor to
send and receive pre-set Canned Text Messages to
other SuperCELL® devices and Grace-Watch®
monitoring systems.
wi
Swivel Clip
Operation
Status LED
Alarm
Button
Speci cations
• Model: SC500-H-SM, Supervisor Model.
• Dimensions: 2-3/16” wide, 1-3/8” deep (without clip),
5” high (with antenna).
• Weight: 5.6 oz.
• Internal Battery: 3.7 V nominal, 1960 mAh,
intrinsically safe, lithium-ion rechargeable.
• Device Run Time: Approximately 40 hrs. in Sensing
Mode, and 10 hrs. in Alarm Mode.
• Radio Frequency: 902 - 928MHz, ISM license free,
spread spectrum.
• Battery Charger Operational Voltage:
120VAC or 12VDC.
• Battery Charge Time: 6 - 8 hrs.
• Certi cations:
• Intrinsically Safe UL913, CSA C22.2 No. 157
• IP67
• FCC ID: J5XT3HEP
• IC: 5916A-T3HEP
Table of Contents
Quick Start Guide 2
Menu Screens 3
Grace Industries, Inc.
De nition of Terms 8
Warranty Information 8
1
SC500-H-SM UI 2017-04
Page 2
Quick-Start Guide
Always test SuperCELL® prior to use
TURN ON: Simultaneously pressing both side PWR
buttons turns the SuperCELL® ON.
TURN OFF: Simultaneously pressing and holding both
side PWR buttons turns the SuperCELL® OFF.
PAGE NAVIGATION: Pressing the MENU/PWR button
cycles through the pages on the SuperCELL®.
MOTION ALARM: If the SuperCELL® remains motionless
for the preset length of time, the SuperCELL® will sound
a repeating alarm tone and transmit man-down alarm
messages. Motion Alarm can be enabled/disabled and
the timing can be adjusted in the Setup Menu. To clear
Alarm and reset the SuperCELL®, simultaneously press
the MENU/PWR and SEL/PWR buttons.
PANIC ALARM: Activate the Emergency Alarm by
pressing the top button. A Panic Alarm signal will be
sent and ALARM will be displayed. To clear Alarm
and reset the SuperCELL®, simultaneously press the
MENU/PWR and SEL/PWR buttons.
EVACUATION ACKNOWLEDGMENT: If an Evacuate
message is received by the SuperCELL®, it can be
manually acknowledged by simultaneously pressing
the MENU/PWR and SEL/PWR buttons.
ALARM MONITORING: Alerts the Supervisor that a
GRACE Man-Down telemetry device, within signaling
range, is transmitting an alarm message. This alert can
be cleared from the SuperCELL® by simultaneously
press the MENU/PWR and SEL/PWR buttons.
Low Battery Indication / Battery Charging
When approximately 3 hours of operating time
remain in standby mode, the SuperCELL® will display a
plug icon on the display status screen. The power-on
tones are not emitted when SuperCELL® has a low
battery. Low battery is also indicated by the
Operational Status LED changing to a periodic Red
strobe. A double chirp sounds once every ve minutes
with audio enabled. Warning: There are no audible low
battery sounds with audio tones disabled.
When low battery is indicated, less than 3 hours of
operating time remain and the battery should be charged
immediately.
With the charger provided, recharge time is
approximately 6 hours from a low battery warning
and 9 hours for a dead battery. Due to current limits
imposed by Intrinsic Safety requirements, a unit that has
gone completely dead will have to be removed from the
charging base and reinserted when the charging light
turns Red. Typical operation time between recharging
is approximately 40 hours in standby/ready mode.
Plug the charger into an outlet. It takes approximately
20 seconds for the Green charger LED to light up. If it
does not turn on or a Red LED turns on, then the battery is either too hot or cold, or has a fault.
Charging is complete when the Green charge LED
starts to slowly ash.
NOTE: If an alarm has been received, the SuperCELL® will
not turn o until the alarm has been cleared or reset. To
force SuperCELL® to turn o (even with an active alarm)
hold down the Up button along with both side PWR
buttons.
SuperCELL® Display Icons
Grace Industries, Inc.
120VAC Adapter
Optional 12VDC Adapter
2
Green
Charge
LED
Charging Base
Page 3
Menu Pages
Pressing MENU button brings up menu pages in the
following order:
Page 1 - Send Message
Page 2 - Alarm History Display
Page 3 - Event Counters Display
Page 4 - Device Name and Run Time Display
Page 5 - Setup Mode
the SuperCELL®. The 32 most recent, unique, alarms
are stored on the SuperCELL® in the order they were
received. Turning the SuperCELL® o clears the Alarm
History.
Pressing MENU/PWR will navigate away from the Alarm
History Display page. Resetting the device will return the
SuperCELL® to the home page.
Page 3 - Event Counters Display
Page 1 - Send Message
The Send Message function may be used to send
one of 80 user-programmed, canned text messages.
These messages are programmed into the SuperCELL®
device through the SuperCELL® Database Manager
Utility Program via the ACTiSYS IrDA USB Adapter,
available for the SuperCELL® device. This process is
explained in the IrDA Transfer section, on page 4.
To send a message, proceed to the Send Message
page by pressing the MENU/PWR button. Next, cycle
through the messages stored on the SuperCELL® by
pressing the UP, DWN, *, or # buttons until you nd the
desired message you wish to send. UP and DWN cycle
the message count by one, * and # cycle the count by
ve. Once you have the desired message displayed,
pressing the SEL button transmits the message, and
a Message Sent acknowledgment is displayed on the
screen. Other messages can be selected and sent by
pressing the UP, DWN, *, or #, and then pressing SEL to
send.
Pressing MENU/PWR will navigate away from the
Send Message page. Resetting the device will return the
SuperCELL® to the home page.
The Event Counters Display page shows the number
of Page (Evacuate), Par, and Roll Call events received
by the SuperCELL® device since it was last turned on.
Navigate to the Event Counters Display page by
pressing the MENU/PWR button.
Pressing MENU/PWR will navigate away from the Event
Counters Display page. Resetting the device will return the
SuperCELL® to the home page. Turning the SuperCELL®
device o resets each counter to zero.
Page 4 - Device Name and Run Time Display
The Device Name and Run Time Display page
displays the SuperCELL® device name which has been
programmed onto the device through the SuperCELL®
Database Manager Utility Program via the ACTiSYS IrDA
USB Adapter, available for the SuperCELL®. This page
also displays the length of time the SuperCELL® has
been running (turned on), in days/hours/minutes.
Navigate to the Device Name and Run Time Display
page by pressing the MENU/PWR button.
Pressing MENU/PWR will navigate away from the
Device Name and Run Time Display page. Resetting the
device will return SuperCELL® to the home page.
Page 2 - Alarm History Display
The Alarm History Display page displays the name
and unit ID of any Grace Industries telemetry product
that has transmitted an alarm message received by
the SuperCELL®.
Proceed to the Alarm History Display page by
pressing the MENU/PWR button. On the Alarm History
Display page, the UP and DWN buttons cycle through
the stored alarm messages that were received by
Grace Industries, Inc.
Page 5 - Setup Mode
The Setup Mode page allows the user to put the
SuperCELL® into Setup Mode, where the various user
preferences of the device can be changed.
To enter Setup Mode, proceed to the Setup Mode
page by pressing the MENU/PWR button. Next, press
and hold the SEL/PWR button for three seconds. The
SuperCELL® device is now in Setup Mode. Press the
MENU/PWR button while in Setup Mode to cycle
3
Page 4

through the Setup Mode pages
WARNING: While in Setup Mode, Alarm, Page, Par,
and Roll Call messages CANNOT be monitored or be
logged in the SuperCELL® devices Event Counter. Any
Alarm, Page, Par, or Roll Call messages received, while
in Setup Mode, will be subject to the SuperCELL®
device’s inhibit timer.
Resetting the device or waiting two minutes without a
button press will exit out of Setup Mode and return the
SuperCELL® to the home page.
Setup Mode Page 1 - Alarm Disabled Noti cation
Setup Mode Page 2 - Firmware Versions
Setup Mode Page 3 - IrDA Transfer Mode
Setup Mode Page 4 - View Adjust
Setup Mode Page 5 - Motion Sensing
Setup Mode Page 6 - Radio Range Test
Setup Mode Page 7 - Sound
Setup Mode Page 8 - Location Change Chirp
Setup Mode Page 9 - Alarm Button Sound
Setup Mode Page 10 - Constant Alarm Vibration
Setup Mode Page 11 - Backlight
Setup Mode Page 12 - Charger Auto O
Setup Mode Page 13 - Alarm Inhibit Timer
Setup Mode Page 1 - Alarm Disabled Noti cation
Press the SEL/PWR button to display the radio
rmware version.
Pressing MENU/PWR will navigate away from the
Firmware Versions page; resetting the device will exit out
of Setup Mode and return SuperCELL® to the home page.
Setup Mode Page 3 - IrDA Transfer Mode
The IrDA Transfer Mode allows the SuperCELL®
device to be loaded with over 60,000 names (254
groups of 255 names) of 16 characters each. The
SuperCELL® can also be loaded with 80 userprogrammed canned text messages, plus the unit ID.
This information is programmed into the SuperCELL®
through the SuperCELL® Database Manager Utility
Program via the ACTiSYS IrDA USB Adapter, available
for the SuperCELL®.
To enter the IrDa Transfer Mode, navigate to
the IrDA Transfer page by pressing the MENU/PWR
button. Once arriving on the IrDA Transfer page, press
and hold the SEL/PWR button for three seconds to enter
the IrDA Transfer Mode. In the IrDA Transfer Mode, the
SuperCELL® will only respond to commands from the
host computer running the SuperCELL® Database
Manager Utility Program.
Alarm Disabled Noti cation page acts as a reminder
the SuperCELL® will not monitor Alarm, Page, Par, or
Roll Call transmissions while in Setup Mode.
Pressing MENU/PWR will navigate away from the Alarm
Disabled Noti cation page. Resetting the device will exit
out of Setup Mode and return SuperCELL® to the home
page.
Setup Mode Page 2 - Firmware Versions
The Firmware Versions page displays the model
number, CPU rmware version, and radio rmware
version found on the SuperCELL® device.
Navigate to the Firmware Versions page by pressing
the MENU/PWR button.
The top text line displays the model number of the
device.
The middle text line displays the CPU rmware
version found on the device.
The Bottom text line displays the creation date of this
rmware version.
WARNING: While in IrDA Transfer Mode, the device
CANNOT monitor or send Alarm, Page, Par, or Roll
Call messages, nor will these messages be logged in
the SuperCELL® device’s Event Counter. Any Alarm,
Page, Par, or Roll Call messages received, while in
IrDA Transfer Mode, will be subject to the SuperCELL®
device’s inhibit timer.
Interrupting an IrDA transfer while in progress may
corrupt the SuperCELL® device’s name database. If this
should occur, the SuperCELL® name database will need
to be reloaded.
Pressing the MENU/PWR button navigates away from
the IrDA Transfer page. Resetting the device exits out of
IrDA Transfer Mode and returns the SuperCELL® to the
home page.
Setup Mode Page 4 - View Adjust
The View Adjust page allows the display contrast
Grace Industries, Inc.
4
Page 5

to be adjusted for easier viewing of the SuperCELL®
device’s display. Adjusting the display contrast may
be necessary if the SuperCELL® is used in extreme
temperatures.
To adjust the display contrast, navigate to the View
Adjust page by pressing the MENU/PWR button. At the
View Adjust page, press the UP and DWN buttons to
increase (or decrease) the display contrast by 1, and the
* and # to increase (or decrease) the display contrast by
10.
Pressing MENU/PWR will navigate away from the View
Adjust page. Resetting the device will exit out of Setup
Mode and return the SuperCELL® to the home page.
Setup Mode Page 5 - Motion Sensing
Resetting the device exits Alarm Mode, returns device
to home page, and resets motion sensing timer.
Setup Mode Page 6 - Radio Range Test
The Radio Range Test mode of the SuperCELL®
device is used to test radio signal propagation during
on-site testing and system installation.
To enable or disable the Radio Range Test mode,
proceed to the Radio Range Test page by pressing the
MENU/PWR button. On the Radio Range Test page,
press SEL/PWR button to enable or disable Radio Range
Test mode. Once the Range Test Mode is enabled,
resetting the device IS NOT REQUIRED - doing so
disables the Radio Range Test mode and returns the
device to the home page.
The Motion Sensing capability of SuperCELL® is
intended to alert personnel that the wearer of the
device has stopped moving.
SuperCELL® is shipped with Motion Sensing timer
set to 120 seconds. To enable or disable Motion
Sensing, and to adjust the length of time the device
must remain motionless before going into alarm mode
- proceed to the Motion Sensing page by pressing the
MENU/PWR button. Once on the Motion Sensing page,
press the UP and DWN buttons to increase (or decrease)
the motion sensing timer by 15 seconds and the * and
# buttons increase (or decrease) the motion sensing
timer by 1 minute (15 minutes maximum).
Pressing the MENU/PWR button navigates away from
the Motion Sensing page. Resetting the device exits out
of Setup Mode and returns the SuperCELL® to the home
page.
With Motion Sensing enabled, the Motion
Sensing Activation Icon appears on the icon line of the
SuperCELL® device’s home page, accompanied by a
countdown timer in the center of the page. The timer
indicates (in minutes and seconds) how much time of
motionlessness remains before the SuperCELL® enters
alarm mode. Moving the SuperCELL® resets the timer.
Approximately 12 seconds before the SuperCELL®
enters alarm mode, a pre-alert warning tone will
sound, alerting the user that the device will enter
alarm mode if it continues to remain motionless. Upon
entering Alarm Mode, the SuperCELL® will sound a
repeating alarm tone and transmit alarm messages.
Any radio signal that can be monitored by the
SuperCELL® (and is within the device’s detection range)
will be displayed on the screen as it is received by the
device. Each received signal is accompanied by an
audio chirp and blinking of the Operation Status LED.
Pressing the MENU/PWR button navigates away from
the Radio Range Test page. Resetting the device disables
Radio Range Test mode and returns the SuperCELL® to the
home page.
Setup Mode Page 7 - Sound
The Sound page allows the majority of the audio
tones emitted from the SuperCELL® device to be
enabled or disabled.
NOTE: Disabling the Sound DOES NOT disable the
Power On or Power O audio tones. The Power On
and Power O audio tones are permanently enabled.
To enable or disable Sound, proceed to the Sound
page by pressing the MENU/PWR button. At on the
Sound page, the SEL/PWR button enables (or disables)
the audio tones emitted from the SuperCELL®.
Pressing the MENU/PWR button navigates away from
the Sound page. Resetting the device exits out of Setup
Mode and returns the SuperCELL® to the home page.
When Sound is enabled, the Sound Icon appears
solid; when Sound is disabled, the Sound Icon
appears empty.
Grace Industries, Inc.
5
Page 6

Setup Mode Page 8 - Location Change Chirp
The Location Change Chirp page (displayed as Loc.
Change Chirp) allows the enabling or disabling of the
audio chirp emitted from the SuperCELL® whenever
the device receives a new location transmission.
To enable or disable Location Change Chirp,
proceed to the Loc.Change Chirp page by pressing
the MENU/PWR button. At the Loc.Change Chirp page,
the SEL/PWR button enables/disables the audio tones
emitted from the SuperCELL® when the device receives
a new location transmission.
Pressing the MENU/PWR button navigates away from
the Loc.Change Chirp page. Resetting the device exits out
of Setup Mode and returns the SuperCELL® to the home
page.
Setup Mode Page 9 - Alarm Button Sound
The Alarm Button Sound page enables/disables the
alarm audio tone emitted from the SuperCELL® when
the Alarm Button is pressed.
NOTE: If the master Sound control is disabled (Setup
Mode Page 9 - Sound), the SuperCELL® will not emit
an alarm audio tone, even if the Alarm Button Sound
is enabled.
To enable or disable Alarm Button Sound, proceed
to the Alarm Button Sound page by pressing the MENU/
PWR button. On the Alarm Button Sound page, the
SEL/PWR button enables or disables the audio tones
emitted from the SuperCELL® device.
Pressing the MENU/PWR button navigates away from
the Alarm Button Sound page. Resetting the device
exits out of Setup Mode and returns the SuperCELL® to the
home page.
Setup Mode Page 10 - Constant Alarm Vibration
The Constant Alarm Vibration page (displayed as
AlarmVibConstant) allows the vibration noti cation
emitted from the SuperCELL® device to be toggled
between a single burst or a continuous series of
bursts.
Pressing the MENU/PWR button navigates away from the
AlarmVibConstant page. Resetting the device exits out of
Setup Mode and returns the SuperCELL® to the home page.
Setup Mode Page 11 - Backlight
The Backlight page allows the SC500 display
Backlight to be enabled or disabled.
To enable or disable the Backlight, proceed to the
Backlight page by pressing the MENU/PWR button.
On the Backlight page, the SEL/PWR button enables or
disables the SuperCELL® device display Backlight.
Pressing the MENU/PWR button navigates away from
the Backlight page. Resetting the device exits out of Setup
Mode and returns the SuperCELL® to the home page.
Setup Mode Page 12 - Auto ON/O
The Auto ON/OFF page allows the Auto ON/OFF
function to be enabled or disabled.
To enable or disable the Auto ON/OFF function,
proceed to the Auto ON/OFF page by pressing the
MENU/PWR button. At the Auto ON/OFF page, the
SEL/PWR button enables or disables the Auto ON/OFF
function.
Pressing the MENU/PWR button navigates away from
the Auto ON/O page. Resetting the device exits out of
Setup Mode and returns the SuperCELL® to the home page.
With the Auto ON/OFF function disabled, the
SuperCELL® is turned on and o by simultaneously
pressing and holding the MENU/PWR and the SEL/PWR
buttons.
With Auto ON/OFF function enabled, the
SuperCELL® is turned on and o by removing or
inserting the device into the Charging Base.
Simultaneously pressing the MENU/PWR and the SEL/
PWR buttons cannot turn the SuperCELL® on and o
with the Charger Auto O function enabled.
Setup Mode Page 13 - Alarm Inhibit Timer
To enable or disable Constant Alarm Vibration,
proceed to the AlarmVibConstant page by pressing
the MENU/PWR button. At the AlarmVibConstant
page, the SEL/PWR button enables or disables the
Constant Alarm Vibration setting.
Grace Industries, Inc.
The Inhibit Timer page allows the Alarm Inhibit
Timer to be enabled or disabled.
The SuperCELL® is shipped with the Alarm Inhibit
Timer enabled.
6
Page 7

To enable or disable the Alarm Inhibit Timer,
proceed to the Inhibit Timer page by pressing the
MENU/PWR button. At the Inhibit Timer page, the SEL/
PWR button enables or disables the Alarm Inhibit Timer
function.
NOTE: With the Alarm inhibit Timer enabled, the
SuperCELL® will not respond to the same alarm
message for 30 seconds after that alarm message
has been acknowledged. This allows the user of the
SuperCELL® time to operate the menu system of the
device during an alarm event.
Pressing the MENU/PWR button navigates away from
the Inhibit Timer page. Resetting the device exits out of
Setup Mode and returns the SuperCELL® to the home page.
When the Alarm Inhibit Timer is enabled
and no alarm messages have been received and
acknowledged within the 30 second inhibit time, the
Alarm Inhibit Timer Icon will be displayed as solid on
the Icon Line of the SuperCELL® display. If an alarm
message HAS been received and acknowledged, the
Alarm Inhibit Timer Icon will be displayed as empty.
This indicates that the device will not respond to an
alarm that had been acknowledged until the 30 second
Alarm Inhibit Timer expires.
Safety Certi cations
Intrinsically Safe, Sécurité Intrinsèque
SuperCell® SC500 Models Intrinsically Safe per ANSI/UL913
For use in Class 1, Groups A, B, C and D; Class II, Groups E, F,
G; Div. 1 Hazardous Locations. CSA C22.2 No.157.
Temperature Code T6. IP67. Exia Rated 4.2VDC.
WARNINGS, AVERTISSEMENTS
WARNING! To prevent ignition of hazardous
atmosphere, battery must only be charged in area known to
be nonhazardous.
AVERTISSEMENT! Pour éviter l’in ammation d’une
atmosphère dangereuse, les batterie doivent être chargées
seulement dans une zone connu comme être non
dangereuse.
FCC Statements
Changes or modi cations not expressly approved by the
party responsible for compliance could void the user’s
authority to operate the equipment.
NOTE: This equipment has been tested and found to comply
with the limits for a Class A digital device, pursuant to part
15 of the FCC Rules. These limits are designed to provide
reasonable protection against harmful interference when
the equipment is operated in a commercial environment.
This equipment generates, uses, and can radiate radio
frequency energy and, if not installed and used in accordance
with the instruction manual, may cause harmful interference
to radio communications. Operation of this equipment in a
residential area is likely to cause harmful interference
in which case the user will be required to correct the
interference at his own expense.
Grace Industries, Inc.
Industry Canada Statements
This Class A digital apparatus complies with Canadian ICES-003.
This device complies with Industry Canada licence-exempt
RSS standard(s). Operation is subject to the following two
conditions: (1) this device may not cause interference, and
(2) this device must accept any interference, including
interference that may cause undesired operation of the
device.
Cet appareil numérique de la classe A est conforme à la
norme NMB-003 du Canada.(select the class for your device)
Le présent appareil est conforme aux CNR d’Industrie
Canada applicables aux appareils radio exempts de licence.
L’exploitation est autorisée aux deux conditions suivantes : (1) l’appareil ne doit pas produire de brouillage, et (2)
l’utilisateur de l’appareil doit accepter tout brouillage
radioélectrique subi, même si le brouillage est susceptible
d’en compromettre le fonctionnement.
7
Page 8

De nition of Terms
Alarm Inhibit Timer: When the SuperCELL® receives an alarm message from
another device, and that alarm is cleared, the Alarm Inhibit Timer provides
a 30 second period of time where the SuperCELL® will not receive another
alarm message from that same device.
Alarm Message: A radio transmitted signal sent from a SuperCELL®, or
other GRACE Industries telemetry device, when the panic button is pressed
for the purpose of notifying monitoring personnel that an emergency
situation is present and rescue action is requested.
Alarm Mode: A SuperCELL®, or other GRACE Industries telemetry device, is
placed in alarm mode by pressing the device’s panic button. When this
occurs, the device transmits an alarm signal and emits a loud alarm audio
tone.
Canned Text Message: Canned Text Messages are pre-programmed, text
based messages that can be sent from one SuperCELL® to another.
Device Name: The Device Name is a pre-programmed name assigned to the
SuperCELL® device that can be viewed on the Device Name and Run Time
Display page.
Dilution of Precision: A term used in satellite navigation to express the
positioning accuracy of a GPS device.
GPS Status Icon: The GPS Status Icon appears on the Icon Line of the Home
Page when the GPS Location feature is active. The icon changes based on
the satellite x quality.
Home Page: The Home Page is the main page of the SuperCELL® that is
displayed on startup and any time the device is reset. Displayed on
this page is the status icons, motion sensing timer, device OEM and ID
numbers, and the rmware versions loaded on the device.
Icon Line: The Icon Line is the display line at the top of the home page that
displays the device status icons.
Man-Down Alarm Mode: A SuperCELL, or other GRACE Industries telemetry
device, enters Man-Down Alarm Mode when the Motion Sensing Timer
counts down to zero.
Monitoring Authority: The Monitoring Authority is the person/people
responsible for monitoring the status of the telemetry devices used by the
various on-scene personnel, usually from a centralized base location.
Motion Sensing Activation Icon: The Motion Sensing Activation Icon
appears on the Icon Line of the Home Page when the Motion Sensing
feature is active. The icon changes as the devices senses motion.
Motion Sensing Timer: The Motion Sensing Timer indicates the seconds of
lack-of-motion required before the SuperCELL® enters the Man-Down
Alarm mode.
Radio Signal Propagation: Radio Signal Propagation is the behavior radio
waves exhibit when they are transmitted. Radio Signal Propagation can be
a ected by structural, environmental, and atmospheric conditions.
Resetting the Device: Simultaneously pressing the MENU/PWR and SEL/PWR
resets the SuperCELL® and returns the display to the Home Page.
Sensing Mode: When the SuperCELL® is turned on, it is in Sensing Mode.
In Sensing Mode, the device is monitoring radio tra c for alarm
messages and canned text messages. The SuperCELL® is also sensing
motion, if enabled.
Setup Mode: Setup Mode allows certain characters and functions on the
SuperCELL® to be activated, deactivated, or modi ed.
Signal Loss: Signal Loss is an event that occurs when the SuperCELL® is out
of the communication range of a base monitor for a preset length of time.
Signal Loss Activation Icon: The Signal Loss Activation Icon appears on the
Icon Line of the Home Page when the Signal Loss feature is active.
Unit ID: The Unit ID is the unique ID number assigned to the SuperCELL®
device for purposes of radio communication. It can be viewed on the
device’s home page.
Unit OEM: The Unit OEM is a number assigned to the SuperCELL® device,
similar to the Unit ID. The key di erence is the Unit OEM is not a unique
number to each device. In most applications all of the SuperCELL® devices
will have the same OEM number; from the factory this number will usually
be 9090.
Warranty Information
Grace industries, Inc. warrants SuperCELL® & related Grace telemetry products to
be free from defects in workmanship and materials for a period of one year from
the date of purchase. This warranty is valid only when the returned product is
accompanied by a sales slip or other proof of purchase that states the date and
location of purchase. Grace Industries, Inc. will not repair or replace any
merchandise under warranty which has been damaged because of accident,
misuse or abuse while in possession or control of the consumer. This warranty is
void if any attempt to repair or replace parts was made or attempted by other than
quali ed Grace Industries, Inc. personnel. This warranty is void if any of the sealed
compartments are opened or tampered with. Send all returned merchandise,
prepaid and accompanied by proof of purchase to: Grace Industries, Inc., Repair
Division, 305 Bend Hill Road, Fredonia, PA 16124 USA. Grace Industries, Inc. shall
not be liable for any direct, incidental or other consequential loss or damage arising
out of the failure of the product to operate. End-user or customer is responsible for
return shipping/freight charges.
The sole and exclusive remedy under all guarantees or warranties, express or
implied, is strictly limited to repair or replacement as herein provided. ALL IMPLIED
305 Bend Hill Road,
Fredonia, PA 16124 USA
www.graceindustries.com
(724)-962-9231
Grace Industries, Inc.
WARRANTIES, INCLUDING BUT NOT LIMITED TO, WARRANTIES OF FITNESS AND
MERCHANTABILITY, ARE HEREBY LIMITED IN DURATION TO A PERIOD ENDING ONE
(1) YEAR FROM THE DATE OF PURCHASE. The warranty and liability set forth in the
prior paragraphs are in lieu of all other warranties, expressed or implied, in law or
in fact, including implied warranties of merchantability and tness for a particular
purpose. Some states do not allow limitations on how long an implied warranty
lasts, so the above limitations may not apply to you.
This warranty gives you speci c legal rights and you may also have other rights
which may vary from state to state.
This information is believed to be accurate and reliable. Grace Industries, Inc.
provides this information as a guide only.
Technical assistance is available by contacting Grace Industries, Inc. by
telephone at 724-962-9231, M – F, 8:00 am – 4:30 pm.
For training purposes a copy of User’s Information is available by contacting
Grace Industries, Inc. at www.graceindustries.com or by mail to: 305 Bend Hill Rd,
Fredonia, PA 16124 U.S.A.
8
 Loading...