

Page 1
2
1
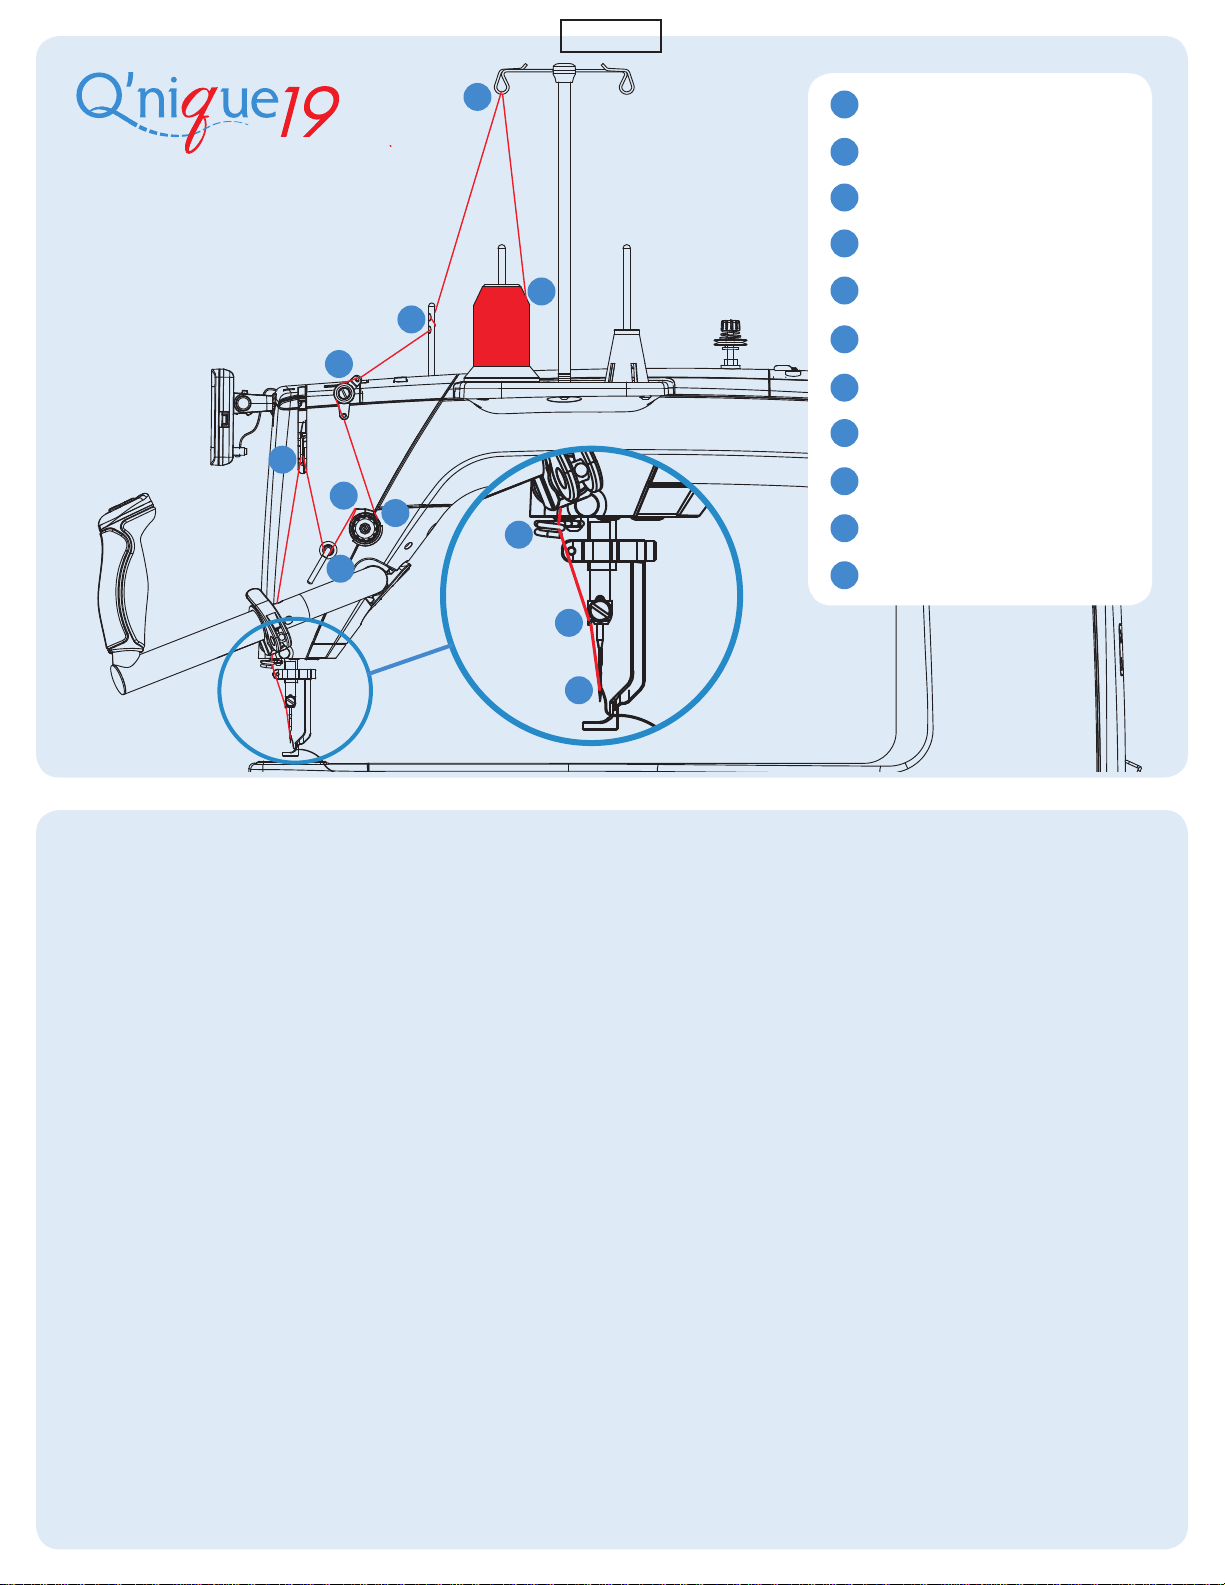
1. Thread Cone
2
2. Thread Mast
Thread Guide
8
3
3. Dual Thread Guide
4
4. Small Tensioner
1
3
4
6
5
9
7
10
11
5
5. Large Tensioner
6
6. Check Spring
7. Thread Guide
7
8
8. Take-up Lever
9. Bottom Thread Guide
9
10
1. Needle Bar Eyelet
11
2. Eye of Needle
Troubleshooting
If your thread is breaking...
• Replace your needle if it
is bent or burred. Use the
needle magnet to install and
align the needle (see page
56).
• Follow the “Top Thread
Tension” guide on the back
to correct your thread
tension.
• Check that your machine is
threaded correctly using the
“Thread Guide” above.
• Follow the “Bobbin Guide”
on the back for threading,
tensioning, and installing the
bobbin case.
• Check the hopping foot
height (see page 59).
• Adjust the height of the
take-up rail on your quilting
frame to be 1/4 inch above
the needle plate.
• For more help call
1(800) 264-0644 or e-mail
support@graceframe.com.
If your machine is skipping
stitches...
• Replace your needle if it
is bent or burred. Use the
needle magnet to align and
install your needle straight
(see page 56).
• Follow the “Top Thread
Tension” guide on the back
to correct your thread
tension.
• Check the hopping foot
height (see page 59).
• Adjust the height of the
take-up rail on your quilting
frame to be 1/4 inch above
the needle plate.
• For more help call
1(800) 264-0644 or e-mail
support@graceframe.com.
Page 2

Needle Information
Use a straight needle.
Needle Style: 135x5, DPX5 Bobbin Type: M-Class
(Equivalent European Needle Styles: 134, 135x7, 797, SY 1955)
Size: Thread Size and Type:
14/90 mono-lament, 100 wt. silk, 60 wt. polyester
16/100 mono-lament, 60 wt., 50 wt. polyester or cotton thread
18/110 40 wt. cotton and polyester, 30 wt. cottons and polyester
20/125 any thread 30 wt. or heavier
Bobbin Guide
Place the bobbin in the
bobbin case so that when you
pull the thread, the bobbin
rotates clockwise.
1 2 3
Tension Test: Hold the
bobbin case in your hand and
pull the thread up.
Tension
is correct if
the bobbin
case tilts
onto its side
but does
not leave
your hand.
Set the bobbin tension rst, and then adjust the top thread
tension.
If the
bobbin case
does not tilt
up...
Increase
Tension by
twisting the
large bobbin
case screw
clockwise
with a small
screwdriver,
pin or
ngernail.
If the
bobbin case
leaves your
hand...
Decrease
Tension by
twisting the
large bobbin
case screw
counter-
clockwise
with a small
screwdriver,
pin or
ngernail.
Large Screw
Large Screw
Top Thread Tension
Top Thread
Knot
Correct thread tension
Set the bobbin tension rst (see above).
The top and bobbin thread
knot in the middle of the
Bobbin Thread
Top Thread
fabric layers.
If the top thread is pulled
through the bottom layer of
4
3
2
1
fabric, increase tension.
Bobbin Thread
Top Thread
If the bobbin thread is pulled
through the top layer of fabric,
4
3
2
1
decrease tension.
Bobbin Thread
Copyright October 7, 2019 Grace Company
Version 1.1
Page 3

Sewing Button Controls
Change
Sewing Mode
Move Needle
Up/Down
or
Single Stitch
(change in
Settings)
Increase
Speed
Settings
*These buttons may be reversed in Settings for left-handed quilters.
Sewing Screen
Regulated
1
2
3
4
Settings
1
Stitch Length
2
Displayed in Stitches Per
Inch (SPI) or Centimeter
(SPC) (see Settings to set the
unit measurement). Press [-]
to decrease SPI/SPC and [+]
to increase SPI/SPC.
SPI/SPC Presets
3
Press to set the SPC/SPI
shown.
Regulated
Precise
Cruise
SPI
SPI
12
12
25%
6
10 14
Min Speed
Jog
Needle
STOP
5 6 7
8
9
Start/Stop
Stitching
Regulated
Cruise
SPI
12
25%
Min Speed
Over-speed Indicator.
6
Baste
Short
Press to switch audible
signal [On] and [O]. Icon
will change [Red] if you move
your machine faster than it is
able to make even stitches.
Machine Inactive
Machine Active
Over-speed: Move
machine slower.
Decrease
Speed
Manual
80%
10
10
Sewing Mode
8
50 90
Press [>] to switch to
Precise, Cruise, Manual, and
Baste.
Minimum Speed
9
Shown as a percentage of
the machine’s highest speed,
ranging from 5% to 25%.
Press [-] to decrease stitch
speed and [+] to increase
stitch speed.
11
12
Jog Needle
4
Press [<] or [>] to move
the needle incrementally.
Needle Stop Indicator
5
Shows if the needle will
stop sewing in the [Up] or
the [Down] position. Press to
switch to [Up] and [Down].
[Up]
STOP
STOP
[Down]
Full Stitch/Half Stitch
7
Pressing this button to
create a full stitch, or a half
stitch. Change which button
is active in Settings.
[Full Stitch]
[Half Stitch]
Baste Length
10
Press [-] to decrease stitch
length and [+] to increase
stitch length.
Manual Speed
11
Displayed as a percentage
of the highest speed. Press
[-] to decrease speed and [+]
to increase speed.
Manual Speed Presets
12
Press to use that stitch
speed. Press and hold to set.
Page 4

System
Settings Button Controls
Regulated
Precise
Return to
Sewing
Back
*These buttons may be reversed in Settings for left-handed quilters.
Settings Screen
1
2 7
3 8
Stitches
per cm
Settings
Stitch
Units
FullHalf
Stitches
per in
4
Screen
Settings
5 6
Return to Sewing
1
Stitch Button Setting
2
Change which button is
active on the Sewing Screen
and on the handle button.
[Full Stitch]
[Half Stitch]
Info
Machine Rev.
V### mm/dd/yy
Motor: 2000 RPM
Display Rev.
####### mm/dd/yy
Stitch Count:
9
10
7
143173
Reset
Total Stitches:
143173
Machine Revision
Hours Run:
143173
Reset
Total Hours:
143173
Information
Display Revision
8
Information
Stitch Count
9
Press [Reset] to reset the
Stitch Count. Total Stitches
will not reset.
Screen
Settings
11
12
11
Screen Calibration
Color Theme
Screen Calibration
Use this setting if buttons
aren’t activated correctly when
pressed.
Color Theme
12
Choose a color theme for
your screen.
Hour Count
Units
3
Change length units from
SPI to SPC on the Sewing
Screen.
Reverse Handle
4
10
Press [Reset] to reset the
hour count. Total hours will
not reset.
Buttons
Reverse the left and right
handle button controls. This
is useful for left-handed
quilters.
System Information
5
Screen Settings
6
Copyright October 7, 2019 Grace Company
Version 1.1
 Loading...