

Page 1
1
FREESTANDING PELLET STOVE
(PLEASE KEEP THESE INSTRUCTIONS FOR FUTURE REFERENCE)
A LIFETIME OF WARMTH
*Please read this entire manual before installation and use of
this pellet fuel burning room heater. Failure to follow these
instructions could result in property damage, bodily injury, or
even death.
*Save these instructions!
INSTALLER: THIS MANUAL MUST STAY WITH APPLIANCE!
MANUFACTURED BY:
NINGBO GRACE MACHINE CO., LTD
PO BOX 315400
Add. Lanshi Bridge Village, LanJiang Street, Yuyao ,Ningbo City,CHINA
Email: info@nbpelletstove.com
Web: www.nbpelletstove.com
Tel. /Fax: 0086-574-62511234/0086-574-62511112
Page 2

2
Table of Contents
1. Fuel Requirement------------------------------------------------3
2. Stove Features -----------------------------------------------------7
3. Structure instruction----------------------------------------------10
4. Installation and Caution ------------------------------------------12
5. Operation ----------------------------------------------------------21
6. Maintenance--------------------------------------------------------34
7. Troubleshooting----------------------------------------------------38
8. Warranty------------------------------------------------------------42
9. Electronic Plan---------------------------------------------------- 43
Page 3

3
1. Fuel Requirement
Before introducing how the stove can be operated, the fuel of
stove should be briefly introduced since it is related to the
performance of the stove. (Your pellet stove has been designed to burn wood
pellets only. Do not use any other type of fuel, as this will void any warranties stated in
this manual.)
Pellet quality is important, please read the following:
The performance of your pellet stove is greatly affected by the type and quality of wood
pellets being burned. As the heat output of various quality wood pellets differs, so will
the performance and heat output of the pellet stove.
The Pellet Fuel Industries (P.F.I.) has established standards for wood pellet manufacturers.
We recommend the use of pellets that meet or exceed these standards. Please use a
recommended pellet type.
P.F.I. PELLET STANDARDS:
Fines (fine particles)......1% maximum through a 1/8‖ screen
Bulk Density..................40 pound per cubic foot minimum
Size..............................1⁄4‖ to 5/16‖ diameter 1⁄2 – 11⁄2‖ long maximum
Ash Content..................1% maximum (Premium grade)
..................3% maximum (Standard grade)
Moisture Content...........8% maximum
Heat Content.................approximately 8200 Btu per pound minimum
CAUTION:
Page 4

4
It is important to select and use only pellets that are dry and free of dirt or any impurities such
as high salt content. Dirty fuel will adversely affect the operation and performance of the unit
and will void the warranty.
ASH: The ash content of the fuel and operation of your stove will directly determine the
frequency of cleaning. The use of high ash fuels may result in the stove needing to be cleaned
daily. A low ash fuel may allow longer intervals between cleaning.
CLINKERING: [clinkers are silica (sand) or other impurities in the fuel that will form a hard
mass during the burning process]. This hard mass will block the air flow through the Burn Pot
Liner and affect the performance of the stove. Any fuel, even approved types, may tend to
clinker. Check the Burn-Pot Liner daily to ensure that the holes are not blocked with clinkers.
If they become blocked, remove the liner (when the unit is cold) and clean/scrape the clinkers
out. Clean the holes with a small pointed object if required.
Refer to the section Routine Cleaning and Maintenance.
PELLET FEED RATES: Due to different fuel densities and sizes, pellet feed rates may vary.
This may require an adjustment to combustion fan‘s speed or to the auger feed trim setting on
low. Since stove supplier has no control over the quality of pellets that you use, we assume no
liability for your choice in wood pellets.
Size of wood pellet
This stove uses wood pellet fuel. It is small column pellet with cleaning surface. Pellets are
either 1\4‖(6MM) or 5\16‖8(MM)in diameter and vary in length. The stove will burn either
diameter pellets. The length is no more than 30mm for¢6mm, 25mm for ¢8mm, and their
humidity is no more than 10%. Ash is no more than 1%. Take care of the pellet. Do not damp
Page 5

5
or crush it. Or, it will affect the efficiency and the dust will be collected on the door glass.
Pellet fuel is made from sawdust and scrap wood from many different species of wood. Pellets
made from hardwoods contain more ash than those made from softwoods. Minerals from ash and
sand in the pellets clinker under the extreme temperatures in the burn pot. Try burning various
brands of pellets until you find one that burns with minimum ash and clinkers. Once you find a
pellet brand that burns well, continue using this brand. High ash fuel increases the frequency of
stove cleaning. Fuel with excessive moisture content may jam the auger assembly.
Store pellets at least 36” (1m) away from the pellet stove
SAFETY WARNINGS AND RECOMMENDATIONS:
Caution: Do not connect to any air distribution duct or system. Do not burn garbage or
flammable fluids such as gasoline, naphtha or engine oil. When unit in operation, Keep
children, clothing and furniture away. Contact may cause skin burns.
FUEL: This pellet stove is designed and approved to only burn wood pellet fuel with up to
3% ash content. Dirty fuel will adversely affect the operation and performance of the unit and
may void the warranty. Check with your dealer for fuel recommendations.
THE USE OF CORDWOOD IS PROHIBITED BY LAW.
SOOT: Operation of the stove with insufficient combustion air will result in the formation of
soot which will collect on the glass, the heat exchanger, the exhaust vent system, and may
stain the outside of the house.
This is a dangerous situation and is inefficient. Frequently check your stove and remove the
dust inside of stove ensure proper combustion. If it is necessary, call your dealer to adjust the
Page 6

6
speed of fan or feeding speed.
CLEANING: There will be some of fly ash and small amounts of creosote built up in the
exhaust. This will vary due to the ash content of the fuel used and the operation of the stove.
It is advisable to inspect and clean the exhaust vent semi-annually or every two tons of
pellets.
Page 7

7
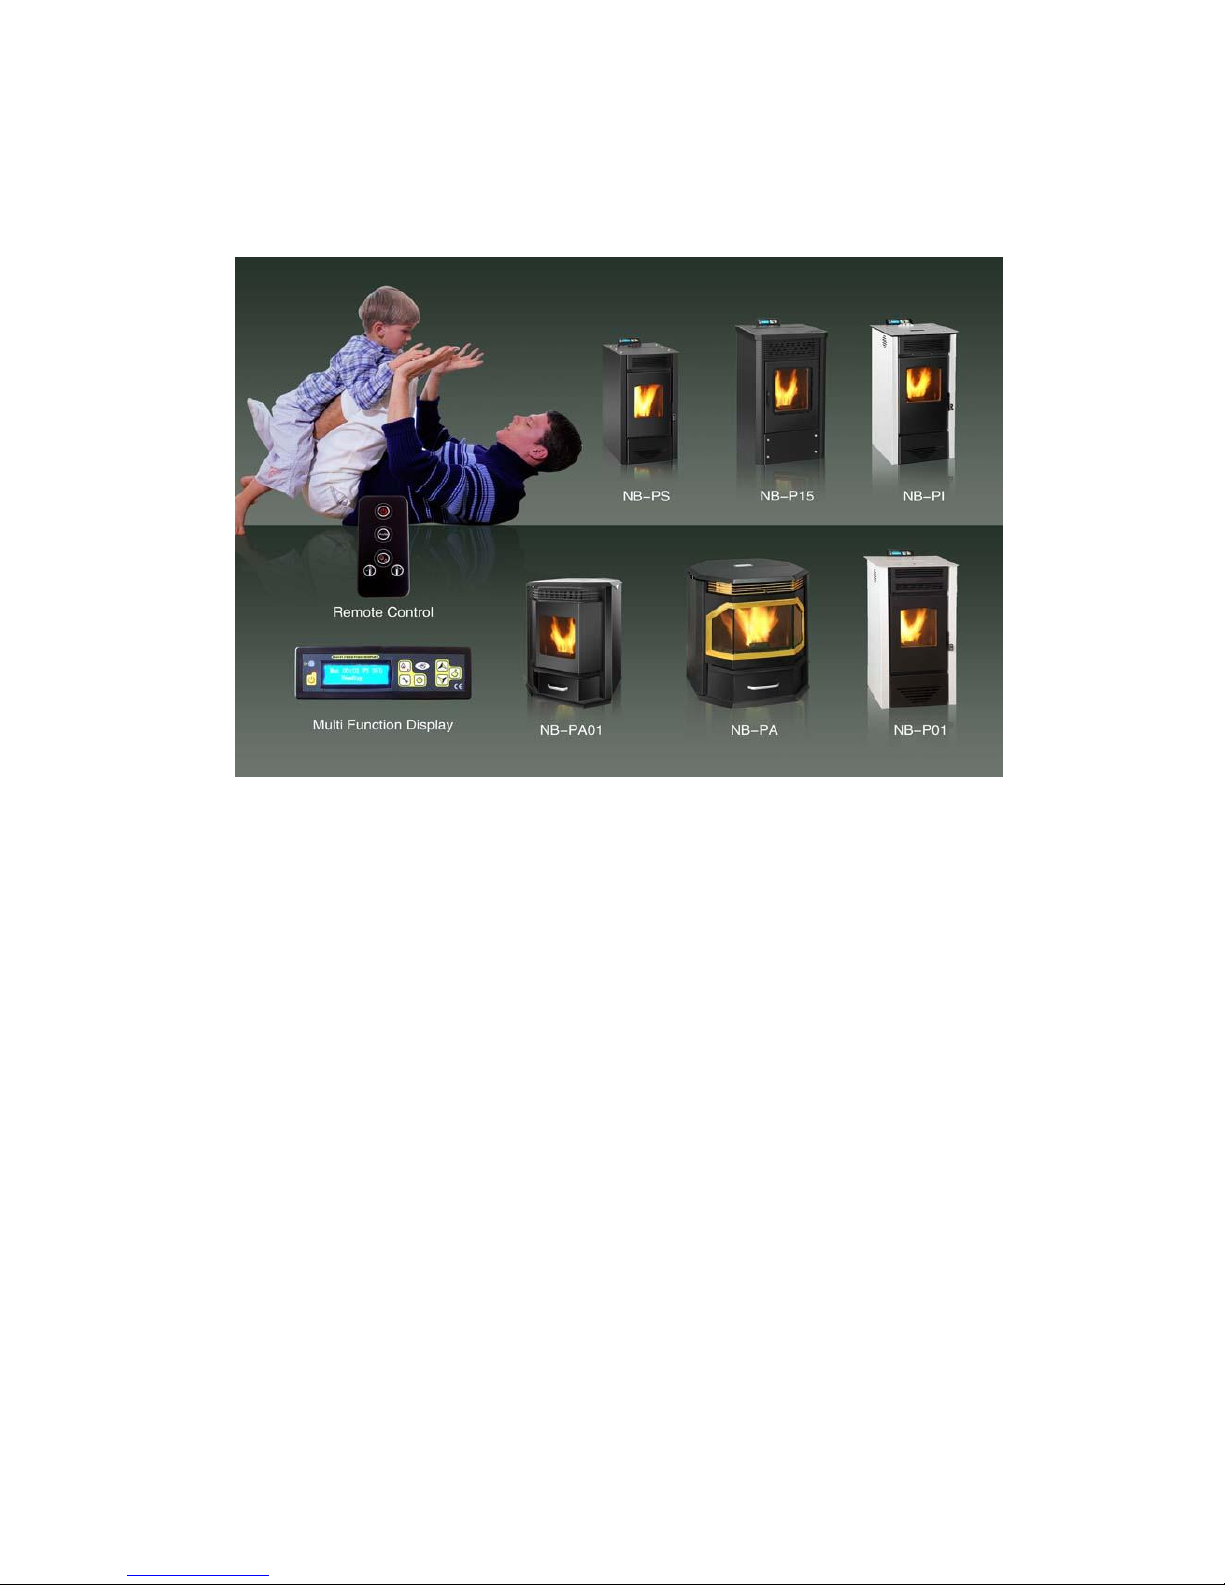
2. STOVE FEATURES
Pellet stove is advanced designed and has individual fresh air input and venting system.
Negative pressure burning technology causes high efficiency and little ash outlet during
burning. It will be shut off automatically by wrong burning or out of fuel. Large BTU, quick
heating and low fuel cost are its advantages.
1. Main performance
Model NP-P15
Dimension (WxHxD) MM 529x1025x512
Weight KG 115
Air inlet Pipe MM 40x80
Air outlet Pipe MM 76
Heat Area M2 120
Automatic Burning Time (Min-Max.) H 16/40
Fuel Wood Pellet
Consumption for Pellet (Min-Max) KG/H 0.8/2.0
Efficiency % 86%
Hopper Capacity KG 32
Electronic consumption W/H 100-400
Rating Voltage and Frequency V/HZ 230/50-115/60
Rating Power KW 11
Model NP-P01
Dimension (WxHxD) MM 510x1029x527
Weight KG 106
Air inlet Pipe MM 50
Air outlet Pipe MM 76/80
Heat Area M2 100
Automatic Burning Time (Min-Max.) H 20/40
Fuel Wood Pellet
Consumption for Pellet (Min-Max) 0.7/1.6
Efficiency % 85%
Hopper Capacity KG 30
Electronic consumption W/H 100-400
Rating Voltage and Frequency V/HZ 230/50-115/60
Rating Power KW 9
Page 8

8
Model NP-PS
Dimension (WxHxD) MM 439x900x487
Weight KG 80
Air inlet Pipe MM 50
Air outlet Pipe MM 80
Heat Area M2 60
Automatic Burning Time (Min-Max.) H 20/50
Fuel Wood Pellet
Consumption for Pellet (Min-Max) 0.4/0.9
Efficiency % 82%
Hopper Capacity KG 20
Electronic consumption W/H 100-400
Rating Voltage and Frequency V/HZ 230/50-115/60
Rating Power KW 5
Model NP-PI
Dimension (WxHxD) MM 471x993x470
Weight KG 110
Air inlet Pipe MM 50
Air outlet Pipe MM 80
Heat Area M2 90
Automatic Burning Time (Min-Max.) H 18/34
Fuel Wood Pellet
Consumption for Pellet (Min-Max) 0.7/1.4
Efficiency % 85%
Hopper Capacity KG 25
Electronic consumption W/H 100-400
Rating Voltage and Frequency V/HZ 230/50-115/60
Rating Power KW 8.0
Page 9

9
Model NP-PA
Dimension (WxHxD) MM 665x787x610
Weight KG 120
Air inlet Pipe MM 76
Air outlet Pipe MM 76
Heat Area M2 140
Automatic Burning Time (Min-Max.) H 13/33
Fuel Wood Pellet
Consumption for Pellet (Min-Max) 0.8/2.1
Efficiency % 83%
Hopper Capacity KG 27
Electronic consumption W/H 100-400
Rating Voltage and Frequency V/HZ 230/50-115/60
Rating Power KW 13
Model NP-PA-01
Dimension (WxHxD) MM 490x680x450
Weight KG 80
Air inlet Pipe MM 50
Air outlet Pipe MM 60
Heat Area M2 50
Automatic Burning Time (Min-Max.) H 15/24
Fuel Wood Pellet
Consumption for Pellet (Min-Max) KG/H 0.5/0.9
Efficiency % 80%
Hopper Capacity KG 12
Electronic consumption W/H 100-400
Rating Voltage and Frequency V/HZ 230/50-115/60-100/50
Rating Power KW 6
Thickness of steel, inside: MM 3
Thickness of steel, outside: MM 1.5-2
APPEARANCE CHOICES
The STOVE can be ordered with the following sides and doors color:
Black Red Beige
Page 10

10
3.Structure instruction
The stove is mainly made up of following items: (NB-P15 AS
EXAMPLE)
1. Hopper covers 2.hopper 3.auger 5.convertion blower 4. Auger motor 6.venting pipe 7. Exhaust
blower 8.front cover 9.ash drawer 10.fire shield board 11.stove door 12.heat exchanger 13.
Control board
The following is a list of main components and their functions
IGNITER
The STOVE comes equipped with an automatic igniter for lighting the fuel when the stove is in
lighting mode. There are two ways to light the wood pellet for our models. One is the igniter heats
wood pellet directly through the burn pot and then lighted by the combustion blower. The other
one is that the igniter lights the pellet directly. The igniter remains energized for the first eight
minutes of the lighting sequence.
VACCUM SWITCH
Page 11

11
The STOVE has s vacuum switch located behind the left door, fastened to the base. If a low
pressure is created in the firebox by a leak, opening the front door, a blocked flue, or unsealed ash
drawer, the vacuum switch will sense it and cause the stove to go into a shutdown mode.
AUGER AND AUGER MOTOR
The 5 RPM auger motor turns the auger, lifting pellets up the auger tube. The pellets are then
dropped down a tube and into the firepot. The auger is controlled by the control board.
OVER TEMPERATURE SNAP SWITCH
This switch is installed on the bottom of hopper and shut off the stove if it senses excessive
temperatures(70 degrees). This snap switch can be changed by resetting programs in the chip!
CONVECTION BLOWER SNAP SWITCH
This switch is installed on the vent pipe and turns the convection blower on when the stove gets up
to temperature (30 degrees). Besides, switch off the stove when the temperature goes below 30
degrees
Page 12

12
4. Pellet Stove installation
Deciding Where to Locate your Pellet Appliance and CLEARANCES TO COMBUSTIBLES:
When installing this unit on a combustible floor (for example linoleum, hardwood flooring) a
noncombustible hearth pad (15mm thickness) must be under the unit. The pad must extend at least
the width of the appliance [22‖ (558 mm)] and at least the depth of the appliance plus 6‖ (153 mm)
in front of the appliance [29 3⁄4‖ (756 mm)].
The clearance between the walls or to the top is no less than the
size of 50mm.
1. Electrical:
The unit must be grounded. The grounded electrical cord should be connected to a standard
230V, 50Hz (4.5 Amps), (115 volts (4.5 Amps), 60 hertz) electrical outlet. Be careful
that the electrical cord is not trapped under the appliance and that it is clear of any hot
surfaces or sharp edges and also must be accessible. If this power cord should become
damaged, a replacement power cord must be purchased from the manufacturer or a qualified
dealer.
2. Air input and venting pipe Installation
Several examples, taken by NB-P15, are the following
Horizontal and Up,
Page 13
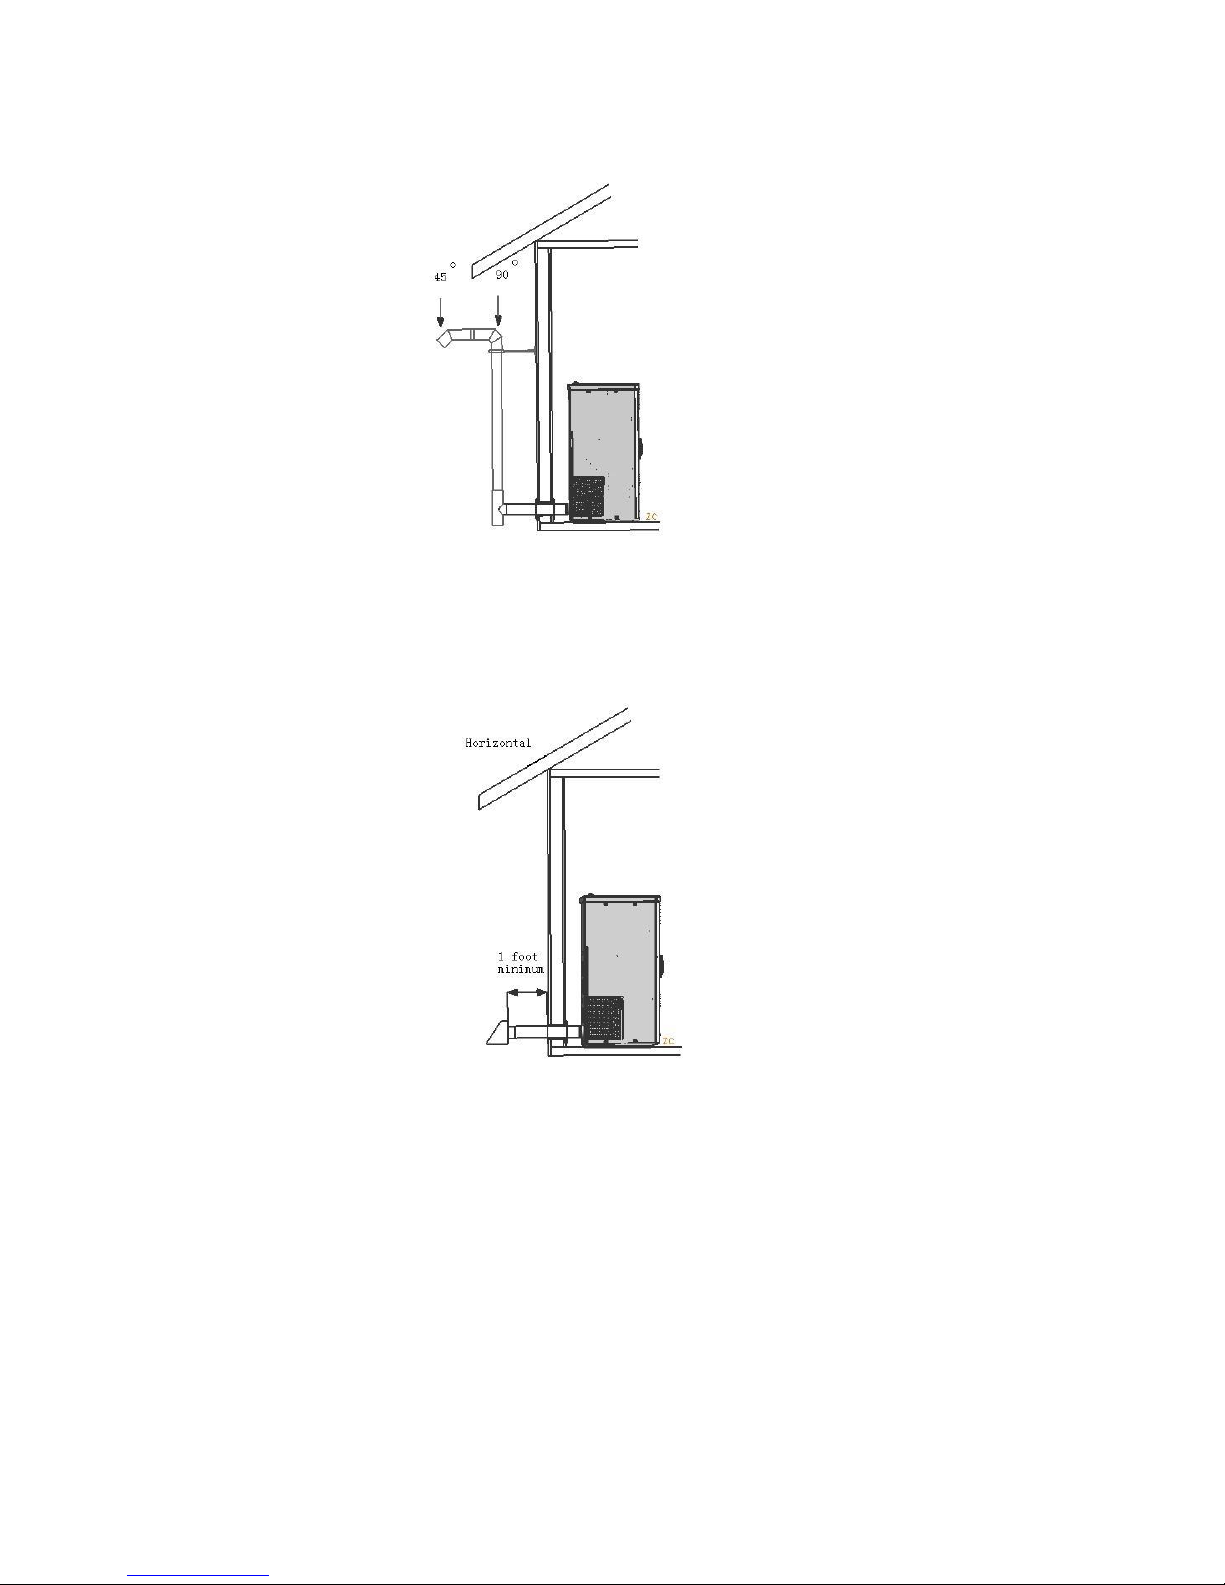
13
Horizontal
Horizontal and Up through the eave
Page 14

14
The Distance between wall and stove when it is installed in the
house (MM)
Page 15

15
The stove of NB-P15'S air input pipe diameter is 40X80 mm, venting pipe diameter is ¢76
mm. The total length of pipes is no longer than 3m and elbows are not available. Indoor
venting pipe joint should be sealed by silicone sealant to prevent exhaust leaking into the
room. Venting pipe and termination should be waterproof and avoid being blocked. Or, the
stove can not work properly. When the installation is limited by space or the owner‘s special
requirements and the pipes‘ length should be longer than 3m and need elbows, the diameters
of the air input pipe and venting pipe must be increased properly for smooth convection. If
not, it will influence the burning and the stove can not work properly. The owner should
connect with the local seller for the right installation. When pellet stove is normal working,
the temperature on venting pipe surface can reach 200˚C, so the combustible things, clothes
and furniture should be away from the venting pipe. To prevent scald, don‘t touch the heating
surface!
Vent Termination Requirements
Page 16

16
(1)Do not terminate the vent in any enclosed or semi enclosed areas such as a carport, garage, attic,
crawlspace, narrow walkway, closely fenced area, under a sundeck or porch, or any location that
can build up a concentration of fumes such as stairwells, covered breezeway,etc.
(2)Vent surfaces can become hot enough to cause burns if touched. Noncombustible shielding or
guards may be required.
(3)Termination must exhaust above the inlet elevation. It is recommended that at least five feet of
vertical pipe be installed outside when the stove is vented directly through a wall. This will create
a natural draft to prevent the possibility of smoke or odor during appliance shut down or power
failure and avoids exposing people or shrubs to high temperatures.
(4)The vent should terminate no less than four feet below, no less than four feet horizontally
from ,and no less than one foot above doors and windows, or gravity /ventilation air inlets into the
building.
(5)The distance between the bottom of termination and grade should be a minimum of 12‖.The
distance between the bottom of the terminate and a public walkway should be a minimum of seven
feet.
(6)Locate the vent terminatation at least two feet away from combustible material such as shrubs,
plants, grass, fences, roof overhangs, and adjacent buildings.
Pellet pipe type PL or L must be used to vent the STOVE. Single wall pipe cannot be used with
this pellet stove. The stove‘s flue collar is 3‖in diameter. An approved wall thimble or approved
ceiling firestop must be used when the pellet pipe passes through a combustible wall ceiling.
The stove‘s combustion blower pressurizes and pushes flue gases out the pellet pipe .As a result,
all pipe joints should be locked together or screwed with three screws if the pipe does not have a
Page 17

17
locking system and sealed with high temperature silicone.
The pipe should be siliconed and fastened with three screws to the stove‘s flue collar.
The longer the run of pipe and the more elbows used, the greater the resistance to the flow of flue
gases. Four inch diameter pellet pipe is recommended for pipe runs greater than 15 feet or when a
number of elbows are used.
DO NOT INSTALL A FLUE DAMPER IN THE EXHAUST VENTING SYS TEM OF
THIS UNIT. FO NOT CONNECT THIS UNIT TO A CHIMNEY FLUE SERVING
ANOTHER APPLIANCE.
Here are some examples of installation in different situation
Horizontal installations that terminate without any vertical sections of pipe are approved;
However, wind may direct flue gases towed the house causing discoloring problems. For this
reason, horizontal and up 5 feet or horizontal and through the eave installations are recommended.
To aid in cleaning, wherever possible, the venting system should include a tee with clean out
attached to the flue collar on the stove.
Masonry Chimney
When venting into a masonry chimney, the pellet pipe can terminate just inside the chimney
.However, it is recommended to run the pellet pipe to the top of the chimney.
Fireplace
When venting into a fireplace chimney, the pellet pipe can terminate just above the damper.
However, it is recommended to run the pellet pipe to the top of the chimney.
Vertical
If the length of pipe exceeds 15 feet, 4 inch pipe rather than 3 inch vent pipe should be used.
Page 18

18
Mobile Home Installations
The following are required for installation of the STOVE in mobile homes.
1) Connecting the STOVE to outside combustion air is optional, except in mobile home
installations and when required by local building codes. The stove‘s air intake will accept 3‖ ID
pipe to accommodate outside air installations. The air intake on the exterior of the home should
always be located substantially below the flue termination and terminate with a cover to keep out
weather and pests
2) The stove must be fastened to the floor using lag screws. The screws can be inserted through
the holes in the pedestal located behind the side doors
3) The stove must be grounded with a #8 or larger copper wire.
WARNING:
DO NOT INSTALL THIS STOVE IN A SLEEPING ROOM IN A MANUFACTURED HOME.
CAUTION:
THE STRUCTURAL INTEGRITY OF THE MANUFACTURED HOME FLOOR, WALL ,AND
CEILING/ROOF MUST BE MAINTAINED.
SURGE PROTECTORS
A surge protector is recommended to ensure the stove‘s electrical components are not damaged
due to a surge in the electrical supply. Only high quality protector should be used—cheap ones do
not provide the protection needed.
OUTSIDE AIR INSTAKKATIONS
Connecting the STOVE to outside combustion air is optional, except in mobile home installation
and when required by local building codes. The stove‘s air intake will accept 3‖ID pipe to
Page 19

19
accommodate outside air installation. The air intake on the exterior of the home should always be
located substantially below the flue termination and terminate with a cover to keep out weather
and pests.
THERMOSTAT INSTALLATION
The stove comes from the factory wired to operate manually see control board operation on the
following page. A low voltage thermostat can be installed on the stove.
CAUTIONS INSTALLATION AND REPAIR SHOULD ONLY BE PERFORMAED BY A
QUALIFIED SERVICE TECHNICIAN. DO NOT ATTEMPT TO SERVICE THE
APPLIANCE YOURSELF.
Avoid over firing the stave do not hand feed pellets to the appliance. Never use gasoline, gasoline
type lantern fuel, kerosene, charcoal lighter fluid, or similar liquids to start or flesh up a fire in this
heater. Keep all such liquids well away from the heater while it is in use. For your safety, do not
install or operate your stove without first reading and understanding this manual.
Any installation or operation of the appliance deviating from that which is stated in this instruction
manual WILL void the warranty and may be hazardous.
Due to high temperature, the stove should be located out of traffic areas and away from furniture
and draperies. Children and adults should be alert to the hazards of high surface temperature and
should stay away to avoid burns or clothing ignition. Young children should be carefully
supervised when they are in the same room as the STOVE. Clothing or any other flammable
material should not be placed on or near the stove. Any grille, panel, or glass removed for service
MUST be replaced prior to operating the stove.
Do not operate appliance with the glass front removed, cracked, or broken. Replacement of the
Page 20

20
glass should be done by a qualified service technician. Country Stoves, its employees, or any of its
representatives assume no responsibility for any damages caused by an inoperable, inadequate, or
unsafe condition as a result of any improper operation, service, or installation procedures. Whether
direct or indirect. The appliance when installed must be electrically grounded in accordance with
local codes or, in the absence of local codes, with the National Electrical Code. ANSI\NFPA 70
Page 21

21
5. Operation
1. The first ignition
When first time‘s running, the paint can be get rid of by burning. So some unpleasant Smell might
come out. Please open the window and door to vent the smell.
Note: If the new stove, when its first time using, it is necessary to put a handful of wood pellet to
the fire pot before hand.
Put wood pellet fuel into the hopper, connect the power. Then On/Off Light is Lighting (It means
that power is on). Operate as the instruction on section 2―start and operation‖
2. Start and operation
Please operate the stove as following (refer to stove structure figure and electrical control figure):
Check the box, pellet grate bar,air mate board and ash pan then adjust to proper position.
Push On/Off button UP to 3mins, the light is off and the combustion fan starts to work for 20
seconds to clean the fire pot, then feeding Light is On, meanwhile Convection Blower Lights and
Feel Intake Quantity Lights will be automatically selected to some level, ignitor is working as well.
After less than one Min‘s Feeding, it stops for a while, some smoke will come out, meanwhile, the
combustion fan starts. After Less than one min., it forms the stable flame.
Note: If the new stove, when its first time using, it is necessary to put some pellet to the fire
pot before hand.
Depending on the heating desire, fuel intake quantity can be adjusted from few to large by the fuel
intake Button. At the same time adjust the convention Button to blow the heat to the room to
reach the best combustion. (According to the various quality of wood pellet, please select right
feeding speed, in order to burn properly)
Page 22

22
Note: if the ignition is failure, the thermal control will shut off the stove automatically. If want to
restart it again, Please Switch off the power for a while and then switch on the power (In order to
shut down the previous process of program), follow the above process to ignite and start again.
3. Turning Pellet Stove Off
Please turn off the stove as the following:
Press On/Off button up to 2 seconds; the auger motor will be stopped, the other motors are
working continuously, meanwhile the ON/OFF light flashes, until the temperature decreases to
somewhere (30 Degree), it will stop completely.
4. Safety
(1) The stove will power off and the fire will be put out since the stove decreases to the safety
temperature
(2) The stove will be shut down, when thermodisc (for the hopper)T2≥70˚C
(3) When vent pipe is blocked, the vent pipe indicator light will be on and the stove will shut
down. Then please check it or call your dealer!
Caution
1. It is important to select and use only pellets that are dry and free of dirt or any impurities
such as high salt content. Dirty fuel will adversely affect the operation and performance of the
unit and will void the warranty. The Pellet Fuel Industries (P.F.I.) has established standards
for wood pellet manufacturers. We recommend the use of pellets that meet or exceed these
standards. Ask your dealer for a recommended pellet type.
2. Please keep the door closing and sealing during burning for good effect and preventing hot
ash flying out.
Page 23

23
3. The burning features ---bright yellow flame, the pellet burning with a little jumping in the
grate bar. No pile pellet and no smoke venting. If it becomes a little dark glow and lazy flame,
smoke appears from the venting terminal, speed up the combustion blower to add the air
input.
4. For reducing the heat output, its better to reduce the pellet feed by selecting lower power
level.
5. Venting pipe and air input pipe should keep unblocked.
FOR MORE INFORMATION ABOUT THE
OPERATION PLEASE READ FOLLOWING:
Page 24

24
Switching on / switching off
The heater switching on and switching off is performed through the ON/OFF key
At the switching on the message, CLEANING will be shown on first,
Cleaning’ is displayed for 20 second, in order to clean the fire pot.
In the same way at the switching off the message
After the temperature in the stove is lower than 30degree, finally, the phrase
‘GOODBYE’ is displayed.
!! ATTENTION !!
During the flame switching off phase and exchanger cooling, it isn’t
possible to switch on again the heater up to the operation end; this
state is highlighted from the message
‘SWITCHING OFF’
5.OperationSwitching on\off
Page 25

25
At the switching on the flame isn’t started immediately, depends from the selected functioning
formality. Two formalities are settable: AUTOMATIC or MANUAL, for further details see the
appropriate section.
The switching on Stage, which has the duration of about 15-20 minutes, are necessary to the
resistence to carry the pellets at the switching on temperature, (depends from the heater). The
switching on procedure is showed from a passages set showed in the display. Before starting the
switching on, the heater performs the brazier cleaning and displays the following wording:
Firstly,
Secondly,
Thirdly,
The starting first phase is showed from the message ‘FEED’. In this phase are performed the
chimney verification operations and the pellets will be loaded in the melting pot. The successive
phase will be showed from the inscription ―Lighting”. In this phase there will be the appearance of
the first breeding grounds. This state remains up to when the smokes temperature doesn‘t exceed
the planned threshold.
!! ATTENTION !!
From the appearance of the first breeding grounds, some minutes can spend before the end of the
switching on phase.
Page 26

26
When the switching on phase is finished, some minutes will spend necessary for the flame
stabilization. This phase is showed from the message ‘STABILIZATION” which finishes
after some minutes going up at the work phase
When the switching on phases are finished the heater will show the own state on the
display..
It is possible to switch off the heater in every functioning phase, except that during the
programming. The switching off performs pressing the key ON/OFF for two seconds, as
previously described.
!! ATTENTION !!
If the heater is switched off, the flame will continue to be present up to the fuel
exhaustion contained in the melting pot, this phase will manage in automatic
way both fans and it will have the duration up to 5 minutes.
The switching off phase is displayed from the message ‗SWITCHING OFF” present up to
the end of the operation.
Whether the heater is switched or not, on the display will display the hour, the power, and
the planned set temperature.
Switching on
/off
Page 27

27
FLAME POWER VARIATION
Pressing the key the feed quantity can be changed, the display shows the
selected power.
MINIMUM POWER P4
LOW POWER P3
MEDIUM POWER P2
MAXIMUM POWER P1
Flame variation
Page 28

28
ECO STAGE
If the room temperature exceeds the set out temperature, automatically the stove is stopped in
order to save energy, It shows like following:
After the room temperature drops down, and below the set out temperature, it automatically,
switching on again.
Automatic and manual SELECTING
Pressing the keys , The light shown on the following, will be
on/off.
If the light is on, it shows that automatic programme is selected.
Otherwise it is manual.
ECO Stage
Manual/Automatic
Page 29

29
DESIRED TEMPERATURES SETTING
Pressing the keys , on the display The temperature is selecting.
Desired temperatures
Setting
Page 30

30
CLOCK SETTING
Pressing the keys up to 2 sconds, on the display Clock is selecting:
You can choose week by keys , keeping press the key
The time can by select, Also using , to select the right one.
CLEANING SETTING
After keeping pressing the key, , you can adjust every X mins, last Y seconds to
cleaning the burning pot by the key
COMBUSTION FAN SETTING
Again by keeping pressing the key, , you can change the speed of combustion
fan
Clock Setting
Page 31

31
from P1 to P4, BY PRESSING
For example P1:
It should be noted, P5 is the speed of combustion fan when it is cleaning.
P6 is the speed of combustion fan during the lighting stage.
TIMER SETTING
On the display the following wording will appear
With this function you program the heater for a weekly programming, associating the
switching on and the switching off at the pre fixed timetables. You can program daily
switching on and switching off for the whole week.
By keeping pressing the key , you will found the attached instruction above,
Then you can press to choose week days
By pressing , to select hours, then press to decide the hour on or Off.
Page 32

32
On the superior line it is showed the day which is programming, the hour with the
functioning state.
On the below line the programmed hour are displayed.
Lower one means off, taller on means on, which also shows on superior line
Pressing the key the programming will finish.
*******************************************************
If showing following words, such as:
It means that there are some problem with vacuum Switch.
Such as door has not been closed properly
Combustion fan's speed should be up.
There is some leakage about the stove and so on.
It means that the high temperature sensor has some problem,
Such as: the switch is broken,
The temperature is too high that the stove runs not properly
Page 33

33
!! ATTENTION !!
You can press to exit the program state. Otherwise, keep pressing
REMOTE CONTROL
Min remote control
Page 34

34
6. Maintenance
Unplug and let the STOVE cool before performing any maintenance or cleaning. Some brands of
pellets produce more ash and clinkers than others. Therefore the frequency of performing the
following cleaning procedures depends to a great degree on the quality of the pellets burned. Not
cleaning this unit will cause it to burn poorly and will avoid your stove’s warranty.
BURN POT CLEANING
The combustion fan comes on at high speed once an hour to blow the byproducts of combustion
out of the burn pot. However, the burn pot should be cleaned more thoroughly after burning about
10 bags of pellets. The burn pot has a number of gaps in the bottom and sides that provide
combustion air to the pellets. The extreme temperatures in the burn pot can cause the impurities in
the pellets to form ash and clinkers.
When the stove is cool, open the front door and lift out the iron burn pot. Scrape the inner bottom
and sides of the pot with a screwdriver to remove all ash and clinkers from these surfaces.
Besides, please also clear the bars of the igniter carefully, although it was made of ceramic, it can
be easily broken by smash them with some hard stuffs. Make sure all the gaps in the bottom of pot
are open. Place the burn pot in the hole from which it was removed. Make sure the high side of the
pot is rotated toward the front of the stove. Push the burn pot down so surface A is tight against
the steel supporting the pot. Do not substitute any other grate or pot for use in this stove.
CLEANING GLASS
Caution: Do not open the front door when the stove is hot. To open the door, follow the first two
steps listed in Front Door Removal. Clean the glass using a soft cloth or paper towel and Windex
Page 35

35
or wood stove window cleaner. A damp cloth with small amount of ash from the firebox can also
be used to clean the glass.
ASH DRAWER REMOVAL AND CLEANING
Caution: Do not remove the ash drawer when the stove is hot. Pull the ash drawer forward and
away from the stove.
Caution:
Disposal of Ashes should be placed in a metal container with a tight fitting lid. The closed
container should be placed on a noncombustible floor or the ground well away from all
combustible materials, pending final disposal. If the ashes are disposed of by burial in soil or
otherwise locally dispersed, they should be retained in the closed container until all cinders have
been thoroughly cooled. Reinstall the ash drawer by inserting the drawer in the stove and
refastening the left and right latches securely. Note that if the ash drawer does not seal tightly to
the stove, the control board may detect a leak and shut the stove down.
CLEANING THE COMBUSTION BLOWER
To clean the combustion blower, remove the four nuts labeled. A in the drawing to the right with
an 11/32‘‘wrench.After removing these nuts, the motor with fan attached can be pulled from the
fan housing. The fan blades and the fan housing can be vacuumed once the motor is removed.
When reinstalling the motor, a new gasket may need to be installed between the motor and the fan
housing. To complete the reinstallation, place the motor back on the fan housing and reinstall the
six nuts. Make sure the motor‘s green ground wire is secured under one of the nuts.
CLEANING THE FLUE GAS PASSAGE WAYS
Cleaning the flue passageways should be done at least once a year. Burning high ash pellets may
Page 36

36
require this cleaning to be done more often. Clean these passageways only when the stove and ash
are cold do not start a fire in the vacuum cleaner by vacuuming up hot ash. On each side of the
stove there are two access covers (see B and C on the drawing to the right) that can be removed by
unscrewing the two 5/32‘‘ allen head screws. Insert a cleaning brush in the openings to loosen any
ash buildup and use a vacuum cleaner to remove the loosed ash. Reinstall the covers when
cleaning is complete. There are also two more access holes located behind the ash drawer.
Remove the ash drawer (see the previous page) and loosen the two 5/32‘‘ allen head screws shown
as D in the drawing below. Rotate the covers over the access holes and use a brush and vacuum to
clean the ash. Rotate the covers back over the holes and tighten the screws. Front View Looking
into the Ash Drawer Cavity with the Ash Drawer Removed.
CLEANING THE CONVECTION BLOWER
To clean the convention blower, remove the right side door (see the following page). Disconnect
the stove power cord from the electrical outlet. Remove the two screws (A in the drawing to the
right) securing the blower to the blower duct. Slide the blower to the rear disengaging it from the
blower duct. A vacuum can be used to remove any dust accumulation on the blower‘s blades or
inside the blower duct. Caution should be used not to damage the blower‘s blades during cleaning.
Note that future models of the stove may be built so that the screws A may just need to be
loosened rather than removed to remove the blower. To reinstall the blower, slide the blower back
into the retaining lip B and reinstall screws A.
CLEANING THE VENT PIPE
Soot and Fly ash: Formation and Need for Removal
The products of combustion will contain small particles of fly ash will collect in the exhaust
Page 37

37
venting system and restrict the flow of the flue gases. Incomplete combustion, such as occurs
during start up, shutdown, or incorrect operation of the room heater will lead to some soot
formation which will collect in the exhaust venting system. The exhaust venting system should be
inspected at least once every year to determine if cleaning is necessary. Sweep the pipe as needed.
A tee and the cleanout in the vent system attached to the stove‘s flue collar will facilitate this
cleaning.
Required Cleaning Schedule after Number of Bags Burned
Burn Pot=10 bags
Ash Drawer=50 bags
Flue Fan=100 bags
Blower=100 bags
NOTE: Cleaning schedule will vary depending on quality of pellets used. Burned high ash
pellets used. Burned high ash pellets will require more frequent cleaning
CHANGE THE HEAT RESISTOR EVERY TWO OR THREE MONTHS
Normally, we have a spare set off heat resistor with a new stove!
Page 38

38
7. Troubleshooting
The control panel of the stove has trouble examine sensors. When the sensor detect the
abnormal work temperature (below 30˚C), or the other sensor‘s temperature is above 70˚C the
auto-control temperature switches will react accordingly. When temperature is below 30˚C,
the safety control system will stop the stove automatically; when the other sensor, fixed into
the hopper, detect the temperature is above 70˚C, the stove will be shut down.
The general troubles, the possible reasons and the solutions are as following, after solving
problems, start the stove again:
problems
reason
solution
1. The start light does not
light when power is on
No power in stove or in the
control panel.
Check the power and wires.
2. The blower doesn‘t
work after pressing the
start bottom.
If after 15 mins, it doest
work, there must be
wrong
It is normal.
It will start automatically
when the temperature is
above 30 degrees on the
venting pipe.
Please wait
No power in stove or in the
control panel.
Or Unplugged on the mother
board
The low temperature sensor is
broken
Check the power and wires.
Plug it
Replace it
3. No feeding after 20 seconds of starting.
There are three stages for the feeding process.
One is during the several minutes, feeding is constantly. "Feeding" is showing on the LCD
display
Page 39

39
Two is the following couple minutes, the feeding light is off.:"Light" showing on the Display
The last stage is that feeding Every several seconds all the time after previous stages.
A. For the first stage
(during first several
minutes)
Feed unit is blocked.
Check the auger is blocked or not.
There is the problem
about the connection
between motor and auger
Check the fasten screw between
auger and motor loose or not.
Or the auger might jump out
No fuel in the hopper.
Fill the fuel into the hopper.
B. For the second stage
It is normal
Please be patient
C. Regarding to the last
stage
Feed unit is blocked.
Check the auger is blocked or not.
There is the problem
about the connection
between motor and auger
Check the fasten screw between
auger and motor loose or not.
Or the auger might jump out
No fuel in the hopper.
Fill the fuel into the hopper.
4. Feeding not properly
A. too much wood pellet
and cannot burned in time
The level of feeding
speed is too high
Adjust the combustion fan's speed
up
B. The fire is off due to
little wood pellet can be
burned
The level of feeding
speed is too low
Adjust the combustion fan's speed
Down
5 After ignition the power
is off 15min later.
Pellet feeder unit is off or
pellet is too little.
30˚C temperature switch
breaks or the connection
wires of switch loose.
Not enough pressure in
the stove
Check the pellet feeder unit and
restart.
Check the connection wires or
change the 30˚C temperature switch.
Adjust the combustion fan's speed
up
6 orange and lazy fire,
piled pellet, carbon on the
glass
Lack of air intake for
burning.
Clean the block in gate bar.
Check the door and window glass
gasket sealed or not.
Page 40

40
Check the air intake pipe and
venting pipe blocked or not, and
clean it. Change to the big diameter
pipes if pipes are too long to affect
combustion.
Adjust the combustion fan's speed
up
Call the dealer to reset the program
7 The fire put out and
power is off
automatically.
The hopper is empty.
No fuel feed.
The fuel feed is too little.
low temperature switch
(30˚C) is wrong.
Set temperature is
reached
Put fuel into the hopper. refer to (2)
Lower the speed of combustion fan
Cool the stove at least 1 hour then
operate again or change the low
temperature switch (30˚C).
"ECO" its normal, waiting, after the
temperature is blow set on, it will
automatically switch on again
8 The blower still works
after the stove is cool and
fuel feed stops.
The low temperature
switch (30˚C) is broken.
Change this switch.
9 no enough heat wind
Unqualified fuel
Blower speed is too high.
Heat exchange tubes are
dirty.
Use the standard specially pellet.
Use higher power
Clean the heat exchange tubes.
10. Showing "Pressure
Erro" on the display
Vent pipe is blocked
The door is opening
The are some leakages
Shut down the stove, check the
venting pipe
Close the door and unplugged then
restart
Check it and repair it.
Page 41

41
Adjust the combustion fan's speed
up to offer more pressure in the
stove
ELECTRICAL GENERATOR OPERATION
Your stove can be powered with a gas driven electrical generator.
However, the generator’s electrical regulator may not be compatible with the stove’s
electronics. The higher the quality of the generator, the greater the chance that it is
compatible with the stove.
Page 42

42
8. Warranty
1. If the owner follows the operation of this manual, it is guaranteed the stove can well work
normally within one year after selling. If the stove be destroyed by the poor quantity or the
stove works abnormally within the guarantee period, it will be repaired or changed parts with
free charge.
2. The problems caused by the owner‘s improperly operation are not our guarantee. We can
supply payment service. It‘s a lifetime product.
Page 43

43
9.Electronic Plan
 Loading...