

Page 1
1
Page 2

Contents page
IMPORTANT Safety Instructions 3
PART I: Turntable Operation 4
Turntable Part Names / Functions 4
Listening to a Record 4
PART II: Record from Turntable to PC or Mac 5
Audacity 5
Audacity Software & USB Connection 5
Audacity for PC 5
Set Up Wizard: How to Set Up with PC 5
Installing Audacity Software on your PC 6
Audacity Control Panel & Configuring Audacity Settings 11
Configuring Settings for PC (Windows) 12
Recording to a PC 14
Export & Save Recordings (files) as WAV 14
Dividing Tracks & Exporting 15
Record to CD 15
Audio Playback & Special Windows Set Up (Windows 7) 16
Windows 7 … Recording Level Adjustments 18
Audacity for Mac 21
Set Up Wizard: How to Set Up & Record with Mac 21
Audacity Software & USB Connection 22
Audacity Control Panel & Configuring Audacity Settings 22
Export & Save Recordings (files) 25
Record to CD 25
Accessory Items Included 26
Specifications & System Requirements 26
Tips for Better Turntable Performance 26
Troubleshooting 27
Warranty 29
Customer Service & Support 29
IMPORTANT SAFETY INSTRUCTIONS
1) Read these instructions.
2
Page 3
2) Keep these instructions.
3) Head all warnings.
4) Follow all instructions.
5) Do not use this apparatus near water.
6) Clean only with a dry cloth.
7) Do not block any ventilation opening(s), install in accordance with the manufacturer's instructions.
8) Do not install near any heat source such as radiators, heat registers, stoves, or other apparatus (including
amplifiers) that produce heat.
9) Do not open the cabinet as this might result in damage to the circuitry or electrical shock. If a foreign object
should get into the set, contact your dealer.
10) The apparatus shall not be exposed to dripping or splashing and that no objects filled with liquids, such as vases,
shall be placed on the apparatus.
11) The mains plug is used as the disconnect device, the disconnect device shall remain readily operable.
12) Before plugging DC power adaptor into the unit; please make sure the “POWER” button is off.
PRECAUTIONS
1. In order to shut off the unit completely, unplug the power cord from the wall outlet, be sure to unplug the unit if you
do not intend to use it for a long period of time.
2. Incorrect use of controls, adjustments and performance other than those specified herein may result in hazardous
radiation exposure.
3. Should this product malfunction, discontinue use and contact a qualified service center.
WARNING
To reduce the risk of fire or electric shock, do not expose this appliance to rain or moisture.
CAUTION
RISKS OF ELECTRIC SHOCK- DO NOT OPEN!
To reduce the risk of electric shock, do not remove casing.
No user serviceable parts inside. Refer servicing to qualified service personnel.
The light flash with arrowhead symbol, within an equilateral triangle, is intended
to alert User to the presence of “dangerous voltage” which may be of sufficient
magnitude to cause electric shock to persons.
The exclamation point inside an equilateral triangle is intended to alert User to
the presence of important operating and maintenance (servicing) instructions in
the literature that may accompany the appliance.
This product may contain cheimcals listed in Proposition 65
(http://www.oehha.ca.gov/prop65/prop65_list/Newlist.html
)
That may be known to cause cancer, birth defects or other reproductive harm
CAUTION: To prevent shock, match wide blade of plug to wide slot, fully inserted
BEFORE USE
1. Choose a safe location and avoid placing the unit in direct sunlight or near any heat source.
2. Avoid locations subject to vibrations, excessive dust, cold or moisture.
3. Do not open the cabinet as this may result in electrical shock.
4. When removing the power plug from the wall outlet, pull directly on the plug, NOT the cord.
5. Do not attempt to clean the unit with chemical solvents as this might damage the finishing. A clean, dry cloth is
recommended for cleaning.
6. In order to completely turn off the unit, unplug the power cord from the wall outlet.
7. Keep this manual for future reference.
PART I: Turntable Operation
Turntable Part Names / Functions
3
Page 4
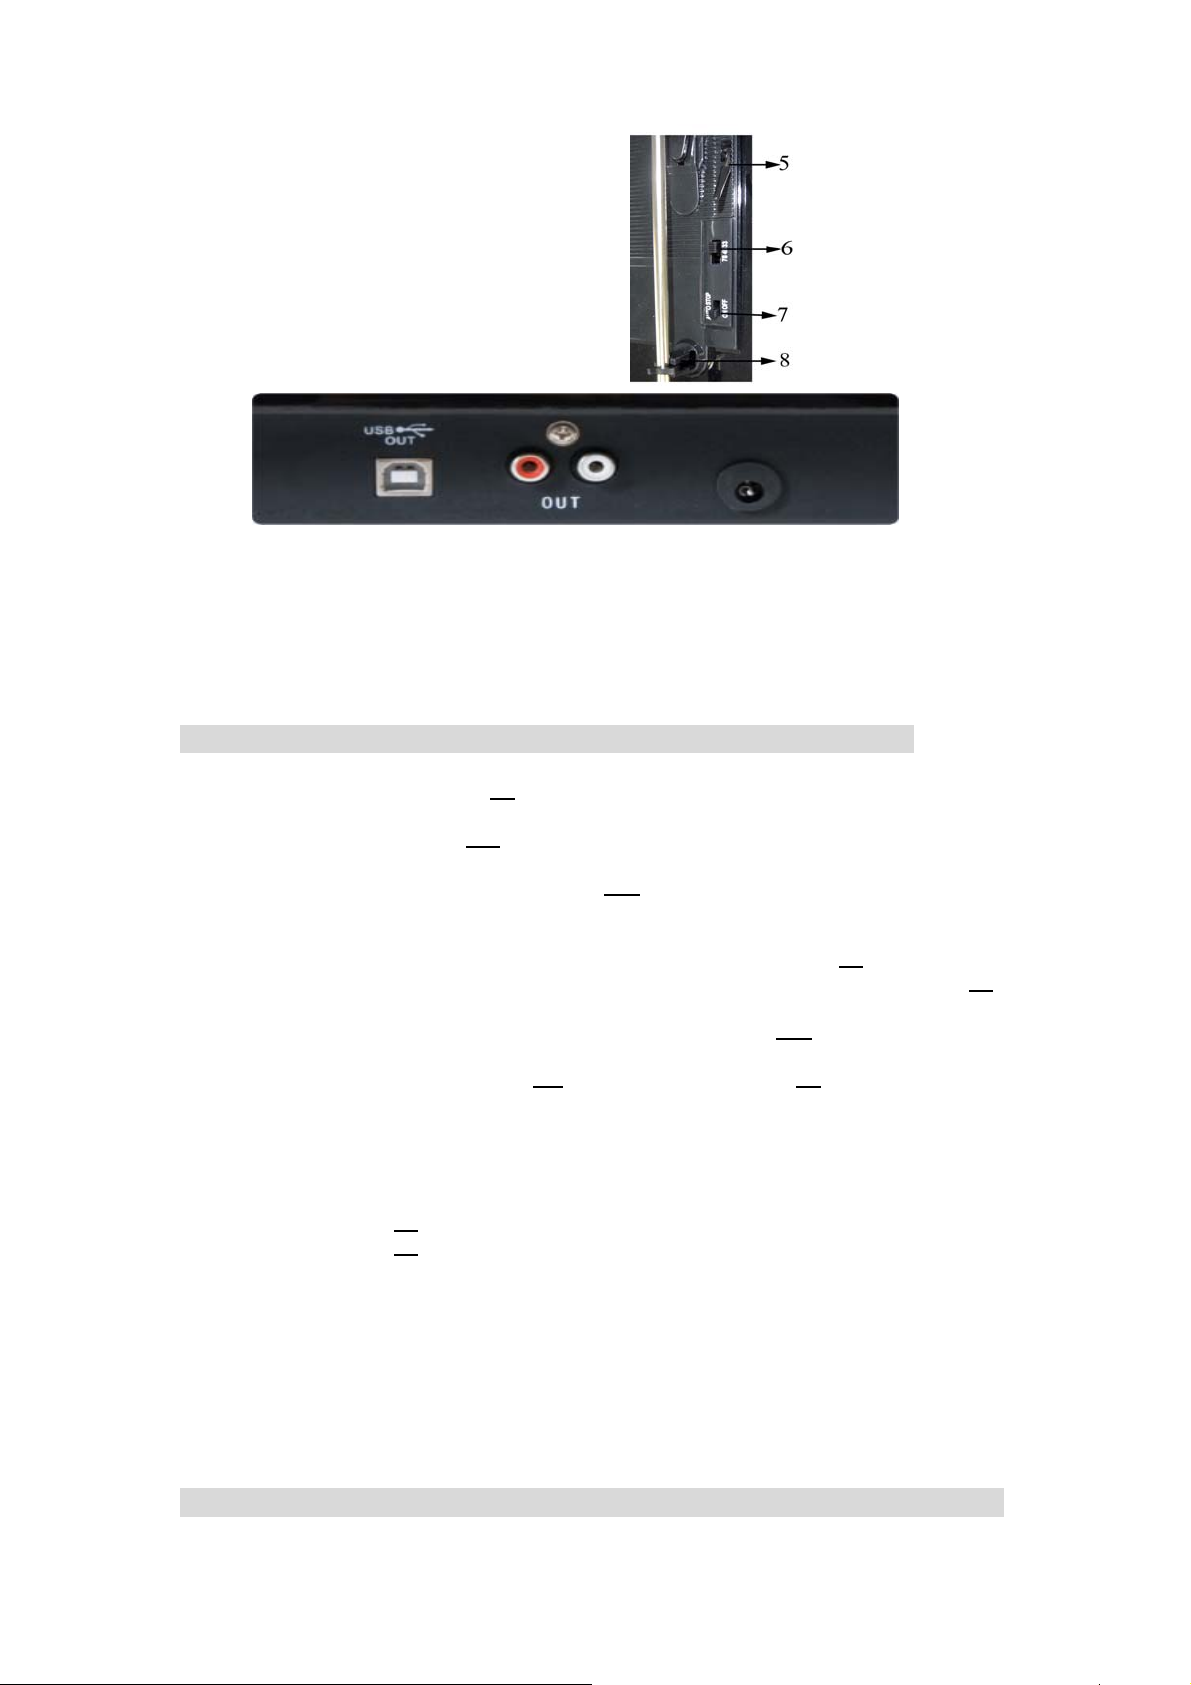
1. Removable Dust Cover
2. Platter 7 ¾”
3. 45 rpm Adapter
4. Adjustable Tone Arm Balance
5. Tone Arm Lift Lever
6. 3 Speed (33 1/3, 45, 78 rpm) Selection
7. Auto Stop Control
8. Tone Arm Balance Rest
9. USB Jack (connect to PC or Mac)
10. RCA Output (connect to stereo / audio system)
11. AC Power Cord (connect to wall power outlet)
12. Turntable Feet
13. Magnetic (Needle) Cartridge
14. Built-in RIAA Equalizer
LISTENING to a RECORD
1. Lift and remove the dust cover (1)
2. Connect the AC power cord (11)
3. Use RCA cables to connect the RCA output (10)
Make sure the red RCA and white RCA are inserted in the red & white jacks accordingly.
4. Place a record on the turntable and select the player speed (33/45/78) (6)
desired record speed. NOTE: when playing a 45 rpm record, use the 45 rpm adapter (3)
5. Remove the protective cover from the needle on your cartridge (13)
6. Remove the tone arm from the rest (8),
and gently move the tone arm to the desired position over the record. The turntable will
begin to spin when the arm is moved toward the record. Push the Lift Lever ○5 forward
lower the tone arm slowly onto the desired position on the record to begin playing the
record. Adjust the tone arm balance if the cartridge (needle skates (slides) on your album
7. If Auto Stop Control (7) is turned ON, record will stop automatically when finished.
If Auto Stop Control (7)
8. For best performance and product maintenance, unplug the turntable when not in use.
is turned OFF, record will NOT stop automatically when finished.
to an electrical outlet (120V~60Hz)
to your powered speaker or stereo system.
according to the
push Lift Lever backward (5) to raise the tone arm
PART II: Record from Turntable to PC or Mac
Audacity
4
Page 5

Audacity is the recording and editing software program included with your VINYLWRITER
PRO turntable. You must install Audacity (or an alternative recording software) on your
computer to record audio from your VINYLWRITER PRO to your computer. The Audacity disc
includes software for use with PC (Audacity Version 1.2.6) and Mac (Audacity Version 1.3.7)
computers.
IF you click on the disc and select open you will find the disc contains 5 software files:
1. Audacity_for_MAC 3. audacity-src-1.2.6
2 Audacity_for_WIN 4. AUTORUN.INF
5. The GNU General Public License.html
IF you use a PC you require Audacity_for_WIN and if you use a Mac you require
Audacity_for_Mac
The software is compatible with Window 98, 2000, ME, XP, VISTA, 7 and Macintosh.
NOTE: The other 3 files (audacity-src-1.2.6; AUTORUN.INF; The GNU General Public
License.html) are reference files only and should be ignored.
Once you have completed installing the Audacity Set Up Wizard to your MAC or PC, Audacity
software will allow you to create, record and edit files made from the audio recorded from your
VINYLWRITER PRO
Once installed, the Audacity program should open automatically. The Audacity icon
be saved to your computer’s Desktop as a shortcut. Click on the icon as a convenient method to
open the Audacity program.
should
Audacity Software & USB Connection
Your PC and Audacity must recognize your USB connection to your VINYLWRITER PRO
turntable. Therefore, always turn on your computer and connect the USB cable to the
turntable’s and the computer’s USB port. Then, with the AC adapter connected to your
VINYLWRITER PRO turntable, move the tone arm toward the album to start the turntable.
IMPORTANT: In order help ensure Audacity and you computer recognize the USB
connection, always connect your turntable USB port to your PC USB port
before you open the Audacity program.
5
 Loading...