

Page 1
Multi-Currency Value Counter
EC1500
USER MANUAL
Page 2
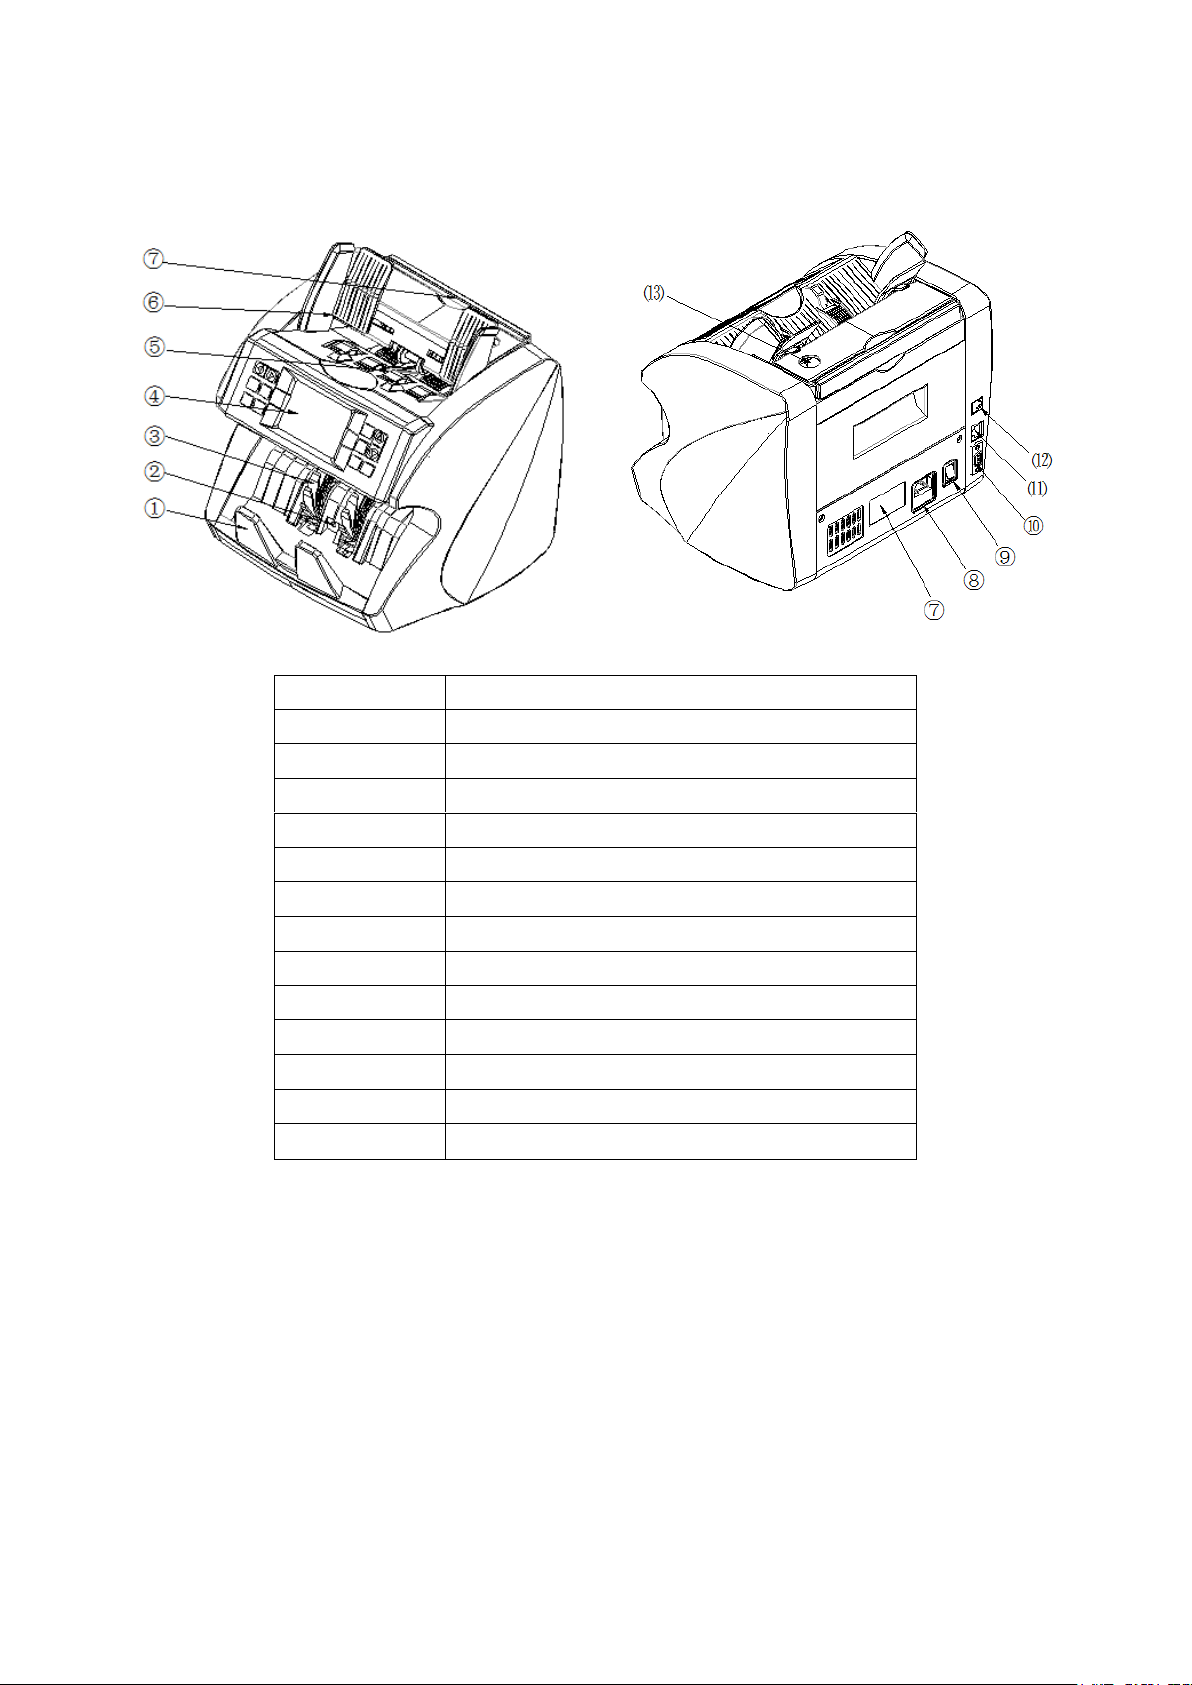
1. Introduction
Item Number
Part Name
1
Block board
2
Launch OC
3
Impeller
4
LCD
5
Start sensor
6
Height block
7
Handle
8
Power socket
9
Power switch
10
Display port
11
Internet port
12
Analyzer
13
Adjust button
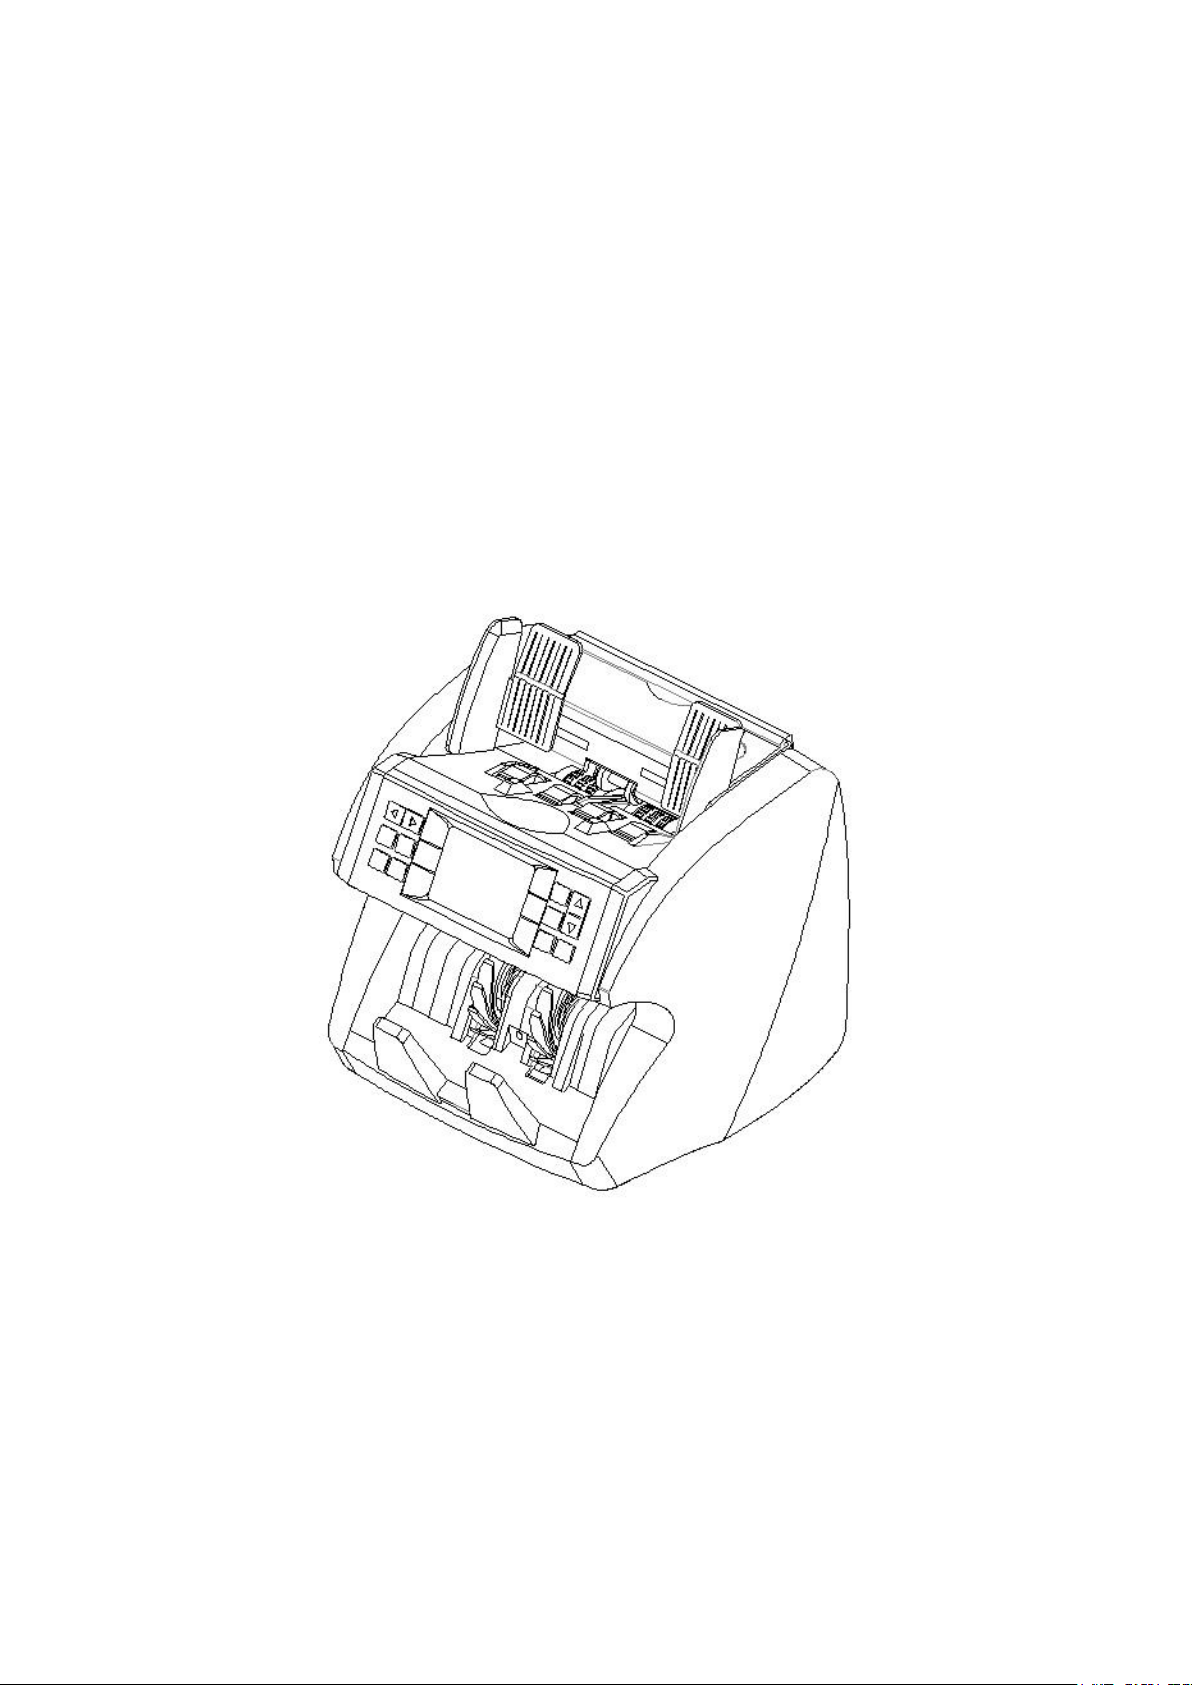
1.1 About this value counter
Thank you for choosing this professional multi-currency value counter based on CIS sensor. We hope you
enjoy using it. This professional counter features its unique feeding mechanism and best performance of
counting and detecting your banknotes.
1.2 Box Content
The box includes 1 unit of value counter, 1 piece of AC power cord, 1 copy of user manual, and 1 piece of
customer display (optional).
Page 3
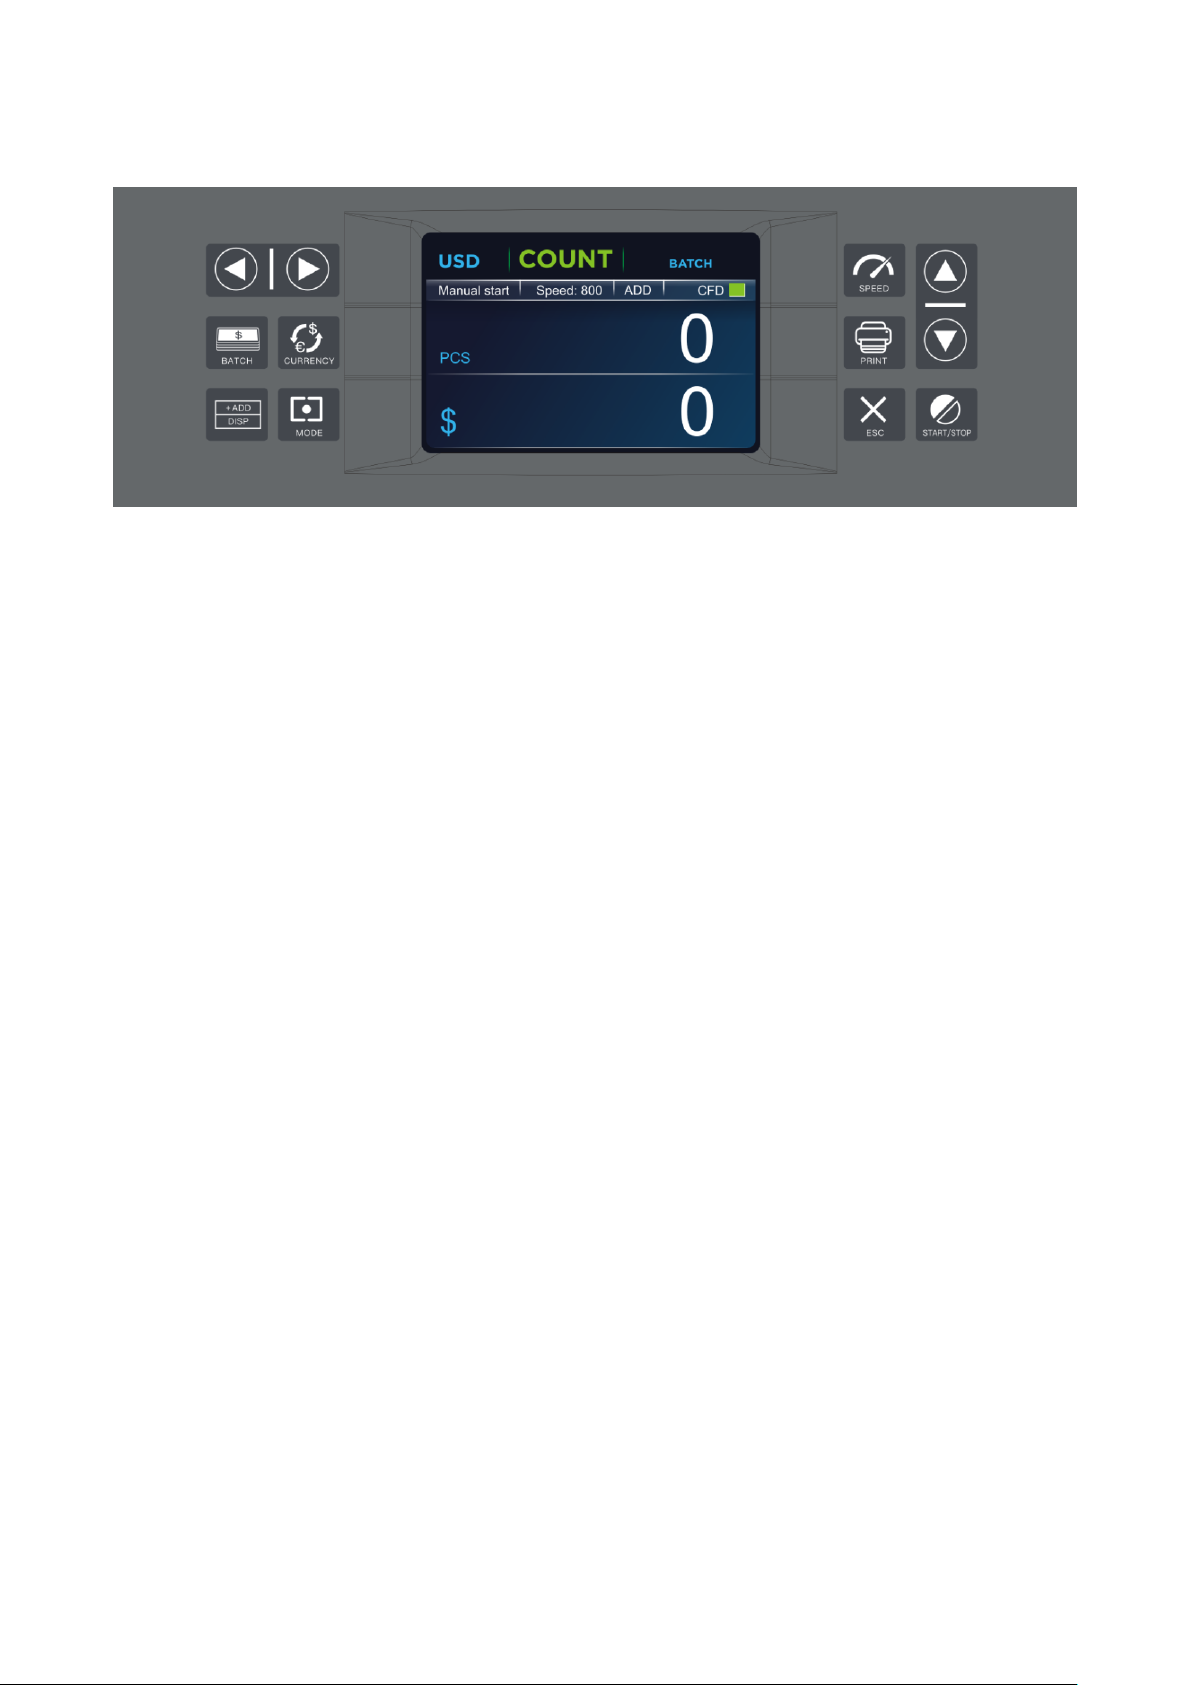
1.3 Control Panel
MODE: This button is used to switch among CNT mode (Count), SDC mode (Single Denomination Count)
& MDC mode (Mixed Denomination Count).
Button BATCH: This button is used to switch on/off batch mode. When BATCH is on, then use ↑→
↓←buttons to input the batch number.
Button DISP: This button is used to report the counting details & serial numbers
Button CURRENCY: This button is to show up the available currency names in your machine and press
corresponding numeric button to select the currency you want.
Button SPEED: The default function is to select different available counting speeds.
Button ↑: This button is used to move up the cursor or adjust number magnitude in batch setting mode.
Button ←: The default function is to move the cursor left. When in batch setting mode it choose the
number digits.
Button →: The default function is to move the cursor right. When in batch setting mode it choose the
number digits. And this button also support to get in the setting menu when in the main interface.
Button ↓: The default function is to move cursor downwards. adjust number magnitude in batch setting
mode.
Button +ADD/DISP: The default function is to switch on/off ADD function.
Button ESC: The default function is to clear the input or back to upper level.
Button PRINT: The default function is to work as a OK or CONFIRMATION. When you press REPORT to
check the counting detail and your value counter is connected with a printer, then in REPORT mode, press
this button to print out the detail.
Button START/STOP: This button is used to start counting, or back to upper level in MENU.
Page 4

1.4 Specifications
Unit Dimensions: 28CM(W)*26CM(D)*27CM(H) / 11”(W)*10.2”(D)*10.6”(H)
Unit Package:
N.Weight: 6.5KGS
G.Weight: 7.5KGS
Counting Speed: 800/1000/1200 notes/min for CNT mode, 800/1000 notes/min for SDC & MDC modes
Size of Countable notes: Minimum 110x60 mm, Maximum 185x90 mm
Thickness 0.08~0.12 mm
Feed system: Roller Friction System
Hopper Capacity: 400-500 notes
Stacker Capacity: 200 notes
Power Supply: AC 100~240V ± 10%, 50/60 Hz
Current: Maximum 1.8A (100~240 VAC)
Power Consumption: <50 Watts
Ambient Temperature: 0℃~35℃ (Operating)
Working Environment: -10℃~60℃ (Stocking)
Ambient Humidity: 20%~90% (no condensation)
Connection Port: USB, RS232, LAN
2. Operation Modes
2.1 CNT mode
Press button MODE to select CNT mode. In this mode, you can switch on ADD or BATCH or ADD+BATCH.
2.2 SDC mode
Press button MODE to select SDC mode. This mode is to count a single denomination bill. The system will
take the first note as the benchmark, and will stop counting when meeting a different denomination.
2.3 MDC mode
Press button MODE to select MDC model. This mode is a value counting mode for mixed denominations,
and press REPORT button to check the counting details.
3. Setting MENU
Press button MENU once, you will see setting menu with the following main interface:
Page 5

Use the cursor to select which sub-menu you want to enter, and press ENTER button to confirm, and
press button CLEAR to quit.
3.1 If you select to enter ‘User Menu’, you will be requested to input a password with the following
interface. The default password is 0518.
After you input the correct password 0518, the interface will jump to the following one:
You can use cursor to select next submenu and press ENTER button to confirm, and use button CLEAR to
quit.
3.1.1 If you select to enter ‘1. Detection Level’, you will see the following interface. You can use LEFT
and RIGHT cursor buttons to select, and UP and DOWN buttons to change the sensitivity levels.
The currency code in the right part is indicating for which currency you are operating. (Please do
not change without communicating with the manufacturer or your local distributor.)
3.1.2 IP Address mode is reserved for servicing purpose. It’s not open to the users.
Page 6

3.1.3 If you select to enter ‘Back to default setting’, you will see the following interface.
3.1.4 MIX C Setting mode is reserved for servicing purpose only, not open to end users.
3.2 If you select to enter ‘Service Menu’ under the main menu, you will be requested to input the
password as well. The default password is 0518. After the password, you will see the following
interface.
3.2.1 If you enter ‘Read Sensor Values’, you will see the following interface. This interface is only for
servicing purpose to see whether any sensor has a malfunction.
3.2.2 If you enter ‘CIS Calibration’, you will see the following interface to instruct you how to do color
balancing for CIS sensors.
Page 7

3.2.3 If you enter ‘MG/MT waveforms’, you will see the following interface
3.2.4 If you enter ‘Password Setting’, you will see the following interface to set a new password. After
inputting new password (4 digits), press START button to confirm and save.
3.2.5 If you enter ‘Motor and CIS Test’, you will see the following interface. This mode is to be used for
production and professional servicing purpose.
3.2.6 If you enter PCS counted and reset’, you will see the following interface. This interface is to tell
the total quantity of counted bills in this counter since last clearing to zero. We provide a hidden
setting for distributors to clear this number for after-sales service.
3.2.7 If you enter ‘Acquire CIS Image’, you will see the following interface. This mode is for servicing
purpose.
Page 8

3.3 If you select to enter ‘Version Information’ under the main menu, you will see the following
interface.
3.4 If you select to enter ‘Current Time Setting’ under the main menu, you will see the following
interface.
3.5 If you select to enter ‘Save Image’ under the main menu, you will see the following interface. This
mode is used to scan a banknote and output the data file into a USB flash drive.
3.5.1 Press START button to go to Image saving mode. It will generate 4 images from single CIS model,
Page 9

and 5 images from dual CIS model from a single insert direction.
Error code
Trouble position
E1 Bill UV sensor error
E2 Bill double error
E3 Chain notes error
E4 Half notes error
E10 Bill CIS sensor signal lose
E11
Denomination error
E12 Bill denomination error
E13 Bill facing recognize error
E14 Bill size recognize error
E15 Bill towards recognize error
E20 MT error
E21 MG1 error
E22 MG2 error
E23 MG3 error
E24 MG4 error
E30 IR transmission area 1 error
E31 IR transmission area 2 error
E32 IR transmission area 3 error
E33 IR transmission area 4 error
E34
IR transmission area 5 error
E35
IR transmission area 6 error
E36
IR transmission area 7 error
E37
IR transmission area 8 error
E38
IR reflect area 1 error
3.5.2 Move the cursor and selecting ‘Save MT’ will generate a .bin format file.
3.5.3 Move the cursor and select ‘Save OCR’ will generate a file for OCR processing purpose.
4. Detections
This counter incorporates various detections including UV(ultraviolet), MG(magnetic), MT(magnetic
thread), Reflected IR mapping, and Penetrating IR mapping.
5. Maintenance and troubleshooting
After start, the machine will go on self-check automatically. If preset window show the following error
code, generally speaking, it is because of dust on the surface or sensor blocked by notes. So please clear
the dust on the surface of sensor with brush or soft cloth, or take the notes away. Then restart the
machine.
Page 10

E39
IR reflect area 2 error
E40
IR reflect area 3 error
E41
IR reflect area 4 error
E42
IR reflect area 5 error
E43
IR reflect area 6 error
E44
IR reflect area 7 error
E45
IR reflect area 8 error
6. Maintenance and notice
6.1 In order to make sure count display and person safety, you must install good grounding when to use.
Safe pipe rated value is “2A”, not too much.
6.2 Please turn off the machine and unplug the power cord when close every day. To clean the
sensors(note-feeding sensor, note-receiving sensor and counting sensors) softly with brush, If meet with
trouble, please ask for repairman to check and repair.
6.3 The time between open and close should be over 5 seconds, to avoid the number of display window
being disturbed.
 Loading...