

Page 1
Sicherheitshinweise
thermio 713 thermio 713
Gefahr durch Stromschlag!
Bedienungsanleitung Operating Manual
DE
WARNUNG
Beachten Sie
20.9
°C
• Die nationalen Vorschriften und Sicherheitsbedingungen.
• Eingriffe und Veränderungen am Gerät führen zum
Erlöschen der Gewährleistung und Garantie.
• Das Gerät darf nur für den beschriebenen
Verwendungszweck betrieben werden.
Lesen und beachten Sie diese Anleitung, um eine
einwandfreie Funktion des Gerätes und ein sicheres Arbeiten
zu gewährleisten.
Anschluss und Montage ausschließlich durch Elektrofachkraft!
Gerätebeschreibung
Der Raumthermostat thermio 713 ermöglicht eine praktische
Wärmeregelung, spart Energie und lässt sich auf einfache
Weise auf die gewünschte Raumtemperatur einstellen.
• Steuerung von Heizungen und Klimaanlagen innerhalb
einer Temperaturspanne von + 5°C bis + 35°C
• Regulierung von Fan Coils
• Automatischer Frostschutz
Bestimmungsgemäße Verwendung
• Aufputzgerät zur Installation an Wänden.
• Nur für den Einsatz in trockenen Räumen geeignet!
EN
20.9
Safety Instructions
Risk of electric shock!
WARNING
°C
Note
• The national regulations and safety instructions.
• Interferences and changes to the device will invalidate the
warranty and guaranty rights.
• The device must only be used for the described purpose.
Read and observe these instructions to guarantee a perfect
function of the device and a safe operation.
Connection and mounting must be
realized by a professional electrician!
thermio_touch/de/en/fr/nl/10/10/01
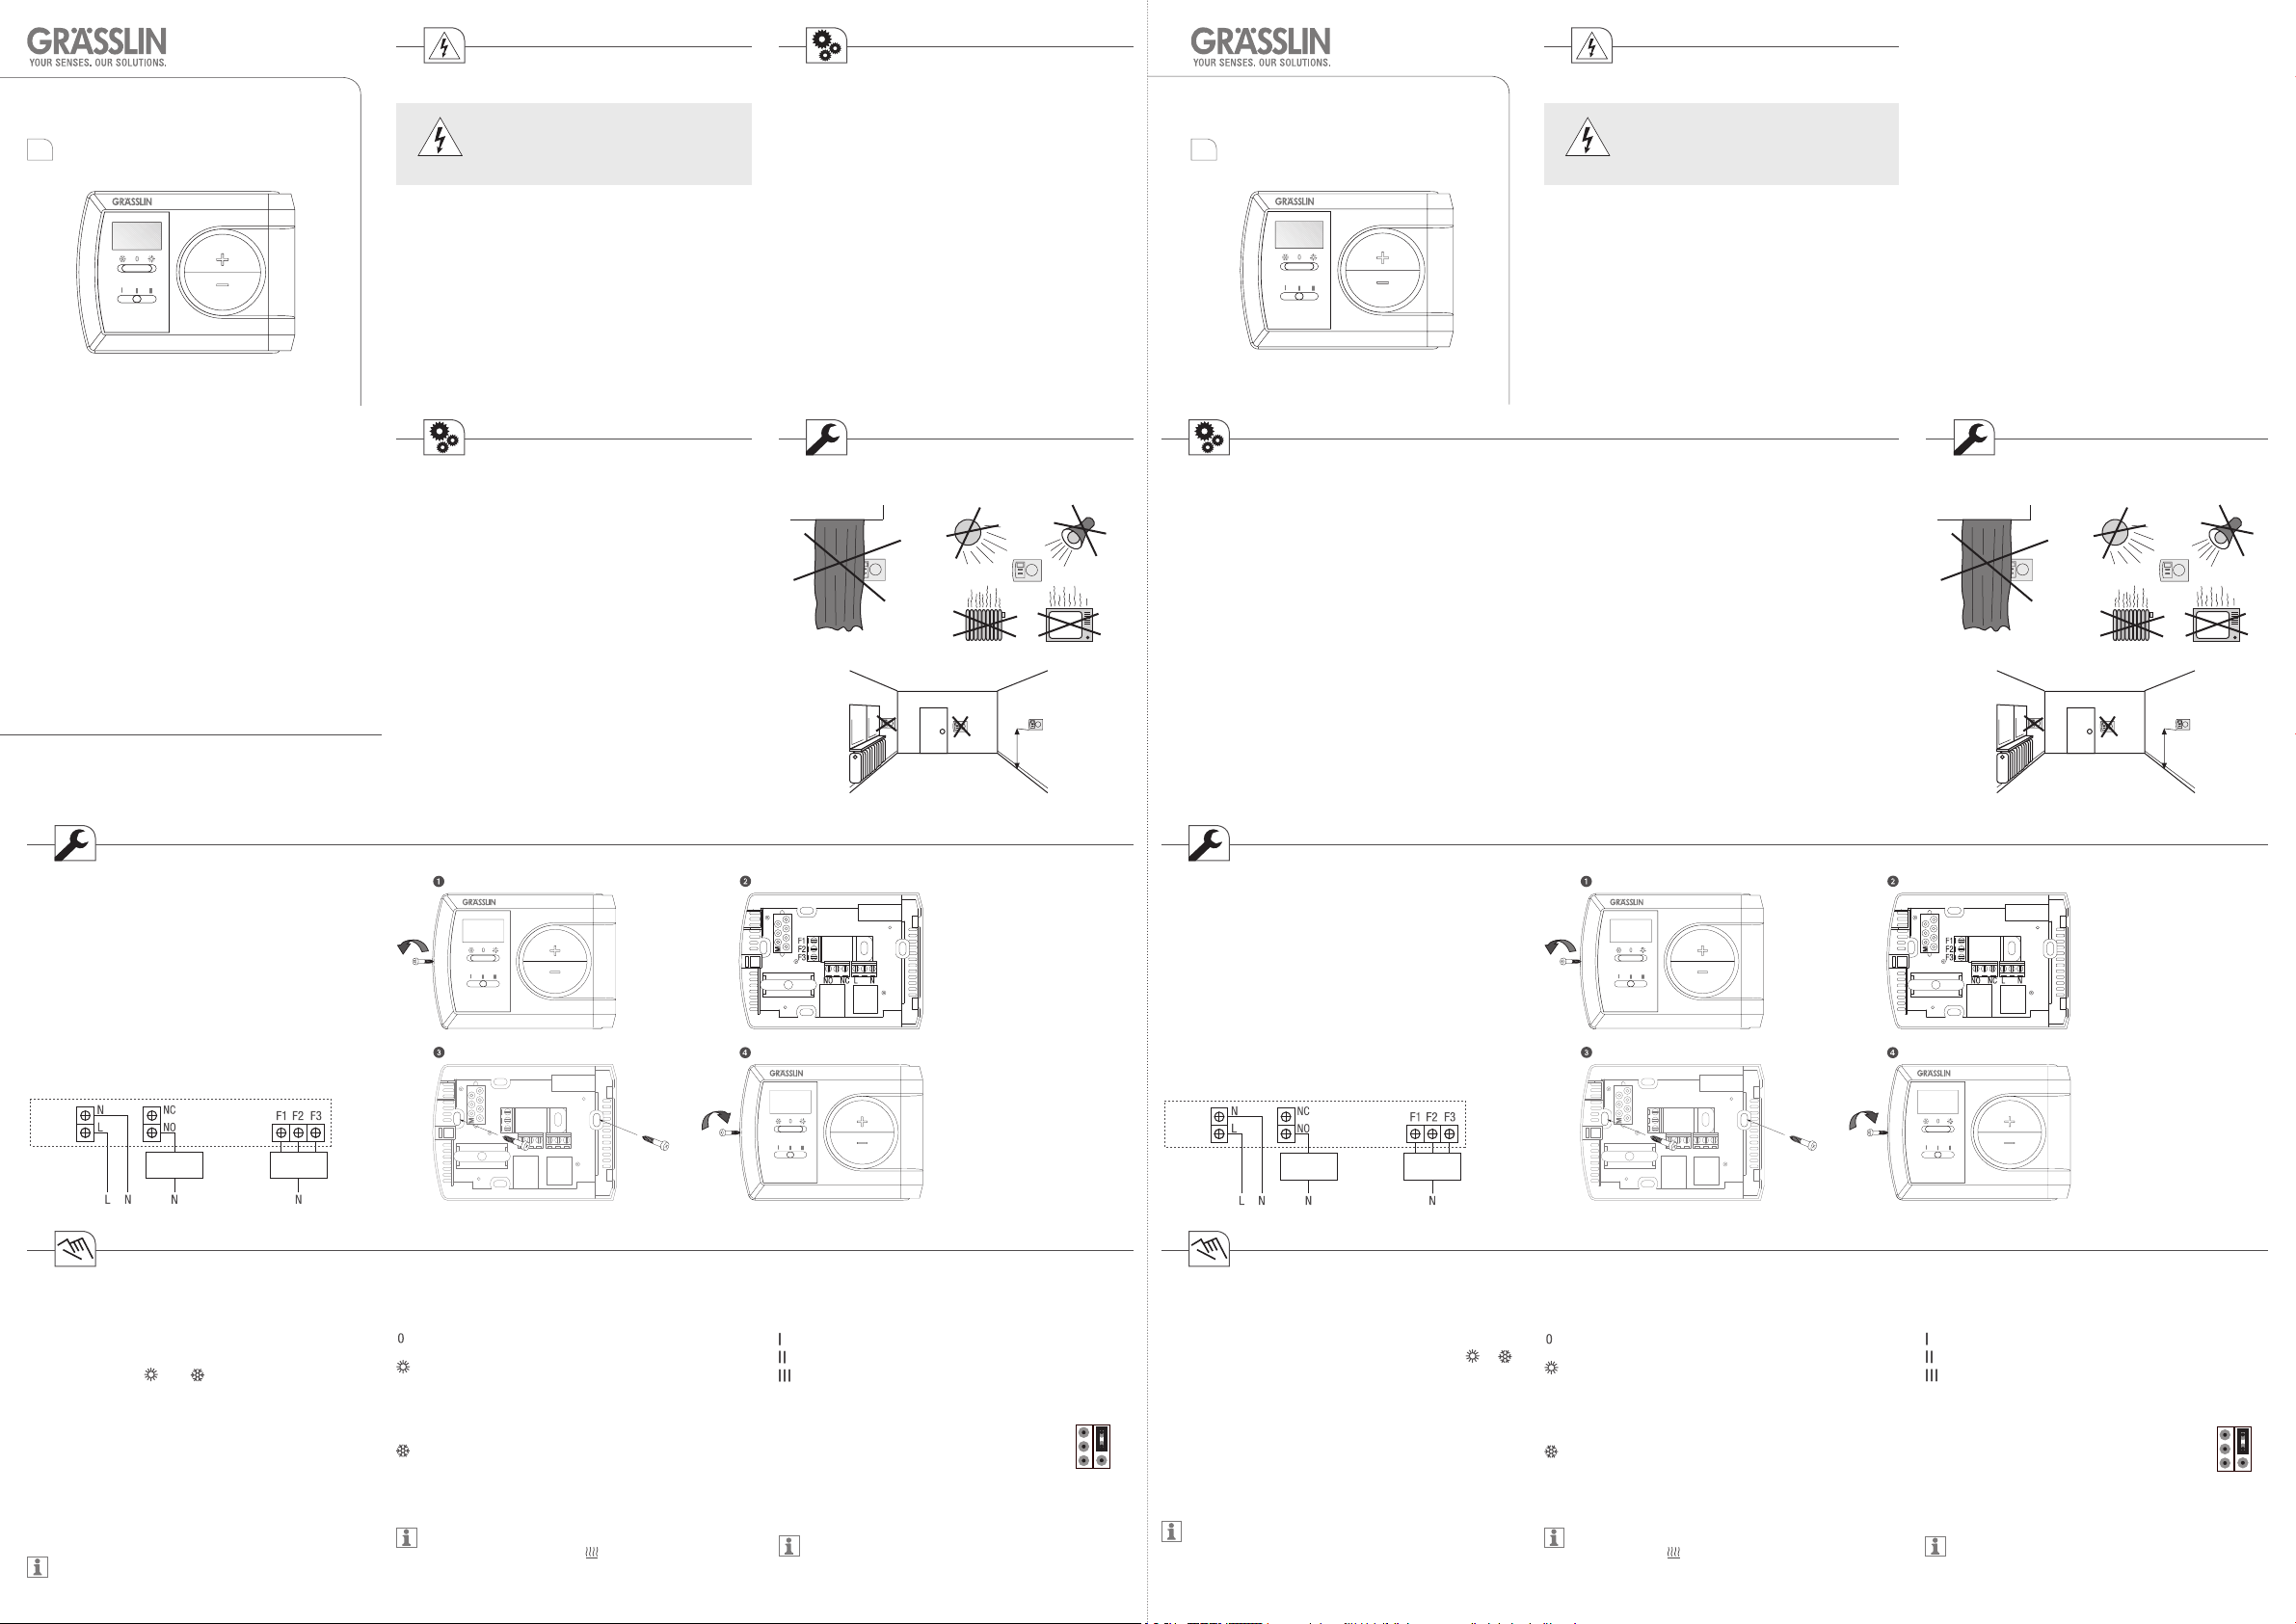
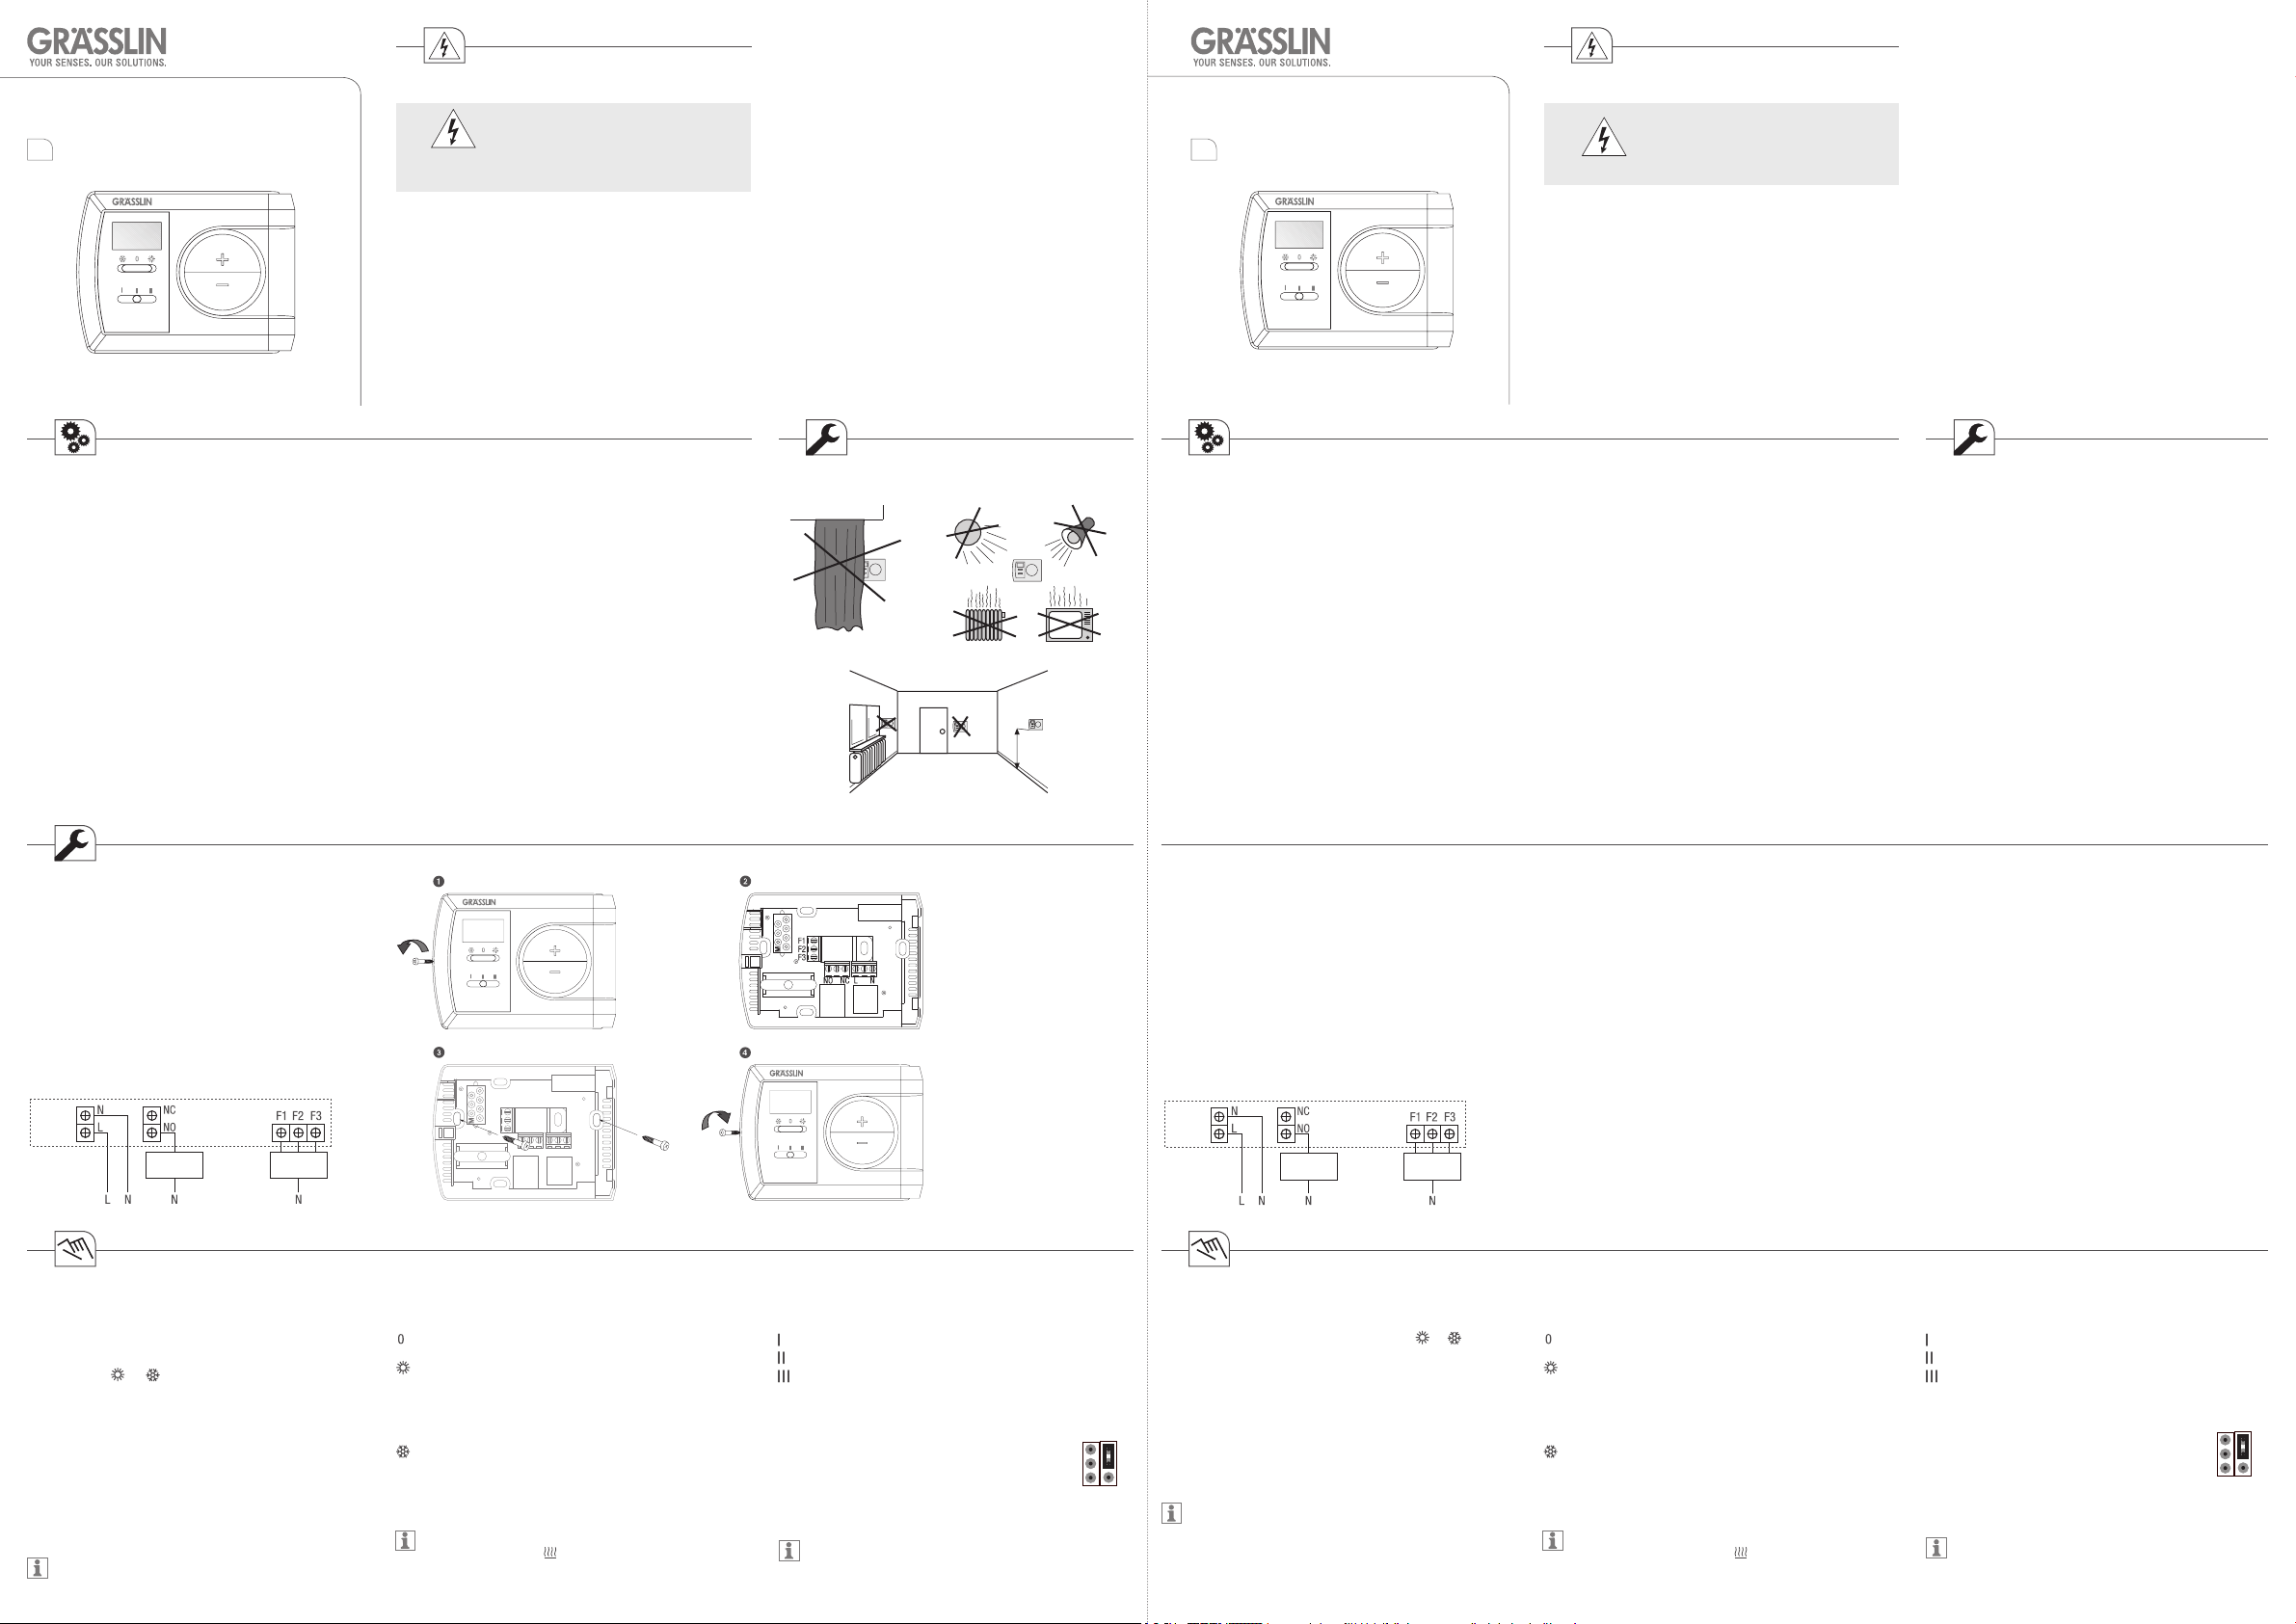
Installation
1. Gehäusedeckel mit einem Schraubenzieher von der
Gehäuserückseite abschrauben.
2. Drähte anschließen, siehe Anschlussplan.
3. Gehäuserückseite mit den mitgelieferten Schrauben an
der Wand befestigen.
4. Gehäusedeckel auf die Gehäuserückseite setzen und
die beiden Gehäusehälften wieder verschrauben.
info@graesslin.de
www.graesslin.de
Technische Daten
Fax: +49 (0) 7724 / 933-240
Phone: +49 (0) 7724 / 933-0
Maße H x B x T (mm)
Anschlussspannung
Germany
Schutzklasse
D-78112 St. Georgen
Schaltleistung
Bundesstraße 36
– ohmsche Last (VDE, IEC)
Grässlin GmbH
– induktive Last cos φ 0,6
Schaltausgang
Funktions-Modus
Geschw. Fan Coil
Automatischer Frostschutz
Differential
Steuertemperatur
Temperaturmessbereich
Display Temperaturupdate
Umgebungstemperatur
Ganggenauigkeit
Auösung
Schutzart
82 x 111 x 26
220-240 V/50-60 Hz
||
max. 6 A / 250 V AC/50 Hz
max. 2 A / 250 V AC/50 Hz
potentialfrei
Heizen / Kühlen
3 Geschwindigkeiten
+5°C
0.4 / 0.6°C
+5°C ... + 35°C
+0°C ... + 40°C
alle 10 Sek.
-5°C ... + 45°C
± 1°C bei +20°C
0,5°C
IP30
Installation und Montage
1.5 m
Description of the device
The room thermostat thermio 713 allows you a practical heat
regulation, saves energy and the desired room temperature
can be set easily.
• Control of heating and air-conditioning systems within a
temperature range from + 5°C to + 35°C
• Automatic anti-freeze protection
• Regulation of fan coils
Designated use
• Surface mounted device which is mounted on walls.
• Suitable for use in dry rooms only!
Installation
1. Unscrew the housing cover from the backside of the
housing using a screwdriver.
2. Connect the wires according to the wiring diagram.
3. Fasten the backside of the housing on the wall by means
of the screws included in the delivery.
4. Place the housing cover on the backside of the housing
and screw the two halves together.
Technical data
Dimensions H x W x D (mm)
Main voltage
Protection class
Switching capacity
– Ohmic load (VDE, IEC)
– Inductive load cos φ 0.6
Switching output
Function mode
Velocity fan coil
Automatic anti-freeze protection
Differential
Controlled temperature
Temperature meas. range
Display temperature update
Ambient temperature
Accuracy
Resolution
Protection degree
82 x 111 x 26
220-240 V/50-60 Hz
||
max. 6 A / 250 V AC/50 Hz
max. 2 A / 250 V AC/50 Hz
potential-free
Heating / Cooling
3 different speeds
+5°C
0.4 / 0.6°C
+5°C ... + 35°C
+0°C ... + 40°C
every 10 sec.
-5°C ... + 45°C
± 1°C for +20°C
0.5°C
IP 30
Installation and mounting
1.5 m
Anschlussplan
230 V AC 50Hz
HEATING/
COOLING
Max.
6(2)A 250 VAC
FAN
Temperatureinstellung
Die Raumtemperatur können Sie mit den Tasten + und –
einstellen.
1. Stellen Sie den Regler auf den gewünschten
Betriebsmodus:
2. Drücken Sie die Taste + oder – zweimal.
Die Hintergrundbeleuchtung des Displays geht an
und die Temperaturanzeige blinkt.
3. Stellen Sie die gewünschte Temperatur mit den Tasten
+ und – ein.
Erfolgt 10 Sekunden lang keine Eingabe, wird die
eingestellte Temperatur gespeichert und im Display
erscheint wieder die aktuelle Raumtemperatur.
Drücken Sie die Taste + oder – einmal um die
Hintergrundbeleuchtung des Displays für 15
Sekunden einzuschalten.
oder
Betriebsmodi
Schieben Sie den Regler auf die gewünschte Position:
AUS
Heizmodus
Stellen Sie die gewünschte Temperatur mit den Tasten
+ und – ein. Je nach aktueller Raumtemperatur wird der
Boiler EIN oder AUS geschalten.
Kühlmodus
Stellen Sie die gewünschte Temperatur mit den Tasten
+ und – ein. Je nach aktueller Raumtemperatur wird die
Klimaanlage EIN oder AUS geschalten.
Wenn der Boiler oder die Klimaanlage EIN geschalten
sind, erscheint das Symbol
im Display.
Geschwindigkeits-Regler für den Fan Coil:
Stufe 1 (F1) = langsame Geschwindigkeit
Stufe 2 (F2) = mittlerer Geschwindigkeit
Stufe 3 (F3) = maximale Geschwindigkeit
Differential (SWING)
Es können zwei Positionen für den Steckreiter
der Differential-Regelung gewählt werden:
0.4 oder 0.6°C
Drücken Sie anschließend die Reset-Taste um
Ihre Änderung zu aktivieren.
Der Differential-Steckreiter sowie die Reset-Taste
bendet sich auf der Innenseite des Gehäusedeckels.
PID
0.4/0.6
ON/OFF
Connection diagram
HEATING/
230 V AC 50Hz
COOLING
Max.
6(2)A 250 VAC
Temperature setting
The room temperature can be set by pressing the keys +
and -.
1. Set the controller to the desired operating mode:
2. Press the keys + or - twice.
The background illumination of the display goes on
and the temperature indication ashes.
3. Use the keys + and - to set the desired temperature.
SWING
If you do not enter anything within 10 seconds, the set
temperature is stored and the current room temperature
is shown again on the display.
Press the key + or - once in order to switch on the
background illumination of the display for 15 seconds.
FAN
or
Operating modes
Slide the controller to the desired position:
OFF
Heating mode
Use the keys + and - to set the desired temperature.
According to the current room temperature, the boiler
will be set ON or OFF.
Cooling mode
Use the keys + and - to set the desired temperature.
According to the current room temperature, the airconditioning system will be set ON or OFF.
If the boiler or the air-conditioning system is switched
ON, the symbol
appears in the display.
Speed controller for the fan coil:
Step 1 (F1) = slow speed
Step 2 (F2) = medium speed
Step 3 (F3) = maximum speed
Differential (SWING)
Two positions for the jumper of the differential
regulation can be selected:
0.4 or 0.6°C
Afterwards press the Reset key to make your
modication effective.
The differential jumper and the Reset key are located
on the inside of the housing cover.
PID
0.4/0.6
ON/OFF
SWING
Page 2
Consignes de sécurité
thermio 713 thermio 713
Mode d‘emploi Bedieningshandleiding
FR
20.9
°C
AVERTISSEMENT
Important
• Respectez les prescriptions et consignes de sécurité
nationales.
• Toute intervention ou modication sur l'appareil entraîne la
perte de la garantie.
• L’appareil ne doit être utilisé que conformément à l'emploi
prévu décrit dans ce manuel.
Lisez et respectez ce mode d'emploi an de garantir un
fonctionnement correct de l'appareil et un travail en toute
sécurité.
Danger d’électrocution!
Le raccordement et le montage ne
doivent être effectués que par des
électriciens qualiés !
NL
20.9
Veiligheidsaanwijzingen
Gevaar door elektrische schok!
WAARSCHUWING
Neemt het volgende in acht
°C
• De nationale voorschriften en veiligheidsvoorwaarden
• Modicaties en wijzigingen aan het apparaat leiden tot het
vervallen van de garantie.
• Het apparaat mag alleen worden gebruikt voor het
voorgeschreven gebruiksdoel.
Lees en neem beslist deze handleiding in acht om een
onberispelijke werking van het apparaat en een veilig werken
te waarborgen.
Aansluiting en montage uitsluitend
door een elektromonteur!
Description de l'appareil
Le thermostat d'ambiance thermio 713 permet une
régulation pratique de la température, permet d'économiser
de l'énergie et il peut être réglé facilement sur la
température ambiante souhaitée.
• Commandes de chauffages et d'installations de
conditionnement d'air dans une plage de température de
+ 5°C à + 35°C
• Mise hors gel automatique
• Régulation de ventilateurs
Utilisation correcte
• Installation apparente du dispositif.
• Uniquement pour une utilisation dans des locaux secs !
Installation
1. Dévisser le couvercle du boîtier de la face arrière du
boîtier à l'aide d'un tournevis.
2. Connecter les ls, voir schéma de raccordement.
3. Fixer la face arrière du boîtier sur le mur à l'aide des
vis livrées.
4. Placer le couvercle sur la face arrière du boîtier et
revisser les deux moitiés du boîtier.
Schéma de raccordement
Caractéristiques techniques
Dimensions H x L x P (mm)
Tension d'alimentation
Classe de protection
Puissance de commutation
– Charge ohmique (VDE, CEI)
– Charge inductive cos. φ 0,6
Sortie de commutation
Mode de fonctionnement
Vitesse ventilateur
Mise hors gel automatique
Mode différentiel
Température régulée
Champ de mesure
Afchage actualisation de la
température
Température ambiante
Précision de marche
Résolution
Type de protection
82 x 111 x 26
220-240 V/50-60 Hz
||
max. 6 A / 250 V CA/50 Hz
max. 2 A / 250 V CA/50 Hz
sans potentiel
Chauffage / refroidissement
3 vitesses différentes
+5°C
0,4 / 0,6°C
+5°C ... + 35°C
+0°C ... + 40°C
toutes les 10 sec.
-5°C ... + 45°C
± 1°C à +20°C
0,5°C
IP 30
Installation et montage
1.5 m
Beschrijving apparaat
De kamerthermostaat thermio 713 maakt een praktische
warmteregeling mogelijk, spaart energie en kan op
eenvoudige wijze ingesteld worden op de gewenste
ruimtetemperatuur.
• Besturing van verwarmingen en airconditionings binnen
een temperatuurgebied van + 5°C tot + 35°C
• Automatische vorstbescherming
• Regulering van fan coils
Gebruik volgens de voorschriften
• Opbouwapparaat voor installatie aan wanden
• Alleen geschikt voor gebruik in droge ruimtes!
Installatie
1. Deksel van de behuizing met een schroevendraaier
losmaken aan de achterkant van de behuizing.
2. Draden aansluiten, zie aansluitschema.
3. Achterkant van de behuizing met de meegeleverde
schroeven bevestigen aan de wand.
4. Deksel van de behuizing op de achterkant van de
behuizing zetten en de beide behuizingsdelen weer
vastschroeven.
Aansluitschema
Technische gegevens
Afmetingen h x b x d (mm)
Aansluitspanning:
Beschermingsklasse
Schakelvermogen
– ohmse belasting (VDE, IEC)
– inductieve belasting cos φ 0,6
Schakeluitgang
Functie-modus
Snelh. fan coil
Automatische vorstbescherming
Differentieel
Stuurtemperatuur
Temperatuurmeetgebied
Display temperatuurupdate
Omgevingstemperatuur
Gangnauwkeurigheid
Resolutie
Beschermingsklasse
Installatie en montage
82 x 111 x 26
220-240 V/50-60 Hz
||
max. 6 A / 250 V AC/50 Hz
max. 2 A / 250 V AC/50 Hz
potentiaalvrij
verwarmen / koelen
3 snelheden
+5°C
0.4 / 0.6°C
+5°C ... + 35°C
+0°C ... + 40°C
elke 10 sec.
-5°C ... + 45°C
± 1°C bij +20°C
0,5°C
IP 30
230 V AC 50Hz
HEATING/
COOLING
Max.
6(2)A 250 VAC
FAN
Réglage de la température
Utiliser les touches + et - pour régler la température
ambiante.
1. Régler le régulateur sur le mode de fonctionnement
souhaité :
2. Appuyez deux fois sur la touche + et -.
3. Utiliser les touches + et - pour régler la température
souhaitée.
Si aucune entrée n'est effectuée en l'espace de 10
secondes, la température réglée est enregistrée et la
température ambiante actuelle est afchée.
Appuyer une fois sur la touche + ou - pour allumer
l'éclairage d'arrière-plan pendant 15 secondes.
ou
L'éclairage d'arrière-plan de l'afchage s'allume et
l'afchage de la température clignote.
Modes opératoires
Placer le régulateur sur la position souhaitée :
ARRÊT
Mode de chauffage
Utiliser les touches + et - pour régler la température
souhaitée. En fonction de la température ambiante
actuelle, le surchauffeur est mis en marche ou arrêté.
Mode de refroidissement
Utiliser les touches + et - pour régler la température
souhaitée. En fonction de la température ambiante
actuelle, la climatisation est mise en marche ou arrêtée.
Lorsque le surchauffeur ou la climatisation est mis(e) en
marche, le symbole
est afché.
Reglaj viteză pentru Fan Coil:
Treapta 1 (F1) = viteză redusă
Treapta 2 (F2) = viteză medie
Treapta 3 (F3) = viteză maximă
Diferenţial (SWING)
Pot selectate două poziţii pentru modulul cu ştift
al reglării diferenţialului:
0.4 sau 0.6°C
Apăsaţi apoi tasta de reset, pentru a activa
modicarea efectuată.
Modulul cu ştift pentru diferenţial precum şi tasta
de resetare se aă pe partea interioară a capacului
carcasei.
PID
0.4/0.6
ON/OFF
230 V AC 50Hz
HEATING/
COOLING
Max.
6(2)A 250 VAC
FAN
Temperatuurinstelling
De ruimtetemperatuur kunt u instellen met de toetsen + en –.
1. Zet de regelaar op de gewenste modus:
2. Druk twee keer op de toets + of –.
De achtergrondverlichting van de display gaat aan en
de temperatuurindicatie knippert.
3. Stel de gewenste temperatuur in met de toetsen + en –.
Vindt 10 seconden lang geen invoer plaats, wordt de
ingestelde temperatuur opgeslagen en op de display
SWING
verschijnt weer de actuele ruimtetemperatuur.
Druk één keer op de toets + of – om de
achtergrondverlichting van de display gedurende 15
seconden in te schakelen.
of
Modi
Schuif de regelaar op de gewenste positie:
UIT
Verwarmingsmodus
Stel de gewenste temperatuur in met de toetsen + en –.
Afhankelijk van de actuele ruimtetemperatuur wordt de
boiler IN of UIT geschakeld.
Koelmodus
Stel de gewenste temperatuur in met de toetsen + en –.
Afhankelijk van de actuele ruimtetemperatuur wordt de
airconditioning IN of UIT geschakeld.
Wanneer de boiler of de airconditioning IN geschakeld
zijn, verschijnt het symbool
op de display.
Snelheidsregelaar voor de fan coil:
Stand 1 (F1) = langzame snelheid
Stand 2 (F2) = middelste snelheid
Stand 3 (F3) = maximale snelheid
Differentieel (SWING)
Er kunnen twee posities gekozen worden voor
de ruitertjes van de differentieel-regeling:
0.4 of 0.6°C
Druk vervolgens op de reset-toets om uw
wijziging te activeren.
Het differentiaal-ruitertje en de reset-toets bevinden
zich aan de binnenzijde van de deksel van de
behuizing.
PID
0.4/0.6
ON/OFF
SWING
Page 3

Bezpečnostní pokyny Popis přístroje
thermio 713 thermio 713
Návod k obsluze Instrukcja obsługi
CS
VÝSTRAHA
Nebezpečí úrazu elektrickým proudem!
Připojení a montáž svěřte výlučně
kvalikovaným elektrikářům!
Mějte, prosím, na paměti
• že je nutno dodržovat příslušné národní předpisy a
podmínky bezpečnosti práce.
• že provedením svévolných zásahů do přístroje nebo úprav
20.9
°C
přestává platit záruka a končí odpovědnost výrobce za
případné škody.
• že přístroj je dovoleno používat jen za zde popsaným
účelem použití.
Tento návod si pročtěte a řiďte se jím, neboť jen tak lze
zaručit, že přístroj bude bezvadně fungovat a že práce s ním
bude bezpečná.
Pokojový termostat thermio 713 umožňuje praktickou regulaci
teploty, šetří energii a vyznačuje se velmi jednoduchým
nastavením požadované teploty v místnosti.
• ovládání teploty topných i klimatizačních soustav v pásmu
od +5°C do + 35°C
• automatická ochrana proti zamrznutí
• regulace ventilátoru jednotky
Používání v souladu s určením
• přístroj určen k nástěnné montáži na omítku.
• přístroj vhodný jen do suchého vnitřního prostředí!
PL
20.9
Wskazówki bezpieczeństwa
Niebezpieczeństwo porażenia
UWAGA
°C
Proszę+ pamiętać
• Przestrzegać krajowych przepisów i warunków
bezpieczeństwa.
• Ingerencja i dokonane zmiany w urządzeniu powodują
wygaśnięcie rękojmi i gwarancji.
• Eksploatacja urządzenia dozwolona jest wyłącznie w
celach zgodnych z przeznaczeniem.
Należy przeczytać niniejszą instrukcję i stosować się do
niej, aby zapewnić niezawodne funkcjonowanie urządzenia i
bezpieczną pracę.
prądem elektrycznym!
Przyłączenie i montaż może wykonać
wyłącznie wykwalikowany elektryk!
thermio_touch/cs/pl/hu/ro/10/10/01
Instalace
1. Šroubovákem odšroubujte kryt termostatu od zadní
stěny.
2. Podle schématu zapojení proveďte zapojení.
3. Termostat přišroubujte s pomocí dodaných šroubů
zadní stranou na stěnu.
4. Přiložte kryt k zadní stěně, a poté obě části termostatu
opět sešroubujte.
info@graesslin.de
www.graesslin.de
Technické údaje
Fax: +49 (0) 7724 / 933-240
Phone: +49 (0) 7724 / 933-0
Rozměry v x šx h (mm)
Připojovací napětí
Germany
Druh krytí
D-78112 St. Georgen
Spínací výkon
Bundesstraße 36
– Ohmický odpor (VDE, IEC)
Grässlin GmbH
– Indukční zatížení cos φ 0,6
Spínací výstup
Funkční režim
Rychlost ventilátoru
Automatická ochrana proti
zamrznutí
Diferenční regulace
Řídicí teplota
Rozsah měření teploty
Aktualizace teploty na displeji
Okolní teplota
Provozní přesnost
Rozlišení
Druh krytí
82 x 111 x 26
220-240 V/50-60 Hz
||
max. 6 A / 250 V AC/50 Hz
max. 2 A / 250 V AC/50 Hz
bezpotenciálový
topení / chlazení
3 rychlosti
+5°C
0.4/0.6°C
+5°C ... + 35°C
+0°C ... + 40°C
po 10 s
-5°C ... + 45°C
± 1°C za +20°C
0,5°C
IP 30
Instalace a montáž Instalacja i montaż
Opis urządzenia
Termostat do pomieszczeń thermio 713 umożliwia praktyczną
regulację termiczną, oszczędza energię i pozwala w prosty
sposób na ustawienie żądanej temperatury w pomieszczeniu.
• Sterowanie ogrzewaniem i klimatyzatorami w przedziale
temperaturowym od 5°C do 35°C
• Automatyczna ochrona przed zamarzaniem
• Regulacja klimakonwektorów (fan-coil)
Użytkowanie zgodne z przeznaczeniem
• Urządzenie do instalacji natynkowej na ścianach.
• Nadaje się wyłącznie do stosowania w suchych
pomieszczeniach!
1.5 m
Dane techniczne
Wym. wys x szer x gł (mm)
Napięcie przyłączeniowe
Klasa zabezpieczenia
Moc załączalna
– obciąż. omowe (VDE, IEC)
– obciąż. indukc. cos φ 0,6
Wyjście łączen.
Tryb działania
Prędkość fan-coil
Automat. ochrona przed zamarz.
Dyferencjał
Temperatura sterowana
Zakres pomiaru temperatury
Display temperatur-update
Temperatura otoczenia
Dokładność działania
Rozdzielczość
Klasa zabezpieczenia
82 x 111 x 26
220-240 V/50-60 Hz
||
maks. 6 A / 250 V AC/50 Hz
maks. 2 A / 250 V AC/50 Hz
bezpotencjałowe
grzanie / chłodzenie
3 prędkości
+5°C
0.4 / 0.6°C
+5°C ... + 35°C
+0°C ... + 40°C
co 10 sek.
-5°C ... + 45°C
± 1°C przy +20°C
0,5°C
IP 30
Instalacja
1. Posługując się śrubokrętem odkręcić pokrywę z tylnej
części obudowy.
2. Druty podłączyć zgodnie ze schematem połączeń.
3. Używając dostarczonych śrub, przymocować tylną część
obudowy do ściany.
4. Założyć pokrywę na tylną część obudowy i obie połówki
ponownie połączyć śrubami.
1.5 m
Schéma zapojení
230 V AC 50Hz
HEATING/
COOLING
Max.
6(2)A 250 VAC
FAN
Nastavení teploty
K nastavení požadované teploty místnosti slouží tlačítka +
a –.
1. Nastavte si posuvník na potřebný provozní režim:
nebo
2. Stiskněte dvakrát za sebou tlačítko + nebo –.
Rozsvítí se displej a rozbliká zobrazená teplota.
3. Požadovanou teplotu nastavíte tlačítky + a –.
Po 10 vteřinách od posledního zadání se nastavená
teplota uloží do paměti a na displeji se rozsvítí opět
okamžitá teplota v místnosti.
Jednorázovým stisknutím tlačítka + či – si můžete na
15 vteřin rozsvítit displej.
Provozní režimy
Přesuňte si posuvník do potřebné polohy:
VYPNUTO
Topení
Požadovanou teplotu nastavíte tlačítky + a –.
Podle okamžité teploty v místnosti bude následovat
buď ZAPNUTÍ nebo VYPNUTÍ boileru.
Chlazení
Požadovanou teplotu nastavíte tlačítky + a –.
Podle okamžité teploty v místnosti bude následovat
buď ZAPNUTÍ nebo VYPNUTÍ klimatizace.
ZAPNUTÍ boileru nebo klimatizace poznáte na displeji
podle symbolu
.
Kolečko pro nastavení rychlosti ventilátoru:
stupeň 1 (F1) = pomalu
stupeň 2 (F2) = středně rychle
stupeň 3 (F3) = maximálně rychle
Diferenční regulace (SWING)
Jezdec diferenční regulace si lze nastavit do
jedné ze dvou možných poloh:
0.4 nebo 0.6°C
Provedenou změnu je následně nutno aktivovat
stisknutím resetovacího tlačítka.
Oba prvky, jezdce diferenční regulace i resetovací
tlačítko, najdete na vnitřní straně krytu termostatu.
PID
0.4/0.6
ON/OFF
Schemat połączeń
HEATING/
230 V AC 50Hz
COOLING
Max.
6(2)A 250 VAC
Regulacja temperatury
Przyciskami + i – reguluje się temperaturę pomieszczenia.
1. Regulator ustawić na żądany tryb pracy:
2. Dwukrotnie nacisnąć przycisk + lub – .
Zapala się tło wyświetlacza i miga wskaźnik temperatury.
3. Za pomocą przycisków + i - ustawić żądaną temperaturę.
Jeśli przez 10 sekund nie nastąpi wprowadzenie nowych
SWING
danych, to nastawiona temperatura zostanie zapisana
w pamięci, a na wyświetlaczu pojawi się znów aktualna
temperatura pomieszczenia.
Jednokrotne naciśnięcie przycisku + lub - włącza tło
wyświetlacza na 15 sekund.
FAN
lub
Tryby pracy
Przemieścić regulator na żądaną pozycję:
Wyłącz. (OFF)
Tryb grzania
Za pomocą przycisków + i - ustawić żądaną
temperaturę. W zależności od aktualnej temperatury
pomieszczenia bojler jest włączany (ON) lub wyłączany
(OFF).
Tryb chłodzenia
Za pomocą przycisków + i - ustawić żądaną
temperaturę. W zależności od aktualnej temperatury
pomieszczenia klimatyzator jest włączany (ON) lub
wyłączany (OFF).
Gdy włączony (ON) jest bojler lub klimatyzator, na
wyświetlaczu pojawia się symbol
.
Regulator prędkości dla klimakonwektora (fan-coil):
stopień 1 (F1) = powolna prędkość
stopień 2 (F2) = średnia prędkość
stopień 3 (F3) = maksymalna prędkość
Dyferencjał (SWING)
Do wyboru są dwie pozycje znacznika
regulacji dyferencjału:
0.4 lub 0.6°C
Następnie nacisnąć przycisk Reset, aby
dokonać aktualizacji zmian.
Znacznik dyferencjału oraz przycisk Reset znajdują
się po wewnętrznej stronie pokrywy obudowy.
PID
0.4/0.6
ON/OFF
SWING
Page 4

Biztonsági előírások
thermio 713 thermio 713
Áramütés veszélye!
Kezelési útmutató Instrucţiuni de utilizare
HU
FIGYELMEZTETÉS
Kérjük ügyeljen
20.9
°C
• A nemzeti előírásokra és biztonsági követelményekre.
• A készüléken történő beavatkozások és változtatások a
garancia elvesztéséhez vezetnek.
• A készülék csak a leírt alkalmazási módra üzemeltethető.
Olvassa el és kövesse ezt az utasítást a készülék hibátlan és
biztonságos munkája érdekében.
Csatlakoztatás és szerelés kizárólag
elektromos szakember által!
RO
20.9
Instrucţiuni de securitate
Pericol de electrocutare!
AVERTIZARE
°C
Vă rugăm respectaţi
• normele şi dispoziţiile de securitate naţionale în vigoare.
• Orice intervenţie sau modicare la aparat duc automat la
pierderea dreptului la garanţie.
• Aparatul trebuie utilizat exclusiv în conformitate cu scopul
de utilizare declarat.
Vă rugăm citiţi şi respectaţi aceste instrucţiuni, pentru a
asigura o funcţionare impecabilă şi o utilizare în condiţii de
siguranţă a aparatului.
Racordarea şi montajul vor efectuate exclusiv de către un electrician
autorizat!
Készülékleírás
A thermio 713 szobatermosztát praktikus hőszabályozást
tesz lehetővé, energiát spórol és egyszerűen állítható a
kívánt szobahőmérsékletre.
• Fűtő- és hűtőberendezések vezérlése +5°C és + 35°C
közötti hőmérsékleten belül
• Automatikus fagyvédelem
• Fan Coils szabályozás
Rendeltetésszerű használat
• Készülék falra való szereléshez.
• Csak száraz helyeken alkalmazható!
Installáció
1. Egy csavarhúzóval csavarozza le a tok hátsó oldalán
lévő toktetőt.
2. Csatlakoztassa a drótokat, lásd ehhez a csatlakoztatási
tervet.
3. A tok hátsó oldalát rögzítse a falhoz a szállított
csavarokkal.
4. Helyezze a tok hátsó oldalára a toktetőt és újra
csavarozza fel mindkét tokfelet.
Csatlakoztatási terv
Műszaki adatok
Méret M x Sz x M (mm)
Csatlakozási feszültség
Védőosztály
Kapcsolási teljesítmény
– ohmikus teher (VDE, IEC)
– indukív teher cos φ 0,6
Kapcsoló kimenet
Fan Coil sebesség
Funkció-mód
Automatikus fagyvédelem
Differenciál
Vezérlő hőmérséklet
Hőmérsékletmérési tartomány
Hőmérsékletfrissítés kijelző
Környezeti hőmérséklet
Menetpontosság
Feloldás
Védekezési mód
82 x 111 x 26
220-240 V/50-60 Hz
||
max. 6 A / 250 V AC/50 Hz
max. 2 A / 250 V AC/50 Hz
potenciálmentes
3 Sebességek
Fűtés / Hűtés
+5°C
0.4 / 0.6°C
+5°C ... + 35°C
+0°C ... + 40°C
Minden 10 másodpercben
-5°C ... + 45°C
± 1°C +20°C-nál
0,5°C
IP 30
Installáció és szerelés
1.5 m
Descrierea aparatului
Termostatul de cameră thermio 713 permite reglarea practică
a temperaturii, contribuie la economisirea de energie şi
permite o ajustare facilă a temperaturii din încăpere.
• Pentru reglarea sistemelor de încălzire şi aer condiţionat cu
un domeniu de temperatură de + 5°C până la + 35°C
• Protecţie automată împotriva îngheţului
• Reglarea de Fan Coils
Utilizarea conformă cu destinaţia
• Aparat montat pe tencuială pentru instalarea pe perete.
• Numai pentru utilizarea în încăperi uscate!
Instalare
1. Desfaceţi capacul carcasei cu ajutorul unei şurubelniţe
de partea posterioară a carcasei.
2. Conectaţi rele conform planului de conexiuni.
3. Fixaţi partea posterioară a carcasei de perete, utilizând
şuruburile din setul de livrare.
4. Aşezaţi din nou capacul carcasei pe partea posterioară
a carcasei, şi xaţi cu şuruburi cele două părţi ale
carcasei.
Plan de conexiuni
Date tehnice
Dimensiuni Înălţ. x Lăţ. x Adânc. (mm)
Tensiune de racordare
Clasă de protecţie
Putere de conectare
– Sarcină rezistivă (VDE, IEC)
– Sarcină inductivă cos φ 0,6
Ieşire comutare
Mod funcţii
Viteză Fan Coil
Protecţie automată împotriva
îngheţului
Diferenţial
Temperatură comandă
Domeniu măsură temperatură
Ecran actualizare temperatură
Temperatură mediu ambiant
Precizie
Rezoluţie
Tip de protecţie
Instalarea şi montajul
82 x 111 x 26
220-240 V/50-60 Hz
||
max. 6 A / 250 V AC/50 Hz
max. 2 A / 250 V AC/50 Hz
contact sec
Încălzire / răcire
3 viteze
+5°C
0.4 / 0.6°C
+5°C ... + 35°C
+0°C ... + 40°C
la 10 sec.
-5°C ... + 45°C
± 1°C la +20°C
0,5°C
IP 30
230 V AC 50Hz
HEATING/
COOLING
Max.
6(2)A 250 VAC
FAN
Hőmérséklet beállítás
A szobahőmérsékletet a + és – gombokkal tudja beállítani.
1. Állítsa a szabályozót a kívánt üzemmódba:
2. Nyomja meg kétszer a + vagy a – gombot.
A kijelző háttérmegvilágítása bekapcsolódik és a
hőmérsékletjelző villog.
3. Állítsa be a kívánt hőmérsékletet a + és – gombokkal.
Ha 10 másodpercen keresztül nem történik bejegyzés,
akkor a beállított hőmérséklet kerül mentésre és a
kijelzőn újra az aktuális hőmérséklet jelenik meg.
Nyomja meg egyszer a + vagy a – gombot, hogy
a kijelző háttérmegvilágítása 15 másodpercre
bekapcsoljon.
vagy
Üzemmódok
Tolja a szabályozót a kívánt pozícióba:
KI
Fűtő üzemmód
Állítsa be a kívánt hőmérsékletet a + és – gombokkal.
Az aktuális szobahőmérséklet alapján kerül a bojler BE
vagy KI kapcsolásra.
Hűtő üzemmód
Állítsa be a kívánt hőmérsékletet a + és – gombokkal.
Az aktuális szobahőmérséklet alapján kerül a
klímaberendezés BE vagy KI kapcsolásra.
Ha a bojler vagy a klímaberendezés BE-kapcsolt
állapotban van, a
szimbólum jelenik meg a kijelzőn.
Sebességszabályozó a Fan Coil-hoz:
1-es szint (F1) = lassú sebesség
2-es szint (F2) = közepes sebesség
3-as szint (F3) = maximális sebesség
Differenciál (SWING)
Két pozíció választható a differenciálszabályozáshoz:
0.4 vagy 0.6°C
Ezt követően nyomja meg a Reset-gombot a
változtatás aktiválásához.
A differenciál-regiszterfül valamint a Reset-gomb a
toktető belső oldalán találhatók.
PID
0.4/0.6
ON/OFF
230 V AC 50Hz
HEATING/
COOLING
Max.
6(2)A 250 VAC
FAN
Reglarea temperaturii
Temperatura din încăpere poate reglată cu ajutorul tastelor
+ şi –.
1. Fixaţi reglajul în modul de operare dorit:
2. Apăsaţi tasta + sau – de două ori.
Se aprinde iluminarea de fundal a ecranului şi aşajul
temperaturii luminează intermitent.
3. Reglaţi temperatura dorită cu ajutorul tastelor + şi –.
Dacă într-un interval de 10 secunde nu se efectuează
SWING
nicio modicare, temperatura aşată va salvată, iar
ecranul va aşa din nou temperatura actuală a încăperii.
Apăsând tasta + sau – o singură dată, aprindeţi
iluminarea de fundal a ecranului pentru 15 secunde.
sau
Moduri de operare
Împingeţi reglajul în poziţia dorită:
OPRIT
Mod încălzire
Reglaţi temperatura dorită cu ajutorul tastelor + şi –.
În funcţie de temperatua actuală din încăpere, boilerul
este PORNIT sau OPRIT.
Mod răcire
Reglaţi temperatura dorită cu ajutorul tastelor + şi –.
În funcţie de temperatua actuală din încăpere, instalaţia
de aer condiţionat este PORNITĂ sau OPRITĂ.
Dacă boilerul sau instalaţia de aer condiţionat sunt
PORNITE, apare simbolul
pe ecran.
Reglaj viteză pentru Fan Coil:
Treapta 1 (F1) = viteză redusă
Treapta 2 (F2) = viteză medie
Treapta 3 (F3) = viteză maximă
Diferenţial (SWING)
Pot selectate două poziţii pentru modulul cu
ştift al reglării diferenţialului:
0.4 sau 0.6°C
Apăsaţi apoi tasta de reset, pentru a activa
modicarea efectuată.
Modulul cu ştift pentru diferenţial precum şi tasta
de resetare se aă pe partea interioară a capacului
carcasei.
PID
0.4/0.6
ON/OFF
SWING
 Loading...