

Page 1
X642eLaser MFP
User’s Guide
Lexmark and Lexmark with diamond design are trademarks of Lexmark International, Inc.,
registered in the United States and/or other countries.
© 2006 Lexmark International, Inc.
All rights reserved.
740 West New Circle Road
Lexington, Kentucky 40550
May 2006
www.lexmark.com
Page 2

Edition: May 2006
The following paragraph does not apply to any country where such provisions are inconsistent with local law: LEXMARK
INTERNATIONAL, INC., PROVIDES THIS PUBLICATION “AS IS” WITHOUT WARRANTY OF ANY KIND, EITHER EXPRESS OR
IMPLIED, INCLUDING, BUT NOT LIMITED TO, THE IMPLIED WARRANTIES OF MERCHANTABILITY OR FITNESS FOR A PARTICULAR
PURPOSE. Some states do not allow disclaimer of express or implied warranties in certain transactions; therefore, this statement may not
apply to you.
This publication could include technical inaccuracies or typographical errors. Changes are periodically made to the information herein; these
changes will be incorporated in later editions. Improvements or changes in the products or the programs described may be made at any time.
Comments about this publication may be addressed to Lexmark International, Inc., Department F95/032-2, 740 West New Circle Road,
Lexington, Kentucky 40550, U.S.A. In the United Kingdom and Eire, send to Lexmark International Ltd., Marketing and Services
Department, Westhorpe House, Westhorpe, Marlow Bucks SL7 3RQ. Lexmark may use or distribute any of the information you supply in
any way it believes appropriate without incurring any obligation to you. To obtain additional copies of publications related to this product, visit
the Lexmark Web site at www.lexmark.com.
References in this publication to products, programs, or services do not imply that the manufacturer intends to make these available in all
countries in which it operates. Any reference to a product, program, or service is not intended to state or imply that only that product,
program, or service may be used. Any functionally equivalent product, program, or service that does not infringe any existing intellectual
property right may be used instead. Evaluation and verification of operation in conjunction with other products, programs, or services, except
those expressly designated by the manufacturer, are the user’s responsibility.
© 2006 Lexmark International, Inc.
All rights reserved.
Trademarks
Lexmark, Lexmark with diamond design, MarkNet, MarkVision, and PrintCryption are trademarks of Lexmark International, Inc., registered
in the United States and/or other countries.
Operation ReSource and LEXFAX
®
PCL
is a registered trademark of the Hewlett-Packard Company. PCL is Hewlett-Packard Company’s designation of a set of printer
commands (language) and functions included in its printer products. This MFP is intended to be compatible with the PCL language. This
means the MFP recognizes PCL commands used in various application programs, and that the MFP emulates the functions corresponding
to the commands.
Details relating to compatibility are included in the Technical Reference.
Other trademarks are the property of their respective owners.
are service marks of Lexmark International, Inc.
UNITED STATES GOVERNMENT RIGHTS
This software and any accompanying documentation provided under this agreement are commercial computer software and documentation
developed exclusively at private expense.
Safety information
• Connect the power supply cord to a properly grounded electrical outlet that is near the product and easily accessible.
CAUTION: Do not use the fax feature during a lightning storm. Do not set up this product or make any electrical or cabling connections,
such as the power supply cord or telephone, during a lightning storm.
• Use only a 26 AWG or larger telecommunications (RJ-11) cord when connecting this product to the public switched telephone
network.
• Refer service or repairs, other than those described in the operating instructions, to a professional service person.
• This product is designed, tested, and approved to meet strict global safety standards with the use of specific Lexmark components.
The safety features of some parts may not always be obvious. Lexmark is not responsible for the use of other replacement parts.
CAUTION: Make sure that all external connections (such as Ethernet and telephone system connections) are properly installed in
their marked plug-in ports.
• This product uses a laser.
CAUTION: Use of controls or adjustments or performance of procedures other than those specified herein may result in hazardous
radiation exposure.
• This product uses a printing process that heats the print media, and the heat may cause the media to release emissions. You must
understand the section in your operating instructions that discusses the guidelines for selecting print media to avoid the possibility of
harmful emissions.
• This product contains mercury in the lamp (<5mg Hg). Disposal of mercury may be regulated due to environmental considerations.
For disposal or recycling information, contact your local authorities or the Electronic Industries Alliance: www.eiae.org.
2
Page 3

This symbol indicates the presence of a hot surface or component.
CAUTION: To reduce the risk of injury from a hot component, allow the surface to cool before
touching.
Mercury statement
This product contains mercury in the lamp (<5mg Hg). Disposal of mercury may be regulated due to environmental considerations. For
disposal or recycling information, contact your local authorities or the Electronic Industries Alliance: www.eiae.org.
Static sensitivity notice
Warn ing: This symbol identifies static-sensitive parts. Do not touch in the areas near these symbols without first touching
the metal frame of the printer.
3
Page 4

Contents
Chapter 1: Learning about the MFP .............................................9
Identifying the MFP ........................................................................................ 9
Using the scanner ........................................................................................ 11
Configured models ....................................................................................... 13
Understanding the MFP control panel .......................................................... 14
Using the LCD touch-screen buttons ........................................................... 21
Menus ........................................................................................................... 27
Chapter 2: Copying ......................................................................28
Quick copy .................................................................................................... 28
Multiple page copying ................................................................................... 29
Using the scanner glass (flatbed) ................................................................. 29
Understanding the copy screens and options .............................................. 29
Copying from one size to another ................................................................ 32
Making transparencies ................................................................................. 32
Copying to letterhead ................................................................................... 32
Copying photographs ................................................................................... 33
Making copies using media from a selected tray ......................................... 33
Copying mixed-sized media ......................................................................... 34
Setting the duplex option .............................................................................. 35
Reducing and enlarging copies .................................................................... 35
Adjusting copy quality ................................................................................... 36
Setting collation options ............................................................................... 36
Placing separator sheets between copies .................................................... 37
Setting paper saving options ........................................................................ 37
Placing the date and time at the top of each page ....................................... 38
Placing an overlay message on each page .................................................. 38
Canceling a copy job .................................................................................... 38
Copy tips ...................................................................................................... 39
4
Page 5

Chapter 3: E-mail ..........................................................................40
Entering an e-mail address .......................................................................... 41
Using a shortcut number .............................................................................. 41
Using the address book ................................................................................ 41
E-mailing to a profile ..................................................................................... 42
Adding e-mail subject and message information .......................................... 42
Changing the output file type ........................................................................ 43
E-mailing color documents ........................................................................... 43
Creating an e-mail shortcut .......................................................................... 44
Creating an e-mail profile ............................................................................. 45
Canceling an e-mail ...................................................................................... 45
Understanding e-mail options ....................................................................... 46
E-mail server setup ...................................................................................... 47
Address book setup ...................................................................................... 47
E-mail tips ..................................................................................................... 48
Chapter 4: Faxing .........................................................................49
Sending a fax ............................................................................................... 50
Using fax destination shortcuts .................................................................... 50
Using the address book ................................................................................ 51
Sending faxes from a computer ................................................................... 51
Creating shortcuts ........................................................................................ 52
Understanding fax options ............................................................................ 54
Changing the fax resolution .......................................................................... 55
Adjusting the Darkness setting ..................................................................... 55
Sending a fax at a later time ......................................................................... 56
Cancel an outgoing fax ................................................................................. 57
Fax tips ......................................................................................................... 57
Fax setup ...................................................................................................... 58
Chapter 5: FTP ..............................................................................60
Entering the FTP address ............................................................................ 60
Using a shortcut number .............................................................................. 60
Using the address book ................................................................................ 61
Creating shortcuts ........................................................................................ 61
5
Page 6

FTP options .................................................................................................. 62
FTP tips ........................................................................................................ 63
Chapter 6: Scanning to a PC or USB flash memory device .....64
Create a scan to PC profile .......................................................................... 64
Understanding scan to PC options ............................................................... 66
Scanning to a USB flash memory device ..................................................... 67
Scanning tips ................................................................................................ 67
Chapter 7: Printing .......................................................................68
Sending a job to print ................................................................................... 68
Printing from a USB flash memory device .................................................... 69
Canceling a print job ..................................................................................... 70
Printing the menu settings page ................................................................... 72
Printing a network setup page ...................................................................... 72
Printing a font sample list ............................................................................. 73
Printing a directory list .................................................................................. 73
Printing confidential and held jobs ................................................................ 73
Printing on specialty media .......................................................................... 77
Loading standard trays and optional trays ................................................... 79
Setting the Paper Type and Paper Size ....................................................... 83
Loading the multipurpose feeder .................................................................. 83
Loading the 2000-sheet drawer .................................................................... 87
Loading the envelope feeder ........................................................................ 90
Linking trays ................................................................................................. 93
Chapter 8: Understanding paper and specialty media guidelines 94
Supported print media .................................................................................. 94
Selecting print media .................................................................................. 101
Storing print media ..................................................................................... 106
Avoiding jams ............................................................................................. 106
Chapter 9: Installing and removing options ............................108
Installing input options ................................................................................ 108
Installing a duplex unit ................................................................................ 111
6
Page 7

Installing memory or option cards .............................................................. 113
Accessing the MFP system board .............................................................. 114
Installing or removing a memory card ........................................................ 118
Installing or removing a flash memory or firmware card ............................. 120
Installing an option card ............................................................................. 122
Replacing the shield ................................................................................... 123
Chapter 10: Understanding the MFP ........................................124
Determining the status of supplies ............................................................. 125
Conserving supplies ................................................................................... 126
Ordering supplies ....................................................................................... 126
Recycling Lexmark products ...................................................................... 131
Cleaning the scanner glass (flatbed) and backing material ........................ 132
Scanner registration ................................................................................... 132
Moving the MFP ......................................................................................... 134
Chapter 11: Administrative support .........................................135
Adjusting control panel brightness ............................................................. 135
Restoring factory default settings ............................................................... 135
Adjusting screen timeout ............................................................................ 136
Adjusting Power Saver ............................................................................... 136
Configuring the MFP .................................................................................. 136
Using the restricted server list function ...................................................... 145
Chapter 12: Clearing jams .........................................................146
Identifying jams ............................................................................................a18.3(.)...0..r7.61ght6(rdoors.7(.r7 and)8.8(t [(I)9-7.7.8(tays.7(.r7 meout)8.6( )-8.6( )-8.6( )-8.6 )-8.6 7.8(t6 )-8.6 7.8(t6 )-8.6 7.8(t6 )-8.6 7.8(t6 )-8.6 7.8(t6 )-8.6 )-8.6 7.8(t6 )-8.6 7.8(t6 )-8.6 7.8(t6 )-8.6 7.8(t6 )-8.6 7.8(t6 )-8.6 )-8.6 7.8(t6 )-8.6 7.8(t6 )-8.6 7.8(t6 )-8.6 7.8(t6 )-8.6 7.8(t6 )-8.6 t6 t6 t6 t6 t6 t6 t6 t6 t6 t6 t6 t6 t6 t6 t6 t6 t6 ..a18.3(4TJT*0.0353 Tc0Under)y01 T.age7.2(55.6 7(.)-2.3(.)8.7(.)-2.3(.)8.7(.)-2.3(.)8.7(.)-27(.)-2.3(.)8.7(.)-2.3(.)8.7(.)-2.3(.)8.7(.)-2.3(.)8.7(.)-2.3(.)8.7(.)-27(.)-2.3(.)8.7(.)-2.3(.)8.7(.)-2.3(.)8.7(.)-2.3(.)8.7(.)-2.3(.)8.7(.)-27(.)-2.3(.)8.7(.)-2.3(.)8.7(.)-2.3(.)8.7(.)-2.3(.)8.7(.)-2.3(.)8.7(.)-27(.)-2.3(.)8.7(.)-2.3(.)8.7(.)-2.3(.)8.7(.)-2.3(.)8.7(.)-27(.)-2.3(.)8.7(.)-2.3(.)8.7(.)-2.3(.)8.7(.)-2.3(.)8.7(.)-2.3(.)8.7(.)-27(.)-2.3(.)8.7(.)-2.3(.)8.7(.)-2.3(.)8.7(.)-2.267)8.648 136
7
Page 8

Printing multiple language PDFs ................................................................ 161
Solving printing problems ........................................................................... 161
Solving copy quality problems .................................................................... 164
Solving scan quality problems .................................................................... 164
Solving fax problems .................................................................................. 164
Solving option problems ............................................................................. 165
Solving paper feed problems ...................................................................... 168
Print quality troubleshooting ....................................................................... 170
Solving print quality problems .................................................................... 171
Notices .........................................................................................176
Conventions ............................................................................................... 176
Electronic emission notices ........................................................................ 176
Other telecommunications notices ............................................................. 182
ENERGY STAR ......................................................................................... 185
Waste from Electrical and Electronic Equipment (WEEE) directive ........... 185
Laser advisory label ................................................................................... 185
Laser notice ................................................................................................ 186
Index .............................................................................................187
8
Page 9
1
Learning about the MFP
Identifying the MFP
Use the following table to determine the features and options of your Lexmark™ X642e MFP
(multifunction printer).Use the following table to determine the features and options of the MFP
(multifunction printer).
For more information about installing input options, see Installing and removing options or the
instructions that came with the option.
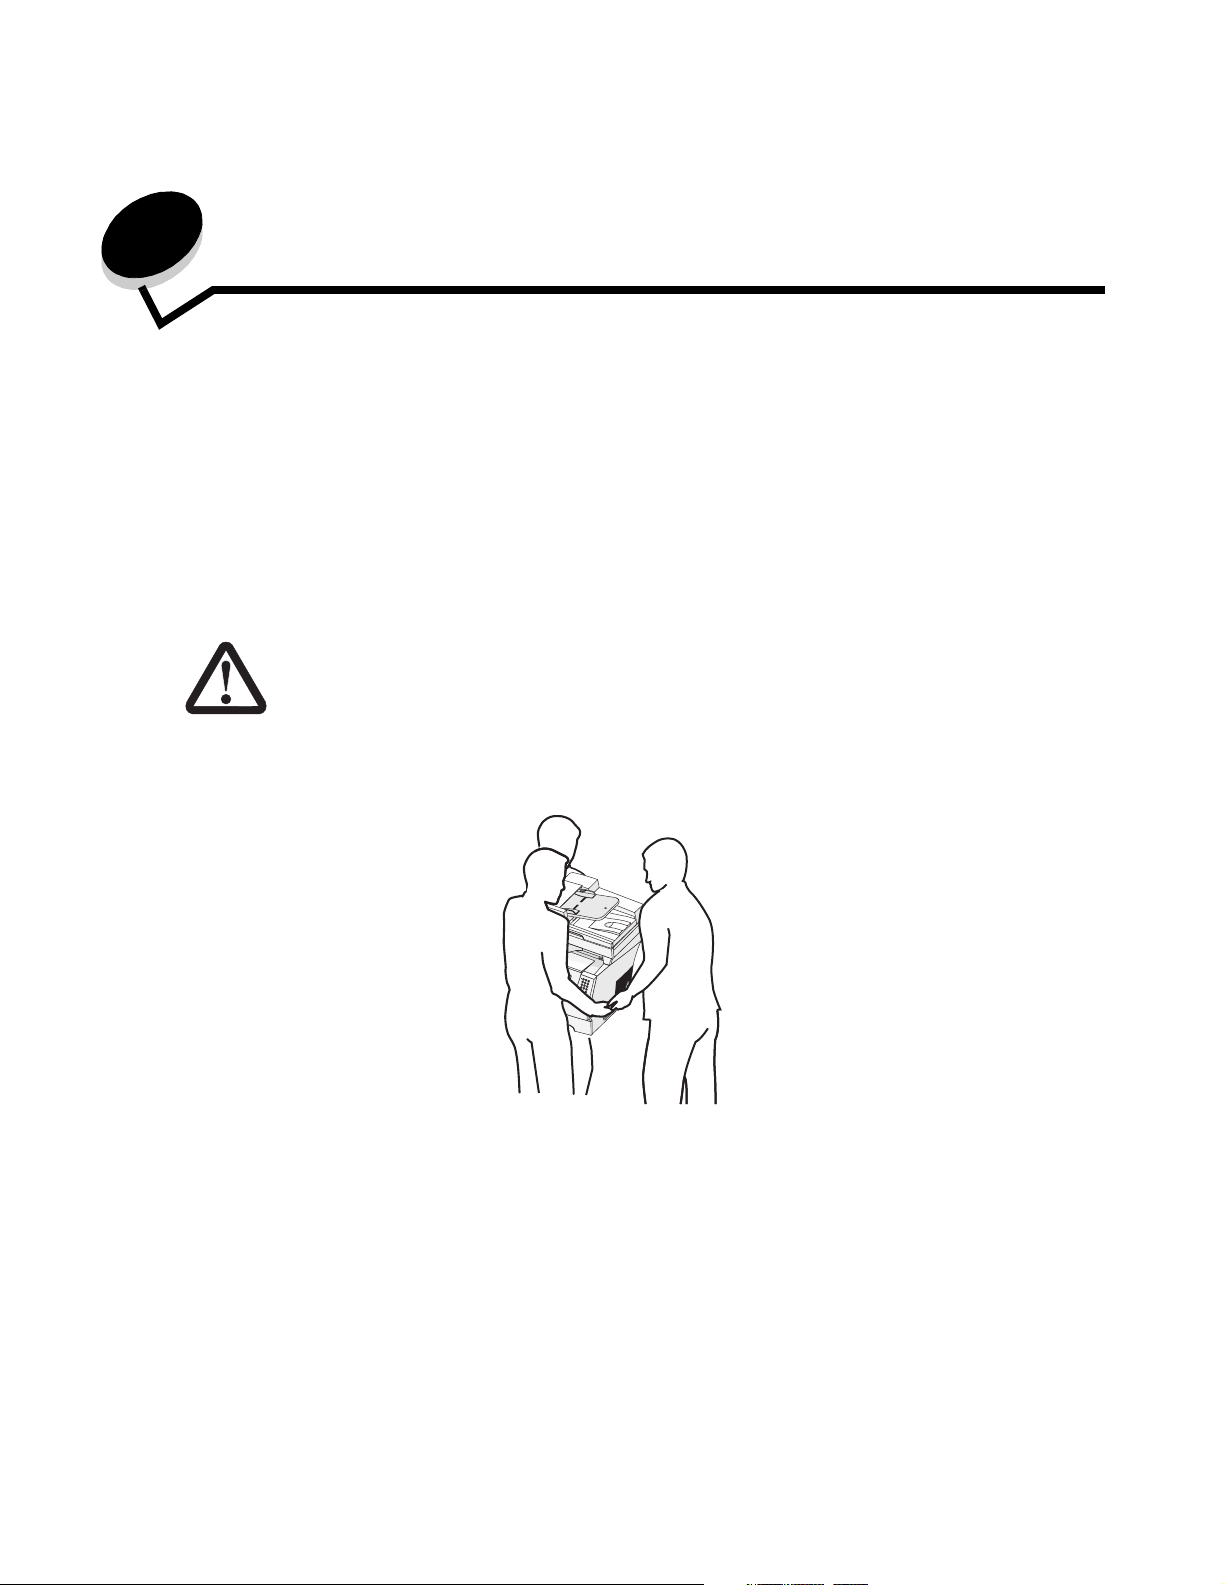
CAUTION: The MFP requires three people to lift it safely.
1
2
3
4
5
6
7
8
9
0
#
9
Page 10
Models
.The following table lists some common features of your printer.
Input capacity 500 sheets
Standard memory 128MB
Maximum memory capacity, non-network/network 640MB
Option card connectors 1
Duplex ability Simplex in, duplex out
Model I Model II
Input capacity 500 sheets 1000 sheets
Standard memory 256MB 256MB
Maximum memory capacity, non-network/network 768MB 768MB
Duplex ability Simplex in,
duplex(optional)
CAUTION: Do not set up this product or make any electrical or cabling
connections, such as the power cord or telephone, during a
lightning storm.
Simplex in,
duplex(optional)
10
Page 11
To identify the MFP machine type-model number, look at the label located under the top front cover.
Model I Model II
Machine
type
7002-001, 7002-002, 7002-011, 7002-012
4542-001, 4542-002, 4542-011, or 4542-012
7002-101, 7002-102, 7002-111, 7002-112
4542-101, 4542-102, 4542-111, or 4542-112
Using the scanner
Basic functions of the scanner
The Lexmark X642e provides copy, fax, and scan-to-network capability for large workgroups. You can:
• Make quick copies, or change the settings on the control panel to perform specific copying
jobs.
• Send an outgoing fax using the MFP control panel.
• Send an outgoing fax to multiple fax destinations at the same time.
• Scan documents and send them to your PC, an e-mail address, or an FTP destination.
• Scan documents and send them to another printer (PDF by way of FTP).
11
Page 12

Automatic document feeder and scanner glass (flatbed)
Note: Color documents can be scanned to a PC, e-mail address, or an FTP destination.
Printed output on this MFP is black and grayscale only, not color.
The ADF (automatic document feeder) can scan multiple pages. The ADF has two scanner
elements. When using the ADF:
• Place the paper in the ADF facing up, short-edge first.
• Place up to 50 sheets of plain paper on the ADF input tray.
• Scan media from 114.0 x 139.4 mm (4.5 x 5.5 in.) to 215.9 x 355.6 mm (8.5 x 14 in.).
• Scan jobs with mixed page sizes (letter and legal).
2
• Scan media weight from 52 to 120 g/m
Note: Color documents can be scanned to a PC, e-mail address, or an FTP destination.
• Copy and print documents at 600 dpi.
Note: Printed output is black and grayscale only, not color.
The scanner glass (flatbed) can be used to scan or copy single pages or book pages. When using
the scanner glass (flatbed):
(14 to 32 lb).
• Place the document in the left rear corner.
• Scan or copy media up to 215.9 x 355.6 mm (8.5 x 14 in.).
• Copy books up to 25.3 mm (1 in.) thick.
• Copy and print documents at 600 dpi.
12
Page 13
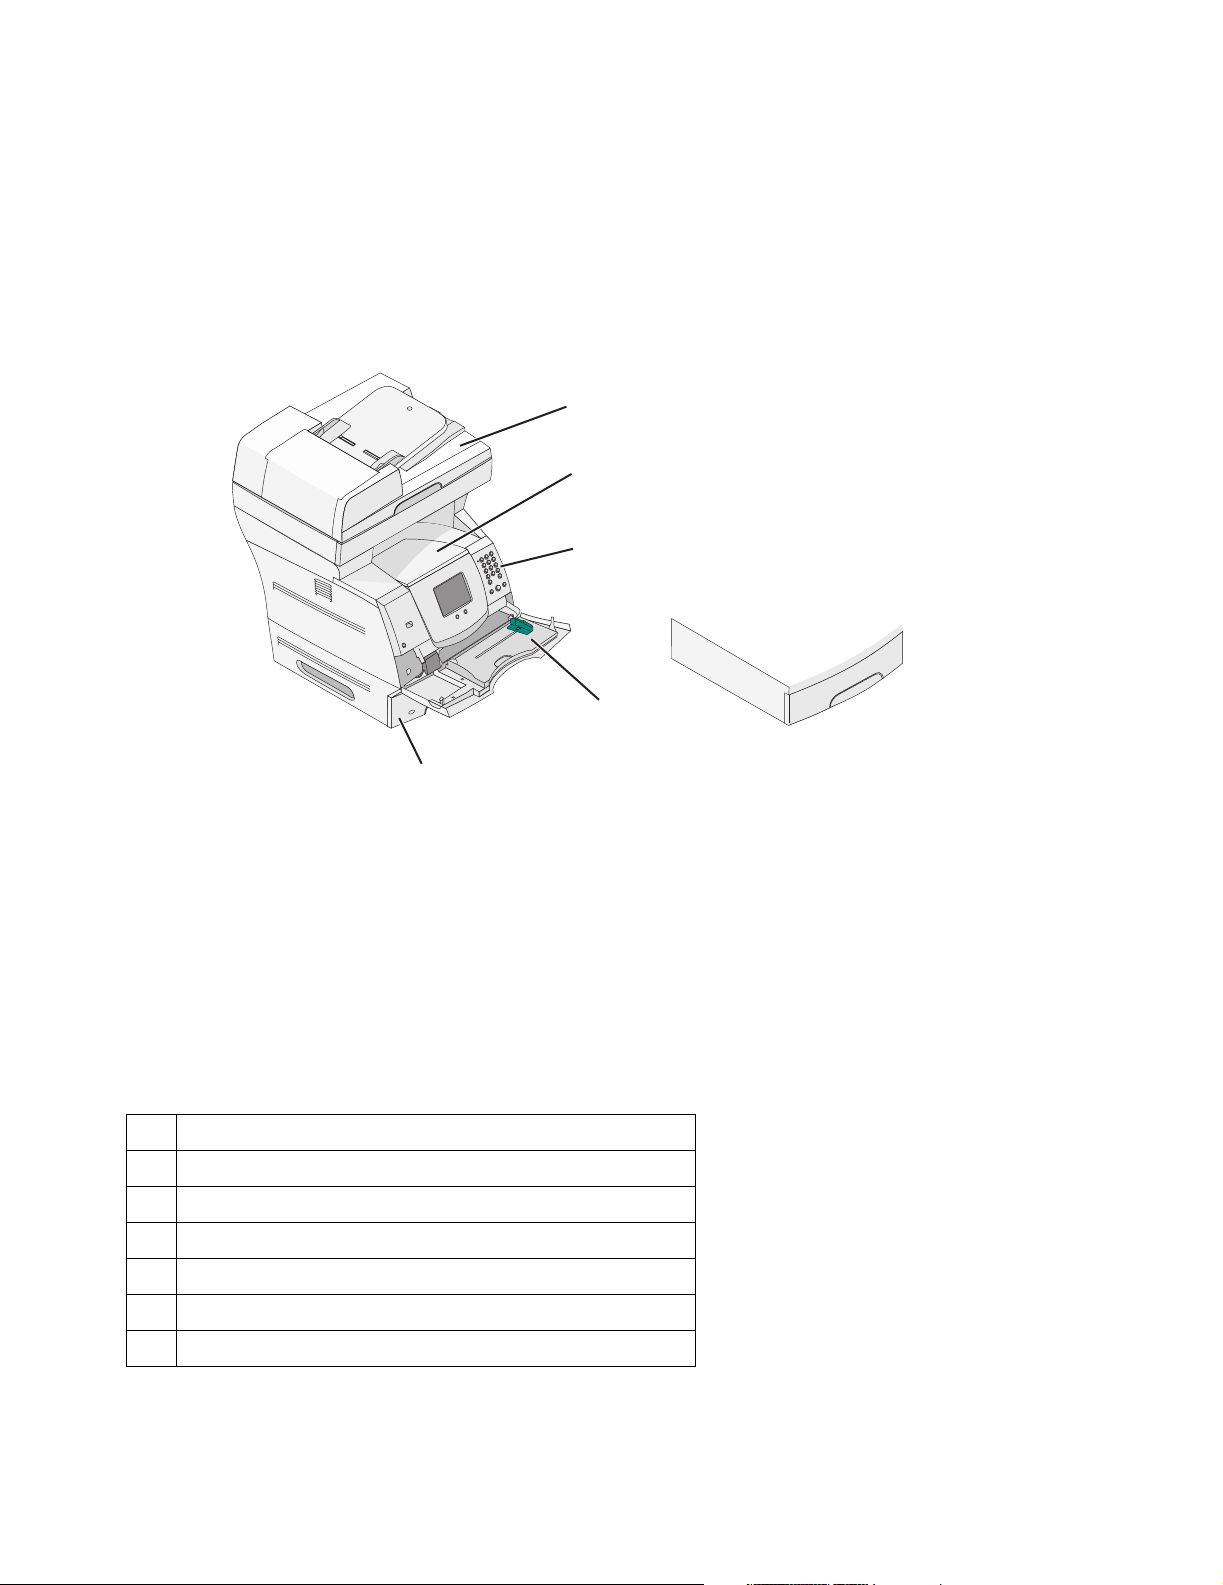
Configured models
The following illustrations show a standard MFP and an MFP with a duplex unit and a 500-sheet
drawer. Other print media handling options are also available.
1
2
3
4
5
CAUTION: Floor-mounted configurations require additional furniture for
stability. You must use either a printer stand or printer base if
using a 2000-sheet drawer. Certain other configurations also
must have a printer stand or printer base. More information is
available on our Lexmark Web site at www.lexmark.com/
multifunctionprinters.
1 Scanner
2 Standard output bin
3 Control panel
4 Multipurpose feeder
5 Tray 1 (integrated tray or standard tray)
6 Duplex unit
7 Tray 2 (500 sheets)
13
Page 14
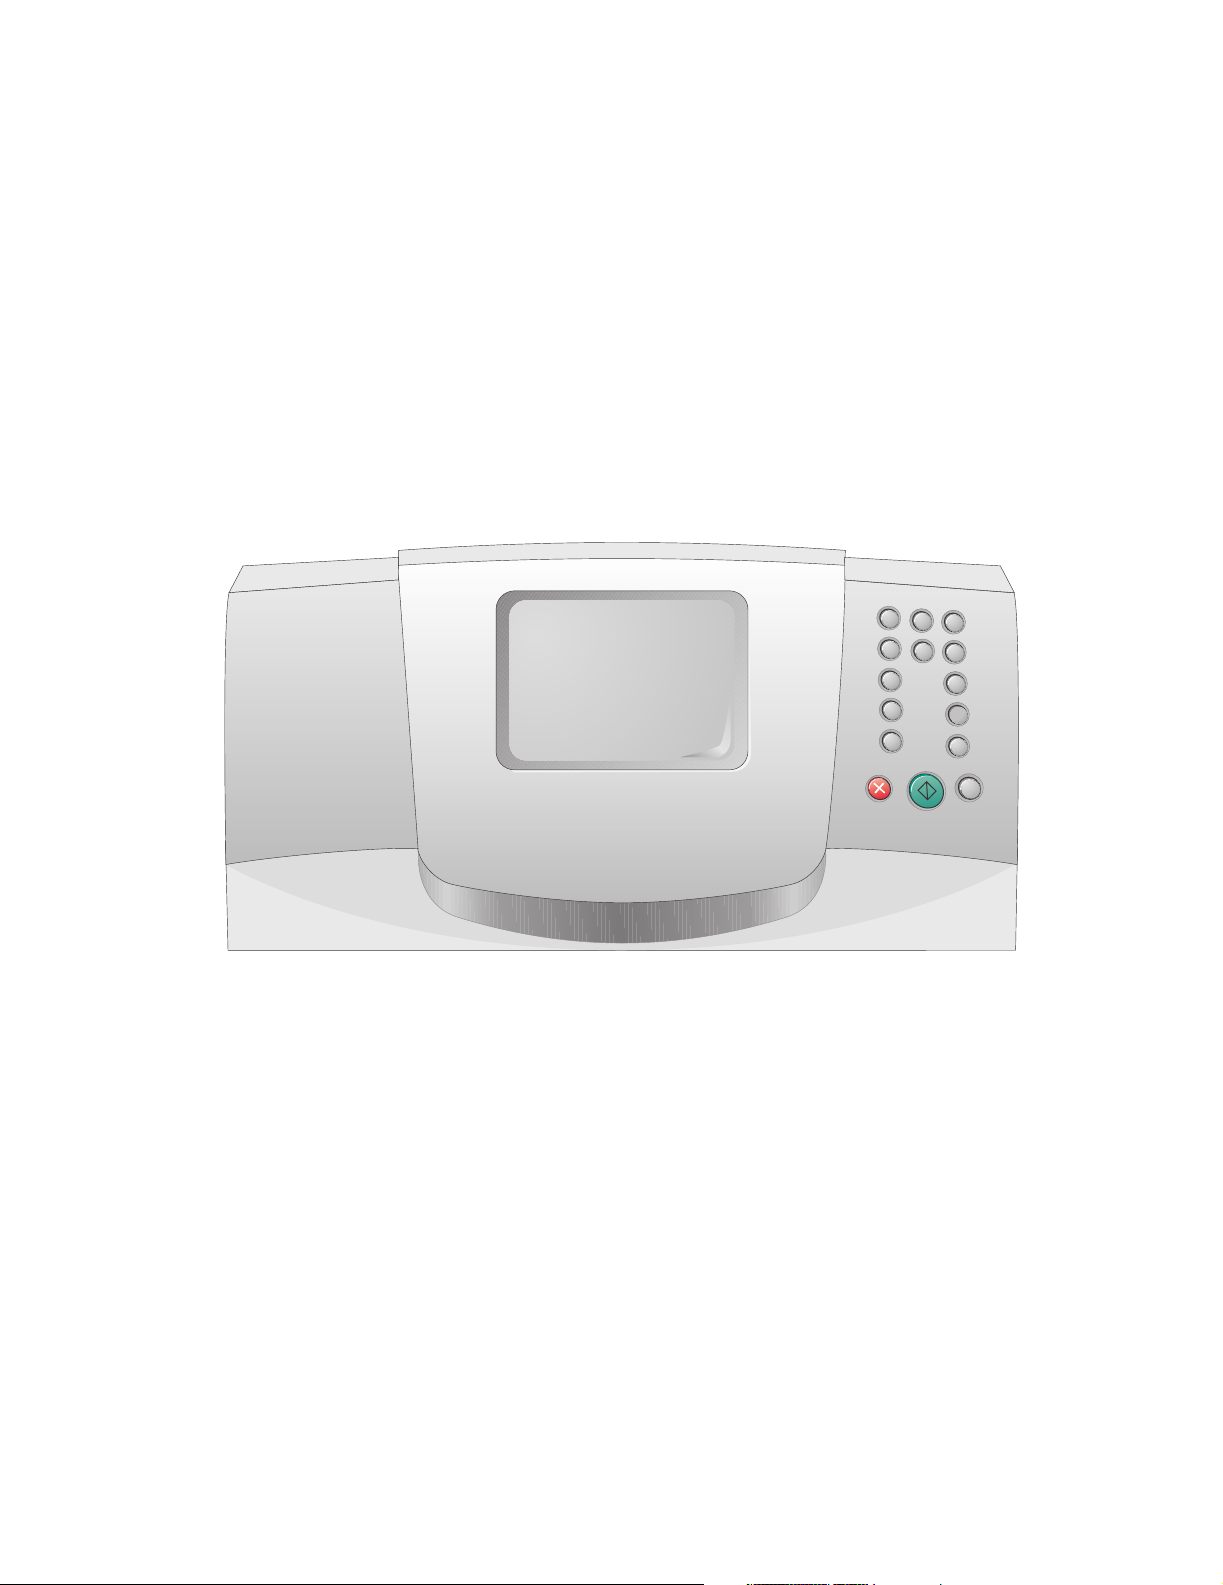
Understanding the MFP control panel
MFP and scanner settings can be changed several ways: through the MFP control panel, the
software application in use, the print driver, MarkVision™ Professional, or the Web pages. Settings
changed from the application or print driver apply only to the job being sent to the MFP.
Changes made to print, fax, copy, and e-mail settings from an application override changes made
from the control panel.
If a setting cannot be changed from the application, use the MFP control panel, MarkVision
Professional, or the Embedded Web Server (EWS) pages. Changing a setting from the MFP control
panel, MarkVision Professional, or the Web pages makes that setting the user default.
The MFP control panel consists of:
14
Page 15

Callout Control panel item Function
1 LCD A liquid crystal display (LCD) which shows home
screen buttons, menus, menu items, and values.
Allows for making selections within Copy, Fax, and
so on.
2 Indicator light Gives information about the status of the MFP
using the colors red and green.
Status Indicates
Off MFP power is off.
Blinking
green
Solid green MFP is on, but idle.
3 0–9
Note: Referred to as the numeric
keypad.
4 # (Pound or number character) Press this button:
5 Dial Pause Press to cause a two- or three-second dial pause in
Press these buttons to enter numbers when the
LCD screen has a field that accepts the entry of
numbers. Also, use these buttons to dial phone
numbers for faxes.
Note: If a number is pressed while on the home
screen without pressing the # button first, the Copy
menu opens and changes the Copy Quantity.
• For a shortcut identifier.
• Within phone numbers. For a Fax number with a
#, enter it twice — ##.
• From the home screen, the Fax Destination List
menu item, E-mail Destination List menu item, or
Profile List menu item to access shortcuts.
a fax number. The button only functions within the
Fax menu or with fax functions.
Press from the home screen to redial a fax number.
MFP is warming up, processing
data, or printing a job.
p
When outside of the Fax menu, fax function, or
home screen, pressing Dial Pause causes an error
beep.
When sending a fax, in the Fax To: field, a Dial
Pause press is represented by a comma (,).
6 Clear All When in the function menus, such as Copy, Fax, E-
mail, and FTP, it returns all settings to their default
values, and then returns the MFP to the main
function screen.
15
Page 16
Callout Control panel item Function
7 Start Press to initiate the current job indicated on the
control panel.
From the home screen, press it to start a copy job
with the default settings.
If pressed while a job runs through the scanner, the
button has no effect.
8 Stop Press to cause the printing or scanning to stop.
During a scan job, the scanner finishes scanning
the current page and then stops, which means
paper may remain in the automatic document
feeder (ADF).
During a print job, the print media path is cleared
before the printing stops.
Stopping appears on the control panel during this
process.
9 Backspace Within the Copy menu, which is accessed by
touching the Copy button, press Backspace to
delete the right-most digit of the value in the Copy
Count. The default value of 1 appears if the entire
number is deleted by pressing Backspace
numerous .
Within the Fax Destination List, press Backspace to
delete the right-most digit of a number entered
manually. It also deletes an entire shortcut entry.
Once an entire line is deleted, another press of
Backspace causes the cursor to move up one line.
Within the E-mail Destination List, press
Backspace to delete the character to the left of the
cursor. If the entry is in a shortcut, the entire entry
is deleted.
10 Asterisk (*) * is used as part of a fax number or as an
alphanumeric character.
11 Home Returns the control panel to the Home screen. See
the “Home screen and Home screen buttons” on
page 18 for more information.
12 Help Tips Accesses the context-sensitive Help feature which
are help screens containing more information.
13 Menu Accesses the menus. These menus are only
available when the MFP is in the Ready state.
16
Page 17

Callout Control panel item Function
14 USB direct interface The host Universal Serial Bus (USB) direct
interface on the control panel is used to plug in a
USB flash memory device and print any Portable
Document Format (PDF) [.pdf file], Joint
Photographic Experts Group (JPEG) [.jpeg or .jpg
file], Tagged Image File Format (TIFF) [.tiff or .tif
file], Graphics Interchange Format (GIF) [.gif file],
Basic Multilingual Plane (BMP) [.bmp file], Portable
Network Graphics (PNG) [.png file], PiCture
eXchange (PCX) [.pcx file], and PC Paintbrush File
Format [.dcx file] files.
The USB direct interface can also be used to scan
a document to a USB flash memory device using
the PDF, TIFF, or JPEG formats.
15 Contrast icon Identifies the location of the contrast wheel. Look
on the left side of the MFP near this icon to locate
the contrast wheel which adjusts the contrast on
the LCD.
17
Page 18

Home screen and Home screen buttons
After the MFP is turned on and a short warm-up period occurs, the LCD shows the following basic
screen which is referred to as the Home screen. Use the Home screen buttons to initiate an action
such as copy, fax, or scan, to open the menu screen, or to respond to messages.
Copy
E-mail FTP
Ready.
Status/ Supplies Cancel Jobs
Button Function
Copy Touch to access the Copy menus.
Copy
If the home screen is shown, press a number to access the Copy menus,
too.
Fax
E-mail Touch to access the E-mail menus. It is possible to scan a document directly
to an e-mail address.
E-mail
Status message bar Shows the current MFP status such as Ready or Busy.
Ready
Status/Supplies Appears on the LCD whenever the MFP status includes a message
Status/ Supplies
Shows MFP conditions such as Toner Low.
Shows intervention messages to give instructions on what the user should
do so the MFP can continue processing, such as Close door or insert
print cartridge.
requiring intervention. Touch it to access the messages screen for more
information on the message including how to clear it.
18
Page 19

Button Function
FTP Touch to access the File Transfer Protocol (FTP) menus. A document can
be scanned directly to an FTP site.
FTP
Fax Touch to access the Fax menus.
Fax
Cancel Jobs Open the Cancel Jobs screen. If only one job is in the queue the button says
Cancel Job. The Cancel Jobs screen shows any of the following items
Cancel Jobs
under three headings on the screen, which are Print, Fax, and Network:
• print job
• copy job
Cancel Job
• fax
• profile
• FTP
• e-mail send
Cancel
Job
Each heading has its own list of jobs shown in a column under it. Each
column can only show three jobs per screen. Each job appears as a button.
If more than three jobs exist in a column, then the down arrow appears at
the bottom of the column. Each touch of the down arrow accesses one job
in the list. When more than three jobs exist, once the fourth job in the list is
reached, then an up arrow appears at the top of the column.
Other buttons may appear on the Home screen. They are:
Button Button name Function
There are held faxes with a scheduled hold time previously set.
To access the list of held faxes, touch this button.
Release
Held Faxes
Release Held
Faxes (or Held
Faxes if in Manual
Mode)
19
Page 20

Button Button name Function
Held Jobs To open a screen containing all the held jobs containers.
Release
Held Faxes
Cancel Jobs To open the Cancel Jobs screen. The Cancel Jobs screen
shows any of the following items under three headings on the
Cancel Jobs
screen which are Print, Fax, and Network:
• print job
• copy job
Cancel Job
• fax
• profile
• FTP
• e-mail send
Cancel
Job
Each heading has its own list of jobs shown in a column under
the heading. Each column can only show three jobs per screen.
The job appears as a button. If more than three jobs exist in a
column, then the down arrow appears at the bottom of the
column. Each touch of the down arrow accesses one job in the
list. When more than three jobs exist, once the fourth job in the
list is reached, then an up arrow appears at the top of the
column. For illustrations of the up and down arrow buttons, see
Information on touch-screen buttons.
To cancel a job, see the Canceling a print job for instructions.
20
Page 21
Using the LCD touch-screen buttons
The following section provides information on navigating through several screens. Only a few are
chosen to demonstrate the use of the buttons.
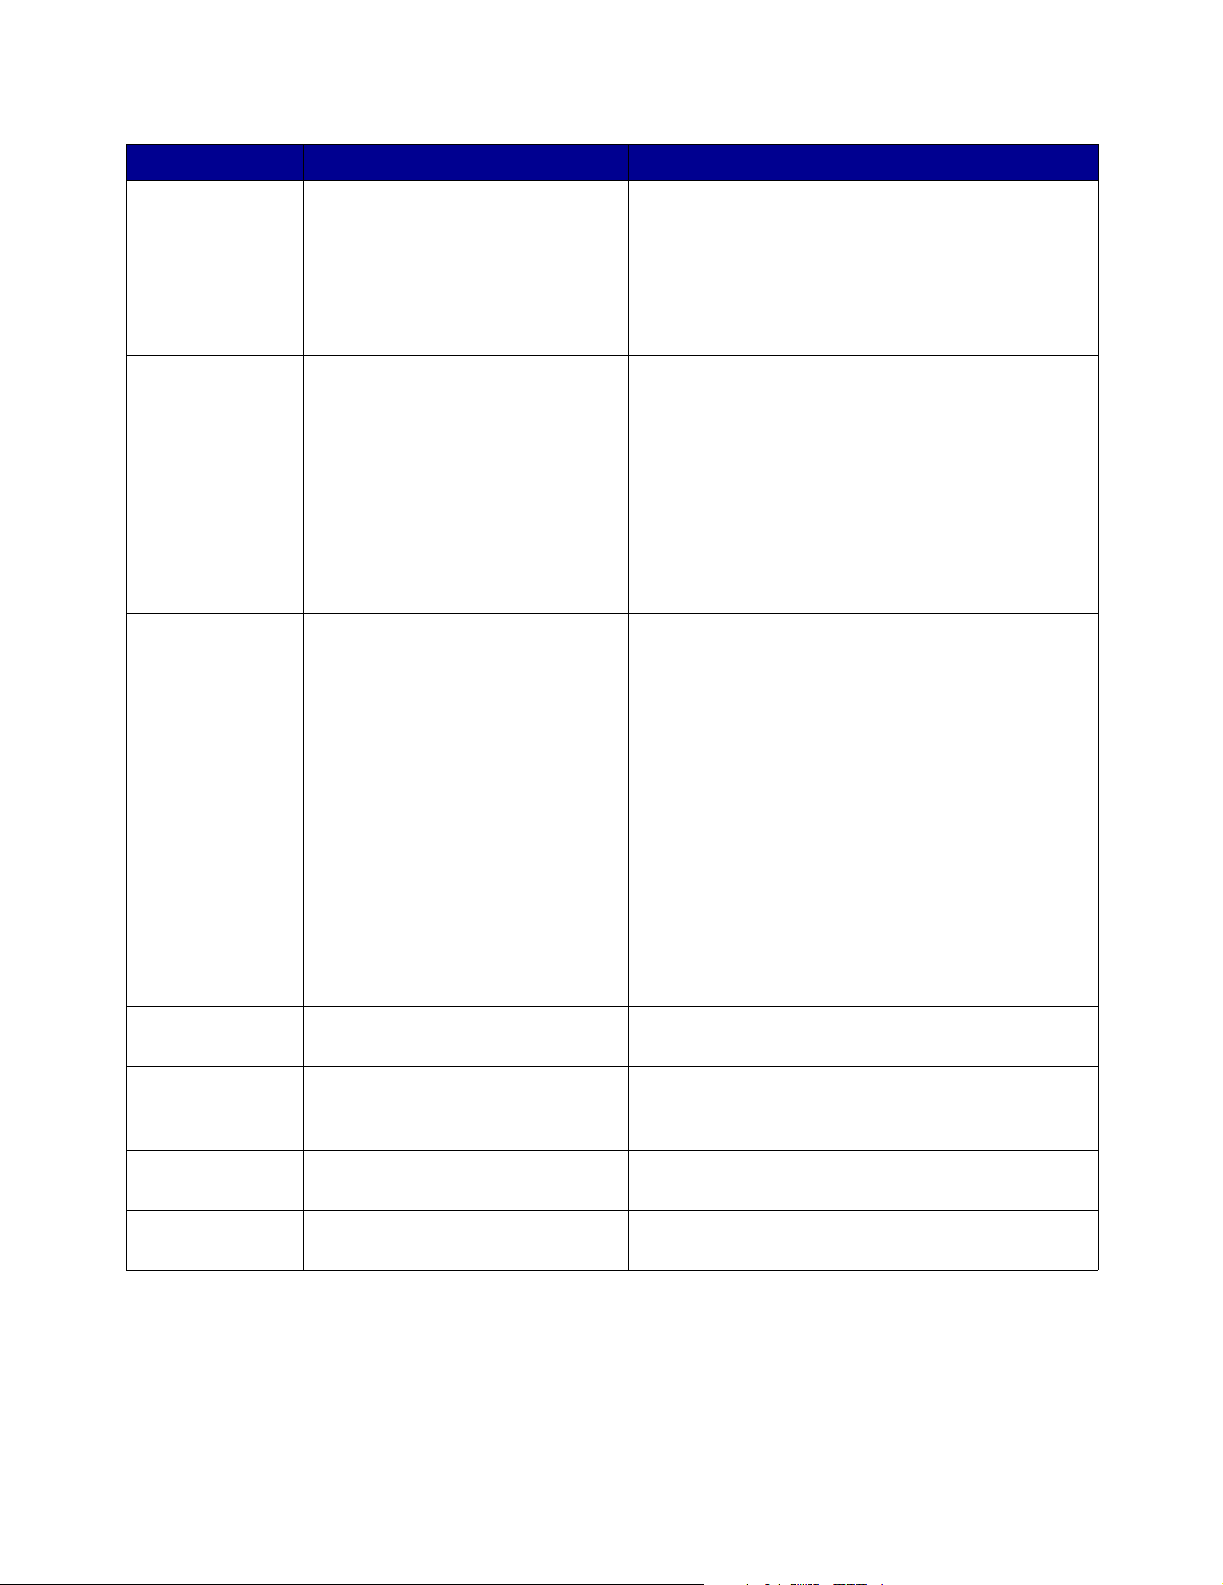
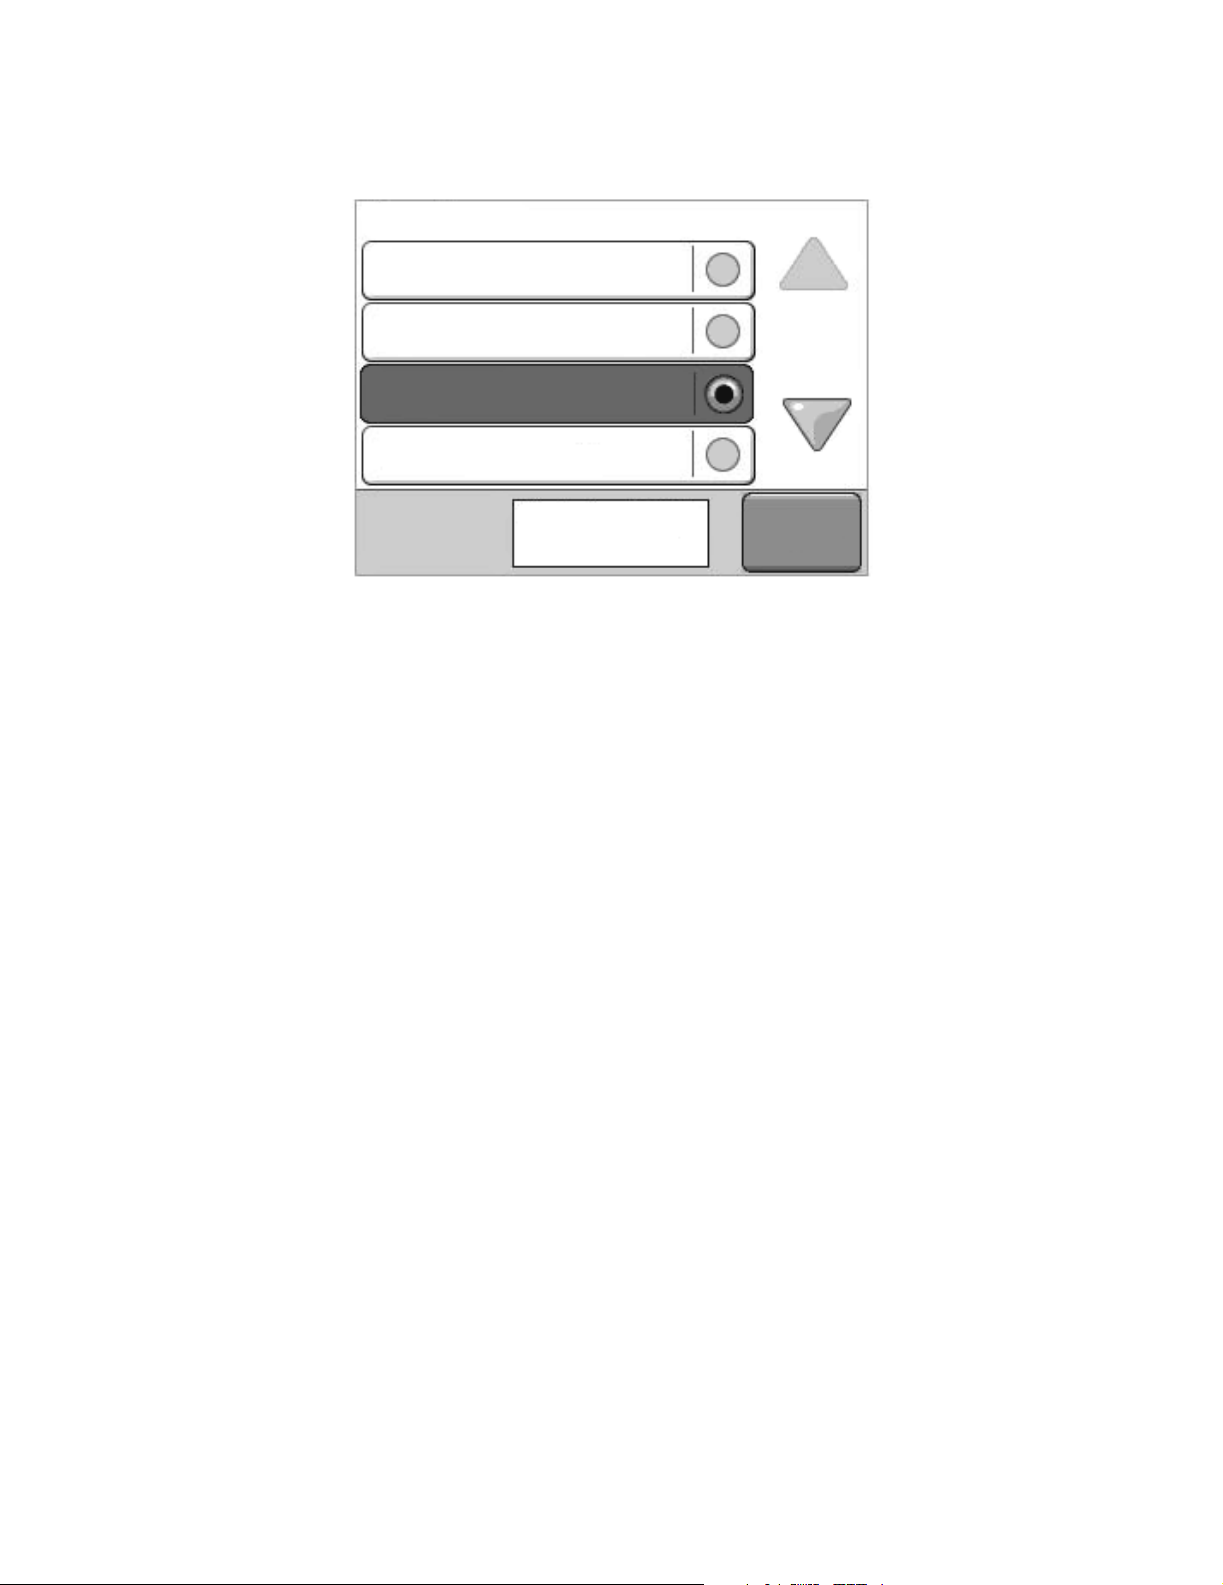
Sample screen one
Sample screen two
Copy
Letter (8.5 x 11 in.)
Copy To:
Letter (8.5 x 11
in.)
Scale / Darkness
Copy It
Sides (Duplex)
Print 1
sided
Collate
On
Scale
Print 2
sided
Off
Options
Copy It
Auto%
Darkness
OptionsOptions
21
Page 22
Sample screen three
Copy from
Letter (8.5 x 11 in.)
Executive (7.25 x 10.5 in.)
Legal (8.5 x 14 in.)
A4 (210 x 297 mm)
Displaying 1-4/5
Back
22
Page 23
Information on touch-screen buttons
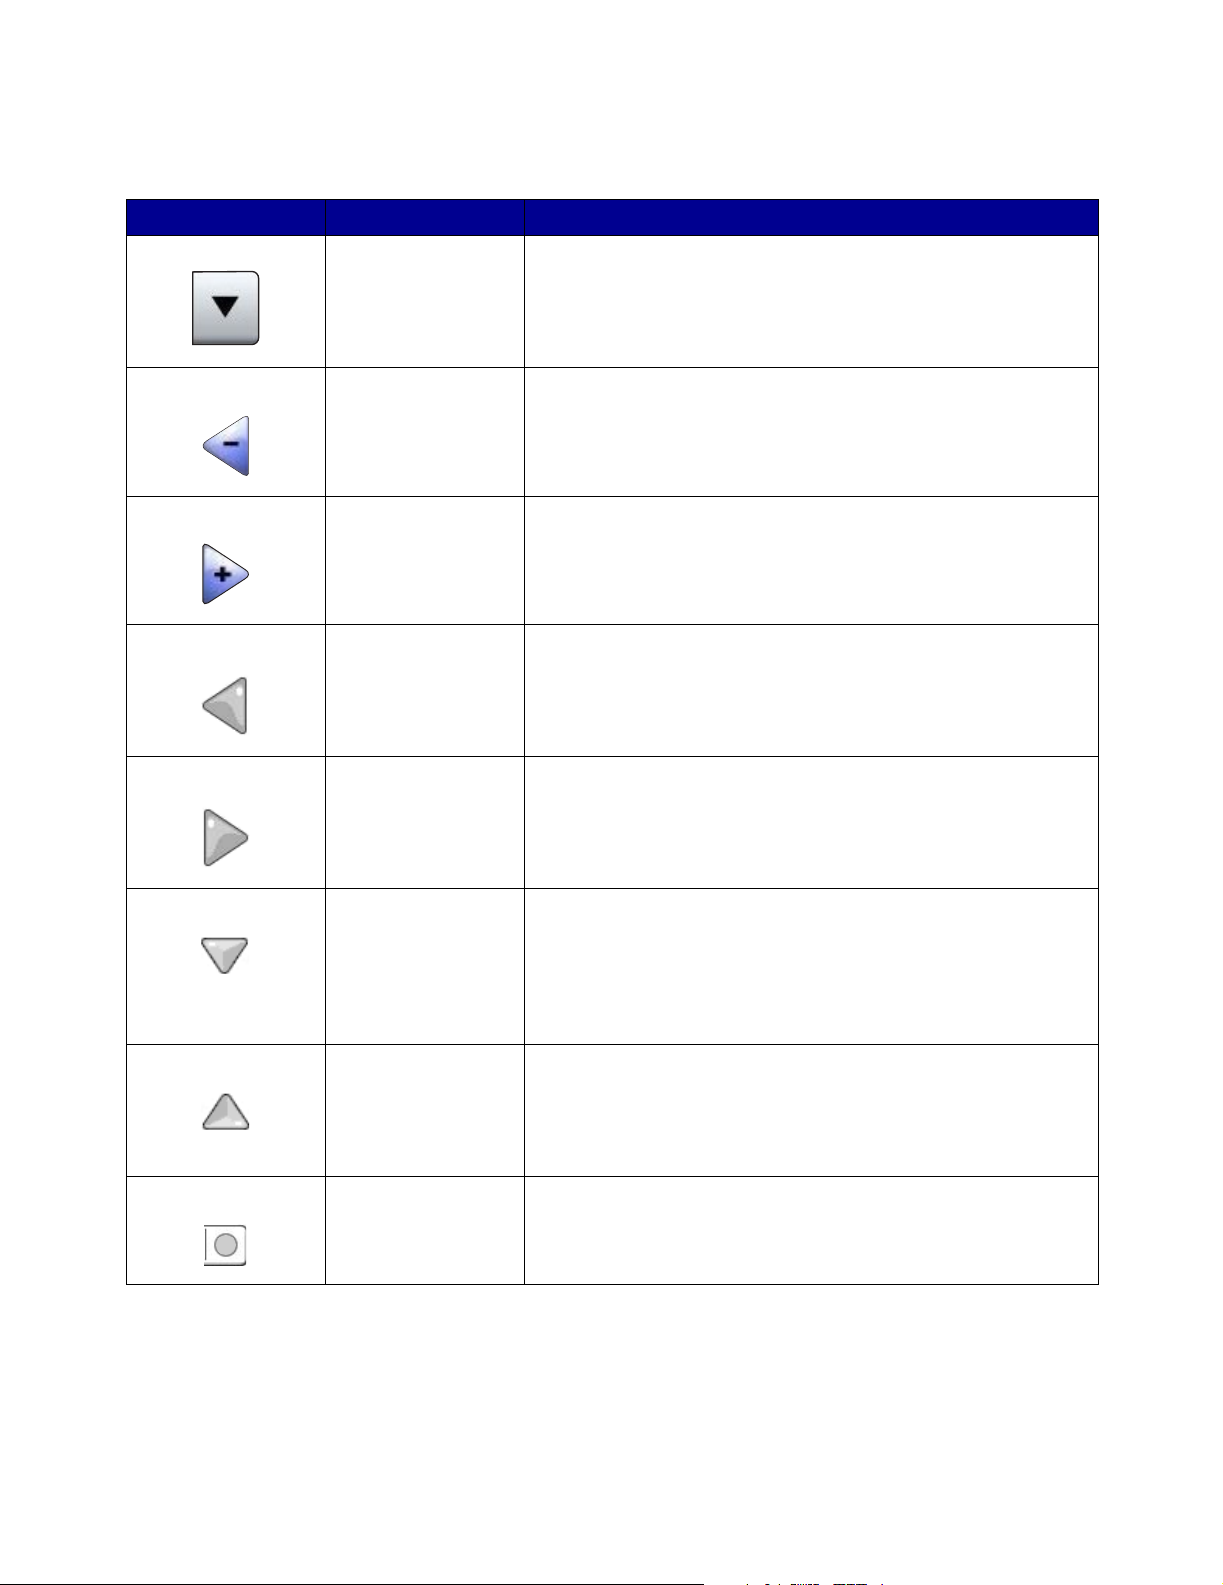
Button Button name Function or description
Select button Touch the select button to have another screen appear with
additional items. On the first screen, the user default setting is
shown. Once the select button is touched, and the next screen
appears, touching another item shown on the screen changes
the user default setting.
Left scroll decrease
button
Right scroll increase
button
Left arrow button Touch the left arrow button to scroll left to:
Right arrow button Touch the right arrow button to scroll right to:
Down arrow Touch the down arrow to move down to the next item in a list,
Touch the left scroll decrease button to scroll to another value
in decreasing order.
Touch the right scroll increase button to scroll to another value
in increasing order.
• Reach a decreased value shown by an illustration.
• See a full text field on the left.
• Reach an increased value shown by an illustration.
• See a full text field on the right.
such as a list of menu items or values. The down arrow does
not appear on a screen with a short listing. It only appears if the
entire listing cannot be seen on one screen. On the last screen
of the listing, the down arrow is gray to indicate that it is not
active since the end of the list appears on this screen.
Up arrow Touch the up arrow to move up to the next item in a list, such as
a list of menu items or values. When on the first screen
presented with a long list, the up arrow is gray to indicate that it
is not active. On the second screen needed to show the rest of
the listed item, the up arrow is blue to show that it is active.
Unselected radio
button
This is an unselected radio button.
23
Page 24
Button Button name Function or description
Back
Selected radio
button
Back Touch the Back button to return to the previous screen, and no
This is a selected radio button. Touch a radio button to select it.
The radio button changes color to show it is selected. In Other
touch-screen buttons, the only paper size selected is Letter.
settings are saved on the screen where it was touched unless
you have selected a radio button previously.
24
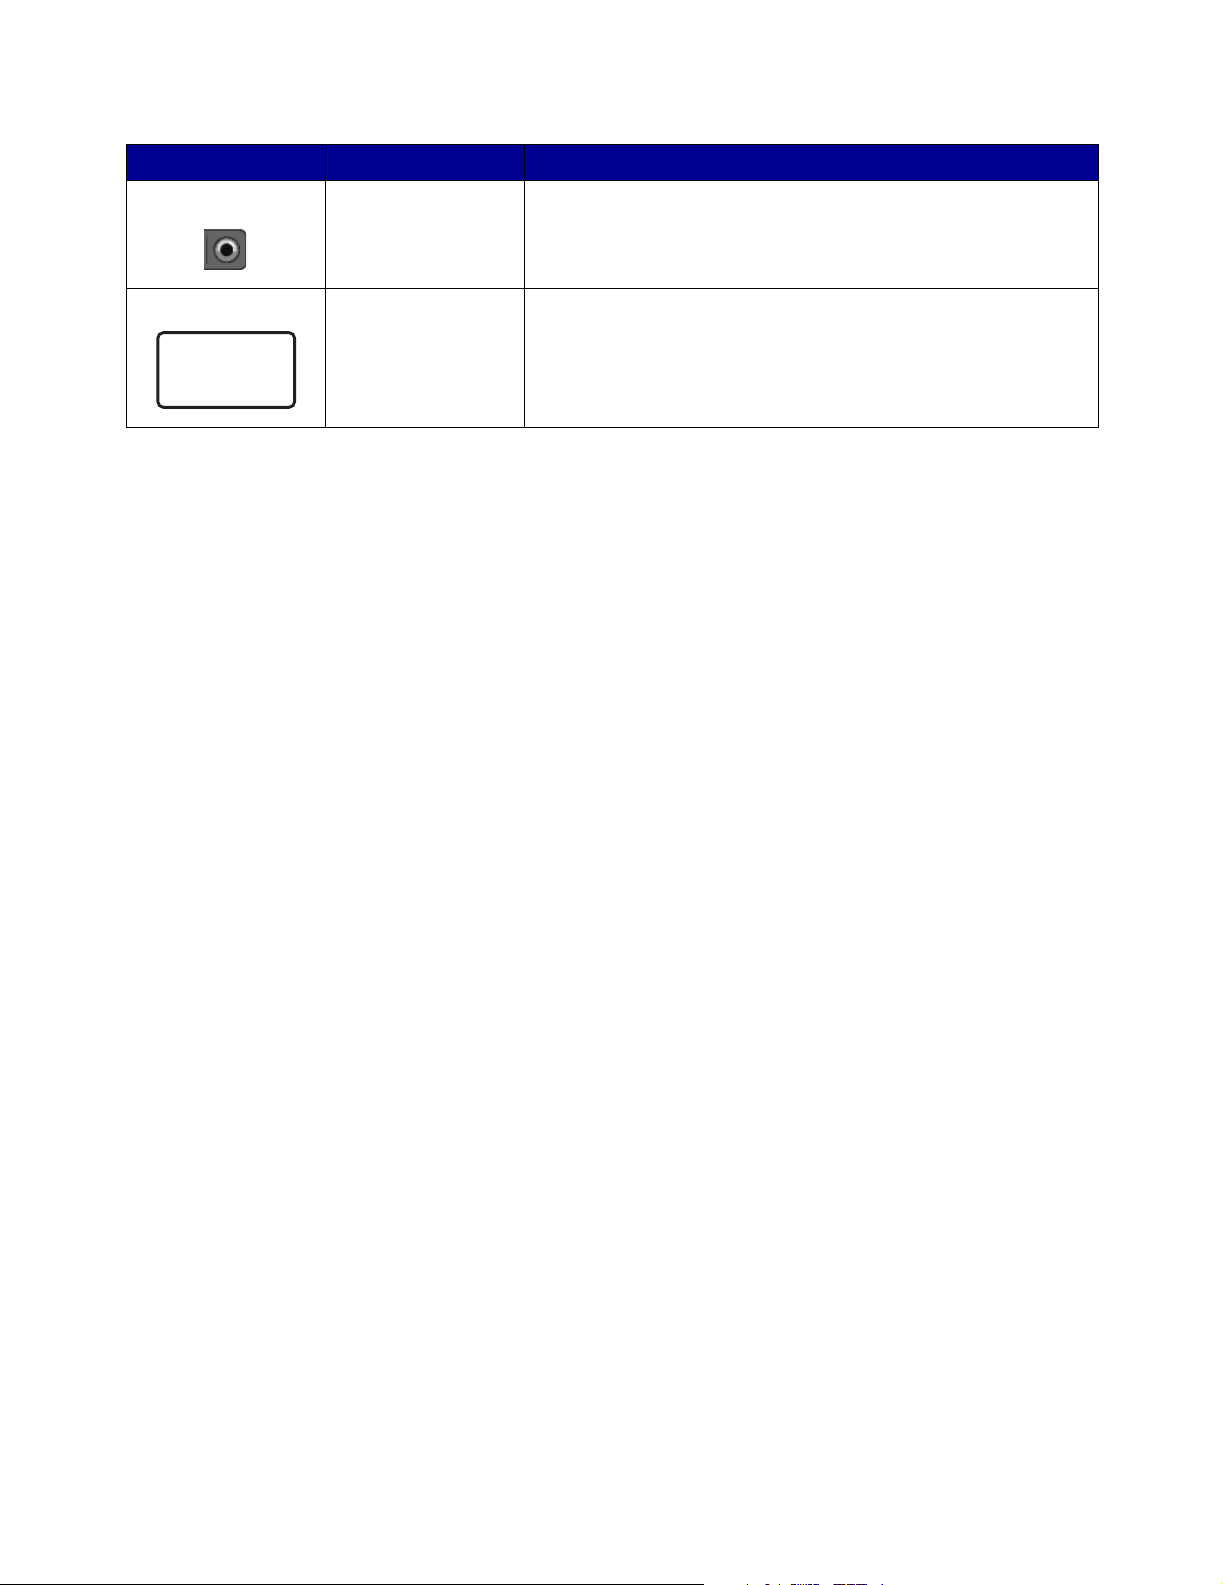
Page 25
Other touch-screen buttons
Button Button name Function or description
Cancel Touch Cancel to cancel an action or a selection.
Touch to cancel out of a screen and return to the
Cancel
Continue
Continue
Custom Allows for creating a custom button based on the
Custom
previous screen.
user’s needs.
Done
Done Allows specifying that a job is finished. For
example, when scanning an original document,
one could indicate that the last page is scanned,
and then printing the job would begin.
Gray button Touch this button to select the action appearing
on the button.
Grayed out button When this button appears, it looks faded with a
faded word on it. It means the button is not active
or unavailable on this screen. It was probably
active on the previous screen, but the selections
made on the previous screen caused it to be
unavailable on the current screen.
25
Page 26
Button Button name Function or description
Select Touch to select a menu. The next screen appears
showing menu items.
Touch to select a menu item. The next screen
appears showing values.
Submit A gray button indicates a choice. If a different
value within a menu item is touched, it needs to
Submit
be saved to become the current user default
setting. To save the value as the new user default
setting, touch Submit.
Features
Feature Feature name Description
Attendance message alert If an attendance message occurs which closes a
function, such as copy or fax, then a blinking gray
exclamation point appears over the function button
on the home screen. This feature indicates an
attendance message exists.
Touch Status/Supplies to see the current status.
26
Page 27
Menus
A number of menus are available to make it easy for you to change MFP settings or print reports. To
access the menus and settings, press Menu on the control panel.
When a value or setting is selected and saved, it is stored in MFP memory. Once stored, these
settings remain active until new ones are stored or the factory defaults are restored.
Note: Settings chosen for faxing, scanning, e-mailing, copying, and settings for printing
from the application may override the settings selected from the control panel.
The following diagram shows the touch screen menu index and the menus and items available under
each menu. For more information about menus and menu items, see the Menus and Messages
Guide on the drivers CD.
Paper Menu
Default Source
Paper Size/Type
Configure MP
Substitute Size
Paper Texture
Paper Weight
Paper Loading
Custom Types
Custom Names
Universal Setup
Reports
Menu Settings Page
Device Statistics
Shortcut List
Fax Job Log
Fax Call Log
E-mail Shortcuts
Fax Shortcuts
FTP Shortcuts
Profiles List
NetWare Setup Page
Print Fonts
Print Directory
Manage Shortcuts
Manage Fax Shortcuts
Manage E-mail Shortcuts
Manage FTP Shortcuts
Manage Profile Shortcuts
Network/Ports
TCP/IP
IPv6
E-mail Server Setup
Wireless
Standard Network
Network <x>
Standard USB
USB <x>
Standard Parallel
Parallel <x>
Serial <x>
NetWare
AppleTalk
LexLink
Settings
General Settings
Copy Settings
Fax Settings
E-mail Settings
FTP Settings
Print Settings
Security
Set Date and Time
Help Pages
Print All
Information Guide
Copying
E-mail
Faxing
FTP
Print Defects
Supplies Guide
27
Page 28

2
Copying
The following copy topics are available in this and other chapters.
Quick copy Reducing and enlarging copies
Multiple page copying Adjusting copy quality
Using the scanner glass (flatbed) Setting collation options
Understanding the copy screens and options Placing separator sheets between copies
Copying from one size to another Setting paper saving options
Making transparencies Placing the date and time at the top of each
page
Copying to letterhead Placing an overlay message on each page
Copying photographs Canceling a copy job
Making copies using media from a selected
tray
Copying mixed-sized media Solving copy quality problems
Setting the duplex option
Copy tips
Quick copy
1 Place the original document facing up in the automatic document feeder (ADF) or facing
down on the scanner glass (flatbed).
Adjust the paper guides when using the ADF.
2 Press Go on the numeric pad.
Note: If an LDSS profile has been installed, you may receive an error when attempting a
quick copy. Contact your system support person for access.
28
Page 29

Multiple page copying
1 Place the original document facing up in the automatic document feeder or facing down on
the scanner glass (flatbed).
Adjust the paper guides when using the ADF.
2 Touch Copy.
3 Use the numeric keypad to specify the number of copies you want.
After entering the number of copies, the touch screen will automatically change to the copy
settings menu.
4 Change the copy options to meet your requirements.
5 Touch Copy It.
Using the scanner glass (flatbed)
If using the scanner glass (flatbed) to make copies:
1 Open the document cover.
2 Place the document facing down on the scanner glass (flatbed).
3 Close the document cover.
4 Touch Copy, or press Go on the numeric pad.
For Copy, continue with step 5.
For Go, proceed with step 8.
5 Set the number of copies.
6 Change the copy options to meet your requirements.
7 Touch Copy It.
8 Touch Scan Next if you have more pages to scan, or touch Finish the Job if you are done.
Touching Finish the Job returns the MFP to the copy screen.
9 Touch Home when you are finished.
Understanding the copy screens and options
Copy From: Opens a screen where you can enter the size of the documents you are going to copy.
• Touching any of the paper size icons on the follow-on screen will make that your selection and
return you to the Copy Options Screen.
29
Page 30

• When Original Size is set to Mixed Sizes, you can scan different size original documents
(letter and legal size pages). They will be scaled automatically to fit the selected output media
size.
Copy To: Opens a screen where you can enter the size and type of paper on which your copies will
be printed.
• Touching any of the paper size icons on the follow-on screen will make that your selection and
return you to the Copy Options Screen.
• If the size settings for Copy From and Copy To are different, the MFP will automatically adjust
the Scale setting to accommodate the difference.
• If you have a special type or size of paper that you'd like to copy onto that is not normally in
the MFP paper trays, you can select MP Feeder, and manually send the type of paper you
want through the MP feeder.
• When using Auto Match, the MFP will match the size of the original document as specified in
the Copy From box. If a matching paper size is not loaded in one of the paper trays, the MFP
will scale the copy to fit loaded media.
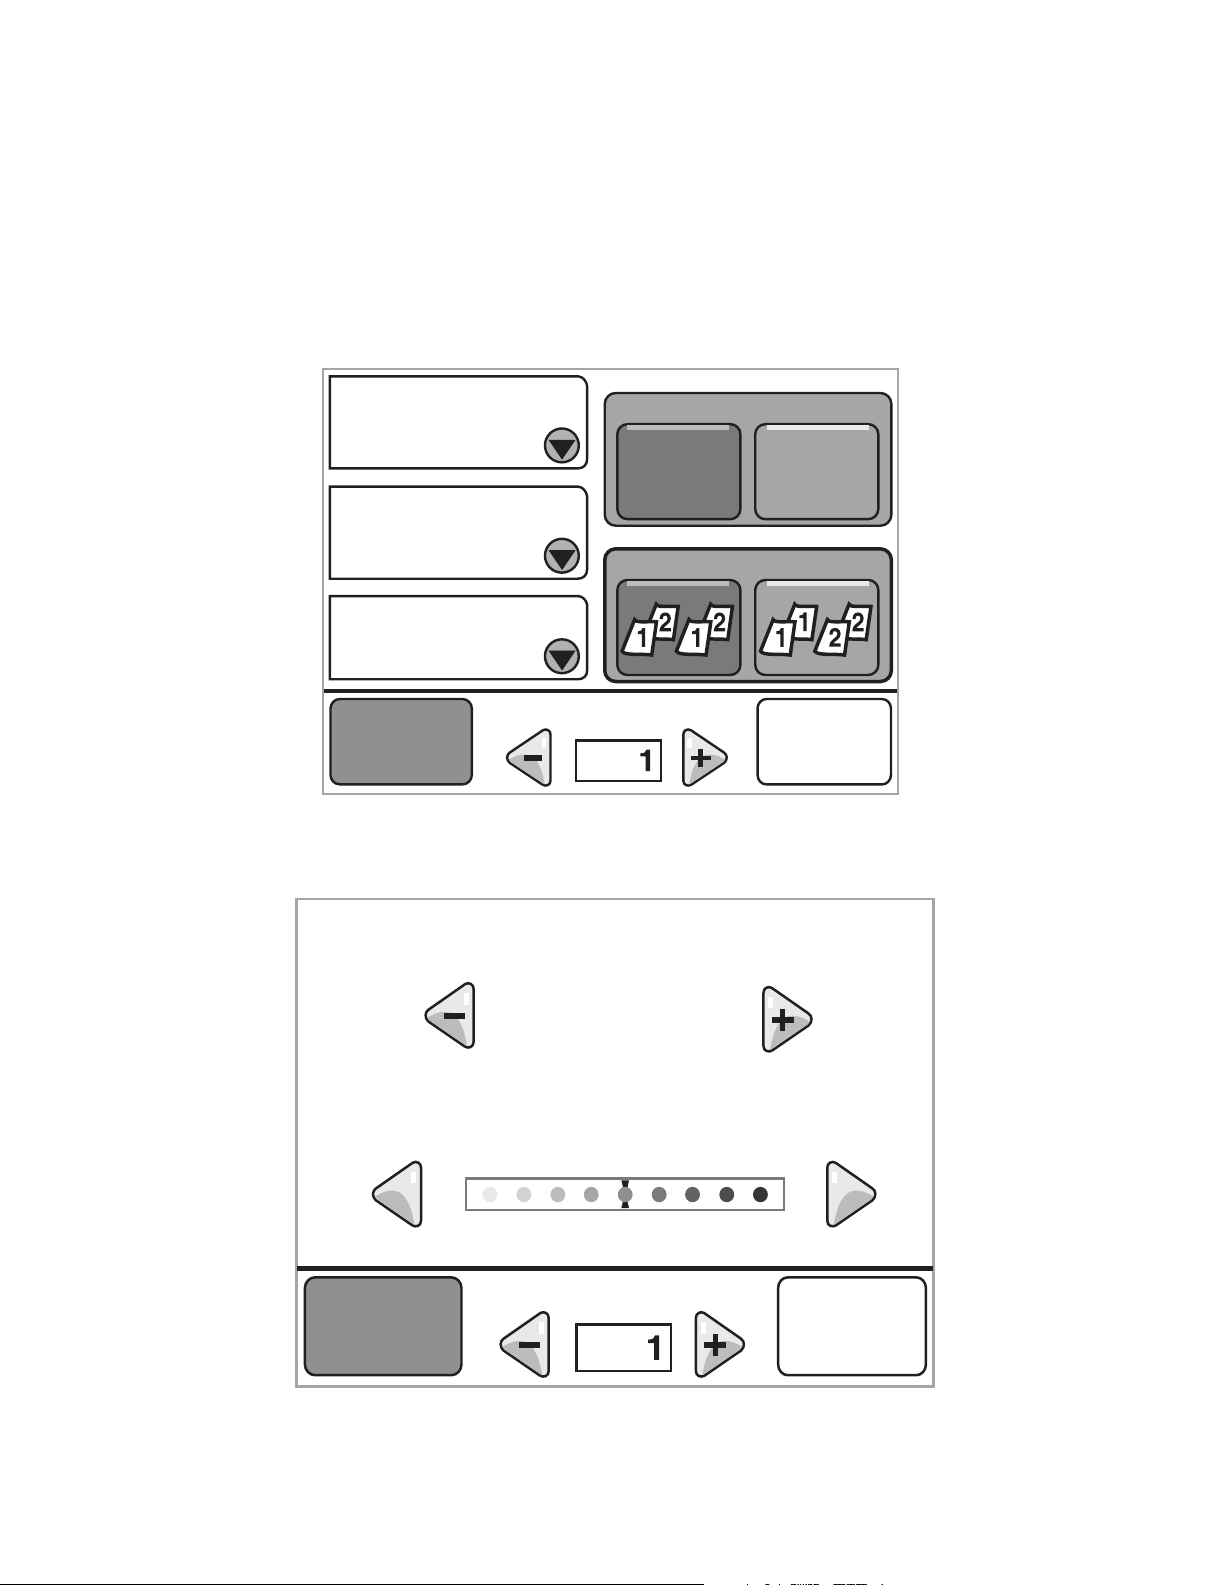
Scale: Creates an image from your copy that is proportionally scaled anywhere between 25% and
400%. Scale can also be set for you automatically.
• When you want to copy from one size of paper to another, such as legal size to letter size,
setting your Copy From and Copy To paper sizes will automatically change the scale to keep
all the original document information on your copy.
• Touching the arrow to the left lowers the value by 1%; touching the arrow to the right
increases the value by 1%.
• Holding your finger on an arrow makes a continuous increment.
• Holding your finger on an arrow for two seconds causes the pace of the change to accelerate.
Darkness: Adjusts how light or dark your copies will turn out in relation to the original document.
Printed Image: Copies halftone photographs or graphics such as documents printed on a laser
printer or pages from a magazine or newspaper that are composed primarily of images. For original
documents that are a mixture of text, line drawings, or other graphics, leave Printed Image off.
Sides (Duplex): Prints copies on 1 or 2 sides, makes 1-sided copies (simplex) of 1-sided originals or
2-sided copies (duplex) from 1-sided original documents.
Note: For 2-sided output, you must have a duplex unit attached to your printer.
Collate: Keeps the pages of a print job stacked in sequence, particularly when printing multiple
copies of the document. The default setting for Collate is on; the output pages of your copies will be
ordered (1,2,3) (1,2,3) (1,2,3). If you want all the copies of each page to remain together, turn Collate
off, and your copies will be ordered (1,1,1) (2,2,2) (3,3,3).
Options: Opens a screen to change Paper Saver, Advanced Imaging, Separator Sheets, Margin
Shift, Edge Erase, Date/Time Stamp, Overlay, Content, or Advance Duplex settings.
30
Page 31

• Paper Saver: Takes two or more sheets of an original document and prints them together on
the same page. Paper Saver is also called N-up printing. The N stands for Number. For
example, 2-up would print two pages of your document on a single page, and 4-up would
print four pages of your document on a single page. Touching Print Page Borders adds or
removes the outline border surrounding the original document pages on the output page.
• Separator Sheets: Places a blank piece of paper between each copy of your copying job.
The separator sheets can be drawn from a bin with a different kind or color of paper from your
copies.
• Margin Shift: Increases the size of the margin the specified distance. This can be useful in
providing space to bind or hole-punch copies. Use the increase or decrease arrows to set
how much of a margin you want. If the additional margin is too large, the copy will be cropped.
• Edge Erase: Eliminates smudges or information around the edges of your document. You
can choose to eliminate an equal area around all four sides of the paper, or pick a particular
edge. Edge Erase will erase whatever is within the selected area, leaving nothing printed on
that portion of the paper.
• Date/Time Stamp: Turns the Date/Time Stamp on and prints the date and time at the top of
every page.
• Overlay: Creates a watermark (or message) that overlays the content of your copy. You can
choose between Urgent, Confidential, Copy, and Draft. The word you pick will appear, faintly,
in large print across each page.
Note: A custom overlay can be created by the system support person. An additional icon
with that message will then be available.
• Content: Enhances copy quality. Choose Te xt for original documents that are mostly text or
line art. Choose Text/Photo when the original documents are a mixture of text and graphics or
pictures. Choose Photograph when the original document is a high-quality photograph or
inkjet print. Choose Printed Image when copying halftone photographs or graphics such as
documents printed on a laser printer or pages from a magazine or newspaper.
31
Page 32

Copying from one size to another
1 Place the original document in the automatic document feeder facing up, short-edge first.
2 Adjust the paper guides.
3 Touch Copy.
4 Touch Copy from:, and then identify the size of the original document.
For example, Legal.
5 Touch Copy to:, and then select the size you want the copy to be.
Note: If you select a paper size that is different from the “Copy from” size, the MFP will
scale the size automatically.
6 Touch Copy It.
Making transparencies
1 Place the original document in the automatic document feeder facing up, short-edge first.
2 Adjust the paper guides.
3 Touch Copy.
4 Touch Copy from:, and then identify the size of the original document.
5 Touch Copy to:, and then touch the tray that contains transparencies.
Note: If you do not see Transparency as an option, speak with your system support
person.
6 Touch Copy It.
Copying to letterhead
1 Place the original document in the automatic document feeder facing up, short-edge first.
2 Adjust the paper guides.
3 Touch Copy.
4 Touch Copy from:, and then identify the size of the original document.
5 Touch Copy to:, and then touch the tray that contains letterhead.
Note: If you do not see Letterhead as an option, speak with your system support person.
6 Touch Copy It.
32
Page 33

Copying photographs
1 Open the document cover.
2 Place the photograph face down on the scanner glass (flatbed).
3 Touch Copy.
4 Touch Options.
5 Touch Content.
6 Touch Photograph.
7 Touch Copy It.
8 Touch Scan Next or Done.
Making copies using media from a selected tray
During the copy process, you can select the input tray that contains the media type of choice. For
example, if a special media type is located in the multipurpose feeder, and you want to make copies
on that media:
1 Place the original document in the automatic document feeder facing up, short-edge first.
2 Adjust the paper guides.
3 Touch Copy.
4 Touch Copy from:, and then identify the size of the original document.
5 Touch Copy to:, and then touch multipurpose feeder or the tray that contains the media type
you want.
6 Touch Copy It.
33
Page 34

Copying mixed-sized media
You can place mixed-sized original documents in the ADF and then copy them. Depending on the
paper size loaded in the trays, the scanner will print on the same size media or scale the document to
fit the media in the tray.
Example 1, the MFP has two paper trays, one tray loaded with letter and the other with legal paper. A
document mixed with letter and legal pages needs to be copied.
1 Place the original document in the automatic document feeder facing up, short-edge first.
2 Adjust the paper guides.
3 Touch Copy.
4 Touch Copy From, and then touch Mixed Sizes.
5 Touch Copy To, and then touch Auto Size Match.
6 Touch Copy It.
The scanner will identify the different size pages as they scan, and then print them on the
correct size paper.
Example 2, the MFP has one paper tray, loaded with letter-size paper. A document mixed with letter
and legal pages needs to be copied.
1 Place the original document in the automatic document feeder facing up, short-edge first.
2 Adjust the paper guides.
3 Touch Copy.
4 Touch Copy From, and then touch Mixed Sizes.
5 Touch Copy It.
The scanner will identify the different size pages as they scan, and then scale the legal size
pages to print on letter-size paper.
34
Page 35

Setting the duplex option
1 Place the original document in the automatic document feeder facing up, short-edge first.
2 Adjust the paper guides.
3 Touch Copy.
4 Touch the button that looks the way you want your copies duplexed.
The first number represents sides of the original documents; the second number represents
sides of the copy.
For example, select 1 --> 2-sided if you have 1-sided original documents and you want 2sided copies.
5 Touch Copy It.
Reducing and enlarging copies
Copies can be reduced to 25% of the original document size or enlarged to 400% of the original
document size. The default for Scale is Auto. If you leave Scale set to Auto, the content of the original
document will be scaled to fit the size of the paper onto which you are copying.
To reduce or enlarge a copy:
1 Place the original document in the automatic document feeder facing up, short-edge first.
2 Adjust the paper guides.
3 Touch Copy.
4 From Scale, touch + or – to enlarge or reduce your output.
Note: Touching Copy To or Copy From after setting Scale manually will turn the scale
value back to Auto.
5 Touch Copy It.
35
Page 36

Adjusting copy quality
1 Place the original document in the automatic document feeder facing up, short-edge first.
2 Adjust the paper guides.
3 Touch Copy.
4 Touch Options.
5 Touch Content.
6 Touch the option that best describes what you are copying:
• Tex t: Used for original documents that are mostly text or line art.
• Text/Photo: Used when the original documents are a mixture of text and graphics or
pictures.
• Photograph: Used when the original document is a high-quality photograph or inkjet
print.
• Printed Image: Used when copying halftone photographs, graphics such as documents
printed on a laser printer, or pages from a magazine or newspaper that are composed
primarily of images.
7 Touch Copy It.
Setting collation options
If you want your copies collated, you don’t need to do anything; this is the default setting.
For example, two copies of three pages will print page 1, page 2, page 3, page 1, page 2,
page 3.
If you don’t want your copies collated, you can change the setting.
For example, two copies of three pages will print page 1, page 1, page 2, page 2, page 3,
page 3.
To turn collation off:
1 Place the original document in the automatic document feeder facing up, short-edge first.
2 Adjust the paper guides.
3 Touch Copy.
4 Use the numeric keypad to enter the number of copies you want.
5 Touch Off if you do not want your copies collated.
6 Touch Copy It.
36
Page 37

Placing separator sheets between copies
1 Place the original document in the automatic document feeder facing up, short-edge first.
2 Adjust the paper guides.
3 Touch Copy.
4 Touch Options.
5 Touch Separator Sheets.
Note: Collation must be On for the separator sheets to be placed between copies. If
Collation is Off, the separator sheets are inserted after the job has been printed.
6 Touch Copy It.
Setting paper saving options
1 Place the original document in the automatic document feeder facing up, short-edge first.
2 Adjust the paper guides.
3 Touch Copy.
4 Make your duplex choice.
5 Touch Options.
6 Touch Paper Saver.
7 Select the output you want.
For example, if you have four portrait-oriented original documents that you want copied to the
same side of one sheet, touch 4 on 1 Portrait.
8 Touch Print Page Borders if you want a box drawn around each page on the copies.
9 Touch Copy It.
37
Page 38

Placing the date and time at the top of each page
1 Place the original document in the automatic document feeder facing up, short-edge first.
2 Adjust the paper guides.
3 Touch Copy.
4 Touch Options.
5 Touch Date/Time Stamp.
6 Touch On.
7 Touch Done.
8 Touch Copy It.
Placing an overlay message on each page
An overlay message can be placed on each page. The message choices are Urgent, Confidential,
Copy, or Draft. To place a message on the copies:
1 Place the original document in the automatic document feeder facing up, short-edge first.
2 Adjust the paper guides.
3 Touch Copy.
4 Touch Options.
5 Touch the button containing the overlay you want to use.
6 Touch Done.
7 Touch Copy It.
Canceling a copy job
While the document is in the ADF
When the ADF begins processing a document, the scanning screen is displayed. You can cancel the
copy job by touching Cancel Job on the touch screen.
Touching Cancel Job cancels the entire job that is being scanned. The scanning screen will
be replaced with a “Canceling scan job” screen. The ADF will clear any page that has started
scanning and leave the other pages in the ADF.
38
Page 39

While copying pages using the scanner glass (flatbed)
During the copy process, the “Scan the next page” screen appears. To cancel the copy job, touch
Cancel Job on the touch screen.
Touching Cancel Job cancels the entire job that has been scanned. The scanning screen will
be replaced with a “Canceling scan job” screen. Once the job has been flushed, the touch
screen will return to the copy screen.
When the pages are being printed
To cancel the print job, touch Cancel Job on the touch screen, or press cancel on the numeric
keypad.
Touching Cancel Job or pressing cancel on the keypad cancels the remaining print job. Once
the job has been deleted, the touch screen will return to the home screen.
Copy tips
The following tips may improve the MFP copy quality. For additional information or to solve copy
problems, see Solving copy quality problems.
Question Tip
When should I use Text
mode?
When should I use Text/Photo
mode?
When should I use
Printed Image mode?
• Text mode should be used when text preservation is the main goal of the
• Text is best used for receipts, carbon copy forms, and documents that only
• Text/Photo mode should be used when copying an original document that
• Text/Photo is best used for magazine articles, business graphics, and
Printed Image mode should be used when copying halftone
photographs, graphics such as documents printed on a laser printer,
or pages from a magazine or newspaper.
When should I use
Photograph mode?
Photograph mode should be used when the original document is a
high-quality photograph or inkjet print.
copy, and preserving images copied from the original document is not a
concern.
contain text or fine line art.
contains a mixture of text and graphics.
brochures.
39
Page 40

3
The MFP can be used to e-mail scanned documents to one or more recipients.
There are four ways to send an e-mail from the MFP. You can type the e-mail address, use a shortcut
number, use the address book, or a profile. Permanent e-mail destinations can be created in the
Manage Destinations link located under the Configuration tab on the Web page.
For more information or detailed instructions, select one of the following:
Entering an e-mail address
Using a shortcut number
Using the address book
E-mailing to a profile
Adding e-mail subject and message
information
Changing the output file type
E-mailing color documents
Creating an e-mail shortcut
Creating an e-mail profile
Canceling an e-mail
Understanding e-mail options
E-mail server setup
Address book setup
40
Page 41

Entering an e-mail address
1 Place the original document facing up in the automatic document feeder or facing down on
the scanner glass (flatbed).
Adjust the paper guides when using the ADF.
2 Touch E-mail.
3 Enter the recipient's address.
You can enter additional recipients by pressing next and then entering the recipient's address
or shortcut number.
4 Touch E-mail It.
Using a shortcut number
1 Place the original document facing up in the automatic document feeder or facing down on
the scanner glass (flatbed).
Adjust the paper guides when using the ADF.
2 Touch E-mail.
3 Press #, and then enter the recipient's shortcut number.
You can enter additional recipients by pressing next and then entering the recipient's shortcut
number or address.
4 Touch E-mail It.
Using the address book
1 Place the original document facing up in the automatic document feeder or facing down on
the scanner glass (flatbed).
Adjust the paper guides when using the ADF.
2 Touch E-mail.
3 Touch Search Address Book.
4 Enter the name or part of the name you are searching for, and then touch Search.
5 Touch the name that you want to add to the To: field.
You can enter additional recipients by pressing next and then entering the recipient's address
or shortcut number, or searching the address book.
6 Touch E-mail It.
41
Page 42

E-mailing to a profile
1 Place the original document facing up in the automatic document feeder or facing down on
the scanner glass (flatbed).
Adjust the paper guides when using the ADF.
2 Touch Held Jobs.
3 Touch Profiles.
4 Select your e-mail destination from the profile list.
5 Touch E-mail It.
Adding e-mail subject and message information
1 Place the original document facing up in the automatic document feeder or facing down on
the scanner glass (flatbed).
Adjust the paper guides when using the ADF.
2 Touch E-mail.
3 Touch Options.
4 Touch Subject.
5 Enter the e-mail subject.
6 Touch Done.
7 Touch Message.
8 Enter an e-mail message.
9 Touch Done.
10 Touch E-mail It.
42
Page 43

Changing the output file type
1 Place the original document facing up in the automatic document feeder or facing down on
the scanner glass (flatbed).
Adjust the paper guides when using the ADF.
2 Touch E-mail.
3 Enter an e-mail address.
4 Touch Options.
5 Touch the button that represents the file type you want to send.
• PDF: This creates a single file with multiple pages, viewable with Adobe Reader. Adobe
Reader is provided free by Adobe at http://www.adobe.com.
• TIFF: Creates multiple files or a single file. If Multi-page TIFF is turned off in the
Configuration menu, then TIFF saves one page in each file. The file size is usually larger
than an equivalent JPEG.
• JPEG: Creates and attaches a separate file for each page of the original document, and
is viewable by most Web browsers and graphics programs.
6 Touch E-mail It.
E-mailing color documents
1 Place the original document facing up in the automatic document feeder or facing down on
the scanner glass (flatbed).
Adjust the paper guides when using the ADF.
2 Touch E-mail.
3 Enter an e-mail address.
4 Touch Options.
5 Touch Color.
6 Touch E-mail It.
43
Page 44

Creating an e-mail shortcut
From a computer
1 Enter the IP address of the MFP into the URL field (address bar) of the Web browser.
2 Click Configuration (in the left frame), and then click Manage Destinations (in the right
frame).
Note: You may be asked to enter a password. If you do not have an ID and password,
obtain one from your system support person.
3 Click E-mail Destination Setup.
4 Enter a unique name for the recipient, and specify the e-mail address.
Note: If entering multiple addresses, separate each address with a comma (,).
5 Choose your scan settings (Format, Content, Color, and Resolution).
6 Enter a shortcut number, and then click Add.
If you enter a number that is already in use, you are prompted to select another number.
7 Go to the MFP, and place the original document in the automatic document feeder facing up,
short-edge first.
8 Touch E-mail.
9 Press #, and then enter the recipient's shortcut number.
10 Touch E-mail It.
44
Page 45

From the MFP
1 Load the original document in the ADF facing up, short-edge first, and adjust the paper
guides.
2 Touch E-mail.
3 Enter the recipient's e-mail address.
To create a group of recipients, touch Next number, and enter the next recipient’s e-mail
address.
4 Touch Save as Shortcut.
5 Enter a unique name for the shortcut.
6 Verify the shortcut name and number are correct, and then touch OK.
If the name or number is incorrect, touch Cancel, and reenter the information.
7 Touch E-mail It.
Creating an e-mail profile
1 Open your Web browser. In the address line, enter the IP address of the MFP you want to
configure using the format: http://ip_address/.
2 Click Configuration.
3 Click E-mail/FTP Settings.
4 Click Manage E-mail Shortcuts.
5 Fill in the fields with the appropriate information.
6 Click Add.
Canceling an e-mail
1 When using the automatic document feeder, touch Cancel while Scanning… is displayed on
the touch screen.
2 When using the scanner bed, touch Cancel while Scan the Next Page / Finish the
Job is displayed on the touch screen.
45
Page 46

Understanding e-mail options
Original Size: Opens a screen where you can enter the size of the documents you are going to email.
• Touching any of the paper size icons on the follow-on screen will make that your selection and
return you to the
e-mail Options screen.
• When Original Size is set to Mixed Sizes, you can scan different size original documents
(letter and legal size pages). They will be scaled automatically to fit the selected output media
size.
Orientation: Tells the MFP whether the original document is portrait or landscape and then changes
the Sides and Binding settings to match the original document orientation.
Binding: Tells the MFP whether the original document is bound on the long-edge or short-edge side.
E-mail Subject: Lets you enter a subject line to your e-mail. You can enter up to 255 characters.
E-mail Message: Lets you enter a message that will be sent with your scanned attachment.
Resolution: Adjusts the output quality of your e-mail. Increasing the image resolution increases the
e-mail filete alete-te-mete-e scate- oreilel document011.9(ti)5.6(ou cabe(d )]TJ0 -1.1978 TD0.0948 Tc0.0887 Twdbjec)18.43(eec)18.(neent)2.o(e)5ujec-m(i)7.1(l)-3.9r iiel len.
46
Page 47

Advanced Options: Lets you change Transmission Log, Scan Preview, Edge Erase, or Darkness
settings.
Transmission Log: Prints the transmission log or transmission error log.
Scan Preview: Displays the first pages of the image before it is included in the e-mail. When
the first page is scanned, the scanning is paused and a preview image appears.
Note: Scan Preview is not supported on all models.
Edge Erase: Eliminates smudges or information around the edges of your document. You
can choose to eliminate an equal area around all four sides of the paper, or pick a particular
edge.
Darkness: Adjusts how light or dark your scanned e-mails will turn out.
E-mail server setup
For e-mail to operate, it must be turned on in the MFP configuration and have a valid IP address or
gateway address. To set up the e-mail function:
1 Open your Web browser. In the address line, enter the IP address of the MFP you want to
configure using the format: http://ip_address/.
2 Click Configuration.
3 Click E-mail/FTP Settings.
4 Click Email Server Setup.
5 Fill in the fields with the appropriate information.
6 Click Submit.
Address book setup
1 Open your Web browser. In the address line, enter the IP address of the MFP you want to
configure using the format: http://ip_address/.
2 Click Configuration.
3 Click E-mail/FTP Settings.
4 Click Manage E-mail Shortcuts.
5 Fill in the fields with the appropriate information.
6 Click Add.
47
Page 48

E-mail tips
The following tips may improve the MFP e-mail quality. For additional information or to solve scan
problems, see Solving scan quality problems.
Question Tip
When should I use Text
mode?
When should I use
Text/Photo mode?
When should I use Photo
mode?
• Text mode should be used when text preservation is the main goal of the
scan, and preserving images copied from the original document is not a
concern.
• Text is best used for receipts, carbon copy forms, and documents that only
contain text or fine line art.
• Text/Photo mode should be used when scanning an original document that
contains a mixture of text and graphics.
• Text/Photo is best used for magazine articles, business graphics, and
brochures.
Photo mode should be used when scanning photos printed on a laser
printer or taken from a magazine or newspaper.
48
Page 49

4
Faxing
The fax function lets you scan items and fax them to one or more recipients directly from the MFP.
When you touch Fax, it opens the fax destination screen. You enter the fax number and touch Fax It
to send your fax. You can also change the fax settings to fit your personal needs.
During initial MFP setup, you may be required to configure the MFP for faxing. For additional
information, see Fax setup.
The following fax topics are available in this and other chapters.
Adjusting the Darkness setting
Using fax destination shortcuts Sending a fax at a later time
Using the address book Cancel an outgoing fax
Sending faxes from a computer Fax tips
Fax setup
Understanding fax options Solving fax problems
Changing the fax resolution Viewing a fax log
49
Page 50

Sending a fax
There are two ways to send a fax: enter the number using a numeric keypad or use a shortcut
number. Use the instructions below to send a fax using the keypad, or see Using fax destination
shortcuts to fax your documents using a shortcut.
1 Place the original document in the automatic document feeder facing up, short-edge first.
2 Adjust the paper guides.
3 Touch Fax.
4 Enter the fax number using the numbers on the touch screen or keypad.
Add recipients by touching next and then entering the recipient's telephone number or
shortcut number, or search the address book.
Note: To place a two-second dialing pause within a fax number, use the Dial Pause
button.
The dial pause will appear as a comma in the Fax to: box. Use this feature if you need to dial
an outside line first.
5 Touch Fax It.
Using fax destination shortcuts
Fax destination shortcuts are just like the speed dial numbers on a telephone or fax machine. You
can assign shortcut numbers when creating permanent fax destinations. Permanent fax destinations
or speed dial numbers are created in the Manage Destinations link located under the Configuration
tab on the Web page. A shortcut number (1–99999) can contain a single recipient or multiple
recipients. By creating a group fax destination with a shortcut number, you can quickly and easily fax
broadcast information to an entire group.
1 Place the original document in the automatic document feeder facing up, short-edge first.
2 Adjust the paper guides.
3 Touch Fax.
Press # followed by the shortcut number on the keypad, or touch Next Number to enter
another address.
For information on creating shortcut numbers, see Creating shortcuts.
4 Touch Fax It.
50
Page 51

Using the address book
Note: If the address book feature is not enabled, contact your system support person.
1 Place the original document in the automatic document feeder facing up, short-edge first.
2 Touch Fax.
3 Touch Search Address Book.
4 Using the touch screen keyboard, enter the name or part of the name of the person for whom
you'd like to find a fax number. (Do not attempt to search for multiple names at the same
time.)
5 Touch Enter.
6 Touch the name, to add it to the Fax to: list.
7 Repeat steps 5 through 6 to enter additional destinations.
8 Touch Fax It.
Sending faxes from a computer
Faxing from a computer lets you send electronic documents without leaving your desk. This gives
you the flexibility of faxing documents directly from software applications.
1 From your software application, click File Æ Print.
2 From the Print window, select your MFP, and then click Properties.
Note: In order to perform this function from your computer, you must use the PostScript
printer driver for your MFP.
3 Choose the Other Options tab, and change Output format: to Fax.
4 Click OK. At the next screen, click OK.
5 From the Fax screen, enter the name and number for the fax recipient.
6 Click Send to send your job.
51
Page 52

Creating shortcuts
Instead of entering the entire phone number of a fax recipient on the control panel each time you
want to send a fax, you can create a permanent fax destination and assign a shortcut number. A
single shortcut number or a multiple number shortcut can be created. There are two methods for
creating shortcut numbers: from a computer or from the MFP touch screen.
From a computer
1 Enter the IP address of the MFP in the URL field (address bar) of your Web browser. If you do
not know the IP address, see your system support person.
2 Click Configuration (in the left frame of your browser window), and then click Manage
Destinations (in the right frame of your browser window).
Note: A password may be required. If you do not have an ID and password, obtain one
from your system support person.
3 Click Fax Shortcut Setup.
4 Enter a unique name for the shortcut, and specify the fax number.
To create a multiple number shortcut, enter the fax numbers for the group.
Note: Separate each fax number in the group with a semicolon (;).
5 Assign a shortcut number.
If you enter a number that is already in use, you are prompted to select another number.
6 Click Add.
7 Go to the MFP, and load the original document in the automatic document feeder facing up,
short-edge first.
8 From the numeric keypad, press #, and then enter your shortcut number.
9 Touch Fax It.
52
Page 53

From the MFP
1 Load the original document in the ADF facing up, short-edge first, and adjust the paper
guides.
2 Touch Fax.
3 Enter the recipient's fax number.
To create a group of recipients, touch Next number, and enter the next recipient’s fax
number.
4 Touch Save as Shortcut.
5 Enter a unique name for the shortcut.
6 Verify the shortcut name and number are correct, and then touch OK.
If the name or number is incorrect, touch Cancel, and reenter the information.
7 Touch Fax It.
53
Page 54

Understanding fax options
Original: Opens a screen where you can choose the size of the documents you are going to fax.
• Touching any of the paper size buttons on the follow-on screen will make that your selection
and return you to the Fax Options Screen.
• When Original Size is set to Mixed Sizes, you can scan different size original documents
(letter and legal size pages). They will be scaled automatically to fit the selected output media
size.
Content: Used to select the type of document you are scanning (for example, Text, Text/Photo, or
Photo). Content affects the quality and size of your scan by selecting how the scanner will handle the
information on the original document.
• The Text setting will emphasize sharp, black, high-resolution text against a clean, white
background.
The Text/Photo setting is used when the original documents are a mixture of text and
graphics or pictures.
• The Photo setting tells the scanner to pay extra attention to graphics and pictures. This
setting takes longer to scan but emphasizes a reproduction of the full dynamic range of tones
in the original document. This increases the amount of information saved.
Sides: Informs the MFP if the original document is simplex (printed on one side) or duplex (printed
on both sides). This lets the scanner know what needs to be scanned for inclusion in the fax.
Resolution: Increases how closely the scanner examines the document you wish to fax. If faxing a
photograph, a drawing with fine lines, or a document with very small text, increase the Resolution
setting. This will increase the amount of time required for the scan and will increase the quality of the
fax output. Standard is suitable for most documents. Fine is recommended for documents with small
print. Super fine is recommended for original documents with fine detail. Ultra fine is recommended
for documents with pictures or photographs.
Darkness: Adjusts how light or dark your faxes will turn out in relation to the original document.
Advanced Options: Accesses the Delayed Send, Transmission Log, Scan Preview, Edge Erase,
Advanced Duplex, or Fax Queue settings.
Delayed Send: Sets up a fax that will be sent at a later time or date. After setting up your fax,
select Delayed Send, enter the time and date you would like to transmit your fax, and then
54
Page 55

touch Done. This setting can be especially useful in sending information to fax lines that are
not readily available during certain hours, or when transmission are cheaper.
Note: If the device is powered off when the delayed fax is due to be sent, the fax is sent
the next time the MFP is powered up.
Transmission Log: Prints the transmission log or transmission error log.
Scan Preview: Displays the image before it is included in the fax. When a page is scanned,
the scanning is paused and a preview image appears.
Note: Scan Preview is not supported on all models.
Edge Erase: Eliminates smudges or information around the edges of your document. You
can choose to eliminate an equal area around all four sides of the paper or pick a particular
edge. Edge Erase will erase whatever is within the area selected, leaving nothing printed on
that portion of the paper.
Changing the fax resolution
1 Place the original document in the automatic document feeder facing up, short-edge first.
2 Adjust the paper guides.
3 Touch Fax.
4 Enter the fax number.
5 Touch Options.
6 Touch the button that represents the resolution you want.
7 Touch Fax It.
Adjusting the Darkness setting
1 Place the original document in the automatic document feeder facing up, short-edge first.
2 Adjust the paper guides.
3 Touch Fax.
4 Enter the fax number.
5 Touch Options.
6 Touch the left Darkness arrow to reduce the darkness of the fax, or touch the right Darkness
arrow to increase the darkness of the fax.
7 Touch Fax It.
55
Page 56

Sending a fax at a later time
1 Place the original document in the automatic document feeder facing up, short-edge first.
2 Adjust the paper guides.
3 Touch Fax.
4 Enter the fax number.
5 Touch Options.
6 Touch Advanced Options.
7 Touch Delayed Send.
Note: If Fax Mode is set to Fax Server, the Delayed Send button will not appear. Faxes
waiting for transmission are listed in the Fax Queue.
8 Touch the left arrow to reduce the time or the right arrow to increase the time the fax will be
transmitted.
Note: Touching the increase or decrease arrow increments the time by 30 minutes. If the
current time is shown, the left arrow is grayed out.
9 Touch Done.
56
Page 57

Cancel an outgoing fax
There are two ways to cancel an outgoing fax:
While the original documents are still scanning
1 When using the automatic document feeder, touch Cancel while Scanning… is displayed on
the touch screen.
2 When using the scanner bed, touch Cancel while Scan the Next Page / Finish the Job is
displayed on the touch screen.
After the original documents have been scanned to memory
1 Touch Cancel Jobs.
The Cancel Jobs screen will appear.
2 Touch the job or jobs you want to cancel.
Only three jobs appear on the screen, touch the down arrow until the job you want appears
and then touch the job you want to cancel.
3 Touch Delete Selected Jobs.
The Deleting Selected Jobs screen appears, the selected jobs are deleted, and then the
home screen appears.
Fax tips
The following tips may improve the MFP fax quality. For additional information or to solve fax
problems, see Solving fax problems.
Question Tip
When should I use Text
mode?
When should I use
Text/Photo mode?
When should I use Photo
mode?
• Text mode should be used when text preservation is the main goal of the
fax, and preserving images copied from the original document is not a
concern.
• Text is best used for receipts, carbon copy forms, and documents that only
contain text or fine line art.
• Text/Photo mode should be used when faxing an original document that
contains a mixture of text and graphics.
• Text/Photo is best used for magazine articles, business graphics, and
brochures.
Photo mode should be used for faxing photos printed on a laser printer
or taken from a magazine or newspaper.
57
Page 58

Fax setup
When you first turn on the MFP or if the MFP has been off for an extended time, Set clock will
appear. Additionally, many countries and regions require outgoing faxes to contain the following
information in a margin at the top or bottom of each transmitted page, or on the first page of the
transmission:
• Date and time (date and time fax is sent)
• Station name (identification of the business, other entity, or individual sending the message)
• Station number (telephone number of the sending fax machine, business, other entity, or
individual)
Note: See Electronic emission notices and Other telecommunications notices for
FCC information.
There are two methods to enter your fax setup information. They are:
• manually entering the information through the MFP control panel, or
• using your browser to access the MFP IP address and then entering the Configure menu.
Note: If you do not have a TCP/IP environment, you must use the MFP control panel to
set your basic fax information.
Select one of the following to find the instructions for the method you want to use.
Performing manual fax setup
Performing browser fax setup
Performing manual fax setup
1 Press Menu.
2 Touch Settings.
3 Touch Fax Settings.
4 Touch General Fax Settings.
5 Touch Station Name.
6 Enter the Station Name (enter your name or company name).
7 Touch Done to save your choice.
8 Touch Station Number.
9 Enter your fax phone number.
10 Touch Done.
58
Page 59

Performing browser fax setup
Note: Configuration is a task usually done by a network administrator. If you are prompted
for a password during the following instructions, see your network administrator for
help.
1 Type the IP address of the MFP in the URL field of your browser (for example, http://
192.168.236.24), and then press Enter.
2 Click Configuration.
3 Under the MFP heading, click Fax Setup.
4 Click Configuration.
If changing fax modes, you must click Submit before you can access the configuration page.
Note: During MFP power up, if the print server is configured to use Network Time
Protocol (NTP) time, the current date and time are provided. However, you must set
the time zone to get the correct time.
5 Enter the required FCC information:
• Date and time (current date and time)
• Station name (personal name or company name)
• Station number (fax phone line number)
6 Select the Time Zone, such as Eastern (USA and Canada, Eastern Standard Time). This
sets the required information.
7 Set your options for Rings to Answer, and so on.
8 After you finish entering the information, click Submit.
Changing optional settings such as setting up a fax transmission log, creating permanent fax
destinations, and enabling the fax server function can be changed through your browser, or the MFP
control panel.
Viewing a fax log
When you send or receive a fax, an entry of the activity is recorded in a file. You can view or print this
file when you want.
To view the fax log:
1 Type the IP address of the MFP in the URL field of your browser, and then press Enter.
2 Click Reports.
3 Click Fax Settings.
4 Click Fax Job Log or Fax Call Log.
59
Page 60

5
FTP
The MFP scanner lets you scan documents directly to a File Transfer Protocol (FTP) server.
Note: Only one FTP address may be sent to at a time.
Once an FTP destination has been configured by your system support person, the name of the
destination becomes available as a shortcut number or listed as a profile under the Held Jobs icon.
An FTP location could also be another PostScript printer: for example, a color document can be
scanned and then sent to a color printer. Sending a document to an FTP server is similar to sending
a fax. The difference is that you are sending the information over your network instead of the phone
line.
For more information or detailed instructions, select one of the following:
Entering the FTP address Using the address book
Using a shortcut number FTP tips
Entering the FTP address
1 Place the original document in the automatic document feeder facing up, short-edge first.
2 Touch FTP.
3 Enter the FTP address.
4 Touch Send It.
Using a shortcut number
1 Place the original document in the automatic document feeder facing up, short-edge first.
2 Touch FTP.
3 Press #, and then enter the FTP shortcut number.
4 Touch Send It.
60
Page 61

Using the address book
1 Place the original document in the automatic document feeder facing up, short-edge first.
2 Touch FTP.
3 Touch Search Address Book.
4 Enter name or part of the name you are searching for, and then touch Search.
5 Touch the name that you want to add to the To: field.
6 Touch Send It.
Creating shortcuts
Instead of entering the entire FTP site address on the control panel each time you want to send a
document to an FTP, you can create a permanent FTP destination and assign a shortcut number. A
single shortcut number or a multiple number shortcut can be created. There are two methods for
creating shortcut numbers: from a computer or from the MFP touch screen.
From a computer
1 Enter the IP address of the MFP in the URL field (address bar) of your Web browser. If you do
not know the IP address, see your system support person.
2 Click Configuration (in the left frame of your browser window) and then click Manage
61
Page 62

From the MFP
1 Load the original document in the ADF facing up, short-edge first, and adjust the paper
guides.
2 Touch FTP.
3 Enter the FTP site.
4 Touch Save as Shortcut.
5 Enter a unique name for the shortcut.
6 Verify the shortcut name and number are correct, and then touch OK.
If the name or number is incorrect, touch Cancel, and reenter the information.
7 Touch Send It.
FTP options
Original Size: Opens a screen where you can enter the size of the documents you are going to copy.
• Touching any of the paper size icons on the follow-on screen will make that your selection and
return you to the FTP Options Screen.
• When Original Size is set to Mixed Sizes, you can scan different size original documents
(letter and legal size pages). They will be scaled automatically to fit the selected output media
size.
Binding: Tells the MFP whether the original document is bound on the long-edge or short-edge side.
Base File Name: Lets you enter a file name. The default value is the word image. A tamp is added
to the file name to prevent overwriting files of the same name at the FTP site.
Note: There is a 53-character limit for the file name.
Resolution: Adjusts the output quality of your file. Increasing the image resolution increases the file
size and the time needed to scan the original document. Image resolution can be decreased to
reduce the file size.
Send As: Sets the output (PDF, TIFF, or JPEG) for the scanned image.
PDF output is a single file.
TIFF output is a single file. If Multi-page TIFF is turned off in the Configuration menu, then
TIFF saves one page each in a series of files.
JPEG saves one page in each file. When multiple pages are scanned, the output will be a
series of files.
62
Page 63

Content: Tells the MFP the original document type. Choose from Text, Text/Photo, or Photo. Color
can be turned on or off with any of the Content choices. Content affects the quality and size of your
FTP file.
Tex t: Emphasizes sharp, black, high-resolution text against a clean, white background.
Text/Photo: Used when the original documents are a mixture of text and graphics or pictures.
Photo: Tells the scanner to pay extra attention to graphics and pictures. This setting takes
longer to scan but emphasizes a reproduction of the full dynamic range of tones in the
original document. This increases the amount of information saved.
Color: Sets the scan type and output for the copy. Color documents can be scanned and sent
to an FTP site, PC, or e-mail address. The MFP will print color documents in grayscale only.
Advanced Options: Accesses the Transmission Log, Edge Erase, or Darkness settings.
Transmission Log: Prints the transmission log or transmission error log.
Edge Erase: Eliminates smudges or information around the edges of your document. You
can choose to eliminate an equal area around all four sides, or pick a particular edge. Edge
Erase will erase whatever is within the area selected and leave nothing printed on that portion
of the paper.
Darkness: Adjusts how light or dark your scanned documents will turn out.
FTP tips
The following tips may improve the MFP FTP quality.
Question Tip
When should I use Text
mode?
When should I use
Text/Photo mode?
When should I use Photo
mode?
• Text mode should be used when text preservation is the main goal of
sending a document to an FTP site, and preserving images copied from
the original document is not a concern.
• Text is best used for receipts, carbon copy forms, and documents that only
contain text or fine line art.
• Text/Photo mode should be used when sending a document to an FTP site
that contains a mixture of text and graphics.
• Text/Photo is best used for magazine articles, business graphics, and
brochures.
Photo mode should be used when the original is composed mostly of
photos printed on a laser printer or taken from a magazine or
newspaper.
63
Page 64

Scanning to a PC or USB flash memory
6
device
The MFP scanner lets you scan documents directly to your PC or a USB flash memory device.
Your computer does not have to be directly connected to the MFP for you to receive Scan to PC
images. You can scan the document back to your computer over the network by creating a scan
profile on your computer and then downloading the profile to the MFP.
For more information or detailed instructions, select one of the following:
Create a scan to PC profile
Understanding scan to PC options
Scanning to a USB flash memory device
Scanning tips
Create a scan to PC profile
1 Type the IP address of the MFP in the URL field of your browser, and then press Enter.
If the Java applet screen appears, click Yes.
2 Click Scan Profile.
3 Click Create Scan Profile.
4 Select your scan settings, and then click Next.
5 Select a location for saving the scanned output file somewhere on your computer.
6 Enter a profile name.
The profile name is the name that will appear on the SCAN PROFILE list on the MFP control
panel.
7 Click Submit.
64
Page 65

Review the instructions on the Scan to PC screen.
8
A shortcut number was automatically assigned when you clicked Submit. You can use this
shortcut number when you are ready to scan your documents.
a Go to the MFP, and place the original document in the automatic document feeder facing
up, long-edge first.
b Press # followed by the shortcut number on the keypad, or touch Profiles on the home
screen.
c After you enter the shortcut number, the scanner will scan and send the document to the
directory or application you specified. If you touch Profiles on the home screen, locate
your shortcut on the list.
9 Return to your computer to view your file.
Your output file is saved in the location you specified or launched in the application you
specified.
65
Page 66

Understanding scan to PC options
To change the options for the scan to PC Profile, you must click the Quick Setup box, and select
Custom. Quick Setup lets you select preset formats or customize your scan job settings. You can
select:
Format Type: Sets the output (PDF, TIFF, or JPEG) for the scanned image.
PDF output is a single file.
TIFF output is a single file. If Multi-page TIFF is turned off in the Configuration menu, then
TIFF saves one page each in a series of files.
JPEG saves one page in each file. When multiple pages are scanned, the output will be a
series of files.
Compression: Sets the compression format used to compress the scanned output file.
Default Content: Tells the MFP the original document type. Choose from Text, Text/Photo, or Photo.
Content affects the quality and size of your scanned file.
Tex t: Emphasizes sharp, black, high-resolution text against a clean, white background.
Text/Photo: Used when the original documents are a mixture of text and graphics or pictures.
Photo: Tells the scanner to pay extra attention to graphics and pictures. This setting takes
longer to scan but emphasizes a reproduction of the full dynamic range of tones in the
original document. This increases the amount of information saved.
Color: Tells the MFP the color of the original documents. You can select Gray, BW (Black and White),
or Color.
Original Size: Opens a field where you can select the size of the document you are going to scan.
Orientation: Tells the MFP whether the original document is portrait or landscape and then changes
the Sides and Binding settings to match the original document orientation.
Darkness: Adjusts how light or dark your scanned documents will turn out.
Resolution:
66
Page 67

Scanning to a USB flash memory device
1 Place the original document in the automatic document feeder (ADF) facing up or on the
scanner glass (flatbed) facing down.
Adjust the paper guides when using the ADF.
2 Insert the USB flash memory device into the USB direct interface on the front of the MFP.
The Held Jobs screen appears.
3 Touch Scan to USB drive.
4 Enter the name of the file.
5 Select your scan settings.
6 Touch Scan It.
Scanning tips
The following tips may improve the MFP scanning quality. For additional information or to solve
scanning problems, see Solving scan quality problems.
Question Tip
When should I use Text
mode?
When should I use
Text/Photo mode?
When should I use Photo
mode?
• Text mode should be used when text preservation is the main goal of the
• Text is best used for receipts, carbon copy forms, and documents that only
• Text/Photo mode should be used when scanning an original document that
• Text/Photo is best used for magazine articles, business graphics, and
Photo mode should be used when scanning photos printed on a laser
printer or taken from a magazine or newspaper.
scan, and preserving images copied from the original document is not a
concern.
contain text or fine line art.
contains a mixture of text and graphics.
brochures.
67
Page 68

7
Printing
This chapter covers information about sending a job to print, printing confidential jobs, canceling a
print job, printing a menu settings page, a font list, and a directory list. This chapter also provides
information on printing folio and statement size media. For tips on paper jam prevention and print
media storage, see Avoiding jams and Storing print media.
Sending a job to print
An MFP driver is software that lets your computer communicate with the MFP. When you choose
Print from a software application, a window representing the MFP driver opens. You can then select
the appropriate settings for the specific job you are sending to the MFP. Print settings selected from
the driver override the default settings selected from the MFP control panel.
You may need to click Properties or Setup from the initial Print dialog to see all of the available MFP
settings you can change. If you are not familiar with a feature in the MFP driver window, open the
online Help for more information.
To support all the MFP features, use the Lexmark custom drivers supplied with the MFP. Updated
drivers, as well as a complete description of the driver packages and Lexmark driver support, are
available from the Lexmark Web site.To support all the MFP features, use the custom MFP drivers
supplied with the MFP.
To print a job from a typical Windows application:
1 Open the file you want to print.
2 From the File menu, select Print.
3 Select the MFP in the dialog. Modify the MFP settings as appropriate (such as the pages you
want to print or the number of copies).
4 Click Properties or Setup to adjust MFP settings that were not available on the first screen,
and then click OK.
5 Click OK or Print to send the job to the MFP.
68
Page 69

Printing from a USB flash memory device
A USB direct interface is located on the control panel so you can insert a USB flash memory device
and print the following types of documents:
• Portable Document Format (PDF) [.pdf file]
• Joint Photographic Experts Group (JPEG) [.jpeg or .jpg file]
• Tagged Image File Format (TIFF) [.tiff or .tif file]
• Graphics Interchange Format (GIF) [.gif file]
• Basic Multilingual Plane (BMP) [.bmp file]
• Portable Network Graphics (PNG) [.png file]
• PiCture eXchange (PCX) [.pcx file]
• PC Paintbrush File Format [.dcx file].
Printing a document from a USB flash memory device is similar to printing a held job.
Note: You cannot print encrypted files or files without printing permissions.
We recommend using the following tested and approved USB flash memory devices in the 256 MB,
512 MB, and 1 GB sizes:
• Lexar JumpDrive 2.0 Pro
• SanDisk Cruzer Mini
Other USB flash memory devices must:
• Be compatible with the USB 2.0 standard.
• Support the Full-Speed standard as well.
Devices only supporting USB low speed capabilities are not supported.
• Use the FAT file system.
Devices formatted with NTFS or any other file systems are not supported.
69
Page 70

To print from a USB flash memory device:
1 Make sure the MFP is on and Ready or Busy appears.
2 Insert a USB flash memory device into the USB direct interface.
Note: If you insert the memory device when the MFP requires attention such as when a
paper jam has occurred, the MFP ignores the memory device.
3 Touch the arrow next to the document you want to print.
A screen asking the number of copies to be printed will appear.
4 To print only one copy, touch Print, or touch + to enter the number of copies.
Note: Do not remove the USB flash memory device from the USB direct interface until the
document has finished printing.
The document will begin printing.
Note: If you insert the memory device when the MFP is busy printing other jobs, the
message Printer Busy appears. Select Continue, and your job prints after the
other jobs finish.
If you leave the device in the MFP after exiting the USB drive menu, you can still print PDFs on the
device as held jobs. See Printing confidential and held jobs.
Canceling a print job
There are several methods for canceling a print job.
• Canceling a job from the MFP control panel
70
Page 71

• Canceling a job from a computer running Windows
– Canceling a job from the taskbar
– Canceling a job from the desktop
• Canceling a job from a Macintosh computer
– Canceling a print job from a computer running Mac OS 9
– Canceling a job from a computer running Mac OS X
Canceling a job from the MFP control panel
If the job is formatting, scanning, or already printing, touch Cancel Job on the display.
Canceling a job from a computer running Windows
Canceling a job from the taskbar
When you send a job to print, a small printer icon appears in the right corner of the taskbar.
1 Double-click the printer icon.
A list of print jobs appears in the printer window.
2 Select the job you want to cancel.
3 Press the Delete key on the keyboard.
Canceling a job from the desktop
1 Minimize all programs to reveal the desktop.
2 Double-click the My Computer icon.
Note: If you do not have the My Computer icon, select Start
Panel, and then go to step 4.
3 Double-click the Printers icon.
A list of available printers appears.
4 Double-click the printer you selected when you sent the job.
A list of print jobs appears in the printer window.
5 Select the job you want to cancel.
6 Press the Delete key on the keyboard.
Æ Settings Æ Control
71
Page 72

Canceling a job from a Macintosh computer
Canceling a print job from a computer running Mac OS 9
When you send a job to print, the printer icon for your selected MFP appears on the desktop.
1 Double-click the printer icon on your desktop.
A list of print jobs appears in the printer window.
2 Select the print job you want to cancel.
3 Click the trash can button.
Canceling a job from a computer running Mac OS X
When you send a job to print, the printer icon for your selected MFP appears in the dock.
1 Open Applications Æ Utilities, and then double-click Print Center or Printer Setup.
2 Double-click the MFP you are printing to.
3 In the printer window, select the print job you want to cancel, and then press Delete.
Printing the menu settings page
You can print a menu settings page to review the default MFP settings and to verify the MFP options
are installed correctly.
1 Make sure the MFP is on and the Ready message appears.
2 Press Menu on the control panel.
3 Touch Reports.
4 Touch Menu Settings Page.
Printing a network setup page
You can print a network setup page to review the default MFP settings and to verify the MFP options
are installed correctly.
1 Make sure the MFP is on and the Ready message appears.
2 Press Menu on the control panel.
3 Touch Reports.
4 Touch Network Setup Page.
72
Page 73

Printing a font sample list
To print samples of the fonts currently available for the MFP:
1 Make sure the MFP is on and the Ready message appears.
2 Press Menu on the control panel.
3 Touch Reports.
4 Touch the down arrow until Print Fonts appears, then touch Print Fonts.
5 Touch PCL Fonts or PostScript Fonts.
Printing a directory list
A directory listing shows the resources stored in flash memory or on the hard disk. To print a listing:
1 Make sure the MFP is on and the Ready message appears.
2 Press Menu on the control panel.
3 Touch Reports.
4 Touch the down arrow until Print Directory appears, then touch Print Directory.
Printing confidential and held jobs
The term held job refers to any type of print job that can be initiated by the user at the MFP. This
includes a confidential job, a verify print job, a reserve print job, a repeat print job, a bookmark, a
profile, or a file on a USB flash memory device. When sending a job to the MFP, you can specify in
the driver that you want the MFP to hold the job in memory. Once your job is stored in MFP memory,
go to the MFP, and use the MFP control panel to specify what you want to do with your print job.
All confidential and held jobs have a user name associated with them. To access confidential or held
jobs, you must first select the type of job (confidential or held), and then select your user name from
the user name list. Once you select your user name, you can print all your confidential jobs, or select
an individual print job. You can then choose the number of copies for the print job, or you can delete
the print job.
Printing a confidential job
When you send a confidential job to the MFP, you must enter a Personal Identification Number (PIN)
from the driver. The PIN must be four digits using the numbers 0–9. The job is held in MFP memory
until you enter the same four-digit PIN from the control panel and choose to print or delete the job.
This ensures the job does not print until you are there to retrieve it. No one else using the MFP can
print the job without the PIN.
73
Page 74

Windows
1 From a word processor, spreadsheet, browser, or other application, select File Æ Print.
2 Click Properties. (If there is no Properties button, click Setup, and then click Properties.)
3 Depending on the operating system, you may have to click the Other Options tab, and then
click Print and Hold.
Note: If you have difficulty finding Print and Hold
topic Confidential Print or Print and Hold, and then follow the driver instructions.
Æ Confidential Print, click Help, see the
4 Enter a User Name and PIN.
5 Send your job to the MFP.
Go to the MFP when you are ready to retrieve your confidential print job, and follow the At the
MFP steps.
Macintosh
1 From a word processor, spreadsheet, browser, or other application, select File Æ Print.
2 In the Copies & Pages or General pop-up menu, select Job Routing.
a When using Mac OS 9, if Job Routing is not a choice on the pop-up menu, select Plug-in
Preferences
b Turn down the disclosure triangle to the left of Print Time Filters, and select Job
Routing.
c In the pop-up menu, select Job Routing.
Æ Print Time Filters.
3 In the radio group, select Confidential Print.
4 Enter a User Name and PIN.
5 Send your job to the MFP.
Go to the MFP when you are ready to retrieve your confidential print job, and follow the At the
MFP steps.
At the MFP
1 Touch Held Jobs.
2 Touch your user name.
Note: A maximum of 500 results can be displayed for held jobs. If your name does not
appear, touch the down arrow until your name appears, or touch Search Held Jobs
if there are a large number of held jobs in the MFP.
3 Select Confidential Jobs.
74
Page 75

Enter your PIN.
4
For more information, see Entering a Personal Identification Number (PIN).
5 Touch the job you want to print.
6 Touch Print, or touch + to input the number of copies, and then touch Print.
Note: After your job prints, it is deleted from MFP memory.
Entering a Personal Identification Number (PIN)
After you select a Confidential Job, the Enter PIN screen appears.
Use the touch screen number pad or the numeric pad to the right of the display to enter the
four-digit PIN associated with the confidential job.
Note: As you enter the PIN, asterisks appear on the display to ensure confidentiality.
If you enter an invalid PIN, the Invalid PIN screen appears.
Reenter the PIN, or touch Cancel.
Note: After your job prints, it is deleted from MFP memory.
Printing and deleting held jobs
Held jobs (Verify Print, Reserve Print, or Repeat Print) are printed or deleted from the MFP control
panel and do not require a PIN.
Verify Print
If you send a Verify Print job, the MFP prints one copy and holds the remaining copies you requested
in MFP memory. Use Verify Print to examine the first copy to see if it is satisfactory before printing the
remaining copies. Once all copies are printed, the Verify Print job is automatically deleted from MFP
memory.
Reserve Print
If you send a Reserve Print job, the MFP does not print the job immediately. It stores the job in
memory so you can print the job later. The job is held in memory until you delete it from the Held
Jobs menu. Reserve Print jobs may be deleted if the MFP requires extra memory to process
additional held jobs.
75
Page 76

Repeat Print
If you send a Repeat Print job, the MFP prints all requested copies of the job and stores the job in
memory so you can print additional copies later. You can print additional copies as long as the job
remains stored in memory.
Note: Repeat Print jobs are automatically deleted from MFP memory when the MFP
requires extra memory to process additional held jobs.
Windows
1 From a word processor, spreadsheet, browser, or other application, select File Æ Print.
2 Click Properties. (If there is no Properties button, click Setup, and then click Properties.)
3 Depending on the operating system, you may have to click the Other Options tab, and then
click Print and Hold.
Note: If you have difficulty finding Print and Hold
topic Held Jobs or Print and Hold, then follow the driver instructions.
Æ Held Jobs, click Help, and see the
4 Select the type of held job you want, and then send your job to the MFP.
Go to the MFP when you are ready to retrieve your confidential print job, and follow the At the
MFP steps.
Macintosh
1 From a word processor, spreadsheet, browser, or other application, select File Æ Print.
2 In the Copies & Pages or General pop-up menu, select Job Routing.
a When using Mac OS 9, if Job Routing is not a choice on the pop-up menu, select Plug-in
Preferences
b Turn down the disclosure triangle to the left of Print Time Filters, and select Job
Routing.
c In the pop-up menu, select Job Routing.
Æ Print Time Filters.
3 In the radio group, select the type of held job you want, enter a user name, and then send
your job to the MFP.
Go to the MFP when you are ready to retrieve your confidential print job, and follow the At the
MFP steps.
76
Page 77

At the MFP
1 Touch Held Jobs.
2 Touch your user name.
Note: A maximum of 500 results can be displayed for held jobs. If your name does not
appear, touch the down arrow until your name appears, or touch Search <your
name> if you have a large number of held jobs in the MFP.
3 Touch the job you want to print.
Touch the down arrow, or touch Search <your name> if you have a large number of held
jobs in the MFP.
4 Touch Print, or touch + to input the number of copies, and then touch Print.
Note: You can also choose to Print All or Delete All.
Printing on specialty media
Media is paper, card stock, transparencies, labels, and envelopes. The last four are some referred to
as specialty media. Follow these instructions to print on specialty media.
1 Load the media as specified for the tray being used. See Loading standard trays and
optional trays for help.
2 From the MFP control panel, set the Paper Type and Paper Size according to the media you
loaded. See Setting the Paper Type and Paper Size for help.
3 From the computer software application, set the paper type, size, and source according to the
media you loaded.
Windows
a From a word processor, spreadsheet, browser, or other application, select File
b Click Properties (or Options, Printer, or Setup, depending on the application) to view the
MFP driver settings.
c Click the Paper tab.
A paper tray list will appear.
d Select the tray containing the specialty media.
Note: If you have difficulty, click Help, and then follow the driver instructions.
e Select the media type (transparencies, envelopes, and so on) from the Paper Type list
box.
Æ Print.
f Select the size of the specialty media from the Paper Size list box.
77
Page 78

g Click OK, and then send the print job as usual.
Mac OS 9
a Select File
b Select the size of the specialty media from the Paper pop-up menu, and then click OK.
c Select File
d With General selected on the top pop-up menu, go to the Paper Source pop-up menu,
e Click Print.
Mac OS X
a Select File
b Select the MFP from the Format for pop-up menu.
c Select the size of the specialty media from the Paper pop-up menu, and then click OK.
d Select File
e On the Copies & Pages pop-up menu, select Imaging.
f Select the specialty media on the Paper Type pop-up menu.
g On the Imaging pop-up menu, select Paper Feed.
h Select the tray containing the specialty media from the All pages from or First page
Æ Page Setup.
Æ Print.
and select the tray containing the specialty media or the name of the media.
Æ Page Setup.
Æ Print.
from / Remaining from pop-up menus.
i Click Print.
78
Page 79

Loading standard trays and optional trays
The MFP has a 500-sheet standard tray. You may have also purchased one or more 250-sheet or
500-sheet optional
tray are the same.
Note: The steps for loading a 2000-sheet drawer are different than the steps for loading
To load print media:
Note: Do not remove a tray when a job is printing or when the control panel green
1 Remove the tray from the MFP, and place it on a flat, level surface.
2 Squeeze the side guide tab, and slide the guide to the outer edge of the tray.
trays or a 2000-sheet drawer. The steps for loading a 250-sheet tray or 500-sheet
a 250-sheet tray or 500-sheet tray.
indicator light is blinking. Doing so may cause a jam.
3 Squeeze the rear guide tab, and slide the guide to the correct position for the size media you
are loading.
79
Page 80

Flex the sheets back and forth to loosen them, then fan them. Do not fold or crease the print
4
media. Straighten the edges on a level surface.
Size indicators
80
Page 81

Place the print media in the tray:
5
Note: Paper must be loaded differently in the trays, depending on the options you have
installed.
• Print side facing down for simplex (single-sided) printing
• Print side facing up for duplex printing
Note: Do not fill paper above the load line. Overfilling the tray may cause jams.
6 Squeeze the side guide tab, and slide the guide toward the inside of the tray until it lightly
rests against the edge of the media.
81
Page 82

Insert the tray into the MFP.
7
82
Page 83

Setting the Paper Type and Paper Size
After setting the Paper Type and Paper Size to the correct values for the type and size used in the
trays, then any trays containing the same size and type are automatically linked by the MFP.
Note: If the size of the media you are loading is the same size of the media previously
loaded, do not change the Paper Size setting.
To change the Paper Size and Paper Type setting:
1 Make sure the MFP is on.
2 Press Menu on the control panel.
3 Touch Paper Menu.
4 Touch Paper Size.
5 Touch the left or right arrow to change the size for the desired tray.
6 Touch Submit.
7 Touch Paper Type.
8 Touch the left or right arrow to change the media type for the desired tray.
9 Touch Submit.
10 Touch the home icon.
Loading the multipurpose feeder
The multipurpose feeder can hold several sizes and types of print media, such as transparencies,
postcards, note cards, and envelopes. It can be used for single-page or manual printing or as an
additional tray.
Note: If you install an optional envelope feeder, you can still use the multipurpose feeder.
The multipurpose feeder can hold approximately:
• 100 sheets of 75 g/m
• 10 envelopes
• 75 transparencies
The multipurpose feeder accepts print media within the following dimensions:
• Width—69.85 mm (2.75 in.) to 215.9 mm (8.5 in.)
• Length—127 mm (5 in.) to 355.6 mm (14 in.)
2
(20 lb) paper
The icons on the multipurpose feeder show you how to load the multipurpose feeder with paper, how
to turn an envelope for printing, and how to load letterhead paper for simplex and duplex printing. A
83
Page 84

finisher affects how letterhead documents should be loaded for duplexing. You can print simplex jobs
on letterhead (or other preprinted media) that has been loaded specifically for duplex printing by
changing the value in the Paper Loading menu.
Simplex
letterhead
Duplex
letterhead
Envelope
To load print media:
Note: Do not add or remove print media when the MFP is printing from the multipurpose
feeder or when the control panel indicator light is blinking. Doing so may cause a
jam.
1 Push the release latch, and lower the multipurpose feeder.
2 Pull the tray extension out.
Note: Do not place objects on the multipurpose feeder. Also, avoid pressing down or
applying excessive force on it.
3 Slide the width guide to the far right.
84
Page 85

Flex the sheets or envelopes back and forth to loosen them, then fan them. Do not fold or
4
crease the print media. Straighten the edges on a level surface.
Note: Hold transparencies by the edges, and avoid touching the print side. Fan the stack
of transparencies to prevent jams. Be careful not to scratch or leave fingerprints on
the transparencies.
5 Load the media in the tray.
Use the stack height label as a guide for stack height when loading print media.
Loading paper, transparencies, or envelopes
Note: Letterhead or other preprinted paper must be loaded differently depending on the
options you have installed.
• Load paper or transparencies with the left edge of the stack against the stack height label
and with the recommended print side facing up.
• Load envelopes flap side down with the stamp area and flap on the left. The end of the
envelope with the stamp area enters the multipurpose feeder first.
– Never use envelopes with stamps, clasps, snaps, windows, coated linings, or self-
stick adhesives. These envelopes may severely damage the MFP.
Note: Load only one size and type of print media at a time in the multipurpose feeder. Do
not mix sizes and types in the same tray.
Loading letterhead or preprinted paper
• Follow the illustrations for loading the paper according to your options.
85
Page 86

• Do not fill paper above the load line. Overfilling the tray may cause jams.
Simplex (single sided) Duplex
6 Slide the side guide toward the inside of the tray until it lightly rests against the edge of the
media.
7 Set the Paper Size and Paper Type for the multipurpose feeder to the correct value for the
print media you loaded. See Setting the Paper Type and Paper Size for more information.
86
Page 87

Closing the multipurpose feeder
1 Remove print media from the multipurpose feeder.
2 Push the extension tray in.
3 Close the multipurpose feeder cover.
Loading the 2000-sheet drawer
The optional 2000-sheet drawer can be used for plain paper, letterhead or other preprinted paper,
labels, or transparencies. For trouble-free printing, make sure you:
• Do not load print media above the load line.
• Do not fold or crease the paper.
• Do not mix sizes or weights in the same source.
• Do not open the door or remove any print media when a job is printing or when the control
panel indicator light is blinking. Doing so may cause a jam.
Note: Before loading print media in the drawer, you should know the recommended print
side of the paper you are using. This information is usually on the paper package.
87
Page 88

To load the 2000-sheet drawer:
1 Open the loading door. If the elevator tray is not already in the lowered position, push the
elevator button to lower the tray.
2 Flex the sheets back and forth to loosen them, then fan them. Do not fold or crease the print
media. Straighten the edges on a level surface.
1
2
3
4
5
6
7
8
9
0
#
Elevator button
88
Page 89

Slightly bend the stack of print media as shown, and place it on the elevator tray with the
3
preferred print side facing down. Align the stack of print media to the back of the drawer.
Note: For duplex printing, letterhead or other preprinted paper must be loaded differently.
Carefully align each stack as you load it to ensure a smooth edge where the stacks meet. Do
not load print media above the load line.
Note: When loading more than one ream of paper, we recommend you remove the top
and bottom sheet.
Duplex
Simplex (single sided)
4 Close the loading door.
Floor-mounted configurations require additional furniture for stability. You must
use either a printer stand or printer base if using a 2000-sheet drawer. Certain
other configurations also must have a printer stand or printer base. More
information is available on our Lexmark Web site at www.lexmark.com/
multifunctionprinters.
89
Page 90

Loading the envelope feeder
The optional envelope feeder can accept a variety of envelope sizes. However, the envelope feeder
must be adjusted correctly to ensure trouble-free printing. To load the envelope feeder:
1 Adjust the envelope support for the length of envelope you are loading.
• Fully closed (pushed in toward the MFP) for short envelopes
• Extended to the middle position for medium-length envelopes
• Fully open (extended to its full length) for long envelopes
Warning: Do not place objects on the envelope feeder. Avoid pressing down on it or applying
excessive force.
2 Lift the envelope weight back toward the MFP. It stays in place.
3 Slide the width guide to the far right.
90
Page 91

Flex a stack of envelopes back and forth, and then straighten the edges on a level surface.
4
Press down the corners to flatten them.
Fan the envelopes. This prevents the edges of the envelopes from sticking together and helps
them feed properly.
5 Load the stack of envelopes flap side down with the stamp area and the flap on the left. The
end of the envelopes with the stamp area enters the envelope feeder first.
Let the envelopes at the bottom of the stack slide into the envelope feeder slightly more than
the ones at the top of the stack.
Warning: Never use envelopes with stamps, clasps, snaps, windows, coated linings, or self-
stick adhesives. These envelopes may severely damage the MFP.
Note: When you load envelopes, do not exceed the maximum stack height. Use the stack
height label as a guide for the correct stack height when loading. Do not try to load
more envelopes indicated by the stack height label; overloading can cause jams.
91
Page 92

Slide the width guide to the left until it lightly touches the stack. Make sure the envelopes do
6
not buckle.
7 Lower the envelope weight to touch the stack.
8 Set the Paper Size and Paper Type for the envelope feeder to the correct value for the print
media you loaded. See Setting the Paper Type and Paper Size for more information.
92
Page 93

Linking trays
Tray linking enables the automatic linking feature for trays when you load the same size and type of
print media in multiple sources. The MFP automatically links the trays; when one tray is empty, print
media feeds from the next linked tray.
For example, if you have the same size and type of print media loaded in tray 2 and tray 4, the MFP
selects print media from tray 2 until it becomes empty, and then the MFP automatically feeds print
media from the next linked tray—tray 4.
By linking all trays (standard and optional), you effectively create a single source with a capacity of
up to 4,100 sheets.
Make sure you load the same size and type of print media in each tray and then, using the Paper
menu, set the same paper size and type for the trays to link.
Set the paper size and type for each tray. See Setting the Paper Type and Paper Size for more
information.
To disable tray linking, set the Paper Type to a unique value for each tray.
If all the trays do not have the same type of print media loaded when linked, you could mistakenly
print a job on the wrong paper.
93
Page 94

Understanding paper and specialty
8
media guidelines
Print media is paper, card stock, transparencies, labels, and envelopes. The MFP provides highquality printing on a variety of print media. You must consider a number of things concerning print
media before you print. This chapter provides information to help you make print media selections.
• Supported print media
• Selecting print media
• Storing print media
• Avoiding jams
For more details about the types of paper and specialty media the MFP supports, see the Card Stock
& Label Guide available on our Lexmark Web site at www.lexmark.com.
We recommend that you try a limited sample of any paper or specialty media you are considering
using with the MFP before purchasing large quantities.
Supported print media
The following tables provide information on standard and optional sources for both input and output
trays and bins.
• Print media sizes
• Print media types
• Print media weights
Note: If you use a print media size not listed, select the next larger size.
94
Page 95

Print media sizes
Legend ✓ — indicates support
Print media size Dimensions
250-sheet tray
500-sheet tray
Multipurpose feeder
2000-sheet drawer (option)
Envelope feeder (option)
Duplex unit (option)
Output bin
A4 210 x 297 mm (8.27 x 11.7 in.) ✓✓✓✓ ✓✓
A5 148 x 210 mm (5.83 x 8.27 in.) ✓✓✓✓ ✓✓
JIS B5 182 x 257 mm (7.17 x 10.1 in.) ✓✓✓✓ ✓✓
Letter 215.9 x 279.4 mm (8.5 x 11 in.) ✓✓✓✓ ✓✓
Legal 215.9 x 355.6 mm (8.5 x 14 in.) ✓✓✓✓ ✓✓
Executive 184.2 x 266.7 mm (7.25 x 10.5 in.) ✓✓✓✓ ✓✓
1
Folio
Statement
Universal
1
2
216 x 330 mm (8.5 x 13 in.) ✓✓✓ ✓✓
139.7 x 215.9 mm (5.5 x 8.5 in.) ✓✓✓ ✓
139.7 x 210 mm to 215.9 x 355.6 mm
✓✓✓ ✓
(5.5 x 8.27 in. to 8.5 x 14 in.)
69.85 x 127 mm to 215.9 x 355.6 mm
✓✓
(2.75 x 5 in. to 8.5 x 14 in.)
69.85 x 127 mm to 229 x 355.6 mm
✓✓✓ ✓✓
(2.75 x 5 in. to 9.01 x 14 in.)
148 x 182 mm to 215.9 x 355.6 mm
✓✓✓ ✓✓
(5.83 x 7.17 in. to 8.5 x 14 in.)
7 ¾ Envelope 98.4 x 190.5 mm (3.875 x 7.5 in.) ✓✓✓
9 Envelope 98.4 x 225.4 mm (3.875 x 8.87 in.) ✓✓✓
10 Envelope 104.8 x 241.3 mm (4.12 x 9.5 in.) ✓✓✓
DL Envelope 110 x 220 mm (4.33 x 8.66 in.) ✓✓✓
B5 Envelope 176 x 250 mm (6.93 x 9.84 in.) ✓✓✓
1
This size does not appear in the Paper Size menu until Tray Size Sensing is turned off. See “Printing folio
and statement sizes” for more information.
2
This size setting formats the page for 215.9 x 355.6 mm (8.5 x 14 in.) unless the size is specified by the
software application.
95
Page 96

Print media sizes(continued)
Legend ✓ — indicates support
Print media size Dimensions
250-sheet tray
500-sheet tray
Multipurpose feeder
2000-sheet drawer (option)
Envelope feeder (option)
Duplex unit (option)
Output bin
C5 Envelope 162 x 229 mm (6.38 x 9.01 in.) ✓✓✓
Other Envelope
1
98.4 x 162 mm to 176 x 250 mm
✓✓✓
(3.87 x 6.38 in. to 6.93 x 9.84 in.)
1
This size does not appear in the Paper Size menu until Tray Size Sensing is turned off. See “Printing folio
and statement sizes” for more information.
2
This size setting formats the page for 215.9 x 355.6 mm (8.5 x 14 in.) unless the size is specified by the
software application.
96
Page 97

Print media types
Print media
250-sheet drawer
500-sheet drawer
Multipurpose feeder
2000-sheet drawer
Duplex unit
Output bin
Paper ✓✓✓✓ ✓ ✓
Card stock ✓✓✓ ✓
Transparencies ✓✓✓ ✓
Vinyl labels
Paper labels
Polyester label
*
*
*
✓✓✓ ✓
✓✓✓ ✓
✓✓✓ ✓
Dual-web and integrated labels* ✓✓✓ ✓
Paper labels (for occasional printing only) ✓✓✓ ✓
*
Printing label applications on the printer requires a special label fuser cleaner. The label fuser cleaner is
included with a special label cartridge for label applications. See Ordering supplies for more information
on obtaining a label fuser cleaner.
97
Page 98

Print media weights
Print media weight
Integrated tray and
optional
Print media Type
Paper Xerographic or
business paper
500-sheet drawer
60 to 176 g/m
2
grain long
(16 to 47 lb bond)
Card stock—
maximum (grain
1
long)
Card stock—
maximum (grain
1
short)
Transparencies Laser printer 138 to 146 g/m
Index Bristol 163 g/m2 (90 lb) 120 g/m2 (67 lb)
2
Tag 163 g/m
Cover 176 g/m
Index Bristol 199 g/m
Tag 203 g/m
Cover 216 g/m
(100 lb) 120 g/m2 (74 lb)
2
(65 lb) 135 g/m2 (50 lb)
2
(110 lb) 163 g/m
2
(125 lb) 163 g/m2 (100 lb)
2
(80 lb) 176 g/m2 (65 lb)
2
(37 to 39 lb bond)
1
Grain short is preferred for papers over 135 g/m2.
2
Includes envelopes fed from the multipurpose feeder only.
3
28 lb bond envelopes are limited to 25% cotton content.
4
Printing label applications on the MFP requires a special label fuser cleaner. See Ordering supplies for
Multipurpose
feeder and optional
250-sheet drawer
60 to 135 g/m2
grain long
(16 to 36 lb bond)
2
(90 lb) n/a
138 to 146 g/m
2
(37 to 39 lb bond)
Envelope feeder
n/a
more information on obtaining a fuser cleaner.
5
Information on whether your vinyl label converter has passed Lexmark criteria is available at the Lexmark
Web site (www.lexmark.com); search for “converter list.” You can also check the Lexmark Automated Fax
system (LEXFAX
SM
).
98
Page 99

Print media weights(continued)
Print media weight
Integrated tray and
optional
Print media Type
Labels—maximum
4
Paper 180 g/m
500-sheet drawer
(48 lb bond)
Dual-web paper 180 g/m
(48 lb bond)
Polyester 220 g/m
(59 lb bond)
5
Vinyl
300 g/m
(92 lb liner)
Labels—maximum Paper 180 g/m
(48 lb bond)
Multipurpose
feeder and optional
250-sheet drawer
2
163 g/m
2
Envelope feeder
n/a
(43 lb bond)
Note: Not supported
in the multipurpose
feeder.
2
163 g/m
2
(43 lb bond)
Note: Not supported
in the multipurpose
feeder.
2
220 g/m
2
(59 lb bond)
Note: Not supported
in the multipurpose
feeder.
2
260 g/m
2
(78 lb liner)
Note: Not supported
in the multipurpose
feeder.
2
163 g/m
2
n/a
(43 lb bond)
Note: Not supported
in the multipurpose
feeder. Use for
occasional paper
label printing only.
1
Grain short is preferred for papers over 135 g/m2.
2
Includes envelopes fed from the multipurpose feeder only.
3
28 lb bond envelopes are limited to 25% cotton content.
4
Printing label applications on the MFP requires a special label fuser cleaner. See Ordering supplies for
more information on obtaining a fuser cleaner.
5
Information on whether your vinyl label converter has passed Lexmark criteria is available at the Lexmark
Web site (www.lexmark.com); search for “converter list.” You can also check the Lexmark Automated Fax
system (LEXFAX
SM
).
99
Page 100

Print media weights(continued)
Print media weight
Print media Type
Integrated forms Pressure-
Integrated tray and
optional
500-sheet drawer
140 to 175 g/m
2
Multipurpose
feeder and optional
250-sheet drawer
140 to 175 g/m
2
Envelope feeder
sensitive area
(must enter the
MFP first)
Paper base
(grain long)
Envelopes
100% cotton content
maximum
weight—24 lb
1
Grain short is preferred for papers over 135 g/m2.
2
Includes envelopes fed from the multipurpose feeder only.
3
28 lb bond envelopes are limited to 25% cotton content.
4
Printing label applications on the MFP requires a special label fuser cleaner. See Ordering supplies for
Sulfite, woodfree, or up to
100% cotton
bonds
75 to 135 g/m
(20 to 36 lb bond)
Not recommended 60 to 105 g/m
2
75 to 135 g/m
(20 to 36 lb bond)
(16 to 28 lb bond)
Note: 28 lb envelopes are limited to 25%
cotton content.
2
2
60 to 105 g/m
2, 3
(16 to 28 lb bond)
2
more information on obtaining a fuser cleaner.
5
Information on whether your vinyl label converter has passed Lexmark criteria is available at the Lexmark
Web site (www.lexmark.com); search for “converter list.” You can also check the Lexmark Automated Fax
system (LEXFAX
SM
).
3
100
 Loading...