

Page 1
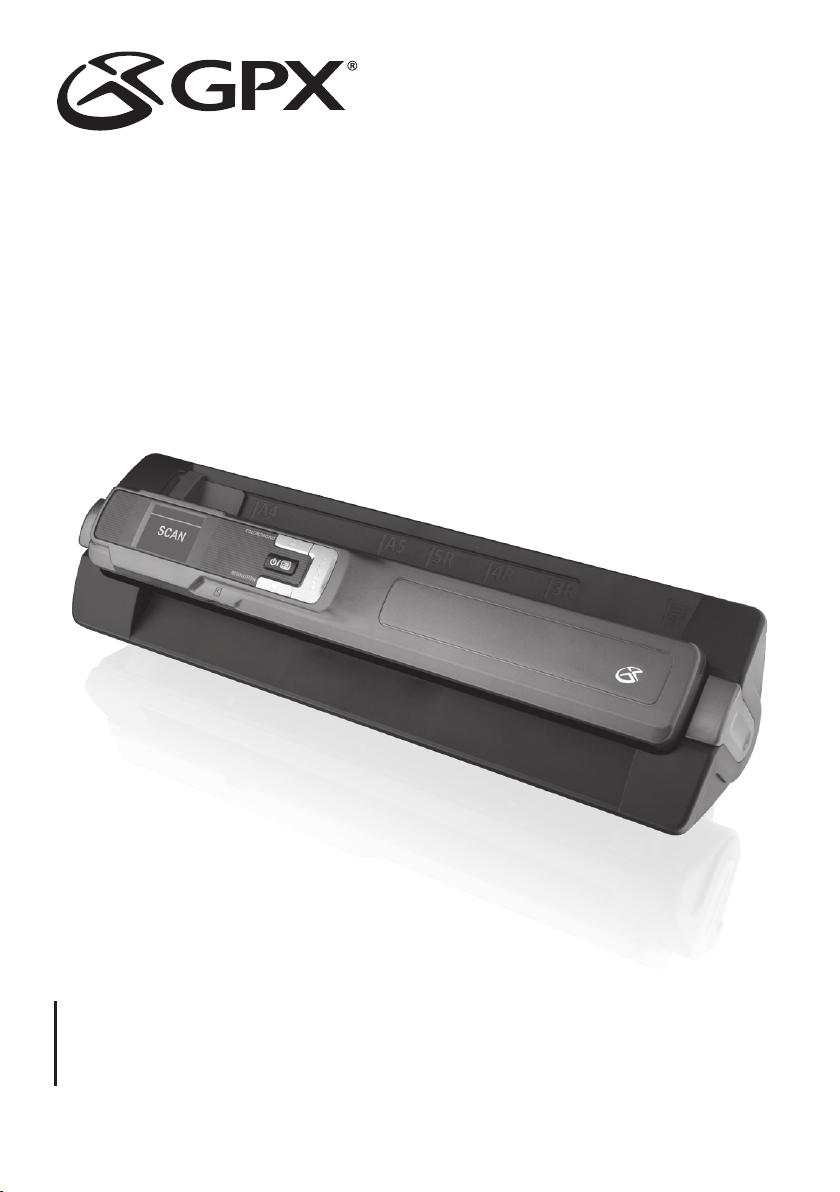
Portable Document Scanner
User’s Guide for Model PS803 v827-01 - Revised 09/2015
For the most up-to-date version of this User’s Guide, go to www.gpx.com
Page 2

Warnings & Precautions
Important Safety Instructions
• Read these Instructions.
• Keep these Instructions.
• Heed all Warnings.
• Follow all instructions.
• Do not use this apparatus near water.
• Clean only with a dry cloth.
• Do not block any ventilation openings. Install in accordance
with the manufacturer’s instructions.
• Do not install near any heat sources such as radiators, heat
registers, stoves, or other apparatus (including ampliers) that
produce heat.
• Refer all servicing to qualied service personnel. Servicing
is required when the apparatus has been damaged in any
way, such as power-supply cord or plug is damaged, liquid
has been spilled or objects have fallen into the apparatus, the
apparatus has been exposed to rain or moisture, does not
operate normally, or has been dropped.
• Use only with a cart, stand, tripod, bracket, or table specied
by the manufacturer, or sold with the apparatus. When a cart
is used, use caution when moving the cart/apparatus combination to avoid injury from tip-over.
2
Page 3

Warnings & Precautions
Additional Warnings and Precautions
• Caution and marking information is located at the rear or
bottom of the apparatus.
Attention et de marquage des informations est situé sur le
paneau arrière ou inférieur de l’unité.
• WARNING: Shock hazard - Do Not Open.
AVIS: Risque de choc électrique - ne pas ouvrir.
• WARNING: To reduce the risk of re or electric shock, do
not expose this apparatus to rain, moisture, dripping, or
splashing.
AVIS: Pour réduire le risque d'incendie ou de choc électrique, n'exposez pas cet appareil à la pluie ou l'humidité ou
aux éclaboussures.
• Objects lled with liquids, such as vases, shall not be placed
on the apparatus.
Objets remplis de liquides, comme des vases, ne doivent pas
être placés sur l’appareil.
• CAUTION: Use of controls or adjustments or performance
of procedures other than those specied may result in hazardous radiation exposure.
AVIS: L’utilisation de commande ou l’exécution de procé-
dures autres que celles spéciées ici peuvent aboutir à une
exposition à des radiations dangereuses.
• WARNING: Changes or modications to this unit not
expressly approved by the party responsible for compliance
could void the user’s authority to operate the equipment.
AVIS: Des changements ou des modications sur ce produit
non expressément approuvés par la partie responsable de la
conformité peut annuler le droit de l’utilisateur d’utiliser cet
équipement.
• WARNING: Do not place this unit directly onto furniture
surfaces with any type of so, porous, or sensitive nish. As
with any rubber compound made with oils, the feet could
cause marks or staining where the feet reside. We recommend using a protective barrier such as a cloth or a piece of
glass between the unit and the surface to reduce the risk of
damage and/or staining.
AVIS: Ne placez pas cette unité directement sur des surfaces
de meubles dont la nition serait douce, poreuse ou sensible.
Car, comme tout composé caoutchouc a base d’huiles, les
pieds pourraient laisser des tracs ou des taches à l’endroit ou
ils sont posés. Nous recommandons d’utiliser une protection
comme un linge ou un morceau de verre entre l’unité et la
surface pour réduire le risque de dégât et/ou de tache.
• CAUTION: Danger of explosion if battery is incorrectly
replaced. Replace only with the same or equivalent type.
AVIS: Un danger d’explosion est présent lorsque les piles
sont remplacées de manière incorrecte. Remplacez seulement
les piles par des piles de type équivalent.
• Battery shall not be exposed to excessive heat such as
sunshine, re or the like.
Les piles ne doivent pas être exposées à de forte chaleur,
tel qu’à la lumière du soleil, au feu ou autres choses de
semblable.
• Keep new and used batteries away from children. If the
battery compartment does not close securely, stop using the
product and keep it away from children.
Gardez les piles neuves et d’occasion à partir des enfants. Si
le compartiment de la batterie ne pas fermer correctement,
cesser d’utiliser le produit et garder loin des enfants.
• If you think batteries might have been swallowed or placed
inside any part of the body, seek immediate medical attention.
Si vous pensez que les batteries peuvent avoir été avalé ou
placé à l’intérieur d’une partie du corps, consulter immédiatement un médecin.
• Do not mix old and new batteries.
Ne pas mélanger vieilles et nouvelles batteries.
• Completely replace all old batteries with new ones.
Remplacer complètement toutes les piles par des neuves.
• Do not mix alkaline, standard (carbon-zinc), or rechargeable
(ni-cad, ni-mh, etc) batteries.
Ne mélangez pas des piles alcalines, standard (carbone-zinc)
ou rechargeables (Ni-Cd, Ni-MH, etc) batteries.
• Batteries should be recycled or disposed of as per state and
local guidelines.
Piles doivent être recyclées ou éliminées selon les directives
étatiques et locales.
• WARNING: This product may contain chemicals known
to the State of California to cause birth defects, or other
reproductive harm (California Prop 65). Wash hands after
handling.
• This product meets and complies with all Federal regulations.
Customer Support: 1-888-999-4215 3
Page 4

Table of Contents
Setup � � � � � � � � � � � � � � � � � � � � � � � � � � � � � � � � � � � � � � � � � � � � � � � � � � � � � � � � � � � � � � � � � � � � � � � � � � � � � � � � � � � � � � � � � � � � � � � � � � � � �5
Features & Specications
Includes
Wand Batteries
Dock Batteries
Installing a Micro SD Card in the Wand
Orientation � � � � � � � � � � � � � � � � � � � � � � � � � � � � � � � � � � � � � � � � � � � � � � � � � � � � � � � � � � � � � � � � � � � � � � � � � � � � � � � � � � � � � � � � � � � � � � �6
Scanning Wand
Wand Display
Dock
Wand Docked
Before You Begin Scanning � � � � � � � � � � � � � � � � � � � � � � � � � � � � � � � � � � � � � � � � � � � � � � � � � � � � � � � � � � � � � � � � � � � � � � � � � � � � � � � �8
Installing the MagicScan Software
Formatting the SD Card
Docking the Wand
Scanning with the Dock � � � � � � � � � � � � � � � � � � � � � � � � � � � � � � � � � � � � � � � � � � � � � � � � � � � � � � � � � � � � � � � � � � � � � � � � � � � � � � � � � � �9
Scanning a Document with the Docking Station
Using the MagicScan Software � � � � � � � � � � � � � � � � � � � � � � � � � � � � � � � � � � � � � � � � � � � � � � � � � � � � � � � � � � � � � � � � � � � � � � � � � � � 10
Picture Direct Mode
OCR Direct Mode
MagicScan Toolbar
BCR Mode
Scan + OCR Mode
Scan + OCR Controls
Scanning with the Wand � � � � � � � � � � � � � � � � � � � � � � � � � � � � � � � � � � � � � � � � � � � � � � � � � � � � � � � � � � � � � � � � � � � � � � � � � � � � � � � � � 12
Scanning a Document with the Scanning Wand
Viewing Files
Transferring Files from the Scanning Wand
Company Information � � � � � � � � � � � � � � � � � � � � � � � � � � � � � � � � � � � � � � � � � � � � � � � � � � � � � � � � � � � � � � � � � � � � � � � � � � � � � � � � � � � 14
Contact Information
Warranty
International Support
4
Page 5
Setup
Features & Specications
• Auto-Feed Docking Station with Detachable
Portable Scanning Wand
• Scanned file format: JPEG, PDF
• Image resolution 900 dpi / 600 dpi / 300 dpi
• Auto Feed Paper Size: Letter, A4, A5 and smaller
• Supports Micro SD card up to 32GB
• Fast scanning speed
• 1.4" TFT display
• Picture preview display
• Micro SD memory card reader
• Mini-USB port, 2.0 high speed
• System requirements: Windows XP, Windows Vista,
Windows 7
Includes
• 4GB Micro SD card
• Mini-USB to USB cable
• Picture direct scanning software
• 3 AAA batteries
• 6 AA batteries
Wand Batteries Dock Batteries
Requires 6 AA batteries (included).
Requires 3 AAA batteries (included).
Installing a Micro SD Card in the Wand
Insert the included Micro SD card into the Micro SD Card Slot on the side of the Scanning Wand.
Note: Scanning Wand will not function without Micro SD card installed.
Customer Support: 1-888-999-4215 5
Page 6

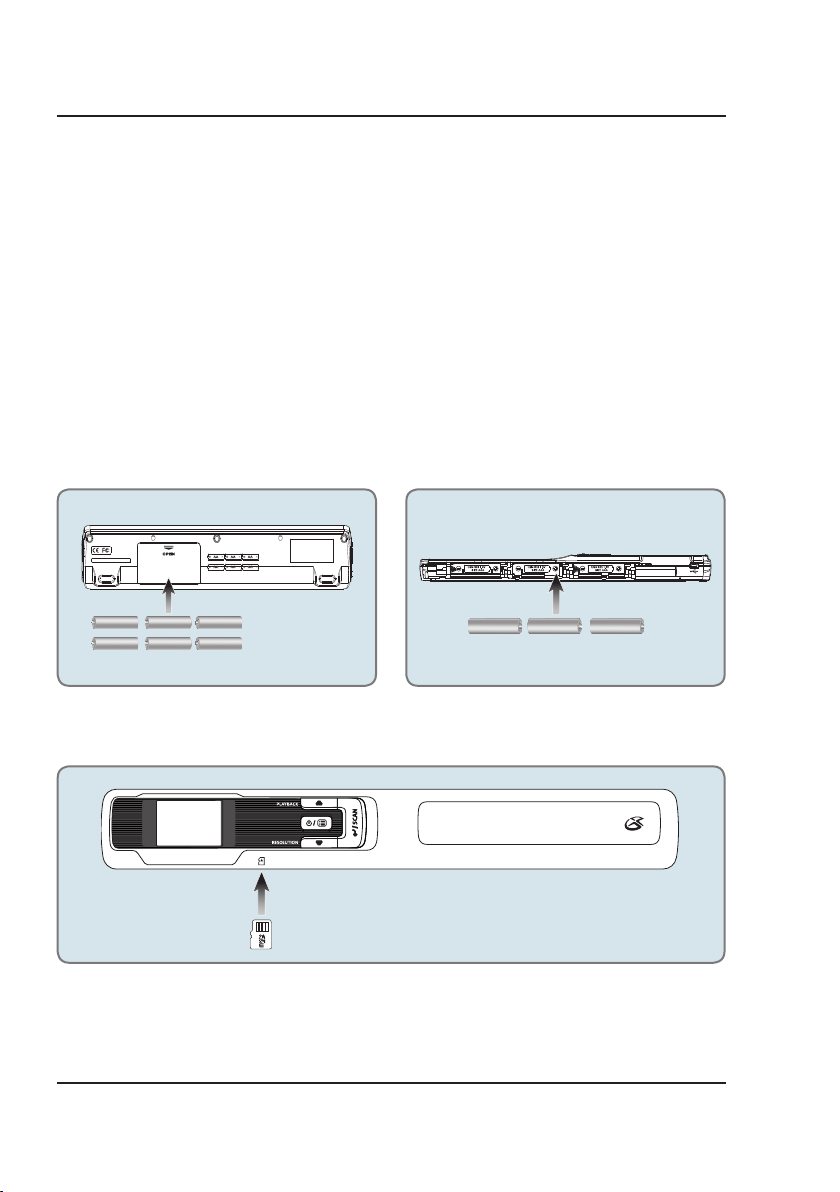
Orientation
Scanning Wand
Power/Menu
Press and hold to power the unit on
and off. In scan mode, press to access
the menu. In playback mode, press to
return to the main screen.
Micro SD Card Slot
Playback/Arrow Up
Press to enter playback mode. In
playback mode, press to navigate.
Resolution/Arrow Down
In scan mode, press to change
the resolution. In playback mode,
press to navigate.
Selection/Scan
In the menu, press to make
a selection. In scan mode,
press to begin scanning.
Mini-USB Port
Wand Display
To change any of the below settings, press the Power/Menu button and the Up/Down and Selection/Scan
buttons to choose the desired setting.
Date & Time Scan Number
Encryption ON/OFF
SD Card Status
Battery Charge
Color Settings
File Format
Resolution
Output Destination
Choose to output scans to a
connected PC or a connected
SD card.
6
Page 7

Dock
Release
Press to release the scanning wand.
Wand Docked
Wand Connector & Mini-USB Port
Align with corresponding port on the scanning
wand to dock.
Mini-USB Port
Customer Support: 1-888-999-4215 7
Page 8

Before You Begin Scanning
Installing the MagicScan Software
Requires Windows XP SP2 or higher.
It is strongly recommended to install the MagicScan software before using the product.
1. Insert the included CD and follow the prompts as they guide you through installation.
Formatting the SD Card
It is recommended to format the included 4GB Micro SD card before use. Please follow the formatting instructions below.
1. Press and hold the Power/Menu button to power the unit on.
2. Press the Power/Menu button to enter the setup menu.
3. Use the Arrow and Selection/Scan buttons to locate and select Format.
4. Use the Arrow buttons to scroll all the way down to the bottom of the menu and select the check mark
( ) , then press the Selection/Scan button to confirm the command.
Docking the Wand
1. Set the right side of the scanning wand in place and carefully align the left side with the slot on the dock,
paying careful attention to the placement of the Mini-USB connector and making sure the scanning wand is
facing the correct way. Gently lower the left side into place. Note: Do not force the scanning wand into the dock
or damage may occur.
2. Once attached, it will click firmly into place.
3. To remove the wand, press the Release button and gently lift the wand upward from the left.
Press Release Lever
Dock and Wand successfully attached
8
Page 9

Scanning with the Dock
Text Orientation
Text Orientation
Scanning a Document with the Docking Station
The MagicScan software must be open and running in the desired mode to use the scanner while docking.
For information on specific scanning modes, see the following sections on Using the MagicScan Software.
1. Connect the Scanning Wand to the dock and lock it into place.
2. Connect the docking station to a PC using the included USB cable.
3. Open the MagicScan Software.
4. Select the desired mode and follow the instructions for that mode to scan your document (see following
section for details).
5. Make sure paper orientation matches the diagrams below, or the document will not scan correctly. The item
to be scanned should feed automatically after you place it in the dock.
FEED ITEMS TO BE SCANNED
DOWNWARDS AND UPSIDE DOWN!
Top of Document
Top of Document
SCANNING WHILE DOCKED REQUIRES USE OF THE MAGICSCAN SOFTWARE.
Customer Support: 1-888-999-4215 9
Page 10

Using the MagicScan Software
MagicScan Toolbar
Picture Direct Mode
Use this mode to scan photos directly into Windows using MS Paint, then edit and save those
photos in a digital format. This mode is the simplest and easiest way to quickly save and edit
old photos or documents.
OCR Direct Mode
Optical Character Recognition can scan text documents, identify characters and words, and
then export that text into a Word document. This is ideal for scanning and saving old term
papers, stories, manuscripts, etc. Note: this mode scans text only. The exported font may appear
different than original.
Picture Direct
(Standard Scan)
1. Open the MagicScan software.
2. Click on Picture Direct > Settings menu, and configure your settings.
• General: System language
• Scan: Image orientation (horizontal or vertical)
3. Open Microsoft Paint before you begin scanning. When the scan is complete it will
automatically export the image to Paint.
4. Insert the original image to be scanned into the scan dock upside down, and proceed
with scan (see image on page 10).
5. The scan will export to Paint. You can now edit or save the file.
1. Open MagicScan software.
2. Click on OCR > Settings menu, and configure your settings.
• General: System language
• Scan: Image orientation (horizontal or vertical)
• OCR: What language will the OCR software recognize
3. Open Microsoft Word before you begin scanning. When the scan is complete it will
automatically export the text to Word.
4. Click on Word Document to place a cursor on the new document.
5. Insert the original document to be scanned into the scan dock upside down, and
proceed with scan (see image on page 10).
6. The scanner will recognize and insert corresponding characters in a new word doc.
• Note: Text and font may appear different than original, this is normal. Once the text has
been copied into the Word file it can be edited using MS Word.
7. Save file new Word file when complete.
Optical
Character
Recognition
(OCR)
Business Card
Reader
OCR + Scan Settings
10
Page 11

Using the MagicScan Software
BCR Mode
Business Card Reader easily scans and exports business card contact information, and keeps all
contact information in a digital file on your computer.
1. Open MagicScan software.
2. Click on BCR .
3. Select New Card
4. Click Scan Image, located at the bottom of screen
5. Insert the business card to be scanned into the scanning dock (see image on page 10).
6. Once the scan is complete, use the image editing tools to crop and correct the
document orientation, if needed.
7. Click OK > Recognize to populate card information from scanned card.
8. Click Sa ve to save the card info to Card List within the MagicScan software. The card list
can be exported from the MagicScan software in either VCard or Text format, and can be
saved in other folders or directories on your computer.
Scan + OCR Mode
Scan + Optical Character Reader allows you to scan images and text at thet same time. This is
useful for things like magazine articles, recipes, and newspaper clippings. The software also
allows you to precisely edit the scanned content. The images and text are then exported to a
new Word document.
Scan + OCR Controls
Start Scan Import Image Save Image Pre -Process
1. Open MagicScan software
2. Click on Scan + ORC.
3. Click Start Scan.
4. Insert article clipping to be scanned into the scan dock upside down (see image on
page 10), the dock will automatically proceed with the scan.
5. Once the scan is complete, use the image editing tools to crop and correct the
document orientation, if needed.
6. Use Pre-Process to remove color or simplify chaotic images so that the software can
recognize images easier. Note that this not required, and the scanner can scan in full color,
if desired.
7. Click Start Recognition to export scan into a Word File. Once the scan is in a Word file it
can be edited and/or saved.
Image
Start
Recognition
Settings Exit
Customer Support: 1-888-999-4215 11
Page 12

Scanning with the Wand
Text Orientation
Scanning a Document with the Scanning Wand
Note: Please make sure the Micro SD card is inserted before attempting to use the wand. The Scanning Wand will not
save images without an SD card installed.
1. Press and hold the Power/Menu button to power the unit on.
2. Place the document you wish to scan on a flat surface.
3. Place the scanner at the top of the document you wish to scan.
4. Make sure the document fits within the indicated markers on the Scanning Wand.
5. Make sure the scanning wand is level and not tilted in either direction.
6. Press the Selection/Scan button.
7. Slowly move the scanning wand to the bottom of the document, taking care to keep it level.
8. Press the Selection/Scan button again to finish scanning.
Top of Document Bottom of Document
Text Orientation
12
CORRECT
ALIGNMENT AND
DIRECTION
INCORRECT
ALIGNMENT AND
DIRECTION
Page 13

Scanning with the Wand
Viewing Files
1. With the unit on, press the Playback/Arrow button to enter playback mode.
2. Press the Arrow buttons to navigate through scans you have made.
Transferring Files from the Scanning Wand
Requires a Mini-USB to USB cable (included).
1. Connect the Mini-USB to USB cable to the Mini-USB Port on the scanning wand and the USB port on a
computer. Note: Make sure you are attempting to connect the cable to the correct port, forcing the cable may
damage the unit.
2. Follow the on screen prompts to view the contents of the scanner.
3. Select the “DCIM” folder to view captured images.
Customer Support: 1-888-999-4215 13
Page 14

Protect for Today
Sustain for Tomorrow
Made
Green
Company Information
Contact Information
Website: www.gpx.com
Email Support: prodinfo@dpiinc.com
Email Parts: partsinfo@dpiinc.com
Phone Support: 1-888-999-4215
Warranty
For Warranty Information and the most up-to-date version of this User’s Guide, go to: www.gpx.com
International Support
To download this User’s Guide in English, Spanish, and French, or to get answers to frequently asked questions, visit
the support section at: www.gpx.com
Para descargar este Manual del Usuario en inglés, español y francés, o para obtener respuestas a preguntas
frecuentes, visite la sección de apoyo en: www.gpx.com
Pour télécharger ce guide de l’utilisateur en anglais, espagnol ou français, ou pour obtenir des réponses à des
questions fréquemment posées, consultez la rubrique d’assistance sur: www.gpx.com
Copyright © 2013 Digital Products International (DPI, Inc.) All other trademarks appearing herein are the property of their respective owners. Specications are subject to change without notice.
14
 Loading...