

Page 1
System Requirements
Microsoft® Windows® 98SE, Windows® Me, Windows® 2000 Professional, Windows® XP Home
Edition/Professional Drive: CD-ROM Drive
• The player and USB Driver cannot be used on Microsoft® Windows® 3.1, Windows® 95, Windows® 98,
and Windows NT®USB Driver:
• Operation on an upgraded OS is not guaranteed.
• Operation on an OS other than the one pre-installed is not guaranteed.
• Multi-CPU or Multi-boot environments are not supported.
• Only users having system Administrator authority can use this software.
Important !
•Customers with Windows 98/98SE computer need to go to our website, www.gpx.com, to download appropriate
drivers for MW33X7 and install it on your computer before you connect the player to your PC.
•Customers with Windows 2000 & Windows XP computer do not need any special drivers to install on their
computer.
•We recommend using Windows Media Player to transfer songs to your MP3 player. (Version 9 on Windows
98/98SE & Windows 2000), (Version 10 on Windows XP)
•To transfer online purchased/subscribed music, you need Windows XP & Windows Media Player 10.
MW3327 512MB
Instruction Manual
Manuel d'InstrucionesManual de Instruciones/
MP3 Player
Before operating this product, please read the instructions completely.
English page 2/Spanish page 5/French page 7
Warnings and Precautions
TO PREVENT FIRE OR SHOCK HAZARDS, DO NOT EXPOSE THIS UNIT TO RAIN OR MOISTURE.
This symbol is intended to alert the user to the presence of important operating and maintenance (servicing) instructions in the literature accompanying the
appliance.
Any use of the controls or an adjustment to the procedures other than those specified herein may result in hazardous radiation.
TO REDUCE THE RISK OF ELECTRIC SHOCK, DO NOT REMOVE COVER (OR BACK). THERE ARE NO USER-SERVICEABLE PARTS INSIDE. PLEASE REFER ANY
SERVICING TO QUALIFIED SERVICE PERSONNEL.
WARNING: Changes or modifications to this unit not expressly approved by the party responsible for compliance could void the user's authority to operate the
equipment.
NOTE: This equipment has been tested and found to comply with the limits for a Class B digital device, pursuant to Part 15 of the FCC Rules. Receiver complies with
Part 15 of FCC rules when manufactured.These limits are designed to provide reasonable protection against harmful interference in a residential installation. This
equipment generates, uses, and can radiate radio frequency energy and, if not installed and used in accordance with the instructions, may cause harmful interference
to radio communications. however, there is no guarantee that interference will not occur in a particular installation. If this equipment does cause harmful interference
to radio or television reception, which can be determined by turning the equipment off and on, the user is encouraged to try to correct the interference by one or more
of the following measures:
• Reorient or relocate the receiving antenna.
• Increase the separation between the equipment and receiver.
• Connect the equipment into an outlet on a circuit different from that to which the receiver is connected.
• Consult the dealer or an experienced radio/TV technician for help.
Special Note
When placing your unit on a lacquered or natural finish, protect your furniture with a cloth or other protective material.
Avant d'utiliser ce produit, faveur lisez les instruciones complètementAntes de utilizar este producto, favor lea las instruciones por completo/
Connecting to a computer
L
Turn on the Player by pressing the PLAY/PAUSE
1.
button.
2. Take the USB cord that comes with the unit and
1
Press and hold
to power on
2
O
V
VOL
Connect
put the little end in the MP3 player, Then take the
other end and put it in the computer’s USB port.
If its connected correctly the LCD display will
say USB .
Transfer Music Files to your MP3 player using Windows® Media Player 10
You will be able to download Purchased/
Subscribed songs to the unit.
Windows Media Player 10
1.Start Windows Media Player 10 and connect the
unit to your computer. On your player's display it
should say 'MTP'. If not, then while the unit is
connected press 'M' mode button to change to
the 'MTP' mode.
2.If you have not set up synchronization between
your computer and this device, the Device Setup
Wizard starts. In the Device Setup Wizard, select
Manual.
3.Click Finish.
4.Select Library option. On the right pane select
Sync List.
5.From the left pane you can select the Play list or Library and you will see the content songs in the center pane.
6.Select the songs from the center pane, drag and add them to the Sync List.
7.Click the 'Start Sync' button in the Sync List pane.
8.Repeat steps 4-7 for any other items that you want to copy to your unit.
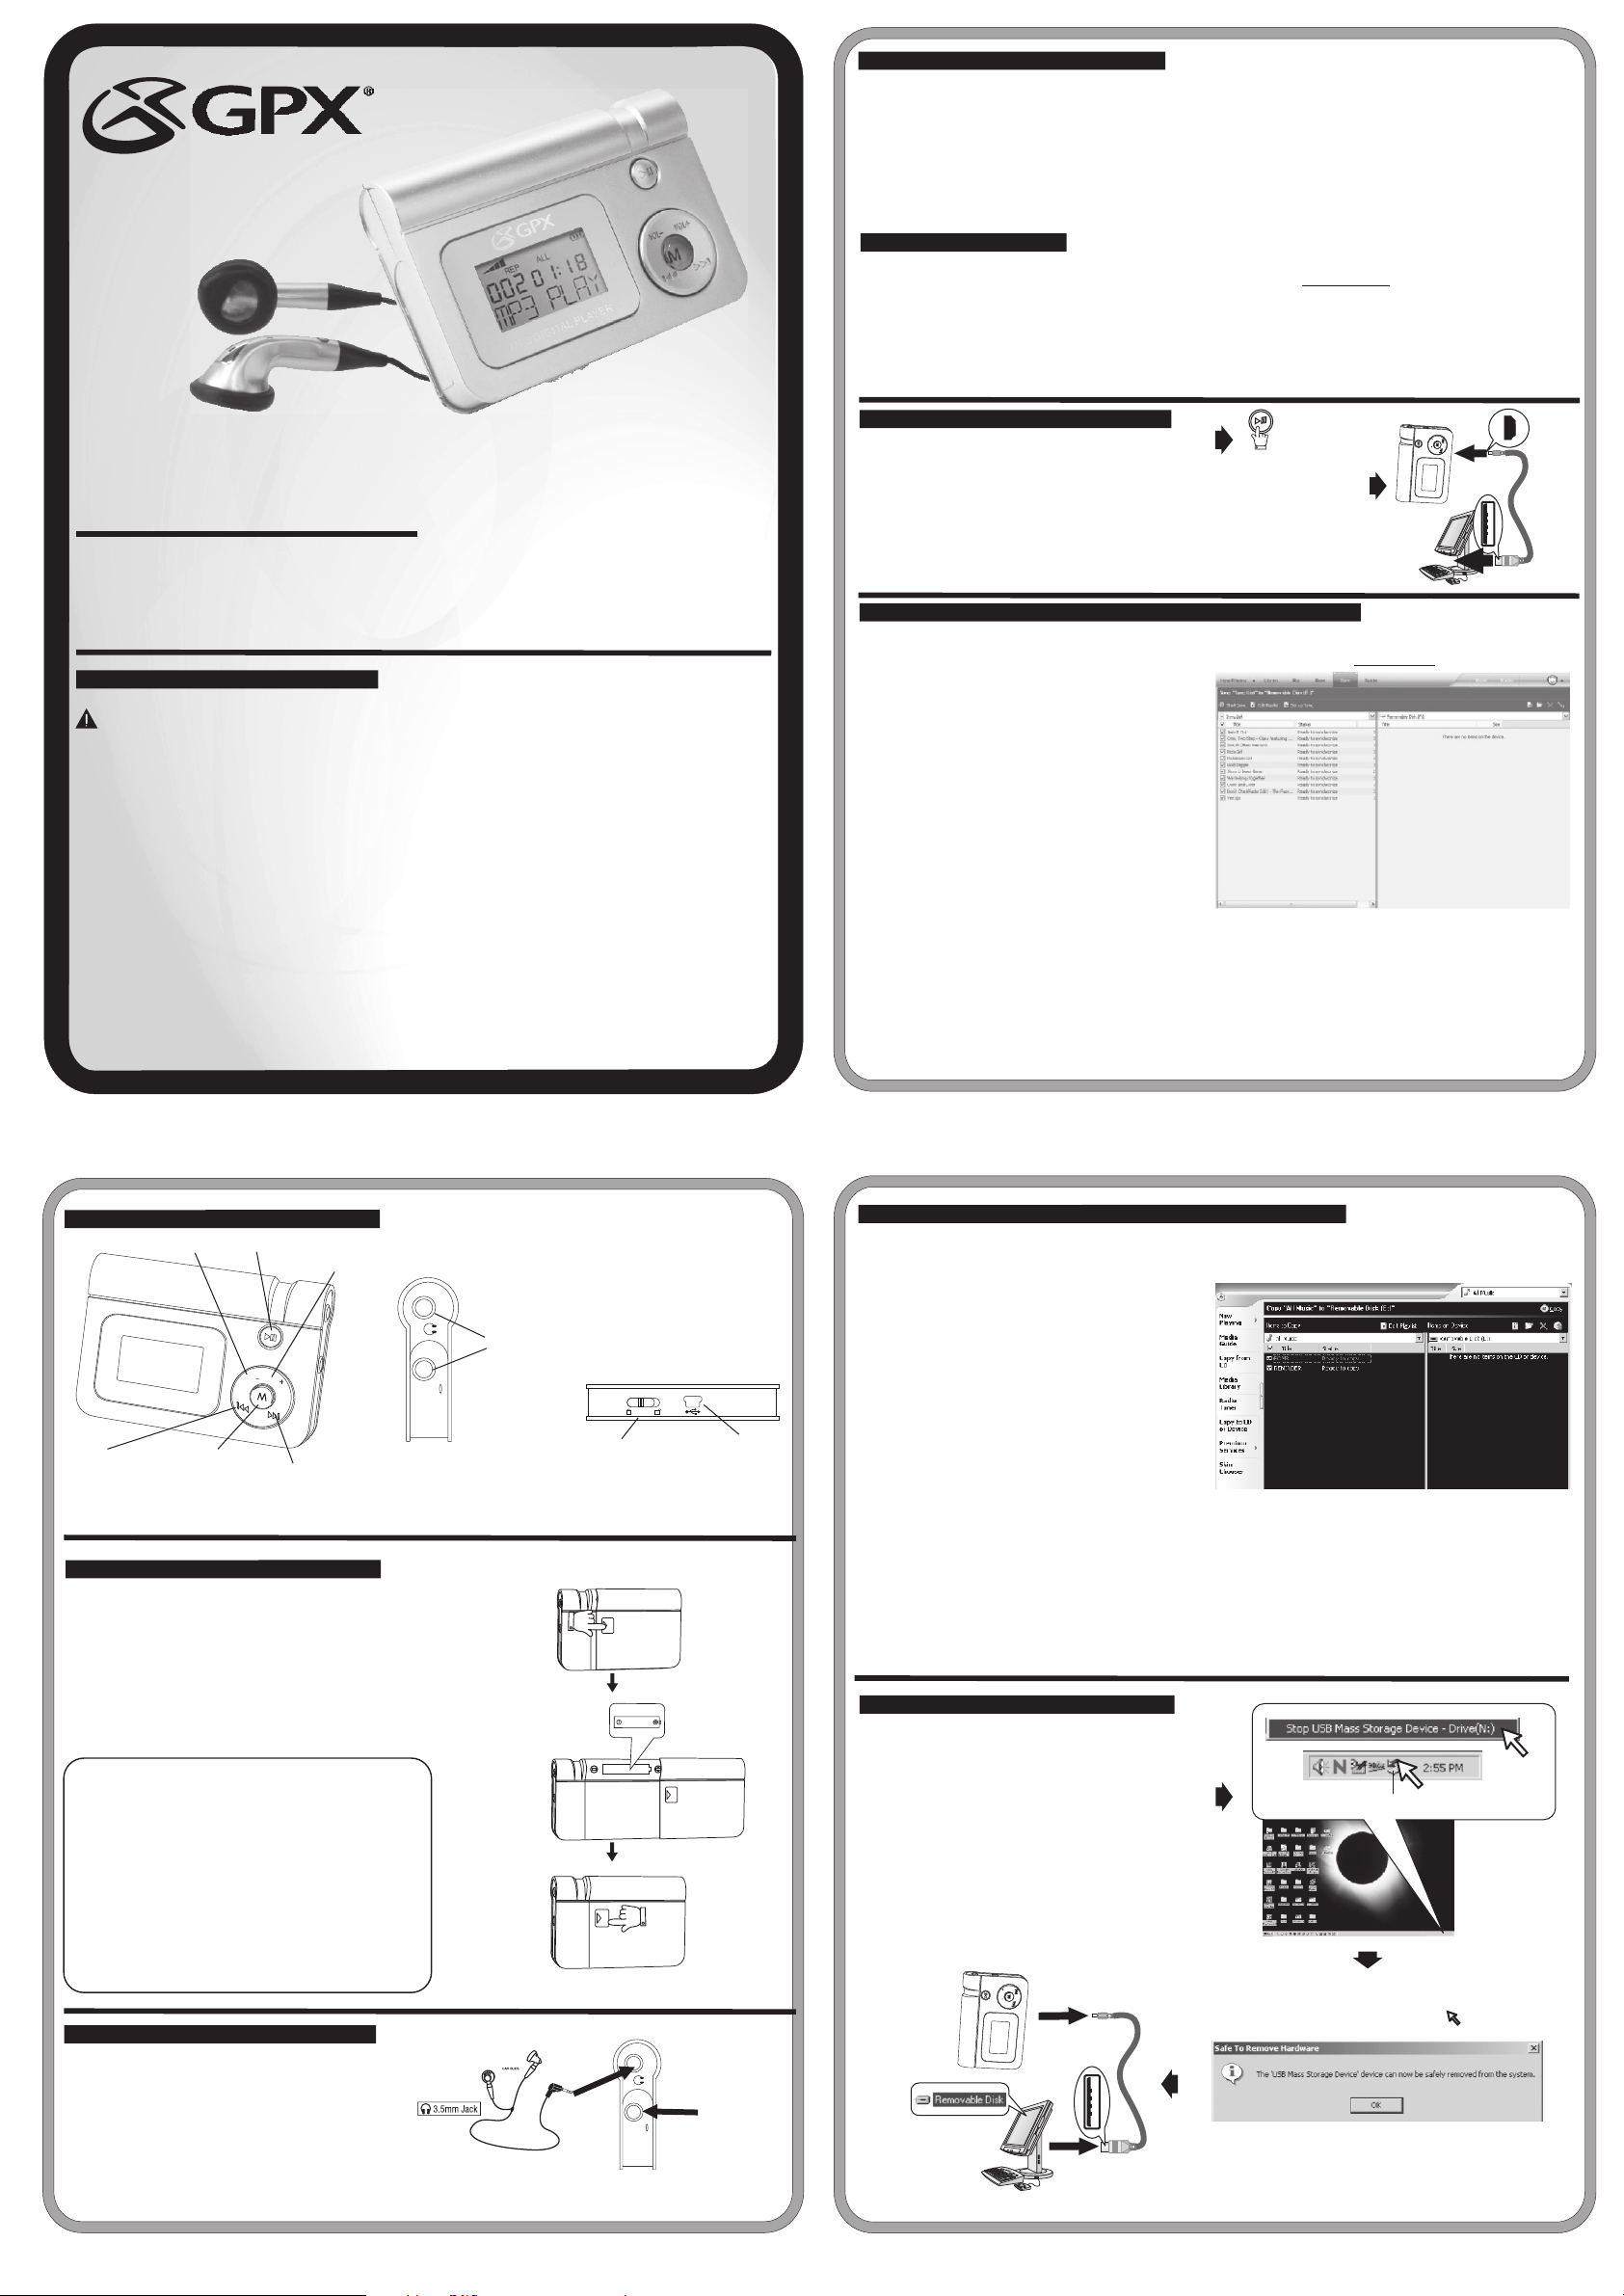
Feature Location:
VOLUME -
SKIP/SEARCH DN
PLAY/PAUSE/STOP
VOL
MODE
SKIP/SEARCH UP
VOLUME +
VOL
Power Source
Battery Compartment
1. Remove battery door by pushing down on
tab.
2. Insert one “AAA” battery as shown (not
included).
3. Replace battery door.
WARNING:
Danger of explosion if batteries are incorrectly
replaced. Replace only with the same or
equivalent type.
• Do not mix old and new batteries.
• Do not mix alkaline, standard (carbon-zinc), or
rechargeable (nickel-cadmium) batteries.
• Replace the batteries when the sound becomes
unstable or cannot be heard.
• When you are not going to use your unit for a
long time, remove the batteries to prevent
damage from battery leakage and corrosion.
Listen with headphones
1. Insert your earphones into the headphone jack.
2. Share your music with a friend by using another pair of
headphone (not included) into the 2nd headphone jacks.
CAUTION:
Set the Volume to a low level before putting on the
headphones. Gradually adjust the Volume to a
comfortable listening level. Please do not play the
volume too loudly for extended periods of time.
- 1 -
2 - HEADPHONE JACKS
HOLD
HOLD SWITCH
OPEN
OPEN
USB JACK
1 x "AAA” Alkaline Batteries
OPEN
Share your music.
- 3 -
Transfer Music Files to your MP3 player using Windows® Media Player 9
You will not be able to download Purchased/Subscribed
songs using Windows Media Player 9
to this unit. You need Windows XP with Windows
Media Player 10.
Windows Media Player 9
You will still be able download regular MP3 & WMA
songs.
1.Start Windows Media Player 9 and connect
unit to your computer.
2.Click Copy to CD or Device.
3.In the “Items to Copy” pane, in the drop-down list,
click the play list, category, or other item that you
want to copy.
4.Clear the check boxes next to any files you do
not want to copy.
5.In the “Items on Device” pane, in the drop-down list, click the device that you want to copy files to.
6.Click the 'Copy' button.
7.Repeat steps 2-5 for any other items that you want to copy to your unit.
Disconnect from your computer
1. We recommend safely disconnecting any USB
device in accordance with your computer’s
operating system instructions.
2. In Windows® 98/Windows® ME, after copying
files to the player, wait approximately 5 seconds
before unplugging the unit.
USB icon
3. In Windows® 2000, click the USB icon in your
computer’s System Tray and “Stop [the] USB
Mass Storage Device”.
4. In Windows® XP, if your player is connected as
'MTP' mode, wait approximately 5 seconds
before unplugging the unit.
L
O
V
L
VO
Disconnect
- 2 -
- 4 -
Page 2
SPANISH:
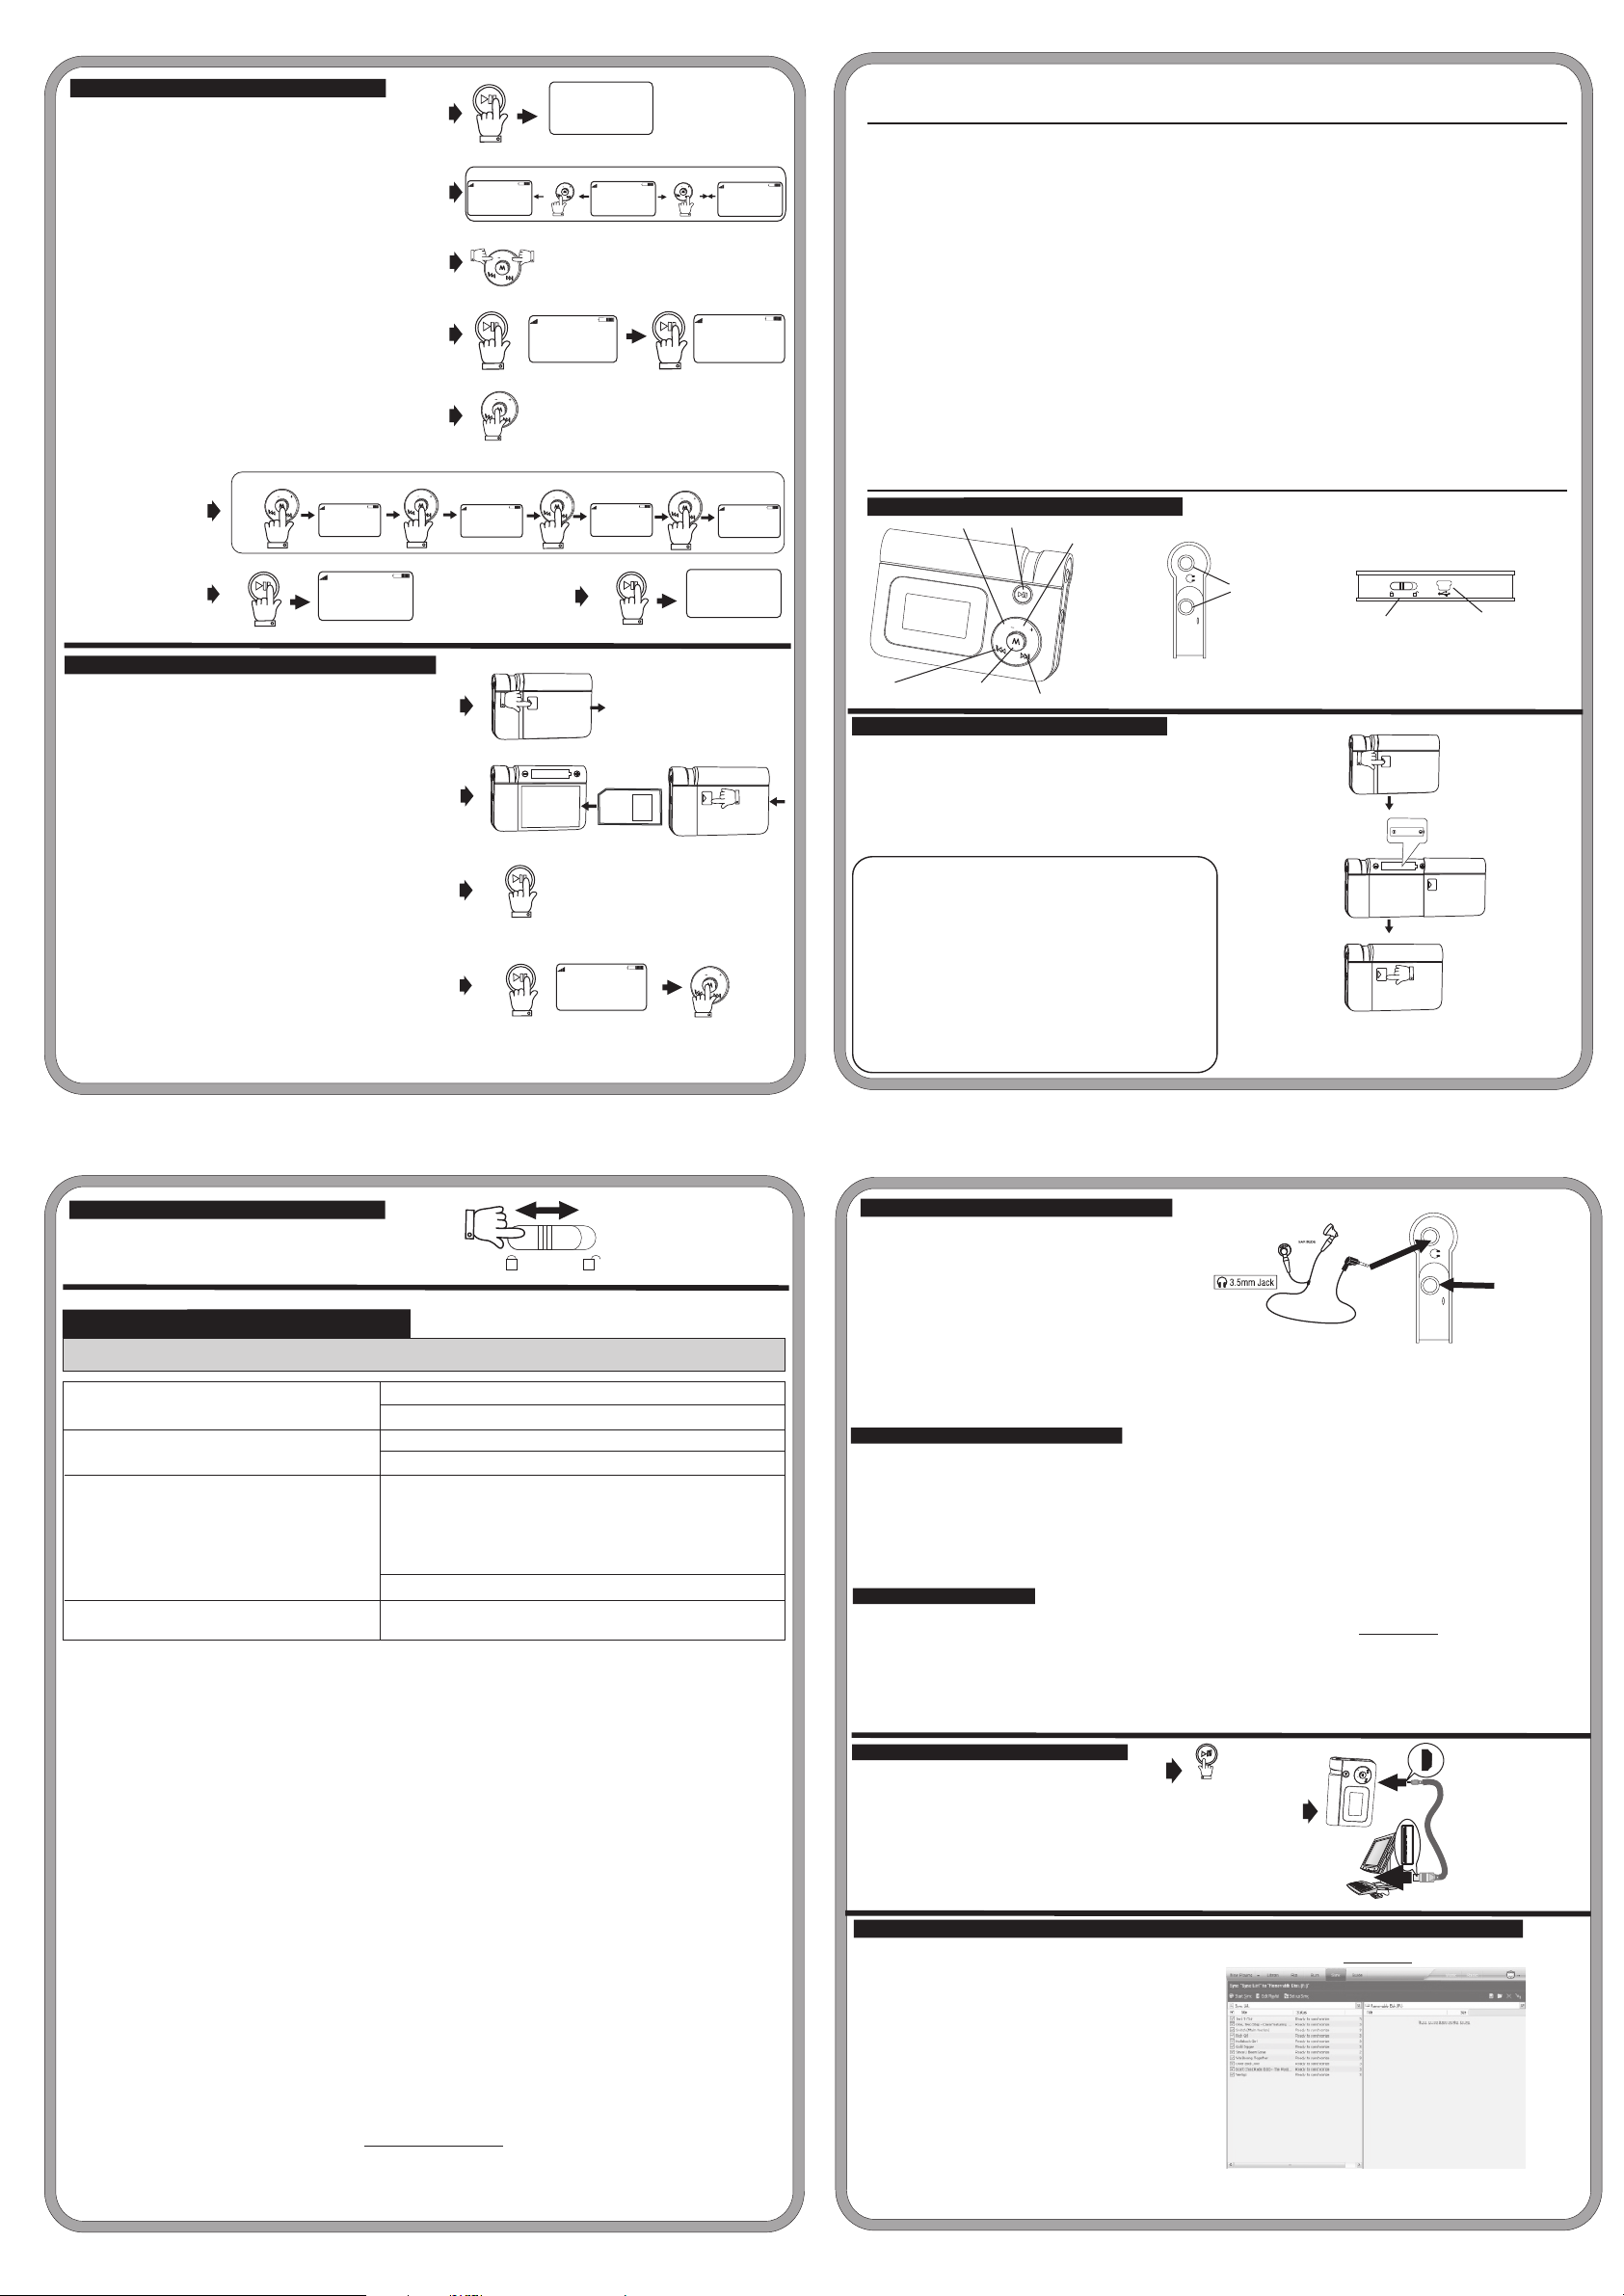
Listening to the music files
1. Press and hold the PLAY/PAUSE button to turn the
unit on.
2. Use the SKIP/SEARCH buttons to select a desired
song you would like.
3. Use the VOLUME buttons to adjust the volume.
4. Press PLAY/PAUSE to pause the playback, press
again to resume it
5. During playback, press and hold the MODE button
to change EQ to POP/ROCK/CLASSIC/JAZZ/BASS
/NORMAL.
6. During playback, press the MODE button to change
playback mode to REPEAT 1/REPEAT ALL/RANDOM
/RANDOM REPEAT/OFF(no display) selections.
7. Press and hold the PLAY/PAUSE to Stop the playback.
8. Press and hold PLAY/PAUSE again to turn the unit off.
MODE
L
O
V
VOL
6
Play/Pause
7
Press and Hold
REPEAT 1 TRACK
REP 1
0 02 00:25
PLAY
0 02 00:00
STOP
MODE
VOL
VOL
Play/Pause
1
Press and Hold
2
0 15 00:00
song title
VOLUME
VOL
3
Play/Pause
4
MODE
VOL
VOL
5
Press and Hold
REPEAT ALL TRACK
REP ALL
0 02 00:25
PLAY
VOL
0 01 01:25
SKIP/SEARCH
DOWN
VOL
VOL
PAUSE
MODE
VOL
VOL
GPX
0 01 00:25
song title
RANDOM PLAY
RAN
0 02 00:25
8
Press and Hold
PLAY
Play/Pause
SKIP/SEARCH
UP
VOL
Play/Pause
MODE
VOL
VOL
0 02 00:00
song title
0 01 01:25
PLAY
VOL
RANDOM REP
RAN REP
0 02 00:25
BYE
PLAY
ADVERTENCIAS Y PRECAUCIONES
PARA REDUCIR EL RIESGO DE INCENDIOS O DE SACUDIDAS ELÉCTRICAS, NO EXPONGA ESTE APARATO A LA LLUVIA O A LA HUMEDAD.
Este símbolo, localizado detrás o en la parte de abajo de la unidad, indica la presencia de "tensiones peligrosas" sin aislar en el interior de la caja del producto que pueden ser de suficiente
magnitud como para constituir un riesgo de sacudida eléctrica para las personas.
Este símbolo indica la presencia de instrucciones de operación y de mantenimiento (reparación) en el material impreso que acompaña el aparato. Usted puede recibir una radiación peligrosa si utiliza los
botones o aplica los procedimientos de manera diferente a la que ha sido indicada en este documento.
AVISO: PARA EVITAR UNA DESCARGA ELÉCTRICA, INTRODUZCA LA HOJA MÁS ANCHA DEL ENCHUFE EN LA RANURA CORRESPONDIENTE DE LA TOMA Y EMPUJE HASTA EL FONDO.
PARA REDUCIR EL RIESGO DE SACUDIDAS ELÉCTRICAS, NO RETIRE LA TAPA (O LA PARTE POSTERIOR) DEL APARATO. DENTRO DEL APARATO NO HAY PARTES QUE PUEDAN SER REPARADAS POR EL
USUARIO. LOS TRABAJOS DE REPARACIÓN DEBEN SER EFECTUADOS POR PERSONAL DE SERVICIO CALIFICADO.
ADVERTENCIA: El usuario puede perder el derecho de utilizar este aparato si efectua cambios o modificaciones que no han sido expresamente aprobados por la autoridad responsable.
NOTA: Este equipo ha sido probado y ha demostrado cumplir con los límites establecidos para los aparatos digitales de Clase B, de acuerdo con el Apartado 15 de las Normas de la FCC. Estos límites
han sido designados para proveer una protección razonable contra las interferencias perjudiciales en una instalación residencial. Este equipo genera, utiliza y puede irradiar energía radioeléctrica y, si
no se instala y utiliza de acuerdo con las instrucciones, puede causar interferencias perjudiciales en las radiocomunicaciones. Sin embargo, no existe garantía de que no se produzcan interferencias
en una instalación en particular. Si este aparato causa interferencias en la recepción de radio o de televisión, lo que puede determinarse desconectando y conectando el aparato, se recomienda tratar
de corregir la interferencia de la siguiente manera:
• Vuelva a orientar la antena o cambie su lugar de instalación.
• Aumente la separación entre el equipo y el receptor.
• Conecte el equipo a una toma de corriente cuyo circuito no sea el mismo que aquél al que ha conectado el receptor.
• Consulte al concesionario o a un técnico de radio/televisión con experiencia.
Nota Especial
Cuando coloque la unidad sobre un mueble con acabado laqueado o natural, proteja su mueble con un paño u otro material protector.
Localización de Características:
VOLUMEN -
TOCAR/PAUSAR/PARAR
OLV
VOL
VOLUMEN +
- 6 -
2 - ENTRADAS DE AURICALARES
HOLD
BOTÓN DE ESPERA
ENTRADA DE USB
External memory
To transfer songs to external memory, insert the card
before connecting the player to the computer:
Remove battery door by pushing down on tab.
1.
2. Insert SD card and close the battery door.
3. Connect the player to your computer. See section for
'Connecting to a computer'.
4. Transfer songs to the external card. See section for
'Transfer Music files to your MP3 player'.
To playback tracks from the external memory card:
. Disconnect your player from computer. See section for
5
'Disconnect from your Computer'
6. Press and hold the PLAY/PAUSE button to turn the unit on.
7. In STOP mode press the MODE button to switch between
1
2
6
7
OPEN
Play/Pause
Press and Hold
Play/Pause
Press and Hold
SD
256MB
0 02 00:00
STOP
MODE
VOL
OPEN
VOL
internal memory to external memory.
- 5 -
Using the hold switch
Using the hold switch will allow you to lock all
functions of the player.
HOLD
TROUBLESHOOTING GUIDE
PROBLEM
Unit turned off or locked up. Reinsert the battery in the correct polarity (+/-) and turn the unit on again.
Replace the battery with a new one.
Sound is distorted or weak.
Songs do not play after dragging/dropping or copying/
pasting.
Player does not work with Windows 98SE.
®
Lower the volume.
Replace the battery with a new one.
We recommend safely disconnecting any USB device in accordance with your
computer’s operating system instructions. In Windows® 98/Windows®ME,
after copying files to the player, wait approximately 5 seconds before
unplugging the unit. In Windows®2000/Windows® XP, click the USB icon in
your computer’s System Tray and “Stop [the] USB Mass Storage Device”.
Only MP3/WMA™ files can be played on this player.
Download the MW33X7 device driver from www.gpx.com and follow the
accompanying instructions for installing.
SOLUTION
SALTAR/BUSCAR ABAJO
MODO
SALTAR/BUSCAR ARRIBA
Fuente de Energía
Compartimento de Pilas
1. Retire la puerta de pilas al empujar hacia abajo en la
lengüeta.
2. Inserte una pila “AAA” tal como es monstrado (nó incluido).
3. Reemplace la puerta de la pila.
ADVERTENCIA:
Peligro de exploción si son reemplazadas
OPEN
1 x "AAA” Alkaline Batteries
OPEN
incorrectamente. Reemplace solamente con el
mismo tipo o uno equivalente.
• No mezcle pilas viejas o nueva.
• No mezcle pilas alkaline, estandard(carbon-zinc) ó
recargables (nickel-cadmium).
• Reemplace las pilas cuando el sonido empieza a
OPEN
estar inestable ó no se puede escuchar.
• Cuando usted no va a utilizar la unidad por una
temporada de tiempo larga, retire las pilas para
prevenir daño de escape o corrosión de las pilas.
- 7 -
Escuche con Auriculares
1. Inserte sus auriculares en el gato de entrada de auricaleres.
2. Comparte su musica con un amigo al utilizar otro par de
auriculares (nó incluido) en la 2da entrada de auriculares.
PRECAUCIÓN:
Fije el Volumen a un nivel bajo antes de ponerse los
auriculares. Gradualmente, ajuste el Volumen a un nivel
de escuchar confortable. Porfavor, no tocque el
volumen en muy alta voz por un periodo de tiempo muy
alto.
Requerimientos de Sistema
Microsoft® Windows® 98SE, Windows® Me, Windows® 2000 Professional, Windows® XP Home
Edition/Professional Drive: CD-ROM Drive
• El tocador y el USB Driver no puede ser utilizado en Microsoft® Windows® 3.1, Windows® 95, Windows® 98,
y Windows NT®USB Driver:
• Operación en un sistema de operaciones actualizado no es garantizado.
Operación en un sistema de operaciones aparte del que tiene no es garantizado
• .
• Multi-CPU ó Multi-SO (Sistema de Operaciones) no son compatible.
• Solamente usuarios que tengan autoridad del Administrador pueden utilizar este software.
Importante !
•Clientes con computadoras que tengan Windows 98/98SE necesitan ir a nuestra página web, www.gpx.com, para bajar los soportes
appropiados para instalar su MW33X7 en su computadora antes de conectar el reproductor a su computadora.
•Clientes con omputadoras que tengan Windows 2000 & Windows XP no necesitanningun tipo de soporte especial para instalar en su
computadora.
•Nosotros recomendamos que utilize Windows Media Player para transferir canciones a su Reproductor de MP3.(Versión 9 en Windows
98/98SE & Windows 2000), (Versión 10 en Windows XP)
•Para transferir musica comprada/subscrita en el internet, usted necesita Windows XP & Windows Media Player 10.
Share your music.
Se rvi ce Inf orm ati on
21 16 Car r S t. St. lou is , M O 6 310 6
(3 14) 621 -28 81
Vi sit us at www. gpx .co m
Em ail Con sum er Ser vic es at
pr odi nfo @gp x.c om
Conectando a una computadora
1. Encienda su Reproductor al presionar
PLAY/PAUSE.
2. Tome el cable de USB que viene con la unidad y
coloque la parte pequeña en el reproductor de Mp3.
Luego, tome la otra parte y pongalo en la entrada de
USB en la computadora. Si está conectado correctamente,
la exhibición de LCD dirá USB.
Transfiera Archivos de Música a su Reproductor de MP3 utilizando Windows® Media Player 10
el botón
1
Press and hold
to power on
Windows Media Player 10
OL
V
L
O
V
2
Connect
Usted podrá bajar canciones Compradas/
Subscrito a la unidad.
1.Comienze Windows Media Player 10 y conecte la
unidad a su computadora. En la exhibición del
reproductor debe decir 'MTP'. Si no, después que la
unidad esté conectada, presione el botón de modo 'M'
para cambiar al modo 'MTP'.
2.Si usted no a fijado la sincronización entre su
computadora y su unidad, el “Device Setup
Wizard” comienza. En el “Device Setup Wizard”,
seleccione “Manual”.
- 8 -
Page 3

3.Tecleé “Finish”.
4.Seleccine la opción “Library”. En el panel derecho
seleccione “Sync List”
5.Usted puede seleccionar el “Play list” o “Library” desde el panel izquierdo y usted verà el contenido de las
canciones
en el centro del panel.
6.Seleccione las canciones en el centro del panel, arrastre y agreguelos en la lista de Sync.
7.Tecleé el botón 'Start Sync' en el panel de la lista de Sync.
8.Repita los pasos 4-7 para cualquier otro artículos que quiera copiar a su unidad.
Transfiera los Archivos de Música a su Reproductor de MP3 utilizando Windows® Media Player 9
Usted no podrá bajar canciones Compradas/Subscrito utilizando
Windows Media Player la unidad. Usted nesecita Windows XP
con Windows Media Player 10.
Windows Media Player 9
Usted podrá bajar canciones regulares de MP3 & WMA.
1.Comienze Windows Media Player 9 y conecte la unidad
a su computadora.
2.Tecleé “Copy” para CD ó Aparato.
3. En el panel “Items to Copy”, en la lista de baja, tecleé
la lista para tocar, categoría u otros artículos que quiera
copiar.
4. Aclare el cuadro de checar al lado de cada archivo que
usted no quiere copiar.
5.En el panel “Items on Device”, en la lista de bajar, tecleé en el aparato donde usted quiere copiar las canciones
6.Tecleé en el botón 'Copy'.
7.Repita los pasos 2-5 para cualquier otro artículo que usted quiera transferir a su unidad.
Disconectando la unidad de su computadora
1. Recomendamos desconectando cualquier aparato
de USB de una manera segura de acuerdo con las
instrucciones del sistema de operaciones de su
computadora.
2. En Windows® 98/Windows® ME, después de copiar
USB icon
los archivos en su reproductor, espere aproximadamente
5 segundos antes de desconectar la unidad.
3. En Windows® 2000, tecleé en el ícono de USB en el
cajón de sistema de su computadora y “Stop [the] USB
Mass Storage Device”.
4. En Windows® XP, si su reproductor está conectado en el
modo 'MTP', espere aproximadamente 5 segundos antes de
desconectar su unidad.
L
VO
L
VO
Disconnect
Utilizando el botón de espera
El utilizar el botón de espera le permitirá frizar
las funciones del reproductor.
GUÍA DE SOLUCIÓN DE PROBLEMAS
PROBLEMA
Unidad apagada ó frizada.
El sonido está distorcionado ó débil.
Las canciones no tocan después de arrastrarlas/dejarlas ó
de copiarlas/aplicarlas.
El Reproductor no funciona con Windows 98SE.
®
In for mac ión de Ser vic io
21 16 Car r S t. St. lou is , M O 6 310 6
Vi sit eno s e n w ww.g px. com
Ma nde nos un E-M ail á
pr odi nfo @gp x.c om
HOLD
SOLUCIÓN
Recoloque la pila en la polaridad correcta (+/-) y encienda la unidad denuevo.
Reemplace la pila con una nueva.
Baje el volumen.
Reeplace la pila con una nueva.
Recomendamos desconectando cualquier aparato de USB de una manera
segura de acuerdo con las instrucciones del sistema de operaciones de su
computadora. En Windows® 98/Windows® ME, después de copiar los
archivos en su reproductor, espere aproximadamente 5 segundos antes de
desconectar la unidad. En Windows® 2000, tecleé en el ícono de USB en el
cajón de sistema de su computadora y “Stop [the] USB Mass Storage
Device”.
Solamente archivos de MP3/WMA™ pueden ser tocados en este reproductor.
Baje los soportes para MW33X7 de www.gpx.com y siga las instrucciones
de instalación.
(3 14) 621 -28 81
- 9 -
Escuchando los archivos de Música
1. Presione y sostenga el botón PLAY/PAUSE para
encender la unidad.
2. Utilize los botones SKIP/SEARCH para seleccionar la
canción deseada.
3. Utilize los botones VOLUME para ajustar el volumen.
4. Presione PLAY/PAUSE para pausar la canción, presione
una vez más para resumir la canción.
5. Mientras está tocando, presione y sostenga el botón
MODE para cambiar el EQ a POP/ROCK/CLASSIC/
JAZZ/BASS/NORMAL.
6. Mientras está tocando, presione el botón MODE para
cambiar el modo de tocar a las siguientes selecciones
REPEAT 1/REPEAT ALL/RANDOM/RANDOM REPEAT/
,OFF(no se exhibe).
7. Presione y sostenga PLAY/PAUSE para parar de tocar.
8. Presione y sostenga PLAY/PAUSE una vez más para apagar
la unidad.
1
6
7
MODE
VOL
Play/Pause
Press and Hold
LVO
REPEAT 1 TRACK
REP 1
0 02 00:25
0 02 00:00
PLAY
STOP
MODE
VOL
VOL
Play/Pause
1
Press and Hold
2
0 15 00:00
song title
VOLUME
VOL
3
Play/Pause
4
MODE
VOL
VOL
5
Press and Hold
REPEAT ALL TRACK
REP ALL
0 02 00:25
PLAY
VOL
0 01 01:25
SKIP/SEARCH
DOWN
VOL
VOL
PAUSE
MODE
VOL
VOL
GPX
0 01 00:25
song title
RANDOM PLAY
RAN
0 02 00:25
PLAY
8
Press and Hold
Play/Pause
SKIP/SEARCH
UP
VOL
Play/Pause
MODE
L
O
V
VOL
0 02 00:00
song title
0 01 01:25
PLAY
VOL
RANDOM REP
RAN REP
0 02 00:25
BYE
PLAY
- 11 -
FRENCH:
AVERTISSEMENT ET PRÉCAUTIONS
POUR PRÉVENIR TOUT RISQUE D'INCENDIE OU D'ÉLECTROCUTION, NE PAS EXPOSER CET APPAREIL À LA PLUIE OU À L'HUMIDITÉ.
Ce symbole, situé dérrière ou dessous de l' appareil, est destiné à avertir l'usager de la présence d'une "tension dangereuse" non isolée dans le boîtier de l'appareil, dont l'intensité pourrait être suffisante
pour constituer un risque d' électrocution pour les personnes.
Ce symbole est destiné à aver tir l'usager de la présence d'instructions importantes pour le fonctionnement et l'entretien (réparation) de l'appareil, dans la brochure qui accompagne celui-ci. Vous pourriez
subir des radiations dangereuses si vous utilisez les commandes ou si vous appliquez les procédures d'une manière différente de celle indiquée dans ce mode d'emploi.
ATTENTION: POUR ÉVITER LES CHOCS ÉLECTRIQUES, INTRODUIRE LA LAME LA PLUS LARGE DE LA FICHE DANS LA BORNE CORRESPONDANTE DE LA PRISE ET POUSSER JUSQU'AU
FOND.
POUR PRÉVENIR TOUT RISQUE D'ÉLECTROCUTION, NE RETIREZ PAS LE COUVERCLE (OU LA PARTIE POSTÉRIEURE) DE L'APPAREIL. VOUS NE DEVEZ PAS RÉPARER DES PIÈCES SE TROUVANT À L'
INTÉRIEUR DE L'APPAREIL. LES RÉPARATIONS DOIVENT ÊTRE EFFECTUÉES PAR DU PERSONNEL QUALIFIÉ.
AVERTISSEMENT: Tout changement ou modification apporté(e) à cet appareil sans autorisation, peut entraîner l’interdiction d’utilisation de ce dernier.
REMARQUE: Cet appareil a été testé et il a été constaté qu'il respecte les limites fixées pour les appareils numériques de la Catégorie B, par la Section 15 des Normes FCC. Ces limites ont été fixées afin de fournir
une protection raisonnable contre les interférences nocives dans un logement résidentiel. Cet appareil produit, utilise et peut émettre de l'énergie radioélectrique et, s'il n'est pas installé et utilisé suivant le mode
d'emploi, il peut produire des interférences nocives sur les radiocommunications. Cependant, il peut y avoir des interférences nocives dans des logements particuliers. Si l'appareil produit des interférences sur
la réception radio ou télévision (ce qu'on peut constater lorsqu'on débranche ou lorsqu'on raccorde celui-ci), nous vous recommandons de corriger ce problème de la manière suivante:
• Réorientez l'antenne ou changez l'appareil de place.
• Séparez davantage l'appareil du récepteur.
• Branchez l'appareil à une prise de courant faisant partie d'un circuit différent de celui auquel est branché le récepteur.
• Consultez le vendeur ou un technicien de radio/télévision expérimenté.
Note Sp éciale
En plaçant votre unité sur une finition laquée ou normale, protégez vos meubles avec un tissu ou autre protecteur matériel.
Localisation de Caractéristiques:
VOLUME -
JEUR/RALENTIR/ARRÊTER
V
OL
VOL
VOLUME +
2 - ENTRÉES D'AURICALARES
HOLD
BOUTON D'ATTENTE
ENTRÉE D'USB
Memoria Externa
Para transferir canciones a la memoria externa, coloque la
tarjeta antes de conectar la unidad a su computadora.
Retire la puerta de pilas al empujar la lengüeta hacia abajo.
1.
2. Coloque la tarjeta SD y cierre la puerta de pilas.
3. Conecte el reproductor a su computadora. Vea la sección
para 'Connecting to a computer'.
4. Transfiera canciones a la tarjeta externa. Vea la sección
para 'Transfer Music files to your MP3 player'.
Para tocar las canciones de la memoria externa:
. Desconecte su reproductor de la computadora. Vea la sección
5
para 'Disconnect from your Computer'
6. Presione y sostenga el botón PLAY/PAUSE para encender la
unidad.
7. En el modo STOP, presione el botòn MODE para cambiar entre
memoria interna a memoria external memory.
- 10 -
1
2
6
7
OPEN
Play/Pause
Press and Hold
Play/Pause
Press and Hold
SD
256MB
0 02 00:00
STOP
MODE
L
VO
SAUTER/CHERCHER VERS LE BAS
MANIÈRE
SAUTER/CHERCHER EN HAUT
Source d'Énergie
Je compartimente de Piles
1. Retirez la porte de piles en poussant vers le bas dans la
languette.
OPEN
2. Insérez une pile "AAA" comme il est monstrado (non inclus).
3. Remplacez la porte de la pile.
AVERTISSEMENT :
Danger d'exploción s'ils sont incorrectement remplacés. Remplacez-vous
OPEN
1 x "AAA” Alkaline Batteries
OPEN
seulement avec le même taux ou un équivalent
• Ne mélangez-vous pas de vieilles piles ou nouvelle.
• Ne mélangez pas de piles alkaline, standard (charbon- zinc) ou
rechargeables (nickel-cadmium).
OL
V
• Remplacez-vous les piles quand le son commencera à être instable ou ne
peut-il pas être écouté.
OPEN
• Quand vous ne irez pas utiliser l'unité pour une saison de temps il lâche,
retirez les piles pour prévoir des dommages échappement ou corrosion des
piles.
- 12 -
Page 4

Écoutez avec des Écouteurs
1. Insérez ses écouteurs dans le chat d'entrée d'auricaleres.
2. Il partage sa musique avec un ami en utilisant une autre
paire d'écouteurs (non inclus) dans la 2da entrée d'écouteurs.
PRÉCAUTION :
Fixez le Volume à un faible niveau avant d'être mis les
écouteurs. Progressivement, il adapte le Volume à un
niveau d'écouter confortable. Porfavor, non tocque le
volume dans voix très haute pour une période de temps
très haut.
Share your music.
Demandes de Système
Microsoft® Windows® 98SE, Windows® Moi, Windows® 2000 Professional, Windows® XP Home
Edition/Professional Drive : CD-ROM Drive
•Clientes avec des ordinateurs qui ont Windows 98/98SE ont besoin d'aller à notre page web, www.gpx.com, pour baisser les
supports appropiados pour installer leur MW33X7 dans leur ordinateur avant de relier le reproducteur à leur ordinateur.
•Clientes avec omputadoras qui ont Windows 2000 et Windows XP non necesitanningun type de support spécial pour installer dans
leur ordinateur.
•Nosotros recommandons qu'utilize Windows Media Player pour transférer des chansons à son Reproducteur de Mp3.
(Versión 9 en Windows 98/98SE et Windows 2000), (Version 10 en Windows XP)
•Para transférer de la musique achetée/souscrite dans l'internet, vous avez besoin de Windows XP et Windows Moyenne Player 10..
Important !
• Des clients avec des ordinateurs qui ont Windows 98/98SE ont besoin d'aller à notre page web, www.gpx.com, pour baisser les
supports appropiados pour installer leur MW33X7 dans leur ordinateur avant de relier le reproducteur à leur ordinateur.
• Clientes avec omputadoras qui ont Windows 2000 et Windows XP non necesitanningun type de support spécial pour installer dans leur
ordinateur.
• Nosotros recommandons qu'utilize Windows Media Player pour transférer des chansons à son Reproducteur de MP3.(Versión 9 en
Windows 98/98SE et Windows 2000), (Version 10 en Windows XP)
• Para transférer de la musique achetée/souscrite dans l'internet, vous avez besoin de Windows XP et Windows Moyenne Player 10.
En reliant à un ordinateur
L
1. Allumez son Reproducteur en pressant le bouton
PLAY/PAUSE.
2. Prenez le câble d'USB qui vient avec l'unité et place la
petite partie dans le reproducteur de Mp3. Donc, prenez
l'autre partie et pongalo dans l'entrée d'USB dans l'ordinateur.
S'il est relié correctement, l'exposition de LCD dira USB.
Transférez de Archives de Musique à son Reproducter de MP3® utilisant Windows® Media Player 10
Vous pourrez baisser des chansons Achetées/Souscrit à
1
Press and hold
to power on
Windows Media Player 10
O
V
L
VO
2
Connect
l'unité.
1.Comienze Windows Moyenne Player 10 et relie l'unité à
son ordinateur. Dans l'exposition du reproducteur il doit
dire 'MTP '. Si non, après que l'unité soit reliée, il presse
le bouton de manière 'M 'de changer à la manière 'MTP '.
2.Si vous non fixée au synchronisation entre son ordinateur
et son unité, "le Device Setup Wizard" commencez. Dans
“Device Setup Wizard", choisissez "Manual".
En écoutant les archives de Musique
1. Pressez et soutenez le bouton PLAY/ralentissez pour
allumer l'unité.
2. Utilize les boutons SKIP/search pour choisir la chanson
souhaitée.
1
3. Utilize les boutons VOLUME pour adapter le volume.
4. Pressez PLAY/ralentissez pour ralentir la chanson, pressez
une fois de plus pour résumer la chanson.
5. Touche entretemps, presse et soutiens le bouton MODE pour
changer l'EQ à POP/ROCK/CLASSIC/JAZZ/BASS/NORMAL.
6. Il touche entretemps, pressez le bouton MODE pour changer
la manière de toucher aux sélections suivantes REPEAT 1/
REPEAT ALL/RANDOM/RANDOM REPEAT /, OFF(no est exhibé).
7. Pressez et soutenez PLAY/PAUSE pour arrêter de toucher.
8. Pressez et soutenez PLAY/PAUSE une fois de plus pour
éteindre l'unité.
6
7
Press and Hold
MODE
V LO
Play/Pause
VOL
REP 1
0 02 00:25
0 02 00:00
REPEAT 1 TRACK
PLAY
STOP
MODE
VOL
Mémoire Externe
Pour transférer des chansons à la mémoire externe, placez la
carte avant de relier l'unité à son ordinateur.
Retirez le porte de piles en poussant la lenguette vers le bas.
1.
2. Placez la carte SD et ferme la porte de piles.
3. Reliez le reproducteur à son ordinateur. Voyez la section
pour 'Connecting to à computer '.
4. Transférez des chansons à la carte externe. Voyez la section
pour 'Transfert Music files to your MP3 player '.
Pour toucher les chansons de la mémoire externe :
. Déconnectez son reproducteur de l'ordinateur. Voyez la
5
section pour 'Disconnect from your Computer '
6. Pressez et soutenez le bouton PLAY/ralentissez pour
allumer l'unité.
7. Dans la manière STOP, pressez le botòn MODE pour
changer entre mémoire interne à mémoire external.
L
VO
Play/Pause
1
Press and Hold
2
0 15 00:00
song title
VOLUME
VOL
3
Play/Pause
4
MODE
VOL
VOL
5
Press and Hold
REPEAT ALL TRACK
REP ALL
0 02 00:25
PLAY
1
2
Play/Pause
6
Press and Hold
Play/Pause
7
Press and Hold
VOL
0 01 01:25
GPX
SKIP/SEARCH
DOWN
VOL
VOL
PAUSE
MODE
VOL
L
VO
8
OPEN
0 02 00:00
0 01 00:25
song title
RANDOM PLAY
RAN
0 02 00:25
PLAY
Play/Pause
Press and Hold
SD
STOP
256MB
SKIP/SEARCH
UP
VOL
Play/Pause
MODE
VOL
VOL
0 02 00:00
song title
0 01 01:25
PLAY
L
VO
RANDOM REP
RAN REP
0 02 00:25
BYE
OPEN
MODE
VOL
VOL
PLAY
- 13-
3. J'ai étudié "Finish".
4. Seleccine l'option "Library". Dans le panneau droit choisissez "Sync List"
5. Vous vous pouvez choisir "le Play list" ou "Library" depuis le panneau gauche et verà le contenu des chansons
dans le centre du panneau.
6. Choisissez les chansons dans le centre du panneau, il entraîne et agreguelos dans la liste de Sync.
7. Ai étudié le bouton 'Start Sync 'dans le panneau de la liste de Sync.
8. Ai étudié le bouton 'Start Sync 'dans le panneau de la liste de Sync.
Transférez de Archives de Musique à son Reproducter de MP3® utilisant Windows® Media Player 9
Vous ne pourrez pas baisser des chansons à l'unité Achetées/Souscrit en utilisant Windows Media Player.
Vous nesecita Windows XP con Windows Moyenne Player 10.
Vous pourrez baisser des chansons régulières MP3 et de
Windows Media Player 9
WMA.
1.Comienze Windows Moyenne Player 9 et relie l'unité
à son ordinateur.
2.J'ai étudié "Copy" pour CD ou Appareil.
3. Dans le panneau "Articles to Copy", dans la liste de
baisse, j'ai étudié la liste pour toucher, la catégorie ou
autres articles qu'il veut copier.
4. Clarifiez le tableau de checar à côté de chaque archives
que vous ne voulez pas copier.
5.Clarifiez le tableau de checar à côté de chaque archives que vous ne voulez pas copier.
6.J'ai étudié dans le bouton 'Copy '.
7.Répétez les pas 2-5 pour tout autre article que vous voulez transférer à son unité.
Disconectando l'unité de son ordinateur
1.Nous recommandons en déconnectant tout appareil d'USB
d'une manière sûre en accord avec les instructions du système
d'opérations de leur ordinateur.
2. En Windows® 98/Windows® MOI, après avoir copié les archives
dans son reproducteur, attendez approximativement 5 seconds avant
USB icon
de déconnecter l'unité.
3. En Windows® 2000, j'ai étudié dans l'icone d'USB dans le tiroir
de système son ordinateur et de “ Stop [the] USB Mass Storage Device".
4. En Windows® XP, si son reproducteur est relié dans la manière 'MTP ',
attendez approximativement 5 seconds avant de déconnecter son unité.
OL
V
LV
O
Disconnect
En utilisant le bouton d'attente
Utiliser le bouton d’attente il lui permettra de
frizar les fonctions du reproducteur.
GUIDE DE SOLUTION DE PROBLÈMES
PROBLEME
Unité éteinte ou frizada.
Le son est déformé ou faible.
Les chansons ne touchent pas après les avoir
entraînées/les laisser ou de les copier/les appliquer.
Le Reproducteur ne fonctionne pas avec Windows®
98SE.
In for mat ion de Ser vic e
21 16 Car r S t. St. lou is , M O 6 310 6
Vi sit eno s e n
Ma nde nos un E-M ail a
pr odi nfo @gp x.c om
- 15-
HOLD
SOLUTION
Replacez la pile dans la polarité correcte (+/-) et allumez l'unité denuevo.
Remplacez la pile avec un nouvelle.
Baissez le volume.
Reeplace la pile avec un nouvelle.
Nous recommandons en déconnectant tout appareil d'USB d'une manière sûre en
accord avec les instructions du système d'opérations de leur ordinateur. En
Windows® 98/Windows® MOI, après avoir copié les archives dans son
reproducteur, attendez approximativement 5 seconds avant de déconnecter l'unité.
En Windows® 2000, j'ai étudié dans l'icone d'USB dans le tiroir de système son
ordinateur et de” Stop [the] USB Mass StorageDevice”.
Seulement archives de MP3/WMA™ ils peuvent être touchés dans ce reproducteur.
Baissez les supports pour Mw33X7 de www.gpx.com et suivez les
instructions d'installation
(3 14) 621 -28 81
ww w.gp x.c om
- 14 -
- 16 -
 Loading...