

Page 1

Warnings
WARNING: Changes or modications to this unit not expressly
approved by the party responsible for compliance could void the
user’s authority to operate the equipment.
NOTE: This equipment has been tested and found to comply
with the limits for a Class B digital device, pursuant to Part
15 of the FCC Rules. These limits are designed to provide
reasonable protection against harmful interference in a residential
installation. This equipment generates, uses, and can radiate radio
frequency energy and, if not installed and used in accordance
with the instructions, may cause harmful interference to radio
communications. However, there is no guarantee that interference
will not occur in a particular installation. If this equipment does
cause harmful interference to radio or television reception, which
can be determined by turning the equipment off and on, the user
is encouraged to try to correct the interference by one or more of
the following measures:
• Reorient or relocate the receiving antenna.
• Increase the separation between the equipment and receiver.
• Connect the equipment into an outlet on a circuit different
from that to which the receiver is connected.
• Consult the dealer or an experienced radio/TV technician
for help.
Page 2

Features
• 8GB installed ash memory
• Digital audio: MP3, WMA, WAV
• Digital video: AVM
• Digital photos: JPEG, BMP, GIF
• DRM free
• 2” TFT LCD display
• Built-in microphone
• Includes: mini-USB to USB cable, one
set of stereo earbuds
Includes
• Mini-USB to USB cable
• One set of stereo earbuds
Page 3

System Requirements
DC battery power: built-in rechargeable
lithium polymer battery
To charge the built-in rechargeable battery
use the included USB cable to connect
the digital media player to a computer
that’s attached to an AC power source and
powered on.
Page 4

Power
Loading music onto the digital media player
requires a computer with a USB port and one
of the following operating systems.
Windows XP, Windows Vista, Windows 7
Mac OS 10.4, 10.5, or 10.6
Page 5
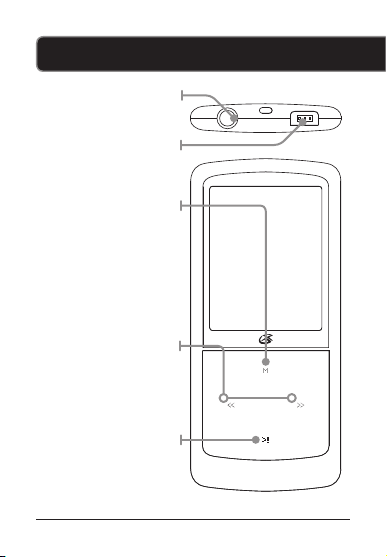
Introduction
Stereo Headphone
Mini-USB Port
Press and hold to
return to the main
menu. Press to
make selections
in the menus or to
access a sub-menu
in Music, Videos,
and Photo mode.
Press or press and
hold to skip or search
through tracks.
or pause music
Jack
Menu
Skip/Search
Play/Pause
Press to play
and videos.
Page 6

Volume
Press to adjust
the volume.
ON/OFF
Slide to power the
player off and on.
Press and hold to
lock or unlock the
players buttons.
Hold
Microphone
Page 7

Loading Files
1. Connect the digital media
player to a computer using
the MINI-USB connection and
a USB cable (included).
2. Once connected, the unit will show
up on the connected computer as if it
were a connected USB thumb drive,
external hard drive, or memory card.
3. Drag and drop the desired les
into the unit’s drive location on
the connected computer.
4. After the les are loaded onto the
unit, right-click on the drive and
eject it from the computer, then
disconnect the USB cable.
File Compatibility:
Digital audio: MP3, WMA, WAV
Digital video: AVM
Digital photos: JPEG, BMP, GIF
Page 8

Video Conversion Software
1. Connect the media player
to a computer using the
included USB cable.
2. Once connected, the video
conversion software will
open automatically.
3. Use the conversion software to
select a video on your computer and
convert it to the AVM format so it will
be playable on the media player.
4. After converting, follow the
instructions for Loading Files
to load the newly created AVM
le to the media player.
Page 9

International Support
To download this User’s Guide in English,
Spanish, or French, visit the support section at
www.gpx.com.
Para transferir esta guía de usuario en inglés,
español, o francés, visite la sección de la ayuda
en www.gpx.com.
Pour télécharger ce guide de l’utilisateur
en anglais, espagnol, ou français, visitez la
section de soutien chez www.gpx.com.
Contact
Phone: 1-888-999-4215
Email: prodinfo@gpx.com
Parts Email: partsinfo@dpi-global.com
Website: www.gpx.com
Copyright © 2011 Digital Products International (DPI, Inc.)
All other trademarks appearing herein are the
property of their respective owners.
Specications are subject to change without notice.
Page 10

Music
1. Follow the instructions
for Loading Files.
2. From the main menu, use the Skip/
Search buttons to highlight the
Music icon. Press the Menu button.
3. With the music paused,
press the Menu button to
access the sub-menu.
4. Use the Skip/Search buttons
to highlight File Select.
Press the Menu button.
5. Use the Skip/Search buttons
to highlight the desired song.
Press the Menu button to begin
playing the selected song.
While music is playing, press the Menu
button to access the EQ/Play menu.
Page 11

Movies
1. Follow the instructions
for Loading Files.
2. From the main menu, use the Skip/
Search buttons to highlight the
Movie icon. Press the Menu button.
3. With the movie stopped,
press the Menu button to
access the sub-menu.
4. Use the Skip/Search buttons
to highlight File Select.
Press the Menu button.
5. Use the Skip/Search buttons
to highlight the desired movie.
Press the Menu button to begin
playing the selected movie.
Page 12

Photo
1. Follow the instructions
for Loading Files.
2. From the main menu, use the Skip/
Search buttons to highlight the View
Photo icon. Press the Menu button.
3. Use the Skip/Search buttons
to highlight File Select.
Press the Menu button.
4. Use the Skip/Search buttons
to highlight the desired photo.
Press the Menu button to begin
playing the selected photo.
Page 13

Record Audio
1. From the main menu, use
the Skip/Search buttons to
highlight the Recording icon.
Press the Menu button.
2. Press the Play/Pause button
to start and stop recording.
3. Press and hold the Menu button
to save your recording and
return to the main menu.
4. Recordings can be accessed
and played through the Voice
icon in the main menu.
Page 14

Voice
1. Follow the instructions for
Recording Audio.
2. From the main menu, use the Skip/
Search buttons to highlight the
Voice icon. Press the Menu button.
3. While paused, press the Menu
button to access the sub-menu.
4. Use the Skip/Search buttons
to highlight File Select.
Press the Menu button.
5. Use the Skip/Search buttons to
highlight the desired recording.
Press the Menu button to begin
playing the selected recording.
While audio is playing, press the Menu
button to access the EQ/Play menu.
Page 15

System Settings
LCD set
Language
Memory info
Default
Exit
Page 16

USER’S GUIDE
V:1356-0523-11
ML861
Digital Media Player
For the most up-to-date version of this
User’s Guide, go to www.gpx.com
 Loading...