

Page 1
© Laipac Technology Inc.
1
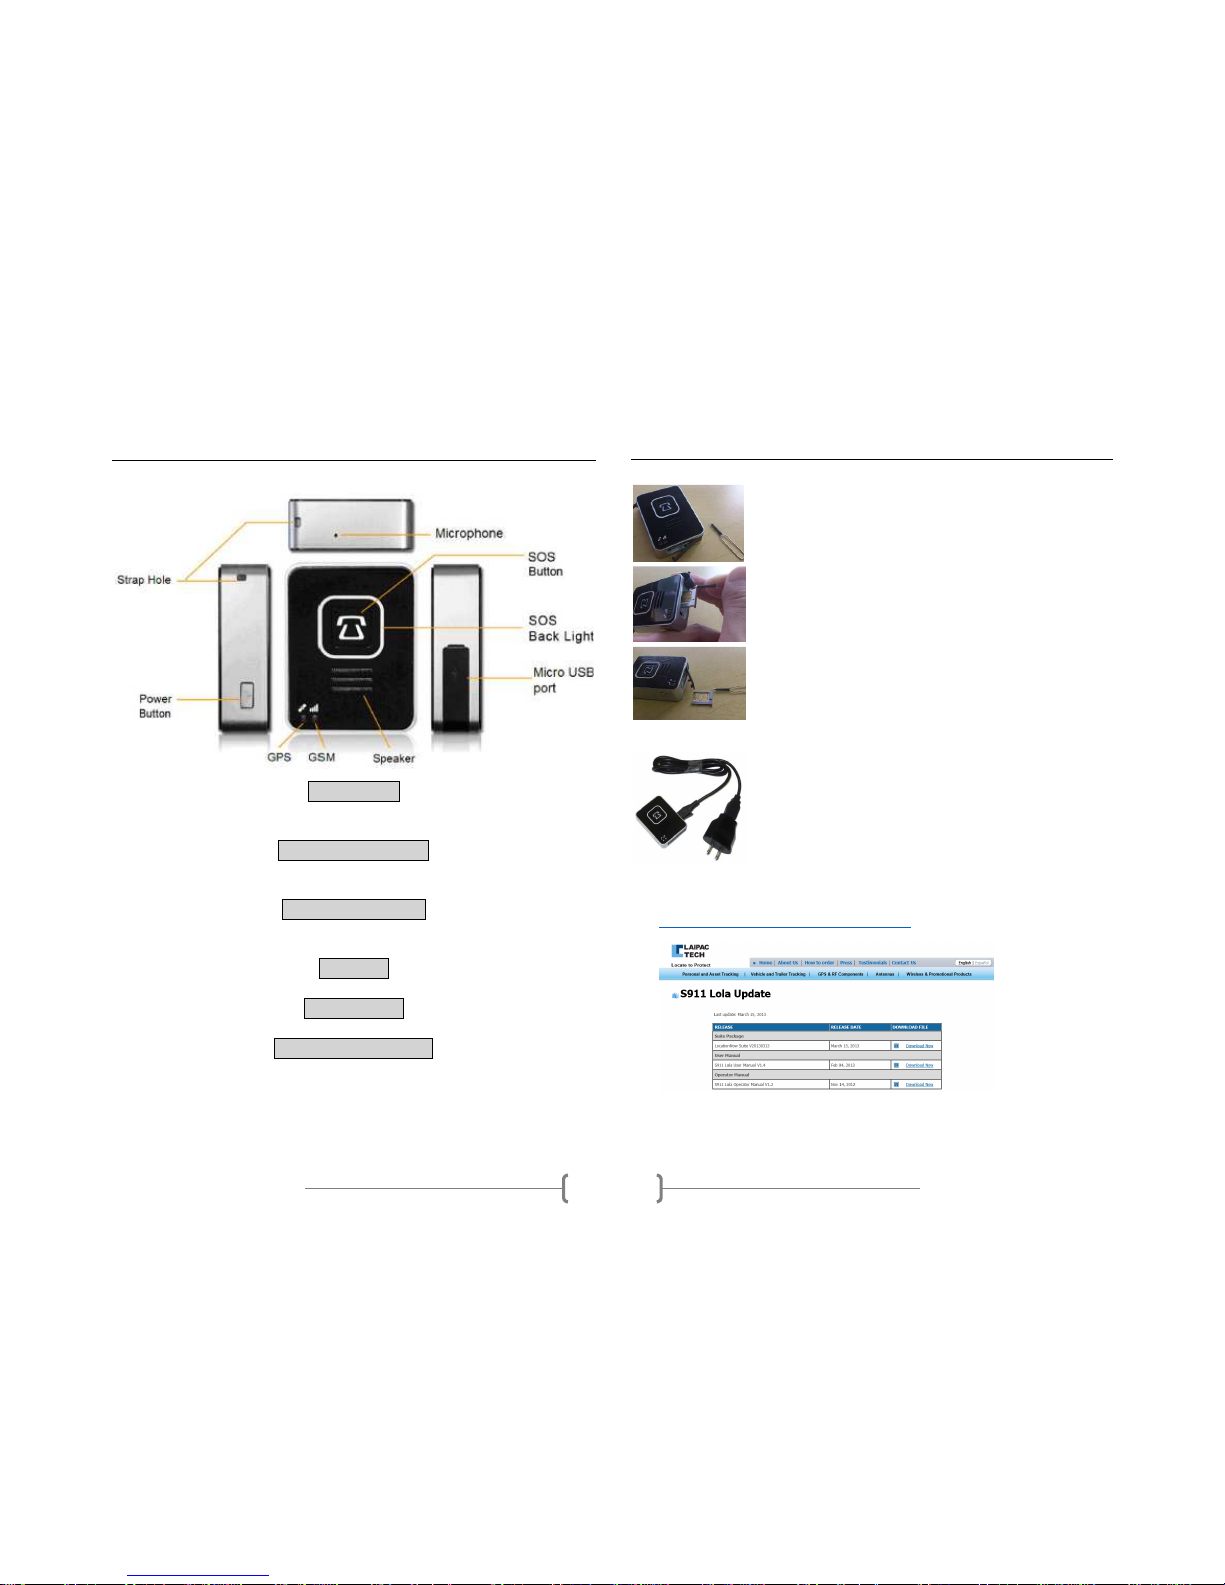
Knowing your S911 Lola
Power Button
Hold down for 3 seconds to turn ON or OFF the unit. GPS and GSM lights
will start flashing and the unit will vibrate.
Speaker & Microphone
Used for communication in case of emergency. For best call quality, hold
unit within 20cm of face.
GPS & GSM Indicators
These lights will show the connectivity status of GPS and GSM. Low battery
is indicated by a red LED flashing light.
Strap Hole
Loop the neck strap through this hole.
Micro USB Port
This port is used to charge and program the unit.
SOS Button & Back Light
To initiate an SOS call, hold down the SOS button for 3 seconds. The
backlight will begin to flash and your SOS call will begin.
Getting Started
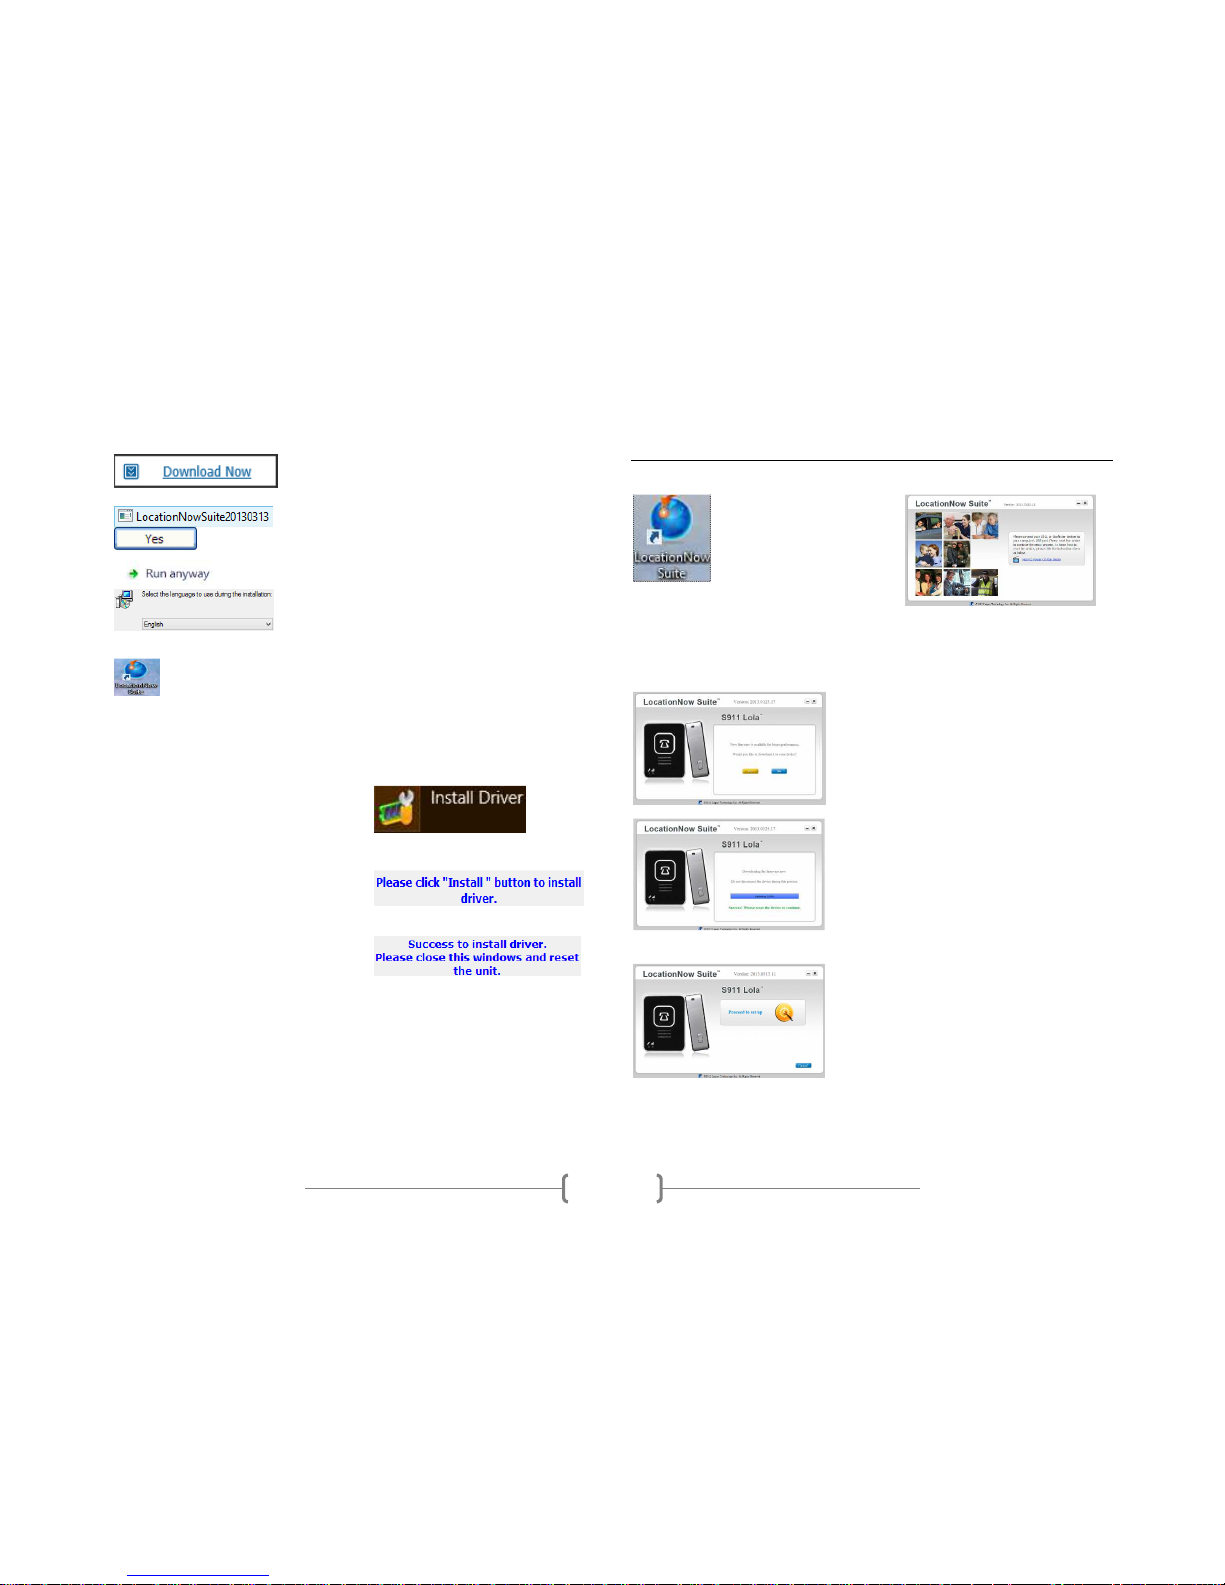
1. Installing the MicroSim Card
Gently pull
the rubber tab at the bottom o
f the unit
to open the Micro SIM card’s bay.
Insert the
pin into the small
hole, pry and pull the
Micro SIM card’s bay out.
Insert the Micro SIM
card into the tray and slide
back into the unit. Close the rubber tab and you are
READY!
2. Charging the unit
The unit will by default turn ON
whenever the USB
is plugged in. After plugging in the unit, the user can
turn OFF the unit to speed up the process. Full
charge can take up to 4 hours. When the battery is
low, the GSM LED indicator will flash red.
3. Installing LocationNow suite
Visit this site and download the LocationNow Suite:
http://www.laipac.com/lolaupdate.htm
Page 2
© Laipac Technology Inc.
2
3. Installing LocationNow Suite
Click on “Download Now” and “Open” the
file.
Execute the downloaded file.
Click “Yes” or “Run Anyway” when
prompted to continue.
Now select your language and follow
the
on
screen instructions until the installation is
complete.
Now you can access LocationNow Suite from
your “desktop”.
4. Obtaining the correct drivers and connecting to your PC
When using Windows 7 or higher, your PC will automatically install
the necessary drivers. For earlier versions, follow the next steps:
Go to Start
-
> All Programs
-
>
LocationNow Suite -> right click on
“Install Driver” and “Run as
Administrator”.
Click on “
Install”, and i
f prompted
with the option, click “Install this
driver software anyway”.
Once the installation is complete
,
close the window and you are DONE!
*Important: The S911 Lola must be turned OFF prior to connecting
to your PC. If this step is not followed LocationNow Suite will not
recognize the unit as being connected.
Using the LocationNow Suite
1. Connecting S911 Lola to LocationNow Suite
Open the LocationNow
Suite from your desktop.
Turn OFF the unit,
connect to your PC and
follow the on screen
instructions.
If the unit fails to connect, do not unplug it. You can simply reset it by
holding down the “SOS” and “Power” buttons together for 3 seconds.
2. Updating the unit’s firmware
Once the unit is connected
, you may be
prompted to update the firmware. Click
“Yes” and you’ll see the progress bar
updating the unit’s firmware.
When the update is completed
, you will
see the message indicating Successful
update of the unit. Close LocationNow
Suite. Disconnect the unit from the PC
and turn it OFF.
3. Setting up the unit and its features
Hold the power button for 3 seconds to
power off. Unit will vibrate and all
lights will go off, indicating the unit has
been shut down correctly. Once the
unit is powered OFF, use the USB cable
to connect it to your PC. Click on
“Proceed to set up” to continue.
Page 3

© Laipac Technology Inc.
3
5. Setting up the unit and its features
“Networks”.
The first step is to input
the unit’s assigned ID. Here you will
also input the details to connect your
unit to the GSM Network and the
LocationNow server. You will also set
up the “Emergency SOS” number for
SOS calls.
“Functions”
.
You can select how the
unit reports: by time interval, distance
or both. You can also activate features
such as “Over Speed” and “Geo-fence”
alert. These features can also be
modified via the web based app.
“Advance”.
Features like
“
Data log”,
keep track of the unit’s location in the
internal memory. “AGPS” allows for
quicker GPS fix by slightly increasing
the data usage. These advanced
settings should only be changed by an
experienced user.
“File”.
From here you can save your
settings and load previous ones by
using “Import” and “Export”. It is
important to keep a backup of your
settings.
“Finished”
.
Click on “Save
setting to device”. Wait for the
operation to “Suceed” and
disconnect the unit.
6. All done, check for GPS and GPRS fix.
Next turn the unit “ON”. Place it somewhere with an unobstructed view
of the sky and wait for the “GPS” and “GPRS” lights to go solid.
Accessing LocationNow.com
1. Login In: User ID and Password.
Now you need to enter your “User ID
and Password”. Look for this
information on your purchase invoice
or email from Laipac. For technical
support at any time, please email us at:
tech@laipac.com
2. Making sure your unit is connected to the Dashboard.
Now, you are l
ogged into LocationNow.com our web
-
based service.
From here you can track and manage all of your units 24/7. Select any
activated unit and click on “Locate Now”. Within a couple of seconds you
will see your unit appear on the map and its updated information will
appear to the left of the “Dashboard”.
3. Learning how to use LocationNow.com
To find out how
LocationNow.com works, please visit:
http://locationnow.com/locationnow/demo.htm
If you have any further questions contact out customer service:
http://locationnow.com/locationnow/contact_us.jsp
Page 4

© Laipac Technology Inc.
4
Content
Knowing your S911 Lola ……………………………………………………………………..Page1
Getting Started ………………………………………………………………………….…...Page1-2
1. Installing the Micro SIM card.
2. Charging the unit.
3. Installing the LocationNow Suite
4. Obtaining the correct drivers and connecting to your PC
Using the LocationNow Suite……………………………………………………….…Page 2-3
1. Connecting S911 Lola to LocationNow Suite.
2. Updating the unit’s firmware.
3. Setting up the unit and its features.
4. All done, check for GPS and GPRS fix.
Accessing LocationNow.com…………………………………………………………...…Page 3
1. Login In: User ID and Password.
2. Making sure your unit is connected to the Dashboard.
3. Learning how to use LocationNow.com
Safety………………………………………………………………………………………..……….Page 4
Safety
The following guidelines are designed to prevent personal injury, loss or
damage of property. Not following these guidelines can be dangerous or
illegal.
Wireless devices can cause and be affected by
interference. Performance is determined by signal
strength and environmental factors.
Tampering or servicing the unit by any other than a
qualified technician can lead to battery/unit damage
or personal injury. Always use OEM accessories and
services.
Do not handle while operating a motor
vehicle if local
laws prohibit the use of mobile devices while driving.
This device op
erates under similar
principles
as
cellular devices. Follow all restrictions that may apply
e.g. airplanes, hospitals, blasting areas, fuels, etc.
Do not expose to water. It could permanently
damage the unit and will void warranty.
 Loading...