

Page 1
User's Manual
- Thank you for choosing Gprinter M320 series Mobile Printers.
- These rugged printers will surely become productive and efficient additions to
your workplace. This user’s guide gives you the information you will need to operate
the M320 printers. These printers use TSPL programming language, to create and
print labels using TSPL languages, refer to the program manual.
There are two options for M320: USB+Bluetooth, USB+Wi-Fi.
Product Number: GB4943.1-2011; GB9254-2008; GB17625.1-2012;Standard
For GP-M320 Mobile Label Printer
Page 2

CONTENTS
1. Printer
1.1 Printer overview .................................................
1.2 Install the battery ...............................................
1.3 Install the media ................................................
1.4 LED display function .............................................
2. Product introduction
2.1 Introduction ....................................................
2.2 Button function .................................................
2.3 Power on function ..............................................
2.4 LED display introduction ..........................................
2.5 DIP switch (NO) .................................................
2.6 Troubleshooting .................................................
1
Page 3
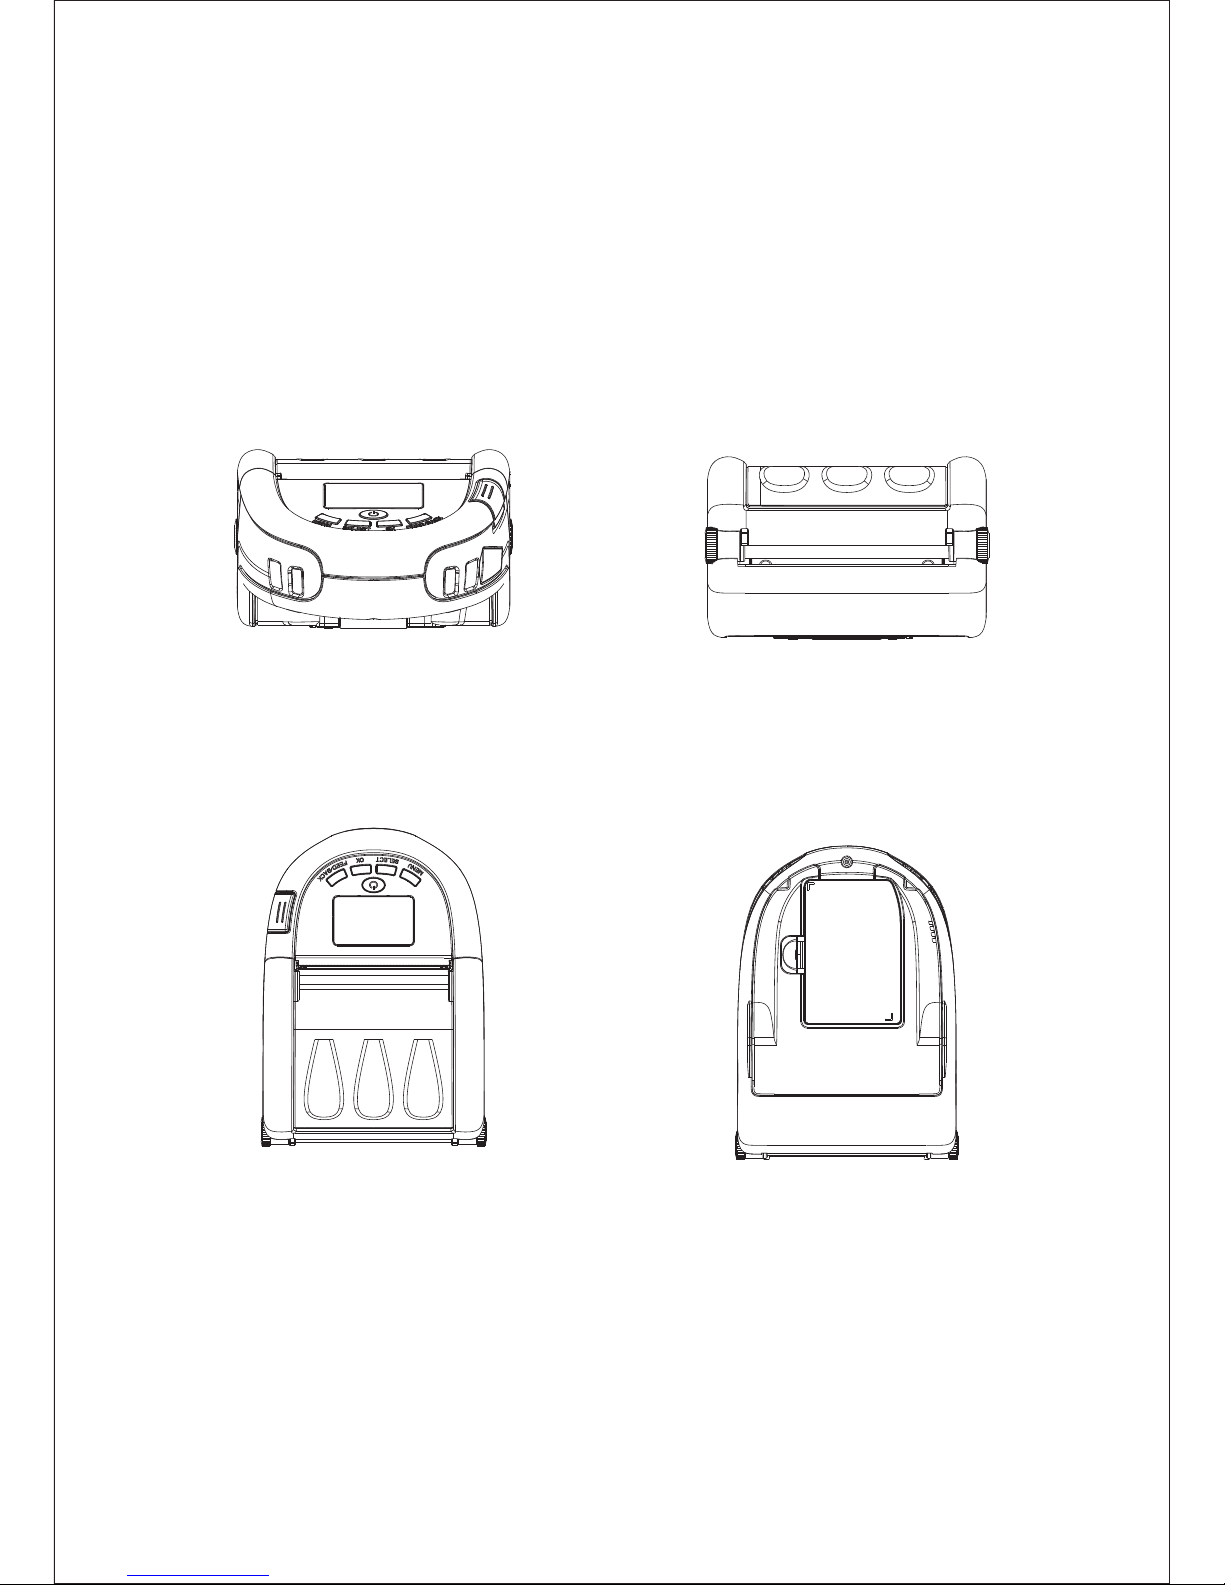
Printer Overview
Upward View
Front view Back view
Top view
2
Page 4
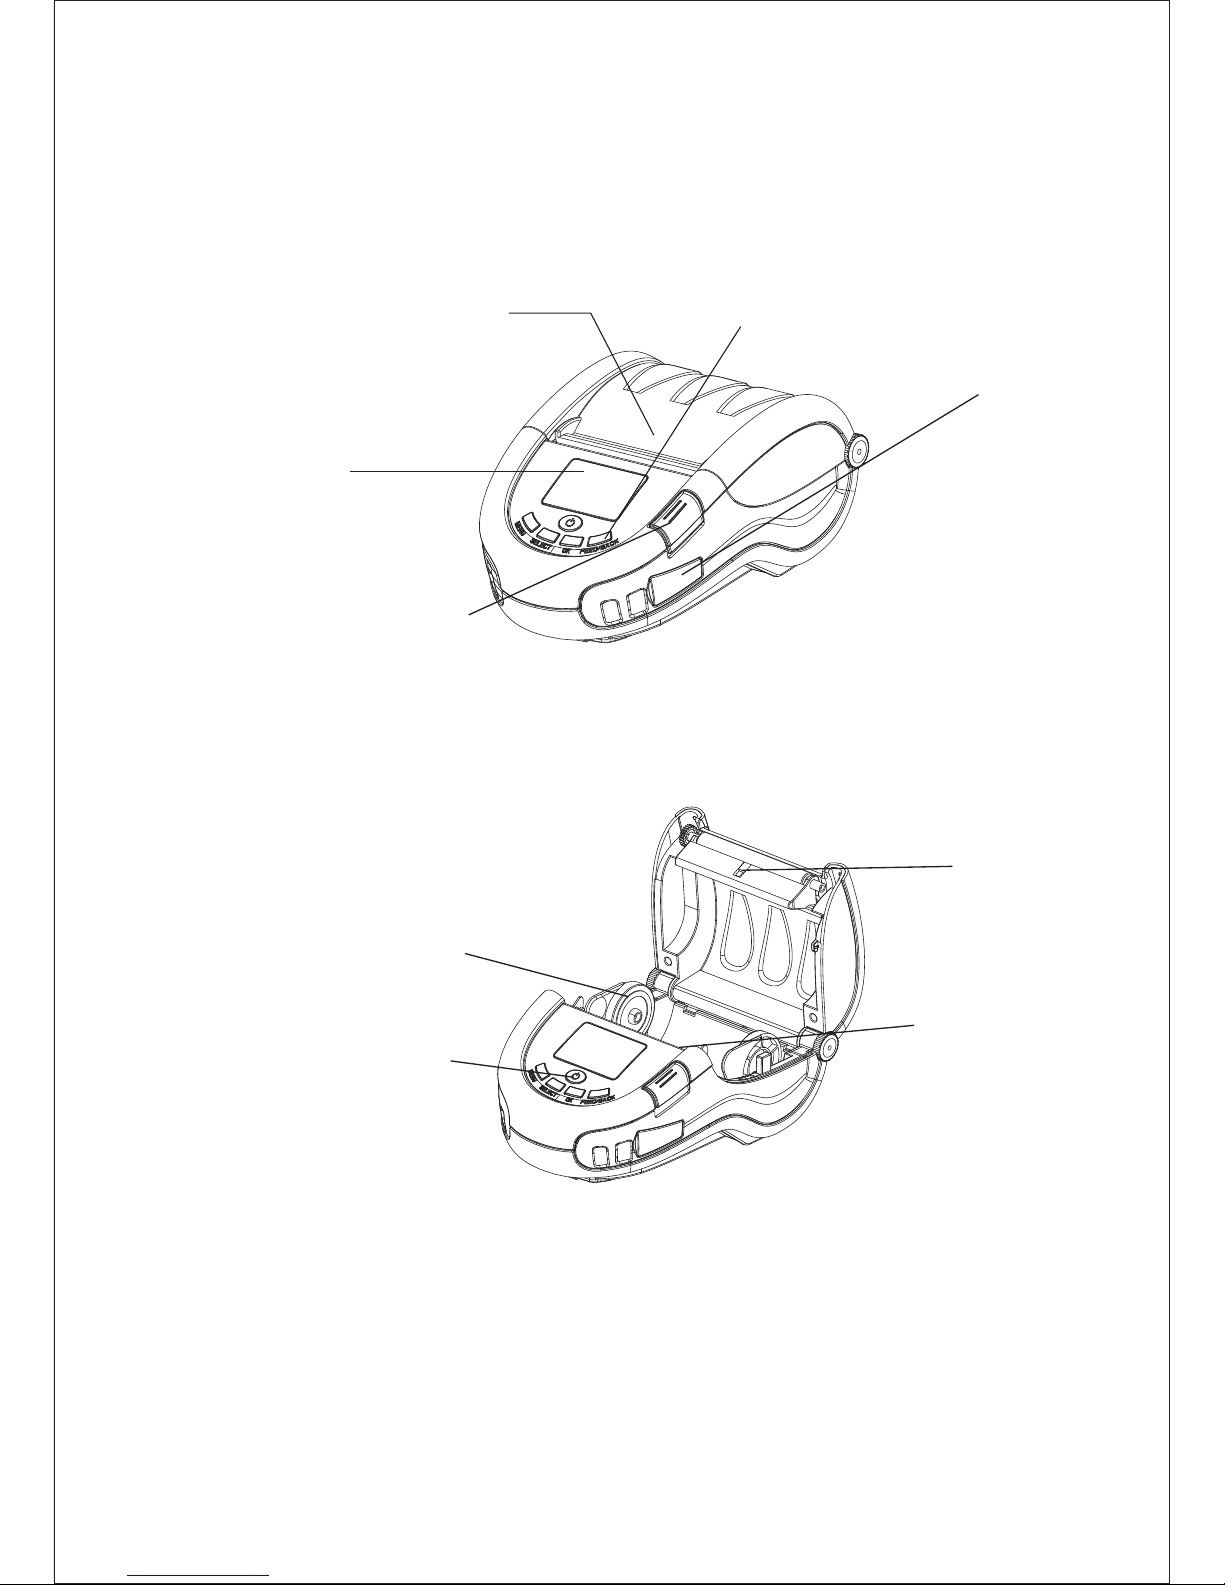
Print Head
Power button
FEED button
PAUSE button
LED indicator
USB Port
Cover-open button
Sensor
Media fixing holder
3
LED indicator lamp: On line ERROR
Please refer to the product model for the actual transmission interface
Page 5

Specification
Print
Model
Print mode
Print method
Print speed
Interface
Print resolution
Print width
Memory
Print Head Temperature Detection
Print Head Position Detection
Paper Sensor
Black Mark Detection
Printer Weight
Printer Dimension
Power Supply
Barcode type
Front
Enlargement
and Rotation
Media type
Media width
Media diameter
Media out Method
Operation Condition
Storage Condition
Driver
M320
Label Mode
Direct Thermal
4inch/s(Max.), 2inch/s(Nomal)
USB+Buetooth(Wi-Fi Optional)
203dpi
Max. 72mm
Dram: 8M, Flash: 4M
Thermal sensitive resistance
Micro switch
Photo electricity sensor
Reflection sensor
CODE128, EAN128, ITF, CODE39、CODE93,
EAN13, EAN13+2, EAN13+5 EAN8, EAN8+2,
EAN8+5, CODABAR POSTNET, UPC-A,
UPC-A+2, UPC-A+5 UPC-E, UPC-E+2, UPC-E+5,
CPOST MSI, MSIC, PLESSEY, ITF14 , EAN14
2D:
ID:
QRCODE
Font 0 to Font 8
1~8 times enlargement in horizontal and vertical
direction. Rotation in 0°、90°、180°、270°.
Roll thermal paper
20MM-80MM
Max. 60
Tear off
Win9X/Win ME/Win2000/WinNT/WinXP,
WinVista, Win7, Win8
0.6KG
170(L)*115(W)*80(H)MM
5VDC, IA
Temperature: 5~45℃, Humidity: 10~80%
Temperature: -10~50℃, Humidity: 10~90%
General
Media
Software
4
Page 6
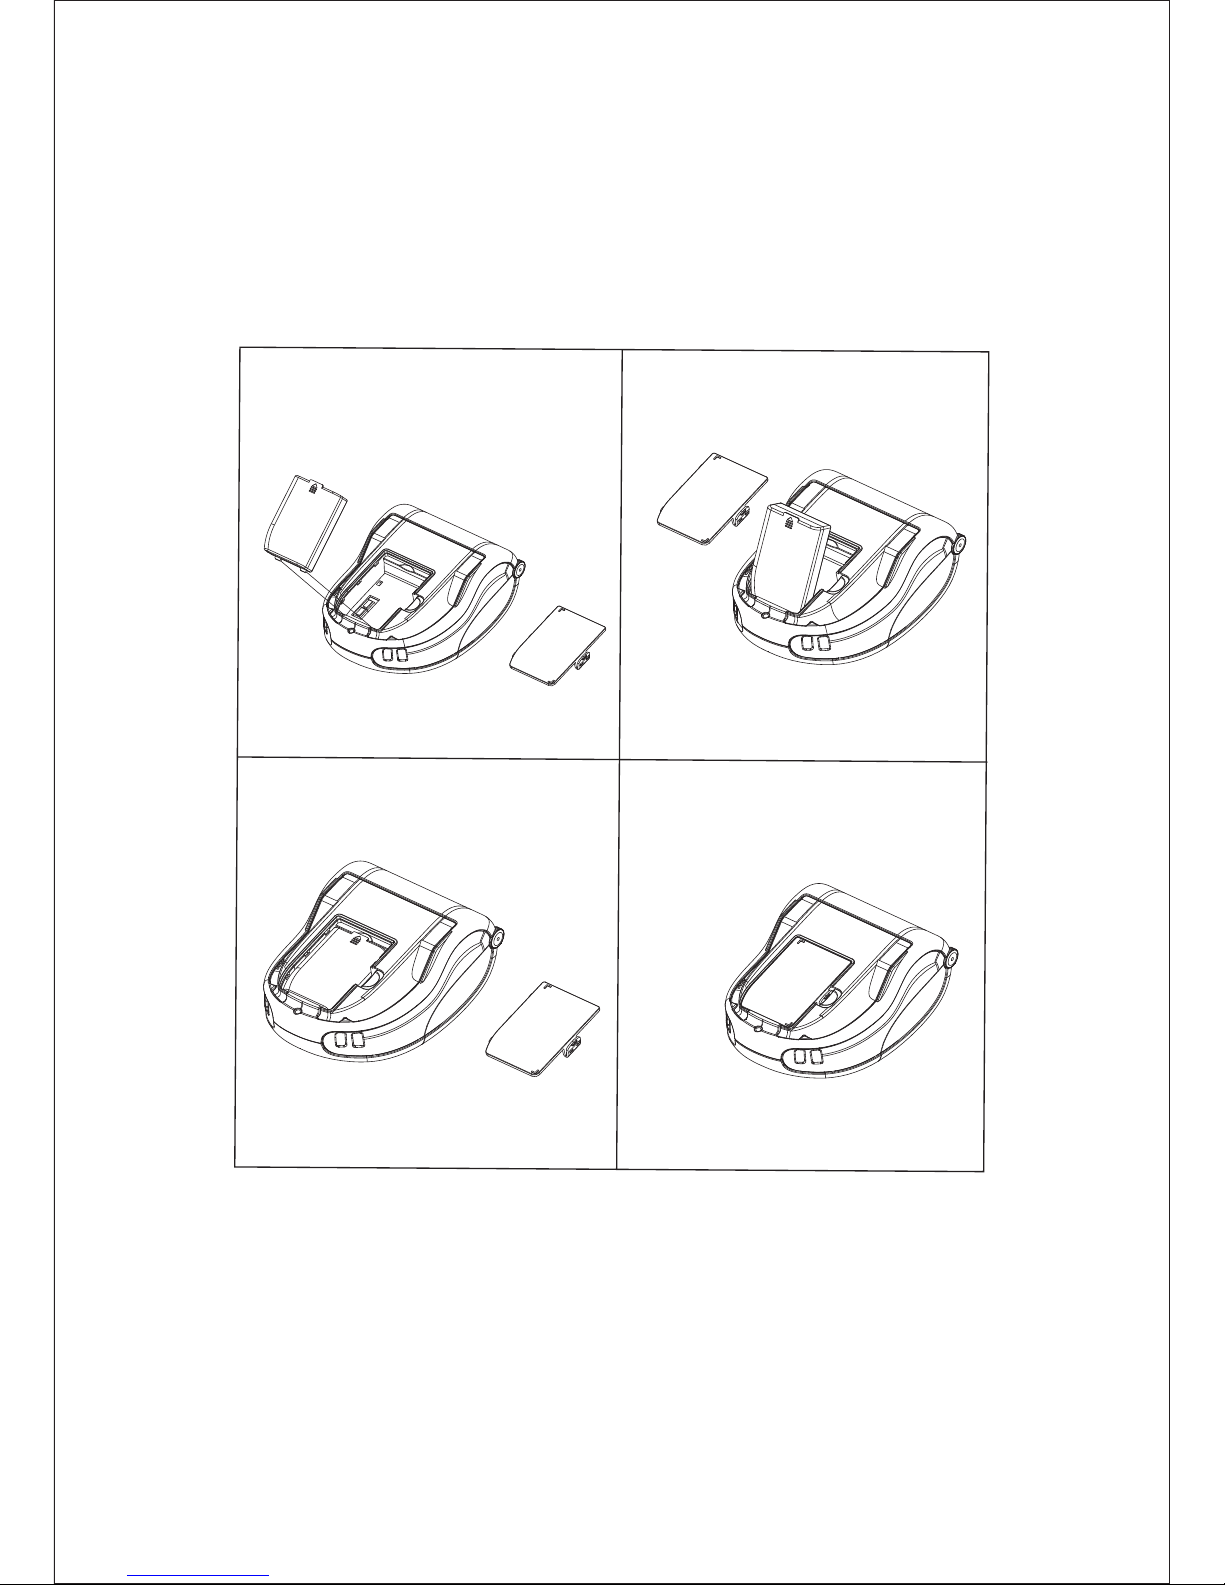
Open the battery compartment cover and put battery inside, re-install battery compartment
sover and lock it securely.
Install the Battery
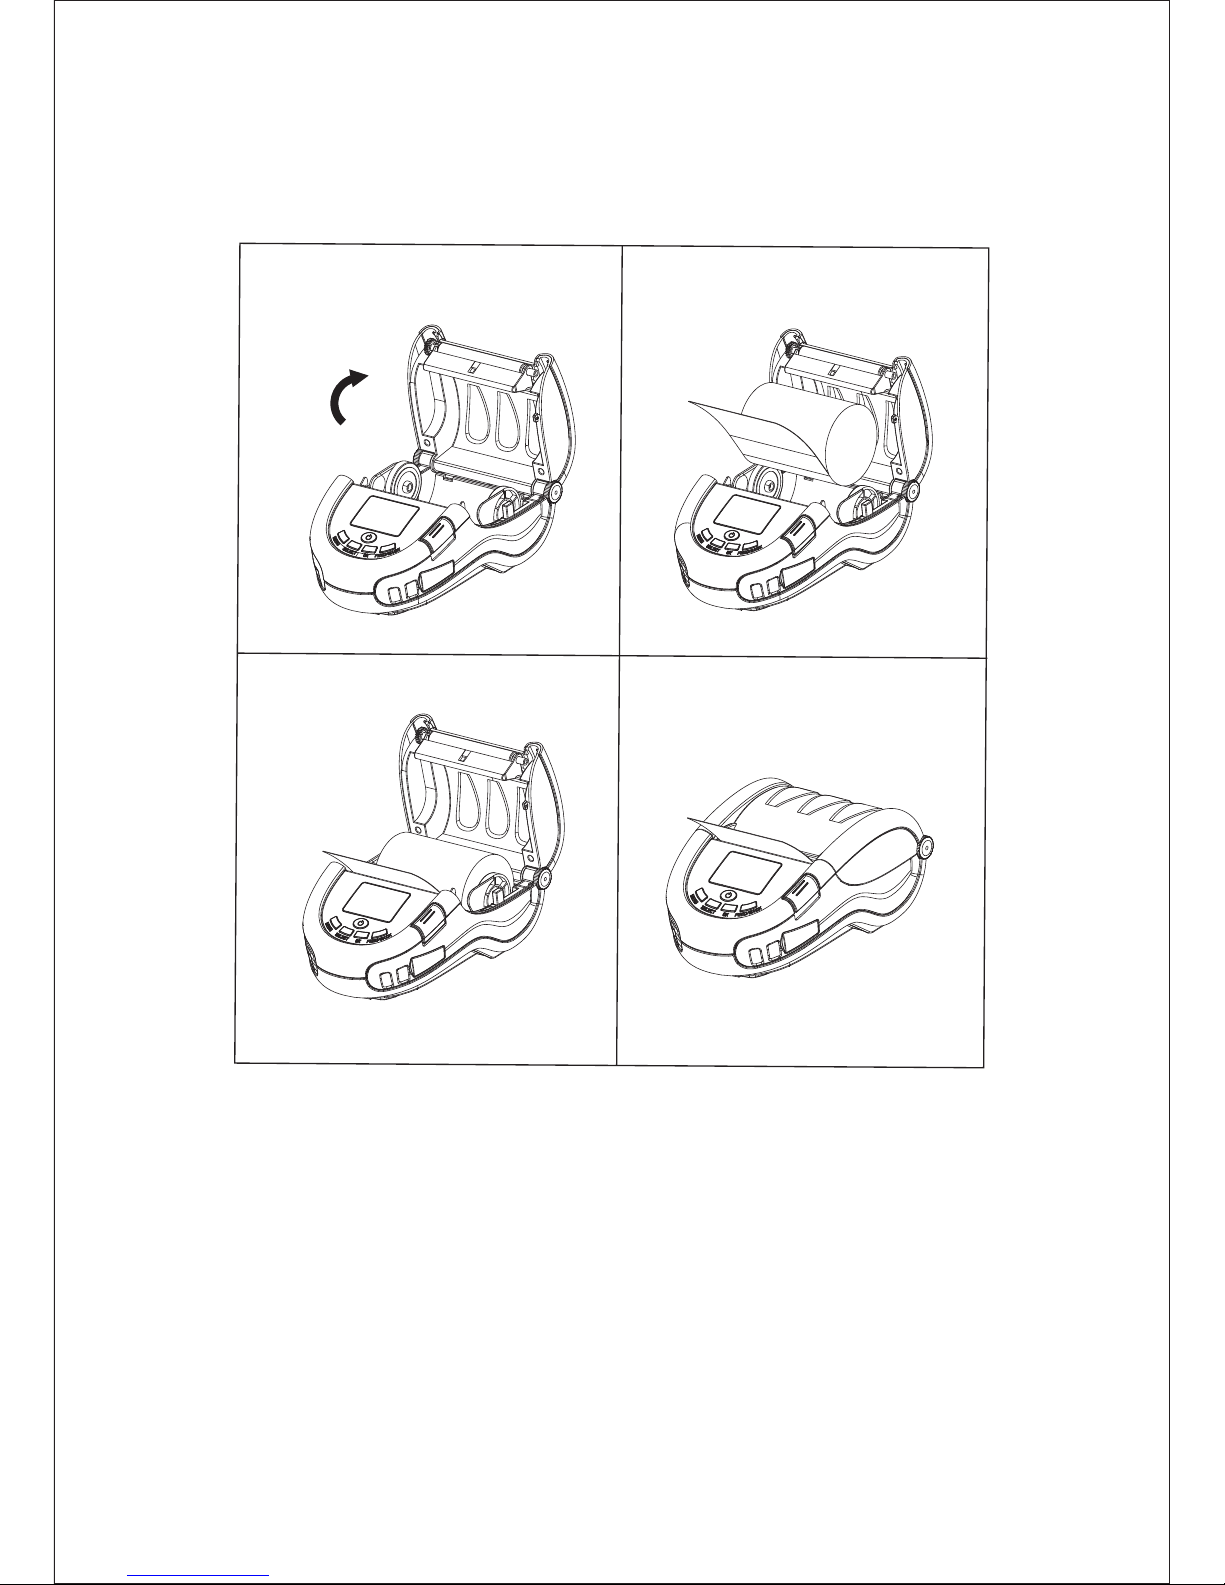
Open the top cover and insert the roll of media into media compartment, ensure that the
media pulls off, and pull a short length of media out of the printer, close the top cover firmly
and ensure it is securely latched on both sides.Turn on the printer and press the FEED button,
the printer will advance the media until the FEED button is released. Verify the media is
feeding properly and without binding or skewing sideways.
Install the Media
5
Page 7
6
Main characteristics :
- Built-in power supply - Print width 20mm-80mm
- Max speed :4inch/sec - Temperature auto control
- Support different size thermal paper - LED screen display
Page 8
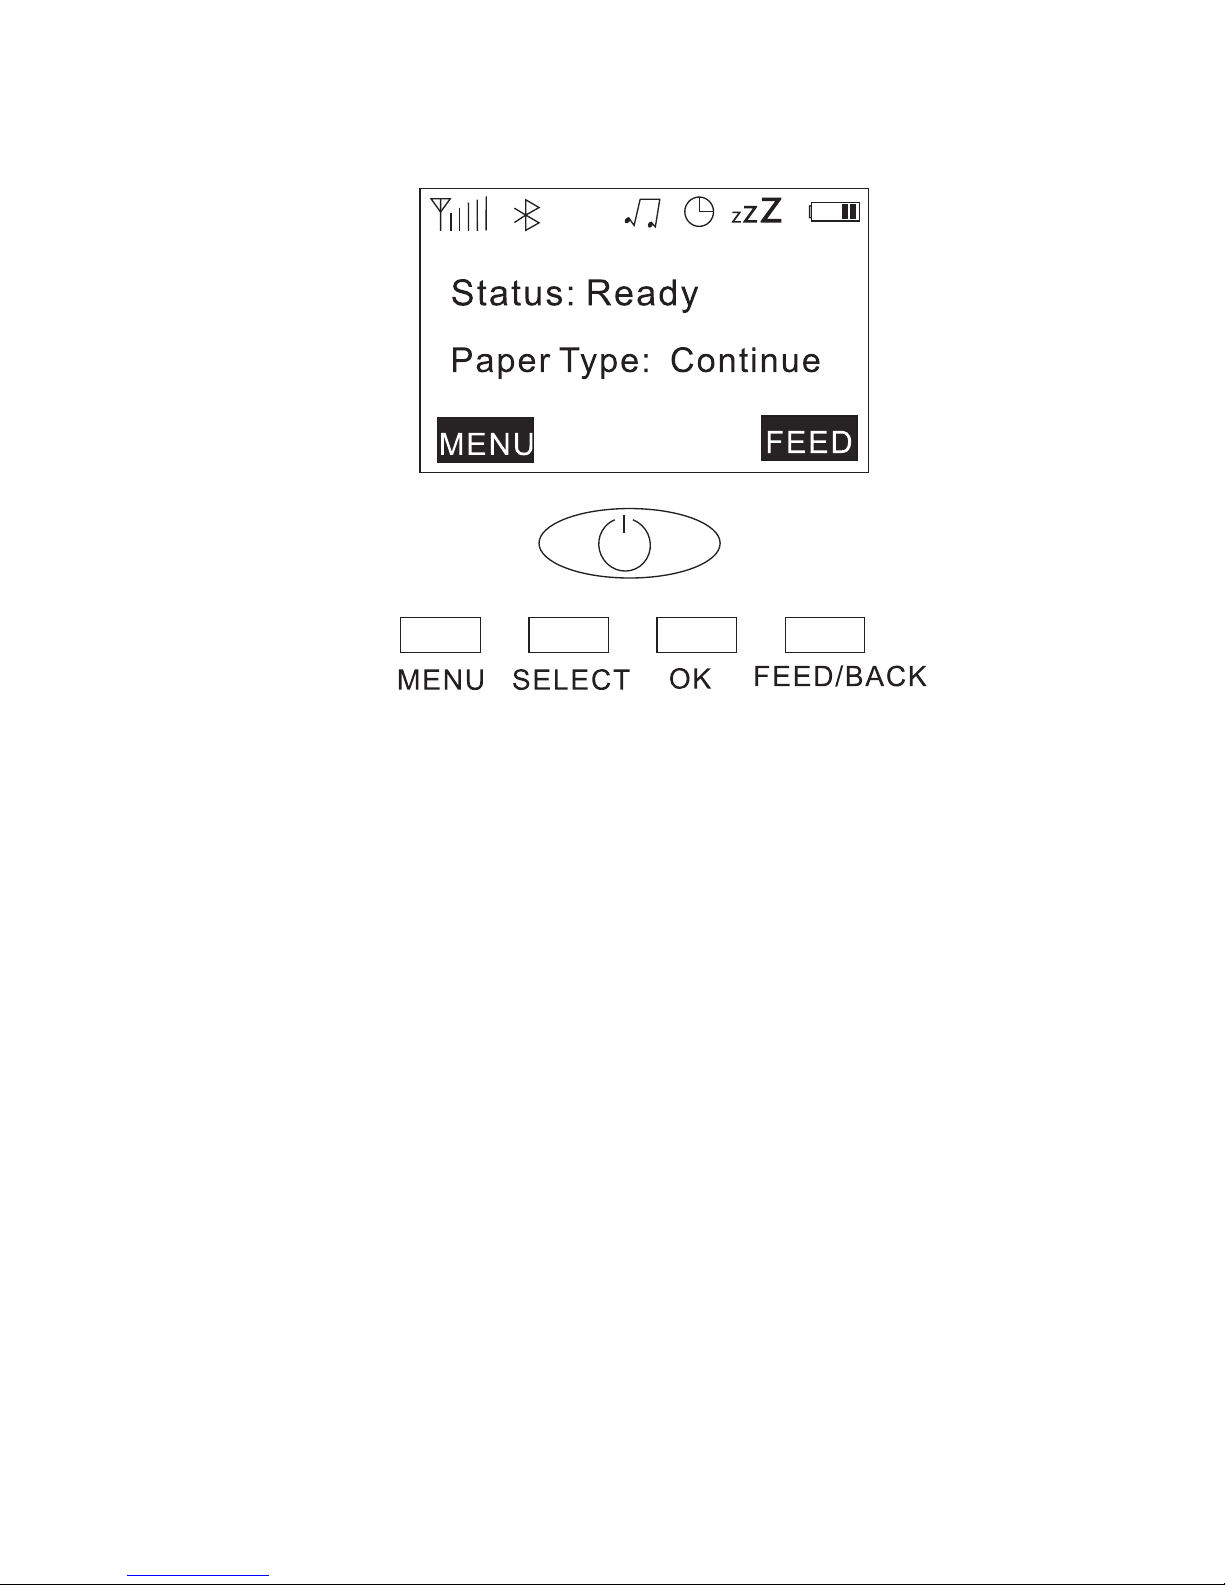
LED Display Function
Button Function
POWER: Press it to turn on when printer is Off; Long
Press it to turn off when printer is On.
7
Menu: Click the entry menu,
OK: Confirmation
SELECT: Menu Selection
Feed/Back: Feed paper and return.
M320 Boot screen
menu
1. setting: speed density
2. communication: bluetooth WIFI USB
3. media: paper quantity
4. display: time setting of Lock Screen and turn off
5. battery: electric quantity
6. information: seft test.version.Factory Default
Page 9
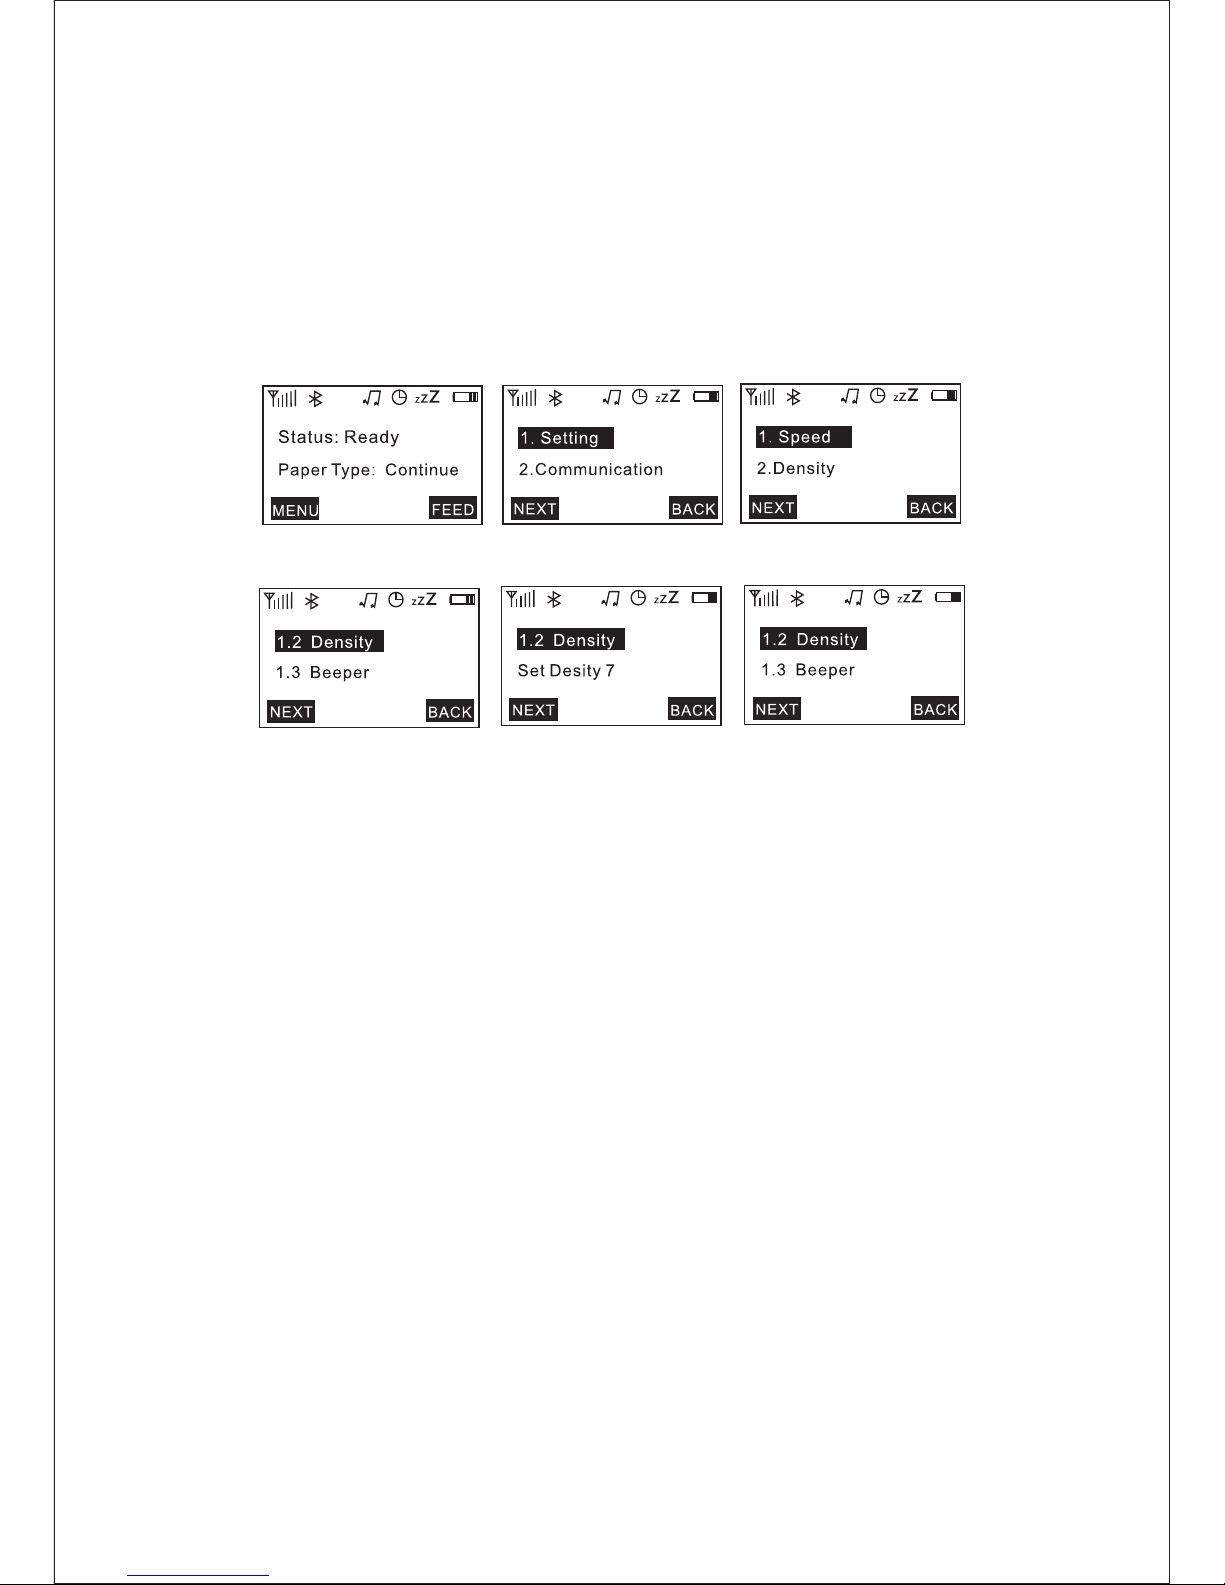
Example for setting printer density
Step 1. Press MENU ( see picture1 & 2)
Step 2. Press SELECT ( see picture 3)
Step 3. Press MENU (NEXT) ( Then see picture 4)
Step 4. Press SELECT ( see picture 5, press SELECT to select density 0~15)
Step 5. Press OK to complete the setting. ( See picture 6, settings done)
Self test printing
Step 1. Load paper into the printer and turn on the POWER.
Step 2. Press MENU to enter into setting menu
Step 3. Press MENU button till you find 6. INFORMATION
Step 4. Press SELECT, and when you see 6.1 Self Test, press SELECT, then selft test will be printed.
Printer display lock time setting
Step 1. Load paper into the printer and turn on the POWER.
Step 2. Press MENU to enter into setting menu
Step 3. Press MENU button till you find 4. Display
Step 4. Press SELECT, when you see 4.1 Lock Screen, press SELECT,
you can select Set lock 10 sec 30sec, 60sec, 90sec
Step 5. Press OK for your final setings like Set lock 90sec, completed.
Printer Initialization
Step 1. Load paper into the printer and turn on the POWER.
Step 2. Press MENU to enter into setting menu
Step 3. Press MENU button till you find 6. Information
Step 4. Press SELECT, press MENU and when you see 6.3 Factory Restore,
press SELECT, then paper will feed as response, to show settings are completed
8
1 2 3
4 5 6
Page 10

This series printers are designed for label roll with large volume. Printer inner volume is fit for 6"
OD (Outer Diameter) paper roll, by using external paper holder, you can install 8.4"OD
industrial grade label roll.
Thanks for choosing GP- M320 s erie s dire ct the rmal b arco de pri nter .
1.Introduction
This printer can be used for batch printing,Connecting with other device by USB
interface、Bluetooth and WiFi, it supports direct thermal printing, you can choose various
kinds of printing media, including thermal paper roll and fanfold paper.
Common 1D barcode and 2D barcode fonts are built in printer. It also support 4 direction
printing, characters can be enlarged from 1 to 10 times. Besides, it supports 5 different size
bitmap fonts, OCR-A and OCR-B fonts. These series printer are the best choice among the
same class with its enhanced features, economical price and excellent printing quality.
Please refer to the information of software when you print labels. If you need to write
command by yourself, please read program manual in CD or download it from our
website. (www.gprinter.hk; www.gprinter.ru; www.gprinter.es )
2. Button Function
Feed When the printer is ready ( LED blue fixed), press the button, label paper into the
font end of the label paper.
Please follow below to operate to start.
Function Descriptions
A.Turn on the pr inte r
B.Make sure label paper is installed corre ctly a nd the
printer top cover is clos ed.
Self-test page
DIP Switch page
A.Turn off the p rint er.
B.Make sure the paper roll i s inst alle d corr ectl y and th e
printer top cover is clos ed.
C.Press and hold PAU SE but ton an d turn o n the pr inte r.
When paper feed and then re leas e FEED b utto n, DIP
switch page will be printed out .
9
Power on function
This printer has a variety of boot functions that can be used to set or test the
printer's hardware. In the boot LED display, keyset settings can activate these
functions.
c. Press menu key, enter menu then press
information, click OK after select self test.
Page 11
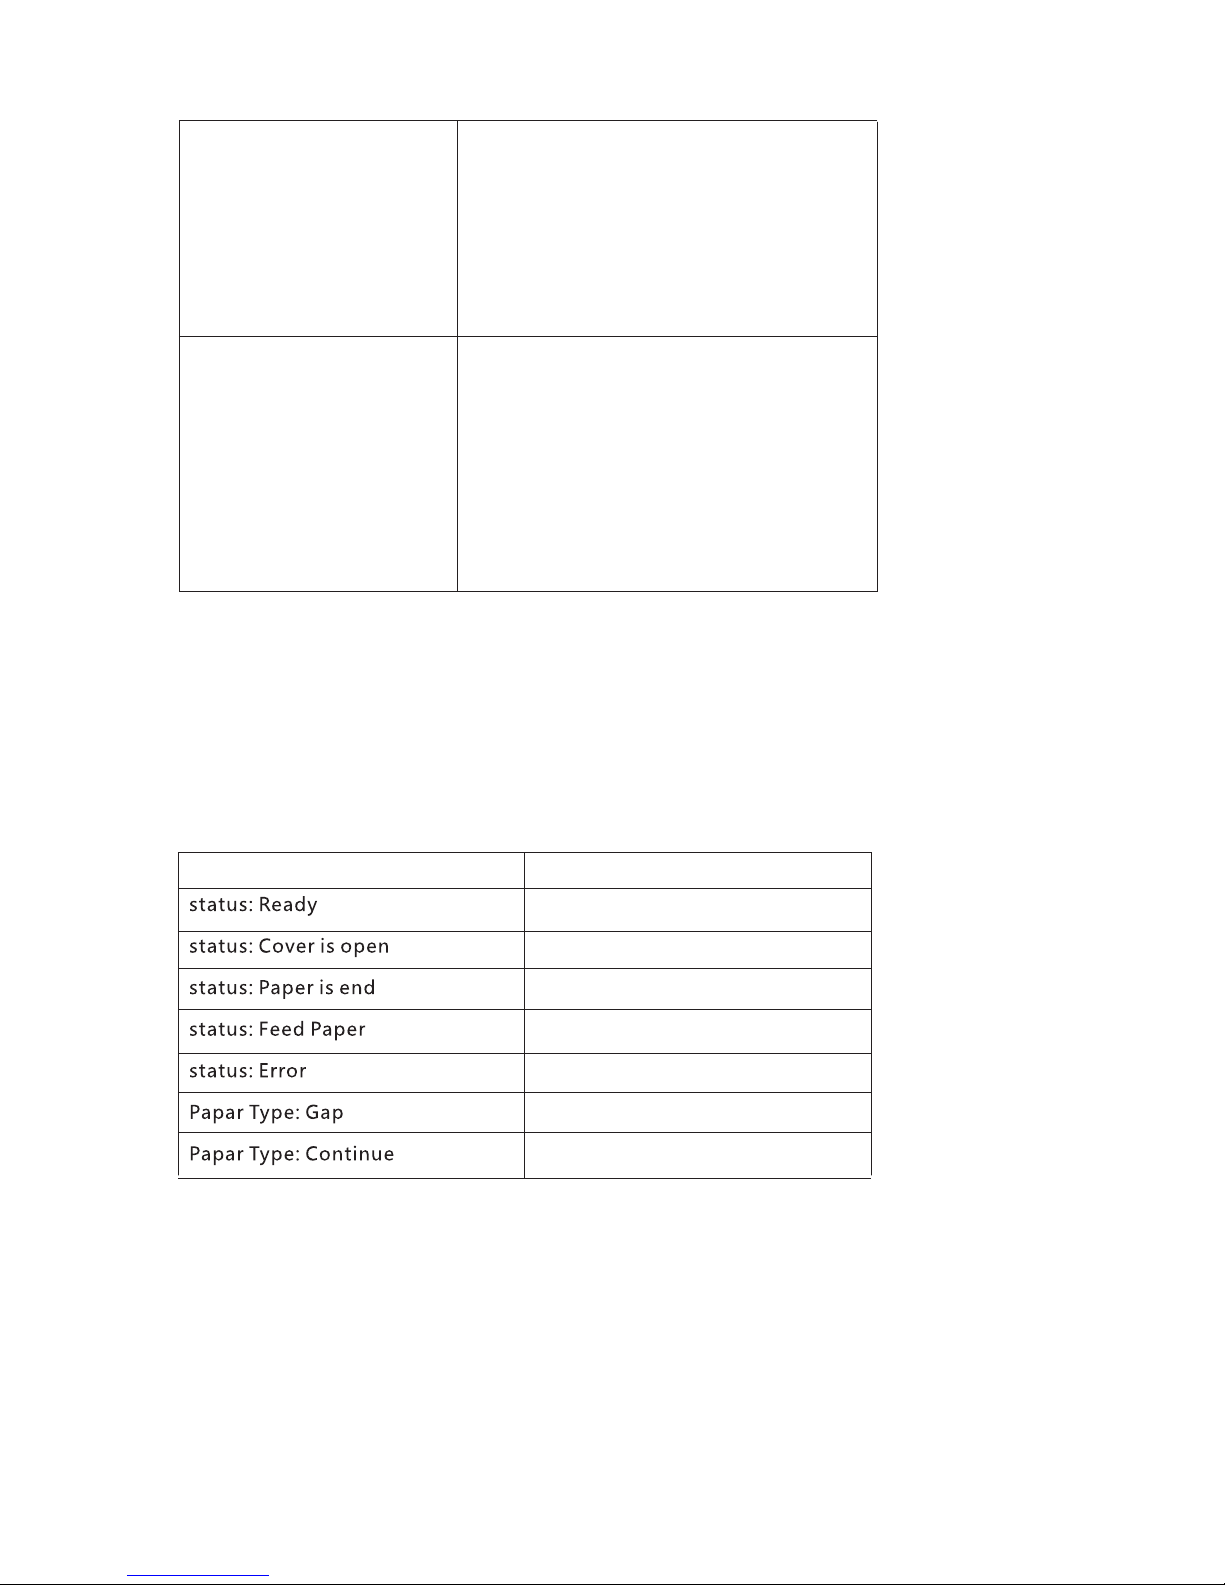
Prin ter c ove r is opened
Pape r err or
Pape r out
10
3. LED display introduction
A. Press power key
B. Put in paper and close the cover.
C. press (menu) key, enter the menu
item, click (next) to select, click the
select key when the you selected
“state” , you can able set the timing
of lock screen or shutdown.
Printer lock shutoff time
A. Press power key
B. Put in paper and close the cover.
C. Press the (menu) key to enter the
menu item, click (next) to select
information, and click the OK key
when factory restorer is selected,
Printer initialization
Prin ter p wro k and Normal p rin t
Description
Prin ter p ape r is end
Pape r gap
Pape r con tin ue
LED
Page 12
5.Troubleshooting
Below the table of contents are generally common problems and solutions, you can also
contact your local service provider for more technical support.
Problems
Possible Reasons Solution and Suggesti on
Power indicator
not “ON”
Plug to AC outlet and
plug to printer not well
connected.
Check power connector
and AC outlet if plugs are
correctly connected.
Printer power not turned on Turn on power switch
Print head not well closed
Close print head by pressing
whole print head mechanism
Label paper end
Change new label paper
Label paper improperly
installed
Refer to Print media loading
steps in User Manual to
re-install paper.
Gap sensor detection error
Adjust paper specification and
print again
Label paper jammed
Clear jammed paper
Cable improperly
connected
Reconnect the cable
If connecting with Serial cable :
1.Change a new cable.
2.Check if Pin configuration in cable
two sides are matching each other;
3.Make sure the baud rate setting in
PC and
If connecting with USB ca ble
1.Check if choose USB virtual p ort
in driver of computer. Pl ease t ry
and print if many virtual ports are
exited.
2.Change new cable if nec essa ry.
3.Clean print head and print
again.
4.Print density setting wro ng.
5.Re-connect print he ad cab le.
6.Check if the motor cabl e
connected properly.
7.Check if there is PRINT c omma nd
at the end of pri ntin g file ; or if
there is CRLF comma nd at th e end
of every line.
printer are the same.
Not printing
Pin configuration in
cable two sides are not
matching each other
11
4. DIP switch function
NO
Page 13

Storage space is
exceeded
(FLASH/ DRAM)
FLASH/ DRAM Storage
is exceeded
Clear unnecessary file from FLASH/ DRAM.
DRAM only can save 256 files.
Max capacity:1024KB.
FLASH only can save 256 files.
Max capacity:1024KB.
Not good
printing
quality
Label improperly installed.
Too much dust or adhesive
on print head.
Print density setting wrong.
Print head damaged.
Re-install label.
Clean print head and print again.
Clean Rubber roller.
Adjust print density and speed.
Take self test page to check if printing
are completely to confirm if necessary
to change new print head.
Change suitable ribbon and label paper.
If the label thickness exceed 0.22 mm or
it will affect the printing quality.
Check if the print head base is totally
closed.
When printing
paper out of
step
Label paper size
wrong setting.
Label sensor was
covered
Adjust label size and print again.
Reduce the gap value and print again.
Clear the sensor.
Data miss printing
in one or two sides
Label paper size
wrong setting.
Exceed the max
printing width.
Adjust label size and print again.
Change roller with maximum width
Printing not stable
Printer in HEX Dump
mode
RS-232 setting wrong
Restart your printer and leave
Dump Mode.
Reset the printer consistent with
computer baud rate.
Grey line
appeared
in black label
Dirty on print head.
Dirty on rubber roller.
Clean print head.
Clean rubber roller
Reset the label print density.
Adjust paper width fixing stand to
fit your label paper size.
Print head unbalanced
stress;
label improperly installed;
Print density setting
incorrectly.
Label feeding not
smoothly;
Ribbon wrinkle
12
Page 14

Gprinter Technology Limted
Add: 703 Nanyufeng Building, Zhuhai, Guangdong, China.
www.gprinter.hk | gprinter.es gprinter.ru|
 Loading...