

Page 1
Customer service hotline : 400 611 3828
Thermal Transfer Barcode Printer
User's Manual
GP-1124T/1125T
Page 2
CONTENTS
The printer
Introduction
Product features
Standard equipment
Optional accessories
Specifications
Print specifications
Ribbon specifications
The paper size
Product introduction
Open and check
Printer components
Appearance
Internal
The bottom
Installation
LED indicator function
Troubleshooting
Maintenance
Install the printer
Install the ribbon
Installation of paper
Installation of paper
LED indicator
Thermal printing
Thermal transfer printing
Butt on Function
Start function
Common problem
13
13
6.1.Printer Cleaning
15
15
Page 3

The printer
Introduction
Thanks for choosing GP-1124T, GP-1125T series direct thermal and thermal transfer label printer.
This series printer is built with 2 sets of gear to drive motor, with capability of handling 300
meters long ribbon and large label roll. Printer inner volume is fit for 5" OD (Outer Diameter)
paper roll, if using external paper holder, you can install 8.4"OD industrial grade label roll.
This printer is designed for real-time and batch label printing, with standard serial, parallel, USB
and Ethernet connection port. Direct thermal printing and thermal transfer printing modes are all
in one printer body, so you can choose various kinds of printing materials, for example: thermal
paper, plain paper, coated paper, silver paper, plastic paper etc.
Common 1D barcode and 2D barcode fonts are built inside printer, also it support 4 direction
printing, characters can be enlarged from 1 to 10 times. Besides, it supports 5 different size
bitmap fonts, OCR-A and OCR-B fonts, together with 203dpi higher print resolution, this series
printer are your best choice among the same class.
Declaration: This is a class A product, fit for Non Tropic regions installation. This product
may cause radio interference in life environment, users may need to take adequate preven
-tive measures.
Application Field
Manufacturing & Warehousing logistic industry
Healthcare
Parcel Post
Office & Studio
Retail
Product labeling and marking
Warehouse management label
Category marking label
Operation instruction marking label
Distributing instruction marking label
Patients marking
Medicine marking
Specimen marking
Mailing label
Price Label marking
Product item marking
Jewelry product marking
Page 4
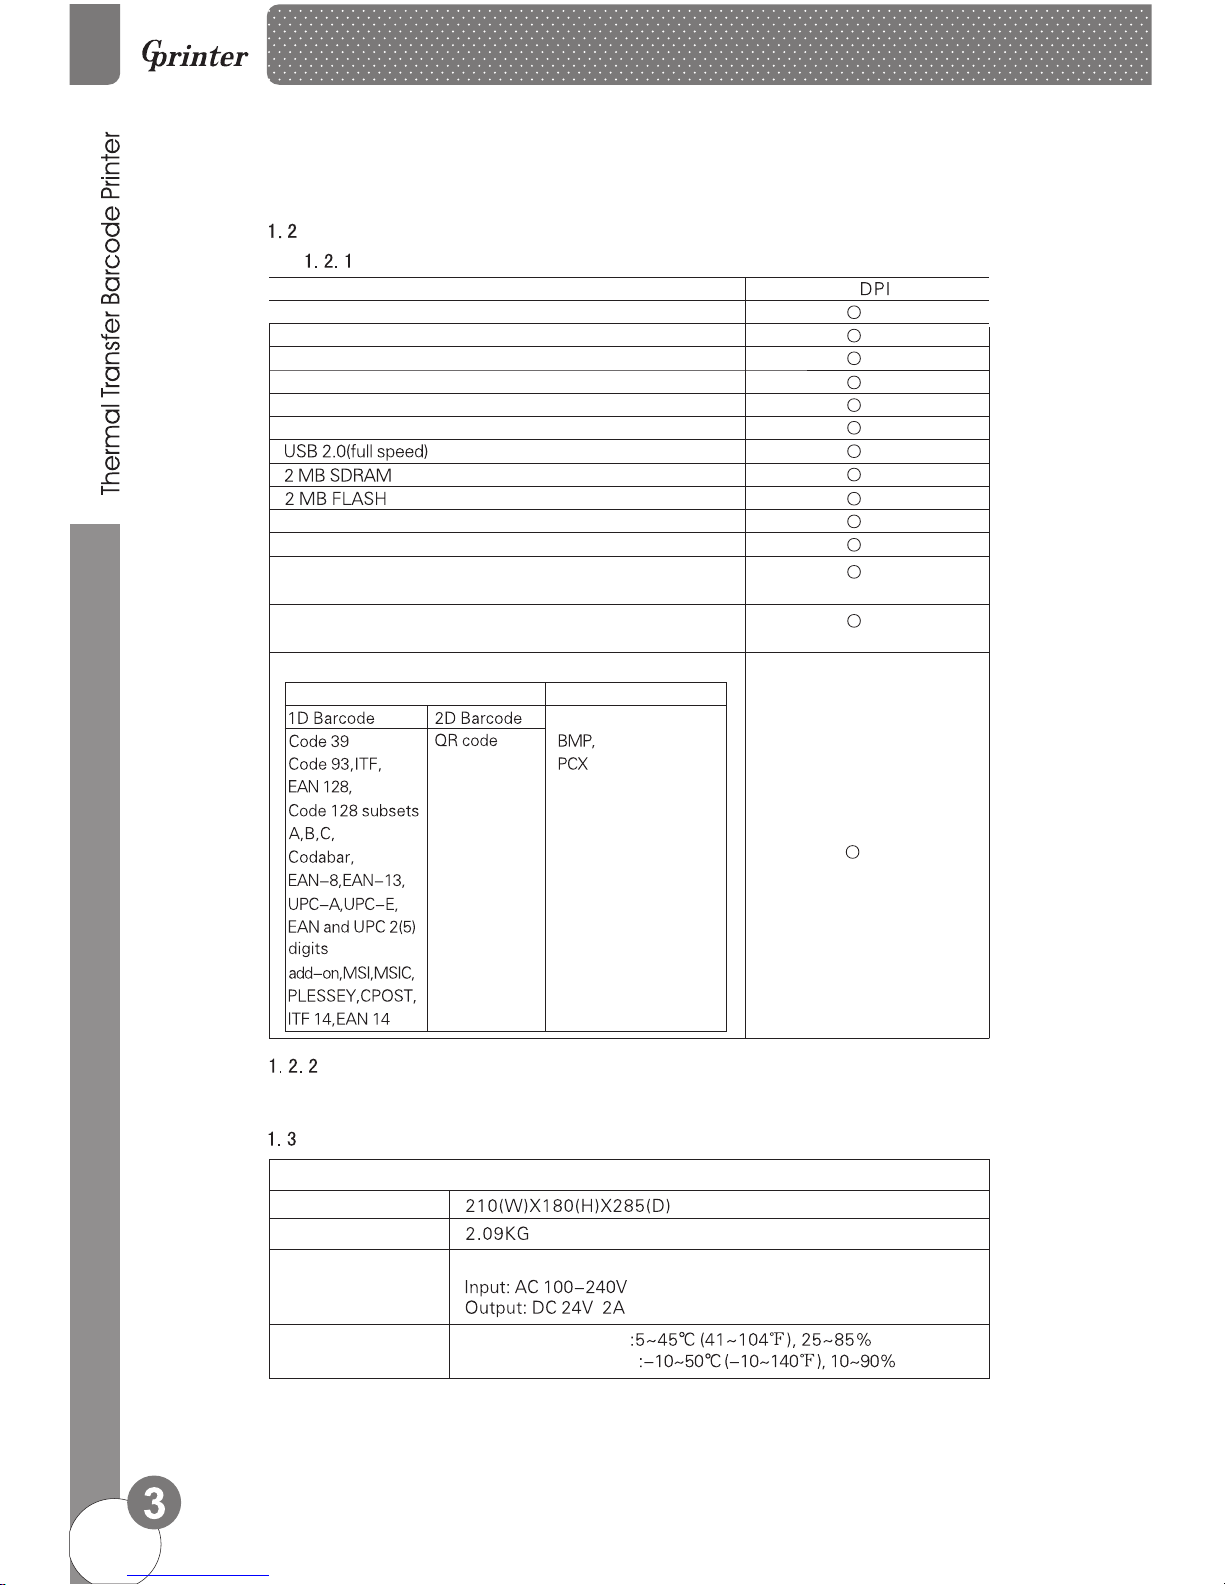
Product features
Standard equipment
Optional accessories
Specifications
Support bar code
Support picture format
Support picture format
Power Supply
Printer weight
Specifications
Printer size
External support optional GP-1124T, GP-1125T standard.
Can print text, bar code, pictures
Product standard
Ribbon printing
Thermal printing
ABS plastic housing
Gap sensor
Ribbon sensor
The print head open sensor
Communication interface
Memory
Memory
The paper key and LED indicating lamp
Built in 8 dot matrix font English number
The character and the bar code can be printed in four directions
of rotation (0,90,180,270) degree.
Built in simplified Chinese, traditional and Korean font for
programming.
The built-in voltage automatic switching power supply
203
Work environment
Dampness
Dampness
Storage environment
Page 5
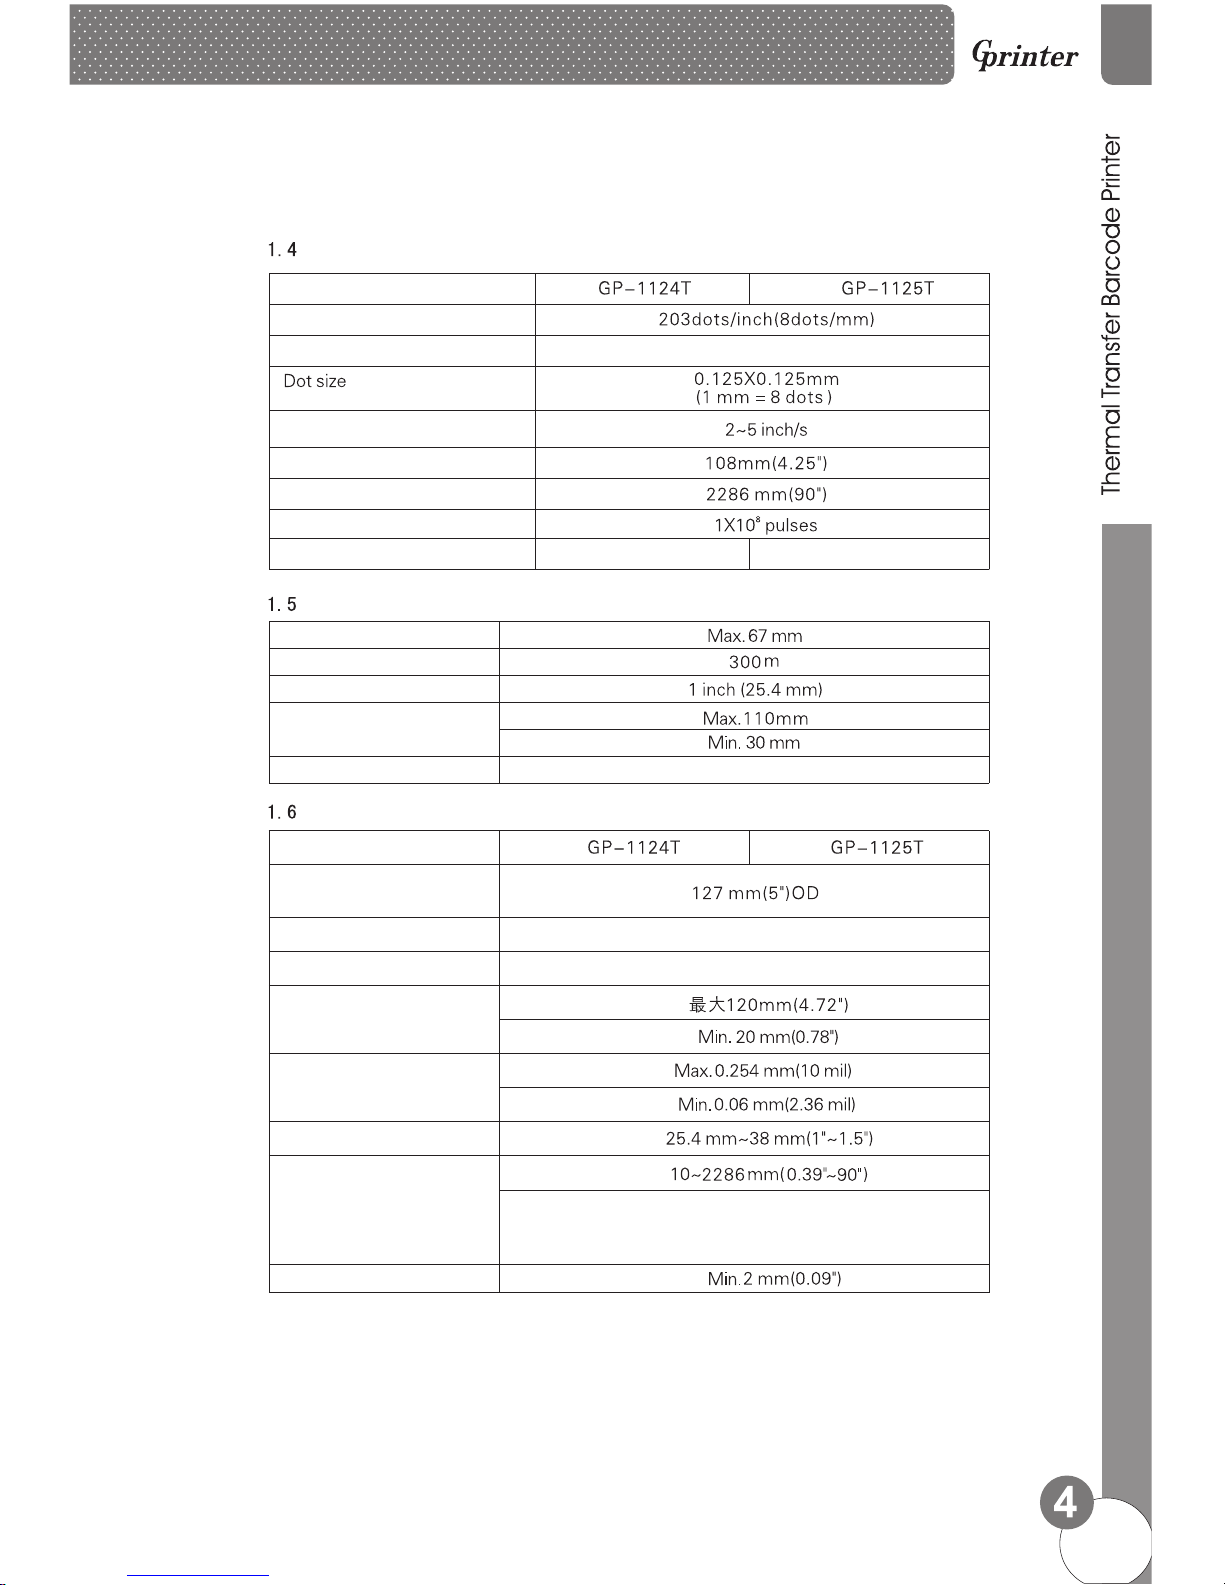
Print specifications
Model
Model
The print head
Print mode
Ribbon / thermal
Ribbon specifications
The paper size
The outer coil type
Pulse excitation
(the size) (width X length)
Print speed (inches per second)
Maximum print width
Maximum print length
Heat sensitive piece (wear)
Ribbon diameter
The ribbon length
The ribbon axis size
The ribbon width
Ribbon winding form
Label length
The paper height gap spacing
Roll axis size
The thickness of the paper
(tag + bottom paper)
The width of the paper
(tag + bottom paper)
The paper winding form
Paper type
The maximum capacity of
internal paper roll diameter
Print out of plane roll / print surface involute
Continuous paper, gap of paper, paper folding, punched paper
Note:If you use the tag length less than 25.4mm (1 "),
recommend the use of a perforated line in the gap on
the label paper so the tear.
100km 50km
Page 6
Product introduction
Open and check
This series printer is with special package to prevent damage in transportation. If there is
any unexpected damage occurred, please put in clean and stable surface and carefully open
the package to check, inform local distributor with damage details, and keep packing mate
-rials well in case you need to mail the printer.
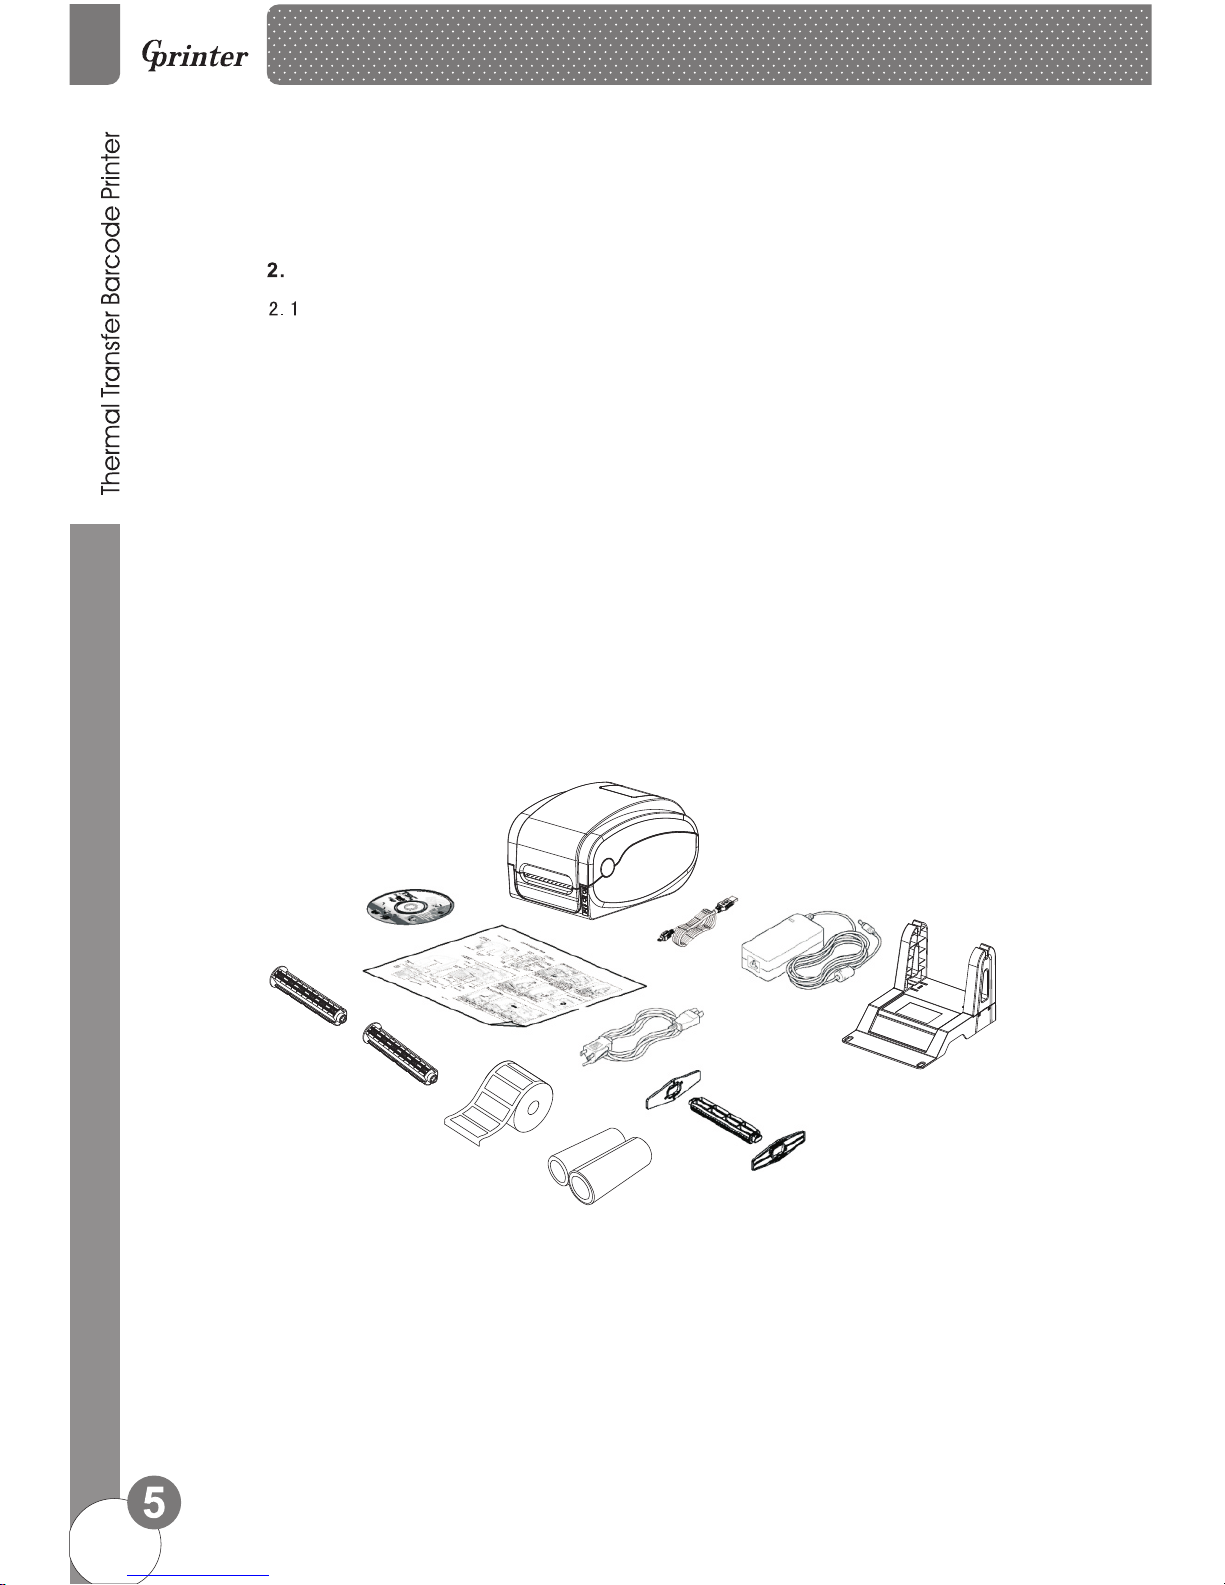
Packing list:
◆ One Label printer
◆ CD ( Driver, Nice label software, User Manual )
◆ Power Adapter
◆ Power Cord
◆ USB cable ( Parallel cabl e, serial cable optiona l)
◆ Ribbon roller & Ribbo n
◆ Label roller & Label pa per
◆ External paper hold er (Standard for GP-1125T )
<Picture 1>
Please pack equipment and materials needed for safekeeping printer for subsequent handling;
if the above items, any lost or missing, please Customer Service Department of your purchase
contact.
Page 7
Printer components
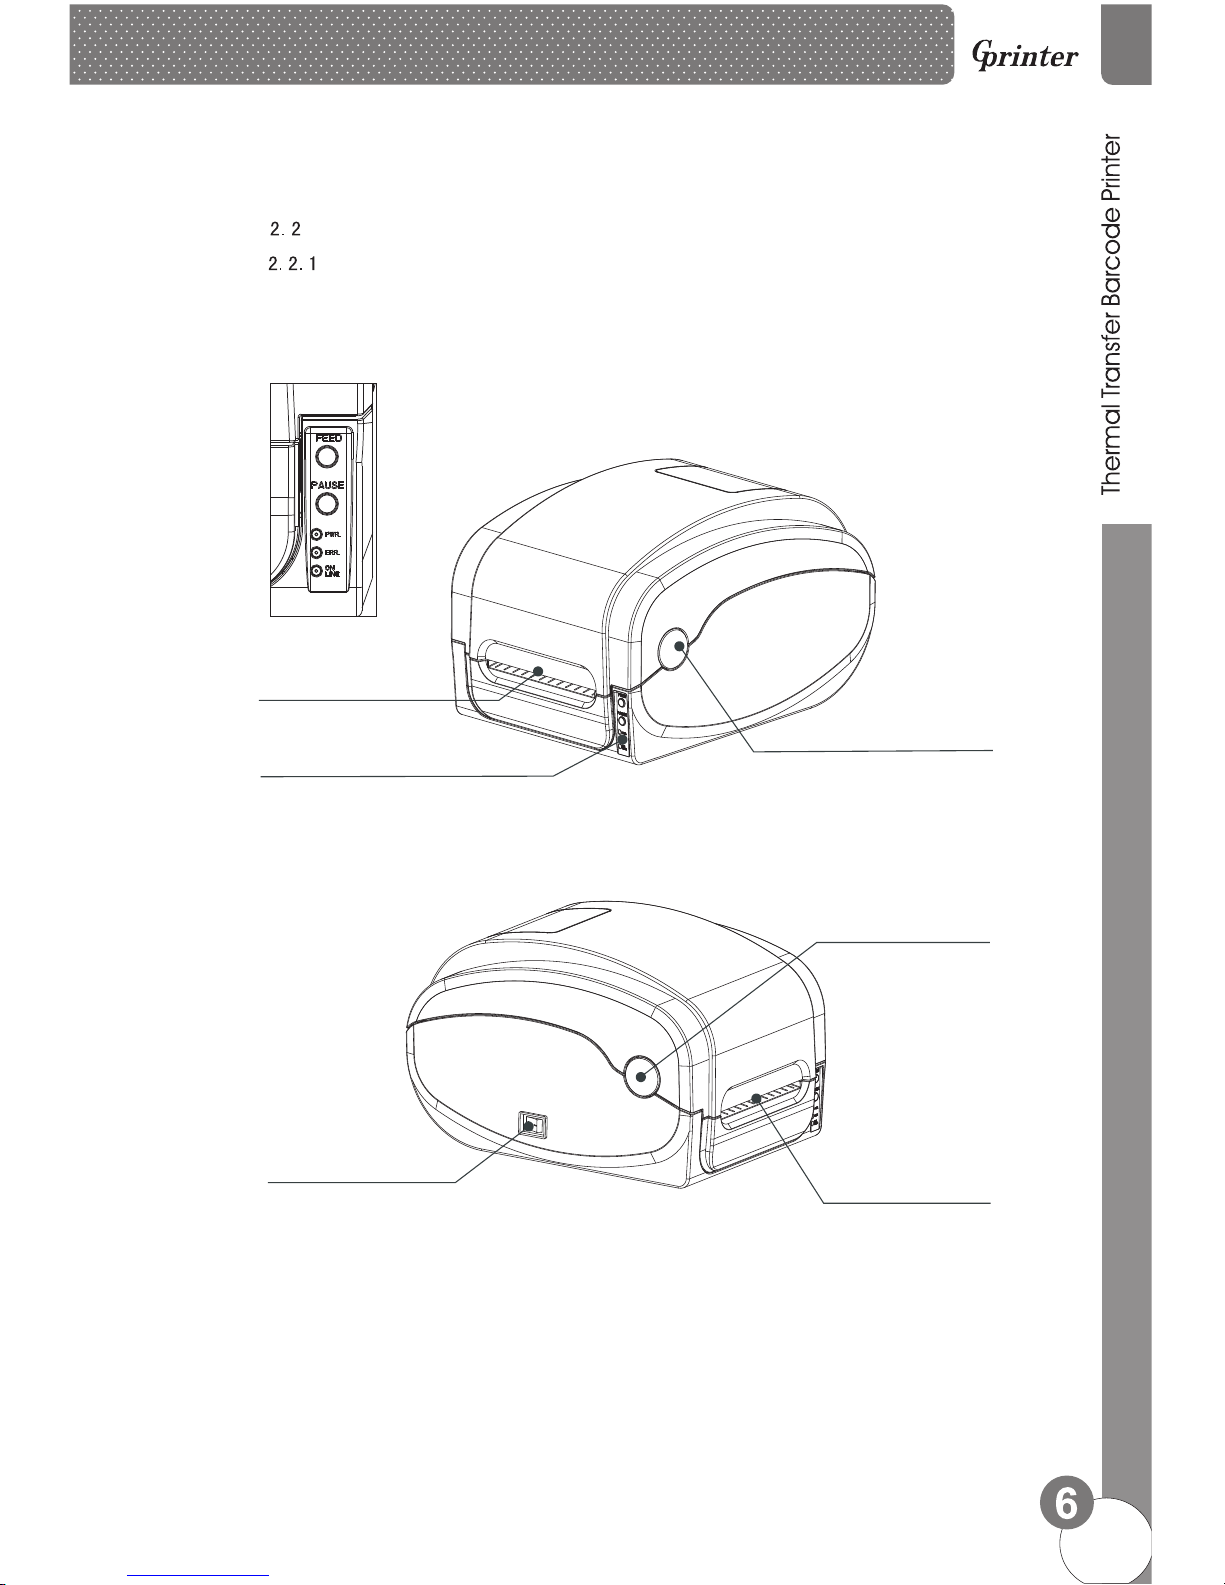
Appearance
Label exit
LED indicator
Press button for top cover open
Press button for top cover open
LED lights indicate:
★ ON LINE electric lamp ★ ERROR error lamp ★ RIBBON ribbon status light
<Pict ure 2>
<Pict ure 3>
Power on/off switch
Label exit
Page 8
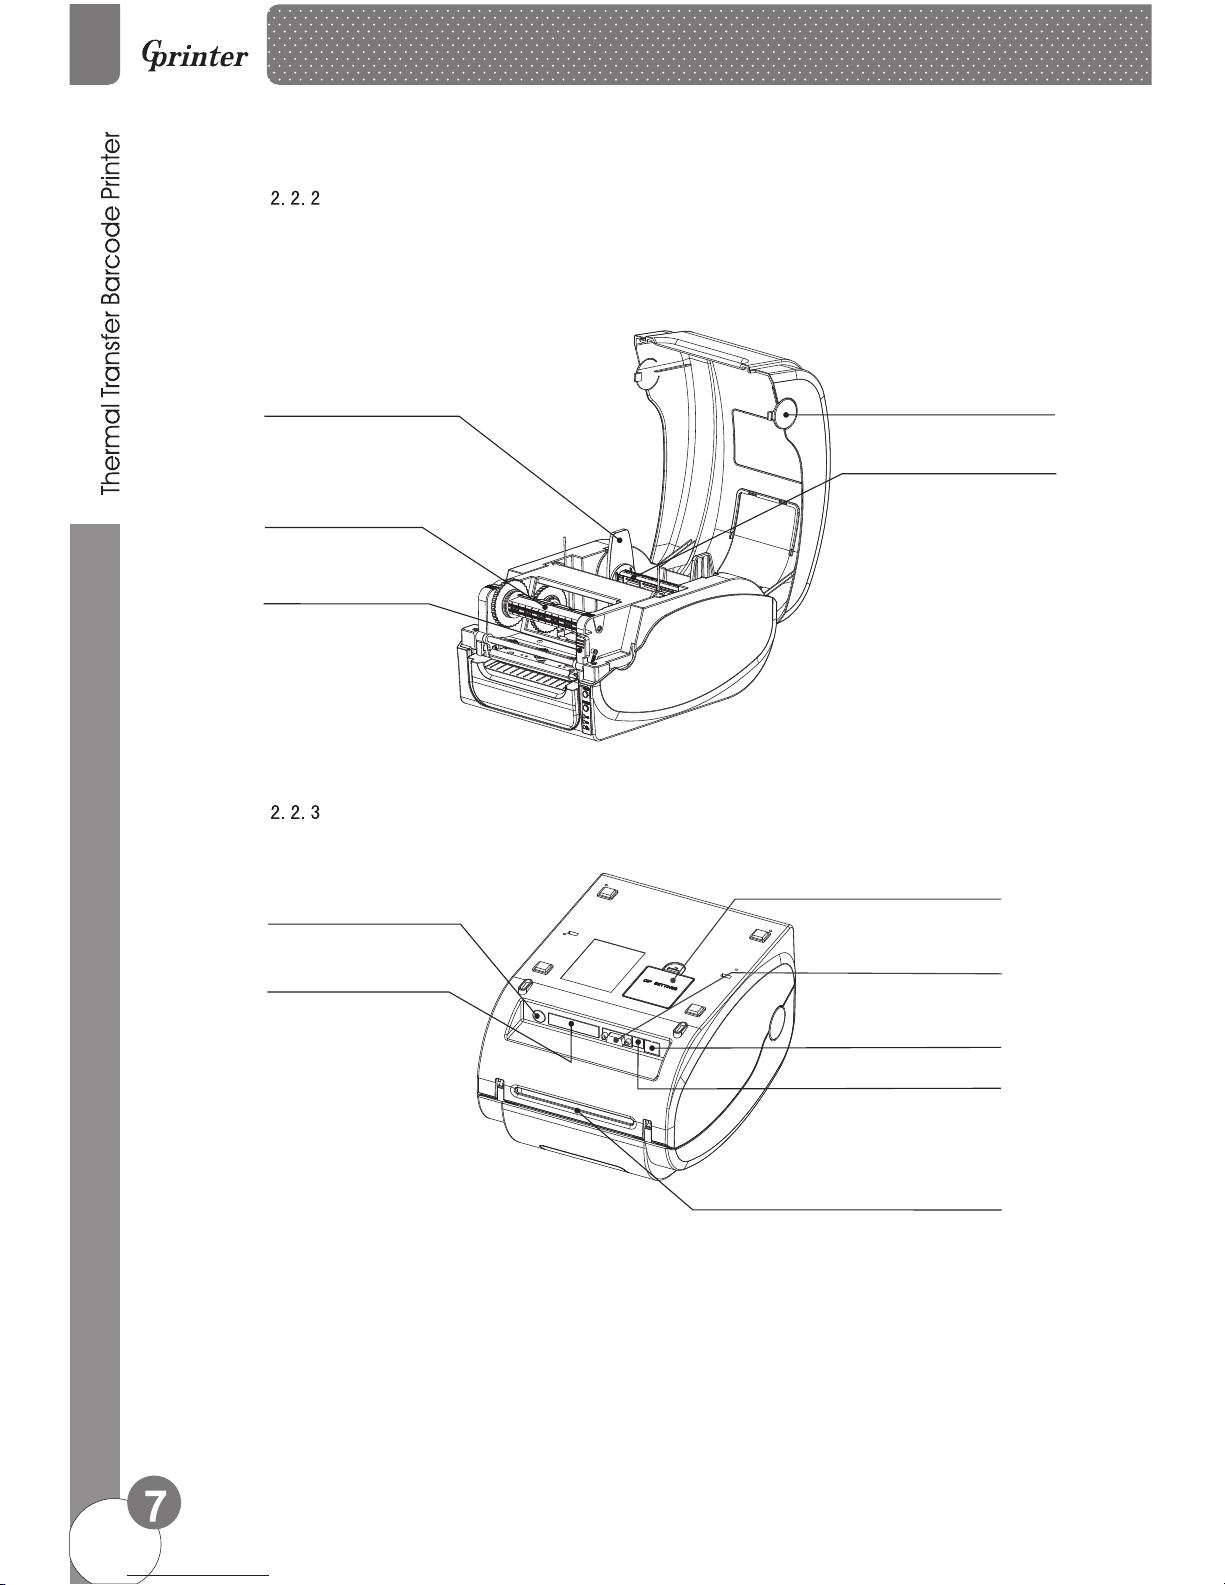
Internal
<Pict ure 4>
<Pict ure 5>
Label paper fixing stand
Label paper supply hub
Ribbon take-up hub
Push button for thermal
print head open
Top cover
The bottom
Power port
Parallel port
Bottom cover with DIP switch
RS-232C serial port
Ethernet port
USB port
Label entrance from
external holder
Note: Picture showing printer port is for GP-1125T.
Page 9
Installation
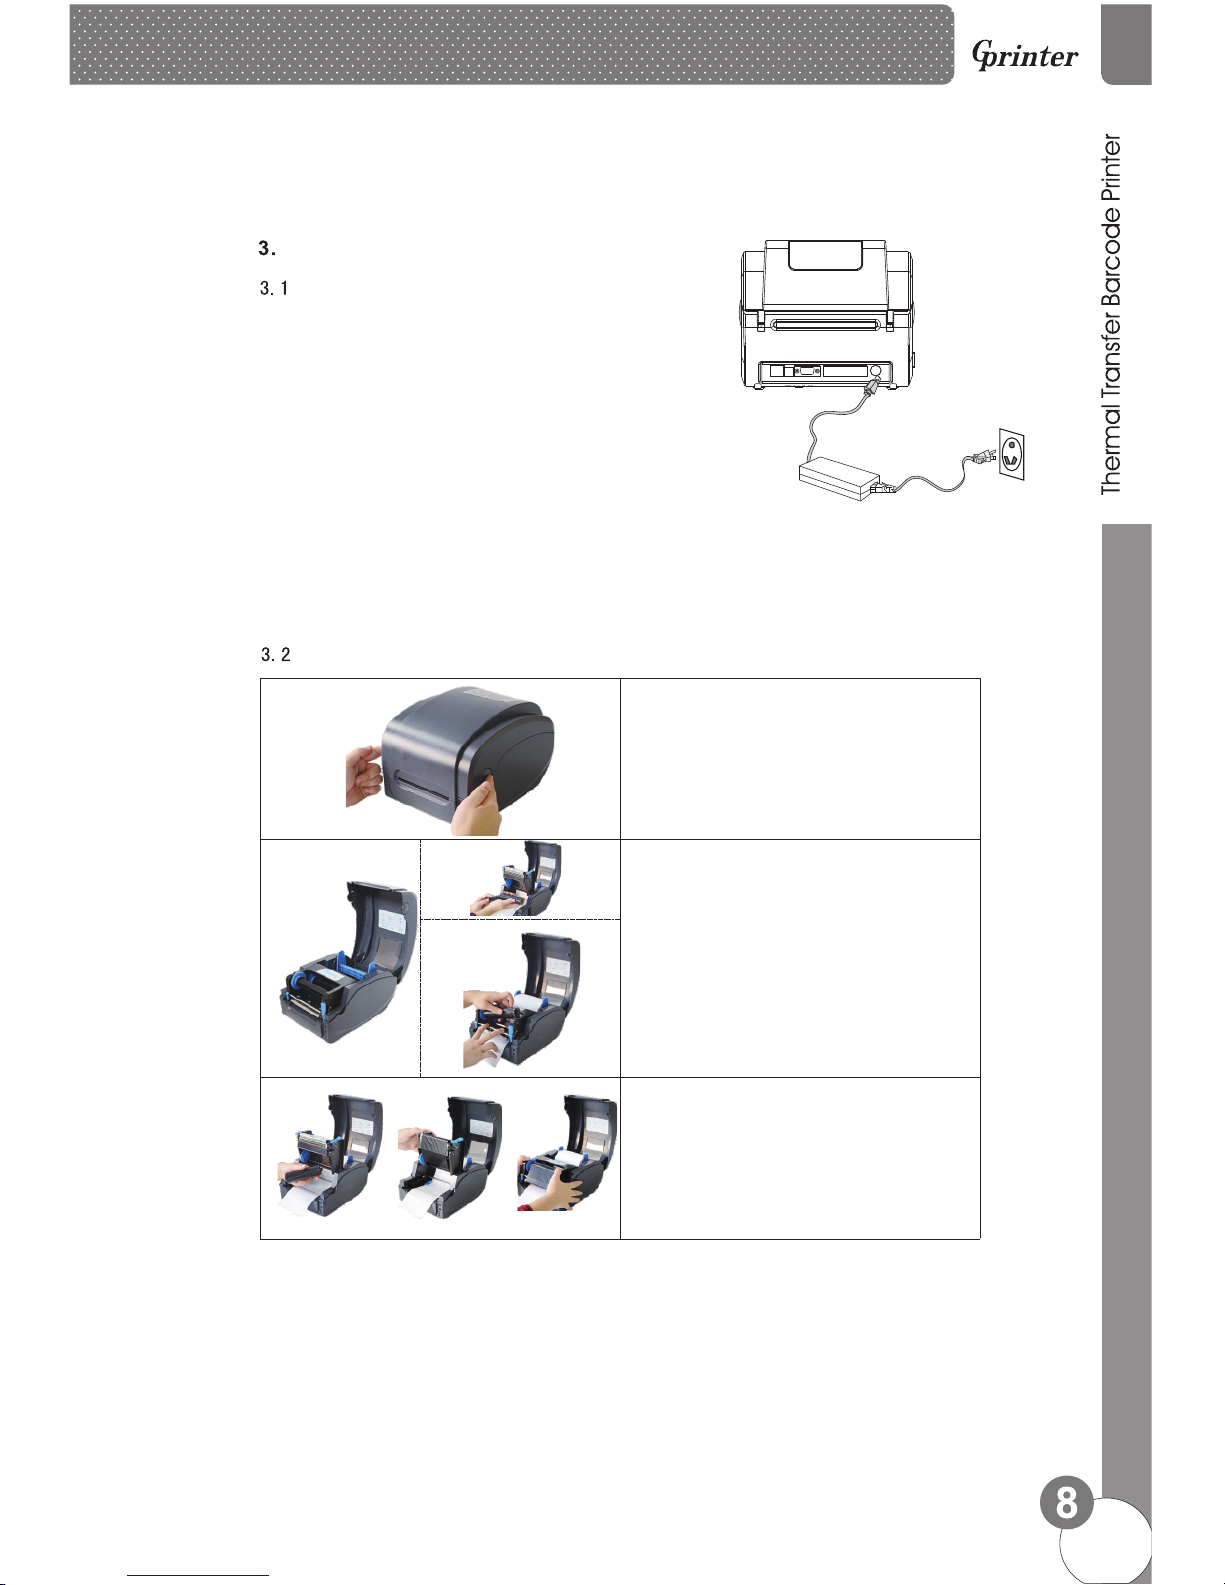
Install the printer
1. Please put the printer on the stable surface.
2. Make sure printer power is turned off, please do not plug
the power cable when the printer power is turned on.
3. Connect serial or USB or Parallel or Ethernet cable to
printer and PC.
4. Connect power plug to power supply socket.
Be careful:
※ Please turn off the power switch the printer in the power socket,
※ Transmission interface in the picture will vary depending on your printer
purchased aircraft type, the actual transmission interface, please refer to
the corresponding product specifications
power line is inserted into the printer.
<Pict ure 6>
Ribbon installation
1. Press two press buttons on left and right
side to open printer top cover.
2. Put empty paper tube into ribbon take-up
hub if you buy new ribbon which one side is
no contact with paper tube.
After that, install ribbon take-up hub left side
and right side onto printer.
Remark: Factory standard ribbon two sides
already fixed well on paper tube. Go ahead
to step 3 instead of step 2.
3. Press the Push button to open print head.
Page 10
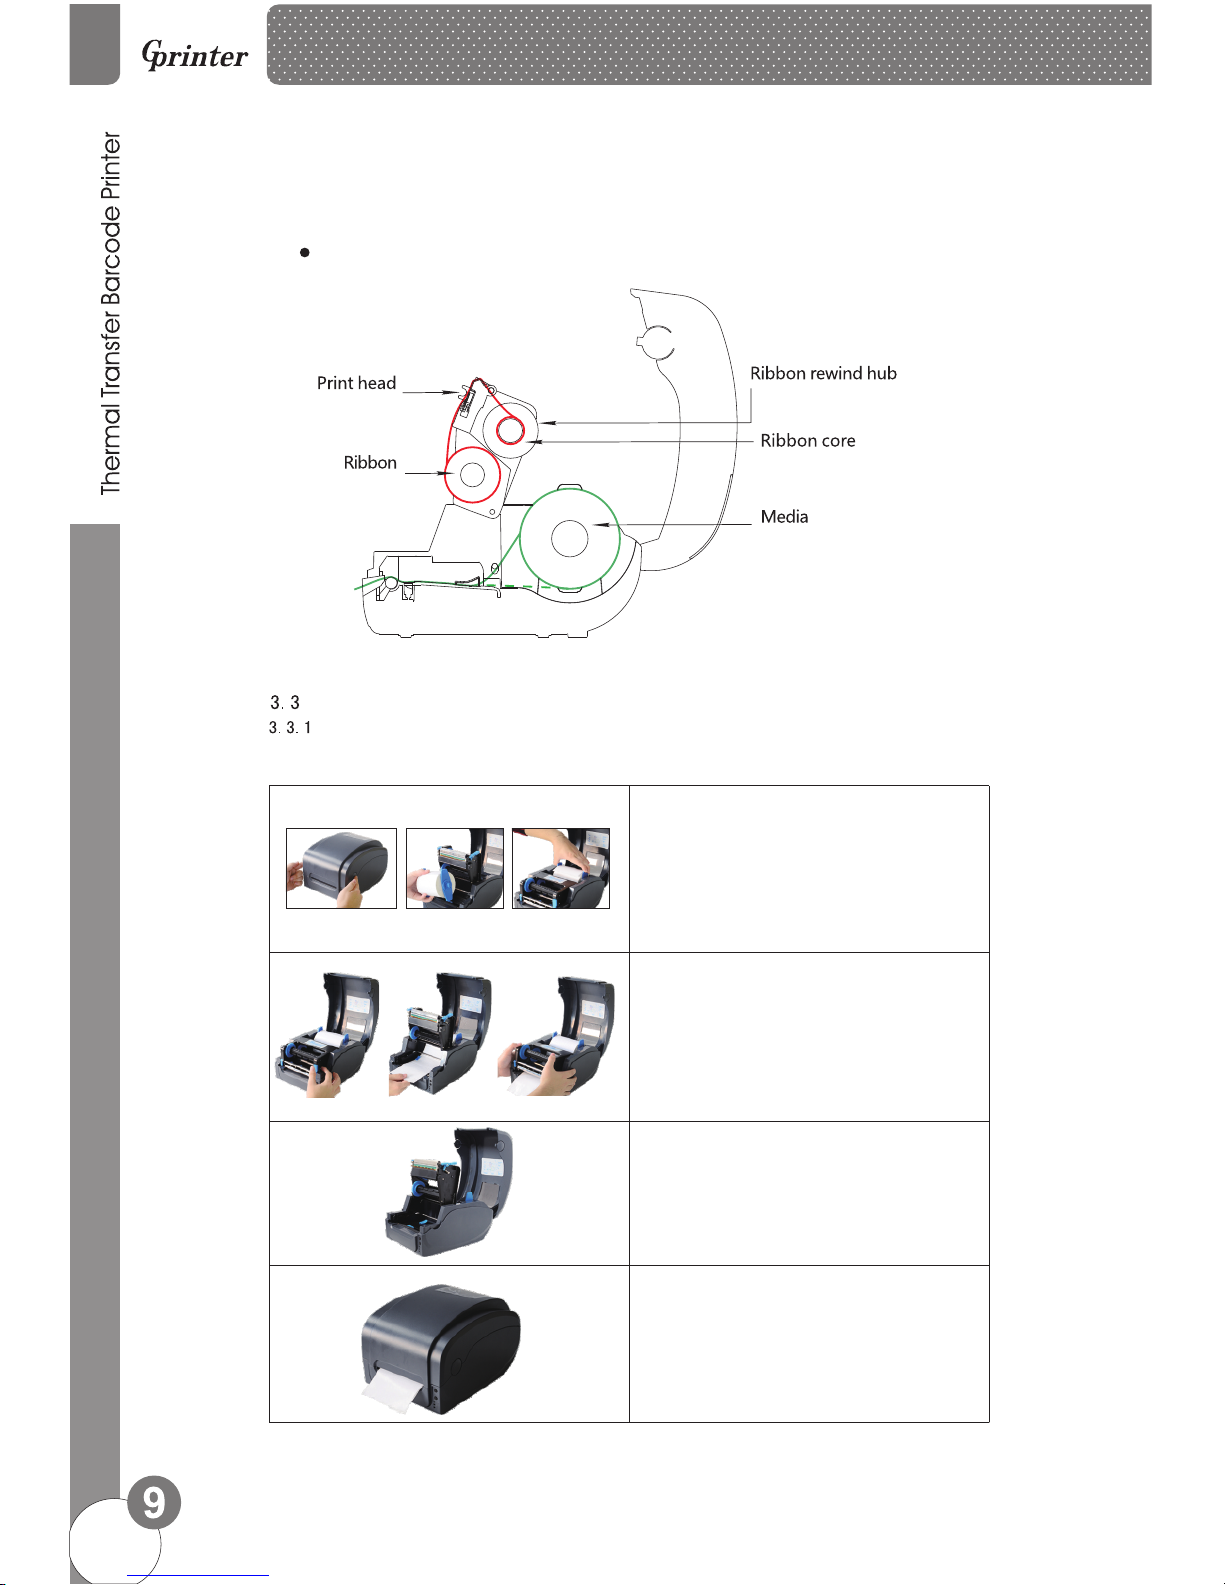
Ribbon installation diagram
<Pict ure 7>
Installation of paper
Installation of paper
1.Open printer top cover;
Insert blue label supply hub into label roll
and fix onto printer.
2.Press Push button to open print head to
install label paper same as picture
showing.
4.Close printer top cover.
3.Close the print head by pressing two arrow
locations. Confirm print head two sides are
closed correctly to ensure you get printing
in good quality.
Page 11
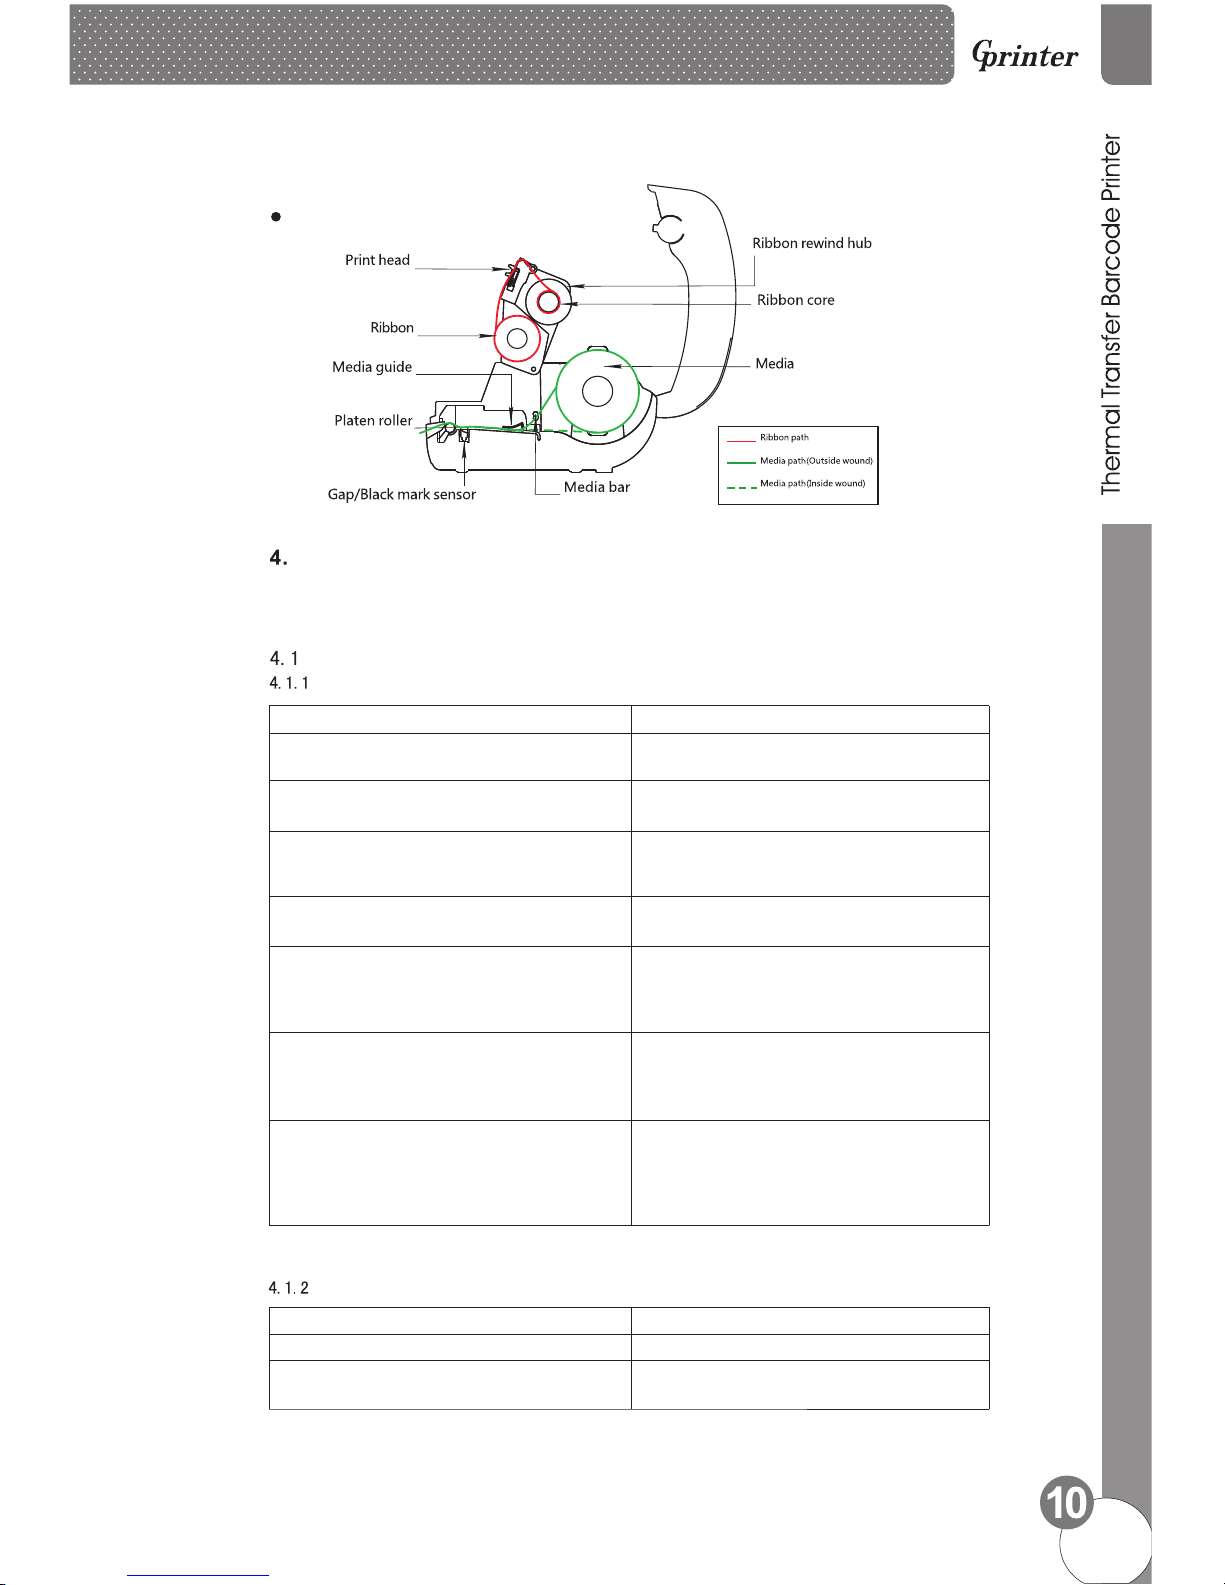
Paper installation diagram
LED Indicator and Function
There’re two buttons and three LED indicators, many functions can be realized through using
different button, indicator and power on/off switch.
LED indicator
Direct thermal printing method
LED Indicator status Descriptions
Power indicator is on,Error indicator is off
Printer is powered on and in normal
printing status
Power indicator flashes every 640ms,
Error indicator is off
Printer is paused
Power indicator is off, Error indicator goes
for 80ms, then goes off for 160ms, printer
start beeping.※
on
Printer cover is opened
Power indicator is off
for 500ms, then goes off for 6s
, Error indicator goes on
Label gap detection error
Power indicator is off Error indicator flashes
every 160ms, after two times flashing, Error
indicator goes off for 320ms, printer start
beeping. ※
,
Paper out
Power indicator is off Error indicator flashes
every 160ms,after three times flashing,Error
indicator goes off for 320ms, printer start
beeping. ※
,
Black mark detection error
Error indicator flashes every160ms.
Printer overheated protection mode is activated. After 1 minute, the printer CPU will
check print head temperature again. When
temperature return normal, printer will work
normally.
※ Beeper function can be enabled through setting DIP switch.
※ Beeper function can be enabled through setting DIP switch.
Thermal transfer printing
LED Indicator status Description
Ribbon indicator is on
Ribbon is installed successfully
Ribbon indicator flashes every 300ms,
beeper sounds every 2.4s ※
Ribbon improperly installed: no ribbon,
or ribbon end, or ribbon broken
Page 12
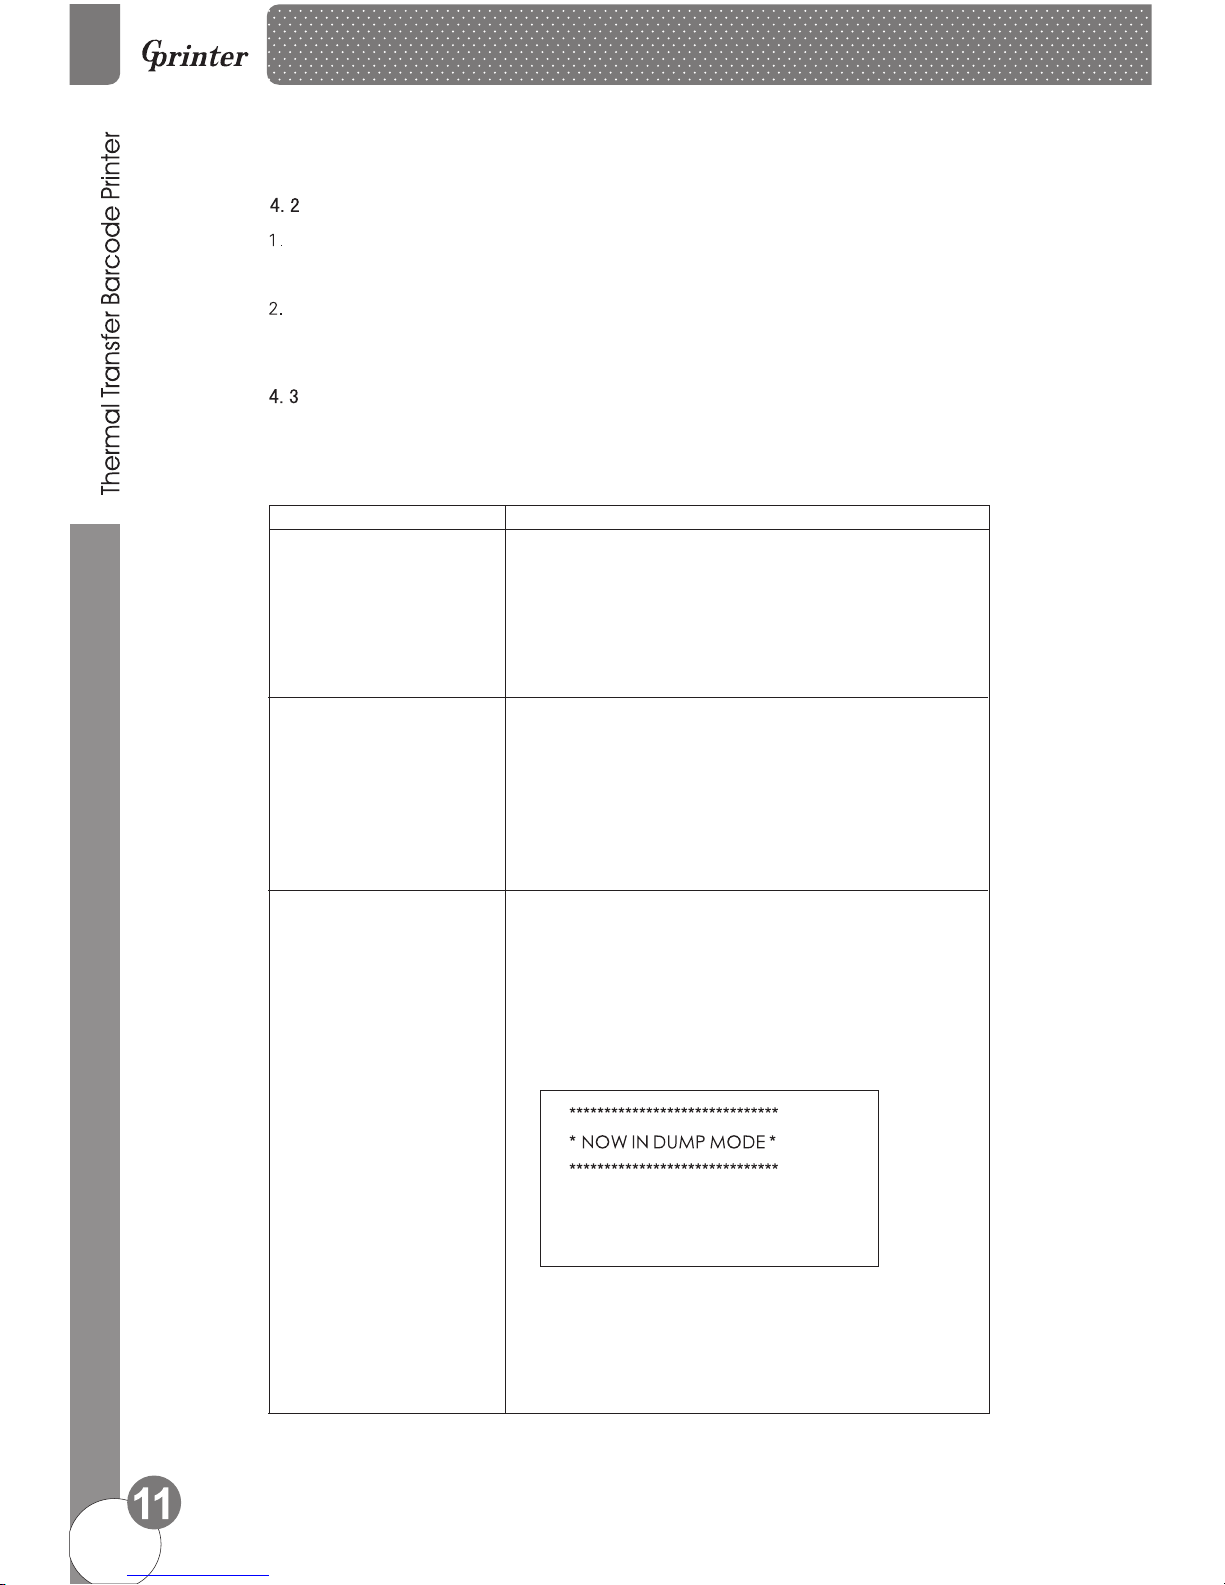
Button Function
Feed
When the printer is ready (LED blue fixed), click the button, label paper into the front end of a paper label.
Print job timeout
The printer in the print, click the PAUSE button to print suspended. At this time power indicator is
blue flashing. Just click the button, the print job resume normal.
Start function
The printer has six kinds of power function can be used to set or test the printer hardware. In the
boot and press the button with lamp signal release key can start these functions.
Six Power-up Functions:
Function
Descriptions
Self-test page
A.Turn off the printer.
B.Make sure the paper roll is installed correctly and the printer
top cover is closed.
C.Press and hold FEED button and turn on the printer. Self-
test page will be printed, then release FEED button.
You can use this function to check if printing function is normal or not.
Print DIP Switch page
Debugging Mode
A.Turn off the printer.
B.Make sure the paper roll is installed correctly and the printer
top cover is closed.
C.Press and hold PAUSE button and turn on the printer. When
paper feed and then release PAUSE button, DIP switch page
will be printed out.
A.Turn off the printer.
B.Make sure the paper roll is installed correctly and printer
top cover is closed.
C.Press and hold PAUSE and FEED button, and turn on the
All label data received in this mode will be printed by machine code.
Right side is ASCII character strings, left side are hexadecimal value
of ASCII character strings. This function is for user or engineer to
debug the program. If you turn off printer and then turn on, printer
will go back to normal printing mode.
printer. When Power indicator(blue) and Error indicator
(red) are on at the same time, release PAUSE and FEED
button, printer goes to Debugging Mode, and you will find
below page printed out:
Page 13
Skip AUTO.BAS program
User can use TSPL2 command to save a code auto-
-ing file (AUTO.BAS) into flash. When turn on printer, prin
-ter will run the program automatically.
runn
If you want to skip AUO.BAS program on power-up,
then follow below steps:
Press and hold PAUSE and FEED button, then turn on the
printer. When Power indicator (blue) is off and Error indi
-cator(red)is on, release PAUSE and FEED button, printer
will skip running AUTO.BAS program, and then Power
indicator will be on.
Printer Initialization
A.Turn off the printer.
B.Press and hold PAUSE and FEED button, then turn on the
printer. When Power indicator(blue)is on and Error indi
-cator (red) is off, release PAUSE and FEED button, all
data in printer DRAM will be cleared and printer setting
will be restored to factory default setting. Then power
indicator will be on and printer goes to ready status.
* Factory default settings do not include ribbon setting.
Ribbon Detection
When printer power turn on, or it is in thermal transfer
printing mode, printer will automatically detect ribbon
status, to check if ribbon installed, or ribbon end, or work
normally. After ribbon detecting, printer will be set to
thermal transfer printing mode or direct thermal printing
mode. If no ribbon,system will go to direct thermal printing
mode and close ribbon rolling motor function.
The printer configuration after the initialization will revert to the default values are as follows:
Parameter
Default setting
Speed
Density
Gap
Direction
4inch/sec (101.6mm/sec), 203dpi
10
0mm
0
0
ON
ON
OFF
OFF
ON
ON
CLEAR
NOT CLEAR
Top left corner from printing direction
Printing content are placed on page from
top to bottom
Reference
SHIFT
OFFSET
SET TEAR
SET HEAD(Cover open detect)
Set PRINTKEY
SET REPRINT
SET KEY1(FEED)
SET KEY2(PAUSE)
CLEAR RAM
CLEAR FLASH
Page 14
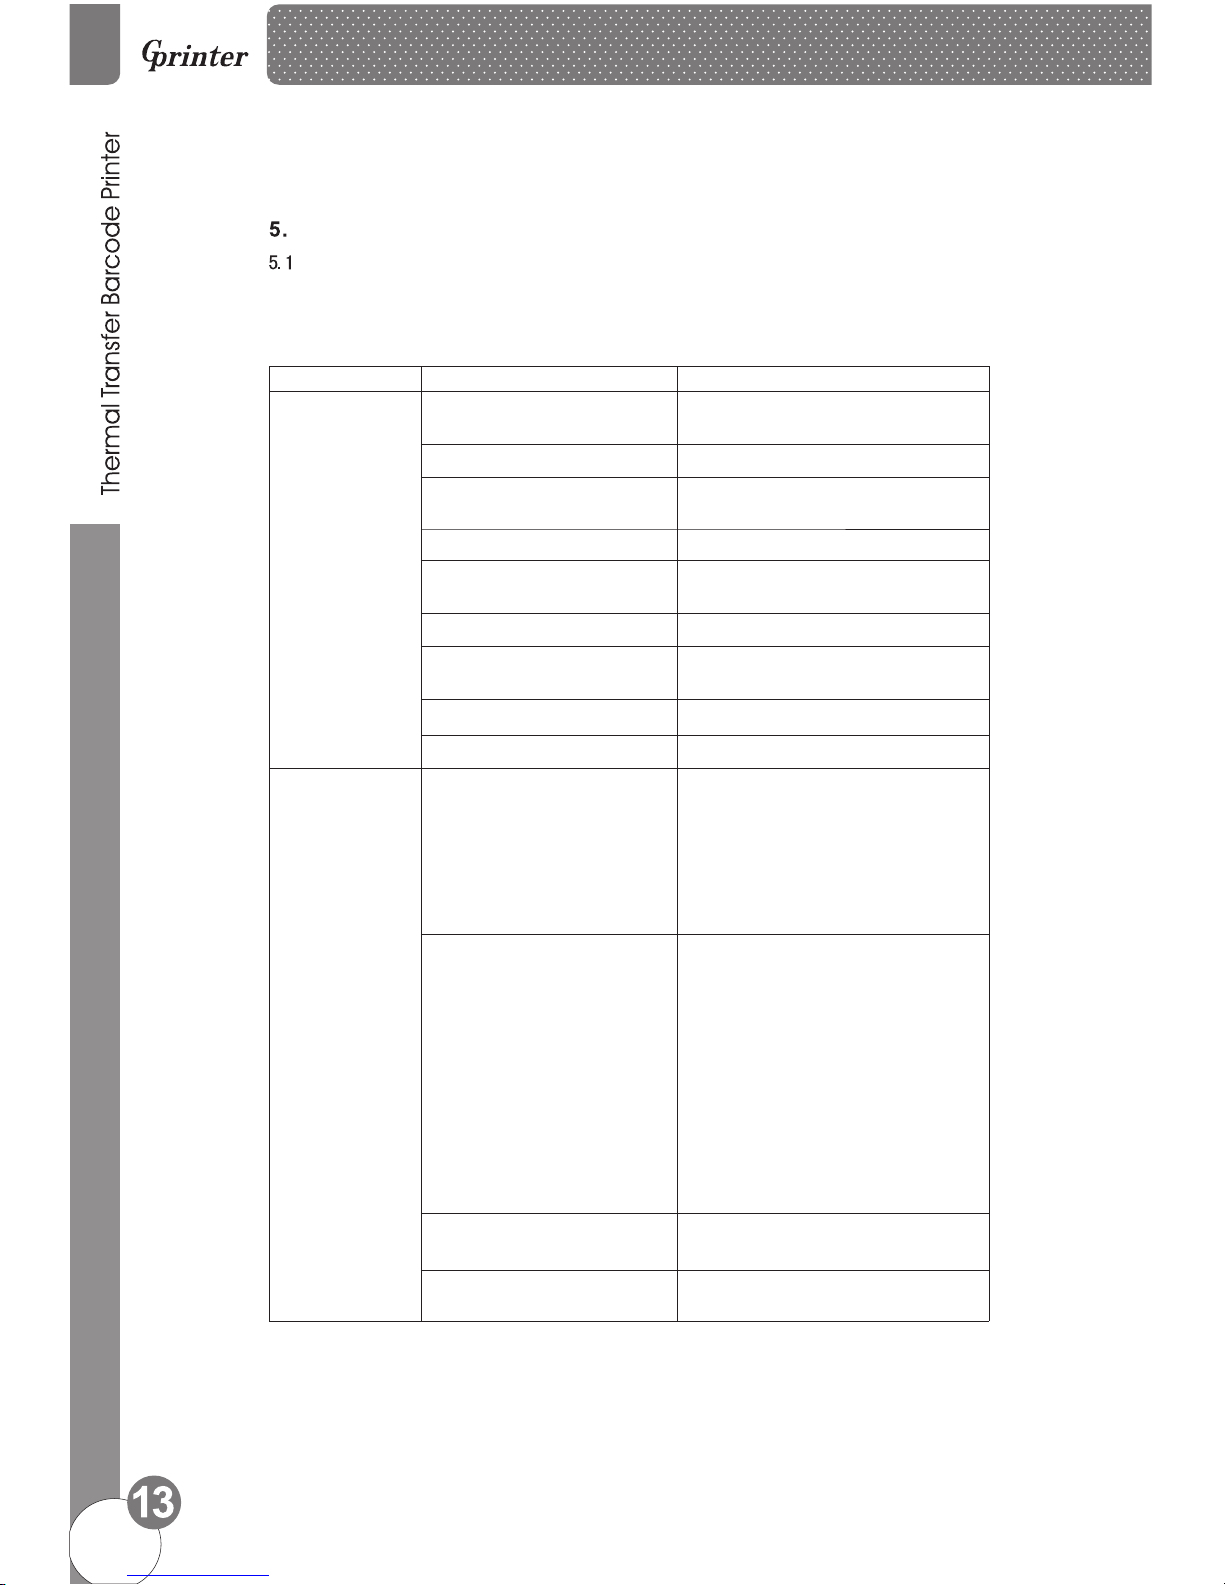
Problems Possible Reasons Solution and Suggestion
Power indicator
not "ON”
Troubleshooting
Common problem
Below the table of contents is generally the common problems and solutions; if you have been in
our proposed methods of eliminating the fault, and the printer is not normal operation, so check
with your purchase customer service department, so as to get more help.
Plug to AC outlet and plug to
printer not well connected
Check power connector and AC outlset
if plugs are correctly connected
Printer power not turned on
Turn on power switch
Print head not well closed
Close print head by pressing whole print
head mechanism (or 2 arrow locations)
Ribbon end
Label paper jamed inside printer
Change new ribbon
Ribbon improperly installed
Refer to Ribbon Installation steps in User
Manual to re-install ribbon
Label paper end
Change new label paper
Label paper improperly installed
Refer to Paper Installation steps in User
Manual to re-install paper
Gap sensor detection error
Adjust paper specification and print again
Clear jamed paper
Not printing
Serial cable improperly
connected
1. Check if Pin configuration in cable two
sides are matching each other;
2. Check if baud rate setting on PC and
printer are the same, If in TPSL comma
-nd mode, We suggest 9600, n, 8, 1 to
ensure higher reliability.
3. Change a new cable.
Ethernet cable improperly
connected
1.Check if RJ-45 green/orange LED
indicator is on. When printer receive
and process printing data, LED will be
orange color;
2.Check if printer IP is assigned in
DHCP mode.
3.Check if fixed IP address is correctly
set in printer property. Wait for some
minutes to make sure printer is connect
-ed server and printing a selftest page
to confirm printer IP address.
4.Change a new ethernet cable.
USB cable improperly
connected
Check if USB cable connected well or
change a new cable
Ribbon non standard
Check if ribbon model and
specification
Page 15
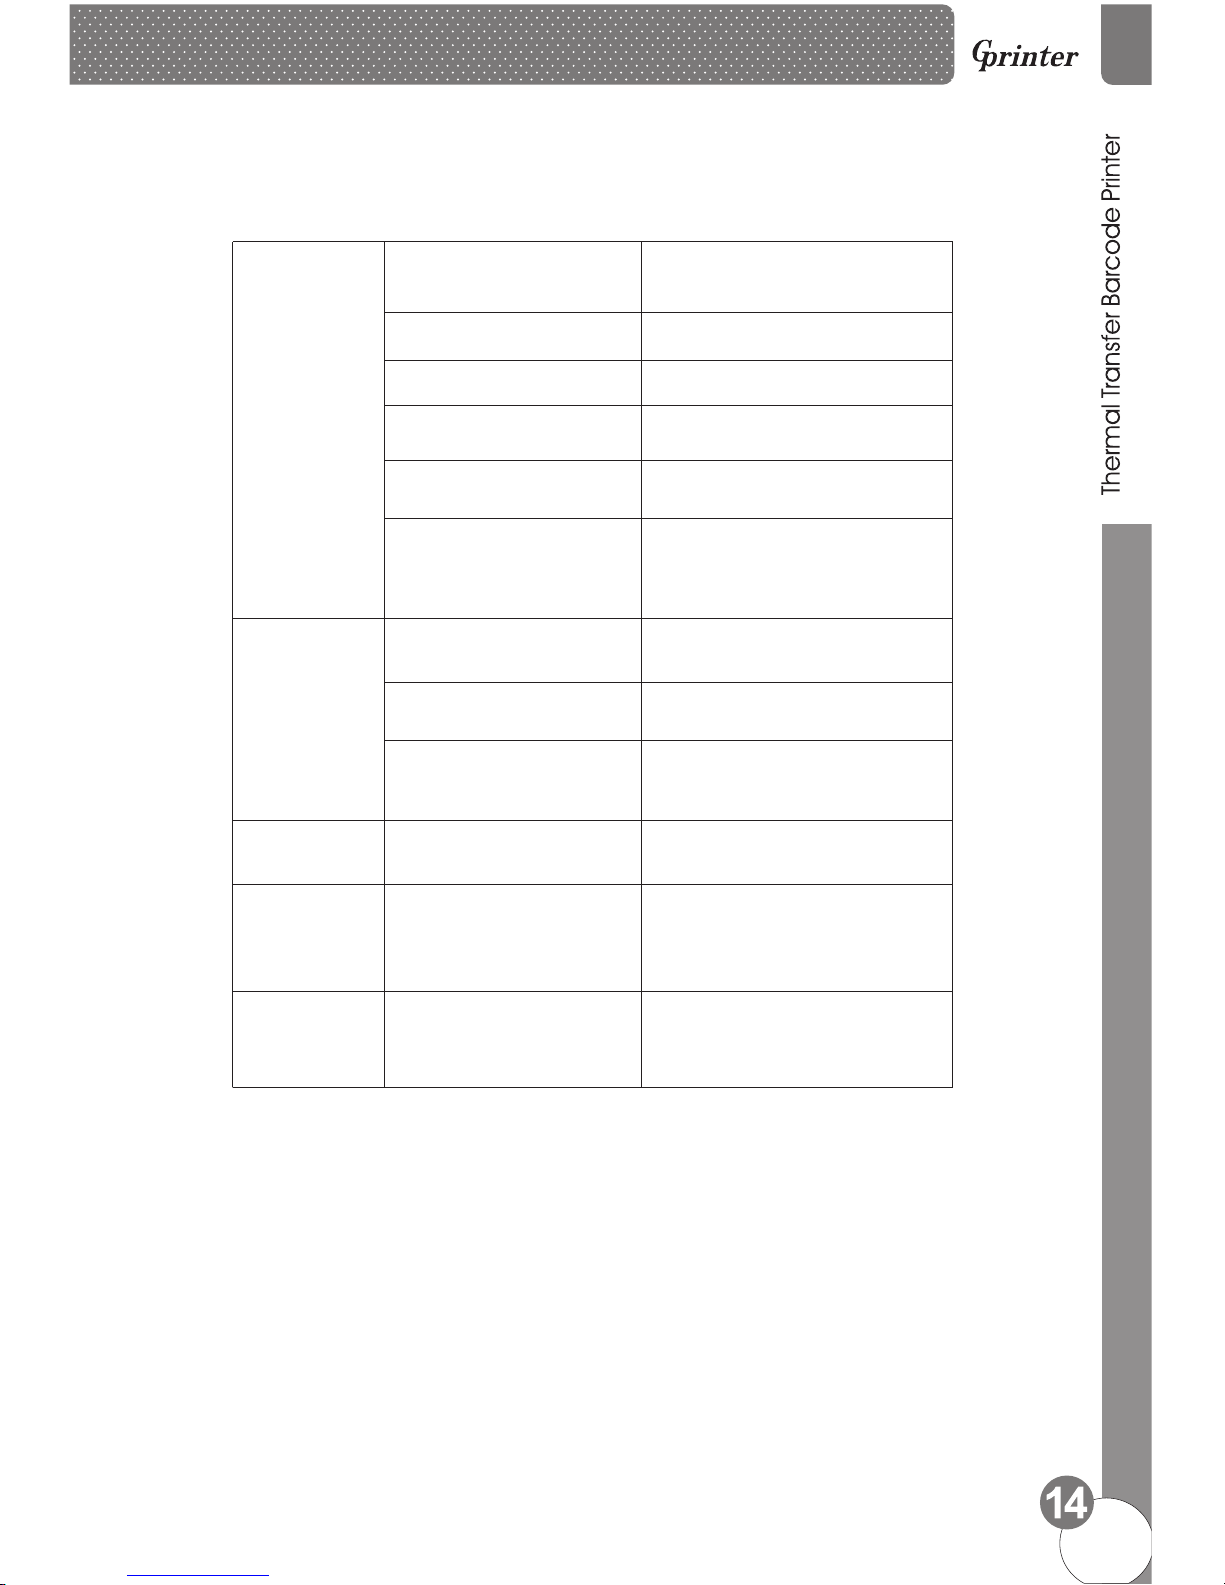
Not printing
Ribbon printing side wrong
installed
Check and re-install ribbon to make
sure printing side touch label paper
Print head not clean
Clean print head and print again
Print density setting wrong
Suggest density set to be 7
Print head cable not well
connected
Re-connect print head cable
Step Motor cable not well
connected
Re-connect step motor cable
Command setting wrong
Check if there is PRINT command
at the end of printing file;
or if there is CRLF command at the
end of every line.
Not good
printing quality
Ribbon and label improperly
installed
Too much dust or adhesive on
print head
Re-install ribbon and/or label
Clean print head and print again
Print head damaged
Take selftest page to check if printing
are completely to confirm if necessary
to change new print head
Data miss printing
in one or two sides
Label paper size wrong
setting
Check if label size set correctly and
same as your label paper
Ribbon wrinkle
Printing not stable
Printer in HEX Dump mode or
RS-232 setting wrong
Print head unbalanced stress;
ribbon & label improperly
installed;
Label feeding not smoothly
Reset the label print density and
adjust paper width fixing stand to
fit your label paper size.
Restart your printer and leave Dump
Mode or reset RS-232 PARAMETER
Page 16
Maintenance
6.
6.1.Printer Cleaning
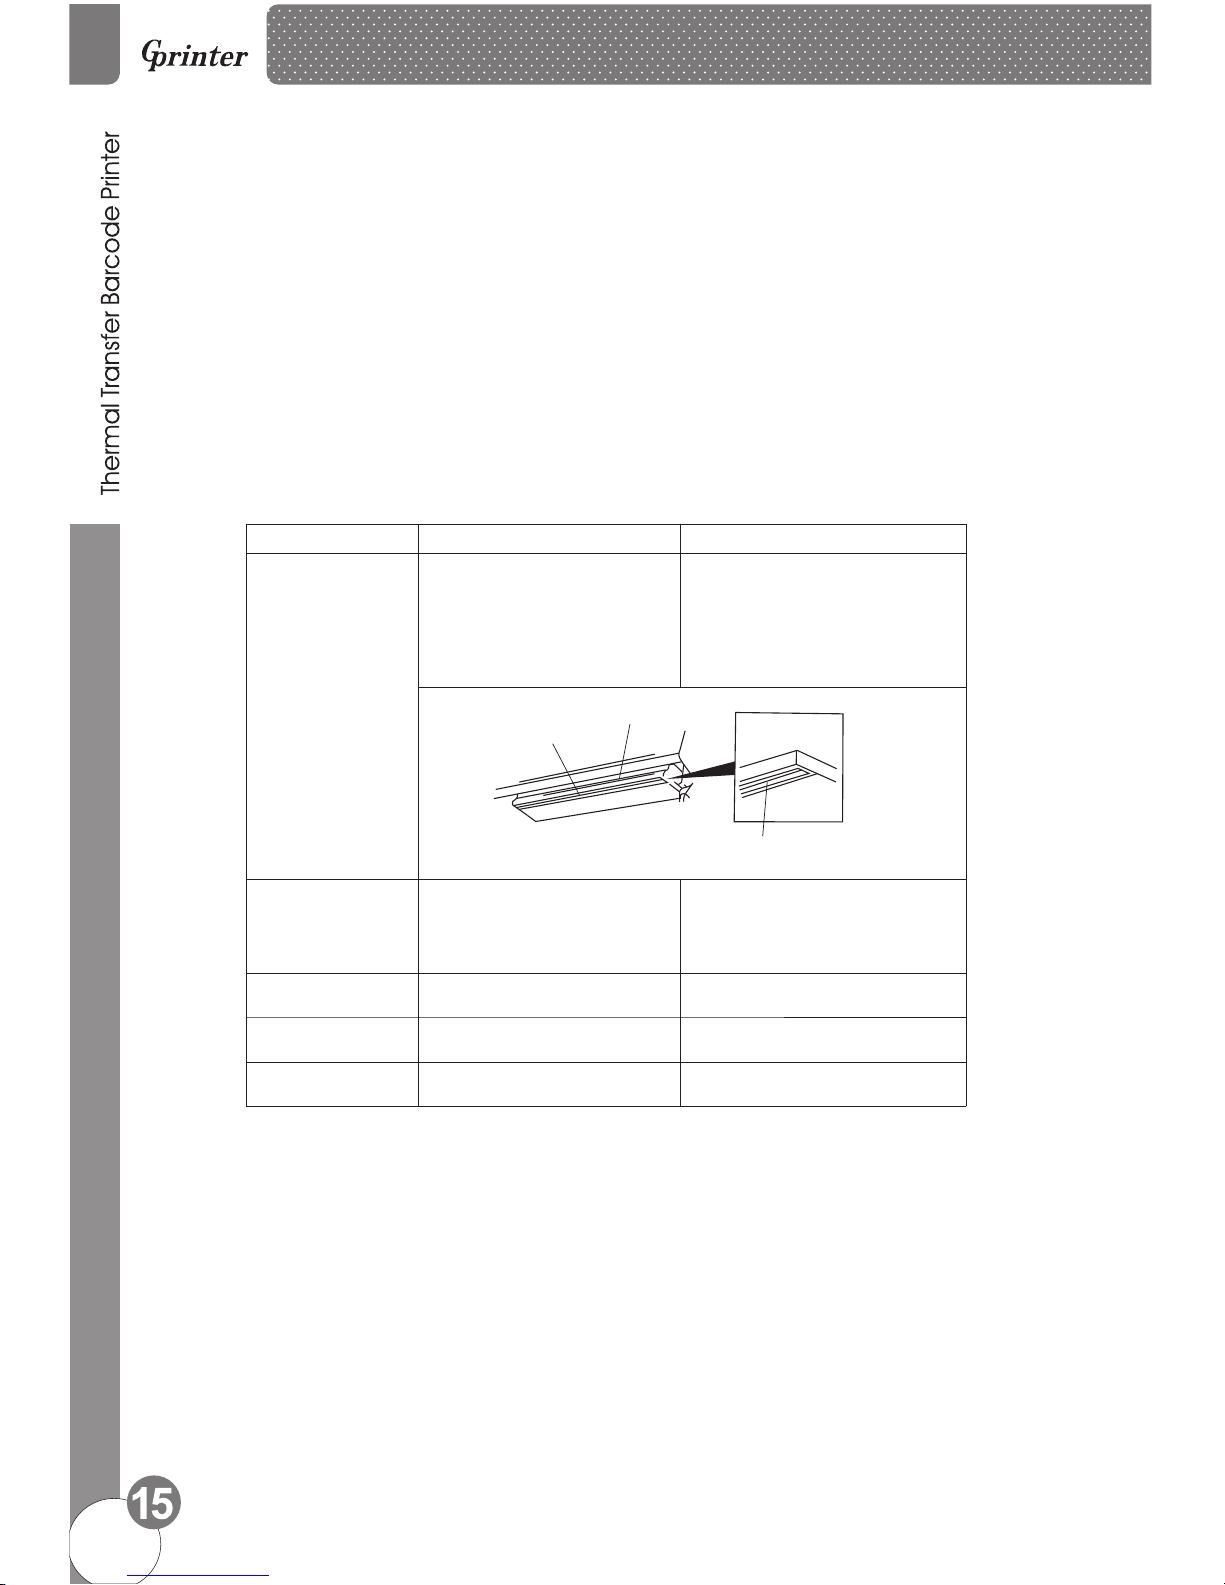
To ensure the printing quality, please proceed this maintenance section to keep your printer
in good conditions and extend its life as well.
Please use one of following material to clean the printer.
★ Cotton swab
★ Lint-free cloth
★ Vacuum / Blower brush
★ 100% ethanol
2.The cleaning process is described as following:
Parts to be cleaned Step
Recommend cleaning frequency
Print head
Rubber roller
Paper tear bar
Sensor
Inner side of printer
1.Turn off the printer.
2.Allow the print head to cool for
at least one minute.
3.Use a cotton swap and 100%
ethanol to clean the print head
surface.
When change new label paper
Thermal transfer printing head
Thermal transfer
printing head
Direct thermal printing head
Direct thermal printing head
1.Turn off the printer.
2.Rotate the platen roller and use
a cotton swap to clean with
100% ethanol.
When Change new label paper
Use a cotton swap and 100%
ethanol to clean.
When necessary.
When necessary.
Use air brush or vacuum to clean
dust of sensor.
Monthly.
Use air brush or vacuum to
the dust.
clean
Note :
※ Always turn off the printer power before cleaning the printer.
※ Do not touch print head by figure.
※ Please use 100% ethanol, Do not use medical alcohol to aviod damage to print head.
Page 17
 Loading...