

Page 1
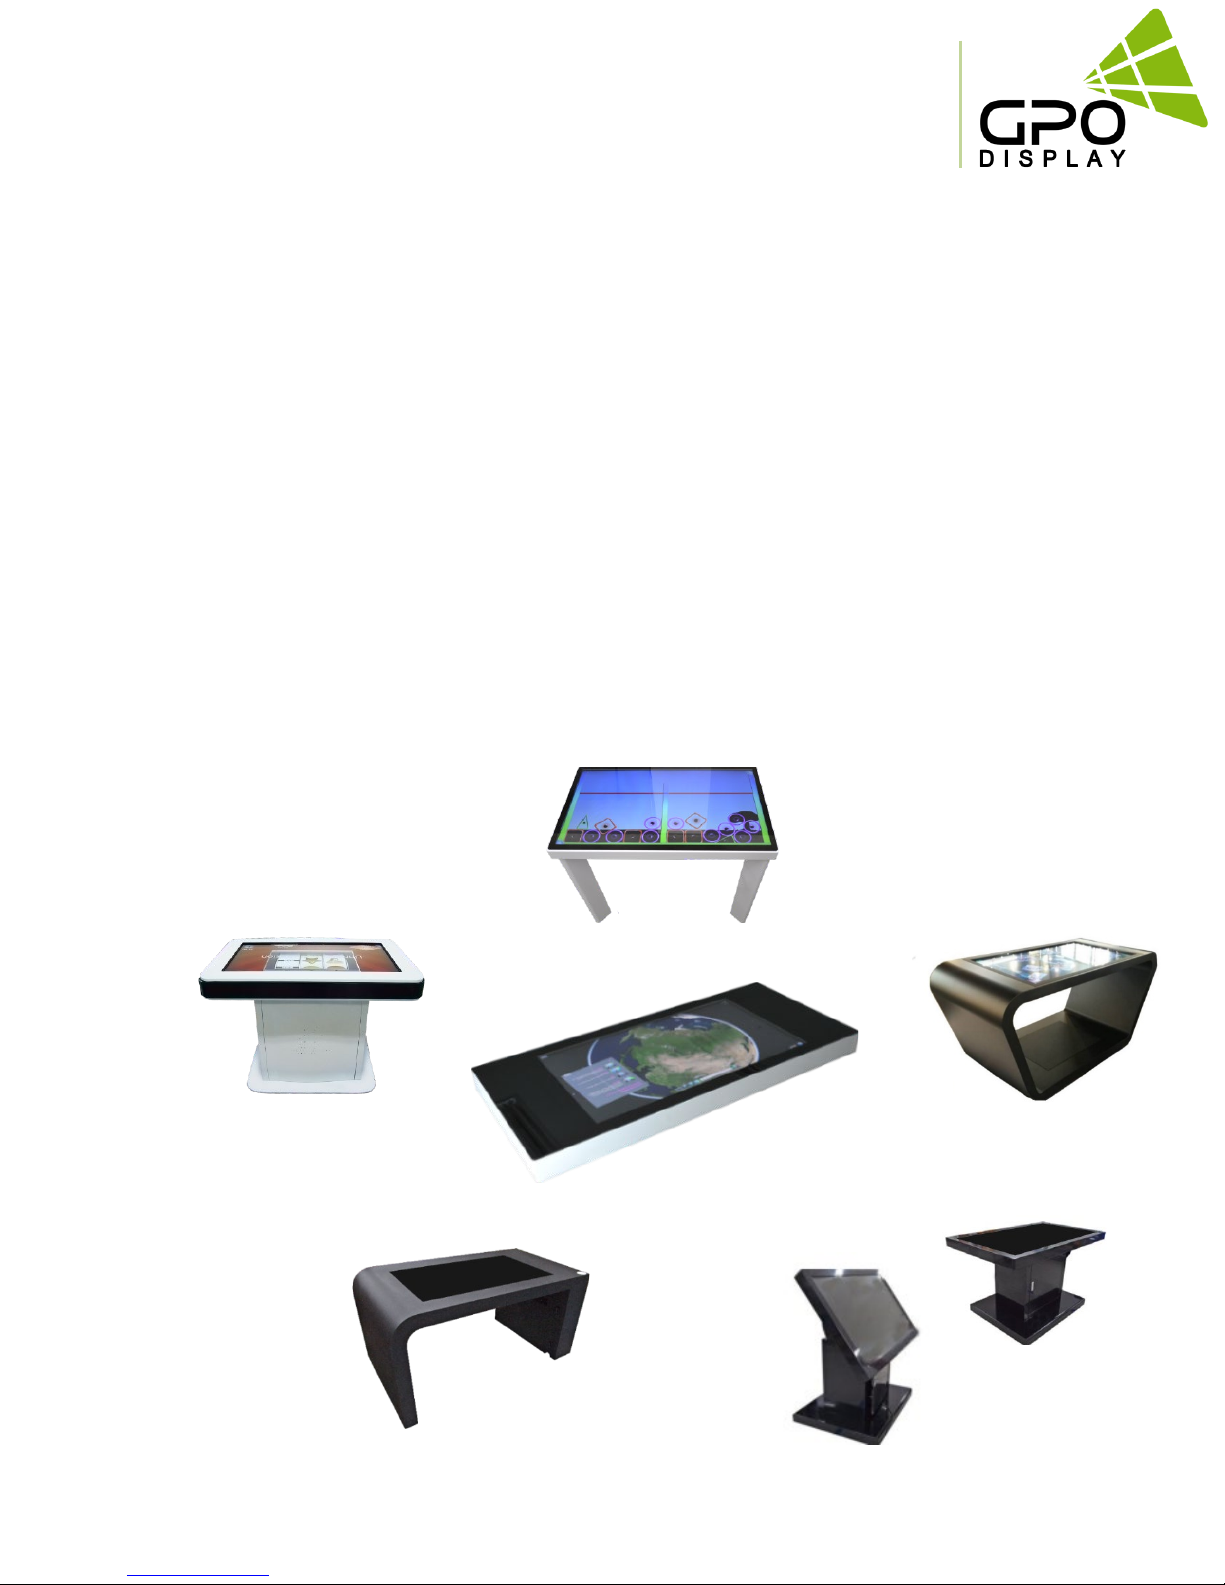
InteracTable
User Manual
V3.0
[InteracTable]
Before operating the unit, please read this manual thoroughly, and retain it for future reference
Page 2

Notice
1. When disconnecting the display from an electrical outlet, the plug must be pulled out from the
socket. Do not remove power cord from outlet by pulling from the cord. Pull from the plug head.
2. WARNING – To reduce the risk of fire or electric shock, do not expose this appliance to rain or other
forms of moisture.
3. Display must not be exposed to liquids via dripping or splashing. Please do not place liquid –filled
items such as vases near the display.
4. Use only a properly grounded plug and receptacle.
5. CAUTION – These instructions are for use by qualified service personnel only. To reduce the risk of
electric shock, do not perform any service other than that contained in the operating instructions
unless you are qualified to do so.
CAUTION
RISK OF ELECTRIC SHOCK
DO NOT OPEN
CAUTION : TO REDUCE THE RISK OF ELECTRIC SHOCK,
DO NOT REMOVE COVER (OR BACK).
NO USER-SERVICEABLE PARTS INSIDE.
REFER SERVICING TO QUALIFIED SERVICE PERSONNEL.
This symbol is intended to alert the user to the presence of insulated
“dangerous voltage” within the product’s enclosure that may be of sufficient
magnitude to constitute a risk of electric shock to persons.
This symbol is intended to alert the user to the presence of important
operating and maintenance (servicing) instructions in the literature
accompanying the product.
www.gpodisplay.com InteracTable
2
Page 3

Important Safety Instructions
1. Read these instructions.
2. Keep these instructions.
3. Heed all warnings.
4. Follow all instructions.
5. Do not use this product near water.
6. Clean only with dry microfiber cloth.
7. Do not block any ventilation openings. Install in accordance with the manufacturer’s instructions.
8. Do not install near any heat sources such as radiators, heat registers, stoves, or other display
(including amplifiers) that produce heat.
9. Do not remove ground prong from three-pronged plugs. If your outlet will not accept three-
pronged plugs, consult an electrician for replacement.
10. Protect the power cord from being walked on or pinched, particularly at plugs, convenience
receptacles, and the point where they exit from the display.
11. Only use attachments/accessories specified by the manufacturer.
12. Use only with the cart, stand, tripod, bracket, or table specified by the manufacturer, or sold with
the display. When a cart is used, exercise caution when moving the cart/display combination to
avoid injury from tip-ov er.
13. Unplug this display during lightning storms or when unused for long periods of time.
14. Refer all servicing to qualified service personnel. Servicing is required when the display has been
damaged in any way, such as power-supply cord or plug is damaged, liquid has been spilled or
objects have fallen into the display, the display has been exposed to rain or moisture, does not
operate normally, or has been dropped.
15. Do not expose this display to dripping or splashing and ensure that no objects filled with liquids,
such as vases, are placed on the display.
16. To completely disconnect this display from the wall outlet, disconnect the power supply cord plug
from the AC receptacle./wall socket
17. The mains plug of the power supply cord shall remain readily operable.
18. An display with CLASS I construction shall be connected to a wall socket outlet with a protective
grounding connection.
19. Note: Prolonged use of headphones at a high volume may cause damage your ears.
20. Notice to users : This is a Class A digital device
21. This device is designed for commercial use and features safety certificates for electromagnetic
interference (EMI). Users should be mindful of EMI issues.
www.gpodisplay.com InteracTable
3
Page 4
Quick Start Guide
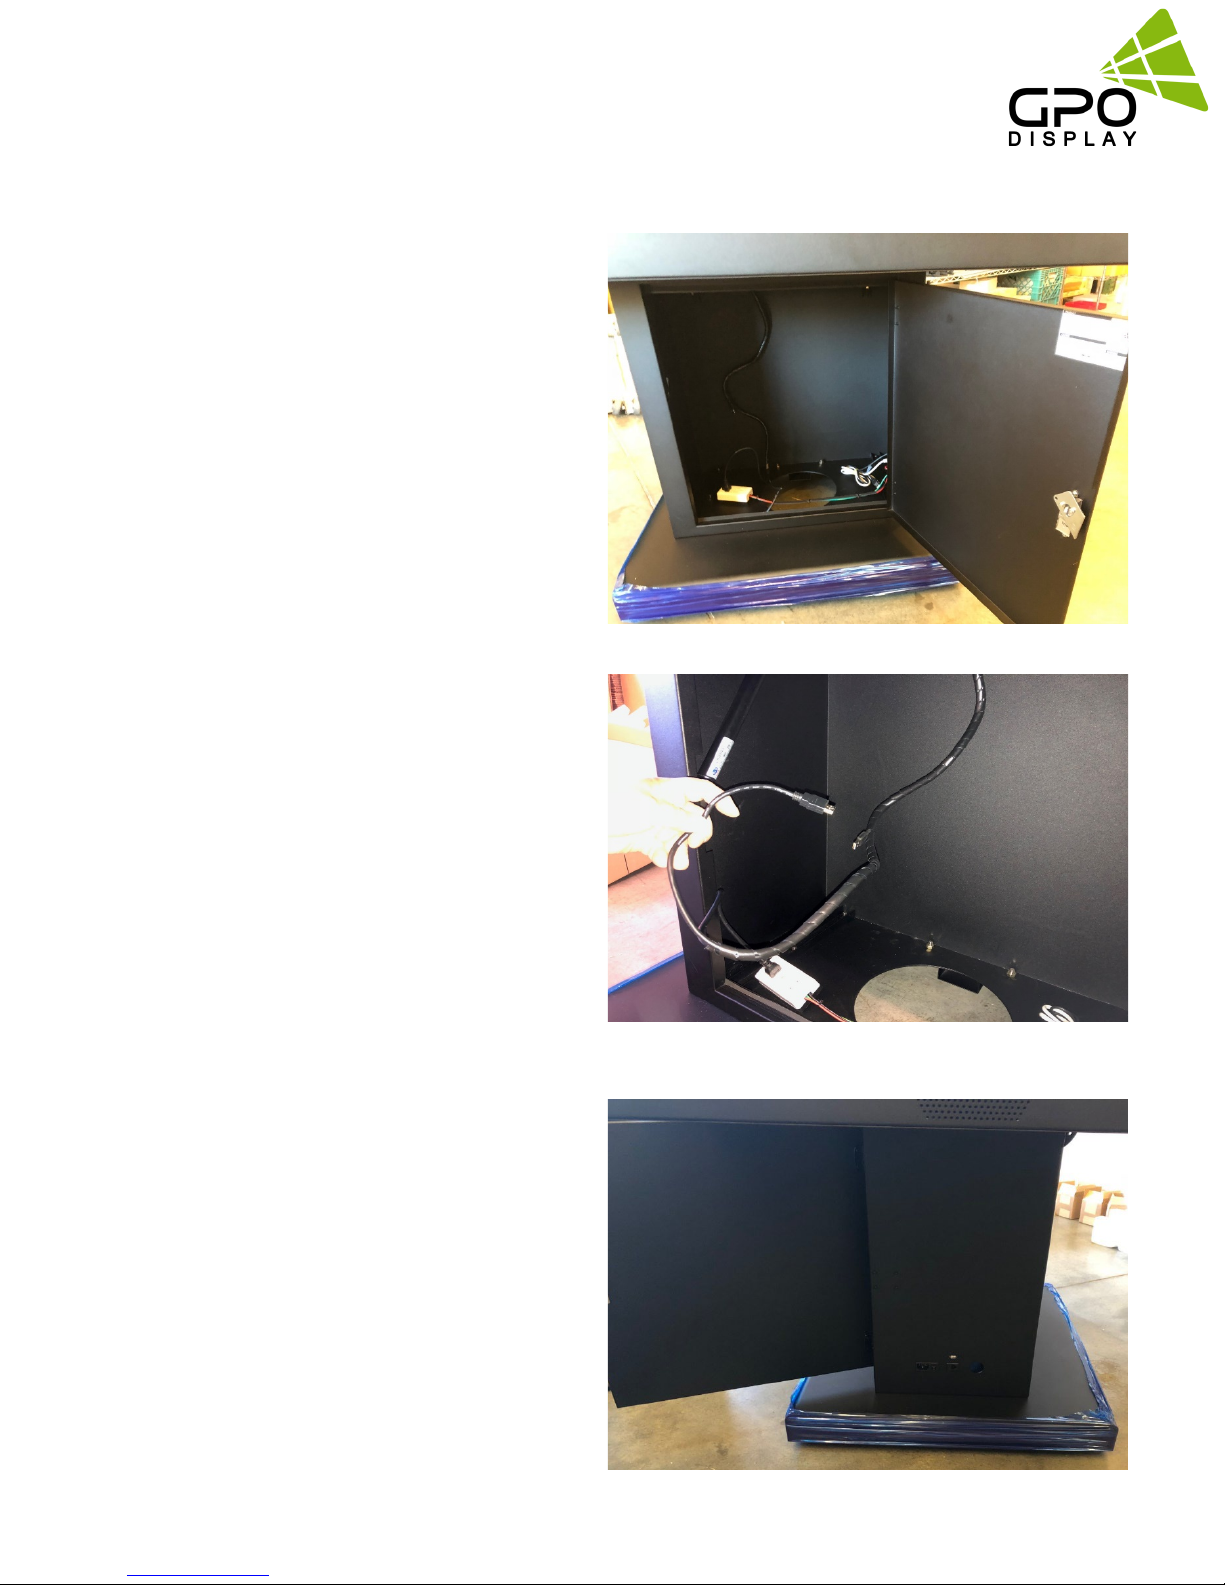
After removing the table from its packaging, open
the cabinet by pushing the key button and pulling
outward.
The interior of the cabinetry is shown above. There is
an access hole at the bottom of the cabinet, through
which cabling can be run. The power cable for the
touch screen must be plugged either into the outlet
shown above or directly to an outlet below the table.
Above is a view of the cables in the cabinet. The
HDMI cable feeding the touch screen is shown
being held by a technician, while the USB is
circled in red. The USB must be connected to
your source device in order for touch functionality
to work.
If the touch screen’s power cable is plugged into
the outlet provided, you will then need to connect a
power cable to the exterior outlet, circled above.
You will need to turn the power switch located next
to the exterior outlet on after connecting your
source device.
www.gpodisplay.com InteracTable
4
Page 5
Front LED Operations
Status Color Operation
Power Off Red On
Normal Blue On
Not Connected (No signal) Blue Blinking
DPMS Red Blinking
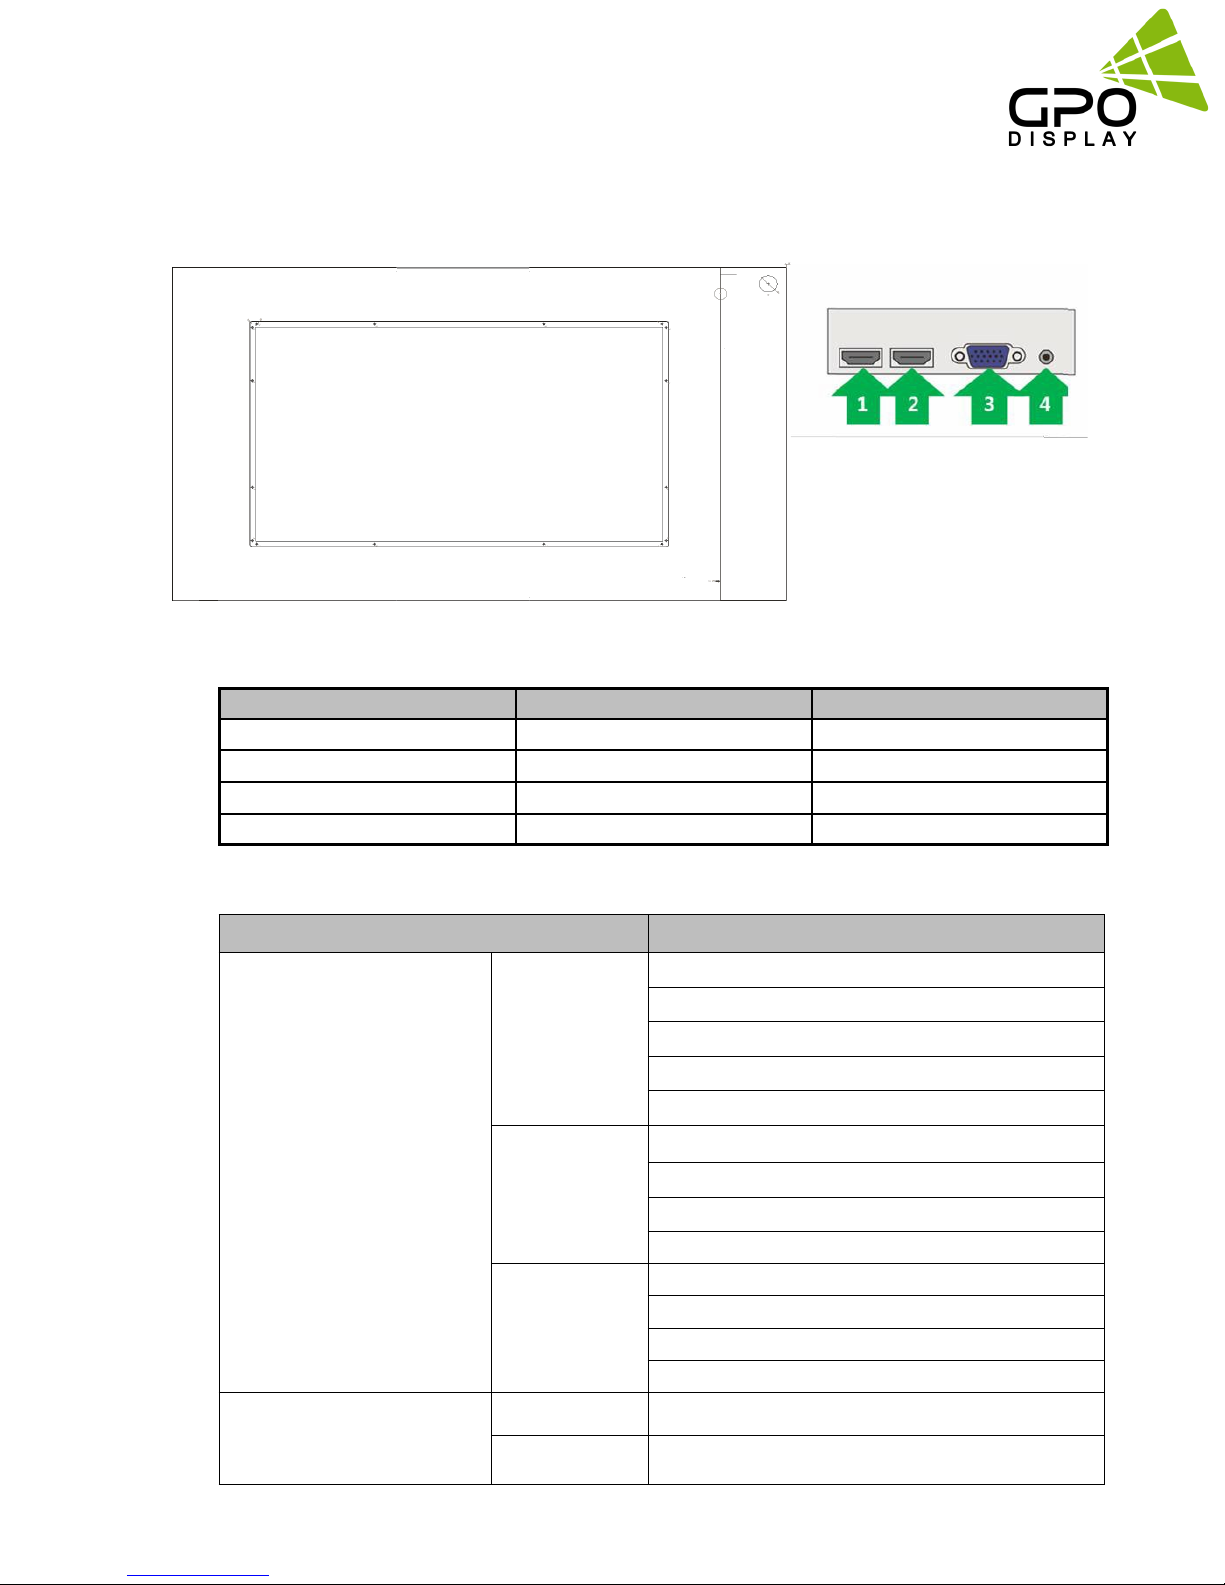
Input / Output Port Description
Items Specifications
1. HDMI1 Input
2. HDMI2 Input
3. PC Input
4. PC Audio Input
H Frequency Range : 20 ~ 64 kHz
V Frequency Range : 55 ~ 75 Hz
DSUB
Supported Signal
Connection
Connection
(Audio)
HDMI 1
HDMI 2
PC
Speaker Out
www.gpodisplay.com InteracTable
Maximum resolution :1920x1080 60Hz
Maximum pixel rate : 110 MHz
SOG sync support
H Frequency Range : 20 ~ 64 kHz
V Frequency Range : 55 ~ 75 Hz
Maximum resolution : 1920x1080 60Hz
Maximum pixel rate : 110 MHz
H Frequency Range : 20 ~ 64 kHz
V Frequency Range : 55 ~ 75 Hz
Maximum resolution : 1920x1080 60Hz
Maximum pixel rate : 110 MHz
Stereo Audio Line In (500mVrms)
5W×2 Channel Speaker (8 ohms)
5
Page 6
Remote Control Key
1
3
4
6
8
2
5
7
9
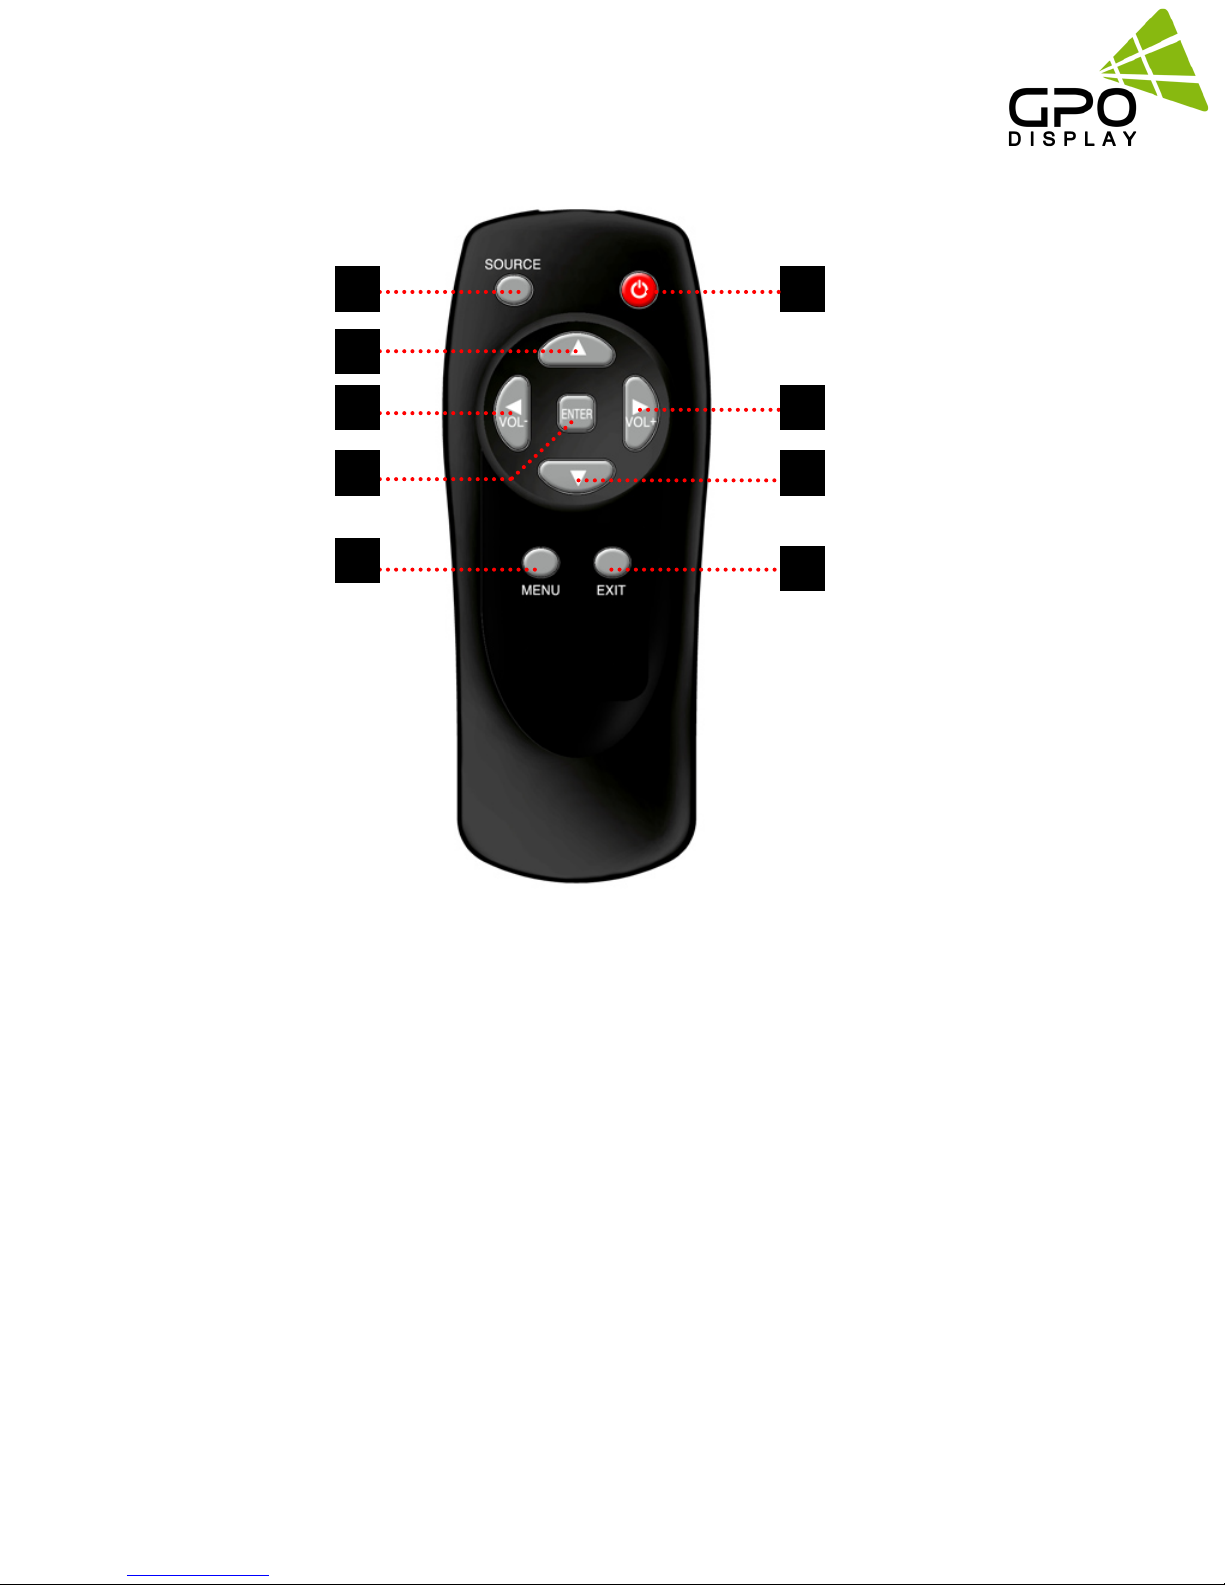
1. SOURCE : Selects Input Source
2. POWER : Turns the LCD Display On and Off
3. UP : Controls the UP cursor in the menu
4. LEFT : Controls the LEFT cursor in the menu
5. RIGHT : Controls the RIGHT cursor in the menu
6. ENTER : Controls the ENTER cursor in the menu
7. DOWN : Controls the DOWN cursor in the menu
8. MENU : Displays the main On-Screen menu
9. EXIT : Exit the On-Screen menu
www.gpodisplay.com InteracTable
6
Page 7
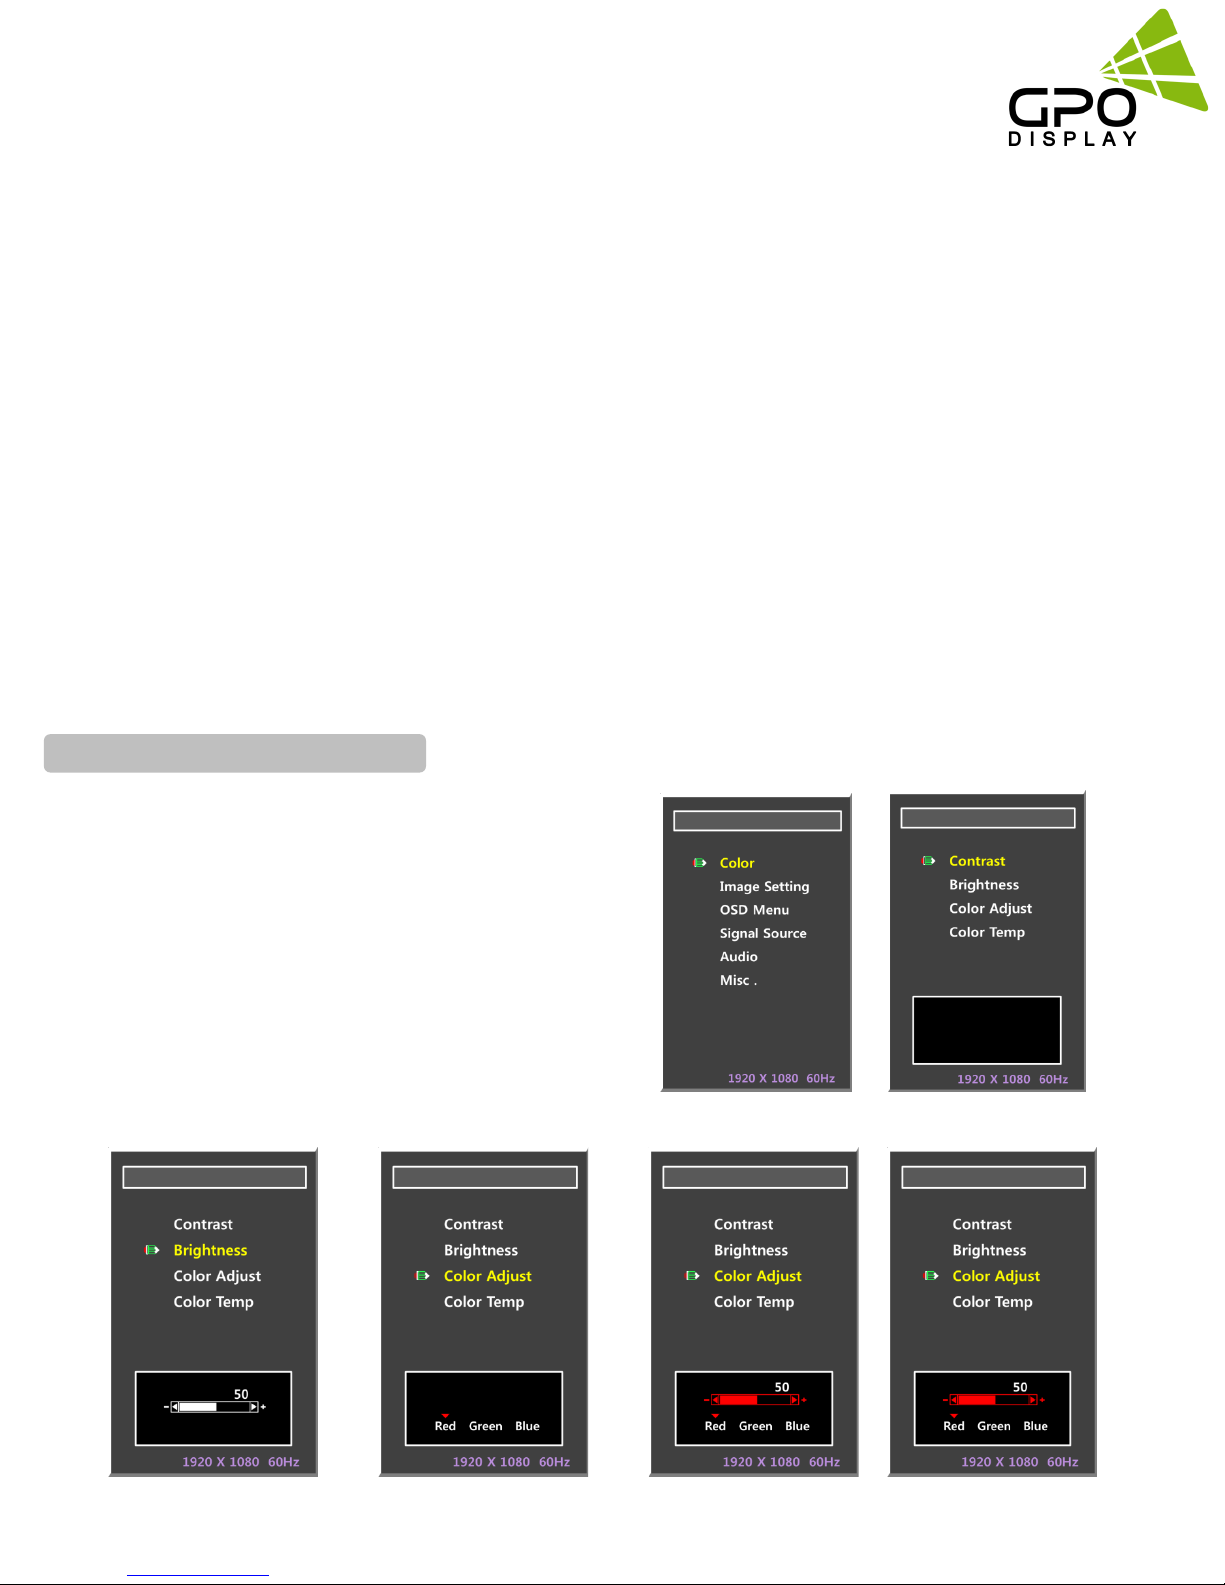
MENU OVERVIEW
Most menus consist of three levels to set up the options, but some require greater depth for the variety of settings. If you press the
MENU button, up to the third level of the menu system will appear on the monitor screen. The fourth level can be displayed by
pressing the OK button
To show and remove the Menu:
Press the MENU button on the Remote Control to display the menu. A second press of the MENU button or a press of the
EXIT button will take you back to monitor viewing.
To go to the next level:
Press OK (or Right arrow button) on the Remote Control.
To go back to the previous level:
Press MENU (or Left arrow button) on the Remote Control.
To go to the next menu:
Press Down arrow button on the Remote Control.
To go to the previous menu:
Press Up arrow button on the Remote Control
Changing the Color Standard
Your television has several setting options that
allow you to control the picture quality.
1. Press the MENU button to display the menu
2. Press the ▲ or ▼ button to select Color,
then press the ENTER button.
3. Select the required mode by pressing the ▲
or ▼ button, then press the ENTER button.
◆ Contrast –Brightness– Color Adjust –Color Temp
www.gpodisplay.com InteracTable
7
Page 8
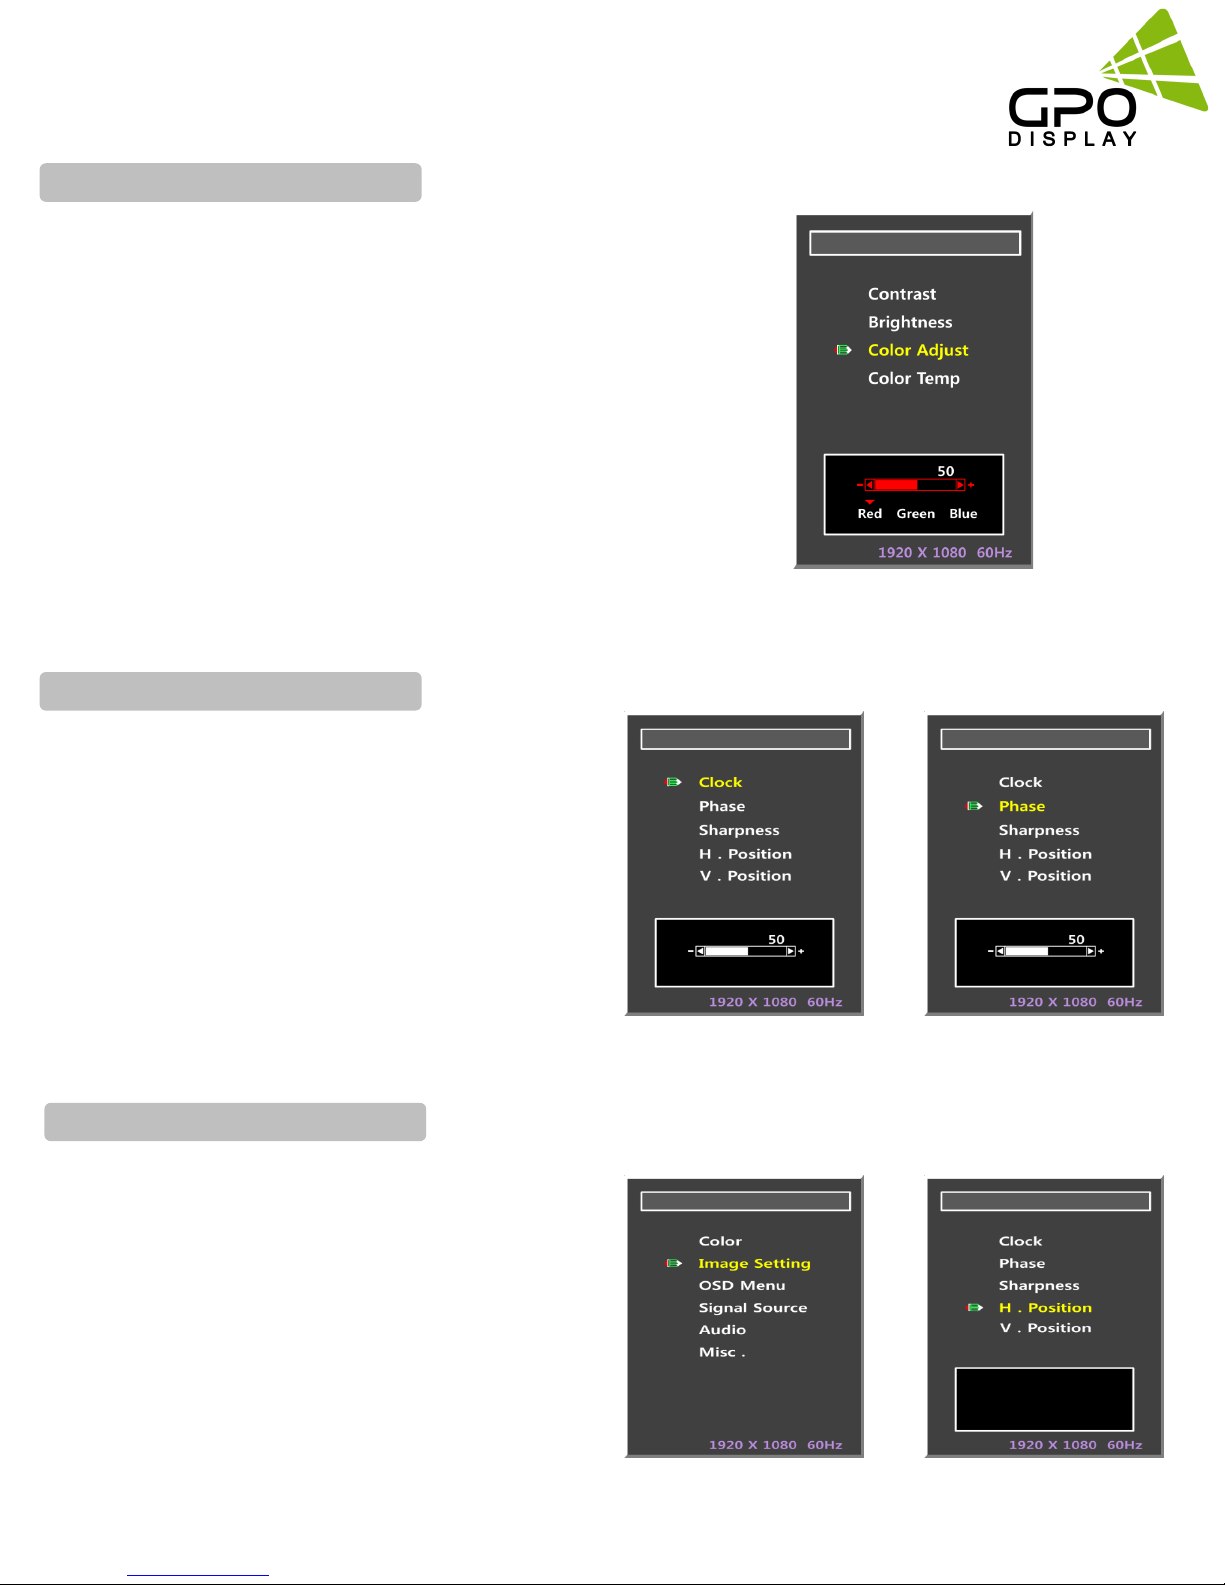
Color Adjust
1. Select the required mode by pressing the ▲
or ▼ button, then press the ENTER button.
2..Select the required mode by pressing the ◀
or ▶ button, then press the ENTER button.
◆ Red –Green– Blue
3.. Press the ◀ or ▶ button until you reach the
optimal setting.
Clock –Phase–Sharpness
1. Select the required mode by pressing the ▲ or ▼
button, then press the ENTER button.
2. Press the ◀ or ▶ button until you reach the
optimal setting.
3.Select the required mode by pressing the ▲ or ▼
button, then press the ENTER button.
4.. Press the ◀ or ▶ button until you reach the
optimal setting.
Changing the Position Standard
1. Press the MENU button to display the menu.
2. Press the ▲ or ▼ button to select Position, then
press the ENTER button.
3. Select the required mode by pressing the ▲ or ▼
button, then press the ENTER button.
www.gpodisplay.com InteracTable
8
Page 9
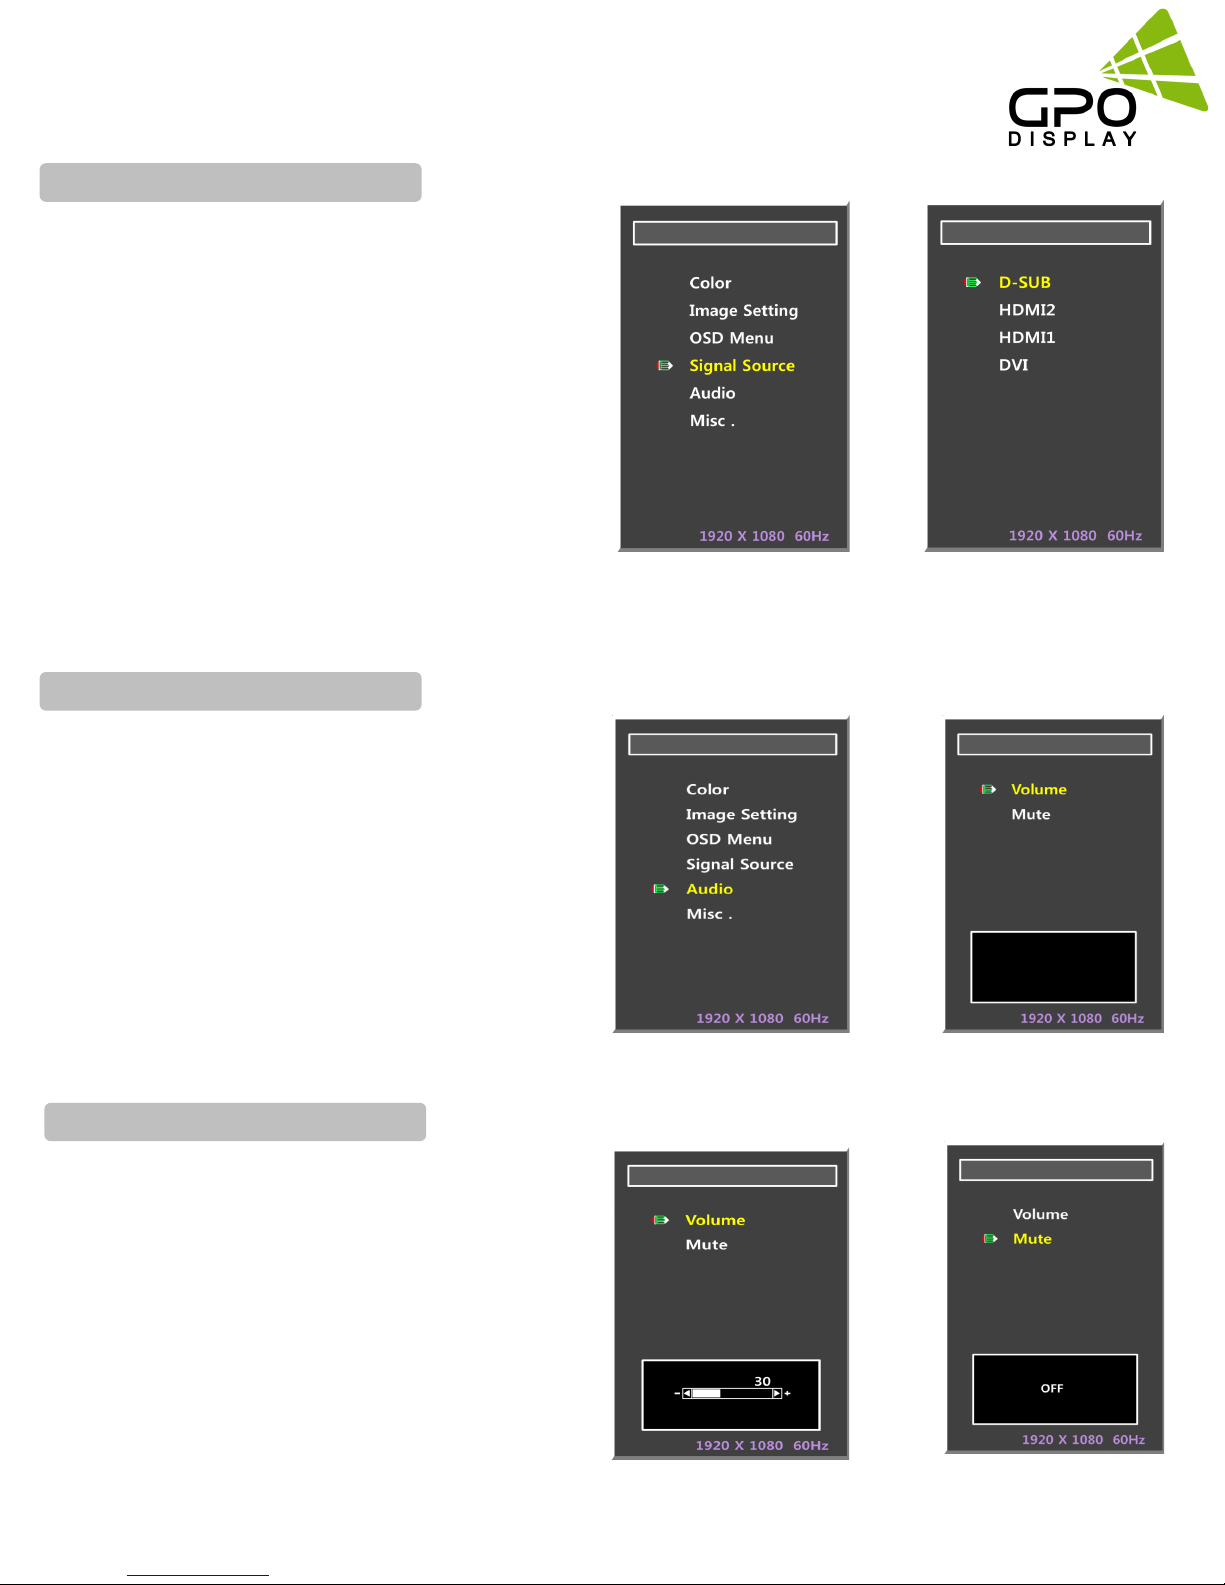
Signal Source Select
1. Press the "MENU" button.
2. Press the ▲ / ▼ button to go to the "Signal
Source" menu, then press "ENTER" button.
3. Press the ▲ / ▼ button and press the scroll
to the desired menu, then "ENTER"
button.◆ D-SUB – HDMI1 – HDMI2
Audio
1. Press the "MENU" button.
2. Press the ▲ / ▼ button and press go to the
"Audio" menu, then "ENTER" button.
3. Press the ▲ / ▼ button and press the scroll to the
desired menu, then "ENTER" button.
◆ Volume –Mut
Volume control, mute
1. Press the ◀ / ▶ button Press to move to
"Volume" menu, then "ENTER" button.
2. Press the ◀ / ▶ button to adjust the desired
settings.
3. Press the ◀ / ▶ button Press to move to "Mute"
menu, then "ENTER" button.
4. Press the ◀ / ▶ button to adjust the desired
settings.
5. Press the "EXIT" button to exit the OSD menu.
www.gpodisplay.com InteracTable
9
Page 10
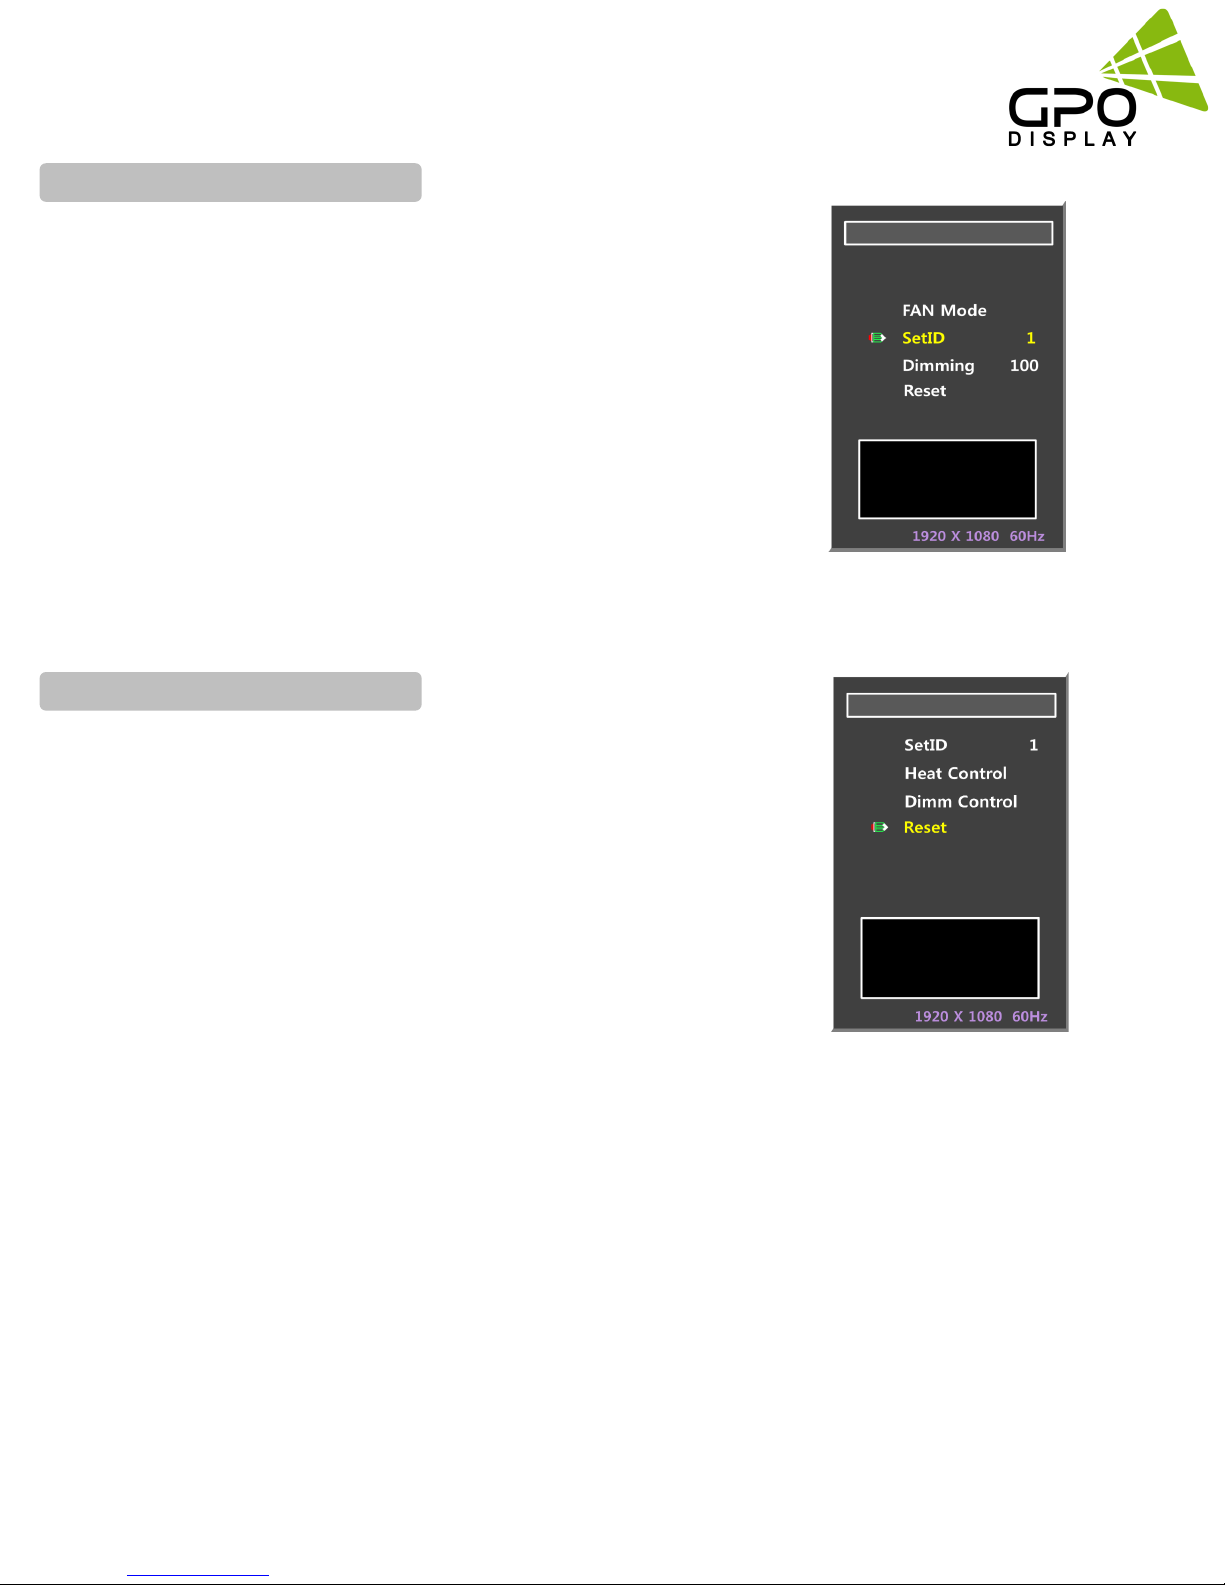
Set ID.
1. Press the MENU button to display the menu.
2. Press the ▲ or ▼ button to select Set ID,
then press the ENTER button.
3. Press the ◀ or ▶ button until you reach
the optimal setting.
4. Press the EXIT button or Back Select to exit.
Reset.
1. Press the MENU button to display the menu.
2. Press the ▲ or ▼ button to select Reset, then
press the ENTER button.
◆ Reset: You can return to the factory defaults
settings
www.gpodisplay.com InteracTable
10
Page 11
Support Timing Table
Display Mode
IBM, 640 x 480 31.469 59.940 25.175 -/-
IBM, 720 x 400 31.469 70.087 28.322 -/-
VESA, 640 x 480 37.861 72.809 31.500 -/-
VESA, 640 x 480 37.500 75.000 31.500 -/-
VESA, 640 x 480 43.269 85.008 36.000 -/-
VESA, 800 x 600 35.156 56.250 36.000 +/+
VESA, 800 x 600 37.879 60.317 40.000 +/+
VESA, 800 x 600 48.077 72.188 50.000 +/+
VESA, 800 x 600 46.875 75.000 49.500 +/+
VESA, 800 x 600 53.674 85.061 56.250 +/+
Horizontal
Frequency(KHz)
Vertical
Frequency(Hz)
Pixel Clock
(MHz)
Sync Polarity
(H/V)
VESA, 1024 x 768 48.363 60.004 65.000 -/-
VESA, 1024 x 768 56.476 70.069 75.000 -/-
VESA, 1024 x 768 60.023 75.029 78.750 +/+
VESA, 1152 x 864 67.500 75.000 108.000 +/+
VESA, 1280 x 960 60.000 60.000 108.000 +/+
VESA, 1280 x 1024 63.981 60.020 108.000 +/+
VESA, 1280 x 1024 79.976 75.025 135.000 +/+
1366 x 768 47.712 60.015 85.500 +/+
VESA,1920 x 1080 66.587 59.934 138.500 +/-
www.gpodisplay.com InteracTable
11
Page 12

※ This product can be changed to improve performance without notification.
www.gpodisplay.com InteracTable
12
 Loading...